

Page 1

CASTLES TECHNOLOGY
Castles Technology Co., Ltd.
6F, No. 207-5, Sec. 3, Beixin Rd., Xindian District,
New Taipei City 23143, Taiwan R.O.C.
http://www.castech.com.tw
SATURN1000 EFT-POS Terminal
User Manual
Confidential
Version 0.4
Mar 2018
Page 2

WARNING
Information in this document is subject to change without prior notice.
No part of this publication may be reproduced, transmitted, stored in a retrieval system,
nor translated into any human or computer language, in any form or by any means,
electronic, mechanical, magnetic, optical, chemical, manual, or otherwise, without the
prior written permission of Castles Technology Co., Ltd.
All trademarks mentioned are proprietary of their respective owners.
Castles Technology Co., Ltd. Confidential • All Right Reserved. Pg. 2
Page 3
Revision History
Version
Date
Descriptions
Author
0.1
Sep 8, 2017
Initial creation.
Jeff
0.2
Oct 11, 2017
1. Add the description of “Debug mode” in “3.1
System Panel”.
2. Add the description of setting the permissions of
storage in “3.4 POS Demo”.
Jeff
0.3
Feb 27, 2018
Modify “2.2. Inserting the Battery”.
Jeff
0.4
Mar 15, 2018
Add FCC Warning. 5.1
Jeff
Castles Technology Co., Ltd. Confidential • All Right Reserved. Pg. 3
Page 4

Contents
1. Introduction .................................................................................................................. 5
2. Hardware Setup ............................................................................................................ 6
2.1. Parts of the Terminal ........................................................................................... 6
2.2. Inserting the Battery ............................................................................................. 8
2.3. Inserting the SAM Card ....................................................................................... 9
2.4. Inserting the Paper Roll ..................................................................................... 10
2.5. Inserting the GSM SIM Card .............................................................................. 11
2.6. Inserting the Memory card ................................................................................. 12
3. Basic Operation ......................................................................................................... 13
3.1. System Panel .................................................................................................... 13
3.2. Loader ............................................................................................................... 16
3.3. Test Utility .......................................................................................................... 18
3.4. POS Demo ........................................................................................................ 21
4. Secure File Loading ................................................................................................... 26
4.1. APK Signing ...................................................................................................... 26
4.2. APK Loading ...................................................................................................... 28
5. Appendix .................................................................................................................... 30
5.1. FCC Warning ..................................................................................................... 30
Castles Technology Co., Ltd. Confidential • All Right Reserved. Pg. 4
Page 5

1. Introduction
This document provides a guideline on operating and configuring Castles SATURN1000
terminal.
The scope of this document includes setting up the terminal, basic operation, application
life cycle, and some advance features.
Castles Technology Co., Ltd. Confidential • All Right Reserved. Pg. 5
Page 6

2. Hardware Setup
SATURN100
1
2
3
4 6 7
5
2.1. Parts of the Terminal
Front (Portable and Countertop)
1. Paper Roll Box
6. Fingerprint identification
2. Front camera (200 MP)
3. LCD Display (5.5”)
4. Smart Card Reader
5. Magnetic Stripe Reader
Castles Technology Co., Ltd. Confidential • All Right Reserved. Pg. 6
area
7. Contactless Card Landing
Zone
Page 7
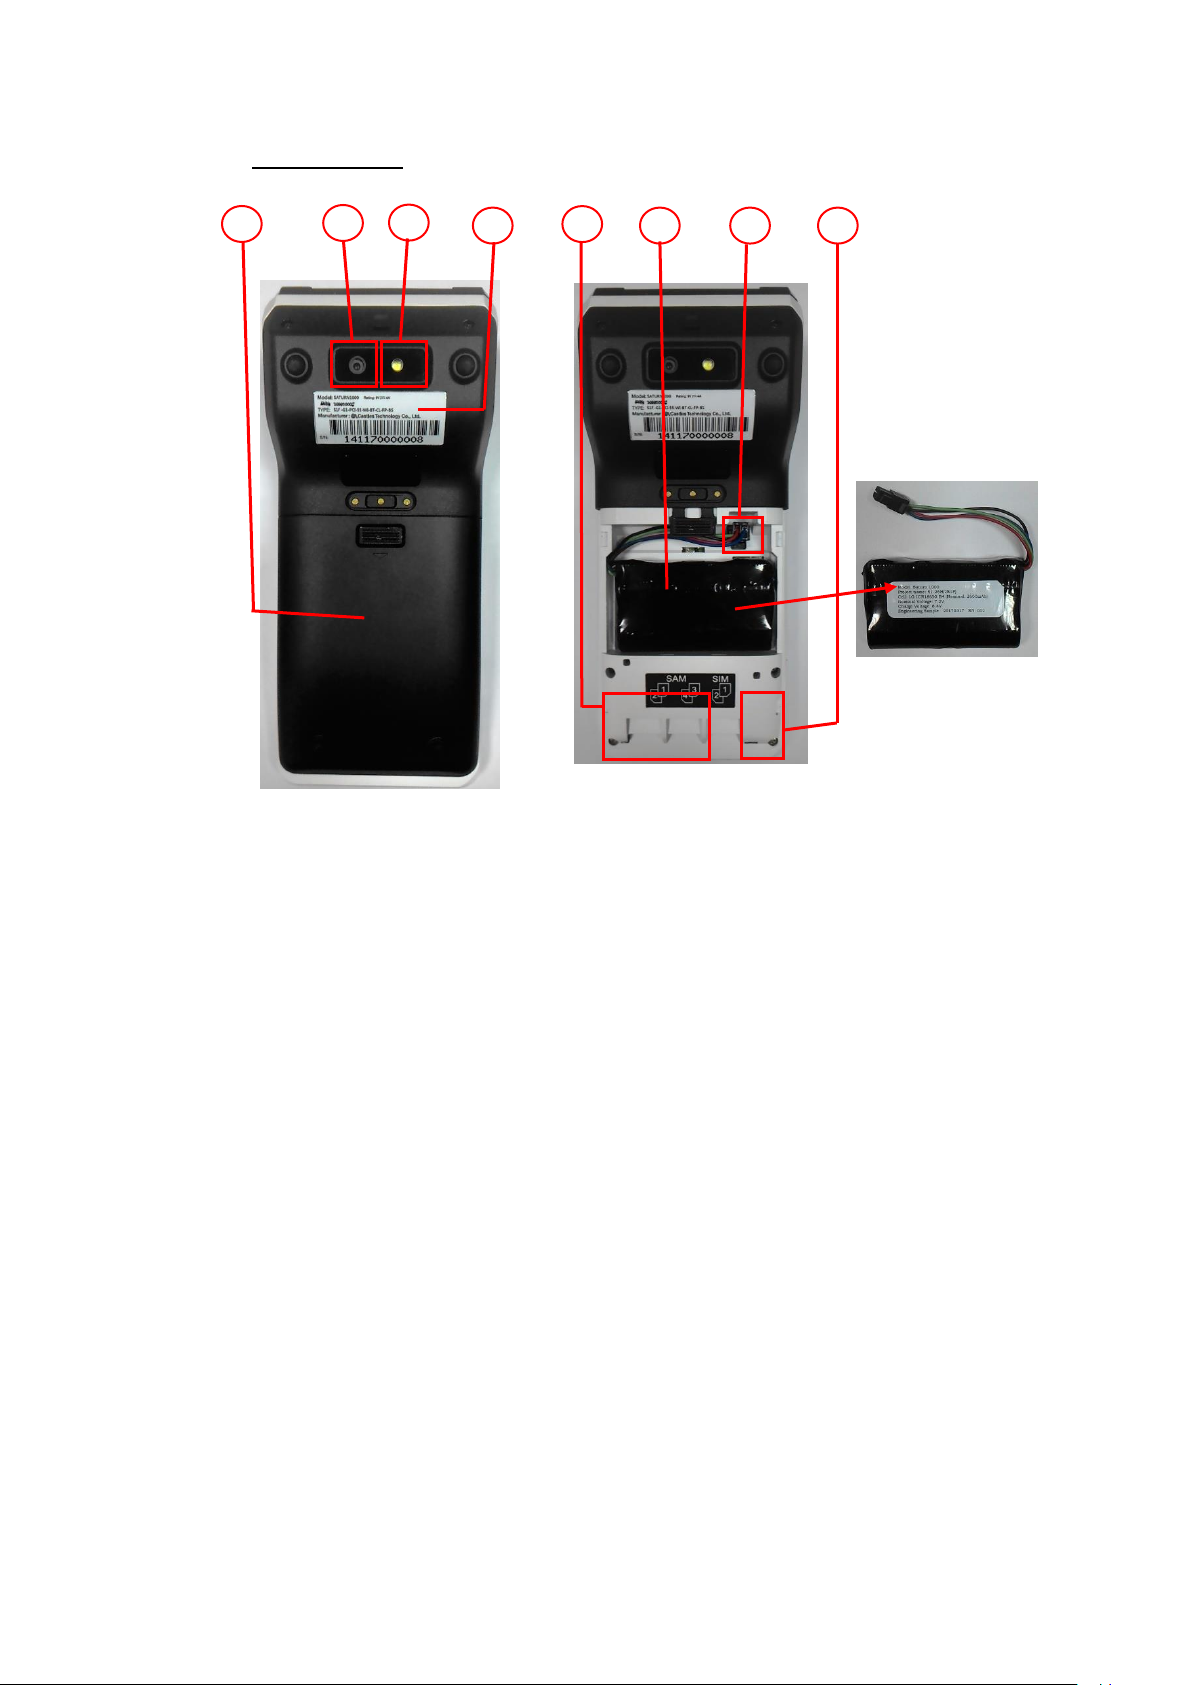
Rear (Portable)
SATURN1000
SATURN1000
SATURN1000
Rechargeable
Battery
8
10
11
13
12
14
15
9
8. Rechargeable Battery Cover
9. Rear camera (500 MP)
10. Photoflash
11. Product label
12. SAM Slots 1-4
13. Rechargeable Battery
14. Battery connector
15. GSM SIM Card Slots 1-2
Castles Technology Co., Ltd. Confidential • All Right Reserved. Pg. 7
Page 8
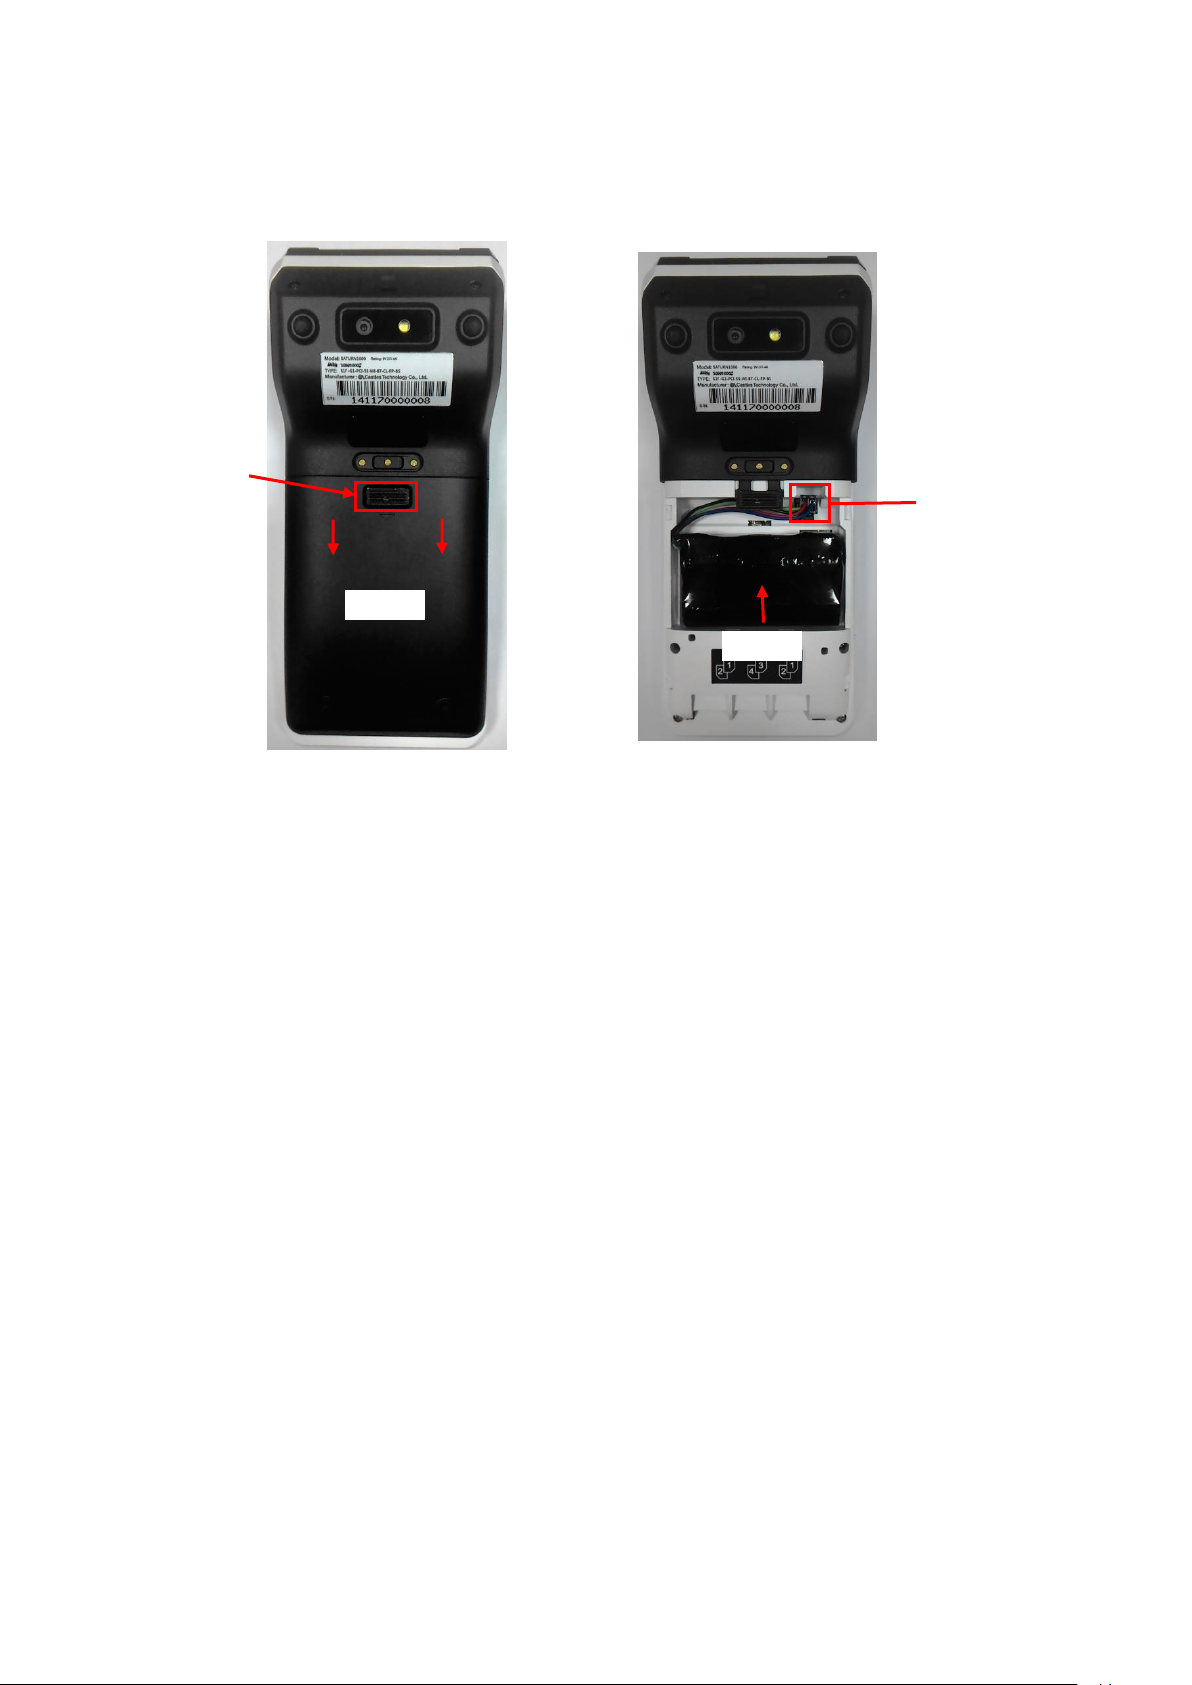
2.2. Inserting the Battery
Align
Step 2
Step 1
Press down the
button
Step 1: Press down the button and push battery cover down to remove the cover.
Step 2: Insert battery into compartment, battery contact point must align with battery
connector.
Step 3: Reverse the operation of step 1 to install the battery cover
Note: Please confirm the battery is installed before starting the terminal.
Castles Technology Co., Ltd. Confidential • All Right Reserved. Pg. 8
Page 9
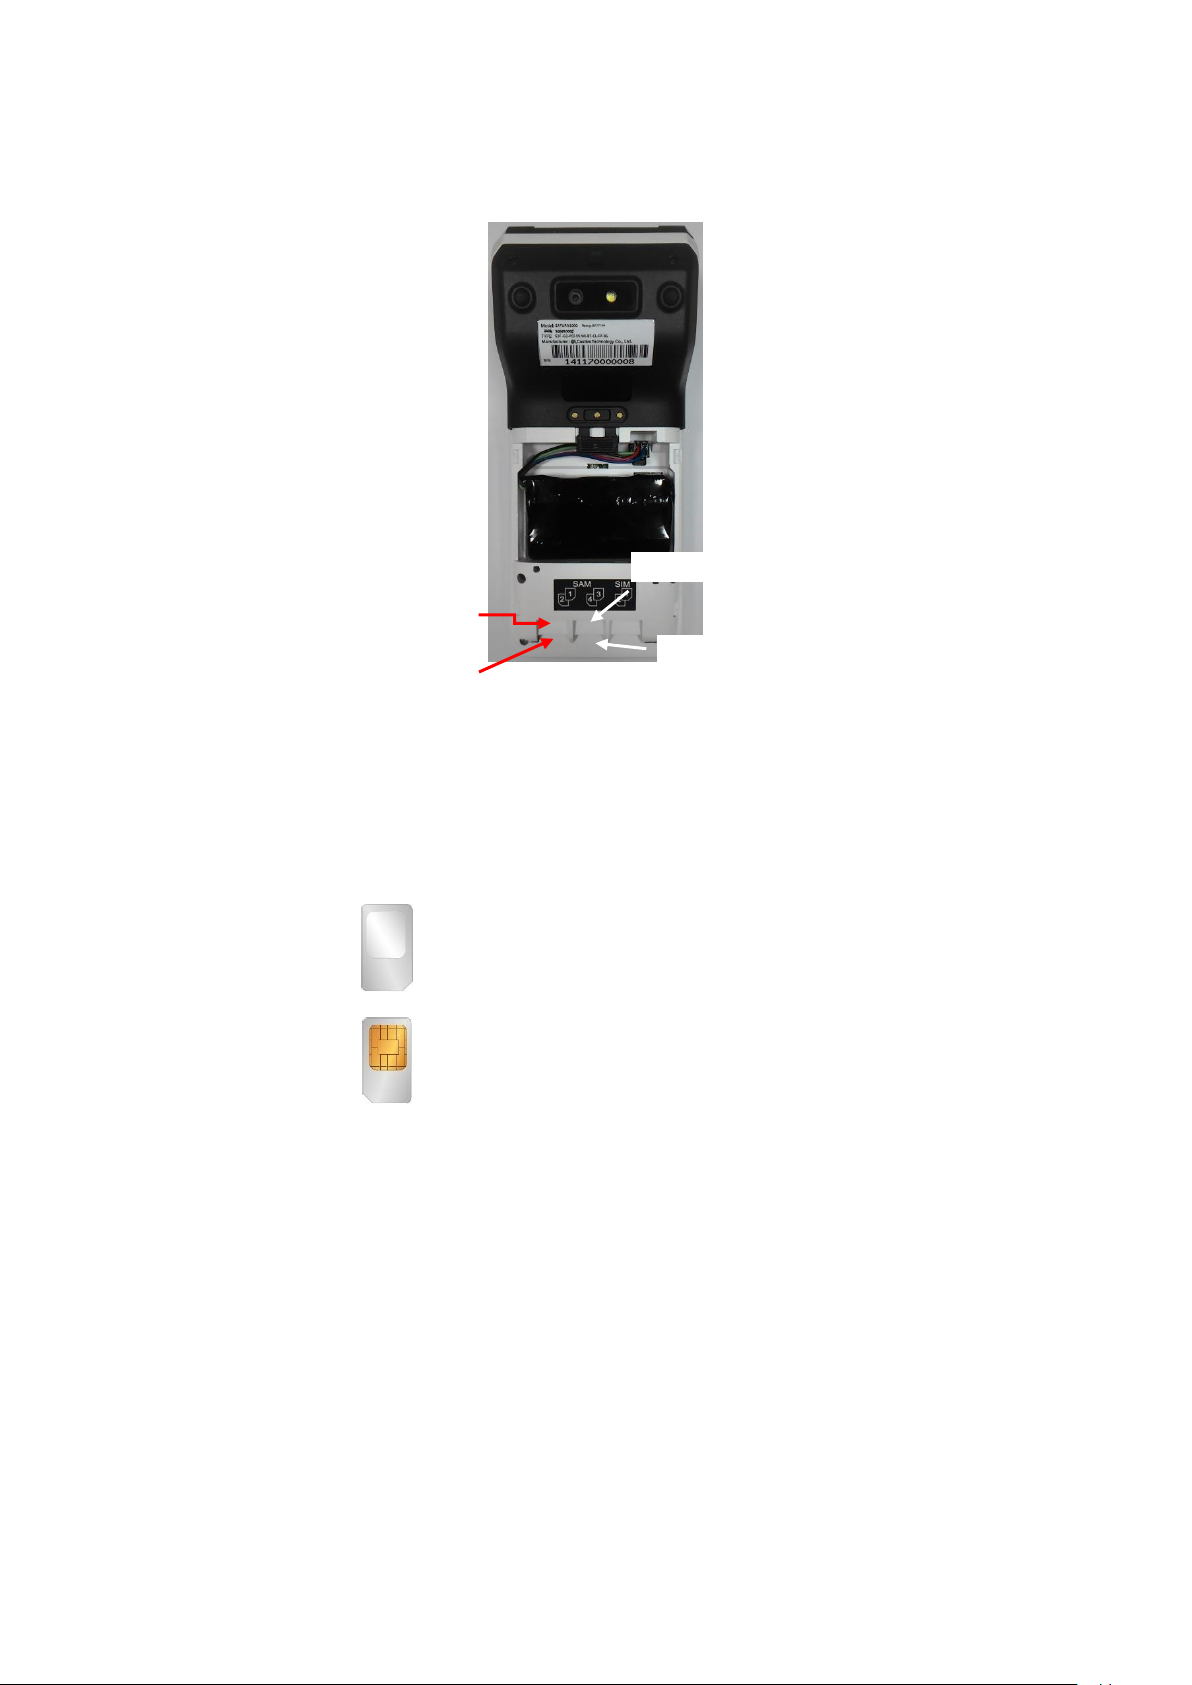
2.3. Inserting the SAM Card
SATURN1000
SAM1
SAM3
SAM2
SAM4
Step 1: Remove battery cover / back cover
Step 2: Insert SAM card into desire slot.
SAM 1 & 3:
Gold contact at upper side of card and facing down.
SAM 2 & 4:
Gold contact at upper side of card and facing up.
Castles Technology Co., Ltd. Confidential • All Right Reserved. Pg. 9
Page 10

2.4. Inserting the Paper Roll
Step 2
Step 1
Step 3
Step 1: Pull up paper roll box handle.
Step 2: Gentle open paper roll cover.
Step 3: Insert paper roll as direction showed.
Paper specification
Width: 57mm
Outside diameter: 40mm
Castles Technology Co., Ltd. Confidential • All Right Reserved. Pg. 10
Page 11

2.5. Inserting the GSM SIM Card
SIM2
SIM1
SATURN1000
Step 1: Remove battery cover / back cover
Step 2: Open SIM socket and insert GSM SIM card into desire slot.
SIM 1:
Gold contact at upper side of card and facing down.
SIM 2:
Gold contact at upper side of card and facing up.
Castles Technology Co., Ltd. Confidential • All Right Reserved. Pg. 11
Page 12

2.6. Inserting the Memory card
Micro SD
SATURN1000
Push down the
metal cover
Open the metal
cover
Place the micro
SD card
Close and push up
the metal cover
Step 1: Remove battery cover / back cover
Step 2: Place Micro SD memory card.
Castles Technology Co., Ltd. Confidential • All Right Reserved. Pg. 12
Page 13

3. Basic Operation
Once the power is on in normal status, terminal will enter Launcher if no default
application selected. All user applications are listed in Launcher. Users can click on an
application and run the application. Castles provide applications “System Panel”,
“loader”, “Test Utility” and “POS Demo” for developer use.
3.1. System Panel
Developer can use system panel to set system settings and check system versions.
Click on [App menu].
Click on [SystemPanel].
Castles Technology Co., Ltd. Confidential • All Right Reserved. Pg. 13
Page 14

Use random number keypad to enter default password ‘00000000’ to both of
first password and second password.
Castles Technology Co., Ltd. Confidential • All Right Reserved. Pg. 14
Page 15

Key Sound: Enable or disable the key sound function. (Currently only support
to EMV pin code input.)
Navigation Bar: Enable or disable this function can show or hide the
navigation bar.
Battery charging threshold: Set percentage of battery power to control the
Charging time.
Debug mode: Enable or disable the adb function. (After enable this function,
please reboot the terminal at once.)
Auto reboot: Enable or disable the auto reboot function.
Auto reboot interval: select the auto reboot interval.
Factory reset: Reset the terminal to the status of factory default.
Enable user password: Enable or disable the user password function.
Change user password: Change the user password.
Change login password: Change the login password.
Date & Time: Set date and time.
Select default application: Select the default application which will auto run
after system boot up.
About: Show system versions.
Castles Technology Co., Ltd. Confidential • All Right Reserved. Pg. 15
Page 16

3.2. Loader
Download user application, or update Android system and kernel modules
firmware.
Click on [App menu].
Click on [loader].
Castles Technology Co., Ltd. Confidential • All Right Reserved. Pg. 16
Page 17

The loader will get into waiting for download status.
If download successes, the screen will display completed information.
Notice: If cannot download success, please check the debug mode is disabled,.
Castles Technology Co., Ltd. Confidential • All Right Reserved. Pg. 17
Page 18

3.3. Test Utility
Diagnose terminal hardware components.
Click on [App menu].
Click on [Test Utility].
Castles Technology Co., Ltd. Confidential • All Right Reserved. Pg. 18
Page 19

Click on [APP Info].
Revision: Display the android OS version.
Size: Display the memory size info.
Castles Technology Co., Ltd. Confidential • All Right Reserved. Pg. 19
Page 20

Click on [UI Test].
LCD: Diagnose the LCD display function.
LED: Diagnose the rear side LED function.
Backlight: Diagnose the brightness of backlight.
RTC: Get system RTC info.
Speaker: Diagnose the speaker function.
Touch: Diagnose the touch function.
Camera: Diagnose the rear camera function.
Finger Print: Diagnose the fingerprint function.
Castles Technology Co., Ltd. Confidential • All Right Reserved. Pg. 20
Page 21

3.4. POS Demo
Test EMV/EMVCL function and demo use.
Click on [App menu].
Click on [POS Demo].
Castles Technology Co., Ltd. Confidential • All Right Reserved. Pg. 21
Page 22

Select items.
Confirm items.
Select payment method.
Confirm Payment.
Castles Technology Co., Ltd. Confidential • All Right Reserved. Pg. 22
Page 23

Waiting Swipe, insert or tap card.
Process payment.
Payment approved.
Print receipt.
Castles Technology Co., Ltd. Confidential • All Right Reserved. Pg. 23
Page 24

If print receipt fail, please check the permission of “storage” that is enable or not.
The steps to check the permission is shown as below.
Click on [Settings].
Click on [Apps].
Click on [POS Demo].
Click on [Permissions].
Castles Technology Co., Ltd. Confidential • All Right Reserved. Pg. 24
Page 25

Enable “Storage”.
Castles Technology Co., Ltd. Confidential • All Right Reserved. Pg. 25
Page 26

4. Secure File Loading
Castles implemented an interface in terminal named User Loader (ULD) to provide secure
file loading to system memory. The Loader apply to download user application and kernel
firmware.
The loading process is secure by signing the files using ULD Key System.
4.1. APK Signing
Castles Technology provides a tool named “CAPGen” to perform this task.
The CAPGen is located at:
C:\Program Files (x86)\Castles\SATURN1000\tools\CAPG (Evaluation Version)\
Run CAPGen.exe
Click on “Enter & Sign Application” to browse file.
Castles Technology Co., Ltd. Confidential • All Right Reserved. Pg. 26
Page 27

If generate success, the tool will show “Finish…”.
App.CAP
App.mci
MultiApp.mmci
The output file will be in a set. A “mci” file with one or more “CAP” files. CAP
file contents the signed file binaries, where MCI file contents the list of CAP
files.
Note: If user would like to load multiple set of signed file, create a new file with
extension of “mmci”. Then put the mmci file contents with the list of mci file.
Castles Technology Co., Ltd. Confidential • All Right Reserved. Pg. 27
Page 28

4.2. APK Loading
User Loader is a tool provided by Castles Technology. It’s the formal way to
download file to terminal.
The Loader is located at:
C:\Program Files (x86)\Castles\SATURN1000\tools\Loader
Run Loader.exe
Select COM port
Browse and select mci file or mmci file
Refer to the chapter “3.2 Loader” to setup terminal to enter download mode.
Castles Technology Co., Ltd. Confidential • All Right Reserved. Pg. 28
Page 29

Press “Download” button to start download.
After download finish, the log screen will show message as following picture.
Castles Technology Co., Ltd. Confidential • All Right Reserved. Pg. 29
Page 30

5. Appendix
5.1. FCC Warning
Federal Communication Commission Interference Statement
This device complies with Part 15 of the FCC Rules. Operation is subject to the following two
conditions: (1) This device may not cause harmful interference, and (2) this device must accept
any interference received, including interference that may cause undesired operation.
This equipment has been tested and found to comply with the limits for a Class B digital device,
pursuant to Part 15 of the FCC Rules. These limits are designed to provide reasonable
protection against harmful interference in a residential installation. This equipment generates,
uses and can radiate radio frequency energy and, if not installed and used in accordance with
the instructions, may cause harmful interference to radio communications. However, there is
no guarantee that interference will not occur in a particular installation. If this equipment does
cause harmful interference to radio or television reception, which can be determined by turning
the equipment off and on, the user is encouraged to try to correct the interference by one of
the following measures:
Reorient or relocate the receiving antenna.
Increase the separation between the equipment and receiver.
Connect the equipment into an outlet on a circuit different from that to which the receiver
is connected.
Consult the dealer or an experienced radio/TV technician for help.
FCC Caution:
Any changes or modifications not expressly approved by the party responsible for
compliance could void the user's authority to operate this equipment.
This transmitter must not be co-located or operating in conjunction with any other antenna
or transmitter.
Radiation Exposure Statement:
This device meets the government’s requirements for exposure to radio waves.
This device is designed and manufactured not to exceed the emission limits for exposure to
radio frequency (RF) energy set by the Federal Communications Commission of the U.S.
Government.
The exposure standard for wireless device employs a unit of measurement known as the
Specific Absorption Rate, or SAR. The SAR limit set by the FCC is 1.6W/kg. *Tests for SAR
are conducted using standard operating positions accepted by the FCC with the device
transmitting at its highest certified power level in all tested frequency bands.
~ END ~
Castles Technology Co., Ltd. Confidential • All Right Reserved. Pg. 30
 Loading...