

Page 1
3
Precautions and Notices for Safety 4
Declaration of Conformity to
R&TTE Directive 5
The Safelinq service 6
1 Introduction 8
2 Features 9
3 Components 10
4 Name of Each Part 11
5 Battery Assembly/Disassembly 12
5.1 Battery Assembly 12
5.2 Battery Disassembly 12
6 Installing the SIM card 13
7 Buttons 14
7.1 Button overview 14
7.2 Button description 15
8 LED’s and Connectors 17
9 Operating your SmartLinQ Mobile 18
9.1 Switching your SmartLinQ Mobile on/off 18
9.2 Call/Answer 18
9.3 Adjust the volume 19
9.4 Make a phone call 19
9.5 Emergency 20
9.6 Auto Answer 21
10 Technical Specification 22
11 Troubleshooting and Safety info 26
Contents
Page 2

4
Precautions
• Turn your phone off in a potentially
explosive atmosphere.
• Turn your phone off during a flight.
• Do not use your phone while driving.
• Turn your phone off in a hospital.
• Be aware of the details on electromagnetic
waves of your phone.
• Do not touch your phone or its power plug with
a wet hand.
• Do not remodel, disassemble, or repair
your phone on your own.
• Use only approved batteries and
accessories
• Use the standard charger acquired with
a TTA certified mark.
• Do not keep your phone in or near a
source of heating, like a stove or
microwave oven.
Precautions and Notices for Safety
Please ensure that you use your handset correctly after reading the safety instructions.
Page 3
1999/5/EC
This equipment fulfils the R&TTE directive
(Council Directive 1999/5/EC).
European States qualified under wireless
approvals:
EU
Austria, Belgium, Denmark, Finland, France,
Germany, Greece, Ireland, Italy, Luxembourg,
The Netherlands, Portugal, Spain, Sweden, and
the United Kingdom
Declaration of Conformity to R&TTE Directive
5
Page 4

6
The Safelinq service
The SmartLinQ Mobile has been exclusively developed by Safelinq. For the full details of the functionality
of your SmartLinQ Mobile go to www.safelinq.com. It should be noted that the SmartLinQ Mobile will only
operate in combination with a Safelinq subscription.
Page 5

8
The SmartLinQ Mobile is a powerful GPS location device which is small in size and lightweight. It is
designed for personal security and has an inbuilt emergency call button as well as a motion sensor. Both
these features ensure direct contact to your chosen control centre or emergency number should
you encounter a difficult or threatening situation. As your location will be known, the control centre or
emergency contact can deal with the situation efficiently and effectively.
The SmartLinQ Mobile is designed to work on any mobile GSM network using 850, 900, 1800 or 1900
frequency (Quad Band).
The SmartLinQ Mobile offers controlled dialling allowing you to call four pre-programmed telephone
numbers.
When you slide the emergency button up, your current position will automatically be sent to the control
centre and the four pre-programmed numbers will simultaneously be dialled in sequence.
1. Introduction
Page 6
9
GPS (Global positioning system) Receiver
Emergency button
Motion sensor alert
Low battery alert
Speed sensor alert
Four pre-programmable buttons
Auto answer
2. Features
Page 7
10
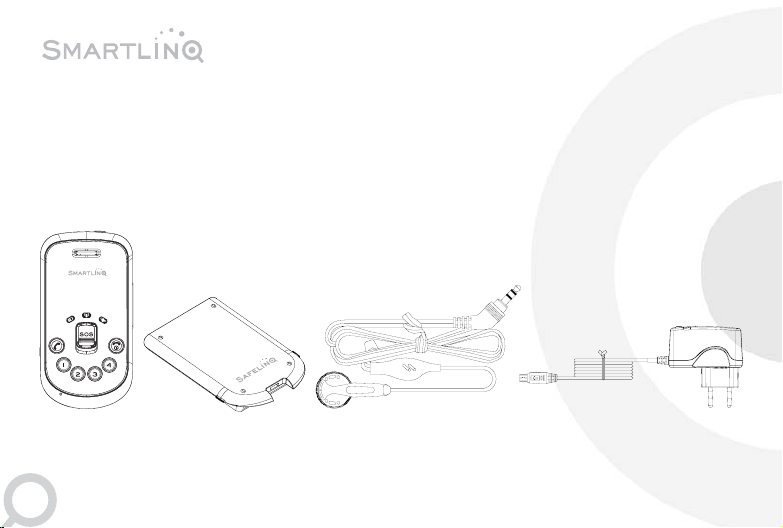
1 SmartLinQ Mobile
2 Battery Pack
3 Handsfree headset
4 AC-power adapter
5 This Manual
Use an approved Safelinq charger and battery.
Do not use non genuine parts as it could damage
the battery or cause an explosion.
3. Components
12 3 4
Page 8
11
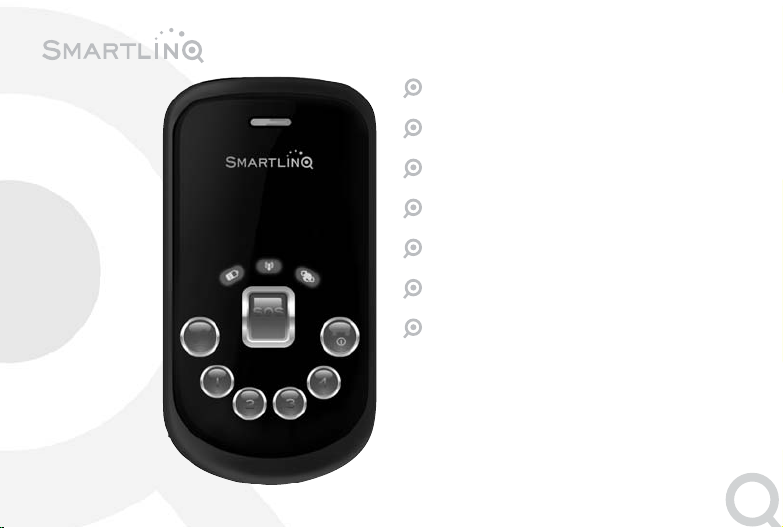
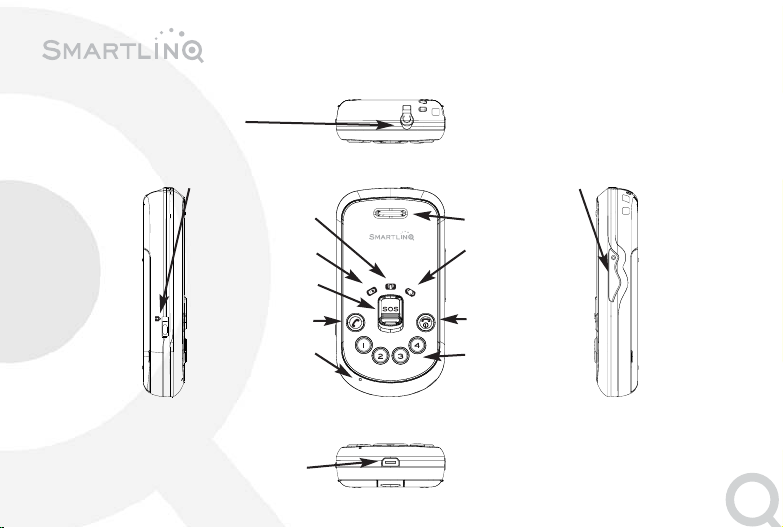
4. Name of Each Part
Earphone jack
Power adapter/connector
Button Lock Volume
GSM LED
power LED
Emergency button
Call/Answer
Microphone
Speaker
GPS LED
Power/Hang up
Pre-Programmable
buttons
+
-
Page 9

5.1 BATTERY ASSEMBLY
1 Fit the battery
pack correctly into
the groove
2 Slide it all the way as
indicated by the
arrow, and lock the battery
button into place.
5.2 BATTERY DISASSEMBLY
Release the battery disassembly button in
the direction indicated by the arrow and
remove the battery.
12
5. Battery Assembly/Disassembly
Page 10

13
1 Gently move the SIM card holder to the right
and open it. Insert the SIM card as shown
ensuring the gold contact area of the SIM
card is facing downwards. Close the SIM card
holder and move it to the left to lock.
2 Slide the battery back in at the top of the
SmartLinQ Mobile and push it down to lock it
into position.
6. Installing the SIM card
Page 11

7.1 BUTTON OVERVIEW
The phone panel consists of nine buttons.
• Power/Hang up Button
• Call/Answer Button
• Emergency Button
• Four pre-programmable
Buttons
• Volume Button
• Lock Button
7. Buttons
14
Page 12

15
7.2 BUTTON DESCRIPTION
Power/Hang up
• To turn on.
Press for 3 seconds until you hear the poweron melody.
• To Turn off.
Press for 3 seconds until all LED’s are off.
• To refuse an incoming call.
Press while ringing.
• To end a call.
Press while in a call.
Call/Answer
• To make a call.
Press this button after pressing one of the preprogrammable buttons and hearing a beep.
• To answer an incoming call.
Press while ringing.
Emergency
When you slide the emergency button up,
your current position will automatically be sent to
the control centre and the four pre-programmed
numbers will simultaneously be dialled in
sequence.
Page 13

16
Pre-programmable buttons
To call the number programmed behind one of the
four pre-programmable buttons, press this button
wait for a beep and then press the Call/Answer
button.
Volume
• To increase the volume of a call.
Press the upper part of the volume button.
• To decrease the volume of a call.
Press the lower part of the volume button.
Lock
Slide the button up to lock all the buttons except
the emergency button.
7. Buttons
Page 14

17
GSM LED
• If the SmartLinQ Mobile cannot establish a
GSM connection, the LED will flash quickly.
• If the SmartLinQ Mobile is connected to the
GSM network, the LED will flash slowly.
GPS LED
While the SmartLinQ Mobile is searching for a GPS
connection, the GPS LED will flash quickly. When a
connection is established, the LED will light up for
3 seconds before switching off.
If a GPS connection cannot be found, the light will
switch off straight after the flashing has stopped.
Power LED
The Power LED will blink while the battery is being
charged. Once charged, the Power LED will light up
continuously.
Headset connector
Headset connection point.
Power adapter/connector
Connection point for the AC power adapter for
charging the battery.
8. LED and Connectors
Page 15

18
9.1 SWITCHING YOUR SMARTLINQ MOBILE ON/OFF
• To turn on: Press the Power/Hang up button at
least for 3 seconds, it will turn on. The GSM
LED will flash quickly until the SmartLinQ
Mobile registers to the GSM network. After
successful registration the GSM LED will flash
slowly. It will then continue to flash but at a
slower pace.
• To turn off: Press the Power/Hang up button at
least for 3 seconds to switch the SmartLinQ
Mobile off.
9.2 CALL/ANSWER
• Press the Call/Answer button to answer an
incoming call.
9. Operating your SmartLinQ Mobile
Page 16

19
9.3 ADJUST THE VOLUME
• Whilst on a call, press the upper part of the
Volume button to increase the volume, and
press the lower part of the volume button to
decrease the volume.
9.4 MAKE A PHONE CALL
• You can store four pre-programmed numbers
in your SmartLinQ Mobile.
• When you want to call one of the numbers,
first press the relevant short dial button, wait
for the beep and then press the Call/Answer
button
• Press the Power/Hang up button to end the
call.
+
-
Page 17

20
9. Operating your SmartLinQ Mobile
9.5 EMERGENCY
The SmartLinQ Mobile support an emergency
function. You can make an emergency call in the
following way:
1 If you slide up Emergency button, the phone
will sequentially dial the four pre-programmed
numbers. If no one answers the call will be
diverted to your chosen control centre.
2 When the emergency button is activated an
automated alert message with the position
information will be sent to the control centre.
Page 18

21
9.6 AUTO ANSWER
The Auto Answer function is used when a user is
in an emergency and unable to receive a call by
pressing the Call/Answer button.
• The following two conditions are to be satisfied
for Auto Answer to be operational:
1 Auto Answer function is activated on the
Safelinq service.
2 When an incoming number corresponds to
a number stored in pre-programmed button
1 or 2.
• If Auto Answer is operated, the microphone
volume is set up to a maximum level and the
speaker volume at the medium level.
Page 19

22
10. Technical Specification
Earphone jack
Power adapter/connector
Button Lock Volume
GSM LED
power LED
Emergency button
Call/Answer
Microphone
Speaker
GPS LED
Power/Hang up
Pre-Programmable
buttons
+
-
Page 20

General
Dimension (mm – H/W/D) 86 x 46 x 16.8 mm
Weight (g) 72g
Hardware
GPS Baseband SIRF GSC3F
Band Quad band GSM 850/900/1800/1900
Receiver 20 x 11 mm
Speaker 20 x 11 mm
Screen No
Indicator light x 3 Charge light
GSM status indicator light
GPS status indicator light
Keyboard backlight LED - Navy blue
Vibrate Mode To activate or de-activate, press the ‘volume down’ button.
GSM Antenna Internal antenna
GPS Antenna Internal antenna
Memory 32M bits FLASH + 16M bits RAM
23
Page 21

System Interface Proprietary
Earphone Interface 2.5 mm jack
RF Test Interface For use by mobile network operators for RF network testing.
Temperature Normal working conditions: -10 to 55˚C
Limited working conditions: 55 to 65˚C
Software
Ring tone 16 polyphonric MIDI for incoming calls
Voice Codec FR,EFR,HR,AMR
Two path audio Earphone and Receiver
GPS • SiRF Star III chipset
• Receive 20 channels, L1 1575.42 MHz,C/A code 1.023 Mhz chip rate
• DGPS accuracy 1 to 5m,typical 0.05m/s
• Acquisition rate (TTFF defined at 95% of first position local station)
Standard GPS mode:
- Hot start <1 second, average in open sky
- Warm start <38 seconds, average in open sky
- Cold start <42 seconds, average in open sky
10. Technical Specification
24
Page 22

25
OTA Over the air command settings from the Safelinq server using the
Safelinq proprietary protocol.
Motion Sensor When activated, sends alert information when the sensor detects
certain changes in the movement of the device.
Speed Sensor When activated, sends alert information when the speed threshold is met.
In the Box:
Handset, Battery, Travel Charger, Handsfree Headset, Quick Start Guide, User Guide
Available Accessories:
900 mAh Battery, Travel Charger, Car Charger, Desktop Charger, Handsfree Headset, Case, Belt Clip
Page 23

26
TROUBLESHOOTING
Problem
After the SmartLinQ Mobile is turned on, the GSM
LED continually flashes rapidly
Reason
The SIM card is not inserted.
The SIM card has been inserted but is protected
by a PIN code.
Where the signal is too weak, the SmartLinQ
Mobile can’t register to the network.
Solution
Insert the SIM card into the SmartLinQ Mobile.
Take out the SIM card and insert it into your
mobile phone. Using your mobile phone, disable
the PIN code then re-insert it in the SmartLinQ
Mobile.
Please move the SmartLinQ Mobile to a place
where the signal is stronger.
Problem
The location of the SmartLinQ Mobile cannot be
found.
Reason
The SmartLinQ Mobile is outside satellite coverage.
Solution
Move the SmartLinQ Mobile to a place where it
has satellite coverage, e.g. outdoors and away
from tall buildings.
Problem
The SmartLinQ Mobile cannot be switched on.
Reason
The battery is not charged.
The Power/Hang Up button was not pressed long
enough.
Solution
Make sure the charger is connected correctly at
both the mains and the SmartLinQ Mobile.
11. Troubleshooting and Safety info
Page 24

27
Make sure the battery is fitted correctly.
Press the Power/Hang Up button for at least 3
seconds in order for the SmartLinQ Mobile to
switch on.
SAFETY INFO
Please do not remove the battery when the
SmartLinQ Mobile is charging.
If you are unable to switch the SmartLinQ Mobile
off, please remove the battery for 3 seconds and
then replace back on the SmartLinQ Mobile. The
SmartLinQ Mobile will now be switched off.
To avoid damage to your ear from the ring tone,
when the SmartLinQ Mobile rings, first press the
answer button and then move the SmartLinQ
Mobile to your ear.
• Do not allow the SmartLinQ Mobile to
overheat.
• Do not keep your SmartLinQ Mobile in
a humid place.
• Do not expose the SmartLinQ Mobile to
direct sunlight.
• Switch off the SmartLinQ Mobile when
in aircraft.
• Switch off the SmartLinQ Mobile if near
medical equipment.
Page 25

Page 26

SAR INFORMATION
The SAR limit of USA (FCC) is 1.6 W/kg averaged over one gram of tissue.
Device types GT100 (FCC ID: XMR-16182010002) has also been tested against this SAR limit.
The highest SAR value reported under this standard during product certification
for use at the ear is 0.773 W/kg and when properly worn on the body is 0.856
W/kg. This device was tested for typical body-worn operations with the back of
the handset kept 1.5cm from the body. To maintain compliance with FCC RF
exposure requirements, use accessories that maintain a 1.5cm separation
distance between the user's body and the back of the handset. The use of belt
clips, holsters and similar accessories should not contain metallic components in
its assembly. The use of accessories that do not satisfy these requirements may
not comply with FCC RF exposure requirements, and should be avoided.
 Loading...