

Page 1

Technox
OWNER’s manual
1
Page 2
2
Page 3

Important !
„Instructions pertaining to a risk of fire, electric shock, or injury to persons“
Warning-When using electric products, basic precautions should always followed, including the following:
1.) Read the instructions before using the product.
2.) To reduce the risk of injury, close supervision is necessary when a product is used near children.
3.) Do not use this product near water - for example, near a bathtub, washbowl, kitchen sink, in a wet
basement, or near a swimming pool, or the like.
4.) This product should be used only with a cart or stand that is recommended by the manufacturer.
5.) The product should be located so that its location or position does not interfere with its proper ventilation.
6.) The product should be located away from heat sources such as radiators, heat registers, or other products
that produce heat.
7.) The product should be connected to a power supply only of the type described in the operatinginstructions
or as marked on the product.
8.) The power supply cord of the product should be unplugged from the outlet when left unused for a long
period of time.
9.) Care should be taken so that objects do not fall and liquids are not spilled into the enclosure through
openings.
10.) The product should be serviced by qualified service personnel when:
a.) The power supply cord or the plug has been damaged; or
b.) Objects have fallen, or liquid has been spilled into the product; or
c.) The product has been exposed to rain; or
d.) The product does not appear to operate normally or exhibits a marked change in performance; or
e.) The product has been dropped, or the enclosure damaged.
Do not attempt to sevice the product beyond that described in the user-maintenance instructions. All other
servicing should be referred to qualified service personnel.
3
Page 4

TABLE OF CONTENTS
1.) Introduction ...................................................................................................... 05
2.) Installation and Operation ................................................................................ 05
a.) Cabling ...................................................................................................... 05
b.) Basic Operations ......................................................................................... 06
3.) Playing the performances ................................................................................. 08
4.) Mode changement ............................................................................................ 08
5.) Playing the single-sounds ................................................................................. 09
6.) Playing the drums ............................................................................................. 09
7.) Editing of the Single-sounds ............................................................................ 09
8.) Editing the effects............................................................................................. 12
9.) Editing the drum-sets ....................................................................................... 19
Storing of drum-sets ......................................................................................... 20
10.) Editing the performance ................................................................................... 20
Storing the newly created performance............................................................ 21
11.) The "Common" menu....................................................................................... 22
12.) Editing the arpeggiator ..................................................................................... 25
13.) Storing, copying, MIDI dump - the "Write" menu ........................................... 26
14.) The "Edit System" menu .................................................................................. 27
15.) Playing of the demo song ................................................................................. 29
16.) Working with a sequencer ................................................................................ 29
Working with the sequencer-multi-setups ........................................................ 29
17.) MIDI and more ................................................................................................. 32
Listing of the MIDI controllers ........................................................................ 32
NRPN and RPN controllers ............................................................................. 32
18.) The SysEx data format of the TECHNOX ....................................................... 34
19.) MIDI implemenation chart ............................................................................... 39
20.) Listing of the performances.............................................................................. 40
21.) Listing of the single-single-sounds .................................................................. 41
22.) How to activate the drum-sets .......................................................................... 43
23.) Listing of the drum-sets.................................................................................... 44
24.) Warranty and registration ................................................................................. 49
25.) Registration card .............................................................................................. 50
26.) Technical specification...................................................................................... 51
4
Page 5
1.) Introduction/ 2.) Installation
1.) Introduction Congratulations! The unique TECHNOX synthesizer lies just in front of you! The times of abstinence have
gone. The times of envy have also gone, when somebody else just bought the ABSOLUTELY last 909 or
303 unit! And no more trouble with these ugly MIDI to CV interface boxes. The TECHNOX offers you all
those fancy Techno sounds you need to fool around in the dance-floor business! And besides, it's much
more affordable than any of the old 'museum pieces' which sometimes have their own little problems
of incompatibility to the rest of your synth gear... You'll remark rapidly that the TECHNOX offers really
EVERYTHING you ever wanted to create your own dance-trax! Dig this!
You get 512 remarkable single sounds destinated for techno, ambient and EBM music.
In the following chapter you'll learn everything about installing your TECHNOX, how to integrate it into
your musical equipment, and finally, how to annoy your neighbours! The last point depends upon several
different parameters: the thickness of your walls, the power of your amp and speakers and - last, but not
least - the nerves of your neighbours. You'll get the best results by using a slightly distorted bass-drum
sound, carefully hard-quantized to 4th notes... And then: pump up the volume! Try it - and see what
happens!
O.k. But now we'll start our delightful journey through the amazing world of TECHNOX:
2.) Installation
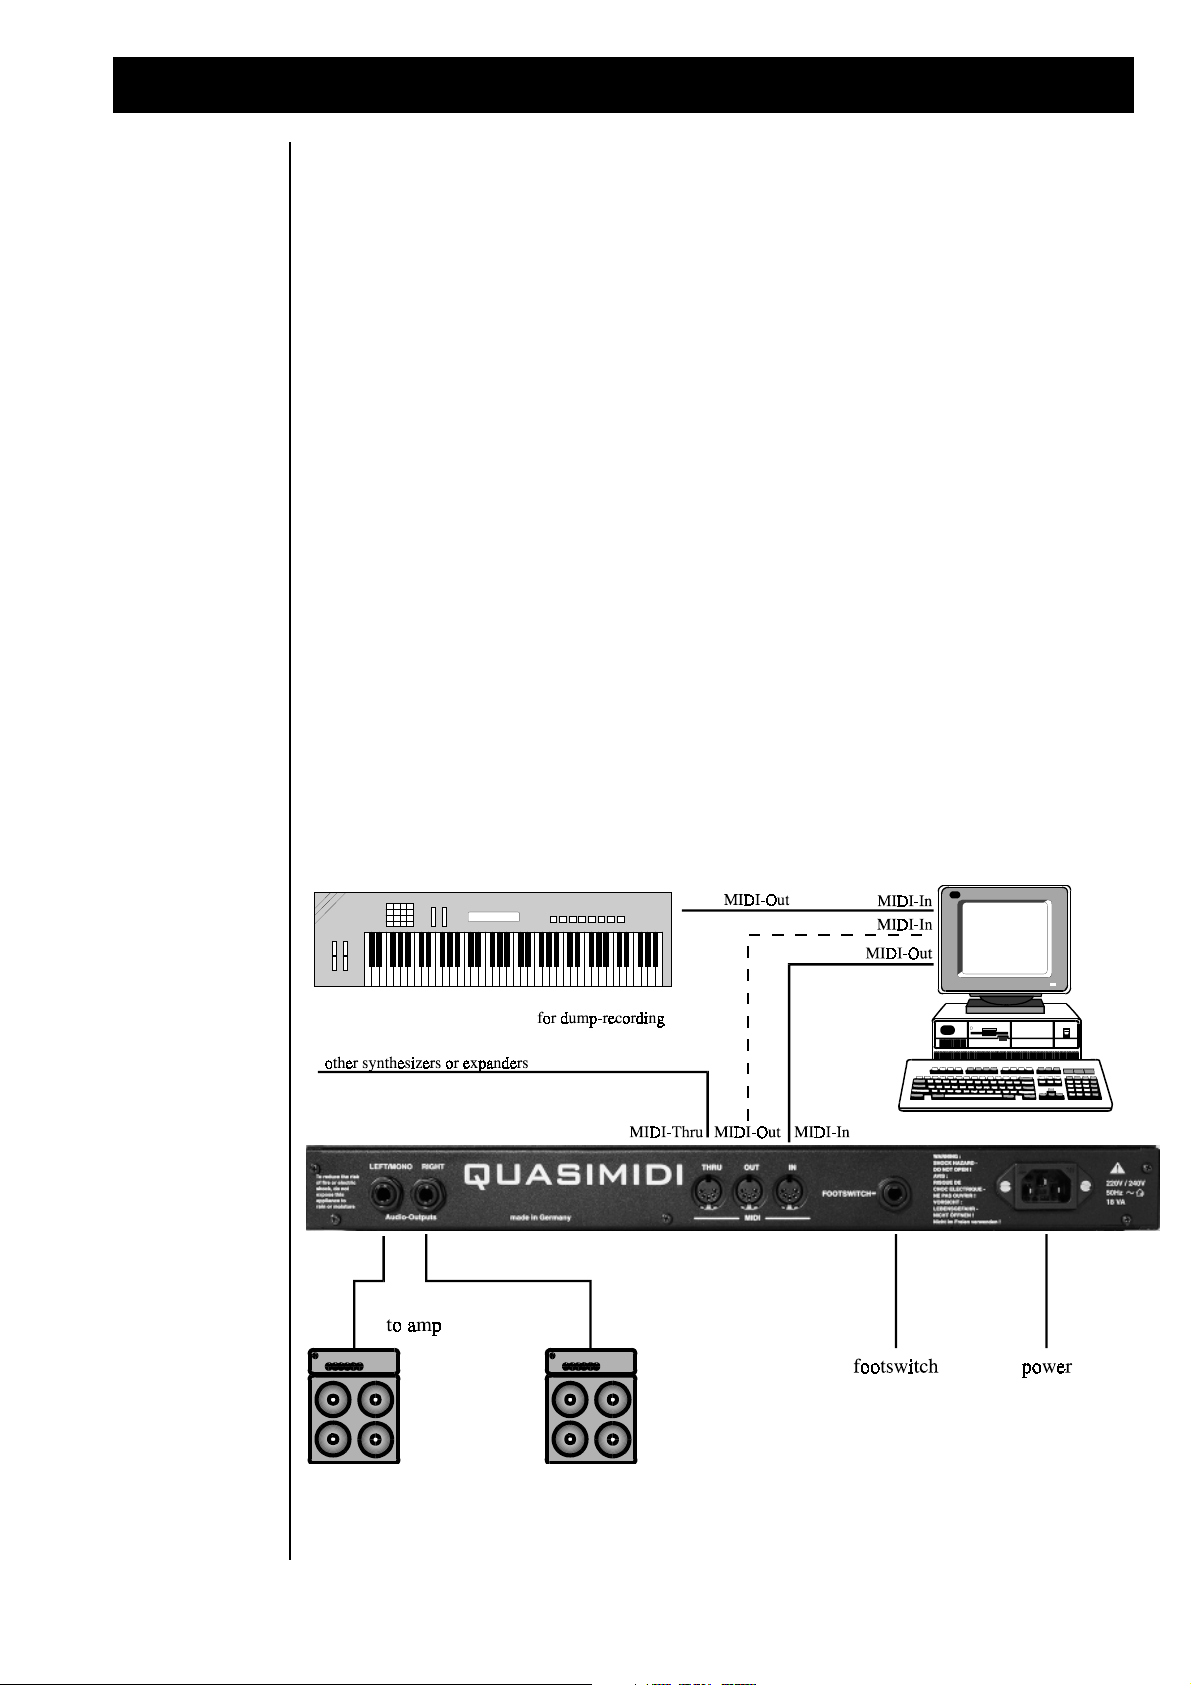
a.) Cabling and
Setup
You'll need the following things for unrestricted pleasure with your new machine:
1. TECHNOX
2. 2 mono-jack 6,3 mm audio cables
3. 2 MIDI cables
4. 1 MIDI keyboard
5. 1 MIDI sequencer either in hard- or software-version, where the last mentioned needs mostly a
computer for best results (...try reading a diskette with your eyes...!)
6. Any kind of listening gear, e.g. active monitor speakers, a keyboard amp or anything else - it only
has to be LOUD! The most simple way is just a headphone which you plug into your TECHNOX. Unfortunately,
in this case you have to renounce the stimulation of your belly...
The following diagram shows you how to set up all the components for your musical delightment:
5
Page 6
2.) Installation
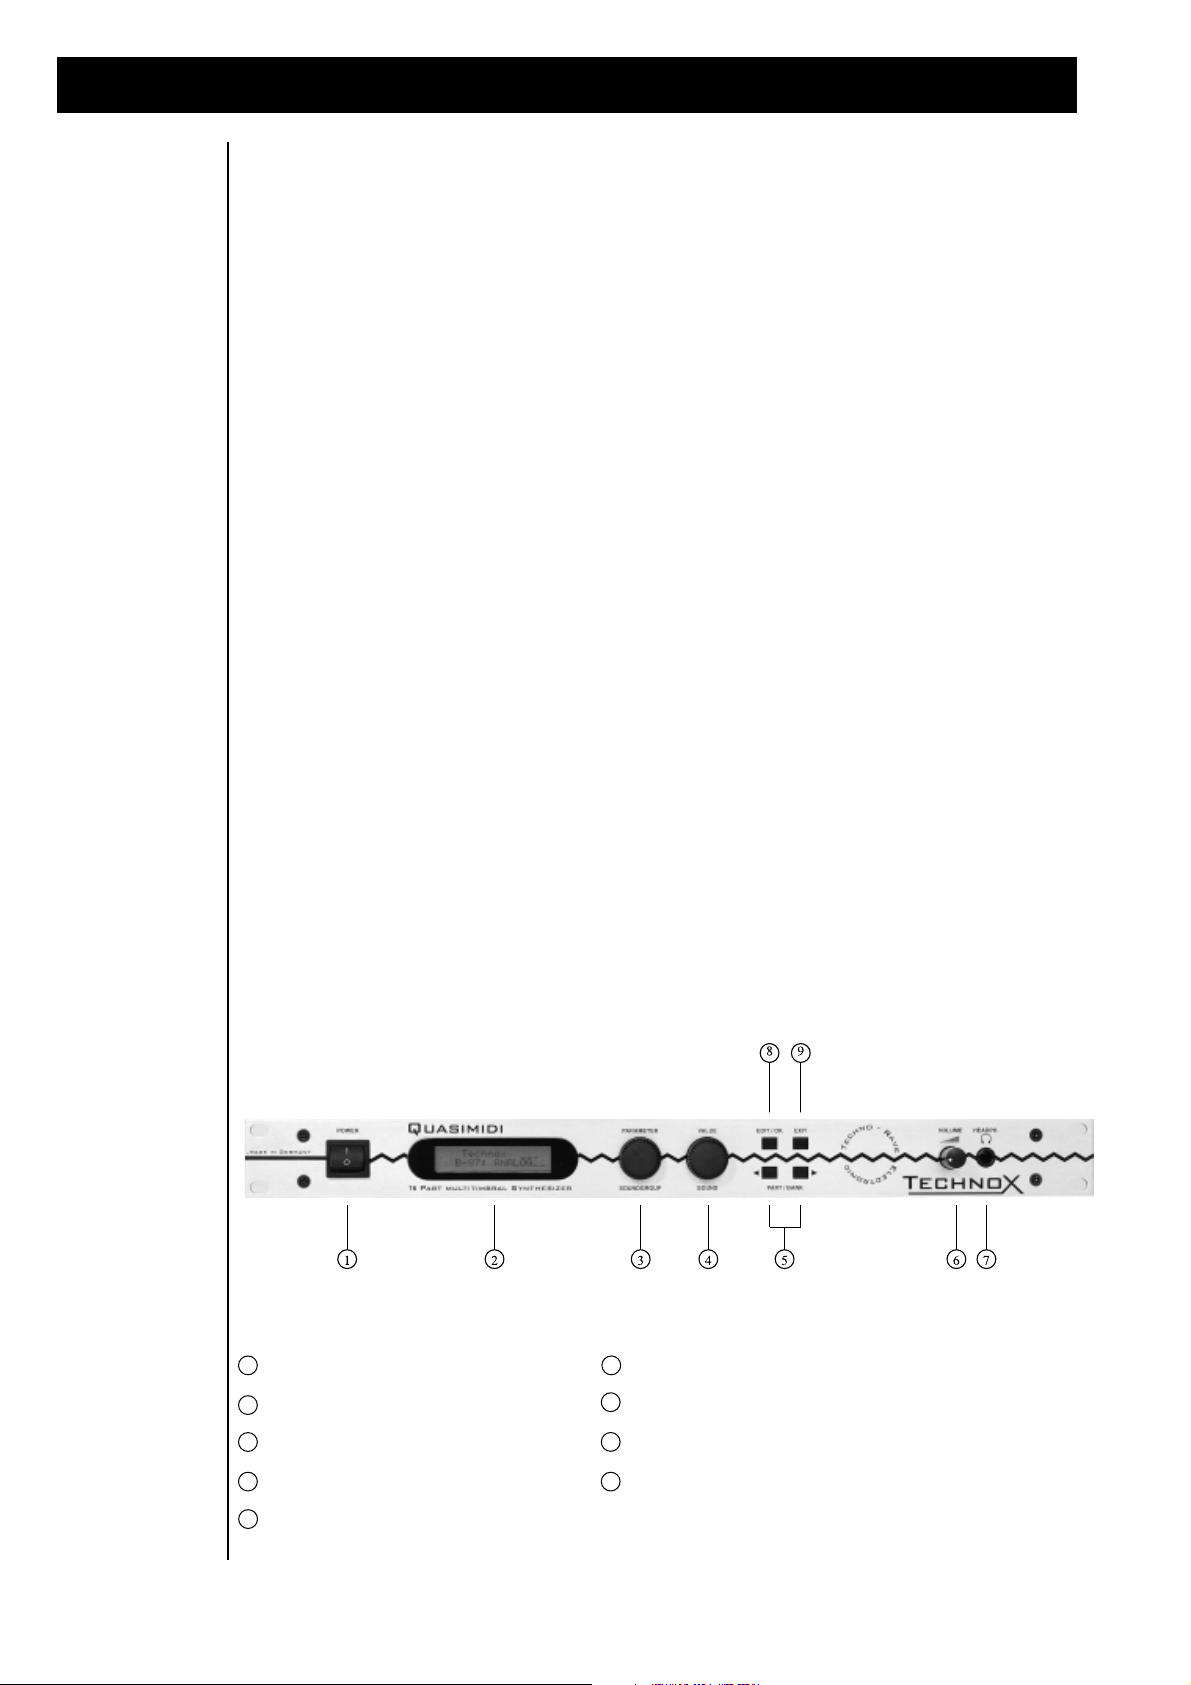
1 "POWER"-switch
2 Display
3 "PARAMETER/ SOUNDGROUP"-dial
4 "VALUE/ SOUND"-dial
5 "PART/ BANK"-button
6 "VOLUME"-Control
7 "HEADPHONE"-jack
8 "EDIT/ OK"-buttons
9 "EXIT"-button
b.) Basic
operations
The TECHNOX offers two different operation modes:
1. Performance mode
The first mode is called "Performance mode". This mode is normally used when playing the TECHNOX
with your master-keyboard or synthesizer. A "Performance" combines different single-sounds and FXsettings which all may be stored into the memory of your TECHNOX. This mode gives you a first impression
of the manifold sound capabilities of your new synth.
2. Sequencer multi-mode
Within this mode the TECHNOX can be controlled on all 16 MIDI channels simultaneously. So - complete
songs may be reproduced with a sequencers. In most cases this is the mode you normally work with.
When switching on the TECHNOX for the first time, it's in "Performance mode". After turning on the
machine, you'll get the following message on the display:
T_e_c_h_n_o__x
Rom-01: ArpgBass
Now, when you press a key on your MIDI keyboard, you'll hear the TECHNOX playing the selected
Performance sound. You can change the Performances by using the two "Alpha dials" (these big black
knobs in the center of the TECHNOX!). With the "PART/BANK" keys you can switch between ROM and
RAM performances. Each bank consists of 50 different performance sounds which are listed in the
appendix of this manual.
Don't care about the MIDI channel of your MIDI keyboard for the moment. Your "virginal" TECHNOX is
set by default to MIDI Omni-mode where it receives MIDI data on all 16 channels. But, don't confuse it
with the Sequencer-mode: it actually receives the SAME information on all 16 channels! If you want to
use the performance sounds in your sequencing environment, you just have to switch off the MIDI Omnimode. The informations of how to switch-off the Omni-mode and how to change the MIDI-channels are
described in chapter 14, pg. 27 ff. For the better understanding of the following chapters, and to get a
short overview over the different functions of the TECHNOX, you should read this - and the following page of the manual. The illustration shows you the front panel of the TECHNOX:
The TECHNOX
frontpanel
6
Page 7
2.b.) BASIC OPERATIONS
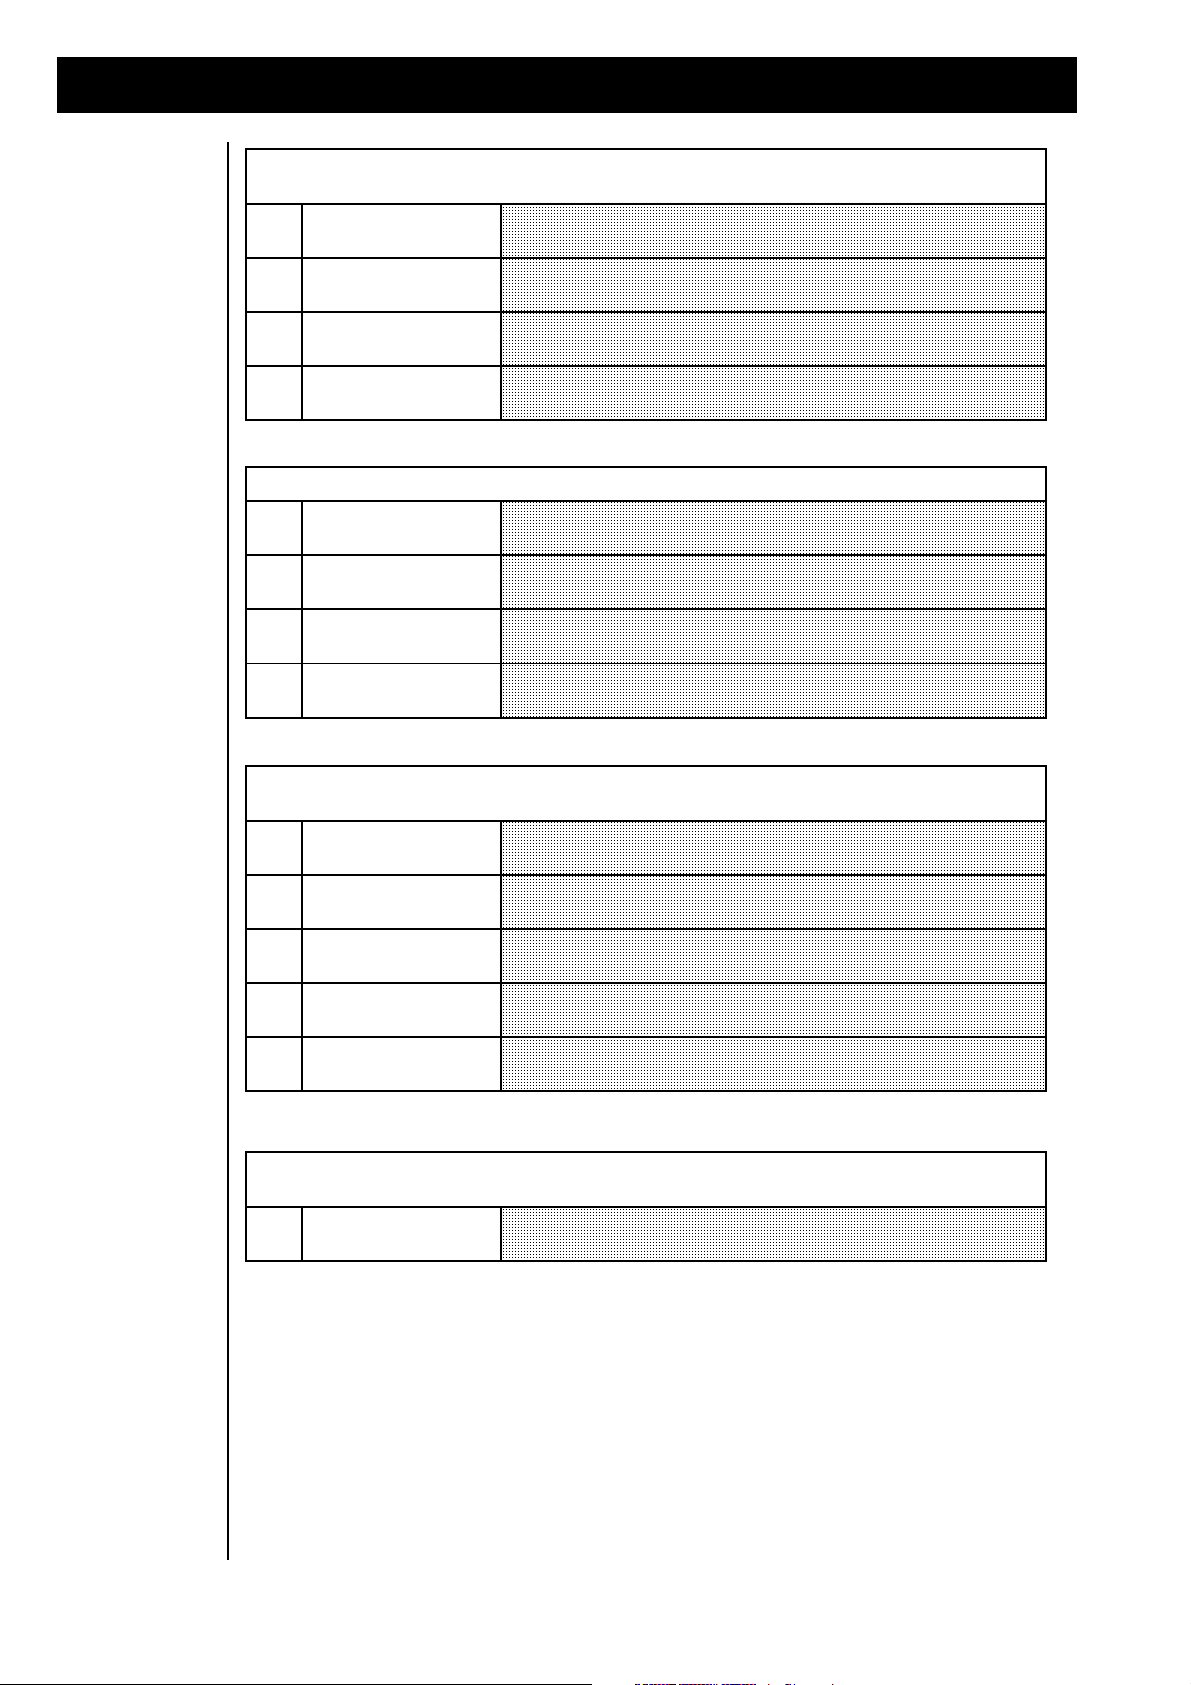
|1>
Page
22 ff
\Edit/Function
|1>\Edit Common
Here you find the parameters concerning the modulation matrix. Also the
performance-mode and the performance-overall-volume can be controlled within
this menu.
<2>
Page
09 ff
\Edit/Function
<2>\Edit\Part
The part-parameters can be edited in this menu-level. Part parameters alter the
sound characteristics of the selected single sound for this part. The changes can be
memorized in performance memories or sequencer-multi-setups.
<3>
Page
19 ff
\Edit/Function
<3>\Edit\Drums
Here in this menu one of the 8 possible drum-sets can be edited. Each of the drum
and percussion sounds can be edited individually by changing its volume,
pan-position and the FX1 and FX2 sends.
<4>
Page
12 ff
\Edit/Function
<4>\Edit\FX1
In this menu you'll find the different parameters for effect processor FX1. To hear
the parameter changes it is necessary that the FX1 send of the actual part is turned
on.
<5>
Page
15 ff
\Edit/Function
<5>\Edit\FX2
Same as "Edit FX1" menu - but for FX2. Make sure that FX2 send is turned on for
the selected part to hear the parameter changes.
<6>
Page
25 ff
\Edit/Function
<6>\Edit\Arpegg.
Here you'll find all the different parameters for the arpeggiator.
<7>
Page
27 ff
\Edit/Function
<7>\Edit\System
In this menu you get the global parameters for your TECHNOX, i.e. all parameter
changes have effect on all parts and performances simultaneously. Global
parameters are e.g. the global tuning, transpose and MIDI functions.
<8>
Page
26 ff
\Edit/Function
<8>\Write/Dump
Under this menu level you can store your edits, copy them or send SysEx bulks via
MIDI in order to archive your individual setups in your computer or MIDI data
recorder.
<9|
Page
29
\Edit/Function
<9|\Play\Demo...
Here you´ll find the TECHNOX demonstration song.
The "POWER" switch [1] is used to (guess!) turn your TECHNOX on. So, usually, you'll use it onceright in the beginning of your musical work. When using it for the second time, you'll obviously will hear
- nothing, because your TECHNOX is switched off.
The "PARAMETER/SOUNDGROUP" Alpha-dial [3] has two functions. When in sequencer mode (main
page), the soundgroups for the different parts may be selected with this dial; in the edit-mode you'll
change the different sound-parameters and menus.
The "VALUE/SOUND" Alpha-dial [4] is used for changing the single-sounds in the sequencer-mode, and
during sound-editing it is used for altering the values of the selected sound parameters.
You'll use the "EDIT/OK" key [8] to select the edit-mode, to change the edit level, and for the confirmation
of some questions you will be asked by the TECHNOX from time to time.
The "EXIT" [9] key is used to exit a selected menu in the edit-mode.
The "PART/BANK" keys [5] are used to select the different parts within the "Multi-Sequencer-Mode"
and for the selection of different performance banks in Performance-mode.
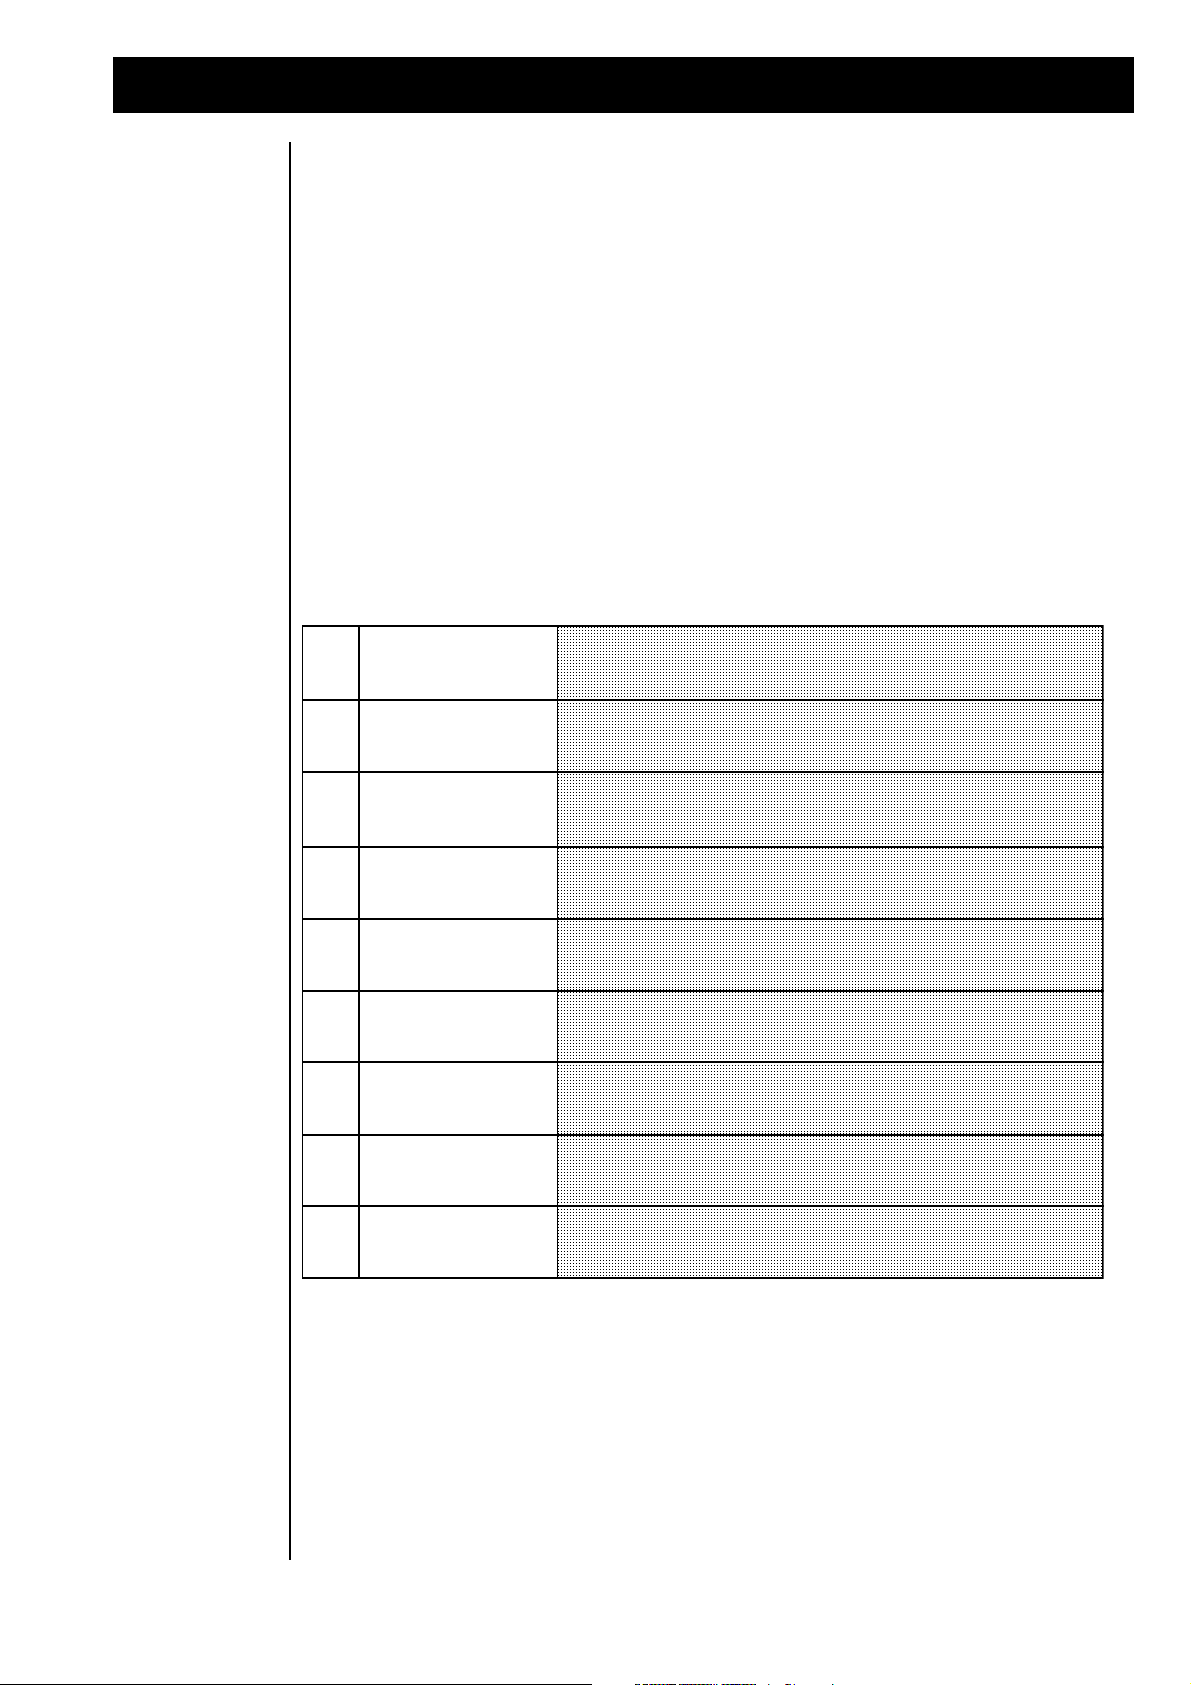
Now you'll get an overview over the different edit-levels of your TECHNOX. After pressing the "EDIT/OK"
key once, the different edit menus can be selected with the "PARAMETER/SOUNDGROUP" Alpha-dial.
The selection of the edit level has to be confirmed by pressing the "EDITOK" key once. The following
table gives you in the first row a reference to the page of this manual where the corresponding edit level
will be explained in detail. The TECHNOX offers you the following edit-menus:
7
Page 8
3.) PLAYING THE PERFORMANCES/4.) MODE CHANGEMENT
Performance-Sounds will be selected in the following way.
Both Alpha-Dials:
Select one performance between 0 - 50
"PART/BANK"-buttons:
Switch between Rom- and Ram-Bank.
3.) Playing the
Performances
We'll stop all this theoretical rubbish now. You shurely didn't buy your TECHNOX because you like
reading manuals so much, did you? You'd rather get some noise out of you new synth "boom box" like
all the other guys with those baseball caps. We'll first listen to some of the performance-sounds. With
the "VALUE/SOUND" dial you can select the different performances when you're in the main page. If you
are not sure about this point, try pressing the "EXIT" key several times. The TECHNOX will return
automatically to the main page. But you certainly won't hit this key during several hours (unlike you're
an "EXIT" key fetichist...); so - you've reached the main page when you get the following message on
the display:
T_e_c_h_n_o__x
ROM-02: BanaBass
* where the second line depends upon the selected performance sound.
Some of the performance sounds make use of the arpeggiator. If - by the way - your TECHNOX doesn't
play the stuff you play on your keyboard, there may be the slight possibility that the arpeggiator is turned
on. If you're hearing some strange sequencer-like things in the background you can be sure:
AH! That's the arpeggiator! And if these arpeggios give you a kind of 'lustful feeling', have a closer
look at page 25; there you'll find everything you need to know of how to increase these feelings... (Don't
bother - this manual is neither censored nor X-rated!)
Also, some performances use the pitch-bend and/or modulation wheel for the control of sound-parameters.
Therefore you should make heavy use of these wheels in order to hear those real-time sound-changes.
4.) Mode
4.) MODE
Changemant
CHANGEMENT
In the next chapters we want to learn everything about single- and drum-sounds. That's why we change
now from performance-mode to sequencer-multi-mode. Starting at the main page, we do the following:
1. Press the "EDIT/OK" key. Now you're in edit-level mode.
2. By using one of the two Alpha-dials you select the following display message:
Edit/Function
<7> Edit System
3. Confirm your selection with the "EDIT/OK" key.
4. If not already selected, use the "PARAMETER/SOUNDGROUP" dial to get to the first parameter
page. Here you'll get the following display message:
Edit System
|1> Mode:Perform
5. Use the "VALUE" dial to change to sequencer-multi-mode. MIDI-Omni-mode will be switched off
automatically.
6. Press the "EXIT" key to leave the edit menu. Your TECHNOX memorizes all your changements, even
after switching it off! Therefore, if you want to play the performance-sounds, you have to change to
performance-mode.
8
Page 9
5.) Playing the single-sounds/ 6.) playing the drums
Single-sounds will be selected in the following way:
"PARAMETER/SOUNDGROUP"Alpha-Dial:
The Single-sounds of the TECHNOX are divided into sound groups.
This makes it easier to find a specific sound.
"VALUE/SOUND"-Alpha-Dial:
With the second dial you can select a single-sound.
"PART/ BANK"-keys:
By pressing this key you select the part for which you want to change the
single-sound.
5.) Playing the
single-sounds
The mode-changement also caused a slight changement of the display message in the main page:
T_e_c_h_n_o__x
1:A001 _303Lead
As soon as the TECHNOX receives MIDI data, this will be displayed in the upper line of the LCD. The 16
MIDI channels on which the TECHNOX receives notes are represented by the 16 bars of the first display
line. When the TECHNOX receives note-data, the display changes from "TECHNOX" to a level-meterlike bargraph display, where the deflection of the different bars depends upon the velocity of the MIDIevents.
In this mode, TECHNOX receives MIDI data on all 16 MIDI channels. Please make sure that your MIDI
keyboard is sending out MIDI data on the appropriate MIDI channel. If you're working with a MIDI
sequencer, the MIDI channel has to be selected within the sequencer (either hard- or software sequencer).
To select your single sounds you have to know the MIDI channel for the corresponding part, where part
1 corresponds to MIDI channel 1, part 2 to MIDI channel 2, and so on.
You will see the actual part number on the lower line of the LCD display left beneath the sound number
of this part. If your keyboard or your sequencer is sending out data on MIDI channel 6, you should also
select part number 6 on the TECHNOX. You can select the part number with the "PART/BANK" keys.
The MIDI monitor will show you a star symbol (*) for the selected part in one of the 16 possible positions.
When the star symbol and the bargraph appear both on the same position on the display, thecorrect part
has been selected.
An exception is part #10 ( MIDI channel 10 respectivly). This channel is the "home part" of the drum-sets
of your TECHNOX. So you can't select single-sounds for this part. In the next section you'll learn how
to select and play your drum-sets from your MIDI machinery.
6.) Playing the
drum-sounds
Switch your MIDI keyboard (or sequencer) to MIDI send channel 10; then you'll be able to play the drumsets of the TECHNOX. Now change to part #10 by using the "PART/BANK" keys. The LCD will display the
name of the current drum-set instead of a single-sound. You can change the drum-set with the "VALUE/
SOUND" Alpha-dial. Even if it's possible to select a drum-set for any of the 16 parts, only on part 10 it is
assured that the drums are correctly tuned and that you have FX sends, pan and volume settings for each
of the drum instruments. User-defined drum-sets can be selectedonly on part #10.
Each MIDI note on your keyboard corresponds to a different drum-sound. You’ll find the appropriate
settings of the different drum-sets in chapter 22, pg. 44-48.
So - now you already know a lot about the manifold sound-capabilities of the TECHNOX. Of course they
may be edited in order to satisfy your musical needs. In the next sections you’ll get all the necessary
informations about sound-editing.
7.) Editing the
single-sounds
As already mentioned before, the TECHNOX offers you a total of 16 different parts, where part #10 is the
dedicated drum-set channel. But you can assign different instruments to all the other parts, and each
„part-sound“ may be edited to your taste. TECHNOX has no memories for edited single-sounds, but
combinations of part-edits may be stored in performance-memories or sequencer-multi-setups. This
allows you to use the same single-sound in different performances with different sound settings. The
editing of one single-sound in one performance has no effect on other performances; each performance
is unique, even if it may use the same single-sounds.
9
Page 10
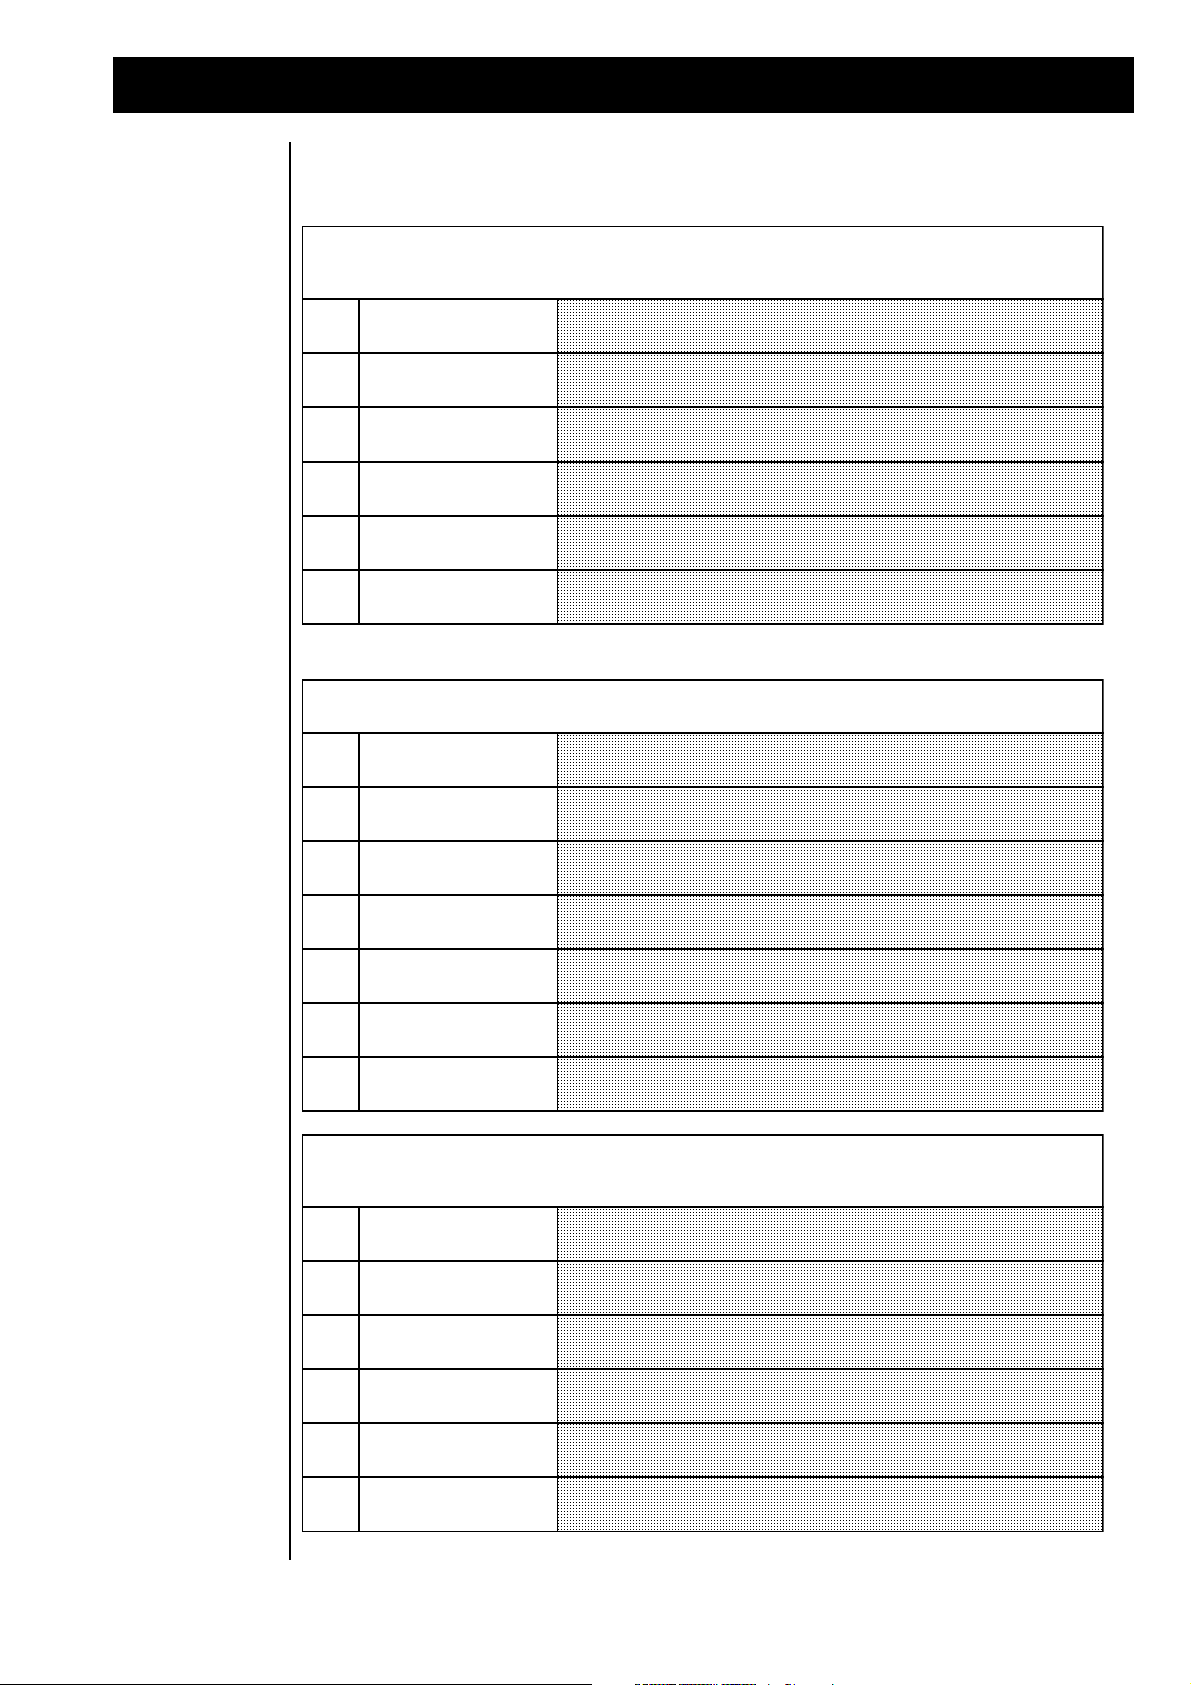
7.) Editing of the single-sounds
<1>
Part\13\SndGroup
|1>\SynthLead
To accelerate the search for a specific sound, all sounds are divided into groups.
With the “VALUE”-dial the groups can be selected.
<2>
Part\13\Sound
<2>\_303Lead
On the second parameter-page you can select the single-sounds directly. Reaching
the last sound of a group and going on automatically swaps to the next group.
<3>
Part\13\_303Lead
<3>\Mode:\\\\\On
With this parameter you decide how a sound is played. The both monophonic
modes allow the use of portamento. They simulate the single-trigger playing like
the old analog synth of former days. The envelopes are triggered only if the
previous key is released. The following modes are available:
Mode: OFF- the part is disabled
Mode ON- the selected part can be played polyphonic.
Mode: MONO- the part can be played only monophonic. The highest note has
priority when pressing more than one key.
Mode: LEAD- the part can be played only monophonic. The last note has priority
when pressing more than one key.
<4>
Part\13\_303Lead
<4>\Level:\\\127
With this parameter you can regulate the volume of the chosen part.
<5>
Part\13\_303Lead
<5>\Panorama:___
With this parameter the part can be placed in panorama. The different types and
effects of the panorama are shown later on this page.
<6>
Part\13\_303Lead
<6>\FX1-Send:\\0
The send-level of the part-signal that is sent to the effect processor 1 (FX1) can be
selected in this menu.
<7>
Part\13\_303Lead
<7>\FX2-Send:\63
The send-level of the part-signal that is sent to the effect processor 2 (FX2) can be
selected in this menu.
<8>
Part\13\_303Lead
<8>\CoarseT:\-12
Each part can be tuned individually. Here you can change the coarse-tune in
semi-tones.
<9>
Part\13\_303Lead
<9>\FineTune:\+0
Each part can be tuned individually. Here you can change the fine-tune e.g. for
detune-effects between two simultaneously playing parts to make a sound more
fat. Warm and full sounds are the result.
Here you see the different panorama-positions and effects, which Technox offers in the part-edit menu.
Panorama:---
At this value, the signal can only pass the output through the FX-processors.
Panorama:L<7-R>7
Different absolute positions are selectable between left and right.
Panorama:RND
Random-Panorama - every new note has another pan-position
Panorama:key\or\yek
The pan-position is controlled by the keynumber of the played note.
Panorama:dyn\or\nyd
The pan-position is controlled by the dynamics (Key-velocity)
Coming from the main-page you have to press the “EDIT/OK” key to enter the edit menu. By Using the
two alpha-dials you can reach the sub-menu to edit a part:
Edit/Function
<2> Edit Part
Press "Edit/OK" once more and the display changes to:
Part 1 SndGroup
|1> SynthLead
With the “Parameter/Soundgroup”-dial you may step through the following menu-pages. If you like to
listen to the changes immediately you first have to select the part corresponding to the send-channel of
your connected keyboard.
10
Page 11

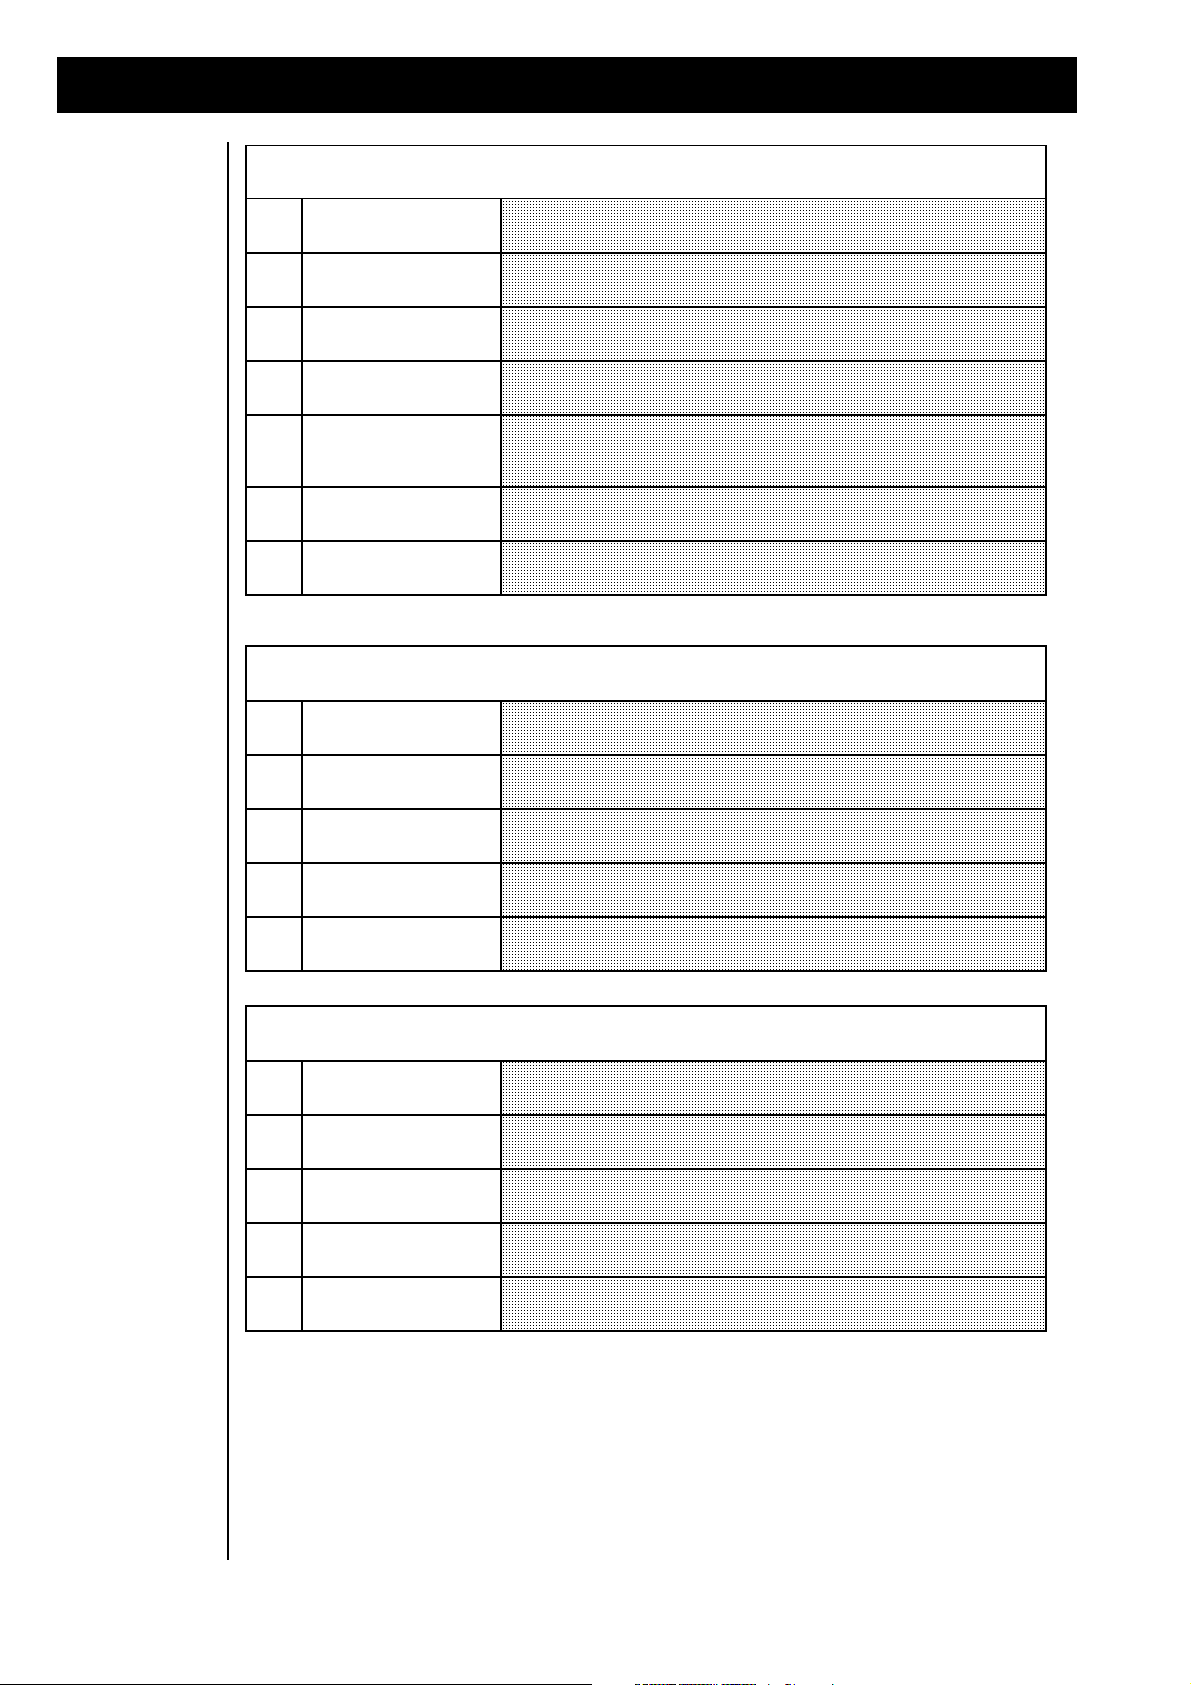
7.) Editing of the single-sounds
<10>
Part\13\_303Lead
<10>\CutFreq:\+0
This parameter controls the cutoff-frequency of the lowpass filter. Above this
point higher harmonics are cut off and below this frequency the harmonics can
pass. Real-time changes of this parameter should be done with a MIDI-controller
like the MOD-wheel of your keyboard because it is easier to handle than an alpha
dial. At TECHNOX the MOD-wheel is routed through the modulation matrix to
the tone-parameter by default. This controls the cut-off frequency directly.
<11>
Part\13\_303Lead
<11>\Resonan:\+0
This parameter controls the resonance of the filter, which means that the output of
the filter is fed back to the input of the filter. At high values the filter can reach
self-oscillation.
The following three parameters change the sound in time and are called envelope parameters. Percussive sounds have
short time periods, strings and pads have longer time periods. To change a time period like the attack-time to shorter
values you have to decrease the time to negative values based on the default value.
<12>
Part\13\_303Lead
<12>\EG\Att:\\+0
The rising-time of the envelope can be changed by this parameter.
<13>
Part\13\_303Lead
<13>\EG\Dec:\\+0
This parameter is responsible for the speed how fast the level goes down from
maximum amplitude to sustain-level.
<14>
Part\13\_303Lead
<14>\EG\Rel:\\+0
This parameter controls the release time of the sound after lifting the fingers from
the keys.
<15>
Part\13\_303Lead
<15>\VibDpth:\+0
The intensity of the vibrato (frequency modulation)
<16>
Part\13\_303Lead
<16>\VibRate:\+0
The speed of the Vibrato (frequency)
<17>
Part\13\_303Lead
<17>\VibDely:\+0
Here the delay time between pressing a key and beginning of the vibrato can be
selected.
Because in the modulation matrix itself only the destination-parameter can be selected and not the part, you can choose in
the following menus the modulation intensity for each part. For further information have a look at chapter 11,
"Common-menu", where the modulation-matrix is described.
<18>
Part\13\_303Lead
<18>\LfoMod:\\76
This parameter controls how strong the LFO of the selected part will be modulated
through the modulation matrix.
<19>
Part\13\_303Lead
<19>\VolMod:\+63
The amount of volume-changes for this part through the modulation-matrix can
be regulated with this parameter. The values can be negative or positive, so that
sound blending through MIDI-controllers etc. between various parts are possible.
<20>
Part\13\_303Lead
<20>\PtchSns:\+2
The amount of pitch-changes for this part by the modulation-matrix.
<21>
Part\13\_303Lead
<21>\ToneMod:+63
Also the amount of filter-modulation can be controlled for each part individually.
Most of the factory sounds are programmed with an almost open filter. So it makes
sense to choose a negative value for closing the filter with any modulation source.
<22>
Part\13\_303Lead
<22>\PorTime:\\0
Gliding in tune between two notes that are played after each other is called
portamento. The tuning of the first note changes to the tuning of the next pressed
note. The speed of this effect is controlled by this parameter.
<23>
Part\13\_303Lead
<23>\HoldPed:OFF
Here you can enable the MIDI hold-pedal function. When disabled, a pressed
hold-pedal of your connected keyboard causes no hold function on this part.
<24|
Part\13\_303Lead
<24|\VelCv:\Fix
With this parameter you may select a special velocity-curve for each part separate.
In the layer-performances with different curves on each used part it´s possible to
create cross-fades between sounds by using negative and positive curves for the
velocity.
11
Page 12
8.) Editing the effects
Room-simulation FX-1 Special-effects FX-2
1.) Room 1.) Chorus 1
2.) Small Room 2.) Chorus 2
3.) Warm Room 3.) Chorus 3
4.) Chamber 1 4.) Flanger 1
5.) Chamber 2 5.) Flanger 2
6.) Plate 1 6.) Phaser 1
7.) Plate 2 7.) Phaser 2
8.) Hall 8.) Panning
9.) Large Hall 9.) Short-Delay
10.) Cathedral 10.) Long-Delay
11.) Gated Reverb 1 11) HQ-Delay
12.) Gated Reverb 2 12.) Ping-Pong
13.) Gated Reverb 3 13.) Gated-Delay
14.) Early Reflection 1 14.) Special FX
15.) Early Reflection 2 15.) Equalizer 1
16.) Early Reflection 3 16.) Equalizer 2
17.) Early Reflection 4 17.) Wah Wah + Overdrive
18.) Raindrops 18.) Auto Wah Wah
19.) HQ-Delay 19) Warm Overdrive
20.) LongDelay 20) Distortion
21.) no Effect 21) no Effect
8.) Editing the
effects
TECHNOX offers two independent effect-processors with various algorithms. For each part the amount
of FX1 and FX2 can be changed by the effect sends. For editing the effects there are two main-menus: One
for all parameters of FX1 and the other for FX2. You can reach them by pressing the “EDIT/OK”-button
and using the “PARAMETER/SOUNDGROUP”-dial. The first parameter in both of the main-menus is
the type of effect. Each effect has different menu-pages depending on the algorithm you have chosen. The
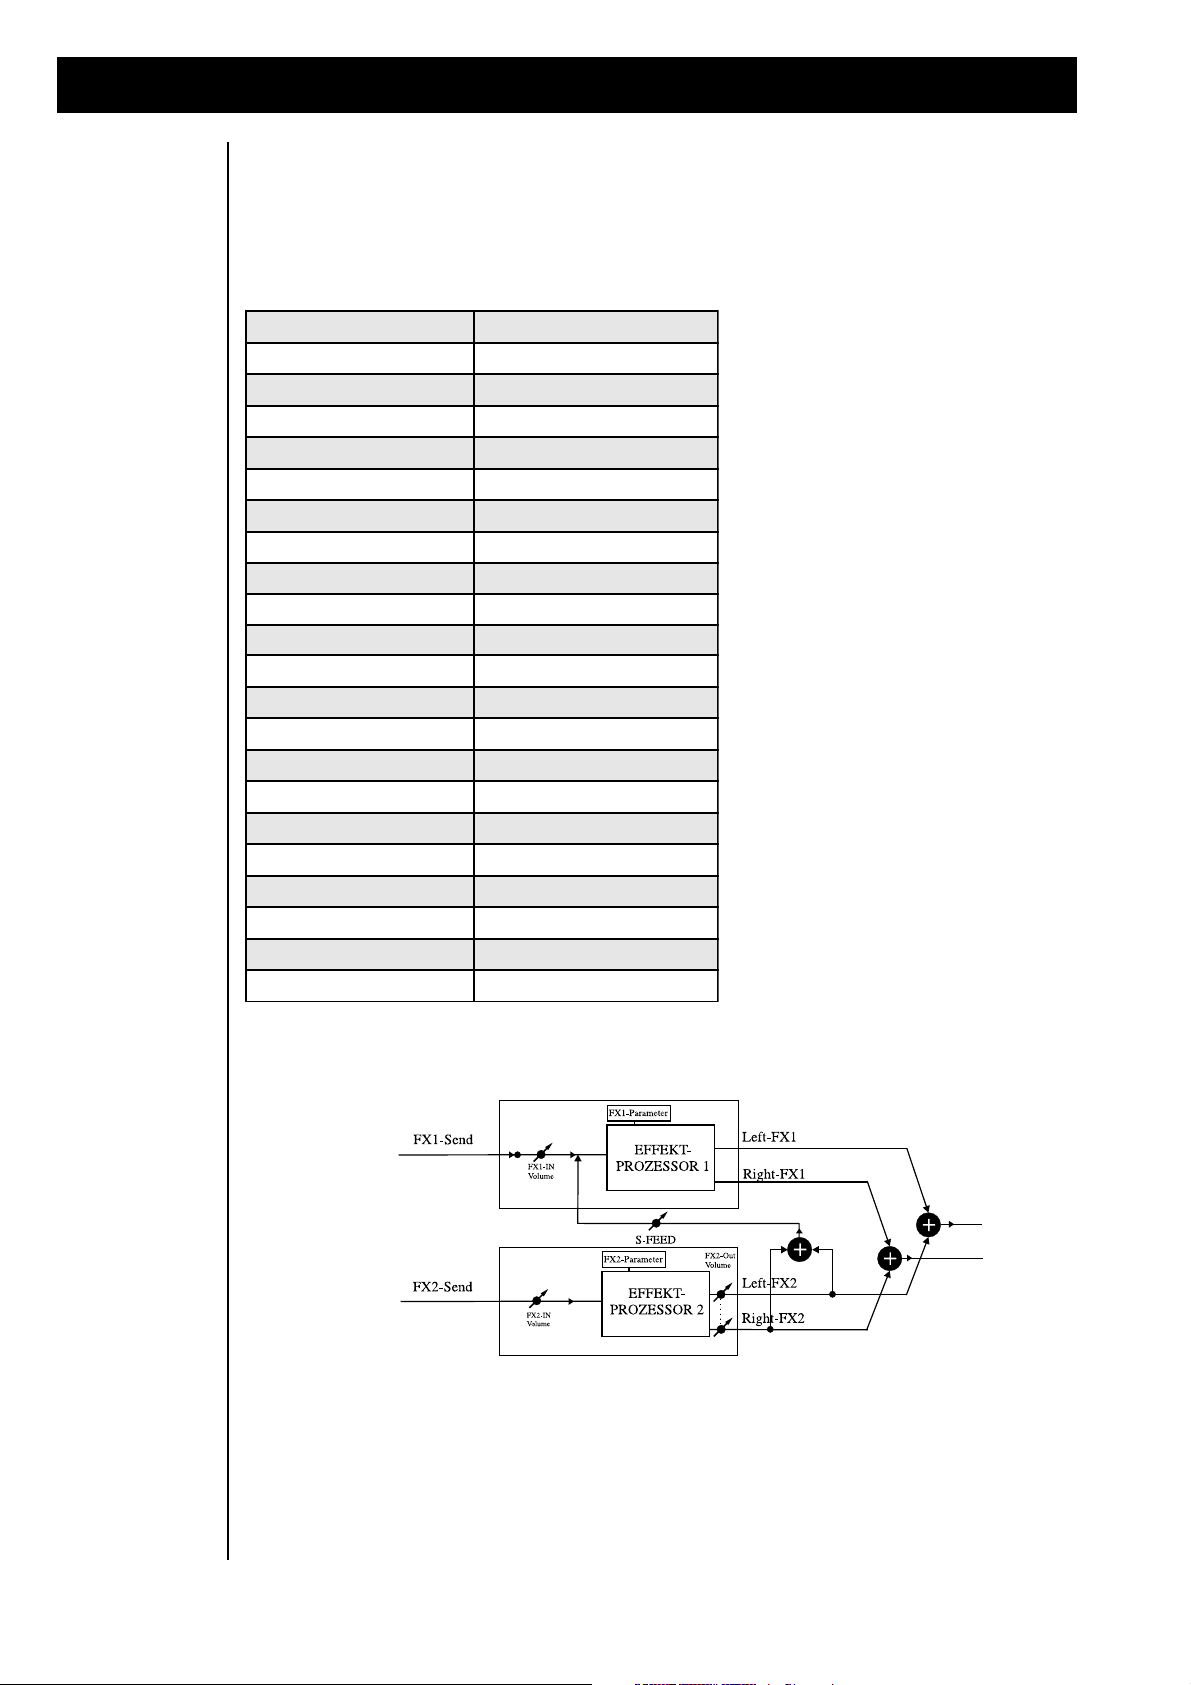
following table gives you an overview about all algorithms:
12
To understand how the two effect processors can influence each other, take a look at the following schematic:
Page 13

The first 10 algorithms are for reverb-effects. They vary in attenuation, level and repetitions of harmonics and time delay
times to simulate different room sizes. The parameter SFeed of this 10 reverbs are the same:
|1>
Edit\FX1\Typ
|1>\01:Room
here you can choose the type of reverb
<2>
Edit\FX1\Paramtr
<2>\InputLev:\+60
This parameter defines the input level. Take care that at least one part has the
effect send open. Otherwise you will hear no effect-signal.
<3>
Edit\FX1\Paramtr
<3>\SerFeed:\\38
This parameter controls the percentage of FX2 feed back to the input of FX1 (see
graphic on page 12.). This makes it possible to chain the two effect processors.
<4|
Edit\FX1\Paramtr
<4|\Decay:\\\\50
Here the decay-time of the reverb can be controlled
The gated reverb is a reverb that is cut off after an adjustable time.The time when this cut-off shall happen and the
threshold-level at which this gate closes, can be adjusted. This effect is superb for drum- and percussion sounds to simulate
grooving reverbs.
|1>
Edit\FX1\Typ
|1>\11:GatedRev1
Algorithm 11 - 13 offer the gated-reverb effects.
<2>
Edit\FX1\Paramtr
<2>\InputLev:\60
This parameter defines the input level. Take care that at least one part has the
effect send open. Otherwise you will hear no effect-signal.
<3>
Edit\FX1\Paramtr
<3>\SerFeed:\\\0
This parameter controls the percentage of FX2 feed back to the input of FX1 (see
graphic on page 12). This makes it possible to chain the two effect processors.
<4>
Edit\FX1\Paramtr
<4>\TrsHold:\\16
This parameter indicates at which incoming level the reverb will start. If the signal
falls below this level the selected hold-time starts and will cut off the reverb-signal
after the hold period has passed.
<5>
Edit\FX1\Paramtr
<5>\HoldTime:\\2
This parameter is responsible for the duration of reverb after falling below the
threshold-level.
<6>
Edit\FX1\Paramtr
<6>\Attack:\\\16
With the attack-rate the rise-time between closed and opened gate can be selected.
<7>
Edit\FX1\Paramtr
<7>\Release:\\30
Here you can select the closing time of the gate: from immediate to very slow fade
out.
8.) Editing the effects
You can see that the output of FX2 may be fed back to the input for FX1. This Serial-Feed connection is
located behind the input level adjustment of FX1. So the level of the FX1-input and the level of the serialfeed can be controlled independently from each other.
Now we start with explanation of FX1: Turn the “PARAMETER/SOUNDGROUP”-dial until you reach
the following sub menu of the edit-menu.:
Confirm with the “EDIT/OK”-key and you are at the start menu of effect-editing. In the tables coming up
you find in the first line an explanation of the algorithm and below the parameters that can be edited.
Reverb-Effekte
Edit/Function
<4> Edit FX1
Gated-ReverbEffekt
13
Page 14
These are reverb effects with an accent on early reflections.
|1>
Edit\FX1\Typ
|1>\14:EarlyRfl1
The effect-types 14-17 offer 4 different early reflection-programs.
<2>
Edit\FX1\Paramtr
<2>\InputLev:127
This parameter defines the input level. Take care that at least one part has the
effect send open. Otherwise you will hear no effect-signal.
<3>
Edit\FX1\Paramtr
<3>\SerFeed:\\\0
This parameter controls the percentage of FX2 feed-back to the input of FX1 (see
graphic on page 12). This makes it possible to chain the two effect processors.
<4|
Edit\FX1\Paramtr
<4|\Decay:\\\\50
Here the decay-time of the reverb can be controlled.
Creates an effect somewhere between Reverb and Echo
|1>
Edit\FX1\Typ
|1>\18:Raindrops
The algorithm 18 offers the raindrop-effect.
<2>
Edit\FX1\Paramtr
<2>\InputLev:\90
This parameter defines the input level. Take care that at least one part has the
effect-send open. Otherwise you will hear no effect-signal.
<3>
Edit\FX1\Paramtr
<3>\SerFeed:\\\0
This parameter controls the percentage of FX2 feed back to the input of FX1 (see
graphic on page 12). This makes it possible to chain the two effect processors.
<4|
Edit\FX1\Paramtr
<4|\Decay:\\\\50
This parameter controls how fast or slow the raindrop effect finishes.
The following effects represent Echo-effects. The HQ-Delay has a higher frequency bandwidth than the Long-delay, but
the Long-delay can produce longer delay times.
|1>
Edit\FX1\Typ
|1>\19:HQ-Delay
The algorithms 19 and 20 offer the echo-effects of FX1.
<2>
Edit\FX1\Paramtr
<2>\InputLev:\90
Here you can control the input volume.
<3>
Edit\FX1\Paramtr
<3>\SerFeed:\\\0
This parameter controls the percentage of FX2 feed-back to the input of FX1 (see
graphic on page 12). This makes it possible to chain the two effect processors.
<4>
Edit\FX1\Paramtr
<4>\Delay:\361ms
This parameter controls the delay time. The delay time is the time between single
echoes.
<5|
Edit\FX1\Paramtr
<5|\Feedback:\64
This parameter indicates how often an echo will be repeated.
The algorithm 21 is especially made for having no effect FX1 on the parts, without turning the effect sends to zero.
|1>
Edit\FX1\Typ
|1>\21:noEffect
Effect 21 offers the "no effect"-algorithm
8.) Effekt-Editierung
Early-ReflectionEffekt
Raindrops
Delay-Effekte
No Effect
14
Page 15
8.) Editing the effects
Chorus produces a short modulated delay. The sound becomes warmer and therefore it is superb for pad-sounds and
brilliant percussive sounds. For better results, mute the original signal from the main output by setting the pan-position of
the part to "pan:---".
|1>
Edit\FX2\Typ
|1>\01:Chorus1
The algorithms 1-3 offer the chorus-effects of FX2.
<2>
Edit\FX2\Paramtr
<2>\InputLev:\80
This parameter defines the input level. Take care that at least one part has the
effect-send open. Otherwise you will hear no effect-signal.
<3>
Edit\FX2\Paramtr
<3>\Depth:\\\100
This parameter controls the intensity of the chorus effect
<4>
Edit\FX2\Paramtr
<4>\Rate:\\\\\\8
This parameter controls the speed of the chorus effect.
<5>
Edit\FX2\Paramtr
<5>\Center:\\\16
Sets the average delay time.
<7|
Edit\FX2\Paramtr
<7|\OutputLv:\64
This parameter controls the output-level of the chorus effect.
Flanger-effects produce a similar modulation. In addition, a feedback gives more possibilities and extreme sounds. Like
the chorus effect it is mostly useful to avoid the original signal in the sum. (Pan:---)
|1>
Edit\FX2\Typ
|1>\04:Flanger1
The algorithms 4-5 offer the flanger-effects of FX2.
<2>
Edit\FX2\Paramtr
<2>\InputLev:\80
This parameter defines the input level. Take care that at least one part has the
effect-send open. Otherwise you will hear no effect-signal.
<3>
Edit\FX2\Paramtr
<3>\Depth:\\\100
This parameter controls the intensity of the flanger effect.
<4>
Edit\FX2\Paramtr
<4>\Rate:\\\\\\8
This parameter controls the speed of the flanger effect.
<5>
Edit\FX2\Paramtr
<5>\Center:\\\16
Sets the average delay time.
<6>
Edit\FX2\Paramtr
<6>\Feedback:\90
The amount of signal, which is fed back from FX2 output to the FX2 input. At
high amounts the typical Jet-flanger sounds occur.
<7|
Edit\FX2\Paramtr
<7|\OutputLv:\64
This parameter controls the output-level of the flanger effect.
Phaser effects produce level changes for different frequencies at once by phase shifting. The amount of phase shift can be
modulated, so a moving multi notch filter is generated. When setting the rate to zero, the phase shift can be adjusted
manually with “Centr.”-parameter.
|1>
Edit\FX2\Typ
|1>\06:Phaser1
The algorithms 6-7 offer the phaser-effects of FX2.
<2>
Edit\FX2\Paramtr
<2>\InputLev:\\90
This parameter defines the input level. Take care that at least one part has the
effect-send open. Otherwise you will hear no effect-signal.
<3>
Edit\FX2\Paramtr
<3>\Depth:\\\\127
This parameter controls the intensity of the phaser effect.
<4>
Edit\FX2\Paramtr
<4>\Rate:\\\\\\4
This parameter controls the speed of the phaser effect.
<5>
Edit\FX2\Paramtr
<5>\Center:\\\\34
When setting the rate to zero, the phase-shift can be adjusted manually with
"center".
<6>
Edit\FX2\Paramtr
<6|\OutputLev:\64
Adjust here the output-level.
Next are the effects of processor FX2. You will find them in the “EDIT FX2”-menu.
Chorus-Effekte
Flanger-Effekte
Phaser-Effekte
15
Page 16
The following effect lets the signal position move in the stereo panorama. This Effect is useful for background sequences.
For this effect, it is most important that the instrument is not fed directly into the stereo-sum (Pan:—)
|1>
Edit\FX2\Typ
|1>\08:Panning
Effect algorithm 8 offers the panning effect.
<2>
Edit\FX2\Paramtr
<2>\InputLev:\80
This parameter controls the input volume of the panning effect.
<3>
Edit\FX2\Paramtr
<3>\Depth:\\\127
With this parameter you set the amount of movement in the stereo panorama.
<4>
Edit\FX2\Paramtr
<4>\Rate:\\\\\40
This parameter controls the speed of movement in panorama.
<5>
Edit\FX2\Paramtr
<5>\Phase:\\\\80
Changes the phase offset between left and right. With value 127, right is loud
when left is soft and vice versa. Phase 0 means synchronously volume changing
(=Tremolo).
<6>
Edit\FX2\Paramtr
<6>\ManPan:\\\64
Here you can change the panorama position manually.
<7|
Edit\FX2\Paramtr
<7|\OutputLv:\64
This is the output volume of the effect.
The following 3 effect types offer echo effects. The HQ-delay has a better bandwidth than the Long-delay. On the other
hand, you can use Long-delay for longer echo times.
|1>
Edit\FX2\Typ
|1>\09:ShortDely
Effects 9 to 11 are the echo effects of FX-2 processor.
<2>
Edit\FX2\Paramtr
<2>\InputLev:\90
Here you can control the input volume.
<3>
Edit\FX2\Paramtr
<3>\Delay:\229ms
This parameter controls the delay time. The delay time is the time between single
echoes.
<4>
Edit\FX2\Paramtr
<4>\Feedback:\64
The intensity of echo repetitions.
<5|
Edit\FX2\Paramtr
<5|\OutputLv:\64
Output level of the effect.
The following effect type produces a so-called ping-pong echo. This means that the echo jumps from the right output to
the left and so on.
|1>
Edit\FX2\Typ
|1>\12:Ping-Pong
Ping-Pong echo is algorithm number 12.
<2>
Edit\FX2\Paramtr
<2>\InputLev:\90
Here you set the input volume.
<3>
Edit\FX2\Paramtr
<3>\Delay:\229ms
This parameter controls the delay time. The delay time is the time between single
echoes.
<4>
Edit\FX2\Paramtr
<4>\Feedback:\64
The intensity of echo repetitions.
<5|
Edit\FX2\Paramtr
<5|\OutputLv:\64
Output level of the effect.
8.) Editing the effects
Auto-PanningEffect
Delay-Effects
Ping-Pong-Echo
16
Page 17

Gated Delay is only audible when fed with sufficient input level because the gate is closed during silent passages. The
attack time for opening and closing the gate can be changed individually (see above in FX-1 gated reverb).
|1>
Edit\FX2\Typ
|1>\13:GatedDely
Effect No. 13 offers a Gated-Delay-Effect.
<2>
Edit\FX2\Paramtr
<2>\InputLev:\50
This Parameter controls the Input-Level of the Effect-Processor.
<3>
Edit\FX2\Paramtr
<3>\Delay:\691ms
The Delay-Time of the Effect can be controlled here (in milliseconds).
<4>
Edit\FX2\Paramtr
<4>\Feedback:\50
The Feedback-Parameter controls the repetition of the Echoes. At extreme
adjustments of the feedback-parameter the Delay gets into self-oscillation, because
the Echo-Signal is repeated infinitely and the level does not fall down.
<5>
Edit\FX2\Paramtr
<5>\TrsHold:\\\5
This controls the minimum input level that opens the gate.
<6>
Edit\FX2\Paramtr
<6>\HoldTime:\10
Sets the minimum time after reaching the Threshold level before the gate reacts.
<7>
Edit\FX2\Paramtr
<7>\Attack:\\\16
Adjusts the opening speed of the gate.
<8>
Edit\FX2\Paramtr
<8>\Release:\\10
Adjusts the closing speed of the gate.
<9>
Edit\FX2\Paramtr
<9|\OutputLv:\64
Output level of the effect.
This effect is especially for experimental FX-Users. It offers a wide range of modulated stereo delays. You can create a
wide range of different flanging-, chorus- and special-effects.
|1>
Edit\FX2\Typ
|1>\14:SpecialFx\
Effect No. 14 offers the special-effect
<2>
Edit\FX2\Paramtr
<2>\InputLev:\64\
This Parameter controls the Input-Level of the Effect-Processor.
<3>
Edit\FX2\Paramtr
<3>\Depth:\\\120
Controls the intensity of the delay-time modulation.
<4>
Edit\FX2\Paramtr
<4>\Rate:\\\\\30
Adjusts the speed of the delay-time modulation.
<5>
Edit\FX2\Paramtr
<5>\Delay:\\\2ms
Sets the average delay-time (in milliseconds).
<6>
Edit\FX2\Paramtr
<6>\Feedback:120
Controls the amount of echo repetitions. This can lead up to self oscillation.
<7|
Edit\FX2\Paramtr
<7|\OutputLv:127
Output level of the effect.
8.) Editing the effects
Gated-Delay
Special-FX
17
Page 18

8.) Editing the effects
The equalizer is an effective tool for sound enhancement, because you can change the sound spectrum for different
frequenzies individually.
|1>
Edit\FX2\Typ
|1>\15:Equalizer
The Effects No. 15 and 16 are two different Equalizers.
<2>
Edit\FX2\Paramtr
<2>\InputLev:\64
This Parameter controls the Input-Level of the Effect-Processor.
The equalizer algorithms of the technox offer graphical EQ´s. With this kind of EQ´s you can adjust different frequency
bands of the audio signal. The first equalizer offers the frequencies of 100 Hz, 500 Hz and 3kHz. The second equalizer
offers the frequencies of 70 Hz, 300 Hz and 3kHz. To hear only the post EQ-Signal of an instrument, you have to switch
the pan-position of the selected part to "---".
<3>
Edit\FX2\Paramtr
<3>\100\Hz:\\\+0
Rises or lowers the spectrum of the first frequency.
<4>
Edit\FX2\Paramtr
<4>\500\Hz:\\\+0
Rises or lowers the spectrum of the second frequency.
<5>
Edit\FX2\Paramtr
<5>\3000\Hz:\\+0
Rises or lowers the frequency of the third frequency
<6|
Edit\FX2\Paramtr
<6|\OutputLv:127
Output level of the effect.
Although the Wah-Wah effect had a strong influence on contemporary music for a couple of years, it is seldomly used
nowadays. It combines a resonant sweepable filter with overdrive.
|1>
Edit\FX2\Typ
|1>\17:WahWah+Ov
Effect No. 17 is a Wah-Wah-Effect combined with Overdrive
<2>
Edit\FX2\Paramtr
<2>\InputLev:\80
This Parameter controls the Input-Level of the Effect-Processor. The strength of
the overdrive parameter is also influenced by these input-level.
<3>
Edit\FX2\Paramtr
<3>\Freqncy:\\64
Controls the Cutoff frequency of the filter. This is most useful for MIDI control of
the effect.
<4>
Edit\FX2\Paramtr
<4>\Drive:\\\100
Adjusts the Overdrive effect.
<5>
Edit\FX2\Paramtr
<5>\ClipLev:\100
Sets the clip-level for the overdrive.
<6>
Edit\FX2\Paramtr
<6|\OutputLv:127
Adjusts the overall level. It is recommended to use relatively high input level and
low output level, in order to make the overdrive respond properly.
Similar to the preceding effect, but the cutoff frequency can not be adjusted manually. It is controlled through the input
level, in other words: from the sound’s volume envelope. Mainly percussive sounds should be used with it, therefore. The
parameters are the same as in WahWah+Overdrive. Only Freq is not available.
|1>
Edit\FX2\Typ
|1>\18:AutoWahWa
Effect No.18 offers a wahwah-Effect.
These effects produce distortion and overdrive. Distortion has an additional gain switch for hard&heavy sounds.
|1>
Edit\FX2\Typ
|1>\20:Distortn
The Effects 19 and 20 offer Distortion-Algorithms.
<2>
Edit\FX2\Paramtr
<2>\InputLev:\64\
As nearly everybody knows, the input level/gain of an overdrive adjusts the
amount of distortion effect.
<3>
Edit\FX2\Paramtr
<3>\Drive:\\\\\4
This parameter (only available for distortion) sets the pre-gain.
<4|
Edit\FX2\Paramtr
<4|\OutputLv:\64
For adjusting the volume in comparison to “dry” sounds, you should adjust this
parameter.
Equalizer
Wah-Wah-Effect
Auto-Wah-Wah
Distortion/
Overdrive
18
Page 19

The following effect doesn’t produce its own effect-sound, it only mutes FX-2. You can use this for modulating the
Input-Level of FX-1. So you can, for example, modulate the intensity of a Reverb-Sound. To use this feature, make sure
that the SFeed parameter of FX-1 has a value greater than 0.
|1>
Edit\FX2\Typ
|1|\21:no\Effect
Effect No. 21 gives “No Effect”.
8.) editing the effects/ Editing the drumsets
Function User action/
(Keys/ Dials)
Display-Message
Select the drumpart. Select Part 10 with the “PART/
BANK” keys.
\T_e_c_h_n_o__x
10:DS25\AnlogSet
Select the drumset. Select the drumset you want with
one of the two Alpha-Dials
\T_e_c_h_n_o__x
10:DS22\Vintage2
Select the Edit-Menu Press "EDIT/OK" key.
\Edit/Function
Select the "Edit-drums" menu. You can reach this menu with one of
the two Alpha-Dials.
\Edit/Function
<3>\Edit\Drums
Confirm selection Press "EDIT/OK" key.
D#0:\AnlgCymb
|1>\Level:\\\110
You have 5 different pages to edit the drumsets. The drum-instrument you want to change can be selected with the
“PART/BANK” key. On the right top of the display you will see the note-number of the selected drum-instrument.
|1>
D#0:\ResoHard
|1>\Level:\\110
The Volume of the selected instrument (0-127) is adjusted here
<2>
D#0:\ResoHard
<2>\Pitch:\\\+0
This parameter controls the pitch of the drum-instrument (-24 - +24)
<3>
D#0:\ResoHard
<3>\Panorama:>c<\
Here you can adjust the position in the Stereo-Panorama. By chosing the "RND"
value, you create drums, flying around you.
<4>
D#0:\ResoHard
<4>\FX1-Send:\63
This parameter controls the FX-1 send.
<5|
D#0:\ResoHard
<5|\FX-Send:\\\0
This parameter controls the FX-2 send.
No Effect
The Parameters of FX-1 and FX-2 can be stored in a Performance or in a Multi-Setup
9.) Editing the
Drumsets:
Technox has got 24 preprogrammed ROM-Drumsets and 8 User-Drumsets. In this 8 Sets you can store the
changes you made to a ROM-Drumset. To make this you first have to edit one of the ROM-Drumsets.
19
Page 20

9.) Editing the drums/ 10.) Editing the performances
Function User action
(Dials/ keys)
Display-Message
Leave the Edit-Drums-Menu Press the “EXIT”-key
\Edit/Function
<3>\Edit\Drums
Select the Write/Dump-Menu You can select it with one of the
both Alpha-Dials
\Edit/Function
<8>\Write/Dump..
Confirm this menu. Press the “EDIT/OK”- key.
|1>\Write\Setup?
Yes<OK>\No<EXIT>
Select the “Write Drums”-Menu It’s selectable with the Alpha-Dials.
<3>\Write\Drums?
Yes<OK>\No<EXIT>
Confirm this menu. Press the “EDIT/OK”- key.
Name:\Vintage2
Yes<OK>\No<EXIT>
Name the new drumset. You can move to the single letters
with the “PARAMETER/
SOUNDGROUP” - or the
“PART/BANK”-Keys. The letter
can be changed with the “VALUE/
SOUND”-Dial.
Name:\NewSet1
Yes<OK>\No<EXIT>
Confirm the new drumset. Press the “EDIT/OK”-key.
\to\25\<UserSet1>
Yes<OK>\No<EXIT>
Select one of the 8 User-Drumsets
where you want to store yours.
It can be selected with the “VALUE/
SOUND”-Dial
\to\26\<UserSet2>
Yes<OK>\No<EXIT>
Start the saving procedure. Press the “EDIT/OK”-key.
Overwr\AnalogSet?
Yes<OK>\No<EXIT>
Save the Drumset. Press the “EDIT/OK”-key again.
<3>\Write\Drums?
\\\\\\\\\\\ok!
Leave the Edit-Menus. Press the “EXIT”-key twice.
\T_e_c_h_n_o__x
10:DS25\NewSet1
9.a.) Storing of
drumsets
The edited drumset can be stored as follow:
10.) Editing the
performances
At the beginning of this manual you learned about how to use the performances. You can easily create your
own Performances. To do this you first have to switch the TECHNOX to Performance-Mode.
1. ) At first, press the “EDIT/OK”-key to get to the selection of the different Edit-Menus
2.) With one of both Alpha-Dials you can select the following Display-Message:
3.) Confirm this menu with the “EDIT/OK”-key.
4.) Select the following page with one Alpha-Dial
Edit/Function
<7> Edit System
Edit System
|1> Mode:Sequenc
20
Page 21

PERFORMANCE-EDITING/STORING A PERFORMANCE
Because the TECHNOX is capable of storing several different parameter changes from different edit-menus, it’s useful to
list all parameters here for a second time. We also give you a reference to the corresponding sections in the manual where
you can find a detailed description of these parameters. For each performance the following parameters can be memorized:
1
The total amount of single-sounds to be used by a performance (Single, Layer 1 to Layer 4) and the main volume
of this performance. (see „Common Menu“, pg. 22 ff.)
2
All effect parameters of the performance (see „Effect editing“, pg. 12 ff.)
3
All part-parameters for part #13 to #16. These parts are used by a performance. (see „Single-Sound-Editing“, pg.
9 ff.)
4
Arpeggiator parameters. (see „Editing the arpeggiator“, pg. 25 ff.)
5
Settings within the „Common Menu“. In this menu it is possible to route the different MIDI controllers such as
Modulation, Pitch bend, Aftertouch as well as a user-defined MIDI controller to the different sound parameters.
(see „Common Parameters“, pg. 22 ff.)
Function User action /
(Keys/Dials)
Display-Message
Select „Write/Dump“ menu. 1.) Press „EDIT/OK“ key.
2.) Use one of the two Alpha-dials to
select the „Write/Dump“ menu.
\Edit/Function
<8>\Write/Dump..
Activate sub-menu „Write
performance“.
1.) Press „EDIT/OK“ key.
2.) Use „PARAMETER/
SOUNDGROUP“ dial to select the
„Write performance“ sub-menu.
|1>\Write\Perf.?
Yes<OK>\No<EXIT>
Start saving performance. Press „EDIT/OK“ key.
Name:\Slidox
Yes<OK>\No<EXIT>
Enter new name. Move cursor with
„PARAMETER/SOUNDGROUP“
dial; select letter with
„VALUE/SOUND“ dial.
Name:\My_Perf
Yes<OK>\No<EXIT>
Confirm new name and select
memory position where the
performance shall be stored.
Press „EDIT/OK“ key and select
memory position with
„VALUE/SOUND“ dial.
to\22\<Soloist•>
Yes<OK>\No<EXIT>
Complete storage of the
performance.
Press „EDIT/OK“ key
Overwr\Soloist•?
Yes<OK>\No<EXIT>
Overwrite old performance. Press „EDIT/OK“ key
|1>\Write\Perf.?
\\\\\\\\\\ok!
Quit „Write/Dump“ menu. Press „EXIT“ key until the main
page is displayed
\T_e_c_h_n_o__x
RAM-22:\MyPerf
5.) Use the „VALUE/SOUND“ dial to select performance-mode.
Edit System
|1> Mode:Perform
6.) After the termination of steps 1 to 5, the Edit-System-Menu can be quitted.
(Texte Tabelle 1/21)
10.a.) Storing a
After finishing performance editing, the performance will be saved like follows:
performance
21
Page 22

11.) The Common-menu
Function User action/
(Keys/Dials)
Display-Message
Selection of edit level. Press "EDIT/OK"-key.
\Edit/Function
Selection of "Edit-Common" menu. Use one of the two Alpha-dials for
the selection.
\Edit/Function
|1>\Edit\Common
Confirm selection. Press "EDIT/OK"-key.
\Edit\Common
|1>\FootCtrl:\67
|1>
\\Edit\Common
|1>\FootCtrl:\50
The footswitch, which may be connected to your TECHNOX, can be routed to a
MIDI controller. Here you can select the controller number, which shall be
controlled by the footswitch. If this controller number is identical to the MIDI
controller that you have defined as a free controller (see below), it’s possible to
route the footswitch to several TECHNOX parameters by using its modulation
matrix.
<2>
\\Edit\Common
<2>\FootOn:\\\\2
It’s only possible to connect real ‘switches’ to TECHNOX, and no other pedals
like volume controls. In this menu you determine which value will be sent when
the footswitch is pressed.
<3>
\\Edit\Common
<3>\FootOff:\\\0
Here in this menu the appropriate value for „footswitch depressed“ may be
entered.
<4>
\\Edit\Common
<4>\FootTog:\\On
In this menu you can decide if the connected footswitch behaves like a regular
„switch“ or not (Toggle mode). If the value is set to „On“, the TECHNOX will
toggle between the values for „FootOn“ and „FootOff“ each time the footswitch is
pressed; if set to „Off“, the footswitch behaves like a regular „pedal“.
<5>
\\Edit\Common
<5>\FreeCtrl:\50
Your TECHNOX already makes use of the most common MIDI controllers for its
modulation matrix. In this menu you can enter a „free“ MIDI controller number
for controlling a sound parameter. Many MIDI keyboards offer the possibility of
sending out different MIDI controllers other than just modulation or volume.
You’d best have a look at the manual of your MIDI keyboard to find out if it is
capable of generating such MIDI data (for example with a joystick).
11.) The CommonMenu
The Common-Menu is important for the Sequencer-Multi-Mode as well as for the Performance-Mode.
Whenever you want to make sound changes in real-time, you first have to go through the different functions
of this menu. But don’t bother - you won’t have to step through hundreds of different pages just to change
one little parameter. It’s as easy as this:
You will find the following parameters in the Common-Menu:
1.) Assignment of the footswitch-control function
2.) Assignment of the MIDI controllers such as Modulation, Pitch bend, etc. to the different sound parameters,
so that you can control your sounds directly from your MIDI keyboard by using its wheels (or the joystick
- depending on which model you currently use).
3.) Assign of the „Free MIDI controller“ to one sound parameter.
4.) Selection of a performance play mode and adjustment of the performance volume.
The Common-Menu will be activated as follows:
footpedal-control
free-controllerselection
The Common-Menu offers you the following parameters:
22
On the following menu pages you find the parameters of the controller matrix.Here you can select if, e.g.
the filter cutoff of one of TECHNOX’ instruments can be controlled by your mod wheel. But there are
some things to take care about when modulating part parameters:
Each part may be controlled individually by the modulation matrix. Some parameters offer even a positive
or negative control of this parameter. So, by using the same MIDI controller, a change of the controller
value may affect different parts in different ways. Take for example a Layer-2-performance that uses two
parts simultaneously. If you set the volume control for the first part to a positive value and the volume
control for the second part to a negative value, a cross-fade effect between the two sounds can be achieved
when you route your MIDI controller to volume control of both parts.
So you see that it’s worth having a closer look at the functions of the modulation matrix.
Page 23

11.) The Common-menu
<6>
\\Edit\Common
<6>\Mod>Lfo:\\26
Intensity of influence on the LFO by mod wheel.
<7>
\\Edit\Common
<7>\Mod>Vol:\\\0
Intensity of influence on the part volume by mod wheel.
<8>
\\Edit\Common
<8>\Mod>Pit:\\\0
Intensity of influence on pitch change by mod wheel.
<9>
\\Edit\Common
<9>\Mod>Cut:\\63
Intensity of influence on the cutoff frequency by mod wheel.
<10>
\\Edit\Common
<10>\Mod>Fx2:\+0
Intensity of influence on the real-time adjustable parameter of FX-2 by mod
wheel.
<11>
\\Edit\Common
<11>\Mod>Arp:\+0
Intensity of influence of the gate time of the arpeggiator by mod wheel.
<12>
\\Edit\Common
<12>\Tch>Lfo:\\0
Intensity of influence on the LFO by aftertouch.
<13>
\\Edit\Common
<13>\Tch>Vol:\\0
Intensity of influence on the part volume by aftertouch.
<14>
\\Edit\Common
<14>\Tch>Pit:\\0
Intensity of influence on pitch change by aftertouch.
<15>
\\Edit\Common
<15>\Tch>Cut:\\0
Intensity of influence on the cutoff frequency by aftertouch.
<16>
\\Edit\Common
<16>\Tch>Fx2:\+0
Intensity of influence on the real-time adjustable parameter of FX-2 by aftertouch.
<17>
\\Edit\Common
<17>\Tch>Arp:\+0
Intensity of influence of the gate time of the arpeggiator by aftertouch.
<18>
\\Edit\Common
<18>\Bnd>Lfo:\0
Intensity of influence on the LFO by pitch-bend wheel.
<19>
\\Edit\Common
<19>\Bnd>Vol:\\0
Intensity of influence on the part volume by pitch-bend wheel.
<20>
\\Edit\Common
<20>\Bnd>Pit:\\0
Intensity of influence on pitch change by pitch-bend wheel.
<21>
\\Edit\Common
<21>\Bnd>Cut:\\0
Intensity of influence on the cutoff frequency by pitch-bend wheel.
<22>
\\Edit\Common
<22>\Bnd>Fx2:\+0
Intensity of influence on the real-time adjustable parameter of FX-2 by pitch-bend
wheel.
<23>
\\Edit\Common
<23>\Bnd>Arp:\+0
Intensity of influence of the gate time of the arpeggiator by pitch-bend wheel.
<24>
\\Edit\Common
<24>\FrC>Lfo:\\0
Intensity of influence on the LFO by free controller.
<25>
\Edit\Common
<25>\FrC>Vol:\\0
Intensity of influence on the part volume by free controller.
<26>
\\Edit\Common
<26>\FrC>Pit:\\0
Intensity of influence on pitch change by free controller.
<27>
\\Edit\Common
<27>\FrC>Cut:\\0
Intensity of influence on the cutoff frequency by free controller.
<28>
\\Edit\Common
<28>\FrC>Fx2:\+0
Intensity of influence on the real-time adjustable parameter of FX-2 by free
controller.
<29>
\\Edit\Common
<29>\FrC>Arp:\+0
Intensity of influence of the gate time of the arpeggiator by free controller.
For all assignable MIDI controllers the menu sequence is the same. Here’s now a list of all pages in order
of their appearance:
modulation
source:
modulation wheel
modulation
source:
aftertouch
modulation
source:
pitch-bend wheel
modulation
source:
free-controller
23
Page 24

11.) The common-menu
<30>
\\Edit\Common
<30>\Mode:Single
Up to four different sounds can be stacked to build up a performance. In this menu
you can select one of the following modes for your performance:
Single - 1 sound ( part 13)
Layer2 - 2 sound ( part 13-14)
Layer3 - 3 sound ( part 13-15)
Layer4 - 4 sound (part 14-16)
<31|
\\Edit\Common
<31|\Volume:\110
Here the general volume for the performance will be adjusted.
At every algorithm of FX-2 you have one parameter, which allows
realtime control by the modulation matrix. Here you see, which
parameter is influenced in which algorithm, when you increase the
FX-2 depth in the modulation matrix.
1
|1>\01:Chorus1
Depth
2
|1>\02:Chorus2
Rate
3
|1>\03:Chorus3
Center
4
|1>\04:Flanger1
Rate
5
|1>\05:Flanger2
Center
6
|1>\06:Phaser1
Rate
7
|1>\07:Phaser
Center
8
|1>\08:Panning
Manual Pan
9
|1>\ShortDely
Feedback
10
|1>\LongDelay
Feedback
11
|1>\HQ-Delay
Feedback
12
|1>\Ping-Pong
Feedback
13
|1>\GatedDely
Feedback
14
|1>\SpecialFX
Center
15
|1>\Equalizr1
Output Level
16
|1>\Equalizr2
Output Level
17
|1>\WahWah+Ov
Fequenz
18
|1>\AutoWhaWa
Drive
19
|1>\WarmOvdrv
Input Level
20
|1>\Distortn
Input Level
21
|1>\no\Effect
Serial-Feed-Level => FX-1
performanceparameter
realtime-control
of FX-2
parameters
The last two parameters are only available in performance-mode. They affect the performance-type and
the general volume of the performance.
Perhaps you may have recognized „FX-2“ as a modulation target in the controller matrix. The following
table shows you which parameter of FX-2 can be changed with this controller:
24
Page 25

12.) Editing the Arpeggiator
Function User Action/
(Keys/Dials)
Display-Message
Selection of edit level Press „EDIT/OK“ key
\Edit/Function
Selection of „Edit Arpeggiator“
menu.
Use one of the two Alpha-dials to
select.
\Edit/Function
<6>\Edit\Arpegg.
Confirm selection Press „EDIT/OK“ key.
Arpeggiator\Edit
|1>\Arpegg.:\\On
|1>
Arpeggiator\Edit
|1>\Arpegg.:\OFF
Use this parameter to switch the arpeggiator on and off.
<2>
Arpeggiator\Edit
<2>\Sync:\Intern
Here you can decide if the arpeggiator will be clocked internally or externally.
When switched to external clock, the arpeggiator uses a MIDI clock signal if this
signal is active on MIDI In of the TECHNOX. If MIDI clock is available, the
arpeggiator will be synchronized to your sequencer.
<3>
Arpeggiator\Edit
<3>\Part:\\\\\13
Here you can select one of the 16 available parts to be controlled by the
arpeggiator.
<4>
Arpeggiator\Edit
<4>\Resolutn:\16
With this parameter the resolution of the arpeggiator will be set. You have the
choice between 4th, 8th, 16th and 32nd notes.
<5>
Arpeggiator\Edit
<5>\Speed:\\\\86
When using the internal clock (Sync: Intern), the arpeggiator speed is set with this
parameter.
<6>
Arpeggiator\Edit
<6>\Gate:\\\\\64
Use this parameter to control the gate time (note length) of the arpeggio notes.
This parameter can also be controlled via the modulation matrix.
<7>
Arpeggiator\Edit
<7>\Directn:\\Up
This parameter controls the direction of the arpeggios. Look at the table below for
the different directions.
<8>
Arpeggiator\Edit
<8>\Hold:\\\\OFF
When set to „ON“, the arpeggiator chord will be held even if the chord on the
keyboard is depressed. (Sometimes this parameter is also called „LATCH“) If set
to „OFF“, the arpeggiator will stop as soon as it receives Note-Off-informations.
<9>
Arpeggiator\Edit
<9|\MidiOut:\OFF
The arpeggiator notes can be sent out via MIDI Out of the TECHNOX when this
parameter is set to „ON“. This offers you the possibility that other MIDI
synthesizers can also use the TECHNOX’ arpeggiator.
The following table shows you the different arpeggiator directions (Sub menu page 7):
1
Direction:\\UP
Arpeggios start with the lowest note first, the others follow in ascending order.
2
Direction:Down
Arpeggios start with the highest note first, the others follow in descending order.
3
Direction:UPDW
Ascending and descending notes consecutively.
4
Direction:\RND
The notes are played in random (no) order.
12.) Editing the
arpeggiator
In this section you will learn about TECHNOX’ built-in arpeggiator. This arpeggiator splits a chord into
single notes, which then can be played back automatically in different ways. The arpeggiator menu will be
reached by executing the following steps:
Following these steps, the following sub-menus are now available:
25
Page 26

13.) STORING, COPYING, MIDI-DUMP - THE „WRITE“ MENU
Function User action
(Keys/Dials)
Display-Message
Selection of edit level Press „EDIT/OK“ key.
\Edit/Function
Selection of „Write“ menu Use one of the two Alpha-dials to
select.
\Edit/Function
<8>\Write/Dump..
Confirm selection Press „EDIT/OK“ key.
|1>\Write\Setup
Yes<OK>\No<EXIT>
|1>
|1>\Write\Perf.?
Yes<Ok>\No<EXIT>
|1>\Write\Setup?
Yes<Ok>\No<EXIT>
Depending upon which mode your TECHNOX currently uses (Performance or
Sequencer-Multi-Mode), the displayed message of this sub-menu differs. Refer to
sections about Performance-editing and sequencer setups for complete
descriptions.
<2>
<2>\Load\Setup?
Yes<OK>\No<EXIT>
Here you can restore a sequencer-multi-setup that has been created before. After
pressing the „EDIT/OK“ key a menu will be displayed where you can select the
selected setup by using the „VALUE/SOUND“ dial. But it’s easier to do the setup
recall by letting the TECHNOX receive a program change information via MIDI.
This function will be enabled by selecting „[RxSetupC: On]“ in page <7> of the
„Edit System“ menu. Program changes between 1 and 14 select one of the 14
possible setups.
<3>
<3>\Write\Drums?
Yes<OK>\No<EXIT>
This sub-menu allows you to store your User-drum-set. Refer to section
„Drumset-Editing“ for complete instructions.
<4>
<4>\Init\Setup?
Yes<OK>\No<EXIT>
Use this function to initialize the actual sequencer-setup. After initializing, all parts
of the setup are set to Single-sound #1, FX-1 is set to „Room“ and FX-2 to
„Chorus“.
<5>
<5>\Init\Part\1?
Yes<OK>\No<EXIT>
The „VALUE/SOUND“ Alpha-dial is used to select the part which has to be
initialized. After completing this functions, all part-parameters of this part are
re-set to their default values.
<6>
<6>\Copy\Part\1?
Yes<OK>\No<EXIT>
By using the „VALUE/SOUND“ dial it’s possible to select a part which has to be
copied to another part. Use the „EDIT/OK“ key to confirm your selection. and
then the „VALUE/SOUND“ dial to select the copy target. After pressing
„EDIT/OK“ all part parameters from the destination will be copied to the target.
THE WRITE-MENU
13.) The WriteMenu
In the following section you will learn everything about storing, copying and MIDI dumping of your
sound creations and how the TECHNOX parameters are initialized.
There are two possible ways to archive your sounds: You can save the performances and multi-setups
either internally to the built-in RAM or you can send these via MIDI to an external MIDI recording device
such as a sequencer or MIDI data recorder. The advantage of using internal memories is that you have
direct access to all configurations without using an external MIDI device. But on the other hand it might
also be useful to archive a complete system setup externally together with your MIDI songfile. So it will
be assured that each song will be played back correctly, even if you have changed all internal RAM
configurations. Most sequencers handle the system-exclusive data (that’s the data format used for external
storage...) exactly like any other MIDI data; so the easiest way is to record the „TECHNOX configuration
block“ straight into your sequencer and put this block in front of the song.
The „Write-Menu“ will be activated as follows:
The „Write-Menu“ offers you the following sub-menus:
26
Page 27

Function User Aktion
(Keys/Dials)
Display-Message
Selection of edit level. Press "EDIT/OK“ key.
\Edit/Function
Selection of "Edit System“ menu. Use one of the two Alpha-dials to
select.
\Edit/Function
<7>\Edit\System
Confirm selection Press "Edit/OK" key.
\Edit\System
|1>\Mode:Sequenc
|1>
\\Edit\System
|1>\Mode:Perform
Here the play mode of the TECHNOX can be altered between the performancemode and the Sequencer-Multi-mode. Usually the performance-mode is mainly
used for live performances whereas the Multi-mode will be used when working
with a MIDI sequencer. Use the „VALUE/SOUND“ dial to toggle the play-mode.
<2>
\Edit\System
<2>\Channel:\\\\1
Use this function to select the basic MIDI channel for your TECHNOX. The
setting of the basic channel is only important when using the TECHNOX in
performance-mode. It then receives its MIDI informations on the selected channel.
Note that this channel is also identical to the ID-number of your TECHNOX (see
above: MIDI dump).
<3>
\\Edit\System
<3>\Transpose:\C
This function is used to transpose the TECHNOX in semi-tones (6 steps up or
down from C).
<4>
\\Edit\System
<4>\Tune:\\\\\\\+0
Fine-tuning is possible with this function (+63 steps [-1 semi-tone], -64 steps [+1
semi-tone]).
14.) The Edit-System-Menu
The following 4 sub-menus are reserved for the transmission of system-exclusive data via MIDI. System-exclusive
informations are unique to each manufacturer of MIDI equipment; each manufacturer uses its own data format for
describing sound-data and machine-dependent informations. TECHNOX uses system-exclusive data for transferring its
RAM informations to a MIDI sequencer (and vice versa). So you can use your sequencer as an external storage device for
your TECHNOX. The TECHNOX can send and receive SysEx data on 16 different ID-numbers. These ID-numbers are
important because it allows you to use more than only one single TECHNOX in your MIDI setup. The ID-number will be
selected in the „System-Edit“ menu. Changing the basic MIDI channel also affects this.
<7>
<7>\Send\Temp?
Yes<OK>\No<EXIT>
After pressing the „EDIT/OK“ key, the TECHNOX sends out all actual settings
via MIDI. This includes all part parameters, the effect settings, the common
parameters and the arpeggiator settings.
<8>
<8>\Send\Setups?
Yes<OK>\No<EXIT>
After pressing the „EDIT/OK“ key, the TECHNOX sends out all
Sequenzer-multi-setups.
<9>
<9>\Send\Drums?
Yes<OK>\No<EXIT>
From here the User-defined drum-sets are sent after pressing the „EDIT/OK“ key.
<10>
<10|\Send\Perfs?
Yes<OK>\No<Exit>
From here the User-defined drum-sets are sent after pressing the „EDIT/OK“ key.
14.) The Edit-
System-Menu
The System menu is used for the settings of all global parameters. These include the filtering of incoming
and outgoing MIDI data, the global tuning of the TECHNOX and the velocity response characteristics.
You will reach this menu from the main page by doing the following:
Now you have access to the following sub-menus:
27
Page 28

14.) The Edit-System-Menu
<5>
\\Edit\System
<5>\VelCrv:\Exp+
Here you can select the velocity curve; i.e. the response characteristics of your
TECHNOX in reference to the incoming MIDI note-on velocities. Refer to the
table below for detailed description of the different velocity curves.
<6>
\\Edit\System
<6>\RxPrgChg:\ON
This parameter sets the reception of program change information to on or off.
<7>
\\Edit\System
<7>\RxSetupC:OFF
If set to „ON“, incoming program change messages will be interpreted as „Setup“
changes. The setup change information has to be sent on the basic channel (see
above); the part that lies on this channel won’t respond to program change
informations.
<8>
\\Edit\System
<8>\RxTouch:\\ON
This parameter sets the reception of Aftertouch information to on or off. Notice
that any Aftertouch informations will be omitted, even if enabled within the
modulation matrix.
<9>
\\Edit\System
<9>\RxModul:\\ON
Here the reception of MIDI controller data will be enabled or disabled. Notice that
any controller informations will be omitted, even if enabled within the modulation
matrix.
<10>
\\Edit\System
<10>\RxParam:\\On
Enable or disables the reception of system-exclusive data.
<11>
\\Edit\System
<11>\TxParam:OFF
If set to „ON“, ‘real time’ parameter changes (via the „VALUE/SOUND“ Alpha
dial) will be sent via MIDI Out of your TECHNOX. This enables a sequencer to
record these parameter changes (for example Filter cutoff, envelope offsets, etc.)
<12>
\\Edit\System
<12>\TxFoot:\OFF
If this function is enabled, control change information (of footswitch controller)
will be sent out via MIDI.
<13>
\\Edit\System
<13>\TxClock:OFF
This enables or disables the sending of MIDI clock data if the arpeggiator is in use.
This allows the TECHNOX to control the tempo of other slave devices (such as
sequencers, drum-machines, etc.)
<14>
\\Edit\System
<14>\OmniMod:\On
If Omni-mode is set to „ON“, the TECHNOX will receive MIDI data on all 16
channels; but it’ll work only in performance mode. Usually you won’t need to use
the Omni mode anyway... When in sequencer mode, this parameter won’t appear
because the TECHNOX will then work only in MIDI Multi mode.
28
Page 29

Lin When set to this value, the TECHNOX responds in a linear way, i.e. incoming velocity
values remain unchanged.
Lin- Here you get a compressed velocity curve - but with a constant factor, so that the
velocity response remains linear.
Lin+ Linear velocity expansion with a constant factor.
Exp- Exponential compression of the incoming velocity values.
Ex-- Even stronger exponential compression of the incoming velocity values.
Exp+ Exponential expansion of the incoming velocity values.
Ex++ STRONG exponential expansion of the incoming velocity values.
Fix NO velocity at all! All notes will have the same velocity value.
Function User Action
(Keys/Dials)
Display-Message
Selection of edit level. Press „EDIT/OK“ key
\Edit/Function
Selection of „Play Demo“ menu. Use one of the two Alpha-dials to
select.
\Edit/Function
<9|\Play\Demo...
Confirm selection. Press „EDIT/OK“ key
________________
<Exit>\for\stop
Stop demo. Press „EXIT“ key
\Edit/Function
<9|\Play\Demo...\
...and go back to the main page. Press "EXIT"-Taste again
\T_e_c_h_n_o__x
\1:B021\Moogy
14.) Edit-System-Menu/ Working with a sequenzer
15.) Playing the
demo-song
16.) Working with
a sequenzer
We’re quite sure that you’d like to do your own musical stuff with your TECHNOX. We’ve included a
diskette with some Techno, Rave and Ambient grooves which you may use to your own „gusto“. The files
on the disk were saved in Standard MIDI file format, so that most software sequencers won’t have any
difficulties in reading them. These programs mostly offer you the selection of importing a Standard MIDI
file within the „Files“ menu. But - take care! There are some nasty programs (mostly „light“ or shareware
versions) which may have difficulties with SysEx data. We’ve put SysEx informations at the very beginning
of each song file in order to assure the correct setting of the TECHNOX. If your sequencer doesn’t play the
SysEx data (you’ll remark this if e.g. the FX settings seem to be a little bit ... strange [???]), try setting the
part parameters manually by comparing the track names in the song file to the part names of your TECHNOX
and ...dial...
But - in most cases - you won’t have any problems with the SysEx data. And we think that storing the setup
data for each song at the beginning of a song file is the most comfortable way to work with your TECHNOX.
You now may ask: WHY? There are a couple of reasons:
1. A song file which includes a SysEx dump at the beginning will sound the same on all of the millions of
TECHNOXXES sold worldwide. And it doesn’t overwrite any internal memories because it uses only the
temporary memory.
29
Page 30

Function User Action
(Keys/Dials)
Display-Message
Selection of „Write/Dump“ menu 1. Press "EDIT/OK“ key.
2.) Use one of the dials to select the
menu.
\Edit/Function
<8>\Write/Dump..
Selection of „Load Setup“ menu. If
not already in sequencer mode, this
mode will be activated when a setup
is loaded.
1. Press „EDIT/OK“ key
2. Use the "PARAMETER/
SOUNDGROUP“ dial to get to
"Load Setup“ menu.
|1>\Write\Setup?
Yes<OK>\No<EXIT>
Confirm selection. Press "EDIT/OK"-key.
Name:\Untitled
Yes<OK>\No<EXIT>
Enter a new name. Move cursor with "PARAMETER/
SOUNDGROUP“ dial; select letter
with "VALUE/SOUND“ dial.
Name:\My_Setup
Yes<OK>\No<EXIT>
Confirm new name and select
memory position where the setup
shall be stored.
Press "EDIT/OK“ key and select
memory position with „VALUE/
SOUND“ dial.
to\\1\<Untitled>
Yes<OK>\No<EXIT>
Complete storage of the
performance.
Press "EDIT/OK“ key.
Overwr\Untitled?
Yes<OK>\No<EXIT>
Overwrite memory. Press "Edit/OK" key.
|1>\Write\Setup?
\\\\\\\\\\\ok!
Exit „Write/Dump“ menu. Press „EXIT“ key until you reach the
main page.
\T_e_c_h_n_o__x
13:A127:\Hardcast
16.) Working with a sequenzer
2. We didn’t supply the TECHNOX with an infinite number of sound memories. Otherwise it would have
cost a horrible amount of money. And the day will come when all RAM memories are used by your sound
creations. Then the problem arises, how to save your valuable data externally. As already mentioned
before, the best way to do this is to use your MIDI sequencer as an external storage device. But if you
create a file that only holds your setup and RAM data there’s still the other problem that you mostly don’t
know which SysEx file belongs to which song...? So, the easiest way of archiving your material is to save
it together with your song. That’s it!
But for all those guys who don’t want to mess around with SysEx, the TECHNOX offers a total amount of
14 memory locations where you can save your sequencer setups. One of these can hold all part, effect,
arpeggiator and common settings.
16.a.) Working
with sequenzermulti-setups
The storage of sequencer setups will be done as follows:
30
Page 31
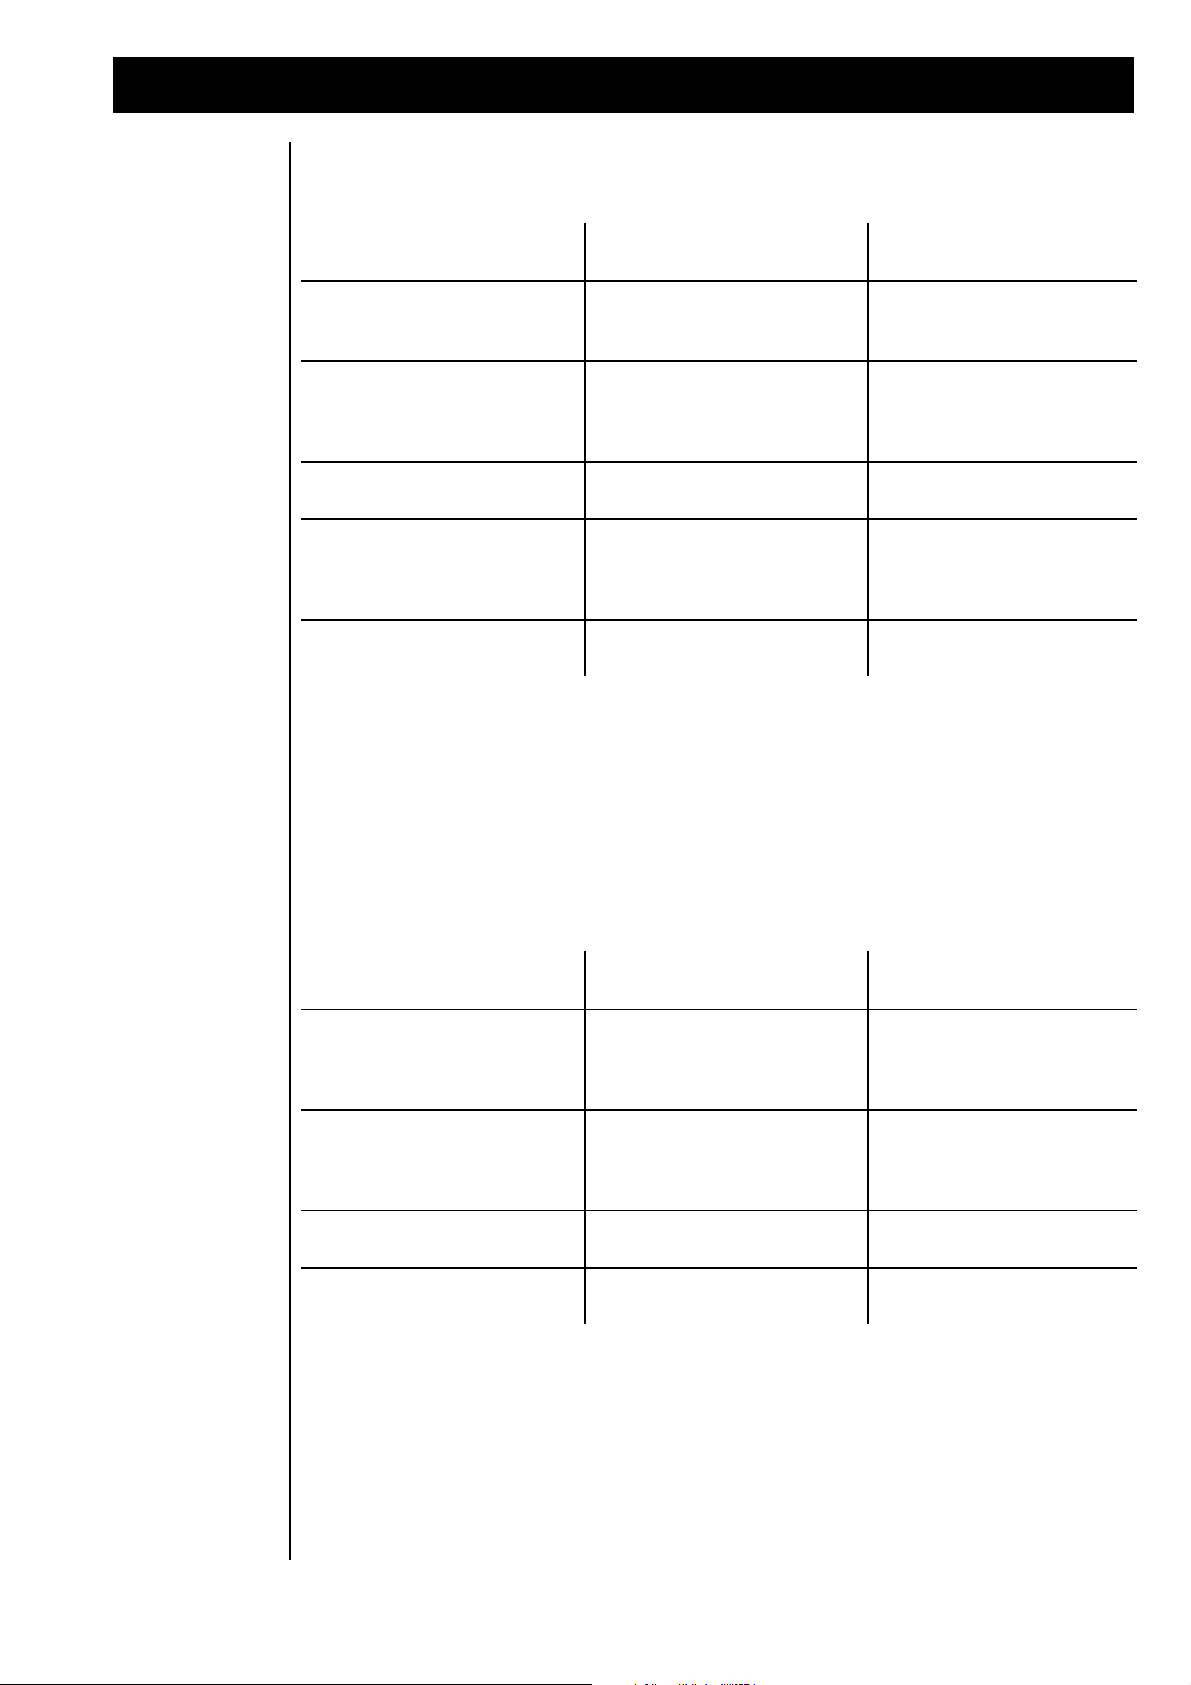
16.) Working with the sequenzer
Function User action
(Dials/Keys)
Display-Message
Selection of „Write/Dump“ menu. 1.) Press „EDIT/OK“ key.
2.) Use one of the dials to select the
menu.
\Edit/Function
<8>\Write/Dump..
Selection of „Load Setup“ menu. If
not already in sequencer mode, this
mode will be activated when a setup
is loaded.
1. Press „EDIT/OK“ key.
2. Use the „PARAMETER/
SOUNDGROUP“ dial to get to
„Load Setup“ menu.
<2>\Load\Setup?
Yes<OK>\No<EXIT>
Confirm Selection. Press "EDIT/OK" Key
Load\14\Untitled
Yes<OK>\No<EXIT>
Select one of the 14 setups. 1.) Use "VALUE/SOUND"-Dial to
select one setup.
2.) Confirm selection with
"EDIT/OK" key.
<2>\Load\Setup?
\\\\\\\\\\\ok!
Exit the "WRITE"-Menu. Press „EXIT“ key until you reach the
main page.
\T_e_c_h_n_o__x
13:A001:\_303Lead
Function User action
(Keys/Dials)
Display-Message
Selection of „Edit System“ menu. 1.) Press "EDIT/OK" key.
2.) Use the „PARAMETER/
SOUNDGROUP“ dial to select
"Edit-system“ menu.
\Edit/Function
<7>\Edit\System
Select menu page „<7> RxSetupC“ 1. Press „EDIT/OK“ key
2. Use the „PARAMETER
/SOUNDGROUP“ dial to get to to
„RxSetupC“ sub-menu.
\Edit\System
<7>\RxSetupC:OFF
Enable MIDI switching. Use „VALUE/SOUND“ dial to set
the function to „ON“
\Edit\System
<7>\RxSetupC:\ON
Exit the "Edit System" menu. Press „EXIT“ key until you reach the
main page.
\T_e_c_h_n_o__x
13:A001:\_303Lead
A sequencer-multi-setup will be activated as follows:
Enabling the setup-loading by using program change informations received via MIDI is simply done by
going into the „Edit System“ menu and setting the „RxSetupC“ (Receive Setup Change) parameter to
„ON“. Please note that it further won’t be possible to receive any program change informations for the part
that is identical to the selected MIDI system channel when RxSetupC is set to „ON“. Program changes can
be received on all other 15 parts.
Setup loading via MIDI will be enabled by doing the following:
31
Page 32

17.) MIDI and MORE/ Listing of the MIDI-Controllers
11.) Midi and
more a) MidiController
Technox can process the following MIDI-Controllers
Controller Nummer Function
Dez. Hex.
0 (BnH 00H) Bank-Select
1 (BnH 01H) Modulation
5 (BnH 05H) Porta-Time
6 (BnH 06H) Data Entry
7 (BnH 07H) Volume
10 (BnH 0AH) Panorama-position
64 (BnH 40H) Hold-Pedal
65 (BnH 41H) Porta on/off
67 (BnH 43H) Soft Pedal
80 (BnH 50H) FX1-Type
81 (BnH 51H) FX2-Type
82 (BnH 52H) Arp. Reso
83 (BnH 53H) Arp. Speed
91 (BnH 5BH) FX1-Send
93 (BnH 5DH) FX2-Send
98 (BnH 62H) NRPN LSB
99 (BnH 63H) NRPN MSB
100 (BnH 64H) RPN LSB
101 (BnH 65H) RPN MSB
120 (BnH 78H) all sounds off
121 (BnH 79H) Controller Reset
123 (BnH 7BH) all notes off
124 (BnH 7CH) omni off
125 (BnH 7DH) omni on
126 (BnH 7EH) mono on
127 (BnH 7FH) poly mode
17.b.) NRPN- und
RPN- Controller
32
A particularity are the NRPN and the RPN- controllers. To make it possible to edit sounds just by MIDIControllers independent from manufacturers and system exclusive data, some agreements were made by
the manufacturers.
The change of a NRPN-parameters needs a lot more data than a standard-controller because there aren´t
enough standard-controllers to control all the possible parameters. The following controllable parameters
have been defined in the GS-Standard. But at first we want to give an example for the use of the NRPNControllers to show you the principle.
Example: NRPN Controller are tuning a drum instrument:
Status Second Third Comment
HEX BnH 63H 18H Controller 99 (63H) with value 24 (18H) Drumtuning
BnH 62H xxH Controller 98 (62H) with value xx for the keynumber
BnH 06H yyH Controller 6 (Data Entry) with value yy for the tuning
Page 33

17.) MIDI and more/ NRPN & RPN-Controller
Sending these three lines one after another will have the following result:
The drum instrument on the key xx (00H - 7FH) on the MIDI-Channel with the Channel-No. n (0h - FH)
will be transposed by the value yy (lowest value 00H - Standard 40H- highest value 7F).
As you can see the tuning of one drum instrument needs 9 bytes. So if you want to tune more drum
instruments you should make this at the beginning of a song in order to avoid timing problems.
The input of the MIDI-data is made in the HEX-Code. See the following listing:
Decimal Hexadecimal Binary
00 00 0000 0000
01 01 0000 0001
02 02 0000 0010
03 03 0000 0011
04 04 0000 0100
05 05 0000 0101
06 06 0000 0110
07 07 0000 0111
08 08 0000 1000
09 09 0000 1001
10 0A 0000 1010
11 0B 0000 1011
12 0C 0000 1100
13 0D 0000 1101
14 0E 0000 1110
15 0F 0000 1111
16 10 0001 0000
17 11 0001 0001 etc.
List of NRPNand RPNControllers
Now a list of all NRPN- and RPN- Controllers that the Technox uses:
NRPN-Controller
Pitch-modulation-speed
NRPN MSB Contr.99 (BnH 63H xxH) NRPN LSB Contr. 98 (BnH 62H xxH) Data-Entry Contr 6 (BnH 6H xxH)
n = Channel, xx = 01 n = Channel, xx = 08 n = Channel, XX =Value
Pitch-modulation-depth
NRPN MSB Contr.99 (BnH 63H xxH) NRPN LSB Contr. 98 (BnH 62H xxH) Data-Entry Contr 6 (BnH 6H xxH)
n = Channel, xx = 01 n = Channel, xx = 09 n = Channel, XX =Value
Pitch-modulation-delay
NRPN MSB Contr.99 (BnH 63H xxH) NRPN LSB Contr. 98 (BnH 62H xxH) Data-Entry Contr 6 (BnH 6H xxH)
n = Channel, xx = 01 n = Channel, xx = 10 n = Channel, XX = Value
Cutoff-frequency
NRPN MSB Contr.99 (BnH 63H xxH) NRPN LSB Contr. 98 (BnH 62H xxH) Data-Entry Contr 6 (BnH 6H xxH)
n = Channel, xx = 01 n = Channel, xx = 20 n = Channel, XX = Value
Resonance
NRPN MSB Contr.99 (BnH 63H xxH) NRPN LSB Contr. 98 (BnH 62H xxH) Data-Entry Contr 6 (BnH 6H xxH)
n = Channel, xx = 01 n = Channel, xx = 21 n = Channel, XX =Value
EG-Attack
NRPN MSB Contr.99 (BnH 63H xxH) NRPN LSB Contr. 98 (BnH 62H xxH) Data-Entry Contr 6 (BnH 6H xxH)
n = Channel, xx = 01 n = Channel, xx = 63 n = Channel, XX = Value
EG-Decay
NRPN MSB Contr.99 (BnH 63H xxH) NRPN LSB Contr. 98 (BnH 62H xxH) Data-Entry Contr 6 (BnH 6H xxH)
n = Channel, xx = 01 n = Channel, xx = 64 n = Channel, XX = Value
33
Page 34

17.) MIDI and more/ Nrpn & Rpn Controller/ Sysex-Data
EG-Release
NRPN MSB Contr.99 (BnH 63H xxH) NRPN LSB Contr. 98 (BnH 62H xxH) Data-Entry Contr 6 (BnH 6H xxH)
n = Channel, xx = 01 n = Channel, xx = 66 n = Channel, XX = Value
Drum-Pitch
NRPN MSB Contr.99 (BnH 63H xxH) NRPN LSB Contr. 98 (BnH 62H xxH) Data-Entry Contr 6 (BnH 6H xxH)
n = Channel, xx = 18 n = Channel, xx = key-number n = Channel, XX = Value
Drum-Level
NRPN MSB Contr.99 (BnH 63H xxH) NRPN LSB Contr. 98 (BnH 62H xxH) Data-Entry Contr 6 (BnH 6H xxH)
n = Channel, xx = 1A n = Channel, xx = key-number n = Channel, X = Value
Drum-Panning Position
NRPN MSB Contr.99 (BnH 63H xxH) NRPN LSB Contr. 98 (BnH 62H xxH) Data-Entry Contr 6 (BnH 6H xxH)
n = Channel, xx = 1C n = Channel, xx = key-number n = Channel, XX = Value
Drum-Instrument FX1-Send
NRPN MSB Contr.99 (BnH 63H xxH) NRPN LSB Contr. 98 (BnH 62H xxH) Data-Entry Contr 6 (BnH 6H xxH)
n = Channel, xx = 1D n = Channel, xx = key-number n = Channel, XX = Value •
Drum-Instrument FX2-Send
NRPN MSB Contr.99 (BnH 63H xxH) NRPN LSB Contr. 98 (BnH 62H xxH) Data-Entry Contr 6 (BnH 6H xxH)
n = Channel, xx = 1E n = Channel, xx = key-number n = Channel,XX = Value
RPN-Controller
18.) The SysExDataformat
Pitch-Bend range
RPN MSB Contr.101 (BnH 65H xxH) RPN LSB Contr. 100 (BnH 64H xxH) Data-Entry Contr 6 (BnH 6H xxH)
n = Channel, xx = 00 n = Channel, xx = 00 n = Channel, xx = Value
Fine-Tune
RPN MSB Contr.101 (BnH 65H xxH) RPN LSB Contr. 100 (BnH 64H xxH) Data-Entry Contr 6 (BnH 6H xxH)
n = Channel, xx = 00 n = Channel, xx = 01 n = Channel, xx = Value
Coarse-Tune
RPN MSB Contr.101 (BnH 65H xxH) RPN LSB Contr. 100 (BnH 64H xxH) Data-Entry Contr 6 (BnH 6H xxH)
n = Channel, xx = 00 n = Channel, xx = 02 n = Channel, xx = Value
18.) The System-Exclusive-Format of the TECHNOX
The next page shows a listing of the System-Exclusive-Format of the Technox. This listing is interesting
especially for Software-Developers who want to create their own Editor-Programs or Dump-Utilities for
TECHNOX..
This Listing is also for an adaptation to well-known Sound-Edititng-Software like e.g. Emagic Soundsurfer.
TECHNOX sends (if you want) all changes, done with the „VALUE/SOUND“- Dial, via its Midi-Output.
If you want to record these changes with your sequencer , think about it before, because the Midi-DataFlow is much more loaded by System-Exclusive- Data than usual controller-messages. So it is much
better to use regular controllers if possible.
Make sure that your sequencer is capable of recording/playing SysEX-Data.
34
Page 35

18.) MIDI-Sysex-Data format
TECHNOX-System-Exclusive Format (Version 1.0)
Identity Request
Byte No. Value Remarks
0 F0 System Exclusive start command
1 7E Common Non-Real-Time message
2 cc channel number = TECHNOX system channel *
3 06 general information
4 01 identity request
5 F7 end of System Exclusive
Identity Reply
Byte No. Value Remarks
0 F0 System Exclusive start command
1 7E Common Non-Real-Time message
2 cc channel number = TECHNOX system channel *
3 06 general information
4 02 identity reply
5 3F QUASIMIDI ID
6 22 TECHNOX id
... ... ...
10..13 vv vv vv vv Version no. (4 ascii characters, i.e ‘2.00’)
10 F7 end of System Exclusive
* note that if cc = 7Fh the TECHNOX respond regardless of what
master channel it is on
Request Data from device:
Byte No. Value Remarks
0 F0 System Exclusive start command
1 3F Quasimidi id number
2 dv device number = TECHNOX System channel
3 22 TECHNOX id number
4 52 (R)equest data
5 ah adress high
6 am adress mid
7 al adress low
8 dh data count high
9 dl data count low
10 F7 end of System Exclusive
Dump Data to device:
Byte No. Value Remarks
0 F0 System Exclusive start command
1 3F Quasimidi id number
2 dv device number = TECHNOX System channel
3 22 TECHNOX id number
4 44 (D)ump data
5 ah adress high
6 am adress mid
7 al adress low
8... dt data (7 bit)
... F7 end of System Exclusive
35
Page 36

18.) MIDI-SysEx-Data format
TECHNOX Address Map:
(third byte is Adress-Offset)
00 00 00 system parameter
01 00 00 temporary common parameter
01 01 00 temporary part parameter (part 1)
01 02 00 -“- (part 2)
... ...
01 10 00 -“- (part 16)
01 11 00 temporary performance name
02 00 00 temporary drum parameter (drum instr 1)
02 01 00 -“- (drum instr 2)
... ...
02 3D 00 -“- (drum instr 61)
02 7E 00 drumset nb (0..15)
02 7F 00 drumset name
03 00 00 reserved
...
04 7F 00 -“-
05 00 00 performance 1 common parameter
05 01 00 -“- part parameter (part 13)
05 02 00 -“- (part 14)
05 03 00 -“- ...
05 04 00 -“- (part 16)
05 05 00 -“- name
06 00 00 performance 2 common parameter
... ...
36 05 00 performance 50 name
37 00 00 multisetup 1 common parameter
37 01 00 -“- part parameter (part 1)
37 02 00 -“- (part 2)
... ...
37 10 00 -“- (part 16)
37 11 00 -“- name
38 00 00 multisetup 2 common parameter
... ...
44 11 00 multisetup 14 name
45 00 00 userdrumset 1 drum parameter (drum instr 1)
45 01 00 -“- (drum instr 2)
... ...
45 3B 00 -“- (drum instr 59)
45 7E 00 drumset nb (0..15)
45 7F 00 drumset name
46 00 00 userdrumset 2 drum parameter (drum instr 1)
... ...
4C 7F 00 userdrumset 8 name
4D 00 00 reserved
...
68 7F 00 -“-
69 00 00 sound name bank 0, sound 0 (only request!)
69 01 00 -“- sound 1 -“-
... ...
69 7F 00 -“- sound 127 -“6A 00 00 sound name bank 1, sound 0 -“-
... ...
6C 7F 00 sound name bank 3, sound 127 -“-
36
6D 00 00 reserved
...
7F 7F 00 -“-
Page 37

18.) MIDI-SysEx-Data format
Address Offsets:
SYSTEM-Parameter
00 transpose /* 0..12 (-6..+6) */
01 tune /* 0..127 (-64..+63) */
02 system channel /* 0..15 (1..16) */
03 multi mode /* 0..1 (off,on) */
04 reserved
05 program change input filter /* 0..1 (off,on) */
06 channel pressure -“- /* 0..1 (off,on) */
07 modulation -“- /* 0..1 (off,on) */
08 parameter control -“- /* 0..1 (off,on) */
09 reserved
0A omni mode /* 0..1 (off,on) */
0B master velocity curve no. /* 0..7 (lin, lin-,lin+,...) */
0C program change out filter /* 0..1 (off,on) */
0D parameter control -“- /* 0..1 (off,on) */
0E foot control -“- /* 0..1 (off,on) */
0F midi clock -“- /* 0..1 (off,on) */
COMMON-Parameter
00 performance level /* 0..127 */
01 performance mode /* 0..3 (single,double...) */
02 reserved
03 reserved
04 free controller no. /* 0..97 */
05 foot controller no. /* 0..127 */
06 foot control on value /* 0..127 */
07 foot control off value /* 0..127 */
08 foot control toggle mode /* 0..1 (off,on) */
Moulation-Matrix...
09 mod.depth[SOURCE1][DEST1] /* 0..127 (-64..63) */
09 mod.depth[SOURCE1][DEST2] /* 0..127 (-64..63) */
... ...
28 mod.depth[SOURCE4][DEST8] -“-
FX Parameter...
29 fx1 activity /* 0..1 (off,on) */
2A fx1 typ /* 0..21, (FX1-Effect#) */
2B fx1 parameter[PAGE1] /* 0..127 (FX1-Parameter1) */
2C fx1 parameter[PAGE2] /* 0..63 (FX1-Parameter2) */
... ... ...
30 fx1 parameter[PAGE6] /* 0..127 (FX1-Parameter6) */
31 fx2 activity /* 0..1 (off,on) */
32 fx2 typ /* 0..21, (FX2-Effect#) */
33 fx2 parameter[PAGE1] /* 0..127 (FX2-Parameter1) */
34 fx2 parameter[PAGE2] /* 0..127 (FX2-Parameter2) */
... ...
3B fx2 parameter[PAGE9] /* 0..127 (FX2-Parameter9) */
Arpeggiator Parameter...
3C arp pak1 /* bit 2 arp_on 0..1 (off,on) */
3D speed /* 0..127 */
3E gate /* 0..127 */
3F arp pak2 /* bit 5 arp_sync 0..2 (int,ext1,ext2) */
40 arp pak3 /* bit 3..6 arp_track 0..15 (1..16) */
/* bit 0..1 arp_resolution 0..3 (4,8,16,32) */
/* bit 3..4 arp_dir 0..2 (up,down,up/down) */
/* bit 2 reserved */
/* bit 1 arp_hold 0..1 (off,on) */
/* bit 0 reserved */
/* bit 2 reserved */
/* bit 1 arp_out 0..1 (off,on) */
/* bit 0 reserved */
37
Page 38

18.) MIDI-SysEx-Data format
PART-Parameter
00 bank no. /* 0..3 */
01 sound no. /* 0..127 */
02 trackmode /* 0..3 (0=muted, 1=poly, 2=mono, 3=lead) */
03 level /* 0..127 */
04 panorama /* 0..20 (off,7L..7R,rnd,key,yek,dyn,nyd)*/
05 fx1 send /* 0..63 */
06 fx2 send /* 0..63 */
07 transpose /* 0..48 (-24..+24) */
08 tune /* 0..127 (-64..+63) */
09 cutoff frequency /* 0..127 (-64..+63) */
0A resonance freq. /* 0..127 (-64..+63) */
0B eg attack /* 0..127 (-64..+63) */
0C eg decay /* 0..127 (-64..+63) */
0D eg release /* 0..127 (-64..+63) */
0E vibrato rate /* 0..127 (-64..+63) */
0F vibrato depth /* 0..127 (-64..+63) */
10 vibrato delay /* 0..127 (-64..+63) */
11 velocity curve no. /* 0..14 (lin,lin-,lin+,exp-,...) */
12 holdpedal /* 0..1 (off,on) */
13 modulation depth /* 0..127 */
14 pitch sensitivity /* 0..24 (-12..12) */
15 volume mod. sens. /* 0..127 (-64..+63) */
16 tone mod. sens. /* 0..127 (-64..63) */
17 portamento time /* 0..127 */
DRUM-Parameter
00 level /* 0..127 */
01 pan /* 0..19 (off,7L..7R,rnd) */
02 fx1 send /* 0..63 */
03 fx2 send /* 0..63 */
04 pitch /* 0..48 (-24..+24) */
38
Page 39

Funktion... Transmitted Recogniced
Basic
Channel
Default
Changed
1
1-16
1
1-16
Mode
Default
Messages
Altered
x
x
x
3b***
0
x
Note
Number True Voice
x
x 1-127
Velocity Note On
Note Off
x
x
0
x
After
Touch
Keys
Channel
x
x
x
0
Pitch Bend MSB (7 bit)
LSB (14 bit)
x
x
0
0
Controller Free Controller 0-97
Continous MSB 0-31
Continous LSB 32-63
Control Change 64-95
124 Omni off
125 Omni on
120 all sounds off
121 reset all controller
123 all notes off
Footpedal Control
x*
x*
x*
x
x
x
x
x
Routable Cont. Matrix
0
0
0
0
0
0
0
0
Program Change x 0
System Exclusive 0**** 0
System
Common
Song Position
Song Select
Tune Request
x
x
x
x
x
x
System
Real Time
Clock
Commands
0**
x
0**
0**
Aux
Messages
Local On/ Off
All Notes Off
Active Sens.
System Reset
x
x
x
x
x
0
x
x
x = No
0 = Yes
* = One Controller selectable for Footpedal Control
** = Arpeggiator Sync-Clock
*** = Multimode 3b at Sequenzer Multimode
= Polymode at Performance-Mode
**** = Parameter Realtime Transmit and Dump-Functions
19.) MIDI-Implementation
19.) MIDI-
Implementation
39
Page 40

20.) Listing of the Performances
20.) Listing of the
performances T
Ram Performances Technox:
01 ArpPad
02 Fantasy
03 FatTekno
04 Obi_Pad
05 Passport
06 Killer
07 Saege
08 Spectize
09 Snowbird
10 Crunch
11 Taurin
12 RedBull
13 Natural
14 Koffein
15 SyntVoic
16 AnaStrng
17 OverPads
18 Padding
19 Piano !
20 Hardcore
21 Strictly
22 FatSolo
23 Computer
24 ArpOdyx
25 Arounder
26 D_Mode
27 Blubber
28 BodyMoog
29 Sequenz
30 Syncers
31 Beltram
32 DeepSea
33 Aliens
34 Dionysos
35 DarkSide
36 Sweepoid
37 Foggy
38 OverDriv
39 Texture
40 Frusty
41 Arktis
42 Sirena
43 VeryDeep
44 ResoArp
45 Floating
46 ChillOut
47 Bonita
48 BanaBrss
49 Happy
50 Friday13
Ram Performances Technox:
01 ArpgBass
02 BadDream
03 BanaBass
04 BassSolo
05 Bassox
06 Beauty
07 Britepad
08 Chicago
09 Clocky
10 DeadEnd
11 Deepbass
12 Echomoog
13 EchoSpac
14 Ephedrin
15 FastVoic
16 FatStrng
17 Feedback
18 GateCore
19 Gliding
20 GoodLife
21 HouseOrg
22 ItalPian
23 Klicker
24 Knatsch
25 LovePowr
26 Louis
27 MiniMoog
28 MKS50Bs
29 ModuBass
30 Moogbass
31 Move_it
32 Oasis
33 Okzident
34 Oxygen
35 ParisCon
36 Polaroid
37 Quasar
38 Raveress
39 Slidox
40 Soloist
41 Spacrace
42 Styx
43 Subway
44 SuperSft
45 Tranced
46 Upndown
47 VeryWarm
48 Voicesed
49 Wobbler
50 X_Massss
40
Page 41

21.) Listing of the single-sounds
The 512 sounds are divided into 4 banks.
To reach the different banks via MIDI you need a Bank-Change-Command (Midi-Controller 0, Value 0 - 3).Value 0 corresponds
to Bank A, Value 1 to Bank B, ... The Bank-Change-Message is followed by a Program change from 0 - 127. Most sequencers start
with a program change-number of 1 (- 128). Also Technox starts at Number 1 (-128).
A001 _303lead
A002 Adventur
A003 Arp_2600
A004 Attsweep
A005 Axxe
A006 B_Blank
A007 BanaBrss
A008 Bananas
A009 Bantal
A010 Beltram
A011 Bic_Bac1
A012 Bic_Bac2
A013 Bic_Bac3
A014 Brassing
A015 Briting
A016 Buchla
A017 Casiotek
A018 Cpt_Iglu
A019 Discobrs
A020 Dominate
A021 Dramatic
A022 El_Paso
A023 Electron
A024 Executer
A025 Fanfare
A026 Fastpads
A027 Flummi
A028 Fotokina
A029 Fucksyn
A030 Futschi
A031 Gabriel
A032 Gipsy
A033 Hilbert
A034 Leader
A035 Longswep
A036 Luckerei
A037 Lucky
A038 Luckysch
A039 M_Mann2
A040 Mixbrass
A041 Mksbrass
A042 Move_it
A043 Mover
A044 Ms20
A045 Ms20po2
A046 NeoDisco
A047 Obx_Synt
A048 Obx2Synt
A049 Obx3Synt
A050 Obx4Synt
A051 Old_Bras
A052 Pcp_Down
A053 Pcp_Up
A054 Perc_Sol
A055 PercSwep
A056 Photon
A057 Pitchy_x
A058 Polysix
A059 Popcorn
A060 Pump_up
A061 Resobras
A062 Resobrss
A063 Resomix
A064 Sagapoly
A065 Seidabei
A066 Sequ_fun
A067 Sequent1
A068 Sequent2
A069 Sequent3
A070 Sequent4
A071 Sequenz
A072 Seufz
A073 Simp_Sng
A074 Softsequ
A075 Solfrust
A076 Starpads
A077 Str_Rev
A078 Supermax
A079 Suprmax2
A080 Sweeplng
A081 Syn_maze
A082 Syncbana
A083 Synhorns
A084 Synpac
A085 Synpizz
A086 Tangram
A087 Techno1
A088 Techno2
A089 Techno3
A090 Tecnoxx2
A091 Tecnoxxy
A092 Tekno9mm
A093 Uk_sequz
A094 Uk2sequz
A095 VX_Dom_1
Basses
A096 Acidbass
A097 Acidharp
A098 Acousynt
A099 Active
A100 Arpfunk
A101 Basslin2
A102 Basslin3
A103 Basslin4
A104 Basslin5
A105 Basslin6
A106 Bassline
A107 Bassocon
A108 BassoNat
A109 Bassstat
A110 Birdland
A111 Blubb
A112 Clearbas
A113 CryLine
A114 DeepBass
A115 DeepMini
A116 Detroit
A117 DjaxPad
A118 Djaxup
A119 Eurobass
A120 Fat_Line
A121 Fatbass
A122 Filtbass
A123 Filtmoog
A124 Filtopen
A125 FM_Acbas
A126 Fretless
A127 Hardcast
A128 Hardms20
B001 Jukebass
B002 Killer
B003 La_Bass
B004 LandBird
B005 Lo_Bass
B006 LowBass1
B007 LowBass2
B008 MC_202_1
B009 MC_202_2
B010 Micromg2
B011 Micromg3
B012 Micromog
B013 Mixfrmt
B014 Mksbass1
B015 Mksbass2
B016 Mksbass3
B017 Moog1
B018 Moog2
B019 Moogbas2
B020 Moogmel
B021 Moogy
B022 Moogy2
B023 Morph
B024 MS20bass
B025 MS20bs2
B026 Norlin_x
B027 Pitch303
B028 Pitchbas
B029 Pulsbass
B030 Ravebass
B031 Reefbass
B032 Resobass
B033 RiseBass
B034 SH101_Bs
B035 Sinebass
B036 Slapbas1
B037 Slide
B038 Slowbass
B039 Taurus
B040 TB_303_1
B041 TB_303_2
B042 TB_303_3
B043 TB_303_4
B044 TB_303_p
B045 ToraTora
B046 V_Moogy
B047 V1_Moogy
B048 Vebsline
B049 Velo303
B050 Voxbass
B051 VX_bass
B052 Warmbass
B053 Wet_synt
Natural
B054 Acousgtr
B055 Bambus
B056 Bottle
B057 Choir
B058 Chor
B059 Clavinet
B060 Clean_gt
B061 Clean_g2
B062 Cuuh
B063 E_Piano
B064 FM_Jazz
B065 ItaloPia
B066 Melloch
B067 Panflute
B068 Piano1
B069 Piano2
B070 Piano3
B071 Piccolo
B072 Steelgtr
B073 Wurlitz1
B074 Farfisa1
41
Page 42

21.) Listing of the Single-Sounds
Organs
B075 Farfisa2
B076 Hammond
B077 Helge_S
B078 Hot_Keys
B079 HouseMks
B080 HouseOrg
B081 MksOrgan
B082 Raveorg1
B083 Raveorg2
B084 Raveorg3
B085 Raveorg4
B086 Raveorg5
B087 SlwLesli
SynthPads
B088 Aliens1
B089 Aliens2
B090 AnaBrass
B091 Angels
B092 Atlas
B093 Bambum
B094 Banana
B095 Banavox
B096 Bellbana
B097 Bentcold
B098 Blas_mit
B099 Childpad
B100 Clearobx
B101 Cloud_9
B102 Cmi_vox1
B103 Cnoxswep
B104 Daydream
B105 Fastbamb
B106 Fastfohn
B107 Fastflng
B108 Fast_cmi
B109 Fastchor
B110 Fatstrgs
B111 Fettfett
B112 Flang_ch
B113 Foehn
B114 Fourvoic
B115 Glider
B116 Halopad
B117 Hohnerst
B118 Ironstgs
B119 Japanese
B120 Jewelry
B121 JP_Long
B122 JPLongst
B123 JPString
B124 JunoStrg
B125 Liquid_X
B126 LuckySwp
B127 Matrix
B128 Mellotrn
SynthPads2
C001 Mixstrng
C002 MksStrng
C003 Moony
C004 MS20swep
C005 ObiPercs
C006 Obx_Brss
C007 Oct_Swep
C008 Omni
C009 Omniswep
C010 Overhome
C011 PadPercs
C012 Pitchswp
C013 Polymix
C014 Polypad
C015 Softtech
C016 Spacerei
C017 Spaceswp
C018 Spcsweep
C019 Spring
C020 Sunrise
C021 Sweep
C022 Sweepy1
C023 Sweepy2
C024 Swellvox
C025 Swlljuno
C026 Synthstr
C027 Truespac
C028 Vitalize
C029 Voc_Cloc
C030 Voiccord
C031 Voice
C032 Voicerel
C033 Vox_filt
C034 Vs_chor
C035 Vs_clock
C036 Vx600
C037 Vx600pad
C038 Warmbrss
C039 Warmobx
C040 Wetstrng
C041 XPressme
C042 Yuppie
C043 Dreieck
Waves
C044 P_50
C045 P_60
C046 Pulse30
C047 Pulse75
C048 Resonan1
C049 Resonan2
C050 Resonan3
C051 Resonan4
C052 Resonan5
C053 Resonan6
C054 Resonan7
C055 Sawzahn
C056 Sinus
C057 Softsine
C058 Spacesaw
C059 VeloReso
C060 FM_Glas
FM_Percussiv
C061 FM_Vibe
C062 Glospiel
C063 Mallet
C064 Musicbox
C065 Plingy
C066 Tinkbell
C067 Tinkle1
C068 Tinkle2
C069 Vibetre2
C070 Vibetre3
C071 Vibetrem
C072 Alpdream
SynthFX
C073 Analglfo
C074 Berlin71
C075 Crossosz
C076 Dirty_fm
C077 Door
C078 Dreaming
C079 Duester
C080 Echo_vox
C081 Echosx
C082 Efector2
C083 Effector
C084 FM_Race
C085 Metall
C086 Spacepad
C087 Spacevib
C088 Splatter
C089 Squarlfo
C090 Step
C091 Sweller
C092 Vocoder1
C093 Vocoder2
C094 Vocoder3
Effects
C095 Alienhb
C096 Avilyn
C097 Bublegum
C098 Comic
C099 Critters
C100 Crumble
C101 Deepest
C102 Defekt
C103 Ducktale
C104 Faldown2
C105 Falldown
C106 Fraggles
C107 Freshair
C108 Higher
C109 Industry
C110 LngBerta
C111 MoogZap
C112 Nine2ten
C113 Nintendo
C114 Noiser
C115 Noisshot
C116 Noisy_fx
C117 Ring_Fun
C118 ScratMet
C119 SF_a1
C120 SF_a2
C121 SF_a3
C122 SF_a4
C123 SF_a5
C124 SF_a6
C125 SF_a7
C126 Spacfrog
C127 Storm
C128 Strike
D001 Take_Off
D002 Terminat
D003 U_96
D004 Worldwar
D005 Expermt1
D006 Expermt2
D007 Expermt3
D008 Expermt4
D009 Expermt5
D010 Expermt6
D011 Expermt7
D012 Expermt8
D013 A_Cymb_T
Tuned Drums
D014 A_Elec_T
D015 A_Gui1_T
D016 A_Klok_T
D017 A_Perc_T
D018 A_Sfx_T
D019 Agogo_T
D020 Ankick1T
D021 Ankick2T
D022 Ankick3T
D023 Ankick4T
D024 Ankick5T
D025 AnatomT
D026 BassdrmT
D027 BelltreT
42
Page 43

21.) Listing of the Single-Sounds/selecting the Drumsets
D028 BongohiT
D029 CabasaT
D030 CastanT
D031 China_T
D032 Clave_T
D033 Clsdhh_T
D034 CowbellT
D035 Conga_T2
D036 Conga_T1
D037 CR78CymT
D038 CR78Cn_T
D039 CR78Bd_T
D040 CR78Gu_T
D041 CR78Ta_T
D042 CR78SnrT
D043 CR78rimT
D044 CR78hh_T
D045 Crash2T
D046 Crash1T
D047 Cuica_T
D048 DrumFX1T
D049 DrumFX2T
D050 EffShakT
D051 Gated_T
D052 Guiro_T
D053 GuiroT2
D054 LinnSn_T
D055 LinnTomT
D056 LongWh_T
D057 MaracasT
D058 MS20P_T
D059 Openhh_T
D060 Reso_T
D061 Ride_T
D062 Scrtch1T
D063 Scrtch2T
D064 SineKick
D065 Slap_T
D066 Snare_T
D067 Snare2T
D068 Stick_T
D069 Sticks_T
D070 Syntom1
D071 Syntom2
D072 syntom3
D073 Trian_t
D074 Tamb_t
D075 Timbalt
D076 Tom_T
D077 TR606bsT
D078 TR606cyT
D079 TR606hhT
D080 TR606ohT
D081 TR606snT
D082 TR606tmT
D083 TR808bsT
D084 TR808hhT
D085 TR808c_T
D086 TR808c1T
D087 TR808c2T
D088 TR808cwT
D089 TR808crT
D090 TR808ohT
D091 TR808rmT
D092 TR808snT
D093 TR808tm
D094 TR909bsT
D095 TR909hhT
D096 TR909c_T
D097 TR909ohT
D098 TR909snT
D099 TR909stT
D100 TR909tmT
D101 Vibra_T
D102 Vochit_T
D103 VocoKikT
D104 VocoPopT
D105 Vocozist
D106 Yeti
D107 Zap_T
D108 ZappngT
D109 Zilp_T
D110 Zip_T
D111 Zipup_T
Drumsets
D112 Standard
D113 TR808Set
D114 TR909Set
D115 Analog
D116 TR606Set
D117 CR78_Set
D118 Linn_Set
D119 Rock_Set
D120 Modular1
D121 Modular2
D122 Kick&Snare
D123 VntgeSet
D124 Dry_Set
D125 DanceSet
D126 NoisySFX
D127 Old-Box
D128 No_Sound
22.) selecting the
drumsets
In the following section you find a listing of the Drumsets of the TECHNOX. The Drumsets can be
reached on every Midi-Channel, but only on Channel 10 they have their correct parameter-values.On
Channel 10 only Drumsets can be played. You need only Program-Changes (no Bank-Changes) on Channel
10. The following list shows which Program-Change you need to select the different Drumsets.
01 Standard
02 TR808Set
03 TR909Set
04 Analog
05 TR606Set
06 CR78_Set
07 Linn_Set
08 Rock_Set
09 Modular1
10 Modular2
11 Kick&Snare
12 VntgeSet
13 Dry_Set
14 DanceSet
15 Noisy SFX
16 Old-Box
17 TR909St2
18 TR808St2
19 Effects
20 Pan_FX
21 Beatbox
22 Vintage2
23 Modular3
24 Standrd2
25 UserSet1
26 UserSet2
27 UserSet3
28 UserSet4
29 UserSet5
30 UserSet6
31 UserSet7
32 UserSet8
43
Page 44

23.) Listing of the drumsets
d#0 27
e0 28
f0 29
f#0 30
g0 31
g#0 32
a0 33
a#0 34
h0 35
c1 36
c#1 37
d1 38
d#1 39
e1 40
f1 41
f#1 42
g1 43
g#1 44
a1 45
a#1 46
h1 47
c2 48
c#2 49
d2 50
d#2 51
e2 52
f2 53
f#2 54
g2 55
g#2 56
a2 57
a#2 58
h2 59
Resohard
Slap
Scratch1
Scratch2
Sticks
Casiodr3
Casiodr1
Casiodr2
Solid
Bassdrum
Stick
Snare
TR808clp
SnreDrum
Tom_2
Clsdhhat
Tom_2
Foothhat
Tom_2
OpenHhat
Tom_1
Tom_1
Crash1
Tom_1
Ride
Chinacrs
Ridebell
Tamburin
Splash
Cowbell
Crash2
VibraSlp
Ride
TR808 DrumsetStandard Set
Resohard
Slap
Scratch1
Scratch2
Sticks
Casiodr3
Casiodr1
Casiodr2
An_Kick2
TR808Bs
TR808Rim
TR808sn
TR808clp
TR909sn
TR808tom
TR808chh
TR808tom
Ravehat
TR808tom
TR808ohh
TR808tom
TR808tom
TR808crs
TR808tom
Ride
ChinaCrs
Ridebell
Tamburin
Splash
TR808Cow
Crash2
Vibraslp
Ride
TR909 Drumset
Resohard
Slap
Scratch1
Scratch2
Sticks
Casiodr3
Casiodr1
Casiodr2
An_Kick1
TR909bs
TR909stk
TR909sn
TR909clp
TR808sn
TR909tom
TR909chh
TR909tom
Ravehat
TR909tom
TR909ohh
TR909tom
TR909tom
Crash2
TR909tom
Ride
ChinaCrs
RideBell
Tamburin
Splash
TR808Cow
Crash1
VibraSlp
Ride
Analog Drumset
Resohard
Slap
Scratch1
Scratch2
Sticks
Casiodr3
Casiodr1
Casiodr2
TR909bs
Resohard
CR78Rim
CR78Snre
TR909Clp
Noisesnr
Anatoms1
TR606HH
Anatoms3
Ravehat
Anatoms1
TR606ohh
Anatoms3
Anatoms1
Anlgcymb
Anatoms3
Ride
Chinacrs
Zipup
Tamburin
Zapping
TR808Cow
Crash1
Anlgelec
Ride
TR606 Drumset:
Resohard
Slap
Scratch1
Scratch2
Sticks
Casiodr3
Casiodr1
Casiodr2
TR808bs
TR606bs
CR78rim
TR606snr
TR808clp
CR78snre
TR606tom
TR606hh
TR606tom
Ravehat
TR606Tom
TR606Ohh
TR606Tom
TR606Tom
TR606Cym
TR606Tom
Ride
Chinacrs
Ridebell
Tamburin
Splash
TR808Cow
Crash2
Vibraslp
Ride
c3 60
c#3 61
d3 62
d#3 63
e3 64
f3 65
f#3 66
g3 67
g#3 68
a3 69
a#3 70
h3 71
c4 72
c#4 73
d4 74
d#4 75
e4 76
f4 77
f#4 78
g4 79
g#4 80
a4 81
a#4 82
h4 83
c5 84
c#5 85
BongoHi
BongoLo
CongaSlp
CongaHi
CongaLo
Timbale
Timbale
HiAgogo
LoAgogo
Cabasa
Maracas
ShrtWhis
LongWhis
GuiroSht
Guiro
Clave
Woodblok
Woodblok
Cuicalo
Cuicahi
Mt_Trngl
Triangle
Shaker
Tamburin
BellTree
Castanet
Bongohi
Bongolo
TR808clo
TR808cmi
TR808chi
Timbale
Timbale
HiAgogo
LoAgogo
Cabasa
TR808mrs
ShrtWhis
LongWhis
Guirosht
Guiro
TR808cla
Woodblok
Woodblok
Cuicalo
Cuicahi
Mt_Trngl
Triangle
Shaker
Tamburin
Belltree
Castanet
BongoHi
BongoLo
TR808Clo
TR808Cmi
TR808Chi
Timbale
Timbale
HiAgogo
LoAgogo
Cabasa
TR808Mrs
ShrtWhis
LongWhis
GuiroSht
Guiro
TR808Cla
WoodBlok
WoodBlok
Cuicalo
Cuicahi
Mt_Trngl
Triangle
Shaker
Tamburin
BellTree
Castanet
Casiodr2
Casiodr3
TR808clo
TR808cmi
TR808chi
Anlklock
Anlklock
HiAgogo
LoAgogo
Anlperc1
Anlperc2
Shrtwhis
Longwhis
Zilp
Anlguir1
TR808cla
Anlperc3
Anlperc4
Pudding1
Pudding2
DrumSfx1
DrumSfx2
Vocokick
Vocopop
Vocozish
Moogtom
BongoHi
BongoLo
CongaSlp
CongaHi
CongaLo
Timbale
Timbale
HiAgogo
LoAgogo
Cabasa
TR808Mrs
ShrtWhis
LongWhis
GuiroSht
CR78Guir
TR808Cla
Woodblok
Woodblok
Cuicalo
Cuicahi
Mt_Trngl
Triangle
Shaker
Tamburin
Belltree
Castanet
44
Page 45

23.) Listing of the drumsets
d#0 27
e0 28
f0 29
f#0 30
g0 31
g#0 32
a0 33
a#0 34
h0 35
c1 36
c#1 37
d1 38
d#1 39
e1 40
f1 41
f#1 42
g1 43
g#1 44
a1 45
a#1 46
h1 47
c2 48
c#2 49
d2 50
d#2 51
e2 52
f2 53
f#2 54
g2 55
g#2 56
a2 57
a#2 58
h2 59
CR78 Drumset
Resohard
Slap
Scratch1
Scratch2
Sticks
Casiodr3
Casiodr1
Casiodr2
TR808bs
CR78Bass
CR78Rim
CR78Snre
TR909clp
TR808sn
TR808tom
CR78hhat
TR808tom
Ravehat
TR808tom
CR78hhat
TR808tom
TR808tom
CR78cymb
TR808tom
Ride
ChinaCrs
RideBell
CR78Tamb
Splash
TR808Cow
Crash1
VibraSlp
Ride
Linn Drumset
Resohard
Slap
Scratch1
Scratch2
Sticks
Casiodr3
Casiodr1
Casiodr2
Solid
Linnkick
Stick
Linnsnre
TR808clp
Linnsnre
Linntom
ClsdHhat
Linntom
Foothhat
Linntom
Openhhat
Linntom
Linntom
Crash1
Linntom
Ride
Chinacrs
Ridebell
Tamburin
Splash
Cowbell
Crash2
Vibraslp
Ride
RockSet
Resohard
Slap
Scratch1
Scratch2
Sticks
Casiodr3
Casiodr1
Casiodr2
BassDrum
Kickdrum
Stick
Gated_Sd
TR808Clp
Snare
Tom_2
ClsdHhat
Tom_2
FootHhat
Tom_2
OpenHhat
Tom_1
Tom_1
Crash1
Tom_1
Ride
Chinacrs
Ridebell
Tamburin
Splash
Cowbell
Crash2
Vibraslp
Ride
Modular1 Drumset Modular2 Drumset
Zip
Slap
Scratch1
Scratch2
Sticks
Casiodr3
Casiodr1
Casiodr2
An_kick3
An_kick4
Anlgrim
Anlperc2
TR808clp
TR909sn
Anatoms2
Anlghhat
Anatoms2
Ravehat
Anatoms2
Anlghhat
Anatoms2
Anatoms2
Anlgcymb
Anatoms2
TR606cym
Chinacrs
Ridebell
CR78Tamb
Splash
TR808cow
Anlgsfx
Vibraslp
Ride
Zipup
Zap
Zilp
Zip
Zapping
Moogtom
Moogtom
Moogtom
F909_kik
An_kick5
Anlperc1
TR909sn
FiltClap
FiltSnre
Anatoms3
TR909chh
Anatoms3
Anlghhat
Anatoms3
TR909ohh
Anatoms3
Anatoms3
CR78cymb
Anatoms3
TR606cym
MS20perc
Anlgsfx
CR78tamb
Anlgcymb
TR808cow
Crash2
Anlgelec
Ride
c3 60
c#3 61
d3 62
d#3 63
e3 64
f3 65
f#3 66
g3 67
g#3 68
a3 69
a#3 70
h3 71
c4 72
c#4 73
d4 74
d#4 75
e4 76
f4 77
f#4 78
g4 79
g#4 80
a4 81
a#4 82
h4 83
c5 84
c#5 85
BongoHi
BongoLo
CR78cnga
CR78cnga
CR78cnga
Timbale
Timbale
HiAgogo
LoAgogo
Cabasa
TR808Mrs
ShrtWhis
LongWhis
GuiroSht
CR78Guir
CR78Clav
Woodblok
Woodblok
Cuicalo
Cuicahi
Mt_Trngl
Triangle
Shaker
Tamburin
Belltree
Castanet
Bongohi
Bongolo
Congaslp
Congahi
Congalo
Timbale
Timbale
HiAgogo
LoAgogo
Cabasa
Maracas
ShrtWhis
LongWhis
Guirosht
Guiro
Clave
Woodblok
Woodblok
Cuicalo
Cuicahi
Mt_Trngl
Triangle
Shaker
Tamburin
Belltree
Castanet
Bongohi
Bongolo
Congaslp
Congahi
Congalo
Timbale
Timbale
HiAgogo
LoAgogo
Cabasa
Maracas
ShrtWhis
LongWhis
Guirosht
Guiro
Clave
Woodblok
Woodblok
CuicaLo
CuicaHi
Mt_Trngl
Triangle
Shaker
Tamburin
Belltree
Castanet
BongoHi
BongoLo
TR808clo
TR808cmi
TR808chi
Anlperc3
Anlperc4
HiAgogo
LoAgogo
Cabasa
TR808Mrs
ShrtWhis
LongWhis
Anlguir1
Anlguir2
TR808cla
Anlperc5
Woodblok
Cuicalo
Cuicahi
Mt_Trngl
Triangle
El_Shako
Moogtom
Ms20Perc
Castanet
Bongohi
Bongolo
TR808clo
TR808cmi
TR808chi
Anlklock
Anlklock
Anlperc4
Anlperc5
Cabasa
TR808Mrs
ShrtWhis
LongWhis
Guirosht
Guiro
TR808cla
Woodblok
Woodblok
CuicaLo
CuicaHi
Mt_Trngl
Triangle
Shaker
MS20perc
Belltree
Castanet
45
Page 46

23.) Listing of the drumsets
d#0 27
e0 28
f0 29
f#0 30
g0 31
g#0 32
a0 33
a#0 34
h0 35
c1 36
c#1 37
d1 38
d#1 39
e1 40
f1 41
f#1 42
g1 43
g#1 44
a1 45
a#1 46
h1 47
c2 48
c#2 49
d2 50
d#2 51
e2 52
f2 53
f#2 54
g2 55
g#2 56
a2 57
a#2 58
h2 59
Zipup
Zap
Zilp
Zip
Zapping
TR909tom
TR909tom
TR909tom
Anlklock
DanceKik
An_kick1
An_kick2
An_kick3
An_kick4
An_kick5
Bassdrum
CR78bass
Kickdrum
Linnkick
TR606bs
TR808bs
TR909bs
F909_kik
CR78snre
Snare
Gated_Sd
Linnsnre
TR909sn
Snredrum
TR606snr
TR808sn
TR808clp
Filtclap
Vintage DrumsetKicks&Snares Drumset
Anlgcymb
Anlgcymb
Anlgcymb
Anlgcymb
Anlgelec
Anlgelec
Anlgelec
Anlklock
TR606bs
CR78bass
CR78rim
CR78snre
CR78snre
TR606snr
TR909Tom
CR78hhat
TR606Tom
TR606hh
TR909Tom
TR606ohh
TR606Tom
TR909Tom
TR606cym
TR606Tom
TR606cym
CR78cymb
Anlgcymb
CR78tamb
MS20Perc
AnlgSfx
Anlgrim
Anlperc5
Anlperc4
Dry Set
Resohard
Slap
Scratch1
Scratch2
Sticks
Casiodr3
Casiodr1
Casiodr2
Linnkick
Solid
Stick
Linnsnre
TR808clp
SnreDrum
Tom_2
ClsdHhat
Tom_2
FootHhat
Tom_2
OpenHhat
Tom_1
Tom_1
Crash1
Tom_1
Ride
Chinacrs
RideBell
Tamburin
Splash
Cowbell
Crash2
Vibraslp
Ride
DanceSet
Resohard
Slap
Bongolo
Bongohi
Sticks
Zip
Zilp
MS20Perc
TR808bs
DanceKik
TR808rim
TR909sn
TR808clp
SnreDrum
TR909tom
TR909chh
TR808tom
Ravehat
TR909tom
TR909ohh
TR808tom
TR909tom
Crash1
TR808tom
Ride
VocHit
Ridebell
Tamburin
Splash
TR808cow
Crash2
Vibraslp
Ride
Noisy SFX
Anatoms1
Anatoms2
Anatoms3
Anatoms1
Anatoms2
Anatoms3
Anatoms1
Anatoms2
Anatoms3
DanceKik
Anlperc1
Anlperc2
Anlperc3
Anlperc4
Anlperc5
Anlgcymb
Anlgcymb
Anlgcymb
Anlgrim
Anlgrim
Anlgrim
Anlgsfx
Anlgsfx
Anlgsfx
Anlklock
Anlklock
Anlklock
Anlgelec
Anlgelec
Anlgelec
Anlghhat
Anlghhat
Anlghhat
c3 60
c#3 61
d3 62
d#3 63
e3 64
f3 65
f#3 66
g3 67
g#3 68
a3 69
a#3 70
h3 71
c4 72
c#4 73
d4 74
d#4 75
e4 76
f4 77
f#4 78
g4 79
g#4 80
a4 81
a#4 82
h4 83
c5 84
c#5 85
TR909clp
Stick
TR808rim
TR909stk
CR78rim
Sticks
TR909chh
TR909ohh
TR808chh
TR808ohh
ClsdHhat
OpenHhat
Crash1
Crash2
TR606cym
CR78cymb
Tamburin
Maracas
Cabasa
Congaslp
Congahi
Congalo
Bongohi
Bongolo
Cowbell
TR808Cow
Anlperc3
Anlperc2
CR78cnga
CR78cnga
CR78cnga
Anlperc1
Anlklock
Anlghhat
Anlguir1
Anlguir2
Anlgelec
Anlgcymb
Anlgcymb
CR78guir
TR909bs
TR909stk
TR909sn
TR909chh
TR909ohh
TR808bs
TR808rim
TR808sn
TR808clp
TR909clp
Crash1
Crash2
Bongohi
Bongolo
Congaslp
Congahi
Congalo
Timbale
Timbale
HiAgogo
LoAgogo
Cabasa
Maracas
ShrtWhis
LongWhis
Guirosht
Guiro
Clave
Woodblok
Woodblok
Cuicalo
Cuicahi
Mt_Trngl
Triangle
Shaker
Tamburin
Belltree
Castanet
Scratch1
Scratch2
Congaslp
Congahi
Congalo
Timbale
Timbale
HiAgogo
LoAgogo
Cabasa
Maracas
ShrtWhis
LongWhis
GuiroSht
Guiro
Clave
Woodblok
Woodblok
Cuicalo
Cuicahi
Mt_Trngl
Triangle
Vocokick
Vocopop
Vocozish
Castanet
DrumsFX1
DrumsFX2
Eff_Shak
Moogtom
Moogtom
Moogtom
Pudding1
Pudding2
VocoKick
VocoPop
VocoZish
Zap
Zapping
Resohard
Zip
Zilp
Zipup
MS20Perc
MS20Perc
MS20Perc
El_Shako
Crash1
Crash2
TR909sn
TR808clp
TR808sn
46
Page 47

23.) Listing of the drumsets
d#0 27
e0 28
f0 29
f#0 30
g0 31
g#0 32
a0 33
a#0 34
h0 35
c1 36
c#1 37
d1 38
d#1 39
e1 40
f1 41
f#1 42
g1 43
g#1 44
a1 45
a#1 46
h1 47
c2 48
c#2 49
d2 50
d#2 51
e2 52
f2 53
f#2 54
g2 55
g#2 56
a2 57
a#2 58
h2 59
Resohard
Slap
Scratch1
Scratch2
Sticks
Casiodr3
Casiodr1
Casiodr2
TR606bs
CR78Bass
CR78Rim
CR78Snre
TR808Clp
TR606Snr
TR606Tom
TR606Hh
TR808Tom
CR78Hhat
TR606Tom
TR606Ohh
TR808Tom
TR606Tom
CR78Cymb
TR808Tom
Ride
TR808Crs
Ridebell
CR78tamb
Splash
TR808Cow
TR606Cym
VibraSlp
Ride
TR909St2
Resohard
Slap
Scratch1
Scratch2
Sticks
Casiodr3
Casiodr1
Casiodr2
An_Kick1
TR909bs
TR909stk
TR909sn
TR909clp
TR808sn
TR909tom
TR909chh
TR909tom
Ravehat
TR909tom
TR909ohh
TR909tom
TR909tom
Crash2
TR909tom
Ride
ChinaCrs
RideBell
Tamburin
Splash
TR808Cow
Crash1
VibraSlp
Ride
TR808St2Old_Box Drumset
Resohard
Slap
Scratch1
Scratch2
Sticks
Casiodr3
Casiodr1
Casiodr2
An_Kick2
TR808Bs
TR808Rim
TR808sn
TR808clp
TR909sn
TR808tom
TR808chh
TR808tom
Ravehat
TR808tom
TR808ohh
TR808tom
TR808tom
TR808crs
TR808tom
Ride
ChinaCrs
Ridebell
Tamburin
Splash
TR808Cow
Crash2
Vibraslp
Ride
Effects
Anatoms1
Anatoms2
Anatoms3
Anatoms1
Anatoms2
Anatoms3
Anatoms1
Anatoms2
Anatoms3
DanceKik
Anlperc1
Anlperc2
Anlperc3
Anlperc4
Anlperc5
Anlgcymb
Anlgcymb
Anlgcymb
Anlgrim
Anlgrim
Anlgrim
Anlgsfx
Anlgsfx
Anlgsfx
Anlklock
Anlklock
Anlklock
Anlgelec
Anlgelec
Anlgelec
Anlghhat
Anlghhat
Anlghhat
Pan_FX
Anatoms1
Anatoms2
Anatoms3
Anatoms1
Anatoms2
Anatoms3
Anatoms1
Anatoms2
Anatoms3
DanceKik
Anlperc1
Anlperc2
Anlperc3
Anlperc4
Anlperc5
Anlgcymb
Anlgcymb
Anlgcymb
Anlgrim
Anlgrim
Anlgrim
Anlgsfx
Anlgsfx
Anlgsfx
Anlklock
Anlklock
Anlklock
Anlgelec
Anlgelec
Anlgelec
Anlghhat
Anlghhat
Anlghhat
c3 60
c#3 61
d3 62
d#3 63
e3 64
f3 65
f#3 66
g3 67
g#3 68
a3 69
a#3 70
h3 71
c4 72
c#4 73
d4 74
d#4 75
e4 76
f4 77
f#4 78
g4 79
g#4 80
a4 81
a#4 82
h4 83
c5 84
c#5 85
CR78Cnga
CR78Cnga
TR808Cmi
TR808Chi
TR808Clo
Timbale
Timbale
HiAgogo
LoAgogo
Cabasa
TR808Mrs
ShrtWhis
LongWhis
GuiroSht
CR78Guir
CR78Clav
Woodblok
Woodblok
Cuicalo
Cuicahi
Mt_Trngl
Triangle
Shaker
Congaslp
Congahi
Congalo
BongoHi
BongoLo
TR808Clo
TR808Cmi
TR808Chi
Timbale
Timbale
HiAgogo
LoAgogo
Cabasa
TR808Mrs
ShrtWhis
LongWhis
GuiroSht
Guiro
TR808Cla
WoodBlok
WoodBlok
Cuicalo
Cuicahi
Mt_Trngl
Triangle
Shaker
Tamburin
BellTree
Castanet
Bongohi
Bongolo
TR808clo
TR808cmi
TR808chi
Timbale
Timbale
HiAgogo
LoAgogo
Cabasa
TR808mrs
ShrtWhis
LongWhis
Guirosht
Guiro
TR808cla
Woodblok
Woodblok
Cuicalo
Cuicahi
Mt_Trngl
Triangle
Shaker
Tamburin
Belltree
Castanet
DrumsFX1
DrumsFX2
Eff_Shak
Moogtom
Moogtom
Moogtom
Pudding1
Pudding2
VocoKick
VocoPop
VocoZish
Zap
Zapping
Resohard
Zip
Zilp
Zipup
MS20Perc
MS20Perc
MS20Perc
El_Shako
Crash1
Crash2
TR909sn
TR808clp
TR808sn
DrumsFX1
DrumsFX2
Eff_Shak
Moogtom
Moogtom
Moogtom
Pudding1
Pudding2
VocoKick
VocoPop
VocoZish
Zap
Zapping
Resohard
Zip
Zilp
Zipup
MS20Perc
MS20Perc
MS20Perc
El_Shako
Crash1
Crash2
TR909sn
TR808clp
TR808sn
47
Page 48

23.) Listing of the drumsets
d#0 27
e0 28
f0 29
f#0 30
g0 31
g#0 32
a0 33
a#0 34
h0 35
c1 36
c#1 37
d1 38
d#1 39
e1 40
f1 41
f#1 42
g1 43
g#1 44
a1 45
a#1 46
h1 47
c2 48
c#2 49
d2 50
d#2 51
e2 52
f2 53
f#2 54
g2 55
g#2 56
a2 57
a#2 58
h2 59
BeatBox
Resohard
Slap
Scratch1
Scratch2
Sticks
Casiodr3
Casiodr1
Casiodr2
TR808bs
CR78Bass
CR78Rim
CR78Snre
TR909clp
TR808sn
TR808tom
CR78hhat
TR808tom
Ravehat
TR808tom
CR78hhat
TR808tom
TR808tom
CR78cymb
TR808tom
Ride
ChinaCrs
RideBell
CR78Tamb
Splash
TR808Cow
Crash1
VibraSlp
Ride
Vintage2
Anlgcymb
Anlgcymb
Anlgcymb
Anlgcymb
Anlgelec
Anlgelec
Anlgelec
Anlklock
TR606bs
CR78bass
CR78rim
CR78snre
CR78snre
TR606snr
TR909Tom
CR78hhat
TR606Tom
TR606hh
TR909Tom
TR606ohh
TR606Tom
TR909Tom
TR606cym
TR606Tom
TR606cym
CR78cymb
Anlgcymb
CR78tamb
MS20Perc
AnlgSfx
Anlgrim
Anlperc5
Anlperc4
Modular3
Zip
Slap
Scratch1
Scratch2
Sticks
Casiodr3
Casiodr1
Casiodr2
An_kick3
An_kick4
Anlgrim
Anlperc2
TR808clp
TR909sn
Anatoms2
Anlghhat
Anatoms2
Ravehat
Anatoms2
Anlghhat
Anatoms2
Anatoms2
Anlgcymb
Anatoms2
TR606cym
Chinacrs
Ridebell
CR78Tamb
Splash
TR808cow
Anlgsfx
Vibraslp
Ride
Standrd2
Resohard
Slap
Scratch1
Scratch2
Sticks
Casiodr3
Casiodr1
Casiodr2
Solid
Bassdrum
Stick
Snare
TR808clp
SnreDrum
Tom_2
Clsdhhat
Tom_2
Foothhat
Tom_2
OpenHhat
Tom_1
Tom_1
Crash1
Tom_1
Ride
Chinacrs
Ridebell
Tamburin
Splash
Cowbell
Crash2
VibraSlp
Ride
c3 60
c#3 61
d3 62
d#3 63
e3 64
f3 65
f#3 66
g3 67
g#3 68
a3 69
a#3 70
h3 71
c4 72
c#4 73
d4 74
d#4 75
e4 76
f4 77
f#4 78
g4 79
g#4 80
a4 81
a#4 82
h4 83
c5 84
c#5 85
BongoHi
BongoLo
CR78cnga
CR78cnga
CR78cnga
Timbale
Timbale
HiAgogo
LoAgogo
Cabasa
TR808Mrs
ShrtWhis
LongWhis
GuiroSht
CR78Guir
CR78Clav
Woodblok
Woodblok
Cuicalo
Cuicahi
Mt_Trngl
Triangle
Shaker
Tamburin
Belltree
Castanet
Anlperc3
Anlperc2
CR78cnga
CR78cnga
CR78cnga
Anlperc1
Anlklock
Anlghhat
Anlguir1
Anlguir2
Anlgelec
Anlgcymb
Anlgcymb
CR78guir
TR909bs
TR909stk
TR909sn
TR909chh
TR909ohh
TR808bs
TR808rim
TR808sn
TR808clp
TR909clp
Crash1
Crash2
BongoHi
BongoLo
TR808clo
TR808cmi
TR808chi
Anlperc3
Anlperc4
HiAgogo
LoAgogo
Cabasa
TR808Mrs
ShrtWhis
LongWhis
Anlguir1
Anlguir2
TR808cla
Anlperc5
Woodblok
Cuicalo
Cuicahi
Mt_Trngl
Triangle
El_Shako
Moogtom
Ms20Perc
Castanet
BongoHi
BongoLo
CongaSlp
CongaHi
CongaLo
Timbale
Timbale
HiAgogo
LoAgogo
Cabasa
Maracas
ShrtWhis
LongWhis
GuiroSht
Guiro
Clave
Woodblok
Woodblok
Cuicalo
Cuicahi
Mt_Trngl
Triangle
Shaker
Tamburin
BellTree
Castanet
48
Page 49

25.) Warranty-Agreement
Please fill out the card on the following page and send it back to:
QUASIMIDI GmbH
Bahnhofstr. 44
35282 Rauschenberg
Germany
How to validate the warranty
To validate your warranty, fill out the enclosed warranty card and return it to QUASIMIDI within ten days of the purchase date.
Without returning the warranty card we only grant for 6 months of full warranty instead of 12 months.
What is covered and what is not covered ?
This warranty covers all defects in material and workmanship for six (twelve) months from the date of original purchase. This
warranty does not cover damage to or deterioration of the external cabinet or internal circuitry resulting from accident, misuse,
neglect, attempted unauthorized repair or failure to follow instructions in the owners manual.
This warranty does not cover units that have been modified or altered (The only exception is an Authorized QUASIMIDI
modification which includes its own warranty coverages).
This warranty does not cover damage that may occur during shipping.
Software/Firmware are sold as is and are not covered by warranty.
QUASIMIDI accessory items are covered under a separate limited warranty.
How to obtain warranty performance
Return your unit to an Authorized QUASIMIDI Repair Station. If you are unable to locate one, write or call the QUASIMIDI
Factory Service Department. We will either refer you to an Authorized Repair Staion or issue you a return authorization
number for factory service. Units returned to QUASIMIDI for factory service must prominently display the authorization
number on the outside of the shipping carton and on all related documents or units will be returned freight collect. You must
pay all shipping costs to and from the factory.
Shipment of the product to QUASIMIDI is the responsibility of the owner, and should be insured by the owner for the full
value of the product.
NO CLAIM FOR WARRANTY WILL BE HONORED WITHOUT PROOF OF PURCHASE
Limitations of implied warranties and exclusion of certain damages
Any implied warranties, including warranties of merchantability and fitness for a particular purpose are limited in duration to
the lenght of the warranty.
QUASIMIDI´s liability, for any defective product, is limited to repair or replacement of the product.
QUASIMIDI shall not be liable under any circumstances for:
1. Damages based upon inconvenience, loss of use of the unit, loss of time, interrupted operation or commercial loss.
2. Any other damages, whether incidental, consequential or otherwise, except damages which may not be excluded under
applicable law
49
Page 50

26.) Warranty and registration
Please answer the following questions, this will be a big help for our development of new products. We will take your wishes
and suggestions very seriously.
Serial-Number of your Technox:
Name:
Birthday:
Address:
Postcode:
What kind of music do you make ?
Which other keyboards and expanders do you use in addition to the Technox ?
Are you a Live- or a Studio-Musician ?
Do you use a computer (Which one?) for making music ?
Which sounds of the Technox do you like the best ?
Which sounds of the Technox don´t you like ?
Do you use the ARPEGGIATOR ?
General wishes and suggestions:
Whitch other products of QUASIMIDI do you know ?
Do you use pre-programmed Songs (Standard-Midi-Files) ?
50
Page 51

Technische Daten
Technical Specifications
Sound Synthesis: MASS (Multi Algorithm Sound Synthesis)
Front Panel
Knob: PARAMETER/SOUNDGROUP,
Key: Power, EDIT/OK, PART/BANK (x2),
Display: 2x16 character LCD
Connector: Headphones (6,3 mm stereo jack)
Rear Panel
Connector: Output L, R (6,3 mm mono jack)
Power
Power Requirement: AC220V, 50 Hz
Power Consumption:11 watts maximum
Physical
Dimensions: 484 mm (width) x 48 mm (height) x 257 mm (depth),
Weight: 3,5 kg
21 voice polyphonic, 16 part multi-timbral
VALUE/SOUND,
Volume
EXIT
Footswitch (6,3 mm mono jack)
MIDI In, Out, Thru (DIN 5p x 3)
Power Inlet (3 pin, IEC-320 standard)
(width 429 mm w/o front panel)
EIA 1 rack unit size
51
Page 52

52
Page 53

Copyright ´94 QUASIMIDI Musikelektronik GmbH
53
 Loading...