


1

The lightning flash with arrowhead symbol, within an
equilateral triangle, is intended to alert the user to presence of uninsulated "dangerous voltage" within the product's enclosure that may be of sufficient magnitude to
constitute a risk of electric shock to persons.
The exclamation point within an equilateral triangle is
intended to alert the user to the presence of important
operating and maintanance (servicing) instructions in the
literature accompanying the product.
INSTRUCTIONS PERTAINING TO A RISK OF FIRE, ELECTRIC SHOCK, OR INJURY TO PERSONS
IMPORTANT SAFETY INSTRUCTIONS
WARNING - When using electric products, basic precautions should always be followed, including the following:
1.
Read all the intructions before using the product.
2.
Do not use this product near water - for example, near a
bathtub, washbowl, kitchen sink, in a wet basement, or
near a swimming pool, or the like.
3.
This product should be used only with a cart or stand that
is recommended by the manufacturer.
4.
This product, either alone or in combination with an
amplifier and headphones or speakers, may be capable of
producing sound levels that could cause permanent hearing
loss. Do not operate for long period of time at a high
volume level or at a level that is uncomfortable. If you
experience any hearing loss or ringing in the ears, you
should consult an audiologist.
5.
The product should be located so that its location or position
does not interfere with its proper ventilation.
6.
The product should be located away from heat sources
such as radiators, heat registers, or other products that
produce heat.
7.
Avoid using the product where it may be affected by dust.
8.
The product should be connected to a power-supply of the
type described in the operating instructions or as marked
on the product.
9.
The power-supply cord of the product should be unplugged
from the outlet when left unused for a long period of time.
10.
Do not tread on the power-supply cord.
11.
Do not pull the cord but hold the plug when unplugging.
12.
When setting up with any other instruments, the procedure
should be followed in accordance with instruction manual.
13.
Care should be taken so that objects do not fall and liquids
are not spilled into the enclosure through openings.
14.
The product should be serviced by qualified service
personnel when:
A.
The power-supply cord or the plug has been damaged;
or
B.
Objects have fallen, or liquid has been spilled into the
product; or
C.
The product has been exposed to rain; or
D.
The product does not appear to operate normally or
exhibits a marked change in performance; or
E.
The product has been dropped, or the enclosure
dammaged.
15. Do not attempt to service the product beyond that described
in the user-maintanance instructions. All other servicing
should be referred to qualified personnel.
SAVE THESE INSTRUCTIONS
The CE-Sign on our products declares that our electrical devices are in conformity with the EN 55014 and
EN 50082-1(in accordance with 89/336 EMC- and EEC directive). The manufacturer also declares the
conformity of above mentioned product with the actual required safety standards.
2

NOTICE
This equipment generates and uses radio frequency energy and if not installed and used properly, that is, in
strict accordances with the manufacturer's instructions, may causes interference to radio and television
reception. It has been type tested and found to comply with the limits for a class B computing device in
accordance with the specifications in Subpart J of Part 15 of FCC Rules, which are designated to provide
reasonable protection against such interference in a residential installation. However, there is no guarantee
that interference will not occur in a particular installation. If this equipment does cause interference to
radio or television reception, which can be determined by turning the equipment OFF and ON, the user is
encouraged to try to correct the interference by one or more of the following measures:
Reorient the receiving antenna
Relocate the computer with respect to the receiver
Move the computer away from the receiver
Plug the computer into different outlet so that the computer and receiver are on different
branch circuits.
If necessary, the user should consult the dealeror an experienced radio/television technician for additional
suggestions. The user may find the following booklet prepared by the Federal Communications Commission helpful:
"How to Identify and Resolve Radio-TV Interference Problems."
This booklet is available from the U.S. Government printing Office, Washington, D.C. 20402, Stock No.
004-000-00345-4.
Technical Specifications:
Keyboard: 61 keys, 5 octaves
Velocity and Aftertouch sensitive
Sound Synthesis: MASS (Multi Algorithm Sound Synthesis)
21 voice polyphonic, 16 part multi-timbral
512 Single Sounds, 250 Performances
Front Panel-
Dials: VALUE-TEMPO, PAGE, F1-F4, VOLUME
Buttons: SONG/BANK-SELECT, SOFT-buttons, TRACK-Buttons, SOLO-button, PLAY, STOP,
MODE, TAB, EDIT, WRITE.
Display: 2x40 character LCD
Rear Panel-
Connector Output L, R (6,3 mm mono jack), Footswitch (6,3 mono jack), Headphone (6,3 mm
stereo jack)
MIDI In, Out, Thru (5 pin DIN),
Europe, Japan : Power (standard 3 pin IEC-320)
USA: DC Power Adapter plug
PowerRequirement: Japan: 100VAC/ 18 VAC, 60 Hz
Europe: 230VAC/ 18 VA, 50 Hz
USA: 12VDC/ 2A *
* Please only use the AC-Adapter, which is shipped by manufacturer.
Consumption: 11 watts maximum
PhysicalDimensions: 1025mm (width) x 102mm (height) x 388mm (depth)
Weight: 12,5 kg
3

Table of Contents
Connections and first switch on................................................................................................................................................... 6
Introduction................................................................................................................................................................................... 6
The RAVEN's User Interface...................................................................................................................................................... 8
Tutorial 1: Getting to know The RAVEN .................................................................................................................................. 9
Tutorial 2: Creating new Patterns by random selection of preprogrammed Motives ......................................................... 13
Random creation of new Patterns ....................................................................................................................... 14
Selecting sounds..................................................................................................................................................... 15
The creation of Breaks .......................................................................................................................................... 15
Muting Tracks ....................................................................................................................................................... 16
Realtime Transpose ............................................................................................................................................... 17
Adjusting Volumes ................................................................................................................................................ 17
User Motives in the Create Pattern section......................................................................................................... 17
The Solo Part ......................................................................................................................................................... 17
Writing Patterns to Song memory ....................................................................................................................... 17
Tutorial 3: Playing live on Stage............................................................................................................................................... 19
Realtime Control of Synth parameters ............................................................................................................... 20
Tempo control ........................................................................................................................................................ 20
Realtime Transpose and Muting with the keyboard .......................................................................................... 20
Adding the Motivator ........................................................................................................................................... 21
More Realtime access............................................................................................................................................ 21
Tutorial 4: Production of complete Songs ................................................................................................................................ 21
Create Song function............................................................................................................................................. 22
Song Editing .......................................................................................................................................................... 23
Editing an existing Songstep ................................................................................................................................ 24
Part Editing ................................................................................................................................................................................. 25
Sound selection and Part mode ............................................................................................................................ 26
Output Routing ..................................................................................................................................................... 27
Tuning Parts .......................................................................................................................................................... 28
Synthesis Filters..................................................................................................................................................... 28
Envelope section .................................................................................................................................................... 29
Pitch Modulation ................................................................................................................................................... 29
Modulation amount............................................................................................................................................... 29
Key Velocity, Portamento Time and Hold .......................................................................................................... 30
Common menu: Performance programming .......................................................................................................................... 31
Selecting the Performance Type: ......................................................................................................................... 31
Footswitch functions: ............................................................................................................................................ 33
Modulation Matrix................................................................................................................................................ 33
Editing the Motivator ................................................................................................................................................................. 35
Groove Quantize.................................................................................................................................................... 37
Note Directions ...................................................................................................................................................... 37
Global Song parameters
Editing Play and Groove parameters in Sequencer mode................................................................................. 38
Changing the Repetition Point ............................................................................................................................. 39
Pattern Editing............................................................................................................................................................................ 40
Selecting the Edit Pattern menu .......................................................................................................................... 40
Loading a ROM Pattern ....................................................................................................................................... 41
Changing the Motive Assignment of Patterns .................................................................................................... 41
Setting Track Volumes .......................................................................................................................................... 42
Deleting Tracks and Controller data, Adjusting Motive lengths, and the Metronome .................................. 42
Recording User Motives ....................................................................................................................................... 42
Realtime Recording............................................................................................................................................... 43
Drum programming (TR-909 style) .................................................................................................................... 44
Global Song parameters
Step-by-Step programming .................................................................................................................................. 45
Grooves and breaks............................................................................................................................................... 45
The RAVEN's Effects Processors ............................................................................................................................................. 46
4

Table of Contents
Reverb .................................................................................................................................................................... 48
Gated Reverb ......................................................................................................................................................... 48
Early Reflection programs ................................................................................................................................... 49
Delay ....................................................................................................................................................................... 50
Chorus .................................................................................................................................................................... 51
Flanger ................................................................................................................................................................... 52
Phaser ..................................................................................................................................................................... 52
Panning .................................................................................................................................................................. 52
Delay ....................................................................................................................................................................... 53
Gated Delay ........................................................................................................................................................... 54
Special-FX .............................................................................................................................................................. 55
Equalizer ................................................................................................................................................................ 55
Wah-Wah ............................................................................................................................................................... 56
Auto Wah-Wah ...................................................................................................................................................... 56
Distortion ............................................................................................................................................................... 57
Rotary ..................................................................................................................................................................... 58
Tremolo .................................................................................................................................................................. 58
Ring Modulation ................................................................................................................................................... 59
No Effect................................................................................................................................................................. 60
Realtime Effects Control ............................................................................................................................................................ 60
Realtime parameters of FX-2 ............................................................................................................................... 62
Editing the Percussion Drumpart ............................................................................................................................................. 63
System parameters ..................................................................................................................................................................... 64
Master Tune ........................................................................................................................................................... 64
Keyboard parameters ........................................................................................................................................... 64
Key Velocity curves ............................................................................................................................................... 64
MIDI parameters .................................................................................................................................................. 65
MIDI Input handling ............................................................................................................................................ 65
MIDI Output handling ......................................................................................................................................... 65
Write menu ................................................................................................................................................................................. 66
Write menu in Sequencer mode ........................................................................................................................... 66
Storing Song and Pattern data ............................................................................................................................. 66
Initializing the Temporary Song .......................................................................................................................... 67
Initializing Part parameters ................................................................................................................................. 67
Dumping Temporary Song data .......................................................................................................................... 68
Copying Part parameters ..................................................................................................................................... 68
Write menu Dump functions ................................................................................................................................ 68
Dumping Song and Pattern data of all 10 songs................................................................................................. 69
Write menu in Performance mode ...................................................................................................................... 69
Storing a Performance .......................................................................................................................................... 69
Initializing the current Performance ................................................................................................................... 69
Initializing Single Parts......................................................................................................................................... 70
Copying Part parameters ..................................................................................................................................... 70
Dumping all Performances................................................................................................................................... 71
Dumping current Performance data (Temporary Dump)................................................................................. 71
Important notes if using an external sequencer ....................................................................................................................... 71
Selecting Single Sounds via MIDI ............................................................................................................................................. 74
Single Sound list .................................................................................................................................................... 74
Selecting Performances via MIDI ............................................................................................................................................. 75
Performance Sound list......................................................................................................................................... 75
Drumset list ................................................................................................................................................................................. 76
System Exclusive data ................................................................................................................................................................ 80
MIDI Implementation Chart ..................................................................................................................................................... 86
Initializing The RAVEN / Reload Factory set .......................................................................................................................... 87
Warranty and Registration Card .............................................................................................................................................. 88
5

Introduction
Introduction
Congratulations for purchasing The RAVEN. You have purchased an instrument which offers you enormous speed and flexibility in music production.
The RAVEN combines all the necessary components of a ‘TECHNO’ or ‘DANCEFLOOR’ studio in one
product. From the first day, this “studio” allows you to produce complete songs with the huge number of
included pre-programmed patterns in the form of Sequence motifs and Drum grooves. You can edit
existing patterns as well as creating your own, or just play The RAVEN in Sound mode, thus allowing you
to decide how to spend your first “Studio-Day”:
1) Getting started with sound generation of The RAVEN
2) Combining Grooves and Motives into new patterns.
3) Playing live on stage
4) The production of complete songs.
Because of the huge number of pre-produced motifs and sounds included in The RAVEN, you can get
started with production right away without having to learn every aspect of the instrument. Instead, just
pick out the pattern you want to work with and get started. For that reason, we have split this manual in
two sections. The first section is like walking around in a “virtual studio”. After several sessions you will
learn all about The RAVEN through various studio activities.
It is of minor importance which room of the studio you enter first. You can enter any room you like. The
second section of this manual contains details about all events in this virtual studio. It is for those who
have already looked in all the rooms in the studio.
We hope you enjoy your new instrument and that with The RAVEN you become a hit-making techno or
dancefloor producer.
Connections and
first switch on
On the rear of The RAVEN are two 6.3mm mono jacks for stereo audio output. These jacks should be
connected to your amplifier or mixer. There are also MIDI IN, OUT and THRU jacks to send and receive
MIDI data. In this chapter you get a detailed description of how to connect The RAVEN to other audio
equipment:
1) Connection with a home stereo amplifier
First, make sure power is switched off on both the amp and The RAVEN. You will need two audio cables
(1/4” male to RCA-type male x 2) to make this connection. Not all the inputs of an amp can be used in
combination with The RAVEN. Use an input described as followed:
1) AUX or auxiliary
2) LINE
3) CD
4) DAT
5) TAPE IN or TAPE PLAY
The PHONO input should not be used because it will distort the audio signal.
Before connecting The RAVEN to your amp, turn the volume of the amp to minimum and the volume The
RAVEN to maximum. Switch The RAVEN on first, then the amp. Switch the amp input to which The
RAVEN is connected and press the “EDIT-FX” and the “EXIT” button at the same time. You should now
hear the DEMO-song. Carefully turn up the volume of your amp until you are satisfied with the volume.
After your settings are done, go to the description of the front panel of The RAVEN.
6

Connecting other devices and first switch on
2) Connection with a mixer-console
When working with a mixing console use LINE inputs. MIC inputs are too sensitive to be used with The
RAVEN. Before connecting, switch off all equipment. Connect the audio outputs of The RAVEN with
two of the mixer’s line inputs. Turn the volume of The RAVEN to maximum and the input gain of the
mixer channel to minimum. To benefit from The RAVEN’s stereo sound, make sure the two mixer channels’ faders are set the same and their panning controls are opposite - one hard right, one hard left. The
master fader should also be set to minimum.
Switch on The RAVEN and the mixer now. Press the “EDIT-FX” and the ”EXIT” buttons of The RAVEN
at the same time to start the DEMO-song. Turn the gain of the mixer to a point which is under the level of
distortion. If your mixer has no metering for the audio level, slowly bring up the gain until distortion, then
turn it down until the distortion stops. Mixers with MIC/LINE switches should be set to LINE. If the
signal distorts with the gain all the way down, lower the volume of The RAVEN. The RAVEN sounds best
when its’ volume is set to maximum and the volume of the connected audio gear is set accordingly.
3) Connection with a professional amp
When using a keyboard amplifier, switch off all equipment before connecting it. Connect the audio outputs
of The RAVEN to the inputs of the amp. Turn the volume of the amp to minimum, and the volume of The
RAVEN to maximum. Switch on The RAVEN first, then the amp. Press the “EDIT-FX” and the “EXIT”
buttons on The RAVEN at the same time to start the DEMO-song. Carefully raise the gain of the amp to
a level that is just under distortion of the audio signal. Then raise the volume knob of the amp to the
desirable level. If the settings are to your satisfaction, go to the next part of the manual “THE FRONTPANEL
OF THE RAVEN”.
4) Working with headphones
The jack for connecting a headphone is on the right part of The RAVEN’s front panel, right next to the
volume knob. To avoid damage to your headphones, switch The RAVEN off before plugging phones in.
*Prolonged headphone listening at high volume levels could damage your hearing.
Audiooutputs
Footswitch
MIDI Power-
supply
Powerswitch
7
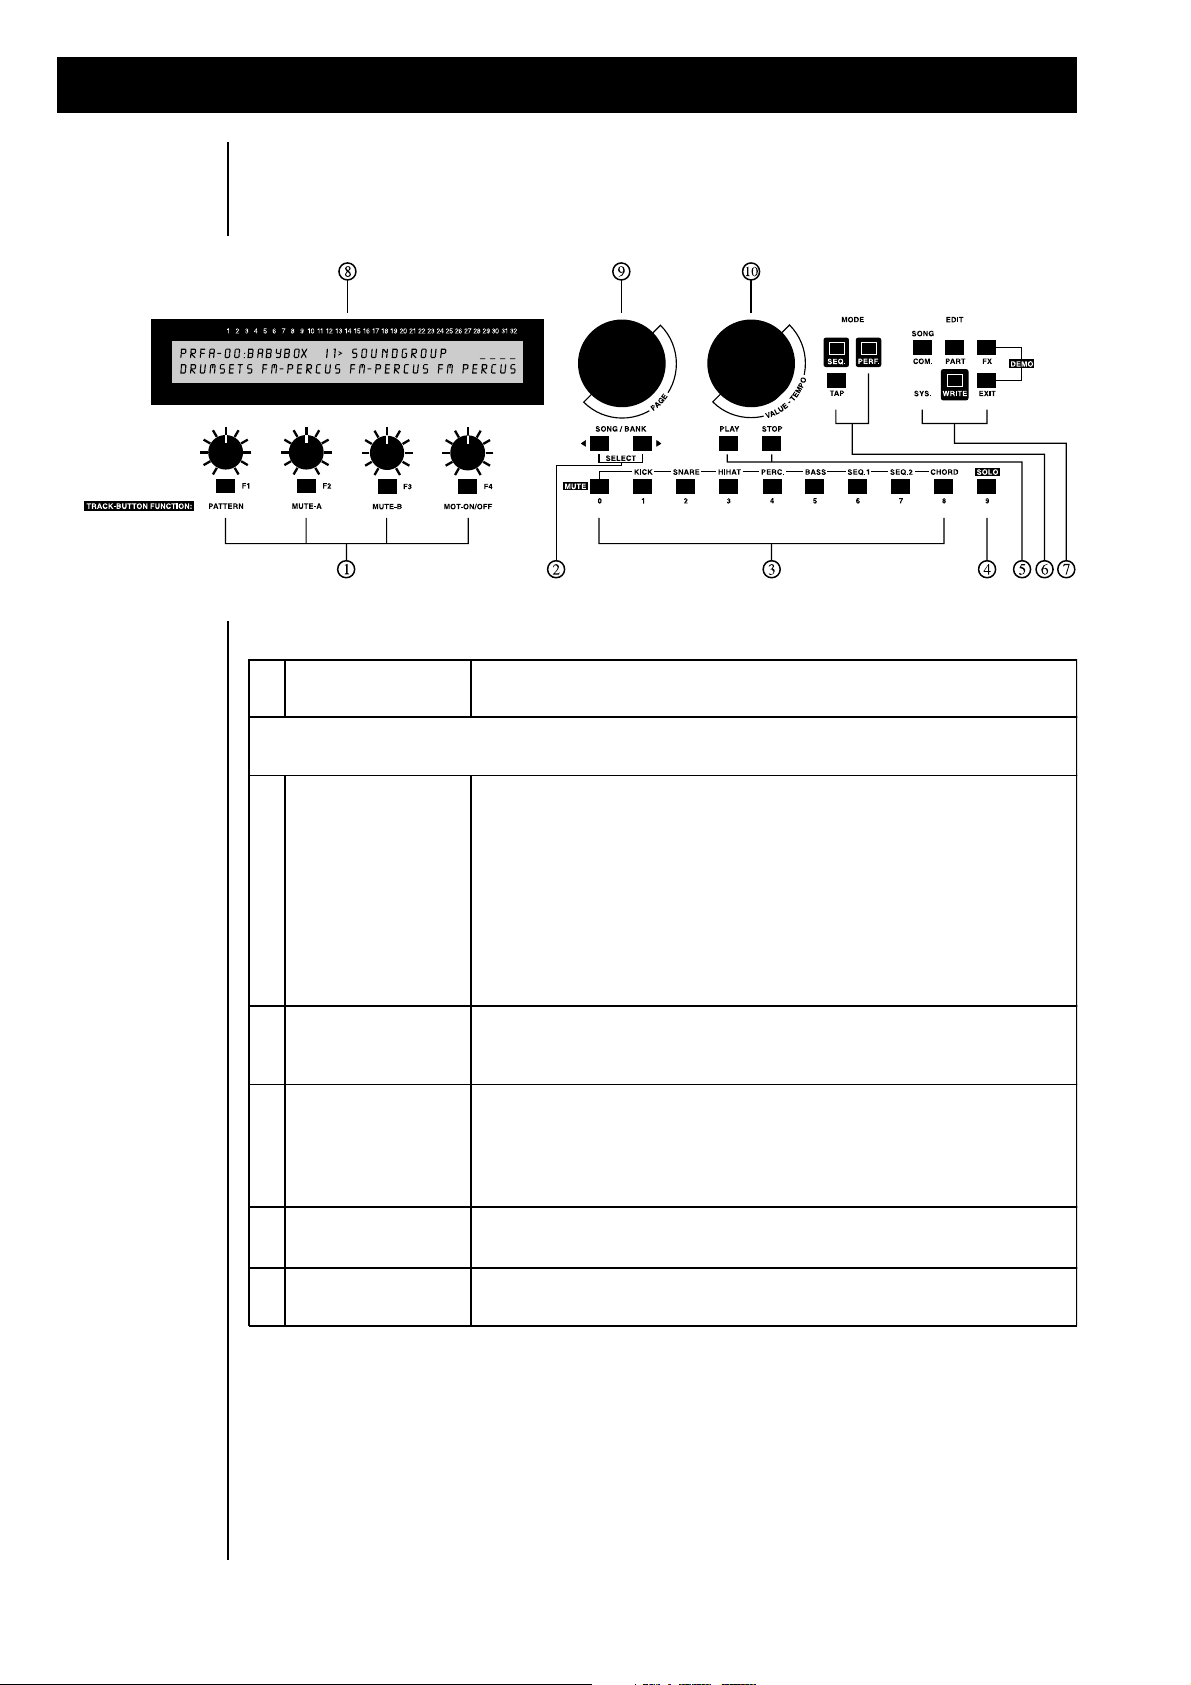
The RAVEN's User Interface
Nr
section
function
TheButtonshavedifferentfunctionsdependinguponwhetherTheRAVENisinSequencermodeorinPerformancemode.Performancemodefunctionsareprintedinred.
1
„SOFT“buttonsan
d
dialsfordataentry
.
Thedialscorrespondtothemenuparametersshowninthedisplay.
Courseadjustmentofparametersisbestdonewiththe"SOFT"dials,whereasfineadjustmentismoreeasilydonewiththe"VALUE"dial(see#10).Toeditaparameterwiththe"VALUE"dial,pressthe"SOFT"button.(Theyarecalled"SOFT"buttonsbecausetheirfunctionsarecontrolledbythesoftware).Theparameteravailableforeditingisshowninthedisplay.Besidesparameterseditedwiththe"VALUE"dial,the"SOFT"buttonsarealsousedincertainmenustoanswerpromptsorforotheractions.InSongPlaymodeyoucanchangethefunctionofthe"TRACK"buttons,(#3),withthe"SOFT"buttons.2„SONG/BANK-SELECT“-buttonsWiththesebuttonsyouselectdifferentSongandPerformancebanks.IntheEdit-part-menue,youselecttheparts,whicharenotpresentedwith"track"-buttons.(parts10-16)3„TRACK“-buttonsThe"TRACK"buttonshavediferentfunctionsindifferentmodes.InSequencermodethefunctionscanbechangedwiththe"SOFT"buttons.Thefunctionsareprintedinredunderthebuttons.InPerformancemod
e
thePerformancesofabankcanbeselectedwiththe"TRACK"buttons.
InbothPartandPerformanceEditmodeyoucanselecttheParts.4„SOLO“-buttonInSequencermodepressthisbuttontoaccesssoundswhileaccompanyingplayingsequence
.5„PLAY“-an
d
„STOP“-button
s
ThesebuttonsstartandstoptheSequencerorMotivator
.
The RAVEN's
User Interface
The DEMO-song you have heard may have interested you to start walking around in the virtual studio. To
prevent you from going the wrong way you should first learn about the front panel and the functions of the
different sections.
8

The RAVEN's User Interface
6
"TAP" button, "SEQ"
button and "PERF"
button
Repeatedly pess the "TAP " button in rhythm to set the Sequencer's tempo.
Pressing the "SEQ" button enters Sequencer mode. Pressing the "PERF"
button enters Performance mode.
7
"EDIT" button
"WRITE" button and
"EXIT" button
The "EDIT" button accesses The RAVEN's Edit modes. Pressing "EDIT FX"
and "EXIT" simultaneously starts The RAVEN's Demo Song. Pressing the
"EXIT" button leaves the current menu. The "WRITE" button selects the Save
function.
8
Display
The display shows detailed information about parameter settings, modes and
"SOFT button & dial functions.
9
"PAGE" dial
The "PAGE" dial scrolls through the submenus while in Edit mode. It is
indicated in the display if there is more than one menu page with the following
symbols: |1 > => Page one is selected, scroll right for more pages. < 2 > =>
Page two is selected, scroll either left or right for more pages. < 8| => Page
eight is selected, scroll left for more pages.
0
"VALUE/TEMPO"
dial
With the "VALUE/TEMPO" dial you can edit parameters in fine increments or
adjust the tempo of the Sequencer. The "SOFT buttons select which
parameter to edit. The selected parameter flashes.
Getting to know
The RAVEN
It doesn’t matter if there are chapters or terms you don’t completely understand. At first it is important to
know a little bit of the basic structure. When we first looked in our virtual studio and you were told to press
the “EXIT” button, you only needed to know where to find it. As we progress through different chapters
we will give more information about the data entry-buttons and dials.
We will now start looking around in our virtual studio. As was stated on the first few pages of this manual,
you decide which part of The RAVEN you want to learn about first.
In this part of our virtual studio we tend to the synthesizers of The RAVEN. We say ‘synthesizers’ because
The RAVEN offers a true “Multimode”. The RAVEN is able to produce several different synthesizer
sounds at the same time. This is important for producing complete songs. To become familiar with the
synthesizers of The RAVEN we will not use Sequencer-mode; we will use Performance-mode. To be get
into Performance-mode, press the “EXIT” button several times, then press the “PERF” button.
In the Performance-mode, you are able to select different “Performances”. Think of a Performance in our
virtual studio as programmable and routable studio settings. A Performance selects the desired Synthesizer modules, connects them with the Effects units and regulates all parameters of the setup. There are
200 ROM Performances and 50 user programmable Performances implemented in The RAVEN. The
Performance-mode is a great way to demonstrate the possibilities of The RAVEN because many aspects of
our virtual studio are used in the Performance-sounds. When a Performance is selected, the Effects associated with that Performance are also selected. The on-board Effects processor adds room simulations and
modulation to the sounds. Up to 4 of the 16 synthesizers in The RAVEN can be used in the Performancemode. All setups and parameters of these synthesizers are saved in a Performance. Besides the sound
generation and effects processing, another important tool has been added to our virtual studio. This tool is
called the “Motivator”. This tool triggers the synthesizers of The RAVEN in many ways and adds some
additional powerful effects. The Performances of a Performance-bank are chosen with the “TRACK”
buttons. Ten Performances are in every bank. With the “SONG/BANK SELECT” button you can choose
from the 25 banks.
9

Tutorial 1: Getting to know The RAVEN
PERFORMANCE
NUMBER
NAME
DESCRIPTION
A-00
Diary
In this Performance several 'synthesizers' of The RAVEN sound at once.
This type of Performance is called a "LAYER". One 'synthesizer' of The
RAVEN is called a "PART".
A-01
Blow-
Job
This Performance uses different Parts on the left and the right side of the
keyboard. In The RAVEN this setup is called a "SPLIT" sound.
A-02
Slappy
In this Performance the key velocity is used to determine which of two Parts
will sound.
A-03
Slidox
This Performance uses the Motivator function. In this case the Motivator
works as an arpeggiator. The Motivator is a feature of The RAVEN which
generates rhythmic models by using played notes. The arpeggiator, for
example, plays the notes of a chord one after another.
A-04
Polysynt
The Motivator is also used in this Performance. The function used here is
called Chord-Rhythmizer. The Motivator adds a rhythmic structure to the
chord.
A-05
Gate
Instead off simply playing a chord, the motivater chops it up. This happens
by using a rhythmic change of the volume.
A-06
Matrix
As in the Performance "Slidox", the Motivator works as a arpeggiator. But in
this case, the notes of the arpeggiator are played on using all four Parts of
The RAVEN. All Parts use the same sound in "Unisono" mode, but are
slightly detuned, for a 'richer' sound.
A-07
SoloPort
This Performance also uses the "Unisono" mode. Four 'synthesizers' are
played at the same time, but in this case, the Motivator is disabled. The
Portamento function is enabled.
A-08
Roto-Drum
The arpeggiator function of the Motivator can play the notes of a chord one
after another. The arpeggiator can also act this way on up to four Parts.
This function is called "TRACK-ROTATE" mode. If each Part of The RAVEN
plays with a different tone colour it generates a 'wavesequence' -like sound.
A-09
Hadjuk
This Performance is a good example of how to combine several different
Performance possibilities. The keyboard is assigned to the "Split" function
and also the Motivator. This makes it possible to use the Motivator (in this
Performance, as an arpeggiator) on a specific part of the keyboard.
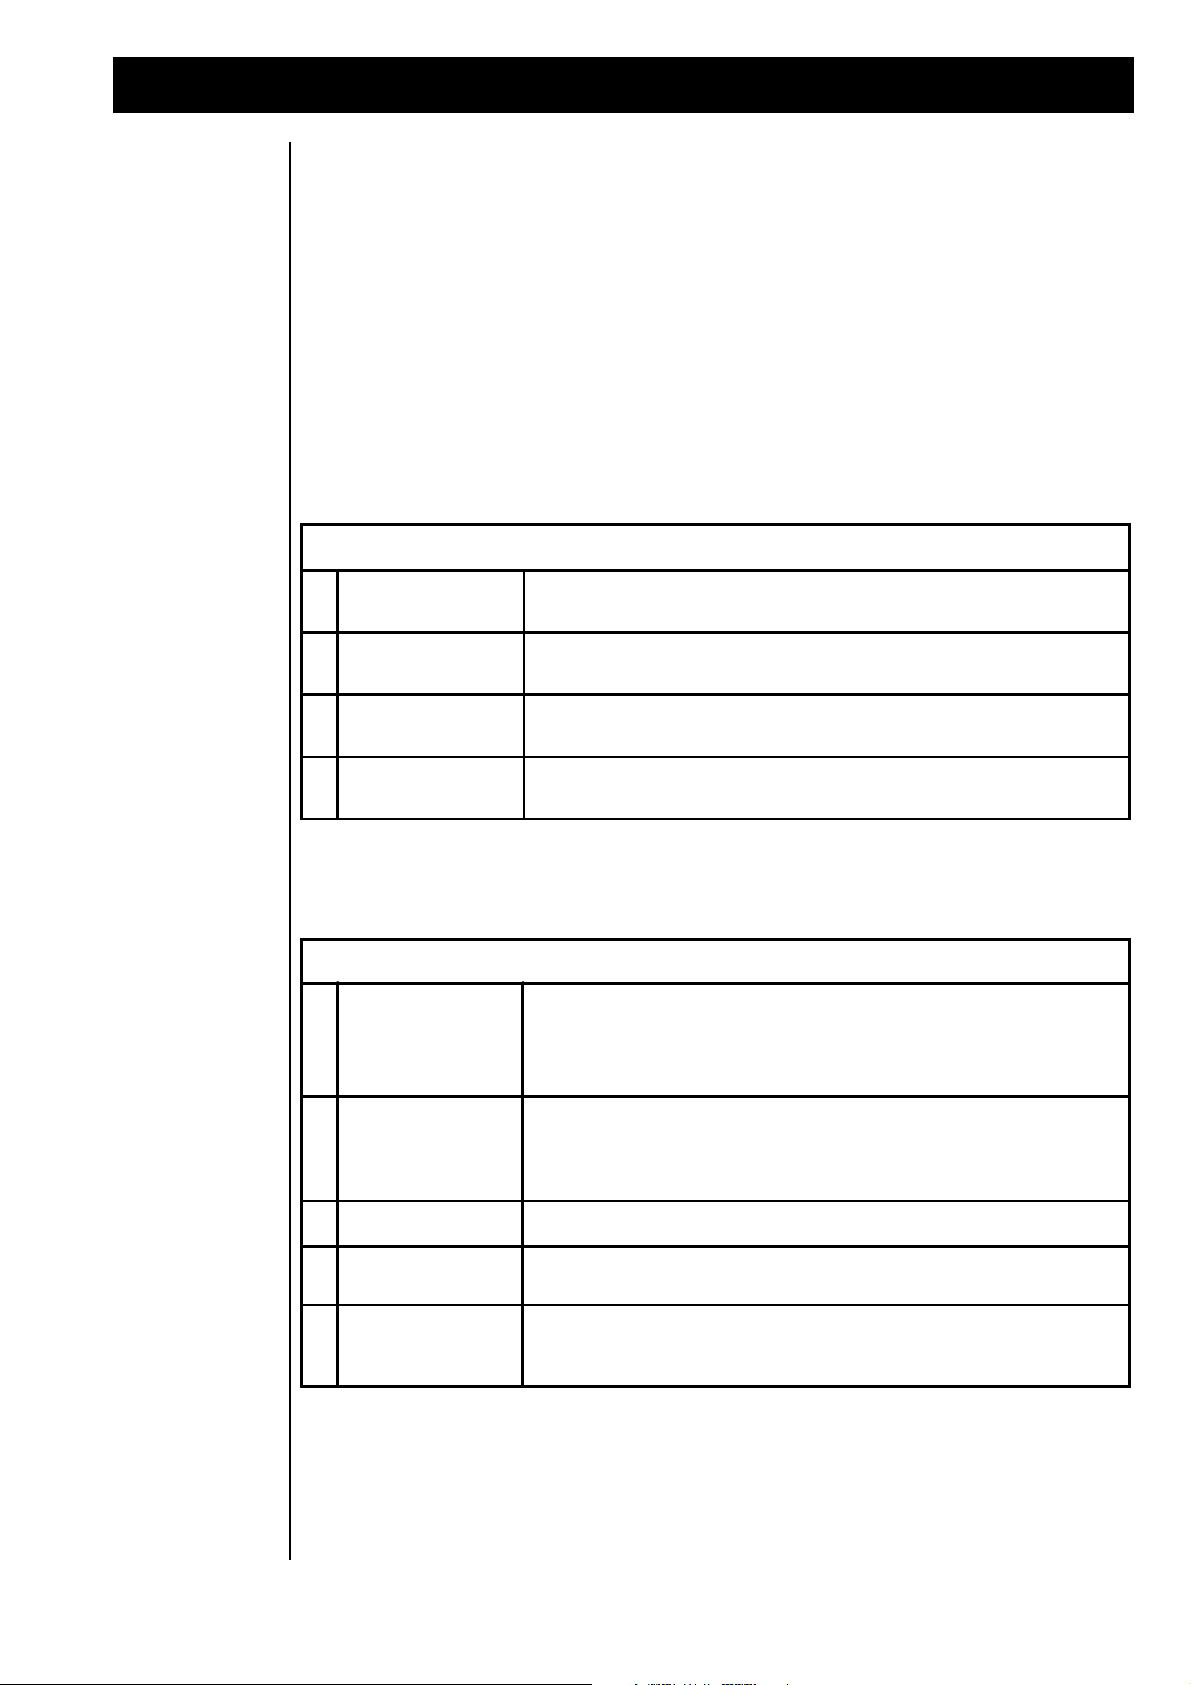
To show the possibilities of the factory programmed Performances, the first 10 ROM Performances show
the flexibility of our virtual studio in many different . To be able to play these Performances press the left
“SONG/BANK-SELECT” button until you reach the first bank of Performances (A-00 - A09). After that
you can select the Performances by pressing the “TRACK” buttons.
The following Performances are found in the first bank A-00 - A-09:
10
Tutorial 1: Getting to know The RAVEN
DESIRED PARAMETER
MENU
PAGE
DESCRIPTION
Selection of the desired
sound-group
|1>
With selecting the sound-group you can make a basic sound
selection. In the "Sound-Group" menu, select the sound category
(Bass, Synth etc...).
Selection of the desired
sound
<2>
Use the appropriate "SOFT" dial, located under the display, to
select a sound from the Sound-Group selected on Menu Page 1.
Adjusting the volume of
each Part
<3>
The "SOFT" dials act as volume controls for each of the Parts.
This feature is very effective for mixing the selected 'Layer-Sound',
when using The RAVEN during live performance.
Selecting the mode of
the Parts
<4>
The Part mode of the active Parts can be changed. The Part
mode determines how each 'synthesizer' is played. For more
details, refer to the Chapter, "Part Editing", located in the second
part of this manual.
Adjusting the pan
settings of each Part
<5|
The "SOFT" dials act as pan controls for each of the Parts. You
can also disconnect each Part's output from appearing at the main
output. When "—" is shown in the display, that Part's output only
reaches the main output after passing through the effects
processors. For more details refer to the Chapter, "Part Editing",
located in the second part of this manual.
For added flexibility, you can use The RAVEN’s Realtime controllers in addition to being able to play the
Performances from the keys. The Realtime controllers of The RAVEN are used as remote control for the
internal Synthesizers, Effects and Motivators.
The RAVEN’s controllers are assigned to specific functions and you can choose which functions to assign
to the controllers. A-00 is set up as an example Performance to show how The RAVEN uses Realtime
controllers. The display should look as follows:
PrfA-00:Diary |1> Soundgroup __
Synpads2 Synpads1 Synpads1
This display shows information about the selected Performance. In the upper left corner, the name and the
number of the Performance is shown. In this case it is “Prf-A-00”. The next parameter to the right is the
menu number. The symbol next to the number indicates where in the menu-scroll you are. In this case, the
arrow points to the right, indicating there are more pages in that direction. If the display doesn’t show
menu page 1, use the “PAGE” dial to select it.
Written to the right of the menu number is which data is available on this menu. In this case you are able
to select the Sound Group of the synthesizers. The RAVEN offers 512 different synthesizers catalogued
into “Sound Groups”. The Sound-groups selected for the active parts are shown in the second line of the
display. In this particular Layered sound only three of four parts are used. In almost every menu of The
RAVEN the parameters that can be changed are shown in the second line of the display. The parameters
are changed with the dials located under the display. Each menu of The RAVEN contains different parameters. The functions of the dials are software controlled so that a large number of functions can be changed
with only a few dials. In Performance mode up to five menu pages are available. Each of the five pages
contain different parameters which are described in the following chart:
Let’s try out the Performance functions. You will likely use Volume control in your live playing.
At the right side of the upper display line you will find a bargraph which stands for the usage of the played
parts. In our example, there are three usage bars because in this Performance we have only 3 synthesizerparts assigned. Playing with increased velocity increases the length of the bargraphs.
11
Tutorial 1: Getting to know The RAVEN
"SOFT" BUTTON
FUNCTION
DESCRIPTION
[OK]
If you confirm with [OK] all edits made on the active Performance will be lost, and The
RAVEN will proceed to the newly selected Performance. This is usually the 'default'
button, unless you want to save your edits, which is not always the case after a 'Live-
Mix'.
[CANCEL]
This button takes you back one page and recalls the active Performance. The
Performance will contain your recent edits, allowing you to decide if you want to save
the edited Performance.
[SAVE]
This button proceeds to the "WRITE" menu where you can rename the Performance
and store it in one of the 50 User locations. For more details, refer to the Chapter,
"Write menu".
If you edit parameters while in a Performance and then want to change to a different Performance, the
following message will appear:
Performance Changes will be lost!
[ok] [cancel] [save...]
This display is informing you that all edited parameters will be lost if the Performance is changed without
being saved first. (This is similar to the way a computer works with files.) The “Soft” buttons are now
used to control the save-to-memory functions.
The functions of the “SOFT” buttons are displayed in the brackets [ ]. These are the functions that are
assigned to the knobs, not the functions that are printed on The RAVEN’s front panel. Until now, we have
seen some of the programming techniques in the Performance-mode, which are available for live sessions
without entering the edit-section. The parameters described until now can all be saved. During a liveperformance there can also be changes that are not saved, but are used to make continuous changes to
parameters while playing. These parameters are controlled with the wheels (realtime controller). The
following realtime controllers are available:
1) Wheels 1 & 2
The wheels located to the left of the keys are available for Modulation or other assignable realtime controllers. By rotating the wheels while playing, you can hear changes to the sound. Data generated by the
wheels can be edited in the common menu
2) Aftertouch
You can’t see this realtime controller because it is located beneath the keyboard! You can hear it by pressing down on the keys after initially playing them. For this reason aftertouch is the best realtime controller
to use when you don’t have any hands free. Aftertouch data can also be edited in the common-menu.
3) Footswitch
Footswitches control the on/off status of functions as opposed to continuous parameter changes. The jack
for connecting a footswitch is located at the backside of The RAVEN. Footswitch data can also be edited
in the common-menu.
If you experiment with these realtime controllers you will notice that they have different assignments in
different Performances. In the selected Performance “Diary” you can control the cutoff-frequency of 2
parts from the Performance with wheel 2.
As you go through the huge number of different Performances, remember to use the realtime controllers!
It is a great way to get used to The RAVEN synthesizers.
12

Tuturial 2: Creating new Patterns
INSTRUMENT
GROUP
FUNCTION
Kick Drum-Track
Here the rhythmic foundation of dance tracks, the bassdrum, is located. 400 different
motifs, from the quarter note bassdrum to complex rhythmic figures is located here.
Snare Drum-Track
Contains 400 snare-drum motifs from simple off-beat hits to shuffled whirls which are
useful in creating interesting snare patterns. Handclaps and similar instruments are
also part of the snare drum repertoire.
HiHat Drum-Track
After the Kick and Snare patterns, the most important rhythm-track.
Percussion Drum-
Track
An 'accessory' to decorate the grooves. 400 different motifs are available.
Bass Melody-
Track
On this track you will find Bass sequences. These 400 motifs are important in
complimenting the first 3 drum-tracks. After combining Drum and Bass melody-tracks
a complete groove is created.
Sequence 1
Melody-Track
The 2 Sequencer tracks are responsible for the backgroud melody. This adds an
interesting element to a groove and can be used to vary arrangements. In each track
there are 400 motifs with complete sequences.
Sequence 2
Melody-Track
Chord Chord-Track
400 harmony sequences are located on this track. This can be used to add that
'finishing touch' to a production, and can also be switched on and off. A harmonic
structure is what makes the song interesting and can really bring out a melody.
Creating new
Patterns by
random selection
of preprogrammed Motives
Imagine you are in the tape vault of our virtual studio. Inside this archive you find a lot of tapes each with
a lot of musical tracks on each one. The tapes are sorted by different groups of instruments. There are
basslines, drumgrooves, accompaniment sequences and effects. Also there is a tape recorder that has the
ability to play eight different tracks off eight different tapes into The RAVEN with all tracks playing in
sync. You would be able to create new patterns and songs by combining the tracks into new ‘grooves’.
The following instrument groups each have 400 ‘tape tracks’:
13

Tutorial 2: Creating new Patterns
The tapes of The RAVEN’s archive (tape vault) can be combined into patterns. The RAVEN offers a
function which can be compared to a tape player that can play up to 8 different tapes at one time. You can
take 1 of the 400 kickdrum tapes and put it into The RAVEN (tape player). Then you can take 1 of the 400
snaredrum tapes, and insert it also. When you press ‘play’, you will hear both tapes - in sync. This can be
done until you insert all 8 tapes. You are able to easily create new patterns by selecting the different tapes.
The selection of different tapes from the archive is called a ‘pattern’.
To illustrate the number of new pattern possibilities, let’s do a little math! Everyone knows the
low chances of winning a lottery. This is because of the huge number of variations caused by
6 from 49. If you want to check it out, type the following problem into your calculator:
49*48*47*46*45*44=
The answer will show practically unwinnable odds, but in comparison, the whopping number
of variations with our tapes is ridiculous. The calculation for the number of possible combinations our tape vault provides is as follows:
400*400*400*400*400*400*400*400=
When calculating through the 2 math problems you will recognize how ridiculous it is. Math
101 has shown that possibility of selecting the same combination twice is very small.
Random creation
of new Patterns
Now for the interesting part! With this demonstration we have only touched the basics. The tapes in our
vault are special. It is possible to change the various instruments of the parts. Now we see that the word
‘tape’ is incorrect; from now on we will call them ‘motives’. A motive is a combination of the played
notes, tones or hits of a tone color. The chosen tone colors can be changed at every time. There are 8
different kinds of motives, which handle a specified function of a pattern and are described in a table
located in the appendix.
To create new patterns, we will mess with some motives now.
To begin combining new patterns, press the “EXIT” button several times, until the display stops changing
menus. If a menu is shown that edits will be lost, you should save if you don’t want to loose your changes,
otherwise press ok.. After that press the “SEQUENCER MODE” button, then the “EDIT-SONG” button.
The following menu will appear:
Create Edit Create Edit
Pattern Pattern Song SONG
In this menu use the “SOFT” buttons again. Press the [CREATE-PATTERN] button. The following
display should appear:
14
(STOP) ******** Give me a groove! |1>
[clear] [break] [undo] [keep] to P0
If the motives have a meaning in this pattern, press the “SOFT” button [CLEAR] to clean up the selections.
The display should now look like the one above except for the tempo-value.
On the left of the display the current status of The RAVEN is shown. If the pattern is played, <PLAYnn>
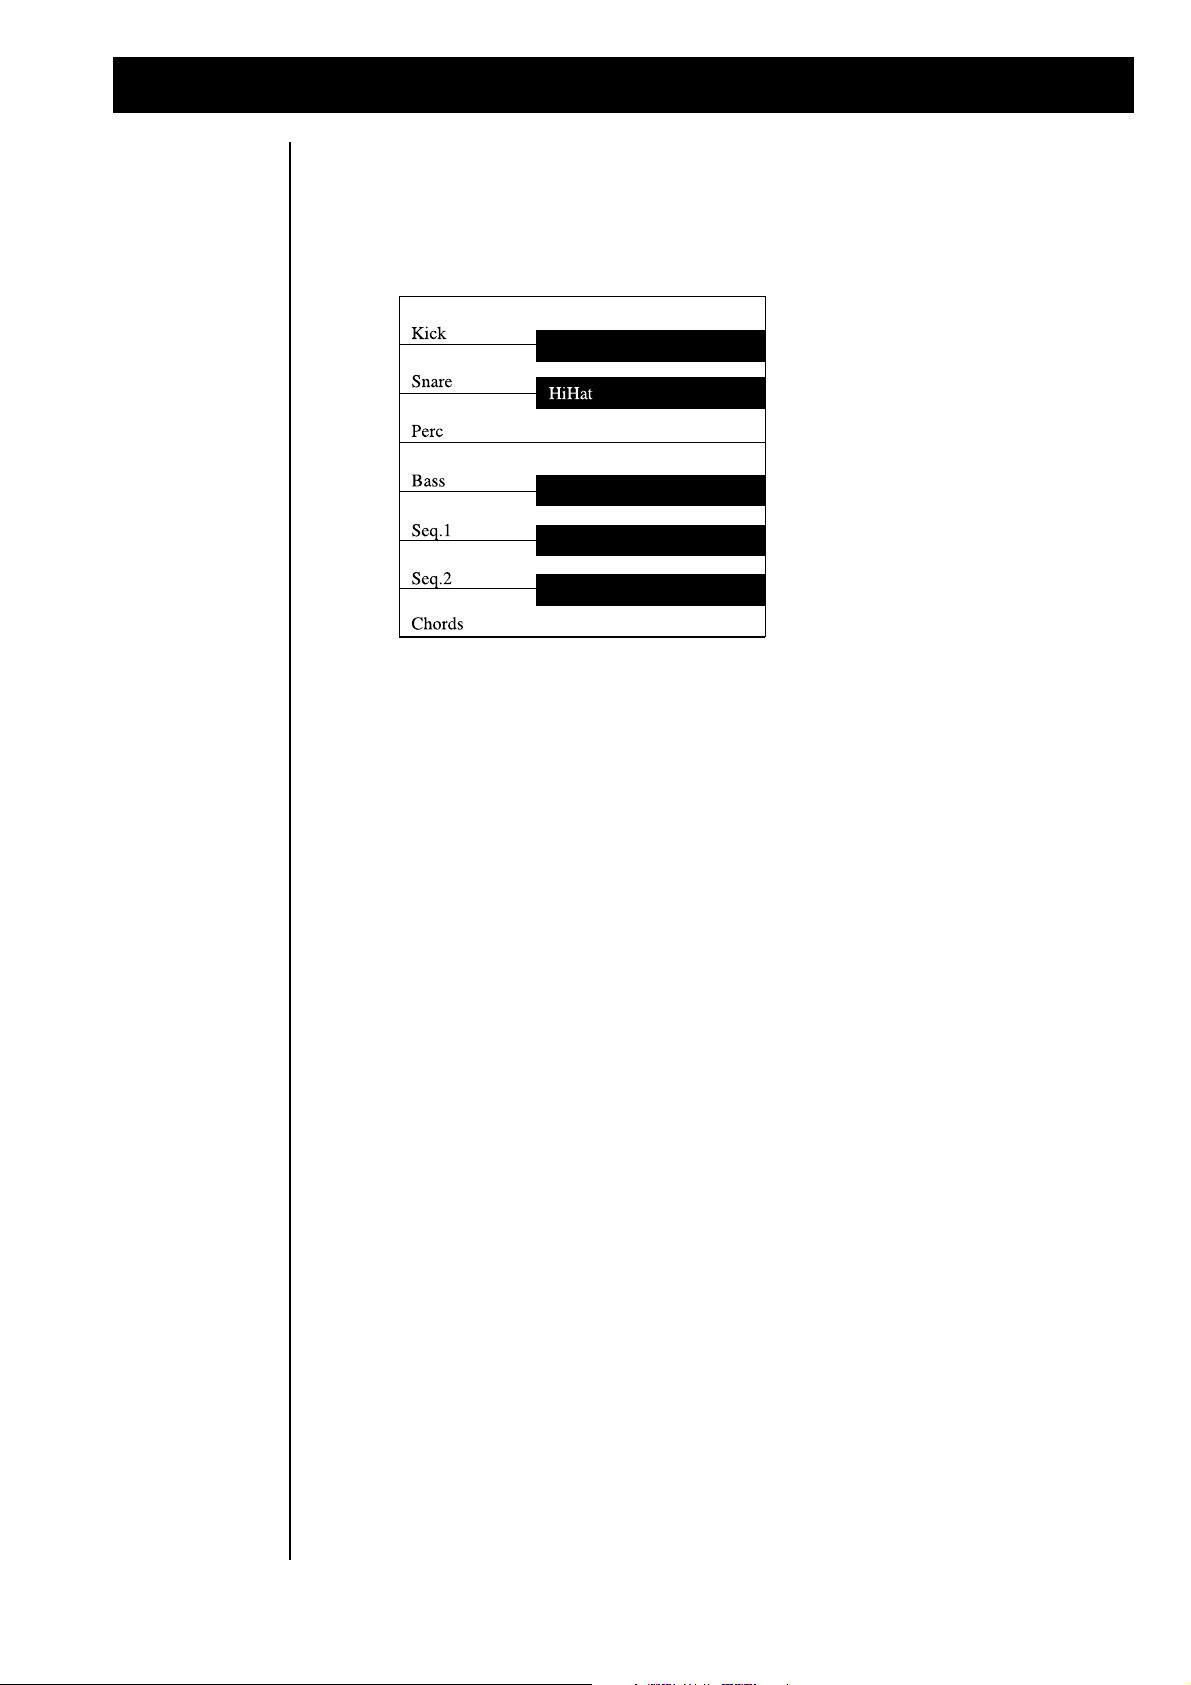
will appear. When it’s stopped, <STOP> will appear. (In place of “nn”, the current number of the pattern
will be shown.) Right beside the status display the trackmonitor is located. The 8 signs are placed right
under the numbers 1-8. Each sign stands for one of the 8 motives. Under the “TRACK” buttons on the
front panel is written which number belongs to which motive. Ex: Number 1 belongs to the kick-drum
motive, number 5 to the bass-motive, etc_ The stars in the display show the tracks that are empty at the
moment.

Tutorial 2: Creating new Patterns
The right side of the display shows the current tempo-value. If you want to change the tempo, press the
“TAP” button and adjust the tempo by rotating the “VALUE” dial. You can also change the tempo value
by tapping on the “TAP” button in quarter-notes.
Don’t be too concerned with the “SOFT” buttons at the moment. After the pattern is completed, we will
use them! Press one of the 8 “TRACK” buttons to select a motive. If you want to start with a kickdrum,
use the “KICK” button. The motive will start playing when the button is pressed. If you want to change
the selected motive press the “TRACK” button until you find one that works. Then, start layering different
instruments by pressing the other “TRACK” buttons. The playing motives will be shown in the display
right under the selected numbers.
Selecting Sounds
If you like the motive but not the instrument, you can change it by pressing the “EDIT-PART” button. The
following menu will appear:
Edit Part Kick |1> Soundselect
Drumset 010:Modular2 Mode: ON
If the display is on another page, go to the 1st page of Part-edit by using the “PAGE” dial. Your display
might not show the same parameters if a different track or sound is selected, but this doesn’t matter for the
moment. Use the “TRACK” buttons to select the track which contains the instrument to be changed. The
name of the Motive will be shown in the display beside the Edit-part. With the third “SOFT” dial under the
display scroll through the instruments until you find one you like. When editing the “MELODY” or
“CHORD” track you can also use the second “SOFT” dial to select the Sound-bank . If you want to edit
other Part parameters, refer to the chapter “The Soundediting”.
To listen to the basic sound of the Motive, press the “SOFT” button F3 twice, located under the dials for
Sound selection. By various selection of Motives from “Sequence 1, Sequence 2 and Chord”, the instrument changes are done automatically. You will hear the sound assigned to the Motive by the composers.
To go to the 1st menu after changing instruments, press the “EDIT-SONG” button. The Create-Pattern
menu will appear again:
[PLAY0] ________ Give me a groove! 142
[clear] [break] [undo] [keep] to P0
The creation of
Breaks
(Now the “SOFT” buttons will be used!) If you are satisfied with the generated pattern save it now by
pressing the “F4” button [KEEP]. The RAVEN will save the pattern to the selected pattern-number (In this
case P0 of the current song). The pattern-number will automatically increment by one to prevent you from
writing over the previously edited pattern. You can also select the pattern by adjusting the fourth “SOFT”
dial. Unused tracks are shown with a star in the display.
In the Create-pattern menu you can store 10 different patterns which can be combined into a song later.
The pattern-numbers read from 0-9. After you have created a groove, press the second “SOFT” button
[BREAK]. In Break-mode The RAVEN selects motives appropriate for Breaks rather than Grooves.
Breaks use the Percussion instruments. A Break can be saved into Pattern-RAM. If you want to select a
different Groove, press the “SOFT” button 1 [groove].
When jamming around, you could change a motive by accident. In this case, press the “SOFT” button 3
[UNDO], to recall the last entry.
15
Tutorial 2: Creating new Patterns
With the procedures described so far, you can create complete patterns. The edits made are stored as part
of the pattern by using the [KEEP] function. There are also functions that are not stored with the Pattern,
such as the realtime transposing and muting of Motives. With these realtime functions, you can test the
variations of a pattern within a song, without permanently affecting it.. In certain musical styles, such as
Techno or Dancefloor, many realtime variations are possible (and fun!). Transposing and Muting of Tracks
or Breaks are two possibilities. Often you might start off with a sequence and add Motives one-by-one
such as hihat, percussion, etc...
The kickdrum might begin after the intro. Then the bassline might come in. This is called the arrangement
of the song.
Muting Tracks
In the Create-pattern menu you can see if the selected pattern is available for the arrangement. The motives can be muted in two ways :
1) While holding down the “MUTE” button, press the button of the track you want to switch off. Pressing
the button again will switch the instrument back on. Pressing the “TRACK” button without holding down
the “MUTE” button will cause the Tracks selection to change.
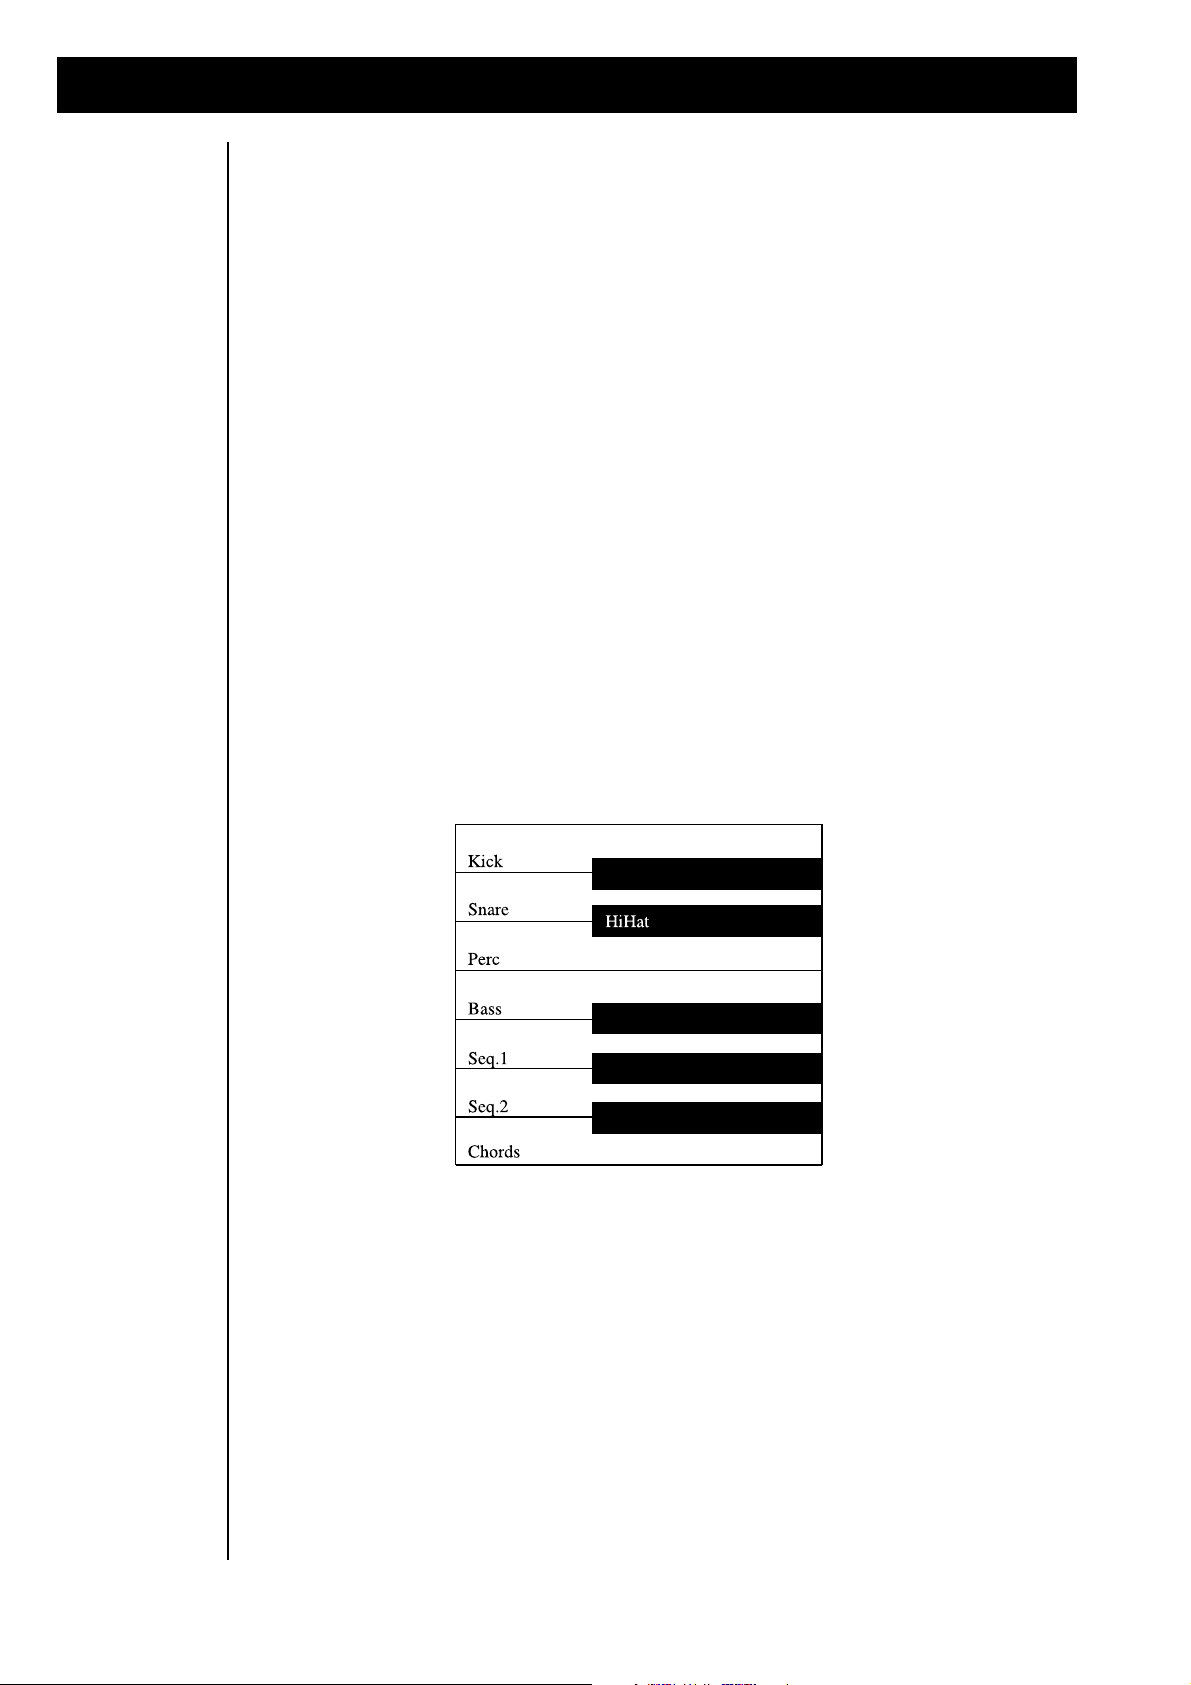
2) Muting can also be selected by using The RAVEN’s keyboard. The Track-mute keys are located in the
lowest octave. In non-musical terms, the lowest octave on The RAVEN is the set of 8 white keys located
on the far left side of the keyboard. (the keys with 1-8 printed on the front panel) The functions of the keys
are as follows:
16
Pressing the “TRACK” key once switches the track off, pressing it a second time switches it back on.

Tutorial 2: Creating new patterns
Realtime transpose
Adjusting Volumes
User Motives in
the Create Pattern
section
Another realtime function available by pressing keys on with the keyboard is Transposing. The next
octave (to the right of the mute-selection) transposes the Pattern in realtime. All melodic tracks can be
transposed up or down. By using the Mute and Transpose functions you can arrange a complete song with
only one pattern!
Adjusting the volume of a Motive is done in the “MIX” page. While in the Create-pattern menu access
page 2 with the “PAGE” dial. The following submenu will appear:
________ Give me a groove! <2>
MIX: Kick Snare HH Prc M: ON
The “SOFT” dials under the display are used to adjust the levels of Tracks 1-4 on MIX page 2 and Tracks
5-8 on MIX page 3. Use the “PAGE” dial to switch between pages.
The selection of the stored Motives is on Create-pattern page 4 and 5. Use the “PAGE” dial to switch
between pages.
1) ROM Motives
2) User Motives
3) All Motives
(Stop) ________ Give me a groove! +<4>
Kick:USR Snare:ROM Hihat:All Perc:ROM
The Solo Part
Writing Patterns
to Song memory
With the 4 “SOFT” dials you can select the basic choice. “ROM” selects ROM motives from the ROM
board. “USR” selects User motives. “ALL” selects all types of motives.
You can also add a solo-part accompaniment on a track which is not played by the sequencer and is
reserved for the right hand. For this purpose a “SOLO” track exists. The parameter changes of the
“SOLO” track are done with the “PART-EDIT” button (refer to page 24 of the manual).
All changes to the Motive combinations are held in The RAVEN’s temporary RAM. This RAM is held
even when The RAVEN is powered down. Selecting another song will transfer that song into temporary
RAM and overwrite the previous song patterns. Therefore if you are satisfied with your edited patterns
save them into Song RAM. Song RAM is permanent until overwritten.
Pattern/Song Changes will be lost! [ok]
[cancel] [save...]
17

Tutorial 2: Creating new Patterns
ACTION
"SOFT"
BUTTON
DESCRIPTION
Delete Temporary
RAM and select a
new Song.
[OK]
All edited parameters will be lost and the newly selected song will
be loaded.
Recall the edits
and go back to the
active settings.
[CANCEL]
Pressing this button will allow you to save you edits before
selecting a new Pattern. The Temporary RAM will retain its data as
it was before you selected a new or other Pattern.
The edited Patterns
will be stored.
[SAVE]
After selecting "SAVE", The RAVEN automatically proceeds to the
Write Menu. There you name the newly created Pattern and save
it by selecting a Song number.
Use the “SOFT” buttons for the appropriate action:
If you have chosen the “SOFT” button [SAVE] or pressed the “WRITE” button while editing, the following message will appear:
|1> Write Pattern/Song?
[ok]
Press the “SOFT” button [OK]. The following message appear:
Name: "Untitled "
[ok] [cancel]
The new song can also be named at this time. The name can contain up to 16 characters. Longer names
can be abbreviated. Enter letters by using the keyboard or the “VALUE” dial. Use the “SONG/BANKSELECT” button to move the cursor. After entering the name, press [OK] to save the song or [CANCEL]
to abort the procedure.
To prevent an accidental overwrite, a confirmation warning will appear:
to 1 "Wahnsinnsteil "
[ok] [cancel]
Use the “VALUE” dial when prompted for a memory location. Blank locations are marked in the display
with stars. After you have chosen a memory location, press the [OK] button. The following warning will
appear:
Overwrite "Wahnsinnsteil "?
[ok] [cancel]
After pressing the [OK] button again, the new song will be saved to the selected location. After saving you
can exit the write-menu by pressing the “EXIT”-button.
18

Tutorial 3: Playing live on Stage
NOTTUB"TFOS"NOITCNUFNOTTUB"KCART"
1 tceleS-nrettaP-1Fdetareneg01ehtpullacnacuoy,nottub"TFOS"tsrifehtsserpuoyfI
,yltceridgniyalptratssnrettaPehT.snottub"KCART"ehtgnisuyb,snrettaP
ehtelihwdegnahcebnacsnrettaPehT.desserpsinottub"KCART"ehtnehw
.gniyalpsirecneuqeS
2 A- etuM-2FffodnanoevitoMehthctiwsnacuoy,nottub"TFOS"dnocesehtsserpuoyfI
ehtnodetacolsinoitcnufemasehT.snottub"KCART"ehtgnisuyb
"KCART"ehtdnasyalpevitoMafI.egaptxenehtnonwohsenozdraobyek
eblliwtiniagadesserpsítinehW.ffodehctiwssikcarteht,desserpsinottub
.elggotasastcati;niaganodehctiws
3 B- etuM-3Fesacsihtnitub,ffodnanoskcartehtsehctiwsoslanottub"TFOS"drihtehT
yllaicepsesiedomsihT.dlehsinottubehtsagnolsayalplliwskcarteht
cisabagniyalpsielpmaxedoogA.sevitoMdetcelesgnireggirtroflufesu
.yltnattimretnisecneuqeSgniddadnanrettaP
Playing live on
Stage
The RAVEN can store 10 complete songs. These songs can contain up to 10 patterns. In the previous
tutorial you learned to create new patterns by using preprogrammed Motives.
If you select one of the preset patterns you can change them during a live-performance, transpose them and
switch the tracks on and off. You can change all of the song-parameters during a live performance. In this
way The RAVEN can be used to test a production in a live situation. If you need to make changes in the
arrangement, you can call up new patterns and mix them on-the-fly.
Press the “EXIT” button several times until the display stops changing pages. Enter Sequencer-mode by
pressing the “SEQ-MODE” button. Select the song to play with the “SONG/BANK-SELECT” button.
(If you have made any edits in the existing song, a message will appear about loosing data. Save it or select
the [OK] button if the edits are not valuable.) The following message will then be displayed:
<STOP> ________ 1:Songname 143
|1> Cut: Bass Seq1 Seq2 Chord M:OFF
The selected song is ready to be played. There are 2 ways to play a song.:
1) The song edits (transpose, muting, etc_) will be done in realtime. All Pattern and Transpose changes are
done “Live”.
2) The song is played with the arrangement from studio day (tutorial) 4. In a live Performance entries and
modulations can be made, but the basic structure is given.
In the following chapter the main focus is on this one variation. Sometimes when playing live, only a few
Pattern changes are necessary to get things happening. The first variation is shown on studio day 4 where
we will copy the REMIX to a digital or analog tape deck.
Live Performance:
There are a number of Demo songs already recorded into The RAVEN. You can use these as a starting
point for your own compositions. Select these songs with the “SONG/BANK-SELECT” buttons. (Demo
songs that have been deleted for any reason can be recalled at any time from the ROM board. Refer to the
chapter “Initializing The RAVEN” on page 87).
In the current mode several functions can be assigned to the “TRACK” buttons by using the “SOFT”
buttons. The meaning of the selected functions are printed in red under the buttons. The following functions are possible:
19

Tutorial 3: Playing live on Stage
Realtime Control
of Synth parameters
In the Song play mode, the functions assigned to the “SOFT” dials depends upon which of the 4
menu pages is currently active. The menu pages are accessed with the Page dial. The current menu
page is shown in the lower left of the display. The following functions are available:
Menu page 1: Cutoff-frequency-modulation
|1> Cut: Bass Seq1 Seq2 Chord M:OFF
This menu allows you to modulate the cutoff-frequency of the sequencer-motives. The dials control
filters of the synthesizers in realtime.
Menu page 2: Level-control drum-tracks
<2> Mix: Kick Snare HH Perc M:OFF
Two pages are used to mix the tracks in realtime. The 8 tracks are split into two pages with 4 tracks
on each. On this page, The RAVEN’s drum sounds can be adjusted. The level of the 4 tracks are
displayed with a beam.
Menu page 3: Level-control melodic-tracks.
<3> Mix: Bass Sq1 Sq2 Chord M:OFF
The volume of the drum-tracks is mixed on menu page 2.
The volume of the melodic-tracks is mixed on the menu page 3.
Tempo control
Menu page 4: Setup of the Solo-Part.
<4| Basses: MoogBas2 Level:100 M:OFF
On this menu page, three of the four “SOFT” dials have a specified meaning. The first dial selects
the Sound group of the SOLO instrument. The second dial selects the tone from the selected Sound
group. The third dial adjusts the volume of the SOLO part.
In this mode, the “VALUE” dial adjusts the tempo. The current tempo is shown in the upper right of
the display. The “TAP” button offers an intuitive way to adjust the tempo by tapping it in quarter
notes beat values. The RAVEN will automatically adjust the tempo accordingly. You can also use
the “TAP” tempo function while the sequencer is playing. This function is ideal for matching tempos when performing live.
20
Tutorial 4: Production of complete Songs
Realtime Transpose and Muting
with the keyboard
As in Create Pattern mode, you can also make parameter changes of the Transposing and Muting, when
working in the Realtime mode. When transposing, the melodic tracks (not the drum and percussion parts)
are pitched up and down.
Adding the
Motivator
More Realtime
access
Production of
complete Songs
The Motivator can also be used in the SOLO track to change the structure of played notes. For example,
the Motivator builds wild sequences out of a played chord, or chops them up to create synth-pads. Refer
to the chapter “Editing the Motivators” for more information. While playing live it is important to be able
to turn the Motivator on and off. “SOFT” button 4 [MOT-ON/OFF] is assigned to this function. The next
tutorial, studio day 4, introduces applying finishing touches to a production.
Now comes the fun! From the Preset or User patterns included in The RAVEN, we will now create a
complete song arrangement which can be recorded to a tape deck or DAT. You will determine which
pattern starts in the intro of the song, which tracks will be muted or played at which bar/beat and when the
patterns will change. Transpose changes are also done now. For the creation of a complete song, some
more things can added. The volumes of the instruments, settings of the Effect processors, the mix and
tuning of the drum sounds, as well as the sound parameters of the synthesizers can all be saved within a
song. See the Reference Chapters in this manual for a complete description of the Effect processors, Part
parameters and drum instrument parameters. With this in mind, it is to your benefit to familiarize yourself
with these features to get the maximum out of The RAVEN. Saving these parameters with the song can
lead to a truly polished production.
Besides creating patterns from scratch, as in tutorial (Tutorial 2), you can create Patterns in a very short
time by using the Create Pattern function. For this tutorial it works best to use User Patterns - and is a lot
of fun. Preset Patterns can be used, but in this case all you would be doing is creating a “Remix-version”
of a Song that already exists.
21

Tutorial 4: Production of complete Songs
1
gnoSagnitceleSgnoSehttcelesdnaedomrecneuqeSfoegapniamehtotog,tsriF
-niamehtnoerauoyerusekaM.desueblliwsnrettaPehthcihwmorf
ybgnoSehttceleS.semitlarevesnottub"TIXE"ehtgnisserpybegap
egassemateguoyfI.snottub"TCELES-KNAB/GNOS"ehtgnisu
,retpahCehtnidebircsedsa(,stidetsalehtevas,tsoleblliwatadtaht
.)"unemetirW"
2
ehtgnitceleS
gnoS-etaerC
noitcnuf
lliwunemA.nottub"GNOSTIDE"ehtsserp,detcelessignosafI
esehtfoenO.snoitcnuftidEtnereffidehttcelesnacuoyerehwraeppa
,]3F[nottub"TFOS"ehtsserP.]GNOSETAERC[dellacsisnoitcnuf
.raeppalliwunemgniwollofehtdna
Create Song
function
For this tutorial we need some patterns from the Song RAM. Even if you don’t know how the song will
be created with the patterns or how to make an song intro or how to add melodic changes, it doesn’t
matter. To get started we will let The RAVEN create a song out of the selected patterns. You might think
the QUASIMIDIOTS are completely crazy, but we’ve included this feature as a creative tool. The quality
of the songs depends upon the quality of the selected patterns. Ugly themes and discordant pattern
changes might create a tasteless song. (cool!)
Study tutorial 2 and create some new patterns. Then, try the "Create song" functions of The RAVEN.
Sometimes the results are surprising.
The functions are selected as follows:
The following menu will appear:
<Stop> ________ Create your Song!
[clear] [create]
To monitor what you and The RAVEN have composed, press “SOFT” button F2. To do a different mix
using the same patterns, press the [create] button and The RAVEN will do a “Remix”.
If you are satisfied with the results, save it or record it to tape. Hints for saving a song are in the chapter:
“The Write menu”.
It is also possible to arrange the song yourself in Step mode.
22
Tutorial 4: Production of complete Songs
INFORMATION SAVED WITH EACH SONG-STEP
1
Pattern Number
A Pattern Number can be entered for each Song-Step.
2
Beat counts
The length (in beats) can be entered for each Song-Step.
3
Transposing
The pitch transpose can be set for each Pattern.
4
Muting
The track mute status (on/off) can be set for each Pattern.
INFORMATION DISPLAYED IN THE SONG EDIT MENU
1
(PLAY0)
The upper left corner of the display shows which pattern is playing at
the current Song-Step. If the Sequencer not currently playing, "(STOP)"
is displayed. When "(PLAYX)" is shown, and there is no sound, you
may have chosen an empty Pattern or muted all tracks.
2
___x_-__
The Track-Monitor. The active tracks are shown by a beam, (like an
underline). An "X" indicates an empty track. A line raised to the middle
of the display, (like a hyphen), indicates that the track is muted.
3
EDIT S1
The active Song-Step, currently available for editing.
4
(BAR 1)
The Beat position of the selected Song-Step.
5
|1>
This indicates the display is currently showing Menu Page 1. It also
indicates there are more Menu Pages available by scrolling to the right.
Song Editing To leave the Create Song function, press the “EXIT” button. The display will show the following menu to
select which edit mode to enter:
[Create ] [Edit ] [Create] [Edit] |1>
[Pattern] [Pattern] [Song ] [Song]
Choose the [EDIT SONG] function by pressing the “SOFT” button [F4]. The Song will start playing and
the following display will appear:
(Play0) ________ Edit S1 (Bar 1) |1>
Pattern:0 Trans: +0 Bars: 4 [keep] S1
Each Song can contain up to 10 patterns and each song can contain up to 99 different steps. Each Song
contains the following parameters:
All these parameters can be edited while the current Song step is playing. In the Edit mode, the current
Song step is played in a loop, enabling you to monitor edits in realtime. The upper line of the LCD
displays information about the Song step currently playing:
The lower line of the display is where you enter the pattern number, the transpose amount and beats per
minute. This can be done with the “SOFT” dials located under the parameters, or with “SOFT” buttons
[F1]-[F3]. The selected parameter is indicated by the flashing cursor. Tracks are muted or enabled by
holding the “MUTE” button and simultaneously pressing the appropriate “TRACK” button. This action
will toggle between On and Off states.
23

Tutorial 4: Production of complete Songs
F1
"Pattern"
Here you select the Pattern Number for the selected Song-Step.
Parameters can also be edited with the "VALUE" dial by selecting the
according parameter with the "SOFT" button.
F2
"Trans"
A transpose value, (-12 to +12 steps), can be entered with each
songstep.
F3
"Bars"
Here you enter the length of the step, (in beats).
F4
"[keep]"
With "[keep]" you can save the Song-Step. Whenever you use
"[keep]", the step-number is incremented by 1, enabling you to edit the
next step.
"Mute"
This function is displayed on the Track-Monitor. Using the "MUTE"
button in combination with the "TRACK" button, allows the Motives to
be switched on and off.
F1
'[insert]"
With "[insert]" a Song-Step will be inserted at the current Song-position.
Steps occurring after the current playback location will be moved in
their entirety after the inserted Song-Step.
F2
"[delete]"
With "[delete]" the selected Song-Step will be erased. Steps occurring
after the current playback location will be moved in their entirety to
begin where the Song-Step was deleted.
F3
"[copy to SX]"
The settings of the current Song-Step can be copied to another Song
position. The target position is selected with the dial under the
parameter. If the selected position is not located at the end of the
Song, the Song-Step of the current position will be decremented by
one step. In addition to the target Song-Step, the beat-position is
shown, and this is where the copy will be stored.
Editing an existing
Songstep
If you are satisfied with the first song-step, press [keep], (“SOFT” button [F4]). This saves the settings of
the selected Song step into Temporary memory. To speed up the process, The RAVEN automatically
copies the data and increments the location number by one. The [keep] function enables you to edit the
following step without having to select it.
In case you wish to change the settings of an existing song-step without having The RAVEN automatically
change to the next song-step, you must select another song-location with the “SONG/BANK””-SELECT
buttons.
To edit a songstep after it has been saved, select it with the “SONG/BANK-SELECT” buttons and make
your edits. Press [keep], (“SOFT” button [F4]). To jump to the end of the current song, press the right
“SONG/BANK-SELECT” button until the step numbers stop changing.
To access more functions to change the song’s structure, use the “PAGE” dial and go to menu page 2:
(Play0) ________ Edit S1 (Bar 1) <2|
[insert] [delete] [copy to S1] (Bar 1)
After the arrangement is done, play the song. Pressing the “EXIT” button twice will get you back to the
Sequencer mode’s main page. Then press the play button.
24
Tutorial 4: Production of complete Songs
1
Pattern
The Motive settings of the Pattern will be saved.
2
Regulation of the
tones
All edited synthesizer parameters will be saved. Parameters such as
Volume, Pan, Sound-Selection and Sound-Group can be different for
each Pattern.
3
Effect-Parameters
The parameters of the assigned effects.
4
Motivator-settings
The settings of the Motivator.
5
Song arrangement
The arrangement with all settings in the play-list.
6
Drum settings
Changes made to the Drumset are saved with the Song.
7
Play parameters
The play parameters "Groove" and "Repetition-Point" are saved with
the song.
At this point it’s a good idea to save the song to RAM. The Write Song procedure can be found in the
Chapter: “Writing Patterns to Song memory” on page 17. This will save the settings as well as the arrangement. After you are satisfied with the Song, proceed to mixdown. The reference section of this manual
contains information for all of The RAVEN’s parameters. All parameters which affect the sound of your
final mix, are stored in the Song memory. The RAVEN has a 10 Song memory capacity. The following
table shows which parameters are stored in Song memory:
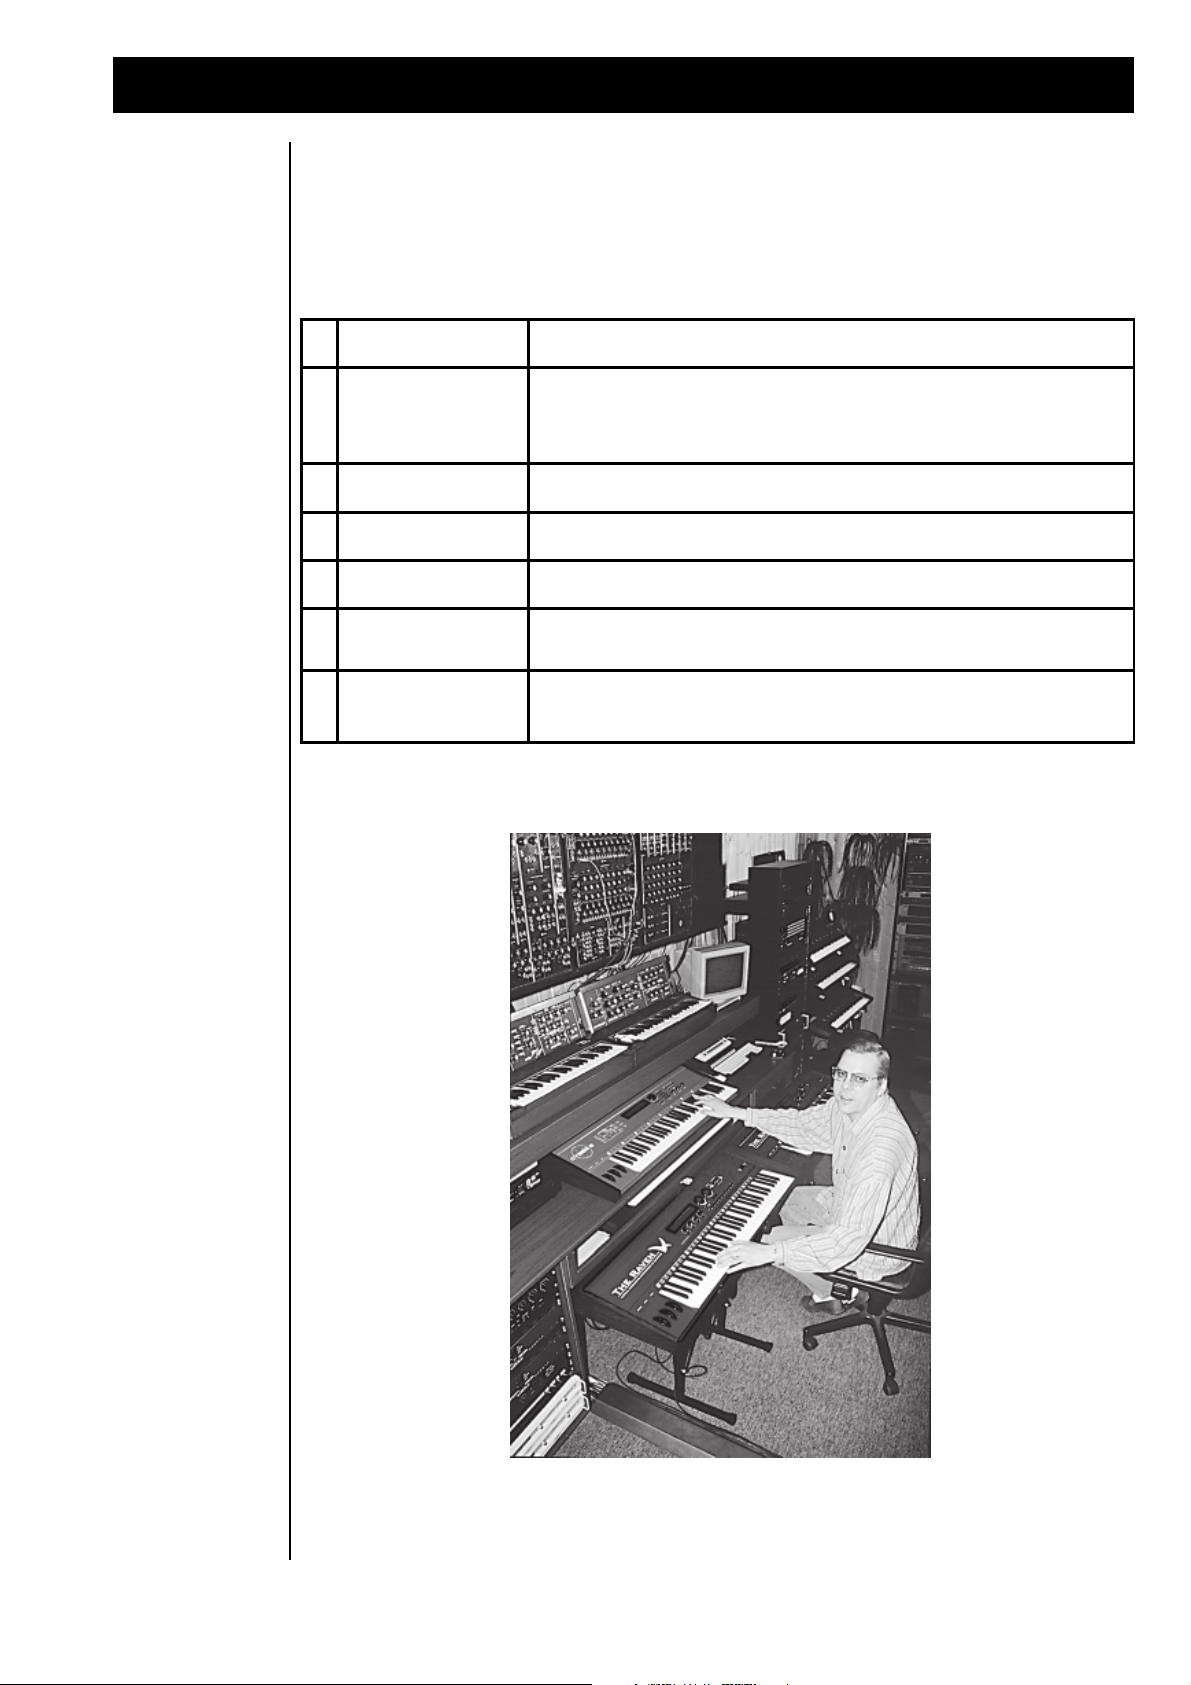
Klaus Schulze himself with QUASIMIDI CYBER-6 and RAVEN
25

Part Editing
F2
Group
The many sounds of The RAVEN are grouped into catagories, or
'Sound-Groups', such as Basses, Organs, Drums, etc... .
F3
Sound
Select the sound from the Sound-Group chosen with [F1].
F4
Mode
The Parts can be used in different 'playmodes', such as polyphonic and
monophonic modes. The following table explains the different modes.
RETEMARAPNOITANALPXE/NOITPIRCSED
1
puorG-dnuoSdnuosdetcelesehtfopuorGdnuoS
2
dnuoStrapdetcelesehtfodnuoS
3
emuloVtrapdetcelesehtfoemuloV
4
amaronaPamaronapoeretsehtninoitisoP
5
enuT-esraoCeciovsihtfogninutenot-imeS
6
dneS-1XFrossecorP-XFtsrifehtottnestraPdetcelesfotnuomA
7
dneS-2XFrossecorP-XFdnocesehtottnestraPdetcelesfotnuomA
Sound Editing
Sound selection
and Part mode
The sounds of the single Parts can be changed and edited. Sound changes are stored in the Performance
section as well as the Song section. When a new song is stored, the Sequence-Part settings are also stored.
Song mode has another useful feature. Certain Part parameters are stored separately for each individual
pattern. Below is a list of the stored parameters followed by an explanation of all Part parameters.
Part parameters stored within the patterns:
The remaining Part parameters are stored with the song only. They affect the entire song. Both Song and
Performance modes allow access to the Part parameters with the “Edit Part” button. Parts to be edited are
selected with the “Track” buttons. Channels 1-16 can also be selected by the “SONG/BANK-SELECT”
buttons. In the Performance mode 1 to 4 parts can be used. These are selected by “Track” buttons 1
through 4. Unused Parts of a Performance are marked in the display.
Press the “Edit-Part” button, then turn the “PAGE” dial counterclockwise. The display shows the following:
Edit Part 1 |1> Soundselect
Group: SynLead A128:PercBana Mode: ON
Menu page 1> is for selecting the sound of the Part and setting the Part mode.
In all menu tables, the display controllers ([F1]-[F4]) of the corresponding parameter are shown in the first
column. This makes it is easy to tell which controller belongs to which parameter. Following are all Part
mode settings:
26
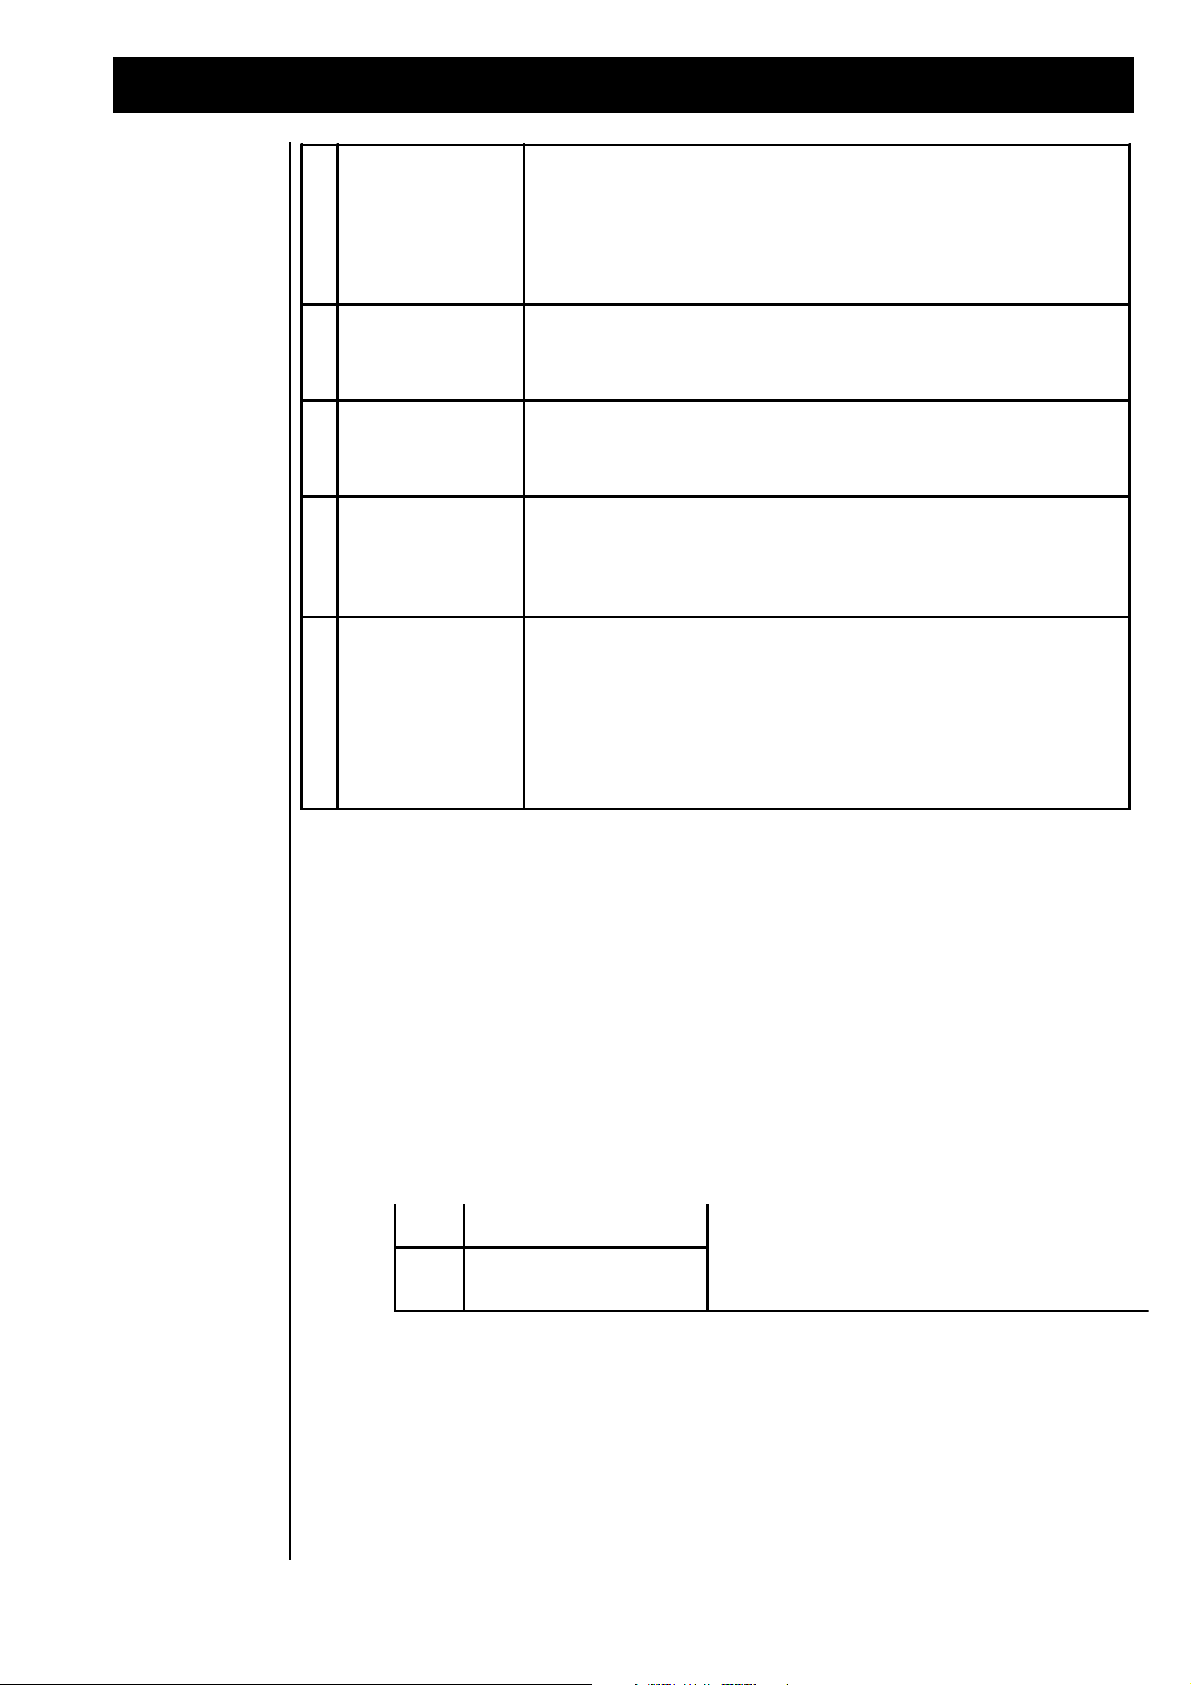
Part Editing
1
"Mode:" off
This mode setting switches off the corresponding voice. This setting is
particularly useful when controlling The RAVEN from an external
sequencer and need to use some of the 16 MIDI channels for another
MIDI device. If a Part is turned off, an "X" is shown in the MIDI
monitor.
2
"Mode:" on
This mode setting is the normal polyphonic playmode. The RAVEN
works with up to 21 voices. These are dynamically allocated among
the individual Parts.
3
"Mode:" mono
=> enables
portamento
Parts using this mode setting are monophonic, meaning you can only
play one tone at a time. The voices have a "Last Note Priority".
4
"Mode:" Lead
=> enables
portamento!
The "Lead" mode is also monophonic, but has "Highest Note Priority".
Lead and mono modes also use the single trigger principle: Hitting a
second key without releasing the first key will not generate a new
envelope.
5
"Mode:" ext
This mode setting can be used in Sequencer mode. With this function
you can control external synthesizers or drum machines using The
RAVEN's sequencer. Instead of an internal synthesizer Part, an
external MIDI device is triggered. The MIDI channel numbers
correspond to track button 1-8. Some Part parameters can also be
sent to external devices, such as Bank Select, Program Changes and
Volume and Pan controllers.
1F
"leveL".traPdetcelesehtfoemulovehtstsujdA
2F
"naP".traPdetcelesehtfonoitisopnaPehtstsujdA
3F
"1XF":sdneS-XF
.srossecorpstceffeehttnestraPdetcelesehtfotnuomaehtstsujdA
4F
"2XF"
Output Routing
When the “PAGE” dial is turned one position to the right, the next menu page appears:
Edit Part 1 <2> Output-Assign
Level:127 Pan: >C< FX1: 63 FX2: 0
Menu page <2> contains parameters to adjust the Volume, Pan, and the Effects.
The following list shows the various pan positions. In addition to fixed positions, The RAVEN offers
some special panorama effects.
27

Part Editing
DISPLAY
PAN POSITION OR EFFECT
"---"
The selected Part is only sent to the Effect Processors
"> C <"
Positioned in the center of the stereo field
"L < 7" - "L < 1"
Various degrees of Left panning
"R > 1" - "R > 7"
Various degrees of Right panning
"RND"
Randomly controlled stereo positions for each individual voice
"KEY"
The Note number determines the pan position. Lower notes send
voices to the Left; higher notes send voices to the Right. The amount
of panning depends on how low or high the note is
"YEK"
A reversed version of the "Key" effect
"DYN"
The Key Velocity determines the pan position. Lighter key velocities
send voices to the Left; harder key velocities send voices to the Right.
The amount of panning depends on how light or hard the key is played
"NYD"
A reversed version of the "Dyn" effect
F2
"Coarse-Tune"
Adjusts the course tuning in semi-tones over a range of 4 octaves
F4
"Fine-Tune"
Adjusts the tuning in fine increments. A value of 63 is equal to one
semi-tone
Tuning Parts
Synthesis Filters
Menu page <3> contains parameters to tune the Parts by steps or cents.
Edit Part 1 <3> Transpose/Tune
Coarse-Tune: +0 Fine-Tune: +0
Menu page <4> contains parameters for adjusting the Low Pass Filter (LPF). Filters are the most important element of Subtractive Synthesis. In addition, The RAVEN offers FM and Additive Synthesis. (The
LPF has no affect with FM and Additive Synthesis.)
Edit Part 1 <4> DCF-Offsets
Cutoff-Freq.: +0 Resonance: +0
Hint: Reduce the volume of a Part when using high Resonance values. This will prevent the sound from
going into self-oscillation and causing digital distortion. A more dramatic effect of filter-modulation can
be achieved with the Modulation Matrix. Realtime controllers can be used effectively to modulate these
parameters.
28
Part Editing
F2
"EG-Attack"
Sets the rate at which the envelope rises to its maximum level when a
note is struck.
F3
"Decay"
Sets the rate at which the level drops to the sustain level once the
maximum level has been reached.
F4
"Release"
Sets the rate at which the level falls to zero once the note has been
released.
F2
"LFO-Depth"
The maximum amount of pitch modulation that can be applied to the
sound.
F3
"Rate"
The rate that the pitch modulates once modulation takes place.
F4
"Delay"
How long after the note is struck before the LFO begins to take effect.
F2
"Cutoff-Freq"
Adjusts the starting point of the Cutoff Frequency. At lower values the
filter will not let as many high frequencies pass, and a "darker" sound
results. At higher values the filter allows more high frequencies to pass
resulting in a "brighter" sound. The filter effect corresponds with the
preprogrammed value.
F4
"Resonance"
Controls the feedback strength of the filter. This can be used to
emphasize frequencies around the cutoff frequency. High settings
produce self-oscillation: You can create new tones with this parameter.
Envelope section
Pitch Modulation
Menu page <5> contains parameters for editing the envelopes. They are used to shape the sound over
time. The display shows the following:
Edit Part 1 <5> EG-Offsets
EG-Attack: +0 Decay: +0 Release: +0
Menu page <6> contains parameters for editing the Low Frequency Oscillator (LFO).
Edit Part 1 <6> LFO-Offsets
LFO-Depth: +0 Rate: +0 Delay: +0
Modulation
amount
Menu page <7> contains parameters for connecting the Modulation matrix in the Common menu to the
various Parts. It also controls the modulation amount of the selected parameter. For example: To use the
modulation wheel for controlling the Cutoff-frequency, set up the parameter “Tone” in the belonging part.
In the Common menu increase the modulation amount for the Modulation Wheel and the parameter “tone”.
The Chapter “The Modulation Matrix” on page 33 for more information. The settings are Part-independent.
Edit Part 1 <7> Modulation-Depth
Lfo: 76 Vol: +0 Pitch: +2 Tone: -64
29
Part Editing
F1
"LFO"
The intensity of the LFO effect controlled by the modulation source.
F2
"Vol"
The depth or amount of volume change applied during modulation.
F3
"Pitch"
The amount of pitch change applied during modulation.
F4
"CutFreq"
The intensity of how much the sound changes. For sounds based on
subtractive synthesis this parameter controls the cutoff-frequency. For
sounds based on FM synthesis this parameter effects the feedback of
the operators.
F2
"VeloCurve"
Determines which Velocity Curve is used while playing the keyboard.
Velocity types are explained in the following table.
F3
"Porta-time"
Adjusts the rate at which the portamento effect is applied.
F4
"Hold"
Determines whether or not the selected Part uses the Hold pedal for
sustain, etc... .
1 - 8
prefix of "-"
The result of the velocity curve will be inverted. This function is useful
when creating 'cross-fade' sounds in Performance mode. Sounds of
two Parts must be active and they must be provided with opposite
velocity-curves.
1
"LIN"
The standard setting; no velocity curve processing.
2
"LIN-"
A 'compressed/expanded' curve. Quiet passages will be louder than
they are played, louder passages will be quieter.
3
"LIN+"
Sensitivity is increased overall, but the curve stays linear.
4
"Exp-"
This compressed curve has an exponential response.
5
"Ex—"
The same as "Exp-", but with more compression.
6
"Exp+"
This expanded curve has an exponential response.
7
"Ex++"
The same as "Exp+", but with more expansion.
8
"FIX"
The velocity value is fixed (85/127), independent of the dynamics
played on the Keyboard.
These parameters have only an effect if at least one MIDI Controller is assigned to the above mentioned
parameters. For example, if there are no Controllers assigned to the Filter, changing the modulation-depth
(intensity) of the chosen part has no effect.
Key Velocity,
Portamento Time
and Hold
Menu page <8 contains the Keyboard-Control parameters. On this page the Velocity Curve, Portamento
Time and Hold Pedal settings are made.
Edit Part 1 <8| Keyboard-Control
VeloCurve: LIN PortTime: 0 Hold: On
The following table lists the different key Velocity Curves.
30
Common menu: Performance programming
1
Common parameters
The type of Performance, Controller assignment, Controller Matrix,
Master Volume and Footswitch function.
2
Part parameters
The sound parameters of all Parts included in this Performance.
3
Effect parameters
The selected Effect algorithms, including all parameters of FX-1 and
FX-2.
4
Motivator parameters
The operating mode of the Motivator, including all Motivator
parameters
5
Parameters of the
Main Page
The Main Page in Performance mode is similar to the Main Page in
Sequencer mode, except that there is the advantage of being able to
edit a particular parameter on all four Parts simultaneousl. For
example, you can change the four Pan values of a Layer-4
Performance on Menu Page 5. (refer to: Tutorial 1, "Getting to know
The RAVEN").
Performance
programming
In addition to the Part parameters which are stored in both the Song memory and the Performances, the
Common parameters offer additional functions in Performance mode. The Edit Common menu is where
you decide how the various parts of The RAVEN are controlled. The keyboard can be split into two
independent zones or single sounds can be layered to trigger different sounds simultaneously. Additionally, controllers can be assigned to different parameters of The RAVEN and the function of the footswitch
can be programmed. There are a number of parameters controlling Performance sounds that are stored in
Performance memory. The following parameter groups are stored with the Performances:
Selecting Performance Types:
This chapter introduces the parameters of the Common-Edit menu and explains the method of creating a
Performance. Because Common parameters are associated only with Performances, first select the Performance mode. You must be in Performance mode in order to enter the Common section.
Store any unsaved patterns or songs before entering the Common-Edit menu by using the “Write” menu.
As an example, go to the Performance named “DIARY”. Press the left “SONG/BANK-SELECT” buttons
repeatedly until the display shows User-Bank 0. Select performance 00 by pressing Track
button “0”. The selected Performance is composed of three sounds which are layered over the entire
keyboard. The three bars in the top right corner of the display, indicates the sounds being triggered and
their velocity.
USER-00:Diary |1> Soundgroup ___
SynPads2 SynPads1 SynPads1
Enter the Common menu by pressing the “EDIT-COMMON” button.
Menu page 1> contains parameters for the selected Performance. The display will show the following:
Edit Common |1> Performance-Parameter
PerfType: Layer3 Level:127
On this menu page you select between several Performance Types and adjust the master Level (volume) of
the Performance. In our example the Type is a “Layer-3” Performance. The Performance Type is selected
with the [F2] controller.
31

Common menu: Performance programming
PERFORMANCE TYPE
DESCRIPTION
"Single"
Individual Single-sound. Assigned to Part number 1.
"Double"
Two sounds are layered. Assigned to Parts 1 and 2.
"Layer-3"
Three sounds are layered. Assigned to Parts 1, 2 and 3.
"Layer4"
Four sounds are layered. Assigned to Parts 1, 2, 3 and 4.
"Split 1+1" "Split 1+2"
"Split 1+3"
One sound is to the left of the splitpoint, the others are to the right. The
parameter, "Key: C3" determines the splitpoint. Sounds to the left of the
splitpoint are assigned to Part 1. Sounds to the right are assigned to
Parts 2 - 4.
"Split 2+2" "Split 2+1"
"Split 3+1"
Two or three sounds are to the left of the splitpoint, the others are to the
right. The parameter, "Key: C3" determines the splitpoint. Sounds to the
left of the splitpoint are assigned to either; Parts 1 and 2 or Parts 1, 2,
and 3. Sounds to the right are assigned to either; Part 3 or Parts 3 and 4.
“DynSplit”
Two sounds are mapped across the entire keyboard, and are switched by
Velocity. Only one sound can be heard at a time. The parameter, "Dyn:
0-127" determines the switch-point. Sounds are assigned to Parts 1 and
2.
“DynSplit2”
Similar function to "DynSplit", except two sounds can be "stacked" for
each Velocity zone. For example: Two sounds triggered from velocity 0-
60 and two different sounds triggered from 61-127.
"SndRotate"
Four keys played one after the other will trigger the sounds that are
assigned to Parts 1 - 4. When you use the arpeggiator function you can
produce a 'wave-sequence'-type effect
"Unisono"
Layered Performance with all four Parts playing the same sound. Each
Part is slightly detuned against the others by default. The detune
parameter can be adjusted between values 0 and 127.
F2
"PerfMode"
Selects the type of Performance.
F3
"Level"
Adjusts the overall Volume level of the Performance.
F4
"Detune", "Key" or
"Dyn"
Adjusts 'special function' parameters associated with the selected
Performance type.
The number of parameters in each menu depends on the type of Performance you have selected. The
controllers [F1] & [F2] have the same functions in every Performance menu.
The Performance Type and other parameters can be edited without loosing Performance data in memory.
Edits are stored in a temporary buffer. Edited Performances are not permanent until stored in a memory
location.
32

The Common menu: Performance programming
1
Hold-Pedal
Selecting this setting will 'Hold' played keys when the footswitch is
depressed. For example: A percussive sound will take longer to decay
and the volume will stay louder, longer. This function can be different
for each individual Performance.
2
Motivator-Freeze
Selecting this setting adds a unique feature to the Motivator. A
generated arpeggio or 'wave-sequence' can be stored temporarily by
pressing and holding the footswitch. You can then transpose the
sequence in realtime by pressing a new key on the keyboard. (Refer
to the Chapter, "Editing the Motivator").
Footswitch functions:
Modulation
Matrix
Menu page <2> contains parameters for control of the connected footswitch.
Edit Common <2> Footcontrol-Parameter
Footswitch-Function: Holdpedal
Controller [F3] selects between two possibilities:
The Modulation matrix is where you assign the realtime controllers of The RAVEN or incoming MIDI
data to several parameters in different menus. The following diagram illustrates some of the various
possibilities. There are 4 possible sources and up to 8 destinations.
Modulation-sources
Modulation-destinations
Menu page <3> contains parameters for assigning Modulation Sources to the first 4 of 8 destinations. The
display shows the following:
Edit Common <3> Mod.Source: PitchBend
Lfo: 0 Vol: 0 Pitch: 63 CutFrq: 0
The top right corner displays the name of the Modulation source. The second line displays destinations 1
- 4 to which the controller is assigned. The adjustable parameter is the ‘depth’ or the amount of how much
the Modulation source will affect that destination.
Menu page <4> contains parameters for assigning Modulation Sources to the second 4 of 8 destinations.
The display shows the following:
Fx2A: +0 Fx2B: +0 ArpDy: +0 ArpGat: +0
33

Common menu: Performance programming
F1
"LFO "
The intensity of the LFO effect controlled by the modulation source.
F2
"Vol"
The depth or amount of volume change applied during modulation.
F3
"Pitch"
The amount of pitch change applied during modulation.
F4
"CutFreq"
Adjusts the starting point of the Cutoff Frequency. At lower values the
filter will not let as many high frequencies pass, and a "darker" sound
results. At higher values the filter allows more high frequencies to pass
resulting in a "brighter" sound. The filter effect corresponds with the
preprogrammed value.
F1
"Fx2A"
Fx2A and Fx2B select parameters to be controlled for Effects
Processor FX2, with a value range of -63 to +63. The function
depends on the selected Effect algorithm. (refer to the Chapter,
"Realtime Effects Control).
F2
"Fx2B"
F3
"MotDy"
This parameter adjusts the amount of 'dynamic' change of the Motivator
sequence, with a value range of -63 to +63. It can be thought of as an
offset which is added or subtracted to single notes of a playing
sequence or arpeggio.
F4
"MotGat"
This parameter controls the length, or 'gate-time', of the notes played
by the Motivator, with an effective range from staccato to legato.
1
Select a Performance type
Before you start programming, it is often a good idea of the
sound or effect you want to create. For example: To program
a 'fat' sound, select a Layer-3 or Layer-4 Performance type. To
program a 'wave-sequence'-type sound, select a Sound-Rotate
Performance type.
2
Select the Single-sounds
and adjust the volumes
On the Main Page of the Common Menu, select the sounds that
will make up the Performance, adjust the volumes and pan
positions. This is an important step in programming
Performances, because it is often a good representation of the
final sound.
The following two tables explain the destinations. Menu pages <3>, <5>, <7> and <9> contain Part
parameters and the Menu pages <4>, <6>, <8> and <10> contain parameters for Effect processor 2 (FX2)
and the assignable functions of the Motivator.
The RAVEN is capable of having up to four single sounds play together in a Performance. The Common
menu contains modulation parameters that affect the Performance globally. The Edit Part menu contains
modulation parameters for individual Parts. Modulation parameters saved with a Part retain their settings
even when used in a Performance, giving you the option of using modulation with only certain Parts in the
Performance or on the Performance as a whole.
34
This Chapter covered the parameters of the Common menu. A Performance can be created from scratch or
by altering an existing Performance. The following table summarizes the creation of Performances.

3
Fine tune the Single-
sounds
If you would like to change sounds or adjust certain parameters
this is a good point to do so. You can fine tune Single-sounds
by switching to the EDIT PART Menu.
4
Select Effects
Now it is a good time to assign some or all of the Parts in the
Performance to one or both of the built-in Effects Processors.
Remember to adjust the FX-sends for each of the Parts. Then,
switch to the EDIT-FX menu and adjust the parameters of the
selected algorithm.
5
Add some Modulation ?
To use The RAVEN's real-time features while playing, assign
realtime- or MIDI-controllers in the Modulation Matrix. This is
done in the COMMON Menu for the whole Performance and the
EDIT PART Menu for individual Performance Parts.
6
Using the Motivator
To use the Motivator to generate amazing bass-lines or thrilling
sequences (!), select the EDIT MOTIVATOR Menu. Access this
menu by first entering the EDIT-FX Menu, then select [F3].
7
Store the Performance:
After you are satisfied with your Performance, you should save
it to a free User memory location. This is done in the WRITE
Menu. Press the WRITE button and follow the prompts.
Editing the Motivator
MOTIVATOR MODE
DISPLAY
DESCRIPTION
Arpeggiator
ARPEG
The Arpeggiator produces sequences based on
the notes and chords you play on the keyboard.
When you play a chord on the, the notes are not
sounded simultaneously, but one after the other in
a rhythmic sequence.
Gater
GATER
The Gater switches played notes or chords on and
off rhythmically. This is done by controlling the
sound's volume with MIDI controller #11,
"expression". This setting is especially effective
when used with the Sequencer.
Chord-Rhythmizer
CHORD
In contrast with the Arpeggiator, the Chord-
Rhythmizer retriggers entire chords rhythmically.
When used in conjunction with the "Track-Rotate"
function it produces a 'wave-sequence'-like effect.
Editing the Motivator
The Motivator arranges notes that are played on The RAVEN’s keyboard in multiple ways. This enables
easy production of machine-like rhythms and sequences. The Motivator has three basic modes of operation:
The Motivator can be used in Performance mode as well as Sequencer mode. Settings of the Motivator are
stored in each Performance and in each Song. When used in Sequencer mode, the Motivator plays the
sound assigned to the solo track. When used in Performance mode it can be routed to any of the Parts, with
one exception: In the Performance modes “Unison” and “Track Rotate”, the Motivator is routed to all four
performance parts.
The Edit Motivator menu is accessed from the Edit FX submenu. Press the “EDIT FX” button, then the
“SOFT” button under Edit Motivator ; [F3].
[Edit] [Edit] [Edit ]
[Fx1 ] [Fx2 ] [Motivator]
35

Editing the Motivator
F1
"Mode"
Selects the Motivator mode.
F2
"Trig"
This parameter is only available in Sequencer mode and is used in
conjunction with "Gater" or "Chord". Select the track which triggers the
Motivator.
F2
"Part"
This parameter is only available in Performance mode. Select the
Performance Part to be controlled by the Motivator.
F3
"Hold: ON/OFF"
When turned on, the notes are still played after the keys are released.
The Motivator 'theme' changes only after all keys have been released
and new keys are played. When turned off, keys that are released will
be removed from the Motivator theme, too.
F4
"M: ON/OFF"
This parameter turns the Motivator function on or off.
1F
"loseR"elbissoP.rotavitomehtfonoitulosercimhtyhrehttesnacuoyereH
nitceffesahnoituloserehT.setondn23roht61,ht8,ht4:eraseulav
ehtniylnoedom"drohc"ro"retag"nidnasyawlaedom"rotaiggepra"
kcartrecneuqesdetceleseht,edomgnosnielihw,edomecnamrofrep
.retemarapsihtsedirrevo
2F
"etaG"setonehtro)emit-etag(noitarudetonehtslortnocretemarapsihT
nielihW.emitlaernidetaludomebnacnoitarudehT.deyalp
ehtotdetuorebnacsrellortnocni-tliubehtfoyna,edomecnamrofrep
sihT."2leehW"ehtotdexifsisihtedomgnosehtni,emit-etag
!tsrifunemnommocehtnidetavitcaebotsahnoitaludom
Menu page 1> of the Edit Motivator menu will differ depending upon which mode The RAVEN is in. In
Song mode, the display will show the following:
Edit Motivator |1> Mode-Parameter
Mode: Arpeg Hold: ON M:ON
In Performance mode the menu contains an additional parameter allowing you to select which Part the
Motivator is routed to:
Edit Motivator |1> Mode-Parameter
Mode:Arpeg Part: 1 Hold: ON M:ON
Only Parts used in the current Performance can be selected, except when using the “gater” or “chord”
function in Sequencer mode. In this case a Sequencer track can be selected to trigger the Motivator. For
example, the rhythm of the chords in gater mode controlled by the hihat track. The chords that are played,
have the rhythm of the hihat Motive. The display will show the following:
Edit Motivator |1> Mode-Parameter
Mode: Gater Trig:HIHAT Hold: On M:ON
Any of the eight can be selected with “SOFT” knob [F3].
The table below explains the parameters of the Edit Motivator menu:
Menu page <2> contains parameters for adjusting the Motivator’s rhythmic timing and whether or not note
data is sent to the MIDI out.
Edit Motivator <2> Timing/Switches
Resol: 16 Gate: 64 Dyn:OFF Midi-Out:OFF
36

Editing the Motivator
3F
"FFO/NO:nyD"yticolevehtsdrocerNEVAReht,"NO"ottessiretemarapsihtnehW
nI."evila"eromneveemocebsemehteht,yawsihT.syekdesserpfo
ehtgnisunehwemitlaernidetaludomebnacscimanydeht,noitidda
.oot,unemnommocehtnidetavitcaebotsahsihT.edomecnamrofrep
4F
:tuO-idiM"
"FFO/NO
ehtotsrellortnocdnasetons'tisdnesrotavitomehtrehtehwslortnoC
.tonro"tuoidim"
F2
"Groove"
Selects which note values are affected by the groove.
F4
"Depth"
Controls the depth of the timing variation. Hint: Smaller values are
recommended for faster tempos.
F1
"Dir"
This changes the order of the notes played by the Arpeggiator. The
possible values are expained in the next table.
F2
"Octaves"
Sets the number of octaves, through which the arpeggio is transposed.
A value of "2" plays the theme once in original pitch and then once one
octave higher.
F3
"Doubl"
The Arpeggiator plays each note twice.
Groove Quantize
Note Directions
Menu page <3> contains a unique parameter. As opposed to normal arpeggiators that generate machinelike patterns, the Motivator on The RAVEN can ‘groove’! The Motivator achieves this by playing the
notes in the first half of the pattern a little slower and playing the second half of the pattern a little faster
while maintaining correct timing for each quarter note. This parameter can be used with 8th or 16th notes
. When the resolution is set to 16th notes, the Groove parameter should also be set to 16th notes, otherwise, it might sound very strange! In Sequencer mode the groove is controlled by the song’s setting. Only
one Groove setting can be used at one time. Following is the display containing the Groove parameters:
Edit Motivator <3> Groove-Parameter
Groove: 16tel Depth: 0%
Menu page <4> contains parameters only available in Arpeggiator mode. Since these parameters have no
effect in other modes, lines are displayed instead of values.
Edit Motivator <4> Motiv-Generator
Dir: UP Octaves:1 Doubl:OFF LngFit: ON
37

Global Song parameters
4F
"tiFgnL"fohtgneleht,ffonehW.rabafodneehttastratserrotaiggeprAehT
nacemehtehT.deyalpsyekforebmunehthtiwseiravoiggepraeht
.'taebffo'roerutangisemitehtfotuoyalpneht
1
"UP"
Notes are played in ascending order.
2
"DOWN"
Notes are played in descending order.
3
"UPDW"
Notes are played first ascending and then descending.
4
"RND"
Notes are played in a random order. The theme will always change.
5
"ASGN"
Notes are played in the order as played.
1
"Transpose:"
ON/OFF
Switches the Motivator transposition on or off.
Possible values for the Arpeggiator’s ‘Direction’ parameter are explained below:
Menu page <5 is only available in Sequencer mode. It contains parameters that determine whether or not
arpeggios and rhythmic chords are transposed when the Sequence is transposed. For example, when
turned on and the sequence is transposed from the key of Cmin to the key of F#min, the Motivator will be
transposed also and will stay in key. The display will show the following:
Editing Play &
Groove parameters in Sequencer
mode
Edit Motivator <5| Transpose
Transpose: OFF
The RAVEN’s patterns are normally played in fixed quantize grids. This is appropriate for certain styles of
music, but some situations call for a different feel such as a groove or a shuffle. The RAVEN’s Groove
function, 8th and 16th notes in the first half of the pattern are played first a little slower and in the second
half a little faster. The effect of the Groove function is more audible with slower tempos than with faster
tempos, and typically sound very good at tempos between 90 to 110 BPM. The Groove parameters are
Sequencer Play-Parameter menu. To access this menu, enter Sequencer mode, The display will show
Sequencer menu page 1>.
[Create ] [Edit ] [Create] [Edit] |1>
[Pattern] [Pattern] [Song ] [Song]
Press “SOFT button [F4] under “EDIT SONG” to enter menu page <2:
[Edit ]
<2|
[Play-Parameter]
Press “SOFT” button [F1] to enter the Sequencer Play-Parameter” menu page:
Sequencer Play-Parameter
38
Groove: 16th Depth: 0% RepPoint: G

Global Song parameters
F2
"Groove"
Selects in which note grid the groove function will operate.
F3
"Depth"
Controls the depth of the timing variation. Hint: S maller values are
recommended for faster tempos.
F4
"RepPoint"
Select the highest key in the theme, above which transposition goes
downwards.
Following is an explanation of the two parameters which are adjusted with “SOFT” knobs [F2] and [F3]:
The Groove parameters can be programmed and stored for each song individually.
Changing the
Repetition Point
As stated in an earlier Chapter, patterns can be transposed by pressing keys on the keyboard. The transposition range is always one octave but you can set the point above which The RAVEN moves the transposition to the lower octave. This is done by changing the high note in the octave, known as the ‘Repetition
Point’, above which the transposition works downwards. This parameter can also be accessed in the Play
Parameter menu.
To access the Repetition Point parameter, enter Sequencer mode. The display will show the following:
[Create ] [Edit ] [Create] [Edit] |1>
[Pattern] [Pattern] [Song ] [Song]
Turn the “PAGE” dial to enter go to page <2>:
[Edit ]
<2|
[Play-Parameter]
Press the “SOFT” button [F1] to enter the Play Parameter menu. The display will show the following:
Sequencer Play-Parameter
Groove: 16th Depth: 0% RepPoint: G
The Repetition Point value can be changed with the knob [F4]:
This parameter value is saved with the song data. To exit this menu press the “EXIT” button.
39

Pattern Editing
This Chapter is one of the most extensive Chapters in this manual. The Pattern Edit menu offers the
following possibilities:
1) direct selection of complete ROM patterns
2) create Motives to build new patterns
3) create User Motives realtime or in Step by Step
4) drum programming similar to as on TR-909 or 808
The Edit menu offers some useful and powerful tools for creating your own Motives. And as compared to
standard computer/software combinations there are some unique features available in The RAVEN’s pattern editing section that make production work even easier.
This Chapter approaches the Edit Pattern menu one step at a time. To demonstrate the examples, make an
empty song by pressing the red “WRITE” button. Select menu page <2>, “Init Pattern/Song” with the
“PAGE” dial:
Press [ok] (“SOFT” button [F1]) to initialize the song memory. The RAVEN will ask for confirmation:
<2> Init Pattern/Song?
[ok]
Init... Sure?
[ok] [cancel]
Selecting the Edit
Pattern menu
Press [ok] (“SOFT” button [F1]) again to proceed with the initialization. At this point, there is an empty
song in the temporary memory. All edits will be held in this memory even when The RAVEN is powered
down. If a different song is selected or if the memory is re-initialized, all edits will be lost. Therefore it is
a good idea to save the song to memory location. This procedure is explained in the Chapter “The Write
menu”.
After clearing the temporary song memory, press “EXIT” to leave the Write menu.
Press the “EDIT SONG” button. The following menu of Sequencer edit functions appears:
[Create ] [Edit ] [Create] [Edit] |1>
[Pattern] [Pattern] [Song ] [Song]
Select [Edit Pattern]. The display will show the following:
Select... [Load ]
Pattern:0 [ok] [Rom Pattern]
Select a Pattern to edit. Each song of The RAVEN consists of up to 10 different Patterns, numbered 0 to 9.
If the Song was not cleared, you would now be able to press play and hear the selected Pattern. This
simplifies the search a Pattern when making changes to a Song during the arrangement process. Since the
Song is empty, playing the Pattern is not possible. Patterns are selected with the knob [F1] and the Pattern
number will be displayed.
You can either load one of the ROM Patterns into RAM or proceed right to the Edit menu. Listen to some
the ROM Patterns first to get some ideas for your own creations.
40
Pattern Editing
F1
"Mtv"
Selects the Motive Bank for the current track.
F2
"Motiv"
Selects the Motive Number from the selected Motive Bank.
F3
"Trans" On/Off
Turns transposition for the selected track on or off. Only available for
'tonal' tra cks.
F4
"keep"
Copies changes made to the Pattern to the Song's Pattern memory.
The functions listed below are available in all PATTERN EDIT menu pages.
->
"TRACK" Buttons
Selects the track to be edited.
->
"MUTE"button
When holding down this button, you can mute and demute each track
with the corresponding track button.
Loading a ROM
Pattern
The RAVEN’s ROM patterns are combinations of pre-produced Motives. To hear the Motives in their
original combinations select [Load ROM Pattern] on the Edit Pattern menu page <1> .
Any motive-combinations in the selected song pattern will be replaced with the ROM pattern.
Load ROM-Pattern
Bnk: MtvA ROM-Pattern: 0 [keep]
The ROM patterns are located in 6 Motive banks named banks A to F. Each bank contains 64 patterns.
Pattern numbers 0 to 51 contain grooves and numbers 52 to 63 are fills and breaks. Knob [F1] selects the
Motive bank and knob [F3] selects the pattern. Selections can be made with greater accuracy by first
pressing the “SOFT” button [F1] or [F3] and then changing the associated value with the “VALUE” dial.
The pattern can be played immediately. To change the tempo press the “TAP” button and change the tempo
with the “VALUE” dial. The tempo is displayed in Beats Per Minute (BPM) in the upper right part of the
display. After setting the tempo you can continue auditioning patterns by pressing “SOFT” button [F3]
and selecting patterns again.
To place a pattern in your song press [keep] (“SOFT” button [F4]). This copies the ROM pattern into song
memory and returns The RAVEN to the first page of the Edit Pattern menu:
Select... [Load ]
Pattern:0 [ok] [Rom Pattern]
The newly loaded pattern can now be processed by pressing [ok] (“SOFT” button [F2]), which changes the
display to:
Changing the
Motive Assignment
of Patterns
(Play0) ________ Edit P0 Bass-Track+|1>
Bnk: MtvA Motiv: 1 Trans: ON [keep]
Menu page 1> contains parameters allowing you to select Motives for the individual tracks. This page is
similar to the Pattern selection page previously explained. The main differences on this page is that
Motives can be changed for one track at a time and also whether or not the tonal tracks (bass, sequence 1,
etc..) shall be transposable in the song. Additionally, you can access the User Motives if there are any in
memory. This will be covered in greater detail in an upcoming Chapter.
41
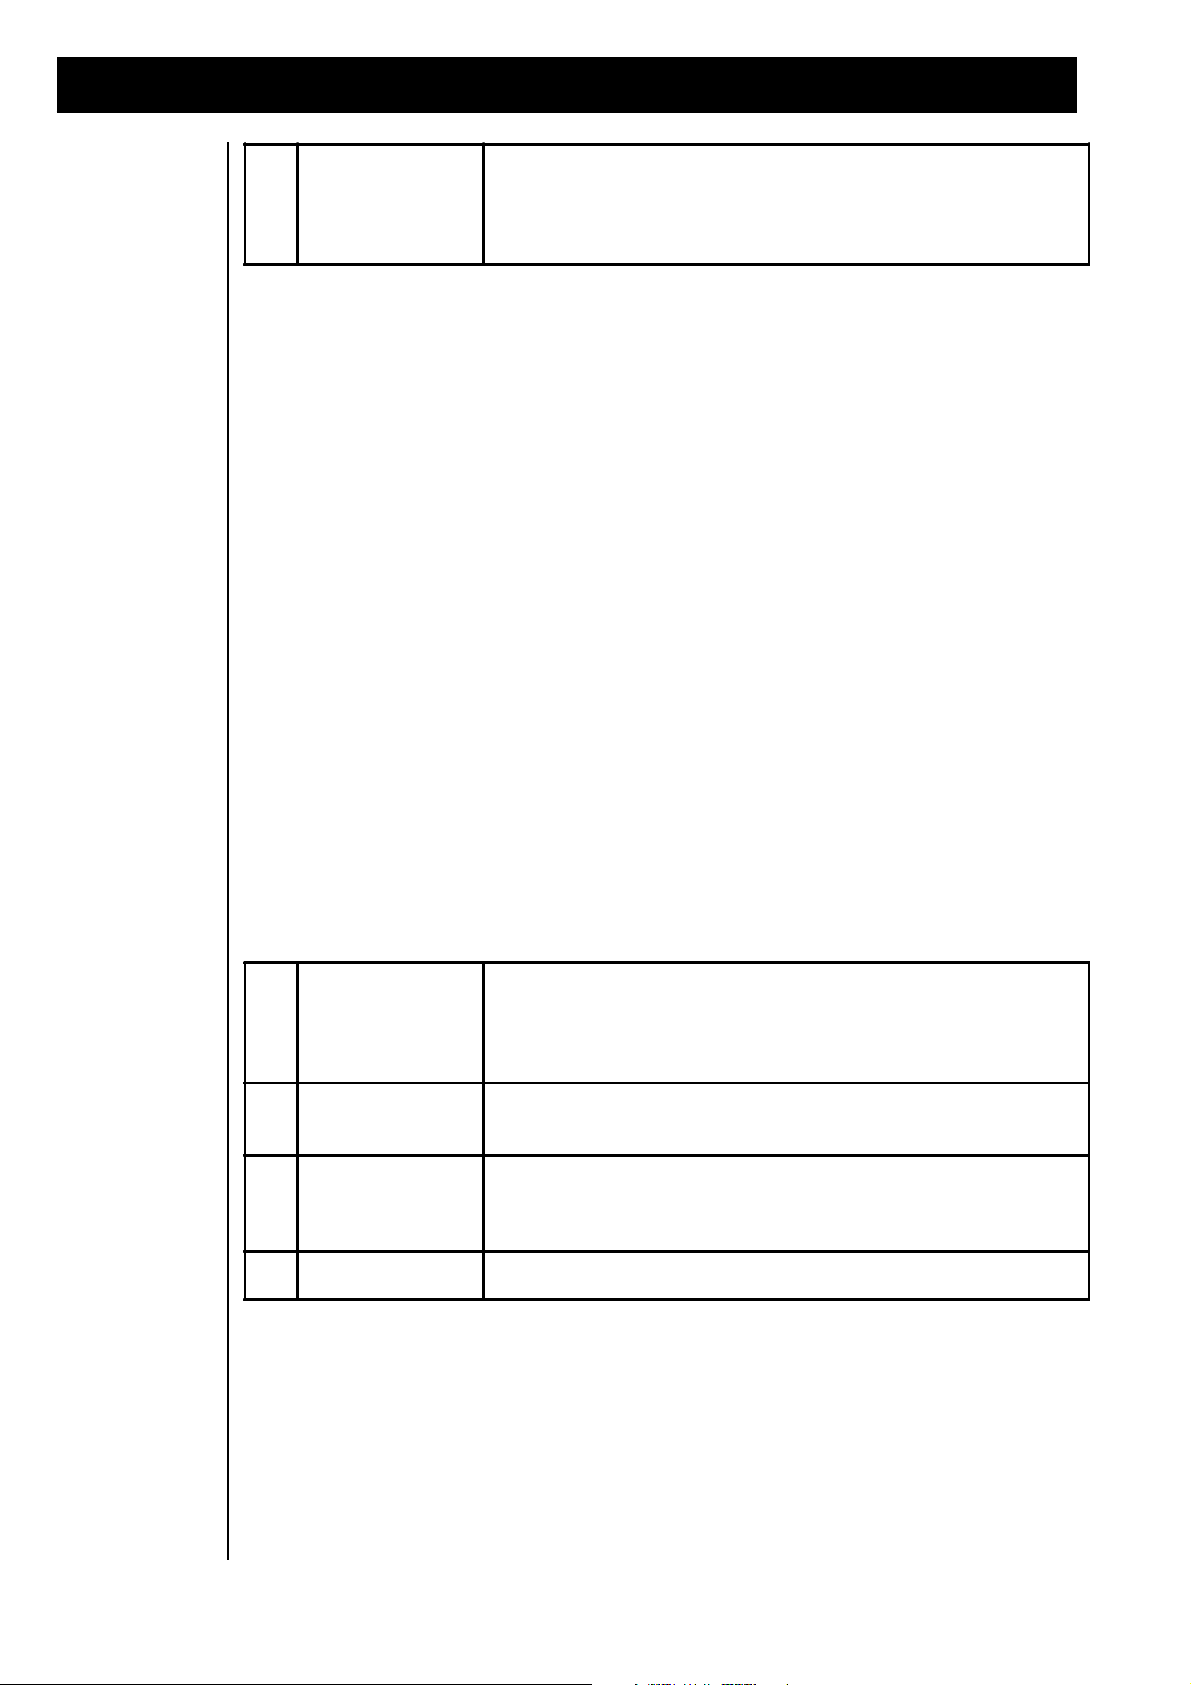
Pattern Editing
->
“TAP”-button
With the TAP button you can change the tempo by tapping quarter
notes. After having pressed the tap-button once, the tempo can also be
changed with the value-dial. To return to normal parameter editing,
press one the corresponding soft buttons F1 to F4.
F1
"Length"
This sets the length of the Motive in multiples of 4/4. Each Motive in a
Pattern may have an individual length. This parameter is not available
for already recorded tracks, since the Motive length can only be
changed on empty tracks.
F2
"clear"
Clears all data, including notes, in the selected track. Select the
desired track with the Track buttons.
F3
"del-ctrl"
Deletes all data, other than notes, on the selected track. Data, such as
Pitch Bend, Aftertouch and MIDI Contrillers are deleted with this
function.
F4
"Click"
Turns the metronome click on or off.
Setting Track
Volumes
Deleting Tracks
and Controller
data, Adjusting
Motive lengths,
and the Metronome.
Menu pages <2> and <3> contain Mix parameters for setting the volume levels of the tracks. These pages
can be accessed with the “PAGE” dial.
(Play0) ________ Edit P0 Kick-Track*<2>
Mix:____ Kick Snare HH Prc
(Play0) ________ Edit P0 Kick-Track*<3>
Mix: ____ Bass Sq1 Sq2 Chrd
These menu pages allow you to adjust the volume of the drum sounds (page <2>) and the melody instruments (page <3>) with the four knobs under the display. The adjustment of the other pertinent settings
(pan, FX levels, etc_)can be done from the Part Edit menu. All of these parameters are saved in each
pattern.
Menu page <4> contains other track editing functions and can be selected with the “PAGE” dial:
(Play0) ________ Edit P0 Bass-Track+<4>
[clear] [del-ctrl] Click: ON
Recording User
Motives
This display offers the following possibilities:
The next section contains information for recording User Motives. There are a number of different approaches to this. Drums can be programmed in a mode inspired by older Roland_ drum machines. Complex lines and hooks can be created in a brand-new way by first recording the notes step-by-step and then
editing the rhythm of the notes in realtime. This allows the creation of tracks which would otherwise
require a lightning-acrobatic-finger technique! Furthermore, you can record directly in realtime. On to the
next tutorial.
42
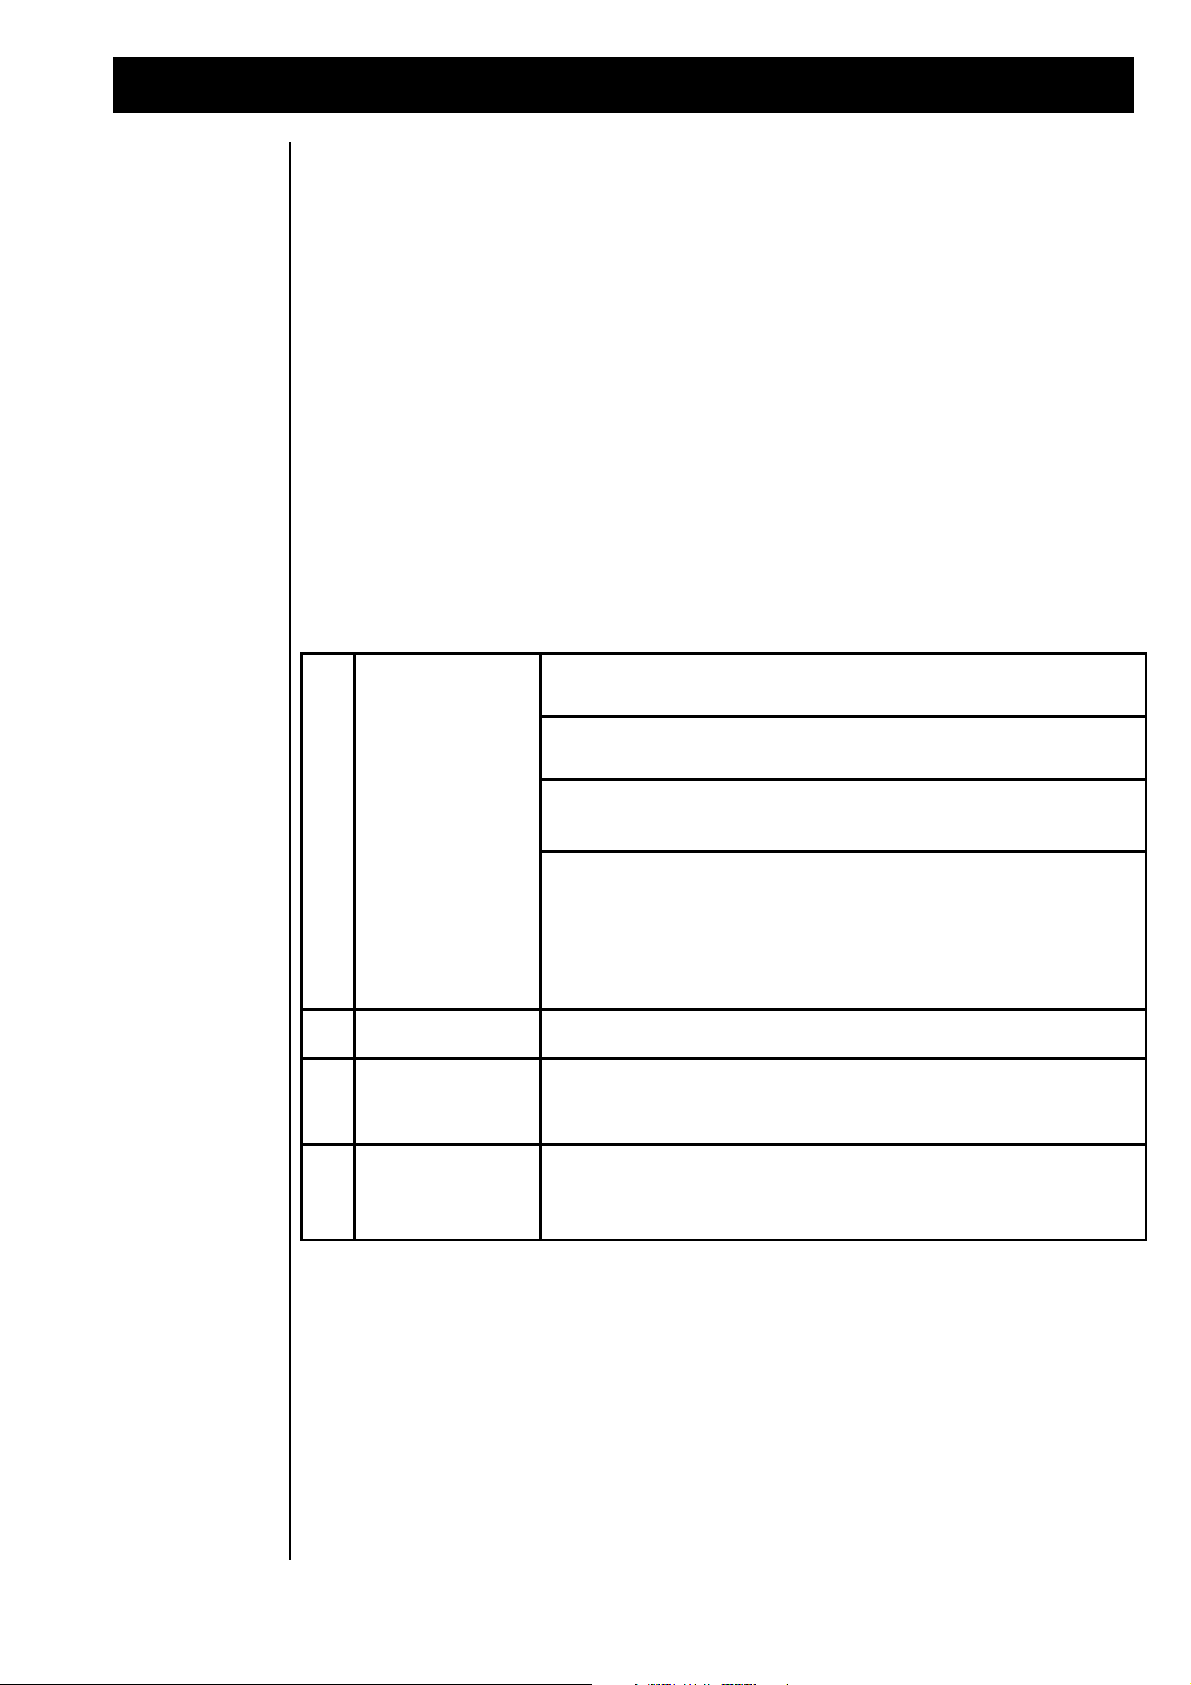
Pattern Editing
F1
"Mode"
Select the realtime recording mode here.
"Mode: NORM" 'Replace' recording; old notes and data are replaced.
"Mode: DUB" Newly recorded notes and data are added to the track's
existing data.
"Mode: DYN" Replaces only the dynamics, (key velocity) data while
leaving note data intact. Wheel 2 is assigned to control the dynamics.
Useful with sounds that have velocity-controlled envelopes. Although
this effect can be achieved by using MIDI controllers, this method uses
very little m emory.
F2
[record]
Starts recording after a countoff of 4 quarter notes.
F3
[ — ] or [undo ]
Erases the most recent action, whether it was recording or
quantization. This is only available if data exists on the track.
F4
[quant]
Quantizes the notes of the selected track. The grid size can be
changed with knob [F4]. The note placement will be moved to this
grid.
Realtime Recording
Before creating User Motives, select an empty Song-pattern. To do this, exit the Edit menu and on the first
page displayed after selecting the Edit pattern menu, select an empty pattern. To leave the Edit pattern
menu, press the “EXIT” button. The display shows the following:
[Create ] [Edit ] [Create] [Edit] |1>
[Pattern] [Pattern] [Song ] [Song]
Select the Edit pattern again menu by pressing the appropriate “SOFT” button.
Select... [Load ]
Pattern:0 [ok] [Rom Pattern]
Select an empty Song-pattern, press [ok], and select Pattern Edit menu page <5> with the “PAGE” dial:
(Play1) ******** Edit P1 Kick-Track+<5>
Mode:Norm [record] [ ] [quant]:16
Pattern Edit menu page <5> contains parameters and action-buttons for selecting the recording mode and
quantizing notes:
For quantization to obtain useful results, play with the metronome. Otherwise, quantization will move
notes to beats that do not necessarily relate to the song. Recording is done on the currently selected track.
43

Pattern Editing
DESIRED ACTION
NAME
DESCRIPTION
Listening without recording
Play
This mode offers no editing possibilities, although
you can play along with the Pattern as it plays.
Realtime recording
Real
Records drum notes in realtime. Quantization is
applied, according to the "Grid" parameter,
during recording.
Entering the rhythm in realtime using the
full keyboard for one instrument.
roll
Maps the selected drum instrument across the
entire keyboard. Useful for easily recording
drums rolls and fills.
Drum programming (TR-909
style)
Edit Pattern menu page <6> contains two available recording modes and can be selected with the “PAGE”
dial:
(Play1) _******* Edit P1 Perc-Track+<6>
[drumgrid] Grid: 16 [step-rec] Mode:NOTE
The first two parameters or action buttons are for the drum program mode (similar to the older Roland
drum machines) and the second two parameters are for the step-by-step recording. The Drumgrid method
is explained next.
First, select the grid size for the drum programming function with the knob [F2]. This selects the note
values (8th, 12th, 16th, 24th or 32nd) notes.
Press [drumgrid],(“SOFT” button [F1]), and the display will show a series of dots. Each dot represents a
step with the resolution you have selected.
| 1/2 | ................................
Drumgrid-Mode: Play Instr: C2 Bassdrum
If Start/Stop is pressed, the Sequencer starts and a star sign marks the current position in the grid. Knob
[F2] selects the edit mode and Knob [F4] selects the drum instrument to be displayed and edited.
If the track contains more steps than will fit in the display, the track can be moved with the “SONG/
BANK-SELECT” buttons. The window number which is currently displayed is shown in the upper left
corner. For example: When editing a track that is four bars long with 16th notes, only 2 bars (32 steps)
can be displayed at a time. Use the “SONG/BANK-SELECT” buttons to toggle between the first screen
(1/2) and the second screen (2/2) in order to view the track as needed.
The lower right part of the display shows the current selected drum instrument (here: C2, bassdrum). You
can leave the drumgrid mode simply by pressing the EXIT button.
In the table below the different edit modes are explained:
44

Pattern Editing
Selecting the drum instrument and pitch
Inst
Selects the drum instrument and contains the
pitch parameter.
Editing step by step
Step
The familiar mode offered on many older drum
machines. You can set or clear steps of the grid
with the white keys. Key velocity is recognized
and displayed as a bar with its height relative to
how hard the key was played. The numbers
printed above the white keys and display
represent the steps in the drumgrid.
Subsequent changing of dynamics
Dyn
Use this mode if you are satisfied with the
rhythm, but would like to change some of the
velocities. Press the key on the step to be
edited, until satisfied with the velocity. You can
also hold down the key and use Wheel 2 for
adjusting the dynamics.
deleting single steps
clr
In contrast with the step function, steps can only
be deleted here. To delete all steps, hold all the
keys down.
While in Drumgrid mode, you cannot select a different track. To select another track, leave the editor
using the “EXIT” button. Remember that using the Drumgrid with different resolutions might result in
moved notes since notes are automatically quantized. A solution is to use multiple tracks when working
with multiple grid resolutions.
When satisfied with drum beat, leave the Drumgrid mode by using the “EXIT” button. The Step Recording mode is explained next.
Step-by-Step
programming
Grooves & Breaks
Enter the Step Recording mode from Edit Pattern menu page <6>. It allows the recording of notes independent of their timing. You then record the timing in a second take. The last two parameters on page
<6>deal with this function:
(Play1) _******* Edit P1 Chord-Track+<6>
[drumgrid] Grid: 16 [step-rec] Mode:NOTE
For learning this function, select a tonal track (e.g. chord-track). With the knob [F4] you can select the
recording of notes or timing. Timing is only available after notes have been recorded. Note: The parameter record-mode (normal/overdub) of menu page <5> is also active here.
Select Mode [note], then [step-rec] (“SOFT” button [F3]). Now play single notes or chords without
paying attention of the timing. Then set the Mode to [time] with the knob [F4] and restart the step-record
function with the “SOFT” button [F3]. The RAVEN will start playing the metronome, play the keys.
Don’t worry about which notes you are playing, The RAVEN is recording only the timing and the note
lengths, then combines them with the pre-recorded notes.
In the last Edit Pattern menu page you can assign the pattern to one of 2 types:
1. Grooves
2. Breaks
The main purpose of these two types is when using the “Create Song” function. Since The RAVEN expects a song to consist of Grooves and Breaks it therefore searches for these types of Patterns, so remember
to set the type.
45

The RAVEN's Effects Processors
The RAVEN's
Effects Processors
LOVE-PARADE
1995, Berlin
The RAVEN includes two Effects Processors. These produce Effects ranging from Room Simulations like
Reverb or Echo to special effects like Flanging and Phasing and even Distortion, Overdrive and Rotary.
Any effect needed for modern music production is built into The RAVEN.
46

The RAVEN's Effects Processors
FX-1
FX-2
1.) Room
1.) Chorus
2.) Small Room
2.) SlwChorus
3.) Warm Room
3.) FatChorus
4.) Chamber 1
4.) JetFlange
5.) Chamber 2
5.) Flanger
6.) Plate 1
6.) Phaser
7.) Plate 2
7.) SlowPhase
8.) Hall
8.) Panning
9.) Large Hall
9.) ShortDely
10.) Cathedral
10.) LongDelay
11.) Gated Reverb 1
11.) HQ-Delay
12.) Gated Reverb 2
12.) Ping-Pong
13.) Gated Reverb 3
13.) GatedDely
14.) Early Reflection 1
14.) SpecialFX
15.) Early Reflection 2
15.) Equalizer
16.) Early Reflection 3
16.) Deep-EQ
17.) Early Reflection 4
17.) WahWah+Ov
18.) Raindrops
18.) AutoWhawa
19.) HQ-Delay
19.) WarmOverdrv
20.) LongDelay
20.) Distortn
21.) NoEffect
21.) Rotor
22.) Tremolo
23.) RingMod
24.) NoEffekt
The effects are divided between two independent Effect Processors. While FX-1 produces mainly reverb
and echo, FX-2 is responsible for the special effects. With the S-FEED parameter of FX-1, the output of
FX-2 can be directed to the input of FX-1. This makes it possible to apply reverb to the special effects.
Effect algorithms available in The RAVEN:
The effect amount can be individually adjusted for each of The RAVEN’s parts with the Part Edit parameters FX1-send and FX2-send.
When using the modulation effects of FX-2, such as flanger, phaser, panning, chorus, etc_, a more intense
effect can be obtained by routing the part through the Effect Processor only. This is done by turning off the
original (dry) signal. Set the Pan parameter on Edit Part menu page <2> (“Output-Assign”) to “—”. The
correct setting for this is shown below. The most important parameter is here “Pan”, which mutes the dry
signal when set to “—”.
Edit Part 1 <2> Output-Assign
Level:127 Pan: ___ FX1: 0 FX2: 63
47

FX-1 Effect Algorithms
F1
"FX-Typ"
Selects the Effect algorithm.
F2
"InLev"
Adjusts the input level of the FX Processor.
F3
"SFeed"
Sets the amount of FX-2's output signal fed into FX-1's input. This is
independent of the "normal" input level.
F4
"Decay"
Adjusts the decay time of the reverb.
The parameters of the Effect Processors are stored in each Song and in each Performance. Whenever a
Song or Performance is saved, the Effect parameters are stored, too. Access the Effect parameters by
pressing the “EDIT-FX” button. The display will show the following:
[Edit] [Edit] [Edit ]
[Fx1 ] [Fx2 ] [Motivator]
FX-1 Effect
Algorithms
Reverb Effects
Here you select an Effect processor or the Motivator for editing. To edit [FX-1], press “SOFT” button
[F1]. The display shows the Edit FX1 menu. The display varies depending upon the selected Effect
algorithm.
Edit FX1: Room Page: I1I
FX-Typ: 1 InLev: 60 SFeed: 0 Decay: 50
All FX Edit menus have one thing in common: the first knob beneath the display always selects the Effect
algorithm. When the algorithm is changed, what is shown in the display often changes, because the
various effect algorithms offer different parameters. Algorithms with more parameters than can fit in one
display are divided among multiple pages, which can be accessed with the “PAGE” dial. The page number
is shown in the upper right corner of the display.
The first 10 algorithms produce reverb effects. While they differ from each other in predelay amount and
intensity of the early reflections, the editable parameters are the same for all of them:
1 Room
2 Small Room
3 Warm Room
4 Chamber
5 Chamber 2
6 Plate 1
7 Plate 2
8 Hall
9 Large Hall
10 Cathedral
Gated Reverb
48
Edit FX1 menu page 1:
Edit FX1: Room Page: I1I
FX-Typ: 1 InLev: 60 SFeed: 0 Decay: 50
The following three programs generate gated reverb. This is reverb in which the ‘tail’ of the reverb is
automatically cut off after a selected time.
Gated reverb is often used with the gate time set to a specific note length. That way the reverb is kept in
time with the music. The effect of gating is

FX-1 Effect Algorithms
F1
"FX-Typ"
Selects the Effect algorithm.
F2
"InLev"
Adjusts the input level of the Effects Processor.
F3
"SFeed"
Sets the amount of FX-2's output signal fed into FX-1's input. This is
independent of the "normal" input level.
F4
"TrsH"
Sets the threshold level, above which the gate opens (Gated Reverb
Effects 1 - 3).
F1
"FX-Typ"
Selects the Effect algorithm.
F2
"HoldT"
Adjusts the time the gate stays open after the threshold level is
exceeded.
F3
"OpSpd"
Adjusts the rate it takes for the gate to switch "on".
F4
"ClSpd"
Adjusts the rate it takes for the gate to close after the Hold-time is over.
minimized if too many tracks are routed through the gated reverb, because the gate will not close if it is
being triggered constantly. A good effect is achieved when there are rests long enough to let the level
detector close the gate. The level detector monitors the input level of FX-1 and reacts if the level is above
or below the sensitivity mark and after the programmed time opens or closes the gate.
Effect algorithms 11 to 13 select among three gated reverb effects:
11 GatedRev1
12 GatedRev2
13 GatedRev3
When selecting one of these algorithms, the display will show:
Edit FX1: GatedRev1 Page: I1>
FX-Typ:11 InLev: 60 SFeed: 0 TresH: 16
As the “>” next to the menu page number indicate, there is more than one display page with parameters
available for this algorithm.
Early Reflection
programs
Edit FX1 menu page <2 contains additional effect parameters. It can be accessed by turning the “PAGE”
dial one position to the right:
Edit FX1: GatedRev1 Page: <2|
FX-Typ: 11 HoldT: 2 OpSpd:16 ClSpd: 30
Algorithms 14 to 17 generate early reflection effects. When an acoustic source sounds in a room, the
sound is reflected off of the walls. Because the distances from the sound source to the walls, the ground
and the ceiling differ, the signals take different amounts of time to reach the listener’s ear. It is these
characteristics that are simulated with FX1 algorithms 14 to 17.
Algorithm 18, “Raindrops”, provides a mixture of reverb and echo effect.
14 EarlyRfl1
15 EarlyRfl2
16 EarlyRfl3
17 EarlyRfl4
18 Raindrops
49

FX-1 Effect Algorithms
F1
"FX-Typ"
Selects the Effect algorithm.
F2
"InLev"
Adjusts the input level of the Effects Processor.
F3
"SFeed"
Sets the amount of FX-2's output signal fed into FX-1's input. This
makes it possible to connect the Effects Processors in series.
F4
"Dly"
Adjusts the delay time, (the amount of time between repeats).
F1
"FX-Typ"
Selects the Effect algorithm.
F2
"Feedb"
Adjusts the amount of times the echo will repeat.
Select Effect algorithm 14 with the knob [F1] to experiment with the Early Reflection parameter. The
parameters of this algorithm correspond with those of Reverb algorithms 1-10, and can be found earlier in
this chapter. The same applies for algorithm 18, “Raindrops”.
Delay Effects
Algorithms 19 and 20 produce echo-effects. Parameters available in this algorithm are: Input Level
(signal level sent to the effect processor), Delay Time (amount of time between repeats) and Feedback
(number of times the echo repeats). Although algorithms 19 and 20 contain the same parameters, the value
range of these parameters differ between the two algorithms, allowing two very different echo effects.
Effect processor FX 2 also can produce echo-effects. To apply Reverb to an Echo, use FX 2 for the echo
effect and then route it to FX 1set to a Reverb effect. This is done with the S-Feed parameter available in
the Edit FX1 menu on page 1>.
19 HQ-Delay
20 LongDelay
Edit FX1 menu page 1> contains different parameters for the echo-effects 19 and 20:
Edit FX1: HQ-Delay Page I1>
FX-Typ: 19 InLev: 90 SFeed: 0 Dly:100ms
FX-2 Effect
Algorithms
Edit FX1 menu page <2 contains additional parameters:
Edit FX1: HQ-Delay Page <2|
FX-Typ: 19 Feedb: 64
This concludes the description of the first Effect Processor, FX 1. The following section describes the
second Effect Processor 2, FX 2.
50
Love-Parade 95

FX-2 Effect Algorithms
F1
"FX-Typ"
Selects the Effect algorithm.
F2
"InLev"
Adjusts the input level of the Effects Processor.
F3
"Depth"
Adjusts the intensity or 'width' of the chorus effect.
F4
"Rate"
Adjusts the speed at which the chorus effect modulates.
F1
"FX-Typ"
Selects the Effects algorithm.
F2
"Center"
Sets the average delay time.
F3
"OutLv"
Sets the output-level of the chorus effect.
If in the FX 1 Edit menu, press the “EXIT” button, otherwise press the “EDIT-FX”-button. The display
shows the following:
[Edit] [Edit] [Edit ]
[Fx1 ] [Fx2 ] [Motivator]
Here you select an Effect processor or the Motivator for editing. To edit [FX 2], press “SOFT” button
[F2]. The display shows the Edit FX2 menu. The display varies depending upon the selected Effect
algorithm. Turn the knob [F1] to the left to start with the same algorithm as shown in the manual.
Chorus Effects
Effect algorithms 1-3 provide different chorus-effects. The chorus produces a full and spatial sound suitable for pads or chords of all kind. When using the modulation effects of FX-2, such as flanger, phaser,
panning, chorus, etc_, a more intense effect can be obtained by routing the part through the Effect Processor only. This is done by turning off the original (dry) signal. Set the Pan parameter on Edit Part menu
page <2> (“Output-Assign”) to “—”. The relevant parameter is here “Pan”, which mutes the dry signal
when set to “—”.
Algorithms 1-3 provides three chorus variations:
1 Chorus
2 SlwChorus
3 FatChorus
After selecting the Chorus effect, Edit FX2 menu-page 1> appears in the display:
Edit FX2: Chorus Page: |1>
FX-Typ: 1 InLev: 80 Depth: 10 Rate: 20
Chorus has a second page, which is selected with the “PAGE” dial:
Edit FX2: Chorus Page: <2|
FX-Typ: 1 Centr: 30 OutLv: 64
51

Effect Algorithms of FX-2
F1
"FX-Typ"
Selects the Effect algorithm.
F2
"Center"
Sets the average delay time of the flanger effects.
F3
"Feedb"
Sets the amount of FX-2's output signal fed into FX-1's input. At high
settings the typical jet-flanger sound results.
F4
"OutLv"
Sets the output-level of the flanger effect.
Flanger Effects
The Flanger produces a more drastic effect than the Chorus. The Flanger effect produces a delay in the
range of milliseconds, whose delay time is modulated. With the Feedback parameter this effect can be
adjusted to self-oscillation. The Flanger was invented in recording studios of the sixties and has remained
one of the most popular effects. Algorithms 4 and 5 provide Flanger effects.
4 JetFlange
5 Flanger
Select one of the two Flanger algorithms with knob [F1]. The display will show the following menu page:
Edit FX2: JetFlange Page: |1>
FX-Typ: 4 InLev: 80 Depth:100 Rate: 8
The Flanger algorithms offer two display pages of parameters. Menu page 1> is identical to the Chorus
menu. Refer to the section in this manual describing the Chorus for an explanation of Flanger edit page 1>
parameters. Menu page <2 of the Flanger menu provides an additional parameter, [Feedback]:
Edit FX2: JetFlange Page: <2|
FX-Typ: 4 Centr: 16 Feedb: 90 OutLv: 64
Phaser Effects
Panning Effect
52
Phaser effects emphasizes and deletes different overtones of the input signal by shifting the phase. Since
the degree of phase shifting can be modulated, a ‘comb-filter’ effect is produced, which changes the sound
cyclically. If the modulation frequency is set to zero, the phaser can be used as a sort of ‘comb filter’ that
can be tuned with the [Centr] parameter. Both menu pages correspond completely, refer to the Chorus
section for a parameter description. Algorithms 6 and 7 provide Phaser effects.
6 Phaser
7 SlowPhase
Algorithm 8 provides a Panning effect. The panning effect automatically and inversely varies the level of
the signal in each speaker, and gives the impression of the sound moving from speaker to speaker.
8 Panning
The Panning menu is selected with knob [F1].
Edit FX2: Panning Page: |1>
FX-Typ: 8 InLev:80 Depth:127 Rate: 40
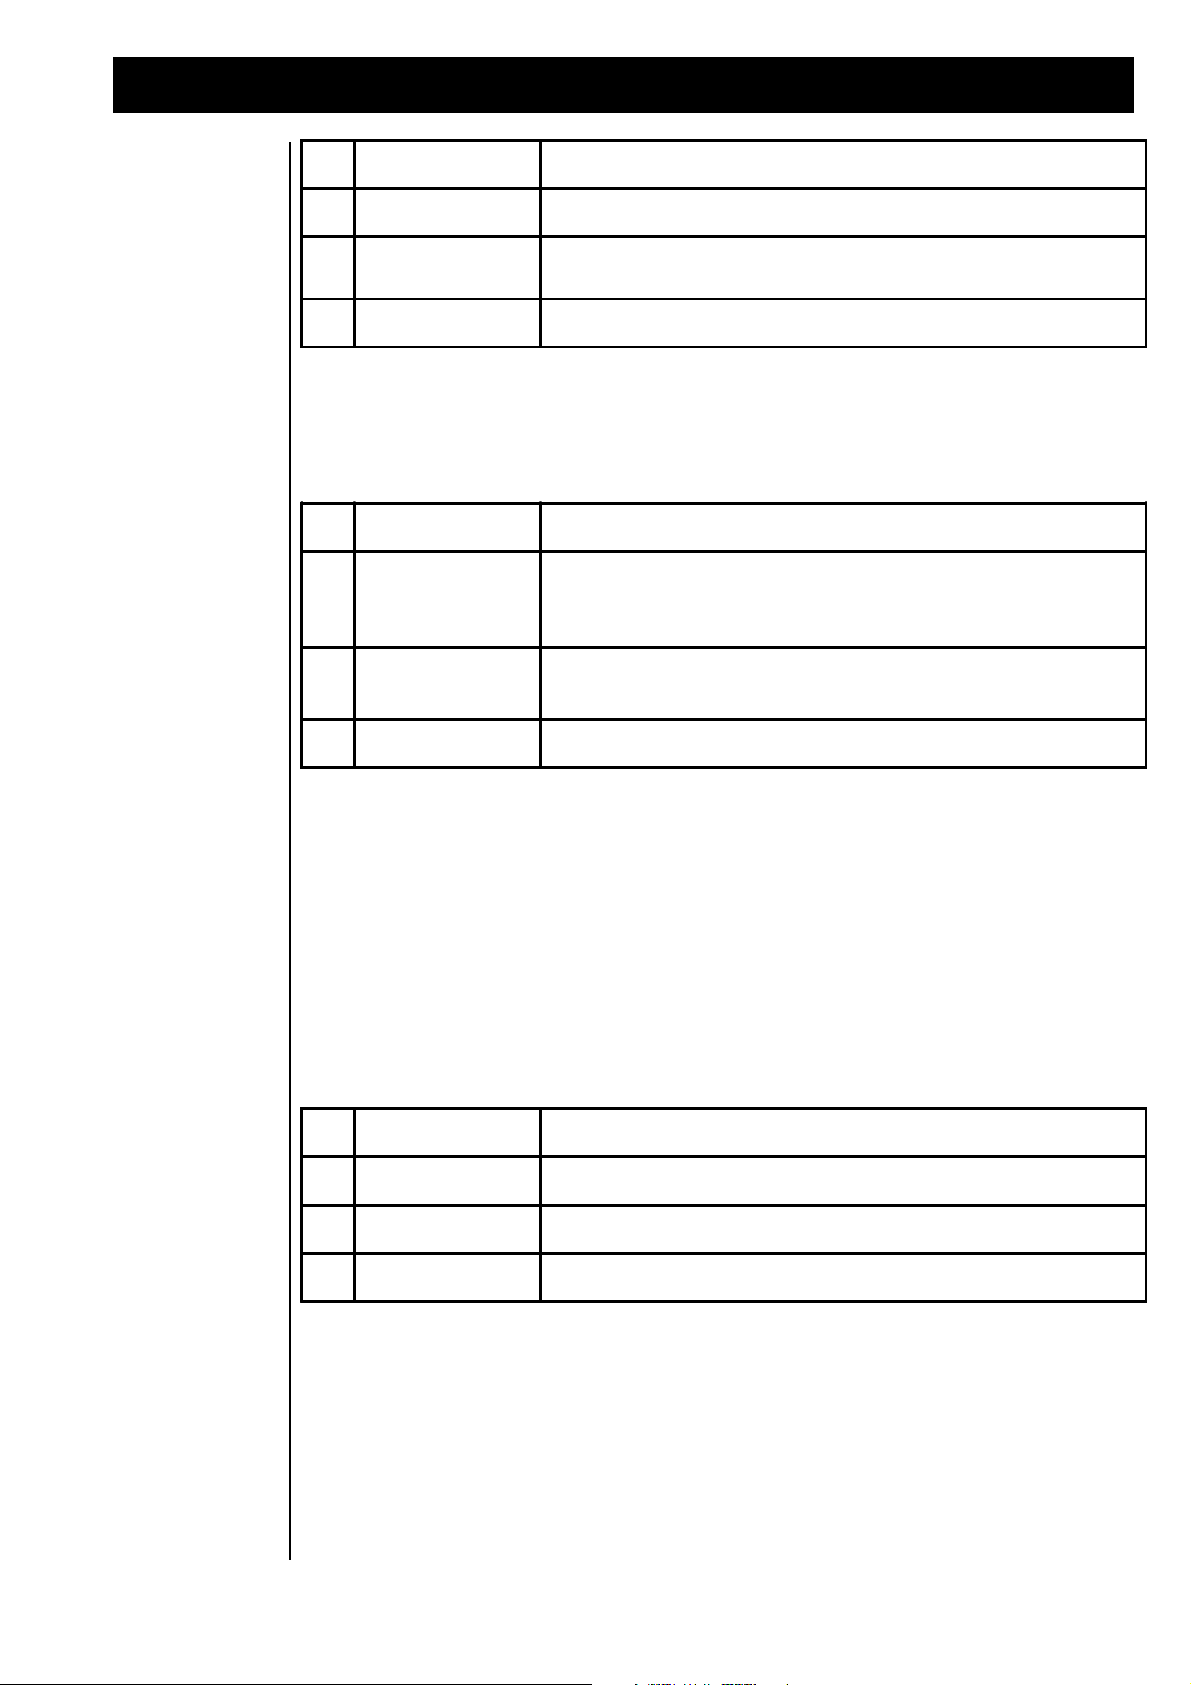
FX-2 Effect Algorithms
F1
"FX-Typ"
Selects the Effects algorithm.
F2
"InLev"
Adjusts the input level of the FX Processor.
F3
"Depth"
Sets the amount of movement (width) in the stereo panorama.
F4
"Rate"
Sets the rate at which the sound moves in the panorama.
F1
"FX-Typ"
Selects the Effect algorithm.
F2
"Phase"
Sets the phase-offset between left and right channels. With a value of
"127", right is loud when left is soft and vice versa. With a value of "0",
both channels change volume simultaneously; (Tremolo).
F3
"MnPan"
A manual adjustment for the panorama position. The parameter "Rate"
should be set to "0".
F4
"OutLv"
Sets the output-level of the flanger effect.
F1
"FX-Typ"
Selects the Effects algorithm.
F2
"InLev"
Adjusts the input level of the FX Processor.
F3
"Dly"
Adjusts the delay time, (the amount of time between repeats).
F4
"Feedb"
Adjusts the amount of times the echo will repeat.
The Panning algorithm offers two display pages of parameters:
Edit FX2: Panning Page: <2|
FX-Typ: 8 Phase: 80 MnPan: 64 OutLv: 64
Delay Effects
Algorithms 9-12 contain Echo effects. Number 12, ‘Ping-Pong’, requires an explanation. With this effect,
the echo alternates between the left and right sides. This type of echo gets its name from Ping-Pong balls
which, in the paddles of good players, change sides for several times.
9 ShortDelay
10 LongDelay
11 HQ-Delay
12 Ping-Pong
Edit FX2: ShortDely Page: |1>
FX-Typ: 9 InLev: 64 Dly:229ms Feedb: 96
Echo has a second page, which is selected with the “PAGE” dial:
Edit FX2: ShortDely Page: <2|
FX-Typ: 9 OutLv: 64
53

FX-2 Effect Algorithms
F1
"FX-Typ"
Selects the Effects algorithm.
F2
"OutLv"
Sets the output-level of the flanger effect.
F1
"FX-Typ"
Selects the Effects algorithm.
F2
"InLev"
Adjusts the input level of the FX Processor.
F3
"Dly"
Adjusts the delay time, (the amount of time between repeats).
F4
"Feedb"
Adjusts the amount of times the echo will repeat.
F1
"FX-Typ"
Selects the Effect algorithm.
F2
"TrsH"
Sets the threshold level, above which the gate opens.
F3
"Hold"
Adjusts the time the gate stays open after the threshold level is
exceeded.
F4
"OpSpd"
Adjusts the rate it takes for the gate to switch "on".
F1
"FX-Typ"
Selects the Effect algorithm.
F2
"ClSpd"
Adjusts the rate it takes for the gate to close after the Hold-time is over.
F3
"OutLv"
Sets the output-level of the gated delay effect.
Gated Delay
Effect
Algorithm 13 provides a Gated Delay. This effect only produces a delay when the volume of the signal
exceeds a preset threshold level. For signal levels under the threshold, a gate suppresses the effect signals.
The times for opening, closing and holding the gate can be adjusted. Algorithm 13 provides a Gated
Delay effect.
13 GatedDelay
The Gated Delay offers 3 different menu-pages:
Edit FX2: GatedDely Page: |1>
FX-Typ:13 InLev: 50 Dly:691ms Feedb: 50
The second menu page can be accessed with the “PAGE” dial:
Edit FX2: GatedDely Page: <2>
FX-Typ:13 TrsH: 5 Hold: 10 OpSpd: 16
The third menu page can be accessed with the “PAGE” dial:
Edit FX2: GatedDely Page: <3|
FX-Typ:13 ClSpd: 10 OutLv: 64
54
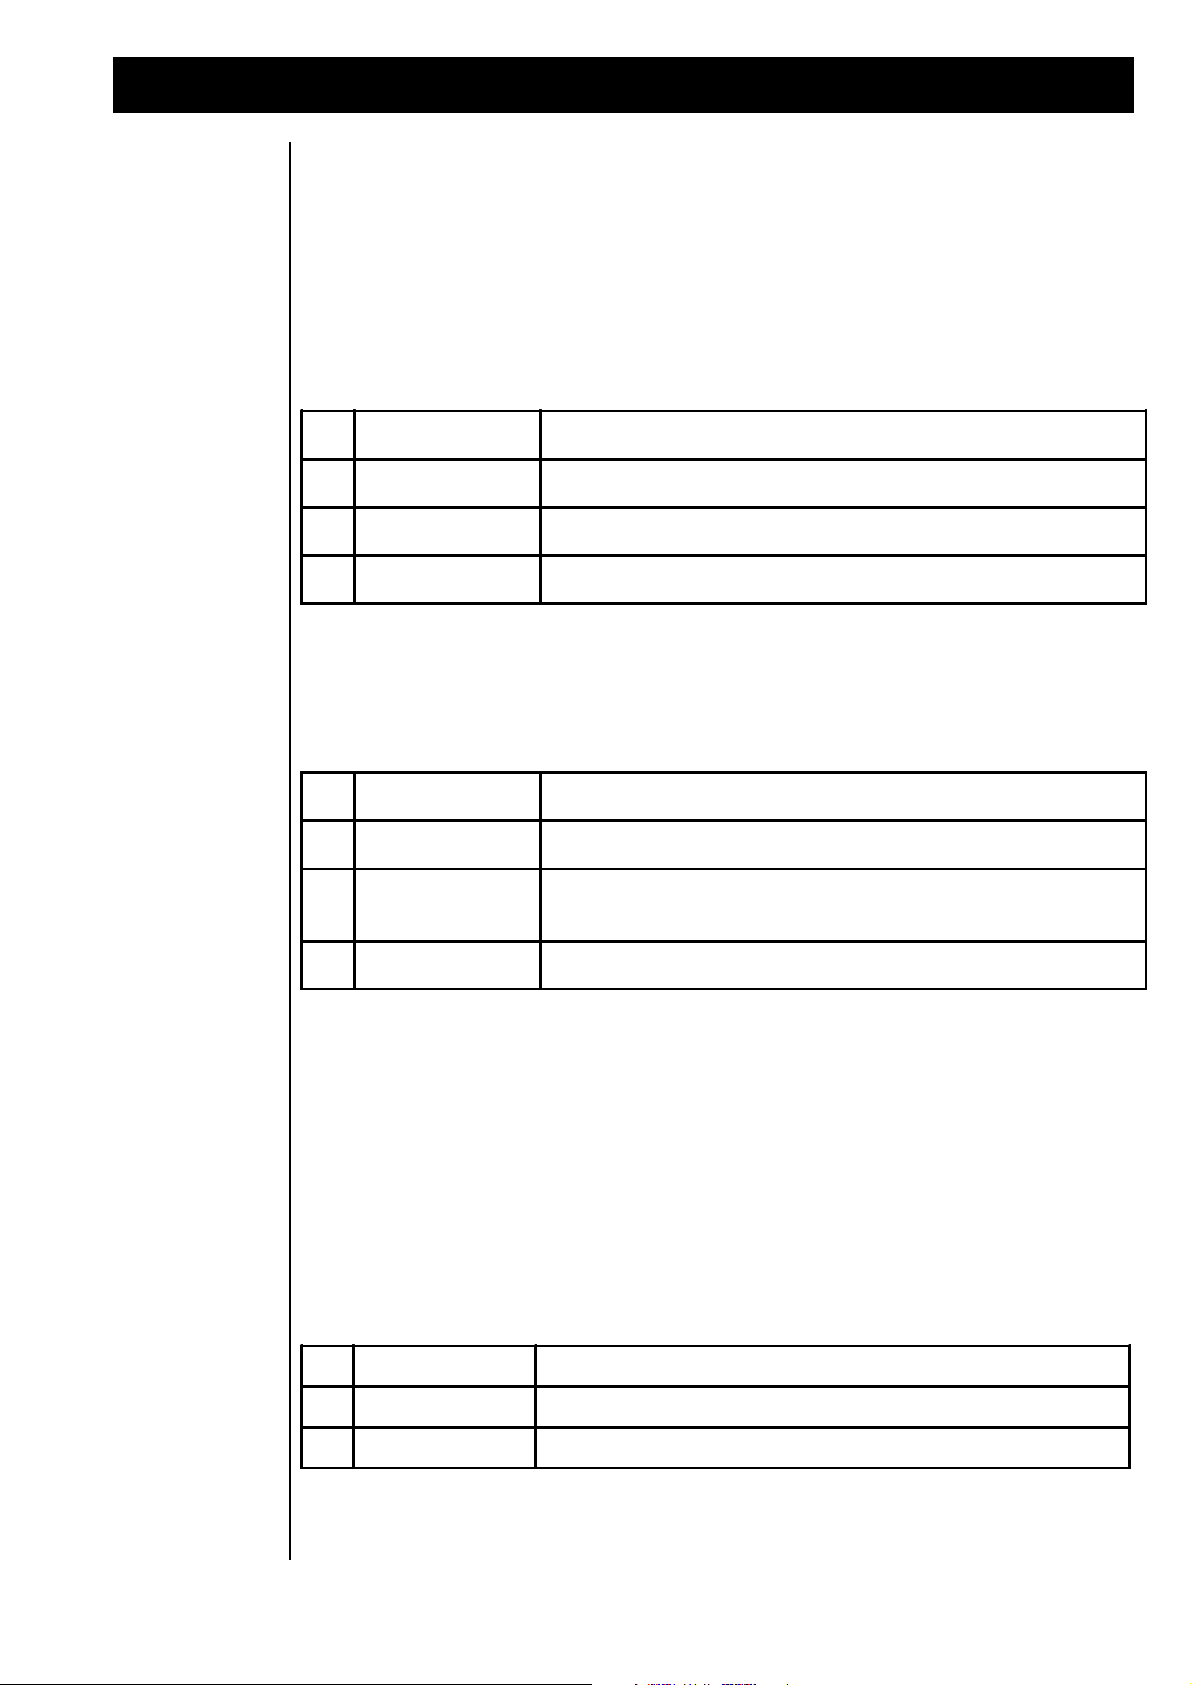
FX-2 Effect Algorithms
F1
"FX-Typ"
Selects the Effect algorithm.
F2
"InLev"
Adjusts the input level of the Effects Processor.
F3
"Depth"
Adjusts the intensity or 'width' of the Special-FX effect.
F4
"Rate"
Adjusts the speed at which the Special-FX effect modulates.
F1
"FX-Typ"
Selects the Effect algorithm.
F2
"Delay"
Sets the delay-time. (in milliseconds)
F3
"Feedb"
Adjusts the amount of times the echo will repeat. Too high of a value
can cause self-oscillation.
F4
"OutLv"
Sets the output-level of the Special-FX effect.
F1
"FX -Typ"
Selects the Effect algorithm.
F2
"InLev"
Adjusts the input level o f the Effects Processor.
F3
"OutLv"
Sets the output-level of the equalizer effect.
Special FX
Algorithm 14 provides a unique 'Special FX' effect and is designed for those who like to experiment with
effects. It contains a Stereo Echo with a Delay Time that can be modulated.
14 SpecialFX
The Special FX algorithm offers two menu-pages:
Edit FX2: SpecialFX Page: |1>
FX-Typ:14 InLev: 64 Depth:120 Rate: 30
The second menu page can be accessed with the “PAGE” dial:
Edit FX2: SpecialFX Page: <2|
FX-Type:14 Dly: 2ms Feedb:120 OutLv:127
Equalizer Effects
Algorithms 15 and 16 contain two 3 band graphic equalizers. They differ in the frequency ranges which
can be boosted or cut. In algorithm 16, (Deep-EQ), the low frequency range is centered at 80 Hz. By
boosting this frequency range, a very powerful low end can be achieved. (FAT!)
15 Equalizer
16 Deep-EQ
The Equalizer menu page 1> is selected with knob [F1]:
Edit FX2: Equalizer Page: |1>
FX-Typ:15 InLev: 64 OutLv: 64
55

FX-2 Effect Algorithms
F1
"FX-Typ"
Selects the Effect algorithm.
F2
"Low"
Boosts or cuts low frequencies.
F3
"Mid"
Boosts or cuts mid frequencies.
F4
"High"
Boosts or cuts high frequencies.
F1
"FX-Typ"
Selects the Effect algorithm.
F2
"InLev"
Adjusts the input level of the Effects Processor.
F3
"Freq"
This parameter controls the Cutoff frequency of the filter. It is most
effective to control this effect in real-time with the regulators.
F4
"Drive"
Adjusts the amount of 'overdrive' added.
F1
"FX-Typ"
Selects the Effect algorithm.
F2
"Clip"
Sets the level where the overdrive starts working.
F3
"OutLv"
Sets the output-level of the wah-wah/overdrive effect. It is
recommended to use relatively high input level and low output level, in
order for the overdrive to respond properly.
The second menu page displays the frequency ranges which can be boosted and cut:
Edit FX2: Equalizer Page: |1>
FX-Typ:15 Low: +0 Mid: +0 High: +0
Wah-Wah+Ov
Effect
Although mostly used by guitarists, the Wah-Wah effect can be used on synthesizers and other instruments
very effectively. The Wah-Wah effect on The RAVEN is composed of a filter that can be tuned and an
adjustable overdrive effect. Algorithm 17 provides a Wah-Wah effect combined with an Overdrive.
17 Wahwah+Ov
The Wah-Wah+Ov menu page 1> is selected with knob [F1]:
Edit FX2: Wahwah+Ov Page: |1>
FX-Typ:17 InLev: 80 Freq: 64 Drive:100
Wah-Wah+Ov menu page <2 contains additional parameters:
Edit FX2: Wahwah+Ov Page: <2|
FX-Typ:17 Clip: 100 OutLv:127
Auto Wah-Wah
Effect
The filter frequency at which the AutoWah-Wah effect operates cannot be shifted manually, because operation of the filter is controlled by signal level, as it is on an ‘envelope-follower’. In this case, the filter
frequency is controlled by the level of the input signal. Effect algorithm 18 provides the AutoWah-Wah
effect.
56

FX-2 Effect Algorithms
F1
"FX-Typ"
Selects the Effect algorithm.
F2
"InLev"
This parameter controls the input-level of the effect. In this effect-type
the input level has an important function: The filter of the "Auto-Wah-
Wah" is related to the parameter "InLev". Set this parameter according
to personal taste.
F3
"Drive"
Adjusts the amount of overdrive added.
F4
"Clip"
Sets the 'clip-level' off the overdrive.
F1
"FX-Typ"
Selects the Effect algorithm.
F2
"OutLv"
Sets the output-level of the auto wah-wah effect.
F1
"FX-Typ"
Selects the Effect algorithm.
F2
"InLev"
Adjusts the input level of the Effects Processor.
F3
"OutLv"
Sets the output-level of the distortion effect. This is a good place to
compensate for the changes in level that a distortion effect often
produces.
F4
"Drive"
Adjusts the amount of 'overdrive' added.
18 AutoWahWah
The AutoWah-Wah menu page 1> is selected with knob [F1]:
Edit FX2: AutoWahwah Page: |1>
FX-Typ:18 InLev: 80 Drive:100 Clip: 100
AutoWah-Wah menu page <2 :
Distortion Effects
Edit FX2: AutoWahwah Page: <2|
FX-Typ:18 OutLv:127
Algorithms 19 and 20 provide Distortion and Overdrive. Algorithm 19, [WarmOvrdrv], has one overdrive
circuit and algorithm 20, [Distortn], has two overdrive circuits. The Distortion algorithm can produce
more distorted sounds than can be achieved with the Warm-Overdrive algorithm. The [Drive] parameter
shown below is only available in the Distortion algorithm. The intensity of the distortion in the Warm
Overdrive algorithm is only controlled by the input level of the effect.
19 WarmOvdrv
20 Distortn
The display as shown in the Distortion algorithm:
Edit FX2: Distortn Page: |1|
FX-Typ:20 InLev: 64 Drive: 4 OutLv: 64
57
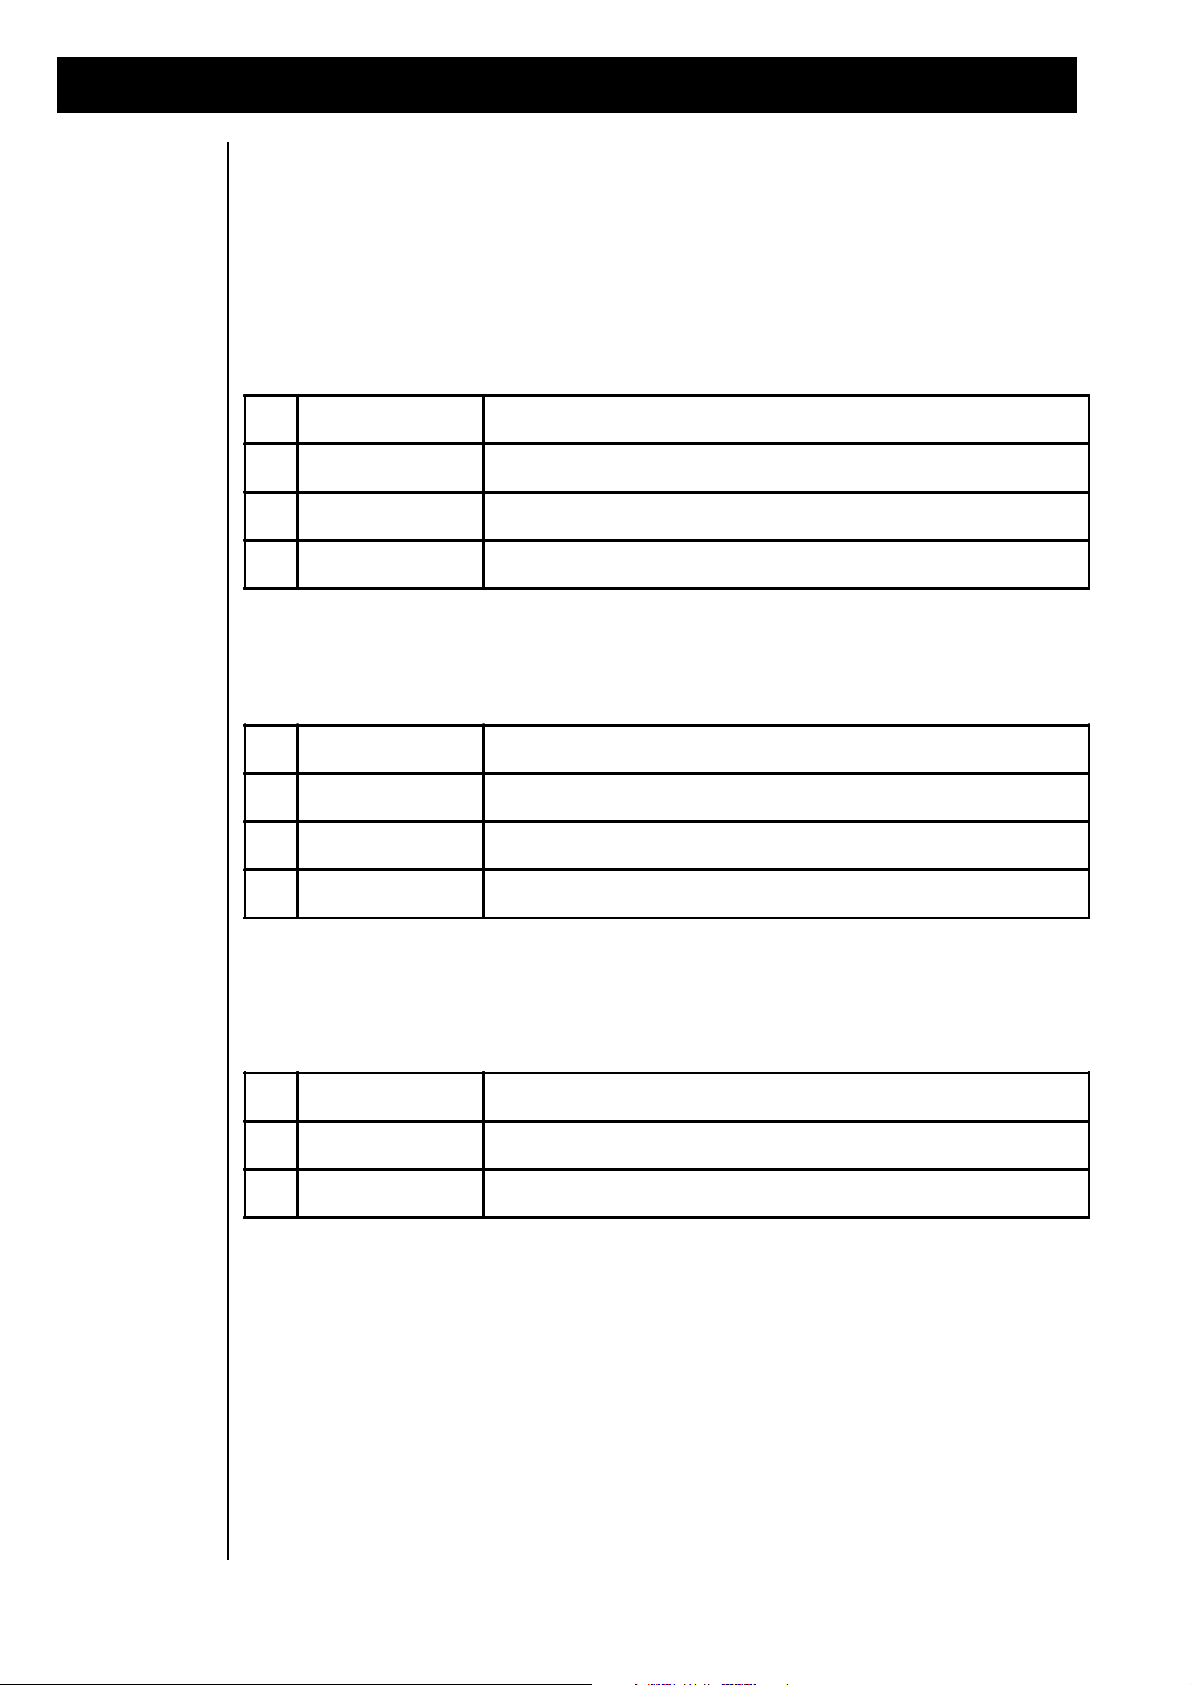
FX-2 Effect Algorithms
F1
"FX-Typ"
Selects the Effect algorithm.
F2
"InLev"
Adjusts the input level of the Effects Processor.
F3
"RotLo"
Adjusts the slow 'leslie' speed.
F4
"RotHi"
Adjusts the fast 'leslie' speed.
F1
"FX-Typ"
Selects the Effect algorithm.
F2
"Decay"
Determines the acceleration and deceleration speed.
F3
"RotLv"
Sets the intensity of amplitude modulation.
F4
"Switch"
Choose between two values of slow (0) or fast (1).
F1
"FX-Typ"
Selects the Effect algorithm.
F2
"Drive"
Adjusts the amount of 'overdrive' added.
F3
"OutLv"
Sets the output-level of the rotary+overdrive effect.
Rotary Effect Algorithm 21 provides the Rotary effect which gives the impression of rotating speakers. The Rotary
effect was and still is a very important effect for electronic organs. Algorithm 21 provides the Rotary
effect:
21 Rotary+Ovr
The Rotary+Ovr menu page <1> contains the following parameters:
Edit FX2: Rotary+Ovr Page I1>
FX-Typ:21 InLev: 64 RotLo: 8 RotHi: 48
The Rotary+Ovr menu page <2> contains the following parameters:
Edit FX2: Rotary+Ovr Page <2>
FX-Typ:21 Decay: 46 RotL: 90 Swtch: 0
Tremolo Effect
The Rotary+Ovr menu page <3> contains an overdrive circuit that can be added to the Rotor effect:
Edit FX2: Rotary+Ovr Page <3I
FX-Typ:21 Drive: 90 OutL: 127
Algorithm 22 provides a Tremolo effect that modulates the volume of the part. This effect was first used
on electric pianos to produce a sound similar to a vibraphone. Algorithm 22 provides the Tremolo effect
and is accessed with knob [F1].
22 Tremolo
The Tremolo menu page 1> contains the following parameters:
Edit FX2: Tremolo Page I1>
FX-Typ:22 InLev: 80 Depth:127 Rate: 15
58
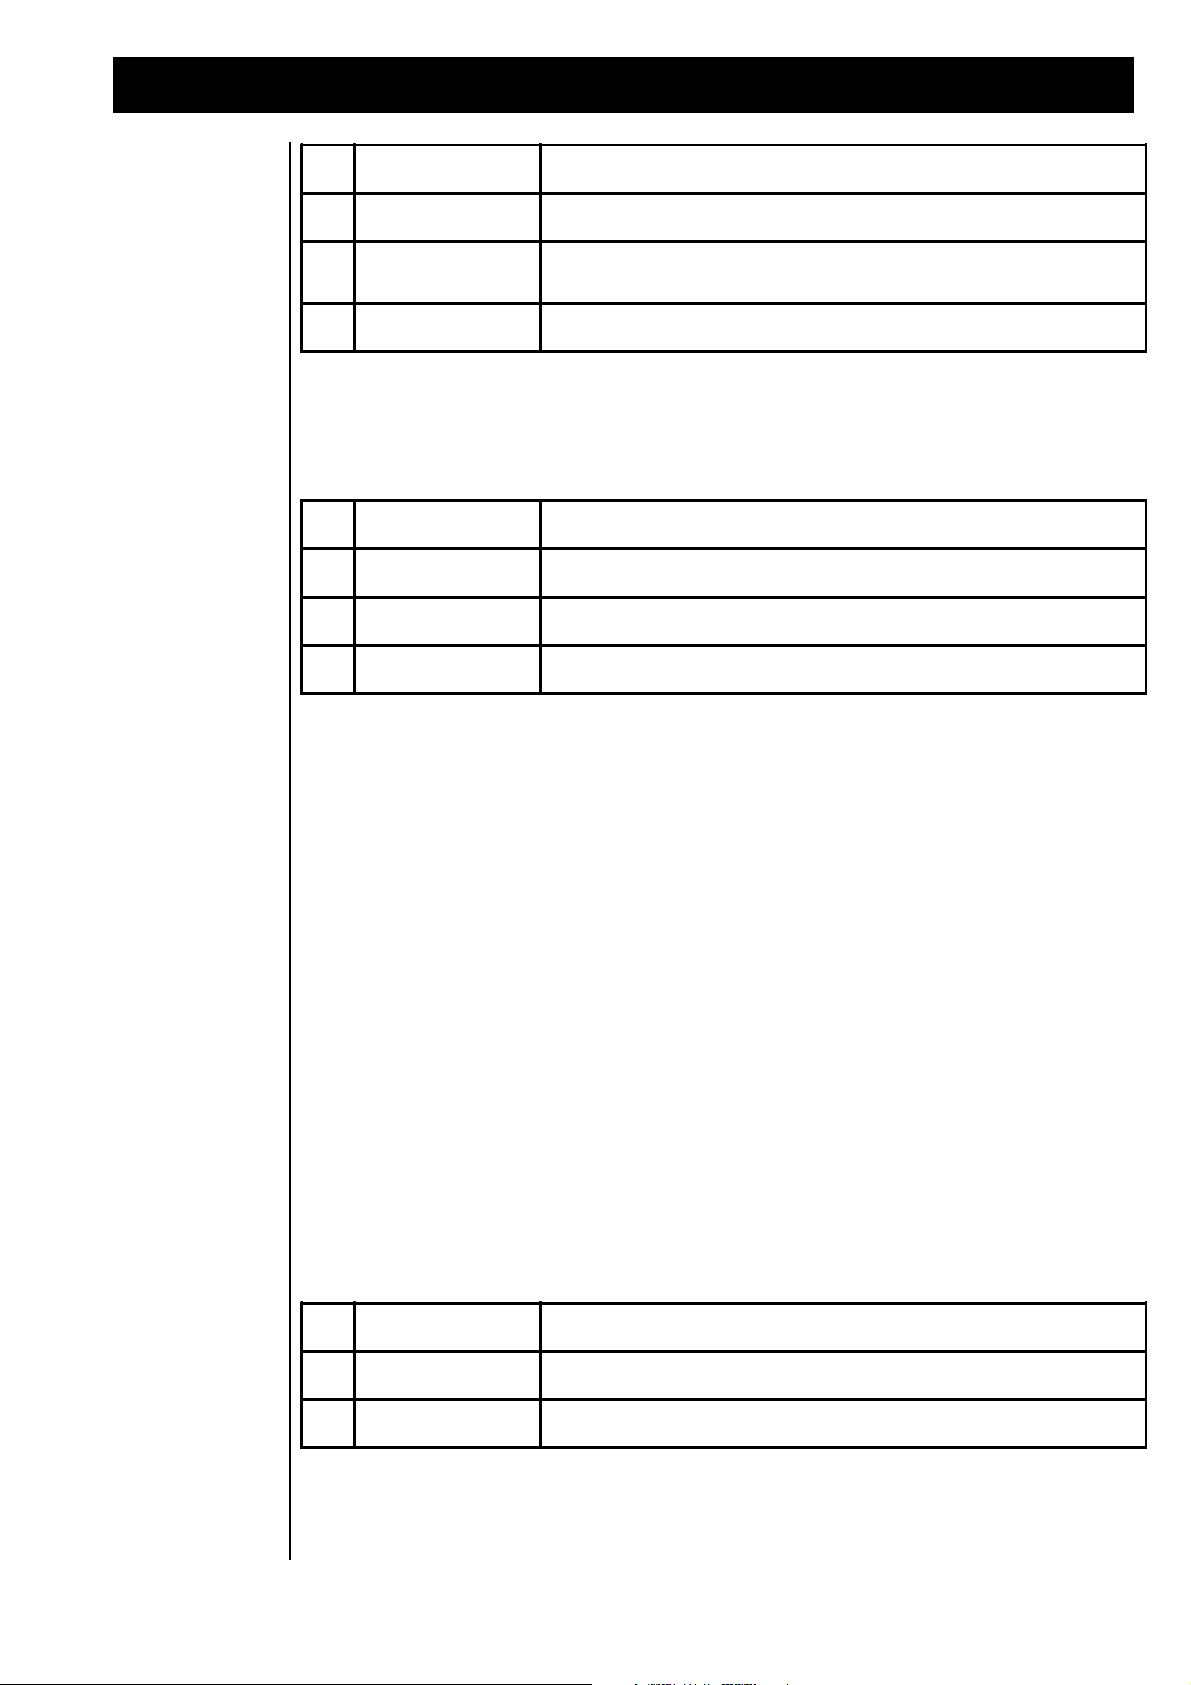
FX-2 Effect Algorithms
F1
"FX-Typ"
Selects the Effect algorithm.
F2
"InLev"
Adjusts the input level of the Effects Processor.
F3
"Depth"
Adjusts the intensity of the tremolo effect. (volume modulation).
F4
"Rate"
Adjusts the speed at which the tremolo effect modulates.
F1
"FX-Typ"
Selects the Effect algorithm.
F2
"Phase"
Adjusts the phase-shifting between left and right channels.
F3
"MnPan"
A manual adjustment for the pan position.
F4
"OutLv"
Sets the output-level of the tremolo effect.
F1
"FX-Typ"
Selects the Effect algorithm.
F2
"InLev"
Adjusts the input level of the Effects Processor.
F3
"OutLv”
Sets the output-level of the ring-mod effect.
The Tremolo menu page <2 contains the following parameters:
Edit FX2: Tremolo Page <2>
FX-Typ:14 OutLv: 64
Ring Modulation
Effect
Although it has been one of the most popular tools for creating alien-like sounds since the beginning of
electronic music, the Ring Modulator effect has unfortunately seen little use recently. The adding and
subtracting of two audio frequencies routed to the two inputs of the Ring Modulator causes the output
signal to have many dissonant overtones, that can be used very effectively for all kinds of noises and belllike sounds. A suggestion when first using the Ring Modulator is to use relatively neutral, basic sounds,
such as those from the Sound group, “Waves”. From the Performance macro, “Double”, select two different sounds and assign one to FX Send 1 and the other to FX Send 2. The setting of the Pan parameter for
both sounds should be set to “—” to mute the ‘dry’ signal. To hear the effect the of the Ring Modulator,
both sounds must be detuned in opposite directions. At first play monophonically since as multiple notes
are sent to the Ring Modulator, more frequencies are generated making the final result resemble a noise
wave, which does not represent the classic Ring Modulator effect. Initially set FX 1 to BYPASS. If FX 1
is set up as a reverb, turning on the S-FEED parameter will cause the Ring Modulator signal to the reverbed
also.
23 RingMod
The Ring Mod menu page 1> contains the following parameters:
Edit FX2: RingMod Page I1I
FX-Typ:23 InLev: 64 OutLv: 64
Although the Ring Modulator can be used to vary the sound in many different ways, it only contains
volume parameters. The overtones of the two selected sounds, as well as their degree of detuning, are what
cause the alien-like sound of the Ring Modulator.
59

Realtime Effects Control
F1
"FX-Typ"
Selects the Effect algorithm.
F2
"InLev"
Adjusts the input level of the Effects Processor.
F3
"OutLv"
Sets the output-level of the 'no-effect' effect.
No Effect
Realtime Effects
Control
The last effect provides a good segue to the next section of this manual, realtime control of the effects. The
Effect Processor FX 2 is the primary destination of realtime parameter control via MIDI control change
messages. By using Effect algorithm 24 (No Effect), controlling the intensity of FX 1 is possible if the SFeed parameter of FX 1 is turned up. In the Part in which the Effect level is to be controlled, only FX 2
Send must be turned up. If you have selected a reverb algorithm on FX 1, realtime control of the reverb
level is possible by controlling the input level of FX 2 (also available via MIDI). For more information
refer to the chapters “The Modulation Matrix” and “Realtime Control of the Effects”. Algorithm 24 allows
realtime control of FX 1.
24 No Effect
Edit FX2: no Effect Page: |1|
FX-Typ:24 InLev: 64 OutLv: 0
The RAVEN allows Realtime control of the parameters of Effect Processor FX 2. This provides a means
for more expressive Performances. To enable Realtime control, the intensity parameter of the effect Modulation for one or several regulators have to be turned on in the Common menu. Realtime modulation of the
Effect Parameters is only accessible in Performance Mode. These settings are saved with the Performances. Each Performance can be programmed with different routings.
To use Realtime effect control, switch into Performance mode. Store any previous edits from Write menu
so they are not lost.
Enter Performance mode by pressing the “PERF MODE” button, then press the “WRITE” button to enter
the Write menu. Select the following submenu with the “PAGE” dial, to initialize the current Performance:
<2> Init Performance?
[OK]
Initialize the Performance [OK], (“SOFT” button). When prompted by the next menu, confirm the operation, again with the [OK] button. After initializing the Performance, press the “EXIT” button to leave the
Write menu. We now have a ‘clean slate’ for learning Realtime effect control. The display now shows the
following, with the User program number and default name:
USER-00:Untitled |1> Soundgroup _
Synlead1
Initialized Performances default as a “Single” Performance. Only one individual sound is played in this
Performance. To enable the FX 2 Effect Processor, turn to the Pattern Edit menu page <2> and set the
value for FX 2 Send to 63.
60

Realtime Effects Control
#
REALTIME CONTROLLER
MIDI DATA
CONTROLLER NUMBER
1
Pitch-Bend
Pitch-Bend
2
Wheel 1
Controller
1 (modulation)
3
Wheel 2
Controller
2 (breath controller)
4
Aftertouch
Aftertouch
Edit Part1 <2> Output-Assign
Level:100 Pan: >C< FX1: 63 FX2: 63
The sound is now routed to the second Effect Processor. Select effect algorithm HQ-Delay, from the FX
2 Edit menu page 1>. Press the “EDIT FX” button multiple times, then the “SOFT” button to select [FX2].
You achieve the HQ-Delay effect with the knob [F1]. Also select an appropriate Delay time:
Edit FX2: HQ-Delay Page: |1>
FX-Typ:11 InLev: 64 Dly:229ms Feedb: 50
With the HQ-Delay you can edit the feedback (the number of echo repeats) and the effect Output level. To
enable these controls, press the “EDIT COMMON” button, to enter the Edit Common menu. Menu pages
<4> (Pitchbend); <6> (Wheel 1); <8> (Wheel 2) and <10> (Aftertouch) allow controllers to be routed to
effect control.
For example, select menu page <8> with the “PAGE” dial, to route the effect-control for the Effect
Processor to Wheel 2:
Edit Common < 8> Mod.Source: Wheel 2
Fx2A: +0 Fx2B: -63 ArpDy: +0 ArpGat: +0
The parameters as set above allow lowering the output level of the HQ-Delay effect by rotating Wheel 2.
Conversely, you can control the level of the effect. When doing this you must lower the output level of the
effect in the FX2 Edit menu and set the Modulation intensity in the Common menu to +64.
Turning up Wheel 2 increases the volume of the echo. Feedback can be controlled in Realtime on HQDelay by setting parameter “FX2A” to +64. You can then change the number of the echo repeats, from no
repeats to an infinite amount, with Wheel 2.
Using this method you can use any available regulator for Realtime control. It is also possible to control
both Realtime controls with different regulators.
When using MIDI, The RAVEN’s regulators are represented by MIDI controllers. These MIDI controllers
are sent to the MIDI output when moving the corresponding regulators.
This way all effect modulations can be recorded to an external sequencer. Upon playback of the sequence,
the controller data received at the MIDI input is sent via the Modulation matrix to the appropriate destinations. The following MIDI data is sent by the regulators to the MIDI out and received by Modulation
matrix at the MIDI in:
61

Realtime Effects Control
FX-2 ALGORITHM
FX-2A CONTROL
FX-2B CONTROL
Chorus
Depth
Rate
SlowChorus
Depth
Rate
FatChorus
Depth
Rate
JetFlange
Depth
Rate
Flanger
Depth
Rate
Phaser
Depth
Rate
SlowPhase
Depth
Rate
Panning
Rate
ManualPan
ShortDelay
Feedback
OutLevel
LongDelay
Feedback
OutLevel
HQ-Delay
Feedback
OutLevel
Ping-Pong
Feedback
OutLevel
GatedDelay
Feedback
Treshold
SpecialFX
Rate
Delaytime
Equalizer
LowLevel
HighLevel
Deep-EQ
MidLevel
HighLevel
Wahwah+Ov
Frequenz
ClipLevel
AutoWahwa
Drive
OutLevel
WarmOvdrv
InLevel
OutLevel
Distortn
InLevel
OutLevel
Rotor
Rate
Switch
Tremolo
Depth
Rate
Ringmod
InLevel
OutLevel
Bypass
InLevel
OutLevel
Realtime parameters of FX-2
The following page shows which parameters of the Effect Processor FX 2 can be controlled with the
regulators or via MIDI.
62
Editing the Percussion Drumpart
F1
"Level"
Adjusts the volume level of the selected drum sound.
F2
"Pan"
Adjusts the stereo positioning, (pan). Selecting "RND" will give each
new drum hit a randomly selected placement in the stereo field,
providing constant movement.
F3
"FX1"
Adjusts how much of the sound will be sent to FX-1.
F4
"FX2"
Adjusts how much of the sound will be sent to FX-2.
F1
"Pitch"
Adjusts the "Pitch" of the selected drum-instrument.
Editing the Percussion Drumpart
In Sequencer mode the Drumset selected on the Percussion Part can be edited. For each drum sound
mapped across The RAVEN’s keyboard you can program the volume and pan settings, the tuning, as well
as the Effect send values. Drum sound parameters are stored in each song. Press the “Edit PART” button
to enter the Edit mode.
Select the Percussion part with the “Track” button.
After selecting the Percussion part, press the “Edit-PART” button again. The display will show as follows:
Edit Drum C2 TR808Bs |1> Output-Assign
Level:127 Pan: >C< FX1: 0 FX2: 0
Select the drum sound to be edited by pressing the appropriate key on the keyboard. - Remember that in
order to hear edits while the sequence is playing, the according sound must be used in the current motive!
The Edit drum menu page 1> contains the following parameters:
Remember that when turning up the value of FX 1 and FX 2 in Edit drum menu page 1>, the signal is
routed to an Effect Processor only when the according Effect sends in the Part Edit menu are also up.
Access to the Part Edit menu from this page can be done quickly by pressing the “EXIT” button once.
Then scroll to menu page <2> to set the Effect sends in the Part settings.
Edit Drum menu page <2> contains the tuning parameter for the selected drum instrument:
Edit Drum C2 TR808Bs |1> Tuning
Pitch: +0
63

System parameters
F2
"Master-Transpose"
Sets the global transpose of The RAVEN; in semi-tones.
F4
"Master-Tune"
A global fine-tuning adjustment. A value of (0) tunes The RAVEN to
the standard frequency of 440 Hz at note A4.
F2
"Velocity-Curve"
Determines which Velocity Curve is used while playing the keyboard.
Velocity types are explained in the following table.
F4
"Aftertouch"
Turns the Aftertouch function of The RAVEN's keyboard on or off. With
this parameter set to "off", modulation cannot be triggered with
Aftertouch.
1 - 8
prefix of "-"
The result of the velocity curve will be inverted. This function is useful
when creating 'cross-fade' sounds in Performance mode. Sounds of
two Parts must be active and they must be provided with opposite
velocity-curves.
1
"LIN"
The standard setting; no velocity curve processing.
2
"LIN-"
A 'compressed/expanded' curve. Quiet passages will be louder than
they are played, louder passages will be quieter.
3
"LIN+"
Sensitivity is increased overall, but the curve stays linear.
4
"Exp-"
This compressed curve has an exponential response.
5
"Ex—"
The same as "Exp-", but with more compression.
6
"Exp+"
This expanded curve has an exponential response.
7
"Ex++"
The same as "Exp+", but with more expansion.
8
"FIX"
The velocity value is fixed (85/127), independent of the dynamics
played on the Keyboard.
System parameters
Master Tune
Keyboard parameters
The Edit System menu contains parameters that affect all operating modes of The RAVEN. In this menu,
MIDI filter settings, selecting MIDI operating mode, synchronization options and the main tuning of the
instrument are located.
Access the System Edit menu by pressing the “SYSTEM-Edit” button (SYS). Edit System contains 5
different menu-pages which are selected with the “PAGE” dial.
Edit System menu page <1>:
Edit System |1> Master-Parameter
Master-Transpose: C Master-Tune: +0
Edit System menu page <2>:
Edit System <2> Keyboard-Parameter
Velocity-Curve: Exp+ Aftertouch: On
Key Velocity
curves
64

System parameters
F1
"Prg.Change"
Sets whether or not Program Change commands can be transmitted.
F2
"ParametrCtrl"
Sets whether or not Parameter Changes (MIDI controllers) can be
received. When set to "Off", the following MIDI controllers are filtered
out: 0, 1, 2, 5, 11. Sys-Ex data is also filtered .
F3
"Start"
Sets whether or not The RAVEN can receive "START" and "STOP"
Realtime messages. When set to "Off", The RAVEN does not respond
to external devices start messages.
F1
"Channel"
Sets the MIDI channel of The RAVEN. This is the basic MIDI channel
for transmitting or receiving MIDI data in Performance mode. This is
also the channel used when transmitting or receiving Sys-Ex data, and
it also defines the ID number. In Sequencer mode The RAVEN
transmits note information only on the Solo-Part, MIDI channel 9.
F2
"Omni"
When Omni-Mode is "On", The RAVEN receives MIDI data on all 16
MIDI channels. (In Performance mode). When "Off", MIDI data is
received on the basic channel only.
F3
"Sync"
When set to "Int", The RAVEN uses its internal clock for Sequencer
and Motivator timing. When set to "Ext", timing information is supplied
by an external source, such as another sequencer or drum machine.
This allows The RAVEN's Sequencer and Motivator to be 'slaved' to
other devices.
F4
"Local"
When set to "Off", notes played on the keyboard are transmitted from
the MIDI output only; and do not trigger the internal sounds directly.
The internal sounds can be triggered via the MIDI input. This is the
normal set-up for working with an external sequencer.
MIDI parameters
Edit System menu page <3> contains parameters for the transmission and the reception of MIDI data:
Edit System <3> Midi-Parameter
Channel: 1 Omni: On Sync: Int Local: ON
MIDI Input
handling
MIDI Output
handling
Edit System menu page <4> contains parameters which control the incoming MIDI data.
Edit System <4> Midi-Input-Handling
Prg.Change:ON Param.Ctrl:ON Start:ON
Edit System menu page <5> contains parameters which control the outgoing MIDI data.
Edit System <5> Midi-Output-Handling
PrgChg:OFF Cntrl: On Param:Off Clock:OFF
65

Write menu
F1
"PrgCh"
Sets whether or not Program Change commands can be transmitted.
F2
"Cntrl"
Sets whether or not The RAVEN's Control Regulator messages,
(Wheels, "SOFT" knobs, etc... ), can be transmitted.
F3
"Param"
Sets whether or not Parameter Changes (MIDI controllers) can be
transmitted.
F4
"Clock"
Sets whethe r or not timing information, ( MIDI sync, S tart, Stop, etc... ) ,
can be transmitted. When enabled, an external sequencer can be
synchronized with The RAVEN, for example.
1
"ok"
If you confirm with [OK] all edits made on the active Performance will be lost,
and The RAVEN will switch to Sequencer mode.
2
"cancel"
This button takes you back one page and recalls the active Performance. The
Performance will contain your recent edits, allowing you to decide if you want
to save the edited Performance.
3
"save..."
This button proceeds to the "WRITE" menu where you can rename the
Performance and store it in one of the 50 User locations. (For details refer to
the Chapter, "Write menu").
Write menu
Write menu in
Sequencer mode
Storing Song and
Pattern data
The Write menu contains submenus for storing, copying and initializing (deleting) data. It is also where
the ‘bulk dump’ parameters of The RAVEN are located. “Dump” means the transmitting of Sound and
Sequencer data via MIDI so that all data of The RAVEN can be saved on external data storage media. In
order to do this you need: a computer with a suitable software, a MIDI File player or a Hardware sequencer that can record System Exclusive data.
Depending upon the current operating mode, the Write menu will contain different submenus. First to be
covered are the menus pertaining to Sequencer mode and subsequently those of Performance mode. Enter
Sequencer mode with the “SEQ-MODE” button. If there are unsaved Performance mode edits, you are
prompted to save the Performance:
Performance Changes will be lost!
[ok] [cancel] [save...]
There are three selection possibilities:
66
After this procedure The RAVEN enters Sequencer mode. If the “WRITE” button is pressed, the display
shows the following:
|1> Write pattern/Song?
[ok]
If a different menu page appears select menu page <1> with the “PAGE” dial. In this menu all Song data
is stored including the accompanying Pattern. Pressing [ok] (“SOFT” button [F1]) initiates storing. The
display then shows the following prompt:
Name: ”Untitled ”
[ok] [cancel]
In this submenu the new song can be named. The letters are selected with the “VALUE” dial or by
pressing keys on the keyboard. The “SONG/BANK-Select” buttons moves the cursor. After naming the
song, press either [ok] (“SOFT” button [F1]) to keep the name or [cancel] (“SOFT” button [F2]) to leave
the submenu with the song name unchanged.

Write menu
After pressing the [ok] button to accept the new song name, select a song number with the “VALUE” dial.
Pressing the [ok] button again displays a prompt to confirm the storage of the song at the selected number.
Pressing [cancel] displays the previous submenu to select a different song number:
This is the last possibility to interrupt the storing. Pressing the [ok] button once again,stores the Song and
all the data it contains.
Overwrite ”Untitled ”?
[ok] [cancel]
Initializing
Temporary Song
memory
Initializing Part
parameters
The Write menu page <2> allows you to delete a song and its associated patterns. This function only clears
the temporary buffer memory and does not delete songs stored in a memory location. However if a song
is initialized in this manner and then stored from the Write menu, the selected song number will then be
empty. The Write menu page <2> is accessed with the “PAGE dial:
<2> Init Pattern/Song?
[ok]
Pressing [ok] (“SOFT” button [F1]) starts the initialization process and prompts you with a confirmation
display:
Init..., Sure?
[ok] [cancel]
The temporary buffer is cleared after pressing [ok]. Pressing [cancel] interrupts the procedure.
Write menu page <3> allows you to reset the Sound parameters of a Part to their default values. If you
have edited parameters within the song, such as: to envelopes, filters, intensities of the modulations or
other parameters, they are reset to the factory default values. The Motive running on this Part is not
affected. The initialization affects only the Temporary buffer. If the song is not stored after initializing the
Part, when the song is called up the next time the parameters stored in the song are restored. The Write
menu page <3> is accessed with the “PAGE” dial:
<3> Init Kick-Part?
[ok]
You can select the Part for initializing with the “VALUE” dial or the “TRACK” buttons. Pressing [ok]
(“SOFT” button [F1]) displays a confirmation prompt:
Init..., Sure?
[ok] [cancel]
Pressing [ok] again initializes the selected part and [cancel] leaves the menu without initializing.
67

Write menu
Copying Part
parameters
Write menu
Dump functions
Write menu page <4> allows you to copy the parameters of one Part to another Part. All Sound parameters
and FX Sends are copied. The Write menu page <4> is accessed with “PAGE” dial:
<4> Copy Kick-Part?
[ok]
You can select the Part for copying with the “VALUE” dial or the “TRACK” buttons. After selecting the
Part to be copied, press [ok] (“SOFT” button [F1]). The display then allows you to select a destination Part
where the data will be copied to:
Copy Kick-Part to Snare
[ok] [cancel]
Use the “VALUE dial or the “TRACK” buttons to select which Part will receive the copied data. Pressing
[ok] executes the copying and [cancel] interrupts the procedure without change.
The Write menu pages <5> and <6> contain the ‘Dump’ functions. The ‘Dump’ function tramsmits The
RAVEN’s parameter settings via MIDI in the form of System Exclusive data. Therefore, the MIDI output
of The RAVEN must be connected to the MIDI input of a MIDI recorder. The Dump function transmits
different parameters when in Performance mode than when in Sequencer mode. This section applies to
Sequencer mode.
The Write menu page <5> is for sending a Dump containing parameter settings for the Song in Temporary
memory, including Pattern, Sound, Effects and Motivator parameters. Recording this data to a MIDI
recorder provides a safe, effective way to store valuable Song data. All data contained in Temporary
memory, even User Motives, are included in the Dump. This allows you to store personalized Sounds and
organize banks of Songs in a simple, effective manner.
Dumping Temporary Song data
The Temporary data is sent as System Exclusive data, often reffered to as SysEx. SysEx can be recorded
by most MIDI recorders. Examples of commonly used MIDI recorders include: a computer/MIDI interface with sequencing software, a dedicated hardware sequencer or MIDI data recorder, such as the STYLEDRIVE by QUASIMIDI which records SysEx directly to floppy disk. Floppy disks are an excellent
medium for storing The RAVEN’s data. You can store up to 100 complete Songs on one economical
Double-Density floppy disk. User Motives and other User edits are saved in their entirety, but when Songs
contain either all or some of the pre-programmed Motives, The RAVEN uses a unique, economical method
of storing the data. By saving to Floppy disk only a ‘pointer’ which indicates which pre-programmed
Motive(s) are used in the Song, and not saving the pre-programmed Motive(s) parameters, much less disk
space is needed. An additional benefit of this method is faster Dump/Load times, which is useful when
loading multiple Songs while using The RAVEN in live performance.
The Write menu page <5> is for initiating a Dump of the Temporary memory:
<5> Send Temporary Dump?
[ok]
To send a Temporary memory Dump, first set up the computer sequencer or other MIDI filer/recorder to
record MIDI SysEx data, which on a computer sequencer might include changing the settings of the Input
Filter, which prohibits selected MIDI data from getting recorded, to allow for the recording of SysEx. Put
the computer/MIDI recorder into ‘Record’. To start the Dump, press [ok], (“SOFT” button [F1]. Computer sequencers are often set up to include a ‘countoff’ and if so, be sure to start the Dump after Bar 1,
otherwise important data might get lost.
‘Librarian’ programs are available in the form of computer software, that are specifically designed for the
recording and storage of MIDI System Exclusive data. Presently there are a number of commercially
available Librarian programs that support The RAVEN with either factory or user programmed ‘modules’.
68

Write menu
Dumping Song
and Pattern data
of all 10 songs
Write menu in
Performance
mode
Storing a Performance
Write menu page <6> is for sending a Dump containing all Song and Pattern data to a MIDI recorder. This
storage capability provides unlimited, safe back-up of The RAVEN’s parameter settings. It is also a great
feature to have in live a performance situation, where an enexpected power-outage can scramble or erase
the memory of ANY computer-based instrument. You can load a complete liveset, consisting of several
songs, from an computer or MIDI-file player, such as the STYLE-DRIVE, into The RAVEN’s memory with one Dump. The Write menu page <6 is accessed with the “PAGE” dial:
<6| Send all Pattern/Songs?
[ok]
Set up the computer/MIDI recorder as described in the Sequencer mode Dump section. Put the computer/
MIDI recorder into ‘Record’. To start the Dump, press [ok], (“SOFT” button [F1]).
The Write menu in Performance mode also contains 6 menu pages. In Performance mode, access this
menu with the “WRITE” key. The pages are selected with the “PAGE” dial.
The Write menu page 1> is for storing an edited Performance. Stores settings of Performance parameters,
including: the Operation mode, Modulation matrix settings, Effect settings, Part parameters, and Motivator parameters to a user-selected Performance memory location. The Write menu page 1> is accessed with
the “PAGE” dial:
|1> Write Performance?
[ok]
Press [ok], (“SOFT” button [F1]), and the display will show the following:
Name: ”Untitled”
[ok] [cancel]
This page allows you to name the Performance. The “SONG/BANK-SELECT” buttons move the cursor.
The “VALUE” dial, or keys of the keyboard, select the letters or symbols. After naming the Performance,
press [ok], (“SOFT” button [F1]) once more. The display then shows the following:
to X ”Untitled”
[ok] [cancel]
”X” indicates the storage number to which the edited Performance will be saved. A different location can
be selected with the “VALUE” dial. To the right of the storage number is the name of the Performance that
will be overwritten by the storing procedure. Pressing [ok] displays a confirmation prompt. Pressing
[cancel] interrupts the storing procedure:
Overwrite ”Untitled”?
[ok] [cancel]
Pressing [ok] stores the Performance at the selected location. Pressing [cancel] interrupts the storing
procedure.
Initializing the
current Performance
The Write menu page <2> is for initializing a Performance. This process resets the parameters in the
currently active Performance in Temporary memory to their default values. Initializing does not erase the
Performance stored in memory until it is saved using the ‘Store’ function. This is useful when programming a Performance ‘from scatch’, then storing the new Performance to a new location. The Write menu
page <2> is accessed with the “PAGE” dial:
69

Write menu
Pressing [ok], (“SOFT” button [F1]), begins the initialization process and displays a confirmation prompt.
Pressing [ok] initializes the selected Performance. Pressing [cancel] interrupts the initialization procedure.
<2> Init Performance?
[ok]
Init..., Sure?
[ok] [cancel]
Initializing Single
Parts
Copying Part
parameters
The Write menu page <3> is for initializing an individual Part in a Performance. Only Parts used in the
current Performance can be selected for initializaing. Thw Write menu page <3> is accessed with the
“PAGE” dial:
<3> Init Part 1?
[ok]
The “VALUE” dial selects desired part. Pressing [ok] begins the procedure and displays a confirmation
prompt:
Init..., Sure?
[ok] [cancel]
Mit [cancel] können Sie diesen Vorgang abbrechen und mit [ok] ausführen.
Ooops! - Pressing [ok] initializes the selected Part. Pressing [cancel] interrupts the Part initialization
procedure.
The Write menu page <4> is for copying Sound parameters of one Part in a Performance to another Part in
the same Performance. This function is particularly useful in the programming of Layer-Sounds. By
programming a Part, copying its parameters to another Part and then slightly altering one of the Parts
parameters, such as detuning, is an easy way to produce a fatter Sound. The Write menu page <4> is
accessed with the “PAGE” dial:
70
<4> Copy Part 1?
[ok]
Select the Part to be with the “VALUE” dial. Pressing [ok], (“SOFT” button [F1]), copies the source Part
to buffer memory. The display then shows the following, where the destination Part is selected with the
“VALUE” dial:
Copy Part to 2
[ok] [cancel]
Pressing [ok] copies the selected source Part to the selected destination Part. Pressing [cancel] interrupts
the procedure.

Important notes if using an external sequencer
Dumping the
current Performance data (Temporary dump)
Dumping all Performances
The Write menu pages <5> and <6> contain the ‘Dump’ functions. The ‘Dump’ function tramsmits The
RAVEN’s parameter settings via MIDI in the form of System Exclusive data. Sent with this function are
Performance parameters, such as Part settings, Modulation matrix and Motivator programming. The Dump
function transmits different parameters when in Sequencer mode than when in Performance mode. This
section applies to Performance mode. The Write menu page <5> is for sending the Performance in Temporary memory and is selected with the “PAGE” dial:
<5> Send Temporary Dump?
[ok]
Put the computer/MIDI recorder into ‘Record’ and press [ok] to initiate transmitting the Dump of the
Performance in Temporary memory.
The Write menu page <6 is for sending all the Performances stored in RAM. The Write menu page <6 is
accessed with the “PAGE” dial:
<6| Send all Performances?
[ok]
Put the computer/MIDI recorderinto ‘Record’ and press [ok] to initiate transmitting the Dump of all Performances.
Important notes if
using an external
sequencer
The Raven offers 16 MIDI-channels for sequenzing with external sequencers. It means that you can useup
to 16 different sounds in an arrangement at the same time. The external sequencer can be a stand-alone
device or a computer with sequencer-software (Creator, Logic, Cubase, Studio vision etc.*)
The 16 part multimode is only available at the ravens sequenzer-mode. For playing notes into the external
sequenzer you connect the MIDI-Output of the RAVEN with the MIDI-In of your sequencing device. For
using the synthesizers by the external sequencer connect also the MIDI-output of the sequencer with the
MIDI-input of the RAVEN. For better results you can set the Local-function of the raven to "local-off".
You'll find further informations concerning the local-function at chapter "midi-parameters" on page 65.
You don't have to change any MIDI-channels for fit the raven for the external sequencer usage. The
MIDI- channel-numbers are fixed to the 16 parts, the synthesizer of the RAVEN offers. In other words
track one, the kick-drum track is assigned to the MIDI-channel one, the Snare-drum-track to MIDI-channel two and so on. If you want to mute one or more of the 16 tracks you can switch the part-mode of the
unused track to "off". This is necessary when you work with mor then one synth at only one MIDI-output.
You can select the sounds of the different tracks with program-changes and bank-changes from the external sequencer. If you want to change sound-parameters of the tracks or if you want to change the programs
directly at the raven, you will miss the Track-buttons 10 - 16 because the raven has only track-buttons for
parts, which are used by the internal sequencer.
To reach also the parts 10-16 of the raven synthesizer press the "edit-part"-button and select the desired
part with the "song/bank-select"-buttons. Above the solo-part you can select the ext-parts 10-16 by pressing the right "song/bank-select"-button.
71

Single Sound list
Basses
A001 _19_19bs
A002 Acbassfm
A003 AjaxPad
A004 Ana_Akai
A005 BallsBas
A006 Basriser
A007 Bassland
A008 BassReso
A009 Bassslow
A010 BassSolo
A011 BauchBs
A012 BobsBall
A013 BsSh101a
A014 Citybass
A015 Conbasso
A016 Coupler
A017 CptBlaub
A018 CutoffBs
A019 DeepBas1
A020 DeepBas2
A021 DeepBas3
A022 DeepLine
A023 DJAxyl
A024 DukeBass
A025 Ecu_Bass
A026 FloorBs
A027 Formant1
A028 FunkyArp
A029 Gide303
A030 Glide303
A031 Glidebas
A032 Glider
A033 Hacke
A034 HighLow
A035 HipBass
A036 Kramer
A037 Line303a
A038 Line303b
A039 Line303c
A040 Line303d
A041 Line303e
A042 Line303f
A043 MC202bs
A044 MC202seq
A045 Melomoog
A046 Miamibs
A047 Micromog
A048 Microrav
A049 Minideep
A050 MKS_50_1
A051 MKS_50_2
A052 MKS_50_3
A053 MoogBas1
A054 MoogBas2
A055 MoogVox
A056 MoogSynt
A057 Mr_Moog1
A058 Mr_Moog2
A059 MS20Bass
A060 MS50Bas1
A061 MS50Bas2
A062 Opener
A063 Passive
A064 Percmoog
A065 Rasputin
A066 Ratbass
A067 Raverbas
A068 ShrtBass
A069 Sinusbas
A070 Slapper
A071 Swepbas
A072 TB_303_1
A073 TB_303_2
A074 TB_303_3
A075 TB_303_4
A076 Tec_Bass
A077 Velocity
A078 VX_600
A079 Weichbas
A080 Wetlook
A081 Wharp
LeadSynts 2
A082 Anabrss
A083 ArpQadra
A084 Axiszero
A085 Banasync
A086 Biotop
A087 Biscin
A088 Brassel
A089 Brassmix
A090 Cherries
A091 Cinnamon
A092 Cutter
A093 Cybersix
A094 Cyclone
A095 Dominate
A096 Don_buch
A097 Doom_II
A098 Dumpfo
A099 E_Breit
A100 EasySequ
A101 Echoes
A102 Elgaucho
A103 El_brass
A104 Fanfarex
A105 Flexi
A106 Fressban
A107 Fullpad
A108 Funkybrs
A109 Fuzzicat
A110 Gummi
A111 Kingsley
A112 Korg_MS
A113 L_Man
A114 Lead_303
A115 LeadSyn1
A116 LuckyEye
A117 MaxSwep
A118 Mirror1
A119 Mirror2
A120 MoveThat
A121 NeoRave
A122 OBX_1
A123 OBX_2
A124 OBX_3
A125 P_Meier
A126 PadVX600
A127 Paladon
A128 Percbana
B001 Percobi
B002 Percswep
B003 Percuter
B004 Pitcdown
B005 Pitch_Up
B006 Pitcher
B007 Poly61
B008 ProOne1
B009 ProOne2
B010 PulsDeep
B011 Rave_1
B012 Rave_2
B013 Rave_3
B014 Rave_4
B015 Rave_5
B016 Rave_8mm
B017 Ravemit
B018 Resobrs1
B019 Resobrs2
B020 Schluri
B021 Sec_Out
B022 Segagame
B023 Sequ_UK1
B024 Sequ_UK2
B025 Sequenz2
B026 Sequenz3
B027 Sequenz4
B028 Sequenz5
B029 Sequenz6
B030 ShrtPoly
B031 SideWalk
B032 SoftSolo
B033 SoftSqua
B034 Solaris
B035 Sonator
B036 Sparta
B037 Supersol
B038 Syntbrss
B039 SyntFick
B040 Synthasi
B041 Texastec
B042 Voiccod1
B043 Voiccod2
B044 Voiccod3
B045 VX_Dom1
B046 W_Apart
B047 Walker
B048 Watrbrd
B049 Wolfram
Natural
B050 Att_Chor
B051 Booh
B052 Clavinet
B053 Cleangt1
B054 Cleangt2
B055 Dooh
B056 El_Piana
B057 Flasche
B058 Flutpad
B059 Fullchor
B060 ItaloKey
B061 Jazzy_FM
B062 Klampfe
B063 Mellotrn
B064 NatVoice
B065 NoPiano1
B066 NoPiano2
B067 Orchhit
B068 Panflute
B069 Perc_Bam
B070 Piccolo
B071 StopdPia
B072 Wers_Mag
B073 Wurlitzr
Organs
B074 Denerlin
B075 FarfisaA
B076 FarfisaB
B077 Hammond1
B078 MKSlikeO
B079 MKSOrgan
B080 Organ1
B081 Organ2
B082 Organ3
B083 Organ4
B084 Organ5
B085 PigOrgn1
B086 PigOrgn2
B087 RaveOrg1
B088 RaveOrg2
B089 RaveOrg3
B090 RaveOrg4
72

Single Sound list
B091 RaveOrg5
B092 RaveOrg6
B093 SchneidO
SyntPads
B094 Angels1
B095 Angels2
B096 Atmopad
B097 Banabell
B098 Chaser
B099 Cloc_voc
B100 Clockyvs
B101 Cloudy
B102 CMIVoice
B103 Crumarst
B104 Diamonds
B105 Easypad
B106 Eight_v
B107 El_Cello
B108 EQ_Zone
B109 Europa
B110 Expressn
B111 FastBamb
B112 FastPoly
B113 FastVoc
B114 Feelings
B115 Filt_Vox
B116 FlanginC
B117 FlangVoc
B118 Fluid_X
B119 Glide_X
B120 GlideSwp
B121 Horns_El
B122 HugeOBX
B123 Imagina
B124 JunoSwel
B125 JXString
B126 Kasper
B127 KorgSwep
B128 Long_JX
C001 LoopSwep
C002 MixedRes
C003 Mixpad
C004 Mixpoly
C005 Nie_Ohne
C006 Oberhpad
C007 Obi_One
C008 OBX_4
C009 OBXClean
C010 Oh_Carol
C011 Oingpad
C012 Percpad
C013 Pitglide
C014 Povray
C015 Psychosi
C016 Pupilpad
C017 Raumstr
C018 Releaser
C019 Rev_Pad
C020 Revvoice
C021 Sawpad
C022 Sequenz1
C023 Shadows
C024 Shrt_CMI
C025 Smplswep
C026 Softie
C027 Starpad1
C028 Starpad2
C029 Stringer
C030 Stringfm
C031 Strngmix
C032 Strngmk5
C033 Sunny
C034 Sweeper1
C035 Sweeper2
C036 Sweeper3
C037 Sweeper4
C038 Sweepup
C039 Swelbody
C040 Swep_OBX
C041 SwepDbl
C042 SwepSolo
C043 SynSaege
C044 T_D_Pad1
C045 TagTraum
C046 Talos_5
C047 Teppich
C048 Vox_Echo
C049 VoxObi
C050 VoxSwell
C051 VS_Pad
C052 VS_Voice
C053 Vulgaris
C054 WarmBlas
C055 Windy
C056 MKS_Poly
Waves
C057 Pulse_30
C058 Pulse_50
C059 Pulse_60
C060 Pulse_75
C061 Rechteck
C062 Resonato
C063 Resowav1
C064 Resowav2
C065 Resowav3
C066 Resowav4
C067 Resowav5
C068 Resowav6
C069 Resowav7
C070 Saegezan
C071 Sinewave
C072 Specwav
FM_Percussion
C073 Chimes_1
C074 Chimes_2
C075 Glas_FM
C076 Gloeckle
C077 Klinklan
C078 Mallet
C079 Metallsp
C080 Plong
C081 Spieluhr
C082 Tinkler
C083 Tremvib1
C084 Tremvib2
C085 Tremvib3
C086 VibesFM
Effects
C087 Ash2Ash
C088 Arnold
C089 Autumn
C090 Battle
C091 Blobby
C092 Butcher
C093 Checov
C094 Daemmrg
C095 Deeper
C096 Dreckig
C097 Effect_1
C098 Effect_2
C099 Experie1
C100 Experie2
C101 Experie3
C102 Experie4
C103 Experie5
C104 Experie6
C105 Experie7
C106 Experie8
C107 Factory
C108 Falling1
C109 Falling2
C110 Ferrochr
C111 Frogger
C112 Gateshot
C113 Gremlin
C114 Heartbat
C115 Humbler
C116 Hyper
C117 Innuendo
C118 ItsClosd
C119 Kreuzmod
C120 Log_Out
C121 MR_Dirty
C122 Nuggets
C123 Racer_FM
C124 Refresh
C125 RepairIt
C126 Ringer
C127 Sitar
C128 Spec_FX
D001 Special1
D002 Special2
D003 Special3
D004 Special4
D005 Special5
D006 Special6
D007 Special7
D008 Stahl
D009 Stepper
D010 Target_Y
D011 Wriggley
D012 Zappmoog
Tuned Drums
D013 A_Cymb_T
D014 A_Elec_T
D015 A_Gui1_T
D016 A_Klok_T
D017 A_Perc_T
D018 A_SFX_T
D019 Agogo_T
D020 Ankick1T
D021 Ankick2T
D022 AnKick3T
D023 AnKick4T
D024 AnKick5T
D025 AnaTomT
D026 BassDrmT
D027 BellTreT
D028 BongoHiT
D029 CabasaT
D030 CastanT
D031 China_T
D032 Clave_T
D033 ClsdHH_T
D034 CowbellT
D035 Conga_T2
D036 Conga_T1
D037 CR78CymT
D038 CR78Cn_T
D039 CR78Bd_T
D040 CR78Gu_T
D041 CR78Ta_T
D042 CR78SnrT
D043 CR78RimT
D044 CR78HH_T
D045 Crash2T
D046 Crash1T
D047 Cuica_T
D048 DrumFX1T
D049 DrumFX2T
D050 EffShakT
D051 Gated_T
D052 Guiro_T
73

Selecting Single Sounds with MIDI
D053 GuiroT2
D054 LinnSn_T
D055 LinnTomT
D056 LongWh_T
D057 MaracasT
D058 MS20P_T
D059 OpenHH_T
D060 Reso_T
D061 Ride_T
D062 Scrtch1T
D063 Scrtch2T
D064 SinusKic
D065 Slap_T
D066 Snare_T
D067 Snare2T
D068 Stick_T
D069 Sticks_T
D070 SynTom1
D071 SynTom2
D072 SynTom3
D073 Trian_T
D074 Tamb_T
D075 TimbalT
D076 Tom_T
D077 TR606BsT
D078 TR606CyT
D079 TR606HHT
D080 TR606OHT
D081 TR606SnT
D082 TR606TmT
D083 TR808BsT
D084 TR808HHT
D085 TR808C_T
D086 TR808C1T
D087 TR808C2T
D088 TR808CwT
D089 TR808CrT
D090 TR808OHT
D091 TR808RmT
D092 TR808SnT
D093 TR808TmT
D094 TR909BsT
D095 TR909HHT
D096 TR909C_T
D097 TR909OHT
D098 TR909SnT
D099 TR909StT
D100 TR909TmT
D101 Vibra_T
D102 VocHit_T
D103 VocokikT
D104 VocopopT
D105 CocoZisT
D106 Yeti
D107 Zap_T
D108 ZappnGt
D109 Zilp_T
D110 Zip_T
D111 Zipup_T
Drumsets
D112 Standard
D113 TR808Set
D114 TR909Set
D115 Analog
D116 TR606Set
D117 CR78_Set
D118 Linn_set
D119 Rock_Set
D120 Modular1
D121 Modular2
D122 VntgeSet
D123 Dry_Set
D124 DanceSet
D125 Old_Box
D126 Kick_Snr
D127 NoisySFX
D128 NoSound
Selecting Single
Sounds with MIDI
The are 512 single sounds in The RAVEN. They are organized into 4 banks with 128 single sounds in each
bank. Since MIDI Program Change messages can access a maximum of 128 sounds, The RAVEN uses
Bank Select messages in addition to Program Change messages to access all 512 sounds. The Bank Select
command is MIDI Controller number 0 and must be given before the Program Change message.
Bank Select commands not accompanied by a Program Change message are ignored. Program Banks A D correspond with Bank Select numbers 0 - 3:
1. Controller 0, Value X; X = Bank-number
X = 0 = Bank A
X = 1 = Bank B
X = 2 = Bank C
X = 3 = Bank D
2. Program-change, Value Y; Y = Program-number
Y = 0 - 127
The sound will be changed after both messages are received. The program will not change with only a
Bank Select message. The Bank Select command must always be terminated by a Program Change.
74
All parameters of The RAVEN can be changed via MIDI System Exclusive messages. Computer programmers will find the following informations useful in programming Dump or Editor Programs for The
RAVEN. For Realtime control it is generally better to use Continuous Controller data because it often
achieves the same result, sends less MIDI data, and is easier to use.

Performance list
A00 Diary
A01 Blow_Job
A02 Slappy
A03 Slidox
A04 Polysynt
A05 Gate
A06 Matrix
A07 Soloport
A08 Rotodrum
A09 Hadjuk
A10 2000Deep
A11 5thHouse
A12 Aladdin
A13 Alhazred
A14 Ali_Baba
A15 Amalgam
A16 Apricosy
A17 Arielle
A18 Artus
A19 Atomsmog
A20 Aztekiae
A21 Babayaga
A22 Babybox
A23 Bachus
A24 Barbara
A25 Bassarps
A26 BassLine
A27 BellVox
A28 BritePad
A29 Brutus
A30 CaveLine
A31 Chinese
A32 Cholera
A33 Chor
A34 Chordula
A35 Chorstrg
A36 Cicero
A37 Clichy
A38 Clopsy
A39 CMI_Vox
A40 Cocktail
A41 Cujamara
A42 DeepBooh
A43 Deviled
A44 DieHard
A45 DX_7
A46 EasySeq
A47 EchoDrin
A48 Echolyt
A49 ElHakim
B00 Equinox
B01 Eunova
B02 Europa
B03 EvilLine
B04 FastChor
B05 FatBass
B06 FatLead
B07 FatStrng
B08 FatSynth
B09 Fit
B10 Flaeche
B11 Flange
B12 Flokati
B13 Floorbss
B14 Floppy
B15 Flutlite
B16 Funky
B17 Futurbss
B18 Gabber
B19 GenError
B20 Gitarre
B21 Gliders
B22 GruvReso
B23 Gwendoly
B24 HaloWahn
B25 Hamburg
B26 HardCore
B27 Harrison
B28 Horrible
B29 House
B30 HouseOrg
B31 HugSynt
B32 Ibis
B33 IceCold
B34 Image
B35 ItalPian
B36 Ivanhoen
B37 Japanese
B38 Jungfer
B39 Klaus
B40 Kniteful
B41 Kreta
B42 K_Houser
B43 Lancelot
B44 Lead_303
B45 Leaders
B46 Legalize
B47 Little15
B48 LoveAge
B49 LoveBody
C00 LowPass
C01 Luigi
C02 Maldoror
C03 MC202
C04 Mellotrn
C05 Memories
C06 Merkur
C07 Message
C08 Miami
C09 Milrahm
C10 Mittig
C11 MKS50
C12 MKSOrgan
C13 Mobilnet
C14 ModuBass
C15 MonoMoog
C16 MoogBass
C17 MoogSome
C18 Moogy
C19 MotoKing
C20 Move_It
C21 Mumpfel
C22 Murmel
C23 Mutantor
C24 NiteMare
C25 Noister
C26 Noisy
C27 NoSchool
C28 No_Talos
C29 Oberheim
C30 Okzident
C31 Orchestr
C32 Orgel
C33 Oriental
C34 OutDoors
C35 Palmin
C36 Panners
C37 Paradox
C38 Patent_X
C39 Petshop
C40 Phasers
C41 Polygon
C42 Propper
C43 Pulsar
C44 PulsArp
C45 Pulseful
C46 Pupils
C47 Quasar
C48 Rachel
C49 Radium
D00 RandyRnd
D01 RatBass
D02 RaveBrss
D03 RaveLead
D04 Raveress
D05 Raverin
D06 Ravesign
D07 Raviera
D08 Restore
D09 Rhythms
D10 Ritenite
D11 RudeBass
D12 RunAway
D13 Sarungi
D14 Satelite
D15 SeaQuest
D16 SeqAngel
D17 SLowPad
D18 SoftClck
D19 Sojus7
D20 Solid
D21 Spartas
D22 Splittig
D23 SpltHaus
D24 Stargate
D25 Starwars
D26 Steely
D27 Stormed
D28 Suckers
D29 Supersol
D30 Sweeper
D31 Synbrass
D32 Syncers
D33 SynSign
D34 SyntiPop
D35 TimTaler
D36 Torture
D37 Tribally
D38 TriebTat
D39 TriplSeq
D40 Ullyses
D41 UniLine
D42 Up‘nDown
D43 WarmStrg
D44 WetLook
D45 Wibbler
D46 Witched
D47 Wurlitz
D48 Xantier
D49 Zombied
How to select the
performances with
midi
The selection of performances works in the same way we have explained it in the last chapter. Every
performance-bank contains 50 performances. The performances are organized in 5 banks 0- 4. For that
reason you have only 50 program-changes from 0 - 49 for each bank. Send first the desired bank-number
and than the program-change number.
Bank 0: User-Bank (RAM-Performances)
Bank 1-4 ROM-Bänke A-D
75

Drumset list
Standard Set
C 2 Bassdrum
C#2 Stick
D 2 Snare
D#2 TR808Clp
E 2 SnreDrum
F 2 Tom_2
F#2 ClsdHHat
G 2 Tom_2
G#2 FootHHat
A 2 Tom_2
A#2 OpenHHat
H 2 Tom_1
C 3 Tom_1
C#3 Crash1
D 3 Tom_1
D#3 Ride
E 3 ChinaCrs
F 3 RideBell
F#3 Tamburin
G 3 Splash
G#3 Cowbell
A 3 Crash2
A#3 VibraSlp
H 3 Ride
C 4 BongoHi
C#4 BongoLo
D 4 CongaSlp
D#4 CongaHi
E 4 CongaLo
F 4 Timbale
F#4 Timbale
G 4 HiAgogo
G#4 LoAgogo
A 4 Cabasa
A#4 Maracas
H 4 ShrtWhis
C 5 LongWhis
C#5 GuiroSht
D 5 Guiro
D#5 Clave
E 5 Woodblok
F 5 Woodblok
F#5 CuicaLo
G 5 CuicaHi
G#5 Mt_Trngl
A 5 Triangle
A#5 Shaker
H 5 Tamburin
C 6 BellTree
C#6 Castanet
D 6 SinusKic
D#6 ResoHard
E 6 Slap
F 6 Scratch1
F#6 Scratch2
G 6 Sticks
G#6 CasioDr3
A 6 Casiodr1
A#6 CasioDr2
H 6 TR808Rim
C 7 Stick
TR808 Set
C 2 TR808Bs
C#2 TR808Rim
D 2 TR808Sn
D#2 TR808Clp
E 2 TR909Sn
F 2 TR808Tom
F#2 TR808CHH
G 2 TR808Tom
G#2 RaveHat
A 2 TR808Tom
A#2 TR808Ohh
H 2 TR808Tom
C 3 TR808Tom
C#3 TR808Crs
D 3 TR808Tom
D#3 Ride
E 3 ChinaCrs
F 3 RideBell
F#3 Tamburin
G 3 Splash
G#3 TR808Cow
A 3 Crash2
A#3 VibraSlp
H 3 Ride
C 4 BongoHi
C#4 BongoLo
D 4 Tr808CLo
D#4 TR808Cmi
E 4 TR808CHi
F 4 Timbale
F#4 Timbale
G 4 HiAgogo
G#4 LoAgogo
A 4 Cabasa
A#4 TR808Mrs
H 4 ShrtWhis
C 5 LongWhis
C#5 GuiroSht
D 5 Guiro
D#5 TR808Cla
E 5 Woodblok
F 5 Woodblok
F#5 CuicaLo
G 5 CuicaHi
G#5 Mt_Trngl
A 5 Triangle
A#5 Shaker
H 5 Tamburin
C 6 BellTree
C#6 Castanet
D 6 SinusKic
D#6 ResoHard
E 6 Slap
F 6 Scratch1
F#6 Scratch2
G 6 Sticks
G#6 CasioDr3
A 6 Casiodr1
A#6 CasioDr2
H 6 TR808Rim
C 7 Stick
TR909 Set
C 2 TR909Bs
C#2 TR909Stk
D 2 TR909Sn
D#2 TR909Clp
E 2 TR808Sn
F 2 TR909Tom
F#2 TR909CHH
G 2 TR909Tom
G#2 RaveHat
A 2 TR909Tom
A#2 TR909OHH
H 2 TR909Tom
C 3 TR909Tom
C#3 Crash2
D 3 TR909Tom
D#3 Ride
E 3 ChinaCrs
F 3 RideBell
F#3 Tamburin
G 3 Splash
G#3 TR808Cow
A 3 Crash1
A#3 VibraSlp
H 3 Ride
C 4 Tr808CLo
C#4 TR808Cmi
D 4 TR808CHi
D#4 BongoHi
E 4 BongoLo
F 4 HiAgogo
F#4 LoAgogo
G 4 Timbale
G#4 Timbale
A 4 TR808Mrs
A#4 Cabasa
H 4 ShrtWhis
C 5 LongWhis
C#5 GuiroSht
D 5 TR808Cla
D#5 Guiro
E 5 Woodblok
F 5 Woodblok
F#5 CuicaHi
G 5 CuicaLo
G#5 Triangle
A 5 Mt_Trngl
A#5 Tamburin
H 5 Shaker
C 6 BellTree
C#6 Castanet
D 6 ResoHard
D#6 SinusKic
E 6 Slap
F 6 Scratch2
F#6 Scratch1
G 6 Sticks
G#6 Casiodr1
A 6 CasioDr2
A#6 CasioDr3
H 6 TR808Rim
C 7 Stick
Analog Set
C 2 ResoHard
C#2 CR78Rim
D 2 CR78Snre
D#2 TR909Clp
E 2 NoiseSnr
F 2 Anatoms1
F#2 TR606HH
G 2 Anatoms3
G#2 RaveHat
A 2 Anatoms1
A#2 TR606OHH
H 2 Anatoms3
C 3 Anatoms1
C#3 AnlgCymb
D 3 Anatoms3
D#3 Ride
E 3 ChinaCrs
F 3 ZipUp
F#3 Tamburin
G 3 Zapping
G#3 TR808Cow
A 3 Crash1
A#3 AnlgElec
H 3 Ride
C 4 CasioDr2
C#4 CasioDr3
D 4 AnlKlock
D#4 AnlKlock
E 4 HiAgogo
F 4 LoAgogo
F#4 Tr808CLo
G 4 TR808Cmi
G#4 TR808CHi
A 4 AnlPerc1
A#4 AnlPerc2
H 4 Zilp
C 5 AnlGuir1
C#5 TR808Cla
D 5 ShrtWhis
D#5 LongWhis
E 5 AnlPerc3
F 5 AnlPerc4
F#5 Pudding
G 5 Pudding2
G#5 DrumSFX1
A 5 DrumSFX2
A#5 VocoKick
H 5 Vocopop
C 6 VocoZish
C#6 MoogTom
D 6 ResoHard
D#6 Slap
E 6 Scratch1
F 6 Scratch2
F#6 Sticks
G 6 CasioDr3
G#6 Casiodr1
A 6 CasioDr2
A#6 TR909Bs
H 6 TR808Rim
C 7 Stick
76

Drumset list
TR606 Set
C 2 TR606Bs
C#2 CR78Rim
D 2 TR606Snr
D#2 TR808Clp
E 2 CR78Snre
F 2 TR606Tom
F#2 TR606HH
G 2 TR606Tom
G#2 RaveHat
A 2 TR606Tom
A#2 TR606OHH
H 2 TR606Tom
C 3 TR606Tom
C#3 TR606Cym
D 3 TR606Tom
D#3 Ride
E 3 ChinaCrs
F 3 RideBell
F#3 Tamburin
G 3 Splash
G#3 TR808Cow
A 3 Crash2
A#3 VibraSlp
H 3 Ride
C 4 GuiroSht
C#4 CR78Guir
D 4 BongoHi
D#4 BongoLo
E 4 CongaSlp
F 4 CongaHi
F#4 CongaLo
G 4 Timbale
G#4 Timbale
A 4 HiAgogo
A#4 LoAgogo
H 4 Cabasa
C 5 TR808Mrs
C#5 ShrtWhis
D 5 LongWhis
D#5 TR808Cla
E 5 Woodblok
F 5 Woodblok
F#5 CuicaLo
G 5 CuicaHi
G#5 Mt_Trngl
A 5 Triangle
A#5 Shaker
H 5 Castanet
C 6 ResoHard
C#6 Slap
D 6 Scratch2
D#6 Scratch1
E 6 Sticks
F 6 SinusKic
F#6 CasioDr3
G 6 Casiodr1
G#6 CasioDr2
A 6 Tamburin
A#6 BellTree
H 6 TR808Rim
C 7 Stick
CR78 Set
C 2 CR78Bass
C#2 CR78Rim
D 2 CR78Snre
D#2 TR909Clp
E 2 TR808Sn
F 2 TR808Tom
F#2 CR78HHat
G 2 TR808Tom
G#2 RaveHat
A 2 TR808Tom
A#2 CR78HHat
H 2 TR808Tom
C 3 TR808Tom
C#3 CR78Cymb
D 3 TR808Tom
D#3 RideBell
E 3 ChinaCrs
F 3 Ride
F#3 CR78Tamb
G 3 Splash
G#3 TR808Cow
A 3 Crash1
A#3 VibraSlp
H 3 RideBell
C 4 BongoHi
C#4 BongoLo
D 4 CR78Cnga
D#4 CR78Cnga
E 4 CR78Cnga
F 4 Cabasa
F#4 TR808Mrs
G 4 Timbale
G#4 Timbale
A 4 HiAgogo
A#4 LoAgogo
H 4 ShrtWhis
C 5 LongWhis
C#5 GuiroSht
D 5 CR78Guir
D#5 CR78Clav
E 5 CuicaHi
F 5 CuicaLo
F#5 Woodblok
G 5 Woodblok
G#5 Mt_Trngl
A 5 Triangle
A#5 Shaker
H 5 SinusKic
C 6 ResoHard
C#6 Scratch1
D 6 Slap
D#6 Scratch2
E 6 Sticks
F 6 Casiodr1
F#6 CasioDr2
G 6 CasioDr3
G#6 TR808Bs
A 6 Tamburin
A#6 BellTree
H 6 TR808Rim
C 7 Stick
Linn Set
C 2 LinnKick
C#2 Stick
D 2 LinnSnre
D#2 TR808Clp
E 2 LinnSnre
F 2 LinnTom
F#2 ClsdHHat
G 2 LinnTom
G#2 FootHHat
A 2 LinnTom
A#2 OpenHHat
H 2 LinnTom
C 3 LinnTom
C#3 Crash1
D 3 LinnTom
D#3 Ride
E 3 ChinaCrs
F 3 RideBell
F#3 Tamburin
G 3 Splash
G#3 Cowbell
A 3 Crash2
A#3 VibraSlp
H 3 Ride
C 4 ResoHard
C#4 Slap
D 4 Scratch1
D#4 Scratch2
E 4 Sticks
F 4 CasioDr3
F#4 Casiodr1
G 4 CasioDr2
G#4 BongoHi
A 4 BongoLo
A#4 CongaSlp
H 4 CongaHi
C 5 CongaLo
C#5 Timbale
D 5 Timbale
D#5 HiAgogo
E 5 LoAgogo
F 5 Cabasa
F#5 Maracas
G 5 ShrtWhis
G#5 LongWhis
A 5 GuiroSht
A#5 Guiro
H 5 Clave
C 6 Woodblok
C#6 Woodblok
D 6 CuicaLo
D#6 CuicaHi
E 6 Mt_Trngl
F 6 Triangle
F#6 Shaker
G 6 Tamburin
G#6 BellTree
A 6 Castanet
A#6 Solid
H 6 TR808Rim
C 7 Stick
Rock-Set
C 2 Solid
C#2 Stick
D 2 Gated_SD
D#2 TR808Clp
E 2 Snare
F 2 Tom_2
F#2 ClsdHHat
G 2 Tom_2
G#2 FootHHat
A 2 Tom_2
A#2 OpenHHat
H 2 Tom_1
C 3 Tom_1
C#3 Crash1
D 3 Tom_1
D#3 Ride
E 3 ChinaCrs
F 3 RideBell
F#3 Tamburin
G 3 Splash
G#3 Cowbell
A 3 Crash2
A#3 VibraSlp
H 3 Ride
C 4 CongaSlp
C#4 CongaLo
D 4 BongoHi
D#4 CongaHi
E 4 BongoLo
F 4 Cabasa
F#4 Maracas
G 4 Timbale
G#4 Timbale
A 4 HiAgogo
A#4 LoAgogo
H 4 ShrtWhis
C 5 LongWhis
C#5 GuiroSht
D 5 Guiro
D#5 Clave
E 5 Woodblok
F 5 Woodblok
F#5 CuicaLo
G 5 CuicaHi
G#5 Slap
A 5 Sticks
A#5 Shaker
H 5 Tamburin
C 6 Scratch1
C#6 Scratch2
D 6 ResoHard
D#6 Mt_Trngl
E 6 BellTree
F 6 Castanet
F#6 Triangle
G 6 CasioDr3
G#6 Casiodr1
A 6 CasioDr2
A#6 Bassdrum
H 6 TR808Rim
C 7 Stick
77

Drumset list
Modular 1 Set
C 2 An_Kick4
C#2 AnlgRim
D 2 AnlPerc2
D#2 TR808Clp
E 2 TR909Sn
F 2 Anatoms2
F#2 AnlgHHat
G 2 Anatoms2
G#2 RaveHat
A 2 Anatoms2
A#2 AnlgHHat
H 2 Anatoms2
C 3 Anatoms2
C#3 AnlgCymb
D 3 Anatoms2
D#3 TR606Cym
E 3 ChinaCrs
F 3 RideBell
F#3 CR78Tamb
G 3 Splash
G#3 TR808Cow
A 3 AnlgSFX
A#3 VibraSlp
H 3 Ride
C 4 AnlPerc3
C#4 AnlPerc4
D 4 Casiodr1
D#4 CasioDr3
E 4 CasioDr2
F 4 BongoHi
F#4 BongoLo
G 4 HiAgogo
G#4 LoAgogo
A 4 Cabasa
A#4 TR808Mrs
H 4 ShrtWhis
C 5 LongWhis
C#5 AnlGuir1
D 5 Anlguir2
D#5 TR808Cla
E 5 AnlPerc5
F 5 Woodblok
F#5 CuicaLo
G 5 CuicaHi
G#5 Mt_Trngl
A 5 Triangle
A#5 El_Shako
H 5 MoogTom
C 6 Ms20Perc
C#6 Castanet
D 6 Zip
D#6 Slap
E 6 Scratch1
F 6 Scratch2
F#6 Sticks
G 6 Tr808CLo
G#6 TR808Cmi
A 6 TR808CHi
A#6 Zapping
H 6 TR808Rim
C 7 Stick
Modular 2 Set
C 2 An_Kick5
C#2 AnlPerc1
D 2 TR909Sn
D#2 FiltClap
E 2 FiltSnre
F 2 Anatoms3
F#2 TR909CHH
G 2 Anatoms3
G#2 AnlgHHat
A 2 Anatoms3
A#2 TR909OHH
H 2 Anatoms3
C 3 Anatoms3
C#3 CR78Cymb
D 3 Anatoms3
D#3 TR606Cym
E 3 Ms20Perc
F 3 AnlgSFX
F#3 CR78Tamb
G 3 AnlgCymb
G#3 TR808Cow
A 3 Crash2
A#3 AnlgElec
H 3 Ride
C 4 BongoHi
C#4 BongoLo
D 4 Tr808CLo
D#4 TR808Cmi
E 4 TR808CHi
F 4 AnlKlock
F#4 AnlKlock
G 4 AnlPerc4
G#4 AnlPerc5
A 4 Cabasa
A#4 TR808Mrs
H 4 ShrtWhis
C 5 LongWhis
C#5 GuiroSht
D 5 Guiro
D#5 TR808Cla
E 5 Woodblok
F 5 Woodblok
F#5 CuicaLo
G 5 CuicaHi
G#5 Mt_Trngl
A 5 Triangle
A#5 Shaker
H 5 Ms20Perc
C 6 BellTree
C#6 Castanet
D 6 ZipUp
D#6 Zapp
E 6 Zilp
F 6 Zip
F#6 Zapping
G 6 MoogTom
G#6 MoogTom
A 6 MoogTom
A#6 909_F_Ki
H 6 TR808Rim
C 7 Stick
Vintage Set
C 2 An_Kick1
C#2 CR78Rim
D 2 CR78Snre
D#2 CR78Snre
E 2 TR606Snr
F 2 TR909Tom
F#2 CR78HHat
G 2 TR606Tom
G#2 TR606HH
A 2 TR909Tom
A#2 TR606OHH
H 2 TR606Tom
C 3 TR909Tom
C#3 TR606Cym
D 3 TR606Tom
D#3 TR606Cym
E 3 CR78Cymb
F 3 AnlgCymb
F#3 CR78Tamb
G 3 Ms20Perc
G#3 AnlgSFX
A 3 AnlgRim
A#3 AnlPerc5
H 3 AnlPerc4
C 4 AnlPerc3
C#4 AnlPerc2
D 4 CR78Cnga
D#4 CR78Cnga
E 4 CR78Cnga
F 4 AnlPerc1
F#4 AnlKlock
G 4 AnlgHHat
G#4 AnlGuir1
A 4 Anlguir2
A#4 AnlgElec
H 4 AnlgCymb
C 5 AnlgCymb
C#5 CR78Guir
D 5 TR909Bs
D#5 TR909Stk
E 5 TR909Sn
F 5 TR909CHH
F#5 TR909OHH
G 5 TR808Bs
G#5 TR808Rim
A 5 TR808Sn
A#5 TR808Clp
H 5 TR909Clp
C 6 Crash1
C#6 Crash2
D 6 RideBell
D#6 AnlgCymb
E 6 AnlgCymb
F 6 AnlgCymb
F#6 AnlgCymb
G 6 AnlgElec
G#6 AnlgElec
A 6 AnlgElec
A#6 AnlKlock
H 6 TR808Rim
C 7 Stick
Kick & Snare Set
C 2 DanceKik
C#2 TR808Rim
D 2 TR808Sn
D#2 TR808Clp
E 2 SnreDrum
F 2 An_Kick1
F#2 TR909CHH
G 2 An_Kick2
G#2 TR808CHH
A 2 An_Kick3
A#2 TR909OHH
H 2 An_Kick4
C 3 An_Kick5
C#3 Crash1
D 3 Bassdrum
D#3 CR78Bass
E 3 CR78Cymb
F 3 LinnKick
F#3 Tamburin
G 3 TR606Cym
G#3 TR909Bs
A 3 Crash2
A#3 909_F_Ki
H 3 CR78Snre
C 4 Snare
C#4 Gated_SD
D 4 LinnSnre
D#4 TR909Sn
E 4 TR606Snr
F 4 FiltClap
F#4 TR909Clp
G 4 Stick
G#4 TR909Stk
A 4 CR78Rim
A#4 Sticks
H 4 TR808Ohh
C 5 ClsdHHat
C#5 OpenHHat
D 5 TR808Bs
D#5 KickDrum
E 5 TR606Bs
F 5 Maracas
F#5 Cabasa
G 5 CongaSlp
G#5 CongaHi
A 5 CongaLo
A#5 BongoHi
H 5 BongoLo
C 6 Cowbell
C#6 TR808Cow
D 6 ZipUp
D#6 Zapp
E 6 Zilp
F 6 Zip
F#6 Zapping
G 6 TR909Tom
G#6 TR909Tom
A 6 TR909Tom
A#6 AnlKlock
H 6 TR808Rim
C 7 Stick
78

Drumset list
Dry Set
C 2 Solid
C#2 Stick
D 2 SnreDrum
D#2 TR808Clp
E 2 SnreDrum
F 2 Tom_2
F#2 ClsdHHat
G 2 Tom_2
G#2 FootHHat
A 2 Tom_2
A#2 OpenHHat
H 2 Tom_1
C 3 Tom_1
C#3 Crash1
D 3 Tom_1
D#3 Ride
E 3 ChinaCrs
F 3 Triangle
F#3 Tamburin
G 3 Splash
G#3 Cowbell
A 3 Crash2
A#3 VibraSlp
H 3 Ride
C 4 BongoHi
C#4 BongoLo
D 4 CongaSlp
D#4 CongaHi
E 4 CongaLo
F 4 Timbale
F#4 Timbale
G 4 HiAgogo
G#4 LoAgogo
A 4 Maracas
A#4 Cabasa
H 4 ShrtWhis
C 5 LongWhis
C#5 GuiroSht
D 5 Guiro
D#5 Shaker
E 5 Woodblok
F 5 Woodblok
F#5 Scratch1
G 5 Scratch2
G#5 Mt_Trngl
A 5 RideBell
A#5 Clave
H 5 Tamburin
C 6 BellTree
C#6 Castanet
D 6 ResoHard
D#6 Slap
E 6 CuicaLo
F 6 CuicaHi
F#6 Sticks
G 6 CasioDr3
G#6 Casiodr1
A 6 CasioDr2
A#6 LinnKick
H 6 TR808Rim
C 7 Stick
Dance Set
C 2 DanceKik
C#2 TR808Rim
D 2 TR909Sn
D#2 TR808Clp
E 2 SnreDrum
F 2 TR909Tom
F#2 TR909CHH
G 2 TR808Tom
G#2 RaveHat
A 2 TR909Tom
A#2 TR909OHH
H 2 TR808Tom
C 3 TR909Tom
C#3 Crash1
D 3 TR808Tom
D#3 Ride
E 3 VocHit
F 3 RideBell
F#3 Tamburin
G 3 Splash
G#3 TR808Cow
A 3 Crash2
A#3 VibraSlp
H 3 Ride
C 4 Scratch1
C#4 Scratch2
D 4 CongaSlp
D#4 CongaHi
E 4 CongaLo
F 4 Timbale
F#4 Timbale
G 4 HiAgogo
G#4 LoAgogo
A 4 Cabasa
A#4 Maracas
H 4 ShrtWhis
C 5 LongWhis
C#5 GuiroSht
D 5 Guiro
D#5 Clave
E 5 Woodblok
F 5 Woodblok
F#5 CuicaLo
G 5 CuicaHi
G#5 Mt_Trngl
A 5 Triangle
A#5 VocoKick
H 5 Vocopop
C 6 VocoZish
C#6 Castanet
D 6 ResoHard
D#6 Slap
E 6 BongoLo
F 6 BongoHi
F#6 Sticks
G 6 Zip
G#6 Zilp
A 6 Ms20Perc
A#6 TR808Bs
H 6 TR808Rim
C 7 Stick
Old-Box
C 2 An_Kick3
C#2 CR78Rim
D 2 CR78Snre
D#2 TR808Clp
E 2 TR606Snr
F 2 TR606Tom
F#2 TR606HH
G 2 TR808Tom
G#2 CR78HHat
A 2 TR606Tom
A#2 TR606OHH
H 2 TR808Tom
C 3 TR606Tom
C#3 CR78Cymb
D 3 TR808Tom
D#3 Ride
E 3 TR808Crs
F 3 Ride
F#3 CR78Tamb
G 3 Splash
G#3 TR808Cow
A 3 TR606Cym
A#3 VibraSlp
H 3 RideBell
C 4 CR78Cnga
C#4 CR78Cnga
D 4 Tr808CLo
D#4 TR808Cmi
E 4 TR808CHi
F 4 Timbale
F#4 Timbale
G 4 HiAgogo
G#4 LoAgogo
A 4 TR808Mrs
A#4 Cabasa
H 4 ShrtWhis
C 5 LongWhis
C#5 CR78Guir
D 5 GuiroSht
D#5 CR78Clav
E 5 Woodblok
F 5 Woodblok
F#5 CuicaLo
G 5 CuicaHi
G#5 Mt_Trngl
A 5 Triangle
A#5 Shaker
H 5 CongaSlp
C 6 CongaHi
C#6 CongaLo
D 6 ResoHard
D#6 Slap
E 6 Scratch1
F 6 Scratch2
F#6 Sticks
G 6 CasioDr3
G#6 Casiodr1
A 6 CasioDr2
A#6 TR606Bs
H 6 TR808Rim
C 7 Stick
Noisy SFX
C 2 An_Kick2
C#2 AnlPerc1
D 2 AnlPerc2
D#2 AnlPerc3
E 2 AnlPerc4
F 2 AnlPerc5
F#2 AnlgRim
G 2 AnlgCymb
G#2 AnlgRim
A 2 AnlgRim
A#2 AnlgCymb
H 2 AnlgRim
C 3 AnlgSFX
C#3 AnlgSFX
D 3 AnlgSFX
D#3 AnlKlock
E 3 AnlKlock
F 3 AnlKlock
F#3 AnlgElec
G 3 AnlgElec
G#3 AnlgElec
A 3 AnlgHHat
A#3 AnlgHHat
H 3 AnlgHHat
C 4 DrumSFX1
C#4 DrumSFX2
D 4 Eff_Shak
D#4 MoogTom
E 4 MoogTom
F 4 MoogTom
F#4 Pudding
G 4 Pudding2
G#4 VocoKick
A 4 Vocopop
A#4 VocoZish
H 4 Zapp
C 5 Zapping
C#5 ResoHard
D 5 Zip
D#5 Zilp
E 5 ZipUp
F 5 Ms20Perc
F#5 Ms20Perc
G 5 Ms20Perc
G#5 El_Shako
A 5 Crash1
A#5 Crash2
H 5 TR909Sn
C 6 TR808Clp
C#6 TR808Sn
D 6 Anatoms1
D#6 Anatoms2
E 6 Anatoms3
F 6 Anatoms1
F#6 Anatoms2
G 6 Anatoms3
G#6 Anatoms1
A 6 Anatoms2
A#6 Anatoms3
H 6 TR808Rim
C 7 Stick
79

System Exclusive data
System Exclusive
data
All of The RAVEN's parameters can be changed via MIDI System Exclusive messages. Computer programmers will find the following informations useful in programming Dump or Editor Programs for The
RAVEN. For Realtime control it is generally better to use Continuous Controller data because it often
achieves the same result, sends less MIDI data, and is easier to use.
RAVEN-System-Exclusive Format
Request Data from device:
Byte No. Value Remarks
0 F0 System Exclusive start command
1 3F Quasimidi id number
2 dv device number = RAVEN System channel
3 23 RAVEN id number
4 52 (R)equest data
5 ah adress high
6 am adress mid
7 al adress low
8 dh data count high (2 bit)
9 dm data count mid (7 bit)
10 dl data count low (7 bit)
11 F7 end of System Exclusive
Dump Data to device:
Byte No. Value Remarks
0 F0 System Exclusive start command
1 3F Quasimidi id number
2 dv device number = RAVEN System channel
3 23 RAVEN id number
4 44 (D)ump data
5 ah adress high
6 am adress mid
7 al adress low
8... dt data (7 bit)
... F7 end of System Exclusive
80

System Exclusive data
RAVEN Adress Map: (third byte is Adress-Offset)
00 00 00 system parameter
01 00 00 temporary common parameter
01 01 00 temporary part parameter (part 1)
01 02 00 -“- (part 2)
... ...
01 10 00 -“- (part 16)
01 11 00 temporary performance name
02 00 00 temporary drum parameter (drum instr 1)
02 01 00 -“- (drum instr 2)
... ...
02 3C 00 -“- (drum instr 61)
02 3D 00 reserved
...
02 7F 00 -“-
03 00 00 temporary track parameter (pattern 0, track 0)
03 01 00 -“- ( -“- , track 1)
... ...
03 07 00 -“- ( -“- , track 7)
03 08 00 -“- (pattern 1, track 0)
... ... ...
03 4F 00 -“- (pattern 9, track 7)
03 50 00 reserved
...
03 7F 00 -“-
04 00 00 temporary song event (step 1)
04 01 00 -“- (step 2)
... ...
04 63 00 -“- (step 100)
04 64 00 reserved
...
04 7F 00 -“-
05 00 00 performance 1 Name
05 01 00 -“- common
05 02 00 -“- part 1
05 03 00 -“- part 2
05 04 00 -“- part 3
05 05 00 -“- part 4
06 00 00 performance 2 name
... ...
36 05 00 performance 50 part 4
370000 song 1 name
37 00 00 song 1 COMMON
37 02 00 -“- part 1 (KICK)
37 03 00 -“- part 2 (... ...
37 0A 00 -“- part 9 (SOLO)
370000 song 1 name
37 00 00 song 1 COMMON
37 02 00 -“- part 1 (KICK)
37 03 00 -“- part 2 (... ...
37 0A 00 -“- part 9 (SOLO)
81

System Exclusive data
38 00 00 song 1 drumset parameter (drum instr 1)
38 01 00 -“- (drum in
str 2)
... ...
38 3C 00 -“- (drum instr 61)
39 00 00 song 1 track parameter (pattern 0, track 0)
39 01 00 -“- ( -“- , track 1)
... ...
39 07 00 -“- ( -“- , track 7)
39 08 00 -“- (pattern 1, track 0)
... ... ...
39 4F 00 -“- (pattern 9, track 7)
3A 00 00 song 1 song event (step 1)
3A 01 00 -“- (step 2)
... ...
3A 63 00 -“- (step 100)
3B 00 00 song 2 name
... ...
3F 00 00 song 3 name
... ...
5E 63 00 song 10 song event (step 100)
5F 00 00 reserved
...
76 7F 00 -“-
77 00 00 user motiv block 0
77 01 00 -“- 1
... ...
77 63 00 -“- 99
77 64 00 reserved
...
77 7F 00 -“77 7F 7F command: clear all user motives!!
78 00 00 sound name bank 0, sound 0 (only request!)
78 01 00 -“- sound 1 -“-
... ...
78 7F 00 -“- sound 127 -“79 00 00 sound name bank 1, sound 0 -“-
... ...
7B 7F 00 sound name bank 3, sound 127 -“7C 00 00 sound name bank 4, sound 0 (only with Expansion-Board)
... ...
7F 7F 00 sound name bank 7, sound 127 -“-
82

System Exclusive data
Adress Offsets:
———————-
SYSTEM-Parameter
00 transpose /* 0..12 (-6..+6) */
01 tune /* 0..127 (-64..+63) *
02 system channel /* 0..15 (1..16) */
03 sequencer mode /* 0..1 (OFF,ON) */
04 extern sync /* 0..1 (OFF,ON) */
05 program change input /* 0..1 (OFF,ON) */
06 keyboard aftertouch /* 0..1 (OFF,ON) */
07 extern start /* 0..1 (OFF,ON) */
08 parameter control input /* 0..1 (OFF,ON) */
09 local /* 0..1 (OFF,ON) */
0A omni mode /* 0..1 (OFF,ON) */
0B master velocity curve no. /* 0..7 (LIN, LIN-,LIN+,..FIX ) */
0C program change out /* 0..1 (OFF,ON) */
0D parameter control out /* 0..1 (OFF,ON) */
0E controller out /* 0..1 (OFF,ON) */
0F midi clock out /* 0..1 (OFF,ON) */
COMMON-Parameter
00 performance level /* 0..127 */
01 performance mode /* 0..13 (SINGLE,DOUBLE...) */
02 performance value /* 0..127 (SPLITKEY/DETUNE) */
03 groove type /* 0..1 (8th,16th) */
04 groove depth /* 0..3 (0%..100%) */
05 foot function /* 0..1 (SUSTAIN,MOT.FREEZE) */
06 reserved
07 repetition point /* 0..12 (C3..C4) */
08 reserved
Modulations-Matrix
09
mod.depth[SOURCE1][DEST1]
/* 0..127
(-64..63) */
0A mod.depth[SOURCE1][DEST2] /* 0..127 (-64..63) */
... ...
28 mod.depth[SOURCE4][DEST8]
FX Parameter
29 fx1 activity /* 0..1 (OFF,ON) */
2A fx1 type /* 0..22, (FX1-Effect#) */
2B fx1 parameter[PAGE1][PAR1] /* 0..127 (FX1-Parameter1) */
2C fx1 parameter[PAGE1][PAR2] /* 0..63 (FX1-Parameter2) */
... ... ...
30 fx1 parameter[PAGE2][PAR3]
31 fx2 activity /* 0..1 (OFF,ON) */
32 fx2 type /* 0..29, (FX2-Effect#) */
33 fx2 parameter[PAGE1][PAR1] /* 0..127 (FX2-Parameter1) */
34 fx2 parameter[PAGE1][PAR2] /* 0..127 (FX2-Parameter2) */
83

System Exclusive data
Motivator Parameter
3C mot pak1
3D speed /* 0..127 speed bit 1..7 (in BPM) */
3E gate /* 0..127 (127 = legato) */
3F mot pak2 /* bit 6mot double (OFF,ON) */
40 mot pak3 /* bit 3..6 mot track 0..15 (1..16) */
/* bit 5..6 mot mode 0..2
ARPEG,GATER,CHORD) */
/* bit 3..4 mot oct 1..4 */
/* bit 2 mot activity (OFF,ON) */
/* bit 0..1 mot resolution 0..3
(4,8,16,32) */
/* bit 3..5 mot dir 0..4
(UP,DOWN,UPDW,RND,AS
SIGN) */
/* bit 2 mot lenght fit (OFF,ON) */
/* bit 1 mot hold (OFF,ON) */
/* bit 0 mot dyn (OFF,ON) */
/* bit 2 reserved */
/* bit 1 mot out (OFF,ON) */
/* bit 0 speed bit 0 */
PART-Parameter
00 bank no. /* 0..3 (4..7 extension board) */
01 sound no. /* 0..127 */
02 trackmode /* 0..4 (OFF,ON,MONO/Drums:EXT,
LEAD, EXT) */
03 level /* 0..127 */
04 panorama /* 0..20 (OFF,<7L..7R>,RND,KEY,
YEK, DYN, NYD) */
05 fx1 send /* 0..63 */
06 fx2 send /* 0..63 */
07 transpose /* 0..48 (-24..+24) */
08 tune /* 0..127 (-64..+63) */
09 cutoff frequency /* 0..127 (-64..+63) */
0A resonance freq. /* 0..127 (-64..+63) */
0B eg attack /* 0..127 (-64..+63) */
0C eg decay /* 0..127 (-64..+63) */
0D eg release /* 0..127 (-64..+63) */
0E vibrato rate /* 0..127 (-64..+63) */
0F vibrato depth /* 0..127 (-64..+63) */
10 vibrato delay /* 0..127 (-64..+63) */
11 velocity curve no. /* 0..14 (LIN,LIN-,LIN+,..-EX++) */
12 holdpedal /* 0..1 (OFF,ON) */
13 modulation depth /* 0..127 */
14 pitch sensitivity /* 12..36 (-12..12) */
15 volume mod. sens. /* 0..127 (-64..+63) */
16 tone mod. sens. /* 0..127 (-64..63) */
17 portamento time /* 0..127 */
84
DRUM-Parameter
00 level /* 0..127 */
01 pan /* 0..16 (OFF,<7L..7R>,RND) */
02 fx1 send /* 0..63 */
03 fx2 send /* 0..63 */
04 pitch /* 0..48 (-24..+24) */

System Exclusive data
TRACK-Parameter
00 bank nb /* bit 6 on track 7 pattern-typ (BREAK/NORM) */
01 sound nb /* 0..127 */
02 motiv nb /* 0..63 */
03 level /* 0..127 */
04 pan /* 0..20 (OFF,<7L..7R>,RND,KEY,YEK,
05 fx1 send /* 0..63 */
06 fx2 send /* 0..63 */
07 transpose /* bit 6 track-trans 0..1 (OFF/ON) */
SONG-EVENT-Parameter
00 bars no. /* 1..127, (0 = end of song)*/
00 pattern nb /* 0..9 */
00 transpose /* 0..48 (-24..+24) */
00 mutes /* 0..255 (1bit/Track) */
/* bit 3..5 motiv bank 1..7 (USER..) */
/* bit 0..2 sound bank 0..3 */
DYN,NYD) */
/* bit 0..5 part-transpose 0..48 */
Identity Request
Byte No. Value Remarks
0 F0 System Exclusive start command
1 7E Common Non-Real-Time message
2 cc channel number = RAVEN system channel *
3 06 general information
4 01 identity request
5 F7 end of System Exclusive
Identity Reply
Byte No. Value Remarks
0 F0 System Exclusive start command
1 7E Common Non-Real-Time message
2 cc channel number = RAVEN system channel *
3 06 general information
4 02 identity reply
5 3F Quasimidi id
6 23 RAVEN id
7 xx Extension Board exists flag (00=no, 01=yes)
8 00 reserved
9 00 reserved
10..13 vv vv vv vv Version no. (4 ascii characters, i.e ‘1.00’)
14 F7 End of System Exclusive
* note that if cc = 7F the RAVEN responds regardless of what
master channel it is set to.
85

MIDI Implementation Chart
Function Transmitted Recognized Sequencer
Transmitted Recognized
Basic
Channel
Default
Changed
1
1-16
1-16
1-16
1-8
x
1-8
x
Mode
Default
Messages
Altered
x
x
x *
x x x
Note
Number
True Voice
36-96
x
0-127
12-108
36-96 36-96
Velocity Note On
Note Off
0
0
0
x
0
x
0
x
After
Touch
Keys
Channel
x
0
x
0
x
0
x
0
Pitch Bend MSB (7 bit)
LSB (1 bit)
0
x
0
0
0
x
0
x
Controller Continuous MSB 0-31
Continuous LSB 32-63
Control Change 64-95
120 all sounds off
121 reset all controller
0,1,2,5,11
x
64
x
0
0,1,2,5**,7**,10**,11
x
64,65
0
0
1,2,7**,
10**,11
x
64,65
x
x
1,2,11
x
64,65
x
x
Program Change 0** 0** 0** 0**
System Exclusive 0*** 0*** x x
System
Common
Song Position
Song Select
Tune Request
x
x
x
x
x
x
x
x
x
x
x
x
System
Real Time
Clock
Commands
x
x
x
x
0**
0**
0**
0**
Aux
Messages
Local On/ Off
All Notes Off
Active Sens.
System Reset
x
x
x
x
0
0
x
x
x
0
x
x
x
x
x
x
x = No
0 = Yes
* = always poly mode, in sequencer multi-mode 3b
** = can be set to on/off in SYSTEM-Edit
*** = Dump-Functions
86

Initializing The RAVEN memory / Reload Factory Set
The Initialization function will erase ALL User Motives, RAM Performances and Song memory. Use the
function to clear the internal memory. Make sure that any valuable data is off-loaded to an external MIDI
dump recorder like a sequencer, Style-Drive, etc.
To perform an Initialization: Switch The RAVEN off, and while holding the "WRITE" button down,
switch The RAVEN on. The display will show the following:
Initialize All?
[yes] [no]
After pressing [yes], ("SOFT" button [F1]), the Initialization will be confirmed. Pressing [no], ("SPFT"
button [F2]), will interrupt the procedure without changes to the internal memory. After Initializing, you
should re-calibrate the Realtime controllers. If you want to return to Performance or Sequencer mode
without recalibrating, press "EXIT". Otherwise, the display will show the following Calibrate menu:
Calibrate Wheels (min:Tap/0, max:Tap/1)
1 1
Follow Steps 1 through 6 to Calibrate The RAVEN's Realtime controllers.
1) Hold all three Wheels (Pitch Wheel and Wheels 1 & 2) in their minimum position.
2) While holding the Wheels at minimum, press and hold the "TAP" button and press the "MUTE"
button (0) once.
3) Then hold all three Wheels in their maximum position.
4) While holding the Wheels at maximum, press and hold the "TAP" button press the "KICK"
button (1).
5) Confirm the calibration. The display will show the parameter values as the Wheels are turned.
Also the 4 Realtime knobs and Aftertouch will be displayed.
6a) Press the "EXIT" button to return The RAVEN to its normal mode of operation, or...
6b) Repeat the procedure from Step 1
87

Warranty and Registration Card
Fill out the Registration Card and send to:
QUASIMIDI GmbH
Bahnhofstr. 44
35282 Rauschenberg
Germany
How to Validate the Warranty
To validate your Warranty, fill out the Warranty card and return it to QUASIMIDI within ten days from
date of purchase. By returning the card the Warranty period will be extended from 6 months to a full 12
months.
What is covered and what is not covered ?
This Warranty covers all defects in material and workmanship for six (or twelve) months from the date of
original purchase. This Warranty does not cover damage to, or deterioration of the external cabinet or
internal circuitry resulting from accident, misuse, neglect, attempted unauthorized repair or failure to follow instructions in this Owners Manual.
This Warranty does not cover units that have been modified or altered (except an authorized QUASIMIDI
modification which includes its own Warranty coverage).
This Warranty does not cover damage that may occur during shipping.
Software/Firmware are sold as is and are not covered by this Warranty.
How to obtain Warranty servicing
Return your unit to an Authorized QUASIMIDI Service Center. If you are unable to locate one, write or
call the QUASIMIDI Factory Service Department. We will either refer you to an Authorized Service
Center or issue a Return Authorization number for Factory service. Units returned to QUASIMIDI for
Factory service must display the Return Authorization number on the outside of the shipping carton and on
all related documents, or units will be returned freight collect. The owner must pay all shipping costs to
and from the Factory.
Shipment of the product to QUASIMIDI is the responsibility of the owner, and should be insured by the
owner for the full value of the product.
NO CLAIM FOR WARRANTY WILL BE HONORED WITHOUT PROOF OF PURCHASE
Limitations of implied Warranties and exclusion of certain damages
Any implied Warranties, including Warranties of usefulness for a particular purpose are limited in duration
to the lenghth of the Warranty.
QUASIMIDI´s liability for any defective product is limited to repair or replacement of the product.
QUASIMIDI shall not be liable under any circumstances for:
1) Damages based upon inconvenience, loss of use of the unit, loss of time, interrupted operation or
commercial loss.
2) Any other damages, whether incidental, consequential or otherwise, except damages which may not be
excluded under applicable law.
88
Please answer the following questions, this will used in the development of new QUASIMIDI products.
All comments and suggestions will be read by a real person!

Warranty and Registration Card
Your RAVEN's Serial Number:
Date of Purchase:
Place of Purchase:
Name:
Company Name:
Address:
Age:
What style of music do you make ?
Which other keyboards and expanders do you use in addition to The RAVEN ?
What is the main purpose of your RAVEN ? Studio work ? Live Performance ?
Do you use a computer for making music ?
How much importance do you place on the internal sequencer ?
Which are your favorite RAVEN sounds ?
Which are your not-so-favorite RAVEN sounds ?
How much importance do you place on the MOTIVATOR ?
What sounds would you like included on future ROM Expansion boards ?
General comments and suggestions:
89
 Loading...