

Page 1
SIRIUS
Operating Instructions
CATEGORIES
NATURAL
DRUMS
DIRTY
NATURAL
SIRIUS
MOD.-WHEEL
ASSIGN
MODULATION
PITCH
WHEEL
BEND
TRACK-MUTING
BD SNARE HIHAT PERC. SYNTH 1 SYNTH 2 SYNTH 3
MODULATOR OSCILLATORS RESONANCE-FILTER
BASSSOUNDS
DIRTY
BASS
ELECTRONIC
PAD-
DRUMS
SOUNDS
PLUCKED
909-TYPE
SOUNDS
808-TYPE
DRUM-SFX
MIXER 11CHANNELVOCODER SEQUENCER
LEVEL
PANORAMA FX1/FX2
PART
PART
PART/SEQ.
SELECT
MUTE
TO MIDI
SOUND
PATTERN
SELECT
SELECT
SONG
SELECT
MOD.-
MACRO
SOLOSOUNDS
EFFECTSOUNDS
KICK/BD
WAVEMACRO
DETUNE FILTER-
MOD.DEPTH
MOD.RATE
SNARE HIHAT
12
AMPLIFIER
LPF 24 dB RELEASE
GLIDE
OVERDRIVE
3 4 5 6 7 8 9 10 11 12 13 14 15 16
CUTOFF ENV.-MOD VCA
LPF 12 dB
Q-FACTOR VCF-EG
HPF 12 dB
KEY-TRACKINGOCTAVE-UPOCTAVE-DOWN VCF-DYN. VCA-DYN. RANDOM-SOUND
PERCUSSION
SYNTH 1 SYNTH 2 SYNTH 3 VOCODER
PATTERN BREAK SPECIAL LOOPTRACKS
LEVEL
MACRO
EG-MACROS PHONETISCHERSPEKTRALTRANSFORMATOR
0
32
64
96
VCA-EG
MACRO
127
PRESS BUTTON
FOR SOUND-CREATION
HOLD BUTTON AND
SELECT PART
ANALYSE CARRIER CARRIER-EXT. MICRO.
ARPEG.
ON/OFF
SELECT
HOLD
TO
RECORD
REW
EDIT WRITE
RECALL EXIT
START
SONG-STEP
PAGE/BANK
SHIFT
STOP
SPECIAL-LOOP
TRACK-FADER
FWD
SIRIUS
by QUASIMIDI
VALUE
TEMPO
MICROPHONE
CONNECTOR
MASTER
EXTERN
VOLUME
AUDIO
SYNC
SYNC.
PHONES
32 OHM32OHM
DEMO
TAP-
TEMPO
OVERBLAST
QUASIMIDI
Page 2

Contents
Important Safety instructions
Introduction . . . . . . . . . . . . . . . . . . . 7
Unpacking and Connecting . . . . . . . . .
What is in the box . . . . . . . . . . . . . . . . 8
Unpacking . . . . . . . . . . . . . . . . . . . . 8
Connecting the power supply . . . . . . . . . . 8
Connecting the goose neck microphone . . . . . 9
Connecting the Sirius to a stereo system . . . . . 9
Connecting the Sirius to a mixing desk . . . . . 10
Connecting the Sirius to an amplifier . . . . . . 10
Operating the Sirius with headphones. . . . . . 10
Getting started
Initialise and Calibrate . . . . . . . . . . . . . 12
Listening to Demo-Songs . . . . . . . . . . . . 12
A round trip on the front panel of your Sirius . . 14
Playing the Sounds of the Sirius . . . . . . . . . 20
How do I listen to the pre-programmed
patterns of the Sirius . . . . . . . . . . . . . . 21
The Synthesizer
Creating Sounds. . . . . . . . . . . . . . . . . 22
The Oscillator-Section. . . . . . . . . . . . . . 22
The Filter-Section . . . . . . . . . . . . . . . . 24
The Amplifier-Section . . . . . . . . . . . . . . 26
The Modulator-Section . . . . . . . . . . . . . 27
Pitch-Wheel and Hold-Pedal . . . . . . . . . . 28
Random-Sound . . . . . . . . . . . . . . . . . 28
Storing the Sound . . . . . . . . . . . . . . . . 29
Recall and Compare-Sound . . . . . . . . . . . 29
Overview of the Sound-Parameters . . . . . . . 30
. . . . . . . . . . . . . . . . 12
. . . . . . . . . . . . . . . 22
. . . . . . . . 4
Patterns, bars and Motifs . . . . . . . . . . . . 41
What is being saved in a Pattern? . . . . . . . . 42
The Song and its Steps . . . . . . . . . . . . . 42
Recording and Editing Motifs . . . . . . . . . . 42
Random Motifs . . . . . . . . . . . . . . . . . 43
Moving or Deleting User Memory Spaces . . . . 44
8
Realtime Recording . . . . . . . . . . . . . . . 45
Overdub Recording . . . . . . . . . . . . . . . 46
The Groove-Factor . . . . . . . . . . . . . . . 47
Quantisation . . . . . . . . . . . . . . . . . . 47
The Memory(Storage) Display . . . . . . . . . . 47
Recording drum-motifs with the drumgrid. . . . 48
The Step Sequencer for the Synthesizer-Parts . . 50
The Mixer-Settings . . . . . . . . . . . . . . . 52
Allocating the Sequencer Tracks. . . . . . . . . 53
Saving a Pattern . . . . . . . . . . . . . . . . . 54
Patterns in a Live-Performance . . . . . . . . . 54
The Number-Keys or ‘Pads’ . . . . . . . . . . . 55
The favourite Patterns . . . . . . . . . . . . . . 55
The Breaks . . . . . . . . . . . . . . . . . . . 55
The Special-Loop-Tracks. . . . . . . . . . . . . 55
Mute und Transpose Tracks . . . . . . . . . . . 56
A Song develops . . . . . . . . . . . . . . . . 57
To Store a Song . . . . . . . . . . . . . . . . . 58
Playing a Song . . . . . . . . . . . . . . . . . 59
The Arpeggiator
The Selection of manufactured
arpeggio-types . . . . . . . . . . . . . . . . . 60
The Arpeggiator-Freeze-Function . . . . . . . . 61
Programming the Arpeggiator . . . . . . . . . . 61
How to use the Gater und the Chord Trigger? . . 64
Saving the Arpeggiator-Settings . . . . . . . . . 65
Free-programmable-arpeggiator-pattern. . . . . 65
How to record the arpeggiator into
the intern sequencer . . . . . . . . . . . . . . 68
. . . . . . . . . . . . . . . 60
The Percussion-Sets
Overview of the Sound and Setup Parameters. . 32
The Write-Menu
Storing/Saving . . . . . . . . . . . . . . . . . . 34
The Quick-Save Function . . . . . . . . . . . . 35
Save Patterns . . . . . . . . . . . . . . . . . . 35
Save Songs . . . . . . . . . . . . . . . . . . . 36
Save Arpeggio-Motions . . . . . . . . . . . . . 36
Initialise Sounds. . . . . . . . . . . . . . . . . 37
Initialise Patterns . . . . . . . . . . . . . . . . 37
Initialise Songs . . . . . . . . . . . . . . . . . 37
Copying Motifs . . . . . . . . . . . . . . . . . 38
Momentary Dump . . . . . . . . . . . . . . . 38
Sound-Dump . . . . . . . . . . . . . . . . . . 38
Song-Dump . . . . . . . . . . . . . . . . . . . 38
All-Dump . . . . . . . . . . . . . . . . . . . . 38
The Sequencer
What is a Sequencer and how does it work? . . 40
. . . . . . . . . . . . . 31
. . . . . . . . . . . . . . . . 34
. . . . . . . . . . . . . . . . 40
The Beat-Recognition-System
How does the Beat-Recognition-System work . . 70
Operating the Beat-Recognition-System. . . . . 70
Connection to a Mixing Desk . . . . . . . . . . 71
For difficult cases: The Beat-Offset . . . . . . . 73
External Synchronization of additional units . . . 73
The Effects
How to direct the Parts of the Sirius
to the two Effect processors? . . . . . . . . . . 74
The Effect processors of the Sirius . . . . . . . . 74
The Effect processor FX1 . . . . . . . . . . . . 74
The Effect processor FX2 . . . . . . . . . . . . 75
The Sirius-Vocoder
Vocoder-Basics . . . . . . . . . . . . . . . . . 78
How does the Vocoder work?. . . . . . . . . . 78
Features of the Sirius-Vocoder. . . . . . . . . . 78
Starting immediately? . . . . . . . . . . . . . . 79
. . . . . . . . . . . . . . . . . . 74
. . . . . . . . . . . . . . 78
. . . . . . . . 70
2
Page 3

Contents
Basic functions of the Vocoder . . . . . . . . . 82
Turning the Vocoder On and Off . . . . . . . . 82
Setting the volume of the Vocoder-sound . . . . 82
How can I select the different Basic programs? . 82
How can I select Analyze-signals and Carrier? . . 84
Using other external sound sources
for the Vocoder . . . . . . . . . . . . . . . . . 86
Changing the level of the individual
Vocoder tracks . . . . . . . . . . . . . . . . . 87
How does the Filter Bank work?. . . . . . . . . 88
How can I set Effects and Pan? . . . . . . . . . 89
The Vocoder Menu . . . . . . . . . . . . . . . 90
Where are the Vocoder settings stored? . . . . . 92
Configuration Diagram of the Vocoder . . . . . 93
The System Menu
Master-Transpose . . . . . . . . . . . . . . . . 94
Master-Tune . . . . . . . . . . . . . . . . . . . 94
MIDI-Master-Channel. . . . . . . . . . . . . . 94
Local-Off . . . . . . . . . . . . . . . . . . . . 95
MIDI-Synchronization. . . . . . . . . . . . . . 96
Send- and Receive Functions . . . . . . . . . . 96
SysEx-Speed. . . . . . . . . . . . . . . . . . . 98
Poti-Snap . . . . . . . . . . . . . . . . . . . . 98
Poti-Info. . . . . . . . . . . . . . . . . . . . . 98
Track-Mute . . . . . . . . . . . . . . . . . . . 99
Beat-Input . . . . . . . . . . . . . . . . . . . 99
. . . . . . . . . . . . . . . 94
Appendix . . . . . . . . . . . . . . . . . . 120
List of Wave-Macros . . . . . . . . . . . . . . 120
List of Percussion Instruments . . . . . . . . . 121
List of Drum Sounds . . . . . . . . . . . . . . 122
List of Synth-Sounds . . . . . . . . . . . . . . 124
List of MIDI-Controllers . . . . . . . . . . . . 126
The System Exclusive Data formats of the Sirius 127
Sirius MIDI-Implementation chart . . . . . . . 133
Diagramatic Overview of the Edit Menus . . . 134
Button combinations. . . . . . . . . . . . . . 136
Special Functions and short selection . . . . . 137
Problems and answers . . . . . . . . . . . . . 138
Hotline . . . . . . . . . . . . . . . . . . . . 139
Initializing of the Sirius and calibration of the
controllers . . . . . . . . . . . . . . . . . . . 140
INDEX . . . . . . . . . . . . . . . . . . . . . 141
Warranty definitions . . . . . . . . . . . . . . 149
Technical Data . . . . . . . . . . . . . . . . . 150
The Sirius and MIDI
MIDI? What on earth that? . . . . . . . . . 100
Connecting MIDI-Gear . . . . . . . . . . . . 100
Examples of MIDI-Connections to the Sirius . . 101
Sirius and Computer . . . . . . . . . . . . . . 103
MIDI-Problems and Solutions . . . . . . . . . 107
Changing Sound banks and Sound programs
with MIDI . . . . . . . . . . . . . . . . . . . 108
Data-Dumping-Storing your Data! . . . . . . . 110
How to Data-Dump . . . . . . . . . . . . . . 110
How does the Data-Dump get back to the
Sirius? . . . . . . . . . . . . . . . . . . . . . 112
The Sirius and Cubase
Synchronisation of the Sirius to Cubase . . . . 113
Recording Sirius-Pattern and -Songs into an
external Sequencer . . . . . . . . . . . . . . 116
Saving and storing
What is stored and where it is stored? . . . . . 118
. . . . . . . . . . . . . 100
is
. . . . . . . . . . . 113
. . . . . . . . . . . . . 118
QUASIMIDI Musikelektronik GmbH
Bahnhofstr. 44
35282 Rauschenberg
Tel: 06425/93000
Fax: 06425/930093
3
Page 4
The lightning flash with arrowhead symbol, within an
equilateral triangle, is intended to alert the user to presence of uninsulated "dangerous voltage" within the product's enclosure that may be of suf ficient magnitude to
constitute a risk of electric shock to persons.
The exclamation point within an equilateral triangle is
intended to alert the user to the presence of important
operating and maintanance (servicing) instructions in the
literature accompanying the product.
INSTRUCTIONS PERTAINING TO A RISK OF FIRE, ELECTRIC SHOCK, OR INJURY TO PERSONS
IMPORTANT SAFETY INSTR
WARNING- When using electr ic products, basic precautions should alw ays be followed, including the following:
The power-supply cord of the product should be unplugged
Read all the intructions before using the product.
1.
Do not use this product near water - for example, near a
2.
bathtub, washbowl, kitchen sink, in a wet basement, or
near a swimming pool, or the like.
This product should be used only with a cart or stand that
3.
is recommended by the manufacturer .
This product, either alone or in combination with an
4.
amplifier and headphones or speakers, may be capable of
producing sound levels that could cause permanent hearing
loss. Do not operate for long period of time at a high
volume level or at a level that is uncomfortable. If you
experience any hearing loss or ringing in the ears, you
should consult an audiologist.
The product should be located so that its location or position
5.
does not interfere with its proper ventilation.
The product should be located away from heat sources
6.
such as radiators, heat registers, or other products that
produce heat.
Avoid using the product where it may be affected by dust.
7.
The product should be connected to a power-supply of the
8.
type described in the operating instructions or as marked
on the product.
9.
from the outlet when left unused for a long period of time.
Do not tread on the power -supply cord.
10.
Do not pull the cord but hold the plug when unplugging.
11.
When setting up with any other instruments, the procedure
12.
should be followed in accordance with instruction manual.
Care should be taken so that objects do not fall and liquids
13.
are not spilled into the enclosure through openings.
The product should be serviced by qualified service
14.
personnel when:
The power-supply cord or the plug has been damaged;
A.
or
Objects have fallen, or liquid has been spilled into the
B.
product; or
The product has been exposed to rain; or
C.
The product does not appear to operate normally or
D.
exhibits a marked change in performance; or
The product has been dropped, or the enclosure
E.
dammaged.
15. Do not attempt to service the product beyond that described
in the user -maintanance instructions. All other servicing
should be referred to qualified personnel.
UCTIONS
SAVE THESE INSTRUCTIONS
The CE-Sign on our products declares that our electr ical devices are in conformity with the EN 55014 and
2
EN 50082-1(in accordance with 89/336 EMC- and EEC dir ective). The manuf acturer also declares the
conformity of above mentioned product with the actual required safety standards.
Page 5

Important Notes
In addition to the "IMPORTANT SAFETY INSTRUCTIONS" on the previous
page please note the following:
Connecting to the Mains:
Do not connect the unit to a socket which is already feeding other units that can cause interference (for
instance electricmotors, lightcontrols, fridges etc.)
The heatgenerated bythe mains adapteris completelynormal.
-
Whenever you intend toconnect theSirius to otherunits, firstturn off all units. Thiswill preventpossible
malfunctions anddamage tospeakers and otherequipment.
Installation:
Using the unit close to heavy power sources (or other units containing larger mains transformers) can
cause "humming"or otherelectrical interference.
The unit might cause disturbances to television and radio. Do not set up your unit near any of these re-
ceivers.
Do not expose the unit to extreme temperatures (like for instance direct sun light in a closed vehicle or
extreme frostin winter).The unit couldbe damagedor the varnishon thecasing might disintegrate.
Maintenance:
To clean the unit wipe it with a soft, dry or damp cloth. To remove persistent stains you can use a damp
cloth anda neutralcleaning agent. Wipethe unit dryafterwards.
Never use Petrol, Thinner, Alcohol or similar cleaning agents to clean your unit. These can dissolve the
markings andvarnish andmight deface thecasing.
Repairs and Data:
Please remember that you might lose the memory of your unit when you send it in for repair. Important
information should therefore be stored on a different MIDI-unit (for instance Sequencer). Although every care is taken when repairing your unit it can happen, especially when work to the storage/memory
or affiliated groups is necessary,that informationis lost. Please notethat itis notpossible for us to restore
lost data.
See page 110
5
Page 6

Important Notes
Storage Protection:
-
The memory of the unit is secured with a Lithium battery (CR 2025). The storage contents will remain
even when the unit is switched off. Depending on how it is treated, the battery will last for several
years. Should you have to exchange it, please contact our Service-Department. Please make sure that
the old batteries are disposed of properly. Batteries of all kinds do not belong in the domestic trash, as
they containdangerous heavymetals.
Additional precautions:
-
See page 110
Please consider that the storage contents can also be irrevocably lost through mal-function or improper
use. Important data should therefore be stored regularly on another MIDI-unit (for instance a sequencer)
-
For these caseswe point outthat itis not possibleto restorelost data.
-
Treat the keys and dials as well as the connection sockets with care - improper use can lead to mal-
functions.
-
Never pressor hitthe buttons orthe displayhard.
-
Whenever you are connecting or unconnecting cables, always pull the plug itself,do not pull the cable.
This will avoid short-circuitsand cabledamage.
-
Should you wish to transport the unit, it is best to use the original carton (including the polystyrene inlays)
The CE-Sign on our products declares that our electrical devices are in conformity with the
EN 55014 and EN 50082-1 (in accordance with 89/336 EMC- and EEC directive). The
manufacturer also declares the conformity of above mentioned product with the actual
required safetystandards.
6
Page 7
Introduction
Introduction:
Dear Sirius-owner,
With the Sirius you have acquired a very user-friendly synthesizer. In the past, you had to spend a
lot of money on many different types of equipment before you could create and record an entire musical composition. This is a fact which we paid a lot of attention to when designing the Sirius. To this
end, we have combined several exciting machines into one all-purpose unit.
In the Sirius you will find everything you need to write and record your own music: a sequencer, a
drum computer, 3 polyphonic synthesizers,
an arpeggiator, a vocoder, a beat-recognition system and even two effects units. The Sirius is therefore a complete and compact studio for very little expense.
It does not matter whether you are a newcomer or have advanced knowledge of such musical instruments. The unit has been designed with user-friendliness as a priority, enabling everyone to reach
their desired musical goals fast! The flexibility of the Sirius guarantees endless pleasure and surprises.
Be it the versatile connection possibilities of the integrated vocoder or the brilliant real time possibilities of the filter and arpeggiator stages, the Sirius will definitely inspire the creative and experimental
sound designing side in everyone who uses it. The Sirius is programmed for endless fun!
You will soon realise that the Sirius, with its many useful functions and simplicity of operation, is the
perfect partner in your day to day musical life. Naturally we have devoted a lot of thought to live performance as well, and have equipped the Sirius with numerous possibilities for real time operation
and management. Your audience will be thrilled.
In order to get to know your Sirius as fast as possible you should work through this manual step by
step and try out the individual functions directly on the machine (learning by doing). Not only will
this save you a dry and dusty week of reading, it will also guarantee that you miss none of the exciting functions available to you.
But enough talk!
Everyone here in the Quasimidi Team wishes you lots of fun working with your new synthesizer.
Tip
This symbol points out the numerous tips you
will find in this manual.
!
Text marked with this symbol should be paid
particular attention to.
!
Caution:
The use of the Sirius preset motifs and patterns for your own music production is granted only to
Quasimidi Sirius owners.
The commercial distribution of Sirius preset-sound and preset-pattern samples on Sampling-CD,
Internet, Disc or any other media without permission of the Quasimidi-Musikelektronik GmbH is
strictly prohibited.
We would like to thank Stefan Skaliks for the friendly support on the Beta-Test.
Copyright © 1998 QUASIMIDI-Musikelektronik GmbH
7
Page 8
Unpacking and connecting
What is in the box
The box in which the Sirius is delivered contains the following parts:
!
Unpacking:
Caution:
ing.
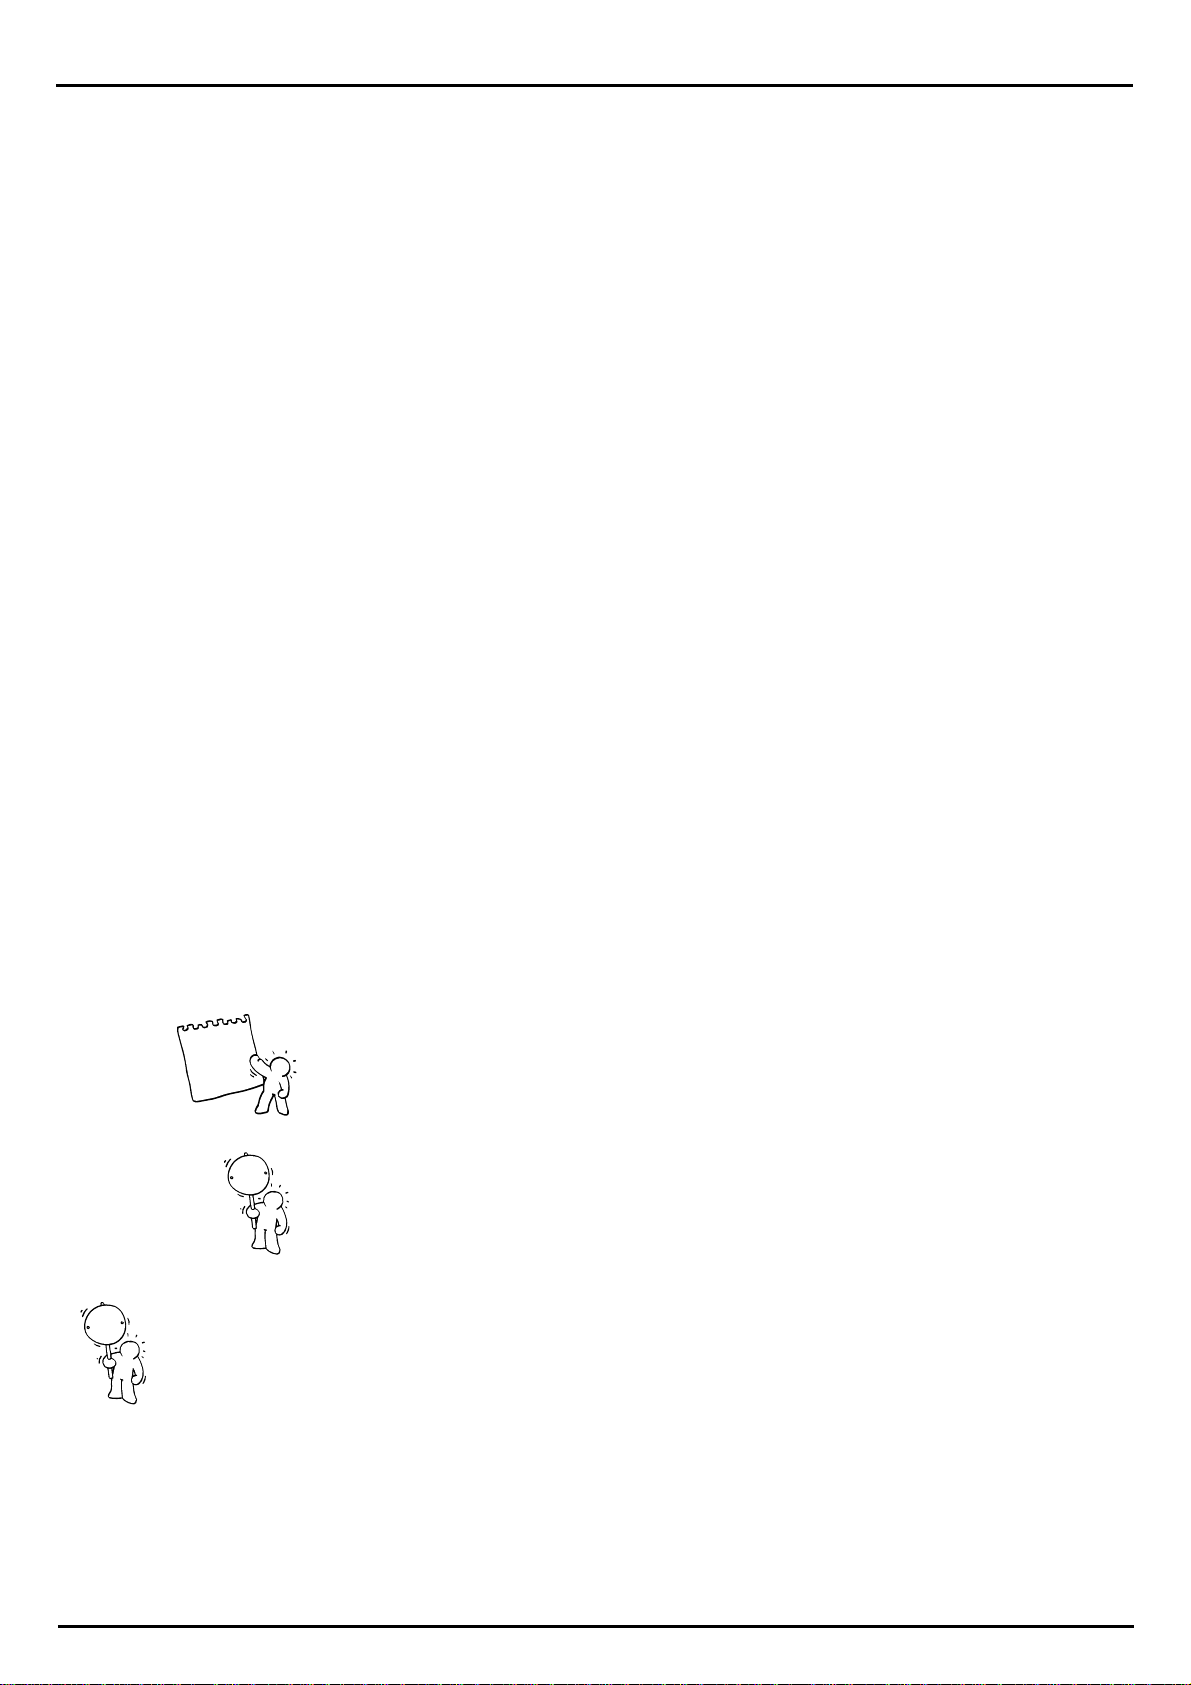
The Sirius is secured in the packing with polystyrene moulded inlays. Take the Sirius together with
these polystyrene moulded inlays out of the box and put it on an even surface. Caution - the mains
adapter is packed in a small cardboard box located in a hollowed-out section in the side of one of
the polystyrene inlays. After you have removed the mains adapter you can then carefully take off the
polystyrene inlays and take the Sirius out of the plastic bag. Now you can install the Sirius in its future place of work.
Do not use a knife or any other sharp metal object when removing the Sirius from its pack-
?
- the Sirius
- the external mains adapter
- this manual
- a guarantee registration form
- 1 goose neck microphone
- 2 jack-jack audio cables
- 2 jack-phono(RCA) adapters
external mains adapter
!
Important:
transport the Sirius, you won´t have any packing problems. In the unlikely event of a repair, the
Sirius should be sent to Quasimidi in its original packaging. Should Quasimidi receive a unit for repair without the original packaging, QUASIMIDI will return the repaired unit in replacement packaging at the owner's expense, as only this packaging can guarantee safe transport. Transport damages
due to improper packaging will not be compensated by QUASIMIDI.
The box in which the Sirius is delivered is ideal for transportation. Should you wish to
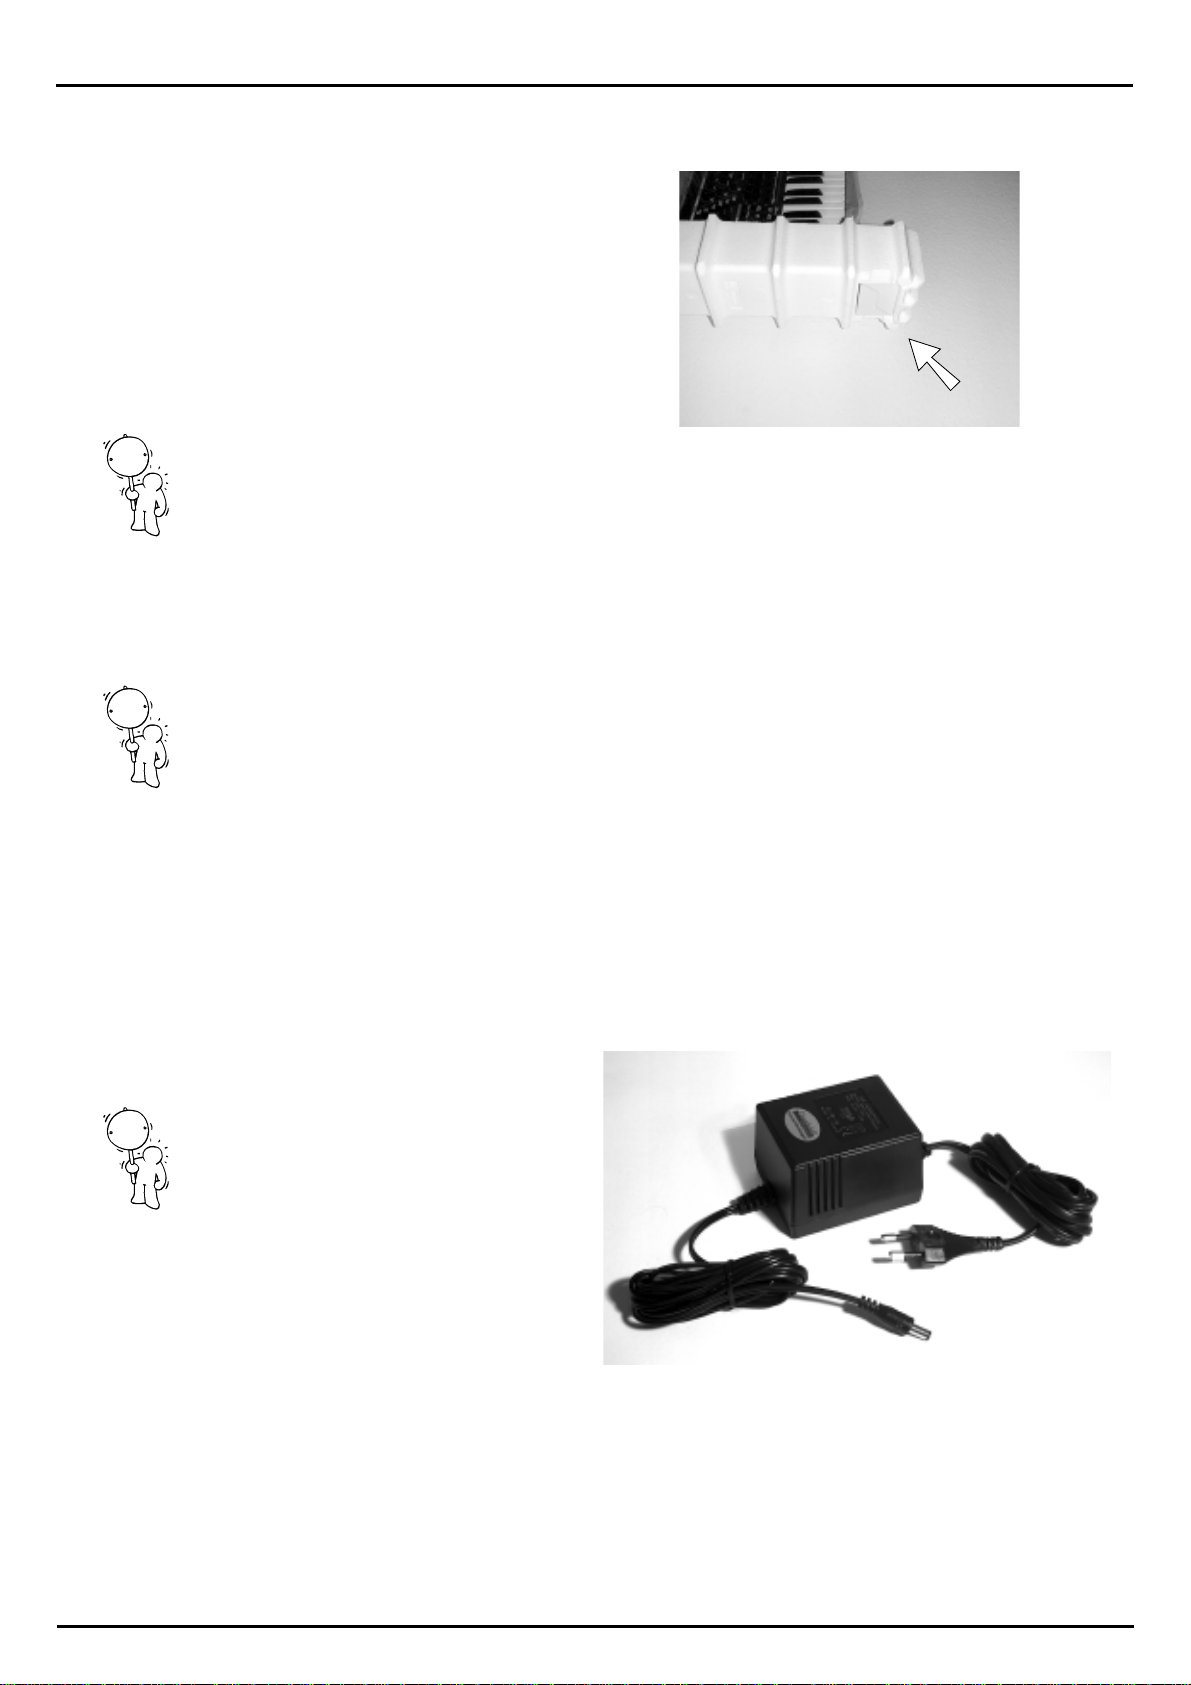
Connecting the mains adapter:
Remove the mains adapter from the box. Plug the big plug into the mains socket. Plug the small plug
at the other end of the cable into the power supply socket, protruding slightly from the rear panel of
the Sirius and located immediately next to the
on/off switch. It is marked as follows:
10,5V DC, 1,5 A
!
Caution:
provided only for running your Sirius. Only this
adapter guarantees both perfect functioning
and damage protection of the Sirius.
Please use the original mains adapter
!
What else do you need to get going?
In order to hear the Sirius you will need an amplifier. Several appliances can be used: Stereo Systems with auxiliary inputs, Mixers connected to an Amplification system, Instrument Amplifiers or
simply Headphones. The respective cables are included with the Sirius. The enclosed jack-jack cables can be used with the usual mixers or instrument amplifiers. The jack-phono(RCA) adapters allow
a problem-free connection to a stereo system (provided it has auxiliary inputs such as CD, AUX, DAT
etc.) or to any other DJ-Mixer.
8
Page 9

The Rear Panel
2
Unpacking and connecting
MIDI-INAUDIO-LEFTCARRIER-IN ANALYSE-IN GAIN MIDI-OUTAUDIO-RIGHT MIDI-THRUFOOTSWITCH
10,5V DC / 1,5 A
POWER
ON / OFF
Carrier-input
for the Vocoder
alternative inputs
for the Beat-Recognition-System
Analyse-input
for the Vocoder
with a Gain-knob
Connecting the goose neck microphone:
First plug the enclosed goose neck microphone into the XLR input which is located at the top right of
the front panel of the Sirius.
How do I connect the Sirius?
On the back of the Sirius you will find two 6,3mm (1/4") jack sockets, the stereo output pair. These
sockets are marked audio-left and audio-right. The amplifier, stereo system or mixing desk will be
connected to these outputs. You will need a mixing desk if you wish to run other instruments apart
from the Sirius through the amplifier or stereo system. The 5-pin din sockets which you will also find
on the rear panel are for the transmission of MIDI information and do not output any audio signal
(sound). A more detailed explanation of the MIDI-connections can be found in the chapter called:
"The Sirius and MIDI".
The following is a detailed description of how to connect the Sirius to the three types of audio equipment we have already mentioned. A detailed connection plan can also be found on the page after
next (Page 11):
to amp or mixer
Footswitch
connection
copy
of the
MIDI-IN
MIDI-keyboard
or computer
power
supply
See page 100
1.) Connecting the Sirius to a stereo system:
First turn off your stereo system and the Sirius. You will need the two enclosed jack-jack cables and
the two jack-phono(RCA) adapters to make this connection. Not all of the auxiliary inputs at the rear
of your stereo amplifier are suitable for connecting the Sirius. Choose one of the following possibilities:
1.) AUX or Auxiliary
2.) LINE
3.) CD
4.) DAT
5.) TAPE IN or TAPE PLAY
Totally unsuitable for the connection of the Sirius is the PHONO input of your stereo amplifier, as
this input has a pre-amp and is constructed for your record player. This input would distort the sound
of the Sirius.
Put the two jack cables in the AUDIO-LEFT/RIGHT socket of the Sirius. Connect the jackphono(RCA) adapters to the other end of the cables. Now you can connect the cables to the stereo
amplifier.
Turn the volume dial of the stereo and the MASTER-VOLUME dial of your Sirius to minimum. Now
first switch on the Sirius and then the stereo system. Turn the input selector on your stereo amplifier
to the input you chose when connecting the Sirius. Now turn the MASTER VOLUME dial of the
Sirius to Maximum. Press the START-Key of the Sirius (located in the SEQUENCER section on the
front panel) to start a sequence. Carefully turn up the volume of your stereo system to the desired
level. In order to avoid damage to your speakers due to the deep bass frequencies the Sirius is able
to create you might have to lower the bass level on your stereo amplifier.
9
Page 10

Unpacking and connecting
2.) Connecting the Sirius to a mixing desk:
If you are connecting the Sirius to a mixing desk you must use the LINE INPUTS. The microphone inputs of most mixing desks are unsuitable for connection to the Sirius - the high output level will
cause distortion. Most microphone inputs are also equipped with XLR sockets which are only very
rarely used for connecting instruments. (By the way, the microphone input on the front panel of the
Sirius is a XLR socket.)
Before you attempt to make any audio connections turn all your equipment off. Then connect the
two audio outputs of the Sirius (AUDIO-LEFT/RIGHT, located on the rear panel) to two of the inputs
on the mixing desk. Turn the MASTER-VOLUME control of the Sirius to maximum and the GAINCONTROL (sometimes referred to as "INPUT SENSITIVITY") of the mixing desk to MINIMUM. The
TONE CONTROL (or "EQUALISATION") of the mixing desk should be in the same position on both
channels. You are best-off choosing a neutral setting for the tone control / equalisation (if possible,
the tone control or equalisation should be switched out) so that the sound of the Sirius will not be
changed.
The pan control of the two channels should be set to the exact opposite of each other:
left channel -> hard left, right channel -> hard right) in order to hear true stereo. Should your mixing desk have stereo inputs, these settings are already made.
Slide the stereo mix faders of the mixing desk back to MINIMUM.
Now turn on first the Sirius and then the mixing desk. Press both the demo Keys of the Sirius at the
same time (located below the large round VALUE/TEMPO-dial on the right of the front panel) and
chose a demo song using one of the Number-Keys marked 1-16, which you will find directly above
the Keyboard.
Set the Gain control of the mixing desk so that the level showing on the channels' individual level meters is below the peak level (if the meters are "in the red", the level is too high and distortion will occur!). If your mixing desk does not have individual level meters for each channel, turn up the stereo
mix faders (master level faders) of the desk so you are able to hear any distortion which may be occurring and turn down the GAIN control accordingly. Instead of a gain control some desks only give a
choice between LINE and MIC sensitivity. In this case turn the input selector to LINE. Should even
the smallest gain setting of the mixing desk result in distortion, turn down both the MASTERVOLUME and OVERBLAST controls on the Sirius respectively. Generally you should always choose
the highest possible setting of your sound source (in this case the Sirius) and turn down the mixing
desk accordingly to achieve the optimum sound to noise ratio. Once the mixing desk been calibrated to the Sirius you can set the stereo mix faders of your mixing desk to your preferred setting.
3.) Connecting the Sirius to an amplifier:
Should you wish to connect your Sirius to an instrument or Keyboard amplifier you should firstly turn
all the equipment off. Then connect the Sirius' audio outputs (AUDIO-LEFT/RIGHT, located on the
rear panel) to the audio inputs of your amplifier.
Turn the volume control and, if there is one, gain control on your amplifier to minium and the MAINVOLUME control on the Sirius to maximum. Switch on the Sirius first and then the amplifier.
On the Sirius press both demo Keys simultaneously (they are located on the right of the front panel
directly below the large round VALUE/TEMPO- dial) and choose a demo song from the NumberKeys 1-16, which you will find directly above the Keyboard. Carefully adjust the gain control of the
amplifier to just below the level where distortion occurs. Then adjust the overall volume of the amplifier to the desired setting.
4.) Operating the Sirius with headphones:
!
The Sirius has a headphone output on the far right of the front panel.
Caution:
in permanent damage to your hearing.
In this case it is necessary to see a doctor.
The headphones should have an impedance of at least 32 ohm.
Should you use headphones please note that extensive blasting of your eardrums can result
10
Page 11
Unpacking and connecting
Now you're almost there!. You may have noticed that on the rear panel of your Sirius there are additional sockets. There is another 6,3mm (1/4") jack socket for a foot pedal and three MIDI sockets: IN,
OUT and THRU.
The Sirius is able to communicate with any other MIDI device via these MIDI sockets. You can for example connect a MIDI Keyboard, a sound expander, a MIDI sequencer or a computer with Midi sequencing software etc.
MIDI allows you to control your Sirius from other midi devices or to control other midi devices from
your Sirius. You can also dump all the information in the Sirius' memory onto a computer where it
can then be saved onto a disk or hard drive in case the Sirius' internal memory should prove too
small for you.
An important point which is unfortunately very often misunderstood:
MIDI transmits control information only from one MIDI device to another. It does not transmit any
audio signal (sound). Should you have several devices connected to each other via MIDI you will still
have to connect the audio outputs of each device to an amplifier or mixing desk separately. You will
find more about connecting MIDI devices in the chapter called: "The Sirius and MIDI".
In addition there are two more 6,3 mm (1/4") jack sockets marked CARRIER-IN and ANALYSE-IN on
the rear panel of your Sirius. These sockets can be used to run the Vocoder of the Sirius with an external sound source (for example drum computer, synthesizer, sampler etc.) Either of the two sockets
can also be used to carry the trigger signal for the beat-recognition system. A detailed description can
be found in the relevant chapter of this manual.
See page 100
See pages 70, 78
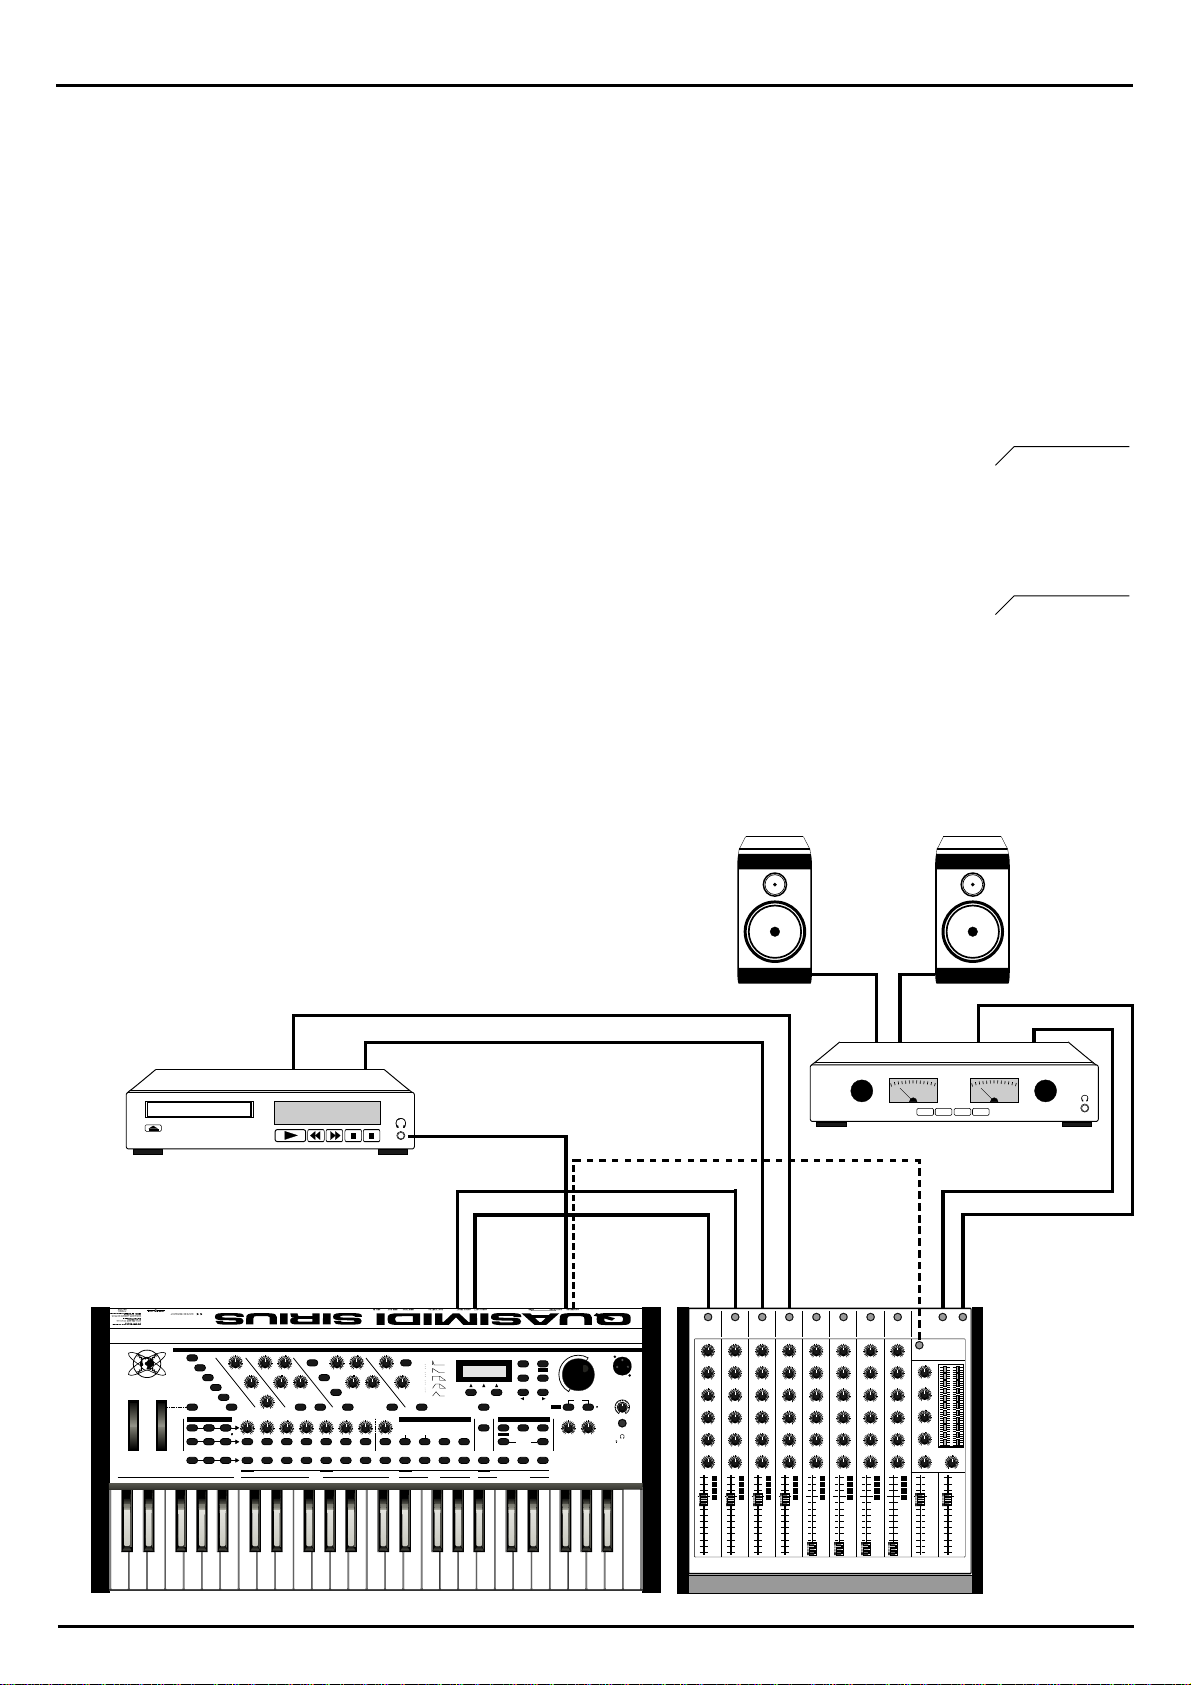
This diagram shows you how to connect the audio section of the rear panel
of your Sirius. The two audio outputs (AUDIO-LEFT/RIGHT) are connected to
the inputs of two adjacent channels on your mixing desk . In order to keep
the stereo quality of the Sirius the pan control of these channels should be
set to opposite positions i. e. channel 1 hard left, channel 2 hard right.
Should your mixing desk consist of stereo channels, no such setting of the
panorama will be necessary.
In order to work with the beat-recognition system the signal from the CD
player has to get to the CARRIER-input or the ANALYSE-input of the Sirius.
The simplest solution is to connect the headphone output of the CD player to
the CARRIER-IN or ANALYSE-IN. This enables the Sirius to receive the trigger
signal even when the CD-player has been muted on the mixing desk. Better
mixing desks offer the possibility to send the trigger signals of the CD player
via the AUX-sends or EFFECT-sends. This connection is also recommended if
the CD-player does not have any headphone output or if you want to use a
record player (with pre-amplifier) as the trigger source.
R OUTPUT L
CD-Player
CATEGORIES
MODULATOR OSCILLATORS RESONANCE-FILTER
NATURAL
BASS-
DRUMS
SOUNDS
DIRTY
DIRTY
NATURAL
BASS
ELECTRONIC
PAD-
DRUMS
SIRIUS
MODULATION
PITCH
BEND
TRACK-MUTING
BD SNARE HIHAT PERC. SYNTH 1 SYNTH 2 SYNTH 3
SOUNDS
909-TYPE
808-TYPE
MOD.-WHEEL
ASSIGN
DRUM-SFX
MIXER 11CHANNELVOCODER SEQUENCER
LEVEL
PANORAMA FX1/FX2
PART
PART
SELECT
MUTE
WHEEL
SOUND
PATTERN
SELECT
SELECT
MOD.MACRO
PLUCKED
SOUNDS
SOLOSOUNDS
EFFECTSOUNDS
PART/SEQ.
KICK/BD
TO MIDI
SONG
SELECT
CD-1 02:35
LPF 24 dB RELEASE
WAVE-
GLIDE
MACRO
MOD.DEPTH
MOD.-
RATE
SNARE HIHAT
12
CUTOFF ENV.-MOD VCA
LPF 12 dB
DETUNE FILTER-
3 4 5 6 7 8 9 10 11 12 13 14 15 16
Q-FACTOR VCF-EG
OVERDRIVE
HPF 12 dB
KEY-TRACKINGOCTAVE-UPOCTAVE-DOWN VCF-DYN. VCA-DYN. RANDOM-SOUND
PERCUSSION
SYNTH 1 SYNTH 2 SYNTH 3 VOCODER
PATTERN BREAK SPECIAL LOOPTRACKS
PHONES
T
-RIGHT
-LEF
AUDIO
AUDIO
EG-MACROS PHONETISCHERSPEKTRALTRANSFORMATOR
AMPLIFIER
0
32
LEVEL
64
96
VCA-EG
MACRO
MACRO
127
PRESS BUTTON
FOR SOUND-CREATION
HOLD BUTTON AND
SELECT PART
ANALYSE CARRIER CARRIER-EXT. MICRO.
RECORD
ARPEG.
ON/OFF
HOLD
TO
SELECT
REW
EDIT WRITE
RECALL EXIT
START
SONG-STEP
PAGE/BANK
DEMO
SHIFT
TAP-
TEMPO
STOP
SPECIAL-LOOP
OVERBLAST
TRACK-FADER
FWD
SIRIUS
by QUASIMIDI
YSE-IN
or
CARRIER-IN
ANAL
VALUE
TEMPO
MICROPHONE
CONNECTOR
MASTER
VOLUME
AUDIO
SYNC
SYNC.
EXTERN
PHONES
32 OHM32OHM
Amplifier
IN IN IN IN IN IN IN IN
R Input LSpeaker
VU VU
-SEND
-/EFFECT
AUX
LR
MAIN-OUT
AUX-SEND
11
1234
5 6 7 8
LR
MIX
Page 12

Getting started
Initialise and Calibrate:
Now that you have connected your Sirius properly you are probably itching to hear it. Before you
switch it on for the first time you should however initialise it and calibrate the performance aids for
safety reasons. The memory of the Sirius will be deleted and all parameters will revert to their original settings.
(In future you will only have two reasons to initialise your Sirius: 1. When the Sirius Service Department tells you to do so or, 2. If you want to reset the Sirius to its original factory settings.)
When you turn on the Sirius for the first time you should hold down the WRITE-Key and turn on the
POWER ON/OFF switch on the rear panel.
The following message will appear on the display:
Now press the left-hand Key under the display (F1-Key) to confirm, and your Sirius will be initialised.
This procedure is shown on the display by a status bar. Once the initialisation is complete the Sirius will
ask youto calibratethe pitch-bend andthe modulationwheels. The displayshows thefollowing:
Initialize All?
[ok] [cancel]
Set Wheels-> min
[OK] [cancel]
Now turn the modulation wheel down all the way and hold the pitch-bend wheel at its lowest position.
Press theleft Key underthe display(F1-Key). The following messageappears:
Set Wheels-> MAX
[OK]
Repeat this procedure by bringing the wheels to their highest position. Again confirm with the F1-Key.
This willbring youto a testmenu. Hereyou can testif thecalibration was successful.
Wheels-Test: 64
[OK] [retry]
When the pitch-bender is released it should show 64, its top setting 127, the lowest 0. The modulation
wheel shouldshow 0in its lowestposition (at the bottom)and 127in its highestposition (at the top).Confirm onceagain bypressing the left-handKey below thedisplay (F1Key). The Sirius isready to go.
NB: Should the calibration not show the desired result you can repeat the procedure by pressing the
right-hand Key under the display (F3-Key)
Listening to Demo-Songs:
In order to sweeten the reading of this manual we have given the Sirius 16 Demo-Songs. 40 minutes
of music of different musical styles await you to give you a small insight into the sound possibilities of
the Sirius. All demo songs were exclusively programmed with the internal functions of the Sirius.
Why not listen to the pieces while you are studying the manual?
To hear the songs the Sirius has to be switched to demo-mode. Press both keys named DEMO below
the VALUE/TEMPO-dial control.
DEMO
TAP-
TEMPO
SYNC.
EXTERN
12
Page 13

Getting started
After pressing the two Keys the normal display of the Sirius says good bye with an elegant wave and
disappears to the right. The display now shows that the Sirius is in demo mode:
*** DEMO ***
1: Saturn
Now you only need to listen. The 16 Demo -Songs are played one after the other. After the last song
it will start again from the beginning. You can also choose the demo songs separately. Press any of
the Number-Keys 1-16 located directly above the Keyboard. To make it easier to choose, here is a
short description of each demo-song:
1.) Saturn:
2.) VOC Grov:
3.) Danceflr:
4.) Hip&Funk:
5.) Tricky:
6.) Elektro1:
7.) AlienJam:
8.) Elektro2:
9.) Prodigy:
A driving song with clear Drum & Bass and jungle elements.
An unusual name for this sparse groove. Please note that the rhythmic synth line is
bubbling directly from the vocoder.
This song takes you directly to the disco. With the Sirius your songs should find
their way into the charts too.
A Song proving that QUASIMIDI-instruments do not only produce "Techno". This
demo song has already thrilled the American audience at the NAMM-SHOW ‘98
in Los Angeles and increased demand for the Sirius in the US!
House-heavy track with a strong stress on the Off-Beat and interesting filtersweeps.
Kraftwerk did not have the advantage of owning a Sirius 20 years ago. Now they
do!!
Not really from this world. Although only at a modest pace of under 130 BPM this
Goa-number with house influence will push your legs to the limit. Pay attention to
the clever use of the vocoder.
And because it was so fabulous, another bit of Kraftwerk.
This demo-song's name speaks for itself. Boxed up break-beats, off the wall synths
and a lot of effects give it an essential drive.
10.) Oldschol:
11.) DanceNow:
12.) Atmosphe:
13.) Tetsuo:
14.) VocodeX:
15.) SpaceAce:
16.) Motivate:
To exit the demo-mode press the EXIT-Key on the top right of the display.
A demo for the nostalgic people amongst the synthesizer brotherhood. In the past
this was known as "The Berlin School".
Commercial dance number. Here there is only a vocal line missing to bring it to
chart success. Be our guest - do one yourself!
Modern, synthetic sound structures with a light ambient-touch.
Driving but still melodic Dancefloor-demo with a memorable refrain.
Another Dance-demo processed by the vocoder.
Several parts of an experimental electronic session with trance elements and some
Phatt-beats.
A trip round the current club scene: a bit of trance, some house, some acid and
the techno soup bubbling away...
13
Page 14
Getting started
DETUNE FILTER-
OVERDRIVE
Q-FACTOR VCF-EG
MACRO
VCA-EG
MACRO
MOD.DEPTH
MOD.-
MOD.-
MACRO
WAVEMACRO
GLIDE
LPF 24 dB RELEASE
0
32
64
96
127
LPF 12 dB
HPF 12 dB
FOR SOUND-CREA
CUTOFF ENV.-MOD VCA
LEVEL
LEVEL
PART
PART
PART/SEQ.
PANORAMA FX1/FX2
SNARE HIHAT PERCUSSION SYNTH 1 SYNTH 2 SYNTH 3 VOCODERKICK/BD
MIXER
SOUND
SELECT
PATTERN
SELECT
SONG
SELECT
1 2 3 4 5 6 7 8 9 10 11 12 13 14 15 16
HOLD BUTTON AND
SELECT PART
ANALYSE CARRIER CARRIER-EXT. MICRO.
11CHANNELVOCODER
PAGE/BANK
RECALL EXIT
EDIT WRITE
REW
START
SONG-STEP
STOP
FWD
SEQUENCER
RECORD
32 OHM32OHM
SPECIAL-LOOP
TRACK-FADER
OVERBLAST
VOLUME
TAP-
TEMPO
DEMO
SYNC.
EXTERN
AUDIO
SYNC
PHONES
UMS
BASSSOUNDS
DIRTY
TURAL
DIRTY
BASS
ELECTRONIC PAD-
SOUNDS
909-TYPE
PLUCKED
SOUNDS
808-TYPE
SOLOSOUNDS
UM-SFX
EFFECTSOUNDS
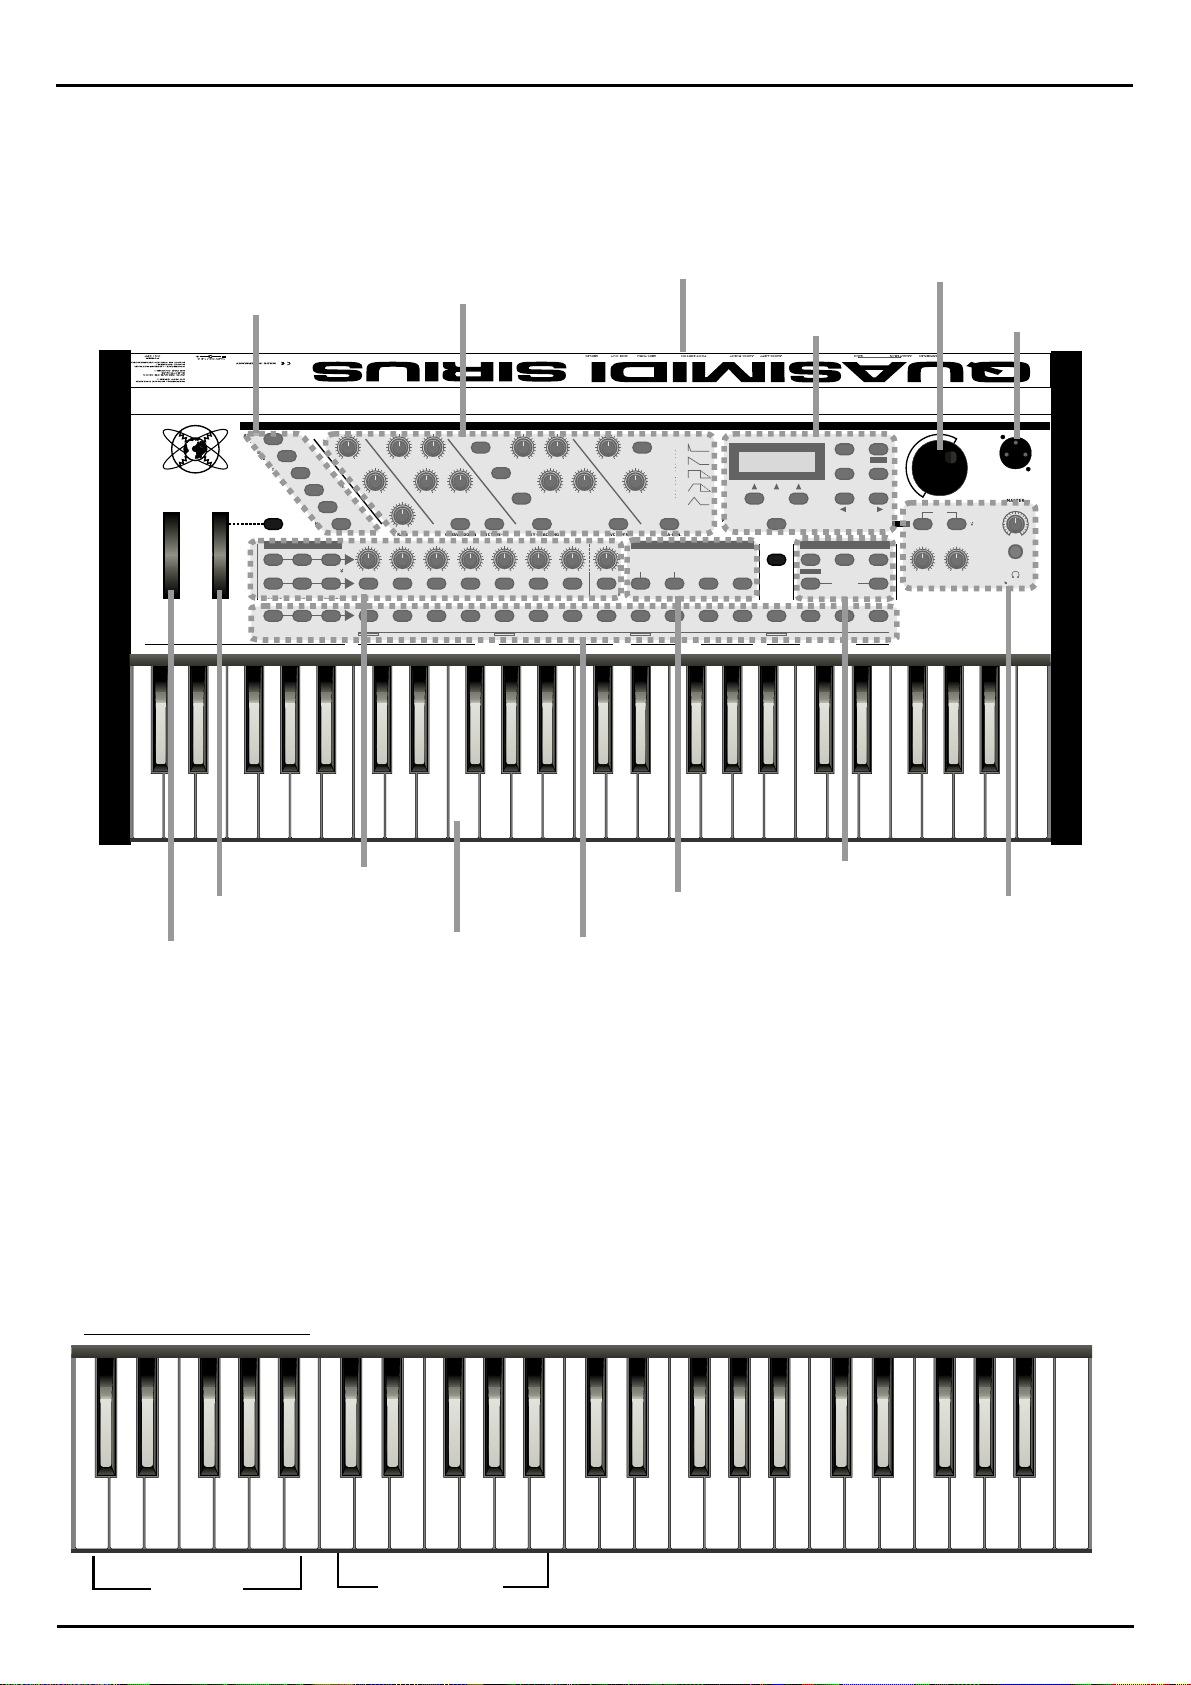
A round trip of the front panel of your Sirius:
The individual control panels on the front panel of the Sirius are clearly divided. The following diagram gives you an overview of the most important functions of the Sirius.
Sound type / categories
CATEGORIES
NATURAL
DRUMS
DIRTY
NATURAL
SIRIUS
MOD.-WHEEL
ASSIGN
MODULATION
PITCH
WHEEL
BEND
TRACK-MUTING
BD SNARE HIHAT PERC. SYNTH 1 SYNTH 2 SYNTH 3
MODULATOR OSCILLATORS RESONANCE-FILTER
BASS-
SOUNDS
DIRTY
BASS
ELECTRONIC
PAD-
DRUMS
SOUNDS
909-TYPE
808-TYPE
DRUM-SFX
MIXER 11CHANNELVOCODER SEQUENCER
LEVEL
PANORAMA FX1/FX2
PART
PART
PART/SEQ.
SELECT
MUTE
SOUND
PATTERN
SELECT
SELECT
Synthesizer-Section
MOD.-
WAVE-
MACRO
MACRO
PLUCKED
SOUNDS
MOD.-
DEPTH
SOLO-
SOUNDS
EFFECT-
SOUNDS
MOD.-
RATE
SNARE HIHAT
KICK/BD
TO MIDI
SONG
12
SELECT
Socket for foot switch
Edit section with display
AMPLIFIER
LPF 24 dB RELEASE
GLIDE
DETUNE FILTER-
OVERDRIVE
3 4 5 6 7 8 9 10 11 12 13 14 15 16
CUTOFF ENV.-MOD VCA
LPF 12 dB
Q-FACTOR VCF-EG
HPF 12 dB
KEY-TRACKINGOCTAVE-UPOCTAVE-DOWN VCF-DYN. VCA-DYN. RANDOM-SOUND
PERCUSSION
SYNTH 1 SYNTH 2 SYNTH 3 VOCODER
PATTERN BREAK SPECIAL LOOPTRACKS
LEVEL
MACRO
EG-MACROS PHONETISCHERSPEKTRALTRANSFORMATOR
0
32
64
96
VCA-EG
MACRO
127
PRESS BUTTON
FOR SOUND-CREATION
HOLD BUTTON AND
SELECT PART
ANALYSE CARRIER CARRIER-EXT. MICRO.
ARPEG.
ON/OFF
SELECT
RECORD
HOLD
TO
REW
VALUE /TEMPO-dial
EDIT WRITE
RECALL EXIT
SHIFT
TAP-
TEMPO
SPECIAL-LOOP
TRACK-FADER
DEMO
OVERBLAST
START
SONG-STEP
PAGE/BANK
STOP
FWD
SIRIUS
by QUASIMIDI
Microphone input
VALUE
TEMPO
MICROPHONE
CONNECTOR
MASTER
VOLUME
AUDIO
SYNC
SYNC.
EXTERN
PHONES
32 OHM32OHM
Modulation wheel
Pitch-Bend Wheel
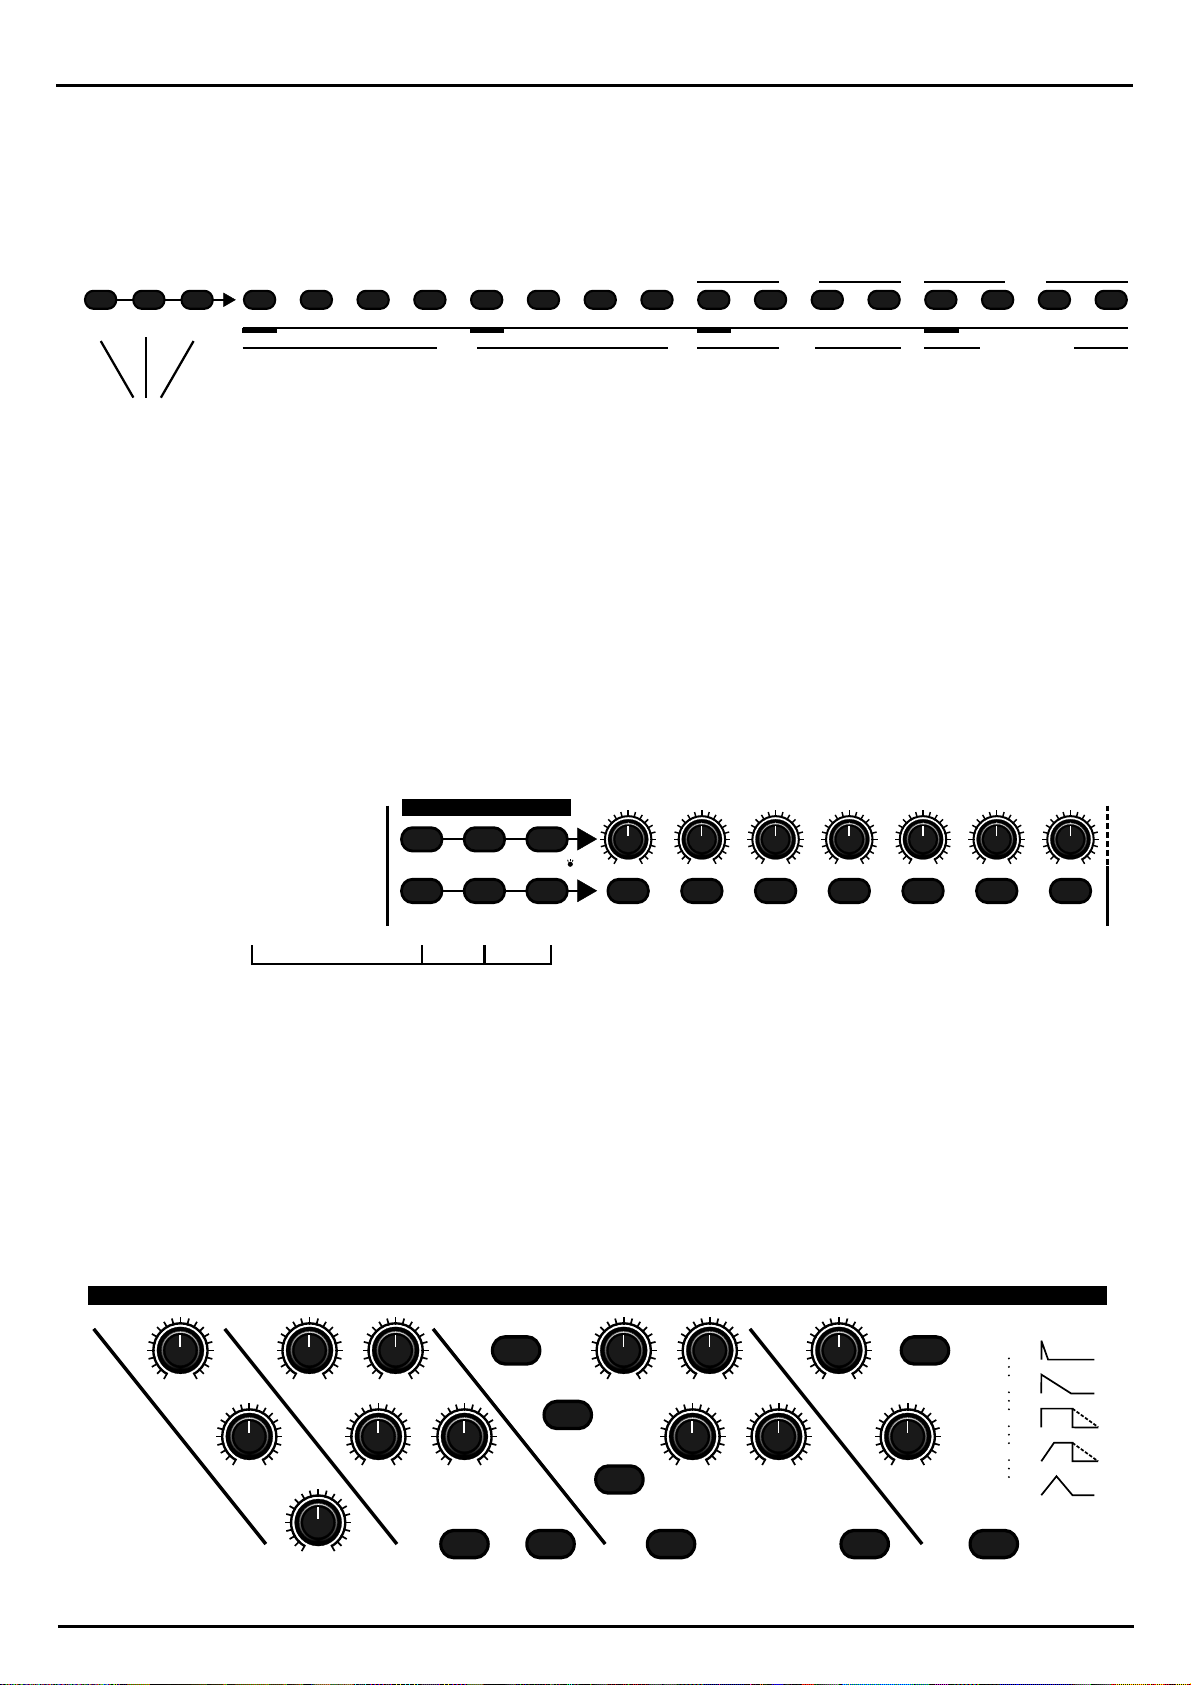
The elements and sections in detail:
As the diagram above is only a rough guide we would like to briefly introduce the individual elements and sections separately . A detailed description of the grouped functions like the Vocoder, the
Sequencer or the Synthesizer can be found in the relevant chapters in this manual.
The Keyboard:
The Keyboard is mainly used to play notes on the synthesizer. You also have the possibility to mute
individual tracks and to transpose a whole pattern (changing the overall musical Key of the pattern).
These functions are available on the first two octaves of the Keyboard.
TRACK-MUTING
BD SNARE HIHAT PERC. SYNTH 1 SYNTH 2 SYNTH 3
Mixer-Section
Keyboard
Vocoder-Section
Number-Keys
Sequencer-Panel
Master-Section
Mute
Transpose
14
Page 15
Getting started
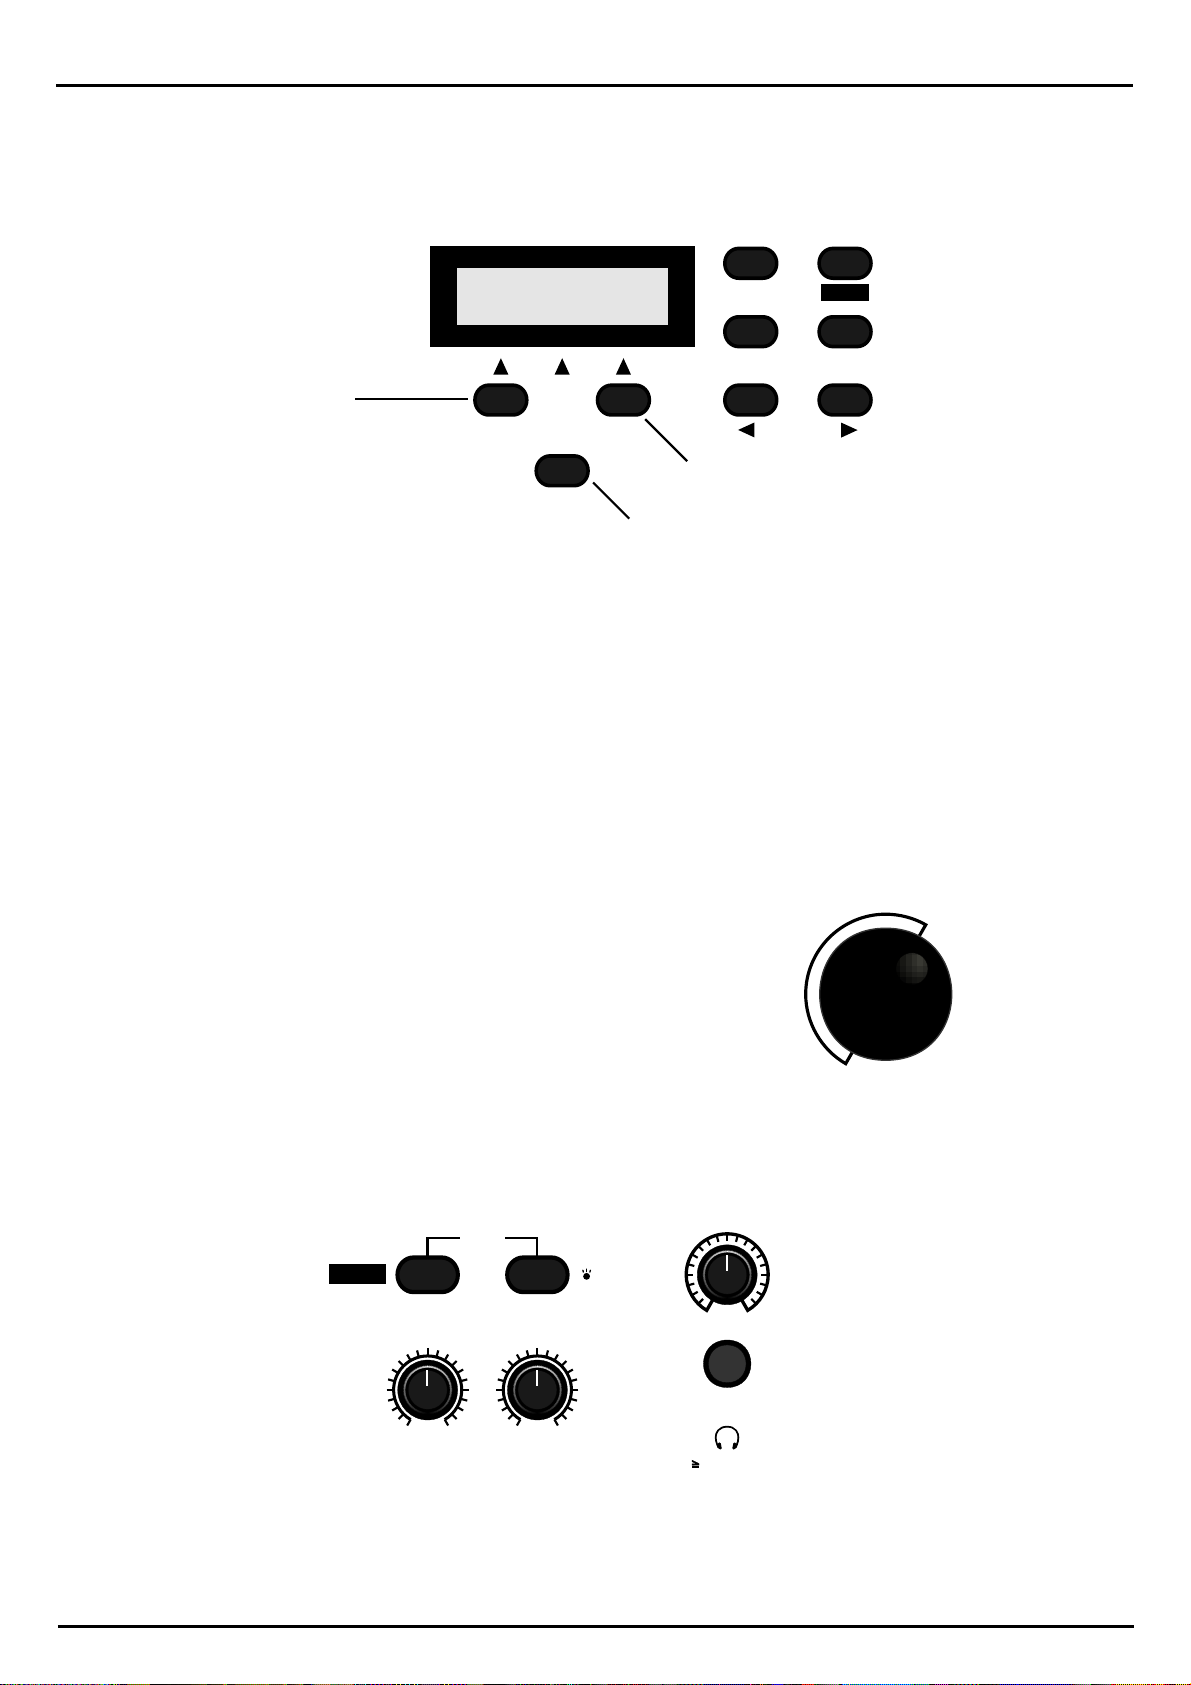
The Edit Panel and Display Panel:
The Display Panel is for communication with the Sirius. It contains the display and the Keys which
enable you to move around the display's menus.
S I R I U S
EDIT WRITE
by QUASIMIDI
RECALL EXIT
F1-Key
PRESS BUTTON
FOR SOUND-CREATION
F3-Key
RANDOM-SOUND
PAGE/BANK
F2-Key
The three Keys below the display will now be referred to in this manual as the F1, F2 and F3 Keys.
Depending on which menu has been chosen, these Keys perform different functions. If there is no
edit or write menu shown on the display, the F2-Key activates the RANDOMIZE-mode which creates
new sounds with an intelligent random-algorithm.
The EDIT-Key opens the edit menu of the Sirius. The WRITE-Key opens the WRITE -menu of the
Sirius in which all memory and Init functions can be found. The RECALL-Key recalls the original version of an edited sound. The EXIT-Key quits the edit menu you were just working in. The
PAGE/BANK-Keys allow you to scroll through the pages in the edit menu. In addition you can chose
from the Sound libraries of the Sirius with these Keys when you're not working in any of the edit
menus.
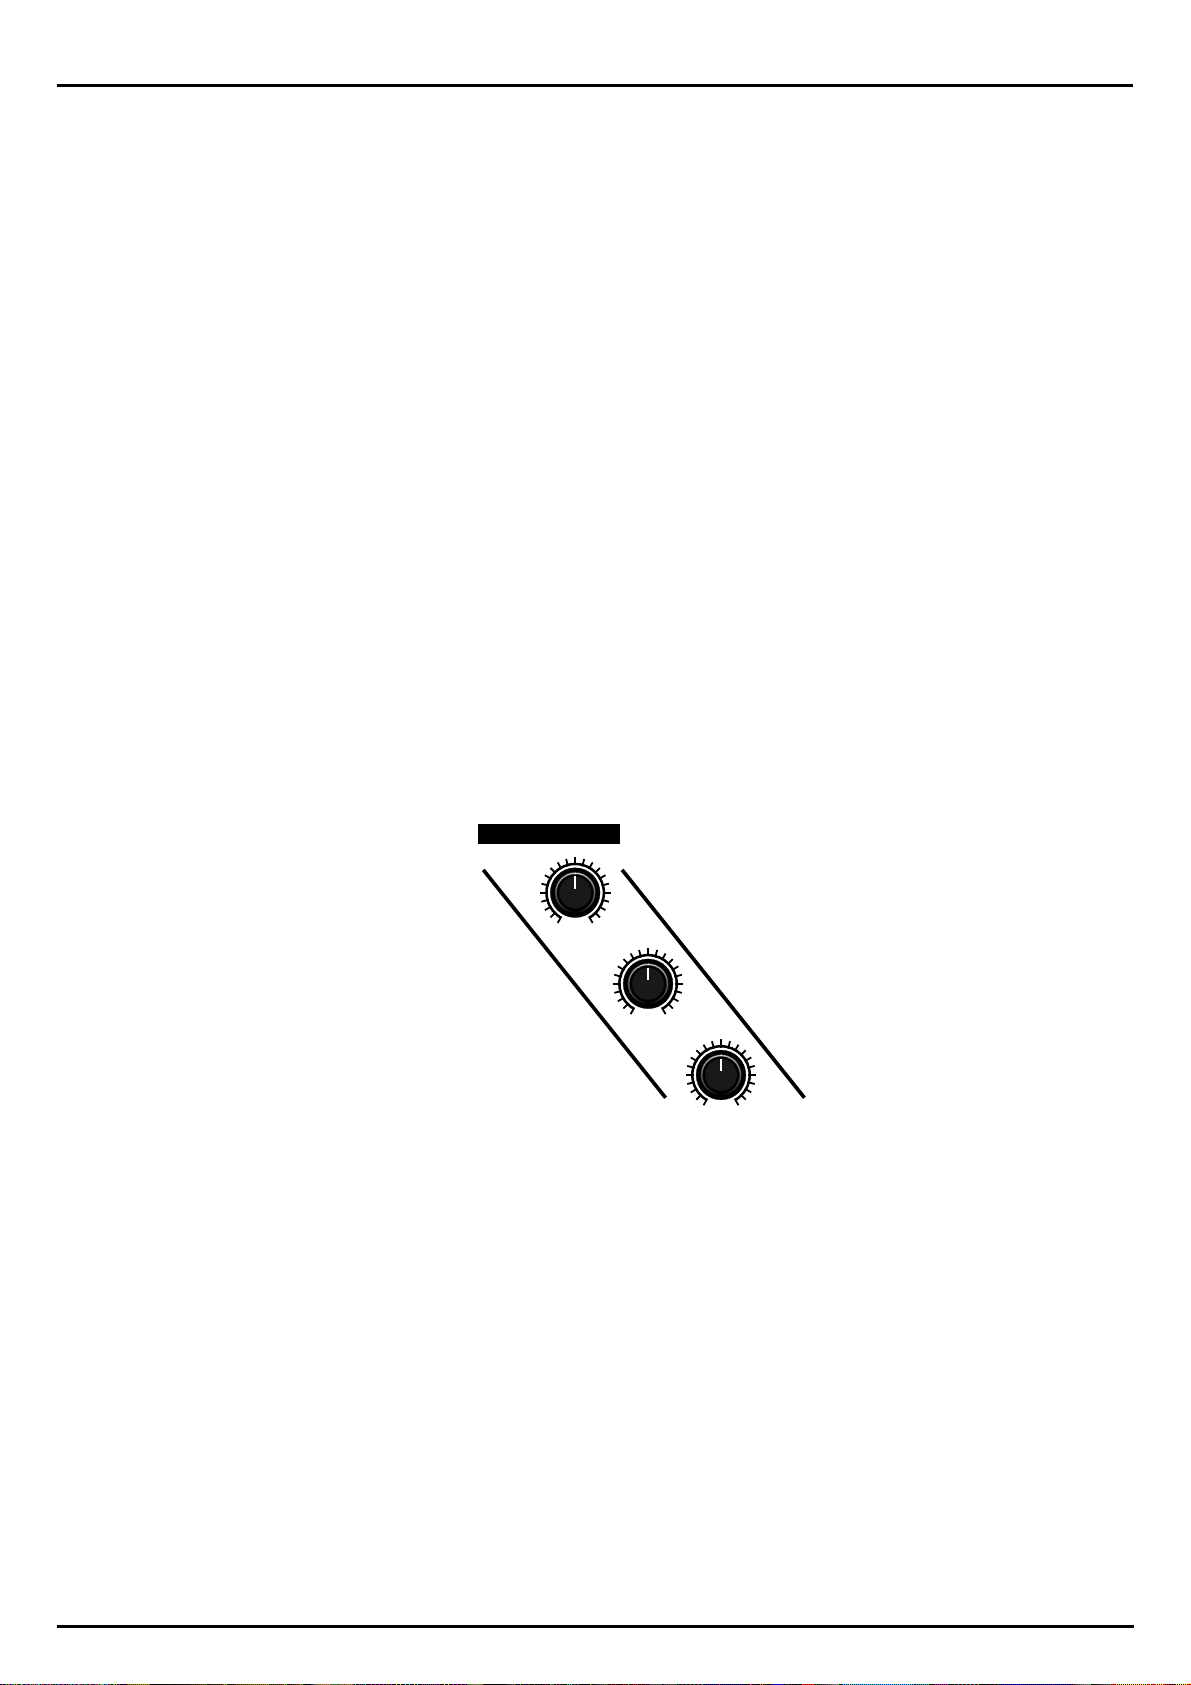
The VALUE/TEMPO-dial:
The VALUE/TEMPO-dial is a so called infinite dial control. With this control the values in the edit menus are changed. It is also used to change
the tempo of the sequencer.
The Master-Section:
The master section holds functions which affect the Sirius as a whole.
MASTER
VOLUME
PHONES
32 OHM32 OHM
SHIFT
SPECIAL-LOOP
TRACK-FADER
TAP-
TEMPO
DEMO
AUDIO
SYNC
SYNC.
EXTERN
OVERBLAST
VALUE
TEMPO
The most important function is without doubt the MASTER-VOLUME control which adjusts the overall volume (output level) of the Sirius. Below this control you will find the headphone socket. The
headphone volume is also adjusted with the MASTER-VOLUME-control.
15
Page 16
Getting started
The control marked SPECIAL-LOOP TRACK-FADER allows you to adjust the volume of the specialloop tracks. When the Sirius is in Record mode you can adjust the volume of the metronome with
this control.
The OVERBLAST-control is located right next to it. It allows you to lift up the high (treble) and low
(bass) ends of the Sirius sounds. You could probably compare this function to the 'loudness' control
on most stereo systems. Above these two controls there are two Keys, both of which can perform
several functions.
See page 136
The SHIFT/TAP-TEMPO KEY serves first of all as a shift-Key. If you press it down you can perform
functions which do not have their own designated Key by using the other Sirius Keys . A list of these
functions can be found in the appendix of this manual. The TAP-TEMPO KEY allows you to adjust
the tempo or pace of the sequencer by tapping it four times at the desired tempo.
With the SYNC-EXTERN KEY you can select whether the Sirius is to be synchronised to an external
MIDI device or to an audio signal. When the Key is constantly lit the Sirius is waiting to be synchronised to an external MIDI device. When the Key is blinking you have activated the BEAT-RECOGNITION-SYSTEM and you can synchronise the Sirius to an audio signal.
When you press both Keys at the same time, the DEMO-mode of the Sirius will be activated. This
mode allows you to listen to the Demo-songs of the Sirius. In order to quit the demo-mode press the
EXIT-Key to the right of the display.
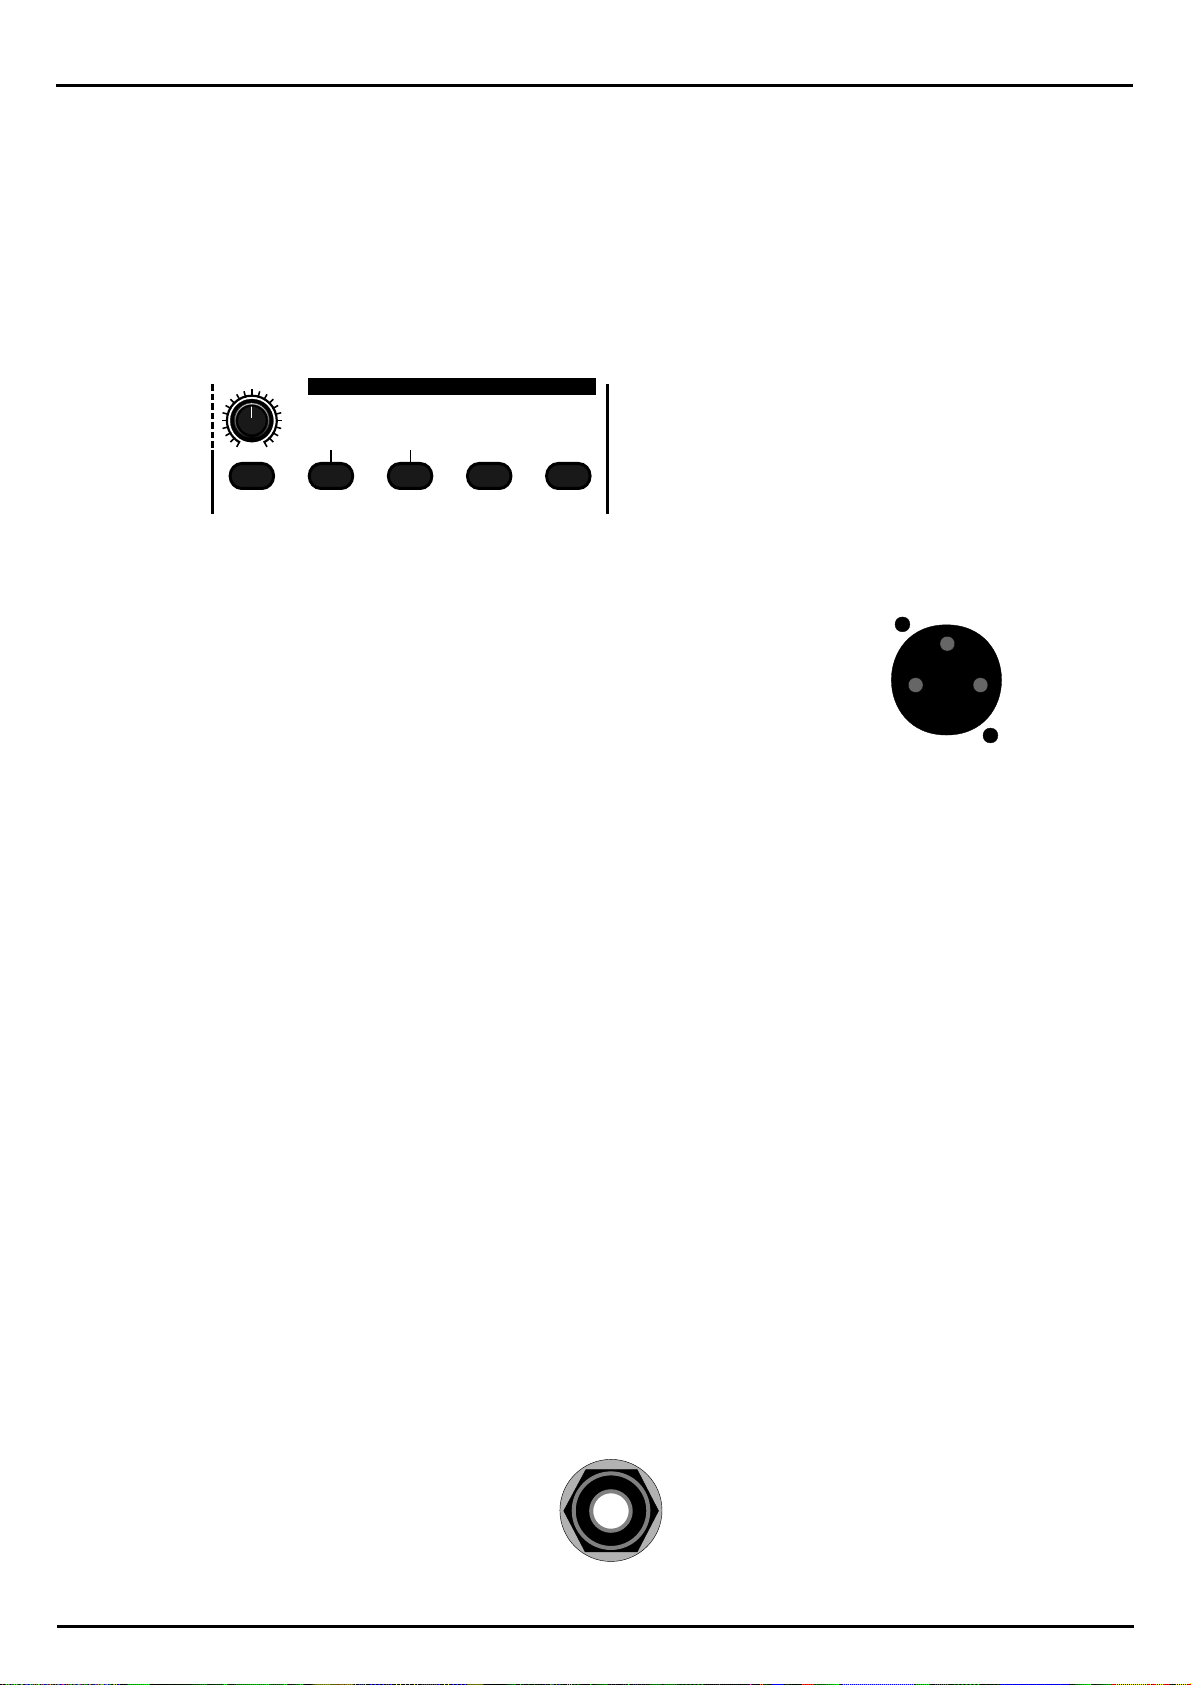
The Sequencer Panel:
The Sequencer panel controls the main functions for the sequencer. This panel will remind you of a
cassette deck and basically gives you the same functions: RECORD, START, STOP, REW and FWD.
SEQUENCER
RECORD
REW
START
SONG-STEP
STOP
FWD
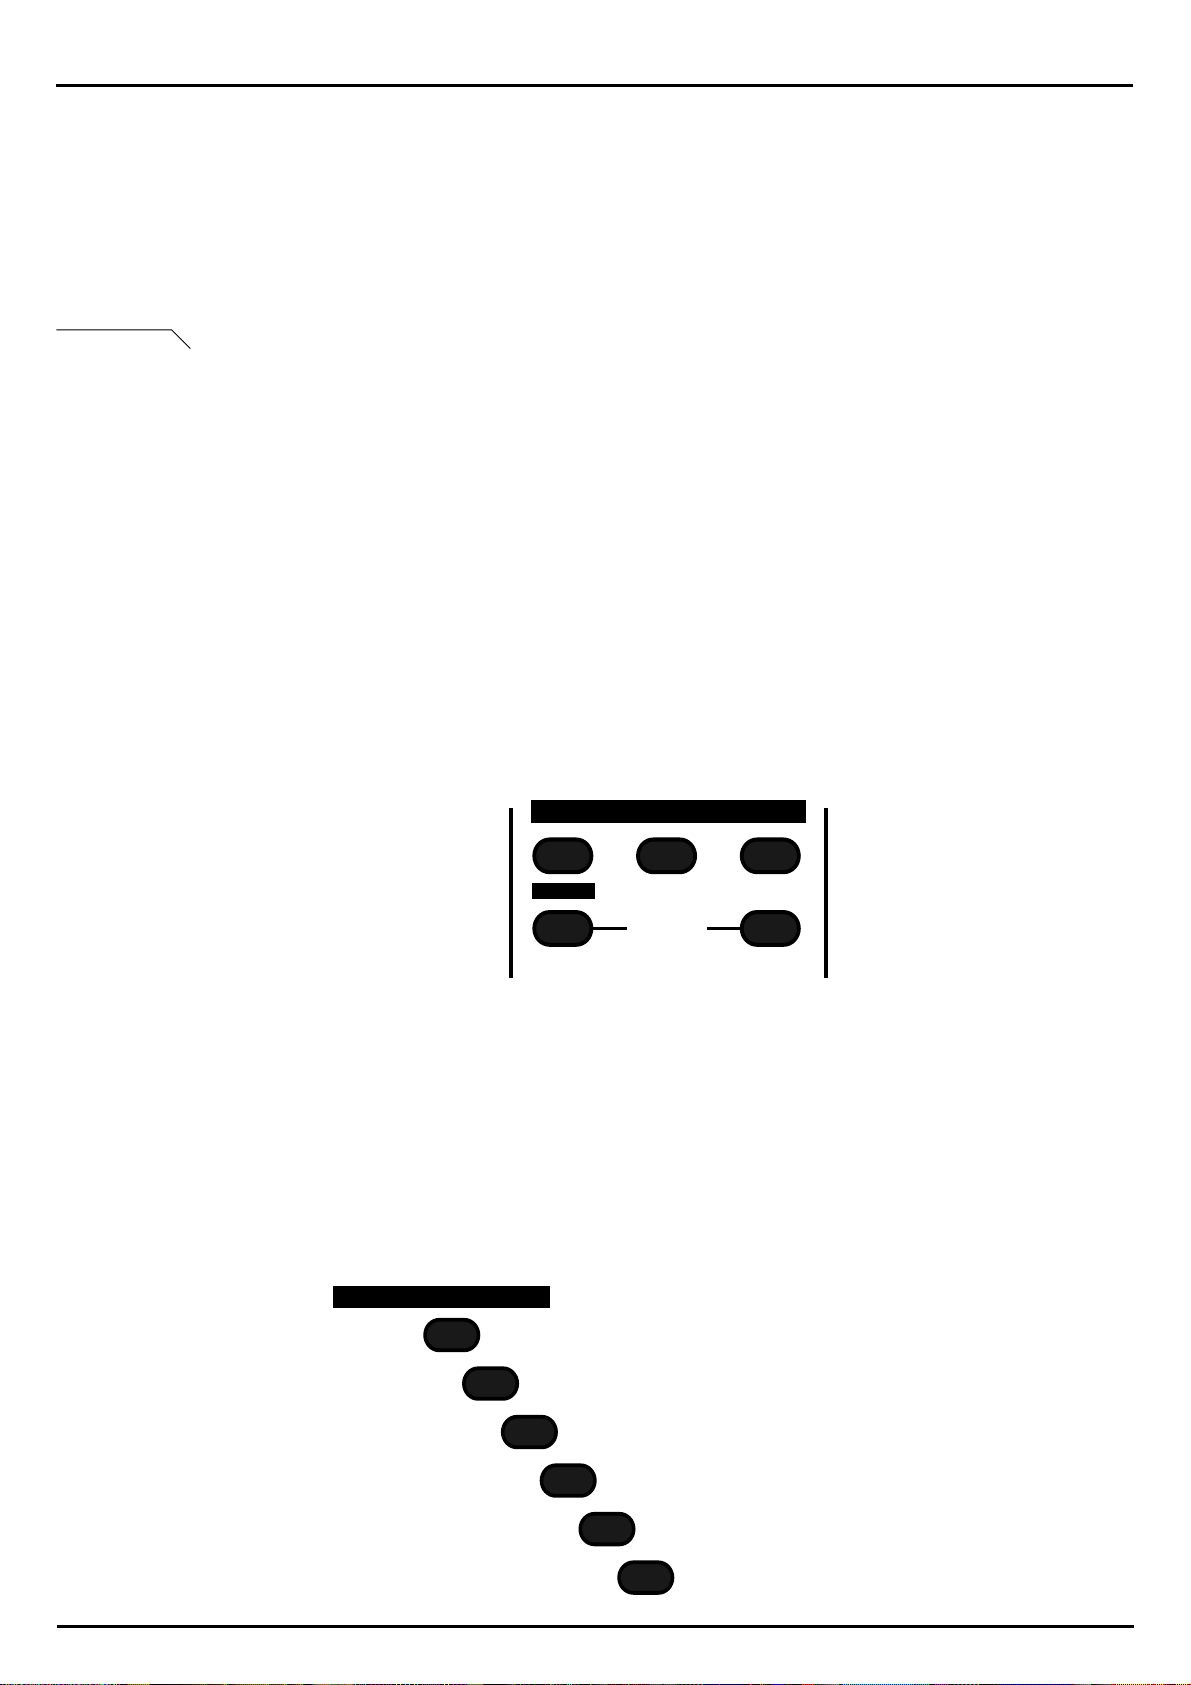
Choosing your sound from the Categories Section:
This section lets you select specific sounds from the sound categories provided. The original sounds
of the Sirius are already divided into specific categories of Sirius factory sounds. If, for example, you
would like to play wide sounds (Pads), simply press the PAD-SOUNDS Key. On the left of the Keys
you will find sound categories for your drum tracks (Parts 1-4), on the right you will find the sound
categories for the synthesizer tracks (Parts 5-7). Inside each of these sound categories there is a library of 16 sounds which you can choose using the number Keys 1-16 directly above the Keyboard.
As the Sirius offers several sound banks, each of these categories is available several times. The
PAGE/BANK-Keys in the edit section allow you to move from one bank of sounds to another.
CATEGORIES
NATURAL
DRUMS
DIRTY
NATURAL
ELECTRONIC
DRUMS
BASSSOUNDS
909-TYPE
808-TYPE
DIRTY
BASS
DRUM-SFX
PADSOUNDS
16
PLUCKED
SOUNDS
SOLOSOUNDS
EFFECTSOUNDS
Page 17
Getting started
The Number Keys:
The Number-Keys 1-16 directly above the Keyboard allow you to perform a number of different
tasks. The most important feature here is the ability to choose whether you want sounds, patterns or
songs. This choice is made by pressing one of the three selection Keys on the far left hand side. The
selection you have made is indicated by the lit Key.
SOUND
PATTERN
SELECT
SELECT
SONG
SELECT
12
With these three Keys you
decide what you want to
choose using the number
Keys.
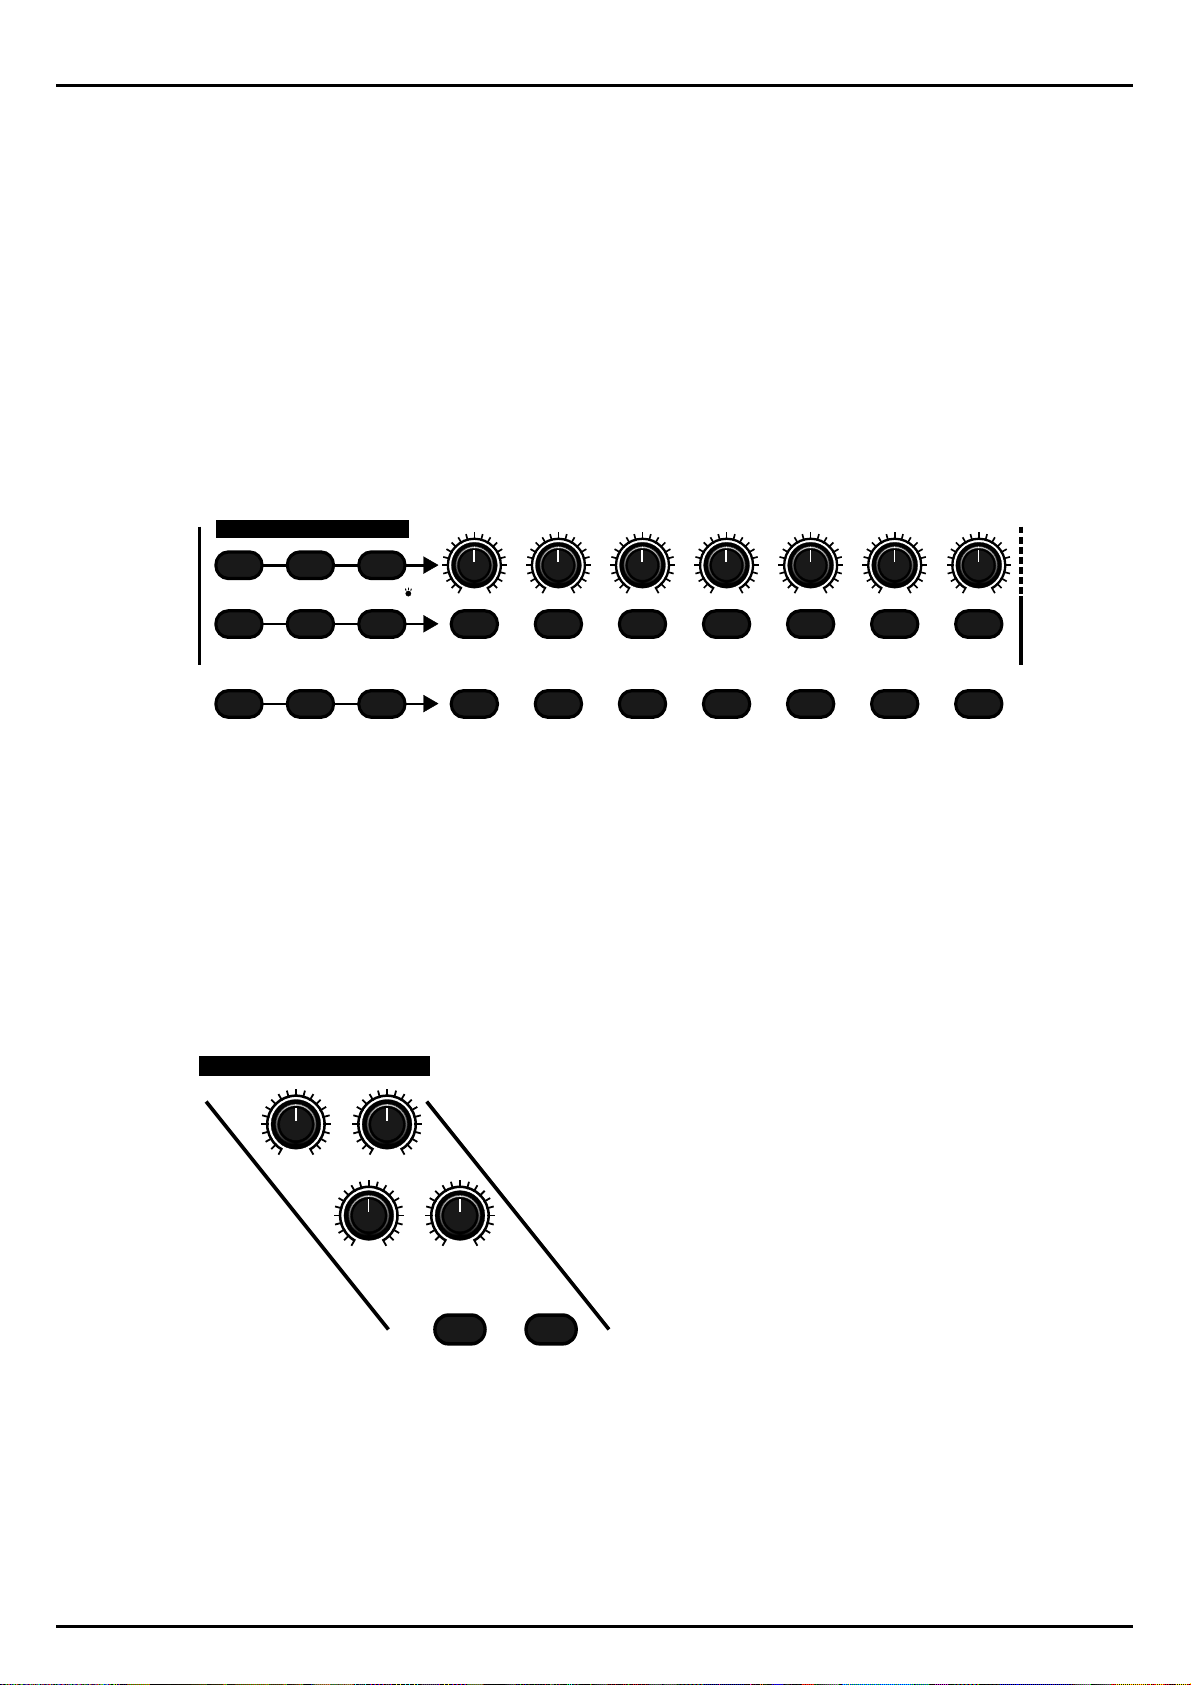
The Mixer Panel:
This section is not only built like a mixing desk but also works like one! Apart from the selection
block for the Part-Keys and Number-Keys, the mixer consists of seven dials above each Part-Key, each
dial with its respective Part-Key works as a pair. Each part (track) of the Sirius is controlled by one of
these pairs. The dial controls allow you to set the volume, the pan position as well as the value for
the FX-sends of a Part (track).
The row of Keys allows you to select the separate Parts of the Sirius in order to, for example, play
them on the Keyboard or to edit them. The Part-Keys also allow you to select individual parts/tracks
or to pass them on to an external MIDI device.
With these Keys you
select the functions which
are to be performed by
the mixer section
VELOCITY
3 4 5 6 7 8 9 10 11 12 13 14 15 16
PATTERN BREAK
GATE-TIME
SPECIAL LOOPTRACKS
You also need to use these Keys to enter notes in the Drumgrid Record-mode,
the Step Record-mode and the Arpeggiator, or to fly in breaks and special -looptracks.
MIXER
LEVEL
PANORAMA FX1/FX2
PART
SELECT
PART
MUTE
PART/SEQ.
TO MIDI
SNARE HIHAT PERCUSSION SYNTH 1 SYNTH 2 SYNTH 3KICK/BD
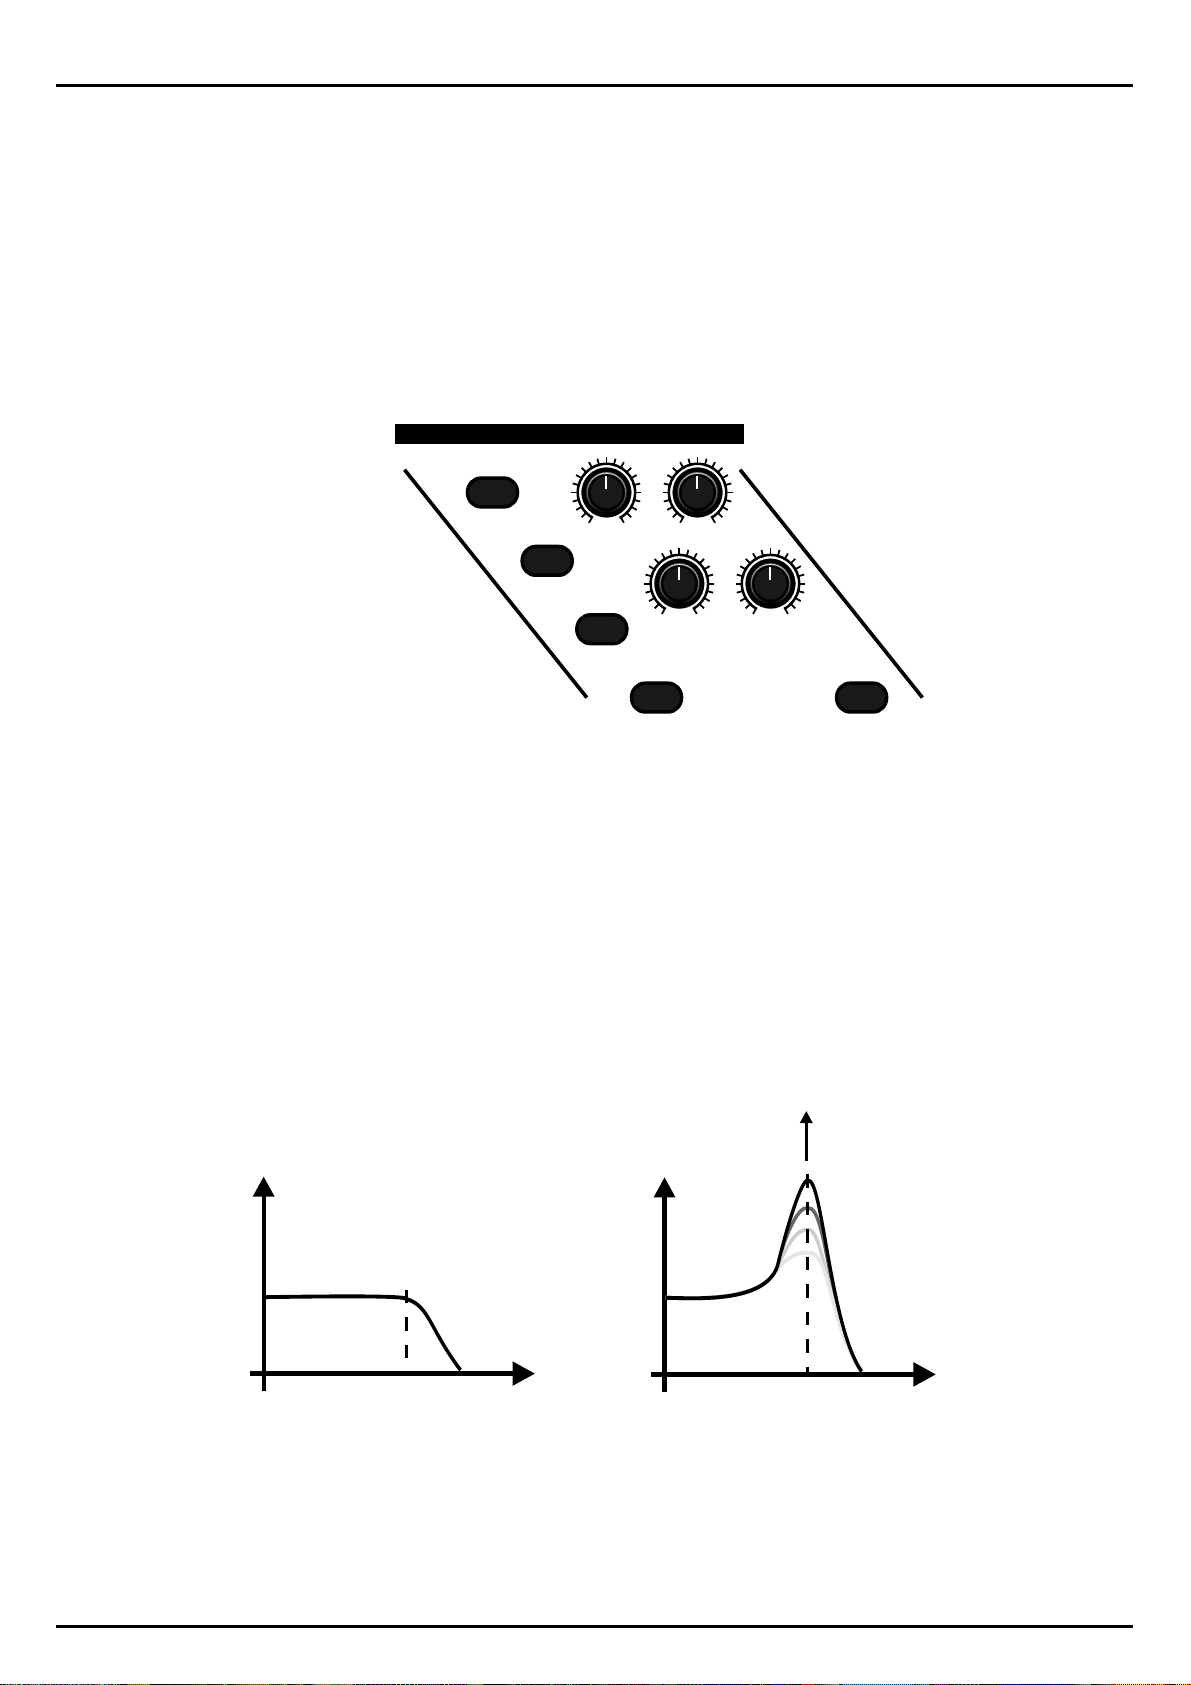
The Synthesizer Section:
The synthesizer-section is the heart of the Sirius. Here all the important sound creating elements are
available to you. The section is built just like a classic analogue synth. From left to right you will find
the modulator (LFO), the oscillators, the filter (VCF) as well as the amplifier (VCA). The diagrams on
the right-hand side of the synthesizer section illustrate the behaviour of the Envelope Generator macros for VCF and VCA.
MODULATOR OSCILLATORS RESONANCE-FILTER
MOD.-
MACRO
MOD.-
DEPTH
WAVE-
MACRO
MOD.-
RATE
GLIDE
DETUNE FILTER-
LPF 24 dB RELEASE
OVERDRIVE
CUTOFF ENV.-MOD VCA
LPF 12 dB
HPF 12 dB
KEY-TRACKINGOCTAVE-UPOCTAVE-DOWN VCF-DYN. VCA-DYN.
17
Q-FACTOR VCF-EG
MACRO
AMPLIFIER
LEVEL
VCA-EG
MACRO
EG-MACROS
0
32
64
96
127
Page 18
Getting started
The Vocoder section:
This section controls the main functions of the Vocoder which are the switching on and off of the
Vocoder, selecting Vocoder presets, adjusting the volume as well as the routing of ANALYSE and
CARRIER signals. The Vocoder section works closely with the mixer section. To adjust the separate filter frequencies of the vocoder, for example, you would use the controls of the mixer while holding
down the VOCODER-Key. With the row of Keys on the mixer, the separate tracks of the Sirius can be
routed to the ANALYSE or CARRIER signal. You select the 16 vocoder presets using the Number-Keys
1-16 while holding down the VOCODER-Key.
HOLD BUTTON AND
SELECT PART
11CHANNELVOCODER
VOCODER
ANALYSE CARRIER CARRIER-EXT. MICRO.
The Microphone connector:
This socket is for connecting the goose neck microphone. The microphone is automatically activated when you select one of the 16 vocoder-presets. Please note that
the microphone socket is immediately de-activated as soon as you connect a cable
to the ANALYSE-IN socket on the rear panel of the Sirius.
MICROPHONE
CONNECTOR
The Footswitch Socket:
Although this socket is not located on the front panel of the Sirius we would like to briefly go into it
at this point.
The reason for this is that a footswitch is a so called 'performance aid' with which the sound of the
Sirius can be influenced in real time. Other performance aids are the modulation wheel and the
pitch bender.
This socket requires a footswitch with an on/off switch. The footswitch should be connected prior to
powering up the Sirius. When the Sirius is turned on it will automatically recognise the polarisation of
the footswitch. Pedals which send continuous information (for example volume pedals) are not suitable for connection to this socket.
Once you have found the right footswitch you can try the following:
hold down a PAD on the Keyboard and step on the footswitch. If you now let go of the note you are
holding down on the Keyboard, the sound will keep on playing until you release the pedal. This is
called a Sustain-footswitch.
The second function of the footswitch enables you to transpose arpeggios. When you step on the
footswitch while the Arpeggiator is running and stay put, the Arpeggio will continue to play out normally. When you now press any note on the Sirius Keyboard the pitch of the whole Arpeggio will
change.
FOOTSWITCH
18
Page 19
Getting started
The two wheels on the left of the front panel of the Sirius are often referred to as performance aids.
They allow you to change the sound while playing, particularly useful in a live situation. Each wheel
has its own functions.
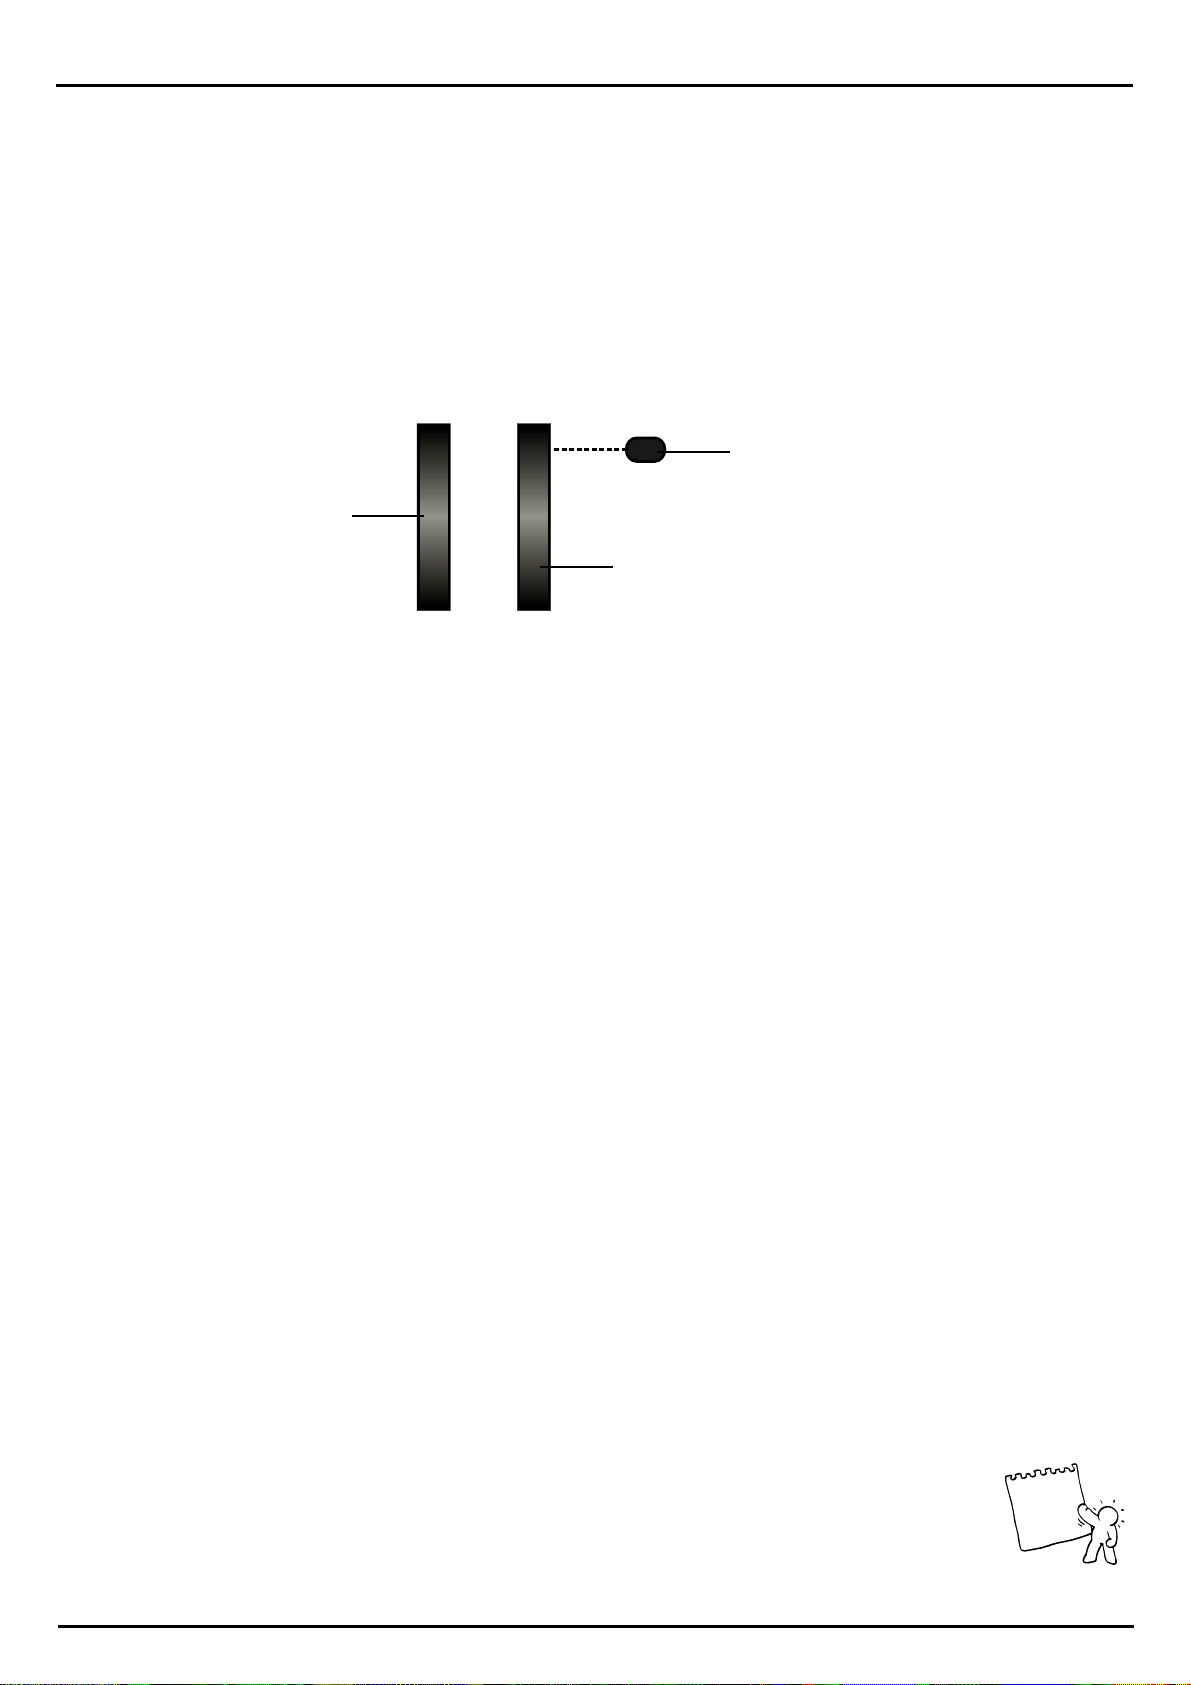
The Pitch-Bend Wheel:
The Pitch-Bend Wheel, also known as the Pitch-Bender, allows you to change the pitch while you
are playing. If you release the wheel it automatically returns to its central position. If you move it
downwards the pitch of the sound will get lower. If you move it upwards it will become higher. Each
sound of the Sirius can be allocated an individual pitch-bend setting.
MOD.-WHEEL
ASSIGN
Pitch-Bend Wheel
Modulation Wheel
Programming Key for the
Modulation wheel
PITCH
BEND
MODULATION
WHEEL
The Modulation Wheel:
The Modulation Wheel allows you, as the name says, to modulate sound. In synthesizer language
modulation means the generating of a continuous change of the sound characteristics while playing.
This could be for example the generating of vibratos or the opening of a filter. A lot of synthesizers
only allow you to control one parameter with each wheel. Not so with the Sirius. You can allocate up
to five sound parameters of the Synthesizer section to the modulation wheel simultaneously. This enables you to create very complex and interesting soundscapes and layers.
How to programme the Modulation Wheel:
The MOD-WHEEL ASSIGN-Key has several important functions. If you have assigned one or more
sound parameters from the synthesizer section to the modulation wheel in order to process your chosen sound, this Key will be lit. This Key also allows you to delete a MOD-WHEEL ASSIGN or to
programme a new one. You can do this by holding the key down. The display will show the following
message:
Mod-Wheel-Assign
[Clear]
If you now press the Key F1 below the display the current settings of the modulation wheel will be
deleted. Once you release the Key the MOD-WHEEL-ASSIGN message on the display disappears.
The Modulaton Wheel is now ready for re-programming. The assigning of parameters is very simple:
Hold down the MOD-WHEEL-ASSIGN -key and turn the dial of the parameter which is to be assigned to the modulation wheel. The display shows a change in value. This value shows the positive
and negative deviation of the parameter relative to the value stored in the sound. This deviation can
now be performed by the Modulation wheel. You can repeat this until you have assigned five different parameters to the Modulation Wheel. Should you want to assign one of the MACRO-controls to
the modulation wheel please note that you are then assigning several parameters at one time. For example the two EG-MACRO-Keys control 4 parameters each.
Experts tip:
Apart from the parameters from the syntehesizer section the parameters from the Mixer section can
also be assigned to the Modulation Wheel. The procedure is the same. You can yield particularly
good results if for example you assign FX-sends when you have chosen a delay as an effect. Check it
out!
19
Tip
Page 20

Getting started
Playing the Sounds of the Sirius:
By now you must be starving to hear the sounds of the Sirius. Once you have left the demo-mode by
pressing the EXIT-Key you will see the following on the display:
This means the following: 'A' indicates the bank from which the sound comes - '71' indicates the
number of the sound within that bank. After the colon comes the sound name, in this case
"SyncSynt".
On the right of the display you see a number, in this case "160" which is indicating the current speed
or tempo of the internal sequencer. In the lower part of the display you see the word "STOPPED"
which means that at present the sequencer is not running.
The seven bars to the right symbolise the separate Parts(tracks) of the Sirius. If you now play the Keyboard you will hear the sound shown on the display. The fifth bar of the part-display will show a level
reading. This is basically indicating that part 5 (SYNTH-1) is active. You will notice that the Part-key in
the mixer-section is also lit up, verifying the display's information.
A71:SyncSynt 160
(STOPPED)_______
The sound categories:
Now let's look at the CATEGORIES section which allows you to choose the sound categories. You will
note that the CATEGORIES-Key named "SOLO-SOUNDS" is lit up. We have deliberately divided the
sounds into these different categories because it makes the selection of particular sounds so much
easier. The drum-sound categories (parts 1-4) are on the left of the CATEGORIES-Keys in orange
print. The synthesizer-sound categories (parts 5-7) are printed in white on the right. With the help of
the number Keys 1-16 directly above the keyboard you can choose one of 16 sounds from the selected sound category. You can immediately play it on the keyboard. The display will directly show
you sound name, storage bank and library number.
The sound banks and libraries:
The synthesizer-sounds are spread over three fixed ROM banks (A, B and C) and a USER-bank. After
listening to all categories and sounds on bank "A" you will have to change to the next bank. You can
do this two ways: Use either the PAGE/BANK-Key in the edit section or press the Categories-Key you
have selected one more time. Every time you press the Categories-Key you change banks.
Playing Drum-Sounds:
In order to play any drum-sounds you have to select the Drum-Part you want to listen to first. You select the parts with the Part-Keys (1-4) in the mixer section. You will find these Keys directly below the
first four Mixer-section dials. Make sure that these Keys are selected by checking if the PART-SELECT
Key on the left of the mixer is lit. If not, press it down. Now choose the part for which you want to
hear the sounds. You select the different sounds exactly like you selected the synthesizer sounds. But
note that there is only one ROM and one USER bank for each drum-part.
There are 96 different ROM-sounds available in every drum-part (kick, snare, hihat and percussion).
This equals 384 drum sounds all together.
The synthesizer -Parts consists of 3 banks with 96 sounds each, 288 synthesizer-sounds in total. All in
all the Sirius has 672 factory sounds ready for you to use.
In addition the Sirius offers you 480 User-storage spaces for sounds programmed by yourself. There
are 96 storage spaces each for the kick, snare, hihat, percussion and synth parts .
The fixed storage space for the factory-sounds of the Sirius is called ROM (Read Only Memory). It
can not be deleted or overwritten. The USER-storage space for your own programmed sounds is
called RAM (Random Access Memory).
20
Page 21

Getting started
How do I listen to the pre-programmed patterns of the Sirius?
There are 142 factory-programmed patterns in the Sirius, the ROM-patterns.
These patterns cannot be deleted or overwritten and serve as a basic stock of new grooves and
USER-patterns. You can combine them randomly to form new songs.
You can also use the separate motifs of these ROM patterns to create new ones. These patterns also
give you an excellent overview of the musical and stylistic versatility of the Sirius. In order to listen to
the patterns systematically proceed as follows:
Press the EDIT-Key next to the display. With the PAGE/BANK-Key you choose page 2 of the menu.
Now select the Edit-pattern menu by pressing the F1 Key.
Select Edit <2>
[Pattern] [Mix]
Press the F1 Key once again to access the menu for the ROM- and USER patterns.
Select Pattern
[Rom] [User]
Here you can choose which pattern-type you want to listen to. If you haven«t created any patterns
yourself yet, the USER-pattern section will be empty. Use the F1-Key to select the area of the ROMpattern:
Load ROM-Pattern
Pattern:055 [ok]
Once you have selected this page on the menu the sequencer of the Sirius will start up. Now you
can scroll through the 142 factory-programmed patterns using the VALUE/TEMPO-dial.
Once you have selected a pattern which you want to have a closer look at, press the F2 Key (OK) to
get to the EDIT-PATTERN menu. Now you can look at single tracks closely, store new motifs or put
other ROM or USER-motifs into the pattern.
See page 42
21
Page 22
The Synthesizer
The Synthesizer
Creating sounds:
We showed you how to access the factory sounds in the section "Playing the sounds of the Sirius".
Now we will show you how to create your own sound with the synth parts 1,2 & 3 (Part-Keys 5-7 on
the mixer section). This procedure also applies to the drum parts (Part-Keys 1-4 on the mixer section)
- even drum-parts are given a complete synthesizer!
We are sure that by now you have already started following your basic instincts: turning controls,
pressing knobs in the synthesizer section, hitting the Randomizer.... Thanks to the macro-controls
and the simple design of the Sirius' front panel, the "learning by doing" or "hands-on" approach will
be easy and fun.
The Sirius is actually offering you many more possibilities for fine editing and sound design than the
front panel immediately suggests. Let’s use the SYNTH 1 part as an example. Press the PART SELECT
Key followed by the SYNTH 1 part Key:
MIXER
LEVEL
PANORAMA FX1/FX2
PART
SELECT
SOUND
SELECT
PART
MUTE
PATTERN
SELECT
PART/SEQ.
TO MIDI
SONG
SELECT
SNARE HIHAT PERCUSSION SYNTH 1 SYNTH 2 SYNTH 3KICK/BD
12
34567
In order to edit this sound within the Edit-section, press the EDIT-Key and select menu page 1 with
the PAGE/BANK-Key:
Select Edit |1>
[Sound] [Arpeg.]
The Oscillator-Section:
First we will look at the parameters available in the oscillator section:
OSCILLATORS
WAVE-
MACRO
GLIDE
DETUNE FILTER-
OVERDRIVE
OCTAVE-UPOCTAVE-DOWN
Hit F1 thereby selecting the Edit-sound menu.
Edit Synt1-Sound
|1> 22: S_Saw
On this page you can choose one of 125 oscillator models. "22" indicates the number which is followed by the name of the oscillator model. The setting can be changed with the VALUE/TEMPO-dial
as well as with the WAVE MACRO- control.
22
Page 23

The Synthesizer
Edit Synt1-Sound
<2> Octave: 8
Press the right-hand PAGE-Key once more. This brings you to page 2 of the menu. The parameter on
menu page 2 allows you to set the octave range of the sound. Four different basic ranges are at your
disposal. '8' means the pitch of the sound remains the same. '4' is one octave higher. '16' is one octave lower, etc.. Changes are made with the VALUE/TEMPO-dial or the Keys OCTAVE-UP and OCTAVE-DOWN in the oscillator section.
OCTAVE-UPOCTAVE-DOWN
Pressing the right-hand PAGE-Key once more will bring you to page 3 of the edit menu, the detune
page. Here you can individually detune the oscillators of the Sirius. The intensity of the de-tuning of
the oscillators can vary from a fraction of a tone to a pitch difference of 24 semi tones (2 octaves).
You can either use the DETUNE control in the oscillator section or the VALUE/TEMPO-dial.
Edit Synt1-Sound
<3> Detune: 0.38
On page 4, the Sirius offers you the possibility of polyphonic portamento. In the oscillator section the
glide-value (or "portamento-time") can be set with the GLIDE-control, values ranging from 0 to 127.
When you play a chord or note in the lowest octave of the Keyboard followed by a chord or note in
the highest octave you can clearly hear how the pitch glides smoothly "to the top".
`
Edit Synt1-Sound
<4> Glide: 127
On page 5 of the menu you can determine if this Part in the Sirius should be played polyphonically
or monophonically.
Polyphonic is the term used for a sound which can be played with many notes simultaneously, suitable for playing chords - monophonic is a sound which can only be played one note at a time.
Some parts benefit greatly from being in the monophonic mode.
Turn the parameter to the ON-position. Hold one note down in the highest octave of the keyboard
and play a tune in a lower octave. When you release each note of the tune being played, the high
note which you are holding down will play out.
Edit Synt1-Sound
<5> Monophon: ON
The Pitch-Envelope Generator (EGP):
Page six brings you to the Pitch Envelope Generator. This determines how the pitch of the original
waveform (sound) will be changed over time.
Edit Synt1-Sound
<6> EGP-Mod: +24
A negative value will make the pitch rise up to the note you have pressed. Positive values will have
the opposite effect. Try it and hear for yourself! The values range from -63 -> +63 and are changed
using the VALUE/TEMPO-dial. This parameter is particularly useful for creating siren sounds, or to
give the glissando characteristic of, for example, a brass section surging into the opening phrase of
'The Stripper'!
On pages 7 and 8 you can time the attack and the decay phases of the pitch envelope. A long attack
means a slow gliding / sliding of the pitch up or down. The decay-phase begins as soon as the original pitch is reached.
Edit Synt1-Sound
<8> EGP-Dec: 113
23
Page 24
The Synthesizer
The last parameter of the oscillator section is the VCF-drive. It produces an overload of the filter stage
which leads to those wonderfully distorted and aggressive overdrive-sounds. Each filter in the parts of
the Sirius therefore has its own distortion unit - very useful for, for instance, acid bass lines, aggressive
solo sounds etc.
The Filter-Section:
Edit Synt1-Sound
<9> VCFDrive: 27
RESONANCE-FILTER
LPF 24 dB
For each of the 7 parts the Sirius has its own multi-mode-filter with controllable cut-off frequencies
and resonance (On the Sirius referred to as Q-factor). The cut-off frequency can be manipulated in a
number of ways. You can do this for instance with the separate envelope waveform generator which
generates sound changes automatically. You can also at any time "tune" the cutoff-frequency in real
time with the CUTOFF-control or assign it to the modulation wheel. Like all sound parameters the filter can also be controlled from an external Midi device.
The first three Keys in the filter section allow you to select one of the filter types. A low pass filter
(LPF) will only allow the frequencies below the cutoff-frequency to pass through. A high pass filter
(HPF) works the other way round. The frequency curve of the filter is given in dB/octave and describes how strongly the frequencies are faded in and out before and after the cutoff-point. The 12
dB filter is a milder curve than the steep 24 dB filter and therefore sounds a bit softer. The Key track
option is explained later.
CUTOFF ENV.-MOD
LPF 12 dB
HPF 12 dB
Q-FACTOR VCF-EG
KEY-TRACKING VCF-DYN.
MACRO
Q-Factor
Filter without
dB
resonance
dB
Sirius-Filter
with resonance
f
CUTOFF-FREQ.
Now choose a filter type with the Keys on the front-panel or use the VALUE/TEMPO-dial.
Edit Synt1-Sound
<10> VCFTyp:LP24
24
CUTOFF-FREQ.
f
Page 25

The Synthesizer
On the next page of the menu you can set the cut-off frequency:
Edit Synt1-Sound
<11> Cutoff: 0
and then the filter bandwidth and resonance (Q-factor):
Edit Synt1-Sound
<12> Qfactor: 92
The resonance is a factor producing an over-loading of the level of the cut-off frequency. When the
resonance-values are high, such over-loading causes the filter to feed back and so generate new harmonics. The result is typically a "whistle" or "squeak" in the sound, providing it with a more cutting
edge. Filters without resonance are therefore not as flexible as the Sirius-filters.
On page 13 of the menu you can set the Key-tracking. You can activate it at any time with the KEYTRACKING-Key on the front panel. The Key-tracking allows you to control the cut-off frequency by
the pitch you are playing on the Keyboard. You can for instance create sounds which become more
brilliant the further up the Keyboard you move. Positive values become more brilliant, negative values more dull.
Edit Synt1-Sound
<13> KeyTrck:+63
Check itout andlet your earsand tastedecide.
On page 14 of the menu you will find the parameter called VCF-dynamic. The VCF-dynamic allows
you to determine how the filter can be controlled through Touch-sensitivity. When for instance you
enter +63 the sound will turn more brilliant the harder you hit the Keyboard. -63 obviously produces the opposite effect. You can activate this function with the VCF-DYN- Key on the front panel.
Edit Synt1-Sound
<14> VCF-Dyn:+63
How much the envelope generator influencesthe filter is controlled on page 15 of the edit menu via the
parameter calledEnvelope Modulation:
Edit Synt1-Sound
<15> Env-Mod:+19
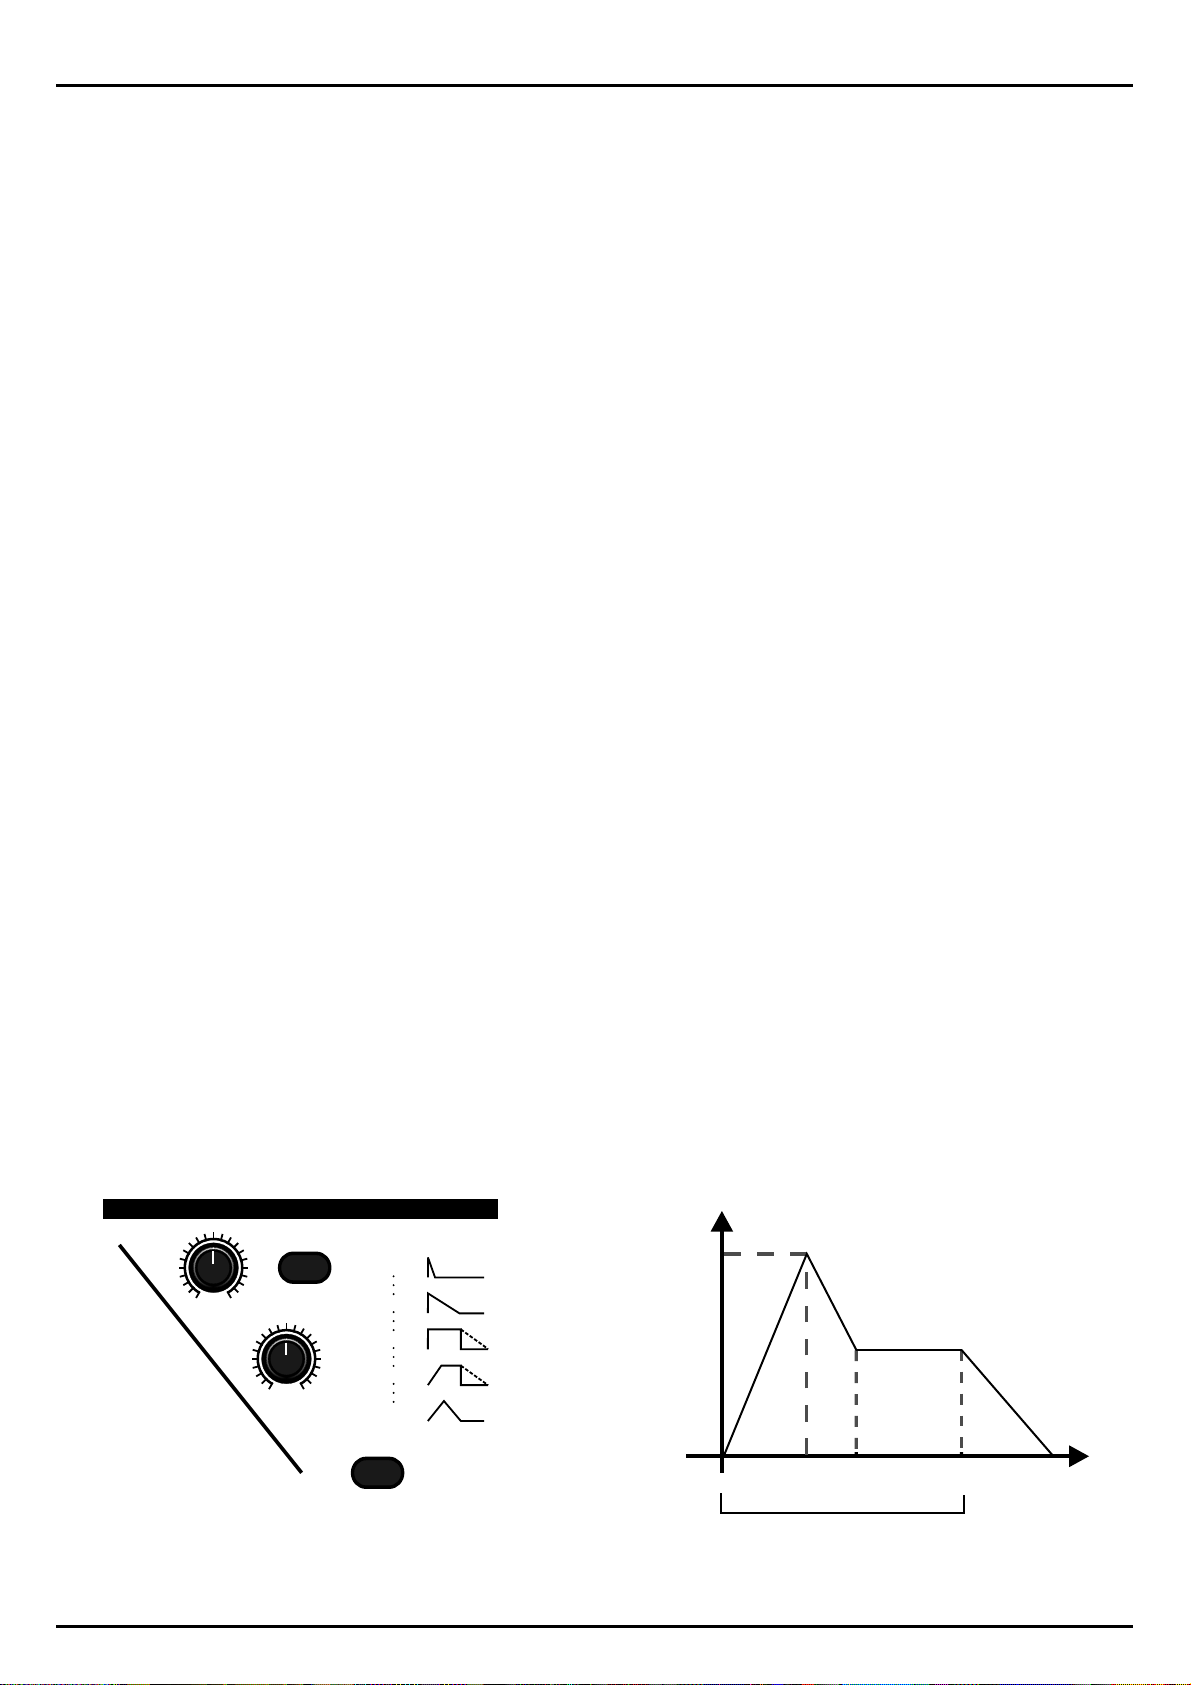
Now we come to the parameters of the waveform envelope. They can be set in two different ways.
You either choose page 16-19 to enter values for attack, decay, sustain and release or you use the
VCF-EG-MACRO control. There you will find 127 different waveform envelopes to control the nature of the sound (waveform). The front panel of the Sirius has diagrams showing the order in which
the various waveform envelopes are placed.
0
32
64
96
127
25
Page 26
The Synthesizer
Please note that the EG-MACROS for both filter and amplifier sections are not identical but are
placed in order using specific criteria.
You can of course fine edit the opened macro in its single parameters:
Attack:
Decay:
Sustain:
Release:
Edit Synt1-Sound
<16> EGF-Att: 64
Edit Synt1-Sound
<17> EGF-Dec: 64
Edit Synt1-Sound
<18> EGF-Sus:115
Edit Synt1-Sound
<19> EGF-Rel: 64
The Amplifier-Section:
This section regulates the behaviour of the volume of the sound. The first parameter sets the level:
Edit Synt1-Sound
<20> VCA-Lev: 88
This is the volume information which is stored for this sound. It has nothing to do with the level settings of the mix section.
You can also control the volume with Touch-sensitivity.
Edit Synt1-Sound
<21> VCA-Dyn: ON
If you strike a note on the keyboard hard the sound will be louder than for a soft strike. You can activate and de-activate the Touch-sensitivity at any time using the VCA-DYN-Key on the front panel.
The following menu pages allow you to set the parameters of the VCA Envelope Generator (EGA).
These processes are explained below:
AMPLIFIER
EG-MACROS
AMP
ENVELOPE :
VCA
LEVEL
RELEASE
VCA-EG
MACRO
0
32
64
96
127
VCA-DYN.
26
A
DSR
Note duration
TIME
Page 27
The Synthesizer
When you hold down a note on the Sirius Keyboard you automatically start the envelope generator.
During the ATTACK time the sound will increase until it has reached its maximum level. After that
the DECAY time sets in, and the volume of the sound decreases until it reaches the adjustable SUSTAIN-level. This level remains until you release the note, when the sound can either stop immediately or fade out. The duration of the fade-out is determined by the RELEASE time.
The VCA-EG-MACRO-control gives you access to the 127 pre-programmed envelopes. The amplifier
section also has a RELEASE-Key which automatically applies a release-time with a length value of 64
for these VCA envelopes.
Attack:
Edit Synt1-Sound
<22> EGA-Att: 0
Decay:
Edit Synt1-Sound
<23> EGA-Dec: 64
Sustain:
Edit Synt1-Sound
<24> EGA-Sus: 91
Release:
Edit Synt1-Sound
<25> EGA-Rel: 64
The Modulator-Section:
MODULATOR
MOD.-
MACRO
MOD.-
DEPTH
MOD.-
RATE
The modulator section allows you to set the type, intensity, frequency and destination of the modulator. Every Part of the Sirius contains a low frequency oscillator (LFO) with which you can programme
automatic pitch changes (vibrato), sound colour changes (filtersweeps) and volume changes (tremolo). You can also synchronise the LFO to a MIDI-clock.
Edit Synt1-Sound
<26> LFOWave:SIN
This page determines the waveform used by the LFO. The following waveforms are available to you:
Sinus (SIN), Sawtooth (SWU), Inverted sawtooth (SWD), Square (SQR), Triangle (TRL) and Random
(RND).
On the following page you can set the frequency of the LFO. The higher the value, the faster the rate
of modulation. If you turn the VALUE/TEMPO-dial or the MOD-RATE-control almost all the way to
the right you can choose the resolution of the modulator when the LFO-frequency is synchronised to
a MIDI-clock (1/4 note. 1/8 note etc.).
Edit Synt1-Sound
<27> LFORate:1/16
27
Page 28

The Synthesizer
Page 28 enables you to set the modulation intensity/depth:
The following menu pages contain the modulator destinations, i.e. which part of the synthesizer section you wish to modulate:
Here you can adjust how strongly you want the LFO to influence the pitch change of the oscillator.
This modulation can be used for siren effects and vibratos.
The next page allows you to set modulations of the cutoff-frequency of the filter for creating, for instance, filtersweeps:
On page 31 you set the modulation of the amplifier section, i.e the volume:
Edit Synt1-Sound
<28> LFODpth: 10
Edit Synt1-Sound
<29> LFO>VCO: 0
Edit Synt1-Sound
<30> LFO>VCF: 45
Edit Synt1-Sound
<31> LFO>VCA: 2
The macro control in the modulation section allows you to access the pre-sets which combine the
various waveforms with the destinations of the modulator. You will also find a macro to modulate the
waveform Pitch Envelope. In this macro the MOD-RATE-control regulates the velocity and the
MOD-DEPTH controls the intensity of the Pitch Envelope.
Pitch-Wheel and Hold-Pedal:
On the last two pages of the menu you can determine the influence of performance-aids on the
sound.
Edit Synt1-Sound
<32> PitSens: 24
Here you determine how much the pitch will change when the pitch wheel is at its maximum or minimum. Value readings are in semitones, i.e. 1=1 semitone, 24=24 semitones or 2 octaves, which is
the maximum available pitch change up or down.
Edit Synt1-Sound
<33| Holdped: ON
Tip
The last page of the sound edit menu determines whether a connected foot pedal/switch will control
the sustain of the sound you are playing. It basically activates or de-activates the footswitch.
Random Sound:
Those of you who like surprises will love the Sirius. Simply press the RANDOM-SOUND-Key below
the display, and, based on special algorithms, the Sirius will generate a totally new sound. You can
then, of course, edit this sound.
28
Page 29
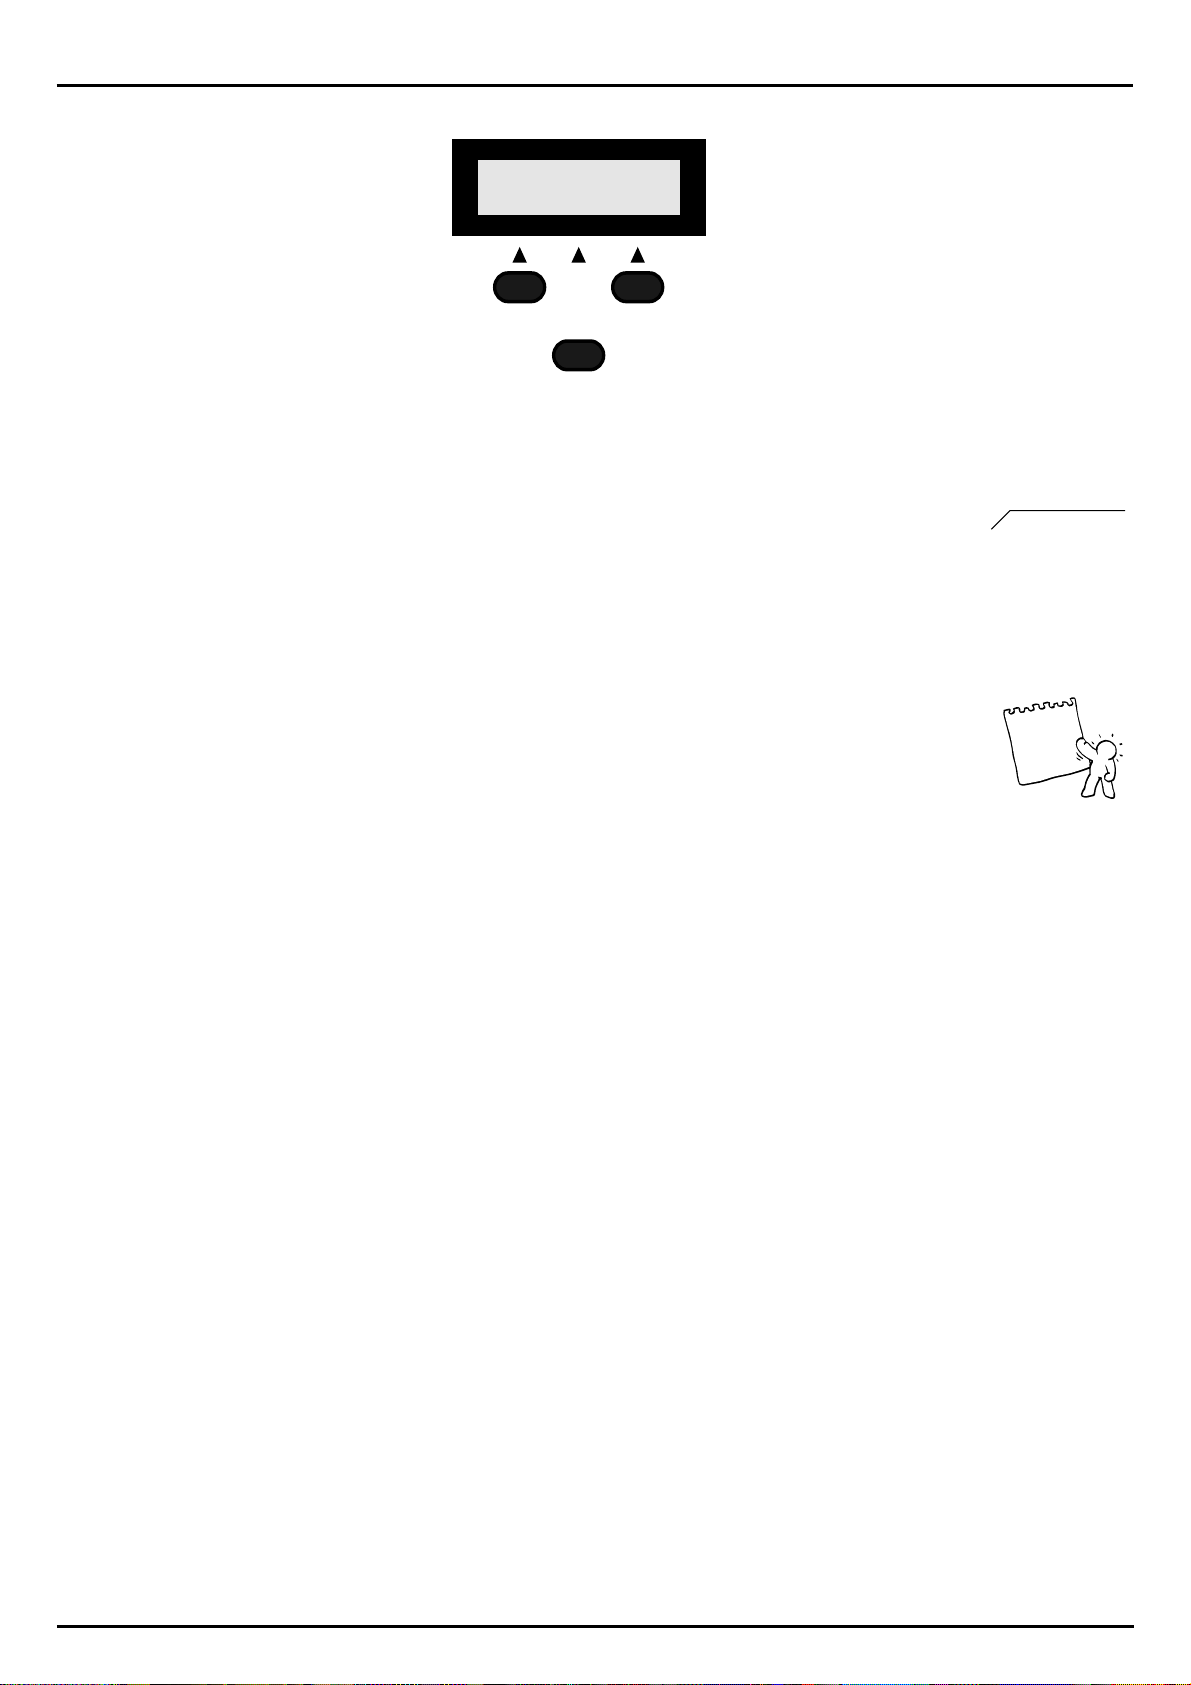
The Synthesizer
Save Sound to 35
ok!
PRESS BUTTON
FOR SOUND-CREATION
RANDOM-SOUND
Storing the Sound:
Once you have edited your custom made sound you can store it on one of the 96 USER-sound memory spaces. This also allows you to access the sound via MIDI with an external Midi device using its
memory number. If you want to assign a sound to one of the 7 Parts (tracks) in the Sirius, you must
store the sound while the sequencer is active. Just press the WRITE-Key and confirm with [ok]. Now
name it, press [ok] and choose a storage space. Press [ok] once more. Done!
See page 108
The Quick-Save Function to save/store your Sound:
If you want to store your sound even faster press one of the 16 Number-keys and hold it down until
the following message appears on the display:
Save Sound to 35
ok!
As the number-Key is held, the storage space is displayed - a status bar indicates the progress of the
saving process. In this example the sound was stored in User-space 35.
The parameters in the edit menu work in the same or very similar ways for the other 6 Parts (kick,
snare, hihat, percussion, Synth-2 and Synth-3) as they do for the Synth-1Part.
Recall and Compare Sound:
You can at any time compare your edited sound to the original. Just press the RECALL-Key. The display will show the following:
**COMPARE**
You can exit the compare mode by either pressing the EXIT-Key or by
re-pressing the RECALL-Key. Should you have accidentally changed the sound, thereby losing the
one you had created, you can recall it with the RECALL-Key.
Tip
On the next page you will find an overview of all the sound parameters of the Sirius.
29
Page 30
The Synthesizer
Overview of the Sound-Parameters: Kick, Snare, Hihat, Synth-1, Synth-2, Synth-3:
(An overview of the parameters of the Percussion-Part you can find on page 32)
Edit Sound
The paramters marked with a * can also be influenced
by control-dials or keys on the front panel.
KICK/BD
|1> Wave-Macro*
Octave: )
(
Tune*
<3>
TORS
OSCILLA
TER
RESONANCE-FIL
AMPLIFIERAMPLIFIER
LFOLFO
Glide: )
<4>
(
Monophon: )
<5>
(
Pitch-Envelope-Modulation*
<6>
<7>
Pitch-Envelope Attack*
<8>
Pitch-Envelope Decay*
<9>
VCF-Overdrive*
<10>
VCF-Typ:
12 dB-Lowpass, 12 dB-Highpass
<11>
Cutoff-Frequency*
<12>
Q-Factor*
<13>
(
Key-Tracking: )
<14>
VCF-Dynamic-Modulation*
<15>
VCF-Envelope-Modulation*
<16>
VCF-Envelope Attack*
<17>
VCF-Envelope Decay*
<18>
VCF-Envelope Sustain*
<19>
VCF-Envelope Release*
<20>
VCA-Level*
<22>
VCA-Envelope Attack*
<23>
VCA-Envelope-Decay*
<24>
VCA-Envelope Sustain*
<25>
VCA-Envelope Release*
<26>
LFO-Wave*
<27>
LFO-Rate: *
<28>
LFO-Depth*
<29>
VCO (Pitch)-Modulation
from LFO*
<30>
VCF (Filter)-Modulation
from LFO*
<31>
VCA (Amplitude)-Modulation
from LFO*
not selectable<2>
not selectable
not selectable
24 dB-Lowpass,
not selectable
can be synchronised
SNARE-Drum HIHAT
|1> Wave-Macro*
Octave: )
not selectable<2>
(
Tune*
<3>
TORS
OSCILLA
*
TER
RESONANCE-FIL
AMPLIFIER
LFO
Glide: )
<4>
(
not selectable
Monophon: )
<5>
(
Pitch-Envelope-Modulation*
<6>
<7>
Pitch-Envelope Attack*
<8>
Pitch-Envelope Decay*
<9>
VCF-Overdrive*
<10>
VCF-Typ:
24 dB-Lowpass,
12 dB-Lowpass, 12 dB-Highpass
<11>
Cutoff-Frequency*
<12>
Q-Factor*
<13>
(
Key-Tracking: )
<14>
VCF-Dynamic-Modulation*
<15>
VCF-Envelope-Modulation*
<16>
VCF-Envelope Attack*
<17>
VCF-Envelope Decay*
<18>
VCF-Envelope Sustain*
<19>
VCF-Envelope Release*
<20>
VCA-Level*
<22>
VCA-Envelope Attack*
<23>
VCA-Envelope-Decay*
<24>
VCA-Envelope Sustain*
<25>
VCA-Envelope Release*
<26>
LFO-Wave*
<27>
LFO-Rate: *
<28>
LFO-Depth*
<29>
VCO (Pitch)-Modulation
from LFO*
<30>
VCF (Filter)-Modulation
from LFO*
<31>
VCA (Amplitude)-Modulation
from LFO*
can be synchronised
not selectable
*
not selectable
|1> Wave-Macro*
Octave: )
(
Tune*
<3>
TORS
OSCILLA
TER
RESONANCE-FIL
AMPLIFIER
LFO
Glide: )
<4>
(
Monophon: )
<5>
(
Pitch-Envelope-Modulation*
<6>
<7>
Pitch-Envelope Attack*
<8>
Pitch-Envelope Decay*
<9>
VCF-Overdrive*
<10>
VCF-Typ:
12 dB-Lowpass, 12 dB-Highpass
<11>
Cutoff-Frequency*
<12>
Q-Factor*
<13>
(
Key-Tracking: )
<14>
VCF-Dynamic-Modulation*
<15>
VCF-Envelope-Modulation*
<16>
VCF-Envelope Attack*
<17>
VCF-Envelope Decay*
<18>
VCF-Envelope Sustain*
<19>
VCF-Envelope Release*
<20>
VCA-Level*
<22>
VCA-Envelope Attack*
<23>
VCA-Envelope-Decay*
<24>
VCA-Envelope Sustain*
<25>
VCA-Envelope Release*
<26>
LFO-Wave*
<27>
LFO-Rate: *
<28>
LFO-Depth*
<29>
VCO (Pitch)-Modulation
from LFO*
<30>
VCF (Filter)-Modulation
from LFO*
<31>
VCA (Amplitude)-Modulation
from LFO*
not selectable<2>
not selectable
not selectable
24 dB-Lowpass,
*
not selectable
can be synchronised
SYNTH 1 SYNTH 2 SYNTH 3
|1> *
Wave-Macro
Octave*
<2>
<3>
TORS
OSCILLA
TER
RESONANCE-FIL
Det
Glide*
<4>
Monophon
<5>
Pitch-Envelope-Modulation*
<6>
<7>
Pitch-Envelope Attack*
<8>
Pitch-Envelope Decay*
<9>
VCF-Overdrive*
<10>
VCF-Typ:
12 dB-Lowpass, 12 dB-Highpass
<11>
Cutoff-Frequency*
<12>
Q-Factor*
<13>
VCF-Key-Tracking*
<14>
VCF-Dynamic-Modulation*
<15>
VCF-Envelope-Modulation*
<16>
VCF-Envelope Attack*
<17>
VCF-Envelope Decay*
<18>
VCF-Envelope Sustain*
<19>
VCF-Envelope Release*
<20>
VCA-Level*
<22>
VCA-Envelope Attack*
<23>
VCA-Envelope-Decay*
<24>
VCA-Envelope Sustain*
<25>
VCA-Envelope Release*
<26>
LFO-Wave*
<27>
LFO-Rate: *
<28>
LFO-Depth*
<29>
VCO (Pitch)-Modulation
From LFO*
<30>
VCF (Filter)-Modulation
from LFO*
<31>
VCA (Amplitude)-Modulation
from LFO*
<32>
Pitch-Bend Range
<33|
Holdpedal
une*
24 dB-Lowpass,
can be synchronised
|1> *
Wave-Macro
Octave*
<2>
<3>
TORS
<4>
<5>
<6>
OSCILLA
<7>
<8>
<9>
*
<10>
TER
<11>
<12>
<13>
<14>
<15>
<16>
RESONANCE-FIL
<17>
<18>
<19>
<20>
<22>
<23>
<24>
AMPLIFIER
<25>
<26>
<27>
<28>
<29>
LFO
<30>
<31>
<32>
<33|
une*
Det
Glide*
Monophon
Pitch-Envelope-Modulation*
Pitch-Envelope Attack*
Pitch-Envelope Decay*
VCF-Overdrive*
VCF-Typ:
24 dB-Lowpass,
12 dB-Lowpass, 12 dB-Highpass
Cutoff-Frequency*
Q-Factor*
VCF-Key-Tracking*
VCF-Dynamic-Modulation*
VCF-Envelope-Modulation*
VCF-Envelope Attack*
VCF-Envelope Decay*
VCF-Envelope Sustain*
VCF-Envelope Release*
VCA-Level*
VCA-Envelope Attack*
VCA-Envelope-Decay*
VCA-Envelope Sustain*
VCA-Envelope Release*
LFO-Wave*
LFO-Rate: *
LFO-Depth*
VCO (Pitch)-Modulation
From LFO*
VCF (Filter)-Modulation
from LFO*
VCA (Amplitude)-Modulation
from LFO*
Pitch-Bend Range
Holdpedal
can be synchronised
*
|1> *
<2>
<3>
TORS
<4>
<5>
<6>
OSCILLA
<7>
<8>
<9>
<10>
TER
<11>
<12>
<13>
<14>
<15>
<16>
RESONANCE-FIL
<17>
<18>
<19>
<20>
<22>
<23>
<24>
AMPLIFIER
<25>
<26>
<27>
<28>
<29>
LFO
<30>
<31>
<32>
<33|
Wave-Macro
Octave*
une*
Det
Glide*
Monophon
Pitch-Envelope-Modulation*
Pitch-Envelope Attack*
Pitch-Envelope Decay*
VCF-Overdrive*
VCF-Typ:
24 dB-Lowpass,
12 dB-Lowpass, 12 dB-Highpass
Cutoff-Frequency*
Q-Factor*
VCF-Key-Tracking*
VCF-Dynamic-Modulation*
VCF-Envelope-Modulation*
VCF-Envelope Attack*
VCF-Envelope Decay*
VCF-Envelope Sustain*
VCF-Envelope Release*
VCA-Level*
VCA-Envelope Attack*
VCA-Envelope-Decay*
VCA-Envelope Sustain*
VCA-Envelope Release*
LFO-Wave*
LFO-Rate: *
LFO-Depth*
VCO (Pitch)-Modulation
From LFO*
VCF (Filter)-Modulation
from LFO*
VCA (Amplitude)-Modulation
from LFO*
Pitch-Bend Range
Holdpedal
can be synchronised
*
30
Page 31

The Percussion Sets
The Percussion Sets
Compared with the other Sirius sections, the PERCUSSION Part has a special status.
This part takes up to twelve instruments simultaneously (called a percussion set). A percussion set
plays in 12 voice polyphony (i.e. you can play all 12 instruments in the set simultaneously). This feature means you can double up the bass drum of the KICK-track, add a second HIHAT and let a tenman conga band do the drumming!
Your own customised percussion sets are automatically stored in one of the 20 User storage spaces
which are available.
On the one hand, you can work on the whole set the same way with the different sound parameters
as you do with single sounds (waveforms). You have the same possibilities to change your sound with
the SOUND-menu or in real time via the dials and Keys of the Sirius. Any parameter changes made
in the sound EDIT-menu will effect all the instruments in the percussion set at the same time. When
the PERCUSSION-part-Key is active the WAVE-MACRO-control allows you to jump between the 20
percussion sets in the memory.
On the other hand you can edit each single instrument of a set separately in the EDIT-menu - the following parameters are available in this mode: basic waveform, tune, level, pan, FX1 send and FX2
send. The structure of the complete percussion set is explained by the diagram on the following
page. Your efforts will pay off - composing your own 12 voice percussion sets from a number of basic
waveforms enables you to create some very complex grooves.
The SOUND-parameters which affect the whole percussion set are more or less the same as those
available for the other 6 parts. Let us go directly to the parameters available in the EDIT-menu for the
editing of the single instruments of a percussion set. You will find those in the SET-menu of the EDITmenu.
First select the percussion set you wish to edit:
Press the PART-SELECT-Key on the mixer panel and then press the PERCUSSION -PART-Key. Now
press the EDIT Key, and select menu page 1 by pressing the right hand PAGE/BANK-key. The following is displayed:
Select Edit |1>
[Snd][Set][Arp.]
F2
Contrary to the other sections you can see here that apart from the whole percussion sound you can
also edit the set's different instruments. In the SET-menu you will always be working on the percussion set you have chosen in the SOUND-menu. In order to edit any of the other 20 percussion sets
just turn the WAVE-MACRO-control (you can also select the set while on page 1 of the SOUNDmenu by using the CATEGORIES-keys in combination with the Number-Keys).
Now open the PERCUSSION-SET EDIT-menu by pressing the F2 Key under the display.
See pages 22 and
32
Important:
make to one of the 20 sets will automatically be stored. (The command "STORE PERC.?" in the
WRITE-menu stores only parameters affecting the sounds in the percussion set).
Unlike the other Parts, changes can not be undone by using the RECALL-Key - so think hard before
you edit a percussion set!!
The percussion sets do not need to be stored with the WRITE function: every change you
31
Page 32

The Percussion Sets
Overview of the SOUND and SETUP parameters: Percussion
Edit Perc-Sound
Parameters with an asterix (*)can also be influenced
by controls or Keys on the front panel.
PERCUSSION
|1>
PERCUSSION-SET 1-20
Octave: )
<2>
<3>
TORS
<4>
<5>
<6>
OSCILLA
<7>
<8>
<9>
<10>
TER
<11>
<12>
<13>
<14>
<15>
<16>
RESONANCE-FIL
<17>
<18>
<19>
<20>
<22>
<23>
<24>
AMPLIFIER
<25>
<26>
<27>
<28>
<29>
LFO
<30>
<31>
not selectable
(
Tune: )
(
not selectable
Glide:
()
not selectable
Monophon
Pitch-Envelope-Modulation*
Pitch-Envelope Attack*
Pitch-Envelope Decay*
VCF-Overdrive*
VCF-Typ:
24 dB-Lowpass,
12 dB-Lowpass, 12 dB-Highpass
Cutoff-Frequenz*
Q-Factor*
(
Key-Tracking: )
VCF-Dynamic-Modulation*
VCF-Envelope-Modulation*
VCF-Envelope Attack*
VCF-Envelope Decay*
VCF-Envelope Sustain*
VCF-Envelope Release*
VCA-Level*
VCA-Envelope Attack*
VCA-Envelope-Decay*
VCA-Envelope Sustain*
VCA-Envelope Release*
LFO-Wave*
LFO-Rate: *
LFO-Depth*
VCO (Pitch)-Modulation
from LFO*
VCF (Filter)-Modulation
from LFO*
VCA (Amplitude)-Modulation
from LFO*
not selectable
can be synchronised
Every percussion set consists of 12 percussion instruments and is playable
in 12 voice polyphony. The instruments can be edited separately.
Edit Set (1-20) - Note:
*
Instrument C#
Instrument C
CDEF
|1> Waveform
<2>
Tune
<3>
Level
Pan
<4>
FX1Send
<5>
FX2Send
<6|
Instrument D#
Instrument D
Instrument E
Instrument F#
Instrument F
Instrument G
Instrument G#
Instrument A#
Instrument A
Instrument H
HA#AG#GF#D#C#
Choose the drum-instruments you want to edit with the Keyboard (the allocation
of instruments to the keys on the keyboard, as shown in the diagram, is identical
for all four octaves of the keyboard).
Choosing instruments:
When you are in the SET-menu you can determine with the keys of the Sirius keyboard which of the
12 different percussion instruments you want to edit. Apart from an overall view of the percussion
section, the above diagram also shows you the order of the instruments on the keyboard. Just press
one key briefly and the relevant instrument is selected for editing and appears in the display.
The letter on the top right of the display shows you which key and therefore which instrument you
have chosen to edit.
Edit Set 1 - C
|1> 22:808HiTom
The Menu Pages:
Menu page 1: (basic waveform)
On page one of the menu you can select the basic sound (waveform) for the instrument.
For the above example we have basic waveform 22 "808HiTom" selected. Turn the VALUE/TEMPOdial and 256 different basic waveforms are available to you ranging from different drum instruments
to exotic percussion and electronic effects.
32
Page 33

The Percussion Sets
Menu page 2: (Tune)
With the tune parameter you can tune the instrument to a higher or lower pitch (in half-tone steps).
Edit Set 1 - C
<2> Tune: -2
Menu page 3: (Level)
On menu page 3 you determine the output level (volume) of the instrument. Here you can regulate
the relative output levels of the instruments in one percussion set.
Edit Set 1 - C
<3> Level: 127
Menu page 4: (Panorama)
Here you can determine where the instrument will sit within the stereo picture. (NB: It is standard
practise for bass drums and snares to have a central position in the stereo picture, indicated by >C<
on the display).
Edit Set 1 - C
<4> Pan: >C<
Menu page 5 and 6: (FX1-send and FX2-send)
These parameters control the effect sends of the instruments to the first and the second Sirius effects
units.
Edit Set 1 - C
<5> Fx1Send: 0
Edit Set 1 - C
<6| Fx2Send: 90
Important:
The effect of the settings in the Edit-SET-menu are also dependant on the settings you have chosen in
the MIX-menu or selected with the dials on the MIXER section of the Sirius for the overall percussion
Part. The parameters of the MIX-menu are superior. In SET however they take care of the fine-tuning
of the parameter for each instrument.
Some examples: If the percussion sound is panned to the very right on the Mixer section, you will
not be able to pan the single instruments to the left in the Edit-SET-menu.
If you want to allocate individual effects settings to each of the 12 instruments in the percussion set,
the equivalent FX send dial in the MIX menu must at least be partially open. You can allocate different volumes to the instruments, the highest volume will however never exceed the value set in the
MIXER-section.
!
33
Page 34

The Write-Menu
The Write-Menu:
The WRITE-Key located next to the VALUE/TEMPO-dial opens the WRITE-menu. This menu contains all the functions relevant to storing, initialising and data-dumping.
In the following pages we will look at the functions of this menu more closely.
First press the WRITE-Key to open the menu.
Storing/Saving:
Menu page 1 (storing sound)
Here you will find the store-function for home-created (customised) sounds to store on one of the
User storage spaces. For the 7 parts of the Sirius you have the following number of sound storage
spaces available:
WRITE
Space
96 own Kick/BD-sounds
96 own Snare-sounds
96 own Hihat Sounds
96 own Percussion-Sounds
96 own Synth-1, Synth-2 and Synth-3 Sounds
A saved sound contains all sound parameters as well as any modulation-wheel allocations. The settings for the arpeggiator are also stored along with any of the Synth-Parts (Parts 5-7). The arpeggiator
is not stored along with Parts 1-4, i.e the drum parts.
|1> Store Synt1?
[ok]
If you want to store a sound press the F1 Key. The following sub-menu will open.
Name: HouseOg2
[ok] [cancel]
Here you can name the sound you wish to store. You can use either the VALUE/TEMPO-dial or the
keys of the keyboard to enter letters, numbers and signs. With the PAGE/BANK-keys you can jump to
the previous or to the next letter.
&
$
/ ! ? -+* 0 1 234 56 7 89
aAbBcCdDeEfFgGhHiIjJkKlLmMnNoOpPqQrRsStTuUvVwWxXyYzZ{[| }
This diagram shows you which keys to use for letters, numbers
and signs when naming your sound, pattern or song.
34
]
Page 35

The Write-Menu
Once you have completed entering the name press the F1 Key under the display to access to the following menu:
to U54(ModSequa)
[ok] [cancel]
Here you select the storage space where you want to store your sound. You select it in the same way
as you selected the sound. Use the CATEGORIES-keys and the Number-keys 1-16.
You can also select the sound storage space with the VALUE/TEMPO-dial. On the last two pages of
the menu you have the option to cancel the storage by pressing the F3-Key (cancel).
Experts-tip:
When storing a sound you should always use a sound category which corresponds to the type of
sound you are storing. In this way you will avoid an arduous search should you want to find the
sound again. This is why it is better to determine the storage space using the CATEGORIES Keys in
combination with the Number Keys 1-16.
In order to find out which sound you would be overwriting you can listen to it again. If you do not
want to overwrite it you merely select another storage space. Press the RECALL-Key to the right of
the display and the following message will appear on the display:
Tip
** COMPARE **
If you now play the Keyboard you will hear the sound you would be overwriting on the selected storage space. By pressing the EXIT-Key you will get back to the menu where you can select the storage
space. You can repeat this procedure until you have found a storage space for your sound, then press
the ok Key (F1). The sound is now stored and can not be lost unless you decide to overwrite it with
another sound.
The Quick-Save Function:
There is a further function available to you which will help to speed up your work with the Sirius:
The Quick-Save-Function. It is recommended for instance if you have slightly modified a factorysound to your liking and you quickly want to store it in the same storage space.
Just press one of the 16 number Keys and hold it down for 3-4 seconds. A status bar showing the storage progress will appear in the display. Once the storage has been completed, an ok-message will appear on the display. Should you release the Number-key before the status bar has completed its journey, the storage process is automatically aborted.
Menu page 2 (storage of patterns)
This function allows you to save the pattern you are currently editing. A pattern stores the number of
used motifs, the used sound numbers, the settings for groove, volume, pan and FX sends as well as
any current VOCODER routings. The latter is important for a problem-free use of the VOCODER in a
live situation. In every user-pattern you can freely allocate the ANALYSE and CARRIER parts which
are to influence the VOCODER.
<2> Store Patt. ?
[Ok]
35
Page 36

The Write-Menu
If you want to store a pattern, press the F1-Key.The following sub-menu will open:
You have 100 storage spaces available to save a pattern. Choose the desired storage space with the
VALUE/TEMPO-dial and confirm with F1. If you press the F3-Key you will cancel the storage procedure.
Menu page 3 (storing of songs)
On this menu page you can store the selected and edited song. You have 16 song-storage spaces
available. A song stores the numbers of used patterns, the allocation of the 16 Number-keys with the
patterns, breaks and special-loop-tracks, the tempo of the song, the sequence of the song , the settings for the effects programmes and the settings for the vocoder.
Press F1 to start saving. The following menu page will open. Here you can name your song individually.
to Pattern P43
[ok] [cancel]
<3> Store Song?
[ok]
Name: OldSchol
[ok] [cancel]
As with the sound name, you enter the song name with the VALUE/TEMPO-dial or the Keyboard. To
change to the next letter use the PAGE/BANK-Key. If you want to enter the name press the F1-Key to
confirm.
to 10 (OldSchol)
[ok] [cancel]
On this page you can select one of the 16 song storage spaces with the VALUE/TEMPO-dial. Once
you have confirmed this function with the F1-Key your song is safely stored. On the last two pages of
the menu you have the option to cancel the storage procedure by pressing the F3-Key.
Menu page 4 (storing arpeggio-motions)
This page allows you to store your home-created or customised arpeggio-motions. You have 9 storage spaces available.
<4> Store Arpg.?
[ok]
When confirmed with F1 the following sub-menu will open:
to Motion MOT2
[ok] [cancel]
Here you can select one of the 9 storage spaces for arpeggio motions with the VALUE/TEMPO-dial.
Once you have done this you can complete the storage procedure with the F1 Key below the display. To cancel the storage procedure press the F3-Key.
36
Page 37

The Write-Menu
Initialise:
With the following INIT-functions you can literally "hide" sounds, patterns and songs. This is very practical if you want to return to the Sirius' original factory settings in order to program or edit a sound.
Important:
Please note that sounds, patterns or complete songs will not automatically be deleted once they are
initialised. The original data will only be lost once you have stored the initialised sound, pattern or
song onto the same storage space. If you save your initialised data onto a different storage space, the
original data will remain unchanged in its original storage space.
Menu page 5 (initialise sounds)
<5> Init Synth1?
[ok]
Once you have started this function by pressing the F1 Key the selected part of the Sirius will be initialised. This means that all sound parameters like for instance filters, LFO, waveform envelopes are
set to their neutral position.
This is very convenient when you want to programme a sound from scratch. Of course this also applies to the drum Parts 1-4. While you are in this menu page you can select any other of the sounds
or drum-parts using the Part-keys, CATEGORIES-keys and Number-keys and then initialise them.
Menu page 6 (initialise patterns)
<6> Init Patt.?
[ok]
Here you can initialise the selected pattern. This means the tracks as well as the setting of the mixer
section are being set to neutral. Following the initialisation you will be working with an empty pattern.
Menu page 7 (Initialise songs)
This function allows you to initialise the selected song.
<7> Init Song?
[ok]
Initialising a song in a way 'hides' the sequence of the song, the allocation of Number-keys and all
song-relevant parameters. If you have initialised a song you still want to use, it matters not one whit.
You will only permanently erase it once you have stored the empty initialised song in the same Userstorage space.
37
Page 38

The Write-Menu
Copying:
Menu page 8 (copy motifs)
With this function you can copy user-motifs to another Part or another User motif storage space. You
can copy, for example, a motif located on the Synth-1 Part in the same pattern to one of the other
Parts without having to replay it.
Press the F1-Key and the copy function will be activated.
In this sub-menu you can select a Part (track) with the Part-keys for which you want to copy a motif.
With the VALUE/TEMPO-dial you can select the motif to be copied. While selecting the motif to be
copied you should leave the sequencer on so you can listen to the each motif being played. Once
you have selected the part and motif press the F1 Key to confirm.
<8> Copy Motif?
[ok]
Copy Synt2 Mtf 1
[ok] [cancel]
to Synt2 Motif 1
[ok] [cancel]
See page 110
Select the part and motif storage space onto which you want to copy the motif you have chosen on
the previous menu page. An asterisk (*) before the motif number signifies that the storage space is
not taken up yet. Here you can also listen to the selected motif that you want to overwrite by running the sequencer. Press the F1-Key to execute the copy command. F3 allows you to cancel it.
Data-Dumping
The Sirius offers you 4 different ways of dumping data. At this point we will only be giving you a brief
overview of the dumping functions. A more detailed description can be found in the chapter called
"The Sirius and MIDI".
Menu page 9 (Momento Dump)
The momento-dump sends all presently set parameters of the Sirius, even those that have not been
stored yet. They are: the sound setting, all system parameters from the system-menu, all common parameters (pad allocation, sequencer-tempo, groove settings, effects settings, vocoder settings, arpeggio settings) and finally Mix settings. You could call the momento dump a 'snapshot' of the current settings or status of the unit.
Menu page 10 (Sound Dump)
The sound dump sends all 480 sounds of the Sirius stored in the User bank, the settings of the percussion-sets and the arpeggiator-settings.
Menu page 11 (Song Dump)
The song-dump sends all stored user-motifs, user patterns P0-P99, the mix parameters and songs. A
finished saved song contains the sequence of the song, the sequence-tempo, the groove settings, the
effects settings o f FX1 and FX2, the vocoder-settings and the arpeggiator settings.
Menu page 12 (All-Dump)
When you select all-dump, a sound-dump and a song-dump are being sent immediately one after
the other.
38
Page 39

Notes
39
Page 40

The Sequencer
The Sequencer of the Sirius
The Sirius has a pattern-sequencer with 7 Parts or tracks.
What is a Sequencer?
The sequencer allows you to play little music pieces, called 'motifs', in various ways, which can then
be put together to form a complete song.
What does the sequencer record?
The sequencer does not record the sound of the instrument which is being recorded, as does a tape
recorder. It is more like a trigger: In record mode the sequencer memorizes which note or key is being played, the strength with which the note or key is hit (known as 'VELOCITY'), the length of time
which the note is held down for and the point at which the note is released.
It also memorizes the movements you make on the dials and wheels of the Sirius, such as the Pitch
Bender or the EG-MACROS. When you replay your 'recording' the sequencer will play back the
same keys you pressed during the time of the recording. In a way, the sequencer invisibly repeats
your performance in every tiny detail.
See page 126
!
You can also record MIDI-information ( for notes and controllers) which comes into the Sirius from
an external Midi device via the MIDI-in socket. In the appendix of this manual you will find a table
showing you which information the sequencer is able to record from an external device.
Important:
battery supplying the storage block with power - this will have to be replaced after some years. Information on the battery and storage protection can be found in the chapter "Important Notes" at the beginning of this manual.
The recorded songs stay stored even after you switch off the Sirius. The Sirius has a small
How is the sequencer configured?
The sequencer in the Sirius is a 7-track-sequencer:
This means up to 7 different tunes (motifs) can be played simultaneously. Every part of the Sirius
(bass-drum, snare-drum, hihat, percussion set, synth-1, snyth-2, synth-3) is given its own track. Don't
forget, the percussion track can play 12 different instruments at once (effectively giving you a maximum of 18 instruments playing at the same time).
PERCUSSION-Instrument 1
PERCUSSION-Instrument 2
PERCUSSION-Instrument 3
PERCUSSION-Instrument 4
PERCUSSION-Instrument 5
PERCUSSION-Instrument 6
PERCUSSION-Instrument 7
PERCUSSION-Instrument 8
PERCUSSION-Instrument 9
PERCUSSION-Instrument 10
BASS-DRUM-Part Kick-Track
SNARE-Part Snare-Track
HI-HAT-Part Hihat-Track
PERCUSSION-SET-Part Perc-Track
SYNTH-1-Part Synt1-Track
SYNTH-2-Part Synt2-Track
SYNTH-3-Part
PATTERN
Synt3-Track
PERCUSSION-Instrument 11
Percussion-Set :
PERCUSSION-Instrument 12
40
Page 41

The Sequencer
This principle has the advantage that you can delete or edit any track without jeopardizing any of the
other (non-selected) tracks. Given the fact that even for the drums you have several tracks available
you can easily change the sounds for single drum instruments such as bass-drum, snare or hihat.
This you can not do with, for instance, a drum-loop in a sampler. Like this you can record one track
after the other and play them back all at the same time. Even for the non-professionals it is very easy
to play rhythmic, complex drum patterns. Whilst replaying you may adjust the volume, pan and effects separately for each track. Use the front panel controls of the Sirius MIXER.
MIXER
LEVEL
PANORAMA FX1/FX2
PART
SELECT
SOUND
SELECT
PART
MUTE
PATTERN
SELECT
PART/SEQ.
TO MIDI
SONG
SELECT
SNARE HIHAT PERCUSSION SYNTH 1 SYNTH 2 SYNTH 3KICK/BD
12
34567
So you can see that you are able to modify your musical creation at any time.
Patterns, bars and motifs:
Having the use of seven adjacent tracks is in itself very practical - but there's more!
Be honest: How would you fancy trying to play the bass-drum from the beginning to the end of an
eight minute long track? Or, after a 5 minute-long performance, you make a mistake and have to
start the whole thing again from the top!
More practical would be if you could play only a very few bars and then have them repeated several
times. Most of the time a song consists of small repeated sections - so the sequencer of the Sirius
gives you the option to separate your musical ideas into these small sections.
And so we come to the MOTIF.
What is a Motif?
In the Sirius a motif is a musical theme lying on a single sequencer track and is between one and
max. 8 bars long. For instance you can put a one bar motif on the bass-drum-track (kick-track) and a
4-bar motif on the snare track and so on.
What is a pattern?
You can store the motifs of the 7 separate sequencer tracks together with other settings as a 'pattern'.
Kick-Track:
Snare-Track:
Hihat-Track:
Perc-Track:
Synt1-Track:
Synt2-Track:
Synt3-Track:
Kick-Motif
Snare-Motif Snare-Motif
HihatMot HihatMot HihatMot HihatMot HihatMot HihatMot HihatMotHihatMot HihatMotHihatMot
Perc-Motif Perc-Motif
Synt1-Motif Synt1-MotifSynt1-Motif Synt1-Motif
Synt2-Motif Synt2-Motif
Synt3-Motif Synt3-Motif
41
Page 42

The Sequencer
What is being saved in a pattern?
You might already have noticed that the Sirius contains a total number of 242 pattern storage spaces.
142 ROM (factory) patterns are permanently installed and can not be deleted by mistake. You can,
however, copy a single or several motifs into a freely editable User-pattern-storage space. UserPattern-storage spaces can be deleted and edited.
In each of the 100 User-Pattern-storage spaces of the Sirius the motif allocations of the seven tracks
are filed with their respective Sound number. You also store the so-called mix settings with the pattern. Apart from the volume settings of the 7 motifs the mix-settings contain the motif«s pan (left, centre or right) and the effects-send settings of the two effects processors FX-1 and FX-2 for each of the
tracks. The internal vocoder routing is also stored with the pattern. This is very important for a problem-free live performance of the vocoder as you can freely assign the ANALYSE- and CARRIER-parts.
Pattern-Parameter Mix-Parameter Vocoder-Routing
Track 1
Motif
Sound N°
The contents of one Pattern-Storage-Space
Level
Panorama
FX1-Send
FX2-Send
Analyse On/Off
Carrier On/Off
Track 2
Track 3
Track 4
Track 5
Track 6
Track 7
Motif
Motif
Motif
Motif
Motif
Motif
Sound N°
Sound N°
Sound N°
Sound N°
Sound N°
Sound N°
Groove
Factor
Level
Level
Level
Level
Level
Level
Panorama
Panorama
Panorama
Panorama
Panorama
Panorama
FX1-Send
FX1-Send
FX1-Send
FX1-Send
FX1-Send
FX1-Send
FX2-Send
FX2-Send
FX2-Send
FX2-Send
FX2-Send
FX2-Send
Analyse On/Off
Analyse On/Off
Analyse On/Off
Analyse On/Off
Analyse On/Off
Analyse On/Off
Carrier On/Off
Carrier On/Off
Carrier On/Off
Carrier On/Off
Carrier On/Off
Carrier On/Off
The Song and its Steps:
It goes without saying that you have the option to compose complete songs and store up to 16 of
them in Sirius' memory block. One song can be made up from up to 100 'steps', called Song-steps.
For every Song-step you define which pattern is to be heard in the step and how long it is to last (a
max. of 64 bars per step is possible). The overall length of the song must not consist of more than
600 bars which would equal 20 minutes per song at a speed of 120 BPM. In a Song-step you can
also determine which tracks are to be muted.
You can also dictate the transposing (varying of the pitch in fixed increments: +/- 12 half tones) of
the three Synth motifs. The following settings of the complete song with its steps are stored:
the settings of the effects-processor, the tempo settings, the vocoder settings except for the internal
vocoder routing. Also stored are the allocations for the 16 pads available in a song: your 8 favourite
patterns on the pads 1-8, the 4 breaks patterns and 4 special loop-motifs on pads 9-16.
Recording and Editing Motifs:
Editing the motifs in the pattern:
Before you start recording a motif you should closely look at an already existing pattern with its motifs.
Press the EDIT-Key then the right-hand PAGE/BANK-Key. Now select the Edit-pattern main menu by
pressing the F1-Key under the display. The display shows the following contents:
Select Pattern
[Rom] [User]
42
Page 43

The Sequencer
Select USER and choose User-pattern 09 with the VALUE/TEMPO-dial. Confirm with F1 [ok] and
start the sequencer with the START-Key.
Select Pattern
Pattern:P09 [ok]
Selected Pattern
Selected Track
Edit P09 T:Synt1
|1> Motif:ROM-55
Selected Motif
Press the PART-SELECT-key and select another Part (track) of the pattern. At the top right-hand corner
of the display you can always see which Part (track) you have just selected, (In this example it is the
Synth-1 Part).
A very practical aspect for you to consider is this: When you have activated the PART-MUTE-Key in
the mixer section the PART-Keys will show the muted tracks instead of the ones selected in the display.
If you turn the VALUE/TEMPO-dial on this menu page you are selecting a different motif for your chosen track. There are 142 ROM motifs per track (non-deletable factory motifs) and 100 User-motifs
available.
Expert's advice:
used or empty ones.
Expert's advice:
Display showing USR -> press F3: USR No. jumps to USR*00
Display showing USR -> press F2 or F1: motif jumps to ROM area with same No. (I.e. Display
Display showing ROM-00 to ROM-99 -> press F3: motif jumps to "no" (empty motif)
Display showing ROM-100 to ROM 142 -> press F3: motif jumps to ROM-100
Display showing ROM-100 to ROM 142 -> press F1: motif number jumps back 100 ROM numbers.
You will notice that when you change the motif, only the tune or arrangement changes, not the
sounds playing the tune or arrangement. This is because each of the sounds allocated to the seven
Parts (tracks) have not been altered.
By holding down the PART-SELECT-Key you can scroll through the Parts (tracks) using the PART-Keys.
You can also allocate different motif numbers to these Parts using the VALUE/TEMPO-dial.
You recognise used User-motifs by the "-" before the number and the "*" for the un-
If you use the function Keys F1-F3 you can execute the following shortcuts:
shows USR*46 - hit F1 or F2 - display jumps to ROM-46)
Tip
Random-Motifs:
Expert's advice:
Hold down the SHIFT-Key and press one of the 7 PART-Keys. The random generator sort of throws
the dice and produces a new sound and a different motif for the selected part. The Sirius does not
write a new motif but picks out one of the many stored ROM patterns at random. The random motif
is called up with the respective sound. Should you not be able to hear anything, the Sirius has probably chosen a pattern in which not all of the 7 tracks are used.
By the way, this function is also available in the normal JAM mode, independent of the Edit-menu.
Motif-Random-Selection:
43
Tip
Page 44

The Sequencer
Time to RECORD!
Following the dial twiddling and dice throwing we come to the most exciting part of the Edit-motif
menu: the recording and editing of your own ideas.
Depending on the part you have selected with your 7 part-Keys (from kick to synth-3) the Sirius has 3
different recording modes available:
The Record mode you select depends entirely on personal taste. Each type of recording has its own
particular advantages and uses.
Moving or Deleting User Memory Spaces:
Before you start recording new things you need to select an empty User motif or even a completely
empty user pattern. As you know, you recognise an empty motif by the "*" sign before the motif number in the track display. If you are in the JAM mode empty tracks are also signified with an asterisk.
In the following example, all 7 parts (tracks) of the selected pattern are still empty:
1. Realtime recording - works on all 7 Parts (tracks)
2. Step-recording - works on Parts (tracks) synth-1 to synth-3
3. Drumgrid-recording (for drum-Parts (tracks) kick, snare, hihat and percussion).
B13:TranceBS 160
(P00) +0 *******
Deleting all motifs in a pattern simultaneously:
Press the EDIT-key. Use the right hand PAGE/BANK-key to access page 2 of the Edit-menu. Hit the F1
key (Pattern). You will now see the following display:
Select Pattern
[Rom] [User]
Press the F3-key and select the user area. With the VALUE/TEMPO-dial select a pattern you wish to
delete (initialise). The display will show for instance:
Select Pattern
Pattern:P09 [ok]
After confirming (ok) with the F3-key, select and edit the desired parameters. The pattern is automatically stored in the Sirius' RAM (temporary memory) block (the original user-pattern will still remain
untouched in its original User-storage bank).
Edit P09 T:Synt1
|1> Motif:ROM-55
Now press the Write-key and use the PAGE/BANK-keys to select page 6:
<6> Init Pattern?
[ok]
Confirm with key F1 and then press the EDIT-key to get back to the Edit-pattern menu.
Edit P09 T:Synt1
|1> Motif: no
As you can see now the motif information for all 7 tracks is deleted. The Sound data remains the
same. Please note the following: When you leave the edit-menu by pressing the EXIT key the pattern
is still not stored and will revert to the original untouched pattern when you call it up again. So don’t
forget to save it!!
44
Page 45

The Sequencer
Deleting one motif only:
If you want to delete only one motif from one track select page 3 of the Edit-pattern-menu and then
press the F2-key.
Edit P09 T:Synt1
|3> [clear]
Now the motif is empty because the values of the notes have been deleted. With the VALUE/
TEMPO-dial you can enter a new motif length between 1 and 8 bars in the display . Should the motif also contain Wheel control information from the performance aids, this will also be deleted with
the clear-function.
Expert's advice:
keys and you will select that part within the current menu.
After you have deleted the motif you will see the following on menu page 1:
Again the "*" stands for an empty motif into which you can now record something new. You can of
course only record onto a User motif-storage space as the ROM storage can only be read and not
over-written.
It does not matter where in the menu you are, simply press one of the other Part-
Edit P09 T:Synt1
|1> Motif:USR*00
Realtime Recording:
The Realtime record-mode records everything in real time, i.e. what you are playing whilst in
Realtime record-mode. You will at this point be playing along to the beat of the metronome.
Procedure:
First you should switch the metronome to ON on page 5 of the Edit-pattern menu:
Edit P09 T:Synt1
<5> Metronom: ON
Tip
If you haven't already done so, select a User-pattern in the Edit-pattern menu and then a free motif
(Menu-page 1) - example:
Edit P09 T:Synt1
|1> Motif:USR*00
Now you have two methods to choose from in order to start your recording. You either simply press
the RECORD-key in the sequencer section:
SEQUENCER
RECORD
REW
Or go to menu page 6. You will see the following display:
Edit P09 T:Synt1
<6> [record]:NEW
START
SONG-STEP
STOP
FWD
45
Page 46

The Sequencer
You haven't started recording yet, but when you press the RECORD-key once more or the F2 key under the display you will hear a one bar count-in (pre-count) from the metronome.
!
Expert's advice:
FADER.
While the metronome is "ticking" away you will have one bar (4 beats) to tune into the beat. Then
the recording will start and you can play your tune. By the way, your metronome will run with you
until it has reached the motif end that you determined (1-8 bars). While you are recording you will
see the present recording position in the motif: At the bottom left you see the bar number, after the
colon is the current quarter note of the bar:
If the selected motif is for instance only 2 bars long you will automatically jump back to the beginning when the recording has stopped. Your 2 bar motif is now going to be repeated again and again
(looped). During these repetitions you can not carry on recording. Your theme is only being replayed. The display will show the same as before.
You can adjust the volume of the metronome with the SPECIAL-LOOP-TRACK-
Edit P09 T:Synt1
1:3 Record!
Edit P09 T:Synt1
<6> [record]:NEW
Overdub-Recording:
You have probably already wondered what the word NEW on this menu page means. NEW shows
that if you re-record a motif the existing contents will be overwritten (deleted). Press the F3-key or
turn the VALUE/TEMPO-dial and you can select another option.
Edit P09 T:Synt1
<6> [record]:DUB
Here DUB means overdub mode. You add a new recording to the already existing theme in the motif. If for instance you played a note or a chord on the 1st beat of each bar and you then want something else to happen on the second beat you can do this in DUB mode. Adding things will not delete
what you have already recorded, or "set".
After recording the melody you can start another overdub-recording and "tune" the dials of the synthsection. Record for instance the movement of the cut-off control or volume control via VCA-level.
You obtain another interesting effect by turning the de-tune control during a normal 16th HiHatmotif.
You should definitely try this out because like this you can achieve incredibly dynamic grooves,
which you can normally only play with four or more hands.
If you should notice immediately after the overdub recording that you don't like it you can cancel the
last action: use the PAGE/BANK-key to change to menu page 8:
Edit P09 T:Synt1
<8> [delc][undo]
The F3-key allows you to jump between the current recording and the recording before that (undo
and redo). Be careful: you can only do this in the overdub recording mode while the sequencer is
still running. As soon as you stop the sequencer the undo function is not available to you anymore. If
you want to delete all the recorded dial movements of a motif at once just press the F2-key DELC
means: delete controller.
46
Page 47

The Sequencer
After the recording:
Following the recording of your motif the edit pattern menu offers you a number of parameters with
which you can edit and perfect the recordings.
The Groove Factor:
On page 2 of your menu you can add a groove-factor to your recording. This will basically reposition the notes you have played using specific musical criteria and gives your melody or your
rhythm more 'swing'. You can adjust the groove-factor in per-cent with the VALUE/TEMPO-dial.
Edit P09 T:synt1
<2> Groove: 37%
Using the groove factor causes your rhythm to "shuffle" or "swing" giving you the impression that a
real drummer is playing. This function is particularly effective for House, HipHop and Funk styles.
If you favour a more machine-orientated groove you can copy the behaviour of the old cult-drum
computers from the early days of electronic music particularly well. Due to slow processors, timing
variations were typical and were integral to the special character of those machines.
Quantisation:
After you finished your recording you might notice that for instance the bass drum is not exactly on
the beat or that the timing of your recording is less than accurate. For such cases the sequencer of
the Sirius has a function which can pull the separate notes into place on a given grid. How fine this
grid is to be set can be determined on page 7 of the menu.
Edit P09 T:synt1
<7> [quant]:16
16 means here for example that your played notes will all be moved to the closest 16th of a bar. The
VALUE/TEMPO-dial allows you to set the quantisation from an 8th to a 32nd of a bar. You can even
quantize to triplet bar measures such as 12ths and 24ths. Totally inaccurate recordings can of course
not be saved through quantization. So a certain accuracy is required when recording in realtime.
The F2 key starts the quantisation, it will also work while replaying the sequencer. You can also apply
the undo function from menu page 8 should you have made a mistake.
The storage display:
On page 9 of the Edit-pattern menu you will find the information showing how much memory is still
available for recording further motifs.
Edit P09 T:synt1
<9| Mem: 99%free
47
Page 48

The Sequencer
Recording drum-motifs with the drumgrid:
To make a recording with the drumgrid proceed as follows: first select a drum part with the Part-key
of the mixer section. Only the orange coloured parts (parts 1-4) can use the Drumgrid Record mode.
We will use the percussion part in our example.
First select an appropriate percussion set using
the sound-select-keys (categories and Numberkeys).
Then look for an empty motif (the one with the
"*") or delete an already existing user-motif with
the Clear-function on Edit-pattern menu page 3.
Then determine the number of bars in your
theme.
Edit P09 T: Perc
<3> [ --- ]Len:1
Move to menu page 4 and activate the drumgrid with the F2 key.
Edit P09 T: Perc
<4> [drumgrid]
You are now in the Drumgrid recording mode.
Grid: 16 | 1/1 |
Instr: 808Kick2
Before we start recording we would like to explain what a drumgrid is.
This diagram shows the
drumgrid of a typical
House groove.
4th
16th
KICK
SNARE
O-HIHAT
C-HIHAT
PERC-1
PERC-2
PERC-3
PERC-4
PERC-5
PERC-6
PERC-7
PERC-8
PERC-9
PERC-10
PERC-11
PERC-12
11234526789310 11 12 13414 15 16
1 bar
48
Page 49

The Sequencer
A two bar theme is split into two bars each with 16 equally long sections. This forms a fixed grid in
which only 16th notes can be inserted. In Techno and Dance sections you very often hear continuous hihat-lines consisting of 16th notes. By putting all the drum instruments onto this grid you get a
good impression of the timing of a drum instrument. You can also verify how many drum instruments
are placed in the same position in the bar. The 16 divisions of the Sirius' drumgrid are represented by
the number keys 1-16 above the keyboard.
VELOCITY
12
3 4 5 6 7 8 9 10 11 12 13 14 15 16
PATTERN BREAK
The keys 1-16 are a bar with 16 X 16th notes. The markings (bold white lines) under the 1, the 5, the
9 and the 13 on the front panel show the position of each 'on' beat.
Starting the Recording
First press the START-key of the sequencer and set the volume of the metronome with the specialloop-track fader. You should now choose a percussion set which you want to record your theme in.
By tapping a key on the keyboard you activate the respective instrument. The name of the instrument will immediately turn up in the second line of the display.
Now you can start entering the notes. The keys 1 to 16 represent one bar, containing 4 beats which
are divided into 16 notes (4 notes per beat or 4 'semiquavers' totalling 16 semiquavers to the bar). So
you are working in a resolution of 16.
Now press some of those 16 number keys and listen to the result. You will recognize a recorded or
'SET' note because the corresponding key will be permanently lit. To remove a note you hit the corresponding key a second time. You should try setting and removing notes intensively. After a short
while you will notice which grid points in the bar are the important ones.(NB: Number keys 1,5,9
and 13 are the most important. Placing a bass drum on each of these grid points gives you the classic
House/Dance 'Four On The Floor' bassdrum)
GATE-TIME
SPECIAL LOOPTRACKS
The drumgrid also allows you to select different volume settings for each note. You have four different volume settings available. To select these, hold down the SHIFT-key. Now one of the keys 9 to 12
will be lit. On these 4 keys you have the volume settings, also called velocity (notice the word
'Velocity' is printed in white above these 4 number-keys!). Key 9 is the most quiet setting, key 12 the
loudest one.
Expert's advice:
The volumes for these 4 number-keys can be programmed in the PAD-menu de-
scribed on pages 33-36.
So while you are holding down the SHIFT-key you can select one of the four programmable settings
with number-keys 9-12.
The change of velocity will only effect notes which are set after the change has been made. If you
want the new velocity to reflect in an already set note you have to delete this note first and then reset it.
If your motif exceeds the selected bar length, the PAGE/BANK keys allow you to jump between the
bars. Like this you can edit each bar on its own. The number of bars is displayed on the top right.
Grid: 16 | 1/4 >
Instr: 808Kick2
Tip
49
Page 50

The Sequencer
Another useful feature of the drumgrid is that you can set another resolution of the notes while entering them. Hold down the SHIFT-key and select the desired resolution with the PAGE/BANK-key.
The following resolutions are available:
It is best to experience the different note resolutions by trying them out. For a bass drum a low resolution will certainly be sufficient. For snare-rolls or driving hihats a resolution of 32 would be appropriate.
8th of a note: lowest resolution. The bar only goes up to Number-key 8.
12th of a note: This resolution is also called a triplet. This means that a bar is divided into
12 steps.
16th of a note This is the standard setting when opening the drumgrid. The bar is divided
into 16 steps.
24th of a note This is another form of triplets. The bar now contains 24 steps.
32nd of a note This is the highest resolution. A bar contains 32 steps. In this resolution the
keys 1 to 16 only represent half a beat.
Triplets can be combined with any other resolution in the same motif, i.e you can have a resolution
of 8 for the bass drum and at the same time a resolution of 24 for the hihat.
Once you have completed the beat for one instrument in the percussion set just press another key
on the keyboard to get to the next instrument of the selected percussion set. Once you have finished
recording all the necessary instruments of the percussion set you exit the drumgrid by pressing the
EXIT-key. Now you can select another track with the Part-keys.
In the HIHAT-section there is an option available you should take notice of:
The drumgrid in the HIHAT section gives you the choice between closed HIHAT (closed HH) and
open HIHAT (open HH). Turn the VALUE/TEMPO-dial to choose between these two options. The
change will be displayed.
!
Caution:
done so), your desired drum and bass sounds. Press the WRITE-key to store the pattern including the
sound number for each track in the WRITE-menu.
The Step Sequencer for the Synthesiser-Parts:
What the drumgrid is for drum and percussion parts the step-sequencer is for the synthesizer parts.
When you are on page 4 of the Edit-pattern-menu and you have selected the synth-1track with the
respective Part-key the following will read on the display:
After completing your drumgrid recording using the EXIT-key, select (if you haven't already
Edit P09 T:Synt1
<4> [stepRecord]
The step sequencer of the Sirius functions much the same way as the old analogue units which came
out in the early Eighties. As it was with these antique units, experimenting with the step-sequencer of
the Sirius will keep on surprising you.
Your motto when using the step sequencer should therefore be joy in experimentation. Don't necessarily try to understand exactly what you are doing at the time.
Just let yourself be surprised by the results. For predictable melodies you still have the Realtime recording mode.
50
Page 51

The Sequencer
One requirement to ensure your first success with the step sequencer is an empty synth motif.
Should the sequencer not be switched on yet, press the START-key. Now press the F2 or F3 key to enter the step sequencer.
Step: 1:1:1/16
--- V: 64 G: 6
Now enter the first note using the keyboard. Just press one of the keys.
Step: 1:1:1/16
C4 V: 64 G: 6
The first step is now set. If you want to cancel / undo the note entry just repress the same key or select another key on the keyboard. Now press the PAGE/BANK-key. If you look at the display you will
notice that you have jumped on to the next step (i.e. the second 16th part of the bar). You can now
enter a second note with the keyboard. The current step is always indicated in the display.
Step: 1:1:2/16
--- V: 64 G: 6
The numbers in the first line of the display means: you are in the first bar - its first 1/4 - its second
16th.
The step sequencer also allows you to set a different resolution while entering the notes. To do
this hold down the SHIFT-key and select the desired resolution with the PAGE/BANK-key.
As in the drumgrid recording you can set the volume for each note with the Number-keys 9-12. The
velocity value is displayed in the centre of the lower line of the display as V: and then a number from
1-127. For sounds that have the filter dynamics controlled by the touch sensitivity, a change of the velocity setting will also open or close the filter. This can make the sound lighter or darker for each step.
At the bottom right of the display you can see another value: G. This stands for Gate-time which basically means the length of a note. This allows you to lengthen or shorten notes according to the resolution of the grid in which they are set. In this example the resolution is set at 16. There are four
lengths available.
You allocate the note lengths with the Number-keys 13 to 16 (you will notice that 'Gate Time' is
printed in white above these 4 number-keys). The length of the note depends on the selected resolution. Key 16 assigns a note length which will join the note to the next step. The display therefore
shows the word "glide".
Expert's advice:
do this hold down the key of the note on the keyboard which you wish to lengthen and hold down
PAGE/BANK-key at the same time . This will stretch the length of your note. Should the next step be
empty you will be able to extend the note«s length into the next step. If the next step is not empty,
and you extend the note into it, the message 'Glide' will appear in the bottom right of the display.
With a chosen resolution of 16, for example, you can change the length of your note to 1/8 of a bar
instantly.
You can also control the length-values of the given Gate-times of keys 13 to 15. To
51
Tip
Page 52

The Sequencer
Play around with the step sequencer and try out its different step-parameters. As already explained
the results are not always predictable. But is this not part of the attraction of electronic music? Once
you have worked out your own system with the step sequencer you wont want to miss it anymore.
Tip
Expert’s advice: You can at any time quantize or add a groove factor to your new motif. It does not
make any difference whether you have recorded your motif in the Realtime, Drumgrid or Step
Record mode.
The Mixer Settings:
Before you now save your pattern you should get to know the MIXER-section, as the mix parameters
are also stored along with the pattern.
Diagram of Mix section functions:
FX1-SEND
FX2-SEND
FX1-SEND
FX2-SEND
FX1-SEND
FX2-SEND
FX1-SEND
FX2-SEND
FX1-SEND
FX2-SEND
FX1-SEND
FX2-SEND
FX1-SEND
FX2-SEND
KICK/BD
SeqTo.:
Wave-Macro
SNARE
SeqTo.:
Wave-Macro
HIHAT
SeqTo.:
Wave-Macro
PERC.
SeqTo.:
Wave-Macro
SYNTH 1
SeqTo.:
Wave-Macro
SYNTH 2
SeqTo.:
Wave-Macro
SYNTH 3
SeqTo.:
Wave-Macro
PAN
PAN
PAN
PAN
PAN
PAN
PAN
MIX-LEVEL
Right
Left
MIX-LEVEL
Right
Left
MIX-LEVEL
Right
Left
MIX-LEVEL
Right
Left
MIX-LEVEL
Right
Left
MIX-LEVEL
Right
Left
MIX-LEVEL
Right
Left
FX-2 FX-1
52
Right RightRightLeft Left Left
OVERBLAST
Right
Audio-Out
Stereo-Output
Left
Audio-Out
Page 53

The Sequencer
Press the EDIT-key followed by the right-hand PAGE/BANK-key to access the Edit-mix menu.
Select Edit <2>
[Pattern] [Mix]
Press the F3 key and you will go to Edit-mix menu page 1.
Edit Mix T:Synt1
|1> SeqTo:Intern
This menu allows you to command each Part (track) of the sequencer to either drive the respective
part of the Sirius (here the synth-1 Part) or to send out MIDI information only - or both. You can set
this parameter with the VALUE/TEMPO-dial. Watch the LED display in the part keys when turning
the VALUE/TEMPO-dial. You can also select between Intern and MIDI with the Part-keys of the mixer
panel directly. You have to make sure that you have pressed the PART/SEQ TO MIDI-key.
Allocating the Sequencer Tracks
This diagram shows the allocation of the
sequencer tracks to the internal Parts
and/or the MIDI-out. For this you must be
switched to “Local: ON” in the system
menu. “Local: OFF” means that all sequencer tracks are exclusively sent to the
MIDI-out (all PART/SEQ TO MIDI-keys are lit)
!
Edit Mix
|1> SeqTo:
INTERN
BOTH (intern+MIDI)
MIDI
INTERN
BOTH (intern+MIDI)
MIDI
INTERN
BOTH (intern+MIDI)
MIDI
Edit System/Midi
<4> Local: ON
INTERN
BOTH (intern+MIDI)
MIDI
KICK/BD
SNARE
HIHAT
PERC
Key on the user
panel will display:
=
PART/SEQ.
TO MIDI
=
PART/SEQ.
TO MIDI
=
PART/SEQ.
TO MIDI
=
PART/SEQ.
TO MIDI
Caution: The allocation of the sequencer
(Internal, MIDI or Both) is not stored for
each pattern individually but is valid for all
patterns together. This allocation will remain in the memory of the Sirius until you
next change it, even if you have turned the
Sirius off. You should therefore first check
out this setting should you not be able to
hear anything from the sequencer. The likelihood is that the tracks are routed to the
MIDI-out only.
The setting can be selected in the Edit mix-menu only
BOTH
The setting can also be activated by the PART/SEQ TO
MIDI
MIDI-key on the front panel.
INTERN
BOTH (intern+MIDI)
MIDI
INTERN
S E Q U E N C E R
BOTH (intern+MIDI)
MIDI
INTERN
BOTH (intern+MIDI)
MIDI
53
SYNTH 1
SYNTH 2
SYNTH 3
MIDI-Out
=
PART/SEQ.
=
PART/SEQ.
=
PART/SEQ.
TO MIDI
TO MIDI
TO MIDI
Page 54

The Sequencer
On menu page 2 you see which sound number has been allocated to which part:
When you switch between parts with the PART-SELECT-keys you will soon see which sounds are assigned to which particular Part (track). Changing these sounds alone can immediately result in a new
musical ideas!
On the following menu pages 3 to 6 you can determine the volume of the track in the pattern, the
stereo-pan position (more to the right or left, centred or random(RND), as well as which Parts you
are sending to the effects processors FX-1 and FX-2.
The parameters on menu pages 2 - 6 are stored with each pattern individually.
Saving a Pattern:
Once you have finished your pattern you can save it. Before you can do this you have to exit the
drumgrid or step-sequencer by pressing the EXIT-key.
Now go to the Write menu by pressing the WRITE-key. Select page 2 of the Write-menu with the
PAGE/BANK-keys. This is what it looks like:
Edit Mix T:Synt1
<2> A15:WaveBass
Tip
<2> Store Patt.?
[ok]
Press F1 [ok] to save. The display shows this:
to Pattern P09
[ok] [cancel]
On this page you can select a User-memory space for your pattern. You do this with the EDIT
VALUE/TEMPO-dial. F3 [cancel] allows you to abort. The pattern will not be saved. When you have
entered your memory space press F1 [ok]. The pattern will now be stored in the selected Usermemory space. Press the EXIT-key to quit the WRITE-menu.
Expert's advice:
Remember that in the pattern you only store the sound number for each of the 7 Parts. If you have
created a new sound for one of the Parts during the editing of the pattern you should save this new
sound (prior to saving the pattern) under a new sound number, i.e in a different User-memory space.
Patterns in a Live-Performance:
The sequencer of the Sirius can not only record and replay patterns but can do a lot more things you
might have missed in other sequencing devices. Particularly with the live performer in mind, the
Sirius offers you the chance to get in on the action. You can be flexible for your audience.
See page 70
The Tempo:
The tempo in which you record and replay can either be set using the VALUE/TEMPO-dial or can be
tapped in using the TapTempo-key. Try tapping the TAP-key rhythmically several times. You will notice that the tempo will adjust to your tapping rhythm.
When you are in the top menu level of sound-select, pattern-select or song-select, the tempo is displayed on the top right of the display. To get to this level hit the EXIT-key repeatedly until the display
stops changing.
You have a further possibility to change the tempo - the Beat-Recognition-System of the Sirius.
!
Important:
able song-memory banks.
The individual tempos of the songs are stored with the song data in each of the 16 avail-
54
Page 55

The Sequencer
The Number-Keys or 'Pads':
In this section we call the 16 Number-keys above the keyboard 'pads'.
You can assign different functions to the pads which later can be called up at any time during a live
gig.
The favourite patterns:
The Number-keys 1-8 can store 8 patterns per song. These patterns do not necessarily have to be in
the song. It can be any pattern from any of the 100 user-patterns available. In the Edit-menu you will
find the menu to assign the pads. When you change to page 5 with the PAGE/BANK-keys, and confirm with the F1-key, you will see the following display:
Edit Pad1 Assign
|1> Pattern:P09
Turning the VALUE/TEMPO-dial allows you to select any user-pattern you want to allocate to Number-key 1. Proceed the same way with the other Number-keys using menu pages 2 to 8.
To play the pattern just press the Number-keys 1-8 and you will immediately start your favourite pattern. It will play/run until you press the STOP-key or any other Number-key. All 8 patterns will start in
the tempo stored in the song memory containing those 8 pattern numbers. You can change the
tempo at any time with the VALUE/TEMPO-dial or the TAP-TEMPO-key. You regain the original
tempo by pressing the song-select key- and then selecting or entering the equivalent song number
with one of the 16 Number-keys.
The Breaks:
On menu pages 9 to 16 you can assign breaks. Again you are dealing with User-patterns which will
not loop endlessly but have a programmable length.
The number of bars for the breaks can be set from 1 to 8 bars. After this length the previously used
pattern will automatically be recalled. With breaks like that you can bring a lot of entertaining change
and tension into a live session.
Expert's advice:
previously played pattern.
The Special-Loop-Tracks
On menu pages 17 to 32 you can set the function of the special-loop-tracks. Special loop tracks are
single motifs which, when flown in, will replace the current motif in the pattern. While pressing one
of the keys 13 to 16 these motifs will replace the original motifs. You can choose from the first 99
ROM and the 99 user motifs. You can also select other sound numbers for these loop motifs.
The volume of the special loop tracks can be adjusted with the SPECIAL -LOOP-TRACK-FADER.
Make sure the contents of your breaks are thematically not too far apart from the
SPECIAL-LOOP
TRACK-FADER
Tip
An example (for this example we are using Pad 13):
Go to menu page 17. Here you have 4 different menu pages for pad number 13 available:
55
Page 56

The Sequencer
Press Number-key 13. The display will show the following:
On this page you can select the Part i.e. track to which the special-loop-track motif should be assigned. To do this turn the VALUE/TEMPO-dial. The right PAGE/BANK-key will take you to the next
page.
Turn the VALUE/TEMPO-dial to select the motif bank. You can choose between ROM and USER. The
right PAGE/BANK-key will take you to the next page.
Turn the VALUE/TEMPO-dial to select the motif number. The right PAGE/BANK -key will take you to
the next page.
Edit Pad13 Assign
<17> Track:Synt3
Edit Pad13 Assign
<18> MotBnk: ROM
Edit Pad13 Assign
<19> Motif: 94
Edit Pad13 Assign
<20> Sound: U96
On this page you set the Sound with which you want the speical-loop-track motif to play. Again turn
the VALUE/TEMPO-dial.
Proceed the same way with the other Pads. Only the numbering of the menu pages will differ from
those in our example. Now that you have programmed the special loop track keys, you can store
them for each song. In each of your 16 User song-storage spaces you have 4 individual loops available.
Mute and Transpose Tracks:
Before you can try the possibilities we have already mentioned, you will have to set another parameter in the SYSTEM -menu. Go to the Edit-menu and select the SYSTEM-menu.
Select Edit <5|
[Pads] [System]
On page 15 of the System-menu set the track-mute-parameter to the ON-position:
Edit System/Midi
<15> TrkMute: ON
The keyboard of your Sirius was given another two functions.
Apart from the Mute Part-keys you can now very comfortably mute and re-activate the single tracks
TRACK-MUTING
BD SNARE HIHAT PERC. SYNTH 1 SYNTH 2 SYNTH 3
Mute
Transpose
56
Page 57

The Sequencer
The second octave of the keyboard can be used to transpose the Synth-1-3 Parts in realtime while
the pattern is playing. Why not just try this function. You will be amazed how many ideas for complete songs will open up to you.
A Song develops:
With the patterns created by you you can arrange a complete song with up tp 100 separate steps
called Song-steps.
What is a Song-Step?
The individual pieces of a song are called Steps. A Step relates to an individual pattern with a predetermined length. You can also set a transposition for the three Synth-Parts within each Step. In addition you can choose whether a Part (track) should be audible or mute. To open the Edit-song menu,
press the EDIT-key. With the PAGE/BANK-keys choose page 4. The display shows the following:
Select Edit <4>
[Vocoder] [Song]
Press the F3-key [song] to open the Edit-song menu:
Edit S1 Bar: 1
|1> Pattern: P09
This is the first page of the Edit-song menu. In all the pages, the top line shows you the current position of the song.
1. Edit S1: This means that you are just in the first Song-step.
2. Bar: 1: This display indicates the actual position of your song in bar-counts.
In both instances, the bottom display line contains a parameter you are allowed to change. On page
1 you select the pattern. You can choose from 100 user-patterns. If you want to load up a ROMpattern copy it onto a User-pattern storage space first.
Now press the right PAGE/BANK-key. You will see page 2 on the display:
Edit S1 Bar: 1
<2> Transp: +0
On this page you set the number of tones you want one of the three synth-motifs to move up or
down (called transposition).
Edit S1 Bar: 1
<3> Bars: 4
On this page you can determine how long the pattern should last, i.e. how many bars it contains.
You can select between 1 and 64 bars.
Edit S1 Bar: 1
<4> [ins] [del]
This page offers you two functions: insert [ins] and delete [del]. Pressing the F2-key [ins] allows you to
insert a Step. Your selected Step will be copied and positioned as the next step in the song. All the following steps move along one position (shuffle).
Caution:
You can not insert when you are in the last step of a song.
57
!
Page 58

The Sequencer
When you press the F3-key [del] the selected step will be deleted. All the following steps shuffle
back.
Page 5 of the Edit-song menu contains a copy function. The display shows the following:
When you press the F2-key the selected step will be copied. The step you want to replace with the
copied Step is selected using the VALUE/TEMPO-dial.
To mute single instrument sections in a step press the MUTE-key accordingly. If the key is lit up, the
section is muted.
Once you have edited a step to your satisfaction press the FWD-key in the Sequencer section to get
to the next step. The REW-key takes you back one step.
To store a Song:
Once you have finished your song you can store it. You do this in the Write-menu. Press the WRITEkey. Select page 3 of the Write-menu with the PAGE/BANK-keys. It looks like this:
Edit S1 Bar: 1
<5| [copy]to:S1
<3> Store Song?
[ok]
Press [ok] to store. You will see the following in the display:
Name: Untitled
[ok] [cancel]
This page allows you to name your song. Turn the VALUE/TEMPO-dial to change the letters. The
next letter you will get to with the right PAGE/BANK-key. You can also use the keyboard to name
your song. The following diagram shows you where to find the letters, numbers and signs on the
'Sirius' keyboard
Space
aAbBcCdDeEfFgGhHiIjJkKlLmMnNoOpPqQrRsStTuUvVwWxXyYzZ{[| }
&
$
You can abort all this with the F3 key [cancel]. The song will then not be stored. Once you have entered the name press the F1 key [ok]. The following confirmation will appear in the display:
/ ! ? -+* 01 234 5 6 789
]
to 1 (Untitled)
[ok] [cancel]
You have to confirm once again if the selected User-memory space is definitely to be overwritten
with your new song. The VALUE/TEMPO-dial allows you to select a different User-memory space.
When you press [ok] the song will be stored. [cancel] allows you to abort the procedure. The song
will then not be stored.
Press the EXIT-key once you have finished and want to leave the Write-menu.
58
Page 59

The Sequencer
Playing a song:
To play a song press the SONG-SELECT-key and select the song using one of the Number-keys 1-16.
Press the START-key to start your song. One song-step will be played after the other.
If during play you press the start key once again the LED will blink in the START-key and indicates
that the actual song-step has been frozen. This step will now be repeated until you repress the
START-key. This is very practical in a live gig to attend to the audience; you can peacefully fine tune
your performance by wildly twiddling with the filter etc.
You also have the possibility to jump complete song-steps either way. Use the FWD-(Forward) and
the RWD-(rewind) key.
RECORD
REW
SEQUENCER
START
SONG-STEP
The Sequencer section on
the front panel gives you all
the functions needed to
play a song.
STOP
FWD
59
Page 60

The Arpeggiator
The Arpeggiator
The arpeggiator is the most used feature to create exciting sequence-figures and also unusual
melodies. Basically the arpeggiator is separated into two different units. The first unit is more or less
the same in every arpeggiator type. As soon as you play one or more keys these notes will be
collected from the first part of the arpeggiator-unit, meaning they will be already saved in a kind of
„in-between memory”. As soon as other keys will be played, this "Pool for notes” will be filled with
given. In the opposite to the most common arpeggiator-types, the SIRIUS is also able to create polyphonic note-pattern. There are even more special features like for instance the chord-trigger-mode
and the gater-function. All the different functions we will explain as follows.
Trying out the Sirius arpeggiator
Basically you can use the Sirius arpeggiator on different tracks - by using the percussion-track even
new rhythm-figures are possible. To get an idea how the arpeggiator is working please go ahead and
try by following these steps:
new notes. The second unit replays these
„collected notes”. The special thing with this
second unit is the order and rhythmic these
notes will be played back with. The simplest
case for instance will be that the notes of a
played chord won’ be played back all at once
but all the single notes that are part of this chord
will be given back one after the other. Especially
in this second unit there are the greatest differences if you compare several arpeggiator-types.
While very plain arpeggiators are playing back
these kind of notes in a „settled” follow up,
there are more complex arpeggiators like the
SIRIUS where you are able to „edit” the variety
of change-possibilities and the rhythmic that is
:
1) Use that part, the arpeggiator should play on.
2) Use a sound that fits on fast melodies and bass-lines.
3) Turn on the arpeggiator by using the ARPEG.-ON/OFF-button. (If this button flashes
already by choosing the tone, you (discovered) selected a sound that has been
saved with an activated arpeggiator.
If you are playing the keys on your Keyboard now you can hear the typical arpeggiator-lines.
The selection of manufactured arpeggio-types
Some basic settings you can select without
editing the arpeggiator. For this case you
hold down the ARPEG.-ON/OFF-button
and choose one of the select-buttons
ranging from 1-16. In this way you get a
first impression on the possibilities of the
arpeggiator. Got nosy?
Then we can go on with the other
possibilities the arpeggiator has.
.
60
Page 61

The Arpeggiator
Especially for LIVE-Performance - The arpeggiator-freeze-function
A favorite function, that in the first place has been realized in our Synthesizer QUASAR, is the so
called arpeggiator-freeze-function. This function allows transposing, meaning the movement of the
sound-level (high/low) of an arpeggiator-pattern on the keyboard of the Sirius. The word „freeze”
says it: the Sirius „freezes” the actually played pattern. As soon as it is „frozen”, the notes you
actually play won’t be added to the pattern but are influencing the transposing.
You can call on this function by using a pedal (a perfect pedal for this function can be purchased
with our „starter-kit”. Besides the pedal our starter-kid has even more beneficial tools on the Sirius).
To try out the function connect the pedal while the Sirius is „off-line” to the special pedal-input on
the backside of the Sirius. Then you can turn on the Sirius again.
:
Choose a sound you like and that already uses the arpeggiator and just play some keys on the
keyboard. If you step on the pedal now you can easily transpose the arpeggio-pattern on the
keyboard. As soon as you release the pedal you can play some new notes into the arpeggiator.
Programming the arpeggiator
For the next step we have a look at the different parameters of the arpeggiator. To do so you don’t
have to stop the arpeggiator but can proceed all the different changes while it is still running.
All the settings you will get to know now, the Sirius will store together with the sound-parameters,
meaning that every tone is also saving Information through the arpeggiator. With a change of the
sound also the arpeggiator will be completely changed.
Expert-tip
another stored sound you just need to change the sound in the MIX-menu of the Sirius. In this case
only the tone changes and the arpeggio-settings stay the same.
To get into the edit-menu of the arpeggiator, press the EDIT-button.
You will see the following display-announcement:
: If you are very happy about a well done arpeggiator-pattern and want to hear it with
.
Select edit I 1>
[Sound] [Arpeg.]
Tip
By using the F3-button under the display you can select the arpeggiator - menu.
After pressing this button you get into the menu for editing the arpeggiator.
With the following menu-points the changes of the parameters are done with Value/Tempo Wheel.
61
Page 62

The Arpeggiator
Menu-page 1: Arpeggiator - mode selection
Here you can select the basic-functions of the arpeggiator. Besides the arpeggiator here you will also
find the functions „GATER” and „CHORD-TRIGGER”. We will take a look at these functions later.
Please don’t change anything on this page, yet.
Since menu-page 2 is only dealing with these two functions we will go directly to menu-page 3. To
do so please use your PAGE/BANK-button.
Menu-page 3: Hold-function
In the position „Hold:OFF” the arpeggiator plays only as long as you hold down the keys on the
keyboard. Assoon asyou release oneor allthe keys theselected noteswon’tbe playedany longer.
The „Hold: ON”-mode istotally different.Here thearpeggiator plays the notes untilyou actuallystop the
arpeggiator. If you hold down only one key you can fill the „note-pool” with every following key you
play. The others automatically play on even you just activate them with a tap on. You can select up to 16
notes. Only when you release all the keys and afterwards play some new notes the „note-pool” will be
cleared andrefilled withyour new notes.
This mode is especially important when the arpeggio-pattern should content more notes than you
actually couldplay withone tap onor ifyou need bothhands forediting.
Edit Arpeggiator
I 1 > mode. ARPEG
Edit Arpeggiator
<3> Hold: ON
Menu-page 4:Dynamic
Edit Arpeggiator
<4>Dynamic:OFF
Here you can set the touchsensitivity on the keys of your keyboardand decide if it willhave influence on
the arpeggio-sequence. If this function is put on „OFF” the notes of the running sequence will always
play with full dynamic (loud). In the „ON”-position the notes will be played with the different touch
sensitivities. (with free-programmed arpeggio-pattern=>Mot 1-9 this parameter won’t have any
influence becausein free-programmedmotions youcan also selectthe dynamic-values).
Menu-page 5:Resolution
Edit Arpeggiator
<5> Resolutn:16
With this parameter you set the note-value a single step of the arpeggiator has. In the position „16” the
arpeggiator plays up to 16 notes in one beat. You can also use this parameter to run the arpeggiator with
the doubleor halfamount of sequence-tempo.
62
Page 63

The Arpeggiator
Menu-page 6:Gate-time (note-length)
Edit Arpeggiator
<6> Gate: 64
This parameter decides if a note is played with staccato (=0, very short) or legato (=127, connected to
next note).Youcan changethis parameter in128 steps.
Menu-page 7:Motion
Edit Arpeggiator
<7> Motion: UP
The motion-parameter gives you the replay-direction of the stored notes. You can select from the
following settings:
Motion -Replay Direction Function
UP
DOWN
UPDW - up and down
RND - random
ASGN - assign
RVSD - reversed assigned
ASG2 - forward and
reversed assign
Here the notes of the chord will be played from the lowest to the
highest.
Here the notes of the chord will be played from the highest to the
lowest.
Here the playedchord willbe repeatedlyplayed upand downand
back again
With „random” the notes ofthe chord will be playedby pure
chance, withouta specialorder.
Here thenotes ofa sequence areplayed in theorder theyare
played on the keyboard. With the similar activated „Hold”
Function and by leaving out a key, you can easily put in complete
melodies. You just leave out the first note of the melody and the
following youjust shortlytap on.
Basically worksthe sameway as theASGN. Here thenotes are
replayed inreverse order.
Has the same function as ASGN and RVSD. Here the notes will
be played in the order they have been played in and then the
other way around.
MOT1 bis MOT9
With these pattern you got free programmable replay-orders that
also could be polyphonic. The MOT1 to MOT9 are manufactured
pattern. Of course you can change these pattern any time on your
behalf.
63
Page 64

The Arpeggiator
Menu-page 8: Octaves
Here you can select how many octaves the arpeggio-pattern should go through while playing. In the
position „Octaves: 1” the noteswill beonly replayedin theoriginal-soundlevel. Inthe position„Octaves:
2” at first the notes will be replayed in the original-soundlevel and then one octave higher. At the
maximum position„Octaves:4” thepattern willbe transposed ina rangeof 4 octaves.
Menu-page 9: Double-notes
In the position „DblNote: ON” all the notes will be played twice instead of once. (On the free
programmable arpeggio-samples => Mot 1-9 this parameter has no influence because in the free
programmable Motionsthe repeatingof different noteswill beindividually set forevery step.)
Menu-page 10:Length-Fit
Edit Arpeggiator
<8> Octaves: 2
Edit Arpeggiator
<9>DblNote: ON
Edit Arpeggiator
<10I LngFit: OFF
Tip
The parameter „Length-Fit” forces the sequence of the arpeggio-pattern to be suitable to a 4/4 beat.
Even you start with5 oronly 3notes the arpeggiator always startsat thebeginning of the beat withthe first
note.
Expert-tip:
running. Inthis way youcan hearand see theresults immediately.
Don’t hesitate to experiment with the above mentioned functions while the arpeggiator is
How to use the Gater and the Chord-Trigger ?
Let us now get back to the arpeggiator-mode on menu-page 1 of the arpeggiator. Since we learned
already how to work with the arpeggiator-setting, now we go to the Gater and chord-trigger-functions.
Firstof allplease go tomenu-page 1of the arpeggiator- edit- menus.
Edit Arpeggiator
I1> Mode: ARPEG
GATER:
This operating mode takes apart a single Sound or a chord. Modulations like LFO or Envelope Generators (Envelope Pitches) that are on the sound will be preserved. The rhythm
of this „taking apart” (chopping up) either oscillates free or is given by one of the intern
sequence-tracks. In this way the chopped pads of common Dance, Trance and Technomusic are produced. For this kind of sound-material always use Sounds with high sustainvalue in the VCA- Envelope Generator, so the tone can be delayed. With short and fast
oscillating sounds the tone already faded before the Gater-effect could take place.
64
Page 65

The Arpeggiator
CHORD:
By using the Value/Tempo-wheel you can select the GATER or the CHORD-Trigger functions. The
following settingswork forboth functions thein sameway:
Turn on the arpeggiator and play a chord on the keyboard. If the sequencer is stopped now you can hear
the above mentioned effect with a given rhythm in the chosen tempo. Now please select page 2 of the
arpeggiator-menu:
If the given rhythm-pattern is to boring for you just choose any sequence-pattern on this menu-page to
get your favorite rhythm. In order to do so you need to select a pattern where at least has one track has a
motif on. This shouldn’t be a problem with the more than 100 ROM-pattern of the Sirius. If you now start
the SIRIUS and play a chord you should be able to hear the influence of the rhythm track on the chord
you play.
Saving the Arpeggiator -Settings:
With the chord-triggerthe chordswon’tbe takenapart but rhythmicaltouched.
If youfor instanceplay a goodold chordof the 70’sthe arpeggiatorwill strike
this chordover andover again. Forthis function pleaseuse a sound with afast
attack timeand areduced release-time in theVCA-Envelope Generator so the
produced effectwill beabsolutely clear.
Edit Arpeggiator
<2> Trig: Kick
All the discussed parameter of the arpeggiator will be stored for every different sound. Meaning, if you
want to keep a setting you also need to store a sound. In order to do so, please select in the Write-menu
the menu-page1 „StoreSynth 1?”.
Free-programmable-arpeggiator-pattern:
As soon as you select one of the free-programmable arpeggiator-pattern 1-9 (Edit-menu Motion: Mot 1Mot9) as replay-direction the arpeggiator-menu will get additional menu-pages. Before you go into
programming wewill giveyou an ideaof howit works:
the free-programmable motions separate a complete arpeggiator -pattern into 2-32 steps. The notevalue of one step corresponds exactly with the punched in resolution-value. Is it on 16 the arpeggiator
plays back 16th notes (semiquavers). If you punch in 16 steps as a pattern-lengththe length of the whole
beat correspondsto thelength of thewhole pattern.For eachof thesesteps you candecide asfollows:
1.) Which ofthe maximum8 notes ofthe note-poolshould bereleased on theselected
step-number.Here maximum 8notes at the time couldbe punched in.
2.) What shouldbe thevelocity these notesshould be playedwith.
3.) What shouldbe theGATE-time these notesshould be playedwith.
4.) Should this step be pulled up or delayed? This possibility works for programming especially
groovy arpeggiatorpattern.
Siehe Seite 29, 34
“Abspeichern von
Sounds”
65
Page 66

The Arpeggiator
The following Graphic explains the construction the free programmable Arpeggio-pattern:
Start
Note 1
Note 2
Note 3
Note 4
Note 5
Note 6
Note 7
Note 8
Velocity 1
Velocity 2
Velocity 3
Velocity 4
Gate 1
STEP 1 STEP 2
STEP 3
TIME REPEAT
STEP 4 STEP 32
Gate 2
Gate 3
Gate 4
0%
-50%
+50%
postponing STEPS
Programming your own arpeggiator - pattern:
If you already selected the free-programmable pattern (Mot 1-9) you can start the programming. First of
all choosemenu-page 11to punch inthe lengthof the pattern:
Edit Arpeggiator
<11> MotLoop: 8
Here you can punchin values ranging from 2 - 32. Depending on how many steps you released withthe
Motion-Loop-Parameter, at menu-page 12 you can select the single steps one by one. As with all the
other parameterfor thisaction you usethe PAGE/BANK-button.
In orderto editthe first step,please selectmenu-page 12:
Edit Arpeggiator
<12>Step01:+O%
Most ofthe parametersare on thenumbered-buttons 1-16on the SIRIUS.
66
Page 67

The Arpeggiator
How to punch in the notes of the selected step:
With the numbered-buttons 1-8 you can activate single notes for this step or you can switch them
off. „1” means the lowest on the keyboard played note will be replayed. If you activate the
numbered - buttons „1” and „2”, the lowest and then the directly following note will be played.
Because you can select from maximum 8 numbered-buttons, chords with up to 8 notes are possible
for each step. Of course you also can decide on deactivating all of the 8 numbered buttons. This of
course will mean a break in your pattern.
How to select the Velocity of the chosen step:
Through the numbered buttons 9-12 you can select the velocity for each step. Of course only one of
the buttons ranging from 9-12 is possible to use. The velocity will effect all the activated notenumbers equally.
CAUTION: You can hear the change of the Velocity-value through these numbered buttons only
if on the selected sound the parameter VCA-DYN or VCF-DYN is turned on.
!
How to punch in the length of a tone on the selected step
Using the numbered buttons 13-16 you can adjust the length of the tone (GATE-time) within four
steps.
How to punch in the movement of a selected step:
In addition every step can be moved forwards or backwards by up to 50% of the selected Resolution.
With a setting of +50% and a Resolution of 16th notes the whole step will be delayed by one 32nd
note. Especially with extremely accurate settings these parameters will guarantee a very groovy noterelease (Gate-release).
Edit Arpeggiator
<12> Step01: +50%
For each step this value is adjustable with the VALUE-wheel.
Now please choose the different steps one after the other out of the pattern and adjust them the way
you want. Don’t hesitate to change the number of the played notes on the keyboard or just play a
whole different chord. Often your arpeggiator-pattern will change drastically. You will also find out,
that selecting only two used note-numbers also a polyphonic (for instance 8-notes) chord will only
release (play) 2 different notes.
:
How to store a User-arpeggio:
In order to be able to use your own created pattern in the future, you need to store it. the freeprogrammable arpeggio-pattern won’t be automatically stored by storing a sound. The sounds only
call up the motion-numbers 1-9. To store the new arpeggio-pattern you need to choose menu-page
4 of the write-menu. Press the Write-button and choose the menu-page 4 by using the PAGE/BANKbuttons.
67
Page 68

The Arpeggiator
With the F1-button you will start the storing-procedure. You will see a display-announcement for
selecting a storage-space.
The storage-spaces 1-9 you can select with the Value-wheel. Pressing the F1-button you will store
the constructed pattern. The F3-button will cancel your storing-action.
How to record the arpeggiator into the intern sequencer:
Before you start using the following function you should go through the sequence-section of this
manual. In the following we put our main interest on realtime-record-function.
The sequencer of the Sirius doesn’t care if you are the artist playing virtuous notes into the
sequencing program or if it is the arpeggiator. This means while real-time-recording you always can
turn on the arpeggiator and record it into the sequencer. here it doesn’t matter if the arpeggiator is in
the Gater, Chord or normal mode. Everything will be recorded by the sequencer.
Because the sequencer has direct access to the sounds of the Sirius (pass the arpeggiator) you won’t
have to worry that your „transferred” arpeggio-pattern uses the arpeggiator directly again.
to Motion 5
[ok] [cancel]
Tip
By the way:
If you just found again a really great arpeggio-pattern but you don’t remember which notes you
played for it, you can transfer this pattern without searching for the lost notes. Just let the arpeggiator
run and select the wanted Motif-length in your sequencer-edit-menu. Than activate the realtimerecord-function. While you hear the metronome your pattern is silence at first. But than it plays again
in the wanted settings and will be transferred directly into your sequencer.
68
Page 69

Notes
69
Page 70

The Beat-Recognition-System
Beat-Recognition-System:
Another extraordinary feature of the SIRIUS is its BEAT-RECONGITION-System. This function allows
you to synchronise the Sirius to an external audio signal.
You can use the BEAT-RECOGNITION-System to create a remix of a Vinyl-record or CD with the
help of additional tracks of the SIRIUS. During a live-gig you can also, in the DJ-setup, fade-in the
SIRIUS using the velocity of the last song.
How does the BEAT-RECOGNITION-System work?
The tempo of a song is expressed in bpm ( eats- er- inute). A value of 120 bpm, in the case of a
continuous quarter-note kick-drum, would mean that the kick-drum would beat 120 times a minute.
The SIRIUS reacts with its-BEAT-RECOGNITION-system to the average frequency of a kick-drum. It
analyses not only the quarter note in an audio track but works with a 16th grid. This way you can
also synchronise audio-tracks where not necessarily every quarter beat is covered with a kick-drum.
The BEAT-RECOGINTION-SYSTEM is constantly searching for/receiving the incoming audio-signal
which allows it to recognise the smallest tempo-changes and then adjust the tempo of the SIRIUS to
it. If during a rhythm pause there is no kick-drum for a long period the Sirius will continue with the
tempo it has calculated. In most cases the Sirius will continue even after a pause in the exact synchronous tempo.
bpm
Operating the BEAT-RECOGNITION-system:
In order to analyse the audio material, the source of the audio (eg. a CD player) will have to be connected to the Sirius. The included Goose-neck microphone is unsuitable for this purpose. In order to
control this system to the maximum use the Analyse or Carrier-input of the Sirius.
The following diagram shows you the connections for the control of the BEAT-RECOGNITONsystem:
CD-Player
CATEGORIES
MODULATOR OSCILLATORS RESONANCE-FILTER
NATURAL
BASS-
DRUMS
SOUNDS
DIRTY
DIRTY
NATURAL
BASS
ELECTRONIC
PAD-
DRUMS
SIRIUS
MODULATION
PITCH
WHEEL
BEND
TRACK-MUTING
BD SNARE HIHAT PERC. SYNTH 1 SYNTH 2 SYNTH 3
SOUNDS
909-TYPE
808-TYPE
MOD.-WHEEL
ASSIGN
DRUM-SFX
MIXER 11CHANNELVOCODER SEQUENCER
LEVEL
PANORAMA FX1/FX2
PART
PART/SEQ.
PART
MUTE
TO MIDI
SELECT
PATTERN
SOUND
SELECT
SELECT
SELECT
PLUCKED
SOUNDS
SONG
MOD.-
MACRO
SOLOSOUNDS
EFFECTSOUNDS
WAVEMACRO
MOD.-
DEPTH
KICK/BD
12
MOD.RATE
SNARE HIHAT
R OUTPUT L
CD-1 02:35
PHONES
T
-RIGHT
-LEF
AUDIO
AUDIO
EG-MACROS PHONETISCHERSPEKTRALTRANSFORMATOR
AMPLIFIER
LPF 24 dB RELEASE
GLIDE
DETUNE FILTER-
CUTOFF ENV.-MOD VCA
LPF 12 dB
OVERDRIVE
3 4 5 6 7 8 9 10 11 12 13 14 15 16
Q-FACTOR VCF-EG
MACRO
HPF 12 dB
KEY-TRACKINGOCTAVE-UPOCTAVE-DOWN VCF-DYN. VCA-DYN. RANDOM-SOUND
PERCUSSION
SYNTH 1 SYNTH 2 SYNTH 3 VOCODER
PATTERN BREAK SPECIAL LOOPTRACKS
LEVEL
VCA-EG
MACRO
HOLD BUTTON AND
SELECT PART
ANALYSE CARRIER CARRIER-EXT. MICRO.
0
32
64
96
127
PRESS BUTTON
FOR SOUND-CREATION
ARPEG.
RECORD
ON/OFF
HOLD
TO
SELECT
REW
EDIT WRITE
RECALL EXIT
PAGE/BANK
START
SONG-STEP
2
DEMO
SHIFT
TAP-
TEMPO
EXTERN
STOP
SPECIAL-LOOP
OVERBLAST
TRACK-FADER
FWD
SIRIUS
by QUASIMIDI
YSE-IN
or
CARRIER-IN
ANAL
VALUE
TEMPO
MICROPHONE
CONNECTOR
MASTER
VOLUME
AUDIO
SYNC
SYNC.
PHONES
32 OHM32OHM
IN IN IN IN IN IN IN IN
-SEND
-/EFFECT
AUX
LR
MAIN-OUT
AUX-SEND
70
1234
5 6 7 8
LR
MIX
Page 71

The Beat-Recognition-System
A suitable sound source will be a CD-player, a tape-deck or an old drum-computer without MIDI or
Sync.-output. A record player can only be connected via a phono pre-amp. This is integrated in all
HiFi-amplifiers and DJ-mixing desks. If you have a stereo system with a separate amplifier or preamp you can use the tape-output of the amplifier to connect a record player to the analyzer of the
Sirius. (In this case connect the amplifier output labelled "REC", "To Tape" or "Tape-Out" to the Sirius.
You can then route the sound source using the record-select control of the amplifier). Because you
will want to hear both signals when using the BEAT-RECOGNITION-system - the signal of the synchronised Sirius and the one of the external audio material, we recommend the use of a mixing desk
with at least one Effects-send.
Expert´s tip
whole unsuitable. The existence of a cross-fader is often overpriced. You're probably better-off looking around for a normal mixing desk. If you want to use a record player you can connect your HiFioutputs to the mixing desk or to separate record-player pre-amplifiers which you can get in your local radio store for around $ 50.
Connection to a Mixing Desk with at least one Aux-send:
In the following example we will connect the Sirius, a CD-player and a mixing desk, in order to synchronise the Sirius to the CD-player and at the same time hear them through your amplifier system.
First you should connect the main-output of the Sirius and the CD-player to the mixing desk as
shown in the diagram. Use the Aux-send/FX-send of the mixing desk to send the signal of the CDplayer to the Sirius. Open up this aux-send on the mixing desk for the CD-player only - close it for
the Sirius. Then connect the outputs of the FX/AUX-sends to the Carrier- or Analyse input of the
Sirius.
In order to tell the SIRIUS which input you want to use to analyse the music you have chosen, you
must first select the Beat-Input in the System-menu. You find the selection in the Edit-system-menu
on menu page 16:
: Most DJ-mixing desks do not have an effects-send or AUX-send. These desks are on the
Edit System/Midi
<16| BeatInp:XAn
Tip
In this menu please set the input to which you have connected the audio source.
XAn stands for the ANALYSE-Input
XCa stands for the CARRIER-Input
Caution: If you use the ANALYSE-input of the SIRIUS, the VOCODER can not be used with the
microphone anymore.
Now switch the SIRIUS to AUDIO SYNC. with the SYNC-EXTERN-key. A constant blinking will indicate the correct selection. Press PLAY on your CD-player. The status of the Beat-Recognition system
is displayed as a sign directly preceding the tempo-info.
1: Saturn ?143
(P09) +0 _______
!
71
Page 72

The Beat-Recognition-System
The following table shows you the signs and their meaning:
Signs in the Display Meaning What to do
?
No sign
.
The Audio signal can not be used
to analyse the tempo:
1.) The input level of the signal is
too high to be correctly analysed
by the SIRIUS
The Audio signal can not be used
to analyse the tempo:
1.) There is no kick drum in the
Audio-track at present.
2.) The input level is too low.
The audio signal has identified a
bass-drum to analyse the tempo.
The level its suitable for the
recognition. The system is
working best when the dot in the
display is not lit permanently but
flickers regularly.
1.) Adjust the level of the CD-player or
the Aux-Send.
If you are using the Analyse-input of
the Sirius, you can adjust the input
sensitivity via the Gain-control on the
back panel.
1.) Wait for the kick-drum to start.
2.) Adjust the level of the CD-player or
the Aux-send.
If you are using the Analyse-input of
the Sirius, you can adjust the input
sensitivity via the Gain-control on the
back panel.
You can start tapping/entering.
A sequence of kick-drums will of course not tell the Sirius where it is in a bar.
You may also want to synchronise music pieces with a more demanding groove than a pure Four-onthe-Flour pattern.
You will have to tap the quarter beats of the music piece to start the Sirius with the TAP-key. With the
information from both the tapping and the analysed kick-drum the Sirius will than calculate the actual tempo. The 5th tap will then start the internal sequencer of the Sirius.
The SIRIUS will then need approx. 3 bars to lock to the beat. During this time the synchronisation is
not actually quite complete and will run 'wild'. For a live performance you should leave the tracks of
the Sirius muted for this phase.
Once you have reached a successful synchronisation the tempo display of the Sirius will only change
from +-1beat per minute. This shows you that the system is constantly adjusting to the tempo. Your
live-performance can begin.
!
Do not despair if the Audio-Sync will sometimes not work right away. It is like a DJ's skill in mixing records - it takes practise! The tapping in of the tempo requires some getting used-to. If a
song is badly mixed it will unfortunately sometimes happen that the frequency of the kick-drum
is not separated cleanly enough - the other instruments may then influence the system in a negative way. Under these circumstances it may happen that the synchronisation fails.
72
Page 73

The Beat-Recognition-System
For difficult cases: The Beat Offset:
Readings in our Audio-laboratory have shown that some music pieces are synchronised perfectly
when it comes to the tempo but that there is a audible deviation in complicated passages.
For this purpose the Sirius has a Beat-Offset-Parameter. For external audio-synchronisaton this will be
controlled using the VALUE/TEMPO-dial. If you turn the VALUE/TEMPO-dial to the right or to the left
the Sirius-Groove will be shifted slightly from the audio material, either delayed or advanced against
the beat. This behaviour is also called Sync.Delay. The amount of change is shown in the display.
1: Saturn .43
Beat-Offset: +2
Positive values will make the Sirius play slightly earlier (advanced), negative will delay it slightly. In
this way you will be able to sit in tight with these sections.
External synchronisation - synchronising additional units with the Audio-signal:
If the SIRIUS is running sync. to the beat of the Audio-signal the clock-signal generated can then be
used to synchronise another synthesizer or sequencer to the SIRIUS using MIDI. You only have to
connect the MIDI-OUT-socket of the Sirius to the MIDI-IN-socket of the Midi-device you wish to synchronise. On page 11 of the Edit-system-menu , you can set the parameter TX-Clock to the "ON"position. You will also have to put all sequencers or synthesizers to external synchronisation mode.
73
Page 74

The Effects
How to direct the Parts of the Sirius to the two effects processors?
The Mixer-section offers you the possibility to direct the sound of a Part straight to one of the Sirius'
effects processors. To the left of the mixer-section control panel you can see a key marked FX1/FX2.
Press this key. It should now be lit. You can now individually set the Sound of each Part which is to
be sent to the effect processor FX1 using the mixer-controls. This is why this function is also called
FX-send. When you press the FX1/FX2-key a second time it will flash. The controls now refer to the
effect processor FX2. Now you can make the individual FX2 settings for each Part.
A further way to access the FX-sends can be found in the MIX menu of the currently selected part.
This is how you get to the MIX-menu: Press the EDIT-key next to the display and immediately afterwards press the right-hand PAGE/BANK-key. You can now open the MIX-menu by pressing the F3key. Go to menu-page 5 of the MIX-menu using the PAGE/BANK-keys. Page 5 contains the FX1-send,
page 6 the FX2-send. In the display these pages look as follows:
Edit Mix T:Synt1
<5> Fx1Send: 127
Edit Mix T:Synt2
<6> Fx2Send: 127
This method is best suited to the final mix situation as you can also set all the other parameters relevant to each Part such as Pan, Sound, and Volume with greater accuracy.
!
CAUTION: Should you notice in the Mix-menu that instead of FX-send values you have three
dotted lines and that the VALUE-TEMPO-dial does not have any effect on determining these values, you should make sure of the following:
Is the currently selected Part set as an Analyse-or Carrier-signal for the Vocoder? If the setting
of the effects is more important to you than the Vocoder, you can change the routing of the
vocoder. First press the Analyse, then the Carrier-key in the vocoder-section. If one or more
Part-keys are lit, these parts are allocated to the Vocoder. Just press all the lit parts to turn off
the keys. After that the display in the MIX menu will show the proper values again for each part
you have deactivated, and you can adjust them once more with the VALUE/TEMPO-dial.
The effects can also be assigned to the VOCODER-signal. This can either be done via the Mixersection as you do with the Parts or you can set it in the Edit-vocoder menu.
The Effects processors of the Sirius:
The SIRIUS has two independently working effects processors. They are called FX1 and FX2. Each of
these processors has different reverb, echo and modulation effects available. Every Sirius-part can be
proportionally routed to the effects processors with the FX1/FX2-controls in the Mixer section. Both
Effects-processors can be used simultaneously with one effects-programme each.
The following listing shows you which effects programmes are available to you in the two effects processors and what they do.
The Effects Processor FX1:
Reverb effects:
Room:
Metallic:
metal tube. A long reverb time will suggest that you are in a big industrial hall.
Here you can reconstruct small rooms ranging from a rehearsal room to a lounge.
With a short reverb time this effect will sound as if you played your instrument through a
74
Page 75

The Effects
Chamber:
Hall:
Cathedrl:
is suitable for long echoing effects.
Plate:
thin metal plates to create reverbs. The reflection of the metal plate was picked up using a microphone or sound-enhancer and then mixed back in with the original sound.
The Reverb-effects have the following parameters:
Echo Effects:
The Chamber-Reverb has the sound character of a large empty room.
The sound characteristics of this parameter are similar to those of a larger hall.
The longest Reverb-effect in this section. It recreates the reverb character of a church and
This is a simulation of one of the oldest reverb effects. Before the digital age, people used large
Level(0-127):
the original sound is influenced, ie. the greater the amount of reverb on the sound.
Time (0-127):
shrinking the 'room' you have placed your sound in. This extends or shortens the reverb on
the sound you are sending to this effect. (eg. A small room has a small decay time, whereas
a cathedral will have a much longer decay time.)
Here the level sent into the effect can be set. The higher the level the more
This value determines the decay time. Imagine it as a way of enlarging or
Delay:
yon, Grand Canyon, Grand Canyon.....! This will effect the whole stereo signal.
PanDelay:
The Echo Effects have the following Parameters available:
The Effects processor FX2:
Chorus:
time-delay, making it sort of 'swirl'. This makes the sound wider, fuller and 'fatter'.
A delay allows you to create a so called echo-effect, a bit like shouting into the Grand Can-
This delay makes the echo signal alternate equally from left to right.
Level(0-127):
the original sound is influenced, ie. the greater the amount of echo on the sound.
Time (0-127):
the echo comes back. The maximum delay for the two Delay-effects of FX1 is 1119 ms
(milliseconds).
Feedback (0-127):
you may have one echo 'slapping back' at you very quickly. In the Grand Canyon the echo
would take much longer to come back, and may repeat many times.
The chorus doubles up the original signal and then sends the double back with a minimum
Here the level sent into the effect can be set. The higher the level the more
Here you can set the delay time of the echo. The lower the value the faster
This value allows you to set the number of echos. In a walled courtyard
SlowChor:
FastChor:
SuperChr:
tremely warm.
FeedbChr:
feedback to the input is so strong that you will get an almost metallic sound. This gives the sound a
completely new character, almost robotic.
The Slow-Chorus works the same way as the chorus.
The delay in the Fast-Chorus is so intense that you will have a very strong swirling effect.
The Super chorus creates a strong swirling and phasing. The sound appears large and ex-
The Feedback-Chorus is a special effect influencing the sound in a dramatic way. The
75
Page 76

The Effects
Flanger:
ple as the chorus but creates a stronger modulation. The flanger will sound particularly interesting on
the Hihat-track. Check it out with bass sounds too!!
These 'modulation' effects have the following parameters available:
Apart from the modulation effects already mentioned, FX2 also has 2 Echo-effects available.
ShortDel:
This effect allows you to create very spacy sounds. The flanger is based on the same princi-
Level(0-127):
the original sound is influenced, ie. the greater the amount of chorusing or flange on the
sound.
Time (0-127):
Original signal.
Feedback (0-127):
input in controllable increments. This creates feedback causing a drastic sound change.
Rate (0-127):
Depth (0-127):
This delay creates a very short echo.
Here the level sent into the effect can be set. The higher the level the more
Here you can set the time delay of the Chorused signal in relation to the
The parameter Feedback routes back the effects signal to the effects
Here you can set the rate or speed of the modulation.
This parameter allows you to set the depth of the modulation.
Tip
Tip
PanDelay:
The FX 2 echo-effects have the following parameters available:
Expert´s tip:
short percussive Synth-sound from the "Plucked-Sound" category. The modulation effects in FX2 are
best expressed in Pads or ambient sounds It is also very interesting to try out the different chorusand flange effects on a Hihat or Percussion track.
Expert´s tip:
to mix these different delay-times which you have applied to the sounds. You can create very nice delay-grooves like this.
This delay is like the PanDelay from section FX1.
Level (0-127):
the original sound is influenced, ie. the greater the amount of echo on the sound.
Time (0-127):
the echo comes back. The maximum delay for these two effects is 870 ms (milliseconds).
Feedback (0-127):
The Reverb-, and Echo-effects in FX1 can best be explored with a Snare-sound or a
If you work with the delays of both FX-sections simultaneously you will have the option
Here the level sent into the effect can be set. The higher the level the more
Here you can set the delay time of the echo. The lower the value the faster
This value allows you to set the number of echoes.
.
76
Page 77

Notes
Notes
77
77
Page 78

The Vocoder
The Sirius-Vocoder
Vocoder-Basics:
Basically the Vocoder transmutes one audio-signal into another. This somewhat boring definition
does not really describe the fascinating and almost inexhaustable sounds you can create with a
Vocoder: change your voice into a polyphonic church choir or a robot version of ALF. Create impressive synthesizer sounds controlled by your voice. Your drums will learn to speak and the sound of a
symphony orchestra appears as a rhythmic base for a Dancefloor-track.
The Vocoder will boost your creativity infinitely.
Modern professional producers use the Vocoder to create some of the hippest sounds of today- its origin however lies way back. In the 70's, Vocoders were relatively complicated machines which cost a
five figure sum. In 1979 the "Elektor" electronics magazine (Dec. 79) predicted that "in a few years,
keyboards would be fitted with a "Vocoder"-switch". Well, this prediction did not come true. But now
the era of the home keyboard is far behind us, and the Vocoder in the Sirius hails the dawning of a
new age.
In order to call up
the DEMO Songs,
press both DEMOkeys simultaneously and select
Number-Key 2.
How does the Vocoder work?
It is not necessary to go into too much detail: just imagine the Vocoder as a box with two inputs and
a stereo output. One input is the "Analyse", the other the "Carrier".
Analyse-Input
Vocoder
Stereo-Output
Carrier-Input
You can now for instance connect a microphone to the Analyse-Input and connect the Carrier-Input
to the audio-output of a synthesizer. If you now speak into the microphone and press a key on the
synthesizer simultaneously, it will sound as if the synthesizer is talking. The pitch is not referring to
the voice but to the note you are currently playing on the synthesizer. So if you are playing a melody,
the synthesizer will "sing". If you play four notes simultaneously you will hear a four voices choir. The
basic principle of it is the following: The Analyse-signal as well as the Carrier are being cut up into
several "frequency-slices", the 'Bands' of the Vocoder. Now the "frequency-slices" of the Analyse signal
are analysed and simultaneously transmitted to the respective "frequency-slices" of the Carrier. All this
in real-time. You can now try to imagine the result if you don´t use a voice but a complete drumgroove as an Analyse-signal. But you might as well just listen to the Demo-Song Nr. 2 of the Sirius
("VOC Grov").
The Vocoder of the Sirius:
The Sirius has a Vocoder with 11 frequency Bandwidths and an integrated filter bank. These are not
Vocoder "effects" but make up a full-blown Vocoder with numerous configuration possibilities. In
many areas the functions of the SIRIUS-Vocoder go way beyond those of other systems:
78
Page 79

The Vocoder
Features of the Sirius-Vocoder:
-The Drum and Synthesizer sounds of the Sirius are, with their infinite manipulation possibilities, the
ideal basic materials for creating unique vocoder sounds. You can use the Sirius immediately without
needing any additional equipment using its seven drum- and synth-Parts, which can be internally
routed as Carrier and Analyse signals, as well as being able to use the Goose-neck microphone via its
integrated pre-amplifier.
- The Sirius-Vocoder offers you 16 controllable Vocoder programmes each with completely different
sound characteristics. You basically have 16 different Vocoders.
- The option to feed and mix different sound sources into the Vocoder will leave you needing practi-
cally nothing more. Apart from the internal Parts and the microphone signal you can connect other,
external sound sources (for instance Drum-computer, Electric guitar, whole tracks from CDs...etc.) to
the Vocoder using the audio sockets at the rear of the Sirius. Several internal parts can simultaneously
be used as Analyse and Carrier signals and can then be mixed with any external audio signal that the
Sirius is receiving.
- For all control signals the Sirius-Vocoder offers controllable Bypass functions. This means: You can
fade in the original signal of the microphone (for example your voice) and mix it with the Vocoder effectively a mixing desk with an integrated microphone. With the effects-units of the SIRIUS you
can then add a little reverb and delay.
- The integrated Filter-banks are able to perform the most delicate sound changes in the mix - or can
create drastic effects which would be unthinkable with ordinary Equalisers which only effect the
bass, psycho-acoustic effects, the weirdest LoFi-sounds etc.
- All Vocoder settings are storable. Although the attraction of a Vocoder is mainly due to the fact that
you can repeatedly influence the sound using your voice, you can also alternate between vocoded
Rhythms and vocoded Pads within one song by switching the different Vocoder routings on and off.
-Despite all these Complex possibilities, the Vocoder is easy to handle: All the basic functions of the
vocoder for both external sound sources and internal Parts, such as routing for example, can be operated from the dials and keys on the front panel. You can also, of course, change settings in real time
while the sequencer is running. A quiet whisper faded into a fat break beat? No problem. And all this
can naturally be controlled via MIDI.
Starting immediately?
Before you try out the 11-Bandwidth-Vocoder with the microphone please note the following to ensure optimum performance:
Important:
the Sirius through the speakers of an audio-unit such as a stereo system or instrument amplifier, then
acoustic feedback may occur.
If you are using the Goose-neck microphone with the Vocoder and you are listening to
!
This is particularly the case when
- the distance between microphone and loud speaker is too little or the loud speakers are faced di-
rectly towards the microphone head, or
- the overall volume of the Sirius or the volume of the amplifier of your audio-system is set too high.
Feedback at high volume can damage your hearing. We therefore advise you to use the lowest possible volume level when using a microphone or to work on headphones. For live-performances make
sure that the microphone is not pointing in the direction of the PA-speakers!
79
Page 80

The Vocoder
Presetting the Gain-Control:
The Gain-control allows you to determine the input sensitivity of the built-in microphone preamplifier. The control is located on the right of the rear panel of the Sirius. Turn the Gain-control to
the middle setting (12 o´clock position).
NATURAL
DRUMS
SIRIUS
MOD.-WHEEL
ASSIGN
MODULATION
PITCH
WHEEL
BEND
TRACK-MUTING
BD SNARE HIHAT PERC. SYNTH 1 SYNTH 2 SYNTH 3
If you have connected the Sirius to an audio-unit such as a stereo system or instrument amplifier,
turn the volume control of your amplifier to minimum for the time being.
Easy-Mode:
The Vocoder works with 16 basic programmes which can of course be changed if required. To get a
Caution:
The initialisation
will delete the entire ram memory
of the Sirius and
all settings will revert to the original
factory settings.
first impression these basic programmes can be tried first. The microphone is the analyse source in
this "Easy-Mode". A Carrier is automatically set you only have to speak into the microphone and
don´t have to press any keys on the keyboard.
Caution: Pre-settings for the Easy Mode:
You require some pre-settings for the Easy-Mode. Should you however have initialised your Sirius as
described at the beginning of this Manual and select a Song without Vocoder-settings (for example
Nr.1 "Saturn") you can leave out the following procedure. Skip on to "Selecting Basic Programmes".
CATEGORIES
MODULATOR OSCILLATORS RESONANCE-FILTER
BASSSOUNDS
DIRTY
DIRTY
NATURAL
ELECTRONIC
DRUMS
909-TYPE
MIXER 11CHANNELVOCODER SEQUENCER
LEVEL
PART
SELECT
SOUND
SELECT
LPF 24 dB RELEASE
BASS
MOD.-
WAVE-
GLIDE
MACRO
MACRO
PADSOUNDS
PLUCKED
SOUNDS
DETUNE FILTER-
MOD.-
OVERDRIVE
DEPTH
SOLO-
808-TYPE
SOUNDS
EFFECT-
DRUM-SFX
SOUNDS
MOD.RATE
PANORAMA FX1/FX2
PART
PART/SEQ.
PERCUSSION
KICK/BD
SNARE HIHAT
MUTE
TO MIDI
PATTERN
SONG
3 4 5 6 7 8 9 10 11 12 13 14 15 16
12
SELECT
SELECT
PATTERN BREAK SPECIAL LOOP TRACKS
EG-MACROS PHONETISCHERSPEKTRALTRANSFORMATOR
AMPLIFIER
0
32
CUTOFF ENV.-MOD VCA
LEVEL
64
LPF 12 dB
96
Q-FACTOR VCF-EG
VCA-EG
MACRO
MACRO
127
HPF 12 dB
KEY-TRACKINGOCTAVE-UPOCTAVE-DO VCF-DYN. VCA-DYN. RANDOM-SOUND
HOLD BUTTON AND
SELECT PART
SYNTH 1 SYNTH 2 SYNTH 3 VOCODER
ANALYSE CARRIER CARRIER-EXT. MICRO.
PRESS BUTTON
FOR SOUND-CREATION
ARPEG.
RECORD
ON/OFF
HOLD
TO
SELECT
CARRIER-IN ANALYSE-IN GAIN
VALUE
TEMPO
EDIT WRITE
MICROPHONE
CONNECTOR
RECALL EXIT
MASTER
OLUME
DEMO
PAGE/BANK
AUDIO
SHIFT
SYNC
TAP-
SYNC.
TEMPO
EXTERN
PHONES
START
STOP
SPECIAL-LOOP
OVERBLAST
TRACK-FADER
32 OHM32OHM
SONG-STEP
REW
FWD
SIRIUS
by QUASIMIDI
Gain-Control
1. The CARRIER-EXT.-key in the VOCODER-panel of the Sirius must be switched off.
2. No Part of the Sirius must be selected as Carrier. You will recognise that the CARRIER-key in the
Vocoder-panel is not lit. If the key is lit, you can change the setting as follows: When you hold down
the CARRIER-key, the Part-keys under the dials in the MIXER-panel will show you which Parts are selected as Carriers. A lit key indicates that this part is a Carrier for the Vocoder. While you still hold
down the CARRIER-key turn off all lit keys below the dials one after the other. Now you have deactivated all internal Carrier signals.
Selecting Basic Programs:
To select the basic programme 1 "Robot Voc" (Robot-Vocals), first hold down the Vocoder-key in the
MIXER-panel. The display will show:
80
Page 81

Select Prg.1..16
While you still hold down the Vocoder-key press the number key 1 - as shown in the photo.
Than say a couple of words into the Goose-neck microphone of the Sirius. You should put your
mouth quite close to the microphone (see drawing!!!)
The Vocoder
Should your Sirius be connected to a audio-unit such as a stereo system or instrument amplifier,
turn up the volume control of the amplifier until you have reached the desired volume. If you
fully
care-
experience feedback even at very low volume-levels, try putting more distance between the Sirius
and the Speakers.
You will now hear, either through your headphones or speakers, not your original voice but the voice
of a seemingly unfriendly robot.
Perhaps you find that you have to speak very loudly to produce a regular robot-voice despite the fact
that you have your mouth very close to the microphone. In this case turn the Gain-control on the
rear of the Sirius to the left (when facing the rear panel) until you get a balanced signal. Try
carefully
to avoid over-the-level settings which you will recognise because they will be distorted.
CARRIER-IN ANALYSE-IN GAIN
Increasing the
input sensitivity
Gain-Control
Let´s try the other basic programmes as well: Hold down the Vocoder-key again and press one of the
Number-keys from 2-14 (on 15 and 16 you have the basic programmes of the filter banks, and will
hear nothing when in Easy-Mode). Programme no. 2 will change your voice for instance into a polyphonic choir. To do this start factory song no. 1 "Saturn" and add your own vocal-hooks. The pitch of
the choir is not changeable in the Easy-Mode. How you change the pitch will be described in the following chapter.
Listening through the different basic programmes you will note that not all of them are good for vocals. Some programmes are designed more for use with artificial sound sources.
81
Page 82

The Vocoder
The setting of the
VOCODER-key can
be stored in a
SONG.
The setting of the
VOCODER-keys
can be stored in
the SONG
Basic functions of the Vocoder:
Turning the Vocoder On and OFF:
The Vocoder is turned on and off with the Vocoder-key located on the MIXER-panel.
Setting the volume of the Vocoder-sound:
The output-level of the Vocoder you can change in the usual way using the MIXER-panel of the
SIRIUS. Switch on the LEVEL-key in the Mixer. Now you can set the volume with the VOCODERdial.
Tip
LEVEL-Key
The volume-changes are sent and received using MIDI information. You can automate these
Tip:
changes using an external sequencer.
How can I select the different Basic Programmes?
When you turn on the Vocoder the automatic Carrier (Easy-Mode) is not activated if you have already selected a Carrier. So when you change through the basic Programmes the selected Analyseand Carrier-signals will remain routed to the Vocoder. When the percussion-track is vocoding a
string sound from the Synth 1-part you can immediately check out how this will sound with different
Vocoder-settings.
Try this with the factory song No. 2 "Voc Grov" playing. You will notice that in different basic
programmes different frequencies of the Grooves are stressed and single instruments are emphasised
or de-emphasised accordingly. Change between different basic settings of the Vocoder as follows:
First hold down the Vocoder-key on the MIXER-panel. The display shows:
Select Prg.1..16
While you still hold down the Vocoder-key you can switch between Vocoder-programs 1-16 using
the Number-keys.
82
Page 83

The Vocoder
The following overview shows you all basic programmes of the 11 Bandwidth-Vocoder and gives you
tips concerning these basic settings. Although we have said that some programmes are more suited to
vocals and others more to artificial sounds, these tips should not be considered as hard and fast rules.
The results depend a lot on what sound characteristics the audio-source has. So experimenting with
the different basic programmes and audio-sources is the order of the day! This is what makes the
Vocoder such an exciting tool: nothing says that you can not try the programme "InverseV" when
your voice is being used to modulate a Synth bass.
The Basic Programs:
Basic Program Description
1: RobotVoc
2: ChoirVoc
3: StrngVoc
4: DuckVoc
5: CrazyVoc
6: FXVoc
7: BADVoc
8: ThinVoc
9: CutVocod
10: InverseV
11: HighQVoc
12: FrameVoc
13: StereoV
Very slow modulating Vocoder for pads
14: SlowVoc
15: Filtbank
16: BBoostFB
particularly suitable for vocals
with bandwidth intereaction up to the high frequencies
Universal Vocoder
treble-rich vocoder
soft Vocoder with available cut off frequency filter
particularly suitable for drums
with high filter quality
with extreme stereo setting
The Filterbanks
emphasizing the low frequencies
Caution: The Filter
banks effect the
chosen Carrier, the
Analyse-sources
are being ignored.
The Vocoder's 16 basic programmes can amongst other characteristics be distinguished by their filtertype, the filter frequency and the decay-time for each of the 11 Vocoder-Bandwidth possibilities, or
'Bands'. By the way QUASIMIDI will offer further Vocoder programmes in future.
After selecting a basic program we now feed different sounds into the Vocoder. You will soon be convinced that the SIRIUS Vocoder is much more than just a voice mutator.
83
Page 84

The Vocoder
How can I select Analyse-signals and Carrier?
You already know that the sound of the Analyse-signal is transmuted into that of the Carrier-signal.
Four keys on the MIXER-panel decide which sources are to be fed into the Vocoder (VocoderRouting): ANALYSE, CARRIER, CARRIER-EXT. and MICRO. The lit key indicates that the respective
sources are fed into the Vocoder. A lit ANALYSE- or CARRIER-key means that at least one SIRIUS-part
is selected as Analyse-signal or as Carrier-signal.
You have probably sensed already: The Sirius-Vocoder allows you to select several Analyse & Carriersignals simultaneously. But most of the time you will obtain a better sound result when only few parts
are routed to the Vocoder. Like so often in music, less is more.
!
Caution:
the Carrier-signal or only the Analyse-signal whilst in sequencer mode, you will not hear any
Vocoder-sound. This is also the case if Carrier and Analyse-signals are not being played out at the
same time.
The Vocoder always requires sound sources on both inputs. When you have selected only
A turned off Analyse-function does
not mean that this
PART is muted. The
PART is just not
sent to the Vocoder
anymore.
A turned off Carrier-function does
not mean that this
PART is muted. The
PART is just not
sent to the Vocoder
anymore.
Selecting Sirius-Parts as the Analyse-signal:
In order to select one or more parts of the Sirius as the Analyse-signal, first hold down the ANALYSEkey of the VOCODER-panel. The lit keys under the dials will indicate which Parts have been selected
as Analyse-signals. While you still hold down the ANALYSE-key, turn on the key for the Part or Parts
which you wish to use as the Analyse-signal of the vocoder. That means you chose from KICK/BD,
SNARE, HIHAT, PERCUSSION and SYNTH 1-3. If you press the Part key again whilst holding down
the ANALYSE-key, you turn off the Analyse-function for that Part.
Selecting Sirius-Parts as Carrier:
To select one or more Parts of the SIRIUS as the Carrier-signal you must first hold down the
CARRIER-key on the MIXER-panel. The lit keys under the dials will indicate which Parts have already
been selected as Carrier-signals. While you still hold down the CARRIER-key, turn on the key for the
Part you wish to use as Carrier of the Vocoder. That means you chose from KICK/BD, SNARE, HIHAT,
PERCUSSION and SYNTH 1-3. If you press the Part key again whilst holding down the CARRIER-key,
you turn off the Carrier-function for that Part.
84
Page 85

The Vocoder
Back to the Worksong Nr 2 "Voc Grov":
When you press the ANALYSE-key the lit Part-keys tell you that the drum tracks of the Sirius are the
Analyse-signals of the Vocoder. When you hold the CARRIER-key you will see that the Synth-tracks
are selected as the Carriers. With playing the sequencer try and switch off the Analyse- and Carrier
function of each Part separately so that you can hear the original signal. This example of Vocoder-use
is somewhat classic: The pads of the Synth-Parts are rhythmatised by the Percussion- and Drum
sound, creating a rhythmic pad.
Expert´s advice:
Maybe you have already tried this - the Sirius gives you the option to use a Part as
the Analyse-Signal and Carrier-signal simultaneously. Your imagination will decide how to use this option!
Selecting the Microphone as the Analyse-Signal:
To use the Goose-neck microphone of the Sirius as Analyse-Signal you merely have to switch-on the
MICRO.-key on the Vocoder-panel. Press the key again and the Analyse-function of the microphone
is switched off.
Important:
If you use a microphone and an audio-unit such as a stereo system or instrument ampli-
fier, please note the following to avoid feedback problems.
- allow sufficient distance between microphone and speakers
- use the lowest possible volume-levels
- during live-performance make sure the microphone is not pointed directly towards the PA-
speakers.
Press SONG SELECT,
Number-key 2 and
PLAY!
Caution: The
Routing of the internal PARTS is stored
with the PATTERN.
Compare with
chapter "Start
immediately" on
page 79.
!
Before you switch on, set the Gain-control to the right of the rear panel of the Sirius to the middle setting (12 o´clock position). If you are using an audio-unit such as a stereo system or instrument amplifier, turn down the volume control of the amplifier to minimum. Then turn on the microphone with
the MICRO.-key as Analyse-source and carefully turn up the volume control while you speak into the
microphone. Bring your mouth as close to the microphone as possible. Should you still not be able
to get a regular Vocoder-sound, carefully turn the Gain-control on the rear panel to the left (when facing the rear panel), until your signal is balanced. Try to avoid overloading.
CARRIER-IN ANALYSE-IN GAIN
Increasing the
input sensitivity
Gain-Control
The use of the human voice is particularly well suited to illustrating once more the way the Vocoder
works. First select a suitable Vocoder-basic programme, for instance Nr.2 "ChoirVoc". Turn the MICRO-key on and select a Synthesizer-sound as Carrier: For example use a soft string-sound. Play a
note on the keyboard and at the same time speak into the microphone. Now play a melody. You will
hear that you can control the pitch of your voice with the keyboard. If you press several keys at once
you will suddenly sing with several voices.
This principle can be used in a different way: You can have a choir singing your lead vocal.
85
Page 86

The Vocoder
Once you have experimented with the different Carriers you will notice that not all Carrier-sounds
are suitable for use with the human voice. In order to obtain the best results, the sound of the Carrier
should be similar to that of the human voice. Safe bets are the Sirius-waveforms SpectrAE, Mal-Choir,
You can also add
effects to your
Vocoder-sound.
Read page 89.
SuprStrg or VS_VOICE. With some waveforms you can create brilliant and original choirs, others are
more for monophonic playing. Here again: EXPERIMENT! Check out the possibilities. Generally the
intelligibility of the voice decreases with increasing pitch because the low frequencies within the
voice are lost. The speech is generally better understood the lower down the Carrier-sound is played
on the keyboard.
Tip
Tip
avoid feedback and to increase vocal intelligibility. Here you can also mix in the original signal of the
microphone in order to use the SIRIUS as a mixing desk with built-in effects units (see page 92).
Using other external sound sources for the Vocoder:
It can of course be very interesting to send sounds other than speech or singing through the microphone into the Vocoder. The Sirius offers the tempting option of also including your other audioequipment in the Vocoder. So you also just bought a full Stand-Alone-Vocoder!
!
Important
tions of the Vocoder really well.
It does not matter whether it's a synthesizer, drum-computer like the RAVE-O-LUTION 309 or CDplayer, tape player, mixing desk …simply connect the audio source to the relevant 6,3mm (1/2") jack
socket on the rear panel of the Sirius: A sound source that is to be used as the Carrier-signal should
be connected to the CARRIER-IN socket. A sound source that is to be used as the Analyse-signal
should be connected to the ANALYSE-IN. The following diagram shows an example of one such configuration.
: In the Edit-VOCODER menu you will find some more useful parameters which help you to
: The use of external sound sources is only recommended once you know the basic func-
POWER
ON / OFF
LFO-WAVEFORM
dB
CUTOFF-FREQ.
ENVELOPES (EG):
AMP
A
TRANSPOSE:HOLD SHIFT
AND PRESS BUTTON
RAVE-O-LUTION 309
CATEGORIES
MODULATOR OSCILLATORS RESONANCE-FILTER
NATURAL
BASS-
DRUMS
SOUNDS
DIRTY
DIRTY
NATURAL
BASS
ELECTRONIC
PAD-
DRUMS
SIRIUS
MODULATION
PITCH
WHEEL
BEND
TRACK-MUTING
BD SNARE HIHAT PERC. SYNTH 1 SYNTH 2 SYNTH 3
SOUNDS
909-TYPE
808-TYPE
MOD.-WHEEL
ASSIGN
DRUM-SFX
MIXER 11CHANNELVOCODER SEQUENCER
PANORAMA FX1/FX2
LEVEL
PART
PART/SEQ.
PART
MUTE
SELECT
PATTERN
SOUND
SELECT
SELECT
SELECT
for example OUT3
IN OUT-1OUT OUT-2
THRU FOOTSWITCH OUT-3 OUT-4 IN-1 IN-2
MIDI AUDIO
KICK OUTPUT
SINUS
SQUARE
SAW-UP
SAW-DOWN
RANDOM
RESO.
DStR
MOD.MACRO
PLUCKED
SOUNDS
SOLOSOUNDS
EFFECTSOUNDS
KICK/BD
TO MIDI
SONG
SNARE HIHAT PERCUSSION SET BASS - LEAD - SYNTHESIZER
INSTRUMENT
TUNE
TUNE TUNE TONE WAVE ATTACK DECAY SUSTAIN MASTER-VOLUME
INSTRUMENT
ATTACK
DECAY
LEVEL
MUTE
SOUND
SELECT SELECT SELECT SELECT SELECT
PLAY STOP
RECORD
SONG/PATTERN
1 92 104 126 148 163 115 137 15
WAVEMACRO
MOD.-
DEPTH
MOD.RATE
SNARE HIHAT
12
INSTRUMENT PERC.-SET
DECAY DECAY ACCENT RESONANCE ENVMOD
TONE DECAY
LEVEL LEVEL LEVEL LEVEL CUTOFF
MUTE MUTE MUTE MUTE
SOUND
SOUND SOUND
F1F2F
3
PATTERN-PADS
LPF 24 dB RELEASE
CUTOFF ENV.-MOD VCA
GLIDE
LPF 12 dB
DETUNE FILTER-
OVERDRIVE
3 4 5 6 7 8 9 10 11 12 13 14 15 16
Q-FACTOR VCF-EG
HPF 12 dB
KEY-TRACKINGOCTAVE-UPOCTAVE-DOWN VCF-DYN. VCA-DYN. RANDOM-SOUND
PERCUSSION
SYNTH 1 SYNTH 2 SYNTH 3 VOCODER
PATTERN BREAK SPECIAL LOOPTRACKS
SOUND
EXIT
EDIT
PAGE
VELOCITY GATE-TIME
SPECIAL LOOPTRACKS
ANALOG-EMULATION-SYNTHESIS BY QUASIMIDI
AMPLIFIER
LEVEL
VCA-EG
MACRO
MACRO
HOLD BUTTON AND
SELECT PART
ANALYSE CARRIER CARRIER-EXT. MICRO.
EXPANSION-SLOTS
SEE BOTTOM-PLATE
GLIDE
EDITVALUE
TAP
PHONES
32 OHM
VCA-GATE
WRITE
FX-ALGORITHMS
FX-1:
STORE SOUND
ROOM 1
ROOM 2
DUMP
ROOM 3
HALL 1
HALL 2
PLATE
DELAY
PAN-DELAY
TEMPO
OVERBLAST
FX-2:
CHORUS 1
CHORUS 2
CHORUS 3
CHORUS 4
SHIFT
FEEDB.CHORUS
LOOP-FADE
FLANGER
SHORT DELAY
FEEDB.DELAY
FX-3:
2-BAND PARAM.EQUALIZER
OVERBLAST
YSE-IN
CARRIER-IN
ANAL
EG-MACROS PHONETISCHERSPEKTRALTRANSFORMATOR
0
32
64
96
127
PRESS BUTTON
FOR SOUND-CREATION
EDIT WRITE
RECALL EXIT
PAGE/BANK
ARPEG.
START
STOP
RECORD
ON/OFF
HOLD
SONG-STEP
TO
SELECT
REW
FWD
VALUE
TEMPO
DEMO
AUDIO
SHIFT
SYNC
TAP-
SYNC.
TEMPO
EXTERN
SPECIAL-LOOP
OVERBLAST
TRACK-FADER
SIRIUS
by QUASIMIDI
MICROPHONE
CONNECTOR
PHONES
MASTER
VOLUME
32 OHM32OHM
Phono-preamp
(DJ-mixing desk)
Example: Drumloop from the 309
as Analyse-signal modulates a
track from a record.
86
Page 87

The Vocoder
Important:
The Gain-control on the back of the Sirius determines also the input sensitivity of the
ANALYSE-IN. If you connect other audio equipment to this socket you should first set the Gaincontrol to minimum.
CARRIER-IN ANALYSE-IN GAIN
Set the Gain-Control to minimum first.
To increase the level carefully turn it
to the left.
Increasing the
input-sensitivity
Gain-Control
You can switch the external Carrier-signal on and off with the CARRIER-EXT.key on the MIXER-panel.
The external Analyse-signal is controlled with exactly the same key as the microphone-signal. This
means the MICRO.-key on the MIXER-panel also switches the external Analyse-signal on and off.
By the way - the Sirius-Vocoder allows you to mix internal Parts, microphone signals and external audio sources almost randomly - this is for the Analyse-signal as well as the Carrier-signal. One exception: If you have connected an audio cable to the ANALYSE-IN-socket, the MICROPHONE CONNECTOR on the front panel will be disabled.
Tip:
Would you like to use your own favorite microphone? Instead of the Goose-neck microphone included with your Sirius, you can connect other dynamic microphones directly into the MICROPHONE CONNECTOR-socket (XLR-socket) of the Sirius. The ANALYSE-IN is also suitable to connect
a microphone. If you want to use a condenser-microphone you will need an external phantompower supply. Whatever Microphone you choose to use, make sure the Gain-control is sensibly adjusted to avoid feedback.
!
The settings for the
CARRIER.EXT.- and
the MICRO-.keys
can be stored in a
SONG.
Tip
Changing the level of the individual Vocoder tracks:
You can use the change of volume of single Vocoder-tracks to create some interesting effects because
you can emphasize or de-emphasize each of the 11 frequency Bandwidth (Vocoder 'Bands') which
make up your complete vocoded sound. Even more interesting is performing these changes in realtime while the sequencer section is active. You can create, for example, real-time morphing of Pads
or sound atmospheres. These options are made available to you using the dials of the MIXER-panel:
here you can, while your sequencer is running, set the volumes for the single Vocoder-Bands. On the
dials you have Vocoder-Bands 2-9 which each represent one bandwidth, from the deepest bass to
the highest treble. Band-2 is the deepest bass, Band 9 the highest treble. (the other Bands are controllable only in the Edit-Vocoder menu - see page 91).
Frequency increased
BAND 2
BAND 3 BAND 4 BAND 5 BAND 6 BAND 7 BAND 8 BAND 9
SNARE HIHAT PERCUSSION SYNTH 1 SYNTH 2 SYNTH 3 VOCODERKICK/BD
To set the Band-volume hold down the Vocoder-key and turn the control in the MIXER-panel at the
same time. The photo on the next page will make it clear to you.
You can store the
Band-volume
settings in a SONG.
87
Page 88

The Vocoder
Controlling the Band volumes:
Hold down the VOCODER-key and
turn the dials in the MIXER panel.
Tip
Tip:
can be recorded in the sequencer and then automated. This way you can for example create impressive automatic phasing effects with the Vocoder.
How does the Filter Bank work?
You will find the filterbank-programs on the Number-keys 15 and 16. When they are used the SiriusVocoder behaves like an equalizer with nine Bands. Because of the steepness of the filter you can
make both subtle sound changes obtain some very extreme effects- filter sweeps, which only
work in the middle ranges, or impressive "formant-modulations". If you (and your neighbour) wish,
you can also mercilessly overload the filter Bands. You will get the most wonderful LoFi-sounds pumping bass drums, grinding HiHats, wicked 303-sounds.
There is one pre-requisite for selecting the sound source: the filterbank will only effect the Parts
which are set as the Carrier-signals. The selected Analyse-signals will not be affected.
As usual you can set the volumes of Bands 2-9 in the MIXER-panel. Hold down the Vocoder-key and
turn the controls in the MIXER-panel at the same time. Use the picture at the top of this page as a
guide. The location of the Bands you can see in the diagram below:
You can also control the Bands of the Vocoder with an external sequencer. All dial movements
and
Tip
Frequenz nimmt zu
BAND 2
Let´s select basic programme no. 16 "BboostFB" (hold down Vocoder-key and press Number-key 16.
Select a Synth-Part as Carrier and for this part choose a Synth-bass (for instance C03 "Acid Mod").
The Part is now located at the entrance of the Filter bank. Now hold down the Vocoder-key and
close the dials 1-5 and 8 completely and open up dials 6 and 7. Also play with Cutoff-control and Qfactor: Aceeeeed!
Tip:
Naturally the Band volumes of the filter bank are sent and received in MIDI so that you can con-
trol the filter movements with an external sequencer.
BAND 3 BAND 4 BAND 5 BAND 6 BAND 7 BAND 8 BAND 9
SNARE HIHAT PERCUSSION SYNTH 1 SYNTH 2 SYNTH 3 VOCODERKICK/BD
88
Page 89

The Vocoder
How can I set Effects and Pan?
As the icing on the cake you can refine your Vocoder-sound with the Sirius-Effects. Mix in rhythmic
delays to a speaking Groove in real-time or let your robot hold great speeches in a tiny bathroom.
The procedure you already know from the description of the MIXER-panel. Above the FX1/FX2-keys
of the Mixer you can select between two effects units of the Sirius. When the key is permanently lit
you have selected FX1. When the key is blinking, FX2 is active. Now the dial of the Vocoder allows
you to mix in the currently selected effect in real time.
Activate FX1 or FX2 with the Mixer and
mix-in the desired effects part with the
VOCODER-control.
You can store the
effects mix and the
pan settings in a
SONG.
The position of the Vocoder-sound in the stereo image ( ie. the pan setting) can be set as usual using
the MIXER -panel. Turn on the PANORAMA-key of the Mixer. Now you can use the Vocoder dial to
position the Vocoder-sound further to the left or right of the stereo picture.
Activate PANORAMA with the Mixer
and determine the Stereo-position
of the Vocoder-sound with the
VOCODER-control.
As you already know, the Sirius allows you to automate changes of the effects mix and pan-
Tip:
orama via MIDI using an external sequencer. Just turn the controls and the Sirius will output the necessary midi information through the MIDI-OUT.
Tip
89
Page 90

The Vocoder
The Vocoder Menu:
Most Parameters of the Vocoder-menu can also be set using the dials and keys on the front panel of
the Sirius. There are however some parameters which can only be set in the Edit-Vocoder menu. The
menu-pages of these restricted parameters are marked with a (*) in the following description of the
Edit-Vocoder menu procedure.
This is how to get to the Edit-Vocoder menu: Press the EDIT-key and select page 4 of the Edit-menu
with the right-hand PAGE/BANK-key. The following selection appears in the display:
Press the F1-key under the display to open the Edit-Vocoder-menu.
Select Edit <4>
[Vocoder][Song]
F1
Menu-page 1: Vocoder Type
Here you can select the 16 different Vocoder types or programmes.
Edit Vocoder
|1> Typ:RobotVoc
The types contain different bandwidth intereaction and different filter types for the Bands.
!
Important:
the basic factory settings as described on page 83.
Menu-page 2: Level
On page 2 you determine the output volume of the selected vocoder programme.
Menu-page 3: Panorama
Here you can set the Panorama (the position of the Vocoder-sound in the stereo image).
When you change between types the Band volume is also changed and you will revert to
Edit Vocoder
<2> Level: 96
Edit Vocoder
<3> Pan: L<61
This is really a balance function: As the single Vocoder-Bands can have different pan settings, then
each Band can take up its own place in the stereo image.
Menu-page 4*: Bypass for the internal Analyse-signal
As the input signals of the Vocoder are being used as 'control' signals, their original sound is usually
not sent to the main outputs and is therefore inaudible. The Bypass function on the next 4 menupages however allows you to mix the original sound back in from the Analyse and Carrier-sound
source. By the way, the original signals are also being sent through the effects-processors of the Sirius.
90
Page 91

The Vocoder
On page 4 you find the Bypass-function for the Analyse-Signals of the Sirius (ie. the internal
Parts of the Sirius which are being sent to the Vocoder). When for example you modulate a pad with
a drumloop, you can mix in the original pad-sound with a controllable volume of 0-127.
Edit Vocoder
<4> AnaBypass: 96
Menu-page 5*: Bypass for the internal Carrier-signal
The Carrier-bypass function enables you to mix the original sound of the Carrier-Parts of the
Sirius back in with the vocoded signal. When for example you modulate a pad with a drumloop, you
can mix in the original pad-sound with a controllable volume of 0-127.
Edit Vocoder
<5> CarBypass: 60
Menu-page 6*: Bypass for the Microphone and external Analyse-signal
With the Bypass function on menu page 6 you can mix-in the original sound of the microphone signal and the external Analyse-signal with a controllable volume of 0-127.
Expert´s-Tip:
to beef up your vocals or guitar solo using, for example, the reverb of a cathedral.
When the Vocoder is inactive you can use the Sirius as a mixing desk which allows you
internal
internal
Tip
Edit Vocoder
<6> MicBypass: 30
Menu-page 7*: Bypass for the external Carrier-signal
The Bypass function on menu-page 7 allows you to mix-in the original sounds of the external Carriersignal with a controllable volume of 0-127.
Edit Vocoder
<7> ExtBypass: 0
Menu-page 8 and 9: Effect-send1 / Effect-send2
These parameters control the Effect-sends of the Vocoder for the first and the second SIRIUS-Effects
units.
Edit Vocoder
<8> FX1Send: 80
Edit Vocoder
<9> FX2Send: 10
Menu-page 10*: Lowpass
The Lowpass is the lowest Band of the SIRIUS-Vocoder. Here you can specifically add bass to the
Parts of the Analyse-signal to, for example, emphasize the bass drum.
Edit Vocoder
<10> Lowpass: 0
Menu-page 11*: Highpass
The Highpass is the highest Band of the Sirius-Vocoder. Here you can specifically add to the treble
Parts of the Analyse-signal.
91
Page 92

The Vocoder
Tip: If you are using the microphone as Analyse-source you can emphasize (with Highpass) the sibi-
Tip
lant qualities of the voice to increase the intelligibility ( ie. the T's and S's).
Menu-page 12-29*: Level/Panorama for the individual Bands
(The volume for Bands 2-9 can also be controlled on the front panel)
On the last 18 menu-pages you can set the volumes and the panorama settings of the other 9 frequency Bands. Yes it´s true: You can indeed select different pan-settings for every single Band! Use
your Vocoder as a psycho-acoustic-processor and distribute in a filterbank-programme the high frequencies of your mix over the total width of the stereo image.
Here is an expample of the menu-page of the first Vocoder Band:
Edit Vocoder
<11> Highpas:108
Edit Voc-Band 1
<12> Level: 98
You can store the
current settings of
all parameters of
the Vocoder-menu
in a SONG.
!
Edit Voc-Band 1
<13> Pan: L<10
The Bypass-functions as well as the complete signaling of the SIRIUS-Vocoder is explained in the diagram on the following page.
Where are the Vocoder settings stored?
Important:
for instance, the settings of the Bands are stored in the Song, the Vocoder-routing is stored in the Pattern. This makes sense because: it allows you during a song to change different allocations. For instance the Percussion track is modulating a pad at the beginning of the piece while this same Percussion becomes clattering metal plates at the end of the song. The different storage functions can be selected as usual with the WRITE-key to the right of the display. Select the desired storage area. The following table shows you which setting of the Vocoder is stored to which area.
Vocoder ON/OFF
Vocoder-LEVEL
Vocoder-PANORAMA
Vocoder-FX1/FX2-Send
Selection of Analyse and Carrier-PARTSinternal
Goose-neck micro as Analyse ON/OFF
external signal as ANALYSE ON/OFF
external signal as Carrier ON/OFF
LEVEL of the Bands
PANORAMA of the Bands
Analyse-BYPASS
Carrier-BYPASS
Microphone-BYPASS
External Carrier-BYPASS
The different basic settings of the Vocoder are stored in different storage areas. Whereas,
Vocoder-Setting
Key
VOCODER SONG
ANAYLSE/CARRIER
MICRO.
MICRO.
CARRIER-EXT.
Storage Level
SONG
SONG
SONG
PATTERN
SONG
SONG
SONG
SONG
SONG
SONG
SONG
SONG
SONG
92
Page 93

Configuration Diagram of the VOCODER:
SOURCES:
MICROPHONE/
ANALYSE-IN
socket (optional)
ANALYSE
PART 1-7
CARRIER
9 Analyse-Bands
CONTROL SIGNAL
CARRIER-IN
socket
PART 1-7
Highpass
Lowpass
PAN
Band 1
PAN
Band 2
PAN
Band 3
PAN
Band 4
PAN
Band 5
PAN
Band 6
PAN
Band 7
PAN
Band 8
PAN
Band 9
The Vocoder
LEVEL
LEVEL
LEVEL
LEVEL
LEVEL
LEVEL
LEVEL
LEVEL
LEVEL
LEVEL
LEVEL
FX-2 FX-1
LEVEL
CARRIER Bypass
LEVEL
EXTERN Bypass
LEVEL
ANALYSE Bypass
LEVEL
MICROPHONE Bypass
FX2-SEND
FX1-SEND
OVERBLAST
93
Right
Audio-Out
Stereo-Output
Left
Audio-Out
Page 94

The System-Menu
The System-Menu:
The System menu of the Sirius contains Parameters which allow you to change the basic settings on
your SIRIUS. The factory settings have the parameters set is such a way that the Sirius functions best
when acting as a stand-alone unit. A change of these Parameters may be necessary if you want to include the Sirius in a larger MIDI-Setup or you want to customize it to your personal requirements.
!
Caution:
the following section. The explanations of the separate menu pages will always contain a reference to
the factory settings. Should your Sirius sound different or behave in any way unusually after changing
these system parameters, you should revert to the original factory settings.
You will get to the System menu as follows: Press the EDIT-key and select page 5 of the Edit-menu
with the right PAGE/BANK-key. The following selection will appear in the display:
Press the F3 key under the display to open the System-menu.
Menu-page 1 (Master-Transpose):
The first two menu-pages allow you to change the overall tuning of the Sirius. On page 1 you find
the parameter called Master-Transpose.
This Parameter allows you to transpose the overall pitch of the Sirius by 6 semi-tones up or down.
Live-keyboardists will particularly appreciate this option in a situation when for instance the Guitarist
wants to play everything in E again. The factory setting is +0.
Changes in the System-menu should only be made once you have read and understood
Select Edit <5|
(Pads) (System)
Edit System/Midi
|1> M.Transp: +0
Menu-page 2 (Master-Tune):
On page 2 of the System-menu you find the parameter Master-Tune.
Edit System/Midi
<2> M.Tune: +0
Here you can fine tune the Sirius. If the value is set to +63 the Sirius will sound one semi-tone
higher than normal. If the value is set to -64 it will sound a semi-tone lower than normal. In most
cases you can ignore this parameter because the Sirius has the standard western tuning as a factory
setting. ( ie. A = 440 Hz). The factory setting is +0.
Menu-page 3 (MIDI-Master-Channel):
The next Menu-page requires a bit more care as the MIDI-channel-allocation of the Sirius is being
set.
The Parts of the Sirius have a fixed MIDI-channel allocation. For the factory setting (1) the Midichannel allocation is as follows:
MIDI-Channel 1: Kick
Channel
MIDI- 2: Snare
Channel
MIDI- 3: Hihat
Channel
MIDI- 4: Percussion
Channel
MIDI- 5: Synth 1
Channel
MIDI- 6: Synth 2
Channel
MIDI- 7: Synth 3
94
Page 95

The System-Menu
In some cases it might be necessary to change this allocation to adapt to your MIDI-setup. This you
can do in the System-menu. On page 3 of this menu you find the Parameter "M.Channel". It allows
you to set the Master-channel of the Sirius. In the above described factory setting it has the value 1. If
you set the value to 5 for instance the allocation of the MIDI-channels will change as follows:
Edit System/Midi
<3> M.Channel: 5
MIDI-Channel 5: Kick
Channel
MIDI- 6: Snare
Channel
MIDI- 7: Hihat
Channel
MIDI- 8: Percussion
Channel
MIDI- 9: Synth 1
Channel
MIDI- 10: Synth 2
Channel
MIDI- 11: Synth 3
Caution:
and cannot be changed.
The order of the Parts in relation to one another is fixed, due to the system configuration,
!
Menu-page 4 (Local-Off):
Another very important function can be found on page 4 of the system-menu: the Parameter Local
On/Off. This parameter is often the solution for many problems that might occur when using the
Sirius with an external sequencer.
Edit System/Midi
<4> Local: ON
The factory settings of this parameter are set to ON - the only sensible setting all the time the Sirius is
being used as a stand-alone unit.
Edit System/Midi
<4> Local: OFF
If the Parameter is switched to OFF the following happens: The keyboard is separated from the
sound sources within the Sirius. If you now press a key the MIDI-information "note-on" will not reach
the Synthesizer of the Sirius anymore. Instead this signal will immediately be sent to the MIDI-Out
socket of the Sirius. The Synthesizer is now able to receive MIDI-data only which gets to the unit via
the MIDI-In socket. The next thing would of course be to connect the MIDI-Out again with the
MIDI-In. This task is in most studios dedicated to the sequencer software. The advantages of such a
system are clear: If for instance the Kick-Part (MIDI-channel 1) on the Sirius has been selected but in
the external sequencer the Synth1-Part (MIDI-channel 5) has been selected, only the Synth 1-Part
will play out when you play the keyboard. The setting Local-ON would in this instance also have the
Kick-Part playing.
What is true for the Keyboard of the Sirius is also true for the Internal- Sequencer. The Position Local
OFF will separate the Internal Sequencer form the internal sounds. This is always an advantage when
a pattern or a song of the Sirius is to be recorded into an external sequencer. How you put this into
practice will be explained a little later with some examples. (see section " Recording Sirius-Patterns
and Songs into an External Sequencer")
The diagram "The Local-Off Function of the Sirius" on the following page will show the above function in detail.
95
See page 116
Page 96

The System-Menu
CATEGORIES
MODULATOR OSCILLATORS RESONANCE-FILTER
NATURAL
BASS-
DRUMS
SOUNDS
DIRTY
DIRTY
NATURAL
BASS
ELECTRONIC
PAD-
DRUMS
SIRIUS
MODULATION
PITCH
WHEEL
BEND
TRACK-MUTING
BD SNARE HIHAT PERC. SYNTH 1 SYNTH 2 SYNTH 3
SOUNDS
909-TYPE
808-TYPE
MOD.-WHEEL
ASSIGN
DRUM-SFX
MIXER 11CHANNELVOCODER SEQUENCER
LEVEL
PANORAMA FX1/FX2
PART
PART
PART/SEQ.
SELECT
MUTE
TO MIDI
SOUND
PATTERN
SONG
SELECT
SELECT
SELECT
PLUCKED
SOUNDS
MOD.-
MACRO
SOLOSOUNDS
EFFECTSOUNDS
EG-MACROS PHONETISCHERSPEKTRALTRANSFORMATOR
AMPLIFIER
LPF 24 dB RELEASE
WAVE-
MACRO
MOD.-
DEPTH
SNARE HIHAT
KICK/BD
12
MOD.RATE
GLIDE
DETUNE FILTER-
CUTOFF ENV.-MOD VCA
LPF 12 dB
OVERDRIVE
3 4 5 6 7 8 9 10 11 12 13 14 15 16
Q-FACTOR VCF-EG
MACRO
HPF 12 dB
KEY-TRACKINGOCTAVE-UPOCTAVE-DOWN VCF-DYN. VCA-DYN. RANDOM-SOUND
PERCUSSION
SYNTH 1 SYNTH 2 SYNTH 3 VOCODER
PATTERN BREAK SPECIAL LOOPTRACKS
LEVEL
VCA-EG
MACRO
HOLD BUTTON AND
SELECT PART
ANALYSE CARRIER CARRIER-EXT. MICRO.
0
32
64
96
127
PRESS BUTTON
FOR SOUND-CREATION
VALUE
EDIT WRITE
RECALL EXIT
PAGE/BANK
RECORD
ARPEG.
START
ON/OFF
HOLD
TO
SELECT
STOP
SONG-STEP
REW
FWD
TEMPO
MICROPHONE
CONNECTOR
MASTER
VOLUME
DEMO
AUDIO
SHIFT
SYNC
TAP-
SYNC.
TEMPO
EXTERN
OVERBLAST
PHONES
32 OHM32OHM
SPECIAL-LOOP
TRACK-FADER
SIRIUS
by QUASIMIDI
The Local-OFF-function of
the Sirius in a schematic
diagram
Menu-page 5 (MIDI-Synchronisation):
Page 5 of the System-menu contains a parameter which can also be set on the front panel of the
Sirius. Here you have 3 settings to choose from:
MIDI-IN
LOCAL-ON LOCAL-OFF
MIDI-OUT
Edit System/Midi
<5> MidiSync:INT
Edit System/Midi
<5> MidiSync:EXT
Edit System/Midi
<5> MidiSync:AUD
In the first setting 'INT' (factory setting), the Sirius creates its own sequencer tempo with its own
clock.
In the position 'EXT' the Sirius can be synchronised to an external MIDI-clock. The setting 'AUD'
makes the Sirius ready to be synchronised with an audio-signal (Beat-Reconition-System). To activate
the Synchronisation parameter you will not have to open the System-menu because there is a key for
these 3 functions on the front panel of the Sirius. This key is marked SYNC.EXTERN/AUDIO.SYNC. If
this key is not lit it means you are in the 'INT' mode. If the key is lit, the Sirius is in the 'EXT' mode. If
the key is blinking the Beat-Recoginition-System is activated. This is the 'AUD' mode.
Menu-page 6-11 (Send- and Receive-Functions):
The Parameters on the following 6 menu pages are Send and Receive filters for certain MIDI-data
types. There you can determine if a particular data type is to leave the Sirius through the MIDI-Out
socket or to reach it via the MIDI-In socket. The abbreviations RX and TX stand for Receive and
Transmit respectively.
96
Page 97

The System-Menu
Menu-page 6 (Receive Program-Change):
Edit System/Midi
<6> RxPrgChg: ON
In the ON setting (factory-setting) the Sirius receives MIDI-programme- change commands and Bankchange commands from external MIDI-devices (for example a sequencer like Cubase or Logic). In
the OFF setting these commands are ignored.
Menu-page 7 (Receive Parameter):
Edit System/Midi
<7> RxParam: ON
In the ON setting (factory setting) the Sirius receives sound parameter information in the form of
MIDI-controller commands from external MIDI-devices. In the OFF setting the controllers will be ignored.
Menu-page 8 (Receive Start):
Edit System/Midi
<8> RxStart: ON
In the ON setting (factory setting) the Sirius receives the start command of an external sequencer
which is required for the synchronisation of all connected midi devices. (more details about Synchronisation can be found in the section "Synchronisation of the Sirius with Cubase"). The start command
will be ignored in the OFF setting.
Menu-page 9 (Transmit Program-Change):
Edit System/Midi
<9> TxPrgChg: ON
In the ON-setting (factory setting) the Sirius sends MIDI-programme- change commands and Bankchange commands to external MIDI-devices (for instance other Synthesizers or expanders as well as
an external sequencer). No commands will be sent in the OFF setting.
Menu-page 10 (Transmit Parameter):
Edit System/Midi
<10> TxParam: ON
See page 113
In the ON-setting (factory setting) the Sirius will send sound parameters in the form of MIDI-control
commands to external MIDI-devices. In the Off-setting the Control commands (for instance dial and
wheel movements on the front panel of the Sirius) are not passed on to the MIDI-Out socket.
Menu-page 11 (Transmit Clock):
Edit System/Midi
<11> TxClock: ON
In the factory setting ON the Sirius will permanently send its internal MIDI-Clock information (even
when the internal sequencer is stopped). In rare cases this can be unwanted. You can stop sending
MIDI-Clock information by turning this parameter to the OFF-setting. More details on Synchronisation can be found in the section "Synchronisation of the Sirius with Cubase".
97
See page 113
Page 98

The System-Menu
Menu-page 12 (SysEx-Speed):
This parameter allows you to set the speed at which system-exclusive data (Momentum, Sound, Song
and All-Data Dumps) is sent from the Sirius. The factory setting should work with all common Sequencing programmes and MIDI-interfaces. Apart from this setting it is also possible the speed up the
TX of the data (position FAST) or to slow it down (position SLOW). To find the best TX speed it is advisable to try out all three options. If the setting FAST works with your MIDI-interface there is nothing
!
against using it permanently - it will increase your work-speed enormously.
Edit System/Midi
<12> SX-Spd:NORM
See pages 38, 110
Caution:
data-Dumping different data types. More information on the different Data-Dump-types and how to
transmit them you will find in the section "Data-Dumping" in the WRITE-menu section of this manual.
Menu-page 13 (Poti-Snap):
This parameter is about the behaviour of the dial controls on the front panel of the Sirius. Just experiment with the setting options of this parameter. These functions allow you to increase ease of operation of the Sirius and to customise it to your special requirements. In the factory setting OFF, the controls on the front panel will behave as follows:
As soon as you turn a dial the value corresponding to the control setting is called up. The resultant
sound changes (for example when changing the Cutoff-frequency) can in some situations be unwanted. We have therefore provided the new Pot-Snap function to the Sirius. It is activated in its ON
setting.
Now the Pots will behave as in the following example: Let's assume the Cutoff-frequency of a sound
has the value 100. The Cutoff-control is however set to 20. Without Pot-Snap the cutoff frequency
would immediately take on the value 20 when you move the control. A clear jump would be audible. With the activated Pot-Snap you can however move the control without hearing a jump. Only
when you exceed the value 100 will the sound start to change. In order for you to know which value
is set for the currently selected sound and in which direction the dial must be turned in order to find
it is indicated in the display while turning the dial. For our example the display would look as follows:
This parameter should only be changed by you when you have already had experience in
Edit System/Midi
<13> PotSnap:OFF
A22:SawBass 130
-> Cutoff: 100
In this example the display shows you that you will have to turn the control to the right and that you
will only hear a change in sound once you have passed a Cutoff-value of 100.
Menu-page 14 (Poti Info):
Edit System/Midi
<14> PotInfo: ON
This parameter lets you decide if you want to have the parameter and the relevant value displayed or
not when you turn a dial. The factory setting for this function is switched to ON. The OFF setting disables this function.
98
Page 99

The System-Menu
Menu-page 15 (Track Mute):
Edit System/Midi
<15> TrkMute: ON
When you have come this far in the manual you will surely have noticed that the two lower octaves
of the Sirius-keyboad allow you to mute and un-mute tracks as well as transpose them. The parameter on this page allows you to turn this function off. The factory setting makes this function active,
and so the parameter is set to ON.
Menu-page 16 (Beat Input):
Edit System/Midi
<16| BeatInp:XCa
The parameter Beat-Input on this menu-page refers to the Beat-Recognition-System. Sirius' factory
setting is set in such a way that the Beat-Recognition-System is provided with audio-material via the
CARRIER-IN socket (on the rear panel of the unit). Should the audio-signal your are feeding not have
the required level for the Beat-Recognition-System you can alternatively use the ANALYSE-IN socket.
The Gain-control, coupled with the socket, allows you to increase the input-sensitivity of the Sirius.
To activate the ANALYSE-IN-socket you have to switch the Beat-Input to Xan.
Caution:
or Record Player, the microphone of the Sirius will be de-activated.
More about this subject can be found in the chapter describing the Beat-Recognition-System.
When you use the ANALYSE-IN-socket to access a sound from an external unit such as CD
!
See page 70
99
Page 100

The Sirius and MIDI
The Sirius and MIDI:
If you already own an expanded MIDI-device setup and have made all the connections yourself,
you can probably ignore this section. Those amongst you who wish to connect a MIDI-keyboard to
your computer for the first time should pay strict attention to the diagrams and explanations in this
chapter.
!
Important:
only transmit from one Midi device to another (eg. "note-on", "note length"
or "note- off").
It is impossible to transmit and hear a sound (audio-signal) via a MIDI-cable.
absolutely no sense to connect a MIDI-cable to an audio-input or output of an amplifier or mixing
desk. Such connections are to be avoided at all costs because you may well damage your MIDIdevice .
First we want to clear some facts which always lead to misunderstandings. MIDI cables
Midi control information
It therefore makes
3 Rules
MIDI? What on earth that?
MIDI is an abbreviation and it means "Musical Instruments Digital Interface". MIDI is an international
standard used by most manufacturers of electronic musical instruments. This is why you can connect
devices made by different manufacturers using MIDI, allowing them to 'talk' to each other. A
interface
data can for example contain information on the pitch, the length, the volume or the sound number
which a synthesiser is to play. A MIDI-interface can administrate up to 16 MIDI channels. They function similarly to the channels of a radio or television. Data that is sent on a particular MIDI-channel
can also only be received by the same channel. In a MIDI system you can send and receive on all
channels simultaneously. The Sirius works on 7 MIDI-channels. It is therefore possible that the Sirius
can play 7 different sounds with different melodies and rhythms at the same time. We say the Sirius
has a 7-part multimode.
allows MIDI-devices to communicate with each other and exchange data. The transmitted
is
MIDI-
Connecting MIDI-Gear:
There are some rules regarding connecting MIDI-devices which you should pay strict attention to:
1.) The MIDI-IN socket of one device is always connected to the MIDI-OUT socket of the other device. The MIDI-OUT socket is the connection from which MIDI-data is sent from a device. The
MIDI-IN socket is the connection to which MIDI data is fed to a device. The MIDI-THRU-socket
takes in the arriving MIDI data and passes it on to the next device without changing it.
2.) When connecting your MIDI-devices you should make sure that you only use high-quality, proper
MIDI-cables. Similar cables from your Hi-fi store ( eg. tape recorder 'DIN' cables) are often not suitable because they can be wired differently.
3) MIDI-cables should never be longer than 5 metres. Data transfer via MIDI is optimal through cables up to this length. Longer MIDI-cables can cause problems.
100
 Loading...