

Page 1

Quark Publishing Platform
2015 System Administration
Guide
Page 2

CONTENTS
Contents
Introducing Quark Publishing Platform administration tasks.......6
Deploying Quark Publishing Platform Server to External Server Containers.7
Setting up environment variables.....................................................................7
Configuring the JVM.........................................................................................7
Preparing the EAR file for deployment.............................................................7
Deploying in IBM WebSphere...........................................................................8
Deploying in Oracle WebLogic..........................................................................9
Deploying in external Tomcat.........................................................................10
Requirements and setup.........................................................................................11
Setup Tomcat running on Windows........................................................................11
Server startup and verification.................................................................................13
Deploying Quark Publishing Platform Server in multi-server deployment.....14
Configuring cluster server instances or nodes........................................................14
Configuring IIS as an HTTP load balancer...............................................................16
Configuring Apache Web Server as an HTTP load balancer...................................18
Configuring server caches flushing mechanism......................................................19
Enabling Secure Sockets Layer (SSL) for Quark Publishing Platform Server.21
SSL support.....................................................................................................21
Enabling SSL in Quark Publishing Platform Server..................................................21
Configuring Platform clients to log on to an SSL enabled Server...........................22
Verifying and using SSL...........................................................................................23
Quark Publishing Platform Server — Manual configuration
...................................................................................................24
Editing "ServerApp.properties".....................................................................24
Editing "PublishingPool.properties"...............................................................25
Configuring Quark Publishing Platform Renderer for Quark Publishing Platform usage.26
Editing "Qla.properties".................................................................................26
Extended configuration files...........................................................................26
Configuring Platform Server to be used for publishing with Quark XML Author - Sharepoint Adapter.27
Configuring Platform Server to be used for publishing with Quark XML Author - FileNet Adapter.27
JVM memory allocation on Windows..............................................................27
Using Quark Publishing Platform Server Console or Quark Publishing Platform Server Windows service.28
Using "Serverstartup.bat".......................................................................................28
Configuring Windows authentication..............................................................28
Steps to enable SSO in Platform Clients.................................................................29
ii | QUARK PUBLISHING PLATFORM 2015 SYSTEM ADMINISTRATION GUIDE
Page 3

CONTENTS
Steps to configure Web Client for mixed mode authentication.............................30
Configuring logging levels..............................................................................31
Changing logging levels in "log4j.xml"..................................................................31
Changing logging levels after starting Quark Publishing Platform Server..............31
Changing logging for exceptions............................................................................32
Modifying search notification evaluation settings..........................................32
Database properties........................................................................................34
Transformation properties..............................................................................35
Session timeout...............................................................................................36
Repository status updater...............................................................................36
Moving Quark Publishing Platform Renderer ................................................37
Integrating Quark Publishing Platform with LDAP.........................................37
Using Kerberos authentication................................................................................37
Using Simple authentication...................................................................................38
Connecting LDAP user passwords with Quark Publishing Platform Server.............38
Restricting Workspace Browser palettes........................................................39
Changing query results settings......................................................................39
Setting up custom content type detection.....................................................39
Specifying a default PDF output style............................................................40
Controlling delivery channel display settings in Web Client...........................40
Changing case-sensitivity for Quark Publishing Platform passwords.............41
Managing filters and index service settings ...................................................41
Index service settings..............................................................................................42
ASPOSE filter...........................................................................................................42
APS filter..................................................................................................................44
POI filter..................................................................................................................44
Configure processing of MS Office documents......................................................45
QuarkXPress Server Filter........................................................................................45
JAWS filter settings.................................................................................................46
XML Author filter settings.......................................................................................46
ImageMagick, Jaws, and DITA OT directories........................................................47
Full text indexing configuration......................................................................47
Charting Service..............................................................................................47
Integrating QLA with Quark Publishing Platform...........................................48
Enabling IPTC support.....................................................................................48
RMI and CORBA clients only...........................................................................49
Changing ports used by Quark Publishing Platform Server....................................49
Multiple network cards............................................................................................50
Firewalls with NAT...................................................................................................51
Failover setup..................................................................................................51
Encrypting a plain text password...................................................................55
Enabling forced log off during inactivity.........................................................56
Configuring WebAdmin to enable forced log off...................................................56
Configuring Workspace to enable forced log off....................................................57
Configuring messaging....................................................................................58
QUARK PUBLISHING PLATFORM 2015 SYSTEM ADMINISTRATION GUIDE | iii
Page 4

CONTENTS
Quark Publishing Platform Web Client: Manual configuration...59
Configuration overview...................................................................................59
Application level settings................................................................................59
Multi-Channel preview....................................................................................61
Attrbutes for General pane.............................................................................62
Role based Toolbar configuration...................................................................63
Restricting access to Web Client/Admin.........................................................65
Quark Publishing Platform Clients — Manual configuration......67
Creating and maintaining the log file (Mac OS X only)...................................67
Creating and maintaining the log file (Windows only)....................................67
Creating and maintaining the log file (Quark XML Author for Platform)........69
Suppressing the accessibility services warning - Mac OS X............................70
Displaying revision comments.........................................................................70
Displaying first and last names........................................................................70
Changing the preview font and size (Windows only)......................................71
Setting maximum number of assets to be fetched (Windows only)................72
Specify whether to use Chunked Encoding (Windows only)...........................72
Specify support for lazy loading when searching (Windows only)..................72
Setting the lazy loading chunk size (Windows only).......................................73
Setting the service time out values for all remote service references (Windows only).73
Setting the service timeout value for publishing service (Windows only)......73
Specify the font size of the copy tasting row (Windows only)........................73
Specify the icon for a file extension (Windows only)......................................73
Controlling password retention (Mac OS X only)............................................74
Using Mac clients with a proxy server............................................................74
Using Windows clients with a proxy server....................................................75
Mirroring the collection hierarchy on Check Out/Get.....................................75
Turning off collection mirroring: Mac OS X.............................................................75
Turning off collection mirroring: Windows..............................................................75
Configuring publishing channels.....................................................................76
Configuring publishing channels: Mac OS X...........................................................76
Configuring publishing channels: Windows............................................................76
Configuring Delivery Channels........................................................................77
Configuring delivery channels: Mac OS X...............................................................77
Configuring delivery channels: Windows................................................................77
Setting preferences for Quark XML Author for Platform...............................78
Setting the Check out location................................................................................78
Setting the file deletion preference on Save and Close..........................................78
Setting the quick search preference........................................................................78
Setting the display revision comments preference on Save and Close..................79
Configuring the Platform Adapters for Microsoft Office components for web sharing.79
Configuring the Quark Publishing Platform Adapter for Microsoft Office - Word...80
Configuring the Quark Publishing Platform Adapter for Microsoft Office - Excel...80
Configuring the Quark Publishing Platform Adapter for Microsoft Office - PowerPoint.80
iv | QUARK PUBLISHING PLATFORM 2015 SYSTEM ADMINISTRATION GUIDE
Page 5

CONTENTS
Update published ClickOnce deployments............................................................80
Manual configuration for QuarkXPress and QuarkCopyDesk XTensions........83
Managing backups and file storage............................................84
Backing up Quark Publishing Platform Server................................................84
Backing up your database.......................................................................................84
Backing up assets....................................................................................................84
Backing up Index files (full text search)...................................................................84
Restoring Quark Publishing Platform Server..................................................85
Restoring Assets......................................................................................................85
Restoring Quark Publishing Platform Server database............................................85
Restoring Full Text Indexes.....................................................................................85
Moving Quark Publishing Platform asset repository......................................86
Legal notices...............................................................................87
QUARK PUBLISHING PLATFORM 2015 SYSTEM ADMINISTRATION GUIDE | v
Page 6

INTRODUCING QUARK PUBLISHING PLATFORM ADMINISTRATION TASKS
Introducing Quark Publishing Platform
administration tasks
Administering a Quark® Publishing Platform™ environment requires extensive
hardware and software maintenance in addition to the controls in Quark Publishing
Platform. This guide describes tasks administrators perform for security, system
configuration adjustments, and integration with other systems. For information about
administrating in the Quark Publishing Platform interface, see A Guide to
Quark Publishing Platform. For information about installing Quark Publishing Platform
software, see the Quark Publishing Platform ReadMe.
6 | QUARK PUBLISHING PLATFORM 2015 SYSTEM ADMINISTRATION GUIDE
Page 7

DEPLOYING QUARK PUBLISHING PLATFORM SERVER TO EXTERNAL SERVER CONTAINERS
Deploying Quark Publishing Platform
Server to External Server Containers
You can deploy Quark Publishing Platform Server in an external Tomcat installation,
in IBM WebSphere, and in Oracle WebLogic.
Setting up environment variables
To prepare for deployment, set the following environment variables.
If you are deploying Quark Publishing Platform Server as a service, you must set these
as global system environment variables.
•
MAGICK_HOME: [ImageMagick installation directory]\bin
•
MAGICK_FILTER_MODULE_PATH: %MAGICK_HOME%/modules/filters
•
MAGICK_CODER_MODULE_PATH: %MAGICK_HOME%/modules/coders
Configuring the JVM
Regardless of which application server you are using, you must increase the memory
available to the JVM in Tomcat, IBM WebSphere and Oracle Weblogic as follows to
accommodate Quark Publishing Platform Server:
• Set the minimum Java heap memory to 1536MB.
• Set the minimum PermGenSpace to 512MB.
Preparing the EAR file for deployment
A Platform EAR build consists of the following things:
• Platform Server Configuration files.
• Binaries of dependencies.
• A tool to generate the JEE EAR file.
The following folders are included in an EAR build:
QUARK PUBLISHING PLATFORM 2015 SYSTEM ADMINISTRATION GUIDE | 7
Page 8

DEPLOYING QUARK PUBLISHING PLATFORM SERVER TO EXTERNAL SERVER CONTAINERS
•
conf: Contains Platform Server configuration files.
•
database: Contains database creation, update, and support files.
•
ImageMagick: Contain ImageMagick application binaries.
•
Jaws: Contains JAWS application binaries.
•
DITA-OT1.6: Contains DITA OT binaries.
•
publishing: Contains configuration and resource files for the Quark Publishing
Platform framework.
The Platform Server application consists of following modules:
•
admin.war: The Quark Publishing Platform administration Web application.
•
workspace.war: The Quark Publishing Platform workspace Web application.
•
webservices.war: The Quark Publishing Platform Server Web services module.
•
rest.war: The Quark Publishing Platform server REST interface module.
•
messaging.war: The HTTP-based messaging interface.
•
qxpsm.war: QuarkXPress Server Manager.
•
qxpsmadmin.war: The QuarkXPress Server Manager administration Web application.
To generate the Quark Publishing Platform Server JEE enterprise archive:
Copy the Quark Publishing Platform EAR build to the computer on which the
1
application server is running.
Update the configuration files (including "Database.properties", "managerconfig.xml",
2
"PluginContext.xml", and "QLA.properties.xml") as described in "Quark Publishing
Platform Server — Manual configuration ."
Update the values for the JMX Agent username and password in "serverApp.properties".
3
The values for username and password will be the same used to log on to WebSphere's
admin console.
Run RunEARUpdater.bat. A "For Deployment" folder is created, containing a
4
deployable Quark Publishing Platform EAR file.
Deploying in IBM WebSphere
To deploy in IBM WebSphere (Supported version is 8.5.5.4):
Copy the "qpp" folder from "For Deployment" to the working directory of the
1
application server instance where the EAR file will be deployed. For IBM WebSphere,
this is typically the folder corresponding to the target profile.
To deliver resources (Quark Publishing Platform or otherwise) to IBM FileNet, add the
following to the end of the [working directory]\properties\wsjaas.conf file:
FileNetP8WSI {
com.filenet.api.util.WSILoginModule required;
};
8 | QUARK PUBLISHING PLATFORM 2015 SYSTEM ADMINISTRATION GUIDE
Page 9

DEPLOYING QUARK PUBLISHING PLATFORM SERVER TO EXTERNAL SERVER CONTAINERS
Launch the IBM WebSphere application server console by navigating to
2
http://localhost:port/ibm/console.
Under Applications, click New Application.
3
Click New Enterprise Application.
4
Under Path to the new application, click Choose File and then select the .ear file in
5
the "For Deployment" folder. (For more information, see "Preparing the EAR file for
deployment.")
Under Preparing for the application installation, click Next.
6
Click Next for steps 1, 2, 3, and 4. Leave all settings at their default.
7
Click Finish for step 5.
8
Click Save.
9
Navigate to Applications > Application Types > WebSphere enterprise applications
10
and click qpp-server-11.0.ear.
Click Class loading and update detection.
11
Under General properties > Class loader order, click Classes loaded with local class
12
loader first (parent last).
Click Save to save all changes.
13
Navigate to Applications > Application Types > WebSphere enterprise applications
14
and click qpp-server-11.0.ear again.
Under References, click Shared library references.
15
Check the box next to qpp-server-11.0.ear, then click Reference shared libraries.
16
On the next screen, click New.
17
Select any name. As classpath, enter the relative paths of the Platform publishing and
18
ext folders.
For example, to target this directory:
C:\ProgramFiles\IBM\WebSphere\AppServer\profiles\AppSrv01\qpp\publishing
...you would enter ./qpp/publishing and ./qpp/ext
Click Apply or OK to save the settings.
19
Assign this library reference to the qpp-server-11.0.ear application.
20
Start the qpp-server-11.0.ear Web application.
21
To verify the installation, navigate to the following URLs:
22
http://localhost:9080/admin
http://localhost:9080/workspace
Deploying in Oracle WebLogic
To deploy Quark Publishing Platform Server in Oracle WebLogic (supported version
is 12.1.3):
QUARK PUBLISHING PLATFORM 2015 SYSTEM ADMINISTRATION GUIDE | 9
Page 10

DEPLOYING QUARK PUBLISHING PLATFORM SERVER TO EXTERNAL SERVER CONTAINERS
Start the WebLogic server.
1
Create a new WebLogic domain named QPP_DOMAIN.
2
To set the JVM parameter for specifying the location of the "krb5.conf" file, open the
3
file [WEB_LOGIC _DIR]\domains\base_domain\bin\setDomainEnv.cmd and
append the following to the end:
set JAVA_OPTIONS=%JAVA_OPTIONS%
-Djava.security.krb5.conf=./qpp/conf/krb5.conf
Copy the "qpp" folder from the "For Deployment" folder to the target WebLogic server
4
domain directory (for example,
C:\oracle\Middleware\user_projects\domains\QPP_DOMAIN).
Set the global system environment variable CLASSPATH on the WebLogic computer
5
to the following value:
[WEB_LOGIC_DIR]\domains\QPP_DOMAIN\qpp\publishing
and
[WEB_LOGIC_DIR]\domains\QPP_DOMAIN\qpp\ext
Restart WebLogic.
6
Open the Oracle Weblogic application server console using the following URL:
7
http://localhost:port/console
Select the domain (QPP_DOMAIN), then click the Web Applications tab.
8
Check Archived Real Path Enabled.
9
Click Save.
10
Under Domain Structure, click Deployments.
11
Under Deployments on the right, click Install and supply the path of the .ear file in
12
the "For Deployment" folder. (For more information, see "Preparing the EAR file for
deployment.")
In the next screen, click Next with the default option (Install this deployment as an
13
application) selected.
In the next screen, click Next.
14
Click Finish.
15
Click Save.
16
Start the Quark Publishing Platform Web application.
17
To verify the installation, navigate to the following URLs:
18
http://localhost:7001/admin
http://localhost:7001/workspace
Deploying in external Tomcat
Developed by the Apache Software Foundation, Apache Tomcat™ serves as the standard
reference implementation for Java™ Servlet and JavaServer™ Pages technologies.
Tomcat™ is a servlet container for managing Web applications.
10 | QUARK PUBLISHING PLATFORM 2015 SYSTEM ADMINISTRATION GUIDE
Page 11

DEPLOYING QUARK PUBLISHING PLATFORM SERVER TO EXTERNAL SERVER CONTAINERS
When you install the standalone version of Quark Publishing Platform Server, the
installation embeds an instance of Tomcat in the Quark Publishing Platform Server
Java Virtual Machine (JVM™) to manage Quark Publishing Platform Web applications,
such as Quark Publishing Platform Web Client.
However, if you are already running a Tomcat server for other Web applications, and
you want the Quark Publishing Platform Web applications to use your existing Tomcat
server, you can deploy Quark Publishing Platform Server in this instance of Tomcat.
Deploying Quark Publishing Platform Server in your existing (that is, external) Tomcat
server means you don't have to run a separate Quark Publishing Platform Server process
on the server computer. If you want to deploy Quark Publishing Platform Server in
your external Tomcat, you can use a separate build located in "Server (External Web
Container)" in your software package.
Requirements and setup
Quark Publishing Platform Server requires JAVA 7 and Apache Tomcat 7.0.61 or above
to be configured as a Web server. The computer on which Tomcat is running should
be a 64-bit computer. You can add Quark Publishing Platform Server to an existing
Tomcat installation.
Setup Tomcat running on Windows
The existing Apache Tomcat installation folder in the steps below is TOMCAT_HOME
To deploy Quark Publishing Platform in an external Tomcat installation created by
the Tomcat installer or deployed with binaries:
Copy the [QPP_BUILD]/qpp folder to the [TOMCAT_HOME] folder.
1
Copy the contents of the [QPP_BUILD]/webapps folder to the
2
[TOMCAT_HOME]/webapps folder.
If a [TOMCAT_HOME]/endorsed folder does not exist, create this folder.
3
Copy the contents of the [QPP_BUILD]/endorsed folder to the
4
[TOMCAT_HOME]/endorsed folder.
If Tomcat is installed with the installer, in the
5
[TOMCAT_HOME]/qpp/publishing/AS-Busdoc.xslt,
[TOMCAT_HOME]/qpp/publishing/BusDoc2QCD.xslt,
[TOMCAT_HOME]/qpp/publishing/BusDoc2QXPS.xslt and
[TOMCAT_HOME]/qpp/publishing/SmartDoc2QXPS.xsltfiles, update the following
paths as given below:
<xsl:include href="./qpp/publishing/xref-dita-anchors.xslt"/>
<xsl:include href="./qpp/publishing/AS-StyleSheets.xslt"/>
<xsl:include href="./qpp/publishing/AS-Transformations.xslt"/>
<xsl:include href="./qpp/publishing/BusDocsWordTableStyles.xslt"/>
If Tomcat is deployed with binaries, in the
6
[TOMCAT_HOME]/qpp/publishing/AS-Busdoc.xslt,
[TOMCAT_HOME]/qpp/publishing/BusDoc2QCD.xslt,
[TOMCAT_HOME]/qpp/BusDoc2QXPS.xslt and
QUARK PUBLISHING PLATFORM 2015 SYSTEM ADMINISTRATION GUIDE | 11
Page 12

DEPLOYING QUARK PUBLISHING PLATFORM SERVER TO EXTERNAL SERVER CONTAINERS
[TOMCAT_HOME]/qpp/publishing/SmartDoc2QXPS.xslt files, update the following
paths:
<xsl:include href="../qpp/publishing/xref-dita-anchors.xslt"/>
<xsl:include href="../qpp/publishing/AS-StyleSheets.xslt"/>
<xsl:include href="../qpp/publishing/AS-Transformations.xslt"/>
<xsl:include href="../qpp/publishing/BusDocsWordTableStyles.xslt"/>
In the [TOMCAT_HOME]/qpp/conf/ServerApp.properties file:
7
•
Enter the webServer.port value you configured for Tomcat (8080 for example).
•
Set the webServer.embeddedWebContainer value to false.
In the [TOMCAT_HOME]/qpp/conf/ManagerConfig.xml file:
8
•
Enter the IP address or hostname of the QuarkXPress Server in the name element of
the connectioninfo section.
•
Enter the port for QuarkXPress Server in the port element.
Keep in mind that your Tomcat and the QuarkXPress Server should not be running
on the same port if QuarkXPress Server and Tomcat are running on the same machine.
In the [TOMCAT_HOME]/qpp/conf/Qla.properties file:
9
• Set the host name, port number, and serial number of your instance of the QLA
Server.
To configure the database, in the [TOMCAT_HOME]/qpp/conf/Database.properties
10
file edit/add the following values:
• For Oracle:
qpp.jdbc.driverClassName = oracle.jdbc.driver.OracleDriver
qpp.jdbc.url = jdbc:oracle:thin:@<hostname><:portnumber><:oracle_sid>
qpp.jdbc.userName = QppOracleDB
qpp.jdbc.password = QppPassword
• For SQL Server:
qpp.jdbc.driverClassName = com.microsoft.sqlserver.jdbc.SQLServerDriver
qpp.jdbc.url
=jdbc:sqlserver://<your-host-name>\\<instanceName>;databaseName=qppdb
qpp.jdbc.userName = QppMSSQLDB
qpp.jdbc.password = QppPassword
Edit the [TOMCAT_HOME]/qpp/conf/PluginsContext.xml file by replacing the
11
default entry of the HSQL Dao context with the required database Dao context:
• For Oracle:
<import
resource="classpath:com/quark/qpp/common/dao/rdbms/oracle/OracleDaoContext.xml"/>
• For SQL Server:
<import
resource="classpath:com/quark/qpp/common/dao/rdbms/sqlserver/SqlServerDaoContext.xml"/>
Set the following global environment variables on the machine:
12
12 | QUARK PUBLISHING PLATFORM 2015 SYSTEM ADMINISTRATION GUIDE
Page 13

DEPLOYING QUARK PUBLISHING PLATFORM SERVER TO EXTERNAL SERVER CONTAINERS
•
MAGICK_HOME : [Tomcat_Home]\qpp\ImageMagick\bin.
•
MAGICK_FILTER_MODULE_PATH : %MAGICK_HOME%/modules/filters.
•
MAGICK_CODER_MODULE_PATH : %MAGICK_HOME%/modules/coders.
Open the [TOMCAT_HOME]/conf/catalina.properties file and add the following
13
line:
Shared.Loader
:${catalina.home}/qpp/conf,${catalina.home}/qpp/lib/*.jar,
${catalina.home}/qpp/publishing, ${catalina.base}/qpp/ext
Open the [TOMCAT_HOME]/conf/catalina.properties file and search for
14
org.apache.catalina.startup.TldConfig.jarsToSkip= and update:
org.apache.catalina.startup.TldConfig.jarsToSkip=a*.jar,b*.jar,c*.jar,d*.jar,e*.jar,f*.jar,g*.jar,
h*.jar,i*.jar,k*.jar,l*.jar,m*.jar,n*.jar,o*.jar,p*.jar,q*.jar,r*.jar,s*.jar,t*.jar,u*.jar,v*.jar,w*.jar,x*.
jar,y*.jar,z*.jar,ja*.jar,jc*.jar,jd*.jar,je*.jar,ji*.jar,jn*.jar
If Tomcat is installed with the installer:
15
Launch the Tomcat monitor. In the JAVA tab, set CATALINA_OPTS under Java Options:
• If Platform Server is running with Oracle database:
Doracle.jdbc.J2EE13Compliant=true
• For integration of LDAP (or give absolute path):
Djava.security.krb5.conf=./qpp/conf/krb5.conf
•
For Java PermGen memory space: XX:MaxPermSize=256m
If Tomcat is deployed with binaries:
16
Open the [TOMCAT_HOME]/bin/catalina.bat file and set following params:
•
JRE_HOME=C:\Program Files\Java\jdk1.7.0_76
•
JAVA_OPTS=-server -Xmx1536m -XX:MaxPermSize=128m
•
CATALINA_OPTS=-Doracle.jdbc.J2EE13Compliant=true
-Djava.security.krb5.conf=../qpp/conf/krb5.conf
Launch the Tomcat monitor. In the JAVA tab, set the following parameters:
17
•
Initial memory pool=1024 MB.
•
Maximum memory pool=1536 MB.
Server startup and verification
After you install Quark Publishing Platform Server with Tomcat and specify the port
for Quark Publishing Platform Server access, you can start Quark Publishing Platform
Server and verify your configuration. Quark Publishing Platform Server and Tomcat
are tied together. To start and stop Quark Publishing Platform Server, you need to start
and stop Tomcat.
To confirm Quark Publishing Platform Web Client access, in you browser's address
field enter: http://[machineName]:[webServerPort]/workspace
QUARK PUBLISHING PLATFORM 2015 SYSTEM ADMINISTRATION GUIDE | 13
Page 14

DEPLOYING QUARK PUBLISHING PLATFORM SERVER TO EXTERNAL SERVER CONTAINERS
To confirm Quark Publishing Platform Web admin access, in you browser's address
field enter: http://[machineName]:[webServerPort]/admin
QuarkCopyDesk, QuarkXPress, Quark Publishing Platform Client, Quark Publishing
Platform Web Client, and Quark Publishing Platform Script Manager use the Tomcat
port to log on to Quark Publishing Platform server.
Deploying Quark Publishing Platform Server in multi-server deployment
A Quark Publishing Platform multi-server cluster is a set of Quark Publishing Platform
Server installations that has been configured to use a common database, shared asset
repository, and message queue. A multi-server cluster offers the following advantages:
• It lets you serve a larger number of requests by adding hardware.
• It lets you add active load balancing.
• It provides redundant and reliable setup.
• Failure of any specific instance in a cluster does not result in complete service outage.
Only a fraction of active sessions are affected by an instance failure, and subsequent
requests can be routed to an available active Quark Publishing Platform Server instance.
• It is transparent to clients that communicate with the load-balancing HTTP server.
To load-balance requests, you must have an HTTP serverand any HTTP load balancer
that supports the "sticky session" feature. The following HTTP servers have been tested
as load-balancing servers:
• Microsoft IIS 7 with the latest version of the IIS Tomcat connector.
• Apache 2.2 with the latest version of the JK Tomcat Connector for Apache 2.2.
• Apache 2.2 with built in mod_proxy and mod_proxy_balancer DSO modules of the
Apache 2.2.
Only requests routed through an HTTP load balancer are load-balanced among different
instances. Requests to a specific instance are always served by that instance, irrespective
of its existing load.
RMI clients must connect directly to a specific server instance.
Configuring cluster server instances or nodes
The Quark Publishing Platform Server can be deployed as a standalone server or in an
external Tomcat using the database on the initial computers, which are called nodes
of the Platform multiserver cluster. The first step in setting up cluster servers is to set
up a Quark Publishing Platform Server database for Oracle or MS SQL Server.
Platform Server deployed as a standalone server to work as nodes
On each Quark Publishing Platform Server computer:
Open the "ActiveMQ.xml" file located in the qpp/conf folder.
1
14 | QUARK PUBLISHING PLATFORM 2015 SYSTEM ADMINISTRATION GUIDE
Page 15

DEPLOYING QUARK PUBLISHING PLATFORM SERVER TO EXTERNAL SERVER CONTAINERS
In the "ActiveMQ.xml" file, uncomment and add network connectors to integrate the
2
server instance's message queue with one or more server instances in the cluster, where
qpp-node-N is the name of a computer where another instance of Quark Publishing
Platform Server is deployed:
<networkConnectors>
<networkConnector dynamicOnly="true" duplex="true" name="remote-nc"
networkTTL="1000" uri="static:(tcp://qpp-node-N:61401)"/>
</networkConnectors>
In the "ActiveMQ.xml" file, uncomment the transport connector(s) to integrate the
3
server instances’ message queues with the IP address and name of the server instances
in the cluster.
<<transportConnector
uri="tcp://localhost:${jms.openWirePort}?wireFormat.maxInactivityDuration=0"
updateClusterClients="true" rebalanceClusterClients="true"
updateClusterClientsOnRemove="true" />
<transportConnector
uri="tcp://10.91.32.51:${jms.openWirePort}?wireFormat.maxInactivityDuration=0"/>
Open the "web.xml" file of the workspace and admin webapps, located in the WEB-INF
4
folder for each webapp and uncomment the SessionResetFilter to handle sessions in
case of node failure.
<filter>
<filter-name>SessionResetFilter</filter-name>
<filter-class>com.quark.web.security.servlet.SessionResetFilter</filter-class>
<init-param>
<param-name>jvmRoute</param-name>
<param-value>qpp1</param-value>
</init-param>
<init-param>
<param-name>sessionCookieName</param-name>
<param-value>JSESSIONID</param-value>
</init-param>
<init-param>
<param-name>sessionInitUrls</param-name>
<param-value>
/workspace/reconnectUser.qsp
/workspace/login.qsp
</param-value>
</init-param>
</filter>
<filter-mapping>
<filter-name>SessionResetFilter</filter-name>
<url-pattern>/*</url-pattern>
</filter-mapping>
In the "ServerApp.properties" file located in the [QPP Server]/conf folder, assign a
5
unique value to server.id.prefix, identifying the server instance.
In the "AssetServiceContext.xml" file found in
6
{install_path}/Server/lib/qpp-core-{version}.jar, uncomment the
PersistantLockedAssetsRegistry and comment the LockedAssetsRegistryImpl beans.
<!- <bean id="lockedAssetsRegistry"
class="com.quark.qpp.core.asset.service.impl.LockedAssetsRegistryImpl">
<property name="assetMessagePublisher" ref="assetMessagePublisher"/>
</bean>
-->
<bean id="lockedAssetsRegistry"
class="com.quark.qpp.core.asset.service.impl.PersistantLockedAssetsRegistry">
<property name="assetMessagePublisher" ref="assetMessagePublisher"/>
<property name="lockedAssetsDao" ref="lockedAssetsDao"/>
</bean>
QUARK PUBLISHING PLATFORM 2015 SYSTEM ADMINISTRATION GUIDE | 15
Page 16

DEPLOYING QUARK PUBLISHING PLATFORM SERVER TO EXTERNAL SERVER CONTAINERS
In the "server.xml" file located in the [server-path]/conf folder, assign a unique
7
value to the jvmRoute attribute of the <Engine> tag.
<Engine name="Catalina" defaultHost="localhost" jvmRoute="node1">
Rename the "serviceArchivesMultiServer" folder, located at
8
{TOMCAT_HOME}/webapps/webServices/WEB-INF, to "services".
Repeat the above steps for all Quark Publishing Platform nodes.
Platform Server deployed in external Tomcat
On each Quark Publishing Platform Server computer:
Deploy a standalone instance of Quark Publishing Platform Server in external Tomcat,
1
using the database on the initial computer.
Open the "ActiveMQ.xml" file located in the qpp/conf folder and add network
2
connectors to integrate the server instance's message queue with one or more server
instances in the cluster, where qpp-node-N is the name of a computer where another
instance of Quark Publishing Platform Server is deployed:
<networkConnectors>
<networkConnector dynamicOnly="true" duplex="true" name="remote-nc"
networkTTL="1000" uri="static:(tcp://qpp-node-N:61401)"/>
</networkConnectors>
Uncomment the transport connector(s) in the "ActiveMQ.xml" file to integrate the
3
server instances’ message queues with the IP address and name of the server instances
in the cluster.
<<transportConnector
uri="tcp://localhost:${jms.openWirePort}?wireFormat.maxInactivityDuration=0"
updateClusterClients="true" rebalanceClusterClients="true"
updateClusterClientsOnRemove="true" />
<transportConnector
uri="tcp://10.91.32.51:${jms.openWirePort}?wireFormat.maxInactivityDuration=0"/>
In the "ServerApp.properties" file located in the [QPP Server]/conf folder, assign a
4
unique value to server.id.prefix, identifying the server instance.
In the "server.xml" file located in the [server-path]/conf folder, assign a unique
5
value to the jvmRoute attribute of the <Engine> tag.
<Engine name="Catalina" defaultHost="localhost" jvmRoute="node1">
Edit the tomcat_home/conf/context.xml file as follows:
6
<Context sessionCookiePath="/">
Rename the "serviceArchivesMultiServer" folder, located at
7
{TOMCAT_HOME}/webapps/webServices/WEB-INF, to "services".
Repeat the above steps for all Quark Publishing Platform nodes.
8
Configuring IIS as an HTTP load balancer
To configure IIS 7 as an HTTP load balancer:
The first step is to deploy the Tomcat connector. For more details on how to do this,
1
see http://tomcat.apache.org/connectors-doc/webserver_howto/iis.html. Create a new folder
16 | QUARK PUBLISHING PLATFORM 2015 SYSTEM ADMINISTRATION GUIDE
Page 17

DEPLOYING QUARK PUBLISHING PLATFORM SERVER TO EXTERNAL SERVER CONTAINERS
named "TomcatConnector," then put the "isapi_redirect.dll" file from the Tomcat
Connector for IIS build.
Create a new file named "isapi_redirect.properties" in the same folder, and insert the
2
following into the file:
extension_uri=/jakarta/isapi_redirect.dll
log_file=C:\TomcatConnector\Log\isapi.log
# Make sure the directory listed for log files in the
# "isapi_redirect.properties" file exists
log_level=info
worker_file=C:\TomcatConnector\worker.properties
worker_mount_file=C:\TomcatConnector\uriworker.properties
Create a new file named "workers.properties" in the same folder, and insert the following
3
into the file, where qpp-node1 and qpp-node2 are the values of the jvmRoute attribute
as specified in the "server.xml" file for each Quark Publishing Platform Server:
worker.list=TomcatBalancer
worker.TomcatBalancer.type=lb
worker.TomcatBalancer.balance_workers=qpp-node1,qpp-node2
worker.TomcatBalancer.sticky_session=True
worker.TomcatBalancer.sticky_session_force=True
worker.TomcatBalancer.method=Request
worker.TomcatBalancer.lock=Pessimistic
worker.qpp-node1.type=ajp13
worker.qpp-node1.host=qpp-node1
# This should be the same as the port in the AJP connector defined
# in the "server.xml" file for the Tomcat server in which Quark
# Publishing Platflrm is deployed
worker.qpp-node1.port=61398
worker.qpp-node1.lbfactor=3
worker.qpp-node2.type=ajp13
worker.qpp-node2.host=qpp-node2
# This should be the same as the port in the AJP connector defined
# in the "server.xml" file for the Tomcat server in which Quark
# Publishing Platflrm is deployed
worker.qpp-node2.port=61398
worker.qpp-node2.lbfactor=3
Create a new file named "uriworker.properties" in the same folder, and insert the
4
following into the file:
/admin/*=TomcatBalancer
/admin=TomcatBalancer
/workspace/*=TomcatBalancer
/workspace=TomcatBalancer
/webservices/*=TomcatBalancer
/webservices=TomcatBalancer
/rest/*=TomcatBalancer
/rest=TomcatBalancer
/messaging/*=TomcatBalancer
/messaging=TomcatBalancer
/qxpsmadmin/*=TomcatBalancer
/qxpsmadmin=TomcatBalancer
/favicon.ico=TomcatBalancer
/*=TomcatBalancer
/qxpsm/*=TomcatBalancer
/qxpsm=TomcatBalancer
This file contains the mappings of the URLs that need to be handled by IIS and
forwarded to Quark Publishing Platform Servers.
Using the IIS management console, add a new virtual directory named "jakarta" to
5
your IIS Web site, with the physical path of the directory where you placed the
"isapi_redirect.dll" file.
QUARK PUBLISHING PLATFORM 2015 SYSTEM ADMINISTRATION GUIDE | 17
Page 18

DEPLOYING QUARK PUBLISHING PLATFORM SERVER TO EXTERNAL SERVER CONTAINERS
Give the virtual directory execute permission. Select the virtual folder, double-click
6
Handler Mappings, and then click Edit Feature Permissions in the Actions pane.
Check Execute in the Edit Feature Permissions dialog box, and then click OK.
Add an ISAPI filter to the IIS Web site. Select the Web site, double-click ISAPI Filters,
7
and then click Add in the Actions pane. In the Add ISAPI Filter dialog box, enter a
name and the path of the "isapi_redirect.dll" file, and then click OK.
Configure the ISAPI and CGI Restrictions feature. Navigate to the Server Home screen,
8
double-click ISAPI and CGI Restrictions, and then click Add in the Actions pane. In
the Add ISAPI or CGI Restriction dialog box, enter a name and the path of the
"isapi_redirect.dll" file, check Allow extension path to execute, and then click OK.
Enable Windows authentication. Navigate to your Web site and double-click
9
Authentication. Right-click Windows Authentication and choose Enable, disable
the other authentication options, and then restart IIS.
To verify the installations, start Quark Publishing Platform Server on all nodes, then
10
access each server using the computer name or IP address and port of the IIS server.
The IIS server should serve and load-balance the request using the Tomcat connector.
You can view the details in the log file identified in the "isapi_redirect.properties" file.
Configuring Apache Web Server as an HTTP load balancer
To configure Apache Web Server 2.2 with the latest version of the JK Tomcat Connector
for Apache 2.2 as an HTTP load balancer:
The first step is to deploy the Tomcat connector. For more details on how to do this,
1
see http://tomcat.apache.org/connectors-doc/miscellaneous/faq.html. Copy the "mod_jk.so"
file from the Tomcat Connector download location to
{Apache_2.2_installation}/modules.
Open the file {Apache_2.2_installation}/conf/httpd.conf in a text editor and
2
insert the following content:
LoadModule jk_module modules/mod_jk.so
<IfModule jk_module>
JkWorkersFile conf/workers.properties
JkLogFile logs/mod_jk.log
JkLogStampFormat "[%H:%M:%S] "
JkRequestLogFormat "%T"
JkLogLevel error
JkOptions +ForwardKeySize +ForwardURICompat -ForwardDirectories
<Directory />
AllowOverride All
<Limit GET HEAD POST PUT DELETE OPTIONS>
Order Allow,Deny
Allow from all
</Limit>
</Directory>
JkMount /workspace TomcatBalancer
JkMount /workspace/* TomcatBalancer
JkMount /webservices TomcatBalancer
JkMount /webservices/* TomcatBalancer
JkMount /admin TomcatBalancer
JkMount /admin/* TomcatBalancer
JkMount /rest TomcatBalancer
JkMount /rest/* TomcatBalancer
JkMount /messaging TomcatBalancer
JkMount /messaging/* TomcatBalancer
JkMount /qxpsm TomcatBalancer
JkMount /qxpsm/* TomcatBalancer
JkMount /qxpsmadmin TomcatBalancer
JkMount /qxpsmadmin/* TomcatBalancer
</IfModule>
18 | QUARK PUBLISHING PLATFORM 2015 SYSTEM ADMINISTRATION GUIDE
Page 19

DEPLOYING QUARK PUBLISHING PLATFORM SERVER TO EXTERNAL SERVER CONTAINERS
Create a file named {Apache_2.2_installation}/conf/workers.properties
3
and add the following content to it, where qpp-node1 and qpp-node2 are the values
of the jvmRoute attribute as specified in the "server.xml" file for each Quark Publishing
Platform Server:
worker.list=TomcatBalancer
worker.TomcatBalancer.type=lb
worker.TomcatBalancer.balance_workers=qpp-node1, qpp-node2
worker.TomcatBalancer.sticky_session=True
# This should be commented out, if it is not, you cannot connect to the
Apache Web server which
# acts as the load balancer.
worker.TomcatBalancer.sticky_session_force=True
worker.TomcatBalancer.method=Request
worker.TomcatBalancer.lock=Pessimistic
worker.qpp-node1.type=ajp13
# This should be the IP address of the first QPP node
worker.qpp-node1.host=Server 1
# 8009 is for external tomcat server
# 61398 is for embedded tomcat with QPP
worker.qpp-node1.port=61398
worker.qpp-node1.lbfactor=3
worker.qpp-node2.type=ajp13
# This should be the IP address of the first QPP node
worker.qpp-node2.host=Server 2
# 8009 is for external tomcat server
# 61398 is for embedded tomcat with QPP
worker.qpp-node2.port=61398
worker.qpp-node2.lbfactor=3
Restart Apache 2.2 httpd.
4
To verify the installations, start Quark Publishing Platform Server on all nodes, then
5
access each server using the computer name or IP address and port of the Apache
server. The Apache server should serve and load-balance the request using the Tomcat
connector. You can view the details in the log files at
{Apache_2.2_Installation}/logs.
Configuring server caches flushing mechanism
Platform Server provides two mechanisms to flush caches across all server instances
in case of an update:
• Notification based - This mechanism clears the cache asynchronously. The Notification
based cache flushing is accomplished by publishing of a message of type CACHE with
property FLUSH_INTERCEPTOR. This is the default configured mechanism.
• REST request based - This mechanism clears the cache synchronously. The REST based
mechanism makes an HTTP request to every peer node to trigger its cache flushing:
http://{peerNode}:61400/rest/service/xcache/flush/{interceptorName}.
This mechanism is not the default configuration, but you may configure it if needed.
In order to configure REST based cache flushing mechanism, make the following
changes:
QUARK PUBLISHING PLATFORM 2015 SYSTEM ADMINISTRATION GUIDE | 19
Page 20

DEPLOYING QUARK PUBLISHING PLATFORM SERVER TO EXTERNAL SERVER CONTAINERS
Open the "CacheManager.xml" file found in
1
{install_path}/Server/lib/qpp-server-common-{version}.jar
Comment the asyncRemoteMessenger and uncomment the
2
synchronousRemoteInvoker. Inject this bean instead of asyncRemoteMessenger in
baseCacheFlushingInterceptor.
<!-- Uncomment and inject this bean instead of asyncRemoteFlushingMessenger
in baseCacheFlushingInterceptor for synchronous REST based cache
invalidation. -->
<bean id="synchronousRemoteInvoker"
class="com.quark.qpp.common.caching.SynchronousRemoteInvoker" >
<property name="remoteHosts" value="${server.peer.url}"/>
<property name="httpContext"
value="${server.cache.remoteFlush.context}"/>
</bean>
<bean class="com.quark.qpp.common.caching.RemoteFlushController">
<property name="flushingInterceptorMap" ref="flushingInterceptorMap"/>
</bean>
<!-- <bean id="asyncRemoteMessenger"
class="com.quark.qpp.core.messaging.service.impl.AsyncRemoteMessenger" >
<property name="messagePublisher" ref="messagePublisher"/>
</bean> -->
Save and close the file.
3
Restart the server.
4
In the "ServerApp.properties" file located in the [QPP Server]/conf folder,
5
uncomment the following:
# Uncomment following properties to configure QPP cluster with synchronous
cache update
# Set comma separate URIs of peer server instances which are part of Cluster
server.peer.url=http://{peerHostN 1}:61400,http://{peerHostN 2}:61400
# Http context which may be used to invoke cache flushing
server.cache.remoteFlush.context=rest/service/xcache/flush
20 | QUARK PUBLISHING PLATFORM 2015 SYSTEM ADMINISTRATION GUIDE
Page 21

ENABLING SECURE SOCKETS LAYER (SSL) FOR QUARK PUBLISHING PLATFORM SERVER
Enabling Secure Sockets Layer (SSL)
for Quark Publishing Platform Server
You can configure Quark Publishing Platform with different security options. In
addition to your own network security specifications, you can specify SSL protocol for
your Quark Publishing Platform client applications.
SSL support
You can configure your application server containers and all Quark Publishing Platform
clients to run in secure mode with SSL technology. This section explains the
configuration process.
It is also possible to run Quark Publishing Platform without embedding Tomcat in
JVM. See "Deploying in external Tomcat" for information about setting up Quark
Publishing Platform without embedding Tomcat.
To manage Web applications in the Quark Publishing Platform environment, Quark
Publishing Platform Server embeds an instance of Apache Tomcat 7.0.61 in its JVM.
The four Web applications in Quark Publishing Platform include Quark Publishing
Platform Web Client, Quark Publishing Platform Console, Quark Publishing Platform
Renderer Manager, and Quark Publishing Platform Web Services.
When you enable SSL, it applies to all Quark Publishing Platform client applications
deployed in Quark Publishing Platform Server.
Enabling SSL in Quark Publishing Platform Server
The instructions below address two scenarios. The "server.xml" file you edit contains
XML tags for both scenarios, which you need to enable or disable by "commenting"
and "uncommenting" specific tags.
To enable SSL for secure HTTP for all Quark Publishing Platform Web applications:
Open the "server.xml" file located in the {install_path}/conf folder.
1
Comment the following tag:
2
<Connector port="61400" maxHttpHeaderSize="8192"maxThreads="150"
minSpareThreads="25" maxSpareThreads="75"enableLookups="false"
redirectPort="61399" acceptCount="100"connectionTimeout="20000"
disableUploadTimeout="true" />
QUARK PUBLISHING PLATFORM 2015 SYSTEM ADMINISTRATION GUIDE | 21
Page 22

ENABLING SECURE SOCKETS LAYER (SSL) FOR QUARK PUBLISHING PLATFORM SERVER
Uncomment the following tag:
3
<Connector port="61399" maxHttpHeaderSize="8192"MaxThreads="150"
minSpareThreads="25" maxSpareThreads="75"enableLookups="false"
disableUploadTimeout="true"acceptCount="100" scheme="https"
secure="true"clientAuth="false" sslProtocol="TLS" />
Replace 61399 with 61400 (or any port on which Tomcat will be listening for secure
4
connections).
Save and close "server.xml."
5
On Quark Publishing Platform Server machine, open the command prompt and execute
6
the follwoing command:
%JAVA_HOME%\bin\keytool -genkey -alias tomcat -keyalg RSA
Provide the details in the prompts. Password should be changeit.
7
Restart the Quark Publishing Platform Server.
8
Access the Admin webpage: https://servername:61399/admin
9
This configuration creates one keystore with a private and public key pair. This is a
self sign certificate.
For more information on SSL configuration, including the use of a Certificate Authority,
10
please see the Apache Tomcat SSL information here:
url:https://tomcat.apache.org/tomcat-7.0-doc/ssl-howto.html
This change means Quark Publishing Platform client applications can use HTTPS. For
example, the URL for a Quark Publishing Platform Web Client user would be as follows:
https://[server name]:61399/workspace.
Configuring Platform clients to log on to an SSL enabled Server
Mac OS X QuarkXPress and QuarkCopyDesk users must fetch a SSL certificate from
Quark Publishing Platform Server before they can log on. To do so, each user should
launch Terminal and run the following command, substituting the IP address of the
Quark Publishing Platform Server computer for [server name]:
echo | openssl s_client -connect [server name]:443 > [server name].pem
This command retrieves a copy of the server certificate named "[server name].pem".
Put this file in the ~/Library/Application Support/Quark/QPP/Certificates
folder (or, if you have customized the plist file at ~/Library/Application
Support/Quark/QPP/[QPP Framework Version], put the file there).
If the "Quark Publishing Platform" and "Certificates" folders do not already exist at the
above locations, create them there manually.
Quark Publishing Platform clients running on Windows do not require a server-based
SSL certificate.
22 | QUARK PUBLISHING PLATFORM 2015 SYSTEM ADMINISTRATION GUIDE
Page 23

ENABLING SECURE SOCKETS LAYER (SSL) FOR QUARK PUBLISHING PLATFORM SERVER
Verifying and using SSL
To verify and use SSL:
Start the Quark Publishing Platform Server.
1
Test Quark Publishing Platform Web Client access by entering the following:
2
https://[machine IP/name]:61399/workspace.
QUARK PUBLISHING PLATFORM 2015 SYSTEM ADMINISTRATION GUIDE | 23
Page 24

QUARK PUBLISHING PLATFORM SERVER — MANUAL CONFIGURATION
Quark Publishing Platform Server —
Manual configuration
You can change the default configuration after you install Quark Publishing Platform
Server. In addition to setting parameters with JConsole while Quark Publishing Platform
Server is running, you can adjust settings in different .xml files and .properties files.
You can also adjust memory allocation for your JVM configuration.
Editing "ServerApp.properties"
To edit "ServerApp.properties":
Open the "ServerApp.properties" file in the [QPP Server]/conf folder.
1
Set the rmi.port value to the number of the port on which the RMI registry listens.
2
Java-based RMI clients such as ScriptManager connect through this port.
Set the rmi.servicePort value to the port number used by the RMI server where
3
Quark Publishing Platform service objects are registered.
Set the namingservice.port value to the port number used for listening to object
4
resolution requests by the CORBA naming service.
Set the serverORB.port value to the port number used by the ORB where Quark
5
Publishing Platform service objects are activated.
Set the jms.openWirePort value to the port number opened for JMS communication
6
via the OpenWire protocol. Java clients such as Quark Publishing Platform Script
Manager connect to this port to listen to server notifications.
Set the webServer.port value to the port number on which Tomcat listens for HTTP
7
connections. Quark Publishing Platform Web Client and SOAP clients connect through
this port. The value should be set to that specified for the HTTP connector in the
Tomcat "server.xml" file.
Set the socketStreaming.port value to the port number to be used for file transfer
8
(upload/download).
To bind Quark Publishing Platform Server to a particular IP address, set the
9
server.machinename value to that IP address and set server.bindtoip=true. Or,
if you have multiple network cards and you want to bind Quark Publishing Platform
to all of their IP addresses, set server.machinename=localhost,
24 | QUARK PUBLISHING PLATFORM 2015 SYSTEM ADMINISTRATION GUIDE
Page 25

QUARK PUBLISHING PLATFORM SERVER — MANUAL CONFIGURATION
server.bindtoip=false, and
server.addtionalnames=[non-default-ip1],[non-default-ip2].
Set the server.additionalnames value to specify the global IP address where the
10
firewall is exposed.
Enter the webServer.port value you configured for Tomcat (8080, for example).
11
To allow users to log on to Quark Publishing Platform Server even when the directory
12
server is not running, set authentication.external.cacheTicket = true.
To set the password case sensitivity, set the server.password.case.sensitive
13
value to false if case sensitivity is not considered for comparing passwords. This option
is not valid if using LDAP for external authentication.
To configure a session TimeOut, set the session.maxIdle value to specify the session
14
timeout in seconds. and set the session.eviction.thread.delay value to specify
the frequency of the session eviction thread in seconds.
The Repository status updater is the background thread that runs at a specified
15
frequency to test whether the underlying repository is active or not and to update the
status of the same in server database. To configure the repository status updater's sleep
interval, set the repository.status.updator.sleepInterval value to specify
the interval in seconds after which the repository status update thread should run.
If the Realm verif. For Admin. Requests is set in QuarkXPress Server, the
16
username and password for QuarkXPress Server need to be set in this file. Set the
following properties to configure the QuarkXPress Server:
•
Set the qxps.username value to specify the QuarkXPress Server username.
•
Set the qxps.password value to specify the QuarkXPress Server password.
•
Set the qxps.locale value to specify the location of QuarkXPress Server.
Editing "PublishingPool.properties"
To edit "PublishingPool.properties":
Open the "PublishingPool.properties" file in the Server Installation conf folder.
1
Set the publishingThread.pool.maxActive value to specify the maximum number
2
of background publishing threads that can run simultaneously.
Set the publishingThread.pool.maxIdle value to specify the maximum number
3
of idle threads in the pool.
Set the publishingThread.pool.minIdle value to specify the minimum number
4
of idle threads in the pool.
Set the publishingThread.pool.maxWait value to specify the time in milliseconds
5
that the publishing request should wait while borrowing a thread from the pool.
Set the publishingThread.pool.minEvictableIdleTimeMillis value to specify
6
the time in milliseconds for a thread to be in the pool before it can be evicted.
QUARK PUBLISHING PLATFORM 2015 SYSTEM ADMINISTRATION GUIDE | 25
Page 26

QUARK PUBLISHING PLATFORM SERVER — MANUAL CONFIGURATION
Set the publishingThread.pool.timeBetweenEvictionRunsMillis value to
7
specify the time in milliseconds after which the evictor thread should run to remove
idle threads.
Configuring Quark Publishing Platform Renderer for Quark Publishing Platform usage
To configure Quark Publishing Platform Renderer for Quark Publishing Platform usage:
Open the QXPSM Admin Client by navigating to the following URL in a Web browser:
1
http://[QPP server name]:[port]/qxpsmadmin.
In the Manage Servers pane, click Add Servers and add the Quark Publishing Platform
2
instance of Quark Publishing Platform Renderer. For more information, see A Guide
to Quark Publishing Platform Renderer.
Editing "Qla.properties"
To edit "Qla.properties":
Open the "Qla.properties" file in the [QPP Server]/conf folder.
1
Enter the IP address or hostname of the QLA Server in the QlaServer.machinename=
2
field.
Enter the port number of the QLA Server in the QlaServer.port= field.
3
If you have a backup QLA server, enter the IP address (or hostname) and port number
4
in the Backup.QlaServer.machinename= and Backup.QlaServer.port= fields.
Enter the Quark Publishing Platform serial number in the Qla.SerialNumber= field.
5
The QLA Server Console and QLA Client applications display your Quark Publishing
Platform serial number.
Save and close "Qla.properties."
6
Extended configuration files
Configuration files are split into base and ext for ease of deployment.
User specific custom beans, processes and publishingchannels should be defined in
.ext files in the Server Installation ext folder, to separate custom extensions and
maintain them after a software upgrade.
• ChannelConfig-ext.xml
• content-mimetype-mappings-ext.xml
• custom-xml-types-ext.xml
• IndexingChannels-ext.xml
• PluginsContext-ext.xml
26 | QUARK PUBLISHING PLATFORM 2015 SYSTEM ADMINISTRATION GUIDE
Page 27

QUARK PUBLISHING PLATFORM SERVER — MANUAL CONFIGURATION
• ProcessConfig-ext.xml
• PublishingConfig-ext.xml
Configuring Platform Server to be used for publishing with Quark XML Author Sharepoint Adapter
To configure Quark Publishing Platform Server to be used for publishing with Quark
XML Author - Sharepoint Adapter:
Open the "sharepoint.properties" file in the [QPP Server]/publishing folder.
1
Set the sharepoint.username value to be the login name of a user with access to
2
Sharepoint sites.
Set the sharepoint.userpassword value to be the login password of the user specified
3
above.
Set the sharepoint.userdomain value to be the domain of the user specified above.
4
Set the sharepoint.sitecollection value to be the URL of a Sharepoint Site
5
Collection which contains documents required during publishing.
Restart the Server.
6
Configuring Platform Server to be used for publishing with Quark XML Author FileNet Adapter
To configure Quark Publishing Platform Server to be used for publishing with Quark
XML Author - FileNet Adapter:
Open the "contentengine.properties" file in the [QPP Server]/publishing folder.
1
Set the filenet.stanza value to be the stanza for filenet content engine connection.
2
You need to edit the parameter only when the filenet server is configured to use a
stanza other than FileNet.
Set the filenet.username value to be the FileNet username.
3
Set the filenet.userpassword value to be the value to be the FileNet password of
4
the user specified above.
Set the filenet.connectionuri value to be the Connection URI of the FileNet
5
Content Engine WebService.
Restart the Server.
6
JVM memory allocation on Windows
On Windows, you can specify JVM memory allocation in different locations, depending
on how you start Quark Publishing Platform Server. On 64-bit operating systems, you
QUARK PUBLISHING PLATFORM 2015 SYSTEM ADMINISTRATION GUIDE | 27
Page 28

QUARK PUBLISHING PLATFORM SERVER — MANUAL CONFIGURATION
can allocate more memory for the Quark Publishing Platform Java process. In either
case, you should not allocate more than 50 percent of available memory.
Using Quark Publishing Platform Server Console or Quark Publishing Platform Server Windows service
Stop Quark Publishing Platform Server.
1
If you start Quark Publishing Platform Server with Quark Publishing Platform Server
2
Console or Quark Publishing Platform Server Windows service, open the "wrapper.conf"
file.
Search for the wrapper.java.maxmemory property.
3
Adjust the value. On a 64-bit operating system, you can make the value larger.
4
Save your changes and restart Quark Publishing Platform Server.
5
Using "Serverstartup.bat"
Stop Quark Publishing Platform Server.
1
If you start Quark Publishing Platform Server with the "ServerStartup.bat" file in the
2
Quark Publishing Platform Server installation folder, open "ServerStartup.bat".
Search for java -server -Xmx1536m -XX:MaxPermSize=256m -classpath. 1536m
3
represents 1536MB of RAM allocated to Quark Publishing Platform Server.
On a 64-bit operating system, you can make the value larger.
4
Save your changes and restart Quark Publishing Platform Server.
5
Configuring Windows authentication
Windows users can log on to Quark Publishing Platform transparently with their
Windows user credentials, without ever having to see a login dialog box. Quark
Publishing Platform supports all Windows authentication schemes, including
NTLM-v1/NTLM-v2 and Negotiate/Kerberos. The Platform also supports mixed-mode,
so Windows authentication and Platform authentication can coexist.
You configure Windows authentication with a pluggable HTTP servlet filter. You can
easily enable and disable authentication at deployment time by adding a security filter
to each Web application‘s "web.xml" file.
28 | QUARK PUBLISHING PLATFORM 2015 SYSTEM ADMINISTRATION GUIDE
Page 29

QUARK PUBLISHING PLATFORM SERVER — MANUAL CONFIGURATION
Each web application of Quark Publishing Platform can be configured to use different
Windows authentication schemes as indicated below.
NTLM and KerberosNegotiate/Kerberos onlyNTLM onlyWeb application
NTLM NegotiateNegotiateNTLMWorkspace
NTLM NegotiateNegotiateNTLMAdmin
NTLM NegotiateKerberosNTLMWeb services
Steps to enable SSO in Platform Clients
For the Admin web app:
Go to C:\Program Files\Quark\Quark Publishing
1
Platform\Server\webapps\admin\WEB-INF
Open the "Web.xml" file and uncomment the following snippet:
2
</p><p>
<filter></p><p>
<filter-name>SecurityFilter</filter-name></p><p>
<filter-class>com.quark.web.security.servlet.ApplicationSecurityFilter</filter-class></p><p>
<init-param></p><p>
<param-name>provider</param-name></p><p>
<param-value>com.quark.web.security.wafflle.WaffleAuthenticationProvider</param-value></p><p>
</init-param></p><p>
<init-param></p><p>
<param-name>provider/protocols</param-name></p><p>
<param-value>NTLM</param-value></p><p>
</init-param></p><p>
</filter></p><p>
<filter-mapping></p><p>
N/AN/AN/AQXPSM
N/AN/AN/AMessaging
N/AN/AN/AREST
QUARK PUBLISHING PLATFORM 2015 SYSTEM ADMINISTRATION GUIDE | 29
Page 30

QUARK PUBLISHING PLATFORM SERVER — MANUAL CONFIGURATION
<filter-name>SecurityFilter</filter-name></p><p>
<url-pattern>/*</url-pattern></p><p>
</filter-mapping>
</p><p>
Save the file.
3
For Workspace and Desktop clients go to the respective web app, open the web.xml
file and uncomment the same snippet.
•
For desktop clients: C:\Program Files\Quark\Quark Publishing
Platform\Server\webapps\webservices\WEB-INF
•
For workspace: C:\Program Files\Quark\Quark Publishing
Platform\Server\webapps\workspace\WEB-INF
The Platform server should be running as a service with an account as Local System.
Steps to configure Web Client for mixed mode authentication
Go to C:\Program Files\Quark\Quark Publishing
1
Platform\Server\webapps\workspace. Make a copy of PreLogin.jsp and name it
local.jsp.
Go to C:\Program Files\Quark\Quark Publishing
2
Platform\Server\webapps\workspace\WEB-INF
Open the "Web.xml" file and uncomment the following snippet, adding the bold lines:
3
< filter >
< filter-name > SecurityFilter </ filter-name >
< filter-class > com.quark.web.security.servlet.ApplicationSecurityFilter
</ filter-class >
< init-param >
< param-name > provider </ param-name >
< param-value >
com.quark.web.security.wafflle.WaffleAuthenticationProvider </ param-value
>
</ init-param >
< init-param >
< param-name > provider/protocols </ param-name >
< param-value > NTLM </ param-value >
</ init-param >
<init-param>
<param-name>exclude-url-patterns</param-name>
<param-value>/local.jsp,/Login.jsp</param-value>
</init-param>
</ filter >
< filter-mapping >
< filter-name > SecurityFilter </ filter-name >
< url-pattern > /* </ url-pattern >
</ filter-mapping >
Save the file.
4
Restart the server and access the corresponding web applications with the following
5
URLs:
• For access through native Platform user authentication use the URL :
http://localhost:61400/workspace/local.jsp
• For access through Windows authentication use the URL:
http://localhost:61400/workspace/
The steps above can be repeated for Web Admin or other web apps as well.
30 | QUARK PUBLISHING PLATFORM 2015 SYSTEM ADMINISTRATION GUIDE
Page 31

QUARK PUBLISHING PLATFORM SERVER — MANUAL CONFIGURATION
Configuring logging levels
You can edit the "log4j.xml" file to adjust logging levels, and you can use JConsole to
change logging levels after starting Quark Publishing Platform Server. You can also set
different logging levels for exceptions.
Changing logging levels in "log4j.xml"
You can change the logging levels for Quark Publishing Platform Web Client and
Quark Publishing Platform Server. Options include ERROR, INFO, WARN, DEBUG,
SQLTRACE, and TRACE.
•
ERROR = includes messages that indicate disrupted and failed requests.
•
INFO = includes messages that indicate the state of services.
•
WARN = includes non-critical service error messages.
•
DEBUG = includes messages that indicate server resource usage.
•
SQL_TRACE = includes messages according to activity related to SQL requests.
•
TRACE = includes messages according to activity related to requests.
Refer to Java documentation for more information about logging levels.
To change logging levels:
Open the "log4j.xml" file in the {QPP Server}/conf folder.
1
To define the logging level for Quark Publishing Platform Web Client activity, scroll
2
to <logger name=com.quark.qpp.web.webeditor. The structure is as follows:
<logger name="com.quark.qpp.web.webeditor" additivity="false"> <level
value="INFO" /> <appender-ref ref="WebHubAsyncAppender" /> </logger>
To define the logging level for Quark Publishing Platform Server activity, scroll to
3
<logger name=com.quark.qpp. The structure is as follows:
<logger name="com.quark.qpp"> <level value="INFO" /> </logger>
To define the logging level for other activity, scroll to the "<root>." The structure is as
4
follows:
<root> <priority value="ERROR" /> <appender-ref ref="QppServerAsyncAppender"
/> </root>
Save and close "log4j.xml."
5
Changing logging levels after starting Quark Publishing Platform Server
With Quark Publishing Platform Server running, display the Platform Server Console.
1
Click JConsole to display a window for monitoring different aspects of Quark
2
Publishing Platform Server performance.
Click the MBeans tab. Separate Quark Publishing Platform Server functions display
3
in tree format on the left side of the MBeans tab.
Open Platform Server > Logging in the tree.
4
Click the Operations tab.
5
QUARK PUBLISHING PLATFORM 2015 SYSTEM ADMINISTRATION GUIDE | 31
Page 32
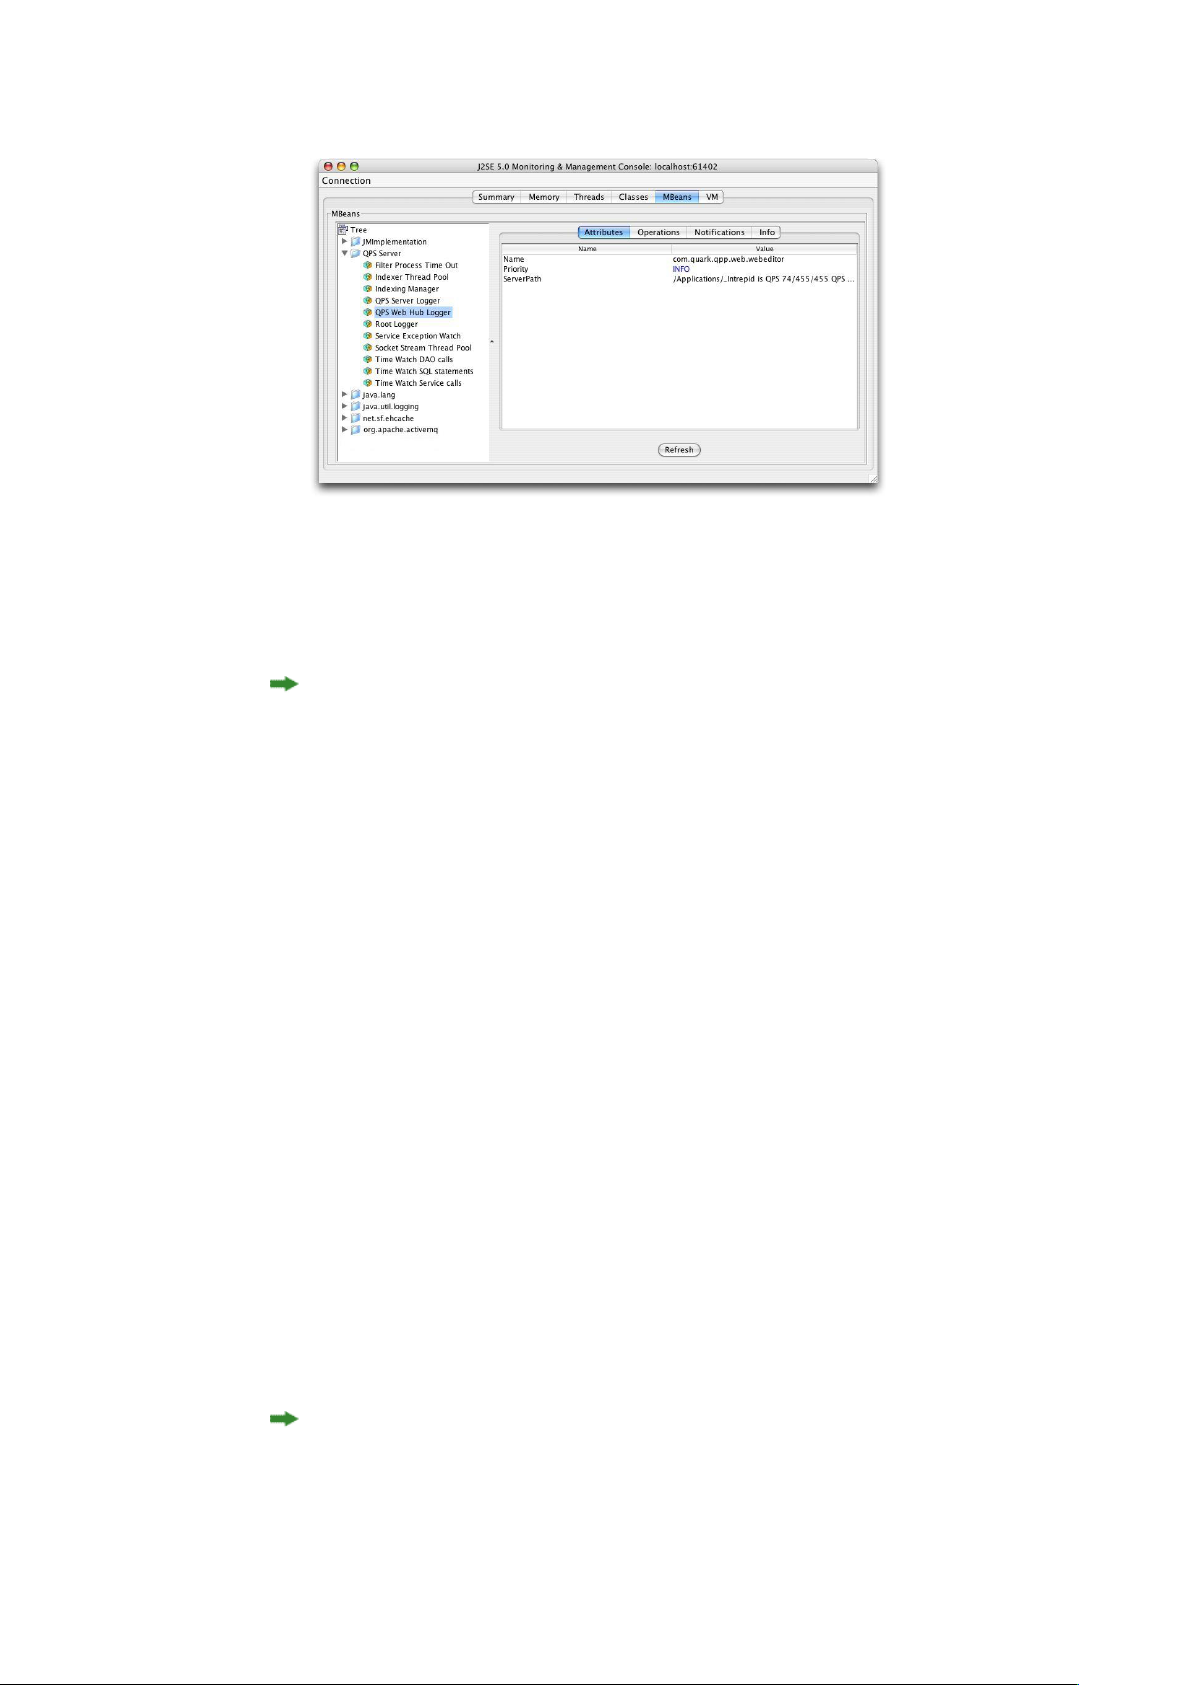
QUARK PUBLISHING PLATFORM SERVER — MANUAL CONFIGURATION
Use JConsole to adjust logging priority levels
To edit the log level of Quark Publishing Platform Server or the Quark Publishing
6
Platform Web Client, set the logging level in the text box and click the corresponding
button.
The changes you make in JConsole take effect immediately, but when you restart Quark
Publishing Platform Server, the settings in "log4j.xml" are applied.
Changing logging for exceptions
You can set logging for known and unknown exceptions by editing two values in the
"ServerApp.properties" file.
Open the "conf" folder in your Quark Publishing Platform Server folder.
1
Open "ServerApp.properties" in a text-editing application.
2
If you don't want to log Quark Publishing Platform exceptions in the Quark Publishing
3
Platform Server log, set server.logqppserviceexception to false.
If you want to avoid logging unknown exceptions, set server.logthrowable to
4
false.
Save and close "ServerApp.properties."
5
Modifying search notification evaluation settings
Quark Publishing Platform Server notifies all open Search Results palettes if the assets
displayed in the palettes have been modified. You can edit several parameters to
influence the strategy and resources used to evaluate conditions and deliver these
query notifications. The optimal value for most parameters depends on the database
and hardware you choose for your Quark Publishing Platform Server.
Only an experienced administrator should change the settings described below. Please
consult Quark Enterprise Support for assistance.
32 | QUARK PUBLISHING PLATFORM 2015 SYSTEM ADMINISTRATION GUIDE
Page 33

QUARK PUBLISHING PLATFORM SERVER — MANUAL CONFIGURATION
Open the "conf" folder in your Quark Publishing Platform Server folder.
1
Open "Query.properties" in a text-editing application.
2
Quark Publishing Platform Server uses two pools of threads to evaluate query
3
notifications — the "Generic Notification Evaluator Thread Pool Configuration" and
the "Simple Notification Evaluator Thread Pool Configuration." The "generic" thread
pool evaluates query notifications using a database. The "simple" thread pool uses a
simpler strategy to evaluate query notification without involving a database. Adjust
the following properties in the "Generic Notification Evaluator Thread Pool
Configuration" area:
• To specify the maximum number of concurrent threads that operate in the background
to evaluate notifications that require database access, adjust the
query.notification.generic.pool.maxActive value. Increase this value to
improve performance when using hardware with several processors and extensive
system memory.
• To specify the maximum number of idle threads in the pool, adjust the
query.notification.generic.pool.maxIdle property.
• To specify the minimum number of idle threads in the pool, adjust the
query.notification.generic.pool.minIdle property.
• To specify the minimum time that a thread can be idle before it can be removed from
the pool, set the time in milliseconds for the
query.notification.generic.pool.minEvictableIdleTimeMillis property.
• To specify the number of milliseconds after which a background evictor thread should
run to clean up idle threads, adjust the
query.notification.generic.pool.timeBetweenEvictionRunsMillis property.
Query notifications for certain asset changes can be evaluated efficiently using a simpler
4
strategy that does not require database access. Adjust the following properties in the
"Simple Notification Evaluator Thread Pool Configuration" area:
• To specify the maximum number of concurrent threads that operate in the background,
adjust the query.notification.simple.pool.maxActive value. Increase this
value to improve performance when using hardware with several processors and
extensive system memory.
• To specify the maximum number of idle threads in the pool, adjust the
query.notification.simple.pool.maxIdle property.
• To specify the minimum number of idle threads in the pool, adjust the
query.notification.simple.pool.minIdle property.
• To specify the minimum time that a thread can be idle before it can be removed from
the pool, set the time in milliseconds for the
query.notification.simple.pool.minEvictableIdleTimeMillis property.
• To specify the number of milliseconds after which a background evictor thread should
run to cleanup idle threads, adjust the
query.notification.simple.pool.timeBetweenEvictionRunsMillis property.
QUARK PUBLISHING PLATFORM 2015 SYSTEM ADMINISTRATION GUIDE | 33
Page 34

QUARK PUBLISHING PLATFORM SERVER — MANUAL CONFIGURATION
To configure JMS topology for query notification, adjust the
5
query.notification.topicPerSession property. To emulate the behavior of
versions of Quark Publishing Platform prior to 8.1, set this value to false.
The default display is used when executing a search for which a user specific display
6
does not exist ( for example, when browsing a collection for the first time). To specify
the default query display settings, adjust the following properties in the "Default Query
display Settings" area:
To specify the default query display settings for asset queries, adjust the following
properties:
• To specify the columns to be displayed in asset queries, adjust the
query.display.default.assets.columns value to contain a list of the columns
you want displayed.
• To specify the display mode for asset queries (PLAIN, THUMBNAIL or SNIPPET), adjust
the query.display.default.assets.displaymode property.
• To specify the explore mode for asset queries (PLAIN, PROJECT, PROJECT AND PAGE,
RELATION, RELATED ASSETS, COLLECTIONS), adjust the
query.display.default.assets.exploremode property.
• To specify the desired grouping of the assets, adjust the
query.display.default.assets.grouping property.
• To specify the desired sorting of the assets, ajust the
query.display.default.assets.sorting property.
To specify the default query display settings for collection queries, adjust the following
properties:
• To specify the columns to be diaplayed in collection queries, adjust the
query.display.default.collections.columns property to contain a list of the
columns you want displayed.
• To specify the display mode for collection queries (PLAIN or THUMBNAIL), adjust the
query.display.default.collections.displaymode property.
• To specify the desired sorting of the assets in collection queries, ajust the
query.display.default.collections.sorting property.
Do not edit the values of other properties in the "Query.properties" configuration file.
7
Save and close "Query.properties."
8
Restart Quark Publishing Platform Server for these settings to take effect.
9
Database properties
You can manually specify the database connection URL, database user name, database
user password, and database connection pool size.
To change database properties:
34 | QUARK PUBLISHING PLATFORM 2015 SYSTEM ADMINISTRATION GUIDE
Page 35

QUARK PUBLISHING PLATFORM SERVER — MANUAL CONFIGURATION
In the "Database.properties" file located in the [QPP Server]/conf folder.
1
Scroll to the Database related configuration section.
2
To specify the driver class name, replace the qpp.jdbc.driverClassName value. For
3
example, for an HSQL database, you would use
qpp.jdbc.driverClassName=org.hsqldb.jdbcDriver.
To specify the database connection URL, replace the path after qpp.jdbc.url.
4
To specify the database user name, replace the qpp.jdbc.userName value.
5
To specify the database user password, replace the qpp.jdbc.password value.
6
To specify the database connection pool size, change the qpp.jdbc.maxActive value.
7
To specify the maximum and minimum numbers of connections that can be idle,
8
change the qpp.jdbc.maxIdle and qpp.jdbc.minIdle values.
To specify the minimum time in milliseconds that a connection must be in the pool
9
before it can be evicted, change the qpp.jdbc.minEvictableIdleTimeMillis
value.
To specify the minimum time in milliseconds after which the evictor thread should
10
run to remove an idle connection, change the
qpp.jdbc.timeBetweenEvictionRunsMillis value.
To adjust the pooling of prepared statements, change the
11
qpp.jdbc.poolPreparedStatements value.
To specify the maximum number of connections to be made in the no-autocommit
12
pool , change the qpp.jdbc.maxActive_noAutoCommit value.
Save and close "Database.properties."
13
If there is a firewall configured between the Platform Server and the Database server
that can terminate TCP sessions when they are idle for a long time, the following
configuration changes should be done in the "Database.properties" file .
•
Set the qpp.jdbc.minIdle value to 0
•
Set the qpp.jdbc.minEvictableIdleTimeMillis value to 60000
•
Set the qpp.jdbc.timeBetweenEvictionRunsMillis value to 60000
Platform Server needs to be restarted for these settings to take effect.
Transformation properties
You can use transformation properties to modify the output of various predefined
transformations. Changes to the "Transformation.properties" file alter the external
commands that are invoked for transforming assets. Commands in this file can contain
predefined macros such as <temp>, <source>, <extension> and <output>.
To change transformation properties:
Open the "Transformation.properties" file located in the [QPP Server]/conf folder.
1
QUARK PUBLISHING PLATFORM 2015 SYSTEM ADMINISTRATION GUIDE | 35
Page 36

QUARK PUBLISHING PLATFORM SERVER — MANUAL CONFIGURATION
To specify a pattern that does not occur as a value (or part of a value) for any other
2
property, specify a value for transformer.spaceEncodingPattern. This pattern is
used for escaping spaces in commands and other property values.
To specify which file types ImageMagick is allowed to handle, enter a comma-separated,
3
case-insensitive list of file extensions in imTransformer.extensions.
To specify the temporary file location to be used by ImageMagickTransformer, specify
4
a path for imTransformer.tempDir.
To specify the ImageMagick command to be executed for generating output with
5
ImageMagickTransformer, enter a value for imTransformer.jpg.imCommand.
To specify which file types the JawsTransformer is allowed to handle, enter a
6
comma-separated, case-insensitive list of file extensions in
jawsTransformer.extensions.
To specify the temporary file location to be used by JawsTransformer, specify a path
7
for jawsTransformer.tempDir.
To specify the Jaws command to be executed for generating output with
8
JawsTransformer, enter a value for jawsTransformer.jpg.command.
Save and close "Transformation.properties."
9
Session timeout
You can specify how long individual sessions can remain idle before they are timed-out,
as well as the frequency of testing for idle sessions.
To specify timeout parameters:
Open the "ServerApp.properties" file located in the [QPP Server]/conf folder.
1
Scroll to the session.maxIdle= entry.
2
Enter the number of seconds a session can be idle before timing out.
3
To specify the frequency for Quark Publishing Platform Server to perform a background
4
check for idle sessions, enter a number (measured in seconds) in the
session.eviction.thread.delay property.
Save and close "ServerApp.properties."
5
Web Client timeout settings can be changed by adjusting the ajaxTimeout entry in
the "Workspace-Config.xml" file (this entry is in milliseconds). This file is located at
{install_folder}/webapps/workspace/WEB-INF/classes
Repository status updater
You can specify a background thread that runs frequently to confirm the Quark
Publishing Platform File Server status.
To specify the repository status update interval:
36 | QUARK PUBLISHING PLATFORM 2015 SYSTEM ADMINISTRATION GUIDE
Page 37

QUARK PUBLISHING PLATFORM SERVER — MANUAL CONFIGURATION
Open the "conf" folder in your Quark Publishing Platform Server folder.
1
Open "ServerApp.properties" in a text-editing application.
2
Scroll to the repository.status.updator.sleepInterval= entry.
3
Enter a value to specify the number of seconds after which the repository status updater
4
thread will run.
Save and close "ServerApp.properties."
5
Moving Quark Publishing Platform Renderer
If you need to move your Quark Publishing Platform Renderer to a different computer,
you don't have to re-install Quark Publishing Platform Server. Instead, you can edit
the "ManagerConfig.xml" file, as follows:
Open the "ManagerConfig.xml" file located in the [QPP Server]/conf folder.
1
Scroll to the <connectioninfo> section at the bottom of "ManagerConfig.xml."
2
Change the name entry value to the IP address or hostname of the new Quark
3
Publishing Platform Renderer.
Change the port entry value to the port number you specified for the new Quark
4
Publishing Platform Renderer.
Save the "ManagerConfig.xml" file and launch Quark Publishing Platform Server.
5
To verify the change, search through the "QppServer.log" file for the line Successfully
6
registered with QXPS.
Alternatively, you can open the Quark Publishing Platform Renderer Manager client
with the URL http://[server]:[port]/qxpsmadmin and make these changes there.
Unless you check Realm verif. For Admin. Requests and enter a user name and
password in the HTTP tab of the QuarkXPress Server Configuration dialog box, you
can leave the <user> and <password> entries blank. This also applies to the username
and password fields in the "ServerApp.properties" file (qxps.username and
qxps.password).
Integrating Quark Publishing Platform with LDAP
For information about integrating Quark Publishing Platform with LDAP, see "Managing
User Lists with LDAP" in A Guide to Quark Publishing Platform.
Using Kerberos authentication
To use Kerberos authentication:
Open "krb5.conf" in a text-editing application. The "krb5.conf" file contains the Kerberos
1
configuration information, which includes the locations of the Key Distribution Center
QUARK PUBLISHING PLATFORM 2015 SYSTEM ADMINISTRATION GUIDE | 37
Page 38

QUARK PUBLISHING PLATFORM SERVER — MANUAL CONFIGURATION
(KDC) and admin servers for the Kerberos realms. Kerberos is a secure method for
authenticating requests for a service over a computer network.
Specify realm settings in the "krb5.conf" file
Edit "krb5.conf" to specify all realm settings. This includes setting the realm names,
2
default realm, realm-domain mappings, and KDCs for the realms.
Save and close "krb5.conf."
3
The convention is to enter realm names in uppercase letters and domain names in
lowercase letters.
Using Simple authentication
If you are using a directory server other than Active Directory on Windows, then in
most cases you will use the Simple authentication scheme. To use Simple
authentication:
In the LDAP Attribute mapping set the Authentication Name= :uid: User Name=uid.
1
For Simple authentication, the Realm Name is optional.
2
Connecting LDAP user passwords with Quark Publishing Platform Server
If you configure Quark Publishing Platform according to the instructions below and
the connection between Quark Publishing Platform Server and Directory Server breaks,
users can still log on to Quark Publishing Platform Server with their Directory Server
credentials.
When a user logs on to Quark Publishing Platform Server successfully for the first time,
encrypted user credentials are stored in Quark Publishing Platform. These credentials
can then be used for subsequent log-on operations when there is no connection
between Quark Publishing Platform Server and Directory Server.
To specify that the LDAP user password can be retrieved, encrypted, and stored in the
Quark Publishing Platform Server database:
38 | QUARK PUBLISHING PLATFORM 2015 SYSTEM ADMINISTRATION GUIDE
Page 39

QUARK PUBLISHING PLATFORM SERVER — MANUAL CONFIGURATION
Open the "ServerApp.properties" file located in the [QPP Server]/conf folder.
1
To allow users to log on to Quark Publishing Platform Server when the connection
2
between Quark Publishing Platform Server and Directory Server is broken, change the
value for authentication.external.cacheTicket= to true. The default setting
for authentication.external.cacheTicket= is false (that is, disabled).
To indicate that it is required to evaluate the
3
"CollectionInfo#isAccessibleChildrenAvailable()" flag at runtime for every collection
in context, the value of collections.evaluateAccessibleChildrenFlag= should
be true (default).
Once an element is fetched from the LDAP server, it will be cached in the Platform
4
Server and provided from the cache for a specified number of seconds, and fetched
again after that time. To specify time to live (in seconds) for LDAP cache elements, set
the value for ldap.cache.timetolive=.
To specify the LDAP synchronization time delay (in seconds), set the value for
5
ldap.synchronization.thread.delay= to true. If LDAP synchronization is not
required, set the value to -1.
Save and close "ServerApp.properties."
6
Restricting Workspace Browser palettes
To restrict the number of Workspace Browser windows which can be open at one
time by a user:
Open the "Query.properties" file located in the [QPP Server]/conf folder.
1
Specify a value for the query.maxWatchedQueryCountPerSession parameter.
2
Save and close "Query.properties".
3
Changing query results settings
• To limit the number of results that will be returned for an Assignments based search,
specify a positive non-zero value for the query.maxAssignmentFetchCount
parameter.
• To limit the number of results that will be returned for a User based search, specify a
positive non-zero value for the query.maxRowFetchCount parameter.
Setting up custom content type detection
By default, Quark Publishing Platform is configured to recognize Quark formats,
common picture formats, common content formats (Microsoft Office, plain text, RTF,
PDF, HTML), XML, XHTML, DITA documents, and BusDoc documents. However, you
can configure Quark Publishing to automatically attempt additional, custom content
types. To do so:
QUARK PUBLISHING PLATFORM 2015 SYSTEM ADMINISTRATION GUIDE | 39
Page 40

QUARK PUBLISHING PLATFORM SERVER — MANUAL CONFIGURATION
To recognize a particular content type by examining a file's MIME type, make sure
1
that MIME type is listed in the "tika-mimetypes.xml" file. If the MIME type is not
included in this file, you can add it to the "custom-mimetypes" file. You can identify
file types by file extension, by magic bytes, or (for XML files) by the root element. For
example:
<mime-type type="application/dita+xml; format=busdoc">
<sub-class-of type="application/dita+xml;format=topic"/>
<_comment>Business Documents</_comment>
</mime-type>
You can assign different MIME types to structurally similar but semantically different
XML files. You can differentiate XML file types based on processing instructions applied
inside that XML. Add a MIME type entry to the "custom-xml-types-ext.xml" file present
in "ext" folder of the Platform server, to do so. For example:
<mime-type type="application/dita+xml; format=busdoc"
sub-class-of="application/dita+xml; format=topic">
<pi name="Xpress">productLine="busdoc"</pi>
</mime-type>
For more information, see http://tika.apache.org.
Configure a Quark Publishing Platform content type based on the identified MIME
2
type. To do so, add a mapping entry to the "content-mimetype-mappings-ext.xml"
file present in "ext" folder of the Platform server. Assets with the specified custom
MIME type will be checked in with the specified custom content type. For example:
<content-type name="Business Document">
<mime-type>application/dita+xml; format=busdoc</mime-type>
</content-type>
Add a corresponding mapping entry to the "Indexing Channels-ext.xml" file present
3
in "ext" folder of the Platform server. For example:
<mapping contenttype="Ratings Document" channel="ratingsPreviewChannel">
<parameter name="channelParam1">param value</parameter>
<parameter name="channelParam2">param value</parameter>
</mapping>
Specifying a default PDF output style
Quark Publishing Platform Web Client users can retrieve copies of QuarkXPress projects
or QuarkCopyDesk articles as PDFs. The settings for these PDFs are defined exclusively
in the default PDF output style for QuarkXPress Server. To specify the default PDF
output style, update the default Job Jackets file as described in "Job Jackets dialog box"
in A Guide to QuarkXPress Server. The default PDF style can also be mentioned in the
Publishing Channel used to take the PDF. The default channel for taking PDF from
QuarkXPress projects is "qxpPdf".
Controlling delivery channel display settings in Web Client
Delivery channels are not visible by default. To make them available, set the property
displaydeliverychannels to true in the file
QPP_HOME\webapps\workspace\WEB-INF\classes\Workspace-Config.xml:
<property name="enableDeliveryChannels" value="true" />
40 | QUARK PUBLISHING PLATFORM 2015 SYSTEM ADMINISTRATION GUIDE
Page 41

QUARK PUBLISHING PLATFORM SERVER — MANUAL CONFIGURATION
Changing case-sensitivity for Quark Publishing Platform passwords
To specify case-sensitivity for Quark Publishing Platform user passwords:
Open the "ServerApp.properties" file located in the [QPP Server]/conf folder.
1
If you want to specify case-sensitivity for user passwords, set
2
server.password.case.sensitive to true. Otherwise, enter false.
Save and close "ServerApp.properties."
3
The default setting for server.password.case.sensitive is true. Quark Publishing
Platform administrators should inform users if case-sensitive passwords are required.
Managing filters and index service settings
Quark Publishing Platform Server uses four filters for generating previews, and you
can change the values in the ".properties" files for each filter. These files include:
• The "AsposeFilterServiceConfig" file provides previews and thumbnails of Word,
RTF,EXCEL,POWER POINT and plain text files.
• The "QxpsFilterServiceConfig.properties" file provides previews and thumbnails of
QuarkXPress projects and QuarkCopyDesk articles.
• The "IMFilterServiceConfig.properties" file provides previews and thumbnails of most
image files.
• The "JawsFilterServiceConfig.properties" file provides previews and thumbnails of
certain image files — PDF files, EPS files, and Adobe® Illustrator® files.
• The "XADocFilterServiceConfig.properties" file provides previews and thumbnails of
XML files.
The following commands are common to all four filters:
•
<FILTER_NAME>filter.generateAttributes: Set this to true to generate
filter-specific attributes.
•
<FILTER_NAME>filter.generatePreview: Set this to true to generate previews.
•
<FILTER_NAME>filter.generateThumbnail: Set this to true to generate
thumbnails.
•
<FILTER_NAME>filter.generateText: Set this to true to extract text and enable
full-text search.
•
<FILTER_NAME>filter.previewWidth: Set this to specify the width of previews
(measured in pixels).
•
<FILTER_NAME>filter.previewHeight: Set this to specify the height of previews
(measured in pixels).
•
<FILTER_NAME>filter.thumbnailHeight: Set this to specify the height of
thumbnails (measured in pixels).
QUARK PUBLISHING PLATFORM 2015 SYSTEM ADMINISTRATION GUIDE | 41
Page 42

QUARK PUBLISHING PLATFORM SERVER — MANUAL CONFIGURATION
•
<FILTER_NAME>filter.thumbnailWidth: Set this to specify the width of thumbnails
(measured in pixels).
•
<FILTER_NAME>filter.previewPages: Set this to specify the number of preview
pages to generate.
•
<FILTER_NAME>filter.processTimeOut: Set this to specify the number of
milliseconds after which an incomplete index preview process will terminate.
Index service settings
You can specify parameters for asset indexing. As a separate background process
that runs inside Quark Publishing Platform Server, indexing can consume significant
system resources. By editing the "Indexing.properties" file as described below, you can
manage index processes (called "indexing thread pools") by adjusting the number of
concurrent thread pools and the time intervals between thread pools.
To manage timing and threads for asset indexing:
Open the "Indexing.properties" file located in the [QPP Server]/conf folder.
1
To specify the maximum number of concurrent indexing threads that operate in the
2
background, adjust the indexingThread.pool.maxActive= value.
To specify the amount of time (in milliseconds) to wait for an available thread from
3
the pool, adjust the indexingThread.pool.maxWait= value. A value of -1 indicates
waiting indefinitely.
To specify the maximum number of idle threads in the pool, adjust the
4
indexingThread.pool.maxIdle= value.
To specify the minimum number of idle threads in the pool, adjust the
5
indexingThread.pool.minIdle= value.
To specify the number of milliseconds a thread can be in the pool before it is evicted,
6
adjust the indexingThread.pool.minEvictableIdleTimeMillis= value.
To specify the number of milliseconds after which the evictor thread should run to
7
evict idle threads, adjust the
indexingThread.pool.timeBetweenEvictionRunsMillis= value. The evictor
thread runs in the background.
When the "evictor" thread is run, it releases all idle threads from the pool beyond
indexingThread.pool.maxIdle value. However, the number of idle threads specified
as indexingThread.pool.minIdle value are maintained in the pool.
To index assets not previously indexed when Quark Publishing Platform Server starts,
8
enter true for the indexing.indexPendingAssetsOnStartup= value.
Save and close "Indexing.properties."
9
ASPOSE filter
The ASPOSE filter handles text files, Microsoft Word, Excel and PowerPoint documents,
RTF files and plain text files. Adjust the ASPOSE filter settings:
42 | QUARK PUBLISHING PLATFORM 2015 SYSTEM ADMINISTRATION GUIDE
Page 43

QUARK PUBLISHING PLATFORM SERVER — MANUAL CONFIGURATION
Open the "AsposeFilterServiceConfig.properties" file located in the [QPP Server]/conf
1
folder.
asposefilter.previewType=png. Supported preview types are png and jpg.
2
asposefilter.generatePreview=true.
3
asposefilter.generateThumbnail=true.
4
asposefilter.generateTableImages=false.
5
asposefilter.generateChartImages=false.
6
asposefilter.thumbnailHeight= entry.
7
asposefilter.thumbnailWidth= entry.
8
asposefilter.previewDpi= entry.
9
asposefilter.reditionPreviewDpi= entry.
10
To specify the time the process should wait before exiting, if indexing is not done,
11
enter a value in the asposefilter.processTimeOut= entry (in milliseconds).
To specify the maximum number of pages for which preview should be generated,
12
enter a value in the asposefilter.previewPages= entry.
To set the preview page layout margin settings for RTF, XML, HTML, HTM and TXT
13
type files enter values in the following:
•
asposefilter.text.topMargin= entry.
•
asposefilter.text.bottomMargin= entry.
•
asposefilter.text.rightMargin= entry.
•
asposefilter.text.leftMargin= entry.
Save and close "AsposeFilterServiceConfig.properties."
14
Configure ASPOSE filter for PDF preview
The Platform Server provides two filter implementations for the indexing of PDF
Documents:
• Jaws Filter
• Aspose Filter
By default the JAWS Filter is configured for PDF document indexing. In order to
configure the ASPOSE Filter for PDF document indexing, do the following:
Open the "AsposeFilterServiceConfig.properties" file located in the [QPP Server]/conf
1
folder.
Look for and uncomment the following:
2
<!-- <supported-file-type>
<mac-os-type/>
<file-extension>pdf</file-extension>
<mime-type/>
<creator-code/>
</supported-file-type>
QUARK PUBLISHING PLATFORM 2015 SYSTEM ADMINISTRATION GUIDE | 43
Page 44

QUARK PUBLISHING PLATFORM SERVER — MANUAL CONFIGURATION
<supported-file-type>
<mac-os-type/>
<file-extension/>
<mime-type>application/pdf</mim-type>
<creator-code/>
</supported-file-type>
<supported-file-type>
<mac-os-type/>
<file-extension/>
<mime-type>application/x-pdf</mime-type>
<creator-code/>
</supported-file-type> -->
Open "JawsFilterServiceConfig.properties." in a text-editing application.
3
Look for and comment out the following supported file type:
4
<supported-file-type>
<mac-os-type/>
<file-extension>pdf</file-extension>
<mime-type/>
<creator-code/>
</supported-file-type>
Save and close "AsposeFilterServiceConfig.properties."
5
Save and close "JawsFilterServiceConfig.properties."
6
APS filter
Adjust the APS filter settings:
Open the "ApsFilterServiceConfig.properties" file located in the [QPP Server]/conf
1
folder.
apsfilter.generatePreview=true.
2
apsfilter.generateThumbnail=true.
3
apsfilter.generateAttributes=true.
4
apsfilter.generateText=true.
5
To specify the time the process should wait before exiting, if indexing is not done,
6
enter a value in the apsfilter.processTimeOut= entry (in milliseconds).
To specify the maximum number of pages for which preview should be generated,
7
enter a value in the apsfilter.previewPages= entry.
Save and close "ApsFilterServiceConfig.properties."
8
POI filter
Adjust the POI filter settings:
Open the "POIFilterServiceConfig.properties" file located in the [QPP Server]/conf
1
folder.
poifilter.approximateCharactersPerPage. Set the number of characters which
2
approximately constitutes a page of text. This value will decide the page break for text
files.
poifilter.previewMaxLineLength. Set the maximum number of characters to
3
place in a row for preview image generation from text files.
44 | QUARK PUBLISHING PLATFORM 2015 SYSTEM ADMINISTRATION GUIDE
Page 45

QUARK PUBLISHING PLATFORM SERVER — MANUAL CONFIGURATION
poifilter.fontName. The name of the font to be used for image generation from
4
text.
poifilter.previewFontSize. The size of the font required for text in an image.
5
poifilter.lineSpacing. The spacing between lines in term of multiples of font
6
size defined in the poifilter.previewFontSize property.
Save and close "POIFilterServiceConfig.properties."
7
Configure processing of MS Office documents
Adjust the MS Office filter settings:
Open the "OfficeServiceConfig.properties" file in the [QPP Server]/conf folder.
1
Set the office.defaultImageFormat property to specify the default output format
2
type. Default format is PNG.
Set the office.defaultHorizontalResolution property to specify the default
3
horizontal resolution of previews.
Set the office.defaultVerticalResolution property to specify the default vertical
4
resolution of previews.
Set the office.onePagePerSheet property to true and all content of the sheet will
5
output to only one page.
Set the office.showHiddenWorksheets property to control the visibility of hidden
6
worksheets.
To set the option to remove or hide the hidden columns/rows from the output formats
7
HTML, XHTML, SMARTTABLE and CALS, set the following properties:
•
office.defaultHiddenColumnDisplayType= entry. The allowed values for this
option are hide or remove.
•
office.defaultHiddenRowDisplayType= entry. The allowed values for this option
are hide or remove.
QuarkXPress Server Filter
To adjust QuarkXPress filter settings:
Open the "QxpsFilterServiceConfig.properties" file located in the [QPP Server]/conf
1
folder.
Set the qxpsfilter.useSpreadForArticles= value to true to specify that previews
2
for articles are generated for each spread.
Set the qxpsfilter.useSpreadForProjects= value to true to specify project
3
previews with spreads.
By default, XML deconstruction is enabled. The default setting for the
4
qxpsfilter.generateDeconstructedXML= entry is true. To disable XML
deconstruction, set the entry to false.
QUARK PUBLISHING PLATFORM 2015 SYSTEM ADMINISTRATION GUIDE | 45
Page 46

QUARK PUBLISHING PLATFORM SERVER — MANUAL CONFIGURATION
By default, Full Text Search (FTS) is enabled. The default setting for the
5
qxpsfilter.generateText= entry is true. To disable FTS, set the entry to false.
A true value for qxpsfilter.generateDeconstructedXML also enables FTS for
QuarkXPress projects and QuarkCopyDesk articles. Text generation is dependent on
XML generation. If you set generateDeconstructedXML to false, Quark recommends
also setting qxpsfilter.generateText to false.
To specify the scale of preview images, adjust the qxpsfilter.previewScale= value.
6
The default value of 1 indicates previews at 100 percent. The values of 2, 3, and 6 are
200 percent, 300 percent, and 600 percent, respectively.
To specify the scale of thumbnail images, adjust the qxpsfilter.thumbnailScale=
7
value. The default value of 1 indicates previews at 100 percent. The values of .5, 2, 3,
and 6 are 50 percent, 200 percent, 300 percent, and 600 percent, respectively.
To specify image quality for JPEG previews, adjust the qxpsfilter.jpegQuality=
8
value. Enter 1 for the highest quality, 2 for high quality, 3 for medium quality, and 4
for lowest quality.
Save and close "QxpsFilterServiceConfig.properties."
9
JAWS filter settings
The JAWS filter is part of the ImageMagick® Filter Service Configurations for EPS, PDF,
and Adobe® Illustrator® files. To specify settings for the JAWS filter:
Open the "JawsFilterServiceConfig.properties" file located in the [QPP Server]/conf
1
folder.
To specify the resolution for thumbnails and previews (measured in dots-per-inch),
2
adjust the jawsfilter.resolution= value.
The jawsfilter.resolution= value is the fallback resolution used to scale the
preview image to the specified size when the proper resolution cannot be calculated.
Save and close "JawsFilterServiceConfig.properties."
3
XML Author filter settings
The XML Author filter is part of the configuration for XML files. XADocFilter is used
to generate Previews and Thumbnails of XML files. To specify settings for the XML
Author filter:
Open the "XADocFilterServiceConfig.properties" file located in the [QPP Server]/conf
1
folder.
To specify the amount of time a process will wait for indexing (with XADocFilter) to
2
complete, adjust the xaDocfilter.processTimeOut= value.
To specify the preview height and width, adjust the xaDocfilter.previewHeight=
3
value and the xaDocfilter.previewWidth= value.
To specify the maximum number of pages for which a preview should be generated,
4
adjust the xaDocfilter.previewPages= value.
46 | QUARK PUBLISHING PLATFORM 2015 SYSTEM ADMINISTRATION GUIDE
Page 47

QUARK PUBLISHING PLATFORM SERVER — MANUAL CONFIGURATION
Save and close "XADocFilterServiceConfig.properties."
5
ImageMagick, Jaws, and DITA OT directories
By default, ImageMagick, Jaws, and the DITA Open Toolkit are included with Quark
Publishing Platform. However, if you have existing installations of ImageMagick or
Jaws, perform the following tasks:
Open the "ServerApp.properties" file located in the [QPP Server]/conf folder.
1
Scroll to the IMAGE_MAGICK_HOME= entry.
2
Enter the path to your existing ImageMagick bin folder.
3
Scroll to the JAWS_HOME= entry.
4
Enter the path to your existing Jaws bin folder.
5
Scroll to the DITA_HOME= entry.
6
Enter the path to your existing DITA Open Toolkit folder.
7
Save and close "ServerApp.properties."
8
Full text indexing configuration
To configure FTSIndex filter settings:
Open the "LuceneTextIndexingConfig.properties" file located in the [QPP
1
Server]/conf folder.
By default, the storage location for index files is in the Quark Publishing Platform
2
installation folder. However, you can change the location by changing the
lucene.index.dir= parameter to indicate the folder in which you want to store
index files.
Specify the language (class) used most frequently for text indexing and query term
3
analysis by changing the lucene.analyzerClass= parameter. The default setting
— StandardAnalyzer — recognizes English semantics for Full Text Search. But if the
majority of the text in your workflow is not English, you can specify another language
to search more accurately according to that language's semantics. The languages are
listed in the "LuceneTextIndexingConfig.properties" file.
"LuceneTextIndexingConfig.properties" contains information for each parameter, as
well as links to the Apache documentation.
To specify the number of changes after which an index compaction shoud be
4
performed, set a value for lucene.maxModificationWithoutOptimisation.
Save and close "LuceneTextIndexingConfig.properties."
5
Charting Service
To configure the properties for the Charting service modify the below properties:
QUARK PUBLISHING PLATFORM 2015 SYSTEM ADMINISTRATION GUIDE | 47
Page 48

QUARK PUBLISHING PLATFORM SERVER — MANUAL CONFIGURATION
Enter the default output format (PDF/HTML/IMAGE/JSON) in the
1
charting.defaultOutputFormat parameter.
Enter the default values for the image output properties in the following parameters:
2
•
charting.defaultImageFormat=png
•
charting.defaultWidth=600
•
charting.defaultScale=
Enter the path to the default HTML template:
3
charting.defaultHTMLTemplateURI=classpath\:DefaultHTMLTemplate.html
Integrating QLA with Quark Publishing Platform
To reconfigure Quark® License Administrator (QLA) primary and backup server settings
with Quark Publishing Platform:
Open the "Qla.properties" file located in the [QPP Server]/conf folder.
1
Enter the current IP address or hostname of the computer where you installed QLA in
2
the QlaServer.machinename= parameter.
Enter the port number in the QLAServer.port= parameter.
3
If you have a backup QLA server, enter the correct IP address or hostname and port
4
values in the Backup.QlaServer.machinename= and Backup.QlaServer.port=
parameters.
In the Qla.SerialNumber= parameter, enter the QLA serial number for Quark
5
Publishing Platform Server. The QLA Server Console and QLA Client applications
display your serial number.
The serial number is updated in "Qla.properties" based on the validation code that you
provided when you installed or updated Quark Publishing Platform Server.
Save and close "Qla.properties."
6
Enabling IPTC support
IPTC values in a picture file can be recognized and included in the picture's attribute
list. To enable or disable IPTC functionality, open the file
\Server\conf\IMFilterServiceConfig.properties and set the
imfilter.generateIPTCAttributes property to true or false. You can also
specify preview/thumbnail resolution by setting a value for imfilter.resolution.
48 | QUARK PUBLISHING PLATFORM 2015 SYSTEM ADMINISTRATION GUIDE
Page 49

QUARK PUBLISHING PLATFORM SERVER — MANUAL CONFIGURATION
RMI and CORBA clients only
By default, Quark Publishing Platform clients require only port 61400. However, if
you are using or developing your own RMI and CORBA clients, you might want to
read the topics below.
Changing ports used by Quark Publishing Platform Server
By default, Quark Publishing Platform clients require only port 61400. However, if
you are using or developing your own RMI and CORBA clients, you can adjust settings
for the server and file streaming ports in your Quark Publishing Platform environment.
By default, Quark Publishing Platform Server provides services on network ports 61400
to 61407, but you can configure all these ports.
Changing the default ports
By default, Quark Publishing Platform clients require only port 61400. However, if
you are using or developing your own RMI and CORBA clients, change the ports as
follows:
Open the "ServerApp.properties" file located in the [QPP Server]/conf folder.
1
To specify the port for running Java-based RMI clients (such as Quark Publishing
2
Platform Script Manager), enter a value in the rmi.port= property. Remote Method
Invocation (RMI) is a standard remote procedure call that allows Java objects on your
network to run remotely.
To specify the port to which service are bound, enter a value in the rmi.serviceport=
3
property.
To specify the port for managing IIOP requests, enter a value in the
4
namingservice.port= property. Internet Inter-Orb Protocol (IIOP) is a message
protocol for handling objects on a TCP/IP network. QuarkXPress, QuarkCopyDesk,
and Quark Publishing Platform Client connect through this port.
To specify the port on which CORBA objects are exported, enter a value in the
5
serverORB.port= property.
To specify the port for all Quark Publishing Platform client application communication,
6
enter a value in the jms.openWirePort= property. In a Quark Publishing Platform
environment, Java Messaging Service (JMS) uses OpenWire® protocol.
To indicate which port the Tomcat server is running on, enter a value in the
7
webServer.port= property. Quark Publishing Platform Web Client connects through
this port.
Save and close "ServerApp.properties."
8
Specifying the Tomcat server port
After changing default ports, you must also specify the port for running the Tomcat
server in a separate file, as follows:
Open the "server.xml" file located in the [QPP Server]/conf folder.
1
Change the Web server port.
2
QUARK PUBLISHING PLATFORM 2015 SYSTEM ADMINISTRATION GUIDE | 49
Page 50

QUARK PUBLISHING PLATFORM SERVER — MANUAL CONFIGURATION
Save and close "server.xml."
3
Restart the server.
4
Changing the file streaming port
To change the file streaming port:
Open the "conf" folder in your Quark Publishing Platform Server folder.
1
Open "SocketStreaming.properties" in a text-editing application.
2
To specify the port for file uploads and downloads, enter a value in the
3
socketStreaming.port= property.
Save and close "SocketStreaming.properties."
4
Multiple network cards
By default, Quark Publishing Platform clients require only port 61400. However, if
you are using or developing your own RMI and CORBA clients, and the computer
running Quark Publishing Platform Server has more than one network interface card,
you can bind to a particular card for Quark Publishing Platform Server or to any and
all IP addresses on the computer.
Binding a specific IP address
To bind to a specific IP address:
Open the "conf" folder in your Quark Publishing Platform Server folder.
1
Open "ServerApp.properties" in a text-editing application.
2
Scroll to the server.machinename= entry. Enter the specific IP address of the network
3
card to which you want to bind.
Scroll to the server.bindtoip= entry. Enter true for Quark Publishing Platform
4
Server to only bind to the IP address and name identified by the "server.machinename="
entry.
Save and close "ServerApp.properties."
5
Editing "server.xml"
You must also edit "server.xml," as follows:
Open the "conf" folder in your Quark Publishing Platform Server folder.
1
Open "server.xml" in a text-editing application.
2
In the "connector" tag, add the IP address. For example, change <Connector
3
port=61400 to <Connector address = "<IP Address>" port="61400".
Save and close "server.xml."
4
Binding all IP addresses to a single computer
To bind to all IP addresses on a single computer:
50 | QUARK PUBLISHING PLATFORM 2015 SYSTEM ADMINISTRATION GUIDE
Page 51

QUARK PUBLISHING PLATFORM SERVER — MANUAL CONFIGURATION
Open the "conf" folder in your Quark Publishing Platform Server folder.
1
Open "ServerApp.properties" in a text-editing application.
2
Scroll to the server.machinename= entry. Enter localhost.
3
Scroll to the server.bindtoip= entry. Enter false for Quark Publishing Platform
4
Server to bind to any and all IP addresses on the computer.
Scroll to the server.additionalnames= entry. Enter the IP address of the network
5
card to which you want to bind. If you have multiple IP addresses, you can separate
entries with a comma (for example, server.additionalnames=
10.91.43.266,10.X.Y.Z). If your computer has only one network card, leave this
field blank.
This list includes non-default IPs only. Do not specify the default IP of the computer
here because Quark Publishing Platform Server automatically uses the default IP address.
Adding a default IP here is not recommended.
Save and close "ServerApp.properties."
6
Firewalls with NAT
If you are using or developing RMI and CORBA clients and you want to provide access
to Quark Publishing Platform Server over the Internet through a firewall running
Network Address Translation (NAT) services, you must specify the public IP address
to which the Quark Publishing Platform Server's private IP address is mapped.
To specify the public IP address:
Open the "conf" folder in your Quark Publishing Platform Server folder.
1
Open "ServerApp.properties" in a text-editing application.
2
Scroll to the server.additionalnames= entry.
3
Enter the public IP address to which the Quark Publishing Platform Server's private IP
4
address is mapped.
Save and close "ServerApp.properties."
5
Failover setup
This topics describes one way you can configure a Quark Publishing Platform
installation for failover.
The key to a setup like this is to use a virtual IP address for the Quark Publishing
Platform Server computer.
QUARK PUBLISHING PLATFORM 2015 SYSTEM ADMINISTRATION GUIDE | 51
Page 52

QUARK PUBLISHING PLATFORM SERVER — MANUAL CONFIGURATION
Failover setup: Normal operation
During normal operations, the Production site is up and running and the virtual IP
address is mapped to that server. The DR (disaster recovery) site is in dormant mode,
with all Quark Services stopped. The following things are being synchronized from
the Production servers to the DR server:
• Quark Publishing Platform repository folder(s)
• Quark Publishing Platform database
•
QPP Server/conf folder
•
QPP Server/Index folder
Synchronization of the Quark Publishing Platform File Server folder(s) and Quark
Publishing Platform Oracle database must be done at the same time and at the same
intervals to maintain data integrity.
If the Production site goes down, synchronization stops and the virtual IP address is
re-mapped to the DR site. End users should not notice the change because they are
still using the same virtual IP adddress.
52 | QUARK PUBLISHING PLATFORM 2015 SYSTEM ADMINISTRATION GUIDE
Page 53

QUARK PUBLISHING PLATFORM SERVER — MANUAL CONFIGURATION
Failover setup: Production server goes down
At this point, an administrator should perform an orderly shutdown of the DR site,
then restart synchronization from the DR site to the Production site.
QUARK PUBLISHING PLATFORM 2015 SYSTEM ADMINISTRATION GUIDE | 53
Page 54

QUARK PUBLISHING PLATFORM SERVER — MANUAL CONFIGURATION
Failover setup: Synchronizing from DR site to Production site
When synchronization is complete between the DR site and the Production site, remap
the virtual IP address to the Production site, reverse the synchronization so that changes
are pushed from the Production server to the DP site, and then launch all of the Quark
Publishing Platform components.
54 | QUARK PUBLISHING PLATFORM 2015 SYSTEM ADMINISTRATION GUIDE
Page 55

QUARK PUBLISHING PLATFORM SERVER — MANUAL CONFIGURATION
Failover setup: Normal operation restored
Encrypting a plain text password
In Quark Publishing Platform 10.1 and later, you can encrypt all of your passwords
that are in plain text. For example, if you are using an SQL Server or Oracle as a database
in the Platform Server then your database user password is stored in plain text in the
"database.properties" file. You can encrypt this password.
To encrypt plain text passwords:
Open the command prompt and navigate to the Platform server installation folder.
1
Launch the "encrypt.bat" file with your password (encrypt.bat password) to retrieve
2
its encrypted value.
Copy the generated encrypted value of the password and use this encrypted value in
3
any of properties file (for example, "database.properties").
Open the "lib" folder in your Quark Publishing Platform Server folder.
4
Open "qpp-server-app-11.0.jar" and navigate to \com\quark\qpp\app inside the jar
5
file.
QUARK PUBLISHING PLATFORM 2015 SYSTEM ADMINISTRATION GUIDE | 55
Page 56

QUARK PUBLISHING PLATFORM SERVER — MANUAL CONFIGURATION
Open "ServerStartupContext.xml " in a text-editing application and under the
6
securePlaceholderConfig node, add an entry for each of the properties file that
you used the encrypted value in. Remove this entry from the placeholderConfig
node if it exists.
Save the file, update the jar and restart the server.
7
You can use any of the algorithms mentioned in the "ServerStartupContext.xml" file
and you can modify the key used to encrypt the password (default is QUARK).
Enabling forced log off during inactivity
Configuring WebAdmin to enable forced log off
Forced Log-Off can be enabled by engaging a predefined Servlet Filter in the "Web.xml"
file in the [QPP Server]/webapps/admin folder:
•
session-idle-time: Specifies the time (in seconds) of inactivity after which a user
will be forced to log off of WebAdmin.
•
exclude-url-patterns: Specifies URL patterns which are not considered user activity.
•
pre-expiry-mag-time: Specifies the time (in seconds) before pending inactivity
bases log off, a warning or countdown message will be shown.
<filter>
<filter-name>SessionTimeoutCookieFilter</filter-name>
<filter-class>com.quark.web.activity.servlet.SessionTimeoutCookieFilter</filter-class>
<init-param>
<param-name>session-idle-time</param-name>
<param-value>60</param-value>
</init-param>
<init-param>
<param-name>exclude-url-patterns</param-name>
<param-value>/admin/keepAlive.qsp</param-value>
</init-param>
<init-param>
<param-name>pre-expiry-mag-time</param-name>
<param-value>40</param-value>
</init-param>
</filter>
<filter-mapping>
<filter-name>SessionTimeoutCookieFilter</filter-name>
<url-pattern>/*</url-pattern>
</filter-mapping>
Forced Log-Off can also be enabled in the "Admin-Home.jsp" file in QPP
Home/webapps/admin/jsp folder:
<!-- Uncomment for "Forced Logoff on Inactivity" -->
<script type="text/javascript" src="resources/js/SessionTimer.js></script>
<link type="text/css" href="resources/js/SessionTimer.css
re;="stylesheet></link>
function logoutDueToInactivity () {
window.location.href = "logout.qsp";
};
<%-- Initialise inactivity monitor --%>
SessionTimer.init(logoutDueToInactivity);
56 | QUARK PUBLISHING PLATFORM 2015 SYSTEM ADMINISTRATION GUIDE
Page 57

QUARK PUBLISHING PLATFORM SERVER — MANUAL CONFIGURATION
Configuring Workspace to enable forced log off
Forced Log-Off can be enabled by engaging a predefined Servlet Filter in the "Web.xml"
file in the [QPP Server]/webapps/workspace folder:
•
session-idle-time: Specifies the time (in seconds) of inactivity after which a user
will be forced to log off of WebAdmin.
•
exclude-url-patterns: Specifies URL patterns which are not considered user activity.
•
pre-expiry-mag-time: Specifies the time (in seconds) before pending inactivity
bases log off, a warning or countdown message will be shown.
<filter>
<filter-name>SessionTimeoutCookieFilter</filter-name>
<filter-class>com.quark.web.activity.servlet.SessionTimeoutCookieFilter</filter-class>
<init-param>
<param-name>session-idle-time</param-name>
<param-value>300</param-value>
</init-param>
<init-param>
<param-name>exclude-url-patterns</param-name>
<param-value>/workspace/keepAlive.qsp/workspace/assetHeaderUpdate.qsp</param-value>
</init-param>
<init-param>
<param-name>pre-expiry-mag-time</param-name>
<param-value>60</param-value>
</init-param>
</filter>
<filter-mapping>
<filter-name>SessionTimeoutCookieFilter</filter-name>
<url-pattern>/*</url-pattern>
</filter-mapping>
Forced Log-Off can also be enabled in the "User-Home.jsp" file in QPP
Home/webapps/workspace/jsp folder:
<!-- Uncomment for "Forced Logoff on Inactivity" -->
<script type="text/javascript" src="resources/js/SessionTimer.js></script>
<link type="text/css" href="resources/js/SessionTimer.css
rel="stylesheet></link>
<%-- Initialise inactivity monitor --%>
SessionTimer.init(UserHomeUI.logout);
The countdown message will be shown with remaining seconds. The user can prevent
the forced log off by clicking Continue Session.
Forced log off countdown
QUARK PUBLISHING PLATFORM 2015 SYSTEM ADMINISTRATION GUIDE | 57
Page 58

QUARK PUBLISHING PLATFORM SERVER — MANUAL CONFIGURATION
Configuring messaging
To configure Quark Publishing Platform Server to display Asset Workflow Changed
messages when any listed attribute is changed on the related asset:
Open the "AssetWorkflowChangedMessageAttributes.xml" file located in the
1
[install_path]/Server/conf/ folder.
Set the attribtues IDs or names to trigger the Asset Workflow Changed message
2
when any listed attribute is changed on the related asset.
<!-- List of attribute ids or names to be considered for "ASSET WORKFLOW
CHANGED MESSAGE"
The "ASSET WORKFLOW CHANGED MESSAGE" will be published if there is any
changes in the attributes
of the mentioned asset/>
<util:list id="assetWorkflowAttributes">
<value>name</value>
<value>Status</value>
<value>Workflow</value>
<value>Routed to</value>
</util:list>
</beans>
58 | QUARK PUBLISHING PLATFORM 2015 SYSTEM ADMINISTRATION GUIDE
Page 59

QUARK PUBLISHING PLATFORM WEB CLIENT: MANUAL CONFIGURATION
Quark Publishing Platform Web
Client: Manual configuration
The following sections describe how to configure the advanced settings of Quark
Publishing Platform Web Client.
Configuration overview
The workspace configuration is organized into two categories:
• Application level settings
• Document level settings
These are set in the "Workspace-Config.xml" configuration file in the [QPP Server]/
webapps /workspace/WEB-INF/classes folder.
Application level settings
The attribute elements of ApplicationSettings defines various application level
settings:
•
userNameFormatting: Specifies the format of the user name to be displayed in all
dialogs:
0 to display login name <username>
1
1 to display <First Name> <Last Name>
2
2 to display <Last Name>, <First Name>
3
QUARK PUBLISHING PLATFORM 2015 SYSTEM ADMINISTRATION GUIDE | 59
Page 60

QUARK PUBLISHING PLATFORM WEB CLIENT: MANUAL CONFIGURATION
•
layoutPreview: Specifies the look and feel of the preview window for assets belonging
to the QuarkXPress content type:
True to display the preview in a separate browser window
1
False to display the preview ina javascript window instead of a browser.
2
•
viewrevision_expandAll: Specifies whether all revision comments need to be
expanded in the view revisions dialog.
•
supported_picture_extension: Specifies the possible file types allowed when
importing a picture/text in the article/project editors.
•
picture_editing_extension: Specifies the possible file formats allowed when
editing pictures in the article/project editors.
•
defaultPreviewScale: Specifies the default zoom preview setting to be used when
editing articles/projects and viewing assets (live preview). Valid values for this parameter
range from 0.1 to 5.
•
ajaxTimeout: Specifies the time period for all background requests originating from
browser after which the requests will be marked as timed out. The value is specified
in milliseconds.
•
showFormView: Specifies whether to show the form view panel in the Check In dialog.
Set to true to show the form view pane.
•
topBannerJspPath: Specifies the path to the .jsp file to be included to show the top
banner in the assignment page.
•
logoFilePath: Specifies the path to the logo image shown in the top banner in the
assignment page.
•
enabledPublishingChannels: Defines the list of publishing channels that need to
be honored when selecting an asset.
•
enableDeliveryChannels: Defines whether delivery channels needs to be enabled
or not.
60 | QUARK PUBLISHING PLATFORM 2015 SYSTEM ADMINISTRATION GUIDE
Page 61

QUARK PUBLISHING PLATFORM WEB CLIENT: MANUAL CONFIGURATION
•
enabledDeliveryChannels: Defines the list of delivery channels that need to be
honored when selecting an asset. This would get enabled when the
enableDeliveryChannels option is set to true.
•
allowPublishedRenditionDownload: Defines whether to allow the download
output displayed for the various previews using the publishing defined for the selected
asset.
<ApplicationSettings>
<Add key="viewrevision_expandAll" value="false"/>
<Add key="supported_picture_extension" value="bmp;jpg;jpeg;tif;tiff;gif;"/>
<Add key="picture_editing_extension" value="jpg;jpeg;tif;tiff;eps"/>
<Add key="userNameFormatting" value="0"/>
<Add key="layoutPreview" value="true"/>
<Add key="defaultPreviewScale" value="0.8"/>
<Add key="ajaxTimeout" value="300000"/>
<Add key="showFormView" value="false"/>
<Add key="topBannerJspPath" value="Header.jsp"/>
<Add key="logoFilePath" value="images/login/topbanner-innerpage-left.png"/>
<Add key="enabledPublishingChannels"
value="qxpPdf;qxpEpub;qxpAppStudio;qxpAppStudioPackage;busDocPdf;busDocHtml;busDocQxp/>
<Add key="enableDeliveryChannels" value="false"/>
<Add key="enabledDeliveryChannels"
value="checkInToSharepoint;checkInToFileNet;checkInToDocumentum;sendEmail;sendToFTPServer"/>
<Add key="allowPublishedRenditionDownload" value="true"/>
</ApplicationSettings>
Multi-Channel preview
For each content type you will specify the publishing channels that should be available
to the user in the Preview tab of the assignment page. Publishing channels for preview
are configured using the <PreviewSettings> element:
•
displayName: Specifies the channel name displayed in the user interface (optional).
If not given, then outputFormat is used.
•
Id: Specifies the Publishing Channel Id as defined in the Platform Server.
•
ContentType: Specifies the content type of the asset .
•
ApplyToChildContentTypes: Specifies whether to include the child content types.
•
outputFormat: Supported values:
IMAGE_ARCHIVE: An image archive for the published output, which will be rendered
1
inside a web page.
HTML_ARCHIVE: An HTML archive for the published output, which will be rendered
2
as is, pointing to the file name present in the HTML Archive.
PDF_ARCHIVE: The published output PDF, which will be rendered as is.
3
•
downloadChannel: (optional) Used in case a different channel needs to be invoked
for download of selected channel preview.
<PreviewSettings>
<ChannelMappings>
<ChannelMapping contentType ="Business Document" applyToChildContentTypes
="true">
<Channels>
<Channel id="busDocPdf" outputFormat="PDF_ARCHIVE"
displayName="PDF"/>
<Channel id="busDocHtml" outputFormat="HTML_ARCHIVE"
QUARK PUBLISHING PLATFORM 2015 SYSTEM ADMINISTRATION GUIDE | 61
Page 62

QUARK PUBLISHING PLATFORM WEB CLIENT: MANUAL CONFIGURATION
displayName="HTML"/>
<Channel id="busDocJpeg" outputFormat="IMAGE_ARCHIVE"
displayName="IMAGE"/>
</Channels>
</ChannelMapping>
<ChannelMapping contentType="Smart Content"
applyToChildContentTypes="true">
<Channels>
<Channel id="smartDocPdf" outputFormat="PDF_ARCHIVE"
displayName="PDF"/>
<Channel id="smartDocHtml" outputFormat="HTML_ARCHIVE"
displayName="HTML"/>
<Channel id="smartDocJpeg" outputFormat="IMAGE_ARCHIVE"
displayName="IMAGE"/>
</Channels>
</ChannelMapping>
</ChannelMappings>
</PreviewSettings>
Attrbutes for General pane
The attributes for the General tab are configured using the <PreviewAttributes>
element. The values specify the list of attributes to be displayed in the General tab for
the selected asset.
<PreviewAttributes>
<PreviewAttribute>Id</PreviewAttribute>
<PreviewAttribute>Created</PreviewAttribute>
<PreviewAttribute>Last modified</PreviewAttribute>
<PreviewAttribute>Creator</PreviewAttribute>
<PreviewAttribute>Last modifier</PreviewAttribute>
<PreviewAttribute>Status</PreviewAttribute>
<PreviewAttribute>Collection</PreviewAttribute>
........
</PreviewAttributes>
62 | QUARK PUBLISHING PLATFORM 2015 SYSTEM ADMINISTRATION GUIDE
Page 63

QUARK PUBLISHING PLATFORM WEB CLIENT: MANUAL CONFIGURATION
Role based Toolbar configuration
This section describes how to define the toolbar items for a desired role. Role based
configuration for toolbar items are configured using the <ToolbarConfig> element.
•
Role name: Specify the name of role whose configuration is to be defined.
•
Item ID: Specify the id of the item whose appearance needs to be configured.
•
showInToolbar: To hide the menu item in the toolbar, set this attribute to false.
•
showInContext: To hide the menu item in the context menu, set this attribute to
false.
•
showInNewMenu:To hide the menu item in the New Asset menu, set this attribute to
false.
•
showInTemplateMenu: If the menu item is not to be shown in the New Asset from
Template, set this attribute to false.
The following is the XML structure of the toolbar configuration:
<Role name ="[ROLE NAME]">
<Item id ="[ITEM ID]"
showInToolbar ="[true/false (defaults to true)]"
showInContextMenu ="[true/false (defaults to true)]"
showInNewMenu ="[true/false (defaults to true)]"
showInTemplateMenu ="[true/false (defaults to true)]"/>
</Role>
<ToolbarConfig>
<Role name ="Guest">
<Item id ="new_qcd_menu_item"/>
QUARK PUBLISHING PLATFORM 2015 SYSTEM ADMINISTRATION GUIDE | 63
Page 64

QUARK PUBLISHING PLATFORM WEB CLIENT: MANUAL CONFIGURATION
<Item id ="new-search-btn"/>
<Item id ="duplicate-asset" showInToolbar="false"/>
<Item id ="delete-asset"/>
<Item id ="show-edit-attributes" showInContextMenu="false"/>
<Item id ="show-Asset_preview" showInToolbar="false"/>
........
</Role>
</ToolbarConfig>
The Context menu for the Guest role will look like:
Context menu for Guest role
Toolbar items fo the Guest role will look like:
Toolbar items for Guest role
Here is the list of item IDs:
•
checkin: Check in the Asset
•
show-check-out: Check out the Asset
•
cancel-checkout: Cancel Asset Check out
•
get-asset: Get Asset
•
new-search-btn: New Search (not available as Context Menu Item)
•
show-Asset-Preview: Preview Asset
•
show-edit-attributes: Edit Asset Attributes
•
attachment-info: Show Attachment Information
•
view-revisions: View Asset Revisions
•
duplicate-asset: Duplicate Asset
•
delete-asset: Delete Asset
•
reindex-asset: Reindex Asset (not shown in Toolbar by default)
•
publish-menu-btn: Publish an asset
•
deliver-menu-btn: Deliver an asset
•
restore: Restore assets
64 | QUARK PUBLISHING PLATFORM 2015 SYSTEM ADMINISTRATION GUIDE
Page 65

QUARK PUBLISHING PLATFORM WEB CLIENT: MANUAL CONFIGURATION
•
archive-asset: Archive assets
•
open-collection: Open the collection to which the asset belongs
•
refresh-datadoc: Refresh a datadoc
•
unlink-datadoc: Unlink a datadoc
•
open-readonly: Open asset as read-only
•
new_qcd_menu_item: Create new QuarkCopyDesk Article
•
new_qxp_menu_item: Create new QuarkXpressProject from template
The showInToolbar and showInContextMenu attributes are only applicable for menu
items displayed in the toolbar and the context menus. For buttons configured in the
ui-extension.xml file, showInToolbar is not applicable, as the configuration is meant
for adding a toolbar button itself. Additionally the button can be added to context
menu, hence only showInContextMenu is applicable for ui-extension.xml buttons. The
showInNewMenu and showInTemplateMenu attributes are only applicable for menu
items in the New Asset menu dropdown, and are not applicable while setting up role
based configuration for ui-extension.xml menus in this section.
The rest of the configurable elements specified in "Workspace-config.xml" are for
integration with Quark Author Web Edition. For more information, see "Quark Author
Web Edition Configuration Guide".
Restricting access to Web Client/Admin
To restrict the webapp so that the workspace and admin pages can only be accessed
from within your own network, use a Tomcat Valve to restrict access based on an IP
address range.
Open the "server.xml" file located in the {install_path}/conf folder.
1
Edit the context elements corresponding to the admin and workspace applications to
2
engage a RemoteAddrValve. The valve has to be configured to allow only intranet
traffic. The final config would look something like the following:
<Context path="/qxpsm" docBase="qxpsm">
<Manager pathname="" />
</Context>
<Context path="/workspace"docBase="workspace">
<Manager pathname="" />
<Valve className="org.apache.catalina.valves.RemoteAddrValve" allow="
10\.91\..*\..* "/>
</Context>
<Context path="/webservices"docBase="webservices">
<Manager pathname="" />
</Context>
<Context path="/messaging" docBase="messaging">
<Manager pathname="" />
</Context>
<Context path="/admin"docBase="admin">
<Manager pathname="" />
<Valve className="org.apache.catalina.valves.RemoteAddrValve" allow="
10\.91\..*\..* " />
</Context>
<Context path="/rest"docBase="rest">
<Manager pathname="" />
</Context>
QUARK PUBLISHING PLATFORM 2015 SYSTEM ADMINISTRATION GUIDE | 65
Page 66

QUARK PUBLISHING PLATFORM WEB CLIENT: MANUAL CONFIGURATION
The value of the allow attribute is a regex for matching IP addresses. Here the intranet
IPs are assumed to be in 10.91.x.x range. You need to update this value based on your
network IP ranges.
66 | QUARK PUBLISHING PLATFORM 2015 SYSTEM ADMINISTRATION GUIDE
Page 67

QUARK PUBLISHING PLATFORM CLIENTS — MANUAL CONFIGURATION
Quark Publishing Platform Clients —
Manual configuration
You can change a variety of configuration options for Quark Publishing Platform
clients and Platform XTensions after installation. See the following topics for more
information.
Creating and maintaining the log file (Mac OS X only)
The setting to create and maintain the log file is mentioned in the
com.quark.qpp.client.Quark.QPP.Client.config.plist file. This file can be
found here: ~/Library/Preferences\Quark\QPP\{version}.
To change the location of the log file, define the new log location using the
LogFileName attribute. The default log location is ~/Library/Logs/Quark
Publishing Platform Client.Log
To change the log file size, define the new size using the LogFileSize attribute.
Users can enable and disable the logging of exceptions using the LogException
attribute.
The supported values are:
• (NO) Disables the exception logging
• (YES) Enables the exception logging
Creating and maintaining the log file (Windows only)
The setting to create and maintain the log file is mentioned in the
Quark.QPP.Client.config file. This file can be found where the application is
installed. Users can enable and disable logging using the QPSLogIsEnabled attribute.
The supported values are:
• 0 (NO)
• 1 (YES)
To change the location of the log file, define the new log location using the
QPSLogFile attribute. The default log location:
QUARK PUBLISHING PLATFORM 2015 SYSTEM ADMINISTRATION GUIDE | 67
Page 68

QUARK PUBLISHING PLATFORM CLIENTS — MANUAL CONFIGURATION
•
for Quark Publishing Platform client is AppData\Quark Inc\Quark Publishing
Platform\{version}\Logs
•
for Platform Client related operations in QuarkXPress is AppData\Roaming\Quark
Software Inc\QuarkXPress {version}\{version}\Logs
To change the size of the log file size, define the new size using the QPSLogFileSize
attribute. The size is defined in Bytes. The default value of the Out of the Box config
is 5242880 bytes.
Use the QPSLogFileMode attribute to specify how the log file is written.
Allowed values are:
• 1 (CreateNew). Specifies that the operating system should create a new file. If the file
already exists, a System.IO.IOException is thrown.
• 2 (Create). Specifies that the operating system should create a new file. If the file already
exists, it will be overwritten.
• 3 (Open). Specifies that the operating system should open an existing file. If the file
does not exist, a System.IO.FileNotFoundException is thrown.
• 4 (OpenOrCreate). Specifies that the operating system should open a file if it exists,
otherwise, a new file should be created.
• 5 (Truncate). Specifies that the operating system should open an existing file. Once
opened, the files should be truncated so that the file size is zero bytes.
• 6 (Append). Opens the file if it exists and seeks to the end of the file, or creates a new
file.
FileMode - OpenOrCreate (4) allows one to open a file with the following access :
FileAccess.Read, FileAccess.Write, FileAccess.ReadWrite, FileAccess.Append. Attempting
to read from a file opened with FileMode - Truncate (5) will throw an exception.
The QPSLogFileShare provides the option to restrict or share the log file created
with other processes.
Allowed values are:
• 0 (None). Declines sharing of the current file.
• 1 (Read). The default value. Allows opening of the file for reading.
• 2 (Write). Allows opening of the file for writing.
• 3 (ReadWrite). Allows opening of the file for reading or writing.
• 4 (Delete). Allows subsequent deleting of a file.
• 16 (Inheritable). Makes the file handle inheritable by child processes.
To specify the maximum number of backup log files us the QPSLogFileBackupNumber
attribute.
68 | QUARK PUBLISHING PLATFORM 2015 SYSTEM ADMINISTRATION GUIDE
Page 69

QUARK PUBLISHING PLATFORM CLIENTS — MANUAL CONFIGURATION
Creating and maintaining the log file (Quark XML Author for Platform)
The following configuration in the Quark.CMSAdapters.config file allows the
system integrator or user to set the log file path:
<!-- Defines log file path.-->
<add key="LogFilePath" value="%APPDATA%\Quark\XML Author\Logs\CMS Adapter
Log.txt"/>
The setting to create and maintain the log file is mentioned in the
Quark.QPP.Client.config file. This file can be found in the application folder.
Users can enable and disable logging using the QPSLogIsEnabled attribute.
The supported values are:
• 0 (NO)
• 1 (YES)
To change the location of the log file, define the new log location using the
LogFilePath attribute. The log location is AppData\Quark\XML Author\Logs\CMS
Adapter Log.txt
To change the size of the log file size, define the new size using the QPSLogFileSize
attribute. The size is defined in Bytes. The default value is 5242880 bytes.
Use the QPSLogFileMode attribute to specify how the log file is written.
Allowed values are:
• 1 (CreateNew). Specifies that the operating system should create a new file. If the file
already exists, a System.IO.IOException is thrown.
• 2 (Create). Specifies that the operating system should create a new file. If the file already
exists, it will be overwritten.
• 3 (Open). Specifies that the operating system should open an existing file. If the files
does not exist, a System.IO.FileNotFoundException is thrown.
• 4 (OpenOrCreate). Specifies that the operating system should open a file if it exists,
otherwise, a new file should be created.
• 5 (Truncate). Specifies that the operating system should open an existing file. Once
opened, the files should be truncated so that the file size is zero bytes.
• 6 (Append). Opens the file if it exists and seeks to the end of the file, or creates a new
file.
FileMode - OpenOrCreate (4) allows one to open a file with the following access :
FileAccess.Read, FileAccess.Write, FileAccess.ReadWrite, FileAccess.Append. Attempting
to read from a file opened with FileMode - Truncate (5) will throw an exception.
The QPSLogFileShare provides the option to restrict or share the log file created
with other processes.
Allowed values are:
• 0 (None). Declines sharing of the current file.
QUARK PUBLISHING PLATFORM 2015 SYSTEM ADMINISTRATION GUIDE | 69
Page 70

QUARK PUBLISHING PLATFORM CLIENTS — MANUAL CONFIGURATION
• 1 (Read). The default value. Allows opening of the file for reading.
• 2 (Write). Allows opening of the file for writing.
• 3 (ReadWrite). Allows opening of the file for reading or writing.
• 4 (Delete). Allows subsequent deleting of a file.
• 16 (Inheritable). Makes the file handle inheritable by child processes.
Suppressing the accessibility services warning - Mac OS X
By default, an alert indicating that "Accessibility services are not enabled" may display
at launch in Quark Publishing Platform Client for Mac OS X. To prevent this warning
from displaying:
Control+click the Quark Publishing Platform Client application icon and choose Show
1
Package Contents. A new window displays.
Open the "Info.plist" file in a text editor.
2
Locate the following lines:
3
<key>QPPDisableAccessibilityWarning</key>
<string>0</string>
Change the zero in the <string> element to a 1.
4
Displaying revision comments
By default, when you display the View Revisions dialog box, you must expand each
revision to see its revision comments. To make revision comments display automatically
on Mac OS X:
Navigate to ~/Library/Preferences/Quark/QPP/[QPP Framework Version].
1
Open the file named "com.quark.qpp.client.[Application Name].config.plist" in a text
2
editor.
Locate the following lines:
3
<key>ExpandAllRevisionComments</key>
<false/>
Change the <false/> element to <true/>.
4
On Windows, open the "[application name].exe.config" file, locate the following line,
and change the zero to a 1.
<add key ="ExpandAllRevisionComments" value="0"/>
Displaying first and last names
You can configure Quark Publishing Platform to show user names in one of three
ways:
70 | QUARK PUBLISHING PLATFORM 2015 SYSTEM ADMINISTRATION GUIDE
Page 71

QUARK PUBLISHING PLATFORM CLIENTS — MANUAL CONFIGURATION
•
[username]
•
[username] ([first name] [last name])
•
[username] ([last name], [first name])
To change this setting:
• For Quark Publishing Platform Client for Mac OS X, open the file
~/Library/Preferences/Quark/QPP/[QPP Framework
Version]/com.quark.qpp.client.{Application}.config.plist, locate the
following text, and set the <string> value to 0 for [username], 1 for [username]
([first name] [last name]), or 2 for [username] ([last name], [first
name]):
<key>UserNameFormattingStyle</key>
<string>0</string>
• For Quark Publishing Platform Client for Windows, open the "Quark Publishing
Platform Client.exe.config" file (in the Quark Publishing Platform Client application
folder), locate the following text, and set the value attribute to DEFAULT for
[username], FIRSTNAME_LASTNAME for [username] ([first name] [last
name]), or LASTNAME_FIRSTNAME for [username] ([last name], [first name]).
<add key="UserNameFormattingStyle" value="DEFAULT"/>
• For QuarkXPress for Mac OS X, open the file
~/Library/Preferences/Quark/QPP/[QPP Framework
Version]/com.quark.qpp.client.{Application}.config.plist, locate the
following text, and set the <string> value to 0 for [username], 1 for [username]
([first name] [last name]), or 2 for [username] ([last name], [first
name]):
<key>UserNameFormattingStyle</key>
<string>0</string>
• For QuarkCopyDesk for Mac OS X, open the file
~/Library/Preferences/Quark/QPP/[QPP Framework
Version]/com.quark.qpp.client.{Application}.config.plist, locate the
following text, and set the <string> value to 0 for [username], 1 for [username]
([first name] [last name]), or 2 for [username] ([last name], [first
name]):
<key>UserNameFormattingStyle</key>
<string>0</string>
• For QuarkXPress and QuarkCopyDesk for Windows, open the
"Quark.QPP.client.config" file (in the application folder), locate the following text,
and set the value attribute to DEFAULT for [username], FIRSTNAME_LASTNAME for
[username] ([first name] [last name]), or LASTNAME_FIRSTNAME for
[username] ([last name], [first name]).
<add key="UserNameFormattingStyle" value="DEFAULT"/>
Changing the preview font and size (Windows only)
To change the font and size used for attribute values to a font other than the default
search palette font and size, add the following key to the <appSettings> section of
QUARK PUBLISHING PLATFORM 2015 SYSTEM ADMINISTRATION GUIDE | 71
Page 72

QUARK PUBLISHING PLATFORM CLIENTS — MANUAL CONFIGURATION
the “Quark Publishing Platform Client.exe.config” file, with the desired font and size
in the “value” attribute:
<add key="FontName_Text Preview" value="Arial, 18"/>
Setting maximum number of assets to be fetched (Windows only)
To change the maximum number of assets fetched per collection when the user
performs a Get Asset command or a Get Collection command, add the following
key to the <appSettings> section of the “Quark Publishing Platform Client.exe.config”
file, with the desired number in the “value” attribute:
<add key="MaximumAssetFetchPerCollection" value="50"/>
The default value is 50.
Specify whether to use Chunked Encoding (Windows only)
To specify whether or not to use Chunked Encoding when transferring files on HTTP,
add the following key to the <appSettings> section of the “Quark Publishing Platform
Client.exe.config” file. Supported values are 0 and 1.
<add key="UseChunkedEncoding" value="0"/>
The default value is 0.
Specify support for lazy loading when searching (Windows only)
To specify support for the lazy loading strategy for searching, add the following key
to the <appSettings> section of the “Quark Publishing Platform Client.exe.config”
file, with the desired strategy in the “value” attribute:
<add key="LazyLoadingMode" value="LAZY_LOADING_SCROLLBAR"/>
The supported values are:
•
NO_LAZYLOADING: All assets at once configured by the chunk size.
•
LAZY_LOADING_HYPERLINK: The results specified are retrieved based on the chunk
size, when the results specified by the chunk size are retrieved, a hyperlink would
appear to enable fetching the next chunk of results.
•
LAZY_LOADING_SCROLLBAR: The results specified are retrieved based on the chunk
size, the scroll bar would enable fetching the next chunk of results.
The default value is LAZY_LOADING_SCROLLBAR.
72 | QUARK PUBLISHING PLATFORM 2015 SYSTEM ADMINISTRATION GUIDE
Page 73

QUARK PUBLISHING PLATFORM CLIENTS — MANUAL CONFIGURATION
Setting the lazy loading chunk size (Windows only)
To change the chunk size of the lazy loading search results to be fetched, add the
following key to the <appSettings> section of the “Quark Publishing Platform
Client.exe.config” file, with the desired size in the “value” attribute:
<add key="LazyLoadingChunkSize" value="50"/>
The default value is 50.
Setting the service time out values for all remote service references (Windows only)
To change service timeout value for all remote service references, add the following
key to the <appSettings> section of the “Quark Publishing Platform Client.exe.config”
file, with the desired time (in seconds) in the “value” attribute:
<add key="ServiceTimeoutInSeconds" value="0"/>
The default value is 0. Use the default value specified in the Platform Server
configuration.
Setting the service timeout value for publishing service (Windows only)
To change service timeout value for the publishing service, add the following key to
the <appSettings> section of the “Quark Publishing Platform Client.exe.config” file,
with the desired time (in seconds) in the “value” attribute:
<add key="PublishingServiceTimeoutInSeconds" value="600"/>
The default value is 600. A value of 0 denotes that the settings specified by
ServiceTimeoutInSeconds will be in effect.
Specify the font size of the copy tasting row (Windows only)
To change the font size used for the copy tasting row, add the following key to the
<appSettings> section of the “Quark Publishing Platform Client.exe.config” file,
with the desired font size in the “value” attribute:
<add key="CopyTastingRowFontSize" value="25"/>
Specify the icon for a file extension (Windows only)
To associate an icon with a specified file extension, add the following key to the
<appSettings> section of the “Quark Publishing Platform Client.exe.config” file,
with the path to the desired icon in the “value” attribute:
<add key="icon_<file extension>" value="Path of icon"/>
The key specifies the "file extension" and the value specifies the file path.
QUARK PUBLISHING PLATFORM 2015 SYSTEM ADMINISTRATION GUIDE | 73
Page 74

QUARK PUBLISHING PLATFORM CLIENTS — MANUAL CONFIGURATION
Controlling password retention (Mac OS X only)
You can configure Quark Publishing Platform clients to remember the user name but
not the user password between logins. To configure this option:
• For Quark Publishing Platform Client, open the file
~/Library/Preferences/Quark/QPP/[QPP Framework
Version]/com.quark.qpp.client.{Application}.config.plist, locate the
following text, and change <false/> to <true/>:
<key>RememberPassword</key>
<false/>
• For QuarkXPress for Mac OS X, open the file
~/Library/Preferences/Quark/QPP/[QPP Framework
Version]/com.quark.qpp.client.{Application}.config.plist, locate the
following text, and change <false/> to <true/>:
<key>RememberPassword</key>
<false/>
• For QuarkCopyDesk for Mac OS X, open the file
~/Library/Preferences/Quark/QPP/[QPP Framework
Version]/com.quark.qpp.client.{Application}.config.plist, locate the
following text, and change <false/> to <true/>:
<key>RememberPassword</key>
<false/>
Using Mac clients with a proxy server
If you want Mac OS X clients outside of the firewall to be able to connect to Quark
Publishing Platform Server through a proxy server, do the following:
•
For Quark Publishing Platform Client, open the ~/Library/Application
Support/Quark/QPP/[QPP Framework
Version]/com.quark.qpp.client.{Application}.config.plist file, locate
the following text, and change <false/> to <true/>:
<key>UseProxy</key>
<false/>
•
For QuarkXPress for Mac OS X, open the ~/Library/Application
Support/Quark/QPP/[QPP Framework
Version]/com.quark.qpp.client.{Application}.config.plist file, locate
the following text, and change <false/> to <true/>:
<key>UseProxy</key>
<false/>
•
For QuarkCopyDesk for Mac OS X, open the ~/Library/Application
Support/Quark/QPP/[QPP Framework
Version]/com.quark.qpp.client.{Application}.config.plist file, locate
the following text, and change <false/> to <true/>:
<key>UseProxy</key>
<false/>
74 | QUARK PUBLISHING PLATFORM 2015 SYSTEM ADMINISTRATION GUIDE
Page 75

QUARK PUBLISHING PLATFORM CLIENTS — MANUAL CONFIGURATION
Using Windows clients with a proxy server
To use a Windows client with a proxy server:
Open the "[application name].exe.config" file and locate the following line:
1
<!-- <add key="ProxyAddress" value="http://<proxyname>:<portnumber>"/> -->
Uncomment the line and insert the appropriate proxy details.
2
Save and close the file.
3
Mirroring the collection hierarchy on Check Out/Get
By default, Quark Publishing Platform clients mirror the collection hierarchy on their
local drive when they check out or get an asset. However, you can change this option.
Turning off collection mirroring: Mac OS X
To turn off collection mirroring on Mac OS X:
For Quark Publishing Platform Client, open the file
1
~/Library/Preferences/Quark/QPP/[QPP Framework
Version]/com.quark.qpp.client.Quark Publishing Platform
Client.config.plist, locate the following text, and change <true/> to <false/>:
<key>MirrorCollectionHierarchy</key>
<true/>
For QuarkXPress, open the file ~/Library/Preferences/Quark/QPP/[QPP
2
Framework Version]/com.quark.qpp.client.QuarkXPress.config.plist,
locate the following text, and change <true/> to <false/>:
<key>MirrorCollectionHierarchy</key>
<true/>
For QuarkCopyDesk, open the file ~/Library/Preferences/Quark/QPP/[QPP
3
Framework Version]/com.quark.qpp.client.QuarkCopyDesk.plist, locate
the following text, and change <true/> to <false/>:
<key>MirrorCollectionHierarchy</key>
<true/>
Turning off collection mirroring: Windows
To turn off collection mirroring on Windows:
For Quark Publishing Platform Client, open the "Quark Publishing Platform
1
Client.exe.config" file, locate the following key, and set value to 0.
<add key="MirrorCollectionHierarchy" value="1"/>
For QuarkXPress, open the "Quark.QPP.Client.config" file, locate the following key,
2
and set value to 0.
<add key="MirrorCollectionHierarchy" value="1"/>
QUARK PUBLISHING PLATFORM 2015 SYSTEM ADMINISTRATION GUIDE | 75
Page 76

QUARK PUBLISHING PLATFORM CLIENTS — MANUAL CONFIGURATION
For QuarkCopyDesk, open the "Quark.QPP.Client.config" file, locate the following
3
key, and set value to 0.
<add key="MirrorCollectionHierarchy" value="1"/>
Configuring publishing channels
You can control which publishing channels are supported by Quark Publishing
Platform.
Configuring publishing channels: Mac OS X
To configure publishing channels on Mac OS X:
For all Mac OS clients, open the following file:
1
~/Library/Preferences/Quark/QPP/[QPP
Framework Version]/com.quark.qpp.publishing.preferences.v7.plist
Locate the following key, which specifies the list of publishing channels that are
2
honored by the client, and add or remove channels.
<key>EnabledPublishingChannels</key>
<array>
<string>qxpPdf</string>
<string>qxpEpub</string>
<string>qxpAppStudio</string>
<string>qxpAppStudioPackage</string>
<string>busDocPdf</string>
<string>busDocHtml</string>
<string>busDocQxp</string>
<string>busDocAppStudio</string>
<string>busDocAppStudioPackage</string>
<string>ditaDocPdf</string>
<string>ditaDocWordRTF</string>
<string>ditaDocHtml</string>
<string>collectBusdocForOutput</string>
<string>collectDitaForOutput</string>
</array>
Add or remove the desired publishing channels.
3
Configuring publishing channels: Windows
To configure publishing channels on Windows:
For Quark Publishing Platform Client, open the "Quark Publishing Platform
1
Client.exe.config" file and locate the following key, which specifies the list of publishing
channels that are honored by the client.
<add key="EnabledPublishingChannels"
value="qxpPdf,qxpEpub,qxpAppStudio,qxpAppStudioPackage,
busDocPdf, busDocHtml,busDocQxp,busDocAppStudio,
busDocAppStudioPackage, ditaDocPdf,ditaDocWordRTF,ditaDocHtml,
qxpAppStudio, collectBusdocForOutput, collectDitaForOutput"/>
Add or remove the desired publishing channels.
2
For QuarkXPress and QuarkCopyDesk, open the "Quark.QPP.Client.config" file and
3
make the same changes.
76 | QUARK PUBLISHING PLATFORM 2015 SYSTEM ADMINISTRATION GUIDE
Page 77

QUARK PUBLISHING PLATFORM CLIENTS — MANUAL CONFIGURATION
Configuring Delivery Channels
You can control which delivery channels are supported by Quark Publishing Platform.
Configuring delivery channels: Mac OS X
To configure delivery channels on Mac OS X:
For all Mac OS X clients, open the following file:
1
~/Library/Preferences/Quark/QPP/[QPP
Framework Version]/com.quark.qpp.publishing.preferences.v5.plist
Locate the following lines:
2
<key>EnableDeliveryChannels</key>
<false/>
Change the <false/> element to <true/>
3
Locate the following key, which specifies the list of delivery channels that are honored
4
by the client:
<key>EnabledDeliveryChannels</key>
<array>
<string>checkInToSharepoint</string>
<string>checkInToFileNet</string>
<string>sendEmail</string>
<string>checkInToDocumentum</string>
<string>sendToFileSystem</string>
<string>sendToFTPServer</string>
</array>
Add or remove the desired delivery channels.
5
Configuring delivery channels: Windows
To configure publishing channels on Windows:
For all Windows clients, open the following file:
1
~application name.exe.config
Locate the following lines:
2
<add key ="EnableDeliveryChannels" value="0">
Change the 0 to a 1.
3
Locate the following line, which specifies the list of delivery channels that are honored
4
by the client:
<add key="EnabledDeliveryChannels"
value="checkInToSharepoint,
checkInToFileNet,
sendEmail,
checkInToDocumentum,
sendToFTPServer,
sendToFileSystem"/>
Add or remove the desired delivery channels.
5
QUARK PUBLISHING PLATFORM 2015 SYSTEM ADMINISTRATION GUIDE | 77
Page 78

QUARK PUBLISHING PLATFORM CLIENTS — MANUAL CONFIGURATION
Setting preferences for Quark XML Author for Platform
The following settings are also applicable for the Platform Adapter for Microsoft Office.
Setting the Check out location
To set the Check out location preference, use the CheckOutLocation key under the
<appSettings> section of the “Quark.CMS.Adapters.config” file. This sets the initial
preference on first launch of the application.
To change the Check out location Go to File > Preferences > General and browse to
the location you want to set as the Check out location.
This preference can be reset in this way:
•
Reset to Default : User can change the preferences by changing the CheckOutLocation
key under the appSettings section of the “Quark.CMS.Adapters.config” file and
using the Advanced > Reset to Default feature.
Setting the file deletion preference on Save and Close
To set the File Deletion preference, use the FileDeletionOption key under the
<appSettings> section of the “Quark.CMS.Adapters.config” file. This sets the initial
preference on first launch of the application.
To change the file deletion preference Go to File > Preferences > General and select
one of the following values:
Delete without Warning
1
Never Allow Deletion
2
Ask Before Deletion
3
This preference can be reset in the following way:
• Reset to Default : User can change the preferences by changing the
FileDeletionOption key under the appSettings section of the
“Quark.CMS.Adapters.config” file and and using the Advanced > Reset to Default
feature.
Setting the quick search preference
To set the Quick Search preference, use the QuickSearchOption key under the
<appSettings> section of the “Quark.CMS.Adapters.config” file. This sets the initial
preference on first launch of the application.
To change the quick search preference, go to File > Preferences > Search and select
one of the following values:
Name
1
Content
2
Name and Content
3
This preference can be reset in the following way:
78 | QUARK PUBLISHING PLATFORM 2015 SYSTEM ADMINISTRATION GUIDE
Page 79

QUARK PUBLISHING PLATFORM CLIENTS — MANUAL CONFIGURATION
•
Reset to Default: User can change the preferences by changing the QuickSearchOption
key under the appSettings section of the “Quark.CMS.Adapters.config” file and
using the Advanced > Reset to Default feature.
Setting the display revision comments preference on Save and Close
To set the Display Revision Comments preference, use the
RevisionCommentsDisplayOption key under the <appSettings> section of the
“Quark.CMS.Adapters.config” file. This sets the initial preference on first launch of
the application.
To change the file deletion preference Go to File > Preferences > Search and select
one of the following values:
Always
1
Never
2
New Assignments Only
3
This preference can be reset in the following way:
• Reset to Default: User can change the preferences by changing the
RevisionCommentsDisplayOption key under the appSettings section of the
“Quark.CMS.Adapters.config” file and and using the Advanced > Reset to Default
feature.
Configuring the Platform Adapters for Microsoft Office components for web sharing
The web sharing configuration is only recommended for standalone server installations
and not for external web container deployments or EAR based deployments. If web
sharing configuration is required under those scenarios you will need to work with
Quark Technical Support.
This chapter gives instruction on installing the following Microsoft Office components:
• Quark Publishing Platform Adapter for Microsoft Office - Word
• Quark Publishing Platform Adapter for Microsoft Office - Excel
• Quark Publishing Platform Adapter for Microsoft Office - PowerPoint
The deployment location will be in the "Quark Publishing Platform Server" webapps
folder on the Platform server machine.
The following steps need to be completed before installing any of the components:
Copy and extract the archive "Platform<version and build>_Adapter_for_Office.zip".
1
From the extracted archive, copy/overwrite all files from the folder "webapps\ROOT"
2
to the "Quark Publishing Platform Server\webapps\ROOT" folder.
Copy the contents of the folder "webapps\clientinstallers" to the "Quark Publishing
3
Platform Server\webapps\clientinstallers" folder.
QUARK PUBLISHING PLATFORM 2015 SYSTEM ADMINISTRATION GUIDE | 79
Page 80

QUARK PUBLISHING PLATFORM CLIENTS — MANUAL CONFIGURATION
Then perform the steps in the following sections to install the individual components.
Configuring the Quark Publishing Platform Adapter for Microsoft Office - Word
To install the Platform Adapter for Microsoft Word:
Extract the contents of the archive "Word Adapter.zip" file from the
1
webapps\clientinstallers folder on the Platform server machine to the
webapps\clientinstallers\Word Adapter folder.
Open the "ConfigureAdapter.bat" file located in the clientinstallers/Word
2
Adapter folder.
Update the HostName/IP and the Port, and then run the Batch file.
3
Configuring the Quark Publishing Platform Adapter for Microsoft Office - Excel
To install the Platform Adapter for Microsoft Excel:
Extract the contents of the archive "Excel Adapter.zip" file from the
1
webapps\clientinstallers folder on the Platform server machine to the
webapps\clientinstallers\Excel Adapter folder.
Open the "ConfigureAdapter.bat" file located in the clientinstallers/Excel
2
Adapter folder.
Update the HostName/IP and the Port, and then run the Batch file.
3
Configuring the Quark Publishing Platform Adapter for Microsoft Office PowerPoint
To install the Platform Adapter for Microsoft Excel:
Extract the contents of the archive "PowerPoint Adapter.zip" file from the
1
webapps\clientinstallers folder on the Platform server machine to the
webapps\clientinstallers\PowerPoint Adapter folder.
Open the "ConfigureAdapter.bat" file located in the clientinstallers/PowerPoint
2
Adapter folder.
Update the HostName/IP and the Port, and then run the Batch file.
3
Update published ClickOnce deployments
To update a published ClickOnce deployment package, use the Manifest Generation
and Editing Tool (mage.exe), which is installed with Microsoft Visual Studio.
Update the package and the application manifest
Go to Application
1
Files\Quark.CMSAdapters.Office.<component>_%HighestVersion% and delete
the "Quark.CMSAdapters.Office.<component>.vsto" file. ,where component is Word,
Excel or PowerPoint.
Make updates to the configuration files as required.
2
80 | QUARK PUBLISHING PLATFORM 2015 SYSTEM ADMINISTRATION GUIDE
Page 81

QUARK PUBLISHING PLATFORM CLIENTS — MANUAL CONFIGURATION
Run the Mage tool. Using the Visual Studio Command Prompt from Visual Studio
3
Tools, type mage.exe.
in Mage, open the application manifest
4
"Quark.CMSAdapters.Office.<component>.dll.manifest" in the \Application
Files\App_%HighestVersion%\folder.
Select Files and check the When populating add the .deploy extension to any file
5
that does not have it option. Then click on the Populate button, and save the file
by either clicking Save or File > Save.
QUARK PUBLISHING PLATFORM 2015 SYSTEM ADMINISTRATION GUIDE | 81
Page 82

QUARK PUBLISHING PLATFORM CLIENTS — MANUAL CONFIGURATION
Click Yes in the Validation dialog.
6
Provide the certificate file location path and its password (if any) by selecting the Sign
7
with certificate file option. Click OK.
82 | QUARK PUBLISHING PLATFORM 2015 SYSTEM ADMINISTRATION GUIDE
Page 83

QUARK PUBLISHING PLATFORM CLIENTS — MANUAL CONFIGURATION
Update VSTO
To update the "Quark.CMSAdapters.Office.<component>.vsto" present in the package
1
folder use the following command:
mage -Update "<path>\Quark.CMSAdapters.Office.<component>.vsto"
-AppManifest
"<path>\Quark.CMSAdapters.Office.<component>.dll.manifest" -CertFile
"<certificate Path>\<certificate>.pfx" -Password "<password>"
Copy the "Quark.CMSAdapters.Office.Word.vsto" file from the package folder to
2
\Application Files\App_%HighestVersion%\.
Manual configuration for QuarkXPress and QuarkCopyDesk XTensions
The QuarkXPress and QuarkCopyDesk XTensions have xml based preferences stored
in the QPPXPressXT.xml and QPPXPressXT.xml files in the application preference
folder.
In Windows, the QuarkXPress preference folder is located:
C:\Users\<username>\AppData\Local\Quark\QuarkXPress 10 and the
QuarkCopyDesk preference folder is located: C:\Users\<user
name>\AppData\Local\Quark\QuarkCopyDesk 10
In Mac OS X, the QuarkXPress preference folder is located:
/Volume/users/username/Library/Preferences/Quark/QuarkXPress 10. The
QuarkCopyDesk preference folder is located:
/Volume/users/username/Library/Preferences/Quark/QuarkCopydesk 10.
Most of the preferences are set using the user interface, but setting the location of the
Platform menu items is done manually.
To set the location of the Platform menu items:
•
Set the location attribute in the PlatformMenuItemsLocation node, under the
<Basic> section of the “QPPXPressXT.xml” and "QPPXPressXT.xml" files. Set to one
of the following values:
0 File Menu (Default Value)
1
1 Platform Menu
2
2 to show in both file and Platform Menu
3
QUARK PUBLISHING PLATFORM 2015 SYSTEM ADMINISTRATION GUIDE | 83
Page 84

MANAGING BACKUPS AND FILE STORAGE
Managing backups and file storage
You choose the backup software and determine the backup intervals for your Quark
Publishing Platform database, your Quark Publishing Platform assets, and essential
files, such as your Quark® Job Jackets® files and script files. Quark recommends
synchronizing backups for your database, assets, and essential files to avoid
inconsistency if you have to restore a backup. Quark also recommends periodic testing
to verify that your backups can be restored successfully, if necessary.
If you move your asset repository, follow the instructions in "Moving Quark Publishing
Platform asset repository."
Backing up Quark Publishing Platform Server
Quark recommends stopping Quark Publishing Platform Server before performing a
backup, but stopping Quark Publishing Platform Server is not required. Back up your
database, your assets, and essential files (such as your FTS index files) on a separate
storage device. Although you can back up your entire "Quark Publishing Platform
Server" folder, the most important folders include the following:
• "conf" folder (contains system configuration files, including files edited manually after
installation)
• "index" folder (contains the Full Text Search index files)
Backing up your database
The database contains all metadata for Quark Publishing Platform assets.
If you use a Microsoft® SQL database or an Oracle database, use the backup tools and
instructions provided with MS-SQL or Oracle.
Backing up assets
You specify the software and intervals for backing up your Quark Publishing Platform
asset repository.
Asset names are encrypted in the Quark Publishing Platform asset repository.
Backing up Index files (full text search)
Quark Publishing Platform Server indexes all files checked into the database so you
can perform a search within the text content of Quark Publishing Platform assets.
84 | QUARK PUBLISHING PLATFORM 2015 SYSTEM ADMINISTRATION GUIDE
Page 85

Quark Publishing Platform Server stores index information for full-text search operations
in the "index" folder. The "index" folder is at the root level of your Quark Publishing
Platform Server folder and is the default location for the files required for full-text
indexes. See "Full text indexing configuration" to learn how to change the full-text index
storage location by editing "LuceneTextIndexingConfig.properties." If you change the
location, back up the new location.
Restoring Quark Publishing Platform Server
If you do not have to restore your Quark Publishing Platform asset repositories, the
storage paths to the asset repositories will still be valid after you restore your Quark
Publishing Platform database. If you must restore your Quark Publishing Platform asset
repositories as well as your database, specify the updated storage location according
to the instructions in "Moving Quark Publishing Platform asset repository."
For example, if the hard drive fails on the computer running Quark Publishing Platform
Server, your latest backup should be stored in a separate location. Re-install Quark
Publishing Platform Server according to the instructions in the Quark Publishing Platform
ReadMe. After you re-install Quark Publishing Platform Server, make sure it is not
running before you restore your database, assets, and other files.
MANAGING BACKUPS AND FILE STORAGE
Restoring Assets
Try to use the same path you used for the old asset repository. For example, if you
replace the hard drive on the computer running Quark Publishing Platform Server,
you can copy the asset repository backup to the same location. Even if you need a new
computer, try to have the same path (for example, C:\QPP_Assets).
If you can search for Quark Publishing Platform assets and you need to see the
encrypted file names, view the "File Path" attribute when your search is complete. The
master file and all asset revisions are stored in the same storage location. The encrypted
asset names follow the same pattern (for example, 34.1.1.1.JPG). The first number
in the encrypted name denotes the asset ID. The second number identifies the
version number, the third number identifies the rendition type for previews, and the
fourth number identifies the first page of the preview.
If you have to restore hardware, launch Quark Publishing Platform Client and
re-establish the link with one or more repositories defined in the Repository tab of
the Administration: Storage screen. Do not delete the storage repository and try to
create another one.
Restoring Quark Publishing Platform Server database
If you use a Microsoft SQL database or an Oracle database, use the restore tools and
instructions provided with MS-SQL or Oracle. When you re-install Quark Publishing
Platform Server, you can enter the correct MS-SQL or Oracle information during the
installation process.
Restoring Full Text Indexes
Restore the "index" folder in the location specified in the
"LuceneTextIndexingConfig.properties" file.
QUARK PUBLISHING PLATFORM 2015 SYSTEM ADMINISTRATION GUIDE | 85
Page 86

MANAGING BACKUPS AND FILE STORAGE
Moving Quark Publishing Platform asset repository
If you move your Quark Publishing Platform asset repository, you can update the asset
repository path with Quark Publishing Platform Client. See "Configuring storage
options" in A Guide to Quark Publishing Platform for more information about specifying
asset storage.
To update the asset repository path:
In a Web browser, navigate to http://[server]:[port]/admin and log on with
1
administration privileges.
Display the Administration screen and click Storage. The Administration: Storage
2
screen displays.
Display the Repository tab, which includes one or more entries in the Repository
3
Name column.
Select a repository, and choose Edit > Edit Repository. A warning message displays.
4
This warning displays when you edit an asset repository
Click Yes. The Edit Repository dialog box displays.
5
The Edit Repository dialog box
Enter a new location in the Location field.
6
Repeat steps 4–6 for every repository listed in the Repository tab.
7
86 | QUARK PUBLISHING PLATFORM 2015 SYSTEM ADMINISTRATION GUIDE
Page 87

Legal notices
©2015 Quark Software Inc. and its licensors. All rights reserved.
Protected by the following United States Patents: 5,541,991; 5,907,704; 6,005,560;
6,052,514; 6,081,262; 6,633,666 B2; 6,947,959 B1; 6,940,518 B2; 7,116,843; 7,463,793;
and other patents pending.
Quark, the Quark logo, and Quark Publishing Platform are trademarks or registered
trademarks of Quark Software Inc. and its affiliates in the U.S. and/or other countries.
All other marks are the property of their respective owners.
LEGAL NOTICES
QUARK PUBLISHING PLATFORM 2015 SYSTEM ADMINISTRATION GUIDE | 87
Page 88

INDEX
Index
A
authentication 37, 38
D
database configuration 34
delivery channels 40
deploying 7, 8, 9
DITA Open Toolkit 47
E
e-mail 40
F
FileNet 40
full-text indexing 47
I
ImageMagick 47
IPTC 48
K
Kerberos authentication 37
N
names, displaying 70
P
passwords, remembering 74
S
SharePoint 40
T
Tomcat 11
transformations, configuring 35
U
user names, displaying 70
J
Jaws 47
JVM 11
JVM configuration 7
W
Web Client 59, 63
WebLogic 9
WebSphere 8
88 | QUARK PUBLISHING PLATFORM 2015 SYSTEM ADMINISTRATION GUIDE
 Loading...