


Quark Print Collection
User Guide

LEGAL NOTICES
©2006 Quark Technology Partnership as to the content and arrangement of this material.
All rights reserved.
©1996–2006 Quark Technology Partnership and its licensors as to the technology.
All rights reserved.
Information in this document is subject to change without notice and does not represent
a commitment on the part of Quark Technology Partnership or its licensee, Quark Inc.
Quark Products and materials are subject to the copyright and other intellectual property
protection of the United States and foreign countries. Unauthorized use or reproduction
without Quark’s written consent is prohibited.
QUARK IS NOT THE MANUFACTURER OF THIRD PARTY SOFTWARE OR OTHER
THIRD PARTY HARDWARE (HEREINAFTER “THIRD PARTY PRODUCTS”) AND
SUCH THIRD PARTY PRODUCTS HAVE NOT BEEN CREATED, REVIEWED, OR
TESTED BY QUARK, THE QUARK AFFILIATED COMPANIES OR THEIR LICENSORS.
(QUARK AFFILIATED COMPANIES SHALL MEAN ANY PERSON, BRANCH, OR
ENTITY CONTROLLING, CONTROLLED BY OR UNDER COMMON CONTROL
WITH QUARK OR ITS PARENT OR A MAJORITY OF THE QUARK SHAREHOLDERS,
WHETHER NOW EXISTING OR FORMED IN THE FUTURE, TOGETHER WITH
ANY PERSON, BRANCH, OR ENTITY WHICH MAY ACQUIRE SUCH STATUS IN
THE FUTURE.)
QUARK, THE QUARK AFFILIATED COMPANIES AND/OR THEIR LICENSORS MAKE
NO WARRANTIES, EITHER EXPRESS OR IMPLIED, REGARDING THE QUARK
PRODUCTS/SERVICES AND/OR THIRD PARTY PRODUCTS/SERVICES, THEIR
MERCHANTABILITY, OR THEIR FITNESS FOR A PARTICULAR PURPOSE. QUARK,
THE QUARK AFFILIATED COMPANIES AND THEIR LICENSORS DISCLAIM ALL
WARRANTIES RELATING TO THE QUARK PRODUCTS/SERVICES AND ANY THIRD
PARTY PRODUCTS/SERVICES. ALL OTHER WARRANTIES AND CONDITIONS,
WHETHER EXPRESS, IMPLIED OR COLLATERAL, AND WHETHER OR NOT, MADE
BY DISTRIBUTORS, RETAILERS, XTENSIONS DEVELOPERS OR OTHER THIRD PARTIES ARE DISCLAIMED BY QUARK, THE QUARK AFFILIATED COMPANIES AND
THEIR LICENSORS, INCLUDING WITHOUT LIMITATION, ANY WARRANTY OF
NON-INFRINGEMENT, COMPATIBILITY, OR THAT THE SOFTWARE IS ERROR-FREE
OR THAT ERRORS CAN OR WILL BE CORRECTED. THIRD PARTIES MAY PROVIDE
LIMITED WARRANTIES AS TO THEIR OWN PRODUCTS AND/OR SERVICES, AND
USERS MUST LOOK TO SAID THIRD PARTIES FOR SUCH WARRANTIES, IF ANY.
SOME JURISDICTIONS, STATES OR PROVINCES DO NOT ALLOW LIMITATIONS
ON IMPLIED WARRANTIES, SO THE ABOVE LIMITATION MAY NOT APPLY TO
PARTICULAR USERS.
IN NO EVENT SHALL QUARK, THE QUARK AFFILIA
THEIR LICENSORS BE LIABLE FOR ANY SPECIAL, INDIRECT, INCIDENTAL,
CONSEQUENTIAL OR PUNITIVE DAMAGES, INCLUDING, BUT NOT LIMITED
TO, ANY LOST PROFITS, LOST TIME, LOST SA
OR EXPENSES OF ANY KIND ARISING FROM INSTALLATION OR USE OF THE
QUARK PRODUCTS/SERVICES, IN ANY MANNER, HOWEVER CAUSED AND
ON ANY THEORY OF LIABILITY. IF, NOTWITHSTANDING THE FOREGOING,
QUARK, THE QUARK AFFILIATED COMPANIES AND/OR THEIR LICENSORS ARE
FOUND TO HAVE LIABILITY RELATING TO THE QUARK PRODUCTS/SERVICES
OR THIRD P
THE AMOUNT PAID BY THE USER TO QUARK FOR THE SOFTWARE/SERVICES
ARTY PRODUCTS/SER
VICES, SUCH LIABILITY SHALL BE LIMITED TO
TED COMP
VINGS, LOST DA
ANIES, AND/OR
TA, LOST FEES,
II
|

LEGAL NOTICES
AT ISSUE (EXCLUDING THIRD PARTY PRODUCTS/SERVICES), IF ANY, OR THE
LOWEST AMOUNT UNDER APPLICABLE LAW, WHICHEVER IS LESS. THESE
LIMITATIONS WILL APPLY EVEN IF QUARK, THE QUARK AFFILIATED COMPANIES, THEIR LICENSORS AND/OR THEIR AGENTS HAVE BEEN ADVISED OF
SUCH POSSIBLE DAMAGES. SOME JURISDICTIONS, STATES OR PROVINCES DO
NOT ALLOW THE EXCLUSION OR LIMITATION OF INCIDENTAL OR CONSEQUENTIAL DAMAGES, SO THIS LIMITATION OR EXCLUSION MAY NOT APPLY.
ALL OTHER LIMITATIONS PROVIDED UNDER APPLICABLE LAW, INCLUDING
STATUTES OF LIMITATION, SHALL CONTINUE TO APPLY.
IN THE EVENT ANY OF THESE PROVISIONS ARE OR BECOME UNENFORCEABLE
UNDER APPLICABLE LAW, SUCH PROVISION SHALL BE MODIFIED OR LIMITED
IN ITS EFFECT TO THE EXTENT NECESSARY TO CAUSE IT TO BE ENFORCEABLE.
USE OF THE QUARK PRODUCTS IS SUBJECT TO THE TERMS OF THE END
USER LICENSE AGREEMENT OR OTHER APPLICABLE AGREEMENTS FOR
SUCH PRODUCT/SERVICE. IN THE EVENT OF A CONFLICT BETWEEN SUCH
AGREEMENTS AND THESE PROVISIONS THE RELEVANT AGREEMENTS
SHALL CONTROL.
Quark, QuarkXPress, and XTensions are trademarks of Quark Inc. and all applicable
affiliated companies, Reg. U.S. Pat. & Tm. Off. and in many other countries. The Quark
logo is a trademark of Quark Inc. and all applicable affiliated companies. Adobe and
Acrobat are either registered trademarks or trademarks of Adobe Systems Incorporated
in the United States and/or other countries. Helvetica is a trademark of Heidelberger
Druckmaschinen AG.
All other marks are the properties of their respective owners.
III
|

TABLE OF CONTENTS
1 Quark Item Marks
hat It Is 1
W
What It Adds to QuarkXPress 1
How it works 1
The Crops Pane 2
The Trim Area 2
The Bleed Area 3
The Safety Area 3
Crop Marks, Guides, and Arrows check boxes 3
Using the Crops Pane 4
Example 1 4
Example 2 4
Example 3 5
Example 4 5
Example 5 6
The Marks Pane 6
The Press Marks area 7
The Plate Tags area 7
The Mark Specifications area 8
Using the Marks Pane 8
Example 1 8
Example 2 9
Example 3 9
The Placement Pane 10
The Position area 10
The Layers area 10
IV
|

2 Quark MarkIt
hat It Is 11
W
What Quark MarkIt adds to QuarkXPress 11
How it works 12
The MarkIt Styles Dialog Box 12
The Edit MarkIt Style Dialog Box 13
The Name field 13
The Registration area field 14
The Page bleed field 14
The Horizontal Trim and Vertical Trim fields 14
Preview controls: proxy, zoom field,
page drop-down menu 14
The position marks relative to trim check box 14
The Press Marks bar 15
TABLE OF CONTENTS
Page preview 16
The Import button 17
The X, Y Fields 17
The Remove button 17
The Auto Place Dialog Box 18
The Setup Dialog Boxes 19
The Trim Line Options dialog box 19
The Text Setup dialog box 20
The Mark Setup dialog box 20
The MarkIt Pane of the Print Layout Dialog Box 21
V
|

TABLE OF CONTENTS
3 Quark Imposer for QuarkXPress
verview 23
O
Setting Up Printer Flats 26
Step 1: Specifying a Sheet Type 26
Step 2: Specifying an Imposition Type 27
Step 3: Specifying a Binding Type 28
Step 4: Flipping and Moving Pages 29
Step 5: Specifying Bleed 29
Step 6: Specifying Creep 29
How Creep Works 30
Step 7: Specifying Crossover 30
Step 8: Specifying Margins 30
Step 9: Specifying Gaps 31
Step 10: Specifying Registration Marks 32
Step 11: Printing with Quark Imposer 32
Tiling with Quark Imposer 34
Creating Custom Impositions 35
Previewing Printer Flats 35
Navigating Pages in the Preview 36
Displaying a Corresponding Page in QuarkXPress 36
Displaying Guides, Bleeds, and Page Numbers 37
Creating and Choosing Styles 38
Standard Style 39
Creating a Style 39
Choosing a Style 39
Updating a Style 39
Editing the Style List 40
Sharing Styles with Other Users 40
VI
|

TABLE OF CONTENTS
3 Quark Imposer for QuarkXPress C
ample Imposition Scenarios 40
S
Saddle-Stitch Scenario 40
Perfect-Bound Scenario 41
Stacked Scenario 41
Work & Turn Scenario 42
Work & Tumble Scenario 42
Split Web Scenario 42
4 Quark Imposer for Acrobat
Setting Up Printer Flats 46
Step 1: Specifying a Sheet Type 46
Step 2: Specifying an Imposition Type 46
Step 3: Specifying a Binding Type 48
Step 4: Flipping and Moving Pages 49
Step 5: Specifying Bleed 49
Step 6: Specifying Creep 49
ONTINUED
How Creep Works 49
Step 7: Specifying Crossover 50
Step 8: Specifying Margins 50
Step 9: Specifying Gaps 50
Step 10: Specifying Registration Marks 51
Step 11: Creating an imposed PDF file with
Quark Imposer 52
Creating Custom Impositions 52
Previewing Printer Flats
Navigating Pages in the Preview 53
Displaying a Corresponding Page in the PDF 54
Displaying Guides, Bleeds, and Page Numbers 54
53
VII
|

TABLE OF CONTENTS
4 Quark Imposer for Acrobat C
reating and Choosing Styles 55
C
Standard Style 56
Creating a Style 56
Choosing a Style 56
Updating a Style 56
Editing the Style List 57
Sharing Styles with Other Users 57
Handling PDFs with Bleed Included 57
Sample Imposition Scenarios 58
Saddle-Stitch Scenario 58
Perfect-Bound Scenario 58
Stacked Scenario 59
Work & Turn Scenario 59
Work & Tumble Scenario 59
Split Web Scenario 60
ONTINUED
VIII
|

Chapter 1: Quark Item Marks
WHAT IT IS
Quark®Item Marks provides convenient methods for making crop marks and
registration marks for individual items and pages.
WHAT IT ADDS TO QUARKXPRESS
Quark Item Marks, XTensions®software, adds to QuarkXPress®the Item Marks
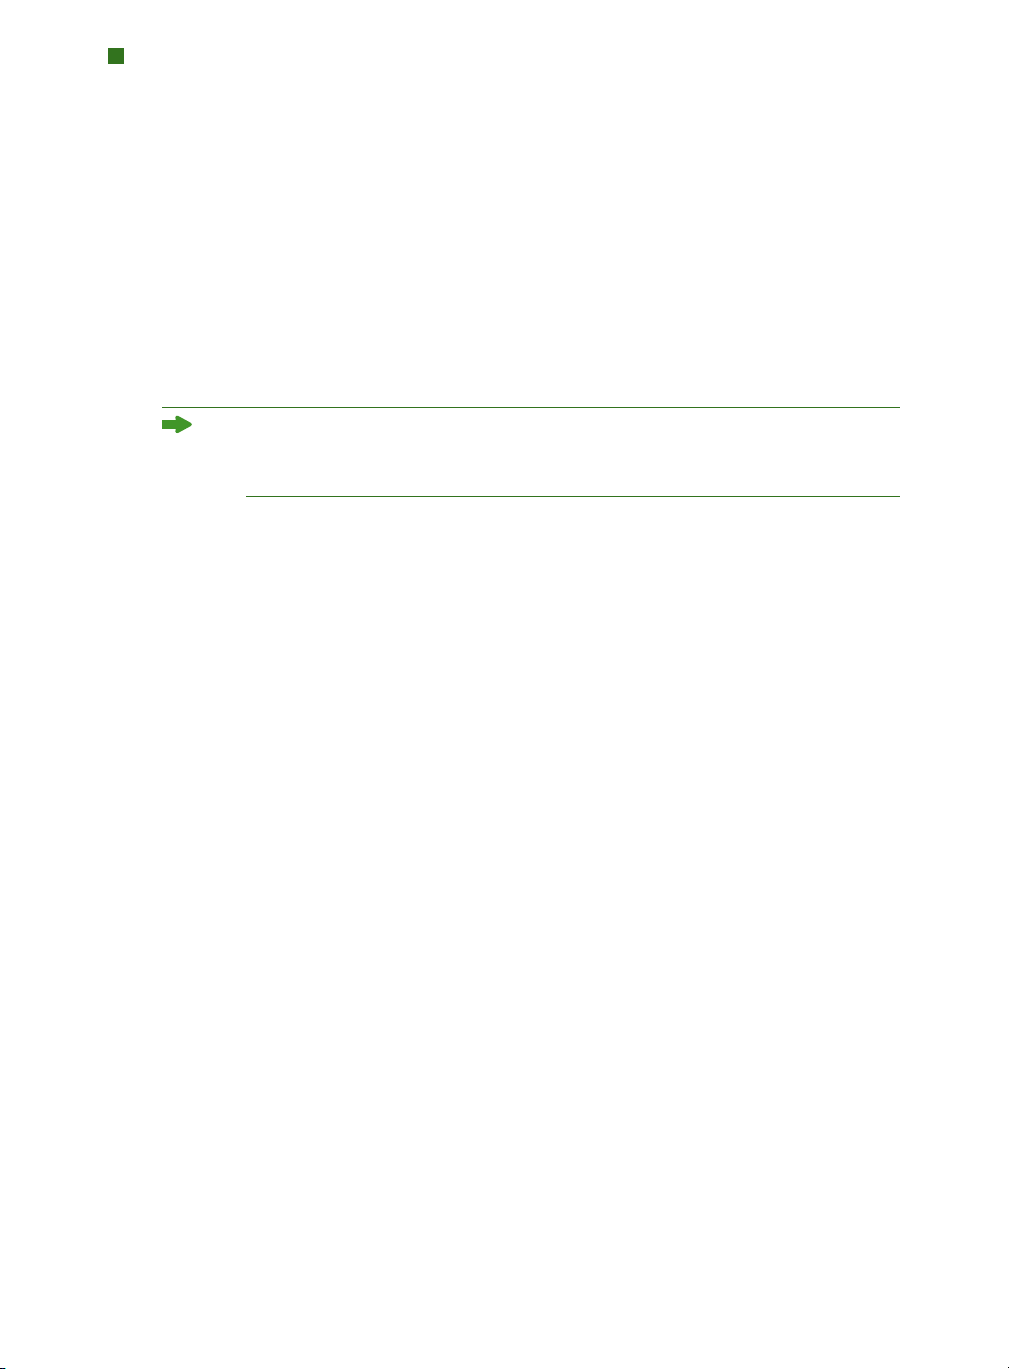
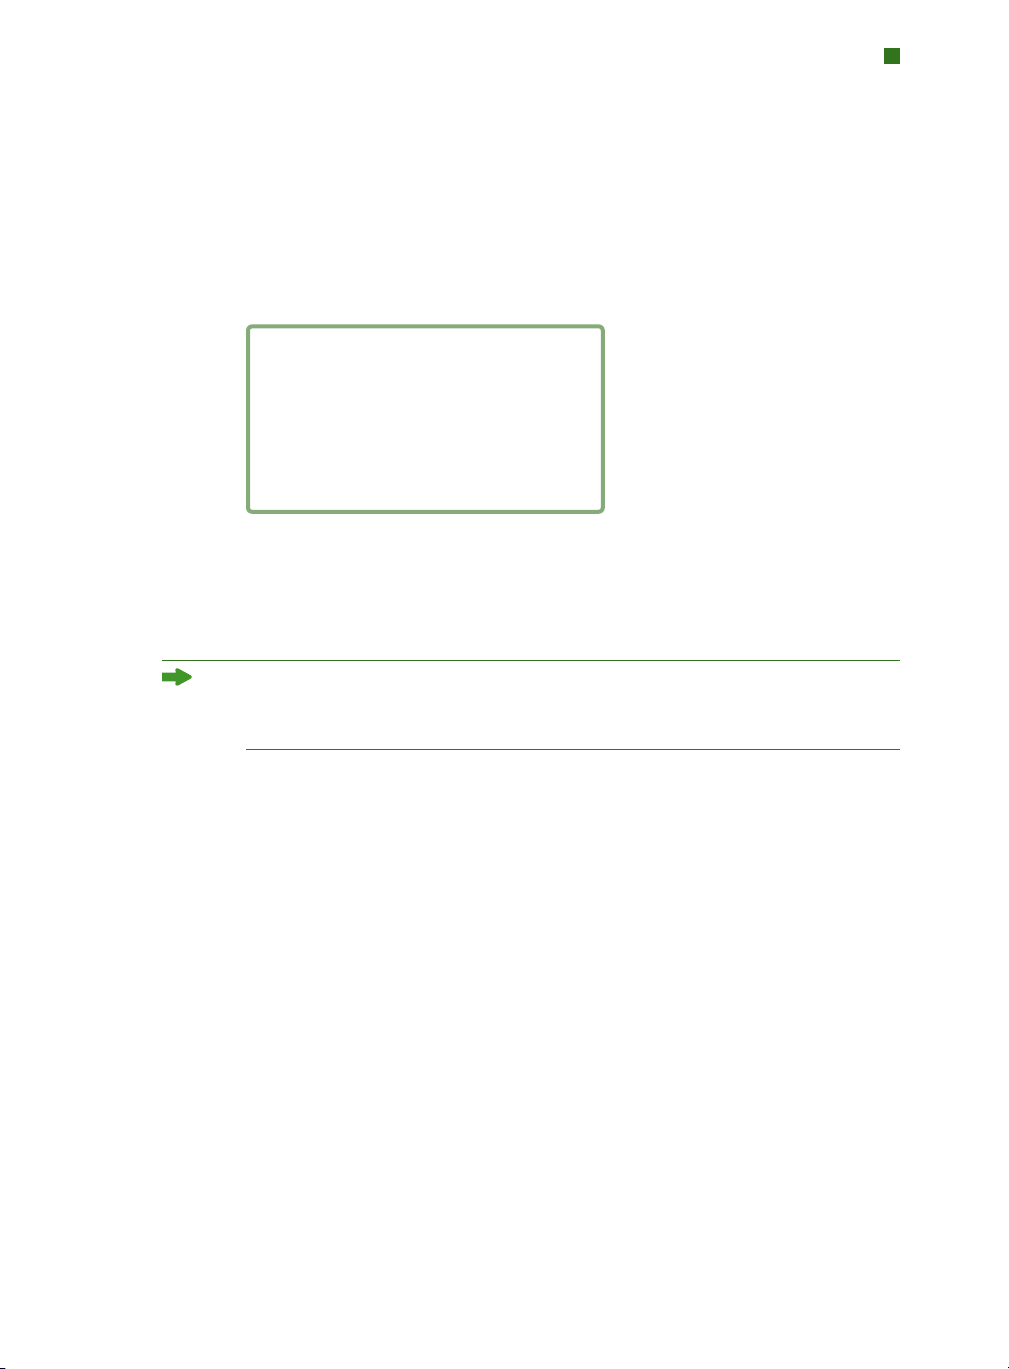
dialog box (Item Þ Item Marks). The Item Marks dialog box contains three
panes of controls:
WHAT IT IS
• Controls in the
margin marks, guides, and dimension arrows.
• Controls in the Marks pane determine the type and placement of the registration
marks, including targets, color bars, and text slugs.
• Controls in the Placement pane determine on what layer and where on the
page — or in relation to the selected items — the marks, guides, and arrows
are created.
The Item Marks dialog box.
Crops pane determine the placement of the crop, bleed,
HOW IT WORKS
Item Marks adds items and guides around selected items. Since the items are part
of the layout pages, you might want to use Item Marks after layouts are final and
CHAPTER 1: QUARK ITEM MARKS
1
|
WHAT IT IS
re ready for production. You can also place marks on a separate layer so they
a
don’t interfere with page items. To use Item Marks:
1 Select an item, multiple items, or a group.
2 Choose Item Þ Item Marks.
3 Set up the crop marks using controls in the Crops, Marks, and Placement
panes of the Item Marks dialog box.
4 Click OK to display the marks.
5 If the marks need adjustment, choose Edit Þ Undo and set up the marks again.
To create crop marks for an entire page, create a box the exact dimensions of
the page and place it behind all other items on the page (
Select this box when creating the marks.
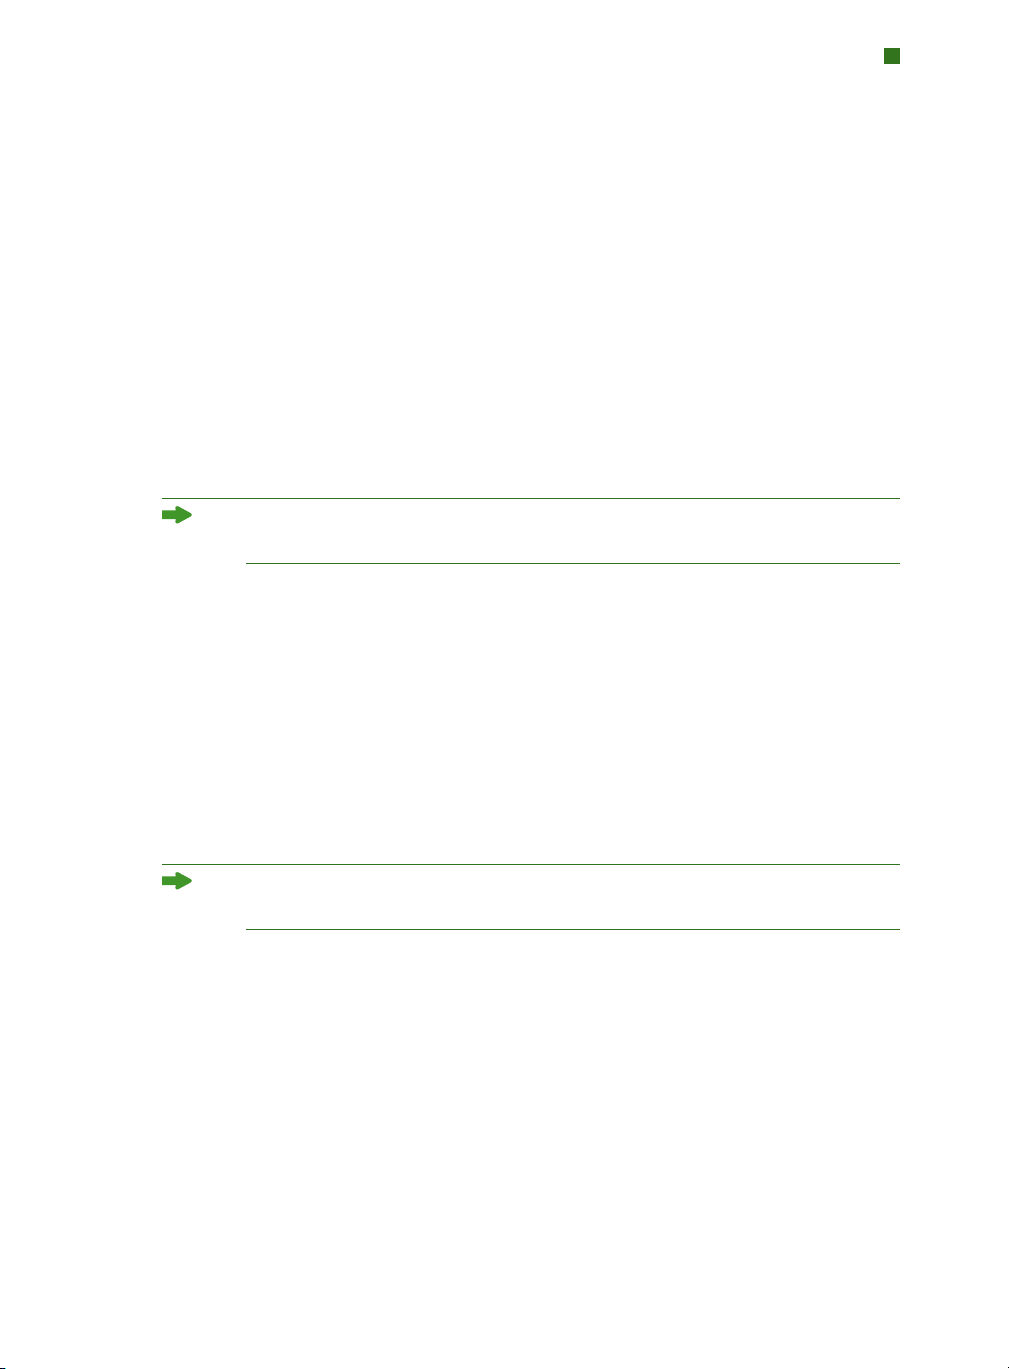
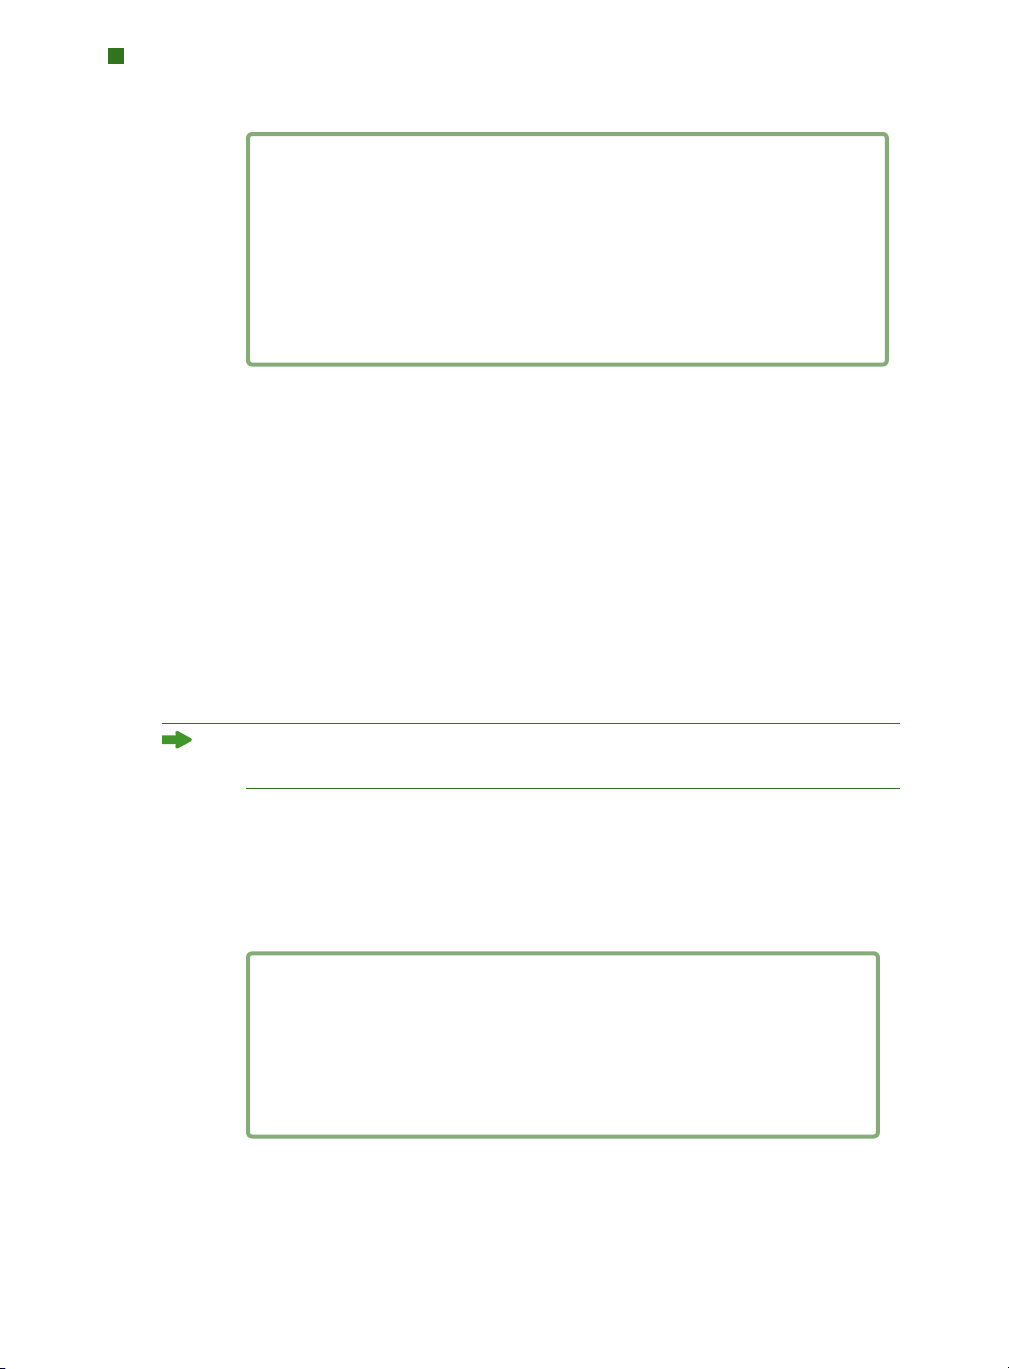
THE CROPS PANE
The Crops pane contains controls for Trim, Bleed, and Safety. Look here for
information about how the controls in the
Item Þ Send to Back).
Crops pane work.
The Crops pane of the Item Marks dialog box.
THE TRIM AREA
Controls in the T
The values in the
the selected item or group. The minimum value for the
is 2 points and the maximum value is the width and height of the spread.
CHAPTER 1: QUARK ITEM MARKS
2
|
rim
area affect the marks for trim size of the item or page.
W
idth
and Height fi
elds default to the width and height of
Width and Height fields

THE CROPS PANE
THE BLEED AREA
Controls in the Bleed area affect the marks for the bleed area of the item or
page. The values in the
Width and Height fields are expressed as a value offset
outward from the trim.
The minimum value for the
Bleed Height and Width fields is 0 points and
the maximum is 72 points.
THE SAFETY AREA
Controls in the Safety area affect the marks for the “live” area within the trim
area. The values in the
Width and Height fields are expressed as a value offset
inward from the trim.
The minimum value for the
Safety Height and Width fields is 0 points, and
the maximum is 25% of the trim width and height.
The maximum values allowed for the Trim and Bleed fields is affected by the
setting in the Placement pane.
CROP MARKS, GUIDES, AND ARROWS CHECK BOXES
The Trim, Bleed, and Safety areas each contain controls for crop marks, guides,
and arrows.
• The
Crop Marks check box toggles on and off crop marks, which consist of
standard QuarkXPress lines. The user defines the crop mark thickness and length
Line Width and Line Length fields in the Marks pane.
in the
Guides check box gives you the option of creating exact guides that align
• The
with the trim, bleed, or safety dimensions. The color of each for
Trim, Bleed,
and Margins can be set by clicking the color swatch next to the Guides check
box. Quark Item Marks guides are standard QuarkXPress guides, which do
not print.
• The
Arrows check box gives you the option of placing dimension arrows that
align with the crop dimensions. Quark Item Marks arrows are standard black
QuarkXPress lines with arrowhead end caps, and the dimensions are provided
in standard QuarkXPress text boxes. The text boxes containing the dimensions
are white with no frames and are placed over the arrows. The text is 7 point
®
Helvetica
, colored black. The thickness of the arrow is set in the Line Width
field in the Marks pane. When Arrows is checked, arrows will only be placed
if the dimensions are large enough to allow for the text boxes containing
the dimensions.
CHAPTER 1: QUARK ITEM MARKS
3
|

USING THE CROPS PANE
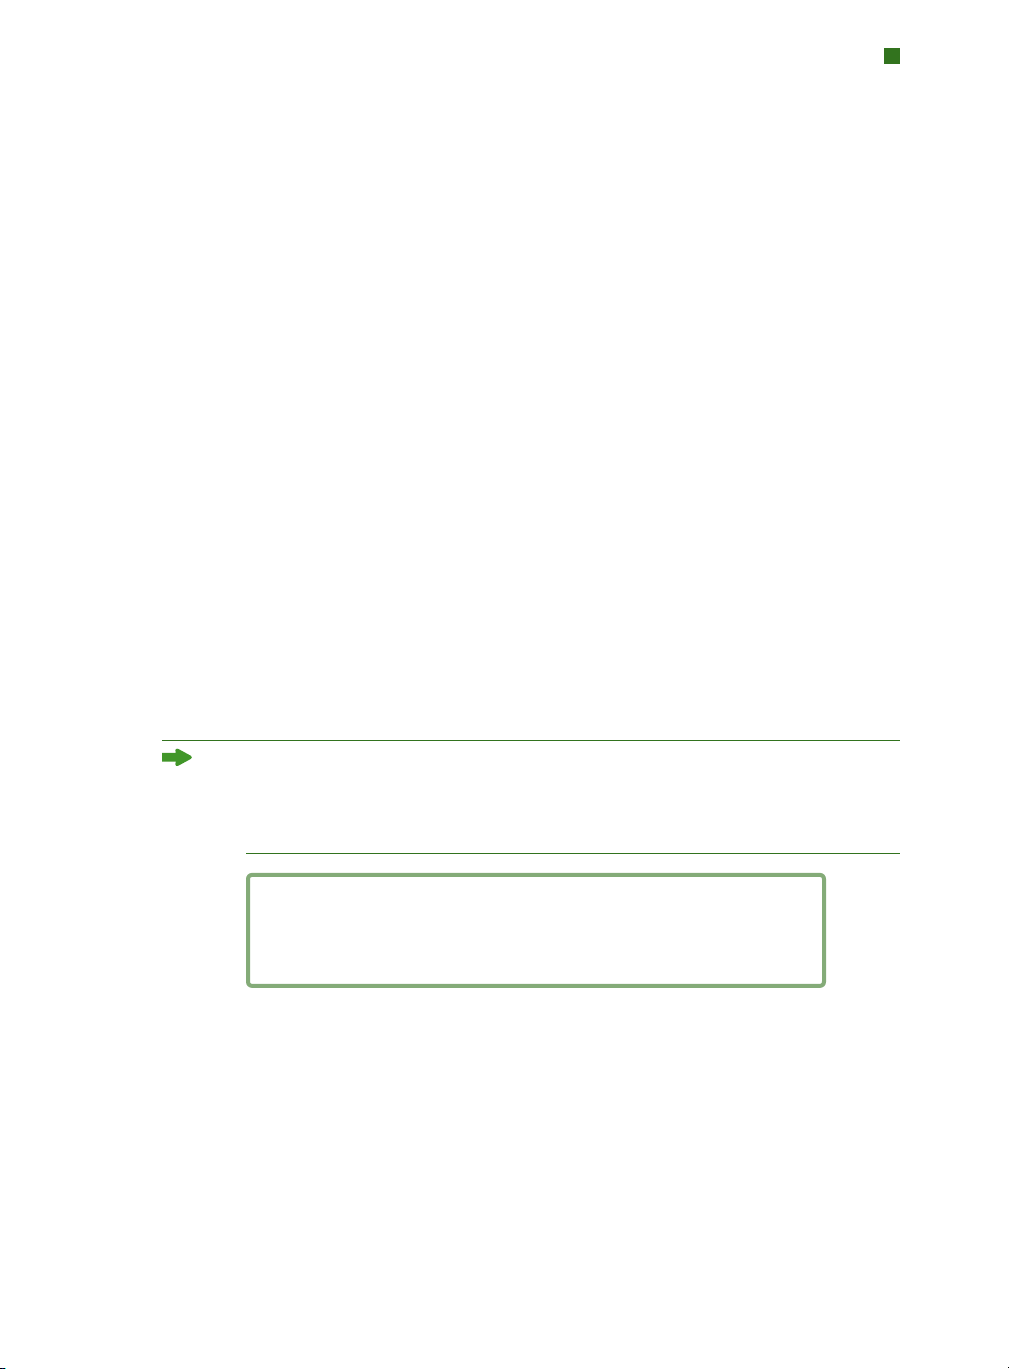
USING THE CROPS PANE
he easiest way to see the effects of controls in the Crops pane is to review the
T
examples shown here with a picture box measuring 24
EXAMPLE 1
In this simple example, Crop Marks is checked in the Trim area. No other
options are checked in the
Crop marks indicated for the trim area.
×24 picas (4"×4").
Trim, Bleed, or Safety areas.
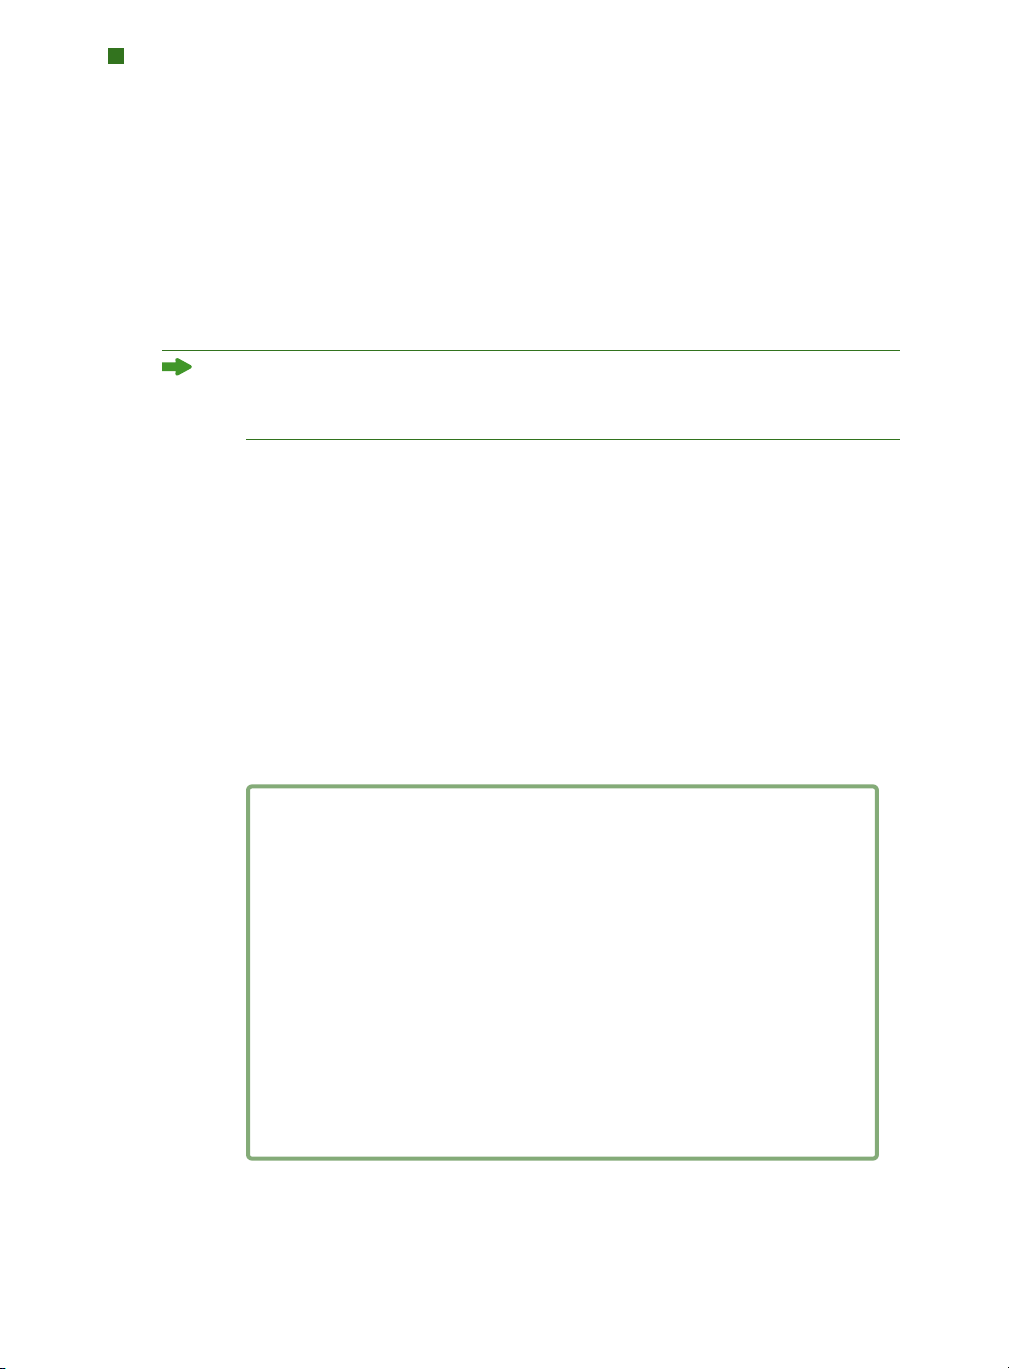
EXAMPLE 2
In this example, Crop Marks and Guides are checked for the Trim area.
Crop marks and guides set for the trim area.
CHAPTER 1: QUARK ITEM MARKS
4
|

USING THE CROPS PANE
EXAMPLE 3
In this example, Arrows is checked in the Trim area in addition to Crop Marks
and Guides. Note that for the arrow on the right side, the text is rotated 90° to
the right, so that the baseline for the dimension text is facing the item.
Crop marks, guides, and arrows set for the trim area.
EXAMPLE 4
Guides is now checked in the Bleed area in addition to Crop Marks, Guides,
and Arrows in the Trim area. The edges of the bleed area are offset 9 points
from the trim area.
Guides for the bleed area in addition to crop marks, guides, and arrows for the
trim area.
CHAPTER 1: QUARK ITEM MARKS
|
5

USING THE CROPS PANE
EXAMPLE 5
Here, Crop Marks, Guides, and Arrows is checked in all three areas — the Trim,
the Bleed, and the Safety. Notice how with the bleed, the dimension arrow
aligns with the outer point of the crop mark, for the trim it aligns with the
center, and for the safety it aligns with the inner point.
Crop marks, arrows, and guides for the trim, bleed, and safety areas.
THE MARKS PANE
The Marks pane contains controls for Press Marks, Plate Tags, and Mark
Specifications.
Marks pane work.
The Marks pane of the Item Marks dialog box.
Look here for information about how the controls in the
CHAPTER 1: QUARK ITEM MARKS
6
|
THE MARKS PANE
THE PRESS MARKS AREA
When Targets is checked in the Press Marks area, four buttons displaying the
four types of targets are available:
Positive,
and Square Negative. They are each comprised of QuarkXPress items
Round Positive, Round Negative, Square
and are placed centered on all four sides in the trim area.
Round Positive marks consist of a QuarkXPress circular box with a white
• The
background, a .25-point frame, and two .25-point cross members that are both
Registration color.
Round Negative targets are the same, except the colors are reversed.
• The
Square Positive Marks consist of a QuarkXPress square box with a white
• The
background, a .25-point frame, and two .25-point cross members that are both
Registration color.
• The
Square Negative targets are the same, except the colors are reversed.
If the area between the trim dimensions is too small to accommodate the
targets, they will not be placed.
Press Marks area, when Color Bars and/or Gray Bars is checked, the
In the
bars are placed outside the trim area.
• The
Color Bars in Quark Item Marks consist of boxes filled with a color for
each ink defined in the project along with a box containing a 50% shade of
Cyan, Magenta, Yellow, and Black. You set both the height and the width of
each box in the
Gray Bars in Quark Item Marks are comprised of 10 boxes filled
• The
Mark Size field in the Marks pane.
with 10%–100% Registration color, in increments of 10 percentage points.
You set both the height and the width of each box in the
Marks pane.
in the
Mark Size field
If the area between the trim dimensions is too small to accommodate the color
and/or gray bars, they will not be placed.
THE PLATE TAGS AREA
Using the Plate Tags area, you can add a date and time, layout name, CMYK
tags, and notes to your marks.
When
•
Date & Time is checked, a white text box containing the date and time
is placed outside the trim area and is located at top right.
s name is
When Layout Name is checked, a white text box containing the fi
•
le’
placed outside the trim area and is located at top left.
CHAPTER 1: QUARK ITEM MARKS
7
|

THE MARKS PANE
When CMYK Tags is checked, a white text box containing the letters “CMYK,”
•
with each letter colored its corresponding color is placed outside the trim area,
and is located at left.
• If text is entered in the
in 7-point Helvetica is placed outside the trim area at the bottom. The
field is limited to 1,024 characters.
THE MARK SPECIFICATIONS AREA
The Mark Specifications controls determine the characteristics of the crop
and registration marks.
• The
marks. The default value is 0.25 point.
• The Line Length field determines the length of the crop, bleed, and margin
marks. The default value is .25".
• The Mark Size field determines the size across of the target marks and the
size across of each block comprising the color bars and gray bars. The default
value is .25".
• The
margin, and registration marks) will be placed. The default value is .25".
Notes field, a white text box containing the text
Notes
Line Weight field determines the thickness of the crop, bleed, and margin
Mark Offset value determines how far from the trim the marks (crop, bleed,
USING THE MARKS PANE
The easiest way to see the effects of controls in the Marks pane is to review the
examples shown here with a picture box measuring 24
EXAMPLE 1
In addition to Crop Marks in the Trim area, this example shows Targets
checked. Notice how the target marks are centered between the crop marks on
each side.
Targets are centered between crop marks.
×24 picas (4"×4").
CHAPTER 1: QUARK ITEM MARKS
8
|

USING THE MARKS PANE
EXAMPLE 2
Color Bars and Gray Bars are now checked in addition to Targets and Crop
Marks
in the Trim area. Note how the color and gray bars are placed underneath
the target marks. The target marks should always remain frontmost.
Color bars and gray bars are placed under target marks.
EXAMPLE 3
All the Plate Tags are checked — Project Name, Date & Time, and CMYK
Tags
— and Notes are added. Note the placement for each.
Small text boxes display plate tags in 7-point Helvetica.
CHAPTER 1: QUARK ITEM MARKS
9
|

THE PLACEMENT PANE
THE PLACEMENT PANE
he Placement pane controls where marks are placed. Look here for information
T
about how the controls in the
The Placement pane of the Item Marks dialog box.
THE POSITION AREA
The Position controls determine the position of the Quark Item Marks in
relation to the selected items or page.
Placement pane work.
• The
Vertical field specifies the vertical position of the trim area on the page.
Enter a value to specify how far from the top of the items or page the trim area
should be placed. Or, choose
area is placed flush against the top edge of the page. If
trim area is centered vertically on the page. If
is placed flush against the bottom of the page.
• The Horizontal field specifies the horizontal position of the trim area on the
page. Enter a value to specify how far from the left edge of the page the trim
area should be placed. Or, choose
trim area is placed flush against the left edge of the page. If
the trim area is centered horizontally on the page. If
area is placed flush against the right edge of the page.
The Position settings can affect the maximum values for the Width and Height
fields in the Crops pane’s Trim and Bleed areas.
THE LAYERS AREA
If you want to place marks on a specific layer (Window Þ Layers), choose it
from the
marks by entering a name in the field.
10
CHAPTER 1: QUARK ITEM MARKS
|
Top, Center, or Bottom. If Top is selected, the trim
Center is selected, the
Bottom is selected, the trim area
Left, Center, or Right. If Left is selected, the
Center is selected,
Right is selected, the trim
Place Marks On drop-down menu. You can also create a layer for the

Chapter 2: Quark MarkIt
WHAT IT IS
Quark MarkIt lets you quickly and consistently add press marks — such as
trim lines, registration targets, and color and gray bars — to QuarkXPress
layouts during output. You can also customize Quark MarkIt by adding
your own EPS marks.
WHAT QUARK MARKIT ADDS TO QUARKXPRESS
Quark MarkIt XTensions software adds to QuarkXPress the MarkIt Styles dialog
box (
Edit Þ MarkIt Styles) and the MarkIt pane to the Print Layout dialog box
File Þ Print).
(
• The MarkIt Styles dialog box lets you set up press marks, save them as Quark
MarkIt styles, edit the styles, and import or export them.
Quark MarkIt pane in the Print Layout dialog box lets you select a
• The
Quark MarkIt Style when printing a layout.
WHAT IT IS
The MarkIt pane in the Print Layout dialog box.
CHAPTER 2: QUARK MARKIT
11
|

WHAT IT IS
HOW IT WORKS
With Quark MarkIt, you define styles for the placement of a specific set of
press marks using (
print (
File Þ Print Layout). Quark MarkIt Styles are saved with the XTensions
Edit Þ MarkIt Styles). You then apply the styles when you
module, so they are available to all your projects. Quark MarkIt applies the
press marks for output only — it does not add items to the layout or alter the
layout in any way.
THE MARKIT STYLES DIALOG BOX
A Quark MarkIt Style defines a particular set of press marks and their placement.
To create or edit Quark MarkIt Styles, choose
MarkIt Styles dialog box.
Edit Þ MarkIt Styles to display the
The MarkIt Styles dialog box.
• This scrolling list displays the names of all available styles. To select a style for
editing, duplicating, deleting, or exporting, click its name in the list to highlight
it. To select multiple styles, Command+click/Ctrl+click the styles; to select a
range of styles, Shift+click the first and last style.
• To create or edit Quark MarkIt styles, click
Edit or Duplicate.
• To share Quark MarkIt styles with other users, use the Import and Export
buttons. You can export only selected styles. When you import styles, styles
with names identical to existing styles will not be imported.
12
CHAPTER 2: QUARK MARKIT
|
New or select a style and click

THE EDIT MARKIT STYLE DIALOG BOX
he Edit MarkIt Styles dialog box displays when you click New, Edit, or
T
Duplicate in the MarkIt Styles dialog box. To place press marks, drag them
from the
Press Marks bar at left to the layout. Context menus let you customize
the marks. For information about specific controls in the
dialog box, look in this section.
THE EDIT MARKIT STYLE DIALOG BOX
Edit MarkIt Style
Dragging a color bar to the page in the Edit MarkIt Style dialog box.
THE NAME FIELD
Enter a descriptive name for the style in the Name field. When printing, you
can choose this name from the
Print Layout dialog box.
the
Style drop-down menu in the MarkIt pane of
CHAPTER 2: QUARK MARKIT
13
|

THE EDIT MARKIT STYLE DIALOG BOX
THE REGISTRATION AREA FIELD
Enter a value in the Registration Area field to specify the thickness of the
registration area or trim margin that displays along each edge of the print
area of the page. The value can be between 12 pt and 288 pt.
THE PAGE BLEED FIELD
Enter a value in the Page Bleed field to define the bleed zone around the print
area of the page. Trim lines and crop marks are offset this distance from the
print area to allow for page bleed. The minimum value is 0 and the maximum
value depends on the value in the Registration Area field.
THE HORIZONTAL TRIM AND VERTICAL TRIM FIELDS
Enter values in the Horizontal Trim and Vertical Trim fields to define the
size of the printed page. Values default to the page dimensions of the active
QuarkXPress layout.
PREVIEW CONTROLS: PROXY, ZOOM FIELD, PAGE DROP-DOWN MENU
You can quickly display a particular area of the style’s page by clicking the
corresponding point on this proxy.
The preview controls in the upper-right corner of the Edit MarkIt Style dialog box.
• Proxy: To display a specific area in the page preview, click the proxy page or
drag the red square.
Zoom field: Enter a value in the field from 10% to 1200% to specify the
•
magnification of the page preview. Click in another field or press
have Quark MarkIt accept the value and change the magnification.
• Page drop-down menu: If the layout page size matches the trim size, you can
choose a specific page from the active layout to preview.
THE POSITION MARKS RELA
Check Position Marks Relative to T
relative position of the marks when the QuarkXPress layout size does not
match the style’
trim size. For precise mark placement, the trim size specifi
and the QuarkXPress layout page size should match.
14
CHAPTER 2: QUARK MARKIT
|
Tab to
TIVE TO TRIM CHECK BOX
rim
to allow Quark MarkIt to adjust the
s trim size. Uncheck this to lock the mark positions to the
ed in the style

THE EDIT MARKIT STYLE DIALOG BOX
THE PRESS MARKS BAR
The scroll list at left displays the press marks you can add to pages.
Displaying a context menu in the Press Marks bar.
• To place a mark, drag its icon from the Press Marks bar to the page
preview. The values in the
X and Y fields below the page preview help
guide the placement.
When a press mark is added to a style, it is framed in the Press Marks bar.
Fixed press marks — trim lines and crop marks — can be turned on and
•
off by clicking their icons in the
o select a mark to edit it, click it in the page preview
T
•
Press Marks bar.
.
CHAPTER 2: QUARK MARKIT
15
|

THE EDIT MARKIT STYLE DIALOG BOX
To automatically place marks, Control+click/right-click the mark and choose
•
Auto Place from the context menu. See “Auto Place Dialog Box” later in
this section.
• To remove a press mark from a style, Control+click/right-click the mark
in the
Press Marks bar, and then choose Remove All from Style from the
context menu.
• To delete a press mark that you never use from the
Control+click/right-click the mark, and then choose
context menu.
A lock icon indicates the mark cannot be deleted. To lock or unlock a mark,
Control+click/right-click the mark in the
Setup from the context menu. The Lock check box in the Mark Setup dialog
box lets you lock or unlock the mark.
• To access a context menu for editing a press mark, Control+click/right-click the
mark. Choose
Delete, Remove All from Style, Setup, or Auto Place.
PAGE PREVIEW
The page preview displays all the marks you’ve added on a preview of the page
selected in the
Page drop-down menu at the Zoom level specified. You can use
the preview area to select and reposition marks as follows:
Press Marks bar,
Delete from the
Press Marks bar, and then choose
• To select a mark, click it. The selected mark is outlined in red and its coordinates
display in the
X and Y fields.
• To add copy of an existing mark, select it in the preview and Option+drag/
Alt+drag the mark to a new location.
• To move a mark, select it and drag it to a new location or enter new values in
X and Y fields. Or, double-click the mark to display the Offset From Page
the
Edge
dialog box and enter new values to indicate the distance from the Top,
Bottom, Left,
and Right edges of the trimmed page.
The Offset from Page Edge dialog box displays when you double-click a mark in
the preview
16
CHAPTER 2: QUARK MARKIT
|

THE EDIT MARKIT STYLE DIALOG BOX
To remove a mark, select it and press Delete. Or, Control+click/right-click the
•
mark in the page preview and choose
To access a context menu for editing most press marks, Control+click/right-click
•
Remove from the context menu.
the mark. Choose Duplicate, Remove, Setup, or Offset.
The context menu that displays for press marks in the page preview.
• To increase the view scale in the page preview, click the zoom icon in the
lower-right corner. To decrease the view scale, Option+click/Alt+click it.
• To access the
Zoom tool, press Control+Shift to increase the view scale and
Control+Option/Ctrl+Alt to decrease the view scale. Click the page preview
or drag to marquee an area to change its view scale.
• To get around within the page preview, use the scroll bars or press
Command/Ctrl to access the page grabber hand. You can also use the
proxy in the upper-right corner of the
Edit MarkIt Style dialog box.
THE IMPORT BUTTON
If you have custom press marks in EPS format, you can add them to the Press
Marks
bar. Click Import to locate and select the EPS file. The mark is added
to the bottom of the
Press Marks bar.
THE X, Y FIELDS
The X value is the distance from the left trim edge of the page to the left edge
of the mark’
s bounding box. Similarly
, the
Y value is the distance from the
top trim edge to the top of the mark. The upper-left corner of the trim area
is the 0, 0 point. The
X and Y fi
page preview, and you can enter new values in the fi
elds display coordinates as you drag marks to the
elds for selected marks.
THE REMOVE BUTTON
Click Remove to delete the selected press mark. This button is available only
for unlocked marks.
CHAPTER 2: QUARK MARKIT
17
|

THE AUTO PLACE DIALOG BOX
THE AUTO PLACE DIALOG BOX
ather than dragging multiple copies of a mark into position, you can use the
R
Auto Place dialog box to place marks. Control+click/right-click a mark in the
Press Marks bar and choose Auto Place. Note that Auto Place is not available
for crop marks or trim lines.
•
Edge Offset: Enter a value in the field to specify the distance between the
trim and the nearest edge of the mark’s bounding box.
• Page Offset: Enter a value in the field to specify how far to place the marks
from the center of the page edges. A positive value moves marks clockwise;
a negative value moves marks counterclockwise from the page edges.
Repeat Count: If you click Distribute in the Method area, you can specify how
•
many copies of the mark to place. Enter a value in the field.
Method: Click a button to specify where the marks should be placed as
•
defined below.
Apply To: Check the boxes to indicate which sides of the pages to place
•
marks on.
The Auto Place dialog box.
18
CHAPTER 2: QUARK MARKIT
|

he Method options specify where the marks are to be placed.
T
enter: Marks are centered according to the Edge Offset value.
• C
•
Off Center: Marks are placed this distance from the page centerpoints.
Corners: Marks are placed in the corners of the sides selected in the
•
Apply To area.
Right of Corners and Left of Corners: The marks are offset in the specified
•
direction (right is clockwise, left is counterclockwise) by the amount in the
Page Offset field.
Distribute: The number of marks specified in the Repeat Count field are
•
distributed evenly along each selected side (if a
mark is shifted accordingly).
THE SETUP DIALOG BOXES
To customize press marks, use the various setup dialog boxes. To open a
mark’s respective setup dialog box, Control+click/right-click the mark in the
Press Marks bar or the page preview and choose Setup. (You cannot display
the context menu for crop marks or trim lines in the page preview; use the
Press Marks bar.)
THE AUTO PLACE DIALOG BOX
Page Offset is entered, each
If you change information in a “setup” dialog box before placing marks, those
attributes become the new default attributes for the mark.
THE TRIM LINE OPTIONS DIALOG BOX
If you choose Setup for crop marks and trim lines, the Trim Line Options dialog
box displays. Enter values in the
Weight and Length fields to specify the
thickness and length, respectively, of crop marks and trim lines.
rim Line Options
The T
dialog box (Setup for crop marks and trim lines).
CHAPTER 2: QUARK MARKIT
19
|

THE SETUP DIALOG BOXES
THE TEXT SETUP DIALOG BOX
If you choose Setup for a text slug, the Text Setup dialog box displays. Check
the information to include in the slug. To include additional information, such
as a job number, check
The Text Setup dialog box (Setup for text slugs).
THE MARK SETUP DIALOG BOX
If you choose Setup for a target, color bar, or gray bar, the Mark Setup dialog
box displays.
Print Spot Plates As: Click an option to specify how the mark is printed on
•
spot-color plates: as a
Magenta,
Color Separate: Check this to color separate the mark.
•
Lock: Uncheck Lock to delete a mark from the Press Marks bar. Check Lock
•
to make sure the mark remains in the Press Marks bar.
Other and enter the information in the field.
Composite of the mark; as only the Black, Cyan,
or Yellow portion of the mark; or Skip the mark.
The Mark Setup dialog box (Setup for targets, color bars, and gray bars).
20
CHAPTER 2: QUARK MARKIT
|

THE MARKIT PANE OF THE PRINT LAYOUT DIALOG BOX
THE MARKIT PANE OF THE PRINT LAYOUT DIALOG BOX
nce you have created or imported Quark MarkIt styles, you can select a
O
style from the
MarkIt pane of the Print Layout dialog box (File Þ Print).
• Style: Choose a style from the drop-down menu to print the specified press
marks on each page of the layout. To print the layout without marks, choose
No Style.
• Knockout EPS Marks: Check this to have any custom, imported EPS press
marks you used knock out of the background.
• Knockout Text Marks: Check this to have any text slugs in the style knock
out of the background.
The MarkIt pane of the Print Layout dialog box (File Þ Print).
When printing spreads, marks intended for the left side of the page print on
the left-facing page and marks intended for the right side of the page print
on the right-facing page.
CHAPTER 2: QUARK MARKIT
21
|

INTRODUCTION
Chapter 3:
Quark Imposer for QuarkXPress
Quark Imposer is XTensions software for QuarkXPress that imposes layout pages
into printer flats. Quark Imposer offers three sheet types (2-Up, 4-Up, or 8-Up)
and five imposition types (Standard, Work & Turn, Work & Tumble, Split Web,
and Sheet Wise). To meet all your imposition needs, you can choose which
pages to impose and how many signatures to create, so you can use different
imposition methods for the same layout.
Quark Imposer compensates for bleed, creep, crossover trapping, page gaps,
spread gaps, and plate margins according to your specifications. Quark Imposer
also allows for the placement of custom marks when used in conjunction with
Quark MarkIt XTensions software.
A significant benefit of Quark Imposer is that it never affects the QuarkXPress
layout because the imposition is handled in the print stream. Quark Imposer
doesn’t add, shuffle, or rotate pages. You don’t need to worry about how
many pages are in the layout, the number or order of pages, or how the
layout is set up.
22
CHAPTER 3: QUARK IMPOSER FOR QUARKXPRESS
|

OVERVIEW
T
1 With the layout to impose active, display the Imposer dialog box
(
2 Set up the imposition using the Layout and Preview panes of the Imposer
dialog box.
OVERVIEW
o use Quark Imposer, follow these steps:
File Þ Imposer).
The Layout pane in the Imposer dialog box.
CHAPTER 3: QUARK IMPOSER FOR QUARKXPRESS
23
|

OVERVIEW
se the Preview pane to verify that your Layout settings will work for the
3 U
print job.
The Preview pane in the Imposer dialog box.
4 Add press marks by selecting a Quark MarkIt style (optional).
24
CHAPTER 3: QUARK IMPOSER FOR QUARKXPRESS
|
lick Print to specify further settings using the Imposer pane of the Print
5 C
Layout
dialog box.
OVERVIEW
The Imposer pane of the Print Layout dialog box.
Quark Imposer provides help in the form of Tooltips that display when you
point at a control. In addition, an information area at the bottom of the
Imposer dialog box summarizes all your settings so you can view them in
both the Preview and Layout panes.
The information area at the bottom of the the Imposer dialog box.
CHAPTER 3: QUARK IMPOSER FOR QUARKXPRESS
25
|
SETTING UP PRINTER FLATS
SETTING UP PRINTER FLATS
efore you set up printer flats, you should work closely with the printer,
B
bindery, and other vendors to confirm that the imposition will work with
their setup. The printer might, in fact, simply tell you how to set it up.
When setting up printer flats, you’ll use a combination of controls in the
Preview and Layout panes. Then, you’ll use the QuarkXPress Print Layout
dialog box to print the pages.
Throughout this discussion, the term “printer flat” refers to a collection of
pages that will be imaged on a single sheet. The term “printer spreads” refers
to two pages next to each other on a sheet of paper.
STEP 1: SPECIFYING A SHEET TYPE
The sheet type is the number of pages on each signature: two, four, or eight.
The type of imposition you select in Quark Imposer —
controls the types of imposition available.
• For
2-Up, Standard imposition is available.
4-Up, Standard, Work & Turn, Work & Tumble, and Sheet Wise
• For
impositions are available.
8-Up, Standard, Work & Turn, Work & Tumble, Split Web, and Sheet
• For
Wise
impositions are available.
2-Up, 4-Up, or 8-Up —
To specify a sheet type, open the Imposer dialog box (File menu) and click the
Layout tab. Then, click the 2-Up, 4-Up, or 8-Up tab.
The 2-Up, 4-Up, and 8-Up tabs let you select a sheet type, which determines the
imposition types available.
26
CHAPTER 3: QUARK IMPOSER FOR QUARKXPRESS
|

SETTING UP PRINTER FLATS
STEP 2: SPECIFYING AN IMPOSITION TYPE
Because the type of imposition interacts with the binding and determines
which other options are available, it’s important to understand how each
type functions.
Standard places the number of pages you specify for the sheet type on each
•
flat: Two for
4-Up Standard, an 8-page document yields two unique printer flats, a 16-page
document yields four unique printer flats, and so on (provided that you choose
Saddle Stitch or Perfect Bound for the binding).
• Work & Turn places four (4-Up) or eight (8-Up) pages on each flat, in which
the printed press sheet is turned from left to right.
Bound
Work & Tumble places four (4-Up) or eight (8-Up) pages per flat, in which the
•
printed press sheet is tumbled top to bottom.
binding yields unique printer spreads, which are then duplicated front and back.
Split Web, available only for 8-Up sheets, places eight pages on each flat.
•
Split Web allows you to impose a document over several forms when printing
to a web press that can be configured to run multiple roll stands. In the
field, enter the number of roll stands to be configured. For example, entering 2
in the
Layout pane, you can toggle between the forms Quark Imposer prints.
Sheet Wise places four (4-Up) or eight (8-Up) pages on each flat, but it creates
•
different plates for each side of the press sheet. Use this option when printing
full signatures that yield one signature out on a web press. When you choose
Sheet Wise, the Units drop-down menu lets you choose how many units out
to produce.
2-Up, four for 4-Up, or eight for 8-Up. For example, if you select
Saddle Stitch and Perfect
binding yields duplicate printer spreads.
Saddle Stitch and Perfect Bound
Sheets
Sheets field imposes 2 forms that make up one 32-page signature. In the
To specify an imposition type:
1 In the Layout pane, confirm the sheet type: 2-Up, 4-Up, or 8-Up.
2 Select General to display the Type drop-down menu.
3 Choose an option from the Type drop-down menu.
The Type drop-down menu in the General area, which offers different imposition
options depending on the sheet type.
CHAPTER 3: QUARK IMPOSER FOR QUARKXPRESS
27
|

SETTING UP PRINTER FLATS
If you choose Sheet Wise, choose an option from the Units drop-down menu.
If you choose
t the bottom of the Layout pane to view the different forms.
a
For Split Web imposition with multiple sheets, you can use the arrows at the
bottom of the
STEP 3: SPECIFYING A BINDING TYPE
The type of binding you choose affects how the printer flats are created:
• Choose Saddle Stitch if the pages will be stapled.
• Choose
• Choose
bound.
format copiers.
• Choose None if the pages will not be bound. None offsets any two (2-Up),
four (
field Preview pane.
Perfect Bound if the pages will be bound to the cover with adhesive.
Stacked if the pages will be three-hole punched, spiral bound, or comb
Stacked is similar to None, except it allows for multiple masters for large
4-Up), or eight (8-Up) pages from the first page specified in the View
Split Web, enter a value in the Sheets field and click the arrows
Layout pane to view the different forms.
Choosing Saddle Stitch, Perfect Bound, or Stacked enables the Sheets field
General controls (Layout pane), which allows you to specify how many
in the
signatures to create.
o specify a binding type:
T
1 In the Layout pane, confirm the sheet and imposition type.
2 Select General to display the Binding drop-down menu.
3 Choose an option from the Binding drop-down menu.
28
CHAPTER 3: QUARK IMPOSER FOR QUARKXPRESS
|

SETTING UP PRINTER FLATS
The Binding drop-down menu in the General area.
STEP 4: FLIPPING AND MOVING PAGES
Once you have the pages arranged, you can rearrange pages if necessary and
decide whether pages need to be flipped (head-to-head, for example).
• To flip pages, click the
the thumbnails to flip them; in
Work & Tumble,
• To rearrange pages, click the
Page Flipping tool in the Layout pane. Click
4-Up Standard, 4-Up Work & Turn, or 4-Up
you can flip the top and bottom sets of thumbnails separately.
Page Sequence Numbering tool in the
Layout pane. If you select None for the binding, click each thumbnail to
display a menu. The menu lets you arrange the pages any way you want.
If you select
Saddle Stitch or Perfect Bound, click a thumbnail to specify
the location of page 1. Page 1 must remain a right-facing page.
STEP 5: SPECIFYING BLEED
The value in the Bleed field (Layout pane Þ General area) specifies the amount
of space used to allow page elements to print beyond the edge of the trimmed
page. Enter a value between zero and the smallest margin. The value you enter
Bleed field affects only the face of a printer flat (the top, bottom, and
in the
outside page edges). To control the bleed between pages for
Saddle Stitch or
Perfect Bound publications, refer to Crossover.
STEP 6: SPECIFYING CREEP
The value in the Creep field (Layout pane Þ General area) specifies the amount
of space necessary to accommodate paper thickness and folding in
Stitch
or Perfect Bound publications. Enter a value between –2" and +2". For
Saddle
Saddle Stitch publications, the value specifies the distance contents move.
Perfect Bound publications, the value specifies the distance pages move
For
relative to the spine.
The Bleed and Creep fields in the General area.
CHAPTER 3: QUARK IMPOSER FOR QUARKXPRESS
29
|

SETTING UP PRINTER FLATS
HOW CREEP WORKS
Quark Imposer considers the “cover” of the final piece to be the outermost
printer flat while the “centerfold” is considered to be the innermost printer flat.
The term “sheet” is used to represent two printer flats — the front of the sheet
and the back of the sheet. The “creep increment” is calculated by dividing the
user-supplied creep value by the total number of sheets minus one.
For example, a 16-page QuarkXPress layout could yield eight printer flats,
or four sheets. The front of the first sheet consists of the first printer flat
(pages 16 and 1) while the back of the first sheet consists of the second printer
flat (pages 2 and 15). For the sake of this discussion, if the user-supplied creep
value was 24 pts (we realize this is an extreme) the creep increment is 8 pts
per sheet (24 divided by 3).
The amount of creep applied to the outermost sheet is 24 pts, the amount of
creep applied to the second sheet is 16 pts and the amount of creep applied to
the third sheet is 8 pts. No creep applies to the fourth and innermost sheet.
As our example illustrates, the amount of creep for each successive sheet was
decreased by the creep increment.
In summary, each page on the outermost sheet is moved 12 pts (half of the 24 pt
creep value for this sheet) away from the spine, each page on the second sheet
is moved 8 pts (half of the 16 pt creep value for this sheet) away from the spine,
each page on the third sheet is moved 4 pts (half of the 8 pt creep value for
this sheet) away from the spine. Pages on the fourth and innermost sheet
are not moved.
BINDING VALUE MOVEMENT
Perfect Positive # Page out
Perfect Negative # Page in
Saddle stitch Positive # Content out
Saddle stitch Negative # Content in
None n/a n/a
STEP 7: SPECIFYING CROSSOVER
The value in the Crossover field (Layout pane Þ General area) specifies
the amount of space used to allow page elements to encroach the
Saddle Stitch or Per
fect Bound
between pages.) Enter a value between zero and half the vertical gap value.
STEP 8: SPECIFYING MARGINS
Values in the Margins area (select Margins in the Layout pane) specify the
amount of space that will surround the actual printer flat (after trimming).
Enter values between 0 and 288 pts in the
30
CHAPTER 3: QUARK IMPOSER FOR QUARKXPRESS
|
Gap in
publications. (Think of it as a bleed for in
Top, Left, Bottom, and Right fields.

SETTING UP PRINTER FLATS
The Margins area in the Layout pane.
STEP 9: SPECIFYING GAPS
Values in the Gaps area (select Gaps in the Layout pane) specify the amount
of space to place between imposed pages and spreads. Enter values between 0
and 288 pts in the
Vertical, Horizontal, and Spread fields.
The Gaps area in the Layout pane.
• The Vertical field represents the distance between the right side of the left
page and the left side of the right page.
A vertical gap value is required if the flat has a crossover. For
Perfect Bound
publications, if you are creeping in (with a negative value), the minimum
vertical gap value is the width of the
Creep value. If you’re manually creating
signatures (for example, if there are different stocks in the same publication),
you can enter a value in the
Vertical field to specify a starting creep for flats
that belong to different signatures.
• The Horizontal field represents the distance between the bottom of the
upper printer spread and the top of the lower printer spread.
• A horizontal gap value is not available for 2-Up flats but is required for 4-Up
flats that bleed.
Spread field, available for 8-Up flats only, represents the vertical space
• The
between the two sets of printer spreads.
In the Layout pane, arrows show the location affected by the active field
(the
Spread field).
CHAPTER 3: QUARK IMPOSER FOR QUARKXPRESS
31
|

SETTING UP PRINTER FLATS
STEP 10: SPECIFYING REGISTRATION MARKS
Quark Imposer lets you print documents without registration marks,
with standard registration marks, and with custom registration marks from
Quark MarkIt XTensions software (included with Quark Print Collection). To
specify registration marks, choose an option from the Registration drop-down
menu in the
The Registration drop-down menu in the Preview pane.
• Choose Off to print without registration marks.
• Choose
Center or Off Center to print Quark Imposer’s default marks, which
include four targets, trim marks, bleed marks, fold lines, a text slug, a gray bar,
and color bar (when printing separations).
Preview pane.
The position of the registration marks is controlled by the value you enter in
the Bleed field in the General area of the Layout pane.
• If Quark MarkIt XTensions software is running, you can choose one of its
registration styles. The Quark MarkIt styles are listed after the default options.
You can also click the
MarkIt button in the lower-left corner of the Imposer
dialog box to create and edit Quark MarkIt styles.
STEP 11: PRINTING WITH QUARK IMPOSER
Printing with Quark Imposer differs slightly from printing with the standard
QuarkXPress controls. For example, the QuarkXPress
controls in it because you specify registration in the
Marks pane has no
Preview pane of the
Imposer dialog box.
o print with Quark Imposer:
T
1 Choose File Þ Imposer
,
then confi
rm all the settings in the
Preview and
Layout panes of the Imposer dialog box.
2 Click Print in the Imposer dialog box. This displays the QuarkXPress Print
Layout
dialog box.
32
CHAPTER 3: QUARK IMPOSER FOR QUARKXPRESS
|

SETTING UP PRINTER FLATS
pecify which flats to print in the Pages area. Specify All to print all the printer
3 S
flats. (The flat numbers are displayed in the
lower-left corner of the
Preview pane.)
Flat drop-down menu in the
4 Choose which printer flats to print from the Sequence drop-down menu:
All, Odd, or Even.
5 If you plan to flip the pages, check Flip Back of Sheets in the Imposer pane.
The Imposer pane of the Print Layout dialog box.
6 In the Pages pane, check Include Blank Pages to print any blank flats added
by Quark Imposer to complete the imposition. In most cases, you will want to
check this. (Blank pages in your QuarkXPress document will print regardless of
this setting.)
7 If you need to set tiling, see the next section “Tiling with Quark Imposer.”
8 Specify all the standard QuarkXPress options as you normally would.
9 Confirm all the settings in the Print Layout dialog box, then click Print.
CHAPTER 3: QUARK IMPOSER FOR QUARKXPRESS
33
|

TILING WITH QUARK IMPOSER
TILING WITH QUARK IMPOSER
f your document page size is larger than the paper you’re printing on, you can
I
print the imposed pages in tiles. To do this:
1 Click the Imposer tab in the Print Layout dialog box.
The Tiling controls in the Imposer pane.
2 To activate tiling, select Manual or Automatic.
• If you select Manual, you can specify an X Offset (vertical) and Y Offset
(horizontal). The values are limited by the paper height and width, respectively,
minus the margins.
• If you select Automatic, you can specify an Overlap value. This value is limited
by the paper size.
3 When printing to a fixed-page device, such as a desktop laser printer, click the
Page Setup button to confi
4 Set the other printing options as you normally would when using Quark
Imposer, then click
34
CHAPTER 3: QUARK IMPOSER FOR QUARKXPRESS
|
Print.
rm that the specified paper size is the same size.

CREATING CUSTOM IMPOSITIONS
ou are not limited to a single imposition type within a layout. You can choose
Y
which pages to impose a certain way, print those, and then impose and print the
remaining pages separately. For example, you might need to print the covers of a
document separately.
The
Preview pane provides these controls in the View area:
• All: Select this option to print all pages in the document.
Range: Select this option to specify a range of pages to print from the layout.
•
Only absolute numbers can be entered into the Range field. Any sections that
have been specified in your QuarkXPress layout must be converted to their
actual page count equivalent.
Keep in mind that comma delimiters signify single pages, while hyphens signify
page ranges. For example, entering 1, 4, 7, 10–14 in the
eight pages: 1, 4, 7, 10, 11, 12, 13, 14.
CREATING CUSTOM IMPOSITIONS
Range field yields
Using the custom imposition settings in the Preview pane.
PREVIEWING PRINTER FLATS
The Preview pane of the Imposer dialog box lets you confirm the settings you
make in the
Layout pane. For example, you can see how the pages are rotated
and you can check the bleed amount.
To open the
Imposer dialog box, choose File Þ Imposer. To switch between the
Preview and Layout panes, click the tabs. Use the resize box in the lower-right
corner to increase the previewing area.
CHAPTER 3: QUARK IMPOSER FOR QUARKXPRESS
35
|

PREVIEWING PRINTER FLATS
NAVIGATING PAGES IN THE PREVIEW
You can navigate through the previews using the scroll bar or using
keyboard commands.
FLAT SCROLL BAR KEYBOARD
First n/a Home
Last n/a End
Next Click right arrow Right arrow
Previous Click left arrow Left arrow
Back several Click left side Page down
Forward several Click right side Page up
Any Drag scroll box n/a
To preview a specific printer flat, choose one from the
Flat drop-down menu
next to the scroll bar.
The Flat drop-down menu in the Preview pane.
DISPLAYING A CORRESPONDING PAGE IN QUARKXPRESS
To see the QuarkXPress page that corresponds with a preview, double-click
that page in the page preview. QuarkXPress displays the page in the active
project window.
36
CHAPTER 3: QUARK IMPOSER FOR QUARKXPRESS
|
PREVIEWING PRINTER FLATS
DISPLAYING GUIDES, BLEEDS, AND PAGE NUMBERS
Settings in the Preview Options dialog box control whether page guides,
bleed guides, and page numbers display in the previews by default. While
previewing flats, you can quickly hide and display these visual aids using
the context menu.
To change these options, Control+click/right-click anywhere in the
Preview
pane to display the context menu.
The context menu for displaying guides and page numbers.
1 Choose a color depth for the previews from the menu. Although all the
options are available, the preview is limited to the number of colors your
monitor can display.
The more colors you choose to display, the more memory the XTensions
software requires. The
Black & White option requires the least amount of
memory, while Millions of Colors requires the greatest.
2 Use the check boxes in the Preview area to determine whether page guides,
bleed guides, and page numbers display by default. Regardless of your preference settings, you can use the context menu to toggle these on and off while
previewing printer flats.
• Check Page Guides to display nonprinting lines that frame the trim area of
each page.
• Check Bleed Guides to display nonprinting lines indicating the extent of the
bleed area of each page.
Check
•
Page Numbers to display the “section” page number of each page.
Section page numbers are assigned through the QuarkXPress
box (
Page menu).
CHAPTER 3: QUARK IMPOSER FOR QUARKXPRESS
Section dialog
37
|

PREVIEWING PRINTER FLATS
The Preview pane with page guides, bleed guides and page numbers displayed.
3 Use the buttons in the Color area to customize the color of the page guides,
the bleed guides, and the page number swatches.
4 When you’ve finished modifying these options, click OK to save your changes.
CREATING AND CHOOSING STYLES
Once you set up an imposition for a document, you can save it as a style. All the
styles you create are saved with the Quark Imposer XTensions software and are
available to all your projects; you can import and export styles to share them
with other Quark Imposer users.
The Style menu in the Layout pane lets you create, edit, and choose styles.
Another
38
CHAPTER 3: QUARK IMPOSER FOR QUARKXPRESS
|
Style menu in the Preview pane lets you choose a style as well.

CREATING AND CHOOSING STYLES
STANDARD STYLE
Quark Imposer comes with a default imposition style called Standard. If
Standard or any other style is italicized, it means you have overridden its
settings with your own settings. If you’re setting up an imposition for a onetime use, you can continue working this way. Otherwise, either edit
to include your own settings or create a style.
CREATING A STYLE
To create an imposition style from the current settings in the Preview and
Layout panes:
Standard
1 Choose Add from the Style menu in the upper-left corner of the Preview or
Layout pane.
2 Enter a name for the style in the Name field and click OK.
3 Your new style is automatically selected. Any changes you make to the current
setup from this point on override the style unless you update the style.
CHOOSING A STYLE
To select an imposition style for the current document, choose a style from the
Style menu.
The Style menu in the Layout pane.
UPDATING A STYLE
If you choose a style, then continue to modify the setup, you can update
the style itself to reflect your changes. To do this, choose
Style menu. The style is updated to reflect the current settings.
CHAPTER 3: QUARK IMPOSER FOR QUARKXPRESS
Update from the
|
39

CREATING AND CHOOSING STYLES
EDITING THE STYLE LIST
Once you’ve created a variety of styles, you might need to start renaming or
deleting some of the styles. To do this:
1 Choose Edit from the Style menu in the upper-left corner of the Preview or
Layout pane.
The Imposer Styles dialog box.
2 To delete a style, select it and click Delete. Shift+click to select contiguous styles;
Command+click/Ctrl+click to select noncontinuous styles.
3 To rename a style, select it and click Rename. Enter a new name in the Name
field and click OK.
4 When you finish editing the list of styles, click Save.
SHARING STYLES WITH OTHER USERS
You and other Quark Imposer users can share styles by importing and exporting
them. To do this, use the
dialog box. To select specific styles to export, Shift+click to select contiguous
styles; Command+click/Ctrl+click to select noncontinuous styles.
SAMPLE IMPOSITION SCENARIOS
To use Quark Imposer effectively, you need to fully understand the types of
imposition it offers. This section provides real-world examples of the imposition
types in action.
SADDLE-STITCH SCENARIO
Let’s say you’re creating printer spreads for a 16-page layout. In the Layout
pane, click the 2-Up tab and choose Saddle Stitch from the Binding drop-down
menu in the
General area. Specify any necessary values (for example in the
Import and Export buttons in the Imposer Styles
40
CHAPTER 3: QUARK IMPOSER FOR QUARKXPRESS
|

SAMPLE IMPOSITION SCENARIOS
argins, Gaps, orBleed fields), then click the Preview tab. To print all the
M
pages in the document, select
All. Choose an option from the Registration
drop-down menu, then click Print. This setup prints eight 2-page printer flats.
Now, let’s say the printer requests a four-up configuration for the same layout.
All you do is click the
4-Up tab in the Layout pane and leave the Type set at
Standard. All the other settings remain the same. (If you specified a Bleed value,
the
Horizontal field (Gap area) is automatically set to twice the Bleed value.)
This setup prints four 4-page printer flats.
PERFECT-BOUND SCENARIO
Let’s say your layout is 116 pages (including the front and back covers) in readerspread format. This job might require two print runs, one for the cover and one
for the guts.
• Cover output: In the
Layout pane, click the 2-Up tab and choose Perfect Bound
from the Binding drop-down menu in the General area. To compensate for the
spine, enter a value in the
fields as necessary, then click the
Horizontal field (Gap area). Enter values in the other
Preview tab. Enter 1, 2, 115, 116 in the Range
field. Choose an option from the Registration drop-down menu, then click
Print. This setup prints the first two printer flats.
• Guts output: In the
printer spreads, click the
Margins, Gaps, or Bleed fields), noting that the horizontal gap setting for
the
the spine is no longer necessary. Click the
Layout pane, click the 4-Up tab (if your printer requests
2-Up tab). Specify any necessary values (for example in
Preview tab and enter 3–114 in the
Range field. Choose an option from the Registration drop-down menu, then
click
Print. This setup prints the remainder of the document in 4-up flats.
Because there are 112 pages of guts to impose in eight-page signatures, and
112÷8=14, this setup prints 14 signatures. (Quark Imposer would allow you
to create 15 signatures from this document if it included the covers.)
STACKED SCENARIO
The Stacked binding option is ideal for documents reproduced on large format
copiers such as a DocuTech, which cuts and collates as it prints. Say you’re
printing a 40-page book on a DocuTech to be spiral bound. First, in the
Layout
pane, click the 2-Up tab and choose Stacked from the Binding drop-down
menu (
General area). In the Sheets field, enter 10. Specify any necessary values
Bleed, Margins, and V
for
disabled for
Stacked binding.
ertical field (
Gap area). Creep and Crossover are
Then, click the Preview tab. To print all the pages in the document, select All.
Choose an option from the Registration drop-down menu, then click Print.
This setup prints 10 four-page sheets. The 10 sheets are then cut to size and
stacked on top of each other to form a 40-page publication ready for binding.
CHAPTER 3: QUARK IMPOSER FOR QUARKXPRESS
41
|

SAMPLE IMPOSITION SCENARIOS
WORK & TURN SCENARIO
Let’s say you’ve got a four-page brochure and the printer is planning to print
this 4-up as a work-and-turn job and has requested composed flats. In the
Layout pane, click the 4-Up tab, choose Work & Turn from the Type drop-down
menu and either
General area). Enter values in the other fields as necessary, then click
menu (
the
Preview tab. Enter 1–4 in the Range field. Choose an option from the
Registration drop-down menu, then click Print.
WORK & TUMBLE SCENARIO
Using the same example as work-and-turn, let’s say the printer requests film
for a work-and-tumble job. The only change you need to make is to choose
Work & Tumble from the Type drop-down menu in the Layout pane. Because
Work & Tumble prints two flats with the same contents, you only need to
print both flats if the printer requests two sets of film.
SPLIT WEB SCENARIO
In this example, say you’re printing a 16-page book to a web press with two
roll stands. Each press unit prints an 8-page signature. Both rolls are printed
at the same time and collated in line to be final folded into a 16-page stapled
book. In the Layout pane, click the 8-Up tab and then choose Split Web from
the
Type drop-down menu (Units defaults to 2 Out), choose Saddle Stitch
from the Binding drop-down menu (General area). Proceed as usual.
Saddle Stitch or Perfect Bound from the Binding drop-down
42
CHAPTER 3: QUARK IMPOSER FOR QUARKXPRESS
|

Chapter 4:
Quark Imposer for Acrobat
Quark Imposer is a plug-in for Adobe®Acrobat®Professional that creates a new
PDF from your original, multi-page PDF file, imposing its pages into printer
flats. Quark Imposer for Acrobat offers three sheet types (2-Up, 4-Up, or 8-Up)
and five imposition types (Standard, Work & Turn, Work & Tumble, Split Web,
and Sheet Wise). To meet all your imposition needs, you can choose which
pages to impose and how many signatures to create, so you can use different
imposition methods for the same PDF file.
Quark Imposer compensates for bleed, creep, crossover trapping, page gaps,
spread gaps, and plate margins according to your specifications.
INTRODUCTION
The plug-in never affects the layout of your PDF file because the imposition is
done in a completely new document, with no further compression performed.
Quark Imposer doesn’t add, shuffle, or rotate pages. You don’t need to worry
about how many pages are in the file or how the file is set up.
CHAPTER 4: QUARK IMPOSER FOR ACROBA
43
T
|

INTRODUCTION
1 O
2 Display the Imposer dialog box (File Þ Imposer).
3 Set up the imposition using the Layout and Preview panes of the Imposer
o use Quark Imposer, follow these steps:
T
pen the Acrobat PDF file to impose.
dialog box.
The Layout pane in the Imposer dialog box.
44
CHAPTER 4: QUARK IMPOSER FOR ACROBA
|
T

INTRODUCTION
se the Preview pane to verify that your Layout settings will work for the job.
4 U
The Preview pane in the Imposer dialog box.
5 Click Create to produce a new PDF file with imposed printer flats displaying
printer’s marks and information about each flat.
Quark Imposer provides help in the form of Tooltips that display when you
point at a control. In addition, an information area at the bottom of the
Imposer dialog box summarizes all your settings so you can view them in
the Preview and Layout panes.
The information area at the bottom of the the Imposer dialog box.
CHAPTER 4: QUARK IMPOSER FOR ACROBA
T
|
45

SETTING UP PRINTER FLATS
SETTING UP PRINTER FLATS
efore you set up printer flats, you should work closely with the printer,
B
bindery, and other vendors to confirm that the imposition will work with
their setup. The printer might, in fact, simply tell you how to set it up.
When setting up printer flats, you’ll use a combination of controls in the
Preview and Layout panes. Then, you’ll click the Create button to produce
a new PDF document containing each printer flat on separate pages.
Throughout this discussion, the term “printer flat” refers to a collection of pages
that will be imaged on one side of a single sheet. The term “printer spreads”
refers to two pages next to each other on a sheet of paper.
STEP 1: SPECIFYING A SHEET TYPE
The sheet type is the number of pages on each printer flat (each side of a sheet):
two, four, or eight. The type of imposition you select in Quark Imposer —
4-Up,
or 8-Up — controls the types of imposition available.
• For 2-Up, Standard imposition is available.
4-Up, Standard, Work & Turn, Work & Tumble, and Sheet Wise
• For
impositions are available.
8-Up, Standard, Work & Turn, Work & Tumble, Split Web, and Sheet
• For
Wise
impositions are available.
2-Up,
To specify a sheet type, open the Imposer dialog box and click the Layout tab.
Then, click the
2-Up, 4-Up, or 8-Up tab.
STEP 2: SPECIFYING AN IMPOSITION TYPE
Because the type of imposition interacts with the binding and determines
which other options are available, it’s important to understand how each
type functions.
Standard places the number of pages you specify for the sheet type on each
•
flat: Two for
2-Up, four for 4-Up, or eight for 8-Up. For example, if you select
4-Up Standard, an eight-page document yields two unique printer flats, a
-page document yields four unique printer flats, and so on (provided that
16
you choose
Work & Turn places four (4-Up) or eight (8-Up) pages on each flat, in which
•
Saddle Stitch or Perfect Bound for the binding).
the printed press sheet is turned from left to right.
Bound
46
CHAPTER 4: QUARK IMPOSER FOR ACROBA
|
binding yields duplicate printer spreads.
Saddle Stitch and Perfect
T

SETTING UP PRINTER FLATS
ork & Tumble places four (4-Up)or eight (8-Up)pages per flat, in which the
• W
printed press sheet is tumbled top to bottom.
Saddle Stitch and Perfect Bound
binding yields unique printer spreads, which are then duplicated front and back.
Split Web, available only for 8-Up sheets, places eight pages on each flat. Split
•
Web
allows you to impose a document over several forms when printing to a
web press that can be configured to run multiple roll stands. In the
Sheets field,
enter the number of roll stands to be configured. For example, entering 2 in the
Sheets field will impose 2 forms that make up one 32-page signature. In the
Layout pane, you can toggle between the forms Quark Imposer creates.
Sheet Wise places four (4-Up) or eight (8-Up) pages on each flat, but it creates
•
different plates for each side of the press sheet. Use this option when printing
full signatures that yield one signature out on a web press. When you choose
Sheet Wise, the Units drop-down menu lets you choose how many units out
to produce.
To specify an imposition type:
1 In the Layout pane, confirm the sheet type: 2-Up, 4-Up, or 8-Up.
2 Select General to display the Type drop-down menu.
3 Choose an option from the Type drop-down menu.
The Type drop-down menu in the General area.
If you choose Sheet Wise, choose an option from the Units drop-down menu.
If you choose
Split Web, enter a value in the Sheets field and click the arrows
at the bottom of the Layout pane to view the different forms.
CHAPTER 4: QUARK IMPOSER FOR ACROBA
47
T
|
SETTING UP PRINTER FLATS
For Split Web imposition with multiple sheets, you can use the arrows at the
bottom of the
STEP 3: SPECIFYING A BINDING TYPE
The type of binding you choose affects how the printer flats are created:
• Choose Saddle Stitch if the pages will be stapled.
• Choose
• Choose
bound.
Perfect Bound if the pages will be bound to the cover with adhesive.
Stacked if the pages will be three-hole punched, spiral bound, or comb
Stacked is similar to None, except it allows for multiple masters for
large format copiers.
• Choose None if the pages will not be bound. None offsets any two (2-Up), four
(
4-Up), or eight (8-Up) pages from the first page specified in the Preview pane.
Layout pane to view the different forms.
Choosing Saddle Stitch, Perfect Bound, or Stacked enables the Sheet field in
the Preview pane, which allows you to specify how many signatures to create.
To specify a binding type:
1 In the Layout pane, confirm the sheet and imposition type.
2 Select General to display the Binding drop-down menu.
3 Choose an option from the Binding drop-down menu.
The Binding drop-down menu in the General area.
48
CHAPTER 4: QUARK IMPOSER FOR ACROBA
|
T

SETTING UP PRINTER FLATS
STEP 4: FLIPPING AND MOVING PAGES
Once you have the pages arranged, you can rearrange pages if necessary and
decide whether pages need to be flipped (head-to-head, for example).
• To flip pages, click the
thumbnails to flip them; in
Work & Tumble,
• To rearrange pages, click the
Page Flipping tool in the Layout pane. Click the
4-Up Standard, 4-Up Work & Turn, or 4-Up
you can flip the top and bottom sets of thumbnails separately.
Page Sequence Numbering tool in the Layout
pane. If you select None for the binding, click each thumbnail to display a
menu. The menu lets you arrange the pages in any way necessary for the job.
If you select
Saddle Stitch or Perfect Bound, click a thumbnail to specify the
location of page 1. Page 1 must remain a right-facing page.
STEP 5: SPECIFYING BLEED
The value in the Bleed field (Layout pane Þ General area) specifies the amount
of space used to allow page elements to print beyond the edge of the trimmed
page. Enter a value between zero and the smallest margin. The value you enter
in the
Bleed field affects only the face of a printer flat (the top, bottom, and
outside page edges). To control the bleed between pages for
Saddle Stitch or
Perfect Bound publications, refer to Crossover.
STEP 6: SPECIFYING CREEP
The value in the Creep field (Layout pane Þ General area) specifies the amount
of space necessary to accommodate paper thickness and folding in
Stitch
or Perfect Bound publications. Enter a value between –144 pt and 144 pt.
Saddle Stitch publications, the value specifies the distance contents move.
For
For
Perfect Bound publications, the value specifies the distance pages move
Saddle
relative to the spine.
The Bleed and Creep fields in the General area.
HOW CREEP WORKS
Quark Imposer considers the “cover” of the final piece to be the outermost
printer fl
at while the “centerfold” is considered to be the innermost printer flat.
The term “sheet” is used to represent two printer flats — the front of the sheet
and the back of the sheet. The “creep increment” is calculated by dividing the
user-supplied creep value by the total number of sheets minus one.
For example, a 16-page PDF file could yield eight printer flats, or four sheets. The
front of the first sheet consists of the first printer flat (pages 16 and 1) while the
back of the first sheet consists of the second printer flat (pages 2 and 15). For the
sake of this discussion, if the user-supplied creep value was 24 pts (we realize this
is an extreme) the creep increment is 8 pts per sheet (24 divided by 3).
CHAPTER 4: QUARK IMPOSER FOR ACROBA
49
T
|

SETTING UP PRINTER FLATS
he amount of creep applied to the outermost sheet is 24 pts, the amount of
T
creep applied to the second sheet is 16 pts and the amount of creep applied to
the third sheet is 8 pts. No creep applies to the fourth and innermost sheet.
As our example illustrates, the amount of creep for each successive sheet was
decreased by the creep increment.
In summary, each page on the outermost sheet is moved 12 pts (half of the 24 pt
creep value for this sheet) away from the spine, each page on the second
sheet is moved 8 pts (half of the 16 pt creep value for this sheet) away from the
spine, each page on the third sheet is moved 4 pts (half of the 8 pt creep value
for this sheet) away from the spine. Pages on the fourth and innermost sheet
are not moved.
BINDING VALUE MOVEMENT
Perfect Positive # Page out
Perfect Negative # Page in
Saddle stitch Positive # Content out
Saddle stitch Negative # Content in
None n/a n/a
STEP 7: SPECIFYING CROSSOVER
The value in the Crossover field (Layout pane Þ General area) specifies the
amount of space used to allow page elements to encroach the
Stitch
or Perfect Bound publications. (Think of it as a bleed for in between
pages.) Enter a value between zero and half the
Gap in Saddle
Vertical Gap value.
STEP 8: SPECIFYING MARGINS
Values in the Margins area (select Margins in the Layout pane) specify the
amount of space to surround the trim size of the printer flat. Enter values
between 0 and 288 pts in the
The Margins area in the Layout pane.
STEP 9: SPECIFYING GAPS
Values in the Gaps area (select Gaps in the Layout pane) specify the amount
of space to place between imposed pages and spreads. Enter values between 0
and 288 pts in the
50
CHAPTER 4: QUARK IMPOSER FOR ACROBA
|
Top, Left, Bottom, and Right fields.
Vertical, Horizontal, and Spread fields.
T

SETTING UP PRINTER FLATS
The Gaps area in the Layout pane.
• The Vertical field represents the distance between the right side of the left page
and the left side of the right page.
A Vertical gap value is required if the flat has a crossover. For Perfect Bound
publications, if you are creeping in (with a negative value), the minimum
Vertical gap value is the width of the Creep value. If you’re manually creating
signatures (for example, if there are different stocks in the same publication),
you can enter a value in the
Vertical field to specify a starting creep for flats
that belong to different signatures.
Horizontal field represents the distance between the bottom of the upper
• The
printer spread and the top of the lower printer spread.
• A Horizontal gap value is not available for 2-Up flats but is required for 4-Up
flats that bleed.
Spread field, available for 8-Up flats only, represents the vertical space
• The
between the two sets of printer spreads.
STEP 10: SPECIFYING REGISTRATION MARKS
Quark Imposer lets you create new PDF files without registration marks
(if the supplied PDF file has its own registration marks) or with standard
registration marks.
1 In the Imposer dialog box, click the Preview tab.
2 Choose an option from the Registration drop-down menu.
The Registration drop-down menu in the Preview pane.
Choose
•
Choose
•
Off to create a PDF without registration marks.
Center or Off Center to create a PDF using Quark Imposer’s default
marks, which include four targets, trim marks, bleed marks, fold lines, a text
slug, a gray bar, and color bar (when printing separations).
The position of the registration marks is controlled by the value you enter in
the Bleed fi
eld in the
Layout pane.
CHAPTER 4: QUARK IMPOSER FOR ACROBA
51
T
|
SETTING UP PRINTER FLATS
STEP 11: CREATING AN IMPOSED PDF FILE WITH QUARK IMPOSER
Quark Imposer for Adobe Acrobat Professional creates a new PDF file with
imposed printer flats from a regular multi-page PDF file.
To create an imposed PDF with Quark Imposer:
1 Choose File Þ Imposer, then confirm all the settings in the Preview and
Layout panes of the Imposer dialog box.
2 Click Create in the Imposer dialog box or press Return/Enter.
Quark Imposer for Adobe Acrobat places each set of printer’s marks on a separate
layer in the final PDF file. These layers can be accessed by clicking the
in Acrobat and can be turned on or off, giving you complete control over which
marks print.
CREATING CUSTOM IMPOSITIONS
You are not limited to a single imposition type within a document. You
can choose which pages to impose a certain way, create a PDF file from those,
then impose and create a second PDF file containing the remaining pages. For
example, the cover pages of a document might need to be in a different PDF
file than the interior pages.
Layers tab
The
Preview pane provides these controls:
• All: Select this option to create an imposed PDF containing all pages from
the original multi-page PDF file.
Range: Select this option to specify a range of pages to impose from the
•
original PDF file.
Keep in mind that comma delimiters signify single pages, while hyphens signify
page ranges. For example, entering 1, 4, 7, 10–14 in the
pages: 1, 4, 7, 10, 11, 12, 13, 14.
Using the custom imposition setting in the Pr
52
CHAPTER 4: QUARK IMPOSER FOR ACROBA
|
Range field yields eight
eview
pane.
T
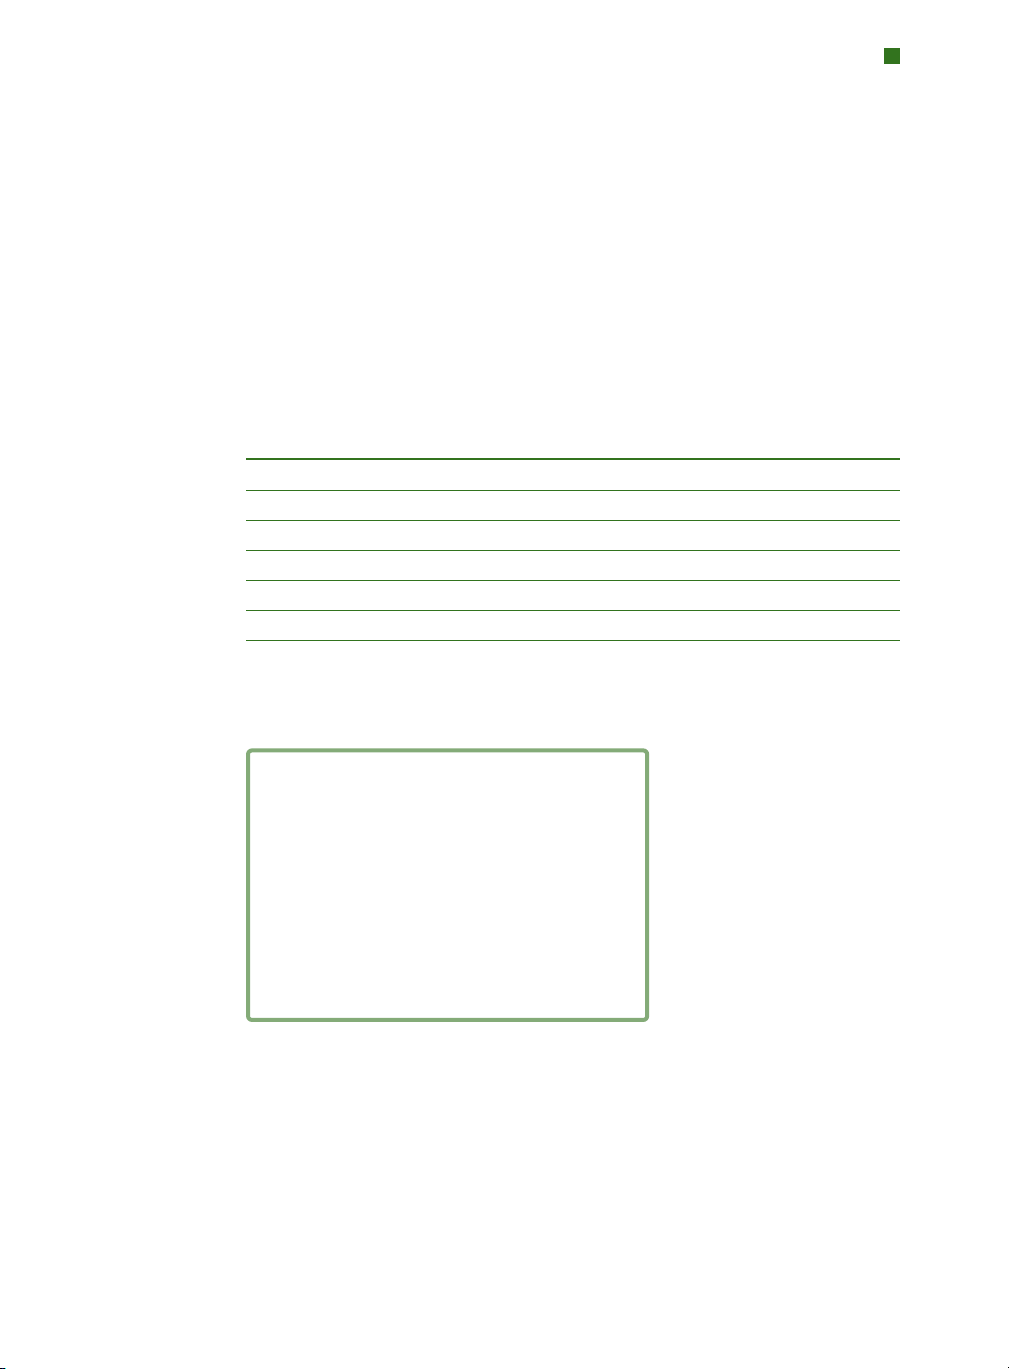
PREVIEWING PRINTER FLATS
he Preview pane of the Imposer dialog box lets you confirm the settings
T
you make in the
Layout pane. For example, you can see how the pages are
rotated and you can check the bleed amount.
PREVIEWING PRINTER FLATS
To open the
Imposer dialog box, choose File Þ Imposer. To switch between the
Preview and Layout panes, click the tabs. Use the resize box in the lower-right
corner to increase the previewing area.
NAVIGATING PAGES IN THE PREVIEW
You can navigate through the previews using the scroll bar or using
keyboard commands.
FLAT SCROLL BAR KEYBOARD
First n/a Home
Last n/a End
Next Click right arrow Right arrow
Previous Click left arrow Left arrow
Back several Click left side Page down
Forward several Click right side Page up
Any Drag scroll box n/a
To preview a specific printer flat, choose one from the
Flat drop-down menu
next to the scroll bar.
The Flat drop-down menu in the Preview pane.
CHAPTER 4: QUARK IMPOSER FOR ACROBA
53
T
|

PREVIEWING PRINTER FLATS
DISPLAYING A CORRESPONDING PAGE IN THE PDF
To see the PDF page that corresponds with a preview, double-click that page
in the page preview. Acrobat displays the page in the document window.
DISPLAYING GUIDES, BLEEDS, AND PAGE NUMBERS
Settings in the Preview Options dialog box control whether page guides,
bleed guides, and page numbers display in the previews by default. While
previewing flats, you can quickly hide and display these visual aids using
the context menu (Ctrl+click/right-click in the Preview pane).
The context menu for displaying guides and page numbers.
Use the check boxes in the Preview area to determine whether page guides,
bleed guides, and page numbers display by default. Regardless of your preference settings, you can use the context menu to toggle these on and off while
previewing printer flats.
• Check
• Check
Page Guides to display lines that frame the trim area of each page.
Bleed Guides to display lines indicating the extent of the bleed area
of each page.
• Check
Page Numbers to display the page number of each page.
The guides and page numbers do not display in the resulting PDF file.
54
CHAPTER 4: QUARK IMPOSER FOR ACROBA
|
T

PREVIEWING PRINTER FLATS
The Preview pane with page guides, bleed guides, and page numbers displayed.
Use the buttons in the Color area to customize the color of the page guides,
the bleed guides, and the page number swatches.
CREATING AND CHOOSING STYLES
Once you set up an imposition for a document, you can save it as an
“imposition style.” All the styles you create are saved with the Quark Imposer
plug-in and are available to all your documents; you can import and export
styles to share them with other Quark Imposer users.
The Style drop-down menu in the Layout pane lets you create, edit, and choose
styles. Another
Style drop-down menu in the Preview pane lets you choose
a style as well.
CHAPTER 4: QUARK IMPOSER FOR ACROBA
55
T
|

CREATING AND CHOOSING STYLES
STANDARD STYLE
Quark Imposer comes with a default imposition style called Standard.
If Standard or any other style is italicized, it means you have overridden its
settings with your own settings. If you’re setting up an imposition for a onetime use, you can continue working this way. Otherwise, either edit
to include your own settings or create a style.
CREATING A STYLE
To create an imposition style from the current settings in the Preview and
Layout panes:
1 Click the Layout tab, and then choose Add from the Style menu in the
upper-left corner.
2 Enter a name for the style in the Name field and click OK.
3 Your new style is automatically selected. Any changes you make to the current
setup from this point on override the style unless you update the style.
CHOOSING A STYLE
To select an imposition style for the current document, choose a style from the
Style drop-down menu.
Standard
The Style drop-down menu in the Layout pane.
UPDATING A STYLE
If you choose a style, then continue to modify the setup, you can update the
style itself to refl
ect your changes. T
drop-down menu. The style is updated to reflect the current settings.
56
CHAPTER 4: QUARK IMPOSER FOR ACROBA
|
o do this, choose
T
Update from the Style

CREATING AND CHOOSING STYLES
EDITING THE STYLE LIST
Once you create a variety of styles, you might need to start renaming or
deleting some of the styles. To do this:
1 Choose Edit from the Style drop-down menu in the upper-left corner of the
Preview or Layout pane.
The Imposer Styles dialog box.
2 To delete a style, select it and click Delete. Shift+click to select contiguous styles;
Command+click/Ctrl+click to select noncontinuous styles.
3 To rename a style, select it and click Rename. Enter a new name in the Name
field and click OK.
4 When you finish editing the list of styles, click Save.
SHARING STYLES WITH OTHER USERS
You and other Quark Imposer users can share styles by importing and exporting
them. To do this, use the
dialog box. To select specific styles to export, Shift+click to select contiguous
styles; Command+click/Ctrl+click to select noncontinuous styles.
HANDLING PDFS WITH BLEED INCLUDED
When handling a print job that includes bleeds, you must prepare PDFs in
certain fashion prior to imposing the document with Quark Imposer for
a
Adobe Acrobat Professional:
Import and Export buttons in the Imposer Styles
1 Be sure to export (or have the client export) the PDF with a symmetrical bleed.
No registration marks are necessar
Bleed T
Set the
2 Open the PDF fi
Crop Pages.
ype
to Symmetric, and the Amount to an appropriate number
le in Adobe Acrobat Professional and choose
y because these are created by Quark Imposer
.
.
Document Þ
CHAPTER 4: QUARK IMPOSER FOR ACROBA
57
T
|

HANDLING PDFS WITH BLEED INCLUDED
nter the bleed amount (from step 1) into each of the fields: Top, Bottom,
3 E
Left,
and Right.
4 Under Page Range, click All to assure all pages are cropped, and choose Even
and Odd Pages from the Apply to drop-down menu below it.
5 Click OK, and the PDF should now be cropped to the final trim size. Using
Quark Imposer at this point yields the expected results.
No information is discarded when you crop a page from within Adobe
Acrobat Professional — cropping controls only the on-screen viewable area.
SAMPLE IMPOSITION SCENARIOS
To use Quark Imposer effectively, you need to fully understand the types
of imposition it offers. This section provides a real-world example of the
imposition types in action.
SADDLE-STITCH SCENARIO
Let’s say you’re creating printer spreads for a 16-page document. In the
Layout pane, click the 2-Up tab and choose Saddle Stitch from the Binding
drop-down menu. Specify any necessary values (for example, in the Margins,
Gaps,
or Bleed fields), then click the Preview tab. To create a new, imposed
PDF containing all the pages from the original document, click
an option from the
Registration drop-down menu, then click Create. This
setup creates a new PDF file containing eight 2-page printer flats.
All. Choose
Now, let’s say the printer requests a four-up configuration for the same
document. All you do is click the
the
Type set at Standard. All the other settings remain the same. If you
specified a
set to twice the
Bleed value, the Horizontal field (Gap area) is automatically
Bleed value.) This setup prints four 4-page printer flats.
PERFECT-BOUND SCENARIO
Let’s say your document is 116 pages (including the front and back covers).
This job might require two print runs, one for the cover and one for the guts.
• Cover output: In the
from the Binding drop-down menu. To compensate for the spine, enter a value
in the
Horizontal fi
then click the
option from the
creates a new
58
CHAPTER 4: QUARK IMPOSER FOR ACROBA
|
Preview tab. Enter 1, 2, 115, 116 in the Range field. Choose an
Registration drop-down menu, then click Create. This setup
, imposed PDF fi
4-Up tab in the Layout pane and leave
Layout pane, click the 2-Up tab and choose Perfect Bound
eld (
Gap area). Enter values in the other fields as necessar
le containing the fi
T
rst two printer flats.
,
y

SAMPLE IMPOSITION SCENARIOS
Guts output: In the Layout pane, click the 4-Up tab (if your printer requests
•
printer spreads, click the
in the
Margins, Gaps, or Bleed fields), noting that the horizontal gap setting
for the spine is no longer necessary. Click the
the
Range field. Choose an option from the Registration drop-down menu,
then click
Create. This setup creates a new, imposed PDF file containing the
2-Up tab). Specify any necessary values (for example,
Preview tab and enter 3–114 in
remainder of the document in 4-up flats.
Because there are 112 pages of guts to impose in eight-page sheets, and
112÷8=14, this setup prints 14 sheets. (Quark Imposer would allow you to
create imposed PDFs for 15 sheets from this document if it included the covers.)
STACKED SCENARIO
The Stacked binding option is ideal for documents to be reproduced on a largeformat copier such as a DocuTech, which cuts and collates as it prints. Say
you’re creating an imposed PDF file for a 40-page book (from a 40-page PDF file)
which will be printed on a DocuTech to be spiral bound. First, in the Layout
pane, click the 2-Up tab and choose Stacked from the Binding drop-down
menu (
General area). In the Sheets field, enter 10. Specify any necessary values
Bleed, Margins, and Vertical fields (Gap area). Creep and Crossover are
in the
disabled for
Stacked binding.
Then, click the Preview tab. To use all the pages in the document, click All.
Choose an option from the Registration drop-down menu, then click Create.
This setup creates a new, imposed PDF file containing 10 four-page sheets. The
PDF file can now be printed to the large-format copier, and the sheets then cut
to size and stacked on top of each other to form a 40-page publication, ready
for binding.
WORK & TURN SCENARIO
Let’s say you have a PDF file for a four-page brochure. The printer is planning
to print this 4-up as a work-and-turn job and has requested a PDF containing
composed flats. In the
Layout pane, click the 4-Up tab, choose Work & Turn
from the Type drop-down menu and either Saddle Stitch or Perfect Bound
from the Binding drop-down menu (General area). Enter values in the other
fields as necessary, then click the
Choose an option from the
Preview tab. Enter 1–4 in the Range field.
Registration drop-down menu, then click Create.
WORK & TUMBLE SCENARIO
Using the same example as work-and-turn, let’s say the printer requests film
for a work-and-tumble job. The only change you need to make is to choose
Work & Tumble from the Type drop-down menu in the Layout pane. Since
Work & Tumble creates two flats with the same contents, you only need to
create a new PDF file of one of the flats.
CHAPTER 4: QUARK IMPOSER FOR ACROBA
59
T
|

SAMPLE IMPOSITION SCENARIOS
SPLIT WEB SCENARIO
In this example, say you’re creating an imposed PDF file for a 16-page
book which will be printed to a web press with two roll stands. Each press unit
prints an 8-page signature. Both rolls are printed at the same time and collated
in line to be final folded into a 16-page stapled book. In the Layout pane,
click the
(
Units defaults to 2 out), choose Saddle Stitch from the Binding drop-down
menu (
8-Up tab and then choose Split Web from the Type drop-down menu
General area). Proceed as usual.
60
CHAPTER 4: QUARK IMPOSER FOR ACROBA
|
T
 Loading...