

Page 1
A Guide to Quark Publishing
Platform 10.1
Page 2

CONTENTS
Contents
Introduction..................................................................................8
Where we're coming from.................................................................................8
Conventions in this book...................................................................................8
About Quark Publishing Platform..............................................10
Platform concepts...........................................................................................11
Platform components......................................................................................12
Platform architecture......................................................................................14
Platform features............................................................................................15
Configuration..............................................................................16
Administration client.......................................................................................16
System area.............................................................................................................17
Content Model area................................................................................................17
Workflow area.........................................................................................................17
Users and Groups area............................................................................................17
Configuring storage options...........................................................................18
Adding repositories.................................................................................................18
Deleting repositories...............................................................................................18
Working with content types............................................................................19
Working with collection types.................................................................................20
Working with attributes..................................................................................20
Defining attributes...................................................................................................20
Adding constraints to attributes..............................................................................26
Working with relationships.............................................................................28
Working with workflows.................................................................................29
Creating a workflow................................................................................................29
Working with statuses.............................................................................................30
Working with forms.........................................................................................31
Defining Roles and Privileges..........................................................................32
Roles and Privileges................................................................................................33
Creating and deleting users ...........................................................................33
Managing user lists with LDAP................................................................................35
Creating and deleting groups.........................................................................39
Configuring Redline colors..............................................................................40
Maintenance and asset management.........................................41
Monitoring user activity and logging off users...............................................41
ii | A GUIDE TO QUARK PUBLISHING PLATFORM 10.1
Page 3

CONTENTS
Deleting assets................................................................................................42
Archiving assets..............................................................................................42
Restoring assets..............................................................................................43
User interface.............................................................................45
Roles, views, and content structure overview................................................45
The Workspace Browser window....................................................................45
Workspace Browser window...........................................................................45
Workspace toolbar..................................................................................................47
View display options...............................................................................................51
Icon columns...........................................................................................................56
Preview pane...........................................................................................................57
Menus (Quark Publishing Platform Client)......................................................59
Quark Publishing Platform Client menu (Mac OS only)...........................................59
File menu.................................................................................................................59
Edit menu................................................................................................................59
View menu...............................................................................................................60
Actions menu..........................................................................................................60
Go To menu............................................................................................................62
Search menu............................................................................................................62
Window menu (Mac OS)..........................................................................................62
Help menu...............................................................................................................62
Menus (QCD)...................................................................................................62
QuarkCopyDesk menu (Mac OS only).....................................................................63
Platform menu.........................................................................................................63
Menus (QXP)...................................................................................................64
QuarkXPress menu (Mac OS only)...........................................................................64
Utilities menu...........................................................................................................64
Window menu.........................................................................................................64
Platform menu.........................................................................................................64
Menus (Platform adapter for Microsoft Word, Excel and PowerPoint)..........66
File menu.................................................................................................................66
Client tasks ................................................................................69
Understanding how Quark Publishing Platform works...................................69
Quark Publishing Platform Server and Quark Publishing Platform client applications.69
Administering a Quark Publishing Platform workflow.............................................69
Using XML Author with Quark Publishing Platform.................................................69
Using the Quark Publishing Platform Adapter for Microsoft Office........................70
Assigning and managing assets from QXP.............................................................70
Routing and tracking...............................................................................................74
Automating output and export...............................................................................75
Archiving and restoring...........................................................................................75
Logging on......................................................................................................75
Creating assets (QCD and QXP)......................................................................77
A GUIDE TO QUARK PUBLISHING PLATFORM 10.1 | iii
Page 4

CONTENTS
Working with collections.................................................................................77
Working with collection templates..........................................................................77
Creating a collection...............................................................................................78
Editing collections...................................................................................................86
Duplicating a collection...........................................................................................86
Deleting a collection...............................................................................................87
Appending content (QCD and QXP)...............................................................87
Checking in assets...........................................................................................87
Check In command.................................................................................................88
Check In Other command ......................................................................................89
Check in multiple assets..........................................................................................89
Check In Project With Pictures (QXP only)..............................................................90
Save to Server (Platform adapter for Microsoft Office)..................................91
Assigning assets..............................................................................................92
Assigning assets: Quark Publishing Platform Client................................................93
Assigning assets: QXP.............................................................................................94
Performing a search........................................................................................94
Using the Quick Search feature...............................................................................96
Performing a nested search.....................................................................................97
Performing a full-text search...................................................................................98
Performing a collection search................................................................................99
Search from here...................................................................................................100
Working with saved searches................................................................................100
Managing searches...............................................................................................101
Search results........................................................................................................102
Checking out assets.......................................................................................103
Checking out an asset: Quark Publishing Platform Client.....................................103
Checking out an asset: QCD.................................................................................103
Checking out an article or project: QXP................................................................103
Checking out a project with attachments: QXP....................................................104
Checking out and editing pictures: QXP & QCD..................................................104
Using Advanced search: QCD and QXP ..............................................................104
Cancelling a Checkout .........................................................................................105
Quark Publishing Platform Adapter for Microsoft Office......................................105
Working with templates................................................................................107
Attaching content to layouts.........................................................................108
Primary and secondary attachments.....................................................................108
Attaching article components by dragging...........................................................109
Attaching articles by dragging..............................................................................109
Attaching articles by assigning..............................................................................111
Attaching text files to layouts................................................................................112
Attaching pictures to layouts.................................................................................112
Attaching multimedia assets to reflow articles......................................................113
Tracking attachments............................................................................................113
Detaching components.........................................................................................113
Attaching digital assets to layouts.........................................................................114
iv | A GUIDE TO QUARK PUBLISHING PLATFORM 10.1
Page 5

CONTENTS
Replacing article geometry...........................................................................114
Working with libraries...................................................................................115
Using Read-Only to view an asset.................................................................115
Publishing assets...........................................................................................116
Viewing and editing attribute information....................................................116
Saving a revision of an asset.........................................................................117
Platform adapter for Microsoft Office...................................................................118
Customizing the search results pane.............................................................120
Setting Quark Publishing Platform Client preferences.................................121
General pane.........................................................................................................121
Workspace pane....................................................................................................124
Startup Mode pane...............................................................................................125
Archive pane.........................................................................................................126
Setting Quark Publishing Platform preferences: QXP .................................126
QXP preferences: General pane...........................................................................126
QXP preferences: Workspace pane......................................................................129
QXP preferences: Project and Attachments pane.................................................130
QXP preferences Article pane...............................................................................131
QXP preferences: Alerts pane...............................................................................132
Setting Quark Publishing Platform preferences: QCD..................................134
QCD preferences: General pane...........................................................................134
QCD preferences: Workspace pane.....................................................................136
QCD preferences: Article pane.............................................................................137
QCD preferences: Alerts pane..............................................................................138
Setting preferences for Quark Publishing Platform Adapter for Microsoft Office.139
Platform adapter for Microsoft Office preferences: General tab..........................139
Platform adapter for Microsoft Office preferences: Connection Settings tab.......140
Platform adapter for Microsoft Office preferences: Search tab............................140
Platform adapter for Microsoft Office preferences: Advanced tab.......................141
Redlining...................................................................................142
Using Redline controls...................................................................................142
Notes........................................................................................144
Working with notes.......................................................................................144
Opening and closing notes...................................................................................144
Showing and hiding notes.....................................................................................144
Deleting notes.......................................................................................................144
Converting between notes and text......................................................................145
Viewing notes by author, date, name, or color.....................................................145
Moving and resizing notes....................................................................................145
Printing notes........................................................................................................145
Notes in PDFs........................................................................................................145
Web Client................................................................................146
A GUIDE TO QUARK PUBLISHING PLATFORM 10.1 | v
Page 6

CONTENTS
Logging on with Quark Publishing Platform Web Client..............................146
Changing password.......................................................................................147
Customize search results display..................................................................148
Searching in Web Client................................................................................148
Archiving and Restoring in Web Client.........................................................148
Using display options....................................................................................148
Previewing assets with Quark Publishing Platform Web Client....................150
Using the Publish features............................................................................150
Editing asset attributes.................................................................................150
Viewing asset revisions.................................................................................151
Viewing relationship information..................................................................152
Creating articles in Quark Publishing Platform Web Client..........................153
Creating projects from templates in Quark Publishing Platform Web Client.154
Editing articles in Quark Publishing Platform Web Client.............................154
Editing text components.......................................................................................154
Editing picture components..................................................................................156
Managing components.........................................................................................157
Finding and replacing text in articles....................................................................158
Adjusting background color for editing................................................................159
Changing text size for editing...............................................................................160
Working with Rubi.................................................................................................160
Working with Grouped Characters........................................................................161
Using notes in articles...........................................................................................162
Editing projects in Quark Publishing Platform Web Client...........................162
Callouts in Quark Publishing Platform Web Client........................................162
Checking in Other files..................................................................................163
Editing Other Files........................................................................................163
Deleting, duplicating and getting a local copy of an asset...........................164
Deleting an asset...................................................................................................164
Duplicating an asset..............................................................................................164
Getting an asset....................................................................................................164
Using the Web Client Preview pane..............................................................165
Setting Quark Publishing Platform Web Client preferences.........................165
Script Manager ........................................................................167
Quark Publishing Platform Script Manager configuration............................167
Working with Quark Publishing Platform Script Manager............................168
Logging on with Quark Publishing Platform Script Manager................................168
Creating a script....................................................................................................169
Importing a script..................................................................................................170
Deleting and exporting scripts..............................................................................171
Writing, editing, and triggering a script.......................................................171
Accessing Quark Publishing Platform Server objects............................................171
Loading a script in a script....................................................................................171
Logging and debugging scripts............................................................................172
Using utility methods in scripts.............................................................................172
vi | A GUIDE TO QUARK PUBLISHING PLATFORM 10.1
Page 7

CONTENTS
Triggering a script.................................................................................................173
Quark Publishing Platform event-based script example.......................................174
Executing a script manually...................................................................................175
Privileges..................................................................................176
Content privileges.........................................................................................177
Content privileges: General..................................................................................177
Content privileges: Edit Attributes........................................................................178
Content privileges: Job Jackets............................................................................178
Content privileges: Edit Redlining........................................................................179
Content privileges: Article Components...............................................................179
Content privileges: Edit Pictures...........................................................................179
Content privileges: Editing...................................................................................180
Application privileges....................................................................................180
Application privileges: Administration..................................................................180
Application privileges: Workspace........................................................................181
Glossary....................................................................................182
Legal notices.............................................................................193
A GUIDE TO QUARK PUBLISHING PLATFORM 10.1 | vii
Page 8

INTRODUCTION
Introduction
Quark® Publishing Platform™ is a collection of networked applications for creative
workgroups. This Guide provides a high-level introduction to the Quark Publishing
Platform Client application and the functionality Quark Publishing Platform adds to
QuarkXPress® and QuarkCopyDesk®. You can use this Guide to learn what each
feature is, what it's for, how you can put it to work for you, and where you can find
it. For information about using Quark Publishing Platform with XML Author, see the
Quark XML Author for Quark Publishing Platform documentation.
Where we're coming from
This book assumes you are familiar with your computer and know how to:
• Launch an application
• Open, save, and close files
• Use menus, dialog boxes, and palettes
• Use the mouse, keyboard commands, and modifier keys
If you need help performing any of these tasks, consult the documentation resources
(user or reference guides) provided with your computer.
Conventions in this book
Formatting conventions in this guide highlight information to help you quickly find
what you need.
• Bold type style: The names of all dialog boxes, fields, and other controls are set in bold
type. For example: "Click Storage in the Administration pane."
• References: In descriptions of features, parenthetical references guide you in accessing
those features. For example: "The System Storage controls (Administration pane) let
you designate asset storage."
• Arrows: You will often see arrows (>), which map the path to a feature. For example:
"Choose Administration > User Profiles to add a user."
• Icons: Although many tools and buttons are referenced by name, which you can see
by displaying ToolTips, in some cases icons are shown for easy identification.
8 | A GUIDE TO QUARK PUBLISHING PLATFORM 10.1
Page 9

INTRODUCTION
• Cross-platform issues: Some labels, buttons, key combinations, and other aspects of
Quark Publishing Platform client applications differ between Mac OS® and Windows®
because of user interface conventions or other factors. In such cases, both the Mac OS
and Windows versions are presented, separated by a slash, with the Mac OS
version presented first. For example, if the Mac OS version of a button is labeled Select,
and the Windows version is labeled Browse, you are directed to "Click Select/Browse."
More complex cross-platform differences are mentioned in notes or parenthetical
statements.
Notes provide helpful information about particular features and general techniques
for using the software.
A GUIDE TO QUARK PUBLISHING PLATFORM 10.1 | 9
Page 10

ABOUT QUARK PUBLISHING PLATFORM
About Quark Publishing Platform
Quark Publishing Platform is a highly configurable solution for complete, automated,
end-to-end multichannel publishing. Quark Publishing Platform is purpose-built to
support end-to-end publishing needs, from complete manual publishing systems to
highly automated workflows.
The Platform consists of a set of core modules that can be combined in various ways
and integrated with third-party systems to accommodate almost any workflow. Its
capabilities can be described in terms of content creation, management, publishing,
and delivery.
Create
Quark Publishing Platform lets you:
• Design professional templates for different publications
• Author structured content in the familiar Microsoft Word environment
• Integrate content from databases with other forms of content
• Utilize multimedia content such as video, audio, and slideshows
Manage
Quark Publishing Platform provides:
• Workflow and collaboration tools
• Task and update notifications
• Component management
• Automated checks
• Version control
Publish
With Quark Publishing Platform, you can:
• Automatically assemble components of various types from various sources into
sophisticated layouts
• Automatically publish those layouts in a variety of formats for a variety of devices
10 | A GUIDE TO QUARK PUBLISHING PLATFORM 10.1
Page 11

Deliver
The automation features built into Quark Publishing Platform make it easy for you to
deliver content to your content consumers in both public and secure environments.
Platform concepts
In order to use Quark Publishing Platform effectively, you should understand some of
the key concepts that it uses.
Assets: An asset is a unit of independent content. Quark Publishing Platform stores,
tracks, and manages assets along with their metadata. The Platform also provides
version control of assets, with both major and minor versions. Versioning policy can
be configured for each content type within a collection. The Platform also supports
multiple renditions of assets (such as previews, thumbnails, XML representations, and
so forth), storing renditions along with each version of their original assets. Assets are
stored in a configurable repository; the default repository on a file server, but pluggable
third-party repositories are also supported.
Content types: Every asset has a content type. The content type concept is a unified
mechanism for associating metadata, workflows, relationships, privileges, and rendering
and publishing actions with different types of content. The Platform can automatically
detect a variety of different content types, including pictures, QuarkXPress projects,
DITA topics, and DITA for Business Documents. Assigning content types to assets
allows the Platform to apply different lifecycles, workflows, and publishing requirements
to different types of content. Content types are hierarchical, with child content types
inheriting from their parents, for easy and logical configuration. Child content types
can be fine-tuned by associating specific metadata and publishing activities with them.
In addition to the standard set of content types, the Platform allows you to define
your own and provides an auto-detection mechanism for so that they can be
automatically recognized.
ABOUT QUARK PUBLISHING PLATFORM
Attributes: Assets can have attributes, which are containers for metadata that model
the intrinsic properties of those assets. The selection of attributes for an asset is
determined by its content type. You can use attributes to drive custom workflows and
publishing processes, and to reflect system-managed state. Attributes are created globally
and can be applied to one or more content types.
Relationships: A relationship links two assets with one another, with one asset being
the parent and the other being the child, and has some associated metadata. There
are different types of relationships, with different sets of associated metadata.
Relationships can be specific to a particular version of a child asset, or can apply to all
versions. Relationships enable component-content management use cases. There are
predefined relationships between QuarkXPress projects and article components, and
between QuarkCopyDesk article components and pictures, and there is a predefined
relationship for XML component references. You can also create your own relationships.
Component management and referencing features are available both for XML
content and for QuarkXPress/QuarkCopyDesk components. In this context, an asset
can be a single topic, a concept, an image, or a media file. Aggregated documents
(including DITA maps and QuarkXPress layouts) are also modeled as assets. The content
type of an asset determines its role.
A GUIDE TO QUARK PUBLISHING PLATFORM 10.1 | 11
Page 12

ABOUT QUARK PUBLISHING PLATFORM
The Platform uses asset relationships to model content-component references. For
cases of content reuse, the Platform creates multiple relationships, which define such
things as a component’s location, its update status, and so forth. You can selectively
burst content when you check it into the Platform, for easy reuse. You can pin content
to a particular version, or be automatically updated when the master version of the
content changes.
Collections: A collection is a generic hierarchy that you can use to organize assets.
You can model departmental hierarchies, folders, or jobs. You can then map one or
more workflows to each collection, and the assets in each collection will follow that
collection's workflow. Collections also have users associated with them, and different
users can have different roles in different collections. You can apply collection-specific
routing rules and revision control settings, and assign collection-specific attributes,
and search on a collection-specific basis. A collection's Job Jackets file defines the
resources available for the projects and articles in that collection.
Workflows: A workflow helps you to manage the lifecycle of assets by providing a
named, ordered set of statuses for those assets to move through. A status-based
auto-routing feature helps keep everything on track. You can create different workflows
for different content types, use different forms to present attributes in different
workflows, and color-code the statuses in a workflow for easy identification. Each
workflow can have its own QuarkXPress/QuarkCopyDesk redlining settings and Job
Jacket rule evaluations, and you can apply status-based constraints for each attribute.
Publishing Services: The Publishing Service Framework is a server-side framework
that automates publishing and delivery tasks. You can create configurable and extensible
publishing processes that use a variety of renderers, including third-party renderers.
• A Publishing Process is a pipeline consisting of re-usable Activities that encapsulate
common tasks such as resolving XML component references and QuarkXPress
attachments, applying transformations, submitting content to the appropriate rendering
engine, packaging and collecting the output, and delivering the rendered output to a
CMS or via FTP or HTTP.
• A Publishing Channel is a specific configuration of a publishing process that can be
mapped to specific content types. The Platform ships with a library of commonly
required Activities and several pre-configured Publishing Channels.
• An SDK for developing custom Activities is also available.
Platform components
Quark Publishing Platform consists of a set of core modules that can be combined in
various ways with each other and with other systems. Depending on the needs of your
organization, you may choose to use some or all of these modules.
Quark Publishing Platform Server: The heart of Quark Publishing Platform. The
Server manages content, controls and coordinates workflows, provides a hierarchical
scheme for organizing assets and tracks the relationships between those assets,
implements automated versioning, and lets you keep track of users and their
permissions. A Web-based administrative interface lets you control and configure the
Server.
12 | A GUIDE TO QUARK PUBLISHING PLATFORM 10.1
Page 13

ABOUT QUARK PUBLISHING PLATFORM
Quark Publishing Platform Clients: A Platform client is any application that can talk
to Quark Publishing Platform Server. Available clients include QuarkXPress for Quark
Publishing Platform, Quark XML Author for Quark Publishing Platform, Quark
Publishing Platform Web Client, QuarkCopyDesk for Quark Publishing Platform, and
desktop client for Mac and Windows. You can also implement and integrate your own
clients with the Quark Publishing Platform SDK. A sample client for iOS "Gateway
Starter App" is also included with the SDK.
• Quark XML Author for Platform: For XML content authoring and reuse in Microsoft
Word.
• Quark Publishing Platform Adapter for Microsoft Office Word: Provides the ability to
work with Platform from Microsoft Word natively.
• Quark Publishing Platform Adapter for Microsoft Office Excel: Provides the ability to
work with Platform from Microsoft Excel natively.
• Quark Publishing Platform Adapter for Microsoft Office PowerPoint: Provides the
ability to work with Platform from Microsoft PowerPoint natively.
• QuarkXPress: For template development, custom layout, content authoring, and layout
and content review.
• QuarkCopyDesk: For content authoring and review.
• Quark Publishing Platform Web Client: For content authoring and review in a Web
browser.
• Quark Publishing Platform Client: A generic desktop client, available for Windows
and Mac OS.
Work-in-Progress Repository: A repository that provides versioning and component
management capabilities for XML assets, QuarkXPress assets, and QuarkCopyDesk
assets. Once a publication is finalized, the published files can be archived in a system
of record.
Quark Publishing Platform Renderer: QuarkXPress Server, an engine that produces
published files from component assets. QuarkXPress Server can produce output in a
variety of formats, including PDF, ePub, and App Studio Article/App Studio Package
(for deployment to the iPad and other devices).
DITA Open Toolkit: An engine that produces published files from XML content that
uses the DITA schema. Working with an XSL-FO processor such as Antenna House,
the DITA Open Toolkit can produce output in PDF, HTML, RTF, and HTML Help
formats.
Quark Publishing Platform Script Manager: A scripting engine that allows you to
build sophisticated custom functionality into Quark Publishing Platform Server without
having to know a programming language.
Quark Publishing Platform SDK and REST interface: Robust interfaces that allow
you to easily develop your own custom Quark Publishing Platform clients.
In addition to the clients listed above, Quark Publishing Platform can support custom
mobile client applications. The Platform includes the source code for a sample mobile
application called the Gateway iOS Starter App, which demonstrates how to create a
A GUIDE TO QUARK PUBLISHING PLATFORM 10.1 | 13
Page 14
ABOUT QUARK PUBLISHING PLATFORM
custom Platform client for iPhone or iPad. We also have the same for Windows 8.1, a
Gateway Starter App sample for Windows 8.1.
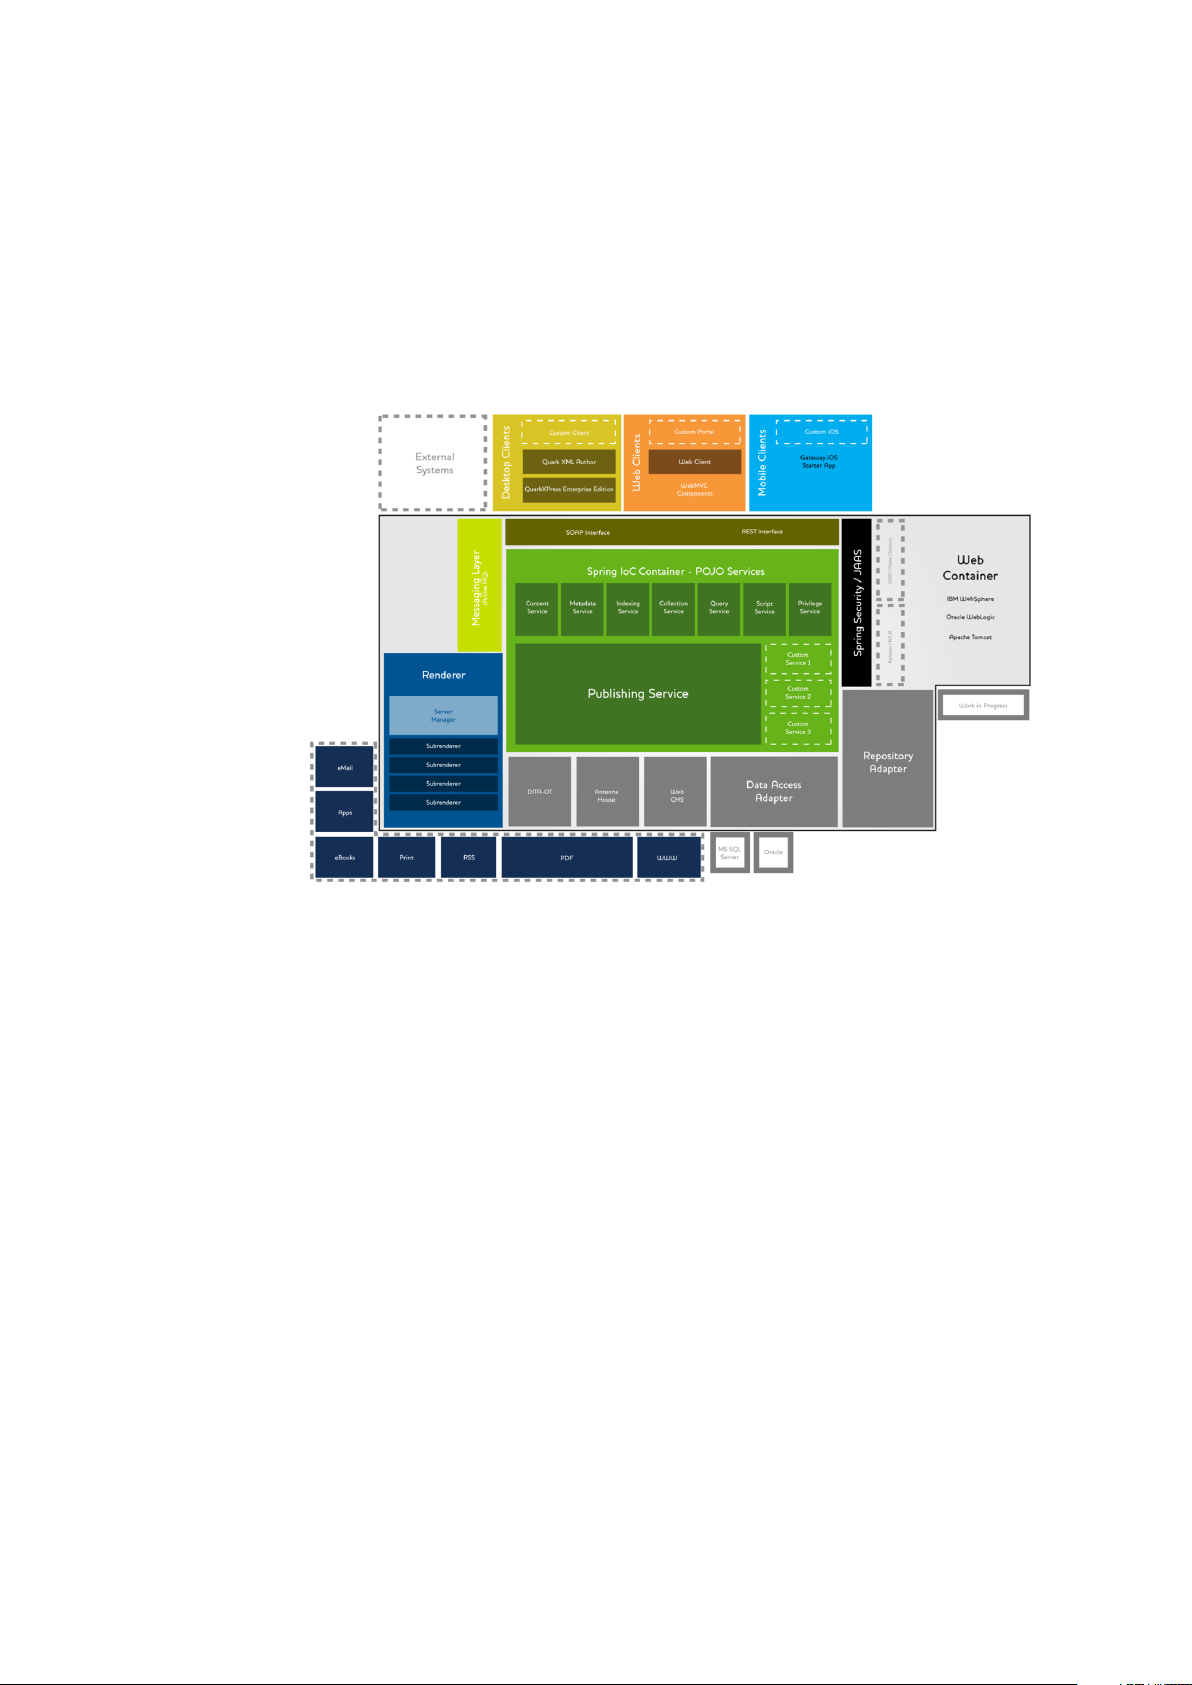
Platform architecture
Quark Publishing Platform is built using open industry standards such as SOA and the
Spring framework, to allow easy integration with existing business systems. The
architecture of Quark Publishing Platform is shown in the following diagram.
Quark Publishing Platform architecture
At the center is Quark Publishing Platform Server, which is a Spring-based Java
application running in a Web container. This application has a number of services,
hosted using the Spring framework, which it uses to perform various operations such
as querying, honoring privileges, and maintaining metadata. You can also write your
own custom services for business system integration.
The Publishing Service provides a component-aware publishing framework that can
integrate with multiple renderers and delivery systems to publish content in multiple
formats, including PDF, eBooks, iPad content, RSS feeds , syndications, and so forth.
At the top of the diagram are the Quark Publishing Platform client applications. These
include desktop applications (such as QuarkXPress, QuarkCopyDesk, and Quark XML
Author), Web applications (including the Web client and Web administrator), and
mobile clients such as the Gateway iOS Starter App. Such client applications can
communicate with Quark Publishing Platform Server via SOAP or the REST interface,
whichever is a better fit.
Also within the Web container are any adapters that are necessary for Quark Publishing
Platform Sever to talk to the Work-in-Progress repository or databases. Other adapters
connect Quark Publishing Platform Server with output technologies such as the DITA
Open Toolkit and the Antenna House XSL-FO formatter.
14 | A GUIDE TO QUARK PUBLISHING PLATFORM 10.1
Page 15

The Web container also hosts Quark Publishing Platform Renderer, which provides
output in a variety of formats (shown in the boxes around the lower left corner). The
Renderer includes a load balancer called Server Manager and some number of
subrenderers running separately to handle requests as efficiently as possible.
Messaging within the system is handled with Java Message Service (JMS) messages,
managed by ActiveMQ.
The Platform can securely communicate with external resources such as LDAP servers
using either Kerberos or NTLM encryption. This enables the Platform to support single
sign-on and domain users.
Platform features
In addition to the features already discussed, Quark Publishing Platform offers the
following.
• Powerful content reuse features: You can easily use and reuse assets and XML content
in an interface that allows you to preview your changes as they will look at outlook
without leaving Microsoft Word. For more information, see the documentation for
Quark XML Author for Quark Publishing Platform.
ABOUT QUARK PUBLISHING PLATFORM
• Versatile automation features: Using the Quark Publishing Platform publishing
framework, you can create publishing channels (for automatically building output) and
delivery channels (for delivering published content to its destination).
• Workflow management: Quark Publishing Platform lets you construct workflows
that can automatically route files to the appropriate parties based on their statuses,
notify those parties of their assigned tasks, add comments to drafts of document, track
and review changes, and divide the work on a single document so that different users
can work on it simultaneously.
• Collections hierarchy: The Work-in-Progress repository can be organized into whatever
kind of hierarchy works for your organization.
• Sophisticated query engine: Quark Publishing Platform clients can take advantage
of a powerful query engine, including metadata search and full-text search, using an
intuitive user interface. Queries can be named, saved, and shared among users.
• Server-side scripting: Quark Publishing Platform Server comes pre-configured with
the Rhino scripting engine for JavaScript. Scripting is implemented using the Apache
Bean Scripting Framework (BSF). All services, data transfer objects (DTOs), and JMS
messages are available to the script engines. Scripts are executed on the server in a
separate thread of the server process for maximum safety and efficiency. Scripts can
be triggered manually, by a schedule, or by a server-side event. For more information,
see "Script Manager ."
• Directory server integration: You can import users from LDAP servers to enable single
sign-on. For more information, see "Managing user lists with LDAP."
A GUIDE TO QUARK PUBLISHING PLATFORM 10.1 | 15
Page 16
CONFIGURATION
Configuration
Administration client
Users with the Administration role can configure and maintain a Quark Publishing
Platform workgroup's workflow. In addition to establishing structure for users and the
content they generate, Administrators control security, set defaults, specify storage
locations, and customize the parameters for tracking every asset in their workflow.
To administer Quark Publishing Platform Server, navigate to the following URL in a
Web browser:
http://[IP address of Platform Server computer]:61400/admin
You can also display the administration from the home page, which is http://[IP
address of Platform Server computer]:61400
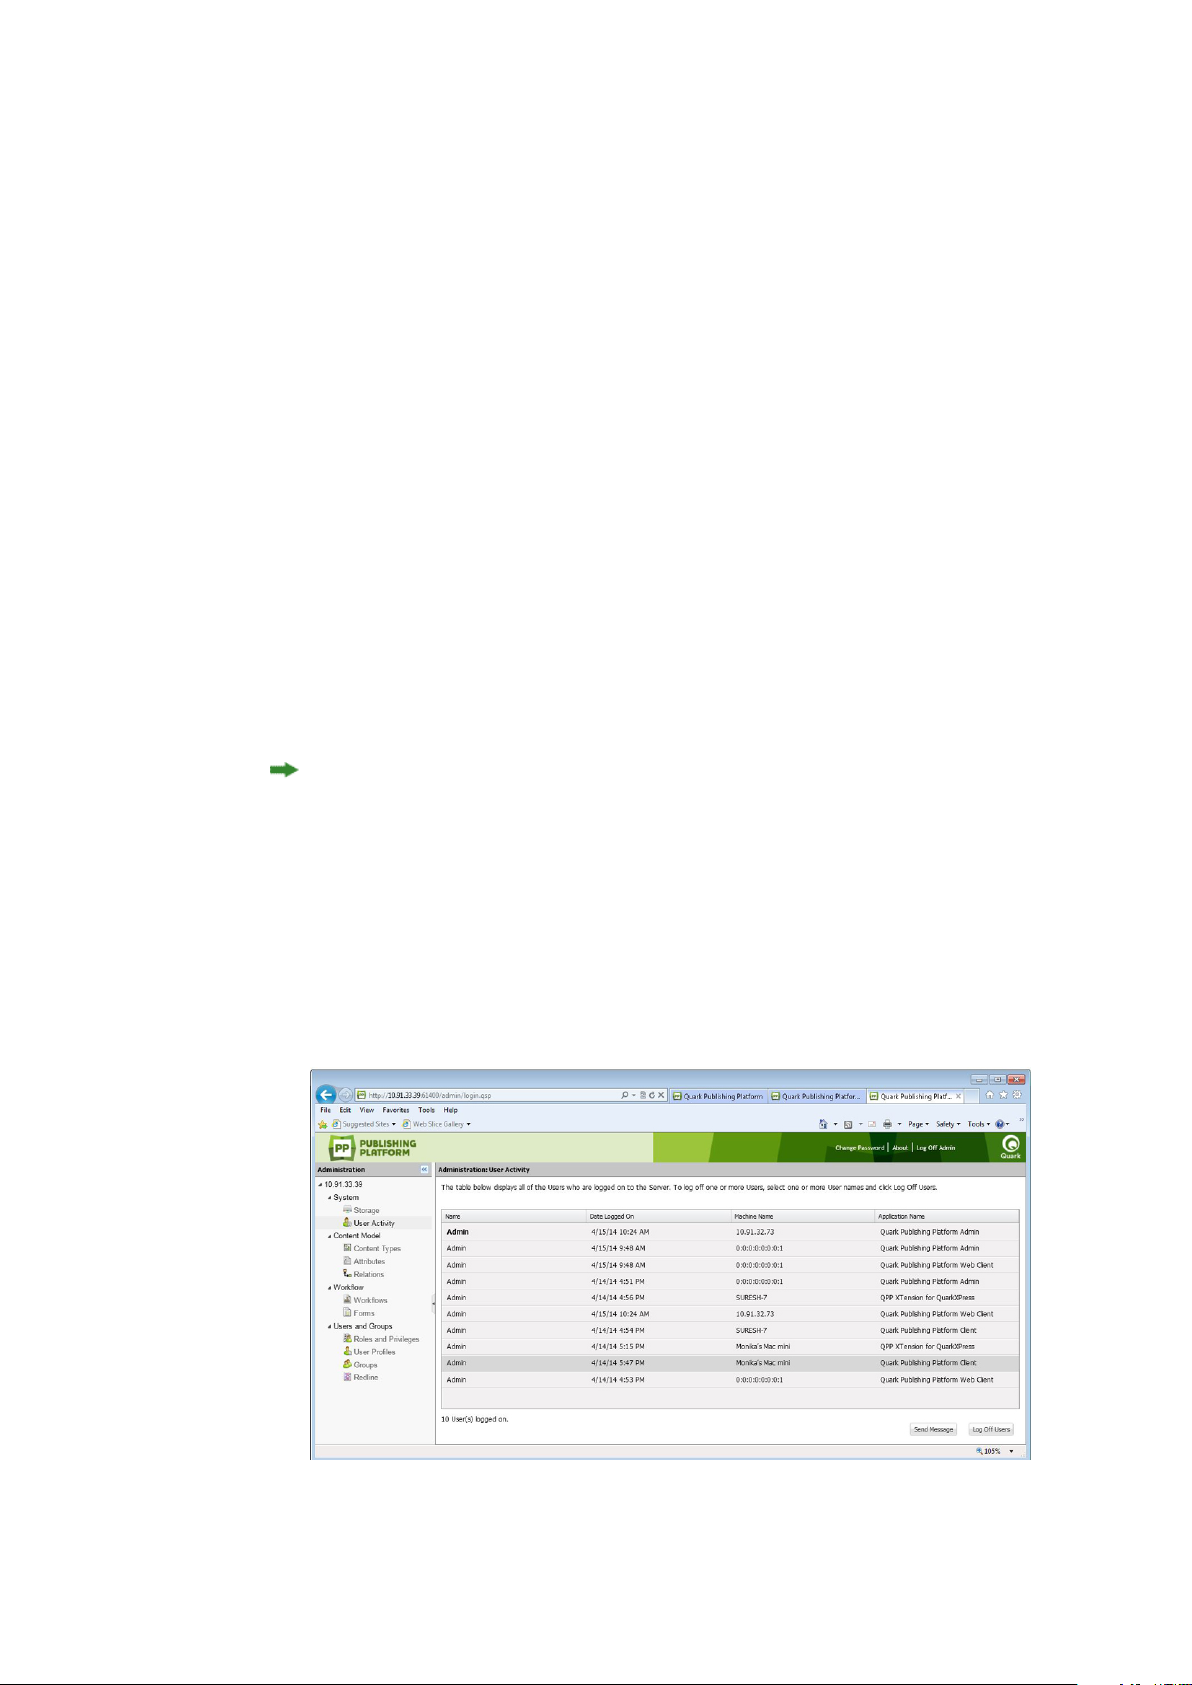
The Quark Publishing Platform Web Administrator displays.
When you select User Activity, the admin client displays the list of all logged-on users,
including each user's name, the time and date each user logged on, each user's machine
name, and each user's application. If you need to log off a user, select the user's name
in the list and click Log Off Users. You can also log off users and send a message to a
logged-on user.
Admin client running in Web client
16 | A GUIDE TO QUARK PUBLISHING PLATFORM 10.1
Page 17

System area
The System area includes the following controls:
• Storage: Use this control to specify one or more storage folders for assets and to
establish rules for storing different file types. For more information, see "Configuring
storage options."
• User Activity: Lets you view logged-on users. For more information, see "Administration
client."
Content Model area
The Content Model area includes the following controls:
• Content Types: Use these controls to specify which types of content the Platform is
managing. For more information, see "Working with content types."
• Attributes (also called "metadata" or "headers"): Use these controls to create and
configure attributes that can be associated with assets, article components, collection
types, and layout types. For example, you could create an attribute called "Image
approved" for picture file types. When a user approves an image, he or she can check
"Image approved" for the picture. When another user searches for approved pictures,
the user can include the "Image approved" attribute in the search criteria and limit
the search results to approved images. For more information, see "Defining attributes."
CONFIGURATION
• Relations: Use these controls to configure the relationships available between Platform
assets. For more informaiton, see "Working with relationships."
Workflow area
The Workflow area includes the following controls:
• Workflow Definition: Use these controls to create and configure workflows. For more
information, see "Working with workflows."
Users and Groups area
The Users and Groups area includes the following controls:
• Roles and Privileges: Use these controls to create, delete, rename, and modify roles
and their associated privileges. For details about setting privileges, see "Privileges." For
example, you can create a role called "Editorial," and assign this role to your writers
and editors. All users with this role will have the same privileges to perform editorial
functions.
• User Profiles: Use these controls to create a user, assign a role to the user, assign a
password, and enable or disable the user's ability to log on. You can also delete, rename,
and modify user accounts.
• Groups: Use these controls to combine user profiles into groups to which assets can
be routed. When you route an assignment to a group, that asset appears in the
assignments for everyone in that group. The first person in the group who checks out
the asset gains control of that asset. You can also delete, rename, and modify groups.
• Redline: Use these controls to specify default redline tracking colors for each user.
A GUIDE TO QUARK PUBLISHING PLATFORM 10.1 | 17
Page 18
CONFIGURATION
Configuring storage options
In versions of Quark Publishing Platform prior to 9.5, you could set up separate
repositories for different file types. In version 9.5 and later, you can simply set up a
single repository for all asset types. You can add additional repositories if you need
additional space, and change the priority of your repositories to control which one
new assets are written into.
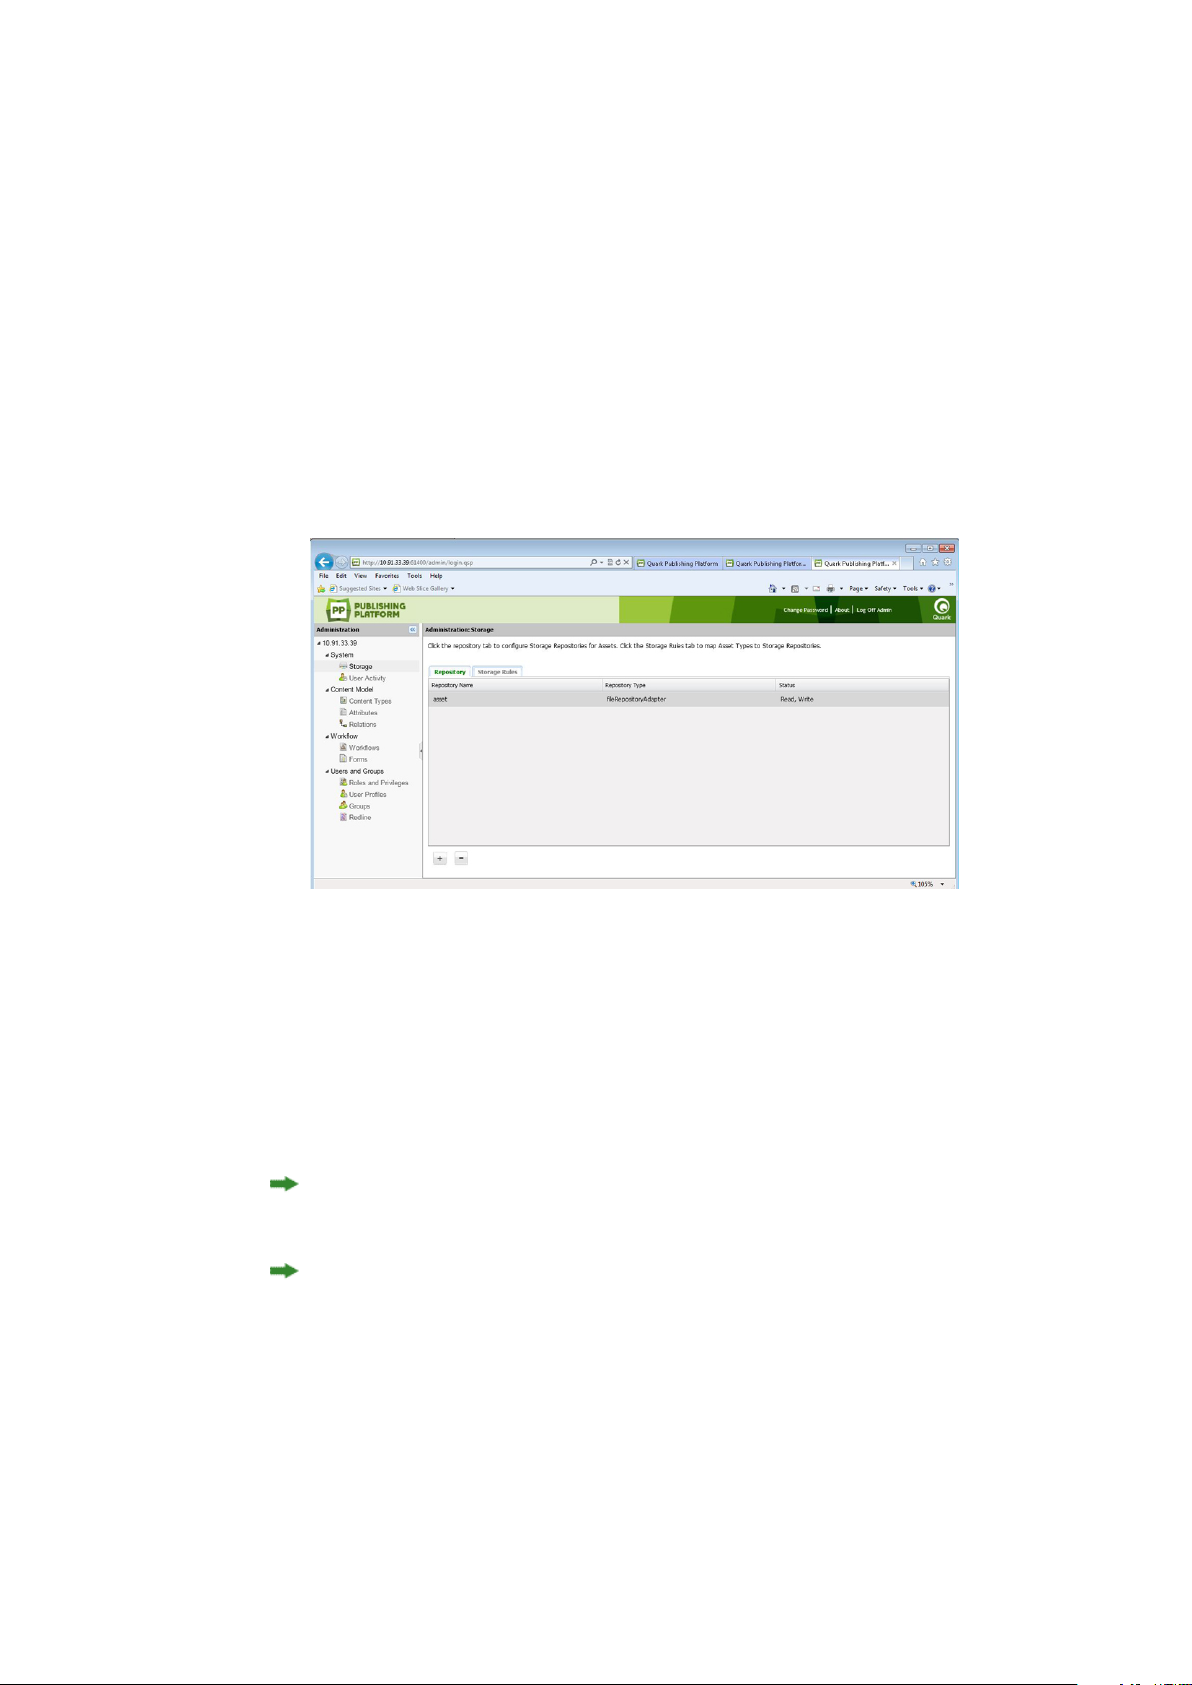
To configure storage options, click Storage.
Adding repositories
To add a storage repository:
Click the Repository tab in the Administration: Storage window.
1
Use the Repository tab of the Administration: Storage area to view and manage the
folders where Quark Publishing Platform assets are stored.
Click + to display the New Repository dialog box.
2
Enter a name for the repository in the Name field.
3
To specify a specific file system directory, choose fileRepositoryAdapter and then
4
specify a URL in the URL field (for example: /Users/Name/QPP Repository for Mac
OS, or C:\QPP Repository for Windows).
For information about creating a SharePoint repository, see the Quark Publishing Platform
SharePoint Adapter ReadMe.
The storage location must include read/write permissions.
Deleting repositories
To remove a storage repository, click the Repository tab in the Administration: Storage
window, select the repository you want to remove, then click – (minus sign). A warning
message prompts you to confirm the deletion.
18 | A GUIDE TO QUARK PUBLISHING PLATFORM 10.1
Page 19
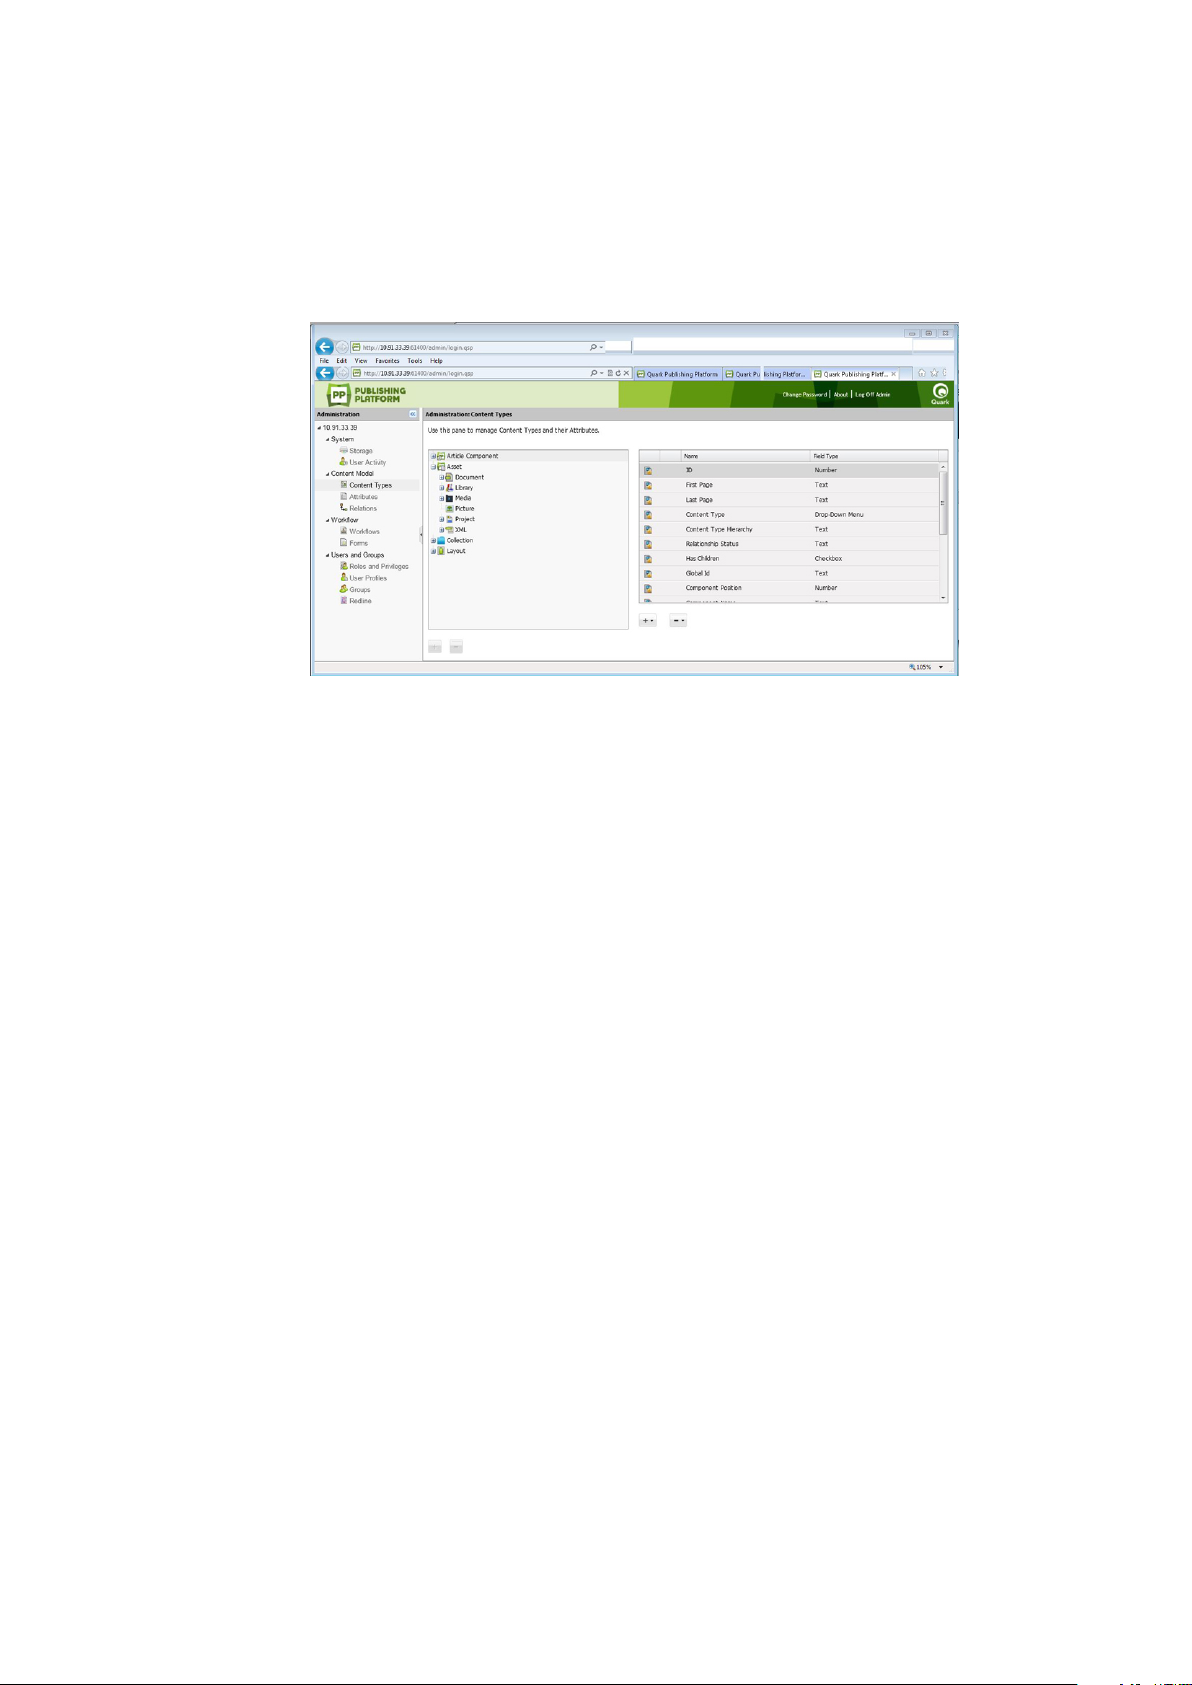
Working with content types
Quark Publishing Platform supports a variety of different types of content, including
QuarkXPress projects, QuarkCopyDesk articles, picture files, multimedia files, and
XML files. The Content Types pane lets you control the way in which information
about each of these content types display in Quark Publishing Platform user interfaces.
CONFIGURATION
Content Types pane
Different types of content have different attributes. For example, the list of attributes
for a picture includes values for "Pixel width," "Pixel height," and "Resolution," and
the list of attributes for a text component includes values for "Word count" and "Line
count." Some attributes, such as "Checked out duration," are relevant only to Quark
Publishing Platform, and are stored only in Quark Publishing Platform.
For XML files that adhere to the DITA and BusDocs schemas, Quark Publishing Platform
provides access to specific file-level element and attribute values. For example, you
can use the Quark Publishing Platform user interface to view the values of a DITA XML
file's <title> and <author> elements without having to open the file.
By default, Quark Publishing Platform is configured to provide access to a variety of
attributes for four categories of content types:
• Article components
• Assets (of various types)
• Quark Publishing Platform collection types (for more information, see "Working with
collection types")
• QuarkXPress layouts
You can create new content types for asset, text components, and picture components.
You can also create new collection types. To add a new content type, select an eligible
parent content type, then click the plus button under the content type list on the left.
You can add new attributes to any content type. These can be existing attributes from
the Attributes pane, or entirely new attributes.
• To add an existing attribute to the selected content type, click the plus button under
the attribute list on the right and choose Select from Existing.
A GUIDE TO QUARK PUBLISHING PLATFORM 10.1 | 19
Page 20
CONFIGURATION
• To create a new attribute, click the plus button under the attribute list on the right
and choose Create New. (For more information, see "Understanding attribute types.")
Any new attributes you create are automatically added to the attribute list displayed
in the Attributes pane.
There are two ways to disassociate an attribute from a content type:
• To permanently delete the attribute, select it, click the minus button under the attribute
list on the right, and choose Delete.
• To disassociate the attribute from the selected content type but leave it in the attribute
pool, select the attribute, click the minus button under the attribute list on the right,
and choose Remove Mapping.
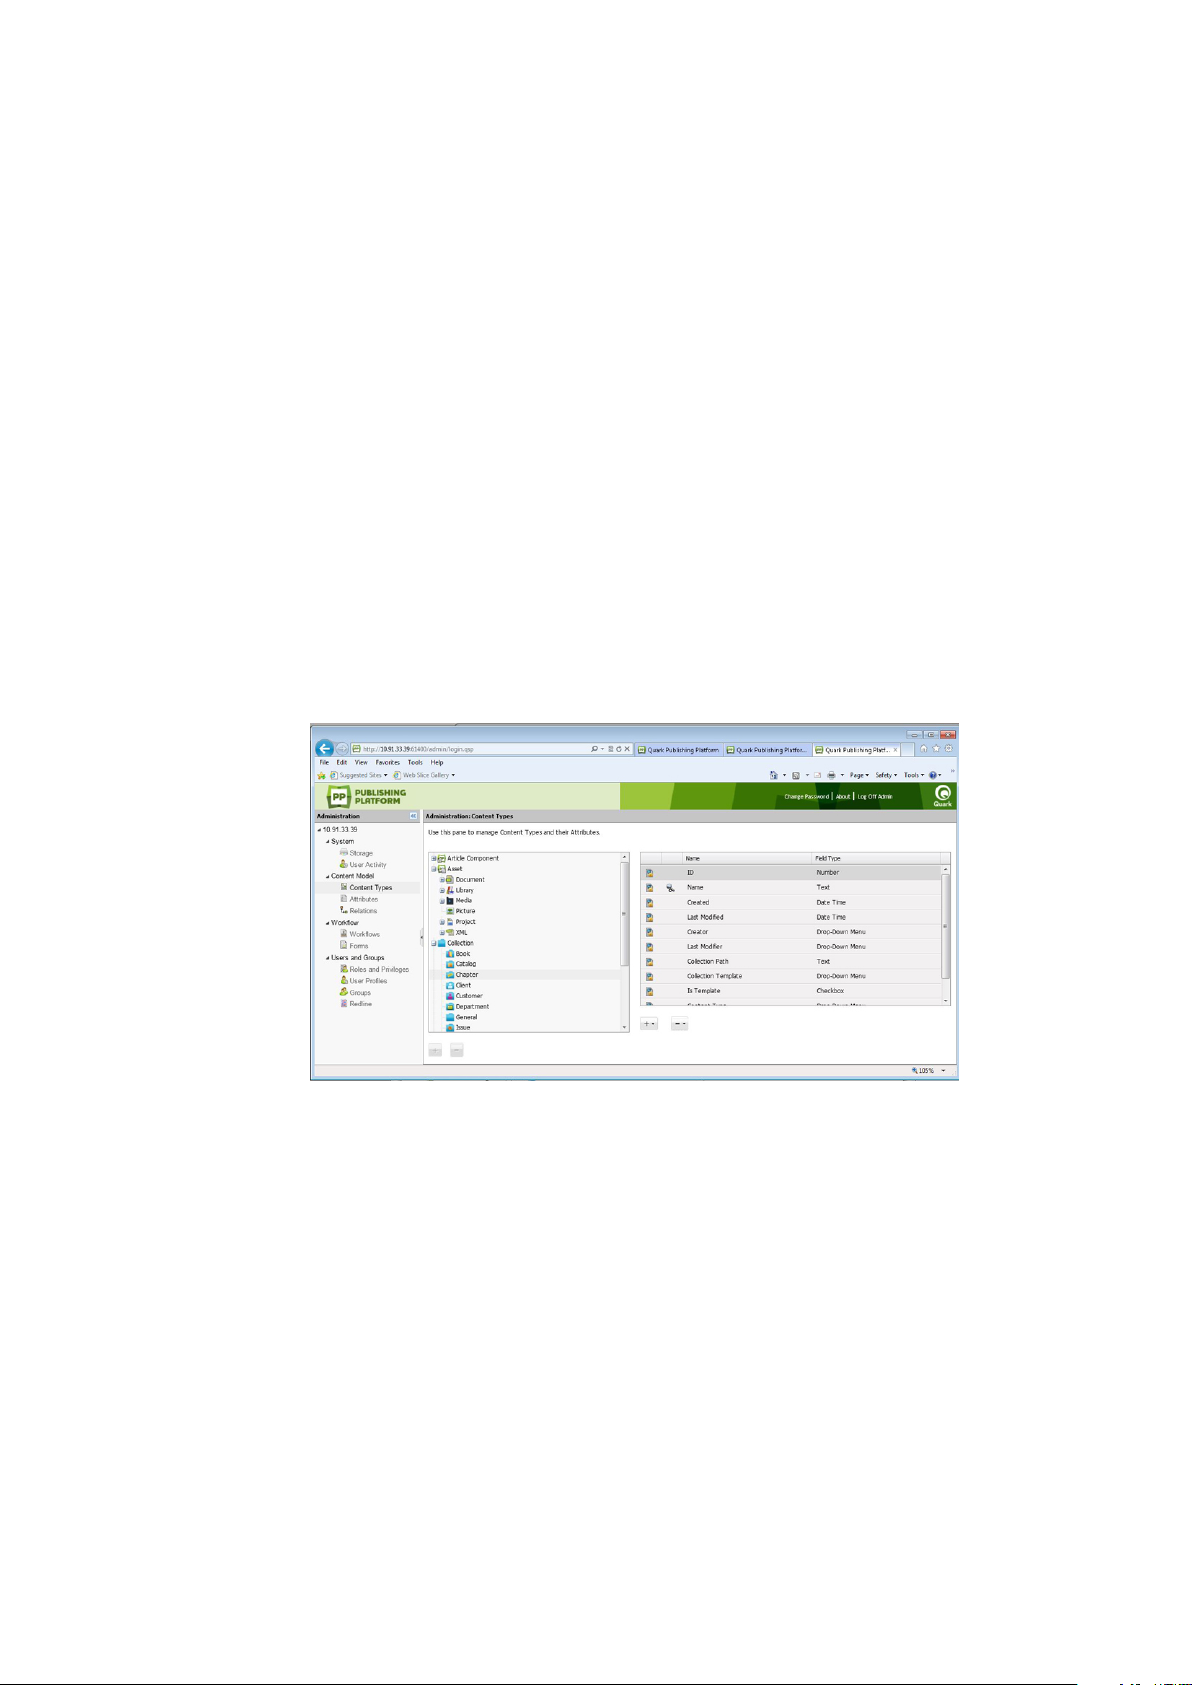
Working with collection types
A collection type is similar to an asset type in that it has a particular set of attributes.
By applying a collection type to a collection, you enable users to view and edit attributes
for that collection and create a form for editing those attributes.
To configure a collection type, expand the Collection category in the content type
tree and select the collection type you want to configure.
Configuring a collection type
For more information, see "Working with collection types."
Working with attributes
Each content type has its own set of attributes. For convenience, all attributes are listed
in the Attributes pane. You can assign attributes to content types in the Content
Types pane. For more information, see "Working with content types."
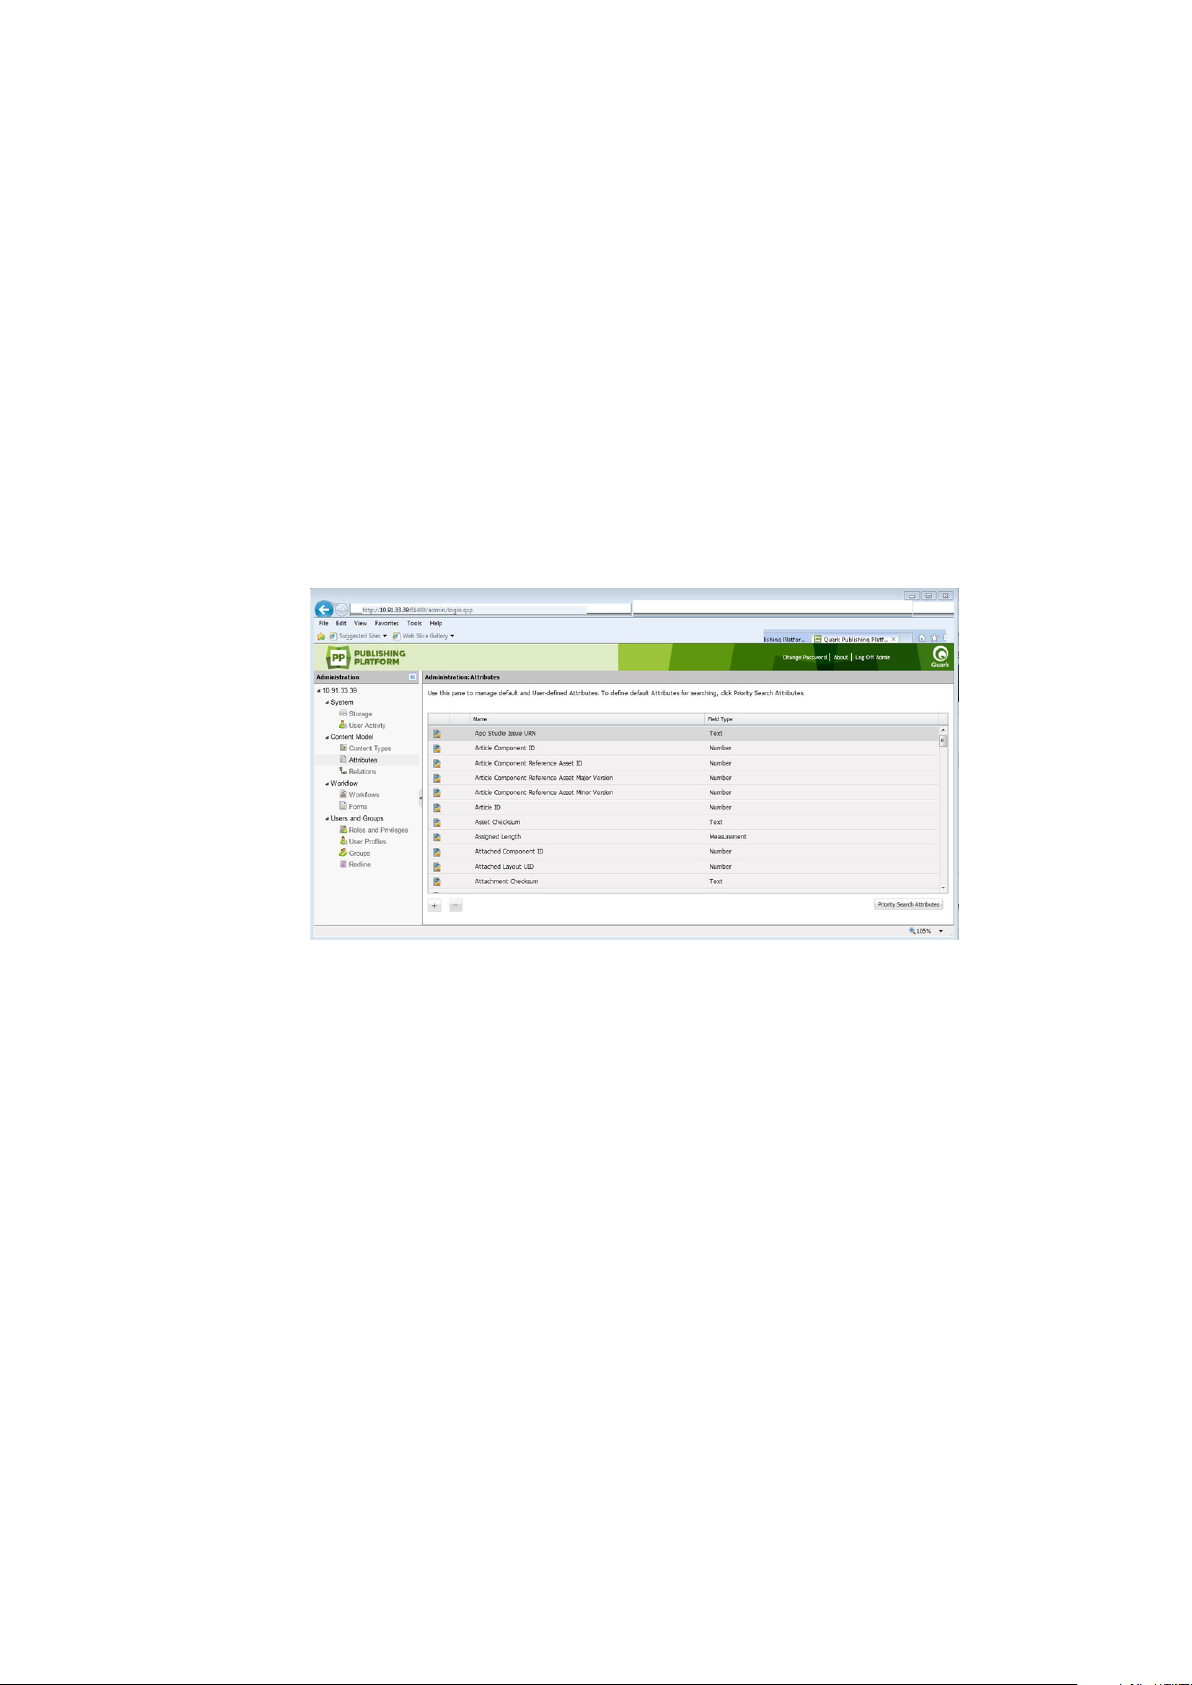
Defining attributes
Each asset in Quark Publishing Platform has a corresponding set of attributes that
describes the asset and its status in the Quark Publishing Platform workflow. Each
content type can have its own set of attributes. These attributes include
20 | A GUIDE TO QUARK PUBLISHING PLATFORM 10.1
Page 21
CONFIGURATION
system-generated information such as the date and time of the last modification,
default Quark Publishing Platform attributes such as Checked Out By, and any custom
attributes you create to meet the needs of your workflow. For example, you could
create an attribute called Image approved for picture file types. When a user approves
an image, he or she could check Image approved for the picture. When another user
searches for approved pictures, the user could include the Image approved attribute
in the search criteria and limit the search results to approved images.
You can create eight kinds of attribute types: Text, Date, Time, Number, Measurement,
Check Box, Drop-down Menu, and Date Time. Each attribute type can have a default
value. For each attribute, you can limit access so that only users with the privileges to
edit "limited-access" fields can edit the attribute values. Attributes are defined at the
server level, so each attribute can be used by multiple asset types and collection types.
To create, delete, and modify attributes, click Attributes in the navigation pane. The
right pane displays the list of attributes available in the system.
Use the Attributes pane to create, edit, and delete attributes that help identify Quark
Publishing Platform assets.
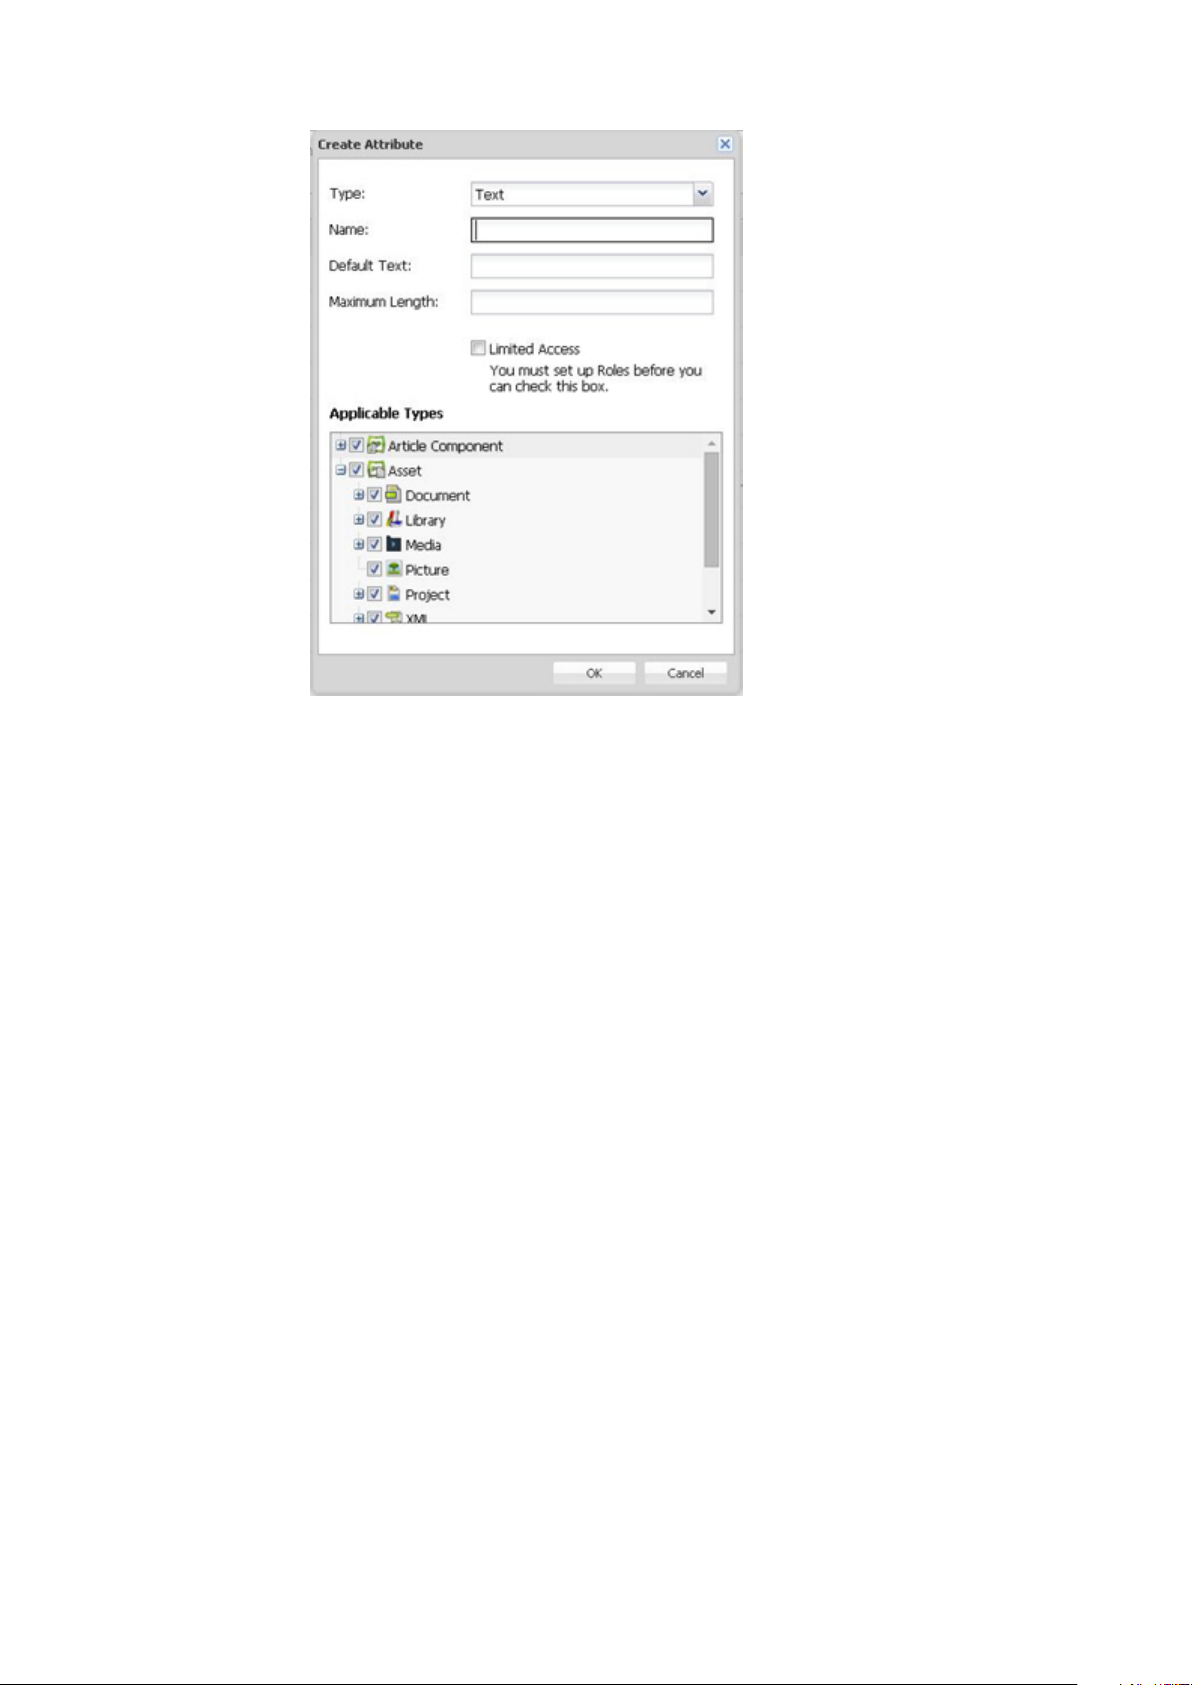
Creating an attribute
To create an attribute:
Click + (plus sign) to display the Create Attribute dialog box.
1
A GUIDE TO QUARK PUBLISHING PLATFORM 10.1 | 21
Page 22
CONFIGURATION
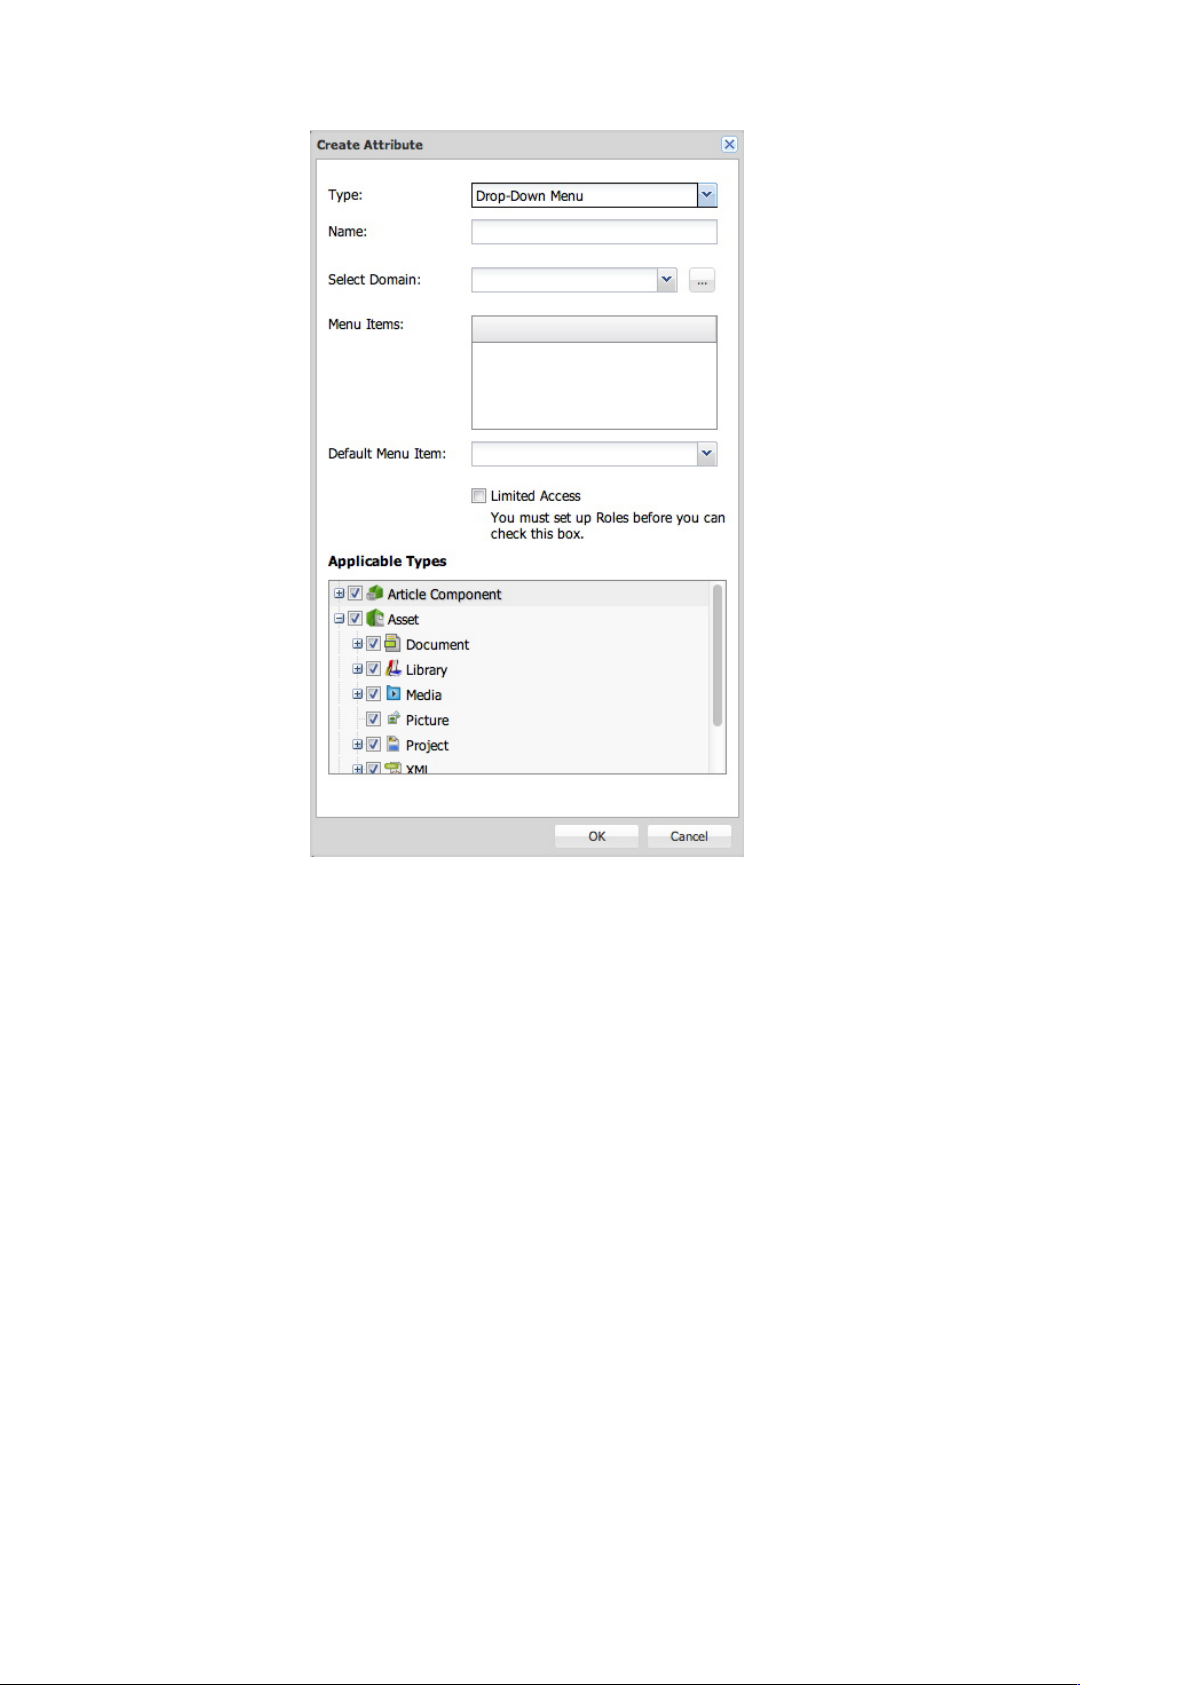
Specify the attribute name and type in the Create Attribute dialog box.
Choose an attribute type from the Type drop-down menu. (For more information
2
about attribute types, see "Understanding attribute types.")
Enter a name for the attribute in the Name field.
3
To allow only users with the "Edit normal- and limited-access fields" privilege to
4
access the attribute, check "Limited Access." For more information, see "Defining Roles
and Privileges."
Configure the remaining controls. These controls vary depending on which attribute
5
type is selected. For more information, see "Understanding attribute types."
To control which content types the attribute is applicable to, check the appropriate
6
boxes in the Applicable Types list.
Understanding attribute types
There are eight kinds of attributes: Text, Date, Time, Number, Measurement, Check
Box, Drop-down Menu, and Date Time.
Text
Use the Text attribute type to create text attributes.
• Enter a default value in the Default Text field.
• To indicate the maximum length of text in the field, enter a value in the Maximum
Length field.
Date
Use the Date attribute type to create date attributes.
22 | A GUIDE TO QUARK PUBLISHING PLATFORM 10.1
Page 23

CONFIGURATION
• Enter a default date in the Default Date field.
• To constrain users to a particular date range, enter a starting date in the Start Date
field and an ending date in the End Date field.
Time
Use the Time attribute type to create attributes where users can enter times.
• Enter a default time in the Default Time field.
• To constrain users to a particular time range, choose a starting time from the Start
Time drop-down menu and an ending time from the End Time drop-down menu.
Time values are determined by the Quark Publishing Platform user's locale setting.
Number
Use the Number attribute type to create attributes where users can enter only numbers.
• Enter a default number in the Default Value field.
• To constrain users to a particular numeric range, enter a minimum number in the
Minimum Value field and a maximum value in the Maximum Value field.
Measurement
Use the Measurement attribute type to create attributes where users can enter only
measurements.
• Enter a default number in the Default Value field.
• Use the Units drop-down menu to specify the unified unit of measure (for example,
Picas or Millimeters).
• To constrain users to a particular measurement range, enter a minimum value in the
Minimum Value field and a maximum value in the Maximum Value field.
Check box
Use the Check Box attribute type to create check box attributes. To display the attribute
with a checkmark by default, check Checked by Default.
Drop-down Menu
Use the Drop-down Menu attribute type to create drop-down menu attributes.
A GUIDE TO QUARK PUBLISHING PLATFORM 10.1 | 23
Page 24
CONFIGURATION
Choose Drop-down Menu from the Type drop-down menu to create a Drop-down Menu
attribute type.
Drop-down menu attributes can display lists of values called attribute domains. For
example, if you create a drop-down menu attribute that requires the list of users on
your system, you can use the existing list of users with the attribute rather than entering
all the names manually.
To assign an attribute domain to a drop-down menu attribute, choose the attribute
1
domain from the Select Domain drop-down menu. The attribute domain's contents
display in the Menu Items list.
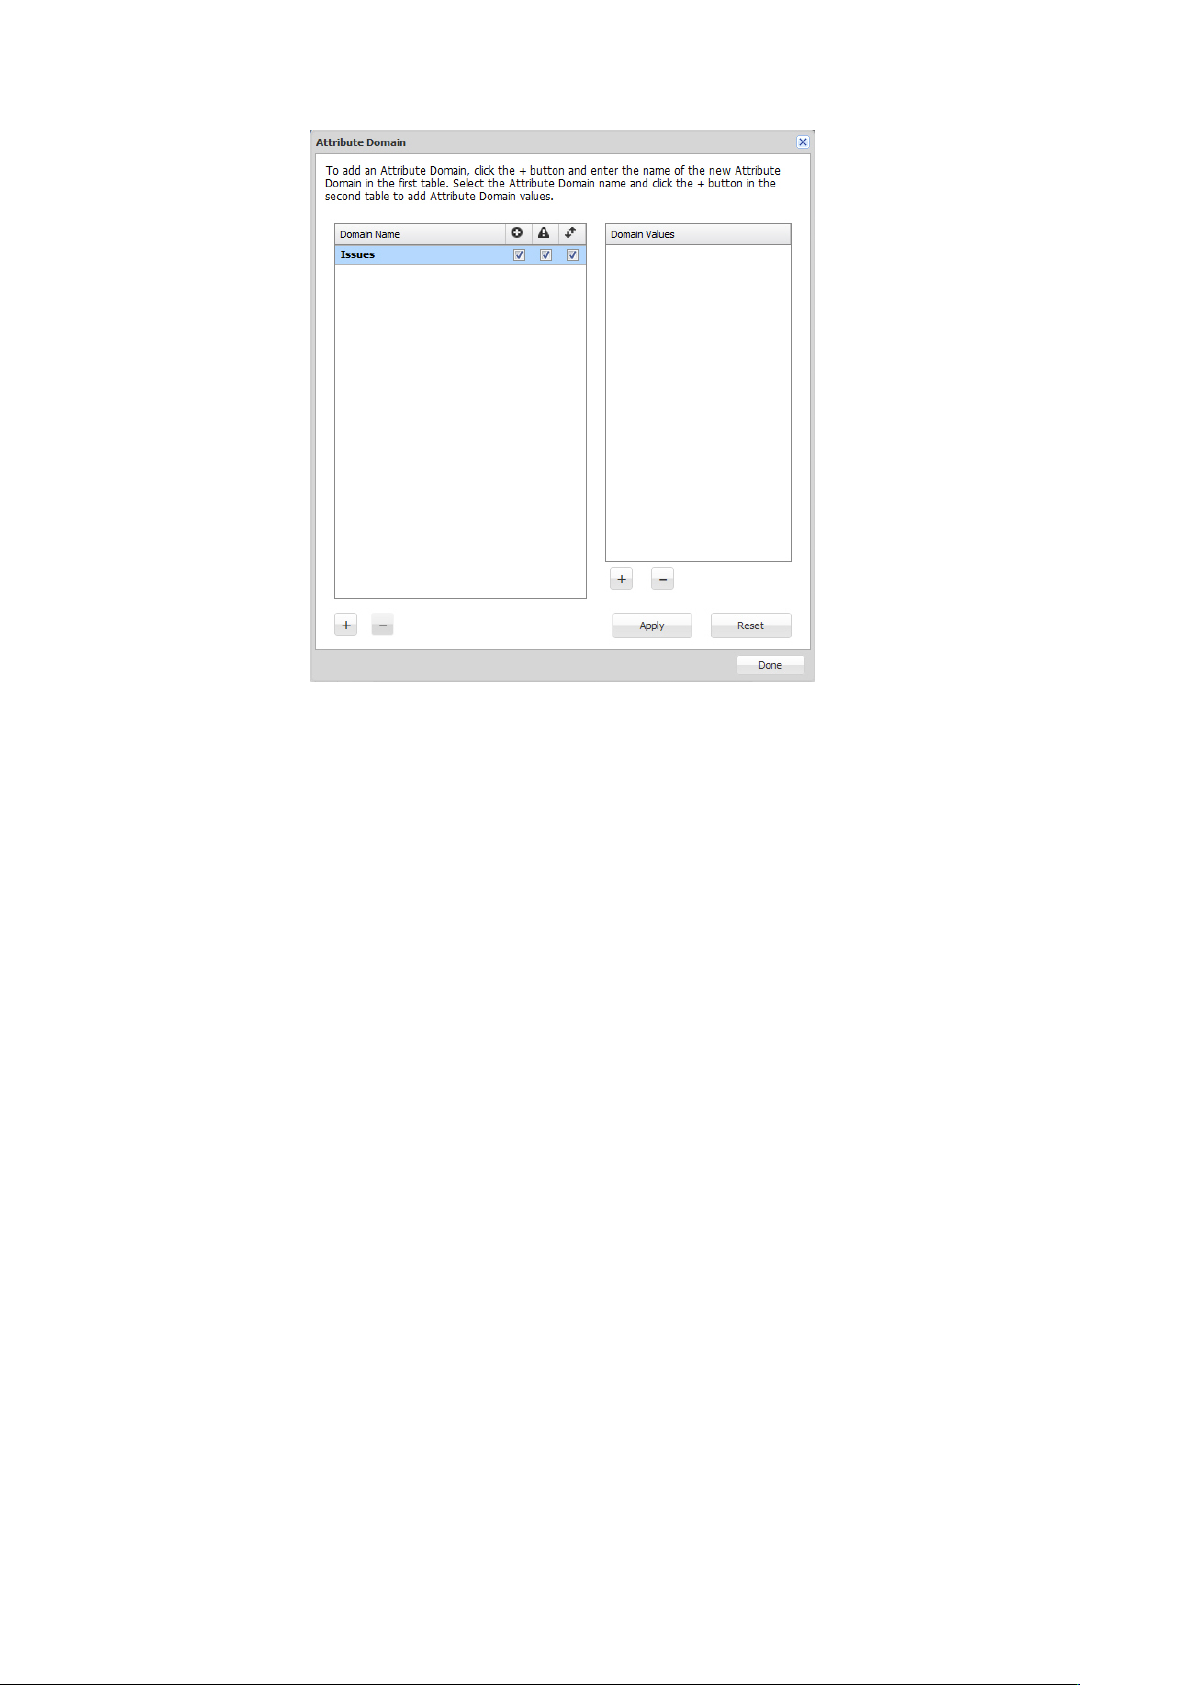
To create a custom attribute domain, click … to the right of the Select Domain
2
drop-down menu. The Attribute Domain dialog box displays.
24 | A GUIDE TO QUARK PUBLISHING PLATFORM 10.1
Page 25
CONFIGURATION
Use the controls in the Attribute Domain dialog box to create and view lists that you can
add to drop-down menu attributes.
The Domain Name list includes the available attribute domains. The Domain Values
column lists the values for the selected attribute domain.
To add an attribute domain, click + (plus sign) below the Domain Name column.
3
To enable users to add entries to the drop-down menu attribute, check the box in the
4
Allow Expansion column.
To warn users when they add an entry to the drop-down menu attribute, check the
5
box in the Display Warning column.
To alphabetically sort items in the drop-down menu attribute, check the box in the
6
Sort Items column.
To rename the domain name, double-click its name.
7
To add values to the selected attribute domain, click + (plus sign) below the Domain
8
Values column.
Click Done to close the Attribute Domain dialog box and continue creating your
9
drop-down menu attribute.
Date Time
Use the Date Time attribute type to create attributes for tracking both dates and times.
• Enter a default date and time in the Default Date field.
• To constrain users to a particular date/time range, enter a starting date and time in
the Start Date field and an ending date and time in the End Date field.
A GUIDE TO QUARK PUBLISHING PLATFORM 10.1 | 25
Page 26

CONFIGURATION
Time values are determined by the Quark Publishing Platform user's locale setting.
Setting priority search attributes
Priority search attributes display at the top of the list of search criteria in the search
controls. After the priority search attributes, all search attributes display alphabetically.
Priority Search Attributes dialog box
To designate priority search attributes, click Attributes in the navigation pane, and
then click Priority Search Attributes. The Priority Search Attributes dialog box
displays. To add an attribute to the list, select it in the list on the left and then click
the right arrow button.
Adding constraints to attributes
Users can edit asset attributes when they check in an asset, when they save a revision,
and by selecting an asset and clicking Edit Attributes. Constraints let a Quark
Publishing Platform administrator place some controls on how users edit attributes at
these times. For example, if you want users with the Editor role to explicitly approve
an asset when it reaches Final status, you can use the Require Value constraint to
require these users to indicate that the asset is approved or not approved. If a user does
not enter a value, "Errors found" displays in red at the bottom of the Check In, Save
Revision, or Edit Attribute dialog box. The attribute is also highlighted in red, and
the user cannot proceed until he or she provides a value.
Only user-modifiable attributes can be constrained. In addition, you cannot constrain
the Workflow and Collection attributes because privileges determine whether these
attributes can be modified.
To constrain an attribute for a particular workflow:
Click Workflows. The Workflows pane displays.
1
Select a workflow in the Workflow Name list.
2
Click the Attribute Constraints tab.
3
26 | A GUIDE TO QUARK PUBLISHING PLATFORM 10.1
Page 27
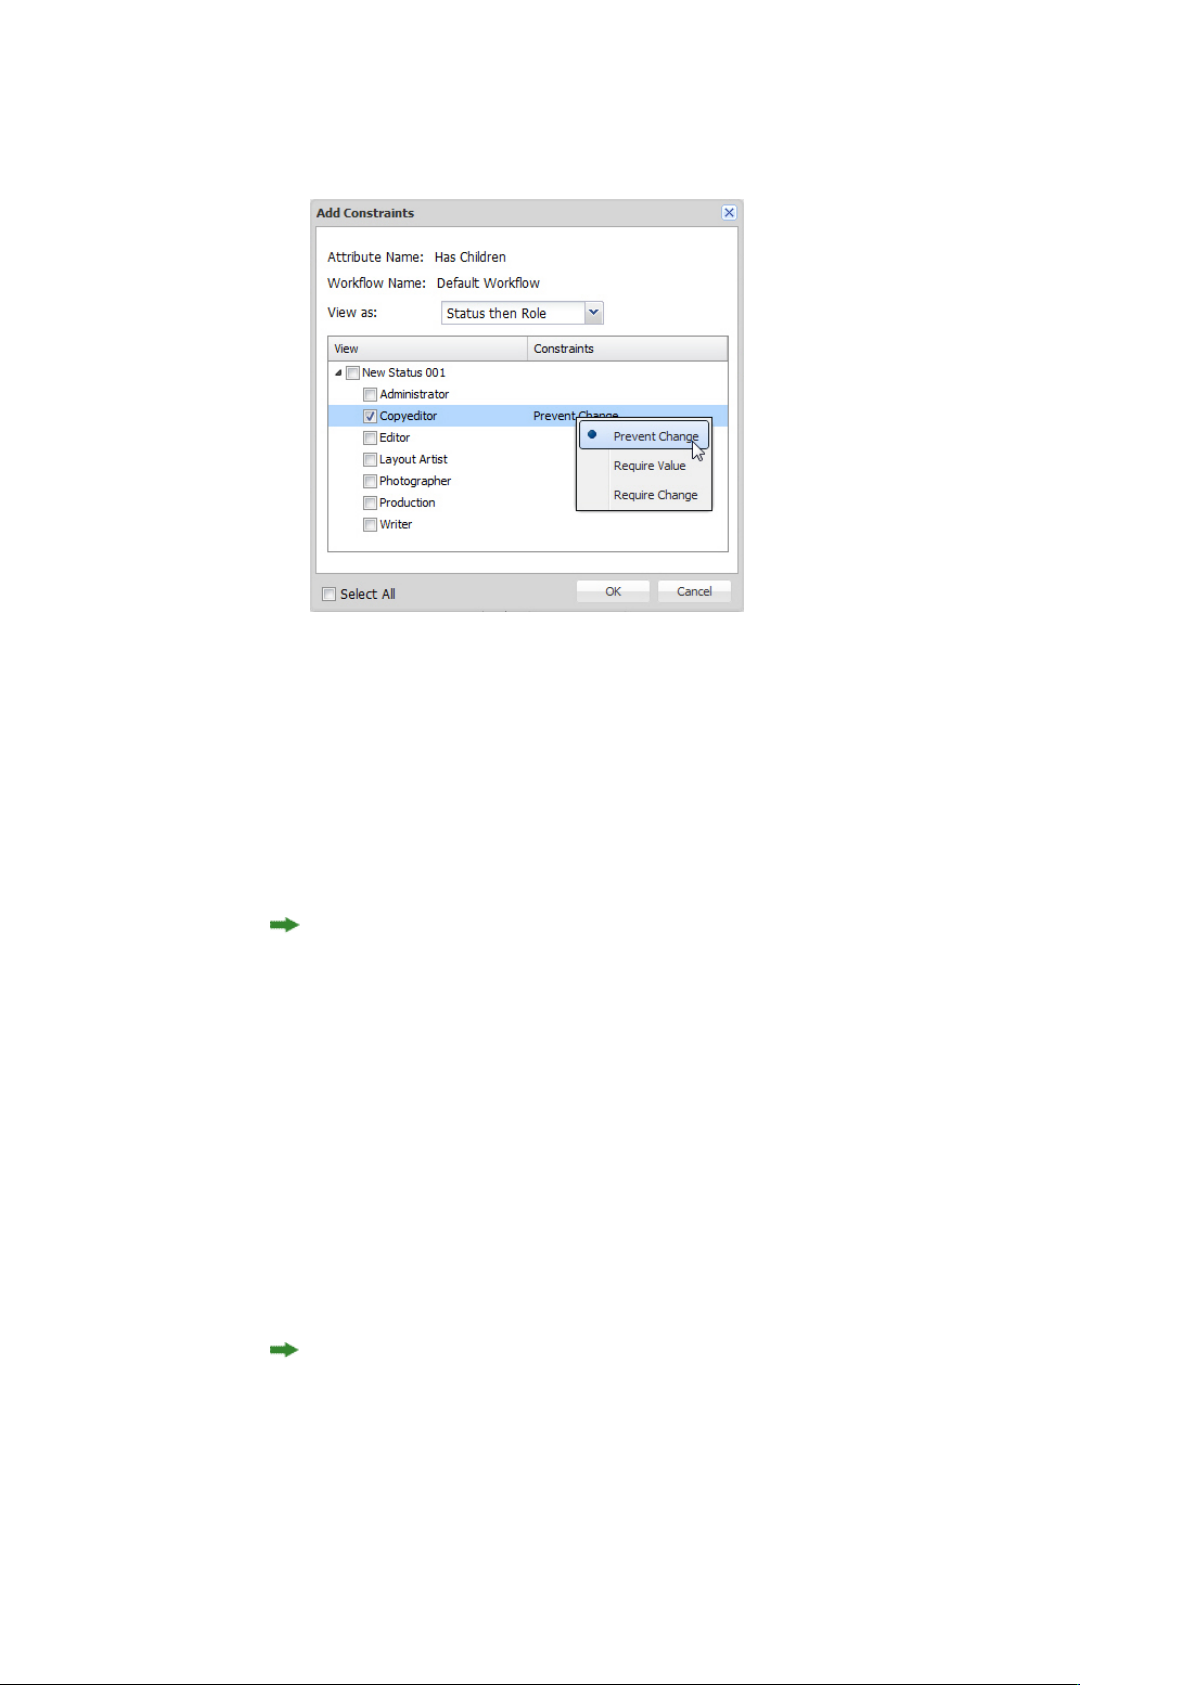
Select the attribute you want to constrain and click Add Constraints. The Add
4
Constraints dialog box displays.
Add Constraints dialog box
CONFIGURATION
Choose an option from the View as drop-down menu. This value controls how the
5
information in the list of statuses and roles displays while you establish a constraint.
Options include:
• Status then Role: Displays a hierarchical list with statuses as main headings and roles
as subheadings. You can apply the constraint to individual roles at specific statuses.
• Role then Status: Displays a hierarchical list with roles as main headings and statuses
as subheadings. You can apply the constraint to individual statuses for specific roles.
If you change the View as option, the active setting will be retained, but will display
according to the View as drop-down menu hierarchy.
Check the box for the status or user role the constraint is for.
6
When you check a role or status in the list, the constraint types become available for
7
the selected line in the list. There are three kinds of constraints:
• Prevent Change: Prevents users from altering the attribute's value.
• Require Value: Prevents users from leaving an attribute's value unspecified.
• Require Change: Forces users to change the attribute value.
To display the status only, check Select All. You can apply the constraint to all or
8
none of the roles at specific statuses. Unchecking Select All displays the roles only.
Constraints are applied based on the user's role and the asset's status at the time the
Check in, Save Revision, or Edit Attribute dialog box is displayed. The constraints
in effect in these dialog boxes remain the same even if you change the value of the
Status drop-down menu.
A GUIDE TO QUARK PUBLISHING PLATFORM 10.1 | 27
Page 28

CONFIGURATION
Working with relationships
You can use constraints to enforce automatic routing according to status. For example,
you can set up automatic routing for a collection at the status level and use Prevent
Change (in the Add Constraints dialog box) to disable modifications of the Route to
drop-down menu in the Check In dialog box. This will cause assets to be rerouted
when their status changes and prevent users from changing the routing of the asset.
A relationship is an object that stores the metadata for the association between two
objects. Whenever you assign an article from a QuarkXPress layout, drag a picture into
a layout, or create an interactive object with App Studio, a relationship object is created
to store information about the link you've just created.
For example, if you drag a picture into a QuarkXPress layout, a relationship is created.
Among other things, that relationship stores the IDs of both the picture and the layout.
This makes it easy to find out which layouts are using a given picture, or how many
pictures are attached to a given layout.
There are six types of relationship:
• Primary attachment: Stores information about a primary attachment.
• Secondary attachment: Stores information about a secondary attachment.
• Overlay attachment: Stores an information about an App Studio or ePub attachment.
• Article component reference: Stores information about the association between an article
component and a linked asset such as a picture.
• XML component reference: Stores information about a reference from one XML file to
another.
• InDesign behaviour reference:
• InDesign hyperlink reference:
• Custom: Developers can create their own relationship types for custom applications.
For more information about attachments, see "Primary and secondary attachments."
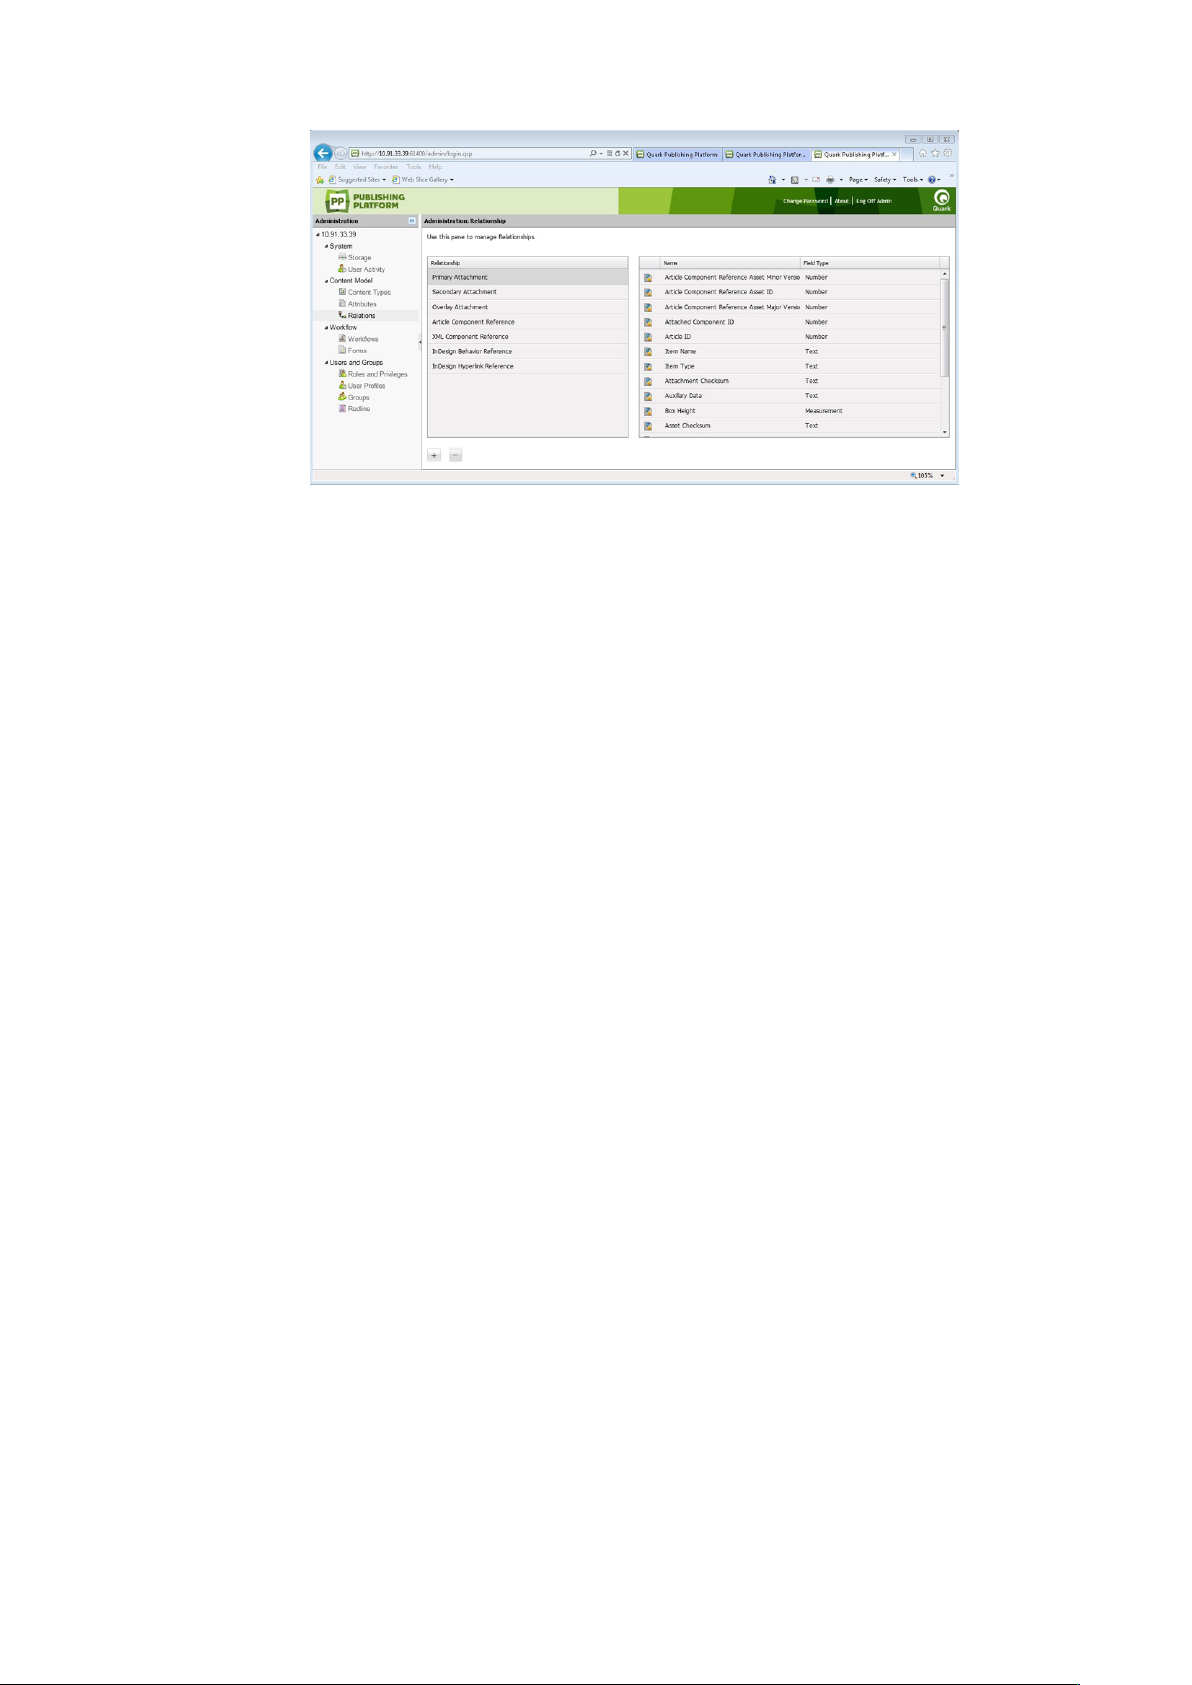
Administrators can view the fields assigned to each type of relationship in the Relations
pane.
28 | A GUIDE TO QUARK PUBLISHING PLATFORM 10.1
Page 29
CONFIGURATION
Relations pane
Administrators can also add custom relationship types and assign atributes to them.
To view or edit the attributes associated with a relationship type, double-click the
relationship type.
In Quark Publishing Platform Web client, users can view the relationships for an asset
by displaying that asset in List View with Relationship Status. Other Platform clients
can view relationships with Relationship View.
Working with workflows
In Quark Publishing Platform terminology, a workflow is a set of steps that helps you
to publish a document. You define workflows at the server level and then apply them
to collections.
Each workflow has the following characteristics:
• A name.
• A list of the asset types to which it applies.
• A set of statuses, in a particular order. The order of the statuses reflects the order of
the steps necessary for completing the workflow. For example, you might specify that
assets begin with a status called "Assigned," followed by "In Progress," "In Review," and
"Completed." You can specify that an asset with the "Completed" status automatically
routes to an editor for final approval (for more information, see "Setting up auto routing").
You can also enable or disable Redline tracking, check-in layout evaluation, and output
layout evaluation for each status.
• A list of asset attributes. Attributes are defined at the server level, so you can use an
attribute in any number of workflows. You can define constraints for some attributes
at the workflow level.
• An attribute form for each asset type. (The attribute form displays when you check an
asset in.)
Creating a workflow
To create a workflow:
A GUIDE TO QUARK PUBLISHING PLATFORM 10.1 | 29
Page 30
CONFIGURATION
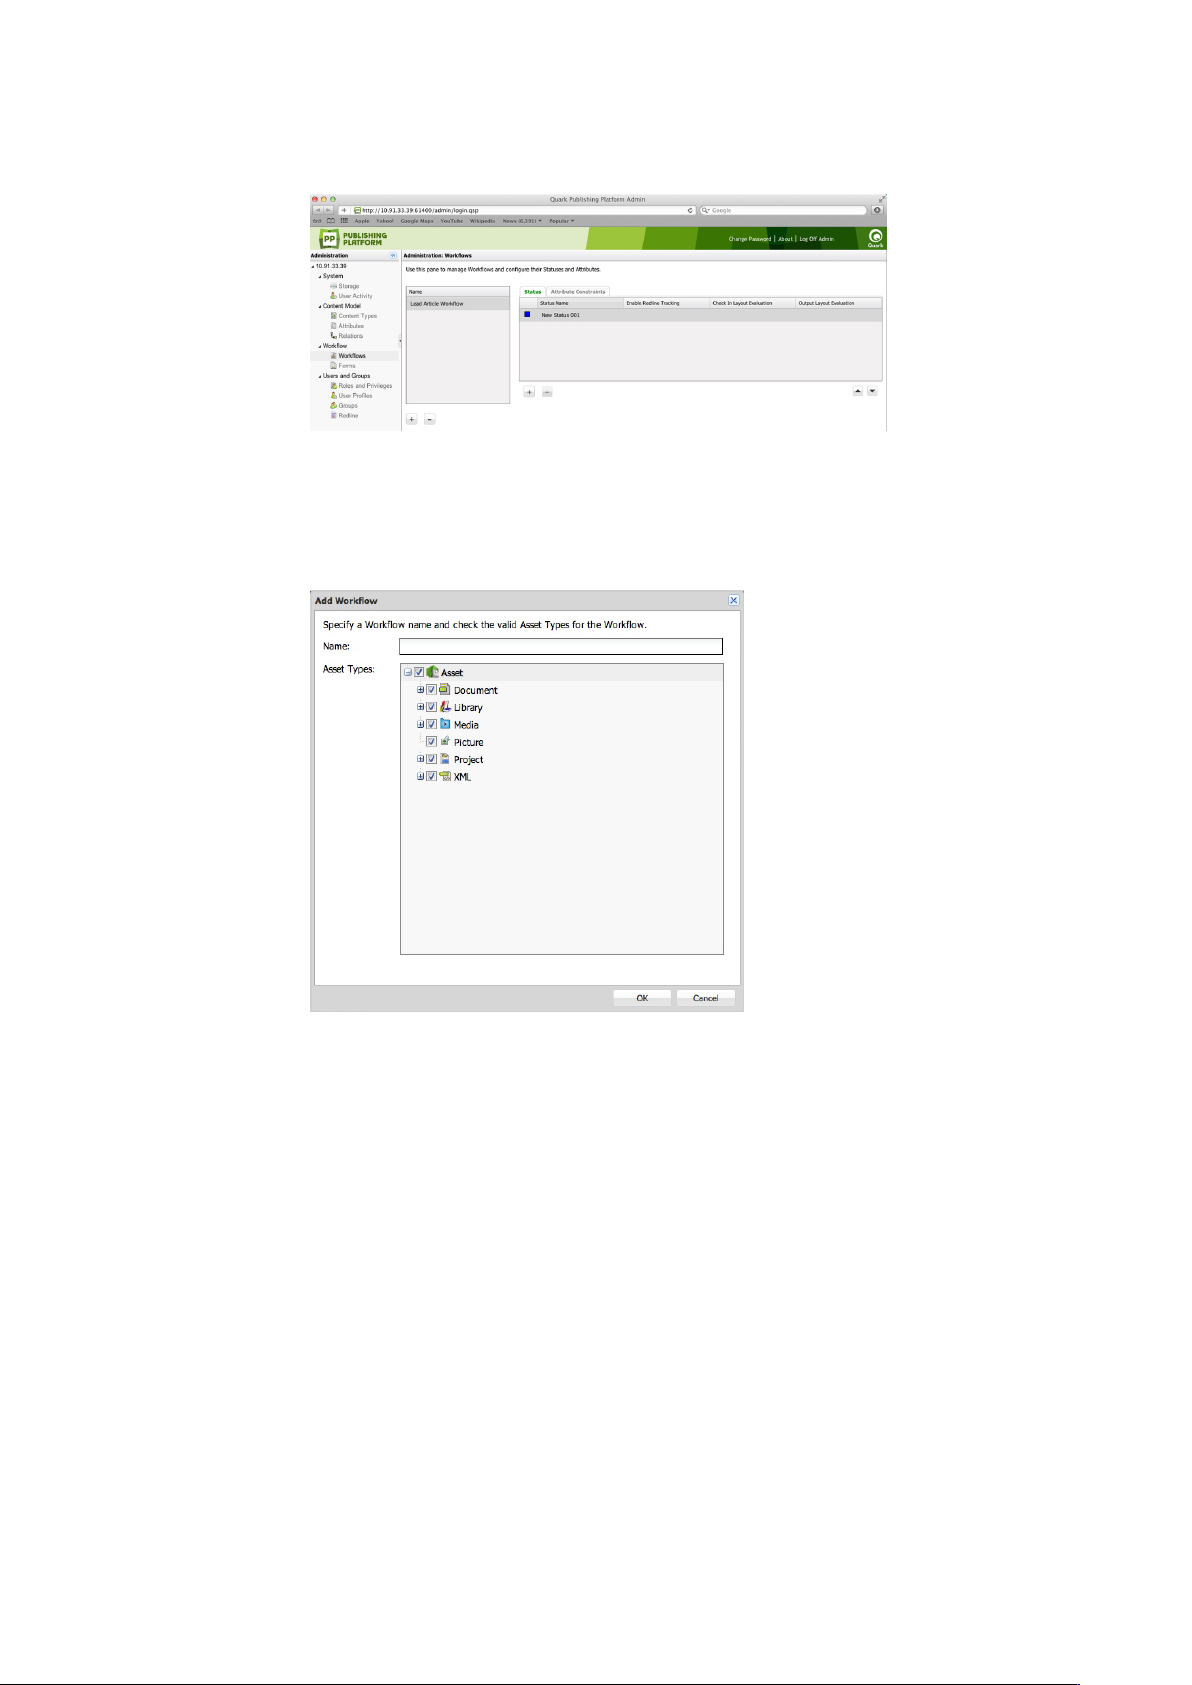
Click Workflows. The Administration: Workflows screen displays.
1
Administration: Workflows screen
To create a workflow, click + under the Name list. The Add Workflow dialog box
2
displays.
Add Workflow dialog box
Enter a name for the workflow in the Name field.
3
Under Asset Types, check the asset types you want this workflow to be available for.
4
Click OK.
5
For information on configuring a workflow, see the following topics.
Working with statuses
Each workflow has its own sequence of statuses. To work with a workflow's statuses:
Click Workflows. The Workflows pane displays.
1
Select a workflow in the Workflow Name list.
2
Click the Status tab.
3
To add a status, click + in the Status tab. The Create Status dialog box displays.
4
30 | A GUIDE TO QUARK PUBLISHING PLATFORM 10.1
Page 31

CONFIGURATION
Create Status dialog box
Enter a name for the status in the Name field.
5
Use the Color control to associate a color with the status. This color displays in the
6
Status icon column in the Workspace window.
To enable redline tracking for articles with this status in this workflow, check Enable
7
Redline Tracking.
To automatically evaluate layouts with this status in this workflow when their projects
8
are checked in, check Check In Layout Evaluation.
To automatically evaluate layouts with this status in this workflow when they are sent
9
to output, check Output Layout Evaluation.
You can give a status an associated set of privileges based on the role privileges defined
10
at the server level, or you can custom design a set of privileges for the status.
• You can specify that a status grants the privileges defined for a particular role at the
server level by choosing an option from the Role drop-down menu and checking Use
Server-level Privileges.
• You can choose an option from the Role drop-down menu and then modify the
settings in the Privileges list. This does not affect the role privileges settings at the
server level; rather, it creates an exception for privileges when assets reach the chosen
status.
Click OK.
11
Use the arrows at the bottom right of the Status area to set up the statuses so that they
12
occur in the proper order (from top to bottom).
To delete a status, select it in the Status tab and click -.
To edit a status, double-click its name in the Status tab.
To duplicate a status, Option+click/right-click the status and choose Duplicate from
the context menu.
Working with forms
The Asset Form tab of the Forms pane lets you edit the asset forms for each of the
content types. The Collection Form tab lets you edit the forms associated with the
various collection types. To configure a form:
Click Forms in the navigation pane. The Forms pane displays.
1
A GUIDE TO QUARK PUBLISHING PLATFORM 10.1 | 31
Page 32

CONFIGURATION
Forms pane
Click the Asset Form or Collection Form tab.
2
Select a content type or collection type in the tree on the left and click Form Designer.
3
The Form Designer dialog box displays.
Form Designer dialog box
To display all attributes in a default layout, check Use the Default View for All Fields.
4
To add individual attributes, drag them from the Attribute Name list to the grid. To
remove an attribute, click its close box at the upper left. Use each attribute's handles
to move and resize the attribute in the grid.
Click Save.
5
Defining Roles and Privileges
All users must belong to a role. A role defines the Quark Publishing Platform privileges
for its members.
32 | A GUIDE TO QUARK PUBLISHING PLATFORM 10.1
Page 33

Roles and Privileges
A role specifies a set of privileges for working within Quark Publishing Platform
applications. Each Quark Publishing Platform user belongs to at least one role. To
create, delete, rename, and modify roles and their associated privileges, click Roles
and Privileges.
CONFIGURATION
Define classifications for different workgroup members in the Administration: Roles and
Privileges area.
• To add a role, click + (plus sign). A new role displays in the Roles column. The role's
content-type privileges display in a tree in the Content Privileges tab, and the role's
available application-specific privileges display in a tree in the Application Privileges
tab. Check privileges to enable them, and uncheck privileges to disable them. For
detailed descriptions of the available resources, see "Privileges."
• To change the name of a role, Control+click/right-click the role, then choose Rename
Role from the context menu. You can also use the toolbar or the contextual menu to
rename a role.
• To make a copy of a role, Control+click/right-click the role, then choose Duplicate
from the context menu.
• To delete a role, click – (minus sign). An alert asks you to confirm the deletion. If users
are assigned to the role, you can assign them to a different role at this time.
Creating and deleting users
To create and delete user profiles, click User Profiles.
A GUIDE TO QUARK PUBLISHING PLATFORM 10.1 | 33
Page 34

CONFIGURATION
Use the Administration: User Profiles window to add and delete users and override
user-role settings.
• To create a user profile, click +. In the Create User Profile dialog box, enter a user
name and password, enter the user's last name and first name, choose a role, and enter
the user's e-mail address and phone number. To prevent the user from logging on (for
example, if the user is on extended leave), check Disable Log On.
Specify a user's name, role, password, and access in the Create User Profile dialog box.
You can edit a user name by double-clicking it or using the contextual menu.
When you add users, you can pull them from your Lightweight Directory Application
Protocol (LDAP) list. See "Managing user lists with LDAP" for instructions. You can add
Quark Publishing Platform users in addition to users you manage through the LDAP
service.
• To delete a user profile, select the profile and click–(minus sign). An alert prompts you
to confirm the deletion. If the user had assets routed to him or her, you can reroute
the assets at this time.
34 | A GUIDE TO QUARK PUBLISHING PLATFORM 10.1
Page 35

• To duplicate a user profile, select the user profile and choose Duplicate from the
contextual menu.
Managing user lists with LDAP
Many system administrators use directory services to manage users on an enterprise
network, such as Lightweight Directory Application Protocol (LDAP). The LDAP protocol
provides global management over user names and passwords. Quark Publishing Platform
administrators are not required to use LDAP, but if they rely on LDAP for other systems,
such as e-mail, then Quark Publishing Platform can be configured so that Quark
Publishing Platform users can log on to Quark Publishing Platform Server with the
same domain username and password they use for other systems on their enterprise
network.
The LDAP service must exist within the same domain as your Quark Publishing Platform
Server.
Quark Publishing Platform Server is the only Quark Publishing Platform application
that maintains communication with the LDAP service.
CONFIGURATION
Quark Publishing Platform Server works with LDAP v3, and X.500 DAP is not required
for or supported by this implementation.
Refer to the Quark Publishing Platform Administration Guide and Quark Publishing Platform
ReadMe for more information about integrating LDAP and Quark Publishing Platform
Server.
Before you can integrate Quark Publishing Platform Server with an LDAP Directory
Server, you must create an LDAP profile and map the LDAP attributes to Quark
Publishing Platform user attributes. The topics below explain how to do this.
Managing LDAP profiles
Before you can import LDAP users into Quark Publishing Platform, you must create
an LDAP profile. An LDAP profile lets you supply the Active Directory Server credentials
that are necessary to allow you to import LDAP users.
To create an LDAP profile:
Click User Profiles.
1
Click Manage LDAP Profiles. The Manage LDAP Profile dialog box displays.
2
A GUIDE TO QUARK PUBLISHING PLATFORM 10.1 | 35
Page 36

CONFIGURATION
Manage LDAP Profile dialog box
Click the + button under the LDAP Profiles list to create a new LDAP profile.
3
Enter a name for the LDAP profile in the Profile Name field.
4
Choose the LDAP server's authentication method from the Authentication Type
5
drop-down menu. Valid values include Kerberos, Digest-MD5, and Simple.
Enter the realm name in the Realm field.
6
The convention is to enter realm names in upper-case letters.
Each profile must have a unique realm name.
Enter the user name and password of a user who has read access to the Directory Server
7
(that is, the designated name in the Directory Server). This user authentication will
be used to retrieve the list of users from the Directory Server.
To add an LDAP server to the profile, click the + button under the Servers list.
8
Click Apply.
9
Click Done.
10
Mapping LDAP attributes
Before you can import LDAP users into Quark Publishing Platform, you must map the
LDAP attributes to Quark Publishing Platform user attributes.
To map LDAP attributes:
Click User Profiles.
1
Click LDAP Attribute Mapping. The LDAP Attribute Mapping dialog box displays.
2
36 | A GUIDE TO QUARK PUBLISHING PLATFORM 10.1
Page 37

LDAP Attribute Mapping dialog box
For each field in the dialog box, specify the corresponding LDAP field.
3
Click OK.
4
CONFIGURATION
Importing LDAP users
To import users from your LDAP service:
Click User Profiles.
1
Click Import Users From LDAP. The Import Users From LDAP dialog box displays.
2
Use the Import Users From LDAP dialog box to add users to your Quark Publishing
Platform user list.
The search controls at the top of the dialog box let you specify which users you want
3
to be able to import. To create a search:
A GUIDE TO QUARK PUBLISHING PLATFORM 10.1 | 37
Page 38

CONFIGURATION
• Choose the name of the appropriate LDAP profile from the Profile Name drop-down
menu.
• Enter the search criteria in the Search Criteria field. For example, to import all LDAP
users that meet the criteria samaccountname=*, enter samaccountname=*
•
Enter the base string in the Base String field. In this string, ou is an abbreviation for
"organizational unit" and dc is short for "domain component." This string represents
the search base used to search for users in the Active Directory server computer's
hierarchy.
• Click Save to save the search and provide a name for the search in the dialog box that
displays.
Choose the search to execute. The matching users are listed on the left.
4
Select one or more names from the LDAP Users list on the left and click the right
5
arrow to add selected users to the Platform Users list on the right. The Assign Role
dialog box displays.
Use the Assign Role dialog box to assign a Quark Publishing Platform user to a role.
Choose a role from the Role drop-down menu in the Assign Role dialog box and then
6
click OK.
You can change the search criteria, execute more searches, and continue to add users
until you click OK in the Import Users from LDAP dialog box.
Click OK. The users in the list on the right are imported.
7
If you duplicate a Quark Publishing Platform user that you imported from your LDAP
service, the duplicated user is not connected to your LDAP service (that is, it's like
creating a new user).
You cannot have two Quark Publishing Platform users with the same name. If you
attempt to add a user name that is the same as an existing user name, you will not be
allowed to add the duplicate user name.
38 | A GUIDE TO QUARK PUBLISHING PLATFORM 10.1
Page 39

A Quark Publishing Platform administrator must have the "Manage LDAP Users"
privilege for the Import Users from LDAP functionality to be available.
Creating and deleting groups
If you combine users into groups, you can route an asset to a group, and any user in
that group can check out the asset and work on it. To create and delete groups, click
Groups.
CONFIGURATION
Use the Administration: Groups screen to create, edit, and delete groups of users.
• To create a group, click + (plus sign). In the resulting dialog box, enter a group name.
Use the -> arrow to add users to the group and the <- arrow to delete users from the
group.
Specify group members through the Create Group dialog box.
You can edit a group name by double-clicking it, using the toolbar, or using the
contextual menu.
A GUIDE TO QUARK PUBLISHING PLATFORM 10.1 | 39
Page 40

CONFIGURATION
Configuring Redline colors
• To delete a group, select the group and click – (minus sign). An alert prompts you to
confirm the deletion.
• To edit a group, double-click the group name.
For users with redline privileges, administrators specify colors that identify each user's
changes.
To specify redline colors:
Click Redline. The Redline pane displays.
1
The Redline screen lets you assign redline colors to users.
Select a user from the User Name list, then click the box in the Redline Color list to
2
display the Colors dialog box. Use the controls in the Colors dialog box to specify a
specific color to be applied to text when the user enters text with redlining enabled.
Alternatively, you can check Display All Redline Deletions in One Color to use a
single color for identifying deletions by all users.
Click Apply.
3
QuarkXPress and QuarkCopyDesk users can specify default redline colors and styles
to differentiate insertions and deletions in WYSIWYG, Full Screen, and Galley views.
However, when a QuarkXPress or QuarkCopyDesk user is logged on to Quark Publishing
Platform and working on an article tracked by Quark Publishing Platform, the colors
assigned by the administrator override the colors specified in the Preferences dialog
box. See A Guide to QuarkCopyDesk for information about using the Redline feature
outside of a Quark Publishing Platform workflow.
You can turn the Redline feature on and off on a status-by-status basis. For more
information, see "Working with statuses."
40 | A GUIDE TO QUARK PUBLISHING PLATFORM 10.1
Page 41

MAINTENANCE AND ASSET MANAGEMENT
Maintenance and asset management
Quark Publishing Platform provides remote server monitoring and other tools to
promote effective server maintenance. Using the Quark Publishing Platform Client,
administrators perform asset management functions to archive completed projects,
restore archives, and so forth. This chapter explains how to use these tools.
Monitoring user activity and logging off users
When you select the server name in the Quark Publishing Platform Web Administrator,
information about Quark Publishing Platform Server and the users logged on to it
displays. To use this information:
Click User Activity. The displayed list includes the number of users who are currently
1
logged on to Quark Publishing Platform Server, their names, the time and date each
user logged on, each user's machine name, and each user's application (including
Quark Publishing Platform Script Manager).
User Activity pane
To log off a user, select the user and click Log Off Users. You can select multiple users
2
to log off more than one at a time.
A GUIDE TO QUARK PUBLISHING PLATFORM 10.1 | 41
Page 42

MAINTENANCE AND ASSET MANAGEMENT
Deleting assets
You can delete assets using Quark Publishing Platform Client, QuarkCopyDesk,
QuarkXPress, or Quark Publishing Platform Web Client. Your preference settings
determine how the deletion process for checked-out and attached assets works for
each application.
To specify how Quark Publishing Platform Client, QuarkCopyDesk, QuarkXPress, or
Quark Publishing Platform Web Client responds when you attempt to delete
checked-out assets and assets attached to QuarkXPress projects, use the Checked-out
Assets and Attached Assets drop-down menus in the Asset Deletion Options area of
the respective Preferences dialog box. The controls are identical for both options.
Choose Delete Asset Without Warning to delete checked-out or attached assets
without displaying a warning. Choose Never Allow Deletion to prevent the deletion
of checked-out or attached assets. Choose Ask Before Deleting to display an alert so
you can decide each time you delete a checked-out or attached asset.
To delete assets:
Display the search results pane and select one or more assets you want to delete.
1
Click Delete in the Quark Publishing Platform Client Workspace toolbar. If the selected
2
assets are not checked out or attached to a QuarkXPress project, they are deleted. If
the selected assets are checked out or attached, the delete process continues according
to your preference settings.
Archiving assets
You can use Quark Publishing Platform Client to archive Quark Publishing Platform
assets when you're finished with them, and Quark Publishing Platform provides a
restore mechanism if you need to reintroduce these assets to your Quark Publishing
Platform workflow. Archiving assets requires the "Enable Asset Archiving" privilege.
To archive assets:
Display the Workspace pane and select one or more assets to archive.
1
Choose Actions > Archive or click Archive in the Quark Publishing Platform Client
2
Workspace toolbar. The Archive dialog box displays.
Specify a folder for storing the archives, enter an archive name, and then click
3
Archive/Save.
The selected assets are copied to the location you specify, and the attribute information
4
for these assets is combined in a single XML file.
If you check Delete Assets Afterwards in the Archive pane of the Preferences dialog
box (Quark Publishing Platform Client > Preferences), Quark Publishing Platform
asks you if you want to delete the assets after a successful archive operation. If Delete
Assets Afterwards is unchecked, the original assets remain on Quark Publishing
Platform Server.
42 | A GUIDE TO QUARK PUBLISHING PLATFORM 10.1
Page 43

Quark Publishing Platform confines an archive file and its corresponding XML file to
a single folder. When you name the XML file and the folder that contains it, you can
identify archive characteristics, such as the date the archive was created. Using
descriptive names will help you identify the archive if you need to restore the assets
later.
Your archive preferences are stored on Quark Publishing Platform Server, so your user
log-on name determines the archive preferences, regardless of the workstation you use
to archive assets. However, archive log files are stored in the same folder where you
store archive files.
Restoring assets
You can restore Quark Publishing Platform assets that have been archived if you have
the "Enable Asset Archiving" privilege.
In versions 9 and later of Quark Publishing Platform, restoring a project also restores
the corresponding versions of all assets attached to that project, and all of those assets
are attached to the project. However, if you revert to a previous version of a project,
any attached assets are detached.
MAINTENANCE AND ASSET MANAGEMENT
To restore assets:
Display the Workspace pane and choose Actions > Restore or click Restore in the
1
Quark Publishing Platform Client Workspace toolbar. The Restore dialog box displays.
On Mac OS, you can add the Restore button to your Workspace toolbar.
Use the Restore dialog box to locate the archive file you want to restore.
Select the XML file that corresponds to the archived assets you want to restore, then
2
click Restore.
Using descriptive names for the archive folder and XML file when you create the
archive will help you identify assets for restoration.
A GUIDE TO QUARK PUBLISHING PLATFORM 10.1 | 43
Page 44

MAINTENANCE AND ASSET MANAGEMENT
If one or more of the attributes for the archived assets are no longer part of the server
configuration, you can choose alternative attributes in many cases. However, when
switching attributes is not possible, the restore process skips to the next archived file.
You will need to re-create the missing attribute to restore these skipped assets.
If an asset with the same name and file type is already checked in to Quark Publishing
Platform Server, an error occurs and identifies the asset in the log file.
Your "Restore" log files are stored in the same folder where you store archive files. If
you do not have write access to the folder where you store archive files, Quark
Publishing Platform Server will prompt you to specify a location.
44 | A GUIDE TO QUARK PUBLISHING PLATFORM 10.1
Page 45

User interface
Users can access their Quark Publishing Platform workflow through the Quark
Publishing Platform Client application, Quark Publishing Platform Web Client, and
(using XTensions® software) QuarkCopyDesk and QuarkXPress. This chapter provides
an overview of the Quark Publishing Platform user interface on both Mac OS and
Windows. To learn how to perform application-specific tasks, see the other chapters
in this document.
USER INTERFACE
Roles, views, and content structure overview
Before you can use Quark Publishing Platform, you must log on to the server. By
default, the Platform includes an existing user named "Admin" with a case-sensitive
password of "Admin." Administrators use this name and password to log on for the
first time, and Quark recommends enhancing administrative security by changing the
password the first time you log on.
For all users, the name and password you use to log on are associated with a particular
role. This role determines which privileges you have and which functions are available
to you. Consequently, your view of the Quark Publishing Platform user interface may
be different from someone else's.
See "Privileges" to learn about specific privileges for a role.
The Workspace Browser window
The Workspace Browser window displays when you log on to Quark Publishing
Platform from any Quark Publishing Platform client application.
Workspace Browser window
You can use the Workspace navigation pane to work with files in Quark Publishing
Platform.
A GUIDE TO QUARK PUBLISHING PLATFORM 10.1 | 45
Page 46

USER INTERFACE
Workspace pane
You can control what displays in the main area on the right by clicking items in the
Workspace navigation pane on the left.
• Quick Search: Use the Quick Search field to search for Quark Publishing Platform
assets according to asset name, text within an asset, or a combination of asset name
and text content.
• Favorites: Drag frequently used collections and searches to this area, and they will be
available in every Quark Publishing Platform client you use. (In Quark Publishing
Platform Web Client, you can Option+click/right-click an asset and use the context
menu to add it to or remove it from the Favorites area.)
• Assignments: Displays all assets that are routed to you.
• Attachments (QuarkXPress only): Displays all assets that are attached to the active
layout.
• Depth (QuarkXPress only): Displays articles with text components that can fit in the
selected text box (within a certain range). For more information, see "QXP preferences:
Workspace > Workspace Browser."
• My Searches: Displays all of your searches. Click a search to see its results in the search
results pane. To duplicate, delete or reload a search, Option+click/right-click it and
choose Duplicate Search, Delete Search or Reload Search. You can also
Option+click/right-click a search and choose Manage Searches in order to edit, share,
duplicate, rename and delete searches.
• Shared Searches: Displays all of the shared searches that you have access to. Click a
search to see its results on the search results pane.
• Unsaved Searches: Displays all unsaved searches that you have created. To delete an
unsaved search, Option+click/right-click it and choose Delete Search.
• Collections: Displays, in tree format, all of the collections that the active user has
access to. You can add an asset to a collection by dragging the asset onto the collection
from elsewhere in the collections hierarchy, from the search results area, or from the
file system.
46 | A GUIDE TO QUARK PUBLISHING PLATFORM 10.1
Page 47

Assign
Check Out
USER INTERFACE
The options for Quark Publishing Platform Web Client are slightly different. For more
information, see "Quark Publishing Platform Web Client."
Workspace toolbar
The Workspace toolbar provides the commands listed in this section. The overflow
menu on the right side of the toolbar includes many other commands.
On Windows, the controls in the Workspace toolbar are presented using the Windows
ribbon interface. This provides additional features, including the Quick Access Toolbar
feature.
DescriptionButton
Use the Assign drop-down menu to display the assignment options: Text File, Graphic,
QuarkCopyDesk Article, QuarkCopyDesk Article Template, QuarkXPress Project, and
QuarkXPress Project Template. QuarkCopyDesk Article displays a submenu with options to
create an assignment based on an existing article or based on default specifications from your
Quark Publishing Platform Server.
Click this button to open and display the asset selected in the Workspace Browser window. The
button accommodates different conditions. If you select a checked-in asset, this button checks the
asset out. If you select an asset that you have checked-out, this button opens it. If you select an
asset that you have open, this button brings that asset's window to the front.
When you check out a file, Quark Publishing Platform automatically copies the asset to your
computer, stores it in a folder that you have designated for storing checked-out assets (or, if this
is your first checkout, prompts you to designate the folder), and opens the asset.
Cancel
Checkout
Read Only
Get
Get
Collection
Click Cancel Checkout to cancel an asset checkout without updating Quark Publishing Platform
Server with a revision. However, if you made any changes, an alert notifies you that your changes
might be lost. If you saved a revision of the asset on Quark Publishing Platform Server, the revision
becomes the current version. You can also cancel the checkout of assets that you have currently
checked out in other applications.
Click Read Only to display an asset with read-only access. You can view the asset's contents, but
you cannot change the asset.
Click Get to move a copy of the selected asset to your computer. If you have the privilege to check
in new files, you can rename the asset and check it in.
Click Get Collection to move a copy of the selected collection to your computer.
Click Check In to check in a checked-out asset selected in the search results pane.
Check In
A GUIDE TO QUARK PUBLISHING PLATFORM 10.1 | 47
Page 48

USER INTERFACE
Check In
Other
Save Revision
Publish
DescriptionButton
(MAC OS client) Click Check In Other to display the Check In Other File dialog box. This dialog
box lets you navigate to one or more assets stored locally or on a network. You can specify an
asset's attributes before checking in the asset. This dialog also lets you choose folders on the disk
to be checked in along with its content and any sub folders and their contents.
(Windows client ) Use the Check In Other drop-down menu to display the options: Check In File
and Check In Folder. Click Check In File to display the Check In Other File dialog box. This
dialog box lets you navigate to one or more assets stored locally or on a network. You can specify
an asset's attributes before checking in the asset. Click Check In Folder to check in a folder and
all of its subfolders.
Click Save Revision to display the Save Revision dialog box and update Quark Publishing Platform
Server with the most current content from the selected asset.
Click Publish to publish the selected asset in one of the following formats:
App Studio Article: publish the selected asset as an HTML5 article. You must supply App
Studio Publishing Portal credentials in QuarkXPress Server in order to be able to upload App
Studio articles to the Portal; for more information, see A Guide to QuarkXPress Server
QuarkXPress Project: publish the selected asset as a QuarkXPress project.
Collect for Ouput: deliver the selected asset, along with all references (images, audio, videos,
reference XML), to the configured delivery channel or to a particular location.
HTML: publish the selected asset in HTML format.
PDF: publish the selected asset in PDF format.
App Studio Package: publish the selected asset as an App Studio Package.
ePUB: publish the selected asset in ePUB format.
Rich Text Format: publish the selected asset in RTF format.
Refresh
Edit
Attributes
Displays
New Search
When you click Refresh, Quark Publishing Platform performs the active search again and refreshes
the search results pane.
Click Edit Attributes to display the Edit Attributes dialog box for the asset selected in the window.
Attributes are known as metadata in other systems, and they were called "headers" in earlier versions
of Quark Publishing Platform. If you have the privilege and an attribute is available, you can change
the attribute value in this dialog box and then click Update.
Use the Displays drop-down menu to control how assets display in the search results pane. For
more information, see "View display options."
For users who have the "Enable Enhanced Search Displays in Workspace Browser" privilege,
this menu also includes Project, Project and Page, Collections, and Relationships options for
asset searches. Also, the dialog box that displays when you choose Custom includes Group By
and Attachment tabs.
Click New Search to create a search with new search criteria.
Use the Saved Searches drop-down menu to execute saved searches. The Saved Searches list also
includes shared searches from other users. Choose Manage to display the Manage Saved Searches
dialog box, which lets you add, edit, share, duplicate, and delete search operations.
48 | A GUIDE TO QUARK PUBLISHING PLATFORM 10.1
Page 49

Saved
Searches
Preview
Selection
Information
Relationship
Information
USER INTERFACE
DescriptionButton
Click Preview to display a large preview of the selected image, QuarkCopyDesk article, or
QuarkXPress project. The preview window also displays navigation controls for previewing different
pages of the asset.
The Preview window remembers the last location and size.
By default, Quark Publishing Platform asset previews include the first five pages of a PDF and the
first 20 pages of a QuarkXPress project or QuarkCopyDesk article. Quark Publishing Platform
administrators can adjust the number of pages in a preview by editing configuration files. See A
Guide to Quark Publishing Platform Administration for details.
Click Selection Information to display the Selection Information dialog box. This dialog box
contains information about the selected asset or assets, such as whether you can check out the
assets or delete components.
Click Relationship Information to view the primary attachments, secondary attachments (if any),
and revision number for the asset selected in the window. For files, the Relationship Information
dialog box also displays Layout Name, Page Name, Page Index &, and Component Name. For
QuarkCopyDersk files, it displays Component Name. For XML files, it displays XPath.
View
Revisions
Index Again
Delete
Asset
Information
Click View Revisions to display the Revisions dialog box. This dialog box contains information
about the revisions tracked by Quark Publishing Platform Server for the selected asset. You can
print a revision, open a read-only copy of a revision, delete a revision, or revert to an earlier
version to designate a revision as the current version.
Click Index Again to receive updated previews from QuarkXPress Server for articles and projects.
Click Delete to remove the selected asset from Quark Publishing Platform Server.
Click Asset Information to display the More Info window, which lists all the attributes and values
for the selected asset.
Click View Slideshow to display a slideshow of the selected assets.
View
Slideshow
Duplicate
Click Duplicate Item to create a copy of the selected asset on Quark Publishing Platform Server.
A GUIDE TO QUARK PUBLISHING PLATFORM 10.1 | 49
Page 50

USER INTERFACE
Export Search
Results
Archive
Restore
DescriptionButton
You can export the results of a search as an HTML file, an XML file, a tab-delimited file, or a
comma-delimited file.
Click Archive to display the Archive dialog box to choose the archive location for the selected
asset. For more information, see "Archiving assets" and "Restoring assets."
Click Restore to display the Restore dialog box to restore one or more archived assets. For more
information, see "Archiving assets" and "Restoring assets."
Click Print to print the search results.
Print
Print Preview
Customize
(Windows only) Click Print Preview to display a preview of printed output.
On Mac OS, click Customize to display the Workspace toolbar icon controls. Clicking Customize
has the same effect as control-clicking the Workspace toolbar and choosing Customize Toolbar.
Compact View (Mac OS only)
Click Compact View to reduce the size of the Workspace Browser window and include
fewer controls. Many of the other controls automatically move to the overflow menu,
and the window identifies the name of the active application. For example, if you
choose Compact View and then switch to TextEdit, the Quark Publishing Platform
Client window displays the name of the active application and provides buttons for
checking in assets, checking out assets, viewing revisions of assets, and searching for
other assets.
Customizing the Workspace toolbar
You can customize your display on Mac OS by control-clicking the Workspace toolbar
and choosing Customize Toolbar. A window displays that allows you to add an icon
by dragging it to the toolbar or remove an icon by dragging it from the toolbar. You
can add the Customize icon to more quickly access this window. You can also add
spacing and dotted-line separators to the Workspace toolbar.
On Mac OS, use the Show drop-down menu at the bottom of the window to display
controls (such as the Check In button) with text and icons, text only, or icons only.
You can also control the size of the icons.
50 | A GUIDE TO QUARK PUBLISHING PLATFORM 10.1
Page 51

On Windows, you can add a command to the Quick Access Toolbar by right-clicking
the command.
If you decrease the size of the Workspace Browser window, increase the size of icons,
and display icons and text, the Workspace toolbar automatically generates an overflow
menu that displays on the right side of the palette to include the controls that don't
fit on the toolbar.
View display options
View display options let you control how assets display in the workspace. These options
are available from the View menu (Mac OS only) and from the icons above the
workspace area in the Workspace Browser window.
Name view
The Name submenu includes the following options.
Choose List View to display assets in a list format.
USER INTERFACE
List view
In list views, you can show and hide all columns except the Name column.
• To sort (or reverse sort) the search results according to a column, click the column
title.
• To show or hide a column, Control+click/right-click the column title and choose the
attribute.
• To show or hide multiple attributes, Control+click/right-click the column title and
choose Customize Current View. The Configure Columns tab includes all the attribute
fields for you to show or hide.
You can add the Thumbnails column to display thumbnail asset previews.
• To reposition a column, click and drag the column title.
• To resize a column, click and drag the column edge.
Quark Publishing Platform assets that match your search criteria but are not attached
to projects are listed below Unattached. Quark Publishing Platform assets that match
your search criteria but are attached to projects that have never been checked in to
A GUIDE TO QUARK PUBLISHING PLATFORM 10.1 | 51
Page 52

USER INTERFACE
the Platform Server are listed below Attached to other projects. Attached assets can
display below multiple projects if they are attached to multiple projects.
Choose Relationship View to display the relationships between assets. This lets you
determine which assets are used by other assets.
Relations view
Choose Thumbnails to display small previews of assets. You can display the color of
an asset's status in the border of the thumbnail preview by checking the Show Status
Color around Thumbnails preference (Quark Publishing Platform Client >
Preferences > Workspace). The status color border displays when you choose
Thumbnails, Filmstrip, or Detailed Thumbnails View from the Displays > Name
submenu.
Thumbnails view
Choose Filmstrip to display a large preview of the selected asset with all other assets
below it.
52 | A GUIDE TO QUARK PUBLISHING PLATFORM 10.1
Page 53

USER INTERFACE
Filmstrip view
Choose Snippet View to display a thumbnail preview for each asset, with a thumbnail
preview and other asset information to the right of the preview.
Snippet view
Project view
Project view displays search results in a hierarchical structure with QuarkXPress projects
at the top. Articles and pictures attached to each project are listed below their respective
projects.
A GUIDE TO QUARK PUBLISHING PLATFORM 10.1 | 53
Page 54

USER INTERFACE
Project view
Project and Page view
Project and Page view displays search results in a hierarchical structure with
QuarkXPress projects at the top. Each page is listed below its respective layout. Articles
and pictures in the layout are listed below their respective pages.
If one item attached to a layout matches the search, the project and all the other
attachments of the project also display.
An article or picture can display below more than one page if it is attached to multiple
pages in a project.
Project and Page view
This view is not available when you are browsing collections. To see the assets attached
to a project, use List View with Attachments.
Collections view
Collections displays search results in the hierarchical structure of the collections tree.
This view is not available when you are browsing collections.
54 | A GUIDE TO QUARK PUBLISHING PLATFORM 10.1
Page 55

Collections view
Custom view
Custom view displays search results in a hierarchical structure based on four levels of
attributes you specify. Choosing Custom displays a window with three tabs: Configure
Columns, Group By, and Explore By.
USER INTERFACE
Use the Configure Columns tab to specify the attributes you want to display as columns
in the search result.
Use the Group By tab to specify up to four hierarchical groups within which you can group
your search results. This option is not available in Quark Publishing Platform Web Client.
A GUIDE TO QUARK PUBLISHING PLATFORM 10.1 | 55
Page 56

USER INTERFACE
Use the Explore By tab to display QuarkXPress projects and attached assets or to display
assets in the collections hierarchy. This option is not available in Quark Publishing Platform
Web Client.
List View with Relationships
List View with Relationships displays assets in a list view where you can expand
projects to see their relationships, and expand articles to see their components.
List View with Relationships view
List View with Relationship Status
List View with Relationship Status displays assets in a list view where you can expand
projects to see their relationships and view their statuses.
Icon columns
In Quark Publishing Platform Client and QuarkCopyDesk, the Workspace Browser
window displays four icon columns that provide information about each asset. The
Workspace Browser window in QuarkXPress displays a fifth icon column called Local
Attachment. These icons display in columns on the left side of the Search Results
list in all extended views and List View, as well as under each asset's icon in
Thumbnails View and Filmstrip View. In order from left to right, the icons are as
follows:
• Clear Diamonds: A diamond indicates each asset's status, relative to the last search
performed in the Workspace Browser window. A green diamond indicates the asset
has been added to the list since the current search was executed. A white diamond
indicates that an asset's attributes have been updated since the current search was
56 | A GUIDE TO QUARK PUBLISHING PLATFORM 10.1
Page 57

USER INTERFACE
executed, but the asset still meets the search criteria. A gray diamond and gray shade
to the line indicate that another user changed the asset's attributes and the attributes
no longer match the search criteria. However, if you made the same change to the
asset's attributes, the asset would simply be removed from the Workspace Browser
window. If you click the Clear Diamonds icon at the top of the column, all diamonds
are removed, the Workspace Browser window is updated, and the assets no longer
matching the search are removed from the display.
Press Option/Alt while clicking the Clear Diamonds icon at the top of the column to
lock or unlock the Clear Diamonds column. When the Clear Diamonds column is
locked , asset attribute changes do not display in the Clear Diamonds column.
Clicking the diamond next to an asset name removes the diamond for that asset, but
the rest of the Clear Diamonds column in the Workspace Browser window does not
change.
• Global Attachment: A symbol indicates whether each asset is attached to a QuarkXPress
project as a primary or secondary attachment. Select an attachment in the Workspace
Browser window and click Attachment Information to determine attachment status.
You can also position your mouse over the Global Attachment icon for the asset to
display a tooltip (for example, "Indirect Picture Attachment" and "Secondary Global
Attachment").
• Local Attachment (QuarkXPress only): A symbol indicates any local attachments for
the active project (that is, "local" project). Select an attachment in the Workspace
Browser window and click Attachment Information to determine attachment status.
You can also position your mouse over the Local Attachment icon to display a tooltip
(for example, "Unattached Secondary Attachment" and "Secondary Local Attachment").
• Checked Out: A symbol indicates whether assets are checked out. If an asset is checked
out by the logged-on user, a green checkmark displays. If an asset is checked out by
another user, a red checkmark displays. If the logged-on user cannot check out the
asset, a red X displays.
• Status: A color-coded circle indicates the Quark Publishing Platform status for the
selected asset. Your Quark Publishing Platform administrator defines these statuses
and associates a color with each status. A tooltip for each color-coded circle displays
the status name.
Preview pane
The Preview pane on the right side of the Workspace window displays additional
information about the selected asset.
A GUIDE TO QUARK PUBLISHING PLATFORM 10.1 | 57
Page 58

USER INTERFACE
Preview pane
The Preview area displays a preview of the selected asset. If the asset is a project or
article, the Preview area displays a spread preview of all pages. If the asset is a project,
the Preview area can display a preview of every layout in the project. If the project
has multiple Print, Interactive, and/or App Studio layouts, a tab displays at the top for
each layout.
You cannot preview projects that contain Web layouts in the Preview area.
Beneath this area are the following tabs:
• Refers To: Displays all assets that the selected asset refers to (including assets that are
attached to it). You can right-click on a referenced asset and select Open Collection.
This takes you to the collection of the referenced asset..
• Where used: Displays all assets that refer to the selected asset..
• Attributes: Displays all of the asset's attributes. Right-click on any attribute to display
the Configure Attributes dialog box.
• The Revisions area displays the number of asset revisions. Click Revisions to display
the View Revisions dialog box. This dialog box allows you to see the full list of
revisions, view a read-only copy of a revision, revert to a previous revision, or print
the asset revision list.
Context menus are provided for references in the Refers To and Where used tabs.
If articles or projects do not display in the Preview Pane, select the assets and click
Index Again in the Workspace toolbar to receive updated asset previews from
QuarkXPress Server.
58 | A GUIDE TO QUARK PUBLISHING PLATFORM 10.1
Page 59

Menus (Quark Publishing Platform Client)
The commands in the Quark Publishing Platform Client application window's menus
vary depending on the active application, the user's role, and the pane selected on the
left side of the window.
Only the Mac OS version of the Quark Publishing Platform Client application has
menus. On Windows, use the ribbon interface.
Quark Publishing Platform Client menu (Mac OS only)
The Quark Publishing Platform Client menu includes the following commands:
• About Quark Publishing Platform Client: Displays information about Quark
Publishing Platform Client, including the version number.
• Preferences: Enables you to specify default settings and customize the way Quark
Publishing Platform Client performs on your workstation.
• Log On/Log Off: The Log On command displays the Log On dialog box. The Log
Off command logs off the user but does not exit the application.
USER INTERFACE
• Quit Quark Publishing Platform Client: Exits the application.
If you click the close icon in the upper-left corner of the Quark Publishing Platform
Client window on Mac OS, the window closes. Click the Quark Publishing Platform
Client icon in the Dock to open a new window.
This menu also contains some commands supplied by Mac OS.
File menu
The File menu provides commands for printing the Quark Publishing Platform Client
window on Mac OS and Windows, as well as the Quit and Log Off commands on
Windows.
• New Window: Displays a new Workspace Browser window.
• Page Setup: Lets you configure the printed version of the active window.
• Print: Prints the active window.
• Close: Closes the active Workspace Browser window.
• Export Search Results: Lets you export the search results displayed in the search results
pane as an HTML file, an XML file, a tab-delimited file, or a comma-delimited file.
Edit menu
The Edit menu includes the following commands:
• Undo <Last Operation>: Reverses the last operation performed on content.
• Redo <Last Operation>: Reverses the last Undo command performed on content.
• Cut: Removes the selected content and stores it on the Clipboard.
• Copy: Copies the selected content and stores it on the Clipboard.
A GUIDE TO QUARK PUBLISHING PLATFORM 10.1 | 59
Page 60

USER INTERFACE
• Paste: Pastes the Clipboard content at the text insertion point.
• Select None: Deselects all the contents of the active document, Workspace window,
or field.
• Select All: Selects all the contents of the active document, Workspace window, or
field.
• Rename: Lets you rename the selected item.
• Add: Adds a new instance of the selected item.
• Edit: Lets you edit the selected item.
• Duplicate: Makes a copy of the selected item.
• Program Language: Lets you change the language of the Quark Publishing Platform
interface.
• Delete Selection: Removes the selected content or item.
• Special Characters: Displays the Character Palette with the character options for
available fonts.
View menu
The View menu includes the following commands:
• Displays submenu: Use this submenu to control how assets display. For more
information, see "View display options."
• Compact: Use this command to change the Workspace display from Expanded View
to Compact View.
• Navigation Pane: Use this command to show or hide the navigation pane on the left.
Actions menu
The Actions menu includes the following commands: for assigning assets, checking
assets in and out, opening copies of assets, opening read-only versions of assets, viewing
asset information, viewing asset revisions, editing asset attributes, and checking in
assets in third-party file formats that cannot be opened with File > Open in QuarkXPress
or QuarkCopyDesk.
• Assign: Use the Assign drop-down menu to display six assignment options: Text File,
Graphic, QuarkCopyDesk Article, QuarkCopyDesk Article Template, QuarkXPress
Project, and QuarkXPress Project Template. QuarkCopyDesk Article displays a
submenu with options to create an assignment based on an existing article or based
on default specifications from your Quark Publishing Platform Server.
• Check In: Click Check In to check in a checked-out asset selected in the Workspace
Browser window.
• Check In Other: Click Check In Other to display the Check In Other File dialog
box. This dialog box lets you navigate to one or more assets stored locally or on a
network. You can specify an asset's attributes before checking in the asset.
• Check Out: Click Check Out to open and display the asset selected in the Workspace
Browser window.
60 | A GUIDE TO QUARK PUBLISHING PLATFORM 10.1
Page 61

USER INTERFACE
• Read Only: Click Read Only to display an asset with read-only access. You can view
the asset's contents, but you cannot change the asset.
• Get: Click Get to move a copy of the selected asset to your computer. If you have the
privilege to check in new files, you can rename the asset and check it in.
• Publish > Publish as ePUB: Click Publish as ePUB to create an ePUB document fom
a layout's Reflow view.
• Publish > Publish as Collect for Output: Click Publish as Collect for Ouput to deliver
the selected asset, along with all references (images, audio, videos, reference XML), to
the configured delivery channel or to a particular location.
• Publish > Publish as App Studio Package: Click Publish as App Studio Package to
publish the selected asset as an App Studio Package.
• Publish > Publish as App Studio Article: Click Publish as App Studio Article to
create an HTML5 App Studio article from a layout and upload it to the App Studio
Publishing Portal. Note that you must supply App Studio Publishing Portal credentials
in QuarkXPress Server in order to be able to upload App Studio articles to the Portal;
for more information, see A Guide to QuarkXPress Server.
• Publish > Publish as PDF: Click Publish as PDF to create a PDF version of an article
or layout.
• Publish > Publish as HTML: Click Publish as HTML to create an HTML version of
an article or layout.
• Publish > Publish as QuarkXPress Project: Click Publish as QuarkXPress Project to
create a QuarkXPress project from a layout.
• Publish > Publish as RTF: Click Publish as RTF to create an RTF file from a layout.
• Cancel Checkout: Click Cancel Checkout to cancel an asset checkout without
updating Quark Publishing Platform Server with a revision. However, if you made any
changes, an alert notifies you that your changes might be lost. If you saved a revision
of the asset on Quark Publishing Platform Server, the revision becomes the current
version. You can also cancel the checkout of assets that you have currently checked
out in other applications.
• Edit Attributes: Click Edit Attributes to display the Edit Attributes dialog box for
the asset selected in the window. Attributes are known as metadata in other systems,
and they were called "headers" in earlier versions of Quark Publishing Platform. If you
have the privilege and an attribute is available, you can change the attribute value in
this dialog box and then click Update.
• View Revisions: Click View Revisions to display the Revisions dialog box. This dialog
box contains information about the revisions tracked by Quark Publishing Platform
Server for the selected asset. You can print a revision, open a read-only copy of a
revision, or revert to an earlier version to designate a revision as the current version.
• Asset Information: Click Asset Information to display the More Info window, which
lists all the attributes and values for the selected asset.
• Edit Collection Template: Click Edit Collection Template to edit collection templates.
• Restore: Click Restore to display the Restore dialog box to restore one or more archived
assets.
A GUIDE TO QUARK PUBLISHING PLATFORM 10.1 | 61
Page 62

USER INTERFACE
• Archive: Click Archive to display the Archive dialog box to choose the archive location
for the selected asset.
Go To menu
When the Workspace pane is selected, you can choose Go To > Assignments to
display all assets routed to you.
If you have administrator privileges, you can use the Go To menu to navigate to the
various administration panes.
Search menu
The Search menu includes the following commands:
• New Search: Creates a search.
• Saved Searches submenu: Choose a search from the Saved Searches submenu to
perform a search with predefined criteria. Choose Manage to display the Manage
Saved Searches dialog box. This dialog box lets you view and modify saved searches,
as well as view and share searches.
• Shared Searches: Choose a search from the Shared Searches submenu to use searches
that have been shared with you. The name of the user who shared the search displays
in parentheses.
Window menu (Mac OS)
The Window menu includes the following commands:
• Minimize: Stores the active window in the dock.
• Zoom: Displays the active window on your entire monitor.
• Bring All to Front: Brings all active Quark Publishing Platform Client windows to the
front.
• The area at the bottom of the Window menu identifies the active window with a
checkmark and lists all other open windows.
Help menu
The Help menu displays the Quark Publishing Platform Help file.
Menus (QCD)
See A Guide to QuarkCopyDesk for a detailed explanation of QuarkCopyDesk menu
commands. The information below applies only to QuarkCopyDesk in a Quark
Publishing Platform environment.
When you Control+click/right-click in the layout or on an item, the Platform submenu
makes it easy to get to the commands that are appropriate in the current setting.
62 | A GUIDE TO QUARK PUBLISHING PLATFORM 10.1
Page 63

QuarkCopyDesk menu (Mac OS only)
The QuarkCopyDesk menu is a part of QuarkCopyDesk for Mac OS. This menu includes
the following Quark Publishing Platform related commands:
• Preferences > Quark Publishing Platform: Enables you to specify default settings
and customize the way QuarkCopyDesk works on your computer. Use the Quark
Publishing Platform area to specify Quark Publishing Platform specific parameters.
See "Setting Quark Publishing Platform preferences — QuarkCopyDesk" for more information.
Platform menu
The Platform menu displays when you install the Quark Publishing Platform XTensions
software module in the "XTensions" folder in your QuarkCopyDesk application folder.
This menu includes the following commands:
• Check Out Article: Displays the Check Out dialog box. This dialog box allows you
to check out a QuarkCopyDesk article, article template, or compatible third-party asset.
• Check In Article: Displays the Check In dialog box. This dialog box allows you to
check in a QuarkCopyDesk article.
USER INTERFACE
You can check in a QuarkCopyDesk template by choosing QuarkCopyDesk Template
from the Content Type drop-down menu in the Check In dialog box.
• Cancel Article Check Out: Removes a checked-out asset from your computer and
makes it available for others to check out. An alert displays, allowing you to save or
discard any changes made since your checkout. Also, if you saved a revision on Quark
Publishing Platform Server, it becomes the current version when you cancel a checkout.
• Save Article Revision: Displays the Save Revision dialog box. This dialog box allows
you to update Quark Publishing Platform Server to reflect recent changes while leaving
the article open for more editing.
• Attach Picture: Displays a dialog box that makes it easy for you to attach a picture to
the selected checked-out picture component or direct attachment. By default, all
pictures routed to you display, but you can also browse and search for other pictures.
• Replace Picture: Displays a dialog box that makes it easy for you to replace the picture
in the selected checked-out picture component or direct attachment with a new picture.
By default, all pictures routed to you display, but you can also browse and search for
other pictures.
• Edit Article Attributes: Displays the Edit Article Attributes dialog box. This dialog
box allows you to view and change attribute information for the active QuarkCopyDesk
article.
• View Revisions > Article: If you have an article checked out and displayed on screen,
this command displays the Revisions dialog box. This dialog box allows you to display
a read-only version of the article, revert the article to an earlier revision, and print the
contents of the Revisions dialog box.
• View Revisions > For All Articles: If you have the privilege and no checked-out articles
are displayed on screen, this command displays the Revisions dialog box. This dialog
box allows you to view article names, display read-only versions of articles, revert an
article to an earlier revision, and print the contents of the Revisions dialog box.
A GUIDE TO QUARK PUBLISHING PLATFORM 10.1 | 63
Page 64

USER INTERFACE
Menus (QXP)
• Workspace Browser: Displays or hides the Workspace Browser window.
• Log On/Log Off: Logs the user on to or off of a Quark Publishing Platform Server.
See A Guide to QuarkXPress for a detailed explanation of QuarkXPress menu commands.
The information below applies only to QuarkXPress in a Quark Publishing Platform
environment
When you Control+click/right-click in the layout or on an item, the Platform submenu
makes it easy to get to the commands that are appropriate in the current setting.
QuarkXPress menu (Mac OS only)
The QuarkXPress menu is a part of QuarkXPress for Mac OS. This menu includes the
following Quark Publishing Platform related commands:
• Preferences > Quark Publishing Platform: Enables you to specify default settings
and customize the way Quark Publishing Platform-related tasks are performed within
QuarkXPress on your computer. Use the Quark Publishing Platform area to specify
Quark Publishing Platform specific parameters.
Utilities menu
If Quark Publishing Platform XTensions software is installed in the "XTensions" folder
in your QuarkXPress application folder, the Utilities menu includes the following
command.
• Redline: Displays the Redline palette. For more information, see "Redlining."
Window menu
If Quark Publishing Platform XTensions software is installed in the "XTensions" folder
in your QuarkXPress application folder, the Window menu includes the following
command.
• Article: Displays the Articles palette.
• Project Attachments: Displays the Project Attachments palette, which lists the assets
attached to the active layout.
Platform menu
If Quark Publishing Platform XTensions software is installed in the "XTensions" folder
in your QuarkXPress application folder, the Platform menu displays in QuarkXPress.
This menu includes the following commands:
• Check Out > Project: Displays the Check Out dialog box. This dialog box allows you
to search for and check out a QuarkXPress project or template (or open a read-only
version of a QuarkXPress project or template).
• Check Out > Article: Lets you check out the article selected in the layout.
64 | A GUIDE TO QUARK PUBLISHING PLATFORM 10.1
Page 65

USER INTERFACE
• Check Out > Picture: Lets you check out the picture attached to the selected picture
box.
• Check Out > Library: Lets you check out a library.
• Check In > Project: Displays the Check In Project dialog box. This dialog box allows
you to check in the active QuarkXPress project.
If you also have one or more attached articles checked out when you choose Check
In Project, all articles are checked in along with the project.
You can check in a QuarkXPress template by choosing Project Template from the
Content Type drop-down menu in the Check In dialog box.
• Check In > Project With Pictures: Displays the Check In dialog box with attached
and imported pictures displayed in a list on the left. This dialog box allows you to
check in the active QuarkXPress project and its pictures.
• Check In > All Local Pictures: Lets you check in all pictures that have been locally
imported into the active layout. The pictures are not attached to the layout.
• Check In > Article: Lets you check in the article selected in the layout.
• Check In > Picture: Lets you check in the picture attached to the selected picture box.
• Check In > Library: Lets you check in the frontmost library.
• Cancel Checkout > Project, Cancel Checkout > Article, Cancel Checkout > Picture,
Cancel Checkout > Library: Removes the asset from your computer and makes it
available for others to check out.
• Save Revision > Project, Save Revision > Article: Updates Quark Publishing Platform
Server with your most current changes while leaving the project or article open for
more editing.
• Save Revision > Picture: Saves a revision of the picture attached to the selected picture
box.
• Save Revision > Library: Saves a revision of the frontmost library (if it has been
checked out from Quark Publishing Platform).
• Assign as Article: Assigns the selected text and/or picture boxes as an article.
• Assign as Picture: Assigns the picture in the selected box as a direct attachment.
• Attach Picture: Displays a dialog box that makes it easy for you to attach a picture to
the selected picture box or checked-out picture component. By default, all pictures
routed to you display, but you can also browse and search for other pictures.
• Replace Picture: Displays a dialog box that makes it easy for you to replace the picture
in the selected checked-out picture component or direct attachment with a new picture.
By default, all pictures routed to you display, but you can also browse and search for
other pictures.
• Detach: Detaches any articles or pictures assigned to the selected boxes.
• Add Component: To add a new component to an article in the active layout, select
one or more boxes and choose this option. If the layout contains more than one article,
the Select Article dialog box lets you choose which article you want to add to.
A GUIDE TO QUARK PUBLISHING PLATFORM 10.1 | 65
Page 66

USER INTERFACE
• Edit Attributes > Project, Edit Attributes > Article, Edit Attributes > Picture: Displays
the Edit <Project/Article/Picture> Attributes dialog box. This dialog box allows you
to view and change attribute information for the active QuarkXPress project,
QuarkCopyDesk article, or picture.
• View Revisions > Project, View Revisions > Article: If you have the privilege, this
command displays the Revisions dialog box. This dialog box allows you to view project
names or article information, display read-only versions of projects or the active article,
revert a project or article to an earlier revision, and print the contents of the Revisions
dialog box.
• View Revisions > Picture: If you have the privilege, this command displays the
Revisions dialog box for the picture attached to the active picture box.
• View Revisions > For All Projects: If you have the privilege and no checked-out
projects are displayed on screen, this command displays the Revisions dialog box.
This dialog box allows you to view project names, display read-only versions of projects,
revert a project to an earlier revision, and print the contents of the Revisions dialog
box.
• Update > Update All: Updates all content and geometry in the active project.
• Update > Content: Updates all the content in the active box or boxes to include the
current content of attached assets stored on Quark Publishing Platform Server.
• Update > All Content: Updates all the content in the active QuarkXPress project to
include the current content of attached assets stored on Quark Publishing Platform
Server.
• Update > Geometry: Updates Quark Publishing Platform Server to include the current
page geometry of the active box or boxes. This enables a QuarkCopyDesk user who is
working on an article attached to the active box or boxes to have exact copyfit
information for the assignment.
• Update > All Geometry: Updates Quark Publishing Platform Server to include the
current page geometry of the active QuarkXPress project.
• Workspace Browser: Displays and hides the Workspace Browser window.
• Log On/Log Off: Logs the user on to or off of Quark Publishing Platform.
Menus (Platform adapter for Microsoft Word, Excel and PowerPoint)
The Quark Publishing Platform Adapter for Microsoft Office provides the ability to
work with Platform from Microsoft Office applications natively.
The information below applies only to Microsoft Office in a Quark Publishing Platform
environment
File menu
The File menu includes the following commands.
• Save to Server & Close: Updates the Quark Publishing Platform Server with your most
current changes, checks in and then closes the document.
66 | A GUIDE TO QUARK PUBLISHING PLATFORM 10.1
Page 67

USER INTERFACE
• Open from Server: Displays the Open from Server dialog box. This dialog box allows
you to search for and check out a Microsoft document or template (or open a read-only
version of a Microsoft document or template) from the Platform server. Allows you to
search, used saved searches and change the view.
Info tab
The Info tab includes the following commands:
• Save to Server & Close: Updates the Quark Publishing Platform Server with your most
current changes, checks in and then closes the document.
• Save Revision to Server: Updates the Quark Publishing Platform Server with your
most current changes while leaving the document checked out and open for more
editing.
• Discard Changes: Discards the checkout, closes the document and makes the document
available for others to check out. An alert displays, allowing you to save or discard any
changes made since your checkout. If you saved a revision on Quark Publishing
Platform Server, it becomes the current version when you cancel a checkout.
• Edit: This will close the document and then re-open an editable checked out version
of the document. This option is only available if you have a read-only copy of a
document open.
New Document from Server tab
The New Document from Server tab includes the following commands:
• New Document from Server Template: Allows you to create a new document based
on a template. This displays the Select Template dialog box. Click
• New Document from Existing Document: Allows you to create a new document
based on an existing document. This displays the Select Document dialog box.
Preferences tab
The General tab of the Preferences dialog box enables you to specify location and
deletion options for checked-out documents.
General pane of the Preferences dialog box
The Connection Settings tab of the Preferences dialog box enables you to specify the
connection settings for Quark Publishing Platform.
A GUIDE TO QUARK PUBLISHING PLATFORM 10.1 | 67
Page 68

USER INTERFACE
Connection Settings pane of the Preferences dialog box
The Search tab of the Preferences dialog box enables you to specify the search settings
and to control how revision comments are displayed
Search pane of the Preferences dialog box
The Advanced tab of the Preferences dialog box enables you to reset all preferences
to their default state and to change the default configuration.
Advanced pane of the Preferences dialog box
68 | A GUIDE TO QUARK PUBLISHING PLATFORM 10.1
Page 69

Client tasks
Many Quark Publishing Platform operations work the same way in all Quark Publishing
Platform client applications. Following a brief overview of the Quark Publishing
Platform workflow concepts, this chapter explains how to log on to a Quark Publishing
Platform Server, change your password, check assets in and out, assign assets, search
for assets, get read-only copies of assets, save revisions of assets, and set application
preferences.
CLIENT TASKS
Understanding how Quark Publishing Platform works
Quark Publishing Platform provides the tools for teams of people to integrate their
writing, designing, and editing skills and produce content for audiences to view and
read. This section describes how Quark Publishing Platform works in practice.
An ideal publishing workflow looks like a linear progression from start to finish. But
in truth, the process often requires changes, and Quark Publishing Platform
accommodates these changes.
Quark Publishing Platform Server and Quark Publishing Platform client applications
The full Quark Publishing Platform software suite includes a Quark Publishing Platform
Server that tracks all assets and a collection of client applications for writers, designers,
artists, editors, and managers to work on assets. Quark Publishing Platform users
transfer assets to one another using client applications, and Quark Publishing Platform
Server dynamically maintains a record of this activity for all Quark Publishing Platform
users to see.
Administering a Quark Publishing Platform workflow
The Quark Publishing Platform administrator defines the workflows for Quark
Publishing Platform, creates the list of users, and assigns each user to a specific role
that governs the privileges available to that user. The Quark Publishing Platform
administrator also controls where assets are stored, the progression of steps in each
workflow, default specifications for new assets, and the attributes (descriptive metadata
fields such as name and due date) that are attached to every asset in Quark Publishing
Platform. All Quark Publishing Platform users can track assets based on these attributes.
Using XML Author with Quark Publishing Platform
With the Quark XML Author for Quark Publishing Platform, you can create XML
content in the familiar Microsoft Word interface, and use the Platform to store it and
A GUIDE TO QUARK PUBLISHING PLATFORM 10.1 | 69
Page 70

CLIENT TASKS
generate output. You can also break your content down into components and reuse
them, as needed, for maximum efficiency. For more information, see the XML Author
for Quark Publishing Platform documentation.
Using the Quark Publishing Platform Adapter for Microsoft Office
With the Quark Publishing Platform adapter for Microsoft Office (Word, Excel,
Powerpoint), you can use the familiar Microsoft Office interface, and use the Platform
to store, retrieve and manage content.
Assigning and managing assets from QXP
A Quark Publishing Platform workgroup for a brochure might include a QuarkXPress
user responsible for page layout, a QuarkCopyDesk user who writes the brochure copy,
a graphic artist who uses an image-editing application, and a remote editorial manager
who uses Quark Publishing Platform Web Client to work on text through a Web
browser.
Quark Publishing Platform users with an alternate workflow might rely almost entirely
on Quark XML Author.
Quark Publishing Platform Server is the central repository of Quark Publishing Platform.
Quark Publishing Platform users connect to Quark Publishing Platform Server from Quark
Publishing Platform clients, which include Quark Publishing Platform Client, QuarkXPress
(with Quark Publishing Platform XTensions software), QuarkCopyDesk (with Quark Publishing
Platform XTensions software), XML Author (with the XML Author Quark Publishing Platform
Adapter), Microsoft Office (with the Quark Publishing Platform Adapters for Word, Excel
and PowerPoint) and a Web browser with Quark Publishing Platform Web Client and Quark
Publishing Platform Web Admin.
Let's consider a sample workflow. Note that this is only a sample; different organizations
set up their Quark Publishing Platform workflows in different ways. In this workflow,
the QuarkXPress user often works as the content manager through which all other
work flows.
The layout artist uses QuarkXPress to create the page layout by drawing boxes for text
and graphics. Once the layout artist has created the page, he or she checks it in to
Quark Publishing Platform Server. The layout is now backed up on the server, and
every time the layout artist checks it out and back in, a new revision is created.
70 | A GUIDE TO QUARK PUBLISHING PLATFORM 10.1
Page 71

CLIENT TASKS
The layout artist checks in the layout.
Using Quark Publishing Platform, the layout artist assigns articles to QuarkCopyDesk
users and picture boxes to artists working in image-editing applications. The writers
and artists receive notification of these assignments, which can also include instructions
and other useful information in the attributes for the asset. Here, a designer has been
assigned to create a picture asset, and a writer has been assigned to write the brochure
text.
The designer receives the picture assignment, and the writer checks out the article in
QuarkCopyDesk.
It is important to note that an article created from a layout comes with geometry, which
is a description of the article's size and shape within the layout. Geometry tells the
writer exactly how much space he or she has to fill.
Having received their assignments, writers and artists can now do their part to complete
the layout. The designer creates the picture, and the writer writes the text.
A GUIDE TO QUARK PUBLISHING PLATFORM 10.1 | 71
Page 72

CLIENT TASKS
The designer creates a picture to the layout artist's specifications, and the writer writes an
article of the appropriate length.
Next, the designer and writer check in their work to update Quark Publishing Platform
Server. Now, like the layout, the picture and article are backed up in a central location,
and revisions of the assets will be saved. When the layout artist refreshes the layout,
the layout updates to show the work of the designer and the writer.
Once checked in, pictures and articles can be viewed in the layout with which they are
associated.
So far we've been looking at a linear workflow. However, workflows are not always
linear. For example, what happens if the layout artist decides that the picture should
be larger and the text should be shorter? If a layout artist changes the size of a text
box in an assigned article, Quark Publishing Platform can automatically update the
page geometry to reflect the new size of the box. The writer can then add or remove
text to fit the updated page design.
72 | A GUIDE TO QUARK PUBLISHING PLATFORM 10.1
Page 73

CLIENT TASKS
The layout artist updates the layout in Quark Publishing Platform. This automatically updates
the geometry in the article. Quark Publishing Platform notifies the writer of the change.
The writer updates the text to fit the available space, checks in the article, and all is
well.
The writer updates the text to match the updated geometry and checks in the article. The
layout updates to show the updated text.
Now, let's assume the copy editor assigned to fact checking is in another location, and
does not have access to the network where Quark Publishing Platform Server is running.
The copy editor can simply launch a Web browser, log in through Quark Publishing
Platform Web Client, check out the story, and do the copyediting. And because Quark
Publishing Platform Web Client is aware of article geometry, the copy editor knows
exactly how much space is available.
A GUIDE TO QUARK PUBLISHING PLATFORM 10.1 | 73
Page 74

CLIENT TASKS
The remote editor copyedits the article using Quark Publishing Platform Web Client.
As mentioned above, this layout-driven workflow is only one option. An organization
might instead choose to use a content-driven workflow, where the designer and writer
do their work first, and the layout artist then designs the layout to fit the content. In
such a workflow, the designer creates a picture and checks it in with Quark Publishing
Platform Client, and the writer creates an article from scratch in QuarkCopyDesk and
then checks it in with the Quark Publishing Platform XTensions software.
When this is done, the layout artist creates a layout and attaches the picture to the
layout by dragging the file icons from the Workspace Browser window to a picture
box, thus creating a relationship between the layout and the picture. The layout artist
can use the same method to attach the text of the article to a text box.
In addition, QuarkXPress users can attach the same article in separate QuarkXPress
projects. The first attachment is called the "primary attachment," or and all other
attachments are "secondary attachments." If the article content changes, all instances
are updated.
While working on an assignment, a Quark Publishing Platform user can update the
entire workgroup with the status of that assignment by using the Save Revision
command. This command updates Quark Publishing Platform Server with the most
current version of the assignment. For example, if a QuarkCopyDesk user finishes four
of five sections in a brochure assignment and then chooses Save Revision, the editor
can open a read-only copy of the text and preview it before the assignment is complete.
Routing and tracking
Many Quark Publishing Platform workflows include a sequence of hand-offs from one
team member to another. In Quark Publishing Platform, this is called routing. For
example, when a QuarkCopyDesk user completes an assignment, he or she might
route the asset to an editor who reads first drafts. Using Quark Publishing Platform
Web Client or QuarkCopyDesk, this first-draft editor might finish the job and route
the asset to a copy editor, who in turn might route it to a managing editor. As the
asset moves from workgroup member to workgroup member, other team members
can track the asset's movement using the Quark Publishing Platform search interface.
74 | A GUIDE TO QUARK PUBLISHING PLATFORM 10.1
Page 75

The Quark Publishing Platform Copytasting feature lets users view the first 255
characters in a QuarkCopyDesk article in the Workspace Browser window. Users can
also view a list of all revisions of an asset, open a read-only copy of any revision, open
a read-only copy of any current asset, and Get (retrieve) a fully editable copy of any
asset tracked by Quark Publishing Platform.
Automating output and export
Organizations often report that the final step in the publishing process — output —
requires too much time and money to accommodate last-minute changes. Quark
Publishing Platform users can streamline much of the output process by using the
Quark Job Jackets controls within QuarkXPress and Quark Publishing Platform Server
to eliminate problems before the output stage.
For final output, Quark Publishing Platform provides three ways to automate tasks.
• Within QuarkXPress and QuarkCopyDesk, users can create output styles that specify
every aspect of output. With an output style, a single action can trigger output for one
or more assets.
• Working with Automation Services or the Quark Publishing Platform Script Manager
application for Quark Publishing Platform Server, administrators can write automation
profiles or scripts that automate output based on conditions within the Quark
Publishing Platform workflow. For example, when a user changes the status of a
QuarkXPress project to "Ready for Output," an automation profile or script can output
or export the project in any of the supported formats (PostScript®, PDF,
PDF/X–1a,PDF/X–3, SWF, PPML, XML, or native QuarkXPress or QuarkCopyDesk
format). Automation Services can also transform content from one format to another
and upload content to a Web server.
CLIENT TASKS
• If an organization requires more automation, the open architecture of Quark Publishing
Platform allows third-party developers to fine-tune the output process with XTensions
software.
Archiving and restoring
When a project is complete, all the assets can be gathered for archiving within the file
system. If the designer needs to revise the brochure or create a similar project in the
future, he or she can use the Quark Publishing Platform Restore function to access the
content. For more information, see "Archiving assets" and "Restoring assets."
Logging on
You must log on to a Quark Publishing Platform Server to access assets on that server.
The Log On dialog box displays when you launch the Quark Publishing Platform
Client application, QuarkCopyDesk, or QuarkXPress. Quark Publishing Platform Web
Client users log on through the Quark Publishing Platform Welcome screen that
displays in the Internet browser window when the user enters the correct URL. If you
do not log on at launch, note that Log On displays in the Quark Publishing Platform
Client menu for Quark Publishing Platform Client, the Platform menu for QuarkXPress
A GUIDE TO QUARK PUBLISHING PLATFORM 10.1 | 75
Page 76

CLIENT TASKS
and QuarkCopyDesk, and the Welcome screen of Quark Publishing Platform Web
Client.
Use the Log On dialog box to access your Quark Publishing Platform Server and, if
necessary, change your password.
• The values in the User Name and Password field are defined for each user by the
Quark Publishing Platform administrator. For Quark Publishing Platform sites that use
Lightweight Directory Application Protocol (LDAP) to manage user lists, Quark
Publishing Platform users log on with their network user names and passwords. Log-on
passwords may or may not be case-sensitive, depending on the Quark Publishing
Platform administrator's specifications.
• The Server Name drop-down menu displays Enter the Server Name by default. But
after you have logged on to one or more Quark Publishing Platform Servers, the Server
Name drop-down menu displays the machine names and IP addresses of separate
Quark Publishing Platform Servers (if your site runs more than one Quark Publishing
Platform Server). Choose an option from the drop-down menu or enter the Quark
Publishing Platform Server's IP address and port number in the fields that display.
• The Protocol controls let you choose whether to use HTTP or HTTPS for communication
with Quark Publishing Platform Server. If you're not sure which to use, ask your Quark
Publishing Platform administrator.
• To automatically enter your user name and password the next time you log on, check
Remember Me.
• To bypass the Log On dialog box the next time you log on, check Do Not Show This
Dialog Box Again and Remember Me. If you want the Log On dialog box to display
again the next time you choose the command, choose Quark Publishing Platform
Client > Preferences, click the Startup Mode icon, and uncheck Do Not Display Log
On Dialog Box.
• To change your password, click the Change Password button. Enter your old password,
your new password, and confirmation of your new password.
When using the Quark Publishing Platform adapter for Microsoft Office (Word, Excel
and PowerPoint) there is no login dialog, you set your connection settings in the
76 | A GUIDE TO QUARK PUBLISHING PLATFORM 10.1
Page 77

Connection Settings tab of the Preferences dialog (File > Preferences). The connection
settings for the Quark XML Author Adapter for BUSDOC/DITA are set in the same way.
Creating assets (QCD and QXP)
In addition to creating QuarkCopyDesk articles and QuarkXPress projects according
to application defaults (File > New), QuarkCopyDesk and QuarkXPress users who are
logged on can create assets with default settings defined in Quark Publishing Platform
Server. For QuarkCopyDesk, the command is File > New > Article From Server Ticket.
For QuarkXPress, the command is File > New > Project from Server Ticket.
When you choose either of these commands, a New Article/Project from Server
Ticket dialog box displays. Choose the collection where you want to store the asset
from the Collection drop-down menu, then choose the Job Ticket that should define
the characteristics of the new article or project. If there is more than one Job Jackets
file associated with the collection, you can select the Job Jackets file and Job Ticket
template you want to use. (The default Job Jackets file for the collection displays in
bold.) When you're finished, click Continue. Quark Publishing Platform creates an
article or project using the Job Ticket template you select.
CLIENT TASKS
When creating a new article from Job Ticket, QuarkCopyDesk uses the dimensions
and margins defined in that Job Jackets file's default Print Layout resource. (Resources
that are not required for article creation are ignored.) If there is no such resource,
QuarkCopyDesk displays a dialog box where you can specify page dimensions and
margins. In any case, only one master page is used.
You can also create projects and articles from templates in Quark Publishing Platform.
For more information, see "Working with templates."
In QuarkXPress and QuarkCopyDesk, you can also create Quark Publishing Platform
assets by attaching or importing text or picture content and updating the Quark
Publishing Platform Server.
If you want to create a file based on a checked-out article or project, choose File > Save
As to create an asset outside of Quark Publishing Platform. If you want to check in the
asset, you must have the privilege to check in new files.
Working with collections
A collection is a group of related assets. Each collection can have one or more associated
workflows (optionally with automatic routing rules), a set of Job Jackets, a number of
associated users and groups, and revision settings for each asset type. A Quark
Publishing Platform server contains a hierarchy of collections.
Working with collection templates
Collection templates make it easier to create and maintain collections. For example,
assume you have several publications, and each publication needs its own identically
configured "Images" subcollection. Rather than creating each "Images" collection
manually from scratch, you can create an "Images Template" collection template, then
A GUIDE TO QUARK PUBLISHING PLATFORM 10.1 | 77
Page 78

CLIENT TASKS
create each "Images" collection from that template. If you later need to add a user or
make a change to the auto routing rules used by the "Images" subcollections, you can
simply make the change to the "Images Template" collection template, and the change
is automatically applied to all collections that use that collection template.
To create a collection template, Option+click/right-click a collection and choose New
Collection Template, then configure the template the way you want it (for more
information, see "Creating a collection").
Collection template icons are different from collection icons.
To create a collection from a collection template, Option+click/right-click a collection
and choose New Collection From Template, then choose a collection template in
the New Collection From Template dialog box and click Continue. Quark Publishing
Platform creates a collection from the template you indicate, as a child of the collection
you clicked. Note that you cannot change any of the settings of the new collection
(except for the name), because the collection pulls all of its settings from the collection
template.
To determine which collection template a collection is based on, look at its Collection
Template attribute. To see which collections are based on a collection template, click
that collection template in the collection tree. The collections based on that collection
template display in the Collections pane.
To break the link between a collection and its collection template,
Option+click/right-click a collection and choose Edit Collection, then uncheck Link
to Collection Template and click OK. The collection retains all of the template's
settings, but loses its link to the collection template. Any changes you make to the
collection template after this will not be applied to the collection.
There is no way to relink a collection with a collection template.
It's generally a good idea to create a collection named "Collection Templates" at the
root level of your collections hierarchy, and store all of your collection templates in
that collection.
You cannot check assets into a collection template.
Creating a collection
To create a new collection, Control-click/right-click the new collection's parent and
choose New Collection from the context menu. The New Collection dialog box
displays. Enter a name for the collection in the Collection Name field, then choose
a collection type from the Collection Type drop-down menu. The attribute form for
the selected collection type displays. (For more information, see "Working with collection
types.") The new collection will be inserted as a child of the collection you click.
78 | A GUIDE TO QUARK PUBLISHING PLATFORM 10.1
Page 79

CLIENT TASKS
Use the New Collection dialog box to set up a collection.
By default, a new collection inherits all of the characteristics of its parent collection
except for its name and attributes. However, you can change these characteristics if
you want.
To edit an existing collection, Control-click/right-click a collection and choose Edit
Collection.
Adding workflows to a collection
Each collection can have one or more workflows. You can use the same workflow for
all assets in a collection, or use different workflows for different asset types. Users can
switch an asset to a different workflow at any time.
Only users with the appropriate privileges can add workflows to a collection or change
an asset to a different workflow. For more information, see "Privileges."
To add workflows to a collection:
Control+click/right-click the collection and choose Edit Collection. The Edit
1
Collection dialog box displays.
Click Workflows in the list on the left. The Workflows pane displays.
2
A GUIDE TO QUARK PUBLISHING PLATFORM 10.1 | 79
Page 80

CLIENT TASKS
Workflows pane
To add a workflow, click +. The Workflow Mapping dialog box displays.
3
Workflow Mapping dialog box
To add a workflow to the collection, select it in the list on the left and then click the
4
right arrow button. To remove a workflow from the collection, select it in the list on
the right and then click the left arrow button.
Click OK.
5
Adding users to a collection
Each collection can have its own list of users. To add users to a collection:
Control+click/right-click the collection and choose Edit Collection. The Edit
1
Collection dialog box displays.
80 | A GUIDE TO QUARK PUBLISHING PLATFORM 10.1
Page 81
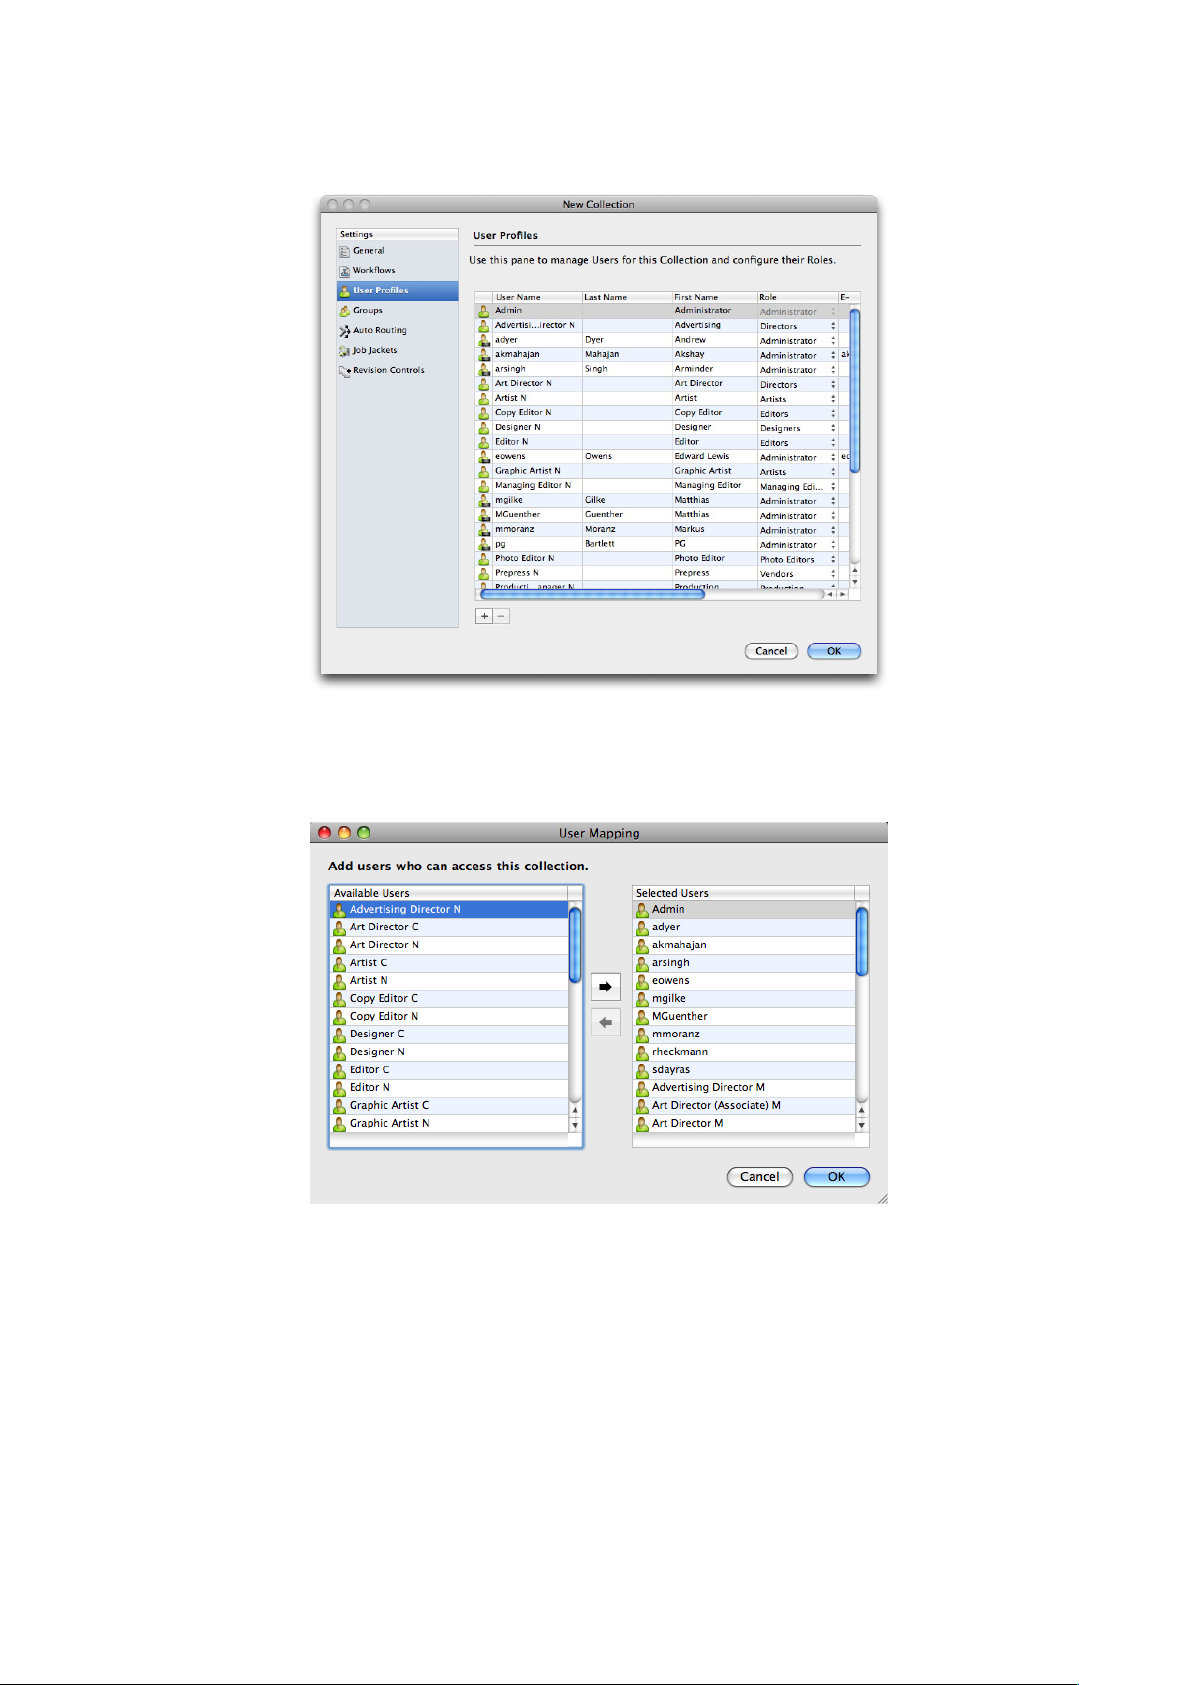
Click User Profiles in the list on the left. The User Profiles pane displays.
2
CLIENT TASKS
User Profiles pane
To add a user, click +. The User Mapping dialog box displays.
3
User Mapping dialog box
To add a user to the collection, select it in the list on the left and then click the right
4
arrow button. To remove a user from the collection, select it in the list on the right
and then click the left arrow button.
Click OK to return to the Edit Collection dialog box.
5
To change a user's role within this collection, choose a different user role for that user
6
from the drop-down menu in the Role column.
Click OK.
7
A GUIDE TO QUARK PUBLISHING PLATFORM 10.1 | 81
Page 82

CLIENT TASKS
Adding groups to a collection
Each collection can have its own list of groups. To add groups to a collection:
Control+click/right-click the collection and choose Edit Collection. The Edit
1
Collection dialog box displays.
Click Groups in the list on the left. The Groups pane displays.
2
Groups pane
To add a group, click +. The Manage Groups dialog box displays.
3
Manage Groups dialog box
To add a group to the collection, select it in the list on the left and then click the right
4
arrow button. To remove a group from the collection, select it in the list on the right
and then click the left arrow button.
Click OK.
5
82 | A GUIDE TO QUARK PUBLISHING PLATFORM 10.1
Page 83

Setting up auto routing
Routing rules let you automatically route assets to a particular user or group when
those assets reach a certain status.
You must create workflows, users and/or groups, and statuses before you can specify
workflow routing.
To set up automatic routing:
Control+click/right-click the collection and choose Edit Collection. The Edit
1
Collection dialog box displays.
Click Auto Routing in the list on the left. The Auto Routing pane displays.
2
CLIENT TASKS
Auto Routing pane
You can use this pane to set up auto routing for any of the workflows associated with
3
this collection. Choose the workflow you want to configure from the Workflow
drop-down menu. The sequence of statuses for that workflow displays.
Select a status name and click the Destination column to choose the user or group to
4
whom assets with this status should be routed.
• To specify that these assets should retain their current Route to value from the previous
status, choose No Auto Routing.
• To specify that these assets should not be routed to a specific user or group, choose
No Group or User.
• To specify that these assets should be routed to a specific group, choose the group
name.
• To specify that these assets should be routed to a specific user, choose the user name.
A GUIDE TO QUARK PUBLISHING PLATFORM 10.1 | 83
Page 84

CLIENT TASKS
Click OK.
5
Setting up Job Jackets
A Job Ticket is a package of QuarkXPress resources (preferences, style sheets, colors,
and so forth). A Job Jackets file is a container for Job Tickets. In QuarkXPress, you can
pre-configure a new project by creating that project from a Job Ticket that contains
the desired resources.
In Quark Publishing Platform, you can use a Job Jackets file to define a Job Ticket with
a collection of default resources for each collection.
Job Jackets files must be created in QuarkXPress. For more information, see A Guide to
QuarkXPress.
When you are configuring resources (for example, style sheets, colors, and H&Js) at
the collections level, make sure you do not have more than 80 resources per Job Ticket.
A larger number of resources can hinder performance in QuarkCopyDesk, QuarkXPress,
and Quark Publishing Platform Web Client. If you require more than 80 resources per
Job Ticket, you can improve performance by adding unique resources through separate
Job Tickets for each collection.
To assign Job Jackets:
Control+click/right-click the collection and choose Edit Collection. The Edit
1
Collection dialog box displays.
Click Job Jackets in the list on the left. The Job Jackets pane displays.
2
Job Jackets pane
To import a Job Jackets file, click +, navigate to the target Job Jackets file, and then
3
click Open.
84 | A GUIDE TO QUARK PUBLISHING PLATFORM 10.1
Page 85

To specify which Job Jackets file to use with the collection, select the Job Jackets file.
4
To specify which Job Ticket to use with the collection, expand its Job Jackets file and
5
then select the Job Ticket.
Controlling asset revision handling
To specify asset revision parameters for a collection:
In the Workflow navigation pane, Control-click/right-click the collection and choose
1
Edit Collection. The Edit Collection dialog box displays.
Click Revision Controls. The Revision Controls pane displays.
2
CLIENT TASKS
Revision Controls pane.
You can specify different parameters for different file types. For example, you might
3
choose to retain all versions of text files because they have relatively small file sizes,
but you might save only the original picture and the most recent revision for larger
picture files. Choose an option from the Asset Type drop-down menu.
To control the default versioning for asset check-in, click Major or Major and Minor
4
under Create a Version.
Configure revision settings for the chosen asset type:
5
• To retain every revision of the chosen asset type, click Keep All.
• To limit automatic revision retention to a specific number of early and recent versions,
click By Number and then enter values in the Keep first and keep last fields.
• To limit automatic revision retention to a specific number of days, click By Days and
then enter values in the Keep first and keep last fields.
A GUIDE TO QUARK PUBLISHING PLATFORM 10.1 | 85
Page 86

CLIENT TASKS
Editing collections
To edit a collection, Control-click/right-click the collection in the Workspace
navigation pane and choose Edit Collection from the context menu. The Edit
Collection dialog box displays. This dialog box is very similar to the New Collection
dialog box (see "Creating a collection").
All of the panes in the Edit Collections dialog box include the Apply settings to child
Collections drop-down menu.
Apply settings to child Collections drop-down menu
You can use the options in this drop-down menu to control how the changes you
make in each pane affect the active collection's child collections.
• None: No changes are made to child collections.
• Merge: This option adds the parent collection's settings to all of its child collections.
Only settings that are not already present in child collections are added to the child
collections. For example, if a child collection has a workflow named "W1," and you
assign a workflow named "W2" to the parent collection, then after the operation the
child collection has both the "W1" and "W2" workflows. If a user has different roles
assigned in the child collection and the parent collection, the role assignment for the
child collection is not changed.
• Override: This option overrides all settings for child collections with the new settings
for the parent collection. For example, if a child collection has a workflow named
"W1," and you assign a workflow named "W2" to the parent collection, then after the
operation the child collection has only the "W2" workflow.
If someone make changes to a collection, an asterisk displays in the label for the
Collections area in the Workspace navigation pane, and the collection's name displays
in italics for everyone except the user who made the change. To update the collection,
Control-click/right-click the collection in the Workspace navigation pane and choose
Refresh Collection from the context menu.
If you want to change a collection that is based on a collection template, you must
change the collection template or unlink the collection from the collection template.
For more information, see "Working with collection templates."
Duplicating a collection
When you duplicate a collection, Quark Publishing Platform creates a duplicate of
that collection, but not of the assets the collection contains. You can specify whether
you want to simply duplicate the collection or also duplicate the hierarchy inside the
collection.
86 | A GUIDE TO QUARK PUBLISHING PLATFORM 10.1
Page 87

To duplicate a collection, Control-click/right-click the collection in the Workspace
navigation pane and choose Duplicate Collection from the context menu.
Deleting a collection
To delete a collection, Control-click/right-click the collection in the Workspace
navigation pane and choose Delete Collection from the context menu.
You cannot delete a collection if it or any of its subfolders contains assets.
Appending content (QCD and QXP)
In QuarkXPress and QuarkCopyDesk, you can use the Append Content button
in the Workspace Browser window toolbar to add text from an article component to
an article component or a QuarkXPress text box. To use the Append Content button:
Select a text box in QuarkXPress or text component in QuarkCopyDesk.
1
CLIENT TASKS
Select a text component or article in the Workspace Browser window.
2
Click the Append Content button in the Workspace Browser toolbar. The text flows
3
into the text box or text component.
(Mac OS only) If the Append Content button is not visible, add it to the toolbar. For
more information, see "Customizing the Workspace toolbar."
If you are working in QuarkXPress and select an article that contains multiple
components in step 5, the Select Text Component dialog box displays, which allows
you to select a text component. If you are working in QuarkCopyDesk, text in all the
components is appended. Picture components are not appended.
The appended text is no longer linked to the article component from which it was
appended. If you change the text in the original article component, the change is not
updated in the text box or text component.
If you selected text before clicking Append Content, the appended content replaces
the selected text.
Checking in assets
Although the fields in the Check In dialog box may vary, the check-in process is
fundamentally the same for all Quark Publishing Platform client applications. The
steps vary slightly if you are checking in an asset you have checked out or if you are
checking in an asset for the first time. You can also use the Check In Other command
to check in new QuarkCopyDesk articles, QuarkXPress layouts, and files in third-party
formats.
A GUIDE TO QUARK PUBLISHING PLATFORM 10.1 | 87
Page 88

CLIENT TASKS
Check In command
The Check In command is available as a menu command and an icon.
Open the asset you want to check in to Quark Publishing Platform Server.
1
Choose Actions > Check In or select the checked-out asset in the Quark Publishing
2
Platform Client toolbar and click the Check In button. The Check In dialog box
displays.
Use the Check In dialog box to add an asset to Quark Publishing Platform Server (or return
a checked-out asset to Quark Publishing Platform Server control).
The Name list on the left shows all of the components that will be checked in along
with this asset. For example, if you're checking in an article with a picture component
and two text components, the Name list displays an item for the article, plus two child
items for the text components, plus a child item for the picture component. In addition,
the picture component has a child item for the picture in the picture component.
You can supply different attribute values for each item. If you do not specify values
for the child items, the child items inherit the values specified for the parent item.
Choose a target collection from the Collection drop-down menu.
3
You can use the search field to find a collection quickly. Mouse over each search result
to see its collection path.
Choose a workflow from the Workflow drop-down menu.
4
To indicate the asset's current status, choose an option from the Status drop-down
5
menu.
To send the asset to a particular user or group, choose an option from the Route to
6
drop-down menu. (Note that if your workflow relies on automatic status-based routing,
the Route to drop-down menu value might change automatically when you choose
an option from the Status drop-down menu.)
If you do not choose any name from the Route to drop-down menu when you check
in an asset for the first time, the asset is routed to the active user.
To specify whether the asset is saved with a major or minor version number, click
7
Major or Minor under Revision.
88 | A GUIDE TO QUARK PUBLISHING PLATFORM 10.1
Page 89

Access to the Minor option is controlled by privileges.
Use the Revision Comment field to enter a revision comment for the version of the
8
asset you are checking in. The revision comment will be stored with the asset.
Depending on the preference setting of the user who checks out the asset, the revision
comment displays during the check-out process. The revision comment also displays
when you view revisions of the asset.
Modify any other available attribute fields as appropriate. Note that access to these
9
attribute fields is determined by your privileges.
Click OK. Depending on your preferences, when the check-in process completes, Quark
10
Publishing Platform Server may delete the local copy of the asset.
Check In Other command
The Check In Other command lets you check in new QuarkCopyDesk articles,
QuarkXPress layouts, and files in third-party formats.
(MAC OS client) To use the Check In Other command, click the Check In Other
button. (Quark Publishing Platform Client users can also choose Actions > Check In
Other). Then navigate to the target asset and follow the procedure in the "Check In
command" section. Click Check In Folder to check in a folder and all of its subfolders.
CLIENT TASKS
(Windows client ) To use the Check In Other command, click the Check In Other and
the drop-down menu displays the options: Check In File and Check In Folder. Click
Check In File to display the Check In Other File dialog box.Then navigate to the
target asset and follow the procedure in the "Check In command" section. Click Check
In Folder to check in a folder and all of its subfolders.
The Last Modified and Last Modifier attributes indicate the name of the user who
checks in a file, as well as the time and date the file is checked in.
Check in multiple assets
You can check in multiple assets in one check-in process with Quark Publishing
Platform Client, QuarkXPress, and QuarkCopyDesk. The process is different if you are
checking in assets you have checked out or if you are using the Check In Other
command to check in new assets.
To check in new assets using Quark Publishing Platform Client, (MAC OS client) Click
1
Check In Other or choose Actions > Check In Other. (Windows client ) Use the Check
In Other drop-down menu to display the options: Check In File and Check In Folder.
In QuarkCopyDesk and QuarkXPress, display the Workspace Browser window and
click Check In Other. A directory dialog box displays for you to select one or more
assets.
You can select a range of assets or non-consecutive assets in the list. To select a range
2
of assets, press Shift, select the first asset in the range, select the last asset in the range,
then click Open. To select non-consecutive assets in the list, press Command/Ctrl,
select an asset, select one or more other assets you want to check in, then click Open.
A GUIDE TO QUARK PUBLISHING PLATFORM 10.1 | 89
Page 90

CLIENT TASKS
The Check In dialog box lists the assets on the left. Articles, pictures, and other files are
listed in separate groups.
Select an asset in the list on the left, and modify the attribute information on the
3
right.
The asset selection on the left determines the attribute options on the right. You can
specify attributes once for multiple assets in a group.
After you specify attributes for the assets, click OK.
4
To check in multiple assets you have checked out, select the assets in the Workspace
5
Browser window and click Check In. The Check In dialog box displays sequentially
for each asset. If Quark Publishing Platform Client users select checked-out QuarkXPress
projects or QuarkCopyDesk articles in addition to other checked-out files, the articles
and projects are not included in the sequence of Check In dialog box displays. See
"Check In command" for more information about the Check In dialog box.
In Quark Publishing Platform Client, QuarkXPress, and QuarkCopyDesk, you can also
check assets into a collection by dragging the assets from the file system to the
collection's icon in the Workspace Browser window.
Check In Project With Pictures (QXP only)
If a checked-out project contains imported pictures, you can attach the pictures and
check them in when you check in the project by choosing Platform > Check In Project
With Pictures. This command allows you to specify Quark Publishing Platform
attributes for each imported picture. See "Check in multiple assets" for more information
about the Check In dialog box for multiple assets.
In QuarkXPress, open a project that contains at least one imported picture.
1
Choose Platform > Check In Project With Pictures.The Check In dialog box displays
2
with the project name and picture names in separate groups on the left. If the project
contains only one imported picture, the picture name displays below the layout name.
Click the project name at the top of the list. The available attributes apply to the
3
project.
Click one or more pictures in the Pictures group. The available attributes apply to the
4
pictures.
90 | A GUIDE TO QUARK PUBLISHING PLATFORM 10.1
Page 91

Follow the instructions in the "Check In command" section to check in the project and
5
its imported pictures.
Save to Server (Platform adapter for Microsoft Office)
You can save a Microsoft Office (Word, Excel and PowerPoint) document to the Platform
server by using the following command::
• The Save to Server & Close command from either the File menu or the Info tab of
the File menu. This command will update the Quark Publishing Platform Server with
your most current changes and then close the document.
Selecting this command will bring up the Save dialog:
CLIENT TASKS
Choose a target collection from the collection list..
1
Enter a file name for the document in the File Name field.
2
To specify whether the asset is saved with a major or minor version number, click
3
Major Version (1.0) or Minor Version (0.1).
Access to the Minor Version (0.1) option is controlled by privileges.
A GUIDE TO QUARK PUBLISHING PLATFORM 10.1 | 91
Page 92

CLIENT TASKS
Choose a content type from the Content Type drop-down menu.
4
Choose a workflow from the Workflow drop-down menu.
5
To indicate the asset's current status, choose an option from the Status drop-down
6
menu.
To send the asset to a particular user or group, choose an option from the Routed to
7
drop-down menu. (Note that if your workflow relies on automatic status-based routing,
the Routed to drop-down menu value might change automatically when you choose
an option from the Status drop-down menu.)
If you do not choose any name from the Routed to drop-down menu when you check
in an asset for the first time, the asset is routed to the active user.
Use the Revision Comment field to enter a revision comment for the version of the
8
asset you are checking in. The revision comment will be stored with the asset.
Depending on the preference setting of the user who checks out the asset, the revision
comment displays during the check-out process. The revision comment also displays
when you view revisions of the asset.
Modify any other available attribute fields as appropriate. Note that access to these
9
attribute fields is determined by your privileges.
Click Save. Depending on your preferences, when the check-in process completes,
10
Quark Publishing Platform Adapter may delete the local copy of the asset, based on a
confirmation dialog.
Assigning assets
Assignments make it easy for each user to know which jobs they should be working
on. When you check in an asset, you can assign it to a particular user or group, or to
No One. When you assign an asset, the following things happen:
• A dialog box displays for the user to whom the asset is routed, indicating that the asset
is assigned to them.
• The asset is listed in the Assignments area in the Workflow navigation pane for the
user to whom the asset is routed.
If the asset is routed to a group, the above is true for every user in that group.
Each user can view the assets assigned to them from any Quark Publishing Platform
client in the Assignments area in the Workflow navigation pane.
92 | A GUIDE TO QUARK PUBLISHING PLATFORM 10.1
Page 93

Assignments displayed in the Workspace Browser window
Assigning assets: Quark Publishing Platform Client
Quark Publishing Platform Client users can make seven kinds of assignments from
the Actions > Assign submenu.
To make an assignment from Quark Publishing Platform Client:
CLIENT TASKS
Click Workspace in the Quark Publishing Platform Client window.
1
To assign a text file, choose Text File.
2
To assign a graphic file, choose Graphic.
3
To assign a QuarkCopyDesk article based on Quark Publishing Platform Server default
4
settings, choose QuarkCopyDesk Article > From Defaults.
To assign a QuarkCopyDesk article based on an existing QuarkCopyDesk article, choose
5
QuarkCopyDesk Article > From Article.
To assign a QuarkCopyDesk article based on a QuarkCopyDesk template, choose
6
QuarkCopyDesk Article Template.
To assign a QuarkXPress project based on an existing QuarkXPress project, choose
7
QuarkXPress Project.
To assign a QuarkXPress project based on an existing QuarkXPress template, choose
8
QuarkXPress Project Template.
You can click the Assign button in the Workspace toolbar to access the Assign
submenu.
When you create a graphic assignment, Quark Publishing Platform Client checks in a
placeholder image that can be opened in an image-editing application and replaced
with picture content.
The Content Creator field is empty when you check in a placeholder.
A GUIDE TO QUARK PUBLISHING PLATFORM 10.1 | 93
Page 94

CLIENT TASKS
Assigning assets: QXP
When you route an asset to another user, you effectively assign it to that user. But
Assign is also a specific command in the Workspace Browser window. To assign an
asset from QuarkXPress:
Open or display a QuarkXPress project.
1
Draw a box.
2
Display the Workspace Browser window (Platform menu).
3
Do one of the following things:
4
• With the box selected, click the Workspace Browser window and choose Assign. (If
you are assigning from picture boxes, you can select more than one.)
• Choose Platform > Assign as Article or Platform > Assign as Picture.
• Control+click/right-click the box and choose Platform > Assign as Article or Assign
as Picture from the context menu.
• Click Assign in the Project Attachments palette.
If you choose Assign as Picture, the Assign Picture Options dialog box displays with
5
options to assign a picture asset or a picture component of a QuarkCopyDesk article.
Choose an option and click OK. The Check In dialog box displays.
If you selected a box containing text before choosing Assign, the Check In dialog box
displays. Follow the instructions for "Check In command."
You can enter asset attribute information in the Check In dialog box.
You can assign an article as a QuarkCopyDesk article or a QuarkCopyDesk article
template by choosing an option from the Content Type drop-down menu in the
Check In dialog box.
To display the Assign Picture dialog box when you drag a picture from the Workspace
Browser window to a box in a QuarkXPress project, uncheck Attaching a picture
under Do not show Assign dialog box when in the Attachments tab of the Alerts
pane in the Preferences dialog box.
If you duplicate a picture box that contains an attached picture, the picture attachment
displays as two separate attachments in the Project Attachments palette after you
save a revision of the project or check it in.
To see which projects and articles are assigned to you, choose Platform > Workspace
Browser.
Performing a search
You can use a variety of methods to search for assets and collections in Quark Publishing
Platform. You can click Assignments in the Workspace navigation pane to display
all assets routed to you. You can click New Search to specify parameters for a new
94 | A GUIDE TO QUARK PUBLISHING PLATFORM 10.1
Page 95

search. And you can choose from predefined search operations that you have created
or that other users have shared with you.
To create a search:
In the Quark Publishing Platform Client, click the Workspace navigation pane.
1
Click New Search in the toolbar. Alternatively, you can Option+click/right-click a
2
saved search in the Workspace navigation pane and choose New Search from the
context menu.
CLIENT TASKS
A new, unsaved search
Use the drop-down menus at the top of the window to specify search criteria.
3
• Choose a file type and collection from the two drop-down menus in the Find Items
search criteria row. To search the subcollections of the selected collection as well as
the selected collection itself, check the box on the right end of the row.
• Use the controls in the Where row to narrow the search. To add a row of search options
and further narrow the search, click +.
• To specify inclusive or exclusive criteria, choose And or Or. Choosing And narrows
your search. Choosing Or widens your search.
• To delete a row, click the – (minus symbol) button for that row.
When you finish defining your search criteria, you can click Count to see how many
assets match the criteria.
If the Count value is too high, you can refine your search and save time by displaying
a smaller search.
If you plan to save this search and use it to search for different values, you can use the
4
Ask feature. To use this feature, choose an attribute from the drop-down menu, then
click the gray Ask icon . The Ask icon displays orange .
When someone executes the search, the Ask dialog box will display.
A GUIDE TO QUARK PUBLISHING PLATFORM 10.1 | 95
Page 96

CLIENT TASKS
Ask dialog box
To add a saved search to the conditions of a search, click New Search, add a row in
5
the search criteria, choose Asset matches search or Asset does not match search
from the attribute drop-down menu, and then choose a saved search from the
drop-down menu to the right of the attribute drop-down menu. You can add as many
conditions as you want on subsequent rows.
If you choose Asset matches search or Asset does not match search, searches that
contain an "Ask" parameter are not included in the list.
To execute the search, click Go.
6
To save a search for future use, click Save and specify a name for the search. The search
name is added to the My Searches area of the Workspace navigation pane and the
Search drop-down menu.
To execute a search again, Control+click/right-click the search in the Workspace
navigation pane and choose Reload Search from the context menu or click Refresh
in the toolbar.
In QuarkXPress and QuarkCopyDesk, if you add the Save as PDF button to the
Workspace Browser toolbar, you can create a PDF of your search results display. See
"Customizing the Workspace toolbar" to learn how to add the Save as PDF button.
Using the Quick Search feature
You can quickly find Quark Publishing Platform assets with the Quick Search feature,
regardless of the active application. To use the Quick Search feature, click the magnifier
icon at the top of the Workspace navigation pane.
96 | A GUIDE TO QUARK PUBLISHING PLATFORM 10.1
Page 97

Use the Quick Search control to search for assets according to text contained in the assets.
Choose an option from the drop-down menu.
• Choose Name to search according to asset name exclusively.
• Choose Content to search according to asset content exclusively.
• Choose Name and Content to search according to asset name and content.
Performing a nested search
You can narrow a search by creating a nested hierarchy of search conditions. In the
example below, the search uses a nested search to look for all assets routed to Tracy
or Pat.
CLIENT TASKS
Click New Search.
1
To add a row of search options, click +.
2
To add a nested condition, choose Asset matches condition from the Where
3
drop-down menu. The Asset matches condition dialog box displays.
Asset matches condition dialog box
Specify an attribute and choose a condition. You can click + in the Asset matches
4
condition dialog box to combine multiple conditions.
You can also click the Ask icon in the Asset matches condition dialog box to display
a prompt when a user performs a conditional search.
After you specify parameters in the Asset matches condition dialog box, click Join.
5
A GUIDE TO QUARK PUBLISHING PLATFORM 10.1 | 97
Page 98

CLIENT TASKS
Nested search
The Nested icon displays when you specify a nested search.
Performing a full-text search
The Quick Search control lets you search for assets according to text contained in the
assets.
Click the Quick Search control to display the Quick Search drop-down menu.
1
Use the Quick Search control to search for assets according to text contained in the assets.
Choose Content to search according to asset content exclusively. Choose Name and
2
Content to search according to asset name and content.
Enter text in the Quick Search field and press Enter. The Workspace Browser window
3
displays the results of your Quick Search. The search is also displayed in the Unsaved
Searches area in the Workspace navigation pane.
By default, only assets with all the text you enter in the Quick Search field are returned.
To refine your full-text search, you can use the following in the Quick Search field:
4
• Phrase search: You can specify exact wording for more than one word by enclosing
your phrase in quotation marks, such as "Bike History." A space between words in a
phrase functions like the "AND" operator, and all the words in quotation marks must
be together to display in the search results.
• Proximity search: Use "~<number of words>" after a phrase search to specify the
number of words that can exist between the words in your phrase. For example, if you
98 | A GUIDE TO QUARK PUBLISHING PLATFORM 10.1
Page 99

CLIENT TASKS
enter "Bike History" ~10, the search will find instances of "Bike" and "History" within
10 words of each other.
• Wildcard search (single character): Use "?" to specify a search with a single wildcard
character, such as "r?de" to find "ride" and "rode."
• Wildcard search (multiple characters): Use "*" to specify a search with multiple wildcard
characters, such as "ride*" to find "rider" and "riders."
• Fuzzy search: Use "~" to specify a search with a range of possibilities for a single word,
such as "gearing~" to find "hearing," "gears," and "gearing."
• Boolean operators (AND): You can narrow a search by using the "AND," "&&," and
"+" operators to search for exact word combinations. For example, you can search for
"Bike" and "History" by entering Bike AND History in the Quick Search field. Use "+"
before search terms to search for one mandatory term and another possible term. For
example, use +Bike History to find instances where "Bike" exists and "History" might
or might not exist.
Boolean operators must be entered in ALL CAPS.
• Boolean operators (OR): You can expand a search by using the "OR" operator to search
for one or more words. For example, if you enter "Bike" OR "History" in the Quick
Search field, the results can include one or both words.
By default, a space between search terms works like the "AND" operator.
• Boolean operators (NOT): You can limit a search by excluding certain words after
"NOT" in the Quick Search field. For example, if you enter "Bike History" NOT "History
of Skiing," the search results will not include the "History of Skiing" text string
combinations.
You can use "!" or "-" instead of "NOT."
You cannot use the "NOT" operator with a single term, such as NOT "Bike History."
Performing a collection search
You can use a collection search to locate a collection that has specific attributes. To
perform a collection search:
Click the Workspace navigation pane.
1
Click New Search in the toolbar. In Quark Publishing Platform Web Client, click New
2
Search in your browser window.
In the Find Items drop-down menu, click Collections to make collection options
3
available.
To search a particular collection, choose the collection's name from the following
4
drop-down menu. You can also type the collection's name in the Quick Search field.
To search the selected collection's subcollections, check the box at the end of the first
5
row.
A GUIDE TO QUARK PUBLISHING PLATFORM 10.1 | 99
Page 100

CLIENT TASKS
Use the drop-down menus at the top of the window to specify search criteria.
6
• Use the controls in the Where row to narrow the search. To add a row of search options
and further narrow the search, click +.
• To specify inclusive or exclusive criteria, choose And or Or. Choosing And narrows
your search. Choosing Or widens your search.
• To delete a row, click the – (minus symbol) button for that row.
When you finish defining your search criteria, you can click Count to see how many
collections match the criteria.
If the Count value is too high, you can refine your search and save time by displaying
a smaller search.
To execute the search, click Go.
7
Not all view options are available for the results of collection searches.
To save a search for future use, click Save and specify a name for the search. The search
name is added to the My Searches area of the Workspace navigation pane and the
Search drop-down menu.
To execute a search again, Control+click/right-click the search in the Workspace
navigation pane and choose Reload Search from the context menu or click Refresh
in the toolbar.
In QuarkXPress and QuarkCopyDesk, if you add the Save as PDF button to the
Workspace Browser toolbar, you can create a PDF of your search results display. See
"Customizing the Workspace toolbar" to learn how to add the Save as PDF button.
Search from here
To create a search that starts from a particular collection, Option+click/right-click that
collection and choose Search from Here. Quark Publishing Platform creates an unsaved
search in that collection and includes its subcollections.
You can limit the search to that particular collection by unchecking Search this
Collection and its Subcollections (on the right end of the first row in the search
interface).
Working with saved searches
To save the active search for future use, click Save and specify a name for the search.
The search name is added to the My Searches area of the Workspace navigation pane
and the Search drop-down menu.
To return to an unsaved search, click the search in the Unsaved Searches area in the
Workspace navigation pane. Unsaved searches are named "New Search XX," where
XX is a number.
100 | A GUIDE TO QUARK PUBLISHING PLATFORM 10.1
 Loading...