


EYR1500L-3B

INSTALLATION
INSTRUCTIONS
2
Condor Rangehood Installation Instructions
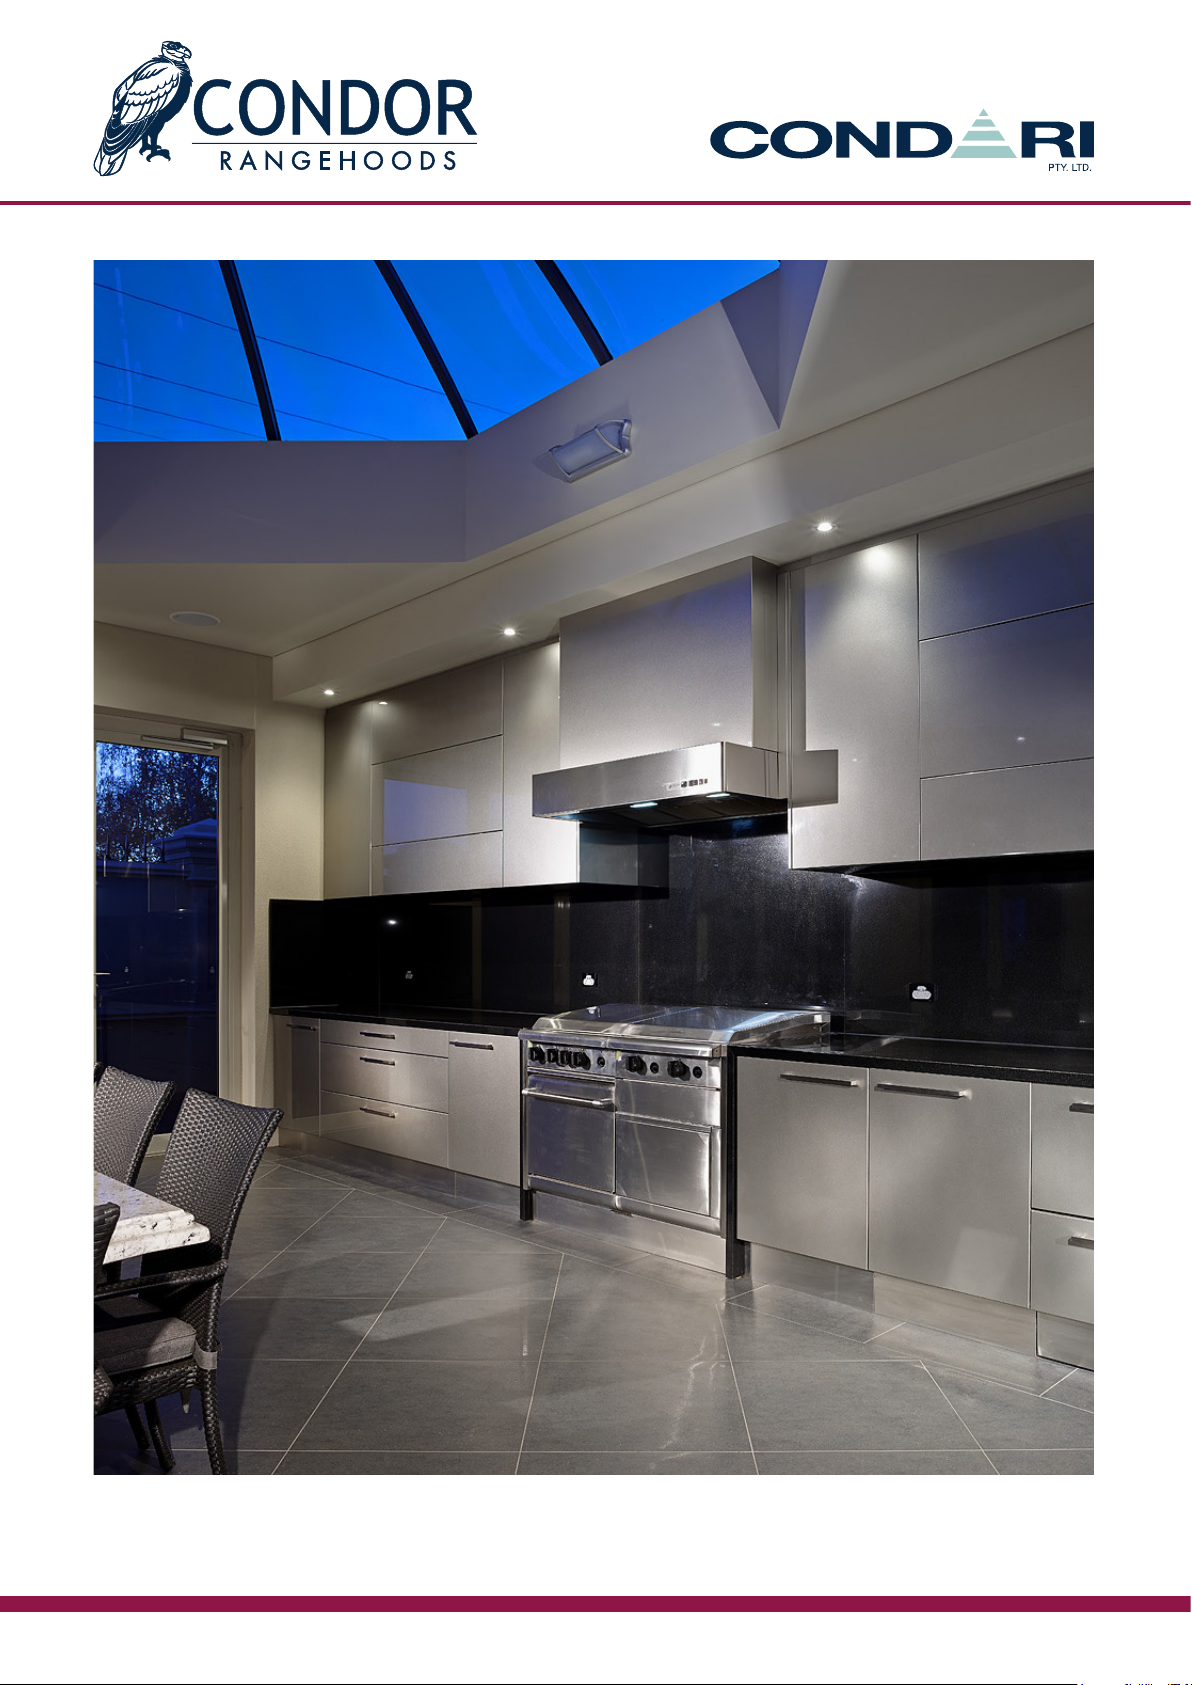
Boston Rangehood
Photo courtesy of TMA Kitchen Design
3
Condor Rangehood Installation Instructions
Warranty
Important Information
Instructions for Models
BCM / EYR / BAL
Instructions for Models
FAL / AUS / MIL / TAN
Operation Details, Rangehood Cleaning, Filter Cleaning
Ducting Pieces
Remote Switching Specications
Guarantee & Exclusions
4
6
19
13
21
23
24
26

4
Condor Rangehood Installation Instructions
CONDARI PTY LTD makes over 120 different models of QASAIR and CONDOR Rangehoods plus many
specials designed by architects and interior designers.
It is important to follow the installation instructions for each model.
The following is general advice for the installation of CONDOR Rangehoods.
Gas regulations require different heights for different brands of hoods. CONDOR hoods can be tted between
1000 mm to 1400 mm above the barbecue. This is due to the fact they do not have plastic motors.
1. The installation of CONDOR Rangehoods must comply with the information in this booklet. CONDOR
Rangehoods are designed and made to work efciently over all domestic barbecues available on the
Australian market.
2. Every CONDOR Rangehood must be ducted to the outside atmosphere by the use of zinc-alume duct or
non-porous and non-ammable materials. We do not recommend the use of any type of exible ducting
or plastic PVC piping (barbecue heat output will affect exible ducting and cause it to desintegrate).
Rangehoods must not be vented into a wall cavity or a ceiling space. This prevents a build up of grease,
which can be a re risk. Ensure the external outlet vent does not restrict the airow in any way, as this may
result in reduced performance.
3. CONDOR Rangehoods must be ducted in duct work equivalent to the outlet of the rangehood
ie: The cross sectional area of the rangehood outlet and the duct work must be equal. Do not reduce the
duct size or have sharp bends. Enlarge the duct size if the duct is to run 6 metres or longer. Advice from
CONDOR is available to ensure optimum performance. Always use nonammable materials to minimise the
risk of re in the duct at a later date.
4. Ensure all ducting pieces are correctly tted and sealed with either duct tape or silicone to ensure that fumes
do not escape into the ceiling space and seep into living areas through vents or light ttings. The installation
and tting of the rangehood should be done in such a way that will allow the unit to be removed if service is
required. Additional costs incurred in the removal of wall tiles, damage to walls or bench tops are not covered
by warranty.
5. Always adequately ventilate the room when the rangehood is in use at the same time as appliances burning
gas or other fuels.
6. WARNING: Incorrect venting will result in additional noise and a reduction in efciency. Exhaust air must not
be discharged into any chimney or ue, which may carry combustible products from other sources.
a) Do not discharge the air-ow from the rangehood into a ue used for exhausting fumes
from burning gas or fuel;
b) A reduction in ducting size will result in the motors eventually failing and will need replacement.
c) For cleaning purposes please refer to page 23 of installation instructions for stainless steel;
d) If cleaning is not carried out in accordance with the instructions as listed on page 23, you
may have an increased risk of re;
e) Accessible parts of the rangehood may become hot when used with cooking appliances;
f) This appliance is not intended for use by persons (including children) with reduced physical,
sensory or mental capabilities, or lack of experience and knowledge, unless they have been given
supervision or instruction concerning use of the appliance by a person responsible for their safety.
IMPORTANT INFORMATION

5
Condor Rangehood Installation Instructions
7. If the supply cord is damaged, an authorised service centre or licensed electrician must replace it.
8. NOTE: CONDARI recommend minimum air movement of 2000 cubic metres per hour and recommend up
to 2700 cubic metres per hour over a barbecue, depending on the length of the duct run. Barbecues should
be positioned under the centre of the hood where the fans are mounted and not near the outer edges where
leakage may occur. Please also note barbecue lid position, as if it does not open to a 90 degree angle the
smoke and by-products can be diverted forward and away from the rangehood catchment area.
9. The lights in the rangehoods are LED.
10. To reduce the risk of xing screws coming in contact with live parts, do not drill or screw into the rangehood.
Live wires are encapsulated where possible to prevent user contact. If necessary drill from the inside out and
only through single sheet material.
11. CONDARI can manufacture rangehoods to be used over commercial cookers in domestic applications.
NOTE: Installation must comply with local State & Council regulations.
6
Condor Rangehood Installation Instructions
INSTALLATION INSTRUCTIONS CONDOR RANGE
To suit wall mounted models:
• Boston
• Eyre
• Baltimore
1. Determine hood position on wall 1000mm to 1400mm above the cooking surface. The installer should check
for state and local regulations in case additional requirements may apply.
2. Mark centre line on wall.
3. Mark base line on wall.
4. Mark the outlet hole in the ceiling or wall for the outlet and cut out, removing any obstructions.
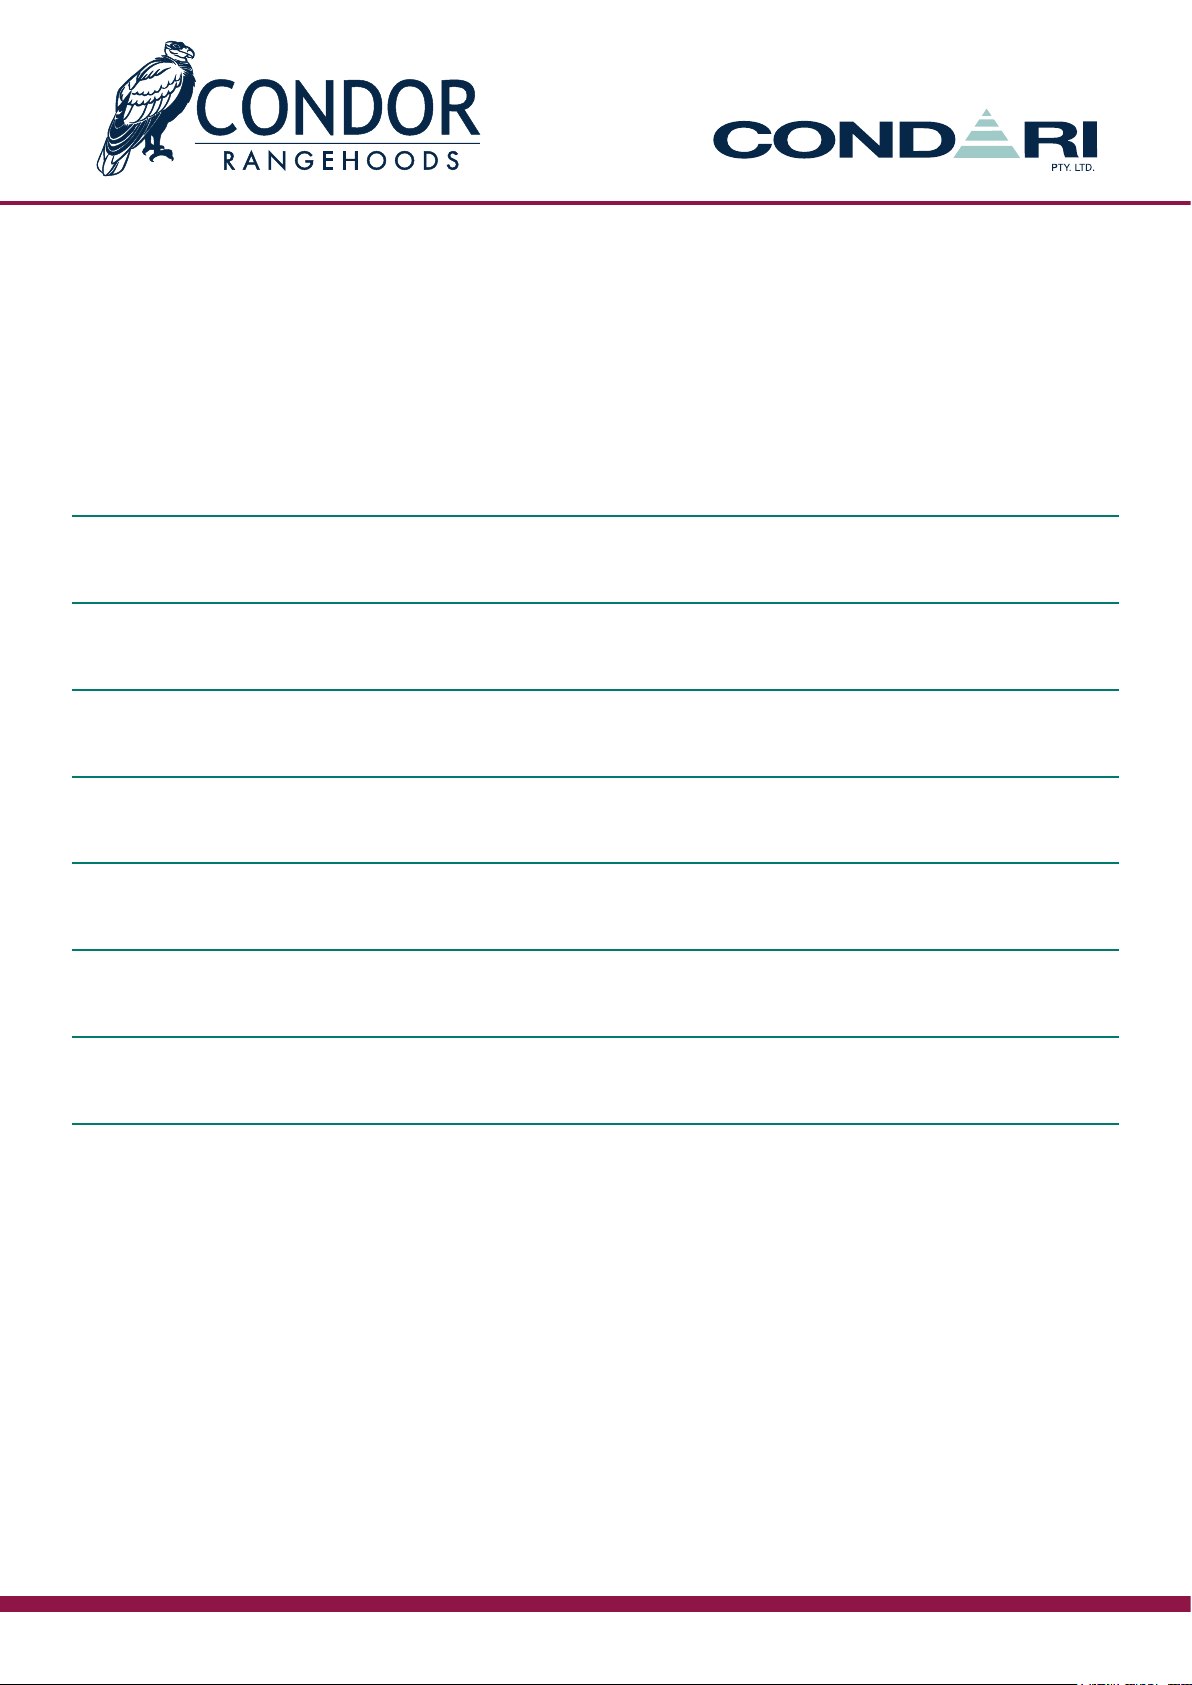
5. Remove the rear insulation panels in hood by removing the lower screws for each panel. slide panel
upwards, pull lower part of insulation panel to clear lower bracket then slide downwards. For the Eyre model
similar insulation panels can be removed from top to access area above the inner fanbox.
6. Locate drill mounting holes in wall as high and wide as possible to suit Rangehood to avoid sagging from
wall.
7. Drill xing holes in rear of hood to suit mounting holes on wall.
8. Remove protective lm from wall mounting bracket and x to wall at base height of hood making sure this is
level and exactly central.
9. Locate position and cut hole for power cable. Consult your electrician for his preferred location.
10. If tting optional Condor ue (CFL-XXX refer pg.11) to suit Baltimore & Boston models, t the ue to top of
Rangehood and secure by bending the 4 tabs over from inside the Rangehood.
11. Remove fans if needed and lift hood up onto wall mounting bracket carefully locating outlet through hole in
ceiling/wall and bringing power cable into hood during this process. Take care when lifting ranghood into
position and ensure you have enough people to lift safely.
7
Condor Rangehood Installation Instructions
12. Using appropriate xing method to safely support Rangehood, secure Rangehood to wall making sure
Rangehood is level and sitting properly on the wall mounting bracket. If required, for the Eyre model t 8mm
all thread (threaded rod) through holes in top of Rangehood and secure to roof structure, secure Rangehood
with washers and nuts. Level Rangehood by tensioning the 8mm nuts, do not over tighten. It is advisable to
use props or portable stands when attaching the Rangehood to the wall or ceiling.
13. Ret insulation panel in the rear/top of the Rangehood and ret fans if they have been removed.
14. Electrical connection can now be made by a licensed electrician to the junction box inside bottom right side
of Rangehood.
15. Extend ducting through to exterior and t roof cowl or wall vent. Making sure to seal roof/wall penetration with
preferred ashing material, consult your plumber for the best product to suit.
INSTRUCTIONS TO CHANGE THE ORIENTATION OF THE
RANGEHOOD OUTLET PLATE
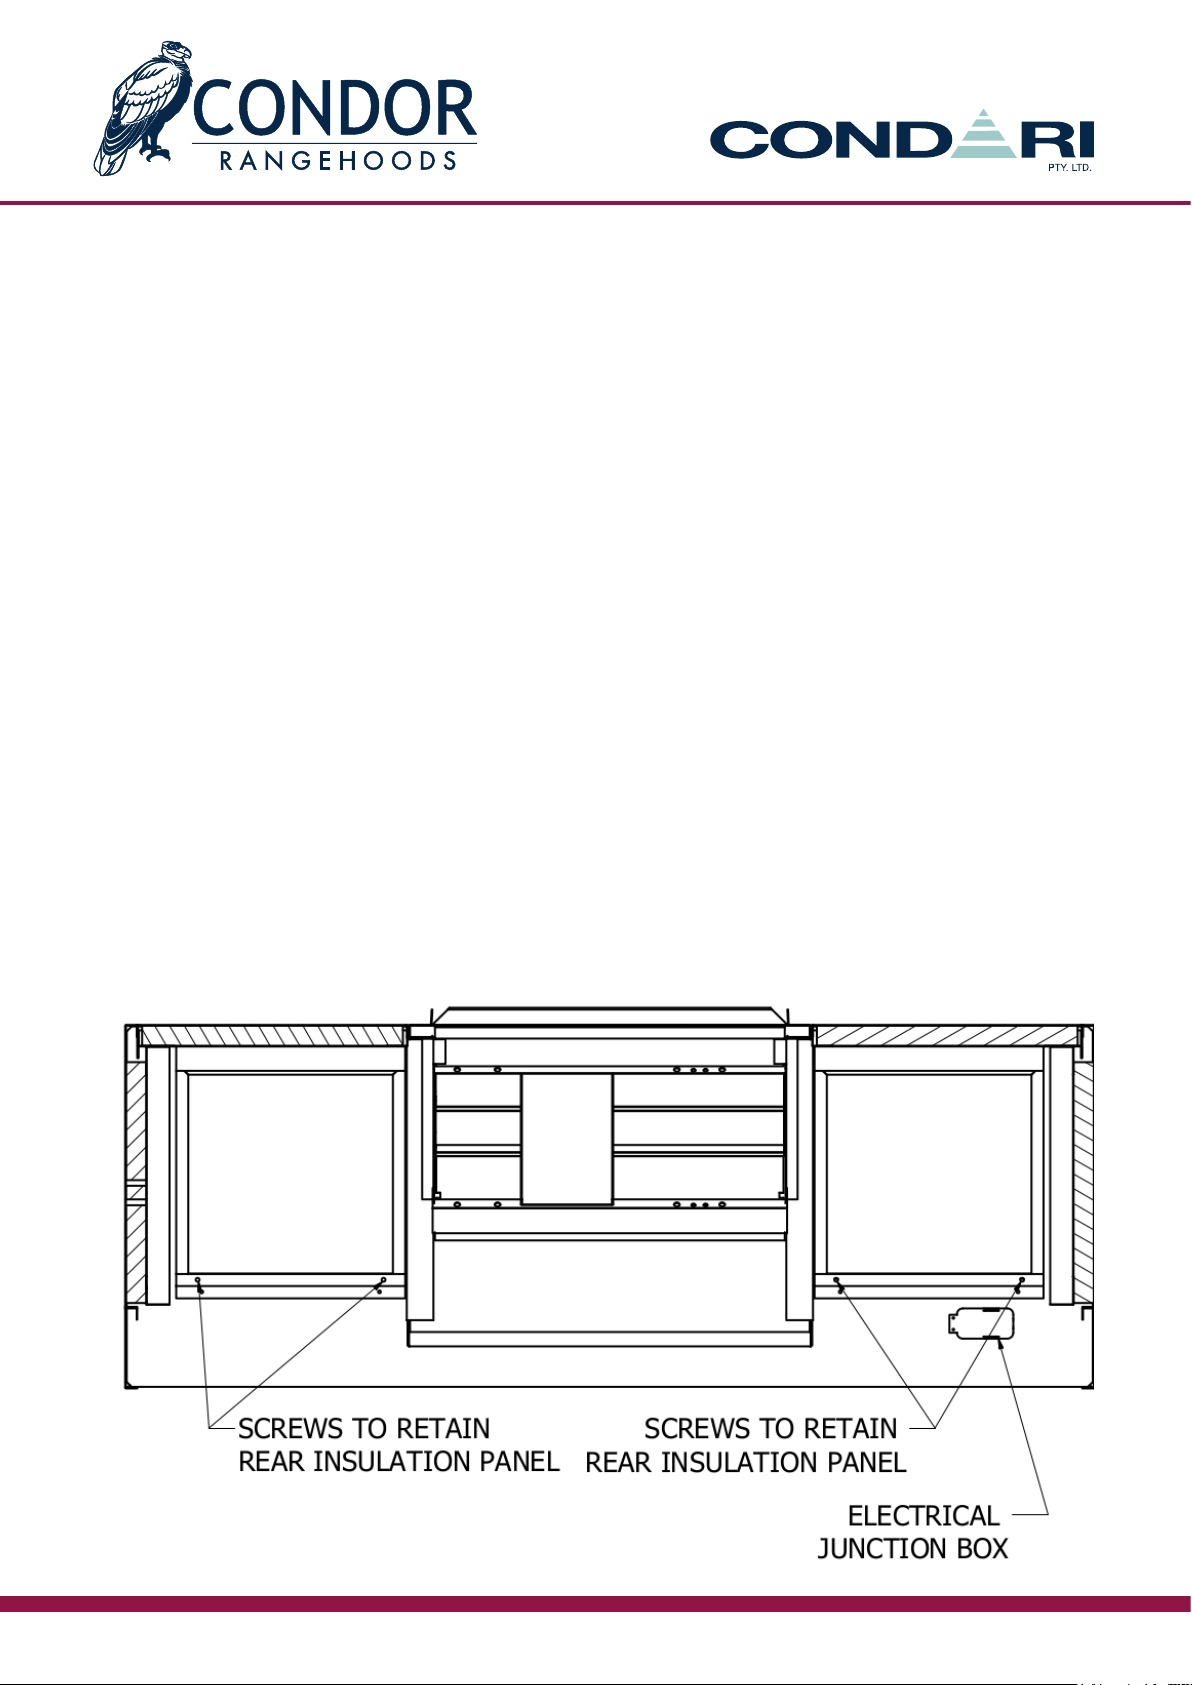
1. Locate and remove 6x M4 Phillips head screws as shown below.
2. Once all screws are removed, push rangehood outlet plate from the inside of the rangehood outwards. Do
not push the fans as they are xed.
3. Reorient rangehood outlet plate from top to back ducted or vice versa, relocate back into range hood and
replace 6x Phillips head screws removed previously.
 Loading...