


Qasair EAS120L2B, EAS120LT2, WCV1300L3B, WCV1300L3T, WES120L2B Installation and Operation Guide
...UNDERCUPBOARD
INSTALLATION & USER
INSTRUCTIONS

|
|
|
|
|
|
|
|
|
|
|
|
|
|
|
|
|
|
|
|
|
|
|
|
|
|
|
|
|
|
|
|
|
|
|
2 |
|
|
|
Qasair Rangehoods Installation Instructions |

|
|
|
|
|
|
|
|
|
|
|
|
|
|
|
|
|
|
|
|
|
|
|
|
|
|
|
|
|
|
|
|
|
|
|
|
|
|
|
|
|
Important Information |
4 |
|
||||
|
|
|
|
|
|
|
|
|
Cutout Dimensions |
6 |
|
||||
|
|
|
|
|
|
|
|
|
Duct Direction Change Instructions |
7 |
|
||||
|
|
|
|
|
|
|
|
|
Instructions for Models |
|
|
||||
|
MT / MC |
8 |
|
||||
|
|
|
|
|
|
|
|
|
Instructions for Models |
|
|
||||
|
FA |
11 |
|
||||
|
|
|
|
|
|
|
|
|
Instructions for Models |
|
|
||||
|
CON / NDCH / LIS / ETN |
13 |
|
||||
|
|
|
|
|
|
|
|
|
Instructions for Models |
|
|
||||
|
WCV |
23 |
|
||||
|
|
|
|
|
|
|
|
|
Instructions for Models |
|
|
||||
|
WES / EAS |
27 |
|
||||
|
|
|
|
|
|
|
|
Remote Switching Specifications |
31 |
|
|||||
|
|
|
|
|
|
|
|
|
Ducting Pieces |
34 |
|
||||
|
|
|
|
|
|
|
|
|
Installation Ideas |
46 |
|
||||
|
|
|
|
|
|
|
|
|
Operation Details, Rangehood Cleaning, Filter Cleaning |
51 |
|
||||
|
|
|
|
|
|
|
|
|
Appliance Guarantee |
52 |
|
||||
|
|
|
|
|
|
|
|
|
Guarantee Exclusions |
53 |
|
||||
|
|
|
|
|
|
|
|
|
Standard Warranty / Extended Warranty |
54 |
|
||||
Qasair Rangehoods Installation Instructions |
3 |

IMPORTANT INFORMATION
The installation of QASAIR Rangehoods must comply with the information in this booklet. QASAIR Rangehoods are designed and made to work efficiently over all domestic cookware available on the Australian market.
Clearance from cooktop to Rangehood
For electric hot plate cooktops
As there are no regulations for Rangehoods over an electric hot plate, please follow the manufacturers Instructions /
Recommendations.
For Induction cooktops
Induction cooktops may present problems with condensation on filters of Rangehoods.
All Qasair Rangehoods installed above an induction cooktop must be installed no less than 750mm between the induction cooktop and the Rangehood, with the exception of the Eastmore (EAS) Rangehood which can be installed no less than 600mm. Undermount (NDCH) and Conley (CON) Rangehoods are not suitable for induction cooktops.
For gas cooktops
All Qasair Rangehood installations over a gas appliance must comply with (AS/NZS 5601.1).
The Regulations for the installation of Gas Appliances (AS/NZS 5601.1) states that the clearance between the highest part of the burner of a gas cooking appliance and a Rangehood be no less than 600mm. If the gas appliance is designed for use without a cooking vessel like an indoor barbecue or open flame grill, then the clearance from the cooking surface to the Rangehood shall be no less than 1200mm.
All Qasair Rangehoods installed above a gas cooktop must be installed no less than 600mm between the highest part of the burner and the Rangehood.
The recommendation for Qasair Wallmount Rangehoods is that they be installed between 700 to 800mm above the highest part of the burner. When the Rangehood is installed in a galley or partially enclosed kitchen the Rangehood can be installed between 900 to 1000mm above the highest part of the burner.
Qasair Island Rangehoods should not be installed any higher than 800mm above the highest part of the burner as any movement around the bench will result in fumes being drawn out from the catchment area of the Rangehood with the exception of the Thermidor and Liverpool which for aesthetic reasons is installed flush with the ceiling.
Ducting
1.Every QASAIR Rangehood must be ducted to the outside atmosphere by the use of zinc-alume duct or non-porous and non-flammable materials. Do not use of any type of flexible ducting or plastic PVC piping.
Rangehoods must not be vented into a wall cavity or a ceiling space. Externally ducting the rangehood prevents a build up of grease, which can be a fire risk. Ensure the external outlet vent does not restrict the airflow in any way, as this may result in reduced performance.
2.QASAIR Rangehoods must be ducted in duct work equivalent to the outlet of the rangehood ie: The cross sectional area of the rangehood outlet and the duct work must be equal. Do not reduce the duct size or have sharp bends. Enlarge the duct size if the duct is to run 6 metres or longer. Advice from CONDARI is available to ensure optimum performance. Always use nonflammable materials to minimise the risk of fire in the duct.
3.Ensure all ducting pieces are correctly fitted and sealed with either duct tape or silicone to ensure that fumes do not escape into the ceiling space and seep into living areas through vents or light fittings.
4 |
Qasair Rangehoods Installation Instructions |

Other Important Information
1.Always adequately ventilate the room when the rangehood is in use at the same time as appliances burning gas or other fuels.
2.WARNING: Incorrect venting will result in additional noise and a reduction in efficiency. Exhaust air must not be discharged into any chimney or flue, which may carry combustible products from other sources.
a)Do not discharge the air-flow from the rangehood into a flue used for exhausting fumes from burning gas or fuel;
b)For cleaning purposes please refer to page 51 of installation instructions for stainless steel;
c)If cleaning is not carried out in accordance with the instructions as listed on page 51, there may be an increased risk of fire;
d)Some parts of the rangehood may become hot when cooking;
e)This appliance is not intended for use by persons (including children) with reduced physical, sensory or mental capabilities, or lack of experience and knowledge, unless they have been given supervision
or instruction concerning use of the appliance by a person responsible for their safety.
3.The installation and fitting of the rangehood should be done in such a way that will allow the unit to be removed if service is required. Additional costs incurred in the removal of wall tiles, damage to walls or bench tops are not covered by warranty.
4.To reduce the risk of fixing screws coming in contact with live parts, do not drill or screw into the rangehood. Live wires are encapsulated where possible to prevent user contact. If necessary drill from the inside out and only through single sheet material.
5.NOTE: CONDARI recommend an air movement of between 1000 to 1400 cubic metres per hour over an indoor barbecue, depending on the length of the duct run. Ensure a twin motor unit is installed over indoor barbecues for optimum results. Barbecues should be positioned under the centre of the hood where the fans are mounted and not near the outer edges where leakage may occur.
6.The lights in the rangehoods are LED and come with a night light except for D400L-1 and SEN400L-1.
7.If the supply cord is damaged, an authorised service centre or licensed electrician must replace it.
8.Do not flambé under the rangehood.
9.QASAIR domestic rangehoods must not to be used over barbecues approved for outdoor use only, CONDARI make a range of hoods specifically for outdoor barbecues in alfresco areas under the CONDOR name.
10.CONDARI can manufacture rangehoods to be used over commercial cookers in domestic applications.
12. NOTE: Ensure all requirements are met with gas and electrical regulations and or state authorities.
Qasair Rangehoods Installation Instructions |
5 |

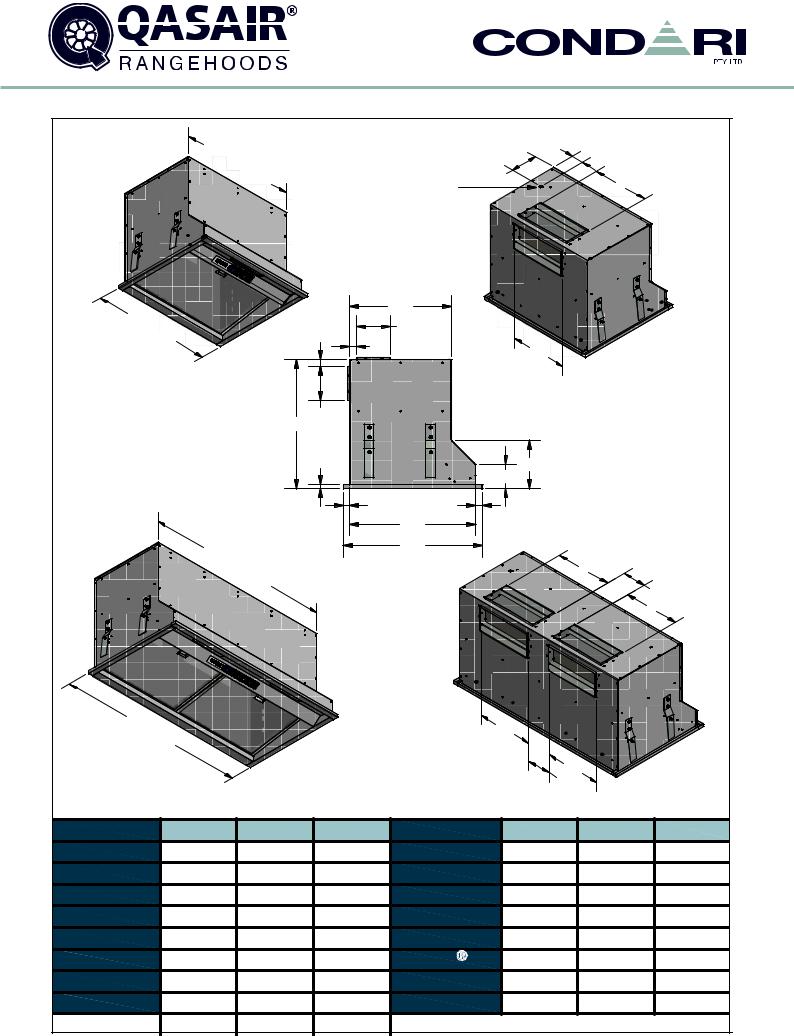
INSTALLATION INSTRUCTIONS
EXECUTIVE / FLINDERS RANGE
CUTOUT DIMENSIONS
MODEL |
HOOD SIZE |
BASE SIZE |
PROUD MOUNT |
FLUSH MOUNT |
|
CUT OUT DIMENSION |
CUT OUT DIMENSION |
||||
|
|
|
|||
CON 60L |
243 x 580 |
280 x 600 |
258 x 585 |
280 x 600 |
|
|
|
|
|
|
|
CON 80L |
243 x 780 |
280 x 800 |
258 x 785 |
280 x 800 |
|
|
|
|
|
|
|
|
|
|
|
|
|
NDCH 90L |
243 x 880 |
280 x 900 |
258 x 885 |
280 x 900 |
|
|
|
|
|
|
|
NDCH 100L |
243 x 980 |
280 x 1000 |
258 x 985 |
280 x 1000 |
|
|
|
|
|
|
|
NDCH 120L |
243 x 1180 |
280 x 1200 |
258 x 1185 |
280 x 1200 |
|
|
|
|
|
|
|
|
|
|
|
|
|
LIS 500L |
390 x 480 |
430 x 500 |
400 x 485 |
430 x 500 |
|
|
|
|
|
|
|
LIS 800L |
390 x 780 |
430 x 800 |
400 x 785 |
430 x 800 |
|
|
|
|
|
|
|
LIS 900L |
390 x 870 |
430 x 900 |
400 x 885 |
430 x 900 |
|
|
|
|
|
|
|
LIS 1000L |
390 x 980 |
430 x 1000 |
400 x 985 |
430 x 1000 |
|
|
|
|
|
|
|
LIS 1200L |
390 x 1180 |
430 x 1200 |
400 x 1185 |
430 x 1200 |
|
|
|
|
|
|
|
LIS 1500L |
390 x 1480 |
430 x 1500 |
400 x 1485 |
430 x 1500 |
|
|
|
|
|
|
|
|
|
|
|
|
|
WES 60L / EAS 60L |
290 x 565 |
330 x 600 |
300 x 570 |
330 x 600 |
|
|
|
|
|
|
|
WES 80L / EAS 80L |
290 x 780 |
330 x 800 |
300 x 785 |
330 x 800 |
|
|
|
|
|
|
|
WES 90L / EAS 90L |
290 x 880 |
330 x 900 |
300 x 885 |
330 x 900 |
|
|
|
|
|
|
|
WES 100L / EAS 100L |
290 x 980 |
330 x 1000 |
300 x 985 |
330 x 1000 |
|
|
|
|
|
|
|
WES 120L / EAS 120L |
290 x 1180 |
330 x 1200 |
300 x 1185 |
330 x 1200 |
|
|
|
|
|
|
|
|
|
|
|
|
|
WCV 1000L |
560 x 980 |
600 x 1000 |
570 x 985 |
600 x 1000 |
|
|
|
|
|
|
|
WCV 1300L |
560 x 1280 |
600 x 1300 |
570 x 1285 |
600 x 1300 |
|
|
|
|
|
|
|
WCV 1600L |
560 x 1580 |
600 x 1600 |
570 x 1585 |
600 x 1600 |
|
|
|
|
|
|
|
WCV 1800L |
560 x 1780 |
600 x 1800 |
570 x 1785 |
600 x 1800 |
|
|
|
|
|
|
|
|
|
|
|
|
|
ETN 600L |
340 x 580 |
380 x 600 |
355 x 585 |
380 x 600 |
|
|
|
|
|
|
|
ETN 900L |
340 x 880 |
380 x 900 |
355 x 885 |
380 x 900 |
|
|
|
|
|
|
|
ETN 1200L |
340 x 1180 |
380 x 1200 |
355 x 1185 |
380 x 1200 |
|
|
|
|
|
|
6 |
Qasair Rangehoods Installation Instructions |
DUCT DIRECTION CHANGE INSTRUCTIONS
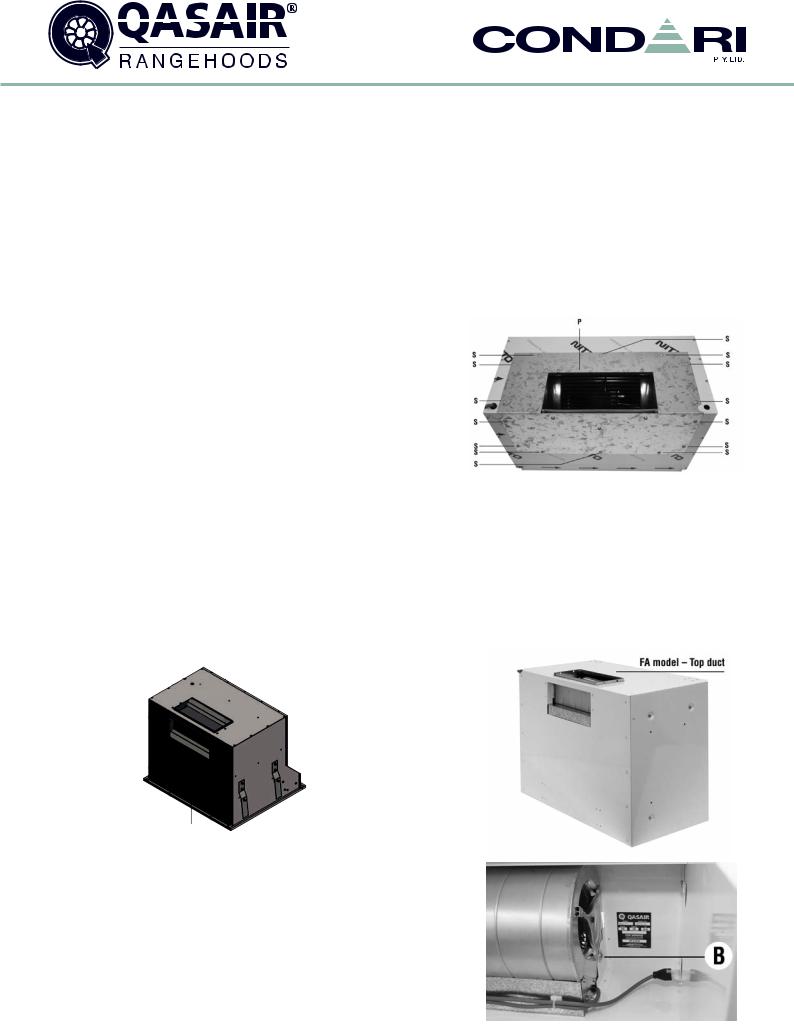
Before installing your rangehood check whether it has the fan mounted for back or top ducting.
For top ducting, the unit will have the air outlet at the top, and for back ducting, the unit will have the air outlet at the back.
To change from top to back or back to top, proceed as follows:
Duct direction for ETN, NDCH and CON models
The motor shown is fitted to the back plate (P) and this plate is attached to the hood by screws (S). To change from top to back, remove the filters, unplug fan(s). Undo all the screw (S), carefully remove the plate and turn it around so
the motor points out the way required. Fit and reconnect the fan(s), and fit all the screws again and tighten.
Duct direction for LIS / FA / MT / MC / EAS and WES
To change the duct direction, proceed as follows:
1.Remove the screws from the fan access panel and remove access panel (for MT and MC models only).
2.Disconnect fan(s).
3.Unscrew the 2 x 7mm screws (B) fixing the fan to the hood. Remove fan entirely. Repeat for each fan.
4.Rotate the fan assembly and re-install so that the air outlet meets with the rangehood outlet hole through which you are going to vent (top or back).
5.Replace the 2 x 7mm screws holding each fan.
6.Reconnect the fan(s)
7.Refit the fan access panel (for MT, EAS and WES models only).
LIS model – Rear duct
Qasair Rangehoods Installation Instructions |
7 |

INSTALLATION INSTRUCTIONS
•MT
•MC
Installation must be carried out by the procedure outlined. Failure to do so may void the guarantee.
Electrical: Wiring to the appliance must comply with State and local Regulations. Connection to be carried out by a registered electrician.
1.Fit a shelf at 410mm from the base of the cupboard.
2.Note hinge location prior to drilling.
3.Work from the centre line mark and drill 4 x M5 to M8 holes.
4.For top ducted models, cut out hole for the ducting allow 20mm clearance.
5.Fix left and right hand mounting brackets (supplied) 145mm from the base of the cupboard flush with the rear of the unit. Notch to the back.
6.Lift rangehood onto mounting brackets by holding either end. DO NOT use the slide mechanism as this may cause damage.
7.Insert the 4 x 50mm pan head screws supplied through the shelf and into the rangehood. Turn clockwise to level the rangehood.
8.Fix the rangehood position by inserting 2 x no 8 1/2 inch screws through the left and right hand brackets.
9.Fit doors.
10.Minor adjustments may be required on the rangehood handle. Loosen the screws on the rear of the handle and adjust handle position and retighten. The rangehood handle can be replaced.
11.All of the rangehoods shown on pages 1 and 8 are supplied with a 10AMP plug and lead for connection to a 10AMP GPO, which must be in an accessible position.
12.The handle can be removed and replaced with one made by the cabinet maker to fit in with the kitchen cabinets. The MT 90 has 3 screws and the MT 60 has 2 screws. These can be accessed by sliding the facia out and un-screwing the front from underneath and behind the facia. The handle will come off by tilting it forward from the top.
8 |
Qasair Rangehoods Installation Instructions |
MINI TRIM - MT
Power entry location is the same for all MT models.
25 
20  10
10
20
10
395

 38 120


275  170
170
 20
20
This view is shown with slide out trim in closed position.
Model |
MT 60L-1 |
MT 90L-1 |
Model |
MT 60L-1 |
MT 90L-1 |
|
|
|
|
|
|
|
|
Body Width |
600mm |
900mm |
Filter Size |
514mmx17m |
407mmx17m |
|
Motor Box / |
518mm |
518mm |
Conversion |
YES |
YES |
|
Flue Width |
Top/Back Back/Top |
|||||
|
|
|
|
|||
Motor Qty |
1 |
1 |
Electrical Connection |
10 Amp Lead |
10 Amp Lead |
|
|
|
|
|
|
|
|
LED Light |
Cool |
Cool |
Minimum Height |
N/A |
N/A |
|
(H =) |
||||||
|
|
|
|
|
||
Nightlight |
YES |
YES |
Maximum Height |
N/A |
N/A |
|
(H =) |
||||||
|
|
|
|
|
||
Light Qty |
1 |
2 |
PowderKote |
N/A |
N/A |
|
Available |
||||||
|
|
|
|
|
||
Light Centres |
N/A |
320mm |
All-thread |
N/A |
N/A |
|
Fixing Centres |
||||||
|
|
|
|
|
||
Filter Qty |
1 |
2 |
Corner Type |
Square |
Square |
|
|
|
|
|
|
|
|
|
|
|
Condari Pty Ltd. |
Version: B 03/12/2014F |
Page 1 of 1 |
|
|
|
|
|
|
|
Qasair Rangehoods Installation Instructions |
9 |
MARCEL - MC
 25
25
20  10
10
20
10 45 


 10 179


 275
275  170
170
 20
20
This view is shown with slide out trim in closed position.
Power Entry
Model |
MC 1000L-2 |
Model |
MC 1000L-2 |
|
||
|
|
|
|
|
|
|
Body Width |
1000mm |
Filter Size |
457mmx17m |
|
||
Motor Box / |
918mm |
Conversion |
YES |
|
||
Flue Width |
Top/Back Back/Top |
|
||||
|
|
|
|
|
||
Motor Qty |
2 |
Electrical Connection |
10 Amp Lead |
|
||
|
|
|
|
|
|
|
LED Light |
Cool |
Minimum Height |
N/A |
|
||
(H =) |
|
|||||
|
|
|
|
|
|
|
Nightlight |
YES |
Maximum Height |
N/A |
|
||
(H =) |
|
|||||
|
|
|
|
|
|
|
Light Qty |
2 |
PowderKote |
N/A |
|
||
Available |
|
|||||
|
|
|
|
|
|
|
Light Centres |
320mm |
All-thread |
N/A |
|
||
Fixing Centres |
|
|||||
|
|
|
|
|
|
|
Filter Qty |
2 |
Corner Type |
Square |
|
||
|
|
|
|
|
|
|
|
|
Condari Pty Ltd. |
|
|
|
Page 1 of 1 |
|
|
Version: B 03/12/2014F |
||||
|
|
|
|
|
|
|
10 |
Qasair Rangehoods Installation Instructions |
INSTALLATION INSTRUCTIONS
• FA
Installation must be carried out by the procedure outlined. Failure to do so may void the guarantee.
Electrical: Wiring to the appliance must comply with State and local Regulations. Connection to be carried out by a registered electrician.
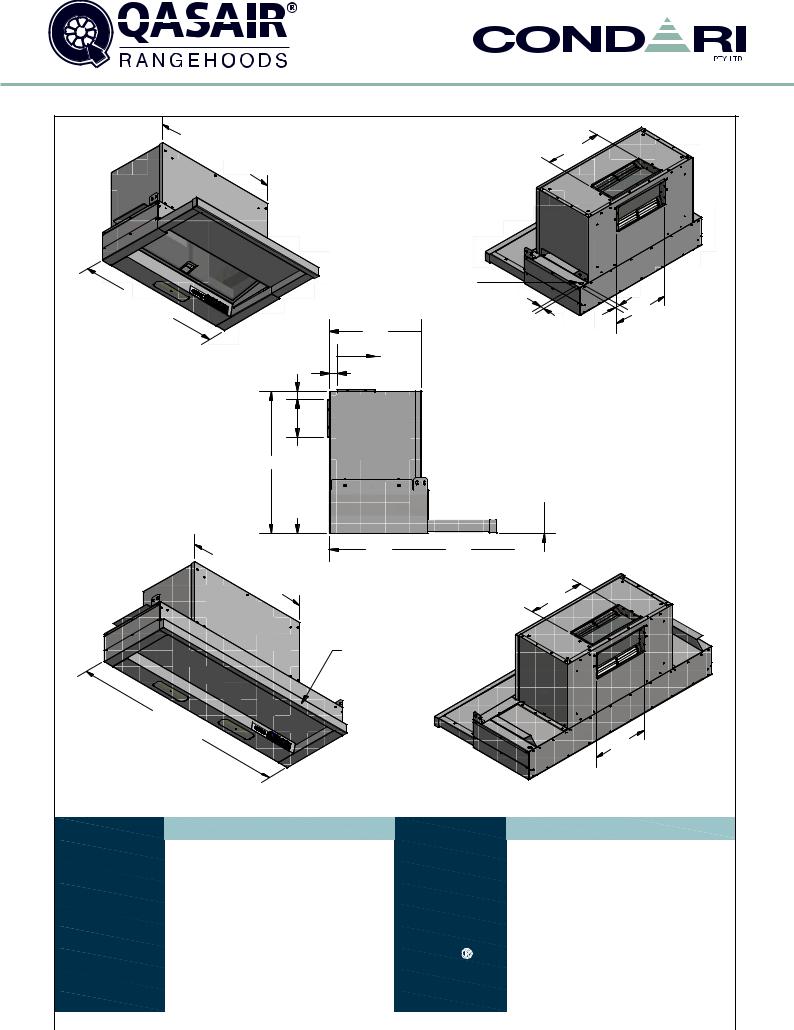
1.The rangehood is designed to be fitted within joinery and can be installed by inserting screws in the three holes provided on each side, or to the top or back by drilling your own mounting holes as required.
2.When installed, cover the access holes to the side fixing screws with the plastic plugs supplied.
3.Fit filters.
4.Install front panel to suit as per your kitchen design.
Qasair Rangehoods Installation Instructions |
11 |
FOLDAWAY - FA
|
|
|
|
Power Entry |
|
|
|
|
|
|
20 |
10 |
|
|
|
||
|
|
20 |
|
|
|
|||
|
|
|
|
|
|
|||
|
|
|
|
|
|
0 |
||
|
|
|
|
|
|
1 |
||
|
|
10 |
4 |
|
|
|
||
|
|
450 |
|
|
|
|
||
|
|
|
|
|
|
|
||
|
|
|
30 20 |
|
|
|
||
|
|
|
This view is shown |
|
|
|
||
|
|
|
with door in closed |
|
|
|
||
|
|
|
position. |
|
|
|
||
|
|
|
|
Power Entry |
|
|
|
|
Model |
FA 60L-1 |
FA 90L-1 |
FA 90L-2 |
Model |
FA 60L-1 |
FA 90L-1 |
FA 90L-2 |
|
Body Width |
598mm |
898mm |
898mm |
Filter Size |
274mmx290m |
424mmx290m |
424mmx290m |
|
Door Width |
573.4mm |
873.4mm |
873.4mm |
Conversion |
YES |
YES |
YES |
|
Top/Back Back/Top |
||||||||
|
|
|
|
|
|
|
||
Motor Qty |
1 |
1 |
2 |
Electrical Connection |
10 Amp Lead |
10 Amp Lead |
10 Amp Lead |
|
LED Light |
Cool |
Cool |
Cool |
Minimum Height |
N/A |
N/A |
N/A |
|
(H =) |
||||||||
|
|
|
|
|
|
|
||
Nightlight |
YES |
YES |
YES |
Maximum Height |
N/A |
N/A |
N/A |
|
(H =) |
||||||||
|
|
|
|
|
|
|
||
Light Qty |
1 |
2 |
2 |
PowderKote |
N/A |
N/A |
N/A |
|
Available |
||||||||
|
|
|
|
|
|
|
||
Light Centres |
Centre |
350mm |
350mm |
All-thread |
N/A |
N/A |
N/A |
|
Fixing Centres |
||||||||
|
|
|
|
|
|
|
||
Filter Qty |
2 |
2 |
2 |
Corner Type |
Square |
Square |
Square |
|
|
|
|
|
Condari Pty Ltd. |
Version: B 03/12/2014F |
Page 1 of 1 |
||
12 |
|
|
|
|
Qasair Rangehoods Installation Instructions |
|||
INSTALLATION INSTRUCTIONS
•CON
•NDCH
•LIS
•ETN
Installation must be carried out by the procedure outlined. Failure to do so may void the guarantee.
Electrical: Wiring to the appliance must comply with State and local Regulations. Connection to be carried out by a registered electrician.
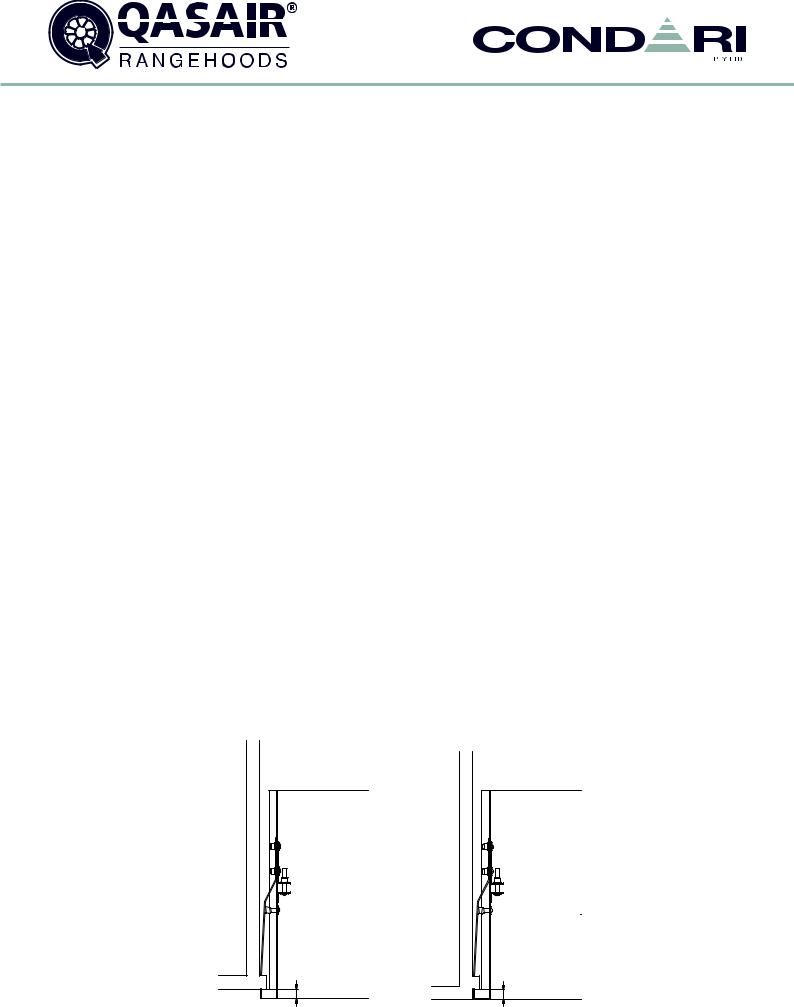
1.Loosen screws A and B by turning anti-clockwise.
2.Turn screw ‘D’ anti-clockwise to extend the outer spring bracket.
3.Insert rangehood into cut out and turn screw ‘C’ clockwise to align rangehood with cupboard base.
4.Do not over tighten.
5.Tighten screw ‘A’ by turning clockwise to lock fixing bracket.
6.Fit off ductwork as required.
7.To remove rangehood, turn screw ‘D’ clockwise.
RANGEHOOD SPRING BRACKETS
Models: LIS
CON
MOUNTING POSITION
|
Front of Rangehood |
Cupboard |
12 |
|
PROUD MOUNT
Models: ETN
NDCH
Front of Rangehood
12
Cupboard
FLUSH MOUNT
Qasair Rangehoods Installation Instructions |
13 |
CONLEY - CON
|
|
|
|
|
Power Entry |
|
||
|
|
|
|
240 |
|
|
|
|
|
|
|
10 |
10 |
|
|
|
|
|
|
|
10 |
|
|
|
||
|
|
|
|
|
|
|
||
|
|
|
10 |
360 |
|
|
|
|
|
|
|
|
|
|
|
||
|
|
|
12 |
|
|
|
|
|
|
|
|
|
280 |
Power Entry |
|
||
|
|
|
|
|
|
|||
Model |
CON 60L-1 |
CON 80L-1 |
CON 80L-2 |
Model |
CON 60L-1 |
CON 80L-1 |
CON 80L-2 |
|
Body Width |
600mm |
800mm |
800mm |
Filter Size |
269mmx250m |
379mmx157m |
379mmx157m |
|
Motor Box / |
580mm |
780mm |
780mm |
Conversion |
YES |
YES |
YES |
|
Flue Width |
Top/Back Back/Top |
|||||||
|
|
|
|
|
|
|||
Motor Qty |
1 |
1 |
2 |
Electrical Connection |
10 Amp Lead |
10 Amp Lead |
10 Amp Lead |
|
LED Light |
Cool |
Cool |
Cool |
Minimum Height |
N/A |
N/A |
N/A |
|
(H =) |
||||||||
|
|
|
|
|
|
|
||
Nightlight |
YES |
YES |
YES |
Maximum Height |
N/A |
N/A |
N/A |
|
(H =) |
||||||||
|
|
|
|
|
|
|
||
Light Qty |
1 |
2 |
2 |
PowderKote |
N/A |
N/A |
N/A |
|
Available |
||||||||
|
|
|
|
|
|
|
||
Light Centres |
Centre |
379mm |
379mm |
All-thread |
N/A |
N/A |
N/A |
|
Fixing Centres |
||||||||
|
|
|
|
|
|
|
||
Filter Qty |
2 |
2 |
2 |
Corner Type |
Square |
Square |
Square |
|
|
|
|
|
Condari Pty Ltd. |
Version: A 01/07/2014F Page 1 of 1 |
|||
14 |
|
|
|
|
Qasair Rangehoods Installation Instructions |
|||
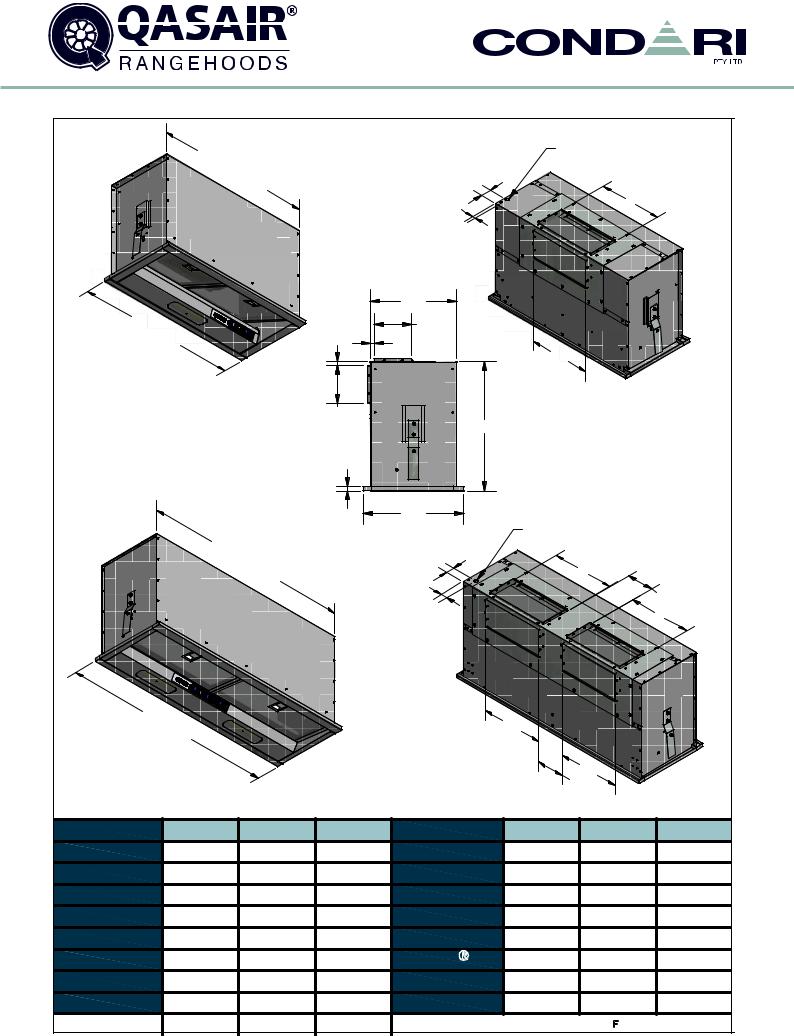
UNDERMOUNT - NDCH
Power entry location is the same for all NDCH models.
 240
240
10
10  10
10
10 


 360
360
12
280
|
Model |
NDCH 90L-1 |
NDCH 90L-2 |
Model |
NDCH 90L 1 |
NDCH 90L-2 |
|
|
|
|
|
|
|
|
|
|
Body Width |
900mm |
900mm |
Filter Size |
340mmx260m |
340mmx260m |
|
|
Motor Box / |
880mm |
880mm |
Conversion |
YES |
YES |
|
|
Flue Width |
Top/Back Back/Top |
|||||
|
|
|
|
|
|
||
|
Motor Qty |
1 |
2 |
Electrical Connection |
10 Amp Lead |
10 Amp Lead |
|
|
|
|
|
|
|
|
|
|
LED Light |
Cool |
Cool |
Minimum Height |
N/A |
N/A |
|
|
(H =) |
||||||
|
|
|
|
|
|
|
|
|
Nightlight |
YES |
YES |
Maximum Height |
N/A |
N/A |
|
|
(H =) |
||||||
|
|
|
|
|
|
|
|
|
Light Qty |
2 |
2 |
PowderKote |
N/A |
N/A |
|
|
Available |
||||||
|
|
|
|
|
|
|
|
|
Light Centres |
770mm |
770mm |
All-thread |
N/A |
N/A |
|
|
Fixing Centres |
||||||
|
|
|
|
|
|
|
|
|
Filter Qty |
2 |
2 |
Corner Type |
Square |
Square |
|
|
|
|
|
|
|
|
|
|
|
|
|
Condari Pty Ltd. |
Version: B 19/12/2014F |
Page 1 of 2 |
|
|
|
|
|
|
|
|
|
Qasair Rangehoods Installation Instructions |
15 |
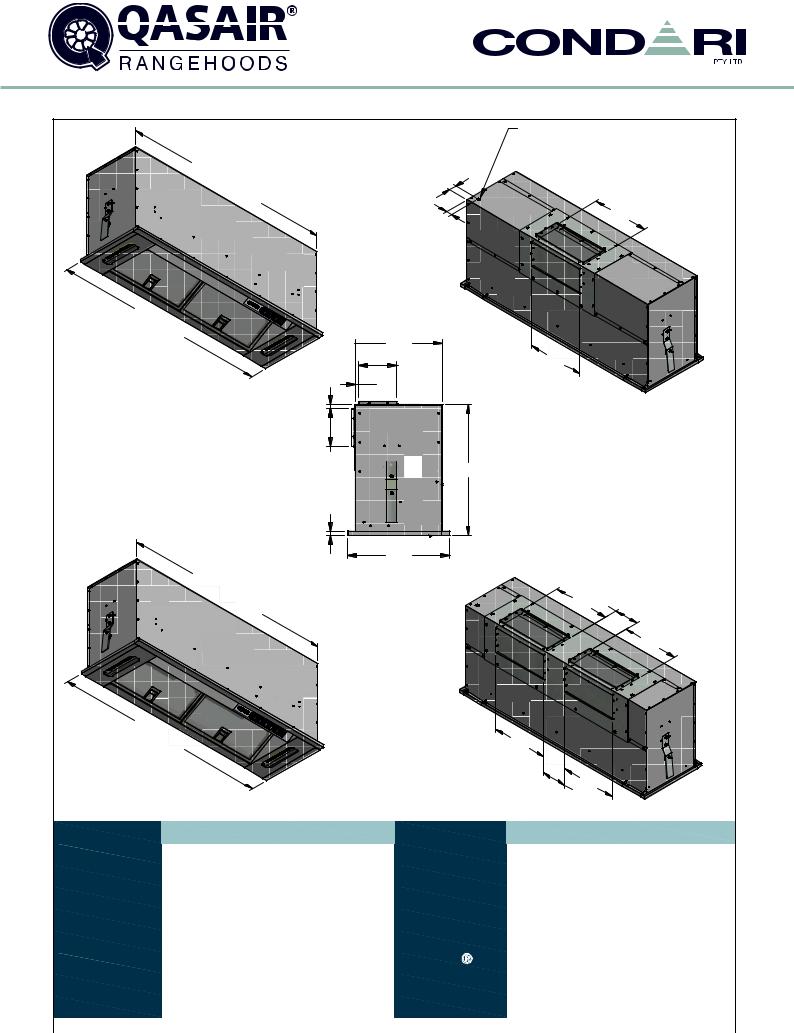
UNDERMOUNT - NDCH
Power entry location is the same for all NDCH models.
 240
240
10  10
10
10
10


 360
360
12
280
|
Model |
NDCH 100L-2 |
NDCH 120L-2 |
Model |
NDCH 100L-2 |
NDCH 120L-2 |
|
|
|
|
|
|
|
|
Body Width |
1000mm |
1200mm |
Filter Size |
379mmx260m |
479mmx260m |
|
Motor Box / |
980mm |
1180mm |
Conversion |
YES |
YES |
|
Flue Width |
Top/Back Back/Top |
||||
|
|
|
|
|
||
|
Motor Qty |
2 |
2 |
Electrical Connection |
10 Amp Lead |
10 Amp Lead |
|
|
|
|
|
|
|
|
LED Light |
Cool |
Cool |
Minimum Height |
N/A |
N/A |
|
(H =) |
|||||
|
|
|
|
|
|
|
|
Nightlight |
YES |
YES |
Maximum Height |
N/A |
N/A |
|
(H =) |
|||||
|
|
|
|
|
|
|
|
Light Qty |
2 |
2 |
PowderKote |
N/A |
N/A |
|
Available |
|||||
|
|
|
|
|
|
|
|
Light Centres |
860mm |
1060mm |
All-thread |
N/A |
N/A |
|
Fixing Centres |
|||||
|
|
|
|
|
|
|
|
Filter Qty |
2 |
2 |
Corner Type |
Square |
Square |
|
|
|
|
|
|
|
|
|
|
|
Condari Pty Ltd. |
Version: B 19/12/2014F |
Page 2 of 2 |
16 |
Qasair Rangehoods Installation Instructions |
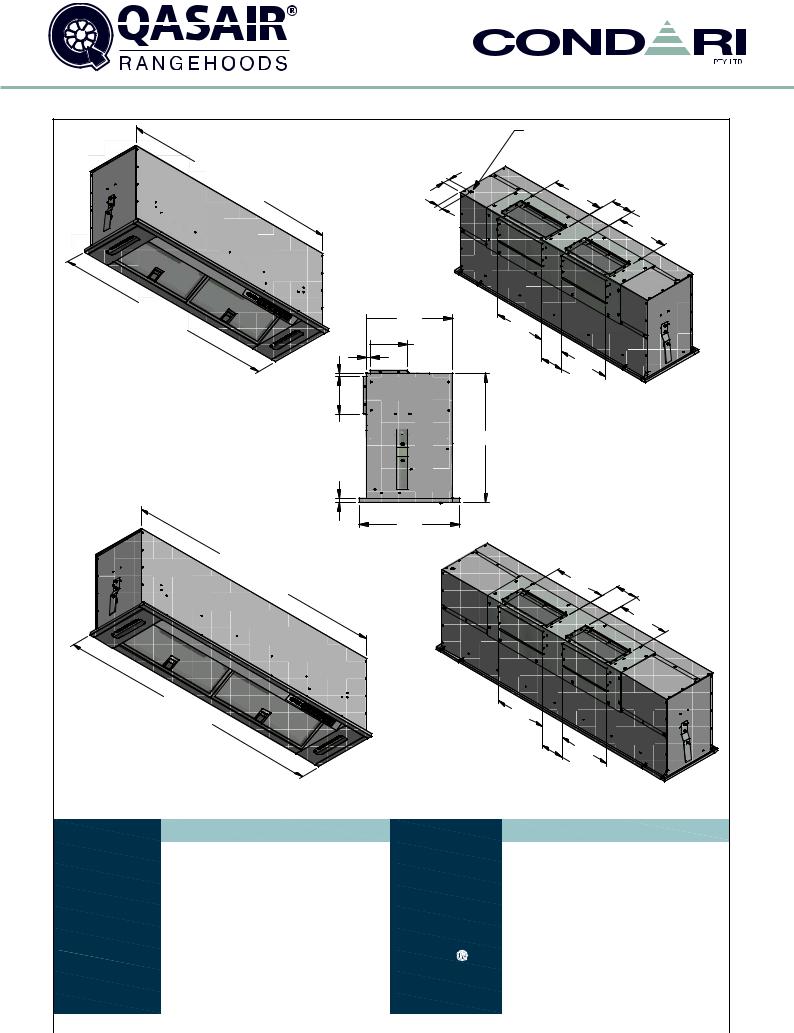
LISMORE - LIS
|
|
|
|
Power entry location |
|
|
|
|||
|
|
|
|
is the same for all |
|
|
|
|||
|
|
|
|
|
LIS models. |
|
|
|
||
|
|
|
|
|
315 |
|
|
|
|
|
|
|
|
20 |
|
10 |
|
|
|
||
|
|
|
20 |
|
|
|
|
|||
|
|
|
|
|
|
|
|
|||
|
|
10 |
|
|
|
|
|
|||
|
|
40 |
|
|
|
|
|
|
||
|
|
|
12 |
|
|
|
150 |
|
|
|
|
|
|
|
|
|
75 |
|
|
||
|
|
|
|
20 |
20 |
|
|
|
||
|
|
|
|
|
390 |
|
|
|
||
|
|
|
|
|
430 |
|
|
|
||
Model |
LIS 500L-1 |
LIS 800L-1 |
LIS 800L-2 |
Model |
|
LIS 500L-1 |
LIS 800L-1 |
LIS 800L-2 |
||
Body Width |
500mm |
800mm |
800mm |
Filter Size |
459mmx290m |
379mmx290m |
379mmx290m |
|||
Motor Box / |
480mm |
780mm |
780mm |
Conversion |
YES |
YES |
YES |
|||
Flue Width |
Top/Back Back/Top |
|||||||||
|
|
|
|
|
|
|
||||
Motor Qty |
1 |
1 |
|
2 |
Electrical Connection |
10 Amp Lead |
10 Amp Lead |
10 Amp Lead |
||
LED Light |
Cool |
Cool |
|
Cool |
Minimum Height |
N/A |
N/A |
N/A |
||
|
(H =) |
|
||||||||
|
|
|
|
|
|
|
|
|
||
Nightlight |
YES |
YES |
|
YES |
Maximum Height |
N/A |
N/A |
N/A |
||
|
(H =) |
|
||||||||
|
|
|
|
|
|
|
|
|
||
Light Qty |
1 |
2 |
|
2 |
PowderKote |
N/A |
N/A |
N/A |
||
|
Available |
|||||||||
|
|
|
|
|
|
|
|
|||
Light Centres |
Centre |
380mm |
380mm |
All-thread |
N/A |
N/A |
N/A |
|||
Fixing Centres |
||||||||||
|
|
|
|
|
|
|
|
|||
Filter Qty |
1 |
2 |
|
2 |
Corner Type |
Square |
Square |
Square |
||
|
|
|
|
|
Condari Pty Ltd. |
Version: B 03/12/2014F |
Page 1 of 3 |
|||
Qasair Rangehoods Installation Instructions |
|
|
|
|
|
|
17 |
|||

LISMORE - LIS
|
|
Power entry location |
|
|
||
|
|
is the same for all |
|
|
||
|
|
LIS models. |
|
|
||
|
|
|
315 |
|
|
|
|
|
20 |
10 |
|
|
|
|
|
20 |
|
|
||
|
|
|
|
|
||
|
|
10 |
|
|
|
|
|
|
40 |
|
|
|
|
|
|
12 |
150 |
|
||
|
|
|
75 |
|
||
|
|
20 20 |
|
|
||
|
|
|
390 |
|
|
|
|
|
|
430 |
|
|
|
Model |
LIS 900L-2 |
LIS 1000L-2 |
Model |
LIS 900L- |
LIS 1000L-2 |
|
Body Width |
900mm |
1000mm |
Filter Size |
424mmx290m |
479mmx290m |
|
Motor Box / |
870mm |
980mm |
Conversion |
YES |
YES |
|
Flue Width |
Top/Back Back/Top |
|||||
|
|
|
|
|||
Motor Qty |
2 |
2 |
Electrical Connection |
10 Amp Lead |
10 Amp Lead |
|
LED Light |
Cool |
Cool |
Minimum Height |
N/A |
N/A |
|
(H =) |
||||||
|
|
|
|
|
||
Nightlight |
YES |
YES |
Maximum Height |
N/A |
N/A |
|
(H =) |
||||||
|
|
|
|
|
||
Light Qty |
2 |
2 |
PowderKote |
N/A |
N/A |
|
Available |
||||||
|
|
|
|
|
||
Light Centres |
424mm |
480mm |
All-thread |
N/A |
N/A |
|
Fixing Centres |
||||||
|
|
|
|
|
||
Filter Qty |
2 |
2 |
Corner Type |
Square |
Square |
|
|
|
|
Condari Pty Ltd. |
Version: B 03/12/2014F |
Page 2 of 3 |
|
18 |
|
|
|
Qasair Rangehoods Installation Instructions |
||
 Loading...