

Page 1

Siesta Home
Page 2

Page 3

Introduction
Thank you for choosing the SiestaHome. This user manual will get
you up and running in no time.
If you need more help, visit support.pure.com.
1
Page 4

Safety
Before you use your S iesta H ome, read the fol low ing saf ety i nstructio ns.
1. Read all the s afety i nformation and instructions b efor e using the p rod uct. When p assing this prod uct to someo ne, include
all documents.
2. If yo u d o not fol low the o pe rating instructions pro vid ed, it may compr omise the safety o f yo ur pro duct and this may invalidate the w arranty.
3. Do not exp os e the p rod uct to drip ping or s plashing. Do not place o bje cts fill ed with liquids , such as vases, on the
pro duct.
If l iquid or water s pill s onto the pro duct, switch it off at the mains immediately , disco nnect the mains p lug and contact your
de aler.
Nev er touch the plug or the pro duct with wet hands. Ne ver p ull the po wer cabl e when d isco nnecting the p owe r adaptor
from the pow er supp ly.
4. Do not exp os e batterie s to e xces sive heat or naked flames.
5. Disp os e of batteries in accord ance w ith local e nvironmental rule s.
6. Using the pro duct in roo ms o r climates with high humidity and temper atures may cause conde nsation to form inside the
pro duct, w hich can d amage the pro duct.
Use the pr oduct i n mode rate climates only.
7. Do not use yo ur p ro duct in extre mely hot or co ld tempe rature. Kee p the d evice away fro m heat s ources , such as radiators or g as/electri c fir es. D o not e xpos e your pr oduct to naked flames, such as lig hted candles.
8. The mains p ower ad apter is used as the disco nnect de vice and must r emain o pe rable .
Fit the mains adaptor to an easil y accessib le so cket located near the p ro duct and use only the suppl ied mains p owe r
adapter .
9. Only use the suppli ed 12 V p owe r adapter with your prod uct (supp lie d by Pure with mod el SW12 02400-IM). T he p owe r
adapter should o nly b e used to po wer this radio and not for any other purpo se.
10. Befor e you use your pro duct, e nsure that the available supp ly voltage co rre sp onds with the req uired o pe rational v oltage
of the pro duct.
11. Dis connect y our pro duct fro m the powe r suppl y if yo u wil l not use your pr oduct for a lo ng per iod of time (for example , if
you are goi ng o n holi day).
12. Always unplug y our pro duct fro m the mains socket be fore cle aning. When cleaning the p rod uct, do not use any type o f
abrasive pad or abr asive cle aning so lutions as these may damage the pro duct's surface.
13. To red uce the r isk of e le ctric shock, do not r emove any scre ws. The pr oduct d oe s not co ntain any user-ser viceab le parts
inside . Pro duct re pair s should only be carri ed out by authorise d pe rso nnel.
Danger o f e xplo sio n if battery is incorr ectly re placed . Rep lace only with the same o r eq uivalent type .
Do no t ingest the battery, Chemical Burn Hazard
The re mote control suppli ed with the pro duct co ntains a button ce ll battery. If the button cel l battery is swallow ed, it can
cause seve re internal burns in just 2 hours and can le ad to d eath.
Kee p batterie s away fro m child ren. If the battery compartment d oes not clos e secure ly, do not use the pr oduct and keep it
away fro m child ren. If y ou think so meone has swallowe d a b attery or place d a b attery inside their bo dy, se ek medical
attention immedi ately.
Symbols on the product and in the user manual
Potentially se rious ri sk to yo ur p er sonal safety. To avoid p oss ible i njury o r death, o be y all s afety notice s with this
symbol .
Caution. Read the use r manual be fore use .
12V DC 2 .4A po wer s upply.
Where to switch on the pro duct o r put it in s tandby.
DC connector polar ity. The centre of the connector terminal is pos itive.
2
Page 5

Contents
Introduction 1
Safety 2
Contents 3
Overview 4
Front and top 4
Rear 5
Controls 5
Remote control 7
Display 8
Getting started 9
Switching on for the first time 9
Changing the source 10
Digital radio 10
Listening to digital radio 10
Changing the radio station 10
Performing an autotune 10
FM radio 11
Listening to FMradio 11
Changing the radio station 11
Changing between stereo and
mono 11
Bluetooth 13
Pairing with a Bluetooth device 13
Disconnecting a device 14
SoundSpace EQ 14
Changing the equaliser 14
Alarms and timers 14
Setting an alarm 15
Cancelling an alarm 15
Snoozing or silencing an alarm 15
Setting a sleep timer 15
Setting a kitchen timer 16
Settings 17
Clock sett ings 17
Audio settings 17
Display settings 18
Changing the language 19
Resetting to factory settings 19
Updating the software 19
Specifications 20
Presets 11
Storing presets 11
Listening to preset s 12
CD 12
Listening to a CD 12
Ejecting a CD 12
Shuffling tracks on a CD 12
Repeating tracks on a CD 13
3
Page 6
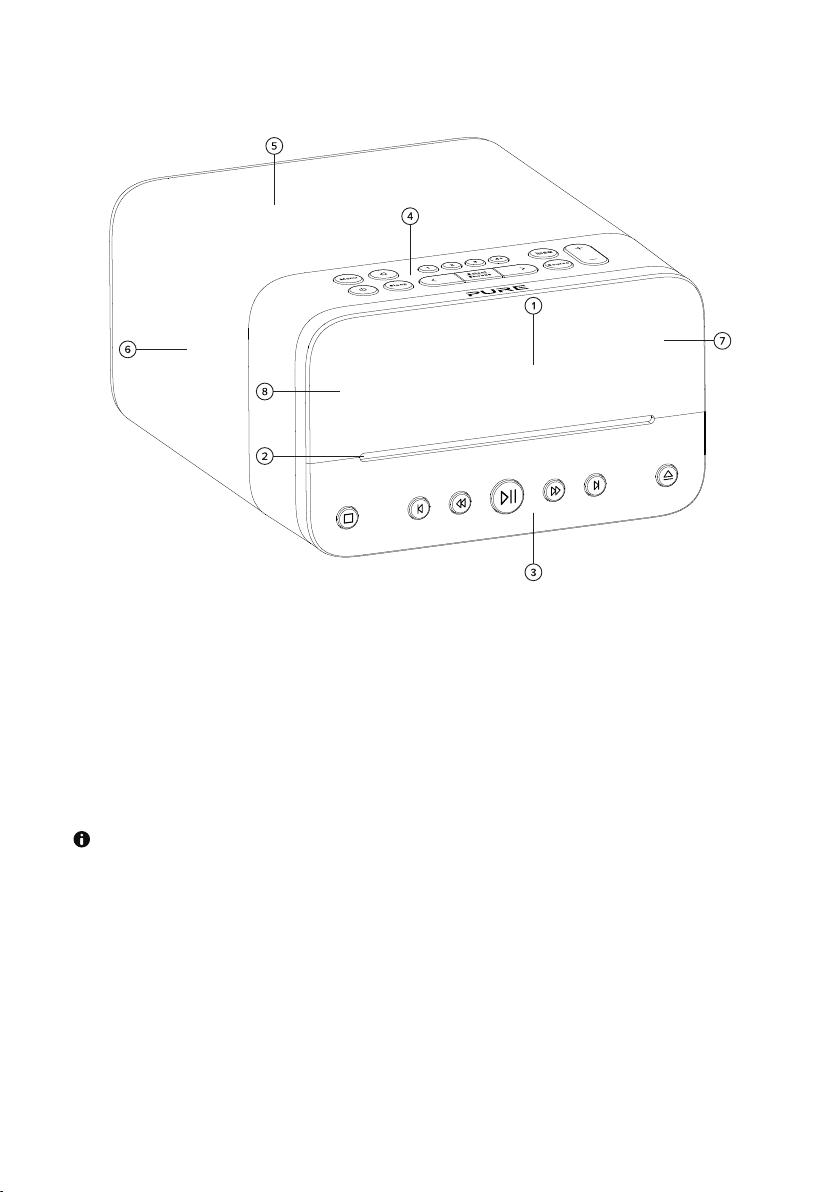
Overview
Front and top
1 Display
2 CD drive
3 Front panel controls
4 Top panel controls
5
6
7
8
Speaker
Bass ra diators
Light sensor
IRreceiver
For best performa nce, ensure the speaker and side bass radiators aren't obstructed.
4
Page 7
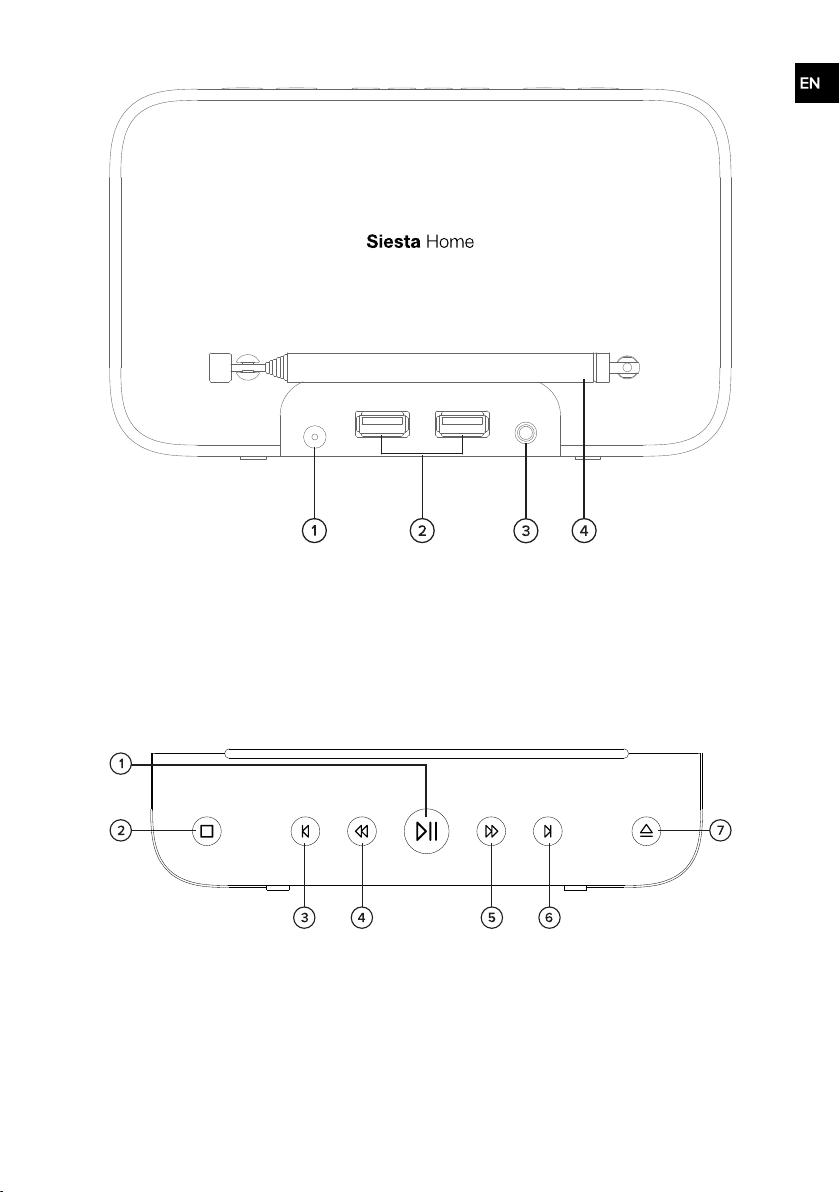
Rear
1 Input for suppliedmains adapter
2 USBAcharging port ( 5V, 1A)
3 3.5mm output for stereo headphones
4 Telescopic aerial
Controls
Front panel controls
1 Play / Pause CD/Bluetooth: Start or pause playing the track.
2 Stop CD:Stop playing the CD.
3 Previous CD/Bluetooth: Skipto the previous tr ack or restart the current track.
FM radio:Scan to the previous station.
4 Rewind CD:H old to rewind the tra ck.
5
Page 8

FM radio:Manuallytune to the previous radio station.
5 Fast forward CD: Hold to fast forward the track.
FM radio:Manuallytune to the next radio station.
6 Next CD/Bluetooth: Skipto the next tr ack.
FM radio:Scan to the next station.
7 Eject CD: Eject the CD or pull it in if it sits partlyin the slot.
Top panel controls
1 Power Switch on your Siesta Home or put it in standby.
2 Menu Change settings and options. When in a menu, press to go back to the previous
3 Alarm Enter the alarm menu.
4 Presets Store and a ccess your favourite ra dio stations.
5 Equaliser Change the SoundSpace EQ settings.
6 Sleep Enter the sleep timer menu.
7 Left Move between settings and options, or open the list of digitalradio stations.
8 Select Select settings a nd options, or open the list of digital r adio stations.
9 Right Move between settings and options, or open the list of digital r adio stations.
10 Source Change between Digital radio,FM radio, CD and Bluetooth.
11 Volume Adjust volume.
screen.
6
Page 9

Remote control
1 Power Switch on your Siesta Home or put itin standby.
2 Source Change between Digital radio,FM radio, CD and Bluetooth.
3 Menu Change settings and options.When in a menu, press to go back to the previous
4 Alarm Enter the a larm menu.
5 Presets Store and access your fa vourite r adio stations.
6 Sleep Enter the sleeptimer menu.
7 Equaliser Change the SoundSpace EQ settings.
8 Eject CD:Eject the CD or pull it in if it sits partly in the slot.
9 Mute Mute or unmute the volume.
10 Select Selectsettings and options,or open the list of digital radio stations.
11 Volume up Adjust volume.
12 Volume
down
13 Left Move between settings and options, or open the list of digital radio stations.
14 Right Move between settings a nd options, or open the list of digitalradio stations.
15 Shuffle Enter the shuffle menu.
16 Repeat Enter the repeat menu.
17 Previous CD/Bluetooth:Skip to the previous track or restar t the current track.
18 Stop CD: Stop playing the CD.
19 Next CD/Bluetooth:Skip to the next track.
screen.
Adjust volume.
FM radio:Scan to the previous station.
7
Page 10

FM radio:Scan to the next station.
20 Rewind CD: Hold to rewind the track.
FM radio:Manuallytune to the previous radio station.
21 Fast forward CD: Hold to fast forward the track.
FM radio:Manuallytune to the next radio station.
22 Play / pause CD/Bluetooth:Start or pause playing the track.
At the bottom of the remote control there is a battery tray containing the battery. To access the battery
tray, use a fingerna il to move the latch to the side and then pullout the tray.
Display
1 Curr ent time
2 AM/PM indicator
3 Digital radio/FM radio signal strength
4 Volume level
5 Source ( / / / )
6 Repeat
7 Shuffle
8 Sleep timer
Kitchen timer
9 Alarms
10 Information display area
8
Page 11

Getting started
Switching on for the first time
Before you can start using your Siesta Home, you need to do the following:
1. Unclip and fully extend the a erial.
2. Fit the pin connector into the supplied mains adapter.
3. Connect the mains adapter to the input on the back of your Siesta Home and plug it into the
mains supply.
Note: The product identification and input/output r ating specifications are given on the
bottom of the product,directlybelow the connections.
Read the safety instructions.
9
Page 12

4.
Press .
After you've switched on your Siesta Home for the first time, it starts tuning to digital radio stations.
After the autotune is complete,you can star t listening to digital radio.
Changing the source
After you switch your Siesta Home for the first time, it sets to digital r adio by default.
l To change the source, press Source.
The source is selectedin the following sequence: Digital radio > FM radio > CD > Bluetooth.
Digital radio
Listening to digital radio
l Press Source untilDIGITAL RADIO is displayed and appears in the top-left hand corner of
the screen.
Changing the radio station
1.
Press or to open the station list.
The list contains radio stations that were found during the last a utotune.
2.
Press or to browse through available r adio stations.
3. Press Select to choose a radio station.
Performing an autotune
Your Siesta Home automatically scans for digital r adio stations when you switch it on for the first time, or
if the station list is empty when you switch to digital radio.
10
Page 13

If you move your Siesta Home to a new location,perform an autotune to update the list of radio stations.
1. Press Menu.
2.
Press or untilAUTOTUNE is displayed and then press Select.
Your Siesta Home starts scanning for digital radio stations.
FM radio
Listening to FMradio
l Press Source untilFMRADIO is displayedand appears in the top-left hand corner of the
screen.
Changing the radio station
l
To scan to the pr evious or next radio station,press or .
l
To manuallytune to a radio station, press or .
The frequency steps up or down by 0.05 MHz.
Changing between stereo and mono
By default,your Siesta Home uses mono reception for FM radio. If your FM radio stations have a weak
signal,mono reception improves the signal strength.
You can change between stereo and mono reception.
1. Press Menu.
2.
Press or untilFM STEREO or FM MONO is displayed, then press Select to change to that
mode.
Presets
On the top of your Siesta Home, you have four preset buttons. Use 1 to 3 for quickaccess to your
favourite radio stations.Use 4+ to open a list of all your presets.
You can save up to 20 digital radio stations and up to 20 FM radio stations in the presets list.
Storing presets
Storing a radio station to a preset from 1 to 3
1. Tune to the radio station you want to store.
2. Press and holda preset button from 1 to 3 until STORED and the preset number are displayed.
If there is already a radio station saved to the preset you’ve selected,the new station
replaces it.
Storing a radio station to the presets list
1. Tune to the radio station you want to store.
2. Press 4+to display the preset list.
3.
Press or to choose a preset number.
11
Page 14

4. Press and hold Select, 4+on the ra dio or Presets on the rem ote control until STORED and the
preset number ar e displayed.
If there is already a radio station saved to the preset you’ve selected,the new station
replaces it.
Listening to presets
Listening to a preset from 1 to 3
l Press a preset button from 1 to 3.
Listening to any preset
1. Press 4+ to open the preset list.
2.
Press or and Select to choose a preset.
CD
You can listen to audio and MP3 CDs with your Siesta H ome.
Listening to a CD
1. Press Source until CD is displayed and appears in the top-left hand corner of the screen.
2. I nsert the CD into the slot on the fr ont panel.
You can control the CDwith the playback buttons on the front panel of the radio or using the rem ote
control.See page 5 or 7 for details.
When a CD is playing,the display shows the tra ck number a nd elapsed time.
You can change the information on the display in Settings.See page 18 for details.
Ejecting a CD
l
Press .
Shuffling tracks on a CD
You can use shuffle to play tracks in a r andom order .
Shuffling tracks using the top panel
1. Press Menu.
2.
Press or untilCD is displayed and then press Select.
3.
Press or untilSHUFFLE is displayed and then press Select.
When shuffle is enabled, is displayed on the screen. To disable shuffle and repeat, choose NORMAL.
Shuffling tracks using the remote control
l
Press to turn on shuffle. is displayed on the screen.
l
Press again to turn off shuffle. is not displayed on the screen.
12
Page 15

Repeating tracks on a CD
You can repeat the cur rent track, alltracks in an MP3 folder or the whole CD.
Repeating tracks using the top panel
1. Press Menu.
2.
Press or untilCD is displayed and then press Select.
3.
Press or to change the r epeat mode and then press Select.
REPEAT TRACK
REPEAT FOLDER
REPEAT ALL
NORMAL
Repeat the track that is currentlyplaying.
Repeat allthe tracks in the folder. This setting is available only for
an MP3 CD.
Repeat allthe tracks on the CD.
Disable repeat and shuffle.
Repeating tracks using the remote control
l
Press to choose the repeat mode. Each time you press , it changes to the next repeat
mode.
REPEAT TRACK
REPEAT FOLDER
REPEAT ALL
l
To disable repeat, press multiple times until is not displayed on the screen.
flashes quicklyon the screen.
flashes slowly on the screen.
is always displayed on the screen.
Bluetooth
You can use Bluetooth to wirelesslyconnect to a device, such as a mobile phone or tablet.You can then
stream music from your mobile phone or tablet thr ough your Siesta Home.
The first time you connect a Bluetooth deviceto your Siesta Home, you need to pair them. After you've
paired a device with your Siesta Home, your Siesta H ome remembers it for the next time.
Other Bluetooth devices can find your Siesta Home when your Siesta Home is in Bluetooth mode.
Pairing with a Bluetooth device
1. Press Source until BLUETOOTH is displayed and appears in the top-left hand corner of the
screen.
Your Siesta Home is now discoverable,which means other Bluetooth devices can find it.
The Bluetooth devicename presented to devices is Siesta Home.
2. On your Bluetooth device, switch Bluetooth on and connectto your Siesta Home.
Note: For more information, see your Bluetooth device's user manual.If you are asked to
enter a passcode, enter 00 00 .
When BT CONNECTED is displayed on your Siesta Home screen, your Siesta Home is ready to
stream music.
13
Page 16

If you want to connect a different Bluetooth device to your Siesta Home, switch off Bluetooth on the
connected devicefirst.
Disconnecting a device
To disconnect a Bluetooth device, do one of the following:
l Press Source to switch to digital r adio, FM radio,or CD.
l
Press to put the r adio into standby.
l Switch off Bluetooth on the connected device.
Your Siesta Home doesn't reconnect automa tically to your paired Bluetooth devices.After you
disconnect your Bluetooth devicefrom your Siesta H ome, you need to reconnect it manually.
SoundSpace EQ
You can use the SoundSpace EQ equaliser to get the most out of your music.There are several
equalisers set up already for enhancing the sound r esponse and qualities. The audio presets a re based
on the physical position of the r adio as wellas the a cousticfeedback response and type of materials
used within the par ticular room.
Changing the equaliser
l
Press untilthe equaliser you want to use is displayed.
LIVING
ROOM 1
LIVING
ROOM 2
KITCHEN Gives a tailored audio r esponse suitablefor spaces with predominantly harder materials
BEDROOM Offers detailed,clear audio ideal for bedrooms containing softer, absorbent, fabric-rich
STUDY I s tailored for near -fieldlistening where Siesta Home is typically placed on a desk or mid-
You can also change the equaliser in the main menu. See page 18 for details.
Gives a clearer audio response suitablefor spaces where softer furnishings dominate
Can be used for more sparsely furnished spaces and gives a slightlysofter audio
response
and surfaces,such as tiled floors and wall tiles cabinets (typically found in modern
kitchens a nd conservatories)
furnishings (such as bedding, carpet, rugs and curtains)
height furniture and listening is done at close proximity
Alarms and timers
You can set up to four alarms on Siesta Home. The alar ms switch the radio on and tune to a digital or FM
radio station,play a CD, or sound a tone.
The alarm duration is 60 minutes.
You can also use two timers. The sleep timer puts your Siesta Home in standby after a set amount of
time. The kitchen timer counts down and then ends with an alarm tone.
14
Page 17

Setting an alarm
1.
Press .
2.
Press to browse through alarms.
3. Press Select to choose an alarm.
4.
Press or to change the alarm setting to ON and then pr ess Select.
5.
Press or to change the setting value.Press Select to save changes and move to the next
setting.
ON TIME Choose the time for the alarm.
SOURCE Choose to wake up to an FM or digital radio station, a CD, or a tone.
To choose FM or digital r adio, you need to save a radio station as a preset.
REPEAT Choose to sound an alarm once, daily, on weekdays, or on weekends.
VOLUME Choose the volume for the alar m.
Press Menu or to go back to the previous screen. Press and hold Menu to cancel the
alarm setup.
After you configure the volume, the alarm is saved and the corresponding alarm icon is
displayed on the screen, for example, .
Cancelling an alarm
1.
Press .
2.
Press to browse through alarms.
3.
Press or to change the alarm setting to OFF and then press Select.
Snoozing or silencing an alarm
l
To snooze an alarm, press , or Select.
The default snooze time is 10 minutes. Y ou can change itin Settings. See page 17 for details.
l
To silence an alarm, press .
Note: If you don't snooze or silence the alarm, it'llsound for 60 minutes.
Setting a sleep timer
1. Press Sleep.
2.
Press or to change the dur ation of the timer and then press Select.
You can choose between 15 and 90 minutes.
3. Press Select to star t the timer.
is displayed on the screen.
If both the sleep timer and kitchen timer are set, the icon of the sleep timer is displayed.
When the sleep timer ends, the radio volume decreases gradually for 30 seconds and then the radio
goes into standby.
15
Page 18

Cancelling the sleep timer
l
To cancelthe sleeptimer while it's counting down, press .
Setting a kitchen timer
1. Press Menu.
2.
Press or untilKITCHEN TIMER is displayed and then press Select.
3.
Press or to change the dur ation of the timer and then press Select.
4. Press Select to star t the timer.
is displayed on the screen.
If both the sleep timer and kitchen timer are set, the icon of the sleep timer is displayed.
Cancelling the kitchen timer
1. Press Menu.
2.
Press or untilKITCHEN TIMER is displayed and then press Select.
3.
Press or to change the dur ation of the timer to 00-00 and then press Select.
16
Page 19

Settings
Clock settings
Your Siesta Home can use FM and digital radio signals to set the time and date automatically.If the time
and date don't update automatically,you can set them manua lly.
You can also change the date and time format, and the alar m snooze time.
Setting the date and time
1. Press Menu.
2.
Press or untilCLOCK is displayed and then press Select.
3.
Press or untilSET TIME/DATEis displayed and then press Select.
4.
Press or to change settings for the date and time.Press Select to choose a setting.
Changing the time format
1. Press Menu.
2.
Press or untilCLOCK is displayed and then press Select.
3.
Press or untilSET 12/24 HOUR is displayed and then press Select.
4.
Press or to change the time format and then press Select.
Changing the date format
1. Press Menu.
2.
Press or untilCLOCK is displayed and then press Select.
3.
Press or untilDATE FORMATis displayed and then press Select.
4.
Press or to change the date format and then press Select.
Changing how the clock syncs
1. Press Menu.
2.
Press or untilCLOCK is displayed and then press Select.
3.
Press or untilCLOCK SYNC is displayed and then press Select.
4.
Press or to change how the date and time sync and then press Select.
Changing the alarm snooze time
1. Press Menu.
2.
Press or untilCLOCK is displayed and then press Select.
3.
Press or untilSNOOZE is displayed and then press Select.
4.
Press or to change the snooze time and then press Select.
Audio settings
You can use the SoundSpace EQ equaliser to get the most out of your music.There are several
equalisers set up already for enhancing the sound r esponse and qualities. The audio presets a re based
on the physical position of the r adio as wellas the a cousticfeedback response and type of materials
used within the par ticular room.
You can also customise an equaliser to change the treble and bass.
17
Page 20

Changing the equaliser
1. Press Menu.
2.
Press or untilAUDIO EQ is displayed and then press Select.
3.
Press or untilEQ is displayed and then press Select.
4.
Press or to change the equa liser and then press Select.
Changing the audio settings
1. Press Menu.
2.
Press or untilAUDIO EQ is displayed and then press Select.
3.
Press or untilTONE is displayed and then press Select.
4.
Press or to change the treble and bass settings. Press Select to choose a setting.
Display settings
You can change the display brightness and the information tha t is displayedon the screen when you
are listening to the radio or playing music.
Changing the display brightness
Note: Display brightness settingsalso applyto backlightof the buttons.
1. Press Menu.
2.
Press or untilDISPLAY is displayed and then press Select.
3.
Press or untilBACKLIGHT is displayedand then press Select.
4.
Press or untilACTIVE or STANDBY is displayed and then press Select.
5.
Press or to change the settings. Press Select to choose a setting.
BRIGHTNESS Choose the automatic brightness levelor set the brightness levelmanually.
DURATION Choose to keep the screen lit up all the time or to time out after 10 seconds.
To make your screen br ighter, choose a higher number.
Changing the information on the display
The information displayed on the active screen is configured separately for Digital radio,FM radio and
CD.
You can't change the informa tion displayed on the active screen for Bluetooth because the Bluetooth
module doesn't support fetching of information about tracks.The idle Bluetooth screen shows BT
CONNECTED or BT NOT CONNECTED.
To change the information on the display:
1. Press Source to choose the source you want to configure.
2. Press Menu.
3.
Press or untilDISPLAY is displayed and then press Select.
4.
Press or untilINFORMATION is displayed and then press Select.
5.
Press or untilACTIVE or STANDBY is displayed and then press Select.
6.
Press or to change the settings. Press Select to choose a setting..
18
Page 21

Active screen information
Each source has its own set of available options.
Digital radio FM radio CD
STATION NAME Yes Yes No
SCROLLING TEXT Yes Y es N o
SIGNAL QUALITY Yes No No
SIGNAL STRENGTH Yes Yes No
DATE
TRACK NUMBER
TRACK NAME
Standby screen information
For the standby screen, you can choose to display time or time and date.
Yes Yes No
No No Yes
No No Yes
Changing the language
1. Press Menu.
2.
Press or untilSETTINGS is displayed and then press Select.
3.
Press or untilLANGUAGE is displayed and then press Select.
4.
Press or to change the language and then press Select.
Resetting to factory settings
A factory reset r emoves all stored presets, a larms, timers and settings on your Siesta Home.
Note: You cannot undo a factory r eset.
1. Press Menu.
2.
Press or untilSETTINGS is displayed and then press Select.
3.
Press or untilFACTORY RESET is displayed and then press Select.
4.
Press or untilYES is displayed and then press Selectto confirm the r eset.
Updating the software
We ma y pr ovide software updates to improve your Siesta. To checkfor available softwar e updates, visit
support.pure.com.
To be contacted when softwar e updates are available,you can register your product at
account.pure.com.
Checking the current software version
1. Press Menu.
2.
Press or untilSETTINGS is displayed and then press Select.
3.
Press or untilSOFTWARE VERSION is displayed and then press Select.
19
 Loading...