

Page 1
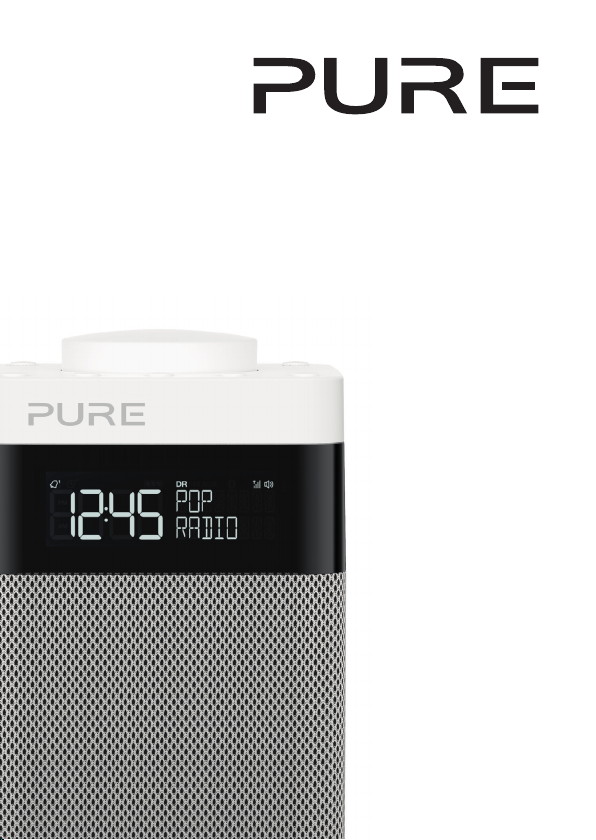
Pop Midi
Page 2

Page 3
Pop Midi
EN
EN
Thank you for choosing Pop Midi. This manual will get
you up and running in no time, and explains how to
make the most of your product.
DE
FR
IT
NO
DA
NL
1
Page 4
Safety
Safety information
1. Familia rise yourself wi th all of the safety informatio n and instruction s before using the radio. When passing th is radio
on to others, please include all documents.
2. The appa ratus shall not be exposed to dripping or splashing and tha t no objects fille d with liquids, suc h as vases,
shall be placed on the apparatus. If liq uid or water is spille d on to the radio, switch it off at the ma ins immediately,
disconnect the mains plug and contact your dealer. Never touch the plug or the radio itself with wet hands. Never
pull the power cable when disconnecting the power adaptor from the power supply.
3. Danger of explosion if the batteries are incorrectly replaced (ensure correct polarity). Replace only with the same or
equivalent type (4 x AA). The b atteries or batte ry (ChargePAK D1) shall not be expose d to excessive heat such as
sunshine, fire or similar. Keep n ew and used batteries and Ch argePAKs away from children. Attention is d rawn to
the environmental aspects of battery disposal.
4. Using the radio in roo ms or climates with high humidity and te mperatures may cause condensati on to form inside
the radio, which can d amage the radio. Use a pparatus in moderate climates only.
5. Avoid extreme degrees of temp erature,either hot or cold. Place the dev ice well away from heat sources such as
radiators or gas/electric fires. No naked flame sources, such as lighted candles, should be placed on the apparatus.
6. The main s power adapter is use d as the disconnect device, the disconnect device sha ll remain readily operable. Fit
the mains a daptor to an easily ac cessible socket located near the rad io and only use the ma ins power adaptor to
connect to this product.
7. Use only th e mains power adaptor listed in th e user instructions (suppl ied by Pure with mode l numbers ZDD055200,
ZDD055200BS, SW055200-NM or SW055200-N01).
8. Ensure that the available supply voltage corresponds with the required operational voltage of the radio before use.
9. Disconnect your radio fro m the power supply if yo u will not use your radio for a long p eriod of time (e.g. if you are
going on holiday).
10. Always unplug your r adio from the mains s ocket before clean ing. When cleani ng the radio, do not use any type of
abrasive pad or abrasive cleaning solutions as these may damage the radio’s surface.
11. To reduce the risk of electric shock, do not remove any screws as there are no user-servic eable parts inside. Refe r
servicing to qualified personnel.
12. Ensure adequate ventilatio n around the product particularl y when charging.
ChargePAK D1 safety instructions
1. Read the in structions for ChargePAK use in this doc ument.
2. Only use your Charg ePAK with original Pure products. Use only the original Pur e ChargePAK D1. Caution: Dang er of
explosion if battery is incorrectly replaced or another type used.
3. Store ChargePAK in a coo l, dry place at normal room temperatu re. Remove from devices that wi ll be stored unused
for extended periods.
4. Do not punc ture, modify, drop, throw, or cause othe r unnecessar y shocks to your Char gePAK. May present a risk of
fire, explosion, or chemical burn if mistreated.
5. Do not disp ose of ChargePAK in a fire or incin erator, or leave in hot places such as a m otor car under direct sunlight.
Do not store near oven, stove, or other heat sourc e.
6. Do not conn ect ChargePAK dire ctly to an electric al source, such as a bu ilding outlet or au tomobile power-poin t. Do
not place i nto a microwave oven, or any ot her high-pressure conta iner.
7. Do not imme rse ChargePAK in water or other wise expose it to liquids.
8. Do not shor t circuit ChargePAK.
9. Do not use or c harge a ChargePAK that appears to be leak ing, discoloure d, rusty, deformed; emitting an odour; o r
is otherwise abnormal.
10. Do not tou ch a leaking Char gePAK directly; wea r protective materi al to remove and dispo se of it properly im mediately.
11. Do not store where children may have acces s.
12. Dis pose of ChargePAK as pe r normal recha rgeable batter ies according to th e local laws and reg ulations of your re gion.
Symbols on the product and in the user manual
This WARNING symbol is used throughout this manual to indicate a potentially serious risk to your personal
safety. Obey all safety notices that accompany this symbol to avoid possible injury or death.
This symbol is used on the product to indicate a caution and that instructions should be read before use.
This symbol indicates DC.
This symbol indicates a USB socket rated at 2 Amps maximum.
2A
2
Page 5

Contents
4 Introduction
4 Top panel
5 Rear panel
6 Display
7 Getting started
7 Quick set up
9 Using your Pop
9 Listening to digital radio
9 Listening to FM radio
10 Storing and selecting presets
10 To quick-store a station to a preset button (1–4)
10 To store a station to the preset list (1–10)
10 To recall a preset when listening to a digital or FM radio station
11 Using the auxiliary input
12 Alarms and timers
12 Setting an alarm
13 Cancelling a sounding alarm
13 Snoozing a sounding alarm
13 Disabling an alarm
13 Setting the sleep timer
13 Setting the kitchen timer
14 Options and settings
14 General settings
15 Audio settings
15 Display settings
16 Clock settings
18 FM stereo
19 Appendix
19 Installing a ChargePAK D1 or four AA batteries
20 Changing Pop Midi’s removable sleeve
21 Help and advice
22 Technical specifications
EN
3
Page 6

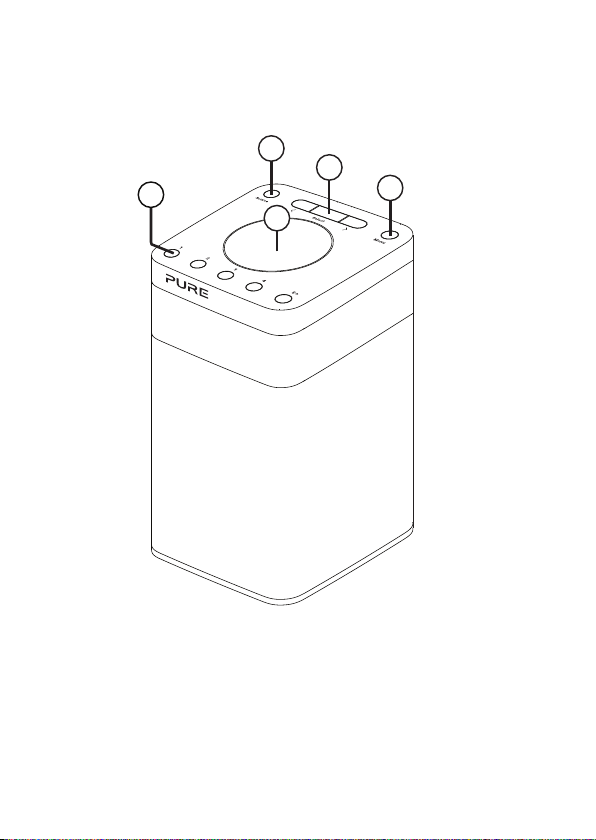
Introduction
Top panel
D
C
E
A
A. Power/Volume dial: Push to switch Pop on/off. Turn to adjust volume.
B. Menu button: Press to change various settings on Pop (see page 14
for more information).
C. Select buttons: Press to change radio stations (see page 9) or press
to scroll and select menu options.
D. Source: Press to switch between listening to digital radio, FM radio and
auxiliary input.
E. Presets 1 - 5+: Store up to 10 digital or 10 FM radio preset stations (see
page 10 for more information).
4
B
Page 7
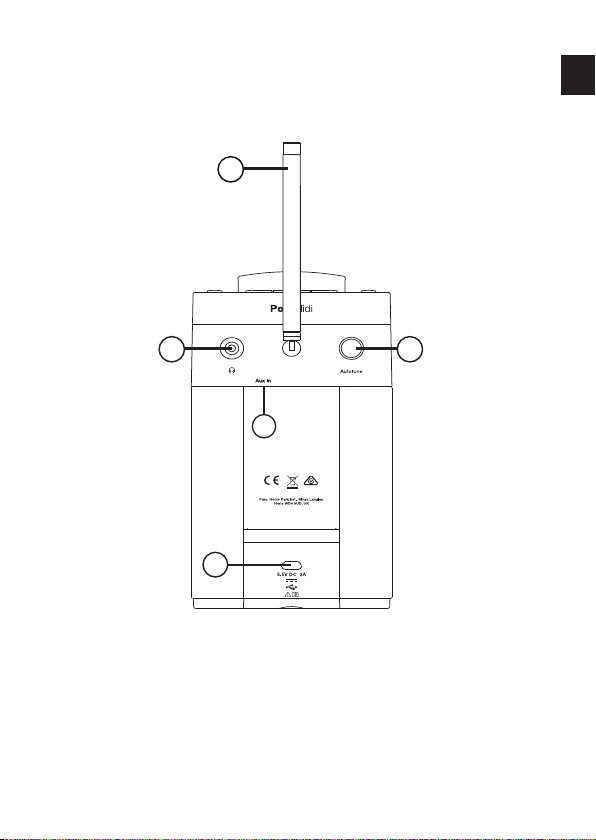
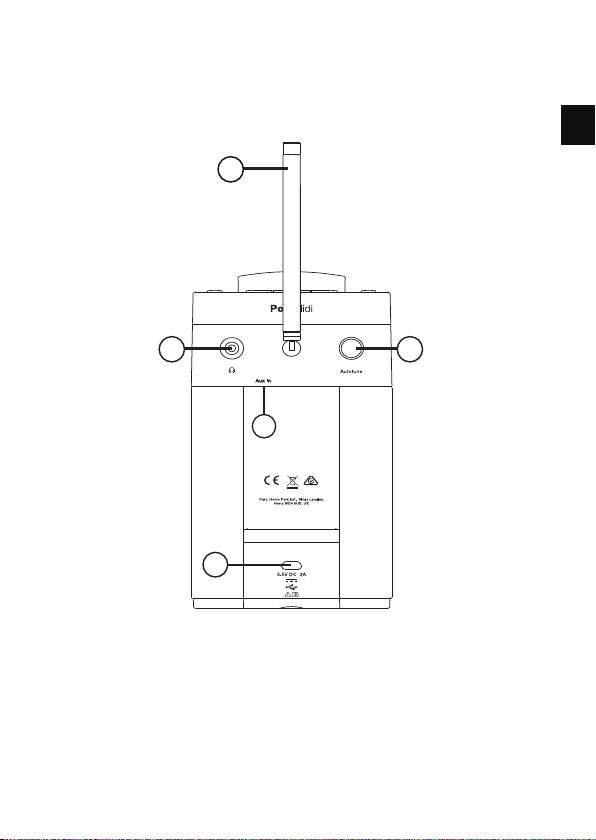
Rear panel
F
G H
I
J
F. Aerial: Rotate the aerial and fully extend it for best reception.
G. Stereo headphone socket (3.5mm)
H. Autotune button: Press to automatically scan for new digital radio
stations and remove inactive ones.
I. Auxiliary input (3.5mm): Analogue stereo input for iPod, MP3 player, etc.
J. Micro-B USB 5.5V power connector: Connect to supplied mains
adapter only.
EN
5
Page 8
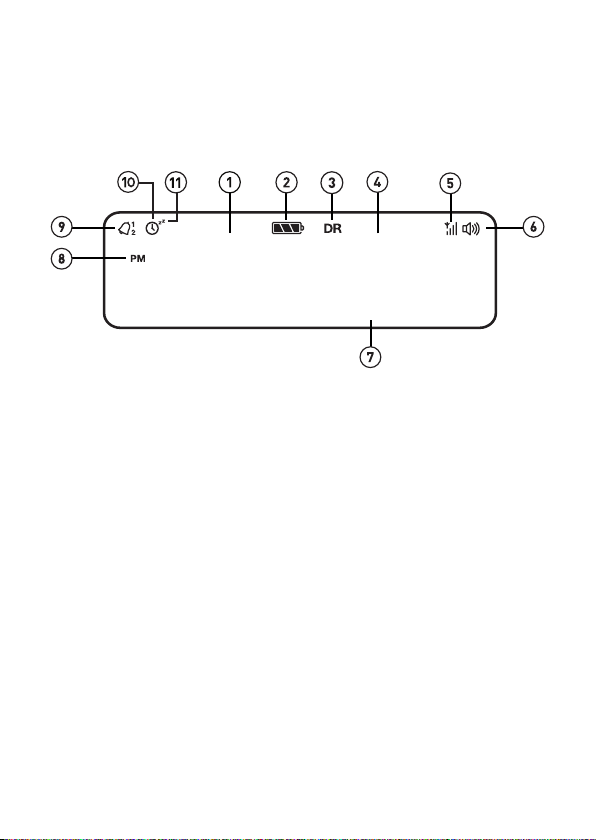
Display
BBC R2
7:00
1. Displays current time.
2. ChargePAK or battery indicator.
3. Source indicator (DR= digital radio, FM= FM radio, AUX= auxiliary input).
4. Station name.
5. Signal strength.
6. Volume indicator.
7. Displays date, scrolling text, settings and station information (see page 16).
8. AM/PM indicator.
9. Alarm set indicator (see page 12).
10. Sleep and kitchen timer indicator (see page 13).
11. Snooze indicator (page 13).
6
TOP 40
Page 9
Getting started
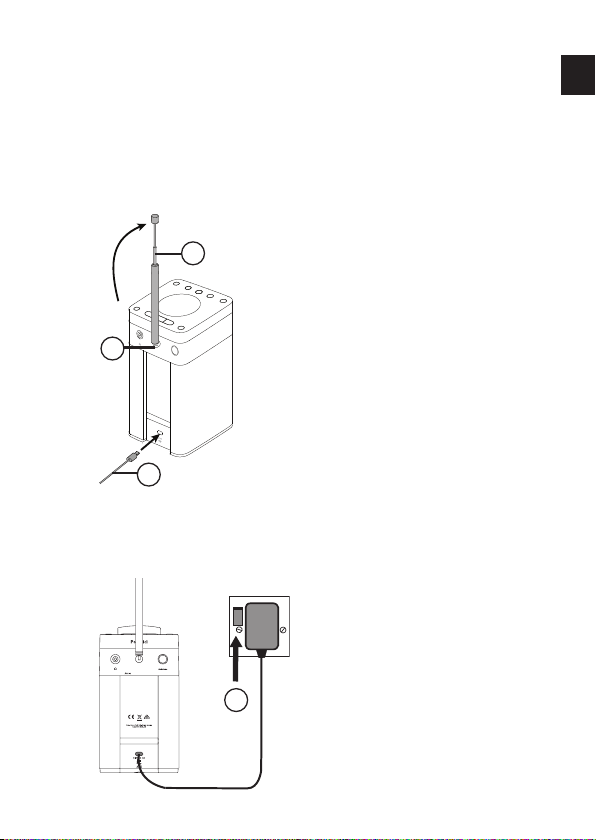
Quick set up
Note: If you have a ChargePAK D1 rechargeable battery (sold separately) or AA
rechargeable batteries fit them now before plugging Pop in. See page 19 for
more information.
1
1
B
• Rotate the aerial and fully extend it
(steps A and B).
A
C
2
2
• Insert the jack of the supplied mains
adapter into the socket on the rear
of the radio (C).
EN
• Plug the mains adapter into the
• Plug the mains adapter into the
mains supply (D).
D
mains supply (D).
7
Page 10
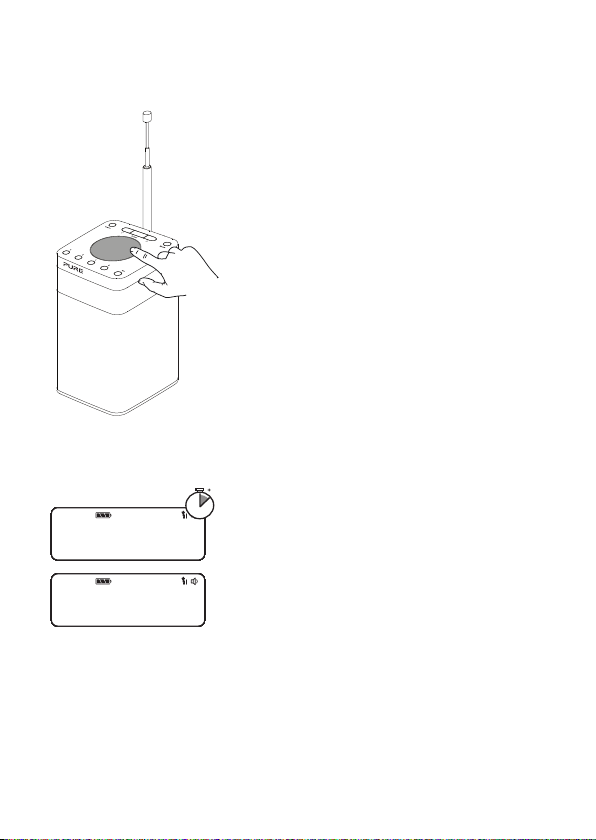
3
1
min
• Push down and release the power button to
switch Pop on.
4
09:59
10:00
8
DR FM AUX BTDR FM AUX BTDR FM AUX BTDR FM AUX BTDR FM AUX BTDR FM AUX BTDR FM AUX BTDR FM AUX BTDR FM AUX BTDR FM AUX BTDR FM AUX BTDR FM AUX BTDR FM AUX BTDR FM AUX BTDR FM AUX BTDR FM AUX BTDR FM AUX BTDR FM AUX BTDR FM AUX BTDR FM AUX BTDR FM AUX BTDR FM AUX BTDR FM AUX BTDR FM AUX BTDR FM AUX BTDR FM AUX BTDR FM AUX BTDR FM AUX BTDR FM AUX BTDR FM AUX BTDR FM AUX BTDR FM AUX BTDR FM AUX BTDR FM AUX BTDR FM AUX BTDR FM AUX BTDR FM AUX BTDR FM AUX BTDR FM AUX BTDR FM AUX BTDR FM AUX BTDR FM AUX BTDR FM AUX BTDR
SCAN 14
******
DR FM AUX BTDR FM AUX BTDR FM AUX BTDR FM AUX BTDR FM AUX BTDR FM AUX BTDR FM AUX BTDR FM AUX BTDR FM AUX BTDR FM AUX BTDR FM AUX BTDR FM AUX BTDR FM AUX BTDR FM AUX BTDR FM AUX BTDR FM AUX BTDR FM AUX BTDR FM AUX BTDR FM AUX BTDR FM AUX BTDR FM AUX BTDR FM AUX BTDR FM AUX BTDR FM AUX BTDR FM AUX BTDR FM AUX BTDR FM AUX BTDR FM AUX BTDR FM AUX BTDR FM AUX BTDR FM AUX BTDR FM AUX BTDR FM AUX BTDR FM AUX BTDR FM AUX BTDR FM AUX BTDR FM AUX BTDR FM AUX BTDR FM AUX BTDR FM AUX BTDR FM AUX BTDR FM AUX BTDR FM AUX BTDR
• Wait for Pop to complete an Autotune for all
available digital
radio stations.
• When the Autotune is complete, a digital radio
station will be selected.
Page 11
Using your Pop
PM
DR
PM
M
EN
DR FM AUX BTDR FM AUX BTDR FM AUX BTDR FM AUX BTDR FM AUX BTDR FM AUX BTDR FM AUX BTDR FM AUX BTDR FM AUX BTDR FM AUX BTDR FM AUX BTDR FM AUX BTDR FM AUX BTDR FM AUX BTDR FM AUX BTDR FM AUX BTDR FM AUX BTDR FM AUX BTDR FM AUX BTDR FM AUX BTDR FM AUX BTDR FM AUX BTDR FM AUX BTDR FM AUX BTDR FM AUX BTDR FM AUX BTDR FM AUX BTDR FM AUX BTDR FM AUX BTDR FM AUX BTDR FM AUX BTDR FM AUX BTDR FM AUX BTDR FM AUX BTDR FM AUX BTDR FM AUX BTDR FM AUX BTDR FM AUX BTDR FM AUX BTDR FM AUX BTDR FM AUX BTDR FM AUX BTDR FM AUX BTDR
10:00
DR FM AUX BTDR FM AUX BTDR FM AUX BTDR FM AUX BTDR FM AUX BTDR FM AUX BTDR FM AUX BTDR FM AUX BTDR FM AUX BTDR FM AUX BTDR FM AUX BTDR FM AUX BTDR FM AUX BTDR FM AUX BTDR FM AUX BTDR FM AUX BTDR FM AUX BTDR FM AUX BTDR FM AUX BTDR FM AUX BTDR FM AUX BTDR FM AUX BTDR FM AUX BTDR FM AUX BTDR FM AUX BTDR FM AUX BTDR FM AUX BTDR FM AUX BTDR FM AUX BTDR FM AUX BTDR FM AUX BTDR FM AUX BTDR FM AUX BTDR FM AUX BTDR FM AUX BTDR FM AUX BTDR FM AUX BTDR FM AUX BTDR FM AUX BTDR FM AUX BTDR FM AUX BTDR FM AUX BTDR FM AUX BTDR FM
10:00
STATIONS
BBC R3
BBC R3
TUNING
DRF
107\60
107\60
SCANNING
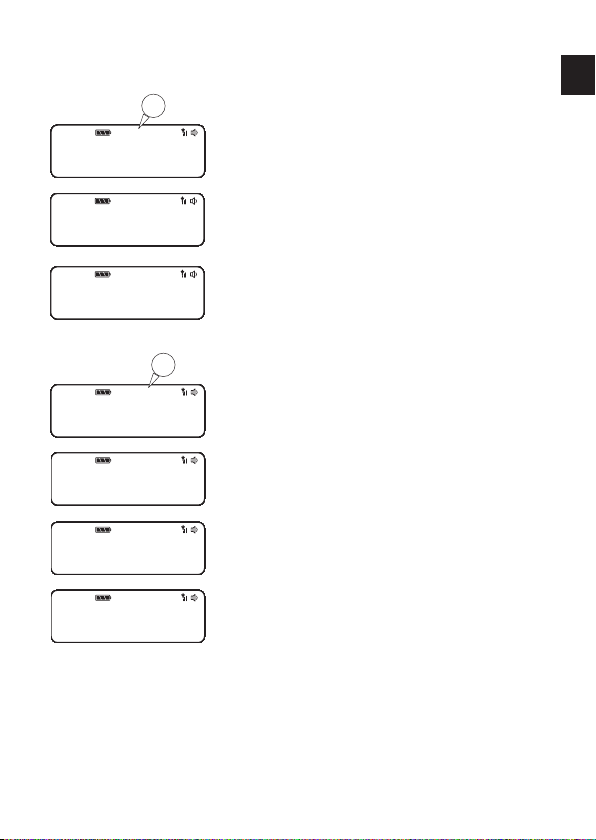
Listening to digital radio
Press the Source button to switch to digital radio.
Changing digital stations
1. Press the < > buttons to scroll through the list of
stations.
2. When you have found the station that you want to
listen to, press the Select button.
Listening to FM radio
Press the Source button to switch to FM radio.
Changing FM stations
Manual tuning
Press the < > buttons to step up or down 0.05 MHz.
Seek tuning
Press and hold the < > buttons to seek to the next or
previous FM radio station that has a strong signal.
9
Page 12
Storing and selecting presets
You can store up to 10 digital and 10 FM radio stations for quick access.
DR FM AUX BTDR FM AUX BTDR FM AUX BTDR FM AUX BTDR FM AUX BTDR FM AUX BTDR FM AUX BTDR FM AUX BTDR FM AUX BTDR FM AUX BTDR FM AUX BTDR FM AUX BTDR FM AUX BTDR FM AUX BTDR FM AUX BTDR FM AUX BTDR FM AUX BTDR FM AUX BTDR FM AUX BTDR FM AUX BTDR FM AUX BTDR FM AUX BTDR FM AUX BTDR FM AUX BTDR FM AUX BTDR FM AUX BTDR FM AUX BTDR FM AUX BTDR FM AUX BTDR FM AUX BTDR FM AUX BTDR FM AUX BTDR FM AUX BTDR FM AUX BTDR FM AUX BTDR FM AUX BTDR FM AUX BTDR FM AUX BTDR FM AUX BTDR FM AUX BTDR FM AUX BTDR FM AUX BTDR FM AUX BTDR
10:00
PRESET 2
STORED
CLASSIC
MOZART
PRESET 5
EMPTY
PRESET 6
STORED
To quick-store a station to a preset
button (1–4)
Tune in to the digital or FM radio station that you want
to store. Press and hold one of the numbered preset
buttons (1–4) for two seconds to save the current station
as a preset. You can save over existing presets.
To store a station to the preset list
(1–10)
1. Tune in to the digital radio or FM radio station you
want to store.
2.
Press and hold the 5+ button to view the numerical list
of stored presets, then press < > to choose any preset
number between 1 and 10.
You can overwrite existing presets.
3. Press the Select button until you see the ‘Preset
stored’ message.
10:00
10:00
10
DR FM AUX BTDR FM AUX BTDR FM AUX BTDR FM AUX BTDR FM AUX BTDR FM AUX BTDR FM AUX BTDR FM AUX BTDR FM AUX BTDR FM AUX BTDR FM AUX BTDR FM AUX BTDR FM AUX BTDR FM AUX BTDR FM AUX BTDR FM AUX BTDR FM AUX BTDR FM AUX BTDR FM AUX BTDR FM AUX BTDR FM AUX BTDR FM AUX BTDR FM AUX BTDR FM AUX BTDR FM AUX BTDR FM AUX BTDR FM AUX BTDR FM AUX BTDR FM AUX BTDR FM AUX BTDR FM AUX BTDR FM AUX BTDR FM AUX BTDR FM AUX BTDR FM AUX BTDR FM AUX BTDR FM AUX BTDR FM AUX BTDR FM AUX BTDR FM AUX BTDR FM AUX BTDR FM AUX BTDR FM AUX BTDR
RECALL
6 CLASS
DR FM AUX BTDR FM AUX BTDR FM AUX BTDR FM AUX BTDR FM AUX BTDR FM AUX BTDR FM AUX BTDR FM AUX BTDR FM AUX BTDR FM AUX BTDR FM AUX BTDR FM AUX BTDR FM AUX BTDR FM AUX BTDR FM AUX BTDR FM AUX BTDR FM AUX BTDR FM AUX BTDR FM AUX BTDR FM AUX BTDR FM AUX BTDR FM AUX BTDR FM AUX BTDR FM AUX BTDR FM AUX BTDR FM AUX BTDR FM AUX BTDR FM AUX BTDR FM AUX BTDR FM AUX BTDR FM AUX BTDR FM AUX BTDR FM AUX BTDR FM AUX BTDR FM AUX BTDR FM AUX BTDR FM AUX BTDR FM AUX BTDR FM AUX BTDR FM AUX BTDR FM AUX BTDR FM AUX BTDR FM AUX BTDR
CLASSIC
MOZART
To recall a preset when listening to
a digital or FM radio station
To tune to presets 1 to 4, press the corresponding
numbered button on Pop (1 to 4).
To access the full list of presets (from 1 to 10):
1. Press and release the 5+ button.
2. Press < > to scroll through the list of presets and push
the Select button to tune to the selected preset.
Page 13
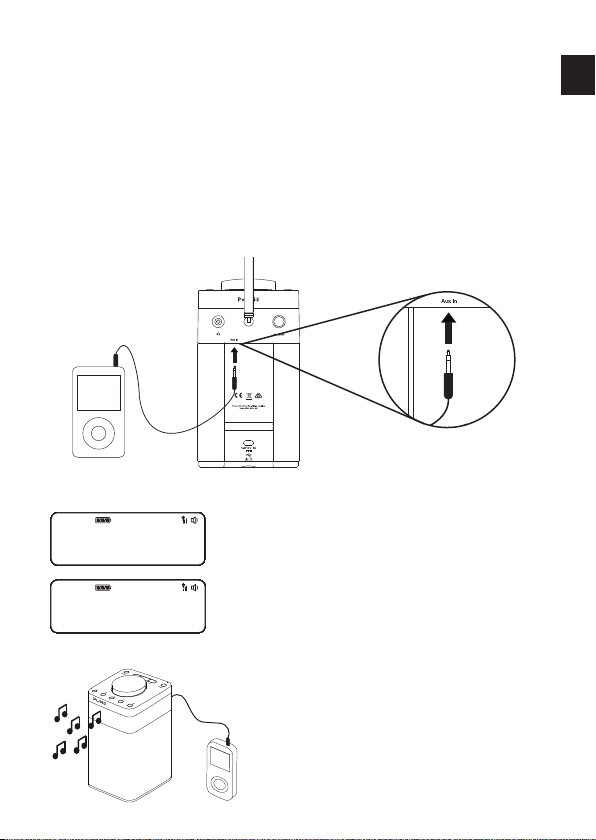
Using the auxiliary input
You can use Pop’s auxiliary input to play any music from your phone or tablet on
to Pop.
Note:
When playing music using Pop’s auxiliary input, you will need to use your
phone or tablet’s volume controls to change Pop’s volume.
Connecting an auxiliary device to Pop
Connect the line out or headphone socket of your auxiliary device to the Aux In
socket on your Pop using a suitable cable.
Selecting the auxiliary input
DR FM AUX BTDR FM AUX BTDR FM AUX BTDR FM AUX BTDR FM AUX BTDR FM AUX BTDR FM AUX BTDR FM AUX BTDR FM AUX BTDR FM AUX BTDR FM AUX BTDR FM AUX BTDR FM AUX BTDR FM AUX BTDR FM AUX BTDR FM AUX BTDR FM AUX BTDR FM AUX BTDR FM AUX BTDR FM AUX BTDR FM AUX BTDR FM AUX BTDR FM AUX BTDR FM AUX BTDR FM AUX BTDR FM AUX BTDR FM AUX BTDR FM AUX BTDR FM AUX BTDR FM AUX BTDR FM AUX BTDR FM AUX BTDR FM AUX BTDR FM AUX BTDR FM AUX BTDR FM AUX BTDR FM AUX BTDR FM AUX BTDR FM AUX BTDR FM AUX BTDR FM AUX BTDR FM AUX BTDR FM AUX BTDR FM AUX
10:00
AUX
2-4-2015
1.
Press and release the Source button until you see
‘AUX’ on Pop’s display.
2. On your auxiliary device, select the content that
you want to listen to
on Pop.
Pop will start to play the content that you selected on
your auxiliary device.
EN
11
Page 14

Alarms and timers
DR FM AUX BTDR FM AUX BTDR FM AUX BTDR FM AUX BTDR FM AUX BTDR FM AUX BTDR FM AUX BTDR FM AUX BTDR FM AUX BTDR FM AUX BTDR FM AUX BTDR FM AUX BTDR FM AUX BTDR FM AUX BTDR FM AUX BTDR FM AUX BTDR FM AUX BTDR FM AUX BTDR FM AUX BTDR FM AUX BTDR FM AUX BTDR FM AUX BTDR FM AUX BTDR FM AUX BTDR FM AUX BTDR FM AUX BTDR FM AUX BTDR FM AUX BTDR FM AUX BTDR FM AUX BTDR FM AUX BTDR FM AUX BTDR FM AUX BTDR FM AUX BTDR FM AUX BTDR FM AUX BTDR FM AUX BTDR FM AUX BTDR FM AUX BTDR FM AUX BTDR FM AUX BTDR FM AUX BTDR FM AUX BT
DR
Note: If Pop is running on batteries or a ChargePAK, Pop’s alarm function will not
work if you turn Pop off after setting an alarm.
Setting an alarm
Pop has two alarms which can switch the radio on
and tune to a digital or FM radio station or sound an
alarm tone.
1. Press the Menu button and scroll
< > to ‘Alarm’.
2. Scroll < > to ‘Alarm1’ or ‘Alarm2’ and press the
Select button.
3. Scroll < > to ‘On’ and press the Select button.
4. Scroll < > to set the hour for the alarm and press
the Select button. Repeat to set the minute for the
alarm.
5. Scroll < > to set the duration of the alarm and press
the Select button.
6.
Scroll < > to specify ‘FM’, ‘Digital’ or ‘Tone’ and
press the Select button to confirm. If you are
specifying a tone alarm, skip to step 8.
7. Scroll < > to specify which station should be played
when the alarm goes off. You have the option of
selecting one of your preset stations or you can
select ‘Last Used’ to select the station that you were
last listening to. Press Select to confirm.
8. Scroll < > to specify one of the following alarm
repeat options:
‘Daily’, ‘Weekdays’, ‘Weekends’ or ‘Once’ and
press the Select button to confirm.
9. Use < > to set the volume that the radio will play at
when the alarm sounds and press the Select button
to confirm.
10
. The alarm icon will light steadily on the display to
show that the alarm has set.
7:00
7:00
7:00
7:00
7:00
7:00
7:00
7:00
7:00
7:00
MENU
ALARM
ALARM
ALARM 1
DURATION
45 MIN5
SOURCE
DIGITAL
STATION
LAST USE
REPEAT
DAILY
VOLUME
2
12
Page 15

Cancelling a sounding alarm
To cancel a sounding alarm, press the Source, <Select> or Menu buttons.
Snoozing a sounding alarm
To snooze a sounding alarm, press one of the Preset buttons. By default, Pop‘s
snooze time is set to eight minutes. To change the default snooze time see page 17.
Disabling an alarm
To disable an alarm after it has been set:
1. Press the Menu button and scroll < > to ‘Alarm’ and press the Select button.
2. Scroll < > to the alarm that you want to disable (‘Alarm1’ or ‘Alarm2’) and press
the Select button.
3. Scroll < > to ‘Off’ and press the Select button.
4
.
The alarm icon will turn off on Pop’s display to show that the alarm has
been disabled.
Setting the sleep timer
The sleep timer can be set to switch Pop off after a specific period of time.
Note: If Pop is running on batteries or a ChargePAK, Pop’s sleep function is disabled.
1. Press the Menu button.
2. Scroll < > to ‘Sleep’ and press the Select button.
3. Scroll < > and press the Select button to set the timer for up to 90 minutes or
choose ‘Off’ to cancel.
Setting the kitchen timer
Pop has a countdown kitchen timer which will sound an alarm after a set time period.
1. Press the Menu button.
2. Scroll < > to ‘Timer’ and press the Select button.
3. Scroll < > to change the hours and press the Select button.
4. Scroll < > again to change the minutes and push to confirm and start the
countdown timer.
The alarm will sound after the time period you have set whether the radio is on or in
standby. Cancel the beeping alarm tone by pressing either the Source, <Select>
or Menu buttons.
EN
13
Page 16

Options and settings
General settings
Changing the language shown on the display
To switch the display language on Pop between English, French, German, Italian
and Spanish:
1. Press the Menu button.
2. Scroll < > to ‘Settings’ and press the Select button.
3. Scroll < > to ‘Lang.’ and press the Select button.
4. Scroll < > and press the Select button to choose the language that you want
Pop to display.
Resetting Pop to factory settings
Resetting your Pop radio removes all presets, clears the station list and resets all
options to defaults. To carry out a factory reset:
1. Press the Menu button.
2. Scroll < > to ‘Settings’ and press the Select button.
3. Scroll < > to ‘Reset’ and press the Select button.
4. Scroll < > to ‘Yes’ and press the Select button.
Displaying Pop’s software version
To display software version that is currently running on Pop:
1. Press the Menu button.
2. Scroll < > to ‘Settings’ and press the Select button.
3. Scroll < > to ‘Version’ and press the Select button.
Updating Pop to the latest version of software
Contact Pure technical support (http://support-uk.pure.com) for more
information on how to update Pop to the latest software version.
14
Page 17

Audio settings
You can use Pop’s audio menu to adjust the bass and treble.
1. Press the Menu button.
2. Scroll < > to ‘Audio’ and press the Select button.
3. Scroll < > to ‘Bass’ or ‘Treble’ and press the Select button.
4. Scroll < > to adjust the bass or treble levels. You can choose a level between
‘-3’ and ‘+3’.
5. Press the Select button to confirm the bass or treble level.
Display settings
Adjusting the display brightness
You can adjust the brightness of the display when Pop is switched on or in
standby. To change the brightness of Pop’s display:
1. Press the Menu button.
2. Scroll < > to ‘Display’ and press the Select button.
3. Scroll < > to ‘Backlight’ and press the Select button.
4. Scroll < > to ‘Active’ and press the Select button to change the settings that
apply when Pop is switched on, or scroll to < > ‘Standby’ and press the Select
button to change settings that apply in standby.
5. Scroll < > to ‘Level’ and press the Select button.
6. Scroll < > to choose a brightness level between ‘1’ and ‘5’.
7. Press the Select button to confirm the brightness setting.
Adjusting how long the display backlight stays on for
You can adjust how long Pop’s display backlight stays on for:
1. Press the Menu button.
2. Scroll < > to ‘Display’ and press the Select button.
3. Scroll < > to ‘Backlight’ and press the Select button.
4. Scroll < > to ‘Active’ and press the Select button to change the settings that
apply when Pop is switched on, or scroll to < > ‘Standby’ and press the Select
button to change settings that apply in standby.
5. Scroll < > to ‘Duration’ and press the Select button.
6. Scroll < > and press the Select button to choose one of the following options:
On: Choose this option if you want the backlight to always stay on.
Off: Choose this option if you want the backlight to turn off after 10 seconds
EN
15
Page 18

Changing the information shown on Pop’s display
If you are listening to a digital or FM radio station, you can change the information
that is shown on Pop’s display:
1. Press the Menu button.
2. Scroll < > to ‘Display’ and press the Select button.
3. Scroll < > to ‘Info’ and press the Select button.
4. Scroll < > and press the Select button to choose one of the following options:
Text: Choose this option if you want to display the information broadcast
by the station you are currently listening to. The information displayed may
include song titles, programme details, news, etc.
Strength: Choose this option if you want to display the signal strength of the
radio station you are currently listening to. The number of asterisks indicate
the reliable reception level.
Date: Choose this option if you want to display the current date.
Clock settings
Setting the time and date
The time and date on Pop are automatically set by the FM or digital radio signal. If
the time/date on Pop is not updating automatically, you can manually set it.
1. Press the Menu button.
2. Scroll < > to ‘Clock’ and press the Select button.
3. Scroll < > to ‘Time/date’ and press the Select button.
4. Scroll < > to set the hour and press the Select button. Repeat to set the minutes.
5. Scroll < > to set the day and press the Select button. Repeat to set the month
and the year.
Changing the time format
1. Press the Menu button.
2. Scroll < > to ‘Clock’
3. Scroll < > to ‘12/24 hr’ and press the
4. Scroll < > to choose between ‘12 hour’ and ‘24 hour’ and press the
button to confirm.
and press the Select button.
Select
button.
Select
16
Page 19

Changing the date format
1. Press the Menu button.
2. Scroll < > to ‘Clock’ and press the Select button.
3. Scroll < > to ‘Format’ and press the Select button.
4. Scroll < > to choose between displaying the date in day, month and year
order ‘DD-MM-YYYY’ or in month, day and year order ‘MM-DD-YYYY’ and
press the
Select
button to confirm.
Clock synchronization options
You can select the radio sources that you want to use for setting the time. By
default, Pop uses both the FM and digital radio signals to synchronize the time.
To specify the clock synchronization options:
1. Press the Menu button.
2. Scroll < > to ‘Clock’ and press the Select button.
3. Scroll < > to ‘Sync to’ and press the Select button.
4. Scroll < > to choose the required clock synchronization option and press the
Select
button to confirm.
Changing the snooze time
You can change the amount of time an alarm will snooze for when you press one
of Pop’s preset buttons during a sounding alarm. By default, Pop’s snooze time is
set to eight minutes.
To change Pop’s snooze time:
1. Press the Menu button.
2. Scroll < > to ‘Clock’ and press the Select button.
3. Scroll < > to ‘Snooze’ and press the Select button.
4. Scroll < > to choose a snooze time between ‘5’ and ‘59’ minutes and press
the
Select
button to confirm.
EN
17
Page 20

FM stereo
You can use the FM stereo menu to switch between stereo and mono reception.
You may want to select ‘Mono’ to try and improve weaker reception.
Note: The ‘FM stereo’ option is only visible when you have selected ‘FM’ as the
radio source.
To change Pop’s FM stereo setting:
1. Press Menu.
2. Scroll < > to ‘FM stereo’ and press the Select button.
3. Scroll < > to choose between ‘Stereo’ and ‘Mono’ and press the Select
button to confirm.
18
Page 21
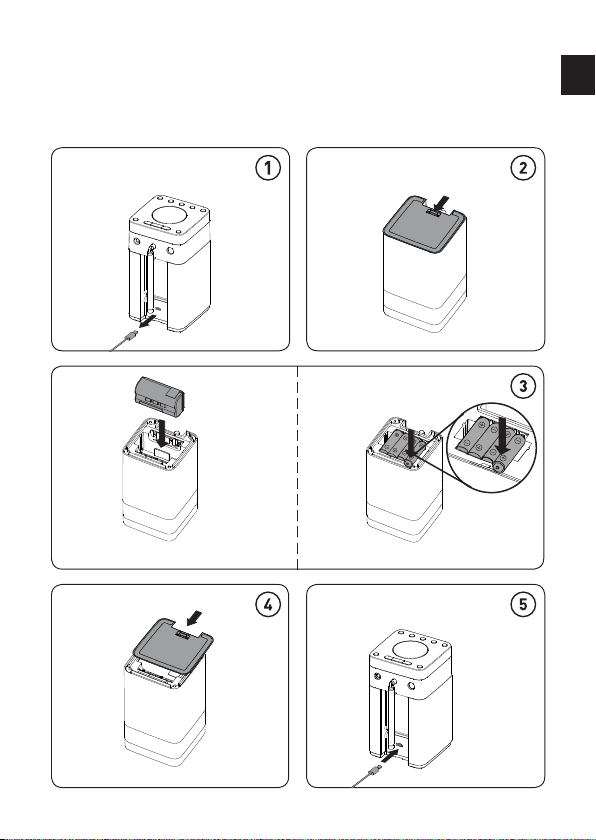
Appendix
Installing a ChargePAK D1 or four AA batteries
ChargePAK D1 4x AA batteries
EN
19
Page 22
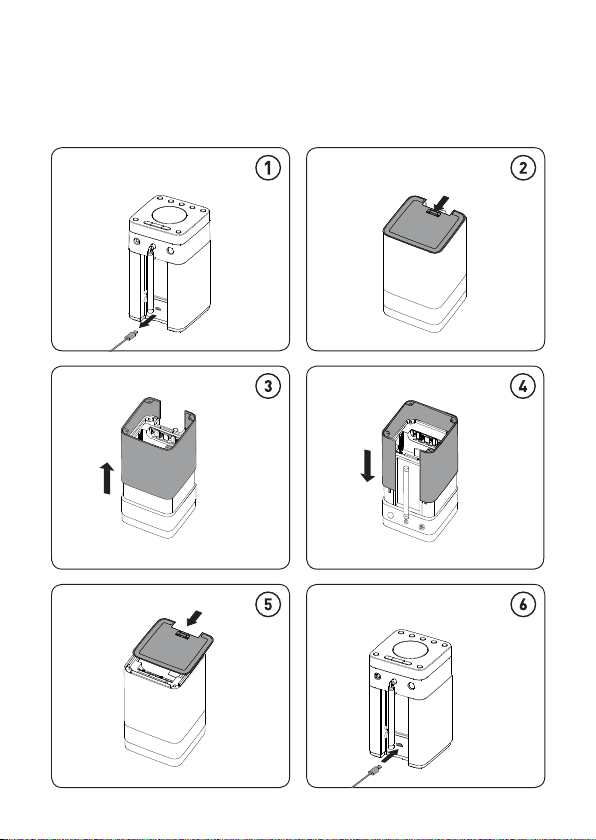
Changing Pop Midi’s removable sleeve
20
Page 23

Help and advice
Secondary and inactive stations
(</>) Secondary digital radio services
Some stations have accompanying secondary services which provide extra
information or alternative content and may only be broadcast at certain times. If a
station has a secondary service available, the station shows ‘>’ next to its name in
the station list and the secondary service appears next to the station in the list. A
secondary service has a ‘<’ before its name in the station list.
(?) Inactive or unavailable digital radio stations
Inactive or unavailable stations appear on the station list preceded by ‘?’ and
cannot be tuned to. A station may be inactive or unavailable because the station
is not broadcasting at the current time (check programme listings) or has stopped
broadcasting altogether. Also, you may not have a strong enough signal to
receive the radio station.
Hints and tips
Display says ‘No stations available’
Press the Autotune button on the back of your Pop to search for digital stations.
Try adjusting your aerial or radio position.
Receiving new digital radio stations that have started broadcasting
Press the Autotune button on the back of your Pop to search for new digital
stations. Try adjusting your aerial or radio position.
EN
21
Page 24

Technical specifications
Radio Digital and FM radio
Frequencies
Speaker
Audio power output 4.3W RMS
Input connectors 5.5V DC power adaptor socket (230V supplied)
Output connectors 3.5mm stereo headphone socket
Presets 10 digital radio and 10 FM radio presets
Power supply 230V AC to 5.5V (2.0A) DC external power adapter
(supplied), optional ChargePAK D1 rechargeable battery
pack or four AA batteries
Power consumption Standby with clock display: 0.55W, Active: 0.92W
Dimensions 93 mm wide x 173 mm high x 102 mm deep
Aerial Telescopic aerial
Software version V1.0
Approvals CE marked. Hereby, Pure International Limited declares that
The full text of the EU Declaration of Conformity is available at
DAB/DAB+, FM radio 87.5-108 MHz
Full-range 3
this radio model Pop Midi is in compliance with the essential
requirements of RED 2014/53/EU.
the following internet address http://www.pure.com/about/red
" drive unit
22
Page 25
Pop Midi
Vielen Dank, dass Sie sich für Pop Midi entschieden
haben. Dieses Handbuch hilft Ihnen, Ihr Produkt in
kürzester Zeit in Betrieb zu nehmen. Sie erfahren hier,
wie Sie all diese faszinierenden Funktionen optimal
nutzen können.
EN
DE
DE
FR
IT
NO
DA
NL
1
Page 26
Sicherheit
Informationen zur Sicherheit
1. Machen Sie sich vor der Nutzung des Radios mit allen Sicherheitsinformationen und Anweisungen vertraut. Wenn Sie dieses
Radio an andere Personen weitergeben, reichen Sie bitte auch alle Dokumente weiter.
2. S tellen Sie sicher, das s das Gerät keinen tr opfenden oder sp ritzenden Flüs sigkeiten ausge setzt ist. Es soll ten keinerlei Obj ekte,
die mit Flü ssigkeit gefüll t sind, wie z. B. Vasen, auf d as Gerät gestell t werden. Wenn Wasser o der eine andere Fl üssigkeit auf
dem Radio v erschüttet wird, s chalten Sie das Ge rät sofort aus, tre nnen Sie es vom Netz u nd kontaktiere n Sie Ihren Händle r.
Fassen Si e niemals den Stec ker oder das Radio mi t nassen Händen a n. Ziehen Sie nie mals am Netzkabe l, wenn Sie den
Netzadapter von der Stromversorgung trennen.
3. Bei einem unsachgemäßen Austausch der Batterie besteht Explosionsgefahr (achten Sie auf eine korrekte Polarität). Tauschen
Sie Batte rien nur gegen Bat terien desse lben oder gleich wertigen Typs aus (4x AA ). Die Batterie (Char gePAK D1) darf nicht große r
Hitze wie Sonneneinstrahlung, Feuer oder Ähnlichem ausgesetzt werden. Bewahren Sie neue und gebrauchte Batterien und
ChargePAKs vor Kindern auf. Achten Sie auf eine umweltgerechte Batterieentsorgung.
4. Bei der Nutzung des Radios in Räumen oder Klimaumgebungen mit hoher Luftfeuchtigkeit und hohen Temperaturen kann sich
Kondens ation im Inneren de s Radios bilden un d Schäden verurs achen. Das Gerät n ur bei gemäßigte m Klima verwende n.
5. Ver meiden Sie extre m hohe oder tiefe Tempe raturen. Halten Si e das Gerät fern von Wär mequellen wie H eizungen und Ga s- oder
Elektro heizstrahler n. Stellen Sie kein of fenes Feuer wie a ngezündete Kerze n auf das Gerät.
6. D er Netzadapter wi rd als Trennvorrichtu ng verwendet. Die Tren nvorrichtung sol lte jederzeit be triebsbereit s ein.
Stecken Sie den N etzadapter in ein e einfach zugäng liche Steckdose in d er Nähe des Radio s und verwenden Si e nur den
Netzadapter, um dieses Produkt anzuschließen.
7. Ver wenden Sie nur de n Netzadapter, der in d er Bedienungsa nleitung aufge führt ist (geli efert von Pure, Mode llnummer
ZDD055200, ZDD055200BS, SW055200-NM oder SW055200-N01).
8. Ver gewissern Sie si ch vor der Nutzung d es Radios, dass di e verfügbare Net zspannung der e rforderlich en Betriebsspa nnung des
Geräts entspricht.
9. Trenn en Sie Ihr Radio von de r Stromversorgu ng, wenn Sie es für lä ngere Zeit nicht be nutzen (z. B. wenn Sie i n den Urlaub
fahre n).
10. Ziehen S ie immer den Netz stecker des Radio s aus der Steckdose, b evor Sie das Gerät re inigen. Verwend en Sie für die
Reinigung des Radios keine Scheuerpads- oder mittel, da diese die Geräteoberfläche beschädigen könnten.
11. Um das Ris iko eines Stromsc hlags zu vermeide n, entfernen Si e keine Schrauben. I m Radio befinden s ich keine vom Benu tzer
wartbaren Teile. Wenden Sie sich für Reparaturarbeiten an qualifiziertes Personal.
12. Sorgen S ie für ausreiche nde Belüftung u m das Produkt, ins besondere beim L aden.
ChargePAK D1 Sicherheitshinweise
1. Lesen Sie die Anleitungen zur Verwendung des ChargePAKs in diesem Dokument.
2. Verwenden Sie Ihr ChargePAK ausschließlich mit Originalteilen von Pure. Verwenden Sie ausschließlich das Original-ChargePAK
D1 von Pure. Bei einem unsachgemäßen Austausch der Batterie besteht Explosionsgefahr (achten Sie auf eine korrekte Polarität).
Tauschen Sie Batterien nur gegen Batterien desselben oder gleichwertigen Typs aus.
3. Lagern Si e das ChargePAK an ei nem kühlen, troc kenen Ort bei Zi mmertempera tur. Nehmen Sie es aus d em Gerät heraus, w enn es
längere Z eit nicht benut zt wird.
4. Achten Sie da rauf, dass das Cha rgePAK nicht mit spi tzen Gegenstä nden bearbei tet wird, dass es wede r verändert, fa llen gelasse n,
geworfe n noch unnötige n Erschütterun gen ausgeset zt wird. Bei fehle rhafter Verwe ndung besteht da s Risiko von Feuer, Expl osion
oder Verätzung.
5. Das Charge PAK nicht in einem Feu er oder einer Ver brennungsanl age entsorgen. N icht an heißen Or ten wie in einem Au to bei direkter
Sonnene instrahlung li egen lassen. L agern Sie es nich t in der Nähe von Öfe n, Herden oder and eren Wärmeque llen.
6. Das Charge PAK nicht direkt mi t einer Stromqu elle verbinden , wie z. B. einer Steckd ose in Haus oder Au to. Nicht in die Mikrowe lle
oder einen Hochdruckbehälter stellen.
7. Tauchen Sie das C hargePAK nicht in Was ser ein und setze n Sie es keinen Flü ssigkeiten aus.
8. Schließe n Sie das ChargePAK n icht kurz.
9. Ein Charge PAK, das offensic htlich undicht, ve rfärbt, rostig o der verformt is t, das merkwürd ig riecht oder Ih nen anderwei tig
ungewöhnlich vorkommt, nicht verwenden.
10. Fass en Sie ein Charge PAK mit einem Leck ni cht direkt an; trag en Sie Schutzk leidung, um es sofo rt ordnungsg emäß zu entfern en
und zu entso rgen.
11. Lag ern Sie es nicht an O rten, die für Ki nder zugänglic h sind.
12. Das ChargePAK wie normale wiederaufladbare Batterien entsprechend Ihren lokalen Gesetzen und Bestimmungen in Ihrer Region
entsorgen.
Symbole am Produkt und in der Bedienungsanleitung
Das Symbol WARNUNG wird in diesem Handbuch verwendet, um auf mögliche ernste Gefahren für Ihre
Sicherheit hinzuweisen. Beachten Sie alle Warnhinweise mit diesem Symbol, um mögliche Gefährdungen für
Leben und Gesundheit auszuschließen.
Durch dieses Symbol wird bei dem Produkt darauf hingewiesen, dass Vorsicht geboten ist und dass vor der
Verwendung Anweisungen zu lesen sind.
Dieses Symbol weist auf Gleichspannung hin.
Dieses Symbol weist auf eine USB-Buchse mit einem maximalen Nennstrom von 2 Ampere hin.
2
Page 27

Inhalt
4 Einführung
4 Oberseite
5 Rückseite
6 Anzeige
7 Erste Schritte
7 Quick Setup - Schnellstart
9 Verwendung Ihres Pop
9 Digitalradio hören
9 UKW-Radiobetrieb
10 Speicherplätze speichern und anwählen
10 Schnellspeichern eines Senders auf einem der Speicherplätze (1–4)
10 Speichern eines Senders in der Voreinstellungsliste (1–10)
10 Aufruf eines gespeicherten Senders beim Empfang von Digitalradio oder
UKW
11 Verwendung des Zusatzeingangs
12 Alarme und Timer
12 Wecker einstellen
13 Abbrechen eines Alarmtons
13 Schlummerfunktion verwenden
13 Deaktivieren eines Alarms
13 Einstellen des Sleep-Timers
13 Einstellen des Küchen-Timers
14 Optionen und Einstellungen
14 Allgemeine Einstellungen
15 Audio-Einstellungen
15 Anzeigeeinstellungen
16 Einstellungen der Uhr
18 UKW Stereo
19 Anhang
19 Einen ChargePAK D1 oder vier AA-Batterien einsetzen
20 Abnehmbare Hülle des Pop Midi wechseln
21 Hilfe und Tipps
22 Technische Daten
DE
3
Page 28
Einführung
Oberseite
D
C
E
A
A. Netztaste/Lautstärkeregler: Drücken zum Ein/Ausschalten des Pop. Drehen Sie
den Regler, um die Lautstärke einzustellen.
B. Menütaste: Drücken Sie diese Taste, um die verschiedenen Einstellungen am Pop
zu ändern (weitere Informationen siehe Seite14).
C. Auswahltasten: Drücken Sie diese Tasten, um den Sender zu wechseln (siehe
Seite9) oder drücken Sie sie, um Menüoptionen durchzublättern und
auszuwählen.
D. Quelle: Drücken Sie diese Taste zum Umschalten zwischen digitalem Radio und
UKW-Radio.
E. Speicherplätze 1 - 5+: Sie können bis zu zehn voreingestellte digitale oder zehn
UKW-Sender speichern (weitere Informationen siehe Seite10).
4
B
Page 29
Rückseite
F
G H
I
J
F. Antenne: Drehen Sie die Antenne und fahren Sie sie ganz aus, um den
bestmöglichen Empfang zu erhalten.
G. Buchse für Stereokopfhörer (3,5 mm)
H. Autotune-Taste: Drücken Sie, um automatisch nach neuen Digitalradiosendern zu
suchen und inaktive Sender zu entfernen.
I. Zusatzeingang (3,5 mm): Analoger Stereo-Eingang für iPod, MP3-Player etc.
J. Micro-B USB 5,5-V-Stromanschluss: Nur mit beiliegendem Netzadapter
verbinden.
DE
5
Page 30

Anzeige
BBC R2
7:00
1. Zeigt die aktuelle Uhrzeit an.
2. Anzeige für ChargePAK oder Batterie.
3. Anzeige der Quelle (DR= Digitalradio, FM= UKW-Radio,
AUX = Zusatzeingang).
4. Sendername.
5. Signalstärke.
6. Lautstärkeanzeige.
7. Zeigt Datum, Lauftext, Einstellungen und Senderdaten an (siehe Seite16).
8. AM/PM-Anzeige.
9. Anzeige Wecker eingestellt (siehe Seite‘Alarme und Timer‘ auf Seite12).
10. Sleep- und Küchen-Timeranzeige (siehe Seite13).
11. Schlummerfunktionsanzeige (Seite13).
6
TOP 40
Page 31

Erste Schritte
Quick Setup - Schnellstart
Anmerkung: Wenn Sie über einen (separat erhältlichen) aufladbaren ChargePAK
D1-Akku oder AA-Akkus verfügen, setzen Sie diese jetzt ein, bevor Sie Pop an
eine Netzsteckdose anschließen. Weitere Informationen siehe Seite19.
121
B
• Drücken Sie die Antenne und ziehen
Sie sie vollständig heraus (SchritteA
A
C
und B).
• Stecken Sie den Stecker des
mitgelieferten Netzteils in die Buchse
auf der Rückseite des Radios (C).
2
• Stecken Sie den Netzadapter in
• Stecken Sie den Netzadapter in
eine Netzsteckdose (D).
D
eine Netzsteckdose (D).
DE
7
Page 32

1
min
3
• Drücken Sie die Netztaste und lassen Sie sie
wieder los, um den Pop einzuschalten.
4
09:59
10:00
8
DR FM AUX BTDR FM AUX BTDR FM AUX BTDR FM AUX BTDR FM AUX BTDR FM AUX BTDR FM AUX BTDR FM AUX BTDR FM AUX BTDR FM AUX BTDR FM AUX BTDR FM AUX BTDR FM AUX BTDR FM AUX BTDR FM AUX BTDR FM AUX BTDR FM AUX BTDR FM AUX BTDR FM AUX BTDR FM AUX BTDR FM AUX BTDR FM AUX BTDR FM AUX BTDR FM AUX BTDR FM AUX BTDR FM AUX BTDR FM AUX BTDR FM AUX BTDR FM AUX BTDR FM AUX BTDR FM AUX BTDR FM AUX BTDR FM AUX BTDR FM AUX BTDR FM AUX BTDR FM AUX BTDR FM AUX BTDR FM AUX BTDR FM AUX BTDR FM AUX BTDR FM AUX BTDR FM AUX BTDR FM AUX BTDR
SCAN 14
******
DR FM AUX BTDR FM AUX BTDR FM AUX BTDR FM AUX BTDR FM AUX BTDR FM AUX BTDR FM AUX BTDR FM AUX BTDR FM AUX BTDR FM AUX BTDR FM AUX BTDR FM AUX BTDR FM AUX BTDR FM AUX BTDR FM AUX BTDR FM AUX BTDR FM AUX BTDR FM AUX BTDR FM AUX BTDR FM AUX BTDR FM AUX BTDR FM AUX BTDR FM AUX BTDR FM AUX BTDR FM AUX BTDR FM AUX BTDR FM AUX BTDR FM AUX BTDR FM AUX BTDR FM AUX BTDR FM AUX BTDR FM AUX BTDR FM AUX BTDR FM AUX BTDR FM AUX BTDR FM AUX BTDR FM AUX BTDR FM AUX BTDR FM AUX BTDR FM AUX BTDR FM AUX BTDR FM AUX BTDR FM AUX BTDR
• Warten Sie, bis Pop für alle verfügbaren
Digitalradiosender eine automatische Sendersuche
abgeschlossen hat.
• Wenn die automatische Sendersuche
abgeschlossen ist, wird ein digitaler Sender
ausgewählt.
Page 33

Verwendung Ihres Pop
PM
DR
PM
M
DR FM AUX BTDR FM AUX BTDR FM AUX BTDR FM AUX BTDR FM AUX BTDR FM AUX BTDR FM AUX BTDR FM AUX BTDR FM AUX BTDR FM AUX BTDR FM AUX BTDR FM AUX BTDR FM AUX BTDR FM AUX BTDR FM AUX BTDR FM AUX BTDR FM AUX BTDR FM AUX BTDR FM AUX BTDR FM AUX BTDR FM AUX BTDR FM AUX BTDR FM AUX BTDR FM AUX BTDR FM AUX BTDR FM AUX BTDR FM AUX BTDR FM AUX BTDR FM AUX BTDR FM AUX BTDR FM AUX BTDR FM AUX BTDR FM AUX BTDR FM AUX BTDR FM AUX BTDR FM AUX BTDR FM AUX BTDR FM AUX BTDR FM AUX BTDR FM AUX BTDR FM AUX BTDR FM AUX BTDR FM AUX BTDR
10:00
DR FM AUX BTDR FM AUX BTDR FM AUX BTDR FM AUX BTDR FM AUX BTDR FM AUX BTDR FM AUX BTDR FM AUX BTDR FM AUX BTDR FM AUX BTDR FM AUX BTDR FM AUX BTDR FM AUX BTDR FM AUX BTDR FM AUX BTDR FM AUX BTDR FM AUX BTDR FM AUX BTDR FM AUX BTDR FM AUX BTDR FM AUX BTDR FM AUX BTDR FM AUX BTDR FM AUX BTDR FM AUX BTDR FM AUX BTDR FM AUX BTDR FM AUX BTDR FM AUX BTDR FM AUX BTDR FM AUX BTDR FM AUX BTDR FM AUX BTDR FM AUX BTDR FM AUX BTDR FM AUX BTDR FM AUX BTDR FM AUX BTDR FM AUX BTDR FM AUX BTDR FM AUX BTDR FM AUX BTDR FM AUX BTDR FM
10:00
STATIONS
BBC R3
BBC R3
TUNING
DRF
107\60
107\60
SCANNING
Digitalradio hören
Drücken Sie die Taste Quelle, um zum Digitalradio
zu wechseln.
Digitalsender wechseln
1. Drücken Sie die Tasten < >, um durch die
Senderliste zu scrollen.
2. Wenn Sie den gewünschten Sender gefunden
haben, drücken Sie die Auswahltaste.
UKW-Radiobetrieb
Drücken Sie die Taste Quelle, um zum UKW-Radio
zu wechseln.
UKW-Sender wechseln
Manuelle Senderwahl
Drücken Sie die Tasten < > , um in Schritten von
0,05MHz nach oben oder unten zu blättern.
Automatische Sendersuche
Drücken Sie die Tasten < > und halten Sie sie
gedrückt, um den nächsten oder vorherigen
UKW-Radiosender mit starkem Signal zu suchen.
DE
9
Page 34

Speicherplätze speichern und
anwählen
Sie können für einen schnellen Zugang bis zu zehn digitale und zehn UKW-Radiosender
speichern.
DR FM AUX BTDR FM AUX BTDR FM AUX BTDR FM AUX BTDR FM AUX BTDR FM AUX BTDR FM AUX BTDR FM AUX BTDR FM AUX BTDR FM AUX BTDR FM AUX BTDR FM AUX BTDR FM AUX BTDR FM AUX BTDR FM AUX BTDR FM AUX BTDR FM AUX BTDR FM AUX BTDR FM AUX BTDR FM AUX BTDR FM AUX BTDR FM AUX BTDR FM AUX BTDR FM AUX BTDR FM AUX BTDR FM AUX BTDR FM AUX BTDR FM AUX BTDR FM AUX BTDR FM AUX BTDR FM AUX BTDR FM AUX BTDR FM AUX BTDR FM AUX BTDR FM AUX BTDR FM AUX BTDR FM AUX BTDR FM AUX BTDR FM AUX BTDR FM AUX BTDR FM AUX BTDR FM AUX BTDR FM AUX BTDR
10:00
PRESET 2
STORED
Schnellspeichern eines Senders auf
einem der Speicherplätze (1–4)
Stellen Sie den Digital- bzw. UKW-Radiosender ein, den
Sie speichern wollen. Drücken Sie eine der nummerierten
Speicherplatztasten (1–4) und halten Sie sie zwei Sekunden
lang gedrückt, um den aktuellen Sender als Voreinstellung
zu speichern. Sie können eine Einstellung auch über
bestehende Speicherplätze speichern.
10:00
10:00
10:00
10:00
10:00
10
DR FM AUX BTDR FM AUX BTDR FM AUX BTDR FM AUX BTDR FM AUX BTDR FM AUX BTDR FM AUX BTDR FM AUX BTDR FM AUX BTDR FM AUX BTDR FM AUX BTDR FM AUX BTDR FM AUX BTDR FM AUX BTDR FM AUX BTDR FM AUX BTDR FM AUX BTDR FM AUX BTDR FM AUX BTDR FM AUX BTDR FM AUX BTDR FM AUX BTDR FM AUX BTDR FM AUX BTDR FM AUX BTDR FM AUX BTDR FM AUX BTDR FM AUX BTDR FM AUX BTDR FM AUX BTDR FM AUX BTDR FM AUX BTDR FM AUX BTDR FM AUX BTDR FM AUX BTDR FM AUX BTDR FM AUX BTDR FM AUX BTDR FM AUX BTDR FM AUX BTDR FM AUX BTDR FM AUX BTDR FM AUX BTDR
CLASSIC
MOZART
DR FM AUX BTDR FM AUX BTDR FM AUX BTDR FM AUX BTDR FM AUX BTDR FM AUX BTDR FM AUX BTDR FM AUX BTDR FM AUX BTDR FM AUX BTDR FM AUX BTDR FM AUX BTDR FM AUX BTDR FM AUX BTDR FM AUX BTDR FM AUX BTDR FM AUX BTDR FM AUX BTDR FM AUX BTDR FM AUX BTDR FM AUX BTDR FM AUX BTDR FM AUX BTDR FM AUX BTDR FM AUX BTDR FM AUX BTDR FM AUX BTDR FM AUX BTDR FM AUX BTDR FM AUX BTDR FM AUX BTDR FM AUX BTDR FM AUX BTDR FM AUX BTDR FM AUX BTDR FM AUX BTDR FM AUX BTDR FM AUX BTDR FM AUX BTDR FM AUX BTDR FM AUX BTDR FM AUX BTDR FM AUX BTDR
PRESET 5
EMPTY
DR FM AUX BTDR FM AUX BTDR FM AUX BTDR FM AUX BTDR FM AUX BTDR FM AUX BTDR FM AUX BTDR FM AUX BTDR FM AUX BTDR FM AUX BTDR FM AUX BTDR FM AUX BTDR FM AUX BTDR FM AUX BTDR FM AUX BTDR FM AUX BTDR FM AUX BTDR FM AUX BTDR FM AUX BTDR FM AUX BTDR FM AUX BTDR FM AUX BTDR FM AUX BTDR FM AUX BTDR FM AUX BTDR FM AUX BTDR FM AUX BTDR FM AUX BTDR FM AUX BTDR FM AUX BTDR FM AUX BTDR FM AUX BTDR FM AUX BTDR FM AUX BTDR FM AUX BTDR FM AUX BTDR FM AUX BTDR FM AUX BTDR FM AUX BTDR FM AUX BTDR FM AUX BTDR FM AUX BTDR FM AUX BTDR
PRESET 6
STORED
DR FM AUX BTDR FM AUX BTDR FM AUX BTDR FM AUX BTDR FM AUX BTDR FM AUX BTDR FM AUX BTDR FM AUX BTDR FM AUX BTDR FM AUX BTDR FM AUX BTDR FM AUX BTDR FM AUX BTDR FM AUX BTDR FM AUX BTDR FM AUX BTDR FM AUX BTDR FM AUX BTDR FM AUX BTDR FM AUX BTDR FM AUX BTDR FM AUX BTDR FM AUX BTDR FM AUX BTDR FM AUX BTDR FM AUX BTDR FM AUX BTDR FM AUX BTDR FM AUX BTDR FM AUX BTDR FM AUX BTDR FM AUX BTDR FM AUX BTDR FM AUX BTDR FM AUX BTDR FM AUX BTDR FM AUX BTDR FM AUX BTDR FM AUX BTDR FM AUX BTDR FM AUX BTDR FM AUX BTDR FM AUX BTDR
RECALL
6 CLASS
DR FM AUX BTDR FM AUX BTDR FM AUX BTDR FM AUX BTDR FM AUX BTDR FM AUX BTDR FM AUX BTDR FM AUX BTDR FM AUX BTDR FM AUX BTDR FM AUX BTDR FM AUX BTDR FM AUX BTDR FM AUX BTDR FM AUX BTDR FM AUX BTDR FM AUX BTDR FM AUX BTDR FM AUX BTDR FM AUX BTDR FM AUX BTDR FM AUX BTDR FM AUX BTDR FM AUX BTDR FM AUX BTDR FM AUX BTDR FM AUX BTDR FM AUX BTDR FM AUX BTDR FM AUX BTDR FM AUX BTDR FM AUX BTDR FM AUX BTDR FM AUX BTDR FM AUX BTDR FM AUX BTDR FM AUX BTDR FM AUX BTDR FM AUX BTDR FM AUX BTDR FM AUX BTDR FM AUX BTDR FM AUX BTDR
CLASSIC
MOZART
Speichern eines Senders in der
Voreinstellungsliste (1–10)
1. Stellen Sie den Digital- bzw. UKW-Sender ein, den Sie
speichern wollen.
2.
Drücken Sie die Taste 5+ und halten Sie sie gedrückt,
um eine Liste der Speicherplätze anzuzeigen. Drücken
Sie anschließend < >, um eine Speicherplatznummer
zwischen 1 und 10 auszuwählen.
Sie können bereits vorhandene Speicherplätze
überschreiben.
3. Drücken Sie die Auswahltaste, bis die Meldung ‘Progr.
gesp.’ angezeigt wird.
Aufruf eines gespeicherten Senders beim
Empfang von Digitalradio oder UKW
Um einen der Speicherplätze 1 bis 4 aufzurufen, drücken Sie
die Taste mit der entsprechenden Zahl am Pop (1 bis 4).
So zeigen Sie die vollständige Liste der Speicherplätze (von
1 bis 10) an:
1. Drücken Sie die Taste 5+ und lassen Sie sie wieder los.
2. Drücken Sie < >, um durch die Liste der Speicherplätze
zu blättern, und drücken Sie die Auswahltaste, um den
ausgewählten Speicherplatz einzustellen.
Page 35

Verwendung des Zusatzeingangs
Sie können über den Zusatzeingang des Pop Musik von Ihrem Smartphone oder
Tablet auf Pop streamen.
Anmerkung:
Pop verwenden, müssen Sie die Lautstärke Ihres Pop über die Lautstärkeregler
Ihres Smartphones oder Tablets steuern.
Wenn Sie den Zusatzeingang des Pop zum Streamen von Musik auf
Externes Gerät an Pop anschließen
Verbinden Sie über ein geeignetes Kabel die Buchse Line-out oder die
Kopfhörerbuchse Ihres Zusatzgeräts mit dem Zusatzeingang an Ihrem Pop.
Zusatzeingang auswählen
DR FM AUX BTDR FM AUX BTDR FM AUX BTDR FM AUX BTDR FM AUX BTDR FM AUX BTDR FM AUX BTDR FM AUX BTDR FM AUX BTDR FM AUX BTDR FM AUX BTDR FM AUX BTDR FM AUX BTDR FM AUX BTDR FM AUX BTDR FM AUX BTDR FM AUX BTDR FM AUX BTDR FM AUX BTDR FM AUX BTDR FM AUX BTDR FM AUX BTDR FM AUX BTDR FM AUX BTDR FM AUX BTDR FM AUX BTDR FM AUX BTDR FM AUX BTDR FM AUX BTDR FM AUX BTDR FM AUX BTDR FM AUX BTDR FM AUX BTDR FM AUX BTDR FM AUX BTDR FM AUX BTDR FM AUX BTDR FM AUX BTDR FM AUX BTDR FM AUX BTDR FM AUX BTDR FM AUX BTDR FM AUX BTDR FM AUX
10:00
AUX
2-4-2015
1.
Drücken Sie die Taste Source (Quelle) und lassen
Sie sie wieder los, bis ‘AUX’ auf dem Pop-Display
angezeigt wird.
2. Wählen Sie auf Ihrem Zusatzgerät den Inhalt, den
Sie auf Pop hören möchten.
Pop beginnt mit der Wiedergabe des Inhalts, den Sie
auf Ihrem Zusatzgerät ausgewählt haben.
DE
11
Page 36

Alarme und Timer
DR FM AUX BTDR FM AUX BTDR FM AUX BTDR FM AUX BTDR FM AUX BTDR FM AUX BTDR FM AUX BTDR FM AUX BTDR FM AUX BTDR FM AUX BTDR FM AUX BTDR FM AUX BTDR FM AUX BTDR FM AUX BTDR FM AUX BTDR FM AUX BTDR FM AUX BTDR FM AUX BTDR FM AUX BTDR FM AUX BTDR FM AUX BTDR FM AUX BTDR FM AUX BTDR FM AUX BTDR FM AUX BTDR FM AUX BTDR FM AUX BTDR FM AUX BTDR FM AUX BTDR FM AUX BTDR FM AUX BTDR FM AUX BTDR FM AUX BTDR FM AUX BTDR FM AUX BTDR FM AUX BTDR FM AUX BTDR FM AUX BTDR FM AUX BTDR FM AUX BTDR FM AUX BTDR FM AUX BTDR FM AUX BT
DR
Anmerkung: Wenn Pop mit Batteriestrom oder über einen ChargePAK betrieben wird,
steht die Pop-Alarmfunktion nicht zur Verfügung, wenn Sie Pop nach dem Einstellen
eines Alarms ausschalten.
Wecker einstellen
Pop hat zwei Alarme, mit denen das Radio eingeschaltet
und ein Digital- oder UKW-Sender oder eine
Geräuschkulisse oder ein Alarmton aktiviert werden kann.
1. Drücken Sie die Menütaste und scrollen Sie mit < > zu
‘Alarm’.
2. Scrollen Sie mit < > zu ‘Alarm1’ oder ‘Alarm2’,
unddrücken Sie die Auswahltaste.
3. Scrollen Sie mit < > zu ‘Ein’ und drücken Sie die
Auswahltaste.
4. Scrollen Sie mit < > , um die Stunde für den Alarm
festzulegen, und drücken Sie dann die Auswahltaste.
Wiederholen Sie diesen Vorgang, um die Minuten für
den Alarm einzustellen.
5. Scrollen Sie mit < > , um die Dauer für den Alarm
festzulegen, und drücken Sie dann die Auswahltaste.
6.
Scrollen Sie mit < > , um ‘UKW’, ‘Digital’ oder ‘Ton’
festzulegen, und drücken Sie zur Bestätigung die
Auswahltaste. Wenn Sie einen Ton-Alarm angeben
wollen, fahren Sie fort mit Schritt 8.
7. Scrollen Sie mit < >, um zu bestimmen, welcher Sender
beim Losgehen des Alarms gespielt werden soll. Sie
können einen bereits gespeicherten Sender verwenden
oder mit ‘Zuletzt genutzt’ den Sender auswählen, den
Sie zuletzt gehört haben. Drücken Sie auf Auswahl,
umdie Auswahl zu bestätigen.
8. Scrollen Sie mit < > , um eine der folgenden AlarmWiederholungsoptionen zu bestimmen ‘Täglich’,
‘Wochentag’, ‘Wochenende’ oder ‘Einmal’, und drücken
Sie zur Bestätigung Auswahl.
9. Verwenden Sie < > , um die Lautstärke des Radios bei
der Weckfunktion einzustellen, und drücken Sie dann
zur Bestätigung die Auswahltaste.
10
. Auf dem Display leuchtet das Alarmsymbol,
umanzuzeigen, dass der Alarm gesetzt wurde.
7:00
7:00
7:00
7:00
7:00
7:00
7:00
7:00
7:00
7:00
MENU
ALARM
ALARM
ALARM 1
DURATION
45 MIN5
SOURCE
DIGITAL
STATION
LAST USE
REPEAT
DAILY
VOLUME
2
12
Page 37

Abbrechen eines Alarmtons
Zum Abbrechen eines Alarms drücken Sie eine der Tasten Quelle, <Auswahl> oder
Menü.
Schlummerfunktion verwenden
Wenn Sie bei einem Alarm die Schlummerfunktion verwenden wollen, drücken Sie
eine der Speicherplatz-Tasten. Standardmäßig ist die Alarm-Unterdrückungsdauer
des Pop auf acht Minuten eingestellt. Informationen zum Ändern der standardmäßigen
Alarm-Unterdrückungsdauer des Pop finden Sie unter Seite17.
Deaktivieren eines Alarms
So deaktivieren Sie einen Alarm, nachdem er gesetzt wurde:
1. Drücken Sie die Menütaste, scrollen Sie mit < > zu ‘Alarm’ und drücken Sie die
Auswahltaste.
2. Scrollen Sie mit < > zu dem Alarm, der deaktiviert werden soll (‘Alarm1’ oder ‘Alarm2’),
und drücken Sie die Auswahltaste.
3. Scrollen Sie mit < > zu ‘Aus’ und drücken Sie die Auswahltaste.
4
.
Das Alarmsymbol auf dem Pop-Display geht aus als Hinweis darauf, dass der Alarm
deaktiviert wurde.
Einstellen des Sleep-Timers
Der Sleep-Timer kann so eingestellt werden, dass das Pop nach einer bestimmten Zeit
ausgeschaltet wird.
Anmerkung: Wenn Pop mit Batteriestrom oder über einen ChargePAK betrieben wird,
istdie Schlaf-Funktion deaktiviert.
1. Drücken Sie die Menütaste.
2. Scrollen Sie mit < > zu ‘Schlaf’ und drücken Sie die Auswahltaste.
3. Scrollen Sie mit < > und drücken Sie die Auswahltaste, um den Timer auf bis zu
90Minuten einzustellen, oder wählen Sie zum Abbrechen ‘Aus’.
Einstellen des Küchen-Timers
Pop hat einen Countdown-Küchenwecker, der nach einer angegebenen Zeit einen Alarm
auslöst.
1. Drücken Sie die Menütaste.
2. Scrollen Sie mit < > zu ‘Timer’ und drücken Sie die Auswahltaste.
3. Scrollen Sie mit < >, um die Stundenangaben zu ändern, und drücken Sie die
Auswahltaste.
4. Scrollen Sie erneut mit < > , um die Auswahl der Minuten zu ändern und drücken Sie,
um die Auswahl zu bestätigen und den Countdown-Timer zu starten.
Der Alarm ertönt nach Ablauf des gewählten Zeitraums, unabhängig davon, ob das Radio
eingeschaltet oder im Standby-Modus ist. Sie können den Alarmton abbrechen, indem
Sie eine der Tasten Quelle, <Auswahl> oder Menü drücken.
DE
13
Page 38

Optionen und Einstellungen
Allgemeine Einstellungen
Ändern der Sprache auf dem Display
So schalten Sie die Anzeigesprache des Pop zwischen Englisch, Französisch, Deutsch,
Italienisch und Spanisch um:
1. Drücken Sie die Menütaste.
2. Scrollen Sie mit < > zu ‘Einstellungen’ und drücken Sie die Auswahltaste.
3. Scrollen Sie mit < > zu ‘Sprache’ und drücken Sie die Auswahltaste.
4. Scrollen Sie mit < > und drücken Sie die Auswahltaste, um die Anzeigesprache des
Pop auszuwählen.
Zurücksetzen des Pop auf die Werkseinstellungen
Setzt das Pop zurück, entfernt alle Speicherplätze, löscht die Senderliste und
setzt alle Optionen auf die Standardwerte zurück. So setzen Sie das Gerät auf die
Werkseinstellungen zurück:
1. Drücken Sie die Menütaste.
2. Scrollen Sie mit < > zu ‘Einstellungen’ und drücken Sie die Auswahltaste.
3. Scrollen Sie mit < > zu ‘Reset’ und drücken Sie die Auswahltaste.
4. Scrollen Sie mit < > zu ‘Ja’ und drücken Sie die Auswahltaste.
Anzeigen der Pop Softwareversion
So zeigen Sie die momentan auf dem Pop verwendete Softwareversion an:
1. Drücken Sie die Menütaste.
2. Scrollen Sie mit < > zu ‘Einstellungen’ und drücken Sie die Auswahltaste.
3. Scrollen Sie mit < > zu ‘Version’ und drücken Sie die Auswahltaste.
Aktualisieren des Pop auf die neueste Version der Software
Kontaktieren Sie den technischen Support von Pure (http://support-uk.pure.com),
wenn Sie mehr Informationen über eine Aktualisierung von Pop auf die neueste
Software-Version wünschen.
14
Page 39

Audio-Einstellungen
Sie können über das Pop-Audiomenü die Bässe und die Höhen einstellen.
1. Drücken Sie die Menütaste.
2. Scrollen Sie mit < > zu ‘Audio’ und drücken Sie die Auswahltaste.
3. Scrollen Sie mit < > zu ‘Bass’ oder ‘Höhen’ und drücken Sie die Auswahltaste.
4. Scrollen Sie mit < >, um die Bässe oder Höhen einzustellen. Sie können eine
Einstellung zwischen ‘-3’ und ‘+3’ auswählen.
5. Drücken Sie die Auswahltaste, um die Einstellungen für die Bässe bzw. Höhen zu
bestätigen.
Anzeigeeinstellungen
Display-Helligkeit einstellen
Sie können die Helligkeit des Displays, während das Pop in Betrieb oder im StandbyModus ist, anpassen. So stellen Sie die Helligkeit des Pop Displays ein:
1. Drücken Sie die Menütaste.
2. Scrollen Sie mit < > zu ‘Anzeige’ und drücken Sie die Auswahltaste.
3. Scrollen Sie mit < > zu ‘Beleuchtung’ und drücken Sie die Auswahltaste.
4. Scrollen Sie mit < > zu ‘Aktiv’ und drücken Sie die Auswahltaste, um die beim
Einschalten des Pop gültigen Einstellungen zu ändern. Sie können auch zu < >
‘Standby’ scrollen und die Auswahltaste drücken, um die im Standby geltenden
Einstellungen zu ändern.
5. Scrollen Sie mit < > zu ‘Helligkeit’ und drücken Sie die Auswahltaste.
6. Scrollen Sie mit < >, um eine Helligkeitseinstellung zwischen ‘1’ und ‘5’ auszuwählen.
7. Drücken Sie die Auswahltaste, um die Helligkeitseinstellung zu bestätigen.
Einstellen, wie lange die Display-Hintergrundbeleuchtung an bleibt
Sie können einstellen, wie lange die Display-Hintergrundbeleuchtung des Pop an bleibt:
1. Drücken Sie die Menütaste.
2. Scrollen Sie mit < > zu ‘Anzeige’ und drücken Sie die Auswahltaste.
3. Scrollen Sie mit < > zu ‘Beleuchtung’ und drücken Sie die Auswahltaste.
4. Scrollen Sie mit < > zu ‘Aktiv’ und drücken Sie die Auswahltaste, um die beim
Einschalten des Pop gültigen Einstellungen zu ändern. Sie können auch zu < >
‘Standby’ scrollen und die Auswahltaste drücken, um die im Standby geltenden
Einstellungen zu ändern.
5. Scrollen Sie mit < > zu ‘Dauer’ und drücken Sie die Auswahltaste.
6. Scrollen Sie mit < > und drücken Sie die Auswahltaste, um eine der folgenden
Optionen auszuwählen:
An: Wählen Sie diese Option aus, wenn die Hintergrundbeleuchtung immer an bleiben soll.
Aus: Wählen Sie diese Option aus, wenn sich die Hintergrundbeleuchtung nach
10Sekunden ausschalten soll.
DE
15
Page 40

Ändern der Informationen auf dem Pop Display
Beim Hören eines Digital- oder UKW-Radiosenders können Sie auswählen, welche
Informationen auf dem Display angezeigt werden sollen:
1. Drücken Sie die Menütaste.
2. Scrollen Sie mit < > zu ‘Anzeige’ und drücken Sie die Auswahltaste.
3. Scrollen Sie mit < > zu ‘Info’ und drücken Sie die Auswahltaste.
4. Scrollen Sie mit < > und drücken Sie die Auswahltaste, um eine der folgenden
Optionen auszuwählen:
Lauftext: Wählen Sie diese Option aus, wenn die von dem momentan
gehörten Sender übertragenen Informationen angezeigt werden sollen.
Dieangezeigten Informationen können Songtitel, aktuelle Programmdetails,
Nachrichten etc. enthalten.
Stärke: Wählen Sie diese Option aus, wenn die Signalstärke des momentan
gehörten Senders angezeigt werden soll. Die Anzahl der Sterne zeigt die
Zuverlässigkeit des Empfangs-Levels an.
Datum: Wählen Sie diese Option aus, wenn das aktuelle Datum angezeigt
werden soll.
Einstellungen der Uhr
Einstellung von Uhrzeit und Datum
Uhrzeit und Datum werden bei Pop automatisch über das UKW- oder
Digitalradiosignal eingestellt. Wenn Uhrzeit und Datum des Pop nicht automatisch
aktualisiert werden, können Sie sie manuell einstellen.
1. Drücken Sie die Menütaste.
2. Scrollen Sie mit < > zu ‘Uhr’ und drücken Sie die Auswahltaste.
3. Scrollen Sie mit < > zu ‘Zeit/Datum’ und drücken Sie die Auswahltaste.
4. Scrollen Sie mit < > , um die Stunde einzustellen, und drücken Sie die
Auswahltaste. Wiederholen Sie diesen Schritt, um die Minuten einzustellen.
5. Scrollen Sie mit < > , um den Tag einzustellen, und drücken Sie die
Auswahltaste. Wiederholen Sie diese Schritte zum Einstellen von Monat und Jahr.
Änderung des Uhrzeitformats
1. Drücken Sie die Menütaste.
2. Scrollen Sie mit < > zu ‘Uhr’
3. Scrollen Sie mit < > zu ‘12/24 Std’ und drücken Sie die
4. Scrollen Sie mit < > , um das ‘12-Stunden’ oder ‘24-Stunden’-Format
auszuwählen, und drücken Sie zur Bestätigung die
16
und drücken Sie die Auswahltaste.
Auswahltaste
Auswahltaste
.
.
Page 41

Änderung des Datumsformats
1. Drücken Sie die Menütaste.
2. Scrollen Sie mit < > zu ‘Uhr’ und drücken Sie die Auswahltaste.
3. Scrollen Sie mit < > zu ‘Format’ und drücken Sie die Auswahltaste.
4. Scrollen Sie mit < > , um das Datum in der Reihenfolge Tag-Monat-Jahr
‘TT-MM-JJJJ’ oder Monat-Tag-Jahr ‘MM-TT-JJJJ’ anzuzeigen, und drücken
Sie zur Bestätigung die
Auswahltaste
.
Option für die Uhrensynchronisation
Sie können die Radioquelle auswählen, die Sie für die Einstellung der Uhrzeit
verwenden wollen. Standardmäßig verwendet Pop sowohl UKW- als auch digitale
Radiosignale zum Synchronisieren der Uhrzeit.
So geben Sie die Optionen zur Uhren-Synchronisation an:
1. Drücken Sie die Menütaste.
2. Scrollen Sie mit < > zu ‘Uhr’ und drücken Sie die Auswahltaste.
3. Scrollen Sie mit < > zu ‘Sync mit’ und drücken Sie die Auswahltaste.
4. Scrollen Sie mit < > zur Auswahl der zur gewünschten UhrenSynchronisationsoption und drücken Sie zur Bestätigung die
Auswahltaste
.
Änderung der Schlummerzeit
Ein ausgelöster Alarm wird nach dem Drücken einer der Speicherplatz-Tasten am
Pop eine Zeit lang unterdrückt; Sie können diese 'Schlummerdauer' einstellen.
Standardmäßig ist die Alarm-Unterdrückungsdauer des Pop auf acht Minuten
eingestellt.
So ändern Sie die Schlummerdauer:
1. Drücken Sie die Menütaste.
2. Scrollen Sie mit < > zu ‘Uhr’ und drücken Sie die Auswahltaste.
3. Scrollen Sie mit < > zu ‘Schlummern’ und drücken Sie die Auswahltaste.
4. Scrollen Sie mit < > zur Auswahl einer Schlummerzeit zwischen ‘5’ und ‘59’
Minuten, und drücken Sie zur Bestätigung die
Auswahltaste
.
DE
17
Page 42

UKW Stereo
Über das UKW Stereo-Menü können Sie den Empfang zwischen Stereo und
Mono umschalten. Sie können bei einem schlechten Empfang ‘Mono’ auswählen,
um den Empfang zu verbessern.
Anmerkung: Die ‘UKW-Stereooption’ ist nur zu sehen, wenn Sie ‘UKW’ als
Radiosenderquelle gewählt haben.
So ändern Sie die UKW-Stereoeinstellung des Pop:
1. Drücken Sie auf Menü..
2. Scrollen Sie mit < > zu ‘UKW Stereo’ und drücken Sie die Auswahltaste.
3. Scrollen Sie mit < > , um zwischen ‘Stereo’ und ‘Mono’ auszuwählen, und
drücken Sie zur Bestätigung die Auswahltaste.
18
Page 43

Anhang
Einen ChargePAK D1 oder vier AA-Batterien einsetzen
ChargePAK D1 4x AA Batterien
DE
19
Page 44

Abnehmbare Hülle des Pop Midi wechseln
20
Page 45

Hilfe und Tipps
Sekundärsender / inaktive Sender
(</>) Sekundäre Digitalradio-Dienste
Manche Sender bieten sekundäre Dienste mit zusätzlichen Informationen oder
alternativen Inhalten; diese Dienste werden eventuell nur zu bestimmten Zeiten
ausgestrahlt. Stehen für einen Sender sekundäre Dienste zur Verfügung, wird
hierfür ‘>’ neben dem Namen in der Senderliste angezeigt. Der sekundäre Dienst
erscheint neben dem Sender in der Liste. Ein sekundärer Dienst weist vor dem
Namen in der Senderliste die Markierung ‘<’ auf.
(?) Inaktive oder nicht verfügbare Sender
Inaktive oder nicht verfügbare Sender erscheinen auf der Senderliste mit einem
vorangestellten ‘?’ und können nicht ausgewählt werden. Ein Sender kann inaktiv
oder nicht verfügbar sein, weil er im Moment nicht sendet (schlagen Sie in den
Programmlisten nach) oder weil der Sendebetrieb insgesamt eingestellt wurde.
Eventuell ist auch das Sendesignal nicht stark genug für den Radioempfang.
Tipps und Tricks
Im Display erscheint der Hinweis ‘Keine Sender verfügbar’
Drücken Sie die Taste Autotune an der Rückseite des Pop, um Digitalsender zu
suchen. Durch Ändern der Stellung Ihres Geräts oder der Antenne können Sie
einen besseren Senderempfang erreichen.
Empfang neuer Digitalradiosender, die ihren Sendebetrieb gerade aufgenommen haben
Drücken Sie die Taste Autotune an der Rückseite des Pop, um nach neuen
Digitalsendern zu suchen. Durch Ändern der Stellung Ihres Geräts oder der
Antenne können Sie einen besseren Senderempfang erreichen.
DE
21
Page 46

Technische Daten
Radio Digital- und UKW-Radio
Frequenzen
Lautsprecher
Audioausgabe 4,3 W eff.
Eingänge 5,5 V DC-Netzadapterbuchse (230-V-Adapter im
Lieferumfang enthalten), 3,5-mm-Eingang für Zusatzgeräte
Ausgänge: 3,5-mm-Buchse für Stereokopfhörer
Speicherplätze 10 Senderspeicherplätze für Digitalradio und 10 für UKW
Netzteil Externes Netzteil für 230 V AC auf 5,5 V (2,0 A) DC
Energieverbrauch Standby mit Anzeige der Uhr 0,55 W, Aktivbetrieb: 0,92 W
Abmessungen 93 mm breit x 173 mm hoch x 102 mm tief
Antenne Teleskopantenne
Softwareversion V1.0
Zulassungen CE-Kennzeichnung. Pure International Limited erklärt
Der vollständige Text der EU-Konformitätserklärung ist auf
DAB/DAB+, UKW-Radio 87,5-108 MHz
Vollbereich 3
(mitgeliefert) oder optional ein ChargePAK D1-Akkupack
bzw. vier AA-Batterien
hiermit, dass dieses Radiomodell Pop Midi die wesentlichen
Anforderungen von RED2014/53/ EU.
folgender Internetseite verfügbar:
http://www.pure.com/about/red
Zoll
22
Page 47

Pop Midi
EN
Merci d’avoir choisi Pop Midi. L’objectif de ce manuel
est de vous aider à mettre en service votre appareil en
un rien de temps et de vous expliquer comment tirer le
meilleur parti de toutes ses fonctionnalités.
DE
FR
FR
IT
NO
DA
NL
1
Page 48

Sécurité
Informations de sécurité
1. Ava nt d’utiliser la radio, f amiliarisez-vous a vec toutes les instr uctions et informa tions de sécurité. D ans le cas où cette ra dio serait
cédée à une autre personne, merci de transmettre également tous les documents qui lui sont associés.
2. N’exp osez pas cet appare il à des éclabous sures ni à des gout tes d’eau; ne placez aucu n objet contenant du l iquide
(telqu’unvase) su r l’appareil. En cas de pro jection d’eau ou d’autres l iquides sur la rad io, coupez immédia tement son
aliment ation, débranch ez la prise du secteu r et contactez votre reve ndeur. Ne branchez et n e touchez jamais la ra dio si vos
mains sont humides. Ne tirez jamais sur le câble d’alimentation pour débrancher l’adaptateur secteur de la prise d’alimentation.
3. Il existe un risque d’explosion si la pile n’est pas remplacée correctement (veillez à respecter les polarités). Remplacez-la
uniquem ent par une pile de t ype identique ou é quivalent (4 x AA). L a pile (ChargePAK D1) ne doit pa s être exposée à une
source de c haleur excessiv e comme la lumière d u soleil, du feu ou une a utre source. Garde z les batteries ne uves et usagées
et les batte ries ChargePAK ho rs de la portée des e nfants. Nous por tons votre attention s ur les aspects env ironnementau x de
l’élimination de la pile.
4. L’utilisatio n de la radio dans une p ièce ou sous un clim at à forte humidité o u à température élevé e peut entraîne r l’appari tion de
condens ation à l’intérieur d e la radio, ce qui pourr ait l’endommager.N’utili sez l’appareil que dan s des climats tempé rés.
5. Év itez les températu res extrêmes, qu’ell es soient basses o u élevées. Placez l’ap pareil à l’abri de toute sou rce de chaleur, telles
que les radiateurs et les cheminées électriques ou au gaz. Ne posez aucune source de flamme nue, comme des bougies
allumées, sur l’appareil.
6. L’adaptateur se cteur sert de dis positif de décon nexion ; en tant que te l, il doit toujours re ster prêt à l’emploi.Bra nchez
l’adaptateur sur une prise de courant facilement accessible à proximité de la radio et utilisez uniquement l’adaptateur secteur
pour effectuer la connexion avec ce produit.
7. Ut ilisez uniquem ent l’adaptateur secte ur répertorié da ns le guide utilis ateur. (fourni par Pure ave c la Modèle ZDD0552 00,
ZDD055200BS, SW055200-NM ou SW055200-N01).
8. Avant d’utiliser la radio, assurez-vous que la tension d’alimentation correspond à la tension nominale de fonctionnement de la
radio.
9. D ébranchez votre rad io de la prise d’alimen tation lors des lo ngues période s d’inutilisation (ex.: d épart en vacanc es).
10. Débran chez toujours la ra dio de la prise secte ur avant tout nettoyag e. N’utilisez pas de tam pon ni de solution a brasive pour
nettoyer votre radio. Vous risqueriez d’endommager sa surface.
11. Afin de ré duire le risque de c hoc électrique, n’ôtez pa s les vis, car aucun e pièce à l’intérieur d e l’appare il n’est susc eptible de
requéri r une interventi on de la part de l’utili sateur. Confiez les op érations d’entretien e t de réparation à des te chniciens qua lifiés.
12. Assure r une ventilation ad équate autour du prod uit, en particul ier lors de la char ge.
Instructions de sécurité relatives à la batterie ChargePAK D1
1. Prenez connaissance des instructions liées à l’utilisation de la batterie ChargePAK, figurant dans ce document.
2. Utilisez votre ChargePAK uniquement avec des produits d’origine Pure. Utilisez uniquement la batterie ChargePAK D1 Pure d’origine.
Il existe un risque d’explosion si la pile n’est pas remplacée correctement (veillez à respecter les polarités). Remplacez-la uniquement
par une pil e de type identiq ue ou équivalen t.
3. Stockez votre Ch argePAK dans un end roit sec, à tempéra ture ambiante. Reti rez-la des appare ils amenés à être sto ckés et non
utilisés pendant une période prolongée.
4. Assurez-vou s de ne pas percer, modif ier, laisser tombe r, lancer ou c auser tout autre c hoc inutile à votre Ch argePAK, qui peut
constitu er un risque d’ince ndie, d’explosion ou d e brûlures chim iques en cas de mau vaise utilisati on.
5. Ne jetez pas votr e ChargePAK dans le s flammes ni dans u n incinérateur, ne la la issez pas direc tement exposée au x rayons du soleil
ou dans de s endroits chaud s, par exemple à proxim ité d’un moteur de voitur e. Ne conservez pa s votre ChargePAK près d ’un four,
d’une cuisin ière ou de toute autre s ource de chaleu r.
6. Ne branchez pas votre ChargePAK directement à une source électrique telle qu’une prise de courant ou l’allume-cigare d’une voiture.
Ne la mettez p as dans un four à mic ro-ondes ni dans to ut autre contene ur haute pression .
7. Ne plongez p as votre ChargePAK da ns l’eau. De manière gé nérale, évitez toute p rojection de liq uide sur votre Char gePAK.
8. Ne placez pa s votre ChargePAK en co urt-circuit.
9. N’utilisez ou n e rechargez pas votr e ChargePAK si elle pr ésente des trace s de fuite, de décol oration, de rouill e ou de déformatio n,
sielle émet une odeur suspecte ou si elle présente une autre anomalie, quelle qu’elle soit.
10. Ne tou chez pas directem ent votre ChargePAK si e lle fuit. Portez d es équipement s de protection indi viduelle pour l’évac uer et la
mettre au re but dans les plu s brefs délais.
11. Ne co nservez pas votre C hargePAK en un lieu o ù elle serait acc essible par des e nfants.
12. En fi n de vie, procédez à l a mise au rebut de votre C hargePAK comme vou s le feriez avec des p iles recharge ables standard , en vous
conformant aux lois et réglementations locales applicables.
Symboles figurant sur le produit et dans le manuel d’utilisation
Ce symbole d’AVERTISSEMENT est utilisé tout au long de ce manuel pour indiquer un danger potentiellement
grave pour votre propre sécurité. Appliquez les consignes de sécurité qui suivent ce symbole pour éviter tout
risque de blessure grave, voire mortelle.
Ce symbole est indiqué sur le produit pour indiquer une mise en garde; les instructions en question doivent
donc être lues avant toute utilisation.
Ce symbole indique une tension DC.
Ce symbole indique une prise USB permettant une intensité maximale de 2 A.
2A
2
Page 49

Table des matières
4 Introduction
4 Panneau supérieur
5 Panneau arrière
6 Affichage
7 Pour commencer
7 Configuration rapide
9 Utilisation de votre Pop
9 Écoute de la radio numérique
9 Écoute de la radio FM
10 Mémorisation et rappel des présélections
10 Pour mémoriser rapidement une station sur un bouton de présélection
(1-4)
10 Pour mémoriser une station dans la liste des présélections (1-10)
10 Pour rappeler une présélection lorsque vous écoutez une station radio
numérique ou FM
11 Utilisation de l’entrée auxiliaire
12 Alarmes et minuteries
12 Programmation d'une alarme
13 Arrêt d'une alarme qui retentit
13 Répétition d'une alarme sonore
13 Désactivation d'une alarme
13 Programmation de la minuterie de veille prolongée
13 Programmation de la minuterie de cuisine
14 Options et paramètres
14 Réglages généraux
15 Paramètres audio
15 Paramètres d'affichage
16 Paramètres de l'horloge
18 FM stéréo
19 Annexe
19 Installation d'une batterie ChargePAK D1 ou dequatre piles AA
20 Changement de la gaine amovible de Pop Midi
21 Aide et conseils
22 Caractéristiques techniques
FR
3
Page 50

Introduction
Panneau supérieur
D
C
E
A
A. Bouton d'alimentation/volume: appuyez pour allumer/éteindre votre
Pop. Tournez le bouton pour régler le volume.
B. Bouton Menu: appuyez pour modifier les différents paramètres de votre
Pop (voir page 14 pour plus d'informations).
C. Bouton Select (Sélectionner): appuyez pour modifier les stations de radio
(voir page 9) ou pour naviguer et sélectionner des options de menu.
D. Source : appuyez pour commuter entre l'écoute de la radio numérique et FM.
E. Boutons de présélection 1 - 5+: mémorisez jusqu'à 10stations
numériques et 10stations FM (voir page 10 pour plus d'informations).
4
B
Page 51

Panneau arrière
F
G H
I
J
F. Antenne: tournez l'antenne et déployez-la entièrement pour une meilleure
réception.
G. Prise casque stéréo format mini-jack
H. Bouton Autotune (Syntonisation automatique): appuyez pour
rechercher automatiquement de nouvelles stations et supprimer les
stations inactives.
I. Entrée auxiliaire de 3,5 mm : Entrée stéréo analogique pour iPod,
lecteur MP3, etc.
J. Mini-connecteur USB 5,5V: connexion uniquement à l'adaptateur
secteur fourni.
FR
5
Page 52

Affichage
BBC R2
7:00
1. Affiche l'heure actuelle.
2. Témoin de charge des piles ou de la batterie ChargePAK.
3. Indicateur de la source (DR = radio numérique, FM = radio FM,
AUX = entrée auxiliaire).
4. Nom de station.
5. Puissance du signal.
6. Indicateur du volume.
7. Affiche la date, du texte défilant, les réglages et des informations sur les
stations (reportez-vous à la page 16).
8. Indicateur matin/après-midi (AM/PM).
9. Indicateur d'alarme active (reportez-vous à la page 12).
10. Indicateur de la minuterie de veille prolongée et de la minuterie de cuisine
(reportez-vous à la page 13).
11. Indicateur de répétition (page 13).
6
TOP 40
Page 53

Pour commencer
Configuration rapide
Remarque: si vous disposez d'une batterie rechargeable ChargePAK
D1 (vendue séparément) ou de piles rechargeables AA, installez-les avant
de brancher votre Pop. Reportez-vous à la page 19 pour obtenir plus
d'informations.
1
1
B
• Tournez l'antenne et déployez-la à
fond (étapes A et B).
A
C
2
2
• Insérez la fiche de l'adaptateur
secteur dans la prise
correspondante à l'arrière de la
radio (étape C).
FR
• Branchez l'adaptateur secteur sur la
• Branchez l'adaptateur secteur sur la
prise de courant (étape D).
D
prise de courant (étape D).
7
Page 54

3
1
min
• Appuyez sur le bouton d'alimentation et
relâchez-le pour allumer votre Pop.
4
09:59
10:00
8
DR FM AUX BTDR FM AUX BTDR FM AUX BTDR FM AUX BTDR FM AUX BTDR FM AUX BTDR FM AUX BTDR FM AUX BTDR FM AUX BTDR FM AUX BTDR FM AUX BTDR FM AUX BTDR FM AUX BTDR FM AUX BTDR FM AUX BTDR FM AUX BTDR FM AUX BTDR FM AUX BTDR FM AUX BTDR FM AUX BTDR FM AUX BTDR FM AUX BTDR FM AUX BTDR FM AUX BTDR FM AUX BTDR FM AUX BTDR FM AUX BTDR FM AUX BTDR FM AUX BTDR FM AUX BTDR FM AUX BTDR FM AUX BTDR FM AUX BTDR FM AUX BTDR FM AUX BTDR FM AUX BTDR FM AUX BTDR FM AUX BTDR FM AUX BTDR FM AUX BTDR FM AUX BTDR FM AUX BTDR FM AUX BTDR
SCAN 14
******
DR FM AUX BTDR FM AUX BTDR FM AUX BTDR FM AUX BTDR FM AUX BTDR FM AUX BTDR FM AUX BTDR FM AUX BTDR FM AUX BTDR FM AUX BTDR FM AUX BTDR FM AUX BTDR FM AUX BTDR FM AUX BTDR FM AUX BTDR FM AUX BTDR FM AUX BTDR FM AUX BTDR FM AUX BTDR FM AUX BTDR FM AUX BTDR FM AUX BTDR FM AUX BTDR FM AUX BTDR FM AUX BTDR FM AUX BTDR FM AUX BTDR FM AUX BTDR FM AUX BTDR FM AUX BTDR FM AUX BTDR FM AUX BTDR FM AUX BTDR FM AUX BTDR FM AUX BTDR FM AUX BTDR FM AUX BTDR FM AUX BTDR FM AUX BTDR FM AUX BTDR FM AUX BTDR FM AUX BTDR FM AUX BTDR
• Attendez que votre Pop ait terminé la syntonisation
automatique, visant à rechercher toutes les
stations numériques disponibles.
• Lorsque la syntonisation automatique est terminée,
une station de radio numérique est sélectionnée.
Page 55

Utilisation de votre Pop
PM
DR
PM
M
DR FM AUX BTDR FM AUX BTDR FM AUX BTDR FM AUX BTDR FM AUX BTDR FM AUX BTDR FM AUX BTDR FM AUX BTDR FM AUX BTDR FM AUX BTDR FM AUX BTDR FM AUX BTDR FM AUX BTDR FM AUX BTDR FM AUX BTDR FM AUX BTDR FM AUX BTDR FM AUX BTDR FM AUX BTDR FM AUX BTDR FM AUX BTDR FM AUX BTDR FM AUX BTDR FM AUX BTDR FM AUX BTDR FM AUX BTDR FM AUX BTDR FM AUX BTDR FM AUX BTDR FM AUX BTDR FM AUX BTDR FM AUX BTDR FM AUX BTDR FM AUX BTDR FM AUX BTDR FM AUX BTDR FM AUX BTDR FM AUX BTDR FM AUX BTDR FM AUX BTDR FM AUX BTDR FM AUX BTDR FM AUX BTDR
10:00
DR FM AUX BTDR FM AUX BTDR FM AUX BTDR FM AUX BTDR FM AUX BTDR FM AUX BTDR FM AUX BTDR FM AUX BTDR FM AUX BTDR FM AUX BTDR FM AUX BTDR FM AUX BTDR FM AUX BTDR FM AUX BTDR FM AUX BTDR FM AUX BTDR FM AUX BTDR FM AUX BTDR FM AUX BTDR FM AUX BTDR FM AUX BTDR FM AUX BTDR FM AUX BTDR FM AUX BTDR FM AUX BTDR FM AUX BTDR FM AUX BTDR FM AUX BTDR FM AUX BTDR FM AUX BTDR FM AUX BTDR FM AUX BTDR FM AUX BTDR FM AUX BTDR FM AUX BTDR FM AUX BTDR FM AUX BTDR FM AUX BTDR FM AUX BTDR FM AUX BTDR FM AUX BTDR FM AUX BTDR FM AUX BTDR
10:00
DR FM AUX BTDR FM AUX BTDR FM AUX BTDR FM AUX BTDR FM AUX BTDR FM AUX BTDR FM AUX BTDR FM AUX BTDR FM AUX BTDR FM AUX BTDR FM AUX BTDR FM AUX BTDR FM AUX BTDR FM AUX BTDR FM AUX BTDR FM AUX BTDR FM AUX BTDR FM AUX BTDR FM AUX BTDR FM AUX BTDR FM AUX BTDR FM AUX BTDR FM AUX BTDR FM AUX BTDR FM AUX BTDR FM AUX BTDR FM AUX BTDR FM AUX BTDR FM AUX BTDR FM AUX BTDR FM AUX BTDR FM AUX BTDR FM AUX BTDR FM AUX BTDR FM AUX BTDR FM AUX BTDR FM AUX BTDR FM AUX BTDR FM AUX BTDR FM AUX BTDR FM AUX BTDR FM AUX BTDR FM AUX BTDR
10:00
DR FM AUX BTDR FM AUX BTDR FM AUX BTDR FM AUX BTDR FM AUX BTDR FM AUX BTDR FM AUX BTDR FM AUX BTDR FM AUX BTDR FM AUX BTDR FM AUX BTDR FM AUX BTDR FM AUX BTDR FM AUX BTDR FM AUX BTDR FM AUX BTDR FM AUX BTDR FM AUX BTDR FM AUX BTDR FM AUX BTDR FM AUX BTDR FM AUX BTDR FM AUX BTDR FM AUX BTDR FM AUX BTDR FM AUX BTDR FM AUX BTDR FM AUX BTDR FM AUX BTDR FM AUX BTDR FM AUX BTDR FM AUX BTDR FM AUX BTDR FM AUX BTDR FM AUX BTDR FM AUX BTDR FM AUX BTDR FM AUX BTDR FM AUX BTDR FM AUX BTDR FM AUX BTDR FM AUX BTDR FM AUX BTDR FM
10:00
DR FM AUX BTDR FM AUX BTDR FM AUX BTDR FM AUX BTDR FM AUX BTDR FM AUX BTDR FM AUX BTDR FM AUX BTDR FM AUX BTDR FM AUX BTDR FM AUX BTDR FM AUX BTDR FM AUX BTDR FM AUX BTDR FM AUX BTDR FM AUX BTDR FM AUX BTDR FM AUX BTDR FM AUX BTDR FM AUX BTDR FM AUX BTDR FM AUX BTDR FM AUX BTDR FM AUX BTDR FM AUX BTDR FM AUX BTDR FM AUX BTDR FM AUX BTDR FM AUX BTDR FM AUX BTDR FM AUX BTDR FM AUX BTDR FM AUX BTDR FM AUX BTDR FM AUX BTDR FM AUX BTDR FM AUX BTDR FM AUX BTDR FM AUX BTDR FM AUX BTDR FM AUX BTDR FM AUX BTDR FM AUX BTDR FM
10:00
DR FM AUX BTDR FM AUX BTDR FM AUX BTDR FM AUX BTDR FM AUX BTDR FM AUX BTDR FM AUX BTDR FM AUX BTDR FM AUX BTDR FM AUX BTDR FM AUX BTDR FM AUX BTDR FM AUX BTDR FM AUX BTDR FM AUX BTDR FM AUX BTDR FM AUX BTDR FM AUX BTDR FM AUX BTDR FM AUX BTDR FM AUX BTDR FM AUX BTDR FM AUX BTDR FM AUX BTDR FM AUX BTDR FM AUX BTDR FM AUX BTDR FM AUX BTDR FM AUX BTDR FM AUX BTDR FM AUX BTDR FM AUX BTDR FM AUX BTDR FM AUX BTDR FM AUX BTDR FM AUX BTDR FM AUX BTDR FM AUX BTDR FM AUX BTDR FM AUX BTDR FM AUX BTDR FM AUX BTDR FM AUX BTDR FM
10:00
DR FM AUX BTDR FM AUX BTDR FM AUX BTDR FM AUX BTDR FM AUX BTDR FM AUX BTDR FM AUX BTDR FM AUX BTDR FM AUX BTDR FM AUX BTDR FM AUX BTDR FM AUX BTDR FM AUX BTDR FM AUX BTDR FM AUX BTDR FM AUX BTDR FM AUX BTDR FM AUX BTDR FM AUX BTDR FM AUX BTDR FM AUX BTDR FM AUX BTDR FM AUX BTDR FM AUX BTDR FM AUX BTDR FM AUX BTDR FM AUX BTDR FM AUX BTDR FM AUX BTDR FM AUX BTDR FM AUX BTDR FM AUX BTDR FM AUX BTDR FM AUX BTDR FM AUX BTDR FM AUX BTDR FM AUX BTDR FM AUX BTDR FM AUX BTDR FM AUX BTDR FM AUX BTDR FM AUX BTDR FM AUX BTDR FM
10:00
STATIONS
BBC R3
BBC R3
TUNING
DRF
107\60
107\60
SCANNING
Écoute de la radio numérique
Appuyez sur le bouton Source pour passer à une
radio numérique.
Changement de stations numériques
1. Appuyez sur les boutons < > pour naviguer parmi
la liste de stations.
2. Une fois que vous avez trouvé la station que vous
souhaitez écouter, appuyez sur le bouton Select
(Sélectionner) .
Écoute de la radio FM
Appuyez sur le bouton Source pour passer à une
radio FM.
Changement de stations FM
Syntonisation manuelle
Appuyez sur les boutons de défilement < > pour
avancer ou reculer de 0,05MHz dans la gamme de
fréquences.
Syntonisation automatique
Appuyez sur les boutons de défilement < > pour
rechercher la station radio FM suivante ou précédente
émettant un signal fort.
FR
9
Page 56

Mémorisation et rappel des
présélections
Vous pouvez mémoriser jusqu'à 10stations radio numériques et 10stations radio FM
pour y accéder rapidement.
DR FM AUX BTDR FM AUX BTDR FM AUX BTDR FM AUX BTDR FM AUX BTDR FM AUX BTDR FM AUX BTDR FM AUX BTDR FM AUX BTDR FM AUX BTDR FM AUX BTDR FM AUX BTDR FM AUX BTDR FM AUX BTDR FM AUX BTDR FM AUX BTDR FM AUX BTDR FM AUX BTDR FM AUX BTDR FM AUX BTDR FM AUX BTDR FM AUX BTDR FM AUX BTDR FM AUX BTDR FM AUX BTDR FM AUX BTDR FM AUX BTDR FM AUX BTDR FM AUX BTDR FM AUX BTDR FM AUX BTDR FM AUX BTDR FM AUX BTDR FM AUX BTDR FM AUX BTDR FM AUX BTDR FM AUX BTDR FM AUX BTDR FM AUX BTDR FM AUX BTDR FM AUX BTDR FM AUX BTDR FM AUX BTDR
10:00
PRESET 2
STORED
CLASSIC
MOZART
PRESET 5
EMPTY
PRESET 6
STORED
RECALL
6 CLASS
Pour mémoriser rapidement une station
sur un bouton de présélection (1-4)
Recherchez la station numérique ou FM que vous
souhaitez mémoriser. Appuyez sur l'un des boutons de
présélection numérotés (1–4) et maintenez-le enfoncé
pendant deux secondes afin d'y assigner la station active.
L'enregistrement d'une présélection peut se faire pardessus une présélection existante, la précédente étant alors
remplacée par écrasement.
Pour mémoriser une station dans la
liste des présélections (1-10)
1. Recherchez la station radio numérique ou FM que vous
souhaitez mémoriser.
2.
Appuyez sur le bouton 5+ pour afficher les présélections
mémorisées dans leur ordre numérique, puis sur < > pour
sélectionner le numéro d'une présélection, entre 1 et 10.
L'enregistrement d'une présélection peut se faire pardessus une présélection existante, la précédente étant
alors remplacée par écrasement.
3. Maintenez le bouton Select (Sélectionner) enfoncé
jusqu'à ce que le message Présélection enregistrée
s'affiche.
10:00
10
DR FM AUX BTDR FM AUX BTDR FM AUX BTDR FM AUX BTDR FM AUX BTDR FM AUX BTDR FM AUX BTDR FM AUX BTDR FM AUX BTDR FM AUX BTDR FM AUX BTDR FM AUX BTDR FM AUX BTDR FM AUX BTDR FM AUX BTDR FM AUX BTDR FM AUX BTDR FM AUX BTDR FM AUX BTDR FM AUX BTDR FM AUX BTDR FM AUX BTDR FM AUX BTDR FM AUX BTDR FM AUX BTDR FM AUX BTDR FM AUX BTDR FM AUX BTDR FM AUX BTDR FM AUX BTDR FM AUX BTDR FM AUX BTDR FM AUX BTDR FM AUX BTDR FM AUX BTDR FM AUX BTDR FM AUX BTDR FM AUX BTDR FM AUX BTDR FM AUX BTDR FM AUX BTDR FM AUX BTDR FM AUX BTDR
CLASSIC
MOZART
Pour rappeler une présélection
lorsque vous écoutez une station radio
numérique ou FM
Pour choisir une présélection de 1 à 4, appuyez sur le
bouton correspondant sur votre Pop (boutons 1 à 4).
Pour accéder à la liste complète des présélections (de1
à 10) :
1. Appuyez sur le bouton 5+ et relâchez-le aussitôt.
2. Appuyez sur < > pour naviguer dans les numéros des
présélections, puis sur le bouton Select (Sélectionner)
pour syntoniser sur la présélection choisie.
Page 57

Utilisation de l’entrée auxiliaire
Vous pouvez utiliser l’entrée auxiliaire de Pop pour diffuser la musique de votre
choix à partir de votre téléphone ou tablette vers votre Pop.
Remarque:
vers Pop, vous devrez régler le volume sur votre téléphone ou votre tablette pour
modifier le volume de votre Pop.
Connexion d’un appareil auxiliaire
Reliez la sortie ligne ou la prise casque de votre lecteur auxiliaire à l’entrée
auxiliaire de votre Pop, en utilisant le câble idoine.
Sélection de l’entrée auxiliaire
10:00
10:00
Lorsque vous utilisez l’entrée auxiliaire pour diffuser de la musique
DR FM AUX BTDR FM AUX BTDR FM AUX BTDR FM AUX BTDR FM AUX BTDR FM AUX BTDR FM AUX BTDR FM AUX BTDR FM AUX BTDR FM AUX BTDR FM AUX BTDR FM AUX BTDR FM AUX BTDR FM AUX BTDR FM AUX BTDR FM AUX BTDR FM AUX BTDR FM AUX BTDR FM AUX BTDR FM AUX BTDR FM AUX BTDR FM AUX BTDR FM AUX BTDR FM AUX BTDR FM AUX BTDR FM AUX BTDR FM AUX BTDR FM AUX BTDR FM AUX BTDR FM AUX BTDR FM AUX BTDR FM AUX BTDR FM AUX BTDR FM AUX BTDR FM AUX BTDR FM AUX BTDR FM AUX BTDR FM AUX BTDR FM AUX BTDR FM AUX BTDR FM AUX BTDR FM AUX BTDR FM AUX BTDR FM AUX
DR FM AUX BTDR FM AUX BTDR FM AUX BTDR FM AUX BTDR FM AUX BTDR FM AUX BTDR FM AUX BTDR FM AUX BTDR FM AUX BTDR FM AUX BTDR FM AUX BTDR FM AUX BTDR FM AUX BTDR FM AUX BTDR FM AUX BTDR FM AUX BTDR FM AUX BTDR FM AUX BTDR FM AUX BTDR FM AUX BTDR FM AUX BTDR FM AUX BTDR FM AUX BTDR FM AUX BTDR FM AUX BTDR FM AUX BTDR FM AUX BTDR FM AUX BTDR FM AUX BTDR FM AUX BTDR FM AUX BTDR FM AUX BTDR FM AUX BTDR FM AUX BTDR FM AUX BTDR FM AUX BTDR FM AUX BTDR FM AUX BTDR FM AUX BTDR FM AUX BTDR FM AUX BTDR FM AUX BTDR FM AUX BTDR FM AUX
AUX
2-4-2015
1.
Appuyez et maintenez enfoncée la touche Source
jusqu’à ce que ‘AUX’ s’affiche sur l’écran de votre
Pop.
2. Sur votre périphérique auxiliaire, sélectionnez le
contenu que vous souhaitez écouter sur votre Pop.
Le contenu sélectionné sur votre appareil auxiliaire
est alors diffusé sur votre Pop.
FR
11
Page 58

Alarmes et minuteries
DR FM AUX BTDR FM AUX BTDR FM AUX BTDR FM AUX BTDR FM AUX BTDR FM AUX BTDR FM AUX BTDR FM AUX BTDR FM AUX BTDR FM AUX BTDR FM AUX BTDR FM AUX BTDR FM AUX BTDR FM AUX BTDR FM AUX BTDR FM AUX BTDR FM AUX BTDR FM AUX BTDR FM AUX BTDR FM AUX BTDR FM AUX BTDR FM AUX BTDR FM AUX BTDR FM AUX BTDR FM AUX BTDR FM AUX BTDR FM AUX BTDR FM AUX BTDR FM AUX BTDR FM AUX BTDR FM AUX BTDR FM AUX BTDR FM AUX BTDR FM AUX BTDR FM AUX BTDR FM AUX BTDR FM AUX BTDR FM AUX BTDR FM AUX BTDR FM AUX BTDR FM AUX BTDR FM AUX BTDR FM AUX BT
DR
Remarque: si Pop fonctionne avec des piles ou une batterie ChargePAK, la fonction
d'alarme de Pop ne fonctionnera pas si vous éteignez Pop après avoir réglé une alarme.
Programmation d'une alarme
Pop dispose de deux alarmes pouvant allumer la radio et
syntoniser sur une station radio numérique ou FM, ou faire
retentir une alarme.
1. Appuyez sur le bouton Menu, puis utilisez les boutons
de défilement < > pour choisir ‘Alarme’.
2. Utilisez les boutons de défilement < > pour choisir
‘Alarme1’ ou ‘Alarme2’ puis appuyez sur le bouton
Select (Sélectionner).
3. Utilisez les boutons de défilement < > pour choisir
‘Marche’ puis appuyez sur le bouton Select
(Sélectionner).
4. Utilisez les boutons de défilement < > pour régler
l'heure de l'alarme, puis appuyez sur le bouton Select
(Sélectionner). Répétez cette opération pour régler les
minutes de l'alarme.
5. Utilisez les boutons de défilement < > pour régler la
durée de l'alarme, puis appuyez sur le bouton Select
(Sélectionner).
6.
Utilisez les boutons de défilement < > pour spécifier
‘FM’, ‘Numérique’ ou ‘Sonnerie’, puis appuyez sur le
bouton Select (Sélectionner) pour confirmer. Si vous
spécifiez une alarme basée sur une sonnerie, passez
directement à l'étape 8.
7. Utilisez les boutons de défilement < > pour spécifier la
station qui doit être lue lorsque l'alarme se déclenche.
Vous pouvez sélectionner l'une de vos stations
présélectionnées ou bien l'option ‘Dernière station
écoutée’ pour que la radio se syntonise sur la dernière
station que vous écoutiez. Appuyez sur Select pour
valider.
8. Utilisez les boutons de défilement < > pour sélectionner
l'une des options de répétition d'alarme: ‘Tous les
jours’, ‘Jours de semaine’, ‘Week-ends’ ou ‘Une fois’,
puis appuyez sur Select (Sélectionner) pour confirmer.
9. Utilisez les boutons de défilement < > pour régler le
volume de la radio lorsque l'alarme se déclenche, puis
appuyez sur Select (Sélectionner) pour confirmer.
10
. L'icône d'alarme reste allumée fixement pour indiquer
que l'alarme est réglée.
7:00
7:00
7:00
7:00
7:00
7:00
7:00
7:00
7:00
7:00
12
MENU
ALARM
ALARM
ALARM 1
DURATION
45 MIN5
SOURCE
DIGITAL
STATION
LAST USE
REPEAT
DAILY
VOLUME
2
Page 59

Arrêt d'une alarme qui retentit
Pour annuler une alarme qui retentit, appuyez sur les boutons Source, <Select>
(Sélectionner) ou Menu.
Répétition d'une alarme sonore
Pour répéter ultérieurement une alarme qui retentit, appuyez sur l'un des boutons
dédiés à l'accès aux présélections. Par défaut, le temps de répétition d'alarme de Pop
est réglé sur huit minutes. Pour modifier le temps de répétition d'alarme par défaut de
Pop, voir page 17.
Désactivation d'une alarme
Pour désactiver une alarme une fois qu'elle a été réglée:
1. Appuyez sur le bouton Menu, utilisez les boutons de défilement < > pour choisir
‘Alarme’, puis appuyez sur le bouton Select (Sélectionner).
2. Utilisez les boutons de défilement < > pour choisir l'alarme que vous souhaitez
désactiver (‘Alarme1’ ou ‘Alarme2’), puis appuyez sur le bouton Select (Sélectionner).
3. Utilisez les boutons de défilement < > pour choisir ‘Arrêt’, puis appuyez sur le bouton
Select (Sélectionner).
4
.
L'icône d'alarme s'éteint sur l'affichage de Pop pour indiquer que l'alarme a été
désactivée.
Programmation de la minuterie de veille prolongée
La minuterie de veille prolongée peut être activée pour éteindre votre Pop après un
certain délai spécifique.
Remarque: si Pop fonctionne sur piles ou sur une batterie ChargePAK, la fonction de veille
prolongée de Pop est désactivée.
1. Appuyez sur le bouton Menu.
2. Utilisez les boutons de défilement < > pour choisir ‘Veille prolongée’, puis appuyez sur le
bouton Select (Sélectionner).
3. Utilisez les boutons de défilement < >, puis appuyez sur Select (Sélectionner) pour
régler la minuterie jusqu'à 90minutes, ou sélectionnez ‘Arrêt’ pour annuler.
Programmation de la minuterie de cuisine
Pop offre une fonction de minuterie dont le compte à rebours déclenche une alarme après
une durée définie.
1. Appuyez sur le bouton Menu.
2. Utilisez les boutons de défilement < > pour choisir ‘Minuterie’, puis appuyez sur le
bouton Select (Sélectionner).
3. Utilisez les boutons de défilement < > pour modifier les heures, puis appuyez sur le
bouton Select (Sélectionner).
4. Utilisez à nouveau les boutons de défilement < > pour modifier les minutes, puis
appuyez pour confirmer et déclencher le compte à rebours de la minuterie.
L'alarme se déclenche à l'expiration de la durée que vous avez programmée, que la
radio soit allumée ou en veille. Annulez la sonnerie de l'alarme en appuyant sur l'un des
boutons suivants: Source, <Select> (Sélectionner) ou Menu.
FR
13
Page 60

Options et paramètres
Réglages généraux
Modification de la langue affichée
Pour permuter entre les différentes options de Pop liées à la langue d'affichage (anglais,
français, allemand, italien et espagnol):
1. Appuyez sur le bouton Menu.
2. Utilisez les boutons de défilement < > pour choisir ‘Paramètres’, puis appuyez sur le bouton
Select (Sélectionner).
3. Utilisez les boutons de défilement < > pour choisir ‘Lang.’, puis appuyez sur le bouton Select
(Sélectionner).
4. Utilisez les boutons de défilement < > puis appuyez sur le bouton Select (Sélectionner) pour
choisir la langue d'affichage souhaitée sur Pop.
Réinitialisation de Pop aux réglages d'usine
Réinitialiser votre radio Pop vous permet d'en effacer toutes les présélections et la liste des
stations mémorisées, et de rétablir toutes les options à leur choix par défaut. Pour restaurer les
réglages d'usine:
1. Appuyez sur le bouton Menu.
2. Utilisez les boutons de défilement < > pour choisir ‘Paramètres’, puis appuyez sur le bouton
Select (Sélectionner).
3. Utilisez les boutons de défilement < > pour choisir ‘Reset’, puis appuyez sur le bouton
Select (Sélectionner).
4. Utilisez les boutons de défilement < > pour choisir ‘OK’, puis appuyez sur le bouton Select
(Sélectionner).
Affichage de la version logicielle de Pop
Pour afficher la version logicielle actuellement utilisée sur Pop:
1. Appuyez sur le bouton Menu.
2. Utilisez les boutons de défilement < > pour choisir ‘Paramètres’, puis appuyez sur le bouton
Select (Sélectionner).
3. Utilisez les boutons de défilement < > pour choisir ‘Version’, puis appuyez sur le bouton
Select (Sélectionner).
Mise à jour de Pop vers la dernière version logicielle
Contactez le support technique de Pure (http://support.pure.com) pour obtenir davantage
d'informations sur la mise à jour du firmware de votre Pop selon la dernière version disponible.
14
Page 61

Paramètres audio
Vous pouvez utiliser le menu audio de Pop pour régler les basses et les aigus.
1. Appuyez sur le bouton Menu.
2. Utilisez les boutons de défilement < > pour choisir ‘Audio’, puis appuyez sur le bouton Select
(Sélectionner).
3. Utilisez les boutons de défilement < > pour choisir ‘Graves’ ou ‘Aigus’, puis appuyez sur le
bouton Select (Sélectionner).
4. Utilisez les boutons de défilement < > pour ajuster le niveau des graves ou des aigus. Vous
pouvez choisir un niveau entre ‘-3’ et ‘+3’.
5. Appuyez sur le bouton Select (Sélectionner) pour confirmer le niveau des basses ou des
aigus.
Paramètres d'affichage
Paramétrage de la luminosité de l'affichage
Vous pouvez régler la luminosité de l'affichage lorsque Pop est en utilisation et en veille. Pour
modifier la luminosité de l'affichage de Pop:
1. Appuyez sur le bouton Menu.
2. Utilisez les boutons de défilement < > pour choisir ‘Affichage’, puis appuyez sur le bouton
Select (Sélectionner).
3. Utilisez les boutons de défilement < > pour choisir ‘Rétroéclairage’, puis appuyez sur le
bouton Select (Sélectionner).
4. Utilisez les boutons de défilement < > pour choisir ‘Activé’, puis appuyez sur le bouton
Select (Sélectionner) pour modifier les paramètres applicables lorsque Pop est en marche,
ou utilisez les boutons de défilement < > pour choisir ‘Veille’, puis appuyez sur le bouton
Select (Sélectionner) pour modifier les paramètres qui s'appliquent en mode veille.
5. Utilisez les boutons de défilement < > pour choisir ‘Niveau’, puis appuyez sur le bouton
Select (Sélectionner).
6. Utilisez les boutons de défilement < > pour choisir un niveau de luminosité entre ‘1’ et ‘5’.
7. Appuyez sur le bouton Select (Sélectionner) pour confirmer le réglage de la luminosité.
Réglage de la durée d'activation du rétroéclairage
Pour régler la durée d'activation du rétroéclairage de Pop:
1. Appuyez sur le bouton Menu.
2. Utilisez les boutons de défilement < > pour choisir ‘Affichage’, puis appuyez sur le bouton
Select (Sélectionner).
3. Utilisez les boutons de défilement < > pour choisir ‘Rétroéclairage’, puis appuyez sur le
bouton Select (Sélectionner).
4. Utilisez les boutons de défilement < > pour choisir ‘Activé’, puis appuyez sur le bouton
Select (Sélectionner) pour modifier les paramètres applicables lorsque Pop est en marche,
ou utilisez les boutons de défilement < > pour choisir ‘Veille’, puis appuyez sur le bouton
Select (Sélectionner) pour modifier les paramètres qui s'appliquent en mode veille.
5. Utilisez les boutons de défilement < > pour choisir ‘Durée’ puis appuyez sur le bouton
Select (Sélectionner).
6. Utilisez les boutons de défilement < > puis appuyez sur le bouton Select (Sélectionner) pour
choisir l'une des options suivantes:
Marche: sélectionnez cette option si vous souhaitez que le rétroéclairage soit toujours activé.
Arrêt: sélectionnez cette option si vous souhaitez que le rétroéclairage se désactive après
10secondes
FR
15
Page 62

Modification des informations affichées sur Pop
Si vous écoutez une station de radio numérique ou FM, vous pouvez modifier les informations
affichées à l'écran:
1. Appuyez sur le bouton Menu.
2. Utilisez les boutons de défilement < > pour choisir ‘Affichage’, puis appuyez sur le bouton Select
(Sélectionner).
3. Utilisez les boutons de défilement < > pour choisir ‘Info’, puis appuyez sur le bouton Select
(Sélectionner).
4. Utilisez les boutons de défilement < >, puis appuyez sur le bouton Select (Sélectionner) pour
choisir l'une des options suivantes:
Texte: sélectionnez cette option si vous souhaitez afficher les informations sur la station
que vous écoutez. Les informations affichées peuvent inclure des titres de chanson, des
détails de programme, des nouvelles, etc.
Puissance: sélectionnez cette option si vous souhaitez afficher la puissance du signal
de la station de radio que vous écoutez. Le nombre d'astérisque indique le niveau de
réception fiable.
Date: sélectionnez cette option si vous souhaitez afficher la date actuelle.
Paramètres de l'horloge
Réglage de la date et de l'heure
La date et l'heure de votre Pop sont automatiquement définies par le signal radio (FM ou
numérique). Si la date et l'heure de votre Pop ne se mettent pas à jour automatiquement, vous
pouvez les régler manuellement.
1. Appuyez sur le bouton Menu.
2. Utilisez les boutons de défilement < > pour choisir ‘Horloge’, puis appuyez sur le bouton Select
(Sélectionner).
3. Utilisez les boutons de défilement < > pour choisir ‘Heure/date’, puis appuyez sur le bouton
Select (Sélectionner).
4. Utilisez les boutons de défilement < > pour régler l'heure, puis appuyez sur le bouton Select
(Sélectionner). Répétez l'opération pour régler les minutes.
5. Utilisez les boutons de défilement < > pour régler le jour, puis appuyez sur le bouton Select
(Sélectionner). Répétez cette opération pour régler le mois et l'année.
Modification du format de l'heure
1. Appuyez sur le bouton Menu.
2. Utilisez les boutons de défilement < > pour choisir ‘Horloge’,
Select (Sélectionner).
3. Utilisez les boutons de défilement < > pour choisir ‘12/24h’, puis appuyez sur le bouton
Select
(Sélectionner).
4. Utilisez les boutons de défilement < > pour choisir entre ‘12h’ et ‘24h’, puis appuyez sur le
bouton
Select
(Sélectionner) pour confirmer.
puis appuyez sur
le bouton
16
Page 63

Modification du format de date
1. Appuyez sur le bouton Menu.
2. Utilisez les boutons de défilement < > pour choisir ‘Horloge’, puis appuyez sur le bouton
Select (Sélectionner).
3. Utilisez les boutons de défilement < > pour choisir ‘Format’, puis appuyez sur le bouton
Select (Sélectionner).
4. Utilisez les boutons de défilement < > pour choisir entre l'affichage de la date dans l'ordre
jour, mois et année ‘JJ-MM-AAAA’ ou dans l'ordre mois, jour, année ‘MM-JJ-AAAA’, puis
appuyez sur le bouton
Select
(Sélectionner) pour confirmer.
Options de synchronisation d'horloge
Vous pouvez sélectionner les sources radio que vous souhaitez utiliser pour le réglage de
l'heure. Votre Pop utilise par défaut les signaux radio des stations numériques et FM pour
synchroniser l'heure.
Pour spécifier les options de synchronisation d'horloge:
1. Appuyez sur le bouton Menu.
2. Utilisez les boutons de défilement < > pour choisir ‘Horloge’, puis appuyez sur le bouton
Select (Sélectionner).
3. Utilisez les boutons de défilement < > pour choisir ‘Synchronisation’, puis appuyez sur le
bouton Select (Sélectionner).
4. Utilisez les boutons de défilement < > pour choisir l'option de synchronisation d'horloge
requise, puis appuyez sur
Select
(Sélectionner) pour confirmer.
Modification du temps de répétition
Vous pouvez modifier le temps de répétition d'une alarme en appuyant sur l'un des boutons de
présélection de pop lorsque l'alarme retentit. Par défaut, le temps de répétition de Pop est réglé
sur huit minutes.
Pour modifier le temps de répétition de Pop:
1. Appuyez sur le bouton Menu.
2. Utilisez les boutons de défilement < > pour choisir ‘Horloge’, puis appuyez sur le bouton
Select (Sélectionner).
3. Utilisez les boutons de défilement < > pour choisir ‘Veilleuse’, puis appuyez sur le bouton
Select (Sélectionner).
4. Utilisez les boutons de défilement < > pour choisir un temps de répétition entre ‘5’ et ‘59’
minutes, puis appuyez sur le bouton
Select
(Sélectionner) pour confirmer.
FR
17
Page 64

FM stéréo
Vous pouvez utiliser le menu FM stéréo pour passer de la réception stéréo à la
réception mono. Vous pouvez sélectionner ‘Mono’ pour essayer d'améliorer une
plus faible réception.
Remarque: l'option de stéréo ‘FM stéréo’ est uniquement visible si vous avez
sélectionné ‘FM’ comme source radio.
Pour modifier le réglage FM stéréo de Pop:
1. Appuyez sur Menu.
2. Utilisez les boutons de défilement < > pour choisir ‘FM stéréo’, puis appuyez
sur le bouton Select.
3. Utilisez les boutons de défilement < > pour choisir entre ‘Stéréo’ et ‘Mono’,
puis appuyez sur le bouton Select (Sélectionner) pour confirmer.
18
Page 65

Annexe
Installation d'une batterie ChargePAK D1 ou
dequatre piles AA
ChargePAK D1 4x piles AA
FR
19
Page 66

Changement de la gaine amovible de Pop Midi
20
Page 67

Aide et conseils
Stations annexes et inactives
(</>) Services de radio numérique annexes
Certaines stations proposent des services annexes, fournissant des informations
supplémentaires ou des contenus alternatifs, et pouvant être diffusés à certains
moments seulement. Si une station propose un service annexe, le symbole ‘>’
apparaît en regard de son nom dans la liste des stations et le service annexe
apparaît à la suite de la station dans la liste. Le symbole ‘<’ précède un service
annexe.
(?) Stations radio numériques inactives ou indisponibles
Les stations inactives ou indisponibles sont précédées d'un ‘?’ dans la liste et
sont impossibles à syntoniser. Une station peut être inactive ou indisponible
parce qu'elle ne diffuse pas de programmes à cet instant (vérifiez les listes de
programmes) ou parce qu'elle a complètement cessé toute activité. De même,
vous pouvez ne pas disposer d'un signal assez fort pour recevoir la station radio.
Conseils et astuces
L'écran affiche le message ‘Aucune station détectée’
Appuyez sur le bouton Autotune (Syntonisation automatique) à l'arrière de votre
Pop pour rechercher les stations numériques. Essayez de changer la position de
la radio ou de l’antenne.
Réception des nouvelles stations radio numériques qui viennent de commencer à émettre
Appuyez sur le bouton Autotune (Syntonisation automatique) à l'arrière de votre
Pop pour rechercher les nouvelles stations numériques. Essayez de changer la
position de la radio ou de l’antenne.
FR
21
Page 68

Caractéristiques techniques
Radio Radio numérique et FM
Fréquences
Haut-parleur
Puissance de sortie 4.3WRMS
Connectique d'entrée Prise pour adaptateur secteur 230 V-5,5V CC.
(fournie), 3 prises d’entrée auxiliaires 5 mm
Connectique de sortie Prise casque stéréo format mini-jack
Présélections 10présélections de radios numériques et
Alimentation électrique adaptateur secteur externe 230VCA-5,5 VCC (2,0A)
Consommation électrique Veille avec affichage de l’heure : 0,55 W, en
fonctionnement : 0,92 W
Dimensions 93 mm x 173 mm x 102 mm
Antenne Antenne télescopique
Version logicielle V1.0
Homologations Certifié CE. Pure International Limited déclare par
DAB/DAB+, radio FM 87,5 - 108MHz
3
" à gamme étendue
10présélections de radios FM;
(fourni) ou batterie ChargePAK D1 rechargeable
(enoption) ou quatre piles AA)
(largeur x hauteur x profondeur)
les présentes que ce modèle de radio Pop Midi est
conforme aux principales exigences de la directive RED
(2014/53/UE). Le texte intégral de la Déclaration de
conformité UE est disponible à l’adresse suivante :
http://www.pure.com/about/red
22
Page 69

Pop Midi
EN
Grazie per aver scelto Pop Midi. Ilpresente manuale
indica come accendere e attivare in breve tempo il
prodotto e descrive l’utilizzo ottimale di tutte le sue
eccezionali caratteristiche.
DE
FR
IT
IT
NO
DA
NL
1
Page 70

Istruzioni di sicurezza
Informazioni di sicurezza
1. Le ggere attentam ente tutte le inform azioni e istruzi oni di sicurezza p rima di utilizz are la radio. In caso di c essione della ra dio a
terzi, includere tutta la documentazione correlata.
2. L’apparecch io non deve esposto a sp ruzzi o gocciol amenti. Non collo care oggetti con tenenti liquidi (ad e sempio vasi)
sull’appare cchio. Se si è versato d el liquido o acqua s ulla radio, spegn ere l’unità, scolle gare la presa dalla r ete di alimentazi one
e contatt are il rivenditore. N on toccare mai la sp ina o la radio stessa c on le mani bagnate. Qu ando si scolleg a l’adattato re dalla
presa di al imentazione e lettrica, non tir are mai il cavo di alim entazione.
3. Pericolo di esplosione se la batteria viene sostituita in modo non corretto (verificare la polarità). Sostituire solo con una batteria
uguale o di t ipo equivalente (4 x A A). La batteria (Cha rgePAK D1) non deve essere es posta a temperatu re eccessivame nte
elevate, quali raggi solari, fuoco o simili. Tenere batterie nuove e usate e ChargePAK lontano dai bambini. Assicurarsi che le
batterie siano smaltite nel rispetto dell’ambiente.
4. L’utilizzo de lla radio in ambie nti o climi con elevat a umidità e tempera tura può causare l a formazione di co ndensa all’intern o della
radio, con c onseguenti dan ni alla radio. Usare l’app arecchio solo in a mbienti con clim a mite.
5. Evitare condizioni estreme, sia minime che massime, di temperatura. Collocare il dispositivo lontano da fonti di calore come
radiatori e fornelli a gas/elettrici. Non collocare sull’apparecchio fonti di calore come fiamme vive o candele.
6. L’adattatore di alimentazione è utilizzato come dispositivo di disconnessione; tale dispositivo sarà sempre pronto all’uso.
Inserire l’adattatore in una presa elettrica facilmente accessibile, posta nelle vicinanze della radio. Utilizzare esclusivamente
l’adattatore di alimentazione indicato per la connessione di questo prodotto.
7. Ut ilizzare solo l’adat tatore di aliment azione indicato n elle istruzion i di utilizzo (forni to da Pure con il numer o di modello
ZDD055200, ZDD055200BS, SW055200-NM o SW055200-N01).
8. Prima di utilizzare la radio, assicurarsi che la tensione di alimentazione elettrica disponibile corrisponda alla tensione nominale
richiesta per la radio.
9. Se l a radio non sarà uti lizzata per un lun go periodo di temp o, scollegarla da ll’alimentazio ne elettrica (ad es . quando si va in
vacanza).
10. Prima di p ulire la radio, scoll egarla sempre d alla presa di alim entazione di rete. Q uando si pulisc e la radio, non utiliz zare spugne
abrasive o soluzioni detergenti abrasive che potrebbero danneggiare la superficie della radio.
11. Per ridu rre il rischio di sco sse elettrich e, non rimuovere alc una vite, poiché all ’interno non vi sono pa rti riparabil i dall’utente.
Affidare le riparazioni a personale qualificato.
12. Garanti re un’adeguata ventila zione attorno a l prodotto, sopratt utto durante la ric arica.
ChargePAK D1 - Istruzioni di sicurezza
1. Leggere le i struzioni per l’uti lizzo di Charge PAK nel presente docu mento.
2. Utilizza re ChargePAK solo c on prodotti orig inali Pure. Usare so lo batterie Cha rgePAK D1 Pure origina li. Pericolo di es plosione se la
batteria viene sostituita in modo non corretto (verificare la polarità). Sostituire solo con una batteria uguale o di tipo equivalente.
3. Conser vare ChargePAK in un lu ogo fresco e asci utto a temperatur a ambiente. Rimuo vere il prodotto da di spositivi non u tilizzati per
lunghi periodi di tempo.
4. Non forare, m odificare, fare c adere o lanciar e ChargePAK e non provo care urti non nec essari. Se util izzato in modo sco rretto, il
prodotto può comportare il rischio di incendi, esplosioni o ustioni chimiche.
5. Non gettare ChargePAK nel fuoco o in un inceneritore e non lasciare in luoghi molto caldi, ad esempio in un’automobile sotto la luce
solare di retta. Non conse rvare in prossi mità di forni, stuf e o altre fonti di calo re.
6. Non collegare direttamente ChargePAK a una fonte di energia elettrica, come la presa elettrica di un edificio o la presa accendisigari
di un’automobile. Non collocare in un forno a microonde o in altri contenitori ad alta pressione.
7. Non bagnar e o immergere Char gePAK nell’acqua e non es porre a liquidi.
8. Non metter e il prodotto in cor to circuito.
9. Non usare o caricare ChargePAK se presenta perdite, scolorimento, tracce di ruggine, deformazioni, odori o altre anomalie.
10. Non to ccare direttam ente ChargePAK se pre senta delle per dite; rimuoverlo n ell’immediato ind ossando guanti d i protezione e
smaltirlo appropriatamente.
11. Con servare in un pos to non accessibi le ai bambini.
12. Smaltire ChargePAK come le normali batterie ricaricabili, conformemente alle norme e alle disposizioni in vigore nell’area di utilizzo.
Simboli sull’apparecchio e nel manuale utente
Questo simbolo di AVVERTENZA viene impiegato in tutto il manuale per indicare un rischio potenzialmente grave
per la sicurezza della propria persona. Per evitare possibili infortuni, anche letali, rispettare tutte le avvertenze di
sicurezza associate questo simbolo.
Questo simbolo viene utilizzato sul prodotto per richiamare l’attenzione dell’utente e avvisarlo di leggere le
istruzioni prima dell’uso.
Questo simbolo indica la tensione DC.
Questo simbolo indica una presa USB di 2 Amp al massimo.
2A
2
Page 71

Sommario
4 Introduzione
4 Pannello superiore
5 Pannello posteriore
6 Display
7 Per iniziare
7 Impostazione rapida
9 Utilizzo
9 Ascolto della radio digitale
9 Ascolto di radio FM
10 Memorizzazione e richiamo delle preselezioni
10 Per memorizzare in modo rapido una stazione e richiamarla con un
pulsante di preselezione (1–4)
10 Per memorizzare una stazione nell’elenco di preselezione (1-10)
10 Per richiamare una preselezione durante l’ascolto di stazioni radio digitali o
FM
11 Utilizzo dell’ingresso ausiliario
12 Sveglie e timer
12 Impostazione di una sveglia
13 Annullamento della sveglia
13 Ripetizione della sveglia
13 Disattivazione di una sveglia
13 Impostazione del timer modalità spegnimento
13 Impostazione del timer da cucina
14 Opzioni e impostazioni
14 Impostazioni generali
15 Impostazioni audio
15 Impostazioni del Display
16 Impostazioni dell'orologio
18 FM stereo
19 Appendice
19 Installazione di un ChargePAK D1 o quattro batterieAA
20 Sostituzione del rivestimento rimovibile di Pop Midi
21 Guida e suggerimenti
22 Caratteristiche tecniche
IT
3
Page 72

Introduzione
Pannello superiore
D
C
E
A
A. Manopola di accensione/volume: premere per accendere/spegnere Pop.
Ruotare per regolare il volume.
B. Pulsante Menu: premere per modificare le varie impostazioni di Pop (vedere a
pagina 14 per ulteriori informazioni).
C. Pulsanti di selezione: premere per cambiare le stazioni radio (vedere a pagina
9) o scorrere e selezionare le opzioni del menu.
D. Sorgente: premere per passare dall'ascolto delle radio digitali a quello delle
radio FM e viceversa.
E. Preselezioni 1 - 5+: memorizza fino a 10 stazioni radio digitali o 10 stazioni
radio FM in preselezione (vedere a pagina 10 per ulteriori informazioni).
4
B
Page 73

Pannello posteriore
F
G H
I
J
F. Antenna: ruotare l'antenna ed estenderla completamente per migliorare la
ricezione.
G. Presa cuffie stereo (3,5 mm)
H. Pulsante Autotune: premere per la ricerca automatica di nuove stazioni radio
digitali e la cancellazione di quelle inattive.
I. Ingresso ausiliario da 3,5 mm: Ingresso stereo analogico per iPod, lettore MP3,
ecc.
J. Connettore di alimentazione Micro-B USB da 5,5 V: collegamento solo al
trasformatore fornito in dotazione.
IT
5
Page 74

Display
BBC R2
7:00
1. Visualizza l'ora attuale.
2. Indicatore ChargePAK o batteria.
3. Indicatore del sorgente (DR= radio digitale, FM= radio FM,
AUX= Ingresso ausiliario).
4. Nome della stazione.
5. Intensità del segnale.
6. Indicatore del volume.
7. Data, testo a scorrimento, impostazioni e informazioni sulle stazioni (vedere a
pagina 16).
8. Indicatore AM/PM.
9. Indicatore impostazione sveglia (vedere a pagina 12).
10. Indicatore timer di autospegnimento e da cucina (vedere a pagina 13).
11. Indicatore Snooze (pagina 13).
6
TOP 40
Page 75

Per iniziare
Impostazione rapida
Nota: se si dispone di una batteria ricaricabile ChargePAK D1 (venduta
separatamente) o di batterie ricaricabili AA, installarle prima di collegare Pop.
Vedere a pagina 19 per ulteriori informazioni.
1
1
B
• Ruotare l’antenna ed estenderla
completamente (passaggi A e B).
A
C
2
2
D
• Inserire il jack del trasformatore
fornito in dotazione nella presa della
parte posteriore della radio (C).
• Inserire il trasformatore nella presa
• Inserire il trasformatore nella presa
di alimentazione di rete (D).
di alimentazione di rete (D).
IT
7
Page 76

3
1
min
• Per accendere Pop, premere e rilasciare il pulsante
di accensione.
4
09:59
10:00
8
DR FM AUX BTDR FM AUX BTDR FM AUX BTDR FM AUX BTDR FM AUX BTDR FM AUX BTDR FM AUX BTDR FM AUX BTDR FM AUX BTDR FM AUX BTDR FM AUX BTDR FM AUX BTDR FM AUX BTDR FM AUX BTDR FM AUX BTDR FM AUX BTDR FM AUX BTDR FM AUX BTDR FM AUX BTDR FM AUX BTDR FM AUX BTDR FM AUX BTDR FM AUX BTDR FM AUX BTDR FM AUX BTDR FM AUX BTDR FM AUX BTDR FM AUX BTDR FM AUX BTDR FM AUX BTDR FM AUX BTDR FM AUX BTDR FM AUX BTDR FM AUX BTDR FM AUX BTDR FM AUX BTDR FM AUX BTDR FM AUX BTDR FM AUX BTDR FM AUX BTDR FM AUX BTDR FM AUX BTDR FM AUX BTDR
SCAN 14
******
DR FM AUX BTDR FM AUX BTDR FM AUX BTDR FM AUX BTDR FM AUX BTDR FM AUX BTDR FM AUX BTDR FM AUX BTDR FM AUX BTDR FM AUX BTDR FM AUX BTDR FM AUX BTDR FM AUX BTDR FM AUX BTDR FM AUX BTDR FM AUX BTDR FM AUX BTDR FM AUX BTDR FM AUX BTDR FM AUX BTDR FM AUX BTDR FM AUX BTDR FM AUX BTDR FM AUX BTDR FM AUX BTDR FM AUX BTDR FM AUX BTDR FM AUX BTDR FM AUX BTDR FM AUX BTDR FM AUX BTDR FM AUX BTDR FM AUX BTDR FM AUX BTDR FM AUX BTDR FM AUX BTDR FM AUX BTDR FM AUX BTDR FM AUX BTDR FM AUX BTDR FM AUX BTDR FM AUX BTDR FM AUX BTDR
• Attendere che Pop completi la sintonizzazione
automatica per tutte le stazioni radio digitali
disponibili.
• Una volta completata la sintonizzazione
automatica, verrà selezionata una stazione radio
digitale.
Page 77

Utilizzo
PM
DR
PM
M
DR FM AUX BTDR FM AUX BTDR FM AUX BTDR FM AUX BTDR FM AUX BTDR FM AUX BTDR FM AUX BTDR FM AUX BTDR FM AUX BTDR FM AUX BTDR FM AUX BTDR FM AUX BTDR FM AUX BTDR FM AUX BTDR FM AUX BTDR FM AUX BTDR FM AUX BTDR FM AUX BTDR FM AUX BTDR FM AUX BTDR FM AUX BTDR FM AUX BTDR FM AUX BTDR FM AUX BTDR FM AUX BTDR FM AUX BTDR FM AUX BTDR FM AUX BTDR FM AUX BTDR FM AUX BTDR FM AUX BTDR FM AUX BTDR FM AUX BTDR FM AUX BTDR FM AUX BTDR FM AUX BTDR FM AUX BTDR FM AUX BTDR FM AUX BTDR FM AUX BTDR FM AUX BTDR FM AUX BTDR FM AUX BTDR
10:00
DR FM AUX BTDR FM AUX BTDR FM AUX BTDR FM AUX BTDR FM AUX BTDR FM AUX BTDR FM AUX BTDR FM AUX BTDR FM AUX BTDR FM AUX BTDR FM AUX BTDR FM AUX BTDR FM AUX BTDR FM AUX BTDR FM AUX BTDR FM AUX BTDR FM AUX BTDR FM AUX BTDR FM AUX BTDR FM AUX BTDR FM AUX BTDR FM AUX BTDR FM AUX BTDR FM AUX BTDR FM AUX BTDR FM AUX BTDR FM AUX BTDR FM AUX BTDR FM AUX BTDR FM AUX BTDR FM AUX BTDR FM AUX BTDR FM AUX BTDR FM AUX BTDR FM AUX BTDR FM AUX BTDR FM AUX BTDR FM AUX BTDR FM AUX BTDR FM AUX BTDR FM AUX BTDR FM AUX BTDR FM AUX BTDR
10:00
DR FM AUX BTDR FM AUX BTDR FM AUX BTDR FM AUX BTDR FM AUX BTDR FM AUX BTDR FM AUX BTDR FM AUX BTDR FM AUX BTDR FM AUX BTDR FM AUX BTDR FM AUX BTDR FM AUX BTDR FM AUX BTDR FM AUX BTDR FM AUX BTDR FM AUX BTDR FM AUX BTDR FM AUX BTDR FM AUX BTDR FM AUX BTDR FM AUX BTDR FM AUX BTDR FM AUX BTDR FM AUX BTDR FM AUX BTDR FM AUX BTDR FM AUX BTDR FM AUX BTDR FM AUX BTDR FM AUX BTDR FM AUX BTDR FM AUX BTDR FM AUX BTDR FM AUX BTDR FM AUX BTDR FM AUX BTDR FM AUX BTDR FM AUX BTDR FM AUX BTDR FM AUX BTDR FM AUX BTDR FM AUX BTDR
10:00
DR FM AUX BTDR FM AUX BTDR FM AUX BTDR FM AUX BTDR FM AUX BTDR FM AUX BTDR FM AUX BTDR FM AUX BTDR FM AUX BTDR FM AUX BTDR FM AUX BTDR FM AUX BTDR FM AUX BTDR FM AUX BTDR FM AUX BTDR FM AUX BTDR FM AUX BTDR FM AUX BTDR FM AUX BTDR FM AUX BTDR FM AUX BTDR FM AUX BTDR FM AUX BTDR FM AUX BTDR FM AUX BTDR FM AUX BTDR FM AUX BTDR FM AUX BTDR FM AUX BTDR FM AUX BTDR FM AUX BTDR FM AUX BTDR FM AUX BTDR FM AUX BTDR FM AUX BTDR FM AUX BTDR FM AUX BTDR FM AUX BTDR FM AUX BTDR FM AUX BTDR FM AUX BTDR FM AUX BTDR FM AUX BTDR FM
10:00
DR FM AUX BTDR FM AUX BTDR FM AUX BTDR FM AUX BTDR FM AUX BTDR FM AUX BTDR FM AUX BTDR FM AUX BTDR FM AUX BTDR FM AUX BTDR FM AUX BTDR FM AUX BTDR FM AUX BTDR FM AUX BTDR FM AUX BTDR FM AUX BTDR FM AUX BTDR FM AUX BTDR FM AUX BTDR FM AUX BTDR FM AUX BTDR FM AUX BTDR FM AUX BTDR FM AUX BTDR FM AUX BTDR FM AUX BTDR FM AUX BTDR FM AUX BTDR FM AUX BTDR FM AUX BTDR FM AUX BTDR FM AUX BTDR FM AUX BTDR FM AUX BTDR FM AUX BTDR FM AUX BTDR FM AUX BTDR FM AUX BTDR FM AUX BTDR FM AUX BTDR FM AUX BTDR FM AUX BTDR FM AUX BTDR FM
10:00
DR FM AUX BTDR FM AUX BTDR FM AUX BTDR FM AUX BTDR FM AUX BTDR FM AUX BTDR FM AUX BTDR FM AUX BTDR FM AUX BTDR FM AUX BTDR FM AUX BTDR FM AUX BTDR FM AUX BTDR FM AUX BTDR FM AUX BTDR FM AUX BTDR FM AUX BTDR FM AUX BTDR FM AUX BTDR FM AUX BTDR FM AUX BTDR FM AUX BTDR FM AUX BTDR FM AUX BTDR FM AUX BTDR FM AUX BTDR FM AUX BTDR FM AUX BTDR FM AUX BTDR FM AUX BTDR FM AUX BTDR FM AUX BTDR FM AUX BTDR FM AUX BTDR FM AUX BTDR FM AUX BTDR FM AUX BTDR FM AUX BTDR FM AUX BTDR FM AUX BTDR FM AUX BTDR FM AUX BTDR FM AUX BTDR FM
10:00
DR FM AUX BTDR FM AUX BTDR FM AUX BTDR FM AUX BTDR FM AUX BTDR FM AUX BTDR FM AUX BTDR FM AUX BTDR FM AUX BTDR FM AUX BTDR FM AUX BTDR FM AUX BTDR FM AUX BTDR FM AUX BTDR FM AUX BTDR FM AUX BTDR FM AUX BTDR FM AUX BTDR FM AUX BTDR FM AUX BTDR FM AUX BTDR FM AUX BTDR FM AUX BTDR FM AUX BTDR FM AUX BTDR FM AUX BTDR FM AUX BTDR FM AUX BTDR FM AUX BTDR FM AUX BTDR FM AUX BTDR FM AUX BTDR FM AUX BTDR FM AUX BTDR FM AUX BTDR FM AUX BTDR FM AUX BTDR FM AUX BTDR FM AUX BTDR FM AUX BTDR FM AUX BTDR FM AUX BTDR FM AUX BTDR FM
10:00
STATIONS
BBC R3
BBC R3
TUNING
DRF
107\60
107\60
SCANNING
Ascolto della radio
digitale
Premere il pulsante Source per passare alla radio
digitale.
Modifica delle stazioni digitali
1. Agire su < > per scorrere l'elenco di stazioni
preselezionate.
2. Una volta trovata la stazione che si desidera
ascoltare, premere il pulsante Select .
Ascolto di radio FM
Premere il pulsante Source per passare alla radioFM.
Modifica stazioni FM
Sintonizzazione manuale
Agire su < > per aumentare o diminuire la frequenza
per passi di 0,05 MHz.
Sintonizzazione
Premere e tenere premuti i pulsanti < > per cercare
una stazione radio FM successiva o precedente con
un forte segnale.
IT
9
Page 78

Memorizzazione e richiamo delle
preselezioni
È possibile memorizzare un massimo di 10 stazioni radio digitali e 10 stazioni FM
di accesso rapido.
10:00
10:00
10:00
10:00
10:00
10:00
10:00
10
DR FM AUX BTDR FM AUX BTDR FM AUX BTDR FM AUX BTDR FM AUX BTDR FM AUX BTDR FM AUX BTDR FM AUX BTDR FM AUX BTDR FM AUX BTDR FM AUX BTDR FM AUX BTDR FM AUX BTDR FM AUX BTDR FM AUX BTDR FM AUX BTDR FM AUX BTDR FM AUX BTDR FM AUX BTDR FM AUX BTDR FM AUX BTDR FM AUX BTDR FM AUX BTDR FM AUX BTDR FM AUX BTDR FM AUX BTDR FM AUX BTDR FM AUX BTDR FM AUX BTDR FM AUX BTDR FM AUX BTDR FM AUX BTDR FM AUX BTDR FM AUX BTDR FM AUX BTDR FM AUX BTDR FM AUX BTDR FM AUX BTDR FM AUX BTDR FM AUX BTDR FM AUX BTDR FM AUX BTDR FM AUX BTDR
DR FM AUX BTDR FM AUX BTDR FM AUX BTDR FM AUX BTDR FM AUX BTDR FM AUX BTDR FM AUX BTDR FM AUX BTDR FM AUX BTDR FM AUX BTDR FM AUX BTDR FM AUX BTDR FM AUX BTDR FM AUX BTDR FM AUX BTDR FM AUX BTDR FM AUX BTDR FM AUX BTDR FM AUX BTDR FM AUX BTDR FM AUX BTDR FM AUX BTDR FM AUX BTDR FM AUX BTDR FM AUX BTDR FM AUX BTDR FM AUX BTDR FM AUX BTDR FM AUX BTDR FM AUX BTDR FM AUX BTDR FM AUX BTDR FM AUX BTDR FM AUX BTDR FM AUX BTDR FM AUX BTDR FM AUX BTDR FM AUX BTDR FM AUX BTDR FM AUX BTDR FM AUX BTDR FM AUX BTDR FM AUX BTDR
PRESET 2
STORED
DR FM AUX BTDR FM AUX BTDR FM AUX BTDR FM AUX BTDR FM AUX BTDR FM AUX BTDR FM AUX BTDR FM AUX BTDR FM AUX BTDR FM AUX BTDR FM AUX BTDR FM AUX BTDR FM AUX BTDR FM AUX BTDR FM AUX BTDR FM AUX BTDR FM AUX BTDR FM AUX BTDR FM AUX BTDR FM AUX BTDR FM AUX BTDR FM AUX BTDR FM AUX BTDR FM AUX BTDR FM AUX BTDR FM AUX BTDR FM AUX BTDR FM AUX BTDR FM AUX BTDR FM AUX BTDR FM AUX BTDR FM AUX BTDR FM AUX BTDR FM AUX BTDR FM AUX BTDR FM AUX BTDR FM AUX BTDR FM AUX BTDR FM AUX BTDR FM AUX BTDR FM AUX BTDR FM AUX BTDR FM AUX BTDR
CLASSIC
MOZART
DR FM AUX BTDR FM AUX BTDR FM AUX BTDR FM AUX BTDR FM AUX BTDR FM AUX BTDR FM AUX BTDR FM AUX BTDR FM AUX BTDR FM AUX BTDR FM AUX BTDR FM AUX BTDR FM AUX BTDR FM AUX BTDR FM AUX BTDR FM AUX BTDR FM AUX BTDR FM AUX BTDR FM AUX BTDR FM AUX BTDR FM AUX BTDR FM AUX BTDR FM AUX BTDR FM AUX BTDR FM AUX BTDR FM AUX BTDR FM AUX BTDR FM AUX BTDR FM AUX BTDR FM AUX BTDR FM AUX BTDR FM AUX BTDR FM AUX BTDR FM AUX BTDR FM AUX BTDR FM AUX BTDR FM AUX BTDR FM AUX BTDR FM AUX BTDR FM AUX BTDR FM AUX BTDR FM AUX BTDR FM AUX BTDR
PRESET 5
EMPTY
DR FM AUX BTDR FM AUX BTDR FM AUX BTDR FM AUX BTDR FM AUX BTDR FM AUX BTDR FM AUX BTDR FM AUX BTDR FM AUX BTDR FM AUX BTDR FM AUX BTDR FM AUX BTDR FM AUX BTDR FM AUX BTDR FM AUX BTDR FM AUX BTDR FM AUX BTDR FM AUX BTDR FM AUX BTDR FM AUX BTDR FM AUX BTDR FM AUX BTDR FM AUX BTDR FM AUX BTDR FM AUX BTDR FM AUX BTDR FM AUX BTDR FM AUX BTDR FM AUX BTDR FM AUX BTDR FM AUX BTDR FM AUX BTDR FM AUX BTDR FM AUX BTDR FM AUX BTDR FM AUX BTDR FM AUX BTDR FM AUX BTDR FM AUX BTDR FM AUX BTDR FM AUX BTDR FM AUX BTDR FM AUX BTDR
PRESET 6
STORED
DR FM AUX BTDR FM AUX BTDR FM AUX BTDR FM AUX BTDR FM AUX BTDR FM AUX BTDR FM AUX BTDR FM AUX BTDR FM AUX BTDR FM AUX BTDR FM AUX BTDR FM AUX BTDR FM AUX BTDR FM AUX BTDR FM AUX BTDR FM AUX BTDR FM AUX BTDR FM AUX BTDR FM AUX BTDR FM AUX BTDR FM AUX BTDR FM AUX BTDR FM AUX BTDR FM AUX BTDR FM AUX BTDR FM AUX BTDR FM AUX BTDR FM AUX BTDR FM AUX BTDR FM AUX BTDR FM AUX BTDR FM AUX BTDR FM AUX BTDR FM AUX BTDR FM AUX BTDR FM AUX BTDR FM AUX BTDR FM AUX BTDR FM AUX BTDR FM AUX BTDR FM AUX BTDR FM AUX BTDR FM AUX BTDR
RECALL
6 CLASS
DR FM AUX BTDR FM AUX BTDR FM AUX BTDR FM AUX BTDR FM AUX BTDR FM AUX BTDR FM AUX BTDR FM AUX BTDR FM AUX BTDR FM AUX BTDR FM AUX BTDR FM AUX BTDR FM AUX BTDR FM AUX BTDR FM AUX BTDR FM AUX BTDR FM AUX BTDR FM AUX BTDR FM AUX BTDR FM AUX BTDR FM AUX BTDR FM AUX BTDR FM AUX BTDR FM AUX BTDR FM AUX BTDR FM AUX BTDR FM AUX BTDR FM AUX BTDR FM AUX BTDR FM AUX BTDR FM AUX BTDR FM AUX BTDR FM AUX BTDR FM AUX BTDR FM AUX BTDR FM AUX BTDR FM AUX BTDR FM AUX BTDR FM AUX BTDR FM AUX BTDR FM AUX BTDR FM AUX BTDR FM AUX BTDR
CLASSIC
MOZART
Per memorizzare in modo rapido
una stazione e richiamarla con un
pulsante di preselezione (1–4)
Sintonizzare la radio sulla stazione digitale o FM da
memorizzare. Per memorizzare la stazione corrente tra
le preselezioni, mantenere premuto uno dei pulsanti
numerati di preselezione (1–4) per due secondi.
Èpossibile sovrascrivere le stazioni preselezionate
esistenti.
Per memorizzare una stazione
nell’elenco di preselezione (1-10)
1. Sintonizzare la radio sulla stazione digitale o FM da
memorizzare.
2.
Premere e tenere premuto il pulsante 5+ per
visualizzare l'elenco numerico delle preselezioni
memorizzate, quindi agire su < > per scegliere
qualsiasi numero preselezionato compreso tra 1 e 10.
È possibile sovrascrivere preselezioni esistenti.
3. Premere il pulsante Select fino a visualizzare il
messaggio "Memorta".
Per richiamare una preselezione
durante l’ascolto di stazioni radio
digitali o FM
Per selezionare le stazioni preselezionate da 1 a 4,
premere il pulsante numerato corrispondente su Pop
(da 1 a 4).
Per accedere all'elenco delle stazioni preselezionate
(da1 a 10)
1. Premere e rilasciare il pulsante 5+.
2. Agire su < > per scorrere l'elenco delle stazioni
preselezionate e poi premere il pulsante Select per
sintonizzarsi su quella desiderata.
Page 79

Utilizzo dell’ingresso ausiliario
È possibile utilizzare l’ingresso ausiliario di Pop per riprodurre la musica da tablet
o smartphone su Pop.
Nota:
durante la riproduzione di musica dall’ingresso ausiliario di Pop, per
regolare il volume occorre utilizzare i tasti per la regolazione del volume su tablet
o smartphone
Collegare un dispositivo ausiliario a Pop
Con un cavo adeguato, collegare la presa “line out” o la presa per cuffie del
dispositivo ausiliario alla presa Aux In di Pop.
Selezione dell’ingresso ausiliario
10:00
10:00
.
DR FM AUX BTDR FM AUX BTDR FM AUX BTDR FM AUX BTDR FM AUX BTDR FM AUX BTDR FM AUX BTDR FM AUX BTDR FM AUX BTDR FM AUX BTDR FM AUX BTDR FM AUX BTDR FM AUX BTDR FM AUX BTDR FM AUX BTDR FM AUX BTDR FM AUX BTDR FM AUX BTDR FM AUX BTDR FM AUX BTDR FM AUX BTDR FM AUX BTDR FM AUX BTDR FM AUX BTDR FM AUX BTDR FM AUX BTDR FM AUX BTDR FM AUX BTDR FM AUX BTDR FM AUX BTDR FM AUX BTDR FM AUX BTDR FM AUX BTDR FM AUX BTDR FM AUX BTDR FM AUX BTDR FM AUX BTDR FM AUX BTDR FM AUX BTDR FM AUX BTDR FM AUX BTDR FM AUX BTDR FM AUX BTDR FM AUX
DR FM AUX BTDR FM AUX BTDR FM AUX BTDR FM AUX BTDR FM AUX BTDR FM AUX BTDR FM AUX BTDR FM AUX BTDR FM AUX BTDR FM AUX BTDR FM AUX BTDR FM AUX BTDR FM AUX BTDR FM AUX BTDR FM AUX BTDR FM AUX BTDR FM AUX BTDR FM AUX BTDR FM AUX BTDR FM AUX BTDR FM AUX BTDR FM AUX BTDR FM AUX BTDR FM AUX BTDR FM AUX BTDR FM AUX BTDR FM AUX BTDR FM AUX BTDR FM AUX BTDR FM AUX BTDR FM AUX BTDR FM AUX BTDR FM AUX BTDR FM AUX BTDR FM AUX BTDR FM AUX BTDR FM AUX BTDR FM AUX BTDR FM AUX BTDR FM AUX BTDR FM AUX BTDR FM AUX BTDR FM AUX BTDR FM AUX
AUX
2-4-2015
1.
Premere e lasciare il pulsante Source (sorgente)
fino alla comparsa di “AUX” sul display di Pop.
2. Dal dispositivo ausiliario, selezionare il contenuto
che si desidera ascoltare su Pop.
Pop avvierà la riproduzione del contenuto selezionato
sul dispositivo ausiliario.
IT
11
Page 80

Sveglie e timer
DR FM AUX BTDR FM AUX BTDR FM AUX BTDR FM AUX BTDR FM AUX BTDR FM AUX BTDR FM AUX BTDR FM AUX BTDR FM AUX BTDR FM AUX BTDR FM AUX BTDR FM AUX BTDR FM AUX BTDR FM AUX BTDR FM AUX BTDR FM AUX BTDR FM AUX BTDR FM AUX BTDR FM AUX BTDR FM AUX BTDR FM AUX BTDR FM AUX BTDR FM AUX BTDR FM AUX BTDR FM AUX BTDR FM AUX BTDR FM AUX BTDR FM AUX BTDR FM AUX BTDR FM AUX BTDR FM AUX BTDR FM AUX BTDR FM AUX BTDR FM AUX BTDR FM AUX BTDR FM AUX BTDR FM AUX BTDR FM AUX BTDR FM AUX BTDR FM AUX BTDR FM AUX BTDR FM AUX BTDR FM AUX BT
DR
Nota: se Pop sta funzionando a batterie o con ChargePAK, la sveglia non
funziona se si spegne Pop dopo averla impostata.
Impostazione di una sveglia
Pop dispone di due sveglie che possono accendere
la radio e sintonizzarla su una stazione digitale o FM o
attivare un segnale di allarme.
1. Premere il pulsante Menu e agire su < > per
selezionare "SVEGLIA".
2. Agire su < > per selezionare "SVEGLIA1" o
"SVEGLIA2" e premere il pulsante Select.
3. Agire su < > per selezionare "MEMORIZ." e premere
il pulsante Select.
4. Impostare l'ora della sveglia con i pulsanti < >
e premere Select. Ripetere la procedura per
impostare i minuti della sveglia.
5. Impostare la durata della sveglia con i pulsanti < > e
premere Select.
6.
Agire su < > per selezionare"FM", "DIGITALE"
o "TONO" e premere il pulsante Select per
confermare. Per impostare una sveglia con
suoneria, passare al punto 8.
7. Agire su < > per selezionare la stazione da
trasmettere quando la sveglia si spegne. È possibile
selezionare una delle stazioni preselezionate, oppure
"ULTIMO USO" per scegliere l'ultima stazione
ascoltata. Premere Select per confermare.
8. Selezionare una delle seguenti opzioni di ripetizione
della sveglia utilizzando i pulsanti < >: "OGNI
GIORNO", "FERIALI", "WEEKEND" o "1 VOLTA" e
premere il pulsante Select per confermare.
9. Impostare il volume della radio al momento della
sveglia con i pulsanti < > e premere il pulsante
Select per confermare.
10
. Sul Display viene visualizzata l'icona della sveglia per
indicare che la sveglia è impostata.
7:00
7:00
7:00
7:00
7:00
7:00
7:00
7:00
7:00
7:00
MENU
ALARM
ALARM
ALARM 1
DURATION
45 MIN5
SOURCE
DIGITAL
STATION
LAST USE
REPEAT
DAILY
VOLUME
2
12
Page 81

Annullamento della sveglia
Per annullare una sveglia, premere il pulsante Source, <Select> o Menu.
Ripetizione della sveglia
Per ripetere una sveglia, premere uno dei pulsanti di preselezione. Il tempo di
ripetizione predefinito della sveglia di Pop è di otto minuti. Per modificare il tempo
di ripetizione predefinito di Pop vedere a pagina 17.
Disattivazione di una sveglia
Per disattivare una sveglia dopo averla impostata:
1. Premere il pulsante Menu, agire su < > per selezionare "SVEGLIA" e premere il
pulsante Select.
2. Agire su < > per selezionare la sveglia che si desidera disattivare ("SVEGLIA1" o
"SVEGLIA2") e premere il pulsante Select.
3. Agire su < > per selezionare "SPENTO" e premere il pulsante Select.
4
.
L'icona della sveglia sul Display di Pop si spegne a indicare che la sveglia è
stata disattivata.
Impostazione del timer modalità spegnimento
Il timer di autospegnimento può essere impostato per spegnere Pop dopo un certo
periodo di tempo.
Nota: se Pop funziona a batterie o con ChargePAK, la funzione di autospegnimento
è disabilitata.
1. Premere il pulsante Menu.
2. Agire su < > per selezionare "AUTOSPEGNIMENTO" e premere il pulsante
Select.
3. Agire su < > e premere il pulsante Select per impostare il timer fino a 90 minuti
oppure scegliere SPENTO per annullare.
Impostazione del timer da cucina
Pop dispone di un timer di conto alla rovescia da cucina che attiva un allarme dopo
un periodo preimpostato.
1. Premere il pulsante Menu.
2. Agire su < > per selezionare timer"" e premere il pulsante Select.
3. Agire su < > per cambiare l'ora e premere il pulsante Select.
4. Agire nuovamente sui pulsanti < > per modificare i minuti e premere per
confermare e avviare il timer di conto alla rovescia.
La sveglia scatterà dopo il periodo di tempo impostato, che la radio sia accesa o
in standby. Per annullare la suoneria beep, premere il pulsante Source, <Select>
o Menu.
IT
13
Page 82

Opzioni e impostazioni
Impostazioni generali
Modifica della lingua visualizzata sul Display
Per cambiare la lingua del Display di Pop tra Inglese, Francese, Tedesco, Italiano e
Spagnolo:
1. Premere il pulsante Menu.
2. Agire su < > per selezionare "IMPOSTAZIONI" e premere il pulsante Select.
3. Agire su < > per selezionare "LINGUA" e premere il pulsante Select.
4. Agire su < > e premere il pulsante Select per scegliere la lingua che si desidera
visualizzare sul Display di Pop.
Ripristino delle impostazioni predefinite di Pop
Il reset di Pop rimuove tutte le preselezioni, elimina l’elenco delle stazioni e ripristina tutte
le impostazioni predefinite. Per ripristinare le impostazioni predefinite:
1. Premere il pulsante Menu.
2. Agire su < > per selezionare "IMPOSTAZIONI" e premere il pulsante Select.
3. Agire su < > per selezionare "RESET" e premere il pulsante Select.
4. Agire su < > per selezionare "Sì" e premere il pulsante Select.
Visualizzazione della versione software di Pop
Per conoscere l'attuale versione software di Pop:
1. Premere il pulsante Menu.
2. Agire su < > per selezionare "IMPOSTAZIONI" e premere il pulsante Select.
3. Agire su < > per selezionare "VERSIONE" e premere il pulsante Select.
Aggiornamento di Pop all'ultima versione software
Per ulteriori informazioni su come installare la versione software più aggiornata di Pop,
contattare l'assistenza tecnica Pure (http://support-uk.pure.com).
14
Page 83

Impostazioni audio
È possibile utilizzare il menu audio di Pop per regolare i bassi e gli acuti.
1. Premere il pulsante Menu.
2. Agire su < > per selezionare "Audio" e premere il pulsante Select.
3. Agire su < > per selezionare "BASSI" o "ACUTI" e premere il pulsante Select.
4. Agire su < > per regolare il livello dei bassi o degli acuti. Il livello può essere scelto
tra "-3" e "+3".
5. Premere il pulsante Select per confermare il livello dei bassi o degli acuti.
Impostazioni del Display
Regolazione della luminosità del Display
È possibile regolare la luminosità del Display con Pop accesa o in standby. Per modificare
la luminosità del Display di Pop:
1. Premere il pulsante Menu.
2. Agire su < > per selezionare "Display" e premere il pulsante Select.
3. Agire su < > per selezionare "Retroillum." e premere il pulsante Select.
4. Agire su < > per selezionare "ATTIVA" e premere il pulsante Select per modificare le
impostazioni da applicare all'accensione di Pop oppure agire su < > per selezionare
"STANDBY" e premere il pulsante Select per modificare le impostazioni da applicare
in standby.
5. Agire su < > per selezionare "LIVELLO" e premere il pulsante Select.
6. Agire su < > per scegliere il livello di luminosità tra "1" e "5".
7. Premere il pulsante Select per confermare l'impostazione della luminosità.
Regolazione della durata dell'accensione della retroilluminazione
La durata dell'accensione della retroilluminazione di Pop può essere regolata:
1. Premere il pulsante Menu.
2. Agire su < > per selezionare "Display" e premere il pulsante Select.
3. Agire su < > per selezionare "Retroillum." e premere il pulsante Select.
4. Agire su < > per selezionare "ATTIVA" e premere il pulsante Select per modificare le
impostazioni da applicare all'accensione di Pop oppure agire su < > per selezionare
"STANDBY" e premere il pulsante Select per modificare le impostazioni da applicare
in standby.
5. Agire su < > per selezionare "DURATA" e premere il pulsante Select.
6. Agire su < > e premere il pulsante Select per selezionare una delle opzioni seguenti:
ACCESO: selezionare questa opzione se si desidera che la retroilluminazione rimanga
sempre accesa.
SPENTO: selezionare questa opzione se si desidera che la retroilluminazione si spenga
dopo 10 secondi.
IT
15
Page 84

Modifica delle informazioni sul Display di Pop
Se si ascolta una stazione radio digitale o FM, è possibile selezionare i dati
visualizzati sul Display di Pop:
1. Premere il pulsante Menu.
2. Agire su < > per selezionare "Display" e premere il pulsante Select.
3. Agire su < > per selezionare "Info" e premere il pulsante Select.
4. Agire su < > e premere il pulsante Select per selezionare una delle opzioni
seguenti:
TESTO: selezionare questa opzione se si desidera visualizzare le informazioni
trasmesse dalla stazione che si sta ascoltando. Le informazioni visualizzate
possono includere titoli di canzoni, dati sul programma, notizie, ecc.
INTENSITÀ: selezionare questa opzione se si desidera visualizzare la
potenza del segnale della stazione radio che si sta ascoltando. Il numero di
asterischi indica l'affidabilità del livello di ricezione.
Data: selezionare questa opzione se si desidera visualizzare la data attuale.
Impostazioni dell'orologio
Impostazione di ora e data
L'ora e la data di Pop vengono impostate automaticamente tramite il segnale
della radio FM o digitale. Se l'ora/data su Pop non si aggiorna automaticamente,
èpossibile impostarla manualmente.
1. Premere il pulsante Menu.
2. Agire su < > per selezionare "OROLOGIO" e premere il pulsante Select.
3. Agire su < > per selezionare"ora/data" e premere il pulsante Select.
4. Agire su < > per impostare l'ora e premere Select. Ripetere per regolare i minuti.
5. Agire su < > per impostare il giorno e premere Select. Ripetere per regolare il
mese e l'anno.
Modifica del formato dell'ora
1. Premere il pulsante Menu.
2. Agire su < > per selezionare "OROLOGIO" e premere il
3. Agire su < > per selezionare "12/24 ORE" e premere il pulsante
4. Agire su < > per scegliere "12 ORE" o "24 ORE" e premere il pulsante
confermare.
pulsante Select.
Select
.
Select
per
16
Page 85

Modifica del formato della data
1. Premere il pulsante Menu.
2. Agire su < > per selezionare "OROLOGIO" e premere il pulsante Select.
3. Agire su < > per selezionare "FORMATO" e premere il pulsante Select.
4. Agire su < > per scegliere il formato di visualizzazione della data tra giorno/
mese/anno "GG-MM-AAAA" e mese/giorno/anno "MM-GG-AAAA" e premere
il pulsante
Select
per confermare.
Opzioni di sincronizzazione dell'orologio
È possibile scegliere le sorgenti radio da utilizzare per l'impostazione dell'ora.
Per impostazione predefinita, Pop utilizza segnali radio sia FM che digitali per la
sincronizzazione dell'ora.
Per selezionare le opzioni di sincronizzazione dell'orologio:
1. Premere il pulsante Menu.
2. Agire su < > per selezionare "OROLOGIO" e premere il pulsante Select.
3. Agire su < > per selezionare "SINCRONIZZA SU" e premere il pulsante Select.
4. Agire su < > per scegliere l'opzione di sincronizzazione dell'orologio desiderata
e premere il pulsante
Select
per confermare.
Modifica della durata della funzione Snooze
È possibile modificare l'intervallo di tempo che deve trascorrere prima della
ripetizione della sveglia quando si preme uno dei pulsanti di preselezione di Pop
mentre la sveglia sta suonando. Il tempo di ripetizione predefinito della sveglia di
Pop è di otto minuti.
Per cambiare il tempo di ripetizione di Pop:
1. Premere il pulsante Menu.
2. Agire su < > per selezionare "OROLOGIO" e premere il pulsante Select.
3. Agire su < > per selezionare "SNOOZE" e premere il pulsante Select.
4. Agire su < > per scegliere il tempo di ripetizione tra "5" e "59" minuti e
premere il pulsante
Select
per confermare.
IT
17
Page 86

FM stereo
Il passaggio dalla ricezione stereo a quella mono e viceversa può essere effettuato
tramite il menu "FM STEREO". Selezionando "MONO" è possibile migliorare la
ricezione di un segnale debole.
Nota: l'opzione "FM STEREO" è visibile solo quando è selezionata "FM" come
sorgente radio.
Per modificare l'impostazione di FM STEREO su Pop:
1. Premere Menu.
2. Agire su < > per selezionare "FM STEREO" e premere il pulsante Select.
3. Agire su < > per scegliere "STEREO" o "MONO" e premere il pulsante Select
per confermare.
18
Page 87

Appendice
Installazione di un ChargePAK D1 o quattro
batterieAA
ChargePAK D1 4 batterie AA
IT
19
Page 88

Sostituzione del rivestimento rimovibile di Pop Midi
20
Page 89

Guida e suggerimenti
Stazioni secondarie e inattive
(</>) Servizi secondari delle radio digitali
Alcune stazioni radio offrono servizi secondari, fornendo informazioni extra
o contenuti alternativi, che potrebbero essere trasmessi solo in determinati
momenti. Se una stazione fornisce servizi secondari, è contrassegnata dal
simbolo ">" a fianco del nome; il servizio è indicato a fianco della stazione
(nell’elenco). Nell’elenco delle stazioni, il servizio secondario viene indicato con il
simbolo "<" riportato prima del nome.
(?) Stazioni radio digitali inattive o non disponibili
Le stazioni inattive o non disponibili appaiono nell’elenco delle stazioni precedute
da "?" Non è possibile sintonizzarsi su queste stazioni. Una stazione può
essere inattiva o non disponibile perché non sta trasmettendo al momento
della sintonizzazione (verificare l'elenco dei programmi) o ha interrotto tutte le
trasmissioni. È anche possibile che il segnale per la ricezione della stazione radio
non sia abbastanza potente.
Domande e risposte
Il Display indica "NESSUNA STAZIONE"
Premere il pulsante Autotune sul retro di Pop per cercare le stazioni digitali.
Regolare la posizione dell’antenna o della radio.
Ricezione di nuove stazioni radio digitali che hanno appena iniziato a
trasmettere
Premere il pulsante Autotune sul retro di Pop per cercare nuove stazioni digitali.
Regolare la posizione dell’antenna o della radio.
IT
21
Page 90

Caratteristiche tecniche
Radio Radio digitale ed FM
Frequenze
Altoparlante
Uscita alimentazione
audio
Connettori in ingresso Presa adattatore da 5,5 V CC (230 V in dotazione),
Connettori in uscita Presa cuffie stereo da 3,5 mm
Stazioni preselezionate 10 stazioni radio digitali e 10 stazioni FM
Alimentazione Adattatore esterno da 230 V CA a 5,5 V CC
Consumo di energia Standby con visualizzazione orologio: 0,55 W, In
Dimensioni 93 mm larghezza x 173 mm altezza x 102 mm
Antenna Antenna telescopica
Versione software V1.0
Approvazioni Marchio CE. Con la presente, Pure International
DAB/DAB+, FM radio 87,5-108 MHz
Unità di comando 3
4,3 W RMS
ingresso di linea da 3,5 mm per dispositivi ausiliari
preselezionabili
(2,0 A) (indotazione) oppure batteria ricaricabile
ChargePAK D1 opzionale o quattro batterie AA
funzione: 0,92 W
profondità
Limited dichiara che il modello di radio Pop Midi
è conforme ai requisiti essenziali della direttiva
RED 2014/53/UE.
Il testo intero della Dichiarazione di Conformità UE è
disponibile al seguente indirizzo internet:
http://www.pure.com/about/red
" full-range
22
Page 91

Pop Midi
EN
Tak, fordi du har valgt Pop Midi. Denne manual er
tænkt som en hjælp til at komme hurtigt i gang med
at bruge produktet og beskriver, hvordan du får størst
udbytte af de fantastiske funktioner.
DE
FR
IT
NO
NO
DA
DA
NL
1
Page 92

Sikkerhet
Sikkerhetsinformasjon
1. G jør deg kjent med a lle sikkerhetsr eglene og -anvis ningene før du tar r adioen i bruk. Hvi s du gir denne radioe n videre til andre,
må du også sø rge for at de får med al le relevante dokum enter.
2. A pparatet må ikke utse ttes for sprut ell er dråper. Gjenstan der som er fylt me d vann - for eksempe l vaser - må ikke sette s
oppå appa ratet. Hvis du søler va nn eller annen væ ske på radioen, må du sl å den av, koble den fra strø mnettet og kontak te
forhand leren. Ikke ta på stø pslet eller selve r adioen med våte hen der. Ikke trekk i lednin gen når du kobler str ømadapteren fra
strømforsyningen.
3. Ek splosjonsfare h vis batteriet ikk e skiftes rikti g (pass på riktig p olaritet). Må bare sk iftes ut med samm e eller tilsvaren de type (4
x AA). Batte riet (ChargePAK D1) må ikke ut settes for sterk var me som sollys, ild el ler lignende. Ho ld nye og brugte batte rier og
ChargePAK s væk fra børn. Ta hensyn til m iljøet ved kasse ring av batterier.
4. B ruk av radioen i rom el ler klima med høy f uktighet og hø ye temperaturer ka n føre til kondensda nnelse inni radi oen, og dette kan
skade rad ioen. Bruk appar atet bare i middels var mt klima.
5. Unngå ekstr eme temperature r, både ekstr em varme og ekstre m kulde. Plasser a pparatet på trygg av stand fra varmek ilder som
radiatore r, gassovn er og elektris ke ovner. Det må ikke sette ts varmekilder m ed åpen flamme, s om tente stearinly s, oppå apparatet
6. Strømadapteren brukes som frakoblingsenhet, og frakoblingsenheten må alltid være lett tilgjengelig.
Koble strømada pteren til en lett til gjengelig stik kontakt i nærhete n av enheten, og ikke br uk strømadaptere n til noe annet enn
åkoble til det te produktet.
7. B ruk bare strømada pteren som er spesi fisert i bruks anvisningen. (l evert av Pure, med mo dellnummer ZDD 055200,
ZDD055200BS, SW055200-NM eller SW055200-N01).
8. Ko ntroller før bruk at d en tilgjengeli ge tilførselss penningen stem mer med påkrevd dr iftsspennin g for radioen.
9. Ko ble radioen fra str ømforsyningen h vis du ikke skal bru ke den på en stund (f.eks. hvi s du reiser på ferie).
10. Koble all tid radioen fra sti kkontakten før re ngjøring. Ikke re ngjør radioen me d slipende svamp er eller slipen de
rengjøringsløsninger, for dette kan skade radioens overflate.
11. For å redus ere faren for elek trisk støt må du ik ke fjerne noen sk ruer. Det er ingen del er inni radioen so m skal vedlikehol des av
brukeren. Overlat vedlikeholdet til autoriserte fagfolk.
12. Sørg for tilstrækkelig ventilation omkring produktet, især ved opladning.
Sikkerhetsanvisninger for det oppladbare batteriet ChargePAK D1
1. Les bruksa nvisningen fo r ChargePAK i dette dok umentet.
2. Bruk Charg ePAK bare med origi nale Pure-prod ukter. Bruk bare den o riginale Pure Ch argePAK D1. Eksplosjonsf are hvis batteri et ikke
skifte s riktig (pass p å riktig polari tet). Må bare skifte s ut med samme ell er tilsvarende t ype.
3. Oppbevar C hargePAK på et kjøli g og tørt sted ved no rmal romtemper atur. Ta batteri et ut av radioen hvis d en settes til oppb evaring
eller ik ke skal brukes i len gre tid.
4. ChargePAK må i kke punkteres, m istes, kastes elle r utsettes for unø dvendige stø t. Feil behandlin g kan medføre fare f or brann,
eksplosjon eller kjemisk forbrenning.
5. Ikke kast Ch argePAK på åpen ild el ler i et forbrenni ngsanlegg, og i kke legg ChargePAK f ra deg på varme sted er slik som i en bil
somstår mi dt i solsteiken. Må ik ke oppbevares i næ rheten av en komfy r, ovn eller a ndre varmekil der.
6. ChargePAK må i kke kobles direk te til en elektri sk kilde som for eks empel en stikko ntakt eller et st rømuttak i en bil. M å aldri plasser es
i en mikrob ølgeovn eller a ndre høytr ykksbeholde re.
7. ChargePAK må a ldri senkes ned i va nn, og aldri utset tes for væsker på and re måter.
8. ChargePAK må i kke kortslutte s.
9. Ikke bruk el ler lad opp et Charg ePAK-batteri som lek ker, er misfarget, rus tent eller deform ert, lukter rar t eller er unor malt på andre
må ter.
10. Berø r aldri et Charge PAK-batteri som lekke r, med bare hender. Fjern b atteriet og avhe nd det forskrif tsmessig. Hus k å bruke
vernehansker.
11. Skal oppbevares utilgjengelig for barn.
12. ChargePAK skal avhendes som vanlige, oppladbare batterier i henhold til lokale lover og forskrifter.
Symboler på produktet og i bruksanvisningen
Dette ADVARSEL-symbolet brukes i veiledningen for å angi en potensielt alvorlig fare for din personlige sikkerhet.
Følg alle sikkerhetsanvisningene etter dette symbolet, for å unngå faren for personskader eller død.
Dette symbolet brukes på produktet for å varsle om at anvisningene bør leses før bruk.
Dette symbolet angir likespenning.
Symbolet angir en USB-port for maksimalt 2 ampere (A).
2A
2
Page 93

Indhold
4 Indledning
4 Toppanel
5 Bagpanel
6 Display
7 Sådan kommer du i gang
7 Hurtig opsætning
9 Brug af Pop
9 Afspilning af DAB-radio
9 Afspilning af FM-radio
10 Lagring og valg af faste stationer
10 Hurtig lagring af en fast station (1-4)
10 Sådan gemmes en fast station (1-10)
10 Valg af en fast station under lytning til en DAB- eller FM-station
11 Brug af Aux-indgangen
12 Alarmer og timere
12 Indstilling af en alarm
13 Afbryd en alarm
13 Afbryd alarm
13 Deaktivering af en alarm
13 Indstilling af dvaletimeren
13 Indstilling af minuturet
14 Valgmuligheder og indstillinger
14 Generelle indstillinger
15 Audioindstillinger
15 Displayindstillinger
16 Urindstillinger
18 FM-stereo
19 Bilag
19 Installation af ChargePAK D1 eller fire AA-batterier
20 Udskiftning af den aftagelige kappe på Pop Midi
21 Hjælp og råd
22 Tekniske specifikationer
NO
DA
3
Page 94

Indledning
Toppanel
D
C
E
A
A. Knap til tænd/sluk samt indstilling af lydstyrke: Tryk for at tænde/
slukke for Pop. Drej for at indstille lydstyrken.
B. Knappen Menu: Tryk for at ændre de forskellige indstillinger på Pop (se
flere oplysninger på side 14).
C. Select-knapper: Tryk for at ændre radiostation (se side 9), eller tryk
for at rulle og vælge menuindstillinger.
D. Source: Tryk for at skifte mellem DAB- og FM-radio.
E. Faste stationer 1 - 5+: Du kan gemme op til 10 faste DAB-stationer eller
10 FM-stationer (se flere oplysninger på side 10).
4
B
Page 95

Bagpanel
F
G H
I
J
F. Antenne: Drej antennen, og træk den helt ud, for at opnå den bedste
signalmodtagelse.
G. Stik til stereohovedtelefoner (3,5 mm)
H. Knappen Autotune: Tryk for at udføre en automatisk scanning for nye
DAB-stationer og fjerne inaktive stationer.
I. AUX-indgang (3,5 mm): Analog stereoindgang til iPod, mp3-afspiller mm.
J. 5,5 V Micro-B USB-stik: Må kun sluttes til den medfølgende
strømforsyningsadapter.
NO
DA
5
Page 96

Display
BBC R2
7:00
1. Viser klokkeslæt.
2. ChargePAK- eller batteriindikator.
3. Kildeindikator (DR= DAB-radio, FM= FM-radio, AUX= AUX-indgang).
4. Stationens navn.
5. Signalstyrke
6. Lydstyrkeindikator.
7. Viser dato, rulletekst, indstilling og stationsoplysninger (se side 16).
8. AM/PM-indikator
9. Alarmindstillingsindikator (se side 12).
10. Sleeptimer- og køkkenursindikator (se side 13).
11. Slumreindikator (side 13).
6
TOP 40
Page 97

Sådan kommer du i gang
Hurtig opsætning
Bemærk! Hvis du har et genopladeligt ChargePAK D1-batteri (sælges separat)
eller genopladelige AA-batterier, skal de isættes nu, før Pop tilsluttes. Læs mere
på side 19.
1
1
1
B
• Drej antennen, og træk den helt ud
(trin A og B).
A
C
2
2
2
• Sæt bøsningen på den
medfølgende lysnetadapter i
indgangsstikket bag på radioen (C).
NO
DA
• Sæt lysnetadapteren i stikkontakten (D).
D
7
Page 98

3
1
min
• Tryk på og slip tænd/sluk-knappen for at tænde
for Pop.
4
09:59
10:00
8
DR FM AUX BTDR FM AUX BTDR FM AUX BTDR FM AUX BTDR FM AUX BTDR FM AUX BTDR FM AUX BTDR FM AUX BTDR FM AUX BTDR FM AUX BTDR FM AUX BTDR FM AUX BTDR FM AUX BTDR FM AUX BTDR FM AUX BTDR FM AUX BTDR FM AUX BTDR FM AUX BTDR FM AUX BTDR FM AUX BTDR FM AUX BTDR FM AUX BTDR FM AUX BTDR FM AUX BTDR FM AUX BTDR FM AUX BTDR FM AUX BTDR FM AUX BTDR FM AUX BTDR FM AUX BTDR FM AUX BTDR FM AUX BTDR FM AUX BTDR FM AUX BTDR FM AUX BTDR FM AUX BTDR FM AUX BTDR FM AUX BTDR FM AUX BTDR FM AUX BTDR FM AUX BTDR FM AUX BTDR FM AUX BTDR
SCAN 14
******
DR FM AUX BTDR FM AUX BTDR FM AUX BTDR FM AUX BTDR FM AUX BTDR FM AUX BTDR FM AUX BTDR FM AUX BTDR FM AUX BTDR FM AUX BTDR FM AUX BTDR FM AUX BTDR FM AUX BTDR FM AUX BTDR FM AUX BTDR FM AUX BTDR FM AUX BTDR FM AUX BTDR FM AUX BTDR FM AUX BTDR FM AUX BTDR FM AUX BTDR FM AUX BTDR FM AUX BTDR FM AUX BTDR FM AUX BTDR FM AUX BTDR FM AUX BTDR FM AUX BTDR FM AUX BTDR FM AUX BTDR FM AUX BTDR FM AUX BTDR FM AUX BTDR FM AUX BTDR FM AUX BTDR FM AUX BTDR FM AUX BTDR FM AUX BTDR FM AUX BTDR FM AUX BTDR FM AUX BTDR FM AUX BTDR
• Vent, til Pop har udført automatisk indstilling af alle
tilgængelige DAB-radiostationer.
• Når den automatiske indstilling er udført, vælges
en DAB-station.
Page 99

Brug af Pop
PM
DR
PM
M
DR FM AUX BTDR FM AUX BTDR FM AUX BTDR FM AUX BTDR FM AUX BTDR FM AUX BTDR FM AUX BTDR FM AUX BTDR FM AUX BTDR FM AUX BTDR FM AUX BTDR FM AUX BTDR FM AUX BTDR FM AUX BTDR FM AUX BTDR FM AUX BTDR FM AUX BTDR FM AUX BTDR FM AUX BTDR FM AUX BTDR FM AUX BTDR FM AUX BTDR FM AUX BTDR FM AUX BTDR FM AUX BTDR FM AUX BTDR FM AUX BTDR FM AUX BTDR FM AUX BTDR FM AUX BTDR FM AUX BTDR FM AUX BTDR FM AUX BTDR FM AUX BTDR FM AUX BTDR FM AUX BTDR FM AUX BTDR FM AUX BTDR FM AUX BTDR FM AUX BTDR FM AUX BTDR FM AUX BTDR FM AUX BTDR
10:00
DR FM AUX BTDR FM AUX BTDR FM AUX BTDR FM AUX BTDR FM AUX BTDR FM AUX BTDR FM AUX BTDR FM AUX BTDR FM AUX BTDR FM AUX BTDR FM AUX BTDR FM AUX BTDR FM AUX BTDR FM AUX BTDR FM AUX BTDR FM AUX BTDR FM AUX BTDR FM AUX BTDR FM AUX BTDR FM AUX BTDR FM AUX BTDR FM AUX BTDR FM AUX BTDR FM AUX BTDR FM AUX BTDR FM AUX BTDR FM AUX BTDR FM AUX BTDR FM AUX BTDR FM AUX BTDR FM AUX BTDR FM AUX BTDR FM AUX BTDR FM AUX BTDR FM AUX BTDR FM AUX BTDR FM AUX BTDR FM AUX BTDR FM AUX BTDR FM AUX BTDR FM AUX BTDR FM AUX BTDR FM AUX BTDR
10:00
DR FM AUX BTDR FM AUX BTDR FM AUX BTDR FM AUX BTDR FM AUX BTDR FM AUX BTDR FM AUX BTDR FM AUX BTDR FM AUX BTDR FM AUX BTDR FM AUX BTDR FM AUX BTDR FM AUX BTDR FM AUX BTDR FM AUX BTDR FM AUX BTDR FM AUX BTDR FM AUX BTDR FM AUX BTDR FM AUX BTDR FM AUX BTDR FM AUX BTDR FM AUX BTDR FM AUX BTDR FM AUX BTDR FM AUX BTDR FM AUX BTDR FM AUX BTDR FM AUX BTDR FM AUX BTDR FM AUX BTDR FM AUX BTDR FM AUX BTDR FM AUX BTDR FM AUX BTDR FM AUX BTDR FM AUX BTDR FM AUX BTDR FM AUX BTDR FM AUX BTDR FM AUX BTDR FM AUX BTDR FM AUX BTDR
10:00
DR FM AUX BTDR FM AUX BTDR FM AUX BTDR FM AUX BTDR FM AUX BTDR FM AUX BTDR FM AUX BTDR FM AUX BTDR FM AUX BTDR FM AUX BTDR FM AUX BTDR FM AUX BTDR FM AUX BTDR FM AUX BTDR FM AUX BTDR FM AUX BTDR FM AUX BTDR FM AUX BTDR FM AUX BTDR FM AUX BTDR FM AUX BTDR FM AUX BTDR FM AUX BTDR FM AUX BTDR FM AUX BTDR FM AUX BTDR FM AUX BTDR FM AUX BTDR FM AUX BTDR FM AUX BTDR FM AUX BTDR FM AUX BTDR FM AUX BTDR FM AUX BTDR FM AUX BTDR FM AUX BTDR FM AUX BTDR FM AUX BTDR FM AUX BTDR FM AUX BTDR FM AUX BTDR FM AUX BTDR FM AUX BTDR FM
10:00
DR FM AUX BTDR FM AUX BTDR FM AUX BTDR FM AUX BTDR FM AUX BTDR FM AUX BTDR FM AUX BTDR FM AUX BTDR FM AUX BTDR FM AUX BTDR FM AUX BTDR FM AUX BTDR FM AUX BTDR FM AUX BTDR FM AUX BTDR FM AUX BTDR FM AUX BTDR FM AUX BTDR FM AUX BTDR FM AUX BTDR FM AUX BTDR FM AUX BTDR FM AUX BTDR FM AUX BTDR FM AUX BTDR FM AUX BTDR FM AUX BTDR FM AUX BTDR FM AUX BTDR FM AUX BTDR FM AUX BTDR FM AUX BTDR FM AUX BTDR FM AUX BTDR FM AUX BTDR FM AUX BTDR FM AUX BTDR FM AUX BTDR FM AUX BTDR FM AUX BTDR FM AUX BTDR FM AUX BTDR FM AUX BTDR FM
10:00
DR FM AUX BTDR FM AUX BTDR FM AUX BTDR FM AUX BTDR FM AUX BTDR FM AUX BTDR FM AUX BTDR FM AUX BTDR FM AUX BTDR FM AUX BTDR FM AUX BTDR FM AUX BTDR FM AUX BTDR FM AUX BTDR FM AUX BTDR FM AUX BTDR FM AUX BTDR FM AUX BTDR FM AUX BTDR FM AUX BTDR FM AUX BTDR FM AUX BTDR FM AUX BTDR FM AUX BTDR FM AUX BTDR FM AUX BTDR FM AUX BTDR FM AUX BTDR FM AUX BTDR FM AUX BTDR FM AUX BTDR FM AUX BTDR FM AUX BTDR FM AUX BTDR FM AUX BTDR FM AUX BTDR FM AUX BTDR FM AUX BTDR FM AUX BTDR FM AUX BTDR FM AUX BTDR FM AUX BTDR FM AUX BTDR FM
10:00
DR FM AUX BTDR FM AUX BTDR FM AUX BTDR FM AUX BTDR FM AUX BTDR FM AUX BTDR FM AUX BTDR FM AUX BTDR FM AUX BTDR FM AUX BTDR FM AUX BTDR FM AUX BTDR FM AUX BTDR FM AUX BTDR FM AUX BTDR FM AUX BTDR FM AUX BTDR FM AUX BTDR FM AUX BTDR FM AUX BTDR FM AUX BTDR FM AUX BTDR FM AUX BTDR FM AUX BTDR FM AUX BTDR FM AUX BTDR FM AUX BTDR FM AUX BTDR FM AUX BTDR FM AUX BTDR FM AUX BTDR FM AUX BTDR FM AUX BTDR FM AUX BTDR FM AUX BTDR FM AUX BTDR FM AUX BTDR FM AUX BTDR FM AUX BTDR FM AUX BTDR FM AUX BTDR FM AUX BTDR FM AUX BTDR FM
10:00
STATIONS
BBC R3
BBC R3
TUNING
DRF
107\60
107\60
SCANNING
Afspilning af DAB-radio
Tryk på knappen Source for at skifte til DAB-radio.
Skift DAB-station
1. Tryk på knapperne < > for at rulle gennem
stationslisten.
2. Når du har fundet den station, du vil lytte til, skal
du trykke på knappen Select.
Afspilning af FM-radio
Tryk på knappen Source for at skifte til FM-radio.
Skift FM-station
Manuel indstilling
Tryk på knapperne < > for at gå 0,05 MHz op eller ned.
Automatisk indstilling
Hold knapperne < > inde for at gå til den næste eller
forrige FM-station, som har et kraftigt signal.
NO
DA
9
Page 100

Lagring og valg af faste stationer
Du kan gemme op til 10 DAB-stationer og 10 FM-stationer, så du nemt kan finde
dem igen.
10:00
10:00
10:00
10:00
10:00
DR FM AUX BTDR FM AUX BTDR FM AUX BTDR FM AUX BTDR FM AUX BTDR FM AUX BTDR FM AUX BTDR FM AUX BTDR FM AUX BTDR FM AUX BTDR FM AUX BTDR FM AUX BTDR FM AUX BTDR FM AUX BTDR FM AUX BTDR FM AUX BTDR FM AUX BTDR FM AUX BTDR FM AUX BTDR FM AUX BTDR FM AUX BTDR FM AUX BTDR FM AUX BTDR FM AUX BTDR FM AUX BTDR FM AUX BTDR FM AUX BTDR FM AUX BTDR FM AUX BTDR FM AUX BTDR FM AUX BTDR FM AUX BTDR FM AUX BTDR FM AUX BTDR FM AUX BTDR FM AUX BTDR FM AUX BTDR FM AUX BTDR FM AUX BTDR FM AUX BTDR FM AUX BTDR FM AUX BTDR FM AUX BTDR
DR FM AUX BTDR FM AUX BTDR FM AUX BTDR FM AUX BTDR FM AUX BTDR FM AUX BTDR FM AUX BTDR FM AUX BTDR FM AUX BTDR FM AUX BTDR FM AUX BTDR FM AUX BTDR FM AUX BTDR FM AUX BTDR FM AUX BTDR FM AUX BTDR FM AUX BTDR FM AUX BTDR FM AUX BTDR FM AUX BTDR FM AUX BTDR FM AUX BTDR FM AUX BTDR FM AUX BTDR FM AUX BTDR FM AUX BTDR FM AUX BTDR FM AUX BTDR FM AUX BTDR FM AUX BTDR FM AUX BTDR FM AUX BTDR FM AUX BTDR FM AUX BTDR FM AUX BTDR FM AUX BTDR FM AUX BTDR FM AUX BTDR FM AUX BTDR FM AUX BTDR FM AUX BTDR FM AUX BTDR FM AUX BTDR
PRESET 2
STORED
DR FM AUX BTDR FM AUX BTDR FM AUX BTDR FM AUX BTDR FM AUX BTDR FM AUX BTDR FM AUX BTDR FM AUX BTDR FM AUX BTDR FM AUX BTDR FM AUX BTDR FM AUX BTDR FM AUX BTDR FM AUX BTDR FM AUX BTDR FM AUX BTDR FM AUX BTDR FM AUX BTDR FM AUX BTDR FM AUX BTDR FM AUX BTDR FM AUX BTDR FM AUX BTDR FM AUX BTDR FM AUX BTDR FM AUX BTDR FM AUX BTDR FM AUX BTDR FM AUX BTDR FM AUX BTDR FM AUX BTDR FM AUX BTDR FM AUX BTDR FM AUX BTDR FM AUX BTDR FM AUX BTDR FM AUX BTDR FM AUX BTDR FM AUX BTDR FM AUX BTDR FM AUX BTDR FM AUX BTDR FM AUX BTDR
CLASSIC
MOZART
DR FM AUX BTDR FM AUX BTDR FM AUX BTDR FM AUX BTDR FM AUX BTDR FM AUX BTDR FM AUX BTDR FM AUX BTDR FM AUX BTDR FM AUX BTDR FM AUX BTDR FM AUX BTDR FM AUX BTDR FM AUX BTDR FM AUX BTDR FM AUX BTDR FM AUX BTDR FM AUX BTDR FM AUX BTDR FM AUX BTDR FM AUX BTDR FM AUX BTDR FM AUX BTDR FM AUX BTDR FM AUX BTDR FM AUX BTDR FM AUX BTDR FM AUX BTDR FM AUX BTDR FM AUX BTDR FM AUX BTDR FM AUX BTDR FM AUX BTDR FM AUX BTDR FM AUX BTDR FM AUX BTDR FM AUX BTDR FM AUX BTDR FM AUX BTDR FM AUX BTDR FM AUX BTDR FM AUX BTDR FM AUX BTDR
PRESET 5
EMPTY
DR FM AUX BTDR FM AUX BTDR FM AUX BTDR FM AUX BTDR FM AUX BTDR FM AUX BTDR FM AUX BTDR FM AUX BTDR FM AUX BTDR FM AUX BTDR FM AUX BTDR FM AUX BTDR FM AUX BTDR FM AUX BTDR FM AUX BTDR FM AUX BTDR FM AUX BTDR FM AUX BTDR FM AUX BTDR FM AUX BTDR FM AUX BTDR FM AUX BTDR FM AUX BTDR FM AUX BTDR FM AUX BTDR FM AUX BTDR FM AUX BTDR FM AUX BTDR FM AUX BTDR FM AUX BTDR FM AUX BTDR FM AUX BTDR FM AUX BTDR FM AUX BTDR FM AUX BTDR FM AUX BTDR FM AUX BTDR FM AUX BTDR FM AUX BTDR FM AUX BTDR FM AUX BTDR FM AUX BTDR FM AUX BTDR
PRESET 6
STORED
Hurtig lagring af en fast station (1-4)
Stil ind på den DAB- eller FM-station, du vil gemme.
Hold en af knapperne til faste stationer (1–4) inde i to
sekunder for at gemme den aktuelle station som en
fast station. Du kan gemme oven i eksisterende faste
stationer.
Sådan gemmes en fast station
(1-10)
1. Stil ind på den DAB- eller FM-station, du vil gemme.
2.
Hold knappen 5+ inde for at få vist en nummereret
liste over faste stationer, og tryk derefter på knappen
< > for at vælge et forudindstillet nummer mellem 1
og 10.
Du kan overskrive eksisterende faste stationer.
3. Tryk på knappen Select, til meddelelsen ‘PRESET
STORED’ (Faste stationer gemt) vises.
10:00
10:00
10
DR FM AUX BTDR FM AUX BTDR FM AUX BTDR FM AUX BTDR FM AUX BTDR FM AUX BTDR FM AUX BTDR FM AUX BTDR FM AUX BTDR FM AUX BTDR FM AUX BTDR FM AUX BTDR FM AUX BTDR FM AUX BTDR FM AUX BTDR FM AUX BTDR FM AUX BTDR FM AUX BTDR FM AUX BTDR FM AUX BTDR FM AUX BTDR FM AUX BTDR FM AUX BTDR FM AUX BTDR FM AUX BTDR FM AUX BTDR FM AUX BTDR FM AUX BTDR FM AUX BTDR FM AUX BTDR FM AUX BTDR FM AUX BTDR FM AUX BTDR FM AUX BTDR FM AUX BTDR FM AUX BTDR FM AUX BTDR FM AUX BTDR FM AUX BTDR FM AUX BTDR FM AUX BTDR FM AUX BTDR FM AUX BTDR
RECALL
6 CLASS
DR FM AUX BTDR FM AUX BTDR FM AUX BTDR FM AUX BTDR FM AUX BTDR FM AUX BTDR FM AUX BTDR FM AUX BTDR FM AUX BTDR FM AUX BTDR FM AUX BTDR FM AUX BTDR FM AUX BTDR FM AUX BTDR FM AUX BTDR FM AUX BTDR FM AUX BTDR FM AUX BTDR FM AUX BTDR FM AUX BTDR FM AUX BTDR FM AUX BTDR FM AUX BTDR FM AUX BTDR FM AUX BTDR FM AUX BTDR FM AUX BTDR FM AUX BTDR FM AUX BTDR FM AUX BTDR FM AUX BTDR FM AUX BTDR FM AUX BTDR FM AUX BTDR FM AUX BTDR FM AUX BTDR FM AUX BTDR FM AUX BTDR FM AUX BTDR FM AUX BTDR FM AUX BTDR FM AUX BTDR FM AUX BTDR
CLASSIC
MOZART
Valg af en fast station under lytning
til en DAB- eller FM-station
Hvis du vil skifte til de faste stationer 1 til 4, skal du
trykke på den relevante talknap på Pop (1 til 4).
Sådan får du adgang til en komplet liste med
forudindstillinger (fra 1 til 10):
1. Tryk på knappen 5+, og slip den igen.
2. Tryk på < > for at rulle gennem listen over faste
stationer, og tryk på knappen Select for at vælge den
ønskede faste station.
 Loading...