

Page 1
PureZone
3-in-1 True HEPA Air Purier
OPERATION MANUAL
READ BEFORE USING
Model: PEAIRPLG
Page 2

WARNINGS AND PRECAUTIONS
TROUBLESHOOTING
Read this entire instruction manual before operation. Failure to
adhere to the following warnings can cause harm to you or the unit.
● Close supervision is necessary when any appliance is used by or near
children and pets.
● Remove the plastic bag that the lter is packaged in before initial use.
● To avoid re and shock hazard, plug PureZone directly into a 120V AC
electrical outlet.
● DO NOT run power cord under carpeting, or cover with rugs or runners.
Arrange the cord away from areas where it may be tripped over.
● To prevent electrical shock, do not spray the unit, plug, or cord with liquids.
Never submerge any part of the unit in water.
● Always unplug PureZone before moving it, opening the front cover
changing the lter, replacing the UV lamp, and whenever the unit is not
being used. To disconnect from the power supply, grip the plug and pull
from the power socket. Never pull by the cord.
● NEVER drop or insert any object into any openings.
● DO NOT operate the unit with a damaged cord or plug, after it
malfunctions, or after it has been dropped or damaged in any way.
● DO NOT use PureZone outdoors.
● DO NOT place any object on top of the unit or block any of its openings or
vents.
● NEVER place the unit on a soft surface, such as a bed or sofa, as this
could cause the unit to tip over and block the air vents.
● Keep PureZone away from heated surfaces and open ames.
● DO NOT attempt to repair or adjust any electrical or mechanical functions
on PureZone. Doing so will void the warranty. The inside of this unit
contains no user serviceable parts.
● PureZone has a polarized plug (one blade is wider than the other). To
reduce the risk of electric shock, this plug is intended to t in a polarized
outlet only one way. If the plug does not t fully in the outlet, reverse the
plug. If it still does not t, contact a qualied electrician. Do not attempt to
alter this safety feature.
Problem Solution
Unit is not
powering on
Decreased air
ow
Excessive noise
If your problem is not resolved by the solutions listed above, contact Pure
Enrichment for assistance by emailing help@pureenrichment.com.
Check to make sure PureZone is properly plugged in and
the electrical outlet is working.
Check that the front cover is latched rmly in place.
Check that the lter is rmly in place.
Check that the lter is clean.
Check for any obstructions in the air inlet and outlet.
Check for any foreign objects in contact with the fan.
The lter may be clogged and ready for replacement.
The foam sealing gaskets have been installed incorrectly.
Uneven positioning.
PRODUCT SPECIFICATIONS
Size: 10.8” L x 6.9” W x 12.1” H
CADR: 80 cfm
Power Supply: AC 120V, 50Hz, 60W
Noise Level: 30dB (Low), 40dB (Medium), 50dB(High)
UV Light: Wavelength: 254nm
Coverage Area: Up to 200 sq ft
Lamp life: Approx. 20,000 hours
1
2
3
Page 3

INTRODUCTION
Thank you for purchasing PureZone. This 3-in-1 True HEPA air purifier is
designed to capture 99.97% of dust, pollen, pet dander, smoke, mold spores,
and household odors so you can breathe easily.
PRODUCT FEATURES
The diagram below highlights all of the important features of the unit.
PRE-OPERATING INSTRUCTIONS
1. Carefully remove PureZone from the box and plastic bag.
2. Select a rm, level, and at location to position the unit.
NOTE:
For proper air ow, place the unit at least 1 foot away from any
wall or furniture. Make sure none of the vents are blocked.
3. Before using, remove the lter from the plastic packaging.
4. Plug PureZone into a 120V AC electrical outlet.
NOTE:
When moving the unit, always lift by the carrying handle located
on back.
OPERATING INSTRUCTIONS
3-IN-1 FILTER TECHNOLOGY
Pre-Filter:
Activated Carbon Filter:
gases.
HEPA:
UV-C Light:
fungi (such as mold toxins).
Captures initial dust and allergen particles.
Absorbs formaldehyde, benzene, and other noxious
Captures dust, smoke, pollen, and other allergens.
Destroys micro-organisms such as germs, viruses, bacteria, and
2 3
4 5
1. “POWER” BUTTON:
Press this button to turn on or switch o the unit.
2. “SPEED” BUTTON:
The fan speed of the unit can be adjusted when the unit is in operation
(L/I, M/II, H/III). Each time that you press the (SPEED) button, the
speed is adjusted from L (low) to M (medium) to H (high).
3. “UV-C” AND SLEEP BUTTON
A.) Press this button to turn on/o the UV lamp and the sleep mode.
-1st Press: UV-C ON and Sleep OFF
-2nd Press: UV-C ON and Sleep ON
-3rd Press: UV-C OFF and Sleep ON
-4th Press: UV-C OFF and Sleep OFF
B.) When Sleep mode is on, the sleep indicator will ash 10 times, then
all the indicators will turn o automatically and the fan speed will change
to the low setting automatically .
Page 4
OPERATING INSTRUCTIONS (CONT'D)
INSTALLING & REMOVING THE FILTER (CONT'D)
4. “TIMER” BUTTON:
A.) By pressing this button, PureZone can be timed to operate for
intervals of 2 hours, 4 hours, or 8 hours. The unit will stop automatically
when the selected operating time has elapsed.
B.) Press the Timer button to select the required operating time. A
warning light automatically indicates the remaining operating time.
C.) To select the continuous operating mode, press the button
repeatedly until there are no more indicator lights on.
NOTE:
When the unit is not in use, switch it o and unplug it. PureZone
has a memory function that will save the previous settings you entered
before turning the unit o.
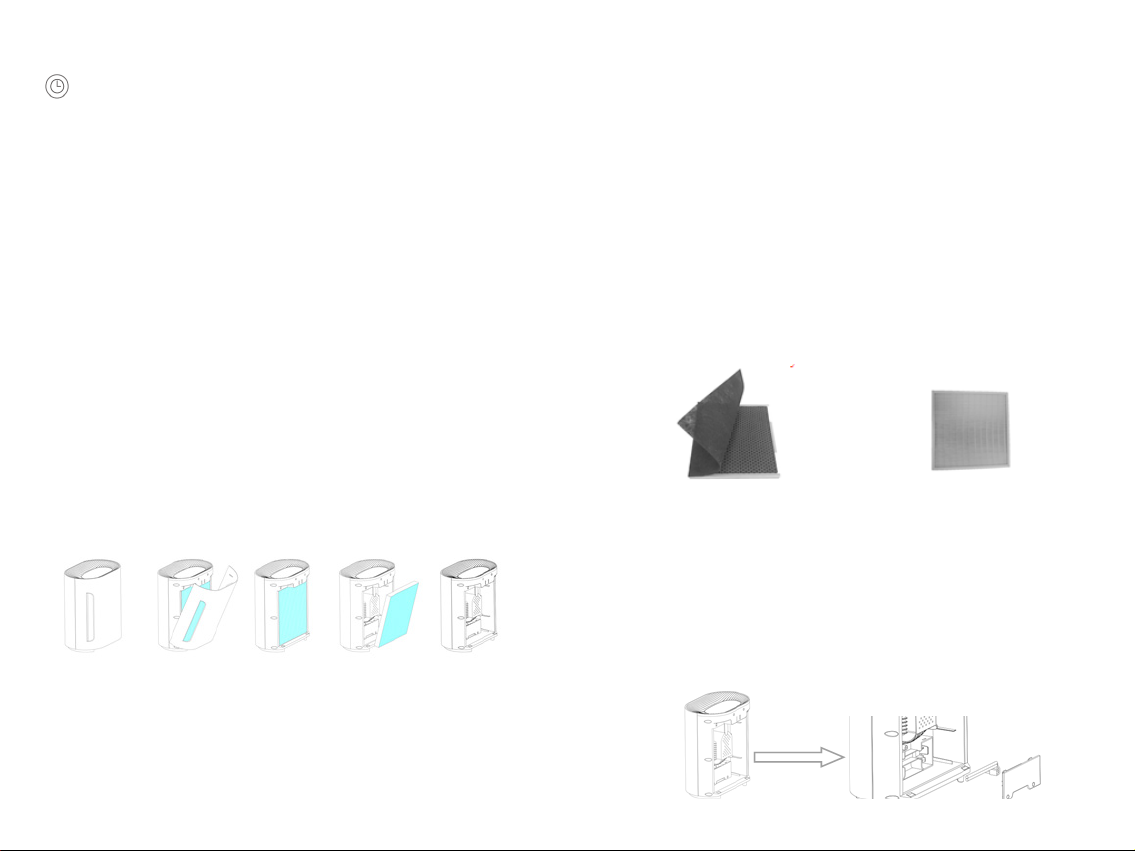
INSTALLING & REMOVING THE FILTER
The "Filter Reset" light will icker continuously when it is time to replace
the lter. Replace the lter according to the directions below, then press the
POWER button and hold for 5 seconds to restart the system. The light will stop
ickering.
NOTE:
The 3-in-1 lter will last approximately 6 months. To purchase the
replacement lter (Model: PEAIRFIL), visit pureenrichment.com.
4. Reattach the front cover of the unit and securely latch into place.
5. Press and hold POWER button for 5 seconds to reset Filter Change
Indicator.
CLEANING & MAINTAINING THE FILTER
For optimal performance, the 3-in-1 lter should be cleaned at least once
every month. More frequent cleaning may be required depending on the
environmental conditions where you live. To clean, separate the pre-lter from
the combo carbon and HEPA lter. Use the brush attachment on your vacuum
cleaner to remove lint and dirt from all three lters. If necessary, you can wash
the pre-lter in warm water with a mild dish detergent.
NOTE:
Only the pre-lter is washable. Make sure it is completely dry
before reattaching it to the combo carbon and HEPA lter.
Front (Pre-Filter & Carbon Filter) Back (HEPA Filter)
UV LAMP REPLACEMENT
1. Open the UV lamp cover with a screw driver.
2. Remove the UV lamp from the holder carefully and unplug the connector.
3. Attach the new UV lamp to the connector and put back into the holder
carefully.
4. Screw the UV lamp cover back into place securely.
1. Open the front cover from the top.
2. Find the strip at the bottom of the lter. Remove the lter by pulling the
strip.
3. Insert the new lter into the unit. Make sure the strip is installed outwards
and the gray pre-lter is facing the front cover for correct installation
direction.
4 5
6 7
NOTE:
DO NOT look directly at the UV light.
Page 5

WARRANTY
PureZone comes with an industry-leading 5 Year Warranty that begins on the
date of purchase.
The warranty applies to the air purier and necessary parts and labor relating
thereto. The warranty does not apply to damage resulting from failure to follow
the operating instructions, accidents, abuse, alterations, or disassembly by
unauthorized individuals.
PRODUCT REGISTRATION
To ensure your full warranty, and to receive product updates and streamlined
customer support, remember to register your product at:
www.pureenrichment.com
ARE YOU 100% SATISFIED?
If you have product questions or concerns, don’t hesitate to contact us directly
at:
help@pureenrichment.com
Pure Enrichment has an award-winning warranty, exchange, and customer
service program that guarantees hassle-free solutions to any issue you might
have within 24 hours!
Santa Ana, CA 92704
www.pureenrichment.com
6
8
 Loading...