

Page 1

Move R3
Page 2

Page 3

Introduction
Thank you for choosing the MoveR3. This user
manual will get you up and running in no time.
If you need more help, visit support.pure.com.
1
Page 4

2
Safety
Befo re you use yourMove R3, read the fo llowing safety instructions.
1.
Read allthe safety informationand instructions be fore usingthe p roduct.W henpassing thispro ductto someo ne,
include alld ocuments.
2.
If you do not follow the op eratinginstructionsp rovided ,it maycomp romise the safety of yourp roduct andthismay
invalidate the warranty.
3.
Do not expo se the pro ductto dripping or splashing.Do not place ob jects filled with liquids,suchas vases,o nthe
prod uct.
If liquido rw ater spillsonto the p roduct,sw itchito ff immediatelyand contactyo urde aler.
If you are using amains-powe red adapt er,d o not touchthe p roduct withw et hands.
4.
The internalb attery inthispro ductis not user replaceable. Donot e xpose the batte ryto excessive heat or naked
flames.Ensure adeq uate ve ntilation and airflow around the pro duct,particuarlywhen charging.Dispose of the
prod uctinaccordance withlocale nvironmentalrules.
5.
Using the prod uctinroo ms or climates with high humidityandt empe ratures may cause conde nsationt o form inside
the prod uct,whichcandamage the prod uct.Use the prod uctinmo derate climateso nly.
6.
Do not useyo urpro ductin extreme lyhot or cold te mperature. Kee p the de viceaway from heat sources,s uchas
radiatorso rg as/electricf ires.Do not exp ose yo urpro ductto naked f lames, suchaslighted candles.
7.
To charge your prod uct,onlyconnect itto asupp lysource that meets the safe ty isolationre quirements of
EN60065 or EN60950-1 fo r anaccessible safety extra low voltage circuit.Forthis connection,use e ither the
supplied micro-USBcable o ra suitablyCEapproved pow er adapter w iththe correct USBoutputrating.
8.
Pow er the prod uctusingane xternal5 V DC1 A pow er supply.T he maximumoutput currentis 1 A,prot ected by an
internalcircuit.
9.
Befo re you charge yo urpro duct,ensure thatthe available supplyvo ltage correspo nds withthe re quired
ope rationalvoltage of the pro duct.
10.
Disconnect yourp roduct from the charging pow er supply ifyo uwillnot use your prod uctfo ra long pe riod of time
(fo re xample,if you are going on holiday).
11.
Alwaysunplug your product from the charging po wer supp lybe fore cleaning. Whencleaning the prod uct,do not
use any type o f abrasivep ad or abrasivecleaning solutionsas these may damage the prod uct'ssurface.
12.
To re duce the riskof e lectricshock,d o not remove anyscrews. The pro ductd oe s notco ntainanyuser-se rviceable
parts inside. Prod uctrep airsshouldo nly be carried out by authorised perso nnel.
Page 5

To p revent po ssible hearing damage,d o not listenat highvolumele velsf or long periods o f time.Co nsistent
5V DC 1A
expo sure to highvolumes whenusingheadp honescan damage yourhearing.Alwayscheck the volumeleve l
bef ore you insertheadp hones into your ears.Use o f headphones other thanthose supp lied by Pure may
expo se you to hearingd amage, as the high levelvo lume warning on the device may be inaccurate.Use of
headphones whileo peratinga vehicleis not recomme nded and isillegalinso me areas.If youfind thatlistening
to your Move is distracting whileo perating any type o f vehicle or p erforming anactivity thatreq uires your full
attention,stop listeningto yourMo ve.
User:T heb attery isnot user se rviceable.Do not attempt to replace the internalb attery inthe prod uct.
Service Pe rsonnelonly:Danger o f explosion if battery is incorrectly replaced. Rep lace onlyw iththe same or eq uivalent
type.
Risko f injury whenchargingthe p roduct indirect sunlight.Onlycharge t hep roduct when itis not indirect sunlight.
Ensureade quate ventilationand airflow around the prod uct,particularlyw hencharging.
Cease to use the d evice ifthere are anyabnormalitiesd uring ope ration,suchashighte mperature,d iscoloration,
bulging,leakage, andso on.
Symbols on the product a nd in the use r ma nual
Pote ntiallyserious riskto yo urpe rsonalsafety. To avoid po ssible injuryor de ath,obe y allsafe ty noticesw iththis
symbol.
Caution.Read the user manualbe fore use.
Caution.Avoid listeningat highvolume levels for long pe riods of time.
5VDC1Ap owe r supply.
Where to switchon the pro ducto r put itinstandby.
3
Page 6

Contents
Intro duct ion 1
Safety 2
Contents 4
Overview 5
Wha t's in the box 5
Con trols 6
Con nectio ns 7
Disp lay 8
Getting started 9
Cha rgin g your Move 9
Switchi ng on for the first ti me 9
Lockin g and u nlo cking your Move 10
Digital radio 12
Listeni ng to di gita l rad io 12
Cha ngi ng the radio sta tion 12
Performing a n au totun e 12
FM radio 13
Listeni ng to FMra dio 13
Cha ngi ng the radio sta tion 13
Cha ngi ng sea rch se tting s fo r rad io
stati ons 13
Cha ngi ng be tween stereo and mono
receptio n 14
Presets 15
Storin g presets to preset1 or2 15
Storin g presets to the prese t l ist 15
Listeni ng to preset s 16
4
Timers 17
Setti ng a sl eep ti mer 17
Setting s 18
Cl ock setti ngs 18
Disp lay setti ngs 19
Cha ngi ng the audi o settin gs 20
Cha ngi ng the lang uag e 21
Resetti ng to fa ctory setti ngs 21
Upda tin g the softwa re 21
Performing a battery reset 22
Specification s 23
Page 7
Overview
2 3
1
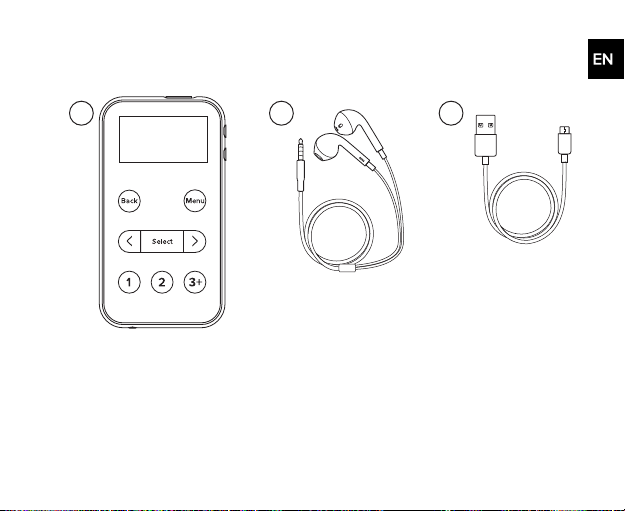
What's in the box
1 Move R3 3 Micro -USB cable (for po wer o nly)
2 H eadp hones
5
Page 8

Controls
1 Volume Pre ss to change the v olume.
2 Back Pre ss to go back to the pr evio us me nu.
3 Menu Pre ss to op en the main menu.
6
Page 9
4 Previous Pre ss to choo se the pre vio us r adio s tation or menu o ption.
2
1
5 Select Pres s to sel ect a r adio station or menu o ption.
6 Next P re ss to choos e the next r adio station or menu o ption.
7 Presets Pre ss to lis ten to yo ur pre sets. P res s and hold to stor e the current radio
8 Power/Lock
station to a pre se t.
Slid e to the po sition to lock the buttons. S lide to the middl e po sition to
unlock the buttons.
Slid e to the pos ition to switch o n yo ur Move . Sli de to the po sition and
hold to swi tch off your Move.
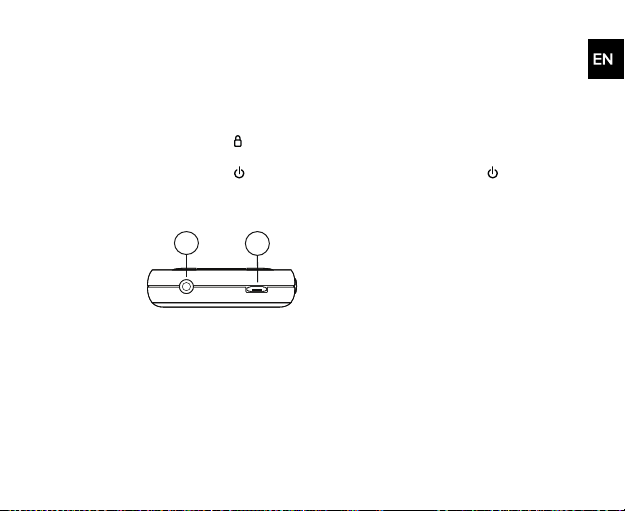
Connections
1 3.5mm headphone so cket
2 Micro-USB s ocket
7
Page 10

Display
1
3
4
2
1 Sle ep timer active 3 Battery le vel
2 Curre nt time 4 Te xt are a
8
Page 11
Getting started
Before using your Move, read the safety information on page2.
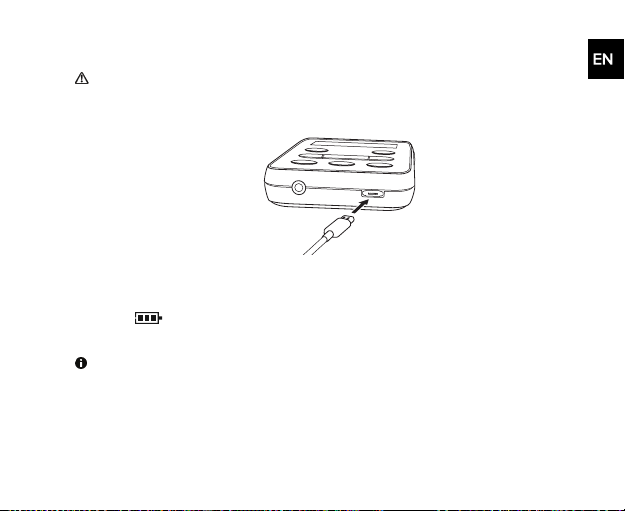
Charging your Move
1. Connect the mic ro-USB cable to the micro-USB port on your Move.
2. Connect the other end of the micro-USB c able to a power outlet, using a USB
power adapter. You c an also charge the battery by connecting your M ove t o
a computer's U SB port.
The icon on the display shows t he battery c harging.
Switching on for the first time
Before you switch on y our Move for the first time, charge the battery for at least
3hours.
9
Page 12
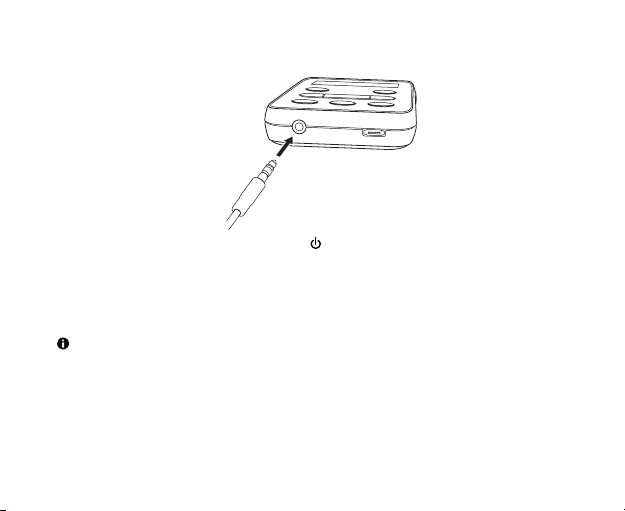
1. Connect the headphones into the headphone socket on y our Move.
The headphonesare also t he aerial for y our Move.
2. Slide the Power/Lock switch into the position, then release the switch.
Your Move switches on and starts tuningto digital radio stations. After the
autotune is complete, you can start listening to digital radio.
Locking and unlocking your Move
You can lock the buttons on your M ove, so you don't accidentally press a button.
When your Move is switched off, lock the buttons so you don't accidentally
switch it on.
10
Page 13

1. To lock the buttons on y our Move, slide the Power/Lock switch into the
position.
2. To unlock the buttons on your Move, slidethe Power/Lock switch into t he
middle position.
11
Page 14

Digital radio
Listening to digital radio
When you are listening to FMradio,you c an change to digital radio.
1. PressMenu.
2. Press and Select to chooseDigital radio.
Changing the radio station
1. Press or to browse the availableradio stations.
2. Press Select to choosea radio station.
Performing an autotune
When you first switch on your Move, it automatic ally searches for radio stations. To
search for digital radio stationsagain, perform an autotune.
1. PressMenu.
2. Press and Select to chooseAutotune.
12
Page 15
FM radio
Listening to FMradio
When you are listening to digitalradio, you c an change to FMradio.
1. PressMenu.
2. Press and Select to chooseFM radio.
Changing the radio station
l To m ove to the previous or next radio station, pressand hold or .
l To tune to a specific radio station frequency, press or to increase or
decreasethe frequency. The frequency steps up or down by 0.05 MHz.
Changing search settings for radio stations
When you press and hold to change radio stations, you c an include all radio
stations or only include radio stat ions with a strongsignal.
1. PressMenu.
2. Press and Select to chooseScan setting.
3. Press andS elect to choose Strongstations only or Allstations.
13
Page 16

Changing between stereo and mono reception
By default, your M ove usesstereo reception f or FMradio. If radio stations hav e a
weak signal, mono reception may improve the signal strength.
1. PressMenu.
2. Press and Select to chooseStereo.
3. Press andS elect to choose FM stereo or Mono.
14
Page 17

Presets
You can store your favourite radio stat ions as presets.
On the front of your Move, there are three preset buttons. Use 1 or 2 f or quick
access t o your fav ourite radio stations. Use 3+ to open a list of all y our presets.
You can save up to 10 digital radio stations and up to 10 FM radio stations in the
presets list.
Storing presets to preset1 or2
1. Tune to the radio station y ou want to store.
2. Press and hold1 or 2 until Preset stored is displayed.
If there is already a radio station saved to the preset you’ve selected, t he
new station replaces it.
Storing presets to the preset list
1. Tune to the radio station y ou want to store.
2. Press and hold3+ until the preset list is displayed.
3. Press andS elect to choose a preset number.
If there is already a radio station saved to the preset you’ve selected, t he
new station replaces it.
15
Page 18

Listening to presets
l To listen to preset1 or2, press1 or2.
l To listen to any preset, press3+ to open the preset list. Press and S elect to
choosea preset number.
16
Page 19

Timers
Setting a sleep timer
The sleeptimer switches off y our Move after a set amount of time.
1. PressMenu.
2. Press and Select to chooseSleep timer.
3. Press andS elect to choose the duration of the timer.
is shown on the display and the timer starts counting down.
To cancel the sleept imer, enter the Sleep timer menu and choose Sleep off.
17
Page 20

Settings
The current value for m ost settings is indicated on the display by an asterisk(*).
Clock settings
Setting the time and date
1. PressMenu.
2. Press and Select to chooseClock> Set time/date.
3. Press andS elect to set the time and then t he date.
Changing the time or date format
1. PressMenu.
2. Press and Select to chooseClock.
3. Choose whether to c hange the time format or date f ormat.
l To c hange the time format, press and Select to c hoose Set 12 /24
hour.
l To c hange the date format, press and Select to chooseSet date
4. Press andS elect to choose a format.
18
format.
Page 21

Changing how the clock updates
Your Move can automatically update its c lock usingthe FM or digital radio signal.
1. PressMenu.
2. Press and Select to chooseClock> Auto update.
3. Press andS elect to choose how t he clock updates.
Display settings
Changing the information shown on the display
1. PressMenu.
2. Press and Select to chooseDisplay> I nfo.
3. Press andS elect to choose a setting.
l Scrolling text. Displays information provided by the radio stat ion, such
as the current song's title and artist.
l Signal quality. Displays the signal quality, from0 to100, of the current
radio station. Only available for digital radio.
l Signal strength. Displays the signal strength of t he current radio station.
Only available for digital radio.
l Date. Displays t oday's date.
19
Page 22

Changing the display brightness
1. PressMenu.
2. Press and Select to chooseDisplay> Brightness.
3. Press andS elect to choose a brightness level. To make the display
brighter, c hoose a higher number.
By default, the display turns off af ter 10seconds of inactivity. To make the
display always stay on, press Menu and chooseDisplay> Duration> Always on.
Changing the audio settings
Use t he equaliser to get the most out of your audio. Thereare several equaliser
settingsset up already. For example, to hear c lassical m usic at its best, change the
equaliser setting to Classic. You can also customise the equaliser to change the
treble and bass.
1. PressMenu.
2. Press and Select to chooseAudio.
3. Choose an equaliser setting.
l To c hoose an existing equaliser setting, press andSelect. You can
choosefrom Natural, Rock, Pop, Classic, J azz, or News.
l To c ustomise the equaliser, press andS elect to choose Custom.
Then press and S elect to change the treble and bass.
20
Page 23

Changing the language
1. PressMenu.
2. Press and Select to chooseSettings> Language.
3. Press andS elect to choose a language.
Resetting to factory settings
If you reset your M ove to f actory settings, it removes storedpresets, clears t he
station list and resets all settings to default.
You cannot undo a fac tory reset.
1. PressMenu.
2. Press and Select to chooseSettings> Factory reset.
3. Press andS elect to choose Yes.
Updating the software
We may provide software updates to improve your M ove. To check for available
software updates, visit support.pure.com.
To be contacted when software updates are available, y ou can register your
product at account.pure.com.
Note: TheMicro-USBcable supplied with y our Move does not support software
updates. To update the software, use a Micro-USB data cable.
21
Page 24

Performing a battery reset
If the c ontrolson your Move stop responding, perform a battery reset.
l To perform a battery reset, use a paper c lip to presst he reset button on the
sideof y our Move.
22
Page 25

Specifications
Radio DAB/DAB+ an d FM ( RDS)
Frequencie s Dig ita l: Ba ndI II 174-240MHz, F M: 87.5-108MHz
Head phones 32oh m 14mm d iamete r dri ver
Receiving power supply 5V(1A) DC mi cro-USB ( cable suppli ed)
Inputs 5VDC ( 1A) Micro-USB powe r socket (a lso for softwa re upda tes)
Outputs 3.5mm stereo h ead phon e socket
Presets 10 di gita l prese ts, 10FM presets
Displa y 1.6"OLED
Software version v1.0
Operationa l tempe rature 0° C to +40° C
Dime nsions 102mm (H) x 56mm ( W) x 15mm (D)
Weight 100g
Aeria l Supp lie d in-e ar hea dpho nes act as a eria l
Approvals CE marked
Lithi um-ion recha rgeab le ba ttery ( 1000mAh)
The sup pli ed Micro-USB cabl e is onl y suita ble f or cha rgin g
Hereby, Pu re Inte rnati ona l Ltd decla res th at thi sradi o, mode l Move R3, i s i n
complia nce with the essenti al requirements of RE D, 2014/53 /EU. T he ful l
Decla rati on of C onformity may be consul ted at
http: //www.p ure.com/ab out/red.
23
Page 26

Correct disposal of thisproduct
Copyright
Copyri ght2017 b y Pu re I nterna tio nal Limited. All rights reserved. N o part of th is publ icat ion may be copi ed
or distrib uted, transmitted, transcribed, stored i n a retri eval system, or tran sla ted in to any hu man or
computer la ngua ge, i n a ny f orm or by any mean s, el ectronic, mecha nica l, mag neti c, manua l or othe rwise, or
disclo sed to thi rd p artie s wi thou t the express writte n permissio n of Pure I nterna tion al Limi ted. F or w arranty
and d iscla imer info rmation , visit p ure.com.
Trademarks
Move, Pure a nd the Pu re logo a re tradema rks or registered trademarks of Pu re Intern ati onal Limited. All
other produ ct n ames are trad emarks of the ir respective compan ies. Version 1Febru ary2016.
Thi s markin g ind icates th at thi s p roduct shoul d not be disposed wi th oth er h ouseh old wa ste
through out the EU. To prevent possi ble h arm to the environ ment or human h eal th from
uncont rolle d waste di sposal , recycle i t resp onsibl y to promote the susta in abl e reuse of
materia l resou rces. T o return your used d evice, pl ea se use the retu rn and collectio n system or
contact the ret ail er where th e product wa s pu rchased. They can take th is product for
environ mental safe recycling .
24
Page 27

Einführung
Vielen Dank, dass Sie sich für das MoveR3
entschieden haben. Mithilfe dieses
Benutzerhandbuch ist Ihr Gerät in kürzester
Zeit betriebsbereit.
Falls Sie weitere Hilfe benötigen, besuchen Sie
support.pure.com.
1
Page 28

Sicherheit
1.
2.
3.
4.
5.
6.
7.
8.
9.
2
Bevor Sie I hrMove R3 inBe trieb nehmen,lesen Sie die fo lgenden Sicherheitsanweisungen.
Lesen Sie alleSicherheitsinformationenund Anweisungen,b evor Sie d asP rodukt verwende n.Sollten Sie das
Prod ukt aneine andere Pe rson weiterg ebe n,lege nSie alle Dokumente be i.
WennS ie den Bed ienungsvorschriften nicht folgen, kanndies d ie Sicherheit des P rodukts bee inträchtigenundd ie
Garantie annullieren.
Setze nS ie das Produkt keinemT ropf- ode rS pritzwasser aus.Ste llenSie keine mitW asser gef ülltenOb jekte wie
Vasenaufd asP rodukt.
FallsFlüssigkeiten ode r Wasser aufd asP rodukt gelangen,schalten Sie es so fort ab undw enden sichanI hren
Händler.
BerührenSie das G erät nichtmit feuchtenH änden,we nnes aneine Ste ckdose angeschlossen ist.
Dieinterne Batterie diese s Prod ukts kannnichtdurchde nBe nutzere rsetzt w erde n.Setze nS ie die Batterie nicht
übermäßiger Hitze o der o ffenem Feuer aus.Sorg enS ie rund umd asP rodukt fürangemesse ne Belüftung und
Luftzufuhr,beso nders während des Ladevo rgangs.Entso rgen Sie das Prod ukte ntsprechend den lokalen
Umweltschutzvorschriften.
Der Geb rauchd es Ge rätsin Räumen ode r klimatischenUmgeb unge nmit hoherFeuchtigkeitundhohen
Temp eraturenkanndazuführen,dass es im Innerend es Pro duktszu Konde nsierung kommt;hierdurchkanndas
Prod ukt Schadennehmen.Ve rwenden Sie das Pro duktnuring emäßigtem Klima.
Verwe ndenS ie IhrP rodukt nichtb eie xtrem hoheno der niedrigen Te mperaturen.Halten Sie das Ge rätvo n
Hitzeq uellen wie He izungen ode r Gas-/Elektro -Heizöf enf ern.Se tzen Sie das Prod uktnicht offe nem Feueraus
(z.B.brennenden Kerzen).
Umdas Pro duktzu laden,schließe nSie e s aneine Versorgungsquelle an,die de nSicherheits-und
Iso lierungsanford erungende r Richtlinie EN60065 od er EN60950-1 für einzugängliches,sicheres
Nied erspannungsnetz genügt.Ve rwende nSie für diese Ve rbindung entwe der d asmitge liefe rte Mikro-USBKabel ode r eing eeignete s,CE- zertifiziertes Netzteil mitde r korrekten USB-Ausgangsleistung.
Versorge nS ie das Produkt mite ineme xternen5 V DC 1A Netzte il.Dermaximale Ausgangsstrom beträgt 1 A,
geschützt durcheine interne Schaltung.
Bevor Sie I hrPro duktladen, stellenSie sicher,d assd ie verfügbare Netzsp annung den Bet riebsanforderungend es
Prod ukts entspricht.
Page 29

10.
TrennenS ie das Produkt vond er Ladeq uelle, wennS ie es länge rnichtverw enden (we nnSie z.B.inUrlaubfahren).
11.
TrennenS ie das Produkt vor einer Reinigung stets vo nde r Ladequelle.Verw enden Sie zumR einigen de s
Prod ukts keine Scheuerschwämme od er aggre ssivenRe inigungsmittel, da diese d ieO berfläche des Pro dukts
beschädigen können.
12.
Entfernen Sie keine Schrauben,umd asR isiko eines Stromschlagszu verringern.DasI nnere d es Pro duktse nthält
keinevo mBe nutzerre parierbarenT eile.Re paraturende s Produkts solltenausschließlichdurchzugelassenes
Fachpersonale rfolgen.
Ummög liche Gehörschäden zuverme iden,verw enden Sie das Ge rätnichtlängere Ze itb eihoher Lautstärke.
Dasdauerhafte Hö renmit Kop fhörern bei hoherLautstärke kannIhr Ge hörschädigen.Übe rprüfenS ie stets d ie
Lautstärke,b evor Sie d ie Höre r indie Ohrenst ecken.Die Verwendung vonK opfhöre rn,die nicht vonP ure
stammen,kannzu Ge hörschäden führen,dad ie Warnungf ürhohe Lautstärke aufde m Ge rätmög licherweise
ungenauist.Die Verw endungvon Kop fhörern beim Ste uerneines Fahrzeugs wird nichte mpfo hlen und ist in
manchenLänderng eset zlichuntersagt.W ennI hrMove S ie beim Ste uerneines be lieb igenFahrzeugso der
irgendeiner Aktivität,die I hrevo lleAufmerksamkeite rforde rt,ablenkt,b eende nSie d ie Verwe ndung des
Move.
Benutzer:Die Batterie kannnichtvom Benutzer ausgetauscht we rden.Ve rsuchenS ie nicht,die interneBatte rie des
Prod ukts zue rsetze n.
Nur technischeMitarbeite r:We nndie Batterie fe hlerhaft ausgewe chseltwird, bes teht Explosionsge fahr.Ersetze nSie
sie nur durchBatteriend esse lben ode re ntsprechenden Typs.
Beim Ladend es Prod uktsunter direkter So nneneinstrahlung beste htVe rletzungsg efahr.LadenS ie das Produkt nur,
wenne s keinerd irektenS onneneinstrahlung ausgesetzt ist.
Sorg enS ie rund umd asPro duktf ürangemesse ne Belüftung undLuftzufuhr,be sonde rsw ährendde s Ladevorg angs.
Setze nS ie das Gerät nicht mehre in,wennwährend de s Betriebs Unrege lmäßigkeiten,z. B.hohe Te mperaturen,
Verfärbungen,Ausbuchtunge n,Undichtigkeiten usw.auftrete n.
Symbole a uf d em Produkt und im Benutzerhand buch
Pote nziellernstes Risikof ürIhre p ersönliche Sicherheit.Ummög liche Verletzungenod er tö dliche Ge fahrenzu
vermeide n,beachtenS ie alle mitd iesem Symbo lve rsehenenS icherheitshinweise.
3
Page 30

5V DC 1A
Achtung.Lese nSie vo rd er Verwe ndung das Benutzerhandbuch.
Achtung.Verwe nden Sie das Ge rätnichtlänge re Zeit be ihoher Lautstärke..
Gleichstromversorgung 5V,1A.
Einschaltende s Ge rätso der Verse tzen inde nStandby-Mo dus.
4
Page 31

Inhaltsverzeichnis
Einf ühru ng 1
Sicherheit 2
Inhaltsverzeichnis 5
Übersicht 6
Lieferumfa ng 6
Steue rungen 7
Anschlüsse 8
Anzeige 9
Erste Schritte 10
Aufla den I hres Move 10
Erstes Ein schalte n 10
Sperren u nd Entspe rren Ihres Move 11
Digitalradio 13
Hören von d igi tal en Rad iosen dern 13
Ändern des Ra diosen ders 13
Durchfü hren ei ner au tomatische n
Sende rsuche 13
UKW-Radio 14
Hören von U KW-Radi osend ern 14
Ändern des Ra diosen ders 14
Ändern der Suche inste ll unge n für
Radi osende r 14
Umschalt en zwischen Stereo- und Mono Empfan g 15
Favoriten 16
Spei chern von Fa voriten a uf
Spei cherpla tz1 oder2 16
Spei chern von Fa voriten i n der
Favori tenl iste 16
5
Aufrufen e ine s F avorite n 17
Kurzzeitmesser 18
Ein richten e ine s Sl eept imers 18
Einst ellungen 19
Uhrei nstel lun gen 19
Anzeige ein stell unge n 20
Ändern der Audi oein stell ung en 22
Ändern der Spra che 22
Rücksetzung au f die We rkseinstel lun gen 23
Aktuali sieren d er S oftware 23
Zurücksetzen der Batte rie 24
Technisch e Daten 25
Page 32

Übersicht
2 3
1
Lieferumfang
1 Move R3 3 Mikro-USB-Kabe l (nur zum Laden)
2 Ko pfhöre r
6
Page 33

Steuerungen
1 Lautstärkeregler
(Volume)
2 Back Drücken S ie, um zumvorher ige n Menü zurückzukehre n.
3 Menu Drücken Sie dies e Taste, um das Hauptmenü aufzurufen.
Drücken Sie dies e Taste, um die Lautstärke anzupasse n.
7
Page 34

4 Zurü ck Drücken Sie diese Taste, umden vor herig en Radiosende r od er
2
1
5 Select Dr ücken Sie di ese Taste, um einen Radiose nder o de r eine
6 Weiter Drücken Sie dies e Taste, um den nächsten Radio sender oder
7 Favoriten Drücken Sie dies e Taste, um Ihre Favoriten abzusp iele n. Halten
8 Einsch alten/Sperren
die vorangeg angene Menüoption auszuwählen.
Menüoption auszuwählen.
die nächste Menüoption auszuwählen.
Sie s ie g edr ückt, um de n aktuelle n Radiose nder als Favor iten z u
spe ichern.
Schieb en Sie d en Reg ler and ie P ositio n , um die T asten zu
spe rre n. Schieben S ie den Regler an die mittlere Positio n, um
die Tasten zu entspe rre n.
Schieb en Sie d en Reg ler and ie P ositio n , um das Move
einzuschalten. S chiebe n und halten Sie ihn an de r Po sition , um
das Move auszuschalten.
Anschlüsse
1 3,5-mm-Kopfhörer buchse
2 Mikro-USB-Anschluss
8
Page 35

Anzeige
1
3
4
2
1 Sleeptimer ist aktiv 3 Batterie lade stand
2 Aktuelle U hrzeit 4 Textbere ich
9
Page 36

Erste Schritte
Lesen Sie die Sicherheitsinformationen auf Seite2,bevor Sie Ihr M ove
verwenden.
Aufladen Ihres Move
1. Stecken Siedas Mikro-USB-Kabel in den Mikro-USB-Anschluss an Ihrem
Move.
2. Stecken Sie das andereEnde des M ikro-USB-Kabels mithilfe einesU SBNetzsteckers in die Steckdose.Siekönnen die Batterie auch aufladen, indem
SieIhr Move an den USB-Anschluss eines Computers anschließen.
Das Symbol auf dem Bildschirm zeigt, dass die Batterie geladen wird.
Erstes Einschalten
Bevor Sie Ihr Move zum ersten Mal einschalten, laden Sie die Batterie
mindestens3Stunden lang auf.
10
Page 37

1. Stecken Siedie Ohrhörer in die entsprechende Buchse Ihres Move ein.
Die Ohrhörer dienen zugleich als Antenne für das Move.
2. Schieben Sie den Reglerfür das Einschalten/Sperren in die Position und
lassen Sie ihn dann los.
Das Move wird eingeschaltet und beginnt m it der Suche nach digitalen
Radiosendern. Nachdem die automatische Sendersuche abgeschlossenist,
können Sie Digitalradio hören.
Sperren und Entsperren Ihres Move
Siekönnen die Tasten Ihres Move sperren, damit diese nicht v ersehentlich gedrückt
werden.
Wenn Ihr Move ausgeschaltet ist, sperren Sie die Tasten,damit das Gerät nicht
versehentlich eingeschaltet wird.
11
Page 38

1. Um dieTasten IhresMove zu sperren, schieben Sie den Regler für das
Einschalten und Sperren in die Position .
2. Um die Tasten IhresMove zu entsperren, schieben Sie den Regler für das
Einschalten und Sperren in die mittlere Position.
12
Page 39

Digitalradio
Hören von digitalen Radiosendern
Wenn Sie UKW-Radio hören, können Sie auf Digitalradioumschalten.
1. Drücken Sie Menu.
2. Drücken Sie und Select, um DigitalRadioauszuwählen.
Ändern des Radiosenders
1. Drücken Sie oder , um durch die verfügbaren Radiosender zu blättern.
2. Drücken Sie Select, um einen Sender auszuwählen.
Durchführen einer automatischen Sendersuche
Wenn Sie Ihr Move zum ersten Mal einschalten, sucht es automatisch nach
Radiosendern. Um erneut nach digitalen Radiosendern zu suchen, führen Sie eine
automatische Sendersuche durch.
1. Drücken Sie Menu.
2. Drücken Sie und Select, um Aut. Suche auszuwählen.
13
Page 40

UKW-Radio
Hören von UKW-Radiosendern
Wenn Sie Digitalradio hören, können Sie auf UKW-Radio umschalten.
1. Drücken Sie Menu.
2. Drücken Sie und Select, um UKW-Radio auszuwählen.
Ändern des Radiosenders
l Halten Sie oder gedrückt, um zum vorhergehendenbzw. nächsten Sender
zu wechseln.
l Um eine bestimmte Sendefrequenzaufzurufen,drücken Sie oder , um eine
höhere oder geringere Frequenzzu wählen. Die Frequenzen werden in
Schritten von 0,05 MHz durchlaufen.
Ändern der Sucheinstellungen für Radiosender
Wenn Sie gedrückt halten, um den Radiosender zu wechseln, können Sie alle
Radiosender einschließen oder nur solche mit starkem Signal.
1. Drücken Sie Menu.
2. Drücken Sie und Select, um Suchlauf-Einstellungauszuwählen.
3. Drücken Sie und Select, um Nur kräftigeSenderoder Alle Sender
auszuwählen.
14
Page 41

Umschalten zwischen Stereo- und Mono-Empfang
Standardmäßig verwendet das Move Stereo-Empfang für UKW-Sender.Wenn das
Signal eines Radiosenders schwach ist, kann die Signalstärke durch Mono-Empfang
eventuell verbessert werden.
1. Drücken Sie Menu.
2. Drücken Sie und Select, um Stereoauszuwählen.
3. Drücken Sie und Select, um UKW stereooderMonoauszuwählen.
15
Page 42

Favoriten
Siekönnen Ihre Lieblingssender als Favoriten speichern.
Auf der Vorderseite IhresMove befinden sich drei Favoritentasten.Mit der Taste 1
oder 2 können Sie schnell auf Ihre Lieblingssenderzugreifen. Mit derTaste 3+ öffnen
Sieeine Liste aller gespeicherten Sender (Programmliste).
In der Liste können Sie bis zu 10 digitale Radiosender und bis zu 10UKW-Sender
speichern.
Speichern von Favoriten auf Speicherplatz1 oder2
1. Stellen Sie den Sender ein, den Sie speichernmöchten.
2. Halten Sie 1 oder 2 gedrückt, bis Favorit gesp. angezeigt wird.
Falls auf dem gewählten Speicherplatz bereits ein Sender gespeichert ist,
wird dieserdurch den neuen Sender ersetzt.
Speichern von Favoriten in der Favoritenliste
1. Stellen Sie den Sender ein, den Sie speichernmöchten.
2. Halten Sie die Taste 3+ gedrückt, bis die Programmliste angezeigt wird.
3. Drücken Sie und Select, um einen bestimmten Favoriten auszuwählen.
Falls auf dem gewählten Speicherplatz bereits ein Sender gespeichert ist,
wird dieserdurch den neuen Sender ersetzt.
16
Page 43

Aufrufen eines Favoriten
l Um den Favoriten1 oder2 aufzurufen, drücken Sie1 oder2.
l Um einen beliebigenFavoriten aufzurufen, drücken Sie3+; daraufhin wird die
Favoritenliste geöffnet. Drücken Sie und Select, um einen bestimmten
Favoriten auszuwählen.
17
Page 44

Kurzzeitmesser
Einrichten eines Sleeptimers
Der Sleeptimer schaltet Ihr Move nach einer bestimmten Zeit aus.
1. Drücken Sie Menu.
2. Drücken Sie und Select, um Sleeptimerauszuwählen.
3. Drücken Sie und Select, um die Dauer des Timers auszuwählen.
wird auf dem Bildschirm angezeigt und der Timer beginnt,
herunterzuzählen.
Um den Sleeptimer abzubrechen, öffnen Sie das Menü Sleeptimerund wählen
SieSleep aus.
18
Page 45

Einstellungen
Der aktuelle Wert für die meisten Einstellungen wird auf dem Bildschirm durch
einenAsterisk (*) gekennzeichnet.
Uhreinstellungen
Einstellen von Uhrzeit und Datum
1. Drücken Sie Menu.
2. Drücken Sie und Select, um Uhr> Zeit/Datum einstellen auszuwählen.
3. Drücken Sie und Select, um die Uhrzeit gefolgt vom Datum einzustellen.
Ändern des Uhrzeit- oder Datumsformats
1. Drücken Sie Menu.
2. Drücken Sie und Select, um Uhrauszuwählen.
3. Geben Sie an, ob das U hrzeit- oder Datumsformat geändert werden soll.
l Um das Uhrzeitformat zu ändern,drücken Sie und Select, um 12/24
Std. einstellen auszuwählen.
l Um das Datumsformat zu ändern,drücken Sie und Select, um
4. Drücken Sie und Select, um ein Format auszuwählen.
19
Datumsformat einst. auszuwählen.
Page 46

Anpassen der Aktualisierung der Uhr
Ihr Move kann seine Uhr automatisch über das UKW- oder Digitalradio-Signal
aktualisieren.
1. Drücken Sie Menu.
2. Drücken Sie und Select, um Uhr> Autom. update auszuwählen.
3. Drücken Sie und Select, um einzustellen, wie die Uhr aktualisiert werden
soll.
Anzeigeeinstellungen
Ändern der auf dem Bildschirm angezeigten Informationen
1. Drücken Sie Menu.
2. Drücken Sie und Select, um Anzeige> Info auszuwählen.
3. Drücken Sie und Select, um eine Einstellung auszuwählen.
l Lauftext. Zeigt die durch den Radiosender bereitgestellten
Informationen (wie z.B den Titel des aktuellen M usikstücks und den
Interpreten).
l Signalqualität. Zeigt die Signalqualität von 0 bis 100 der aktuellen
Funkstation an. Nur für Digitalradio verfügbar.
l Signalstärke. Zeigt die Signalstärke des aktuellen Senders an. Nur für
Digitalradio verfügbar.
l Datum. Zeigt das heutige Datum an.
20
Page 47

Ändern der Anzeigehelligkeit
1. Drücken Sie Menu.
2. Drücken Sie und Select, um Anzeige> Helligkeitauszuwählen.
3. Drücken Sie und Select, um eine Helligkeitsstufe auszuwählen. Um den
Bildschirm heller zu machen, wählen Sie eine hohe Zahl aus.
Standardmäßig wird der Bildschirm ausgeschaltet, nachdem 10Sekunden lang
keine Aktivität erfolgt ist. Um den Bildschirm dauerhaft einzuschalten, drücken
SieMenuund wählen Sie Anzeige> Dauer> Immer an.
21
Page 48

Ändern der Audioeinstellungen
Mit dem Equaliser können Sie das Beste aus Ton und Musik herausholen. Es sind
bereits diverse Equaliser-Einstellungen eingerichtet. Um beispielsweise den
optimalen Klang für klassische Musik zu erhalten, setzen Sie die EqualiserEinstellung auf Klassik. Sie können einen Equaliser auch anpassen, um die Höhen
und Bässe zu ändern.
1. Drücken Sie Menu.
2. Drücken Sie und Select, um Audio auszuwählen.
3. Wählen Sie eine Equaliser-Einstellung aus.
l Um eine vorhandene Equaliser-Einstellungauszuwählen, drücken Sie
und Select. Siekönnen zwischen Normal,Rock, Pop, Klassik,Jazz
und Nachrichtenauswählen.
l Um den Equaliser anzupassen, drücken Sie undSelect, um
Individuell auszuwählen. D rücken Sie dann und Select, um die
Höhen und Bässe anzupassen.
Ändern der Sprache
1. Drücken Sie Menu.
2. Drücken Sie und Select, um Einstellungen> Sprache auszuwählen.
3. Drücken Sie und Select, um eine Sprache auszuwählen.
22
Page 49

Rücksetzung auf die Werkseinstellungen
Wenn Sie Ihr Move auf die Werkseinstellungenzurücksetzen, werden gespeicherte
Favoriten sowie die Senderliste gelöscht und alle Einstellungen auf die
Standardvorgabenzurückgesetzt.
Eine Rücksetzung auf Werkseinstellungen kann nicht rückgängiggemacht
werden.
1. Drücken Sie Menu.
2. Drücken Sie und Select, um Einstellungen> Werkseinstellung
auszuwählen.
3. Drücken Sie und Select, um Ja auszuwählen.
Aktualisieren der Software
Unter Umständenstellt Software-Updatesfür das Move zur Verfügung. Auf
support.pure.com können Sie feststellen, ob Software-Updates verfügbar sind.
Siekönnen Ihr Produkt unter account.pure.com registrieren,damit Sie
benachrichtigt werden, wenn Software-Updates verfügbar sind.
Hinweis: D as Ihrem Move beiliegendeMikro-USB-Kabel unterstützt keine
Software-Updates. Zur Aktualisierungder Software v erwenden Sie ein
Mikro-USB-Datenkabel.
23
Page 50

Zurücksetzen der Batterie
Wenn die Steuerungen Ihres Move nicht mehr reagieren, setzen Sie die Batterie
zurück.
l Drücken Sie die Reset-Taste an der Unterseite Ihres Move m ithilfe einer
Büroklammer, um die Batterie zurückzusetzen.
24
Page 51

Technische Daten
Radio DAB/DAB+ und U KW (RDS)
Frequenze n Digi tal : Band I II 174–240 MHz, UKW 87,5-108MHz
Kopfhörer 32 Ohm 14-mm-Treiber
Empfäng er-Stromversorgung 5V(1 A) DC Mikro-USB (Ka bel l ie gt bei)
Eingä nge 5VDC ( 1A) Mikro-USB-Anschlu ss ( auch fü r So ftware-U pdate s)
Ausgän ge 3 ,5-mm-Buchse f ür Stereo-Kopf hörer
Favoriten 10 di gita le F avoriten spei cherplä tze, 10UKW-F avorite nspei cherplä tze
Anzei ge 1,6 Zol l OLED
Software-Version v1.0
Betriebstemperatur 0° C bi s +40° C
Abme ssungen 102mm (H) x 56mm (B) x 15mm (T)
Gewicht 100g
Antenn e Die beil iege nden Oh rhörer fung ieren a ls Anten ne
Zulassung en CE-zertifi ziert
25
Wied erauf lad bare Lith ium-Ion en-Ba tterie ( 1000 mAh)
Das be il iege nde Mikro-USB-Kab el i st n ur für Ladevorgä nge ge eign et
Hie rmit e rklärt Pure In ternat iona l Ltd, d ass diese s Ra dio , Modell Move R3,
den we sentli chen Anfo rderunge n und a nde ren Vorschriften der Ri chtli nie
2014/53/EU ( RED) e ntspricht. Die vol lstän dig e Konformitä tserklärun g kann
unte r ht tp://www .pure. com/abou t/red ein gesehe n werden .
Page 52

Korrekte EntsorgungdiesesProdukts
Copyright
Copyri ght2017 b y Pu re I nterna tio nal Limited. All e Rechte vorbeh al ten. Je gli che Vervielfä lti gun g diese r
Publ ikati on– a uch au szugswei se– sowi e ihre Verbrei tung, Übermittl ung, Abschrift, Speiche rung in eine m
Date nverarbei tun gssystem oder Üb ersetzung i n ei ne na türli che Sprach e oder Programmiersprache in
jeg liche r F orm, sei es el ektronisch, mecha nisch, magnetisch, manuel l ode r a nderwe iti g, sowi e jeg lich e
Offenl egun g an D ritte i st o hne a usdrückliche schriftli che Zustimmung du rch P ure Inte rnati ona l Limited
unte rsagt. I nformati onen zu r Ga rant ie un d zu Haf tungsa usschlü ssen fin den Si e au f pure. com.
Marken
Move, Pure un d das Pure -Logo si nd Marken ode r e inge tragen e Marken von Pure In terna tion al Limi ted. All e
and eren Produ ktnamen sin d Marken ihrer j ewei lig en Un terneh men. Version 1, F ebrua r2016.
Die se Markierung we ist da rauf hi n, d ass die ses P rodukt i nn erhal b der EU n icht zusammen mit
and eren Ha usha ltsa bfäl len entsorgt werden d arf. U m Gesu ndhe its- oder Umwel tschäde n
durch unkon trolli erte Abfal le ntsorgun g zu vermeiden, sorgen Sie für ei n veran twortung svolle s
Recycling. Sie ermögl ichen d amit gl eichzei tig e ine nachha lti ge Wie derverwendu ng von
Ressourcen. Wenn Si e Ihr geb rauchtes Ge rät zurückgeben wo ll en, n utzen Si e da s Rü ckgab eund Sa mmelsystem, oder wend en Si e sich an den Hän dle r, bei d em Si e da s G erät gekau ft
hab en. D iese St ell en könne n das Produ kt ei nem umwel tgerechten Recycli ng zufüh ren.
26
Page 53

Introduction
Merci d’avoir choisi le MoveR3. Ce manuel
utilisateur va vous permettre de profiter au
mieux et au plus vite de votre produit.
Si vous avez besoin d'aide, alors visitez le site
support.pure.com.
1
Page 54

2
Sécurité
Avant d'utiliser votre Move R3, lisezles instructions de sé curité suivantes.
1.
Lisezt outes les instructionse t les informationsre latives à lasécurité avant d'utiliserle p roduit.Lorsq uece prod uit est
confié àuntiers, joignez-y tous les documents.
2.
Le non-respect d e ces instructions d’utilisationp eut comprome ttre lasé curité de votre p roduit et en invaliderla
garantie.
3.
Le prod uitne doit p asê tre exp osé à de s éclaboussureso uà de s gouttes d 'eau.Ne pose z pas d'objet sre mplis
de liquides,te lsq ue des vases, surle p roduit.
Siun liquide ou de l'eaue st déve rsé( e) sur le prod uit,alors éte ignez-le immédiatement et contactez votre
revende ur.
Sivo usutilisez unadaptate ursecte ur,alorsne to uchez jamaisle p roduitavec d es mains mouillées.
4.
Labatte rie interne de ce pro duitne pe utp asê tre remp lacée parl'utilisateur.N'exposez p asla batterie à une chaleur
excessive o uà une flamme nue. Assurez-vousq ue laventilatione t lacirculation d’air autour dup roduit sont
adéquates, en particulierp endantlacharge. Mette zle p roduit aurebut conformé mentaux réglementationslocales
relativesà lapro tection de l'environnement.
5.
L'utilisationdu prod uitdansd es p ièces humides ou sous de s climatso ùles te mpératures et l'humidité sont élevée s
peut entraînerlaf ormationde condensationà l'intérieurdu prod uit,s usceptible de l'endommage r.N'utilisez le
prod uit que sous de s climatst empé rés.
6.
N'utilisez pas votre p roduit dansde s conditionse xtrêmes d e chaud ou de fro id.T enez le prod uit àl'écart des
sources de chaleur,tels que les radiateursou les chauffages à gaz ou électriques.N'expo sez p asvot re prod uità
une flamme nue, telle qu'une bougie allumée.
7.
Pour charger vo tre prod uit,raccordez-le uniquement à une alimentationsatisfaisantauxe xigences de sécurité
relativesà l’isolationde lanorme EN60065 ou de lanorme EN60950-1 concernant les circuitsaccessibles à très
basse te nsion de sé curité. Pour ce raccordeme nt,utilisez soit le câblemicro-USB fo urnisoit unadaptate ursecte ur
homologuéCE,dé livrantlab onnep uissanced e so rtie USB.
8.
Alimenter le prod uità l'aide d'unealimentation externe 5 V CC 1A. Le courant de so rtie maximume st de 1 A,p roté gé
par uncircuitinterne.
9.
Avant de charger votre prod uit,assurez-vous que late nsiond'alimentationse cteurd isponibleco rrespo ndb ienà la
tensiond e fonctionnementre quise pour le prod uit.
Page 55

10.
Débranchez votre prod uit de l'alimentationsecte ursi vousne l'utilisez pas pendantune pé riode p rolongée ( par
exemp le,lorsque vo usparte z envacances).
11.
Débranchez toujoursvo tre pro duitde l’alimentationse cteuravantd e le nettoye r.Lorsq uevo usnetto yez le pro duit,
n'utilisez aucuntampon abrasifniso lutiond e netto yage abrasive,carce ux-cipourraientendo mmager sasurface.
12.
Pour éviter tout risque d’électrocution,ne retirez aucune vis.Le prod uitne contientaucune pièce s usceptible d'être
réparée par l'utilisateur.Les réparationsd up roduitd oivent être e ffe ctuées uniquement par dup ersonnel agréé.
Afind’éviter d’éve ntuels dommage s auditifs,n’écoutez pas de musique à unniveauso nore élevé p endantd es
périod es pro longées. Unee xposition constante à de svo lumes so nores élevés p rovenantd ’écouteursp eut
endommage rvo tre ouïe.Vé rifiezto ujours le volumeso nore avant d’insérer les é couteursd ansvos o reilles.
L'utilisationd'éco uteursautres que ceux fournispar Pure pe utvous exp oser à de s dommages auditifs,car
l'avertissement de volumeé levé surl'appareilp eut être inexact.L'utilisation d’écouteurs lorsd e laco nduite d’un
véhiculen’est pas conseillée;elle est mê me illégale dans certains endroits. Sivo uspe nsez que l’utilisationde
votre Mo ve est une source de d istraction encas de conduited ’unvé hicule ou d’exécutiond ’une tâche
requérant une concentrationtotale, alorscess ez d’utiliser votre Move .
Utilisateur:Lab atterie n’estp asre mplaçable par l'utilisateur.N’essayez pas de re mplacerlab atterie interned e ce
prod uit.
Perso nnel de maintenance:Le remplacement incorrect d e labatte rie risqued e pro voquer une explosion.
Remplacez-launiquementp arune batterie de même typ e ou de t ype é quivalent.
Risque de b lessure sil’appareilen charge e st exp osé d irectement auxrayonsd uso leil.Chargez le prod uituniquement
lorsqu'ilest à l’abride s rayonsd irectsd uso leil.
Assurez-vousq ue laventilatione t lacirculation d’air autour dup roduit sont adéquates, en particulierpe ndantlacharge.
Cessez d 'utiliser l'appareils'ily ad es anomalies pe ndant le fonctionnement, telles qu'une temp érature élevée ,une
déco loration,unre nflement,unef uite, etc.
Symboles présents sur l e produit et dans le m anue l utili sateur
Risque pot entielgrave p ourvo tre sécurité pe rsonnelle. Pour éviter toute b lessure outo utaccident morte l,
respe ctez to utes les consignesd e sécurité accompagnées d e ce symbo le.
Attention.Lisez le manuelutilisateuravantutilisation.
Attention.Évitez d ’écouter de la musique àunniveauso nore élevé p endantd es pé riodes p rolongées .
3
Page 56

5V DC 1A
Alimentation5VCC,1A.
Quand allumervo tre pro duito ule mettre en veille.
4
Page 57

Contenu
Introduction 1
Sécurité 2
Contenu 5
Présentation 6
Con tenu de la boî te 6
Commande s 7
Raccordements 8
Affichag e 9
Démarrage 10
Cha rge de votre Move 10
Première mise en route 10
Verrouil lag e et déverroui ll age d e votre
Move 11
Radio numérique 13
Écoute de l a ra dio nu mérique 13
Cha nge ment de stati on rad io 13
Syntoni sati on au tomati que 13
Radio FM 14
Écoute de l a ra dio FM 14
Cha nge ment de stati on rad io 14
Modifi catio n des para mètres d e recherche
des stati ons radi o 14
Bascule ment entre récepti on Stéré o et
Mono 15
Station s mémorisées 16
Enregi strement de sta tion s mémorisée s
dan s l a mémoire 1 ou 2 16
Enregi strement de sta tion s mémorisée s
dan s l a l iste de mémorisa tion 17
5
Écoute de sta tio ns mémorisées 17
Minut eurs 18
Paramétra ge d'un min uteur de mi se en
veil le 18
Paramètres 19
Paramètres d'ho rloge 19
Paramètres d'a fficha ge 20
Modifi catio n des régl ages a udio 22
Modifi catio n de la lan gue 2 2
Rétabl issemen t d es para mètres d'usi ne 23
Mise à j our du l ogici el 23
Réin iti ali sati on de l a ba tterie 24
Spécification s 25
Page 58

Présentation
2 3
1
Contenu de la boîte
1 Move R3 3 Câble micro USB (uniquement pour l’alimentation)
2 É couteurs
6
Page 59

Commandes
1 Volume App uyez sur ce b outon p our modifier le volume.
2 Back Appuyez sur ce bouton pour revenir au menu pré cédent.
3 Menu Appuyez sur ce bouton pour accéder au menu principal.
7
Page 60

4 Précédent Appuyez sur ce b outon pour sélectionner la station radio
2
1
5 Select Appuyez s ur ce bo uton pour s éle ctionner une station radio
6 Suivant Appuyez sur ce bouton pour sélectionner la station radio
7 Stations mémorisées Appuyez sur ce bouton pour accéder à vos stations
8 Alimentation/Verrouillage
pré céd ente ou une option du menu.
ou une option du menu.
suivante ou une optio n du menu.
mémorisé es. Appuyez s ur ce bouton et maintenez-le
enfoncé po ur e nreg istrer la station rad io courante dans une
mémoire.
Faites glisser le bouton en position pour ve rrouiller
toutes les touches. Faites glisse r le bouton en
pos itioncentrale pour déverr ouille r toutes les touches.
Faites glisser le bouton en position pour allumer vo tre
Move. Faites glisse r le bouton en po sition et maintenez-le
enfoncé po ur é teindre votre Move.
Raccordements
1 Pris e casque3,5mm
2 Pris e micro U SB
8
Page 61

Affichage
1
3
4
2
1 Minuteur de mise en ve ille actif 3 N iveau de la batterie
2 Heure actuelle 4 Zone de texte
9
Page 62

Démarrage
Avant d’utiliser votre M ove, lisez toutes lesinformations relatives à la sécurité
détaillées en page2.
Charge de votre Move
1. Raccordezle câblemicro USB au port micro USB de votre Move.
2. Raccordez l’autre extrémité du c âble micro USB à une prise secteur à l’aide
d’unadaptateur secteur USB. Vouspouvez également charger la batterie en
branchant v otre Move au port USB d’unordinateur.
Sur l’écran, l’icône indiquela charge de la batterie.
Première mise en route
Avant de mettre en route votre Move pour la première fois, c hargezla batterie
pendant au m oins3heures.
10
Page 63

1. Branchez v os écouteurs sur la prise casque de votre Move.
Les écouteurs servent également d’antenne pour votre Move.
2. Faites coulisserle commutateur Alimentation/Verrouillage en position puis
relâchez-le.
Votre Move s’allume et commence par se syntoniser sur les stations radio
numériques. Une fois la syntonisation achevée, vous pourrez commencer à
écouter la radio numérique.
Verrouillage et déverrouillage de votre Move
Vouspouvezverrouiller les touches de votre Move, de manière à ce qu’elles ne
soient pas presséespar inadvertance.
Lorsque votre Move est éteint, verrouillez les touches pour ne pas l’allumer
accidentellement.
11
Page 64

1. Pour verrouillerles touches de votre M ove, faites glisserle commutateur
Alimentation/Verrouillageen position .
2. Pour déverrouiller les touches de votre Move, faites glisser le commutateur
Alimentation/Verrouillageen positioncentrale.
12
Page 65

Radio numérique
Écoute de la radio numérique
Lorsque vous écoutez la radioFM, vous pouvez basculer en radio numérique.
1. Appuyezsur Menu.
2. Appuyez sur et sur Select pour choisir Radio numérique.
Changement de station radio
1. Appuyezsur ou sur pourbalayer les stations radio disponibles.
2. Appuyez sur Select pour sélectionner une station radio.
Syntonisation automatique
Lorsque vous allumez votre Move pour la première fois, l’appareil recherche
automatiquement les stations radio. Pour rechercher une nouvellefois les stations
radionumériques, lancez une syntonisation automatique.
1. Appuyezsur Menu.
2. Appuyez sur et sur Select pour choisir S yntonisationauto..
13
Page 66

Radio FM
Écoute de la radioFM
Lorsque vous écoutez la radionumérique, v ous pouvez basculer en radioFM.
1. AppuyezsurMenu.
2. Appuyez sur et sur Select pour choisir Radio FM.
Changement de station radio
l Pour aller à la station radio précédente ou suivante, appuyezet maintenez
enfoncé ou .
l Pour vous syntoniser sur une fréquence radio spécifique, appuyez sur ou
pouraugmenter ou diminuerla fréquence. Les fréquences augmentent ou
diminuent par pas de 0,05MHz.
Modification des paramètres de recherche des stations radio
Lorsque vous appuyezet maintenez enfoncé pour rechercher des stationsradio,
vous pouvez inclure toutesles stations radio ou seulement celles dont le signal
d'émission est fort.
1. Appuyezsur Menu.
2. Appuyez sur et sur Select pour choisir Régl. recherche.
3. Appuyezsur et sur Select pour choisirStations fortesou Toutes chaînes.
14
Page 67

Basculement entre réception Stéréo et Mono
Par défaut, votre Move est réglé sur la réception Stéréo pour la radioFM. Si vos
stations radio émettent des signaux faibles,alorsla réceptionMono peut augmenter
l'intensitédu signal.
1. Appuyezsur Menu.
2. Appuyez sur et sur Select pour choisir S téréo.
3. Appuyezsur et sur Select pour choisirFM stéréoou Mono.
15
Page 68

Stations mémorisées
Vouspouvezenregistrervos stationsradiofavoritesdansles mémoires.
En face avant de votre Move, se trouvent trois boutons de mémorisation.Utilisez les
boutons 1 ou 2 pour accéderrapidement à vos stationsradiofavorites. U tilisez3+
pouraccéder à la liste de toutes vos stations mémorisées.
Dans la liste de mémorisation, vous pouvezenregistrer jusqu'à 10stations radio
numériques et jusqu'à 10stations radio FM.
Enregistrement de stations mémorisées dans la
mémoire1 ou2
1. Recherchez la fréquence de la station radio que v ous souhaitezmémoriser.
2. Appuyez et maintenezenfoncé 1 ou 2 jusqu’à ce que Présél. mém.sée
s’affiche.
Si une station radio était déjà enregistréedansla m émoire que vous avez
sélectionnée, alors la nouvelle station va remplacer l'ancienne.
16
Page 69

Enregistrement de stations mémorisées dans la liste de mémorisation
1. Recherchez la fréquence de la station radio que v ous souhaitezmémoriser.
2. Appuyez et maintenezenfoncé le bouton3+ jusqu'à ce que la liste de
mémorisation s'affiche.
3. Appuyezsur et sur Select pour choisirun numérode mémoire.
Si une station radio était déjà enregistréedansla m émoire que vous avez
sélectionnée, alors la nouvelle station va remplacer l'ancienne.
Écoute de stations mémorisées
l Pour écouter la station mémorisée1 ou2, appuyez sur1 ou sur2.
l Pour écouter n'importe quellestation mémorisée, appuyez sur3+ pour
accéder à la liste de mémorisation. Appuyez sur et sur Select pour choisir
un numéro de mémoire.
17
Page 70
Minuteurs
Paramétrage d'un minuteur de mise en veille
Le minuteur de mise en veille met v otre Move en veille à l'issue de la durée
paramétrée.
1. Appuyezsur Menu.
2. Appuyez sur et sur Select pour choisir Minuterie veille.
3. Appuyezsur et sur Select pour choisirla duréedu minuteur.
s’affiche à l’écran et le minuteur démarre le compte à rebours.
Pour supprimer le minuteur de mise en veille, allez dansle menu Minuterieveille
et sélectionnez Arr.mode sommeil.
18
Page 71

Paramètres
Pour la plupart desparamètres, la valeur courante est repérée à l’écran par un
astérisque(*).
Paramètres d'horloge
Paramétrage de l'heure et de la date
1. Appuyezsur Menu.
2. Appuyez sur et sur Select pour choisir Horloge> Régl. heure/date.
3. Appuyezsur et sur Select pour régler l’heure puis la date.
Modification du format de la date ou de l'heure
1. Appuyezsur Menu.
2. Appuyez sur et sur Select pour choisir Horloge.
3. Choisissez de modifier le format de l'heureou celui de la date.
l Pour modifier le format de l'heure, appuyezsur et sur Select pour
choisir Régl.12h/24h.
l Pour modifier le format de la date, appuyez sur et sur Select pour
4. Appuyezsur et sur Select pour choisirun format.
19
choisir Régl.format date.
Page 72

Modification de la mise à jour de l'horloge
Votre Move peut mettre à jour automatiquement son horloge à l’aide du signal
radioFM ou du signal radionumérique.
1. Appuyezsur Menu.
2. Appuyez sur et sur Select pour choisir Horloge> MAJ automatique.
3. Appuyezsur et sur Select pour choisirla manière dont l’horlogese met à
jour.
Paramètres d'affichage
Modification des informations affichées à l'écran
1. Appuyezsur Menu.
2. Appuyez sur et sur Select pour choisir Affichage> Infos.
3. Appuyezsur et sur Select pour choisirun réglage.
l Texte défilant. Affiche lesinformations fournies par la stationsradio,
comme le titre de la chanson diffusée et le nom de l’artiste.
l Qualité signal. Affiche la qualité du signal, entre0 et100, de la station
radioen coursde diffusion. Uniquement disponible pour une station
radionumérique.
l Intens.signal. Affiche l'intensitédu signal de la station radio en coursde
diffusion.Uniquement disponible pour une station radio numérique.
l Date. Affiche la date du jour.
20
Page 73

Modification de la luminosité de l'affichage
1. Appuyezsur Menu.
2. Appuyez sur et sur Select pour choisir Affichage> Luminosité.
3. Appuyezsur et sur Select pour choisirun niveau de luminosité. Pour rendre
l’affichage pluslumineux, choisissezune valeur plusélevée.
Par défaut, l’écran d’affichage s’éteint au bout de 10secondesd'inactivité. Pour
que l’écran d’affichage reste allumé en permanence, appuyez sur Menu et
sélectionnez Affichage> Durée> Toujours actif.
21
Page 74

Modification des réglages audio
Utilisez l'égaliseur pour profiter au mieux de votre rendu audio. Plusieurs paramètres
d'égaliseur sont préréglés. Par exemple, pour bénéficier de la meilleure écoute pour
la musiqueclassique, réglezles paramètres de l'égaliseur sur Classique. Vous
pouvezégalement personnaliser l’égaliseurpourmodifier les aigus (treble) et les
basses.
1. Appuyezsur Menu.
2. Appuyez sur et sur Select pour choisir Audio.
3. Choisissez un paramétrage de l'égaliseur.
l Pour choisir un paramétrage d'égaliseur existant, appuyez sur et sur
Select. Vous pouvez également c hoisirNormal, Rock, Pop, Classique,
Jazz ou I nformations.
l Pour personnaliser l’égaliseur,appuyezsur et sur Select pour c hoisir
Personnalisé. Puis appuyez sur puis sur Select pour modifier les
aigus(treble) et les basses.
Modification de la langue
1. Appuyezsur Menu.
2. Appuyez sur et sur Select pour choisir Paramètres> Langue.
3. Appuyezsur et sur Select pour choisirune langue.
22
Page 75

Rétablissement des paramètres d'usine
Si vous rétablissezlesparamètres d'usine de votre Move, alors votre appareil vide
toutes les mémoires, supprime la liste desstationset réinitialise tousles paramètres
à leursvaleurs par défaut.
Vousne pouvez pas annuler un rétablissement desparamètres d'usine.
1. Appuyezsur Menu.
2. Appuyez sur et sur Select pour choisir Paramètres> Régl.en usine.
3. Appuyezsur et sur Select pour choisirOui.
Mise à jour du logiciel
Nous pouvons mettre à dispositiondesmises à jour logiciellespour améliorer votre
Move. Pour rechercher les misesà jour du logiciel disponibles, visitezl'adresse
suivante:support.pure.com.
Pour être informé(e) de la disponibilité desmises à jour du logiciel, vous pouvez
enregistrer votre produit sur: account.pure.com.
Remarque: Le câblemicro USB fourni avec votre Move n’est pas adaptépour
23
effectuer les misesà jour du logiciel. Pourmettre à jour le logiciel,
utilisezun câble de transmissionde données micro USB.
Page 76

Réinitialisation de la batterie
Si les commandes de votre Move cessent de répondre,alors vous devez effectuer
une réinitialisationde la batterie.
l Pour effectuer une réinitialisation de la batterie,utilisezun trombone pour
appuyer sur le boutonde réinitialisationsitué sur le côté de votre Move.
24
Page 77

Spécifications
Radio DAB/DAB+ et FM (RDS)
Fréquences Numérique : Ban deI II 174- 240MHz, FM: 87,5 -108MHz
Écouteurs Ci rcuit 32 Ohms, dia mètre f iche 14mm
Ali mentati on éle ctrique 5V(1A) CC , micro-USB (câbl e fou rni)
Entrées 5VC C (1A) p rise d'al imenta tion micro-USB (é gal ement pou r l es mises à j our
Sorties Prise casque Stéréo3, 5mm
Stations mém orisées 10sta tion s ra dio numéri ques et 10stat ions rad io FM
Affichage Écran OLED 1,6po uces
Version l ogiciel le v1.0
Tempé rature de
fonctionnem ent
Dime nsions 102mm (H) x 56mm ( L) x 15mm ( P)
Poids 100g
Antenn e Les é couteurs in tra-au ricula ires fon t offi ce d’ an tenne
Homol ogatio ns Marqua ge CE
25
Batteri e rechargea ble Li thiu m-ion (1000mAh)
du lo gicie l)
Le câ ble micro USB fou rni convie nt un ique ment pour l a charge
de 0° C à +40° C
Présente ment, Pure I nterna tion al Ltd, dé clare qu e cette radi o, modè le Move
R3 est conforme au x pri ncipa les exi gences de l a Di rective RED 2014/53/UE .
La Décla rati on de C onformité compl ète peu t être consul tée à l 'adresse
suiva nte: http://ww w.pu re.com/abou t/red.
Page 78

Miseau rebut adaptée de ce produit
Copyright
Copyri ght2017 d étenu par P ure Int ernati ona l Limited . Tou s d roits réservés. Aucune pa rtie d e cette
publ icati on n e peut êt re copi ée ou distribu ée, tra nsmise, tra nscrite, e nregi strée dan s u n système
d'archivag e ou trad uite e n la nga ge hu main ou informati que sou s q uel que forme que ce soi t, él ectroniqu e,
mécaniq ue, ma gnéti que, manuel le o u autre , ni d ivul guée à de tierces pa rties, e n tout ou e n pa rtie, sa ns le
consente ment préal abl e écrit et expl icit e de Pure I nterna tion al Li mited. Po ur des in formation s rel ati ves à la
gara ntie e t à la clause de non-respon sabi lit é, visi tez le si te pure. com.
Marquescommerciales
Move, Pure et l e log o Pure sont de s marqu es commercia les ou d es marques dépo sées de Pure I nterna tio nal
Limited. Tous les a utres noms de produ its sont de s marqu es commercial es de l eurs entrep rises respectives.
Version 1févrie r2016.
Ce marqu age i ndi que qu e, a u sei n de l'UE , ce produi t ne doi t pas être mi s a u rebut a vec l es
ordures ména gères. L'éli mina tion i ncontrôl ée de s dé chets pouva nt porter préj udice à
l'envi ronnemen t o u à l a san té humai ne, merci de l e recycler d e façon respo nsabl e pou r
promouvoir l'ut ili sati on du rable des ressou rces maté riell es. Po ur renvoyer votre a ncie n
appa reil , ut ili sez les systèmes de retou r et de collecte di sponi ble s o u contactez l e déta ill an t
chez qui vou s a vez acheté l e produ it. C eux-ci pe uvent procéde r a u recyclage du produit e n
toute sécuri té.
26
Page 79

Introduzione
Si ringrazia per avere scelto l'MoveR3. Leggere
il presente presente manuale d'uso per
utilizzare subito il prodotto.
Per ulteriori informazioni di assistenza tecnica,
visitare il sito support.pure.com.
1
Page 80

Norme di sicurezza
Primadi utilizzarelaradio Mo ve R3, legg ere le se guentinorme di sicurezza.
1.
Legg ere tutte le norme d isicurezzae le istruzionipe rl’uso primadi utilizzarel’apparecchio. Qualoral’apparecchio
vengace duto a terzi,allegare tuttii documenti.
2.
L'inosservanzade lle istruzioniper l'usofo rnitep otreb be p regiudicarela sicurezza del pro dotto e comp ortare il
possibile annullamentod ellagaranzia.
3.
Nones porre la radioa spruzzio gocce d’acqua.Nons istemaso pra laradio ogg etti pienid iliquidi,come vasi.
In casod iingresso d’acquanell’apparecchio,sp eg nerlosubito e contattareil rivenditore .
Qualora siutilizziunadattatore dire te, nonto ccarel’apparecchio con le manib agnate.
4.
Labatte riainternadel pre sente apparecchio nonpuò e ssere so stituita dall’utente. None sporre labatte riaacalore
eccessivo o a fiamme libe re.G arantire l’adeg uatave ntilazione de ll’apparecchio,spe cialmente durante laricarica.
Smaltire l’apparecchio osse rvando le norme ambientalilocali.
5.
L’utilizzo de ll’apparecchio inlocalio inclimimolto umidi o molto caldip uòp rovocare lafo rmazione di condensa nel
suo interno, conconseg uentidanni.Utilizzare l’apparecchioso lo inclimite mperati.
6.
Nonutilizzarel'apparecchioa te mperature tropp o basse o trop po alte. Tenere l’apparecchiolontanod af ontidi
calore, come caloriferi o stufe a gas/elett riche.Non esp orre l’apparecchio af iamme libere, come candele accese.
7.
Caricarel’apparecchiocollegandolo a unafonte di alimentazioneche sod disfii req uisitidi isolamento previstid alla
normadi sicurezzaUE60065 o UE6095 0-1 per uncircuito a bassissimatensione dis icurezzaaccessibile.E seg uire
laconnessione utilizzando ilcavo micro-USBind otazione o unadattatore d icorre nte omolog ato CE dallacorretta
corrente e rogata dallap resa USB.
8.
Alimentare ilprod otto utilizzando unalimentatore e sterno da 5 V CC1 A.La corrente d iuscitamassimaè di 1 A,
prote tta da uncircuitointerno.
9.
Primadi caricare l’apparecchio,accertarsiche late nsione di rete disponibileco rrispondaallatensione prevista pe ril
suo funzionamento.
10.
Staccarel’apparecchiod alcaricatore qualoranon siintendautilizzarlop er lunghipe riodid ite mpo ( ad ese mpio,se si
parte pe r unavacanza).
11.
Staccares empre la spinade ll’apparecchio dalcaricatore primadi pulirlo.P er pulirel’apparecchio, nonutilizzareun
panno abrasivo o soluzionidete rgenti abrasive pe rchép otre bbe ro danneggiarne lasupe rficie.
2
Page 81

12.
5V DC 1A
Per limitare ilrischio di scossa elettrica,nont ogliere le viti.L’appare cchio noncontiene compo nentiinternida
sotto porre amanutenzione.Le riparazionidell’apparecchio de vono essere ese guite esclusivamente da perso nale
autorizzato.
Onde evitare danniall’udito, nonascoltare lamusicaa volumitrop po altripe r lunghiperiod id ite mpo. Lacontinua
espo sizionea volumielevatiq uando si utilizzano gliauricolaripo trebb e causare danniall’udito. Controllare
sempre ilvolumep rimadi utilizzare gli auricolari.L'usod iauricolaridiverse d aq uelle fo rnite da Pure po treb be
espo rvia danniall'udito, inquanto l'avviso di volumealto suld ispositivop otre bbe esse re impreciso.S isconsiglia
di utilizzare gliauricolaridurante laguidad iunveicolo, che è comunquevietato inalcune zone. Qualoracisi renda
chel’ascolto dellaradio Move d istraggad allag uida o dall’azionamento di unveicolo o dallo svolgimento di
un’attivitàche richiede la massimaatte nzione, sico nsigliadi interrompere l’ascolto dellaradio Move .
Utente:La batteria nonpuò e ssere so stituitad all’utente. Nonso stituire lab atteriainternade ll’apparecchio.
Informazionide stinate aimanutentori:L’inserimento e rratod ellabatte riapuò pro vocare un’esplosione. Cambiare la
batteria conunaidenticao e quivalente.
Lacaricadell’apparecchio allaluce diretta del sole p uòp rovocare infortuni.Noncaricaremail’apparecchioallaluce
diretta de lsole.
Garantire l’ade guataventilazione dell’apparecchio,sp ecialmente durante laricarica.
Cessare di utilizzare ild ispositivo incasod ianomalie durante ilfunzionamento,ad ese mpio temp eraturaelevata,
scolorimento,rigonfiamento,p erdite e così via.
Simbo li riportati sul prodotto e nel m anua le d' uso
Possibile grave rischio all'incolumitàp ersonale.Onde e vitarelesioni anchemo rtali,o sservare tutte le istruzionid i
sicurezza checo ntengono questo simbolo.
Avvertenza.Legg ere il manuale primad ell'uso.
Avvertenza.Evitare l’ascolto de llaradioa volume tropp o alto per lunghiperiodi di temp o.
Alimentazioneinc.c.da 5V CCe 1A.
Siutilizzaper accendere ,sp egnere o inserire lamo dalità stand-by dell’apparecchio.
3
Page 82

Indice
Intro duzio ne 1
Norme di sicu rezza 2
Indice 4
Info rmazioni d i carattere generale 5
Con tenut o dell a confe zione 5
Coman di 6
Con nessio ni 7
Disp lay 8
Info rmazioni p reliminari 9
Come cari care la ra dio Move 9
Prima accensi one d ell a radi o 9
Blocco e sblocco del la radio Move 10
Radio digit ale 12
Ascolto del le stazi oni radio di gita li 12
Ricerca del le sta zioni radio 12
Esecuzio ne del la sintoni zzazio ne
auto matica 12
Radio FM 13
Ascolto del le stazi oni radio FM 13
Ricerca del le sta zioni radio 13
Modifi ca del le i mpostazion i di ricerca
del le stazi oni radio 13
Sele zione dell a modal ità stereo e mono 14
Stazion i r adio preselezionate 15
Memorizzazion e del le stazi oni
presele zion ate sui pulsa nti 1 o 2 15
Memorizzazion e del le stazi oni
presele zion ate sul l’ ele nco stazio ni
presele zion ate 16
4
Ascolto del le stazi oni radio
presele zion ate 16
Timer 17
Impostazi one de l ti mer di spegnimen to
auto matico 17
Impos tazioni 18
Impostazi one de ll 'orologi o 18
Impostazi oni per i l di spla y 19
Come cambia re le i mpostazi oni a udi o 20
Scelta dell a li ngu a 21
Ripri stino de ll e imposta zioni di defa ul t 21
Aggiorna mento del software 21
Come resetta re la b atteri a 22
Dati tecnici 23
Page 83

Informazioni di carattere generale
2 3
1
Contenuto della confezione
1 Move R3 3 Cavo micro-USB (s olo p er l ’alimentazione)
2 Aurico lari
5
Page 84

Comandi
1 Volume Pr emer e pe r re go lare il volume.
2 Back Pre mere p er r itornare al menù p rece de nte.
3 Menu Pre mere p er ap rire il menù ge nerale .
6
Page 85

4 Precedente Pre mere i l pulsante per sele zionare la stazio ne r adio o
2
1
5 Select Pre mere i l pulsante per sele zionare una s tazione radi o o
6 Successiva Pr emere il puls ante pe r se lez ionare la stazio ne radio o
7 St azioni radio
preselezionate
8 Alimentazione/Blocco
l'o pzio ne de l menù pre ced ente.
un'opzio ne de l menù.
l'o pzio ne de l menù success iva.
Pre mere p er ascoltare le stazioni r adio p res ele zio nate.
Pre mere e tenere p re muto per memorizzare l’attuale stazione
radio a un numer o di p resele zio ne.
Spo stare alla po sizi one per b loccare i p ulsanti. Sp ostare alla
pos izio ne centrale pe r sb loccar e i pulsanti.
Spo stare alla po sizi one pe r accende re la rad io Move.
Spo stare alla po sizi one e tenere p remuto per speg nere la
radio Move.
Connessioni
1 Pre sa pe r auricolari da 3,5 mm
2 Pre sa micro-USB
7
Page 86

Display
1
3
4
2
1 Timer speg nimento automatico attivo 3 Liv ello carica b atter ia
2 Ora attuale 4 Area vis ualizzazione testo
8
Page 87

Informazioni preliminari
Prima di utilizzarela radio Move, leggere le norme di sicurezza riportate a
pagina2.
Come caricare la radio Move
1. Collegare il cav o m icro-USB all’ingressomicro-USB sulla radio M ove.
2. Collegare l’altra estremità del cav o m icro-USB a una presa elettrica
utilizzando un adattatore di corrente USB. E’ anc he possibile caricare la
batteria c ollegando la radio Move all’ingresso USB di un computer.
L’icona sullo schermo visualizza il livello di caric a della batteria.
Prima accensione della radio
Prima di acc endere la radio Move per la prima v olta, c aricare la batteria per
almeno 3 ore.
9
Page 88

1. Collegare gli auricolari alla presa per auricolari prevista sulla radio Move.
Gli auricolari svolgonoanche la funzione di antenna per la radio Move.
2. Spostare l’interruttore Alimentazione/Blocco alla posizione , poi rilasciare
l’interruttore.
La radio Move si accende e comincia a sintonizzarsi sulle stazioni radio
digitali. Al termine della sintonizzazione automatica, è possibile ascoltare le
stazioni radio digitali.
Blocco e sblocco della radio Move
E’ possibile bloccare i pulsanti sulla radio Move onde evitarne la pressione
accidentale.
Quandosi spegne la radio M ove bloccare i pulsanti onde evitarne l’ac censione
accidentale.
10
Page 89

1. Per bloccare i pulsanti della radio Move, spostare l’interruttore
Alimentazione/Blocco alla posizione .
2. Per sbloccare i pulsanti sulla radio M ove, spostare l’interruttore
Alimentazione/Blocco alla posizione centrale.
11
Page 90

Radio digitale
Ascolto delle stazioni radio digitali
Durante l’ascolto di una radio FM, è possibileselezionare una radio digitale.
1. Premere Menu.
2. Premere e Select e scegliere RadioDigitale.
Ricerca delle stazioni radio
1. Premere o per visionare le stazioni radio disponibili.
2. Premere Select e scegliere una stazione radio.
Esecuzione della sintonizzazione automatica
Quandosi acc ende la radio Move per la prima volta, viene eseguita la ricerca
automatica delle stazioni radio. Per cercare di nuovo le stazioni radio digitali,
eseguire la sintonizzazione automatic a.
1. Premere Menu.
2. Premere e Select e scegliere Sintoniz. auto.
12
Page 91

Radio FM
Ascolto delle stazioni radio FM
Durante l’ascolto della radio digitale, è possibilepassare all’ascolto della radio FM.
1. Premere Menu.
2. Premere e Select e scegliere RadioFM.
Ricerca delle stazioni radio
l Per trovare la stazione radio precedente o successiva, premere o .
l Per sintonizzare la radio sulla radiofrequenza di una particolare stazione radio,
premere o e aumentare o diminuire la frequenza. La ricerca delle
frequenze viene eseguita ad intervalli di 0,05MHz verso l’alto o v erso il
basso.
Modifica delle impostazioni di ricerca delle stazioni radio
Quandosi preme e tiene premuto per cambiare stazioni radio, è possibile cercare
tutte le stazioni radio o solo quelledal segnaleforte.
1. Premere Menu.
2. Premere e Select e scegliere Impostaz. di ricerca.
3. Premere e Select e scegliere Solo stazioni con buona ricezione o Tutte le
stazioni.
13
Page 92

Selezione della modalità stereo e mono
La radio Move è predisposta per l’utilizzo della ricezione stereo per la radio FM. In
caso di catt iva ricezionedelle stazioni radio FM , la ricezione mono m igliora
l'intensità del segnale.
1. Premere Menu.
2. Premere e Select e scegliere Stereo.
3. Premere e Select e scegliere Stereo FM o Mono.
14
Page 93

Stazioni radio preselezionate
E' possibile preselezionare e memorizzare le stazioni radio preferite.
Il frontale della radio Move è dotata di tre pulsanti di preselezione. Utilizzare 1 o 2 per
sintonizzarsi rapidamente sulle stazioni radio preferite. Utilizzare 3+ per aprire la lista
di tutt e le stazioni radio preselezionate.
E' possibile memorizzare fino a 10 stazioni radio digitali e 10 stazioni radio FM
nell’elenco stazioni radio preselezionate.
Memorizzazione delle stazioni preselezionate sui pulsanti 1 o 2
1. Sintonizzarsi sulla stazione radio desiderata per memorizzarla.
2. Premere e tenerepremuto 1 o 2 fino a quando non c ompare Preselez.memor..
Qualora sia già stata memorizzata una stazione radio su un pulsante di
preselezione, sarà sostituita dalla nuova stazione.
15
Page 94

Memorizzazione delle stazioni preselezionate sull’elenco stazioni preselezionate
1. Sintonizzarsi sulla stazione radio desiderata per memorizzarla.
2. Premere e tenerepremuto 3+ fino a quando non appare la della lista di
stazioni preselezionate.
3. Premere e Select e scegliere un numero preimpostato.
Qualora sia già stata memorizzata una stazione radio su un pulsante di
preselezione, sarà sostituita dalla nuova stazione.
Ascolto delle stazioni radio preselezionate
l Per ascoltare le stazioni radio preselezionate1 o2, premere1 o2.
l Per ascoltare una delle stazioni radio preselezionate, premere 3+ e aprire
l’elenco dellestazioni radio preselezionate. Premere e Select per scegliere
un numero di preselezione.
16
Page 95

Timer
Impostazione del timer di spegnimento automatico
Il tim er di spegnimento automatico spegne la radio Move dopoun periodo di tempo
predefinito.
1. Premere Menu.
2. Premere e Select e scegliere Timerspegnim..
3. Premere e Select e scegliere la durata del timer.
appare sullo schermo e il timer comincia ad eseguire il conto alla rovescia.
Per annullare il timer di spegnimento automatico, entrare nel menù Timer
spegnim. e scegliere Autospegnim.off.
17
Page 96

Impostazioni
Il valore attuale per la maggior parte delleimpostazioni è indicato sullo schermo
da un asterisco(*).
Impostazione dell'orologio
Impostazione dell'ora e della data
1. Premere Menu.
2. Premere e Select e scegliere Orologio > I mpost. ora/data.
3. Premere e Select e impostare l’ora, poi la data.
Modifica del formato di visualizzazione dell'ora o della data
1. Premere Menu.
2. Premere e Select e scegliere Orologio.
3. Scegliere se cambiare il f ormato dell’ora o della data.
l Per cambiare il format o di visualizzazione dell’ora, premere e Select
e scegliere Impost.12/24 ore.
l Per cambiare il format o di visualizzazione della data, premere e
4. Premere e Select e scegliere un formato di v isualizzazione.
18
Select e scegliere Impost. formato data.
Page 97

Modifica della modalità di aggiornamento dell’orologio
La radio Move può aggiornareautomaticamente l’orologia utilizzando il segnale
radio FM o digitale.
1. Premere Menu.
2. Premere e Select e scegliere Orologio > Aggiorn. automatico.
3. Premere e Select e scegliere la modalità di esecuzione degli
aggiornamenti dell’orologio.
Impostazioni per il display
Come modificare le informazioni visualizzate sul display
1. Premere Menu.
2. Premere e Select e scegliere Display > Info.
3. Premere e Select e scegliere un'impostazione.
l Testoa scorr..Visualizza le informazioni trasmesse dalla stazione radio,
come il t itolo e il cantante della canzone attuale.
l Qualità segnale. Visualizza la qualità del segnale, da 0 a 100,
dell’attuale stazioneradio. D isponibile soloper la radio digitale.
l Intens.Segnale. Visualizza l’intensità del radio dell’attuale stazione
radio. Disponibile solo per la radio digitale.
l Data. Visualizza la data odierna.
19
Page 98

Regolazione della luminosità del display
1. Premere Menu.
2. Premere e Select e scegliere Display > Luminosità.
3. Premere e Select e scegliere un livello di lum inosità. Per aumentare la
luminosità dello schermo, scegliere un numero più alto.
Lo schermo si spegne automaticamente dopo 10 secondi inattività. Per
impostare l’accensione ininterrotta dello schermo, premere Menu e scegliere
Display> Durata> S empre acceso.
Come cambiare le impostazioni audio
Utilizzare l’equilizzatoreper ottimizzare la qualità del suono. Sono già predisposte
numeroseimpostazioni per l'Equaliser.Ad esempio,per l'ascolto ottimale della
musica classica, si consiglia di scegliere l'impostazioneClassica. E' anche possibile
personalizzare un equalizzatoreper cam biare la regolazione degli acuti e dei bassi.
1. Premere Menu.
2. Premere e Select e scegliere Audio.
3. Scegliere un'impostazione per l'equalizzatore.
l Per scegliere un’impostazione per l’equalizzatore, premere e Select.
E’ possibile scegliere tra N ormale, Rock, Pop, Classica, Jazz, o Notizie.
l Per personalizzarel’equilizzatore, premere e S elect e scegliere
Personalizzaz.. Poi premere e Select per cambiare gli acuti e i bassi.
20
Page 99

Scelta della lingua
1. Premere Menu.
2. Premere e Select e scegliere Impostazioni > Lingua.
3. Premere e Select e scegliere una lingua.
Ripristino delle impostazioni di default
L’eventuale ripristino delle impostazioni di default per la radio Move comporta la
rimozione delle stazioni radio già memorizzate, la cancellazione dell’elenco delle
stazioni radio e il ripristinodi tutte le impostazioni di default.
Una volta eseguito, non è possibile annullare il ripristinodelle im postazioni di
default.
1. Premere Menu.
2. Premere e Select e scegliere Impostazioni > Ripristino valoridi default.
3. Premere e Select e scegliere Sì.
Aggiornamento del software
E' possibile eseguire aggiornamenti software per migliorare le prestazioni dell'Move.
Per verificare la disponibilità degli aggiornamenti software, visitare il sito
support.pure.com.
Per essere informat i sulla disponibilità degli aggiornamenti software, è possibile
registrare il prodotto sul sito account.pure.com.
21
Page 100

Nota: Il cav o m icro-USBin dotazionecon la radio M ove non supporta gli
aggiornamenti software. Per aggiornare il software, utilizzareun cavo
telematico micro-USB.
Come resettare la batteria
In caso di m ancata attivazione dei comandi della radio Move, resettare la batteria.
l Per resettare la batteria, usare una graffetta per premere il pulsante di reset
posto sul lato della radio Move.
22
 Loading...