


W W W . P U L S A R - N V . C O M

v. 1212

SPECIFICATIONS |
75096 |
75097 |
Type of image intensifier tube |
CF-Super/ EP33-SF-U |
|
Magnification, x |
2.7 |
3.5 |
Objective lens, mm |
50 |
50 |
Resolution in the centre FOV, lines/mm, min |
42 |
42 |
Angular field of view, degree |
13 |
11 |
Max. detection range, m/yds* |
150/164 |
170/186 |
Eyepiece adjustment, diopter |
±4 |
±4 |
Exit pupil, mm |
6 |
6 |
Eye relief, mm |
12 |
12 |
Operating voltage, V |
3 (2xAAA) |
3 (2xAAA) |
Tripod mount, inch |
¼ |
¼ |
Av. operation time with 2 AAA batteries, (IR off/on), h |
50 / 20 |
50 / 20 |
Operating temperature |
-20 °C~+40 °C / -4 °F~+104 °F |
|
Dimensions, mm/inch: |
|
|
Length |
203 / 8 |
233 / 9.2 |
Width |
122 / 4.8 |
122 / 4.8 |
Height |
65 / 2.6 |
71 / 2.8 |
Weight of the unit, kg/oz |
0.85 / 29.9 |
0.85 / 29.9 |
*Max. detection range of an object measuring 1.7x0.5 m in natural night conditions (0.05 lux, quarter moon). Detection range increases as the size of the objects under observation and/or light intensity becomes greater.
PACKAGE CONTENTS
Edge GS 2.7x50/3.5x50 unit
Carrying case
User manual
Neck strap
Cleaning cloth
Warranty card
For improvement purposes, design of this product is subject to change.
OVERVIEW
At the core of the Edge GS 2.7x50/3.5x50 Night Vision Binocular is the unique combination of specially designed R-Contact optics and the CF-Super Image Intensifier Tube, created specifically for each other such that they will not work with any other system. The result of this exclusive technological development is the highest edge-to-edge resolution performance ever seen in a budget consumer NV product. The binocular is outfitted with new objective lenses that minimize distortion on the edges of the field of view and increase sharpness and contrast of the image.
The soft rubber eyecups conceal the light emission from the tube thus permitting a user to stay unnoticed.
The binocular is equipped with an IR illuminator necessary for normal observation in moonless cloudy conditions in total darkness.
The goggles are equipped with a 1/4'' socket which allows them to be fixed on the included head mount .
The goggles are fully self-contained and can work up to 50 hours on two AAA batteries at temperatures varying from -20 ºC to + 40 ºC.
Your NV Goggles are ideal for professional and amateur use, including:
The Edge 2.7x50/3.5x50 is equipped with a Weaver rail that allows additional accessories (like the powerful Pulsar-805 IR Flashlight) to be attached. The binocular is fully self-contained and can work up to 50 hours on two AAA batteries at temperatures varying from -20 ºC to + 40 ºC. Your binoculars are ideal for professional and amateur use, including:
Night observation in natural environment
Search and rescue
Night orienteering
Repair and maintenance of equipment
Hunting
PECULIARITIES OF USE
Your night vision binocular is designed to provide many years of reliable service. To ensure high performance you should adhere to the following rules:
The binoculars feature bright light protection system which prevents the screen of the tube from burn-through in case of rapid change of illumination level. If a bright object (such as flashlight, headlights, lamp etc.) shows up in the field of view or if the unit is switched on without the caps on the lenses, the image will grow darker. After the unit returns to its normal mode, green and uniform image will be restored. Normal operation restores automatically within a second unless the unit was switched off manually.
Your binoculars were designed to be self-contained. Do not open the body of the unit or otherwise attempt to service this device. If such need arises return the binocular for replacement or repair.
Protect the device from exposure to direct sunlight and extreme temperatures.
Avoid dropping or otherwise shocking the device - it incorporates a sophisticated optical system which could be damaged in extreme cases of misuse.
Clean optical parts (lenses) with professional lens cleaning supplies designed for use with multicoated optics.
Damage to this device from failure to observe these warnings may void the device's
warranty!
BATTERY INSTALLATION
Your binocular runs on two AAA batteries. To install them, turn the screw of the battery cover 90° clockwise, remove the cover and install two AAA batteries as indicated.
2 |
3 |
Match the boss of the battery compartment with the groove of the battery cover. The cover should tightly fit the body along the perimeter, avoid skewing. Lock the cover by turning the screw of the battery cover 90° counterclockwise.
USE AND TESTING
Make sure that the batteries have been installed according to the instructions found in the battery installation section of this manual.
Enter a dark area before turning on the binocular. Remove the objective caps.
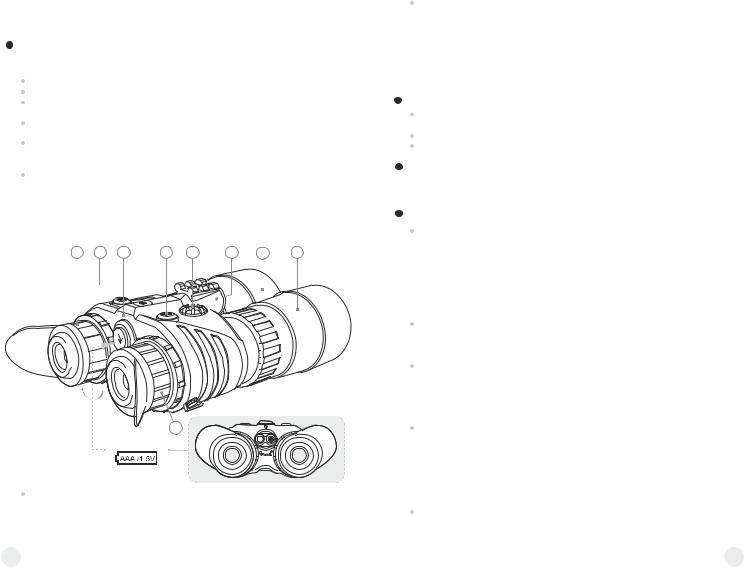
Activate the device by pushing the “ON” (2) button. The green LED indicator (3) lights up. If the batteries are low, the colour of the indicator will turn red.
You can test your binocular in a light area without removing the protective caps. This will not damage your unit.
If the subject to be viewed is in a completely dark area, including lowlight shadow areas; activate the infrared illuminator (4) by pushing the “IR” button
(5). To adjust the IR power, rotate the controller (6).
Direct the turned on binocular at an object at a distance of about 10-100 meters. Rotating the eyepieces (7), focus on the tube's screen - rough surface or tiny dark dots are visible. Rotate the objective lenses (1) until the image quality is optimal. Re-focus the eyepieces, if necessary. After this adjustment you may not rotate the eyepieces irrespective of the distance and objective lenses.
7 |
2 |
3 |
5 |
6 |
4 |
1 |
1 |
90º
7
- +
+
+ |
- |
OPEN |
Point the binocular at an object to be viewed and adjust the final focus by rotating the objective lens focusing ring until the image is optimal. When screwing the objective lenses into the housing, it focuses on farther objects, when screwing out - on closer ones.
4
When you are finished using your binocular place the caps back onto the objective lenses and turn off the unit by pushing the “ON” (2) button, the LED indicator will go out. Put the binocular into the carrying case.
CAUTION!
Your device can be used in extreme cold. However, when the unit is brought back into a warm environment, you must wait approximately 2-3 hours before using the unit again. Failure to do so may result in damage as a result of condensation accumulating on the internal circuitry of the unit.
MAINTENANCE
Clean the lens with professional lens cleaning supplies intended for use with multicoated optics.
Blow any dust or dirt off the lenses using dry, compressed air. Clean the unit housing with a soft, clean cloth.
STORAGE
During long-time storage please remove the batteries to prevent possible leakage. The battery cover must be fully screwed during long-time storage.
TROUBLESHOOTING
The scope will not turn on.
Check that the batteries are installed properly. Install the batteries according to the (+) and (-) polarity, ensuring that the markings on the battery and battery compartment correspond with one another. Check the battery contacts to ensure they are clean and free of corrosion; if necessary, clean the contacts with rubbing alcohol. Also check that the cap of the battery department is fully closed, otherwise the device will not operate. If necessary, replace the batteries as they may be depleted. Also be sure that the “ON” button has been pushed and the green LED is on.
Distinct black dots appear on the screen.
These dots are cosmetic blemishes resulting from tube production processes and do not interfere with the reliability or performance of the scope and are not a defect.
The image “snows”.
Image may “snow” in a dark environment during 30-60 seconds after the device is activated; this effect disappears soon. Image may slightly “snow” if the device was previously operated without the lens caps at a high level of luminance. Image may also “snow” if the device is operated in complete darkness with the IR illuminator off.
The image is not focused.
Adjust the focus of the eyepieces and the objectives (see “Use and Testing” section). Check that the lenses are not foggy or dusty; if they are, carefully clean the external surfaces of lenses with a soft cotton fabric. Replace the batteries if the total battery charge is less than 2.2V.
When the unit is brought into a warm environment from a cold one, condensation may appear on the internal lenses; you must wait two hours before using the unit.
Visibility decreases or disappears.
Turn the power off and turn the binocular away from the light source; visibility will restore itself immediately.
5
DONNÉES TECHNIQUES |
75096 |
75097 |
Type du tube |
CF-Super/ EP33-SF-U |
|
Grossissement, x |
2,7 |
3,5 |
Diamètre de la lentille, mm |
50 |
50 |
Résolution (centre du champ de vue), lignes/mm, min |
42 |
42 |
Champ de vue, degrés |
13 |
11 |
Champ de détection max, m* |
150 |
170 |
Ajustement dioptrique, D |
±4 |
±4 |
Diamètre de la pupille de sortie, mm |
6 |
6 |
Dégagement oculaire, mm |
12 |
12 |
Alimentation, V |
3 (2xAAA) |
3 (2xAAA) |
Support de trépied, pouce |
¼ |
¼ |
Temps moyen d'utilisation avec une pile, (torche IR on/off), h 50 / 20 |
50 / 20 |
|
Température d'utilisation |
-20 °C~+40 °C |
|
Dimensions, mm: |
|
|
Longueur |
203 |
233 |
Largeur |
122 |
122 |
Hauteur |
65 |
71 |
Poids de l'appareil, kg |
0,85 |
0,85 |
*Distance de la detection max. du object avec dimensions 1,7x0,5 m à l'éclairage nocturne naturel 0,05 lux (un quart de la lune). La distance augmente selon que la taille des objets observés et/ou l'intensité lumineuse deviennent importants.
CONTENU DE L'EMBALLAGE
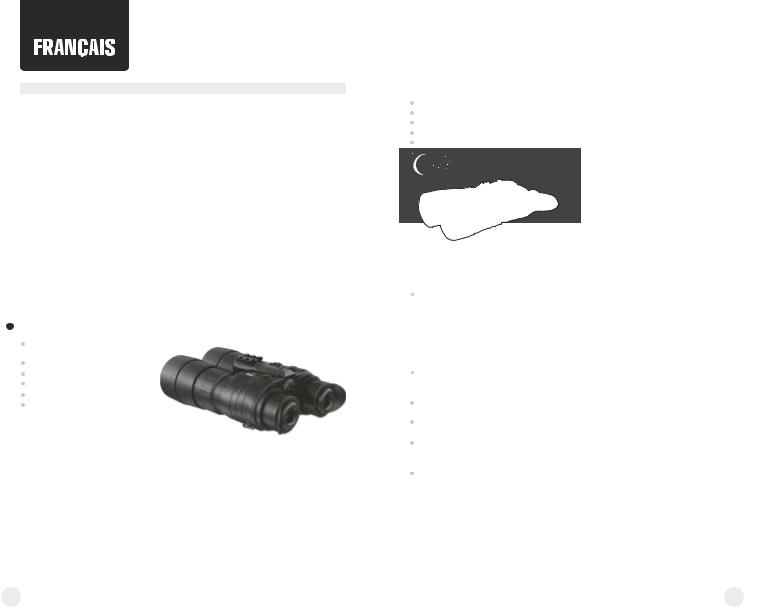
Jumelles
Edge GS 2.7x50/3.5x50
Cordon cou
Étui de transport Guide d'utilisation Chiffon
Carte de garantie
Le design de ce produit pourrait-être amené à changer, afin d'améliorer son utilisation.
 VUE D'ENSEMBLE
Les jumelles de vision nocturne Edge GS 2.7x50/3.5x50 sont la combinaison unique d'optique R-contact spécialement conçue et du Tube d'Intensificateur d'Image CF-SUPER, créé spécifiquement l'un pour l'autre tel qu'ils ne fonctionneront pas avec un autre système. Le résultat de cette technologie exclusive est la haute performance de resolution jamais vue dans un produit NV de cette gamme de prix. Les jumelles sont équipées de nouvelles objectifs réduisant la distorsion sur les bords du champ de vision et améliorant la netteté et le contraste de l'image. Des œilletons souples diminuent l'émission de lumière du tube, permettant ainsi à l'utilisateur de rester dissimulé.
Les jumelles intègrent une torche haute-puissance IR du grand champ nécessaire pour une observation en nuit noire (sans lune) ou dans des conditions nuageuses en obscurité totale.
Les jumelles sont équipé de la planche supplémentaire Weaver pour installer des accessoires complémentaires comme une lanterne infrarouge Pulsar-805 supplémentaire etc. Les jumelles sont autonomes et peuvent fonctionner jusqu'à 50 heures sur deux piles AAA à des températures variant de – 20 °C +40 °C. Les jumelles de vision nocturne sont idéales pour une utilisation professionnelle ou pour les loisirs, tels que:
L'observation de nuit dans des environnements naturels
Les services de secours et de recherche
Сourse d'orientation de nuit
La réparation et la maintenance de matériel Сhasse
 PRECAUTIONS D'USAGE
Votre jumelles de vision nocturne sont conçus pour vous fournir de nombreuses années de bons et loyaux services. Afin d'en garantir la meilleure performance, nous vous conseillons de suivre les règles suivantes:
Les jumelles présentent un système de protection contre la luminosité excessive, qui évite à l'écran du tube de bruler lors d'un changement rapide du niveau de l'éclairage. Si un objet lumineux (tels que lampe de poche, phares, etc) apparaît dans le champ de vision ou si l'appareil est allumé sans les protèges oculaires, l'image s'assombrira. Après que l'appareil revienne à son mode normal, l'image verte et uniforme sera restaurée. L'utilisation normale se restaure automatiquement en une seconde sauf si l'appareil a été éteint manuellement.
Votre appareil a été conçu pour être auto-suffisant. Ne jamais ouvrir le corps du appareil ou essayer de réparer cet appareil. Si de telles opérations étaient nécessaires, renvoyez votre jumelles pour remplacement ou réparation.
Protégez l'appareil d'une exposition directe: à la lumière du soleil et à des températures extrêmes.
Conservez l'appareil dans un endroit tempéré et sec, loin de sources de chauffage et d'air conditionné, ou d'autres équipements de ventilation.
Evitez de laisser tomber l'appareil, au risque de lui porter un choc. Cet appareil contient un système optique sophistiqué, qui pourrait être endommagé dans des cas extrêmes de mauvaise utilisation.
Nettoyez les lentilles optiques avec des produits utilisés par les professionnels pour le nettoyage des lentilles, prévu pour une utilisation sur des optiques traitées multicouches.
Les dégâts occasionnés sur ces jumelles liés au non-respect des recommandations
suivantes, rendront caduque la garantie de cet appareil!
 INSTALLATION DES PILES
Vos jumelles fonctionnent sur deux piles LR3/AAA. Pour les installer, tournez la vis du couvercle du compartiment à piles à 90° dans le sens des aiguilles d'une montre, retirez le couvercle et installez les deux piles LR3/AAA comme indiqué. Faire correspondre l'emboiture du moyeu du compartiment à piles avec la rainure du couvercle. Le couvercle doit parfaitement s'adapter sur le corps le long du périmètre, veiller à une parfaite mise en
6 |
7 |
 Loading...