

PTZOptics PT-SUPERJOY-G1 User Manual

A 1st-Generation Network and Serial Camera Controller
PT-SUPERJOY-G1
User Guide
V1.1

Thank You!
Thank you for selecting our joystick camera controller built to support both IP and serial communication.
As you read through this manual it will help identify the options you have for setting up the device,
connecting equipment as well as recommended configurations; as a result we recommend reading over
this guide prior to beginning any setup to have the best possible experience.
-The PTZOptics team
Using this guide to Get Started
We recommend that you read the entire user guide prior to any setup and please refer to the Table of
Contents when attempting to locate specific product information or setup instructions.
Copyright Notice
The entire contents of this manual / guide, whose copyright belongs to PTZOptics, may not be cloned, copied,
or translated in any way without the explicit permission of the company. The product specifications referred to
in this document are for reference only and as such are subject to updating at any time without prior notice.
2
Rev 1.1 2/21

What’s in the Box?
● PT-SUPERJOY-G1 joystick controller
● 12V 2A international power supply
● 8’ (2.4m) RS-232C / DB9 female to 8-pin mini-din male cable
● PTZOptics PT-SUPERJOY-G1 Quick Start Guide
Introducing the PT-SUPERJOY-G1
The PT-SUPERJOY-G1 is designed to provide in depth control of the PTZOptics and HuddleCamHD line of
cameras for use in production environments and more. With the ability to support both IP and Serial control
from a single controller, the PT-SUPERJOY-G1 presents itself as a flexible control solution.
When used via a Local Area Network (LAN), you can connect to cameras using TCP or UDP communications
to send PTZOptics VISCA over IP commands, with limited support for NDI & Sony VISCA over IP capable
cameras. If using the serial connections via RS-232, RS-485 or RS-422 you have PTZOptics VISCA
commands, Pelco-D, Pelco-P and limited Sony VISCA support.
Note using this with non PTZOptics or HuddleCamHD products may offer limited or no control capabilities.
You can view the PTZOptics VISCA and VISCA over IP command libraries at
ptzoptics.com/downloads/
How to care for your PT-SUPERJOY-G1
Please read the recommendations below to ensure you do not damage the product or possibly void your
warranty.
● Keep the joystick away from rain and out of moist environments
● Do not remove any portions of the case, cover or interfaces
○ Removal may result in the risk of an electrical shock
○ Removal will void the manufacturer's warranty.
● Only use the product within the recommended temperature and humidity ranges
○ Operating temperature range: 14° ~ 122°F (-10° ~ +50°C)
○ Operating humidity range: 10 ~ 90% *Non-condensing
● Do not use any other power supply than the one originally supplied with the joystick.
● Keep the joystick and signal cables away from strong electromagnetic sources or abnormal and
unreliable control may be experienced
● If you need to clean the surface of the product please use a soft dry cloth.
○ If the joystick becomes extremely dirty, use a diluted neutral detergent to clean the surface.
○ Do not use any type of solvents, which may damage the surface of the product.
In case of abnormal operation, please contact our support team at support@ptzoptics.com
3
Rev 1.1 2/21
Table of Contents
4
Rev 1.1 2/21
Preface
i
Copyright Notice
i
What’s in the Box
ii
Introducing the PT-SUPERJOY-G1
ii
How to care for your PT-SUPERJOY-G1
ii
Table of Contents
iii
PT-SUPERJOY-G1 Overview
1
Top Down View & Layout
1
Button & Dial Descriptions
2
Rear Panel View & Layout
4
Technical Specifications
5
Preparing to use the Joystick
6
Installation and Setup
6
Power
6
Physically Connecting a Camera to the Controller
6
Network Setup
7
Serial Control Setup & Options
8
Adding a Camera
9
From the Joystick
9
From the Web Interface
10
Joystick OSD Menu Control
11
Operating the Camera
12
Pan, Tilt, & Zoom Operations
12
Setting and Calling Presets
12
Adjusting the Camera’s Image
13
Camera OSD Menu Control
14
Basic Mode
14
Matrix Mode
14
Joystick Web Interface
15
Device Management
15
Settings
16
Troubleshooting and Extras
17
Troubleshooting
17
Additional Information
18
Warranty
18
Certifications
18
Changelog
18
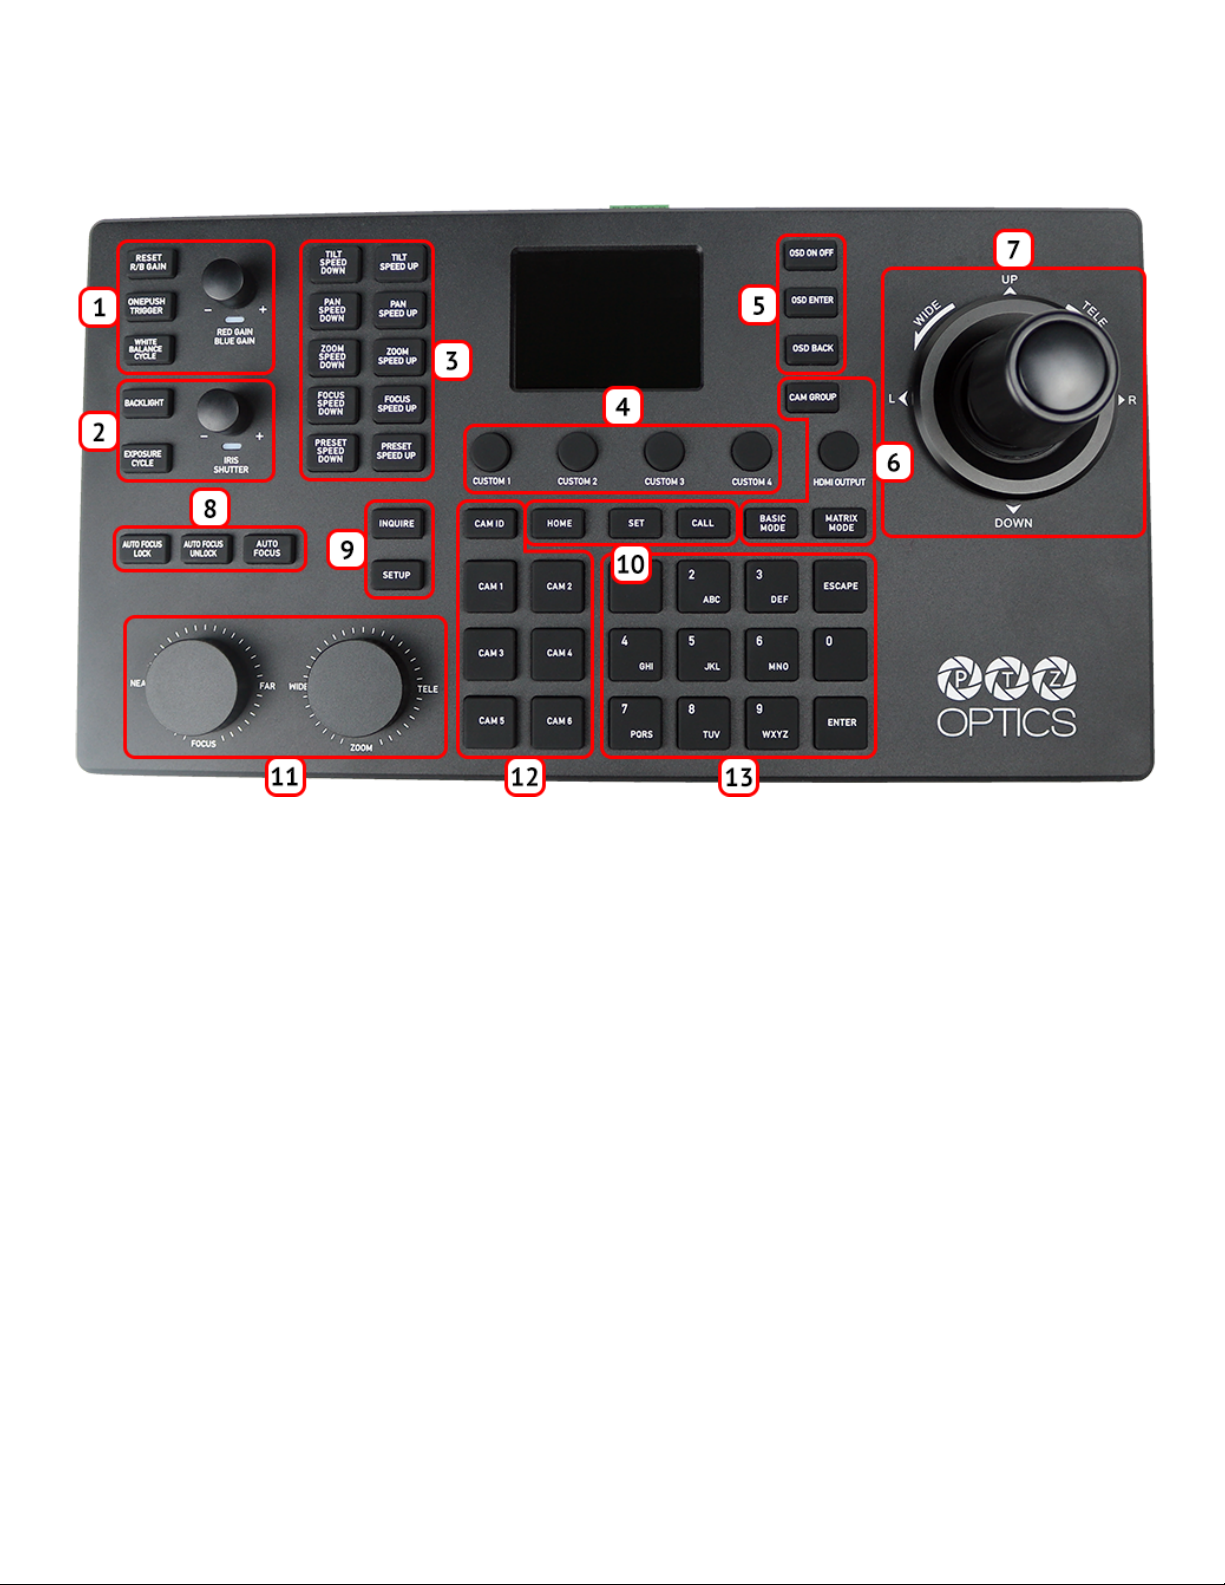
PT-SUPERJOY-G1 Overview
Top Down View & Layout
1. White Balance Control
2. Exposure Control
3. Speed Control
4. Custom Control Buttons
5. Camera OSD Control
6. SuperJoy Unique Control
7. Joystick Controller
8. Focus Mode Control
9. Controller Information
10. Preset Control Buttons
11. Focus & Zoom Control Dials
12. Camera Select Control
13. Alpha-Numeric Keypad
5
Rev 1.1 2/21

Button & Dial Descriptions
The below descriptions will describe the buttons and dials available on the controller.
1. White Balance Control
The White Balance Control section allows you to adjust the white balance settings of the camera.
a. [RESET R/B GAIN] Button
Press the [RESET R/B GAIN] button to reset the red & blue gain to default values.
b. [ONEPUSH TRIGGER] Button
Press the [ONEPUSH TRIGGER] button allows you to
c. [WHITE BALANCE CYCLE] Button
Press the [WHITE BALANCE CYCLE] button to cycle through the White Balance Modes.
Options include: Auto, Indoor, Outdoor, OnePush, & Manual.
d. [RED GAIN / BLUE GAIN] Knob
The [RED GAIN / BLUE GAIN] knob can be used to adjust the red & blue gain values.
2. Exposure Control
The Exposure Control section allows you to adjust the exposure settings of the camera.
a. [BACKLIGHT] Button
Press the [BACKLIGHT] button to toggle the camera’s backlight compensation.
b. [EXPOSURE CYCLE] Button
Press the [EXPOSURE CYCLE] button to cycle through the Exposure Modes.
Options include: Auto, Manual, Shutter Priority, Iris Priority, & Brightness Priority.
c. [IRIS / SHUTTER] Knob
The [IRIS / SHUTTER] knob allows you to adjust the Iris and Shutter values of the camera.
3. Speed Control Buttons
Use the Speed Control section to adjust the speeds the joystick controls the camera(s).
a. [TILT SPEED UP / DOWN] Buttons
Press the [TILT SPEED UP / DOWN] buttons to adjust the camera tilt speed.
b. [PAN SPEED UP / DOWN] Buttons
Press the [PAN SPEED UP / DOWN] buttons to adjust the camera pan speed.
c. [ZOOM SPEED UP / DOWN] Buttons
Press the [ZOOM SPEED UP / DOWN] buttons to adjust the camera zoom speed.
d. [FOCUS SPEED UP / DOWN] Buttons
Press the [FOCUS SPEED UP / DOWN] buttons to adjust the camera focus speed.
e. [PRESET SPEED UP / DOWN] Buttons
Press the [PRESET SPEED UP / DOWN] buttons to adjust the camera preset speed.
4. Custom Control Buttons
Use the Custom Control buttons to set up custom commands typically not available to the SuperJoy.
a. [CUSTOM 1 - 4] Button
The four (4) Custom buttons allow you to send custom commands to network based equipment.
Options include: HTTP Trigger, UART, TCP, UDP, & Super Presets.
5. Camera OSD Control Buttons
The Camera OSD Control section allows you to open and adjust the camera’s on screen display menu.
a. [OSD ON / OFF] Button
Press the [OSD ON / OFF] button to open and close the on screen display menu.
Move the joystick up, down, left, and right to traverse the camera’s OSD menu.
b. [OSD ENTER] Button
Press the [OSD ENTER] button to select an OSD menu option.
6
Rev 1.1 2/21

c. [OSD BACK] Button
Press the [OSD BACK] button to go back an OSD menu option.
Refer to the Camera OSD Menu Control section of this guide for more information.
6. SuperJoy Unique Control
The SuperJoy includes unique buttons for use with
a. [CAM GROUP] Button
Press the [CAM GROUP] button to cycle through the four (4) Camera Groups.
b. [HDMI OUTPUT] Button
Press the [HDMI OUTPUT] button to enable the HDMI output of the connected camera.
c. [BASIC MODE] Button
Press the [BASIC MODE] button to toggle between Basic Mode control and normal control.
d. [MATRIX MODE] Button
Press the [MATRIX MODE] button to toggle between Matrix Mode control and normal control.
7. Joystick Controller
The joystick allows you to pan, tilt, and zoom (twist) the camera. The control speed is affected by the
Speed Control dial.
8. Focus Mode Control
The Focus Mode section allows you to change the focus mode of the camera.
a. [AUTO FOCUS LOCK] Button
Press the [AUTO FOCUS LOCK] button to lock the focus in its current position.
b. [AUTO FOCUS UNLOCK] Button
Press the [AUTO FOCUS UNLOCK] button to unlock the focus from its current position.
c. [AUTO FOCUS] Button
Press the [AUTO FOCUS] button to set the camera to auto focus mode.
9. Controller Information Button
The Controller Information section allows you to find and edit the parameters of the controller.
a. [INQUIRE] Button
Press the [INQUIRE] button to open the controller’s device list.
b. [SETUP] Button
Press the [SETUP] button to open the controller’s OSD menu.
Refer to the Joystick OSD Menu Control section of this guide for more information.
10. Preset Control Buttons
The Preset Control section allows you to set and call presets of the camera.
a. [HOME] Button
Press the [HOME] button to send the camera to the home position (facing forward).
b. [SET] Button
Press the [SET] button to set a camera preset. Use the alpha-numeric keypad to set a preset
number.
c. [CALL] Button
Press the [CALL] button to call a camera preset. Use the alpha-numeric keypad to call a preset
number.
Refer to the Setting and Recalling Presets section of this guide for more information.
d. Quick Set Preset Shortcut
Press and hold a number on the alpha-numeric keypad for 3+ seconds to set a camera preset in
the current location.
7
Rev 1.1 2/21
 Loading...