


 Loading...
WORKABOUT PRO M/C
Hand-Held Computer
Quick Start Guide
March 11, 2004 |
PN 8000025.A |
ISO 9001 Certified
Quality Management System
© Copyright 2004 by Psion Teklogix Inc., Mississauga, Ontario
This document and the information it contains is the property of Psion Teklogix Inc., is issued in strict confidence, and is not to be reproduced or copied, in whole or in part, except for the sole purpose of promoting the sale of Psion Teklogix manufactured goods and services. Furthermore, this document is not to be used as a basis for design, manufacture, or sub-contract, or in any manner detrimental to the interests of Psion Teklogix Inc.
All trademarks are the property of their respective holders.
Return-To-Factory Warranty
Psion Teklogix warrants a return-to-factory warranty for a period of one year. In some regions, the warranty exceeds this period. Please contact your local Psion Teklogix office for details. For a list of offices, refer to “Support Services & Worldwide Offices” on page 29. The warranty on Psion Teklogix manufactured equipment does not extend to any product that has been tampered with, altered, or repaired by any person other than an employee of an authorized Psion Teklogix service organization. See Psion Teklogix terms and conditions of sale for full details.
Service
When requesting service, please provide information concerning the nature of the failure and the manner in which the equipment was used when the failure occurred. Type, model, and serial number should also be provided. Before returning any products to Psion Teklogix, please call the Customer Services Group for a Return Authorization number.
Support Services
Psion Teklogix provides a complete range of product support services to its customers. For detailed information, please refer to “Support Services & Worldwide Offices” on page 29.
Disclaimer
Every effort has been made to make this material complete, accurate, and up- to-date. Psion Teklogix Inc. reserves the right to make changes without notice and shall not be responsible for any damages, including but not limited to consequential damages, caused by reliance on the material presented, including but not limited to typographical errors.

Table Of Contents
1. Basic Preparation . . . . . . . . . . . . . . . . . . . . . . . . . . . . . . . . . 3
1.1 Charging The Battery . . . . . . . . . . . . . . . . . . . . . . . . . . 3
1.2 Installing The Battery . . . . . . . . . . . . . . . . . . . . . . . . . . 3
1.3 Switching The Unit On. . . . . . . . . . . . . . . . . . . . . . . . . 4
1.4 Switching The Unit Off (Suspend) . . . . . . . . . . . . . . . . 4
2. Getting To Know The WORKABOUT PRO . . . . . . . . . . . . 5
2.1 Features. . . . . . . . . . . . . . . . . . . . . . . . . . . . . . . . . . . . . 5
2.2 The Battery . . . . . . . . . . . . . . . . . . . . . . . . . . . . . . . . . . 7
2.2.1 Battery Swap And Runtime . . . . . . . . . . . . . . . . 9
2.3 The Keyboard . . . . . . . . . . . . . . . . . . . . . . . . . . . . . . . . 9
2.3.1 Modifier Keys . . . . . . . . . . . . . . . . . . . . . . . . . . . 10
2.3.2 The Keys. . . . . . . . . . . . . . . . . . . . . . . . . . . . . . . 10
2.3.3 Adjusting The Keypad Backlight . . . . . . . . . . . . 12
2.4 The Display. . . . . . . . . . . . . . . . . . . . . . . . . . . . . . . . . . 12
2.4.1 Colour Display . . . . . . . . . . . . . . . . . . . . . . . . . . 13
2.4.2 Monochrome Display . . . . . . . . . . . . . . . . . . . . . 14
2.4.3 Calibrating The Touchscreen . . . . . . . . . . . . . . . 14
2.5 Indicators . . . . . . . . . . . . . . . . . . . . . . . . . . . . . . . . . . . 15
2.5.1 The LED . . . . . . . . . . . . . . . . . . . . . . . . . . . . . . . 15
2.5.2 Onscreen Indicators . . . . . . . . . . . . . . . . . . . . . . 16
2.5.3 Audio Indicators . . . . . . . . . . . . . . . . . . . . . . . . . 18
3. Navigating In Windows CE. . . . . . . . . . . . . . . . . . . . . . . . . . 19
3.1 Navigating A Touchscreen . . . . . . . . . . . . . . . . . . . . . . 19
3.2 Navigating Using The Keyboard . . . . . . . . . . . . . . . . . 19
Psion Teklogix WORKABOUT PRO Hand-Held Computer Quick Start Guide 1
3.3 The Startup Desktop . . . . . . . . . . . . . . . . . . . . . . . . . . . 20
3.3.1 Accessing Desktop Icons . . . . . . . . . . . . . . . . . . 20
3.3.2 The Taskbar. . . . . . . . . . . . . . . . . . . . . . . . . . . . . 21
3.4 The Start Menu . . . . . . . . . . . . . . . . . . . . . . . . . . . . . . . 21
3.5 Using A Dialogue Box . . . . . . . . . . . . . . . . . . . . . . . . . 26
4. General Maintenance. . . . . . . . . . . . . . . . . . . . . . . . . . . . . . . 28
4.1 Caring For The Touchscreen. . . . . . . . . . . . . . . . . . . . . 28
4.2 Cleaning The WORKABOUT PRO . . . . . . . . . . . . . . . 28
Approvals . . . . . . . . . . . . . . . . . . . . . . . . . . . . . . . . . . . . . . . . . 33
Safety Summary . . . . . . . . . . . . . . . . . . . . . . . . . . . . . . . . . . . . 35
Program License Agreements. . . . . . . . . . . . . . . . . . . . . . . . . . 38
2Psion Teklogix WORKABOUT PRO Hand-Held Computer Quick Start Guide

1. Basic Preparation
Important: All approval and safety information is outlined in the ‘WORKABOUT PRO Hand-Held Computer User Manual’
– part number 8000024. This manual is available on our web site www.psionteklogix.com through the Teknet extranet. It is important that you review all safety guidelines before charging a battery or operating a scanner.
This quick start guide provides basic information on the operation and features of the Psion Teklogix WORKABOUT PRO M (Monochrome) and WORKABOUT PRO C (Colour) Hand-Held Computer. For more detailed information, refer to the WORKABOUT PRO
M/C Hand-Held Computer User Manual (PN 8000024) or the documentation supplied with the application you are using.
Typically, WORKABOUT PROs are configured at the factory and arrive ready for use.
1.1 Charging The Battery
Batteries shipped from the factory are not charged. They must be fully charged prior to use. Full capacity may not be reached until at least 5 full charge/discharge cycles have been performed.
1.2 Installing The Battery
•Turn the fasteners at the base of the battery cover counterclockwise to unlock the cover and remove it. The top of the stylus is shaped to help you loosen the fasteners.
•Insert the charged battery. Replace the battery cover, and turn the fasteners at the base of the battery cover clockwise to lock the battery in place.
Psion Teklogix WORKABOUT PRO Hand-Held Computer Quick Start Guide 3
Note: If you are using a docking station, you can insert an uncharged battery, dock the unit and switch it on.
1.3 Switching The Unit On
•Press and hold down the <ENTER/ON> key for at least one second to switch the unit on.
•When the LED flashes green, release <ENTER/ON>.
A splash screen displaying the Psion Teklogix logo and the Microsoft® Windows CE .NET logo appears followed by the startup desktop.
Note: If the unit was already in use – the unit may be off (suspend state) – pressing <ENTER/ON> ‘wakes’ the unit from this state. The screen in which you were working prior to the suspend state is displayed.
1.4 Switching The Unit Off (Suspend)
•Press the <BLUE> key, and then press <ENTER/ON> to switch off the WORKABOUT PRO.
4Psion Teklogix WORKABOUT PRO Hand-Held Computer Quick Start Guide
2. GettingToKnowTheWORKABOUTPRO
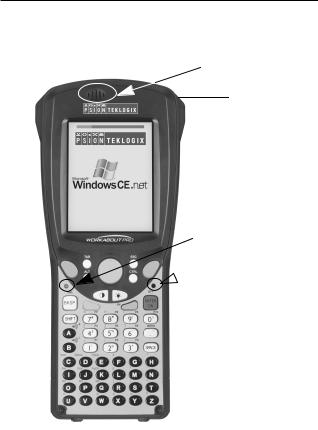
2.1 Features
Sound Port
Stylus (pointing tool)
LED
(Light Emitting Diode)
 Microphone
Psion Teklogix WORKABOUT PRO Hand-Held Computer Quick Start Guide 5
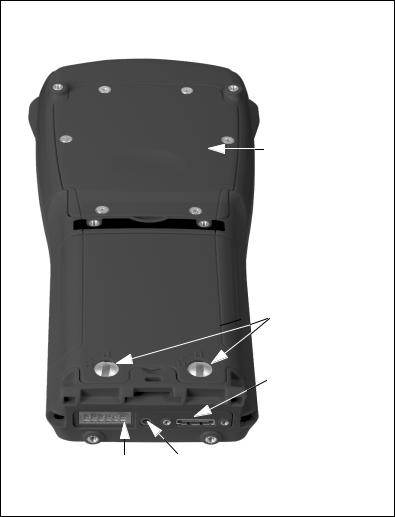

 End Cap
Back Cover

 Battery Cover
Battery Cover
Fasteners
Tether Port
Low Insertion |
Audio Jack |
Force (LIF) Port |
|
6Psion Teklogix WORKABOUT PRO Hand-Held Computer Quick Start Guide
2.2 The Battery
The WORKABOUT PRO will operate with a standard 1800 mAh Lithium Ion battery pack, a high-capacity 2700 mAh Lithium-Ion battery pack or three AA alkaline batteries. If you are using a Lithium Ion battery pack, the battery pack must first be charged.
Warning: Before charging or using the battery pack, it is critical that the safety information in this section be reviewed and that all warnings are strictly followed.
BATTERIES ARE CONSIDERED HAZARDOUS WASTE. For proper disposal, forward all used batteries to one of:
Psion Teklogix Inc. |
Psion Teklogix Corp. |
2100 Meadowvale Blvd. |
1810 Airport Exchange Blvd. |
Mississauga, Ontario |
Suite 500 |
Canada |
Erlanger, Kentucky |
L5N 7J9 |
USA 41018 |
Psion Teklogix S.A.
La Duranne; 135 Rue Rene Descartes; BP 421000
13591 Aix-En-Provence
Cedex 3; France
Warning: TO PREVENT the battery from leaking acid, generating heat or exploding, adhere to precautions below.
•The battery incorporates built-in safety devices. To ensure their proper function, do not disassemble or alter any parts of the battery.
•Do not short-circuit the battery by directly connecting any of the exposed terminals with metal objects such as wire. Do not transport or store the battery together with metal objects such as necklaces, hair pins, etc.
•Do not dispose of batteries in fire.
Psion Teklogix WORKABOUT PRO Hand-Held Computer Quick Start Guide 7
•Do not use or leave the battery near a heat source such as a fire or heater.
•Do not immerse the battery in water.
•When charging, use the battery charger specifically designed for the battery.
•Do not pierce, strike, throw or step on the battery.
•Do not directly solder the battery.
•Do not connect the battery to an electrical outlet, vehicle cigarette lighter, etc.
•Do not put battery into a microwave oven or pressurized container.
•Do not use the battery in combination with primary batteries (such as dry-cell batteries) or batteries of different capacities or brands.
•Immediately remove the battery from the device or battery charger and stop use if the battery gives off an odour, generates heat, becomes discoloured or deformed, or in any way appears abnormal during use.
•Do not continue charging the battery if it does not recharge within the specified charge time.
•The battery may burst or ignite if the battery leaks. Always ensure that it is away from any exposed flames.
•If leaking electrolyte sprays into your eyes, rinse them with clean running water, and immediately seek medical attention.
•Do not store the battery in extremely high temperatures (e.g., a vehicle, strong direct sunlight, etc.). This may cause the battery to overheat or ignite, and it may also reduce the performance and service life of the battery.
•Do not use in areas where static electricity is greater than what the manufacturer guarantees.
•Keep batteries out of reach of children.
8Psion Teklogix WORKABOUT PRO Hand-Held Computer Quick Start Guide

2.2.1 Battery Swap And Runtime
Under normal operating conditions, fully charged 1800 mAh batteries hold a charge for up to 8 hours. 2700 mAh batteries can hold a charge for up to 12 hours.
2.3 The Keyboard
Arrow Keys
Scan Key |
Scan Key |
|
|
Contrast Key |
Blue Key |
Orange Key |
|
Display |
|
Backlight Key |
|
The keyboard is equipped with a set of standard keys along with a <ORANGE> and a <BLUE> modifier key to provide access to additional keys and system functions. These additional keys are
colour coded in orange and blue print above the standard keys.
Psion Teklogix WORKABOUT PRO Hand-Held Computer Quick Start Guide 9
2.3.1 Modifier Keys
The <SHIFT>, <CTRL>, <ALT>, <ORANGE> and <BLUE> keys are modifier keys. Pressing a modifier key changes the function of the next key pressed. For example, a square bracket is printed
in orange print above the <4> key. Pressing the <ORANGE> key followed by the <4> key displays a square bracket rather than the number 4.
The <SHIFT>, <CTRL> and <ALT> keys operate much like a desktop keyboard except that they are not chorded – two keys cannot be held down simultaneously. The modifier key must be pressed first followed by the key whose function you want modified.
Activating Modifier Keys
When a modifier key is pressed once, the modifier key icon displays the key in lowercase letters in the taskbar. For example, pressing <CTRL> once displays ctrl key in the taskbar. Once the next key is pressed, the modifier key becomes inactive and disappears from the taskbar.
Locking Modifier Keys
When a modifier key is pressed twice, it is ‘locked’ on. A ‘locked’ modifier key icon displays the key in uppercase letters in the taskbar. For example, pressing the <BLUE> key twice locks it on – it is displayed as BLUE KEY in the taskbar at the bottom of the screen.
The locked modifier key remains active until it is pressed a third time to unlock or turn it off.
2.3.2 The Keys
The <SHIFT> Key
Used to display uppercase alpha characters and provide access to the symbols above the numeric keys.
10 Psion Teklogix WORKABOUT PRO Hand-Held Computer Quick Start Guide
The Arrow Keys
Contained in the round disk-shaped key at the top of the keyboard. Moves the cursor around the screen – up, down, left and right.
The <BKSP/DEL> Key
Moves the cursor one character to the left, erasing the incorrectly entered key stroke.
<DEL> key (<BLUE> <BKSP>) erases the character at the cursor position.
The <CTRL> And <ALT> Key
Modify the function of the next key pressed and are application dependent.
The <TAB> Key
Usually moves the cursor to the next field to the right or downward. Pressing <ORANGE> <TAB> move the cursor backward.
The <ESC> Key
Generally used as a keyboard shortcut to close the current menu, dialogue box or activity and return to the previous one.
The <SPACE> Key
Inserts a blank space between characters. In a Windows dialogue box, the <SPACE> key enables (√ ) or disables a checkbox.
The <SCAN> Keys
Activate the scanner beam while pressed. For units without internal scanners, these keys are inoperable.
The Function Keys – <F1> to <F10>
Perform special, custom-defined functions. These keys are accessed by pressing <BLUE> followed by numeric keys <1> to <10>. They can be used with the Windows CE .NET operating system or another application.
Psion Teklogix WORKABOUT PRO Hand-Held Computer Quick Start Guide 11
Loading...