


NS2300N

SMARTSTOR
NS2300N
Quick Start Guide
Kurzanleitung
Guide de démarrage rapide
Guida Introduttiva
Guía de inicio rápido
Руководство по быстрому началу
работы
クイックスタートガイド
快速安裝手冊
快速安装手册
빠른 시작 안내서
Version 1.0
© 2008 Promise Technology, Inc. All Rights Reserved.

SmartStor NS2300N Quick Start Guide
2
Contents
English . . . . . . . . . . . . . . . . . . . . . . . . . . . . . . . . . . . . . . . . . . . . . . . 3
Deutsch . . . . . . . . . . . . . . . . . . . . . . . . . . . . . . . . . . . . . . . . . . . . .22
Français . . . . . . . . . . . . . . . . . . . . . . . . . . . . . . . . . . . . . . . . . . . . . 41
Italiano . . . . . . . . . . . . . . . . . . . . . . . . . . . . . . . . . . . . . . . . . . . . . . 60
Español . . . . . . . . . . . . . . . . . . . . . . . . . . . . . . . . . . . . . . . . . . . . . . 79
Pусский язык . . . . . . . . . . . . . . . . . . . . . . . . . . . . . . . . . . . . . . . . . 98
日本語 . . . . . . . . . . . . . . . . . . . . . . . . . . . . . . . . . . . . . . . . . . . . . . 117
繁體中文 . . . . . . . . . . . . . . . . . . . . . . . . . . . . . . . . . . . . . . . . . . . .136
简体中文 . . . . . . . . . . . . . . . . . . . . . . . . . . . . . . . . . . . . . . . . . . . .155
한국어 . . . . . . . . . . . . . . . . . . . . . . . . . . . . . . . . . . . . . . . . . . . . . . 173

Step 1: Unpacking the SmartStor NS2300N
3
SmartStor Task List
• Step 1: Unpacking the SmartStor NS2300N (page 3)
• Step 2: Installing Disk Drives (page 5)
• Step 3: Connecting to the Network (page 5)
• Step 4: Connecting the Power (page 6)
• Step 5: Installing the Software (page 6)
• Step 6: Setting up the SmartStor (page 7)
• Step 7: Connecting to PASM (page 11)
• Step 8: Setting up Network Drives on other PCs (page 14)
• Step 9: Setting up a USB Printer (page 18)
For complete information about your SmartStor NS2300N, see the
SmartStor
NS2300N Product Manual
on the CD.
Step 1: Unpacking the SmartStor NS2300N
The SmartStor NS2300N box contains the following items:
• SmartStor NS2300N Unit
• Quick Start Guide
• Screws for disk drives
(1 package)
• Ethernet cable
•Power cord
• 12V DC Power Adapter
• CD with SmartNAVI software,
Product Manual
and
Quick Start
Guide
Warning
The electronic components within the SmartStor are sensitive to
damage from Electro-Static Discharge (ESD). Observe
appropriate precautions at all times when handling the SmartStor
or its subassemblies.
Important
To configure the SmartStor, you must install the software onto a
PC running Windows Vista, 2003 Server, XP Professional, or
2000.

SmartStor NS2300N Quick Start Guide
4
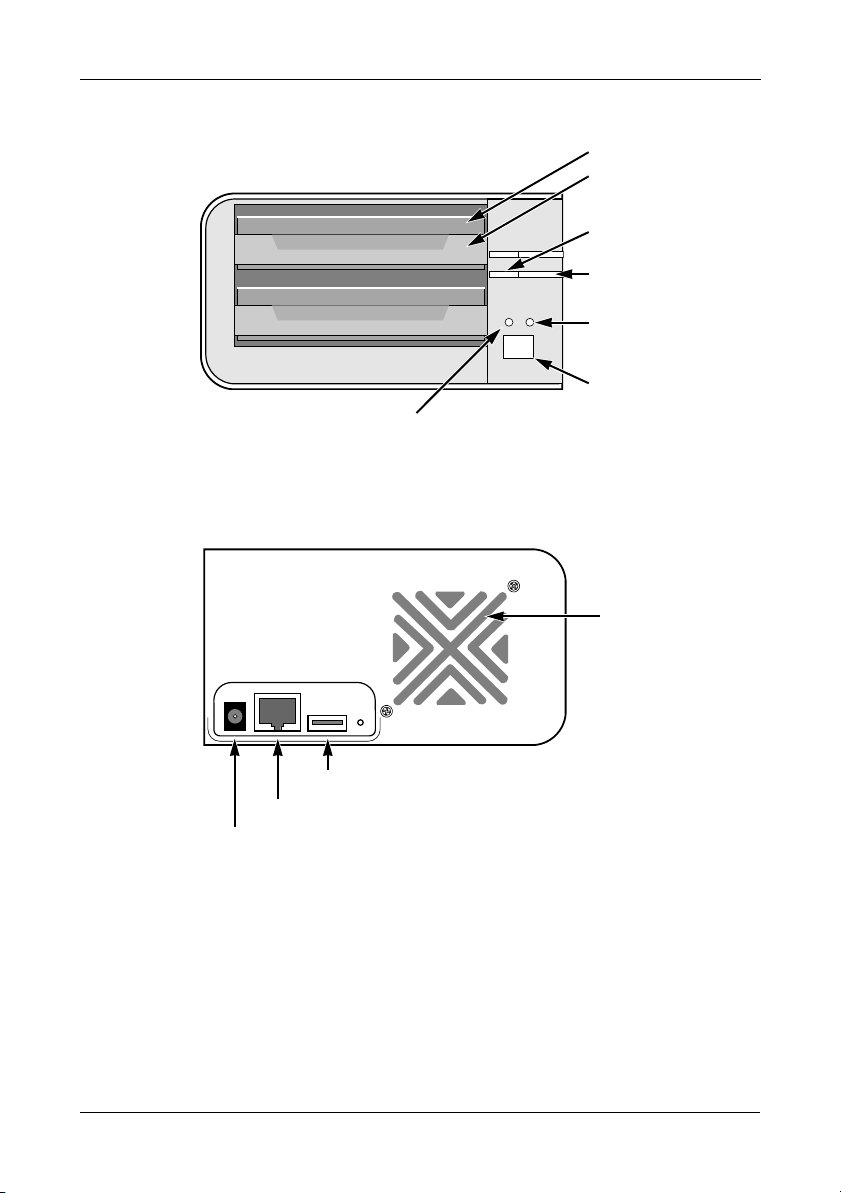
Figure 1. SmartStor NS2300N Front View
Figure 2. SmartStor NS2300N Rear View
Disk Drive
Drive Carrier
Drive Activity
LED
Power Button
Ethernet
Activity LED
Drive Status
LED
Note: This SmartStor is shown without the front door.
System Status LED
Power Connection
USB Connection
RJ45 Network Connection
Cooling Fan

Step 2: Installing Disk Drives
5
Step 2: Installing Disk Drives
You can populate the SmartStor NS2300N with SATA 1.5 Gb/s or 3.0 Gb/s disk
drives. For optimal performance, install disk drives of the same model and
capacity. Your disk drives will become a RAID Volume on the SmartStor.
To install disk drives:
1. Open the door on the front of the SmartStor enclosure.
2. Pull a disk drive carrier from the enclosure. See Figure 1.
3. Carefully lay the disk drive into the drive carrier, so that the screw holes on
the sides of the carrier align with the screw holes in the drive.
4. Insert the screws through the holes in the drive carrier and into the sides of
the disk drive.
• Install only the counter-sink screws supplied with the SmartStor.
• Install four screws per disk drive.
• Snug each screw. Be careful not to over-tighten.
5. Reinstall the drive carrier into the SmartStor enclosure.
Repeat steps 2 through 5 for the other disk drive.
6. Close the door on the front of the SmartStor.
Step 3: Connecting to the Network
To connect the SmartStor to your network:
1. Attach one end of the network cable to the RJ45 network connection.
See Figure 2.
2. Attach the other end of the network cable to your Ethernet hub or switch.
Important
If there are multiple networks at your facility, note the network to
which you connect the SmartStor. You will need this information
during the setup process.

SmartStor NS2300N Quick Start Guide
6
Step 4: Connecting the Power
To power the SmartStor:
1. Attach the power cord from the power source to the power adapter.
2. Connect the power adapter to the back of the SmartStor enclosure. See
Figure 2.
3. On the front of the SmartStor, press the power button. See Figure 1.
It takes about a minute to boot the SmartStor. When fully booted:
• The System Status LED turns green. See Figure 1.
• The buzzer beeps one time.
Step 5: Installing the Software
The SmartNAVI software connects your PC to the SmartStor, sets up the
SmartStor, sets up network drives on your PC, and performs backups.
To install the software:
1. Insert the CD into your CDROM.
2. Double-click the SmartNAVI installer icon.
3. Click the Next button to begin installation.
The License Agreement screen appears.
4. Click the “I accept the terms...” option, then click the Next button.
The Choose Destination Location screen appears.
5. Optional. Click the Browse... button to choose a new install location for the
software.
Click the Next button.
The Ready to Install screen appears.
6. Click the Install button to proceed with installation.
When the installation is finished, the final installation screen appears.
7. Click to Finish button to close the installer.
With the Online Registration box checked, your browser will open and go
directly to the Promise product registration website. Thank you for taking the
time to register.
The installer adds a SmartNAVI icon to the:
• Start menu
• Application tray
SmartNAVI loads automatically every time your Windows OS starts.
Step 6: Setting up the SmartStor
7
Step 6: Setting up the SmartStor
The SmartNAVI performs the setup procedures on your SmartStor. After the
procedure is done, you will have a default folder on the SmartStor, set up as a
network drive on your PC.
You can change the network settings, create RAID volumes, add and mount
folders on your SmartStor after initial setup using SmartNAVI. You can also made
more advanced settings using the PASM software. See “Step 7: Connecting to
PASM” on page 11.
To set up your SmartStor:
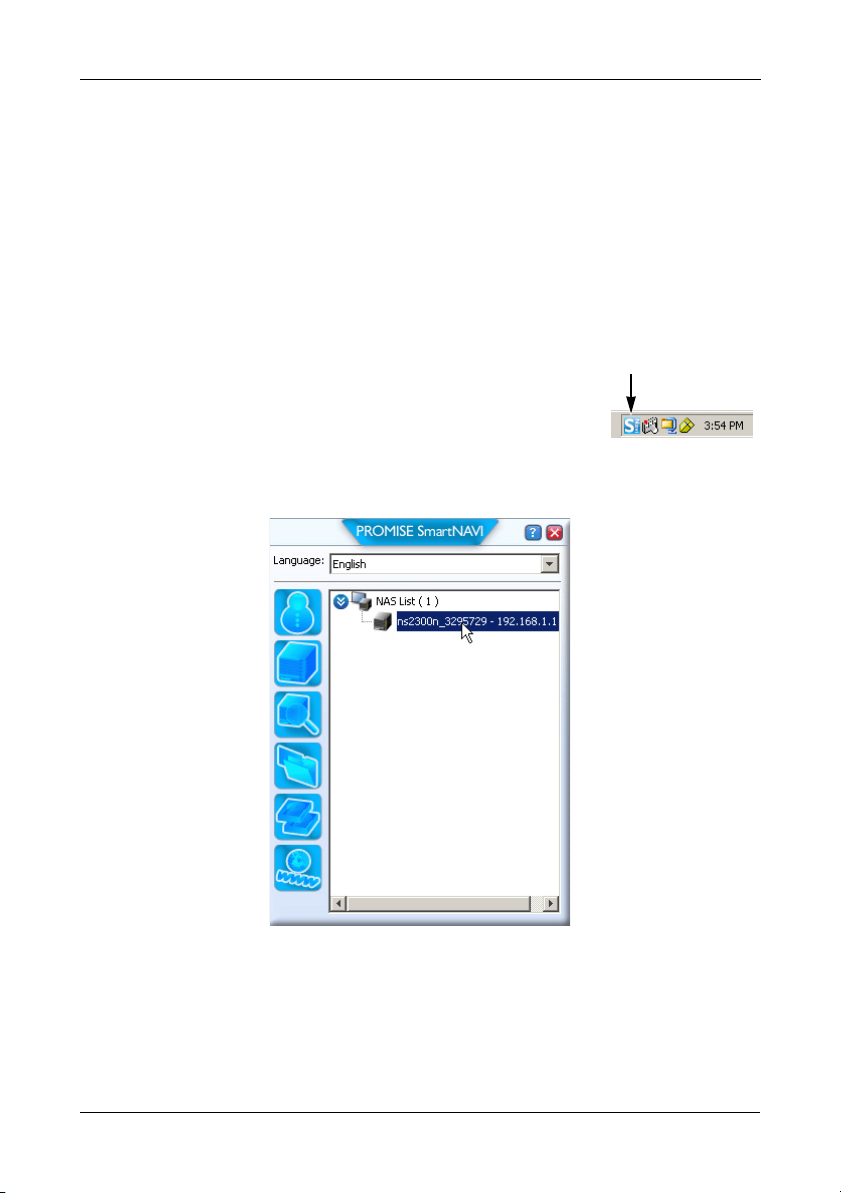
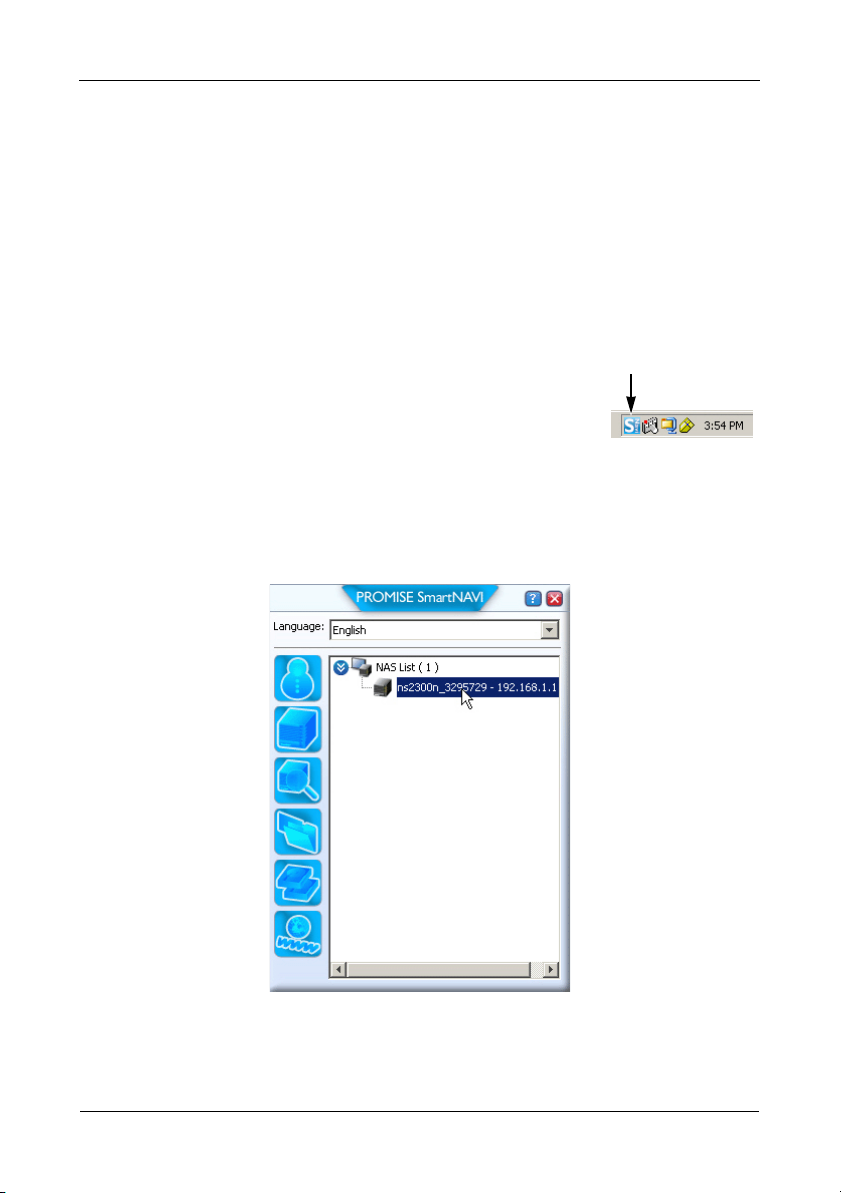
1. Right-click the SmartNAVI icon in the Windows
application tray (lower right corner of the screen).
2. Choose Open SmartNAVI from the popup menu.
The MSN Window opens.
3. Optional. From Language dropdown menu, choose the language you prefer.
4. Double-click the NS2300N in the NAS list.
The login window opens.
SmartNAVI icon
SmartStor NS2300N Quick Start Guide
8
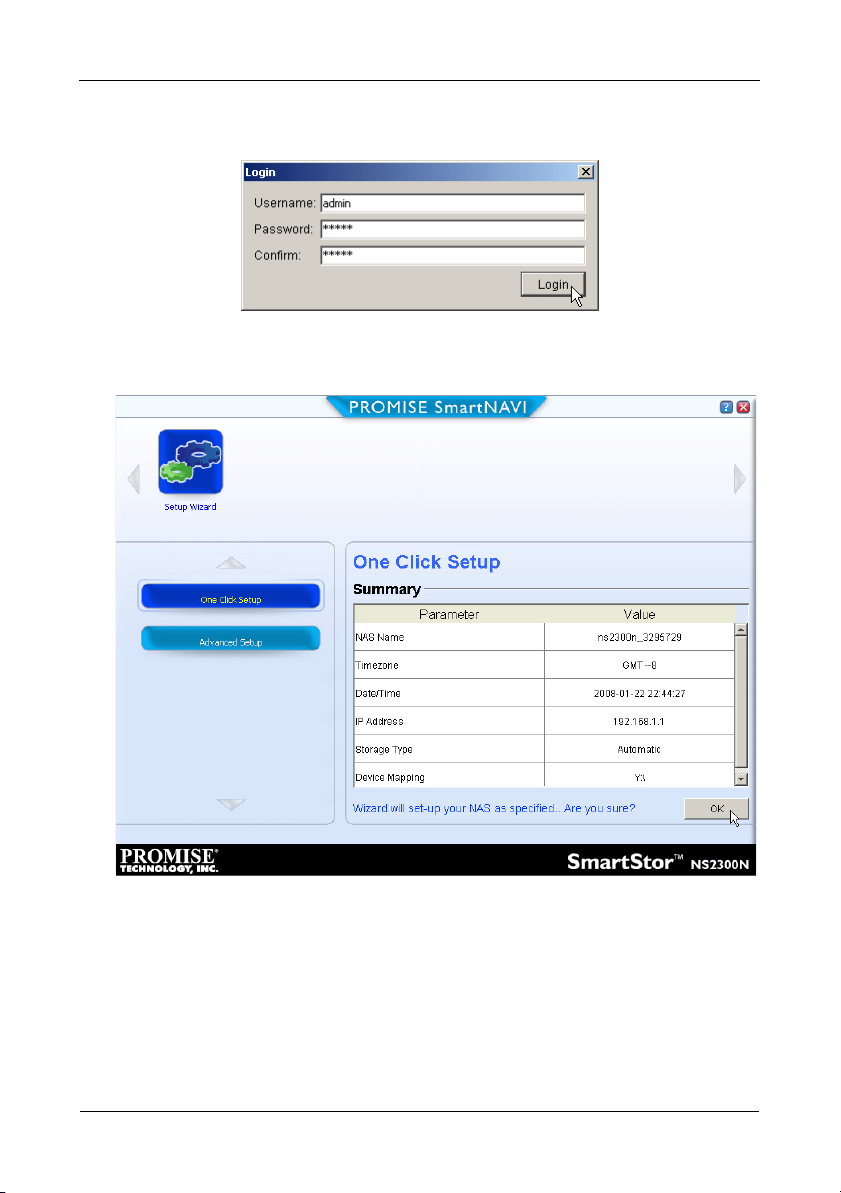
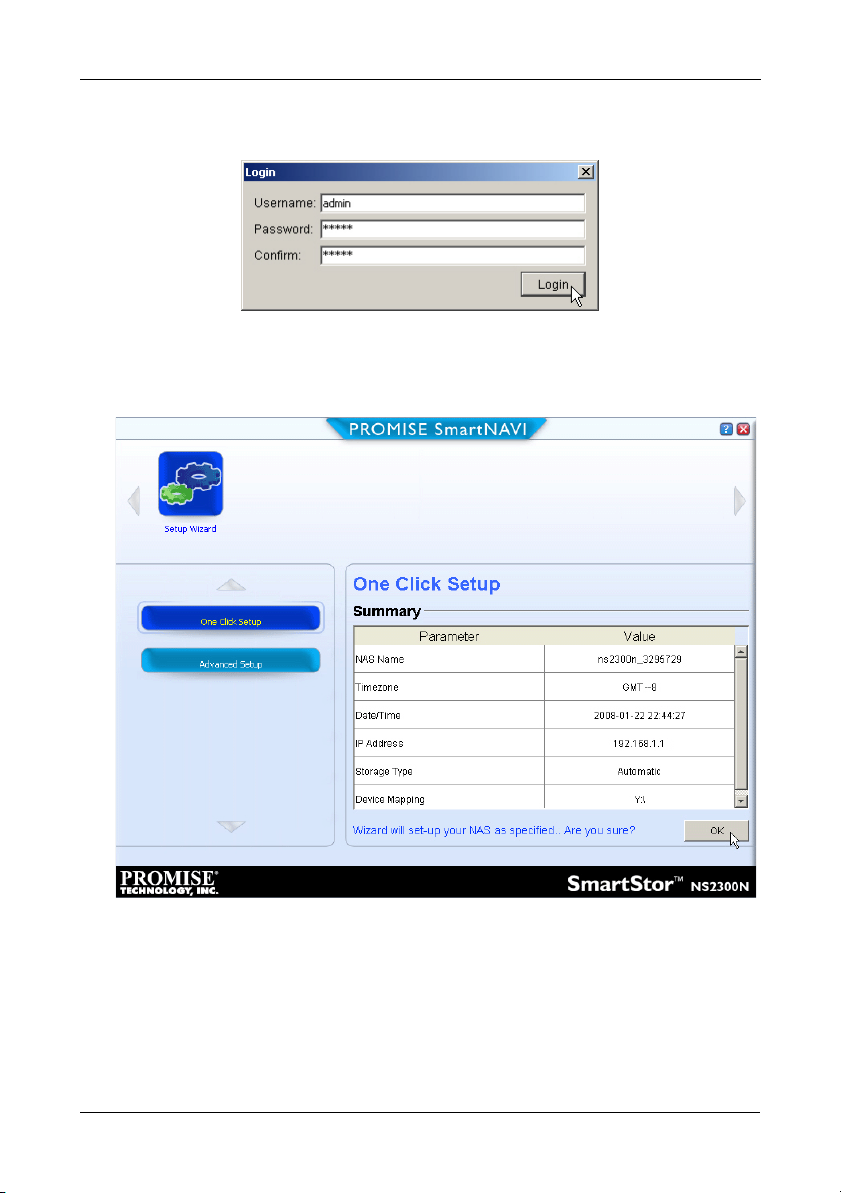
5. Type admin in the Username, Password, and Confirm fields, then click the
Login button.
This action creates a default user and logs the default user into SmartNAVI.
The Main Window opens.
6. Choose a Setup Mode and click the button:
• One Click Setup – Loads a collection of default settings.
Recommended for most users.
• Advanced Setup – Enables you to make your own settings.
Recommended for advanced users.
7. Click the OK button to continue.
If you chose One Click Setup, the Wizard creates a RAID Volume and a
default folder called
Public
. You are finished with the setup.

Step 6: Setting up the SmartStor
9
If you chose Advanced Setup, go to the next step.
8. Choose Automatic (DHCP) or Manual network settings.
If you chose Manual settings, type entries for each of the following
parameters in the fields provided:
• Computer (NAS system) Name
• IP Address
• Subnet Mask
• Gateway
• Primary and Secondary DNS – optional
9. Click the Next button to continue.
10. Choose the following values from their respective dropdown menus:
• Timezone
•Year
• Month
•Day
• Time in Hours, Minutes, and Seconds
11. Click the Next button to continue.
12. Choose Automatic or Manual RAID Volume creation.
If you chose Manual, choose the type of RAID Volume you want:
• Maximum Capacity – RAID 0, using both disk drives
• Data Protection – RAID 1, using both disk drives
13. Click the Next button to continue.
14. Choose a network drive letter from the dropdown menu.
This drive will be mapped as a network drive on your PC.
The list begins with Z and goes in reverse alphabetical order.
15. Click the Next button to continue.
16. Review your parameters.
To make changes, click the Previous button.
To accept the parameters and configure your NAS system, click the OK
button.
17. Click the Yes button in the confirmation box.
The Wizard creates a RAID Volume and a default folder called
Public
.
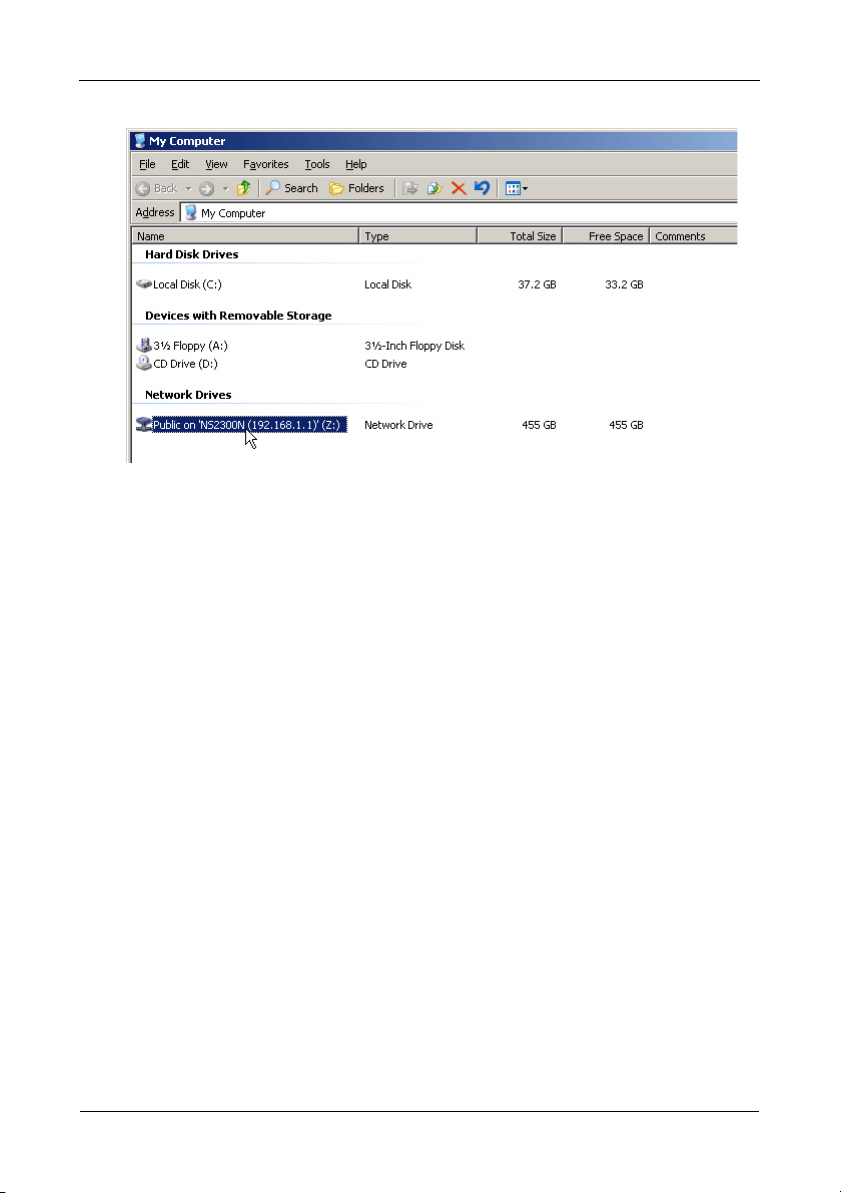
The Public folder on the SmartStor appears under My Computer as a
network drive.
SmartStor NS2300N Quick Start Guide
10
You can now copy files to and from the folder on the SmartStor.
To access this folder from other PCs, see “Step 8: Setting up Network Drives
on other PCs” on page 14.
To create additional RAID Volumes and folders, see Chapter 5 of the
SmartStor NS2300N User Manual
on the CD.
Step 7: Connecting to PASM
11
Step 7: Connecting to PASM
The Promise Advanced Storage Manager (PASM) software is factory-installed on
the SmartStor system. PASM runs in the browser on your PC. You can access
PASM:
• Directly in your browser (page 12)
• Through SmartNAVI (page 13)
Browser Support
Choose one of the following browsers to use with PASM:
Finding the SmartStor’s IP Address
To access the SmartStor in your browser, you must know the SmartStor’s IP
address. Use SmartNAVI for this purpose.
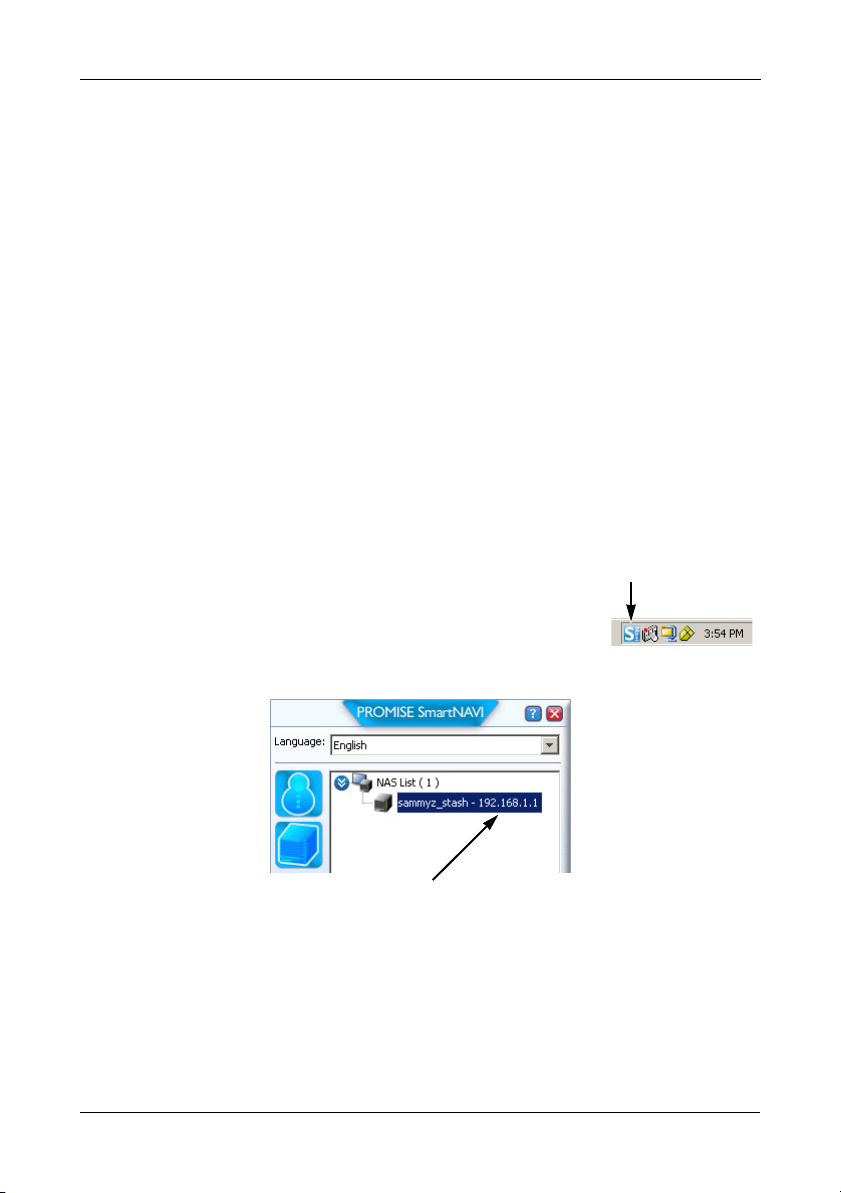
1. Right-click the SmartNAVI icon in the Windows
application tray (lower right corner of the screen).
2. Choose Open SmartNAVI from the popup menu.
The SmartNAVI MSN window appears with the NAS
List displayed. The IP address of the SmartStor shown in the NAS List.
For more information about SmartNAVI, see Chapter 4 of the
SmartStor
NS2300N User Manual
on the CD.
• Internet Explorer
• Mozilla
• Firefox
• Netscape Navigator
• Safari (Mac OS X)
SmartNAVI icon
IP address of the SmartStor
detected on the network
SmartStor NS2300N Quick Start Guide
12
PASM in your Browser
To log into PASM in your browser:
1. Start your Browser.
2. In the Browser address field, type in the IP address of the SmartStor.
See “Finding the SmartStor’s IP Address” on page 11.
Note that the IP address shown below is only an example. The IP address
you type into your browser might be different.
• PASM uses an HTTP connection . . . . . . . . . . . . . . . . . . . . . . .http://
• Enter the SmartStor’s IP address . . . . . . . . . . . . . . . . . 192.168.1.1
Together, your entry looks like this: http://192.168.1.1
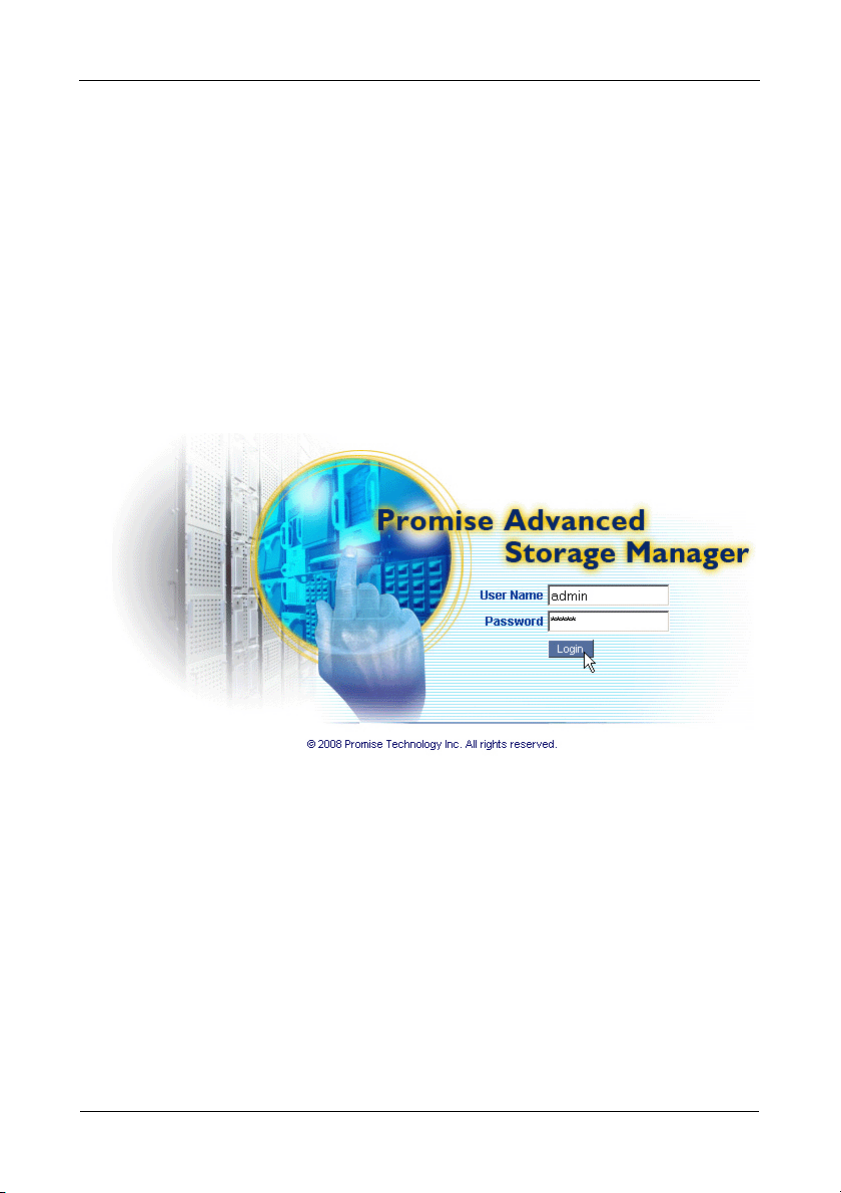
The PASM login screen displays.
3. Type admin in both the User Name and Password fields, then click the
Login button.
The user name and password are case sensitive.
For more information about PASM, see Chapter 5 of the
SmartStor
NS2300N User Manual
on the CD.

Step 7: Connecting to PASM
13
PASM in SmartNAVI
To log into PASM through SmartNAVI:
1. On the Windows desktop, right-click the SmartNAVI
icon (right).
2. Choose Open Advanced Management from the
popup menu.
Your default browser starts and the PASM login screen displays.
3. Type admin in both the User Name and Password fields, then click the
Login button.
The user name and password are case sensitive.
For more information about PASM, see Chapter 5 of the
SmartStor
NS2300N User Manual
on the CD.
SmartNAVI icon

SmartStor NS2300N Quick Start Guide
14
Step 8: Setting up Network Drives on other PCs
In Step 6, the SmartNAVI Setup Wizard created a default folder on the SmartStor
and made it a network drive on your PC.
To setup network drives on other PCs, where you have not installed the
SmartNAVI software, you must use the PCs’ Operating Systems for this purpose:
• Setting up a Network Drive on a Windows PC (page 14)
• Setting up a Network Drive on a UNIX or Linux PC (page 14)
• Setting up a Network Drive on a Macintosh PC (page 16)
Setting up a Network Drive on a Windows PC
To setup a Network Drive with My Network Places:
1. On the Windows desktop, double-click the My Network Places icon.
2. Click the Search button in the toolbar.
If the Search button is not shown, from the View menu, choose Toolbars,
then Standard Buttons.
3. In the Computer name field, type the IP address of the SmartStor and click
the Search button.
See “Finding the SmartStor’s IP Address” on page 11.
The SmartStor appears in the search results list.
4. Double-click the SmartStor to show the Public folder.
5. Right-click the Public folder and choose Map Network Drive from the
dropdown menu.
The Map Network Drive dialog box appears.
6. In the Map Network Drive dialog box, choose a drive letter and click the
Finish button.
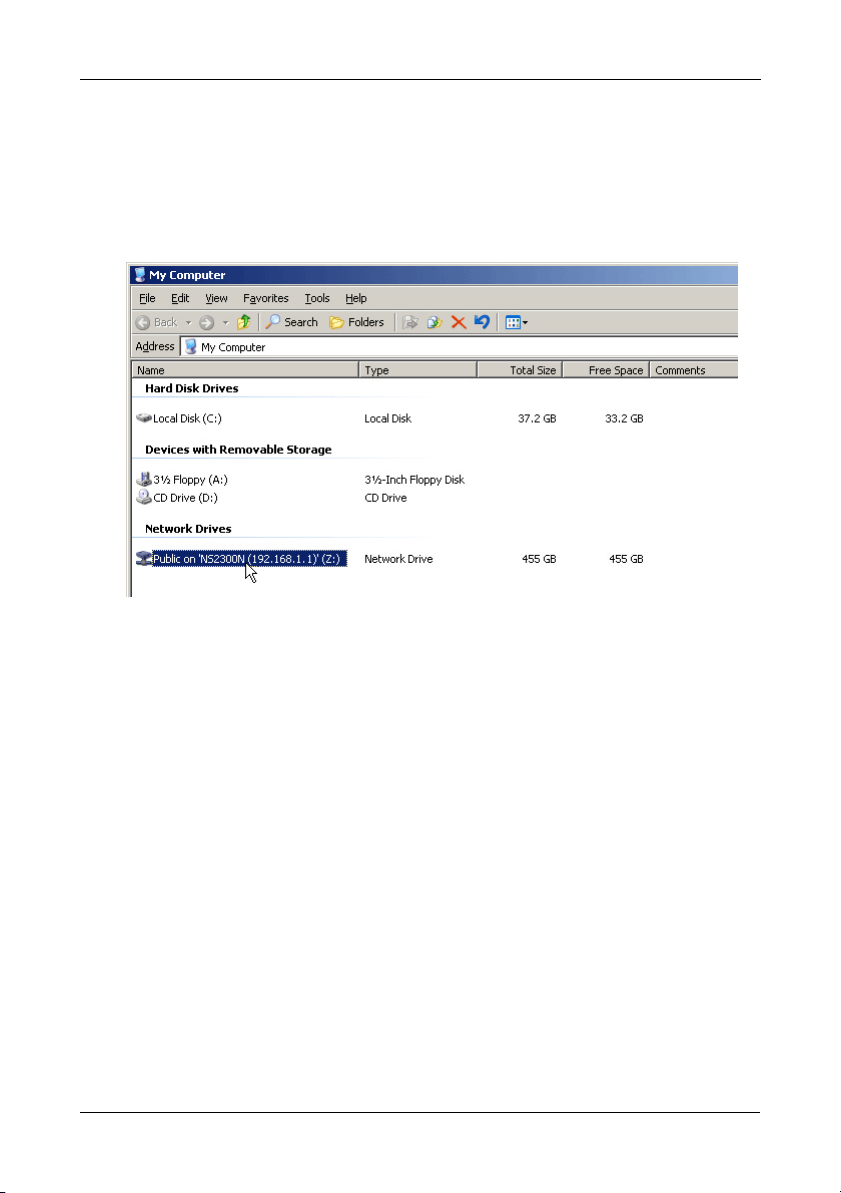
7. Double-click the My Computer icon on your Windows desktop.
The Public folder on the SmartStor appears under My Computer as a
network drive. You can now copy files to and from the folder on the
SmartStor.
Setting up a Network Drive on a UNIX or Linux PC
Before you can access the SmartStor from a UNIX or Linux PC, you must use
PASM to configure the SmartStor to communicate with UNIX and Linux.
On the Windows PC
1. Start PASM.
See “PASM in your Browser” on page 12 or “PASM in SmartNAVI” on
page 13.

Step 8: Setting up Network Drives on other PCs
15
2. In the Tree, on the left side of the PASM screen, click the + beside the File &
Print icon to expand the Tree.
3. Click the Protocol Control icon, then click the UNIX/Linux tab.
4. Next to Service, click the Enable option, then click the OK button.
The UNIX/Linux protocol enables UNIX and Linux PCs to connect to
SmartStor.
5. Click the File Sharing icon in the tree.
6. Click the Modify tab.
7. Check the Unix/Linux box, then click the OK button.
The UNIX/Linux file sharing enables UNIX and Linux PCs to access folders
on the SmartStor. In this case, access is given for the PUBLIC folder.
8. Click the Sharing Setup icon in the tree.
9. Click the UNIX/Linux Sharing tab.
10. In the New IP Address field, type the IP address of the UNIX/Linux PC from
which you want to access the SmartStor.
11. Click the Add button.
On the UNIX or Linux PC with Command Line Interface
1. Open a terminal window.
2. Create a new folder for the SmartStor. Type mkdir SmartStor and press
Enter.
3. Mount the SmartStor. Type mount 192.168.1.1:/VOLUME1/PUBLIC /
SmartStor and press Enter.
Note that the IP address shown here is only an example. The IP address you
type in your terminal window might be different.
See “Finding the SmartStor’s IP Address” on page 11.
Volume1 and Public refer to the default RAID Volume and folder created
during setup. See page 9.
4. Change to the SmartStor directory. Type cd /SmartStor and press Enter.
You can now copy files to and from the folder on the SmartStor.
5. When you are done with the SmartStor, type cd; umount /SmartStor and
press Enter.

SmartStor NS2300N Quick Start Guide
16
On the Linux PC with Graphic Desktop
This procedure is for a RedHat Enterprise Linux 4 configuration. If you run a
different version of Linux, you might have to adapt the procedure. See your OS
documentation.
1. From the Applications menu, choose Network Servers.
2. In the Network window, double-click Windows Network.
3. Double-click the SmartStor (NS2300) on the network.
4. Double-click the PUBLIC folder.
If this is the first time you accessed this folder, an Authentication dialog box
opens.
5. Type admin in the Username and Password fields, then click the OK button.
Leave the Domain field blank.
The folder opens. You can now copy files to and from the folder on the
SmartStor.
Setting up a Network Drive on a Macintosh PC
Before you can access the SmartStor from a Macintosh, you must use PASM to
configure the SmartStor to communicate with MacOS X.
On the Windows PC
1. Start PASM.
See “PASM in your Browser” on page 12 or “PASM in SmartNAVI” on
page 13.
2. In the Tree, on the left side of the PASM screen, click the + beside the File &
Print icon to expand the Tree.
3. Click the Protocol Control icon, then click the Macintosh tab.
4. Next to Service, click the Enable option, then click the OK button.
The Macintosh protocol enables Macintosh PCs to connect to SmartStor.
5. Click the File Sharing icon in the tree.
6. Click the Modify tab.
7. Check the Macintosh box, then click the OK button.
The Macintosh file sharing enables Macintosh PCs to access folders on the
SmartStor. In this case, access is given for the PUBLIC folder.

Step 8: Setting up Network Drives on other PCs
17
On the Macintosh PC
1. From the Go menu, choose Connect to Server.
2. In the Connect to Server dialog box, type afp://192.168.1.1 and click the
Connect button.
Note: The IP address shown here is only an example. The IP address you
enter might be different.
See “Finding the SmartStor’s IP Address” on page 11.
Click the + button to add this IP address to the Favorite Servers list.
3. Type admin in both the user name and password fields, then click the
Connect button.
4. In the Select the Volumes dialog box, click the PUBLIC folder, then click the
OK button.
5. In the Welcome screen, click the OK button.
A window opens on the Macintosh desktop to access the PUBLIC folder on
the SmartStor. You can now copy files to and from the folder on the
SmartStor.

SmartStor NS2300N Quick Start Guide
18
Step 9: Setting up a USB Printer
You can use the SmartStor as a print server. You must connect the USB printer,
enable SmartStor’s print server, and set up printing on your PC.
• Connecting a USB Printer to SmartStor (page 18)
• Setting up the Print Server on SmartStor (page 18)
• Setting up Windows Printing (page 18)
• Setting up Linux Printing (page 19)
• Setting up Macintosh Printing (page 20)
Connecting a USB Printer to SmartStor
To connect a USB printer:
1. Set up your printer according to the printer’s
Setup Guide
or
User Manual
.
2. Install the printer drivers onto your PC as described in the printer’s
Setup
Guide
or
User Manual
.
3. Attach the USB cable from your printer to one of the USB connections on the
back of the SmartStor. See Figure 2.
Setting up the Print Server on SmartStor
You must use PASM to configure the SmartStor for printing.
To set up the SmartStor’s print server:
1. Start PASM.
See “PASM in your Browser” on page 12 or “PASM in SmartNAVI” on
page 13.
2. In the Tree, on the left side of the PASM screen, click the + beside the File &
Print icon to expand the Tree.
3. Click the Protocol Control icon, then click the Printer Server tab.
4. Click the Enable option button beside Printer Server.
5. Click the OK button to save your settings.
Setting up Windows Printing
To set up printing on a Windows PC:
1. On the Windows desktop, double-click the My Network Places icon.
2. Click the Search button in the toolbar.
If the Search button is not shown, go to View > Toolbars and choose
Standard Buttons.

Step 9: Setting up a USB Printer
19
3. In the Computer name field, type the IP address of the SmartStor and click
the Search button.
See “Finding the SmartStor’s IP Address” on page 11.
The SmartStor appears in the search results list.
4. In the computer list, double-click the SmartStor to open it.
If the Connect to dialog box appears, type admin in the both the user name
and password fields, then click the OK button.
5. Right-click the usbptr1 icon and choose Connect... from the dropdown
menu.
6. When the warning message about printer drivers appears, click OK to
continue.
7. In the Add Printer Wizard, click the Manufacturer and model name of your
USB printer, then click OK.
8. In the Add Printer Wizard, click the OK button.
9. To verify printer installation, in the Windows Start menu, choose Settings,
then Printers and Faxes.
The Printers and Faxes screen appears. The usbptr1 is the USB printer on
the SmartStor.
Setting up Linux Printing
This procedure is for a RedHat Enterprise Linux 4 configuration. If you run a
different version of Linux, you might have to adapt the procedure. See your OS
documentation.
1. From the Applications menu, choose System Settings, then Printing.
Printer configuration window opens.
2. Click the New button.
Add a new print queue dialog box opens.
3. Click the Forward button.
4. In the Name field, type a name for the printer, such as
NAS_printer
, a
description, and click the Forward button.
5. From the Select a queue type dropdown menu, choose Network Windows
(SMB).
6. Scroll the list and click the triangle icon beside NS2300.
USBPTR01 appears below NS2300. USBPTR01 represents the USB printer
connected to the SmartStor.
7. Highlight USBPTR01 and click the Forward button.
The Authentication dialog box opens.

SmartStor NS2300N Quick Start Guide
20
8. In the User name and Password fields, type admin, then click the OK
button.
The Printer Model dialog box opens.
9. From the dropdown menu, choose the manufacturer of your printer.
From the model list, highlight the model of your computer.
Then click the Forward button.
10. Click the Finish button.
USBPTR01 is added to your printer list.
Setting up Macintosh Printing
To set up printing on a Macintosh PC:
1. From the Apple Menu, choose System Preferences.
2. Double-click the Print & Fax icon.
3. Click the Setup Printers button.
4. In the Printer List, click the Add icon.
The Printer List displays a new panel.
5. In the new panel, from the popup menus, choose:
• Windows Printing
• Workgroup
6. From the list, highlight the SmartStor, then click the Choose button.
A user name and password dialog box appears.
7. Type admin into the User Name and Password fields, then click OK.
The printer list displays a new panel.
8. Highlight the USBPTR01 in the list.
USBPRT01 represents the USB printer connected to the SmartStor.
9. In the Printer Model popup menu, choose the make of your printer.
10. In the Model Name list, choose the model of your printer.
11. Click the Add button.
USBPTR01 is added to your printer list.

GNU General Public License
21
GNU General Public License
This product includes copyrighted third-party software licensed under the terms
of the GNU General Public License. Please see the GNU General Public License
(“GPL”) for the exact terms and conditions of this license at www.gnu.org.
The GPL source code incorporated into the product is available for free download
at our web site www.promise.com/support/download/download_eng.asp.
Subject to GPL, you may re-use, re-distribute and modify the GPL source code.
Note that with respect solely to the GPL Software, no warranty is provided, we do
not offer direct support for the distribution.

SmartStor NS2300N Kurzanleitung
22
SmartStor Aufgabenliste
• Schritt 1: Packen Sie den SmartStor NS2300N aus (Seite 22)
• Schritt 2: Installation der Laufwerke (Seite 24)
• Schritt 3: Verbindung zum Netzwerk (Seite 24)
• Schritt 4: Verbindung mit der Stromversorgung (Seite 25)
• Schritt 5: Installation der Software (Seite 25)
• Schritt 6: Einrichten des SmartStor (Seite 26)
• Schritt 7: Verbindung mit PASM (Seite 30)
• Schritt 8: Einrichten der Netzlaufwerke auf anderen PCs (Seite 33)
• Schritt 9: Einrichten eines USB-Druckers (Seite 37)
Vollständige Informationen über Ihren SmartStor NS2300N finden Sie in der
SmartStor NS2300N Produktanleitung
auf der CD.
Schritt 1: Packen Sie den SmartStor NS2300N aus
Die Verpackung des SmartStor NS2300N enthält Folgendes:
• das SmartStor NS2300N Gerät
• Kurzanleitung
• Schrauben für die Laufwerke
(1 Päckchen)
• Ethernet-Kabel
•Stromkabel
• 12V DC-Stromadapter
• CD mit der SmartNAVI-Software,
Produktanleitung
und
Kurzanleitung
Warnhinweis
Die elektronischen Komponenten des SmartStor reagieren
empfindlich auf elektrostatische Entladung. Beachten Sie stets die
entsprechenden Vorsichtsmaßnahmen, wenn Sie den SmartStor
oder seine Bauteile handhaben.
Wichtig
Um den SmartStor konfigurieren zu können, müssen Sie zunächst
die Software auf einem PC mit Windows Vista, 2003 Server, XP
Professional oder 2000 Betriebssystem installieren.
Schritt 1: Packen Sie den SmartStor NS2300N aus
23
Abbildung 1. SmartStor NS2300N Frontansicht
Abbildung 2. SmartStor NS2300N Rückansicht
Laufwerk
Laufwerkträger
Laufwerkaktivitäts-
LED
Stromschalter
Ethernet-
Aktivitäts-LED
Laufwerkstatus-
LED
Hinweis: Dieser SmartStor wird ohne die vordere Abdeckung dargestellt.
Systemstatus-LED
Stromanschluss
USB-Anschluss
RJ45 Netzwerkverbindung
Gebläse

SmartStor NS2300N Kurzanleitung
24
Schritt 2: Installation der Laufwerke
Sie können den SmartStor NS2300N mit SATA 1.5 Gb/s oder 3.0 Gb/s
Laufwerken bestücken. Die beste Leistung erhalten Sie, wenn Sie das gleiche
Laufwerksmodell mit derselben Kapazität installieren. Ihre Laufwerke werden auf
dem SmartStor zu RAID-Datenträgern.
So installieren Sie die Laufwerke:
1. Öffnen Sie die vordere Abdeckung des SmartStor-Gehäuses.
2. Ziehen Sie einen Laufwerkträger aus dem Gehäuse heraus. Siehe
Abbildung 1.
3. Legen Sie das Laufwerk vorsichtig in den Laufwerkträger ein, sodass die
Bohrungen auf den Seiten des Trägers mit denen im Laufwerk
übereinstimmen.
4. Stecken Sie die Schrauben durch die Bohrungen im Laufwerkträger in die
Seiten des Laufwerks.
• Verwenden Sie nur die mit dem SmartStor mitgeliefertenSinkschrauben.
• Verwenden Sie vier Schrauben pro Laufwerk.
• Ziehen Sie jede Schraube gut an, aber überdrehen Sie sie nicht.
5. Schieben Sie den Laufwerkträger wieder in das SmartStor-Gehäuse ein.
Wiederholen Sie Schritte 2 bis 5 für das andere Laufwerk.
6. Schließen Sie die vordere Abdeckung des SmartStor.
Schritt 3: Verbindung zum Netzwerk
So stellen Sie die Verbindung zwischen dem SmartStor und Ihrem Netzwerk her:
1. Verbinden Sie ein Ende des Netzwerkkabels mit dem RJ45-
Netzwerkanschluss. Siehe Abbildung 2.
2. Verbinden Sie das andere Ende des Netzwerkkabels mit Ihrem Ethernet-
Hub oder Switch.
Wichtig
Sollte Ihr Unternehmen über mehrere Netzwerke verfügen,
vermerken Sie, mit welchem Ihr SmartStor verbunden ist. Sie
benötigen diese Information später beim Setup.

Schritt 4: Verbindung mit der Stromversorgung
25
Schritt 4: Verbindung mit der Stromversorgung
So schließen Sie den SmartStor an die Stromversorgung an:
1. Verbinden Sie das Stromkabel mit der Stromquelle und dem Stromadapter.
2. Verbinden Sie den Stromadapter mit dem Anschluss auf der Rückseite des
SmartStor-Gehäuses. Siehe Abbildung 2.
3. Drücken Sie den Stromschalter auf der Vorderseite des SmartStors. Siehe
Abbildung 1.
Der SmartStor benötigt etwa eine Minute zum Booten. Wenn das Booten
abgeschlossen ist:
• Die Systemstatus-LED leuchtet grün. Siehe Abbildung 1.
• Der Summer piept einmal.
Schritt 5: Installation der Software
Die SmartNAVI-Software verbindet Ihren PC mit dem SmartStor, richtet den
SmartStor sowie die Netzlaufwerke auf Ihrem PC ein und führt Sicherungen
durch.
So installieren Sie die Software:
1. Legen Sie die CD in Ihr CDROM-Laufwerk ein.
2. Doppelklicken Sie auf das Symbol des Installationsprogramms SmartNAVI.
3. Klicken Sie auf die Schaltfläche Weiter, um mit der Installation zu beginnen.
Der Bildschirm mit dem Lizenzvertrag geht auf.
4. Klicken Sie auf die Option „Ich bin mit den Geschäftsbedingungen
einverstanden.“ und dann auf Weiter.
Der Bildschirm „Speicherort auswählen“ geht auf.
5. Optional. Klicken Sie auf die Schaltfläche Durchsuchen..., um einen neuen
Speicherort für die Installation der Software auszuwählen.
Klicken Sie auf die Schaltfläche Weiter.
Der Bildschirm „Installieren“ geht auf.
6. Klicken Sie auf die Schaltfläche Installieren, um mit der Installation
fortzufahren.
Wenn die Installation abgeschlossen ist, geht der letzte
Installationsbildschirm auf.
7. Klicken Sie auf Abschließen, um das Installationsprogramm zu beenden.
Wenn das Kästchen „Online Registrierung“ aktiviert ist, öffnet sich Ihr Browser
und geht direkt zur Produktregistrierung auf der Promise-Website. Vielen
Dank, dass Sie sich die Zeit genommen haben, Ihr Produkt zu registrieren.
Das Installationsprogramm fügt hier ein Symbol SmartNAVI hinzu:
• Startmenü
• Anwendungsablage
SmartNAVI lädt automatisch bei jedem Start Ihres Windows
Betriebssystems.
SmartStor NS2300N Kurzanleitung
26
Schritt 6: Einrichten des SmartStor
SmartNAVI führt das Setup auf Ihrem SmartStor durch. Nach diesem Vorgang
haben Sie einen Standardordner auf dem SmartStor, der auf Ihrem PC als
Netzlaufwerk erscheint.
Nach dem ersten Setup mit SmartNAVI können Sie die Netzwerkeinstellungen
ändern, RAID-Datenträger erstellen sowie Ordner auf dem SmartStor hinzufügen
und einrichten. Sie können mit der PASM-Software auch erweiterte Einstellungen
einrichten. Siehe „Schritt 7: Verbindung mit PASM“ auf Seite 30.
So richten Sie Ihren SmartStor ein:
1. Rechtsklicken Sie auf das Symbol SmartNAVI in der
Windows Anwendungsablage (unten rechts auf dem
Bildschirm).
2. Wählen Sie aus dem Popup-Menü SmartNAVI
öffnen aus.
Das MSN-Fenster wird geöffnet.
3. Optional. Wählen Sie aus dem Dropdown-Menü Sprache Ihre bevorzugte
Sprache aus.
4. Doppelklicken Sie in der Liste NAS auf NS2300N.
Das Anmeldefenster wird geöffnet.
SmartNAVI Symbol
Schritt 6: Einrichten des SmartStor
27
5. Geben Sie in die Felder Benutzername, Passwort und Bestätigen admin ein
und klicken dann auf die Schaltfläche Anmelden.
Dadurch wird ein Standardbenutzer erstellt, der sich automatisch bei
SmartNAVI anmeldet.
Das Hauptfenster wird geöffnet.
6. Wählen Sie einen Setup-Modus aus und klicken auf die Schaltfläche:
• Setup mit einem Klick – Lädt verschiedene Standardeinstellungen.
Wird für die meisten Benutzer empfohlen.
• Erweitertes Setup – Für Ihre eigenen Einstellungen. Emphohlen für
Fortgeschrittene.

SmartStor NS2300N Kurzanleitung
28
7. Klicken Sie auf OK, um fortzufahren.
Wenn Sie Setup mit einem Klick auswählen, erstellt der Assistent einen
RAID-Datenträger und einen Standardordner namens
Öffentlich
. Das Setup
ist nun abgeschlossen.
Wenn Sie Erweitertes Setup auswählen, gehen Sie zum nächsten Schritt.
8. Wählen Sie „automatische“ (DHCP) oder „manuelle Netzwerkeinstellungen“.
Wenn Sie die manuellen Einstellungen auswählen, geben Sie die folgenden
Parameter in die bereitgestellten Felder ein:
• Computername (NAS-System)
• IP-Adresse
• Subnetzmaske
• Gateway
• Primäre und sekundäre DNS – optional
9. Klicken Sie auf die Schaltfläche Weiter, um fortzufahren.
10. Wählen Sie die folgenden Werte aus den entsprechenden Dropdown-Menüs
aus:
• Zeitzone
•Jahr
• Monat
•Tag
• Zeit in Stunden, Minuten und Sekunden
11. Klicken Sie auf die Schaltfläche Weiter, um fortzufahren.
12. Wählen Sie „automatische“ oder „manuelle Erstellung der RAID-
Datenträger“ aus.
Wenn Sie manuell wählen, wählen Sie die gewünschte Art des RAID-
Datenträgers aus:
• Maximale Kapazität – RAID 0, mit beiden Laufwerken
• Datenschutz – RAID 1, mit beiden Laufwerken
13. Klicken Sie auf die Schaltfläche Weiter, um fortzufahren.
14. Wählen Sie einen Netzlaufwerkbuchstaben aus den Dropdown-Menü aus.
Dieses Laufwerk wird auf Ihrem PC als Netzwerklaufwerk zugeordnet.
Die Liste beginnt mit Z und wird in umgekehrter alphabethischer Reihenfolge
fortgesetzt.
15. Klicken Sie auf die Schaltfläche Weiter, um fortzufahren.
16. Prüfen Sie Ihre Parameter.
Um Änderungen vorzunehmen, verwenden Sie die Schaltfläche Vor ige
Seite.
Wenn Sie die Parameter akzeptieren und Ihr NAS-System konfigurieren
möchten, klicken Sie auf OK.
Schritt 6: Einrichten des SmartStor
29
17. Klicken Sie auf die Schaltfläche Jaim Bestätigungsfeld.
Der Assistent erstellt einen RAID-Datenträger und einen Standardordner
namens
Öffentlich
.
Der Ordner „Öffentlich“ im SmartStor erscheint unter „Mein Arbeitsplatz“ als
Netzlaufwerk.
Sie können jetzt Dateien vom Ordner sowie in den Ordner auf dem
SmartStor kopieren.
Wie Sie von anderen PCs aus auf diesen Ordner zugreifen können, erfahren
Sie unter „Schritt 8: Einrichten der Netzlaufwerke auf anderen PCs“ auf
Seite 33.
Wie Sie zusätzliche RAID-Datenträger und Ordner erstellen können erfahren
Sie in Kapitel 5 in der
SmartStor NS2300N Gebrauchsanleitung
auf der CD.

SmartStor NS2300N Kurzanleitung
30
Schritt 7: Verbindung mit PASM
Die Promise Advanced Storage Manager (PASM) Software wird werkseitig auf
dem SmartStor-System installiert. PASM wird auf den Browser auf Ihrem PC
ausgeführt. Sie können auf PASM folgendermaßen zugreifen:
• Direkt von Ihrem Browser (Seite 31)
• Über SmartNAVI (Seite 32)
Browser-Support
Wählen Sie einen der folgenden Browser für die Verwendung mit PASM aus:
So finden Sie die SmartStors IP-Adresse
Um mit dem Browser auf SmartStor zuzugreifen, müssen Sie die SmartStor IP-
Adresse kennen. Verwenden Sie hierfür SmartNAVI.
1. Rechtsklicken Sie auf das Symbol SmartNAVI in der
Windows Anwendungsablage (unten rechts auf dem
Bildschirm).
2. Wählen Sie aus dem Popup-Menü SmartNAVI
öffnen aus.
Das SmartNAVI MSN-Fenster erscheint mit der NAS-Liste. Die IP-Adresse
von SmartStor wird in dieser Liste angegeben.
Weitere Informationen über SmartNAVI finden Sie in Kapitel 4 in der
SmartStor NS2300N Gebrauchsanleitung
auf der CD.
• Internet Explorer
• Mozilla
• Firefox
• Netscape Navigator
• Safari (Mac OS X)
SmartNAVI Symbol
Die IP-Adresse von SmartStor, die
auf den Netzwerk erkannt wurde.
 Loading...