


DSA-1 Manager
Operation Manual

DSA-1 Manager
Operation Manual
This manual is also available as 'on-line help' from the
DSA-1 Manager software. You can access the on-line help
from the 'Help' menu.
by Ian Dennis

Table of Contents
Part 1 General information
Part 2
Introduction
................................................................................................................................. 21 PC requirements
................................................................................................................................. 22 About this manual
Part 3 Getting started
................................................................................................................................. 31 Software installation
................................................................................................................................. 32 Connecting the DSA-1
....................................................................................................................................................... 3USB-COM adapter
Part 4 Using the DSA-1 Manager
................................................................................................................................. 41 User interface
................................................................................................................................. 42 Uploading a Results Log
................................................................................................................................. 43 Remote Control
................................................................................................................................. 54 Test Sequences
................................................................................................................................. 75 Updating the DSA-1 firmware
Part 5 Menu reference
1
2
3
4
9
................................................................................................................................. 91 File menu
................................................................................................................................. 92 Edit menu
................................................................................................................................. 103 Search menu
................................................................................................................................. 104 Format menu
................................................................................................................................. 105 DSA-1 menu
................................................................................................................................. 116 Help menu
Part 6 Test Sequence authoring guide
................................................................................................................................. 121 Elements of a Test Sequence
................................................................................................................................. 132 Language reference
Part 7 Icons and Hotkeys reference
................................................................................................................................. 181 Toolbar icons
................................................................................................................................. 192 Hotkeys (short-cut keys)
Index
12
18
20

Operation Manual
Manual revision history
Rev
Date
Author
Notes
1.00
8th October 2005
I.G.Dennis
To accompany software 1.0.0
Support contacts
Prism Media Products Limited
Prism Media Products Inc
William James House
21 Pine Street
Cowley Road
Rockaway
Cambridge CB4 0WX
NJ 07866
UK
USA
Telephone: +44 1223 424988
Telephone: +1 973 983 9577
Fax: +44 1223 425023
Fax: +1 973 983 9588
Email:
tech.support@prismsound.com
Web:
http://www.prismsound.com
Or contact your local Prism Sound distributor as detailed on the website.
Trademark acknowledgements
Microsoft, MS-DOS,
Visual Basic, VB, VBA, VBScript, Visual C++ and Windows are trademarks of
Microsoft Corporation.
All trademarks acknowledged
© 2005 Prism Media Products Limited. All rights reserved.
This manual may not be reproduced in whole or part, in any medium, without the written permission of
Prism Media Products Limited.
In accordance with our policy of continual development, features and specifications are subject to
change without notice.
Revision 1.00Prism Sound DSA-1 Manager
1
General information
© 2005 Prism Media Products Ltd
1.1

Operation Manual
The DSA-1 Manager is a Windows program which allows the DSA-1 hand-held analyzer to be used
with a PC.
The DSA-1 Manager provides four functions:
Results Log uploader
Uploads the contents of the DSA-1's non-volatile Results Log
to the PC for printing, inclusion in reports etc.
Remote Control window
Allows the DSA-1 to be remote controlled using screen and
mouse.
Test Sequence compiler/downloader
Allows user-defined Test Sequences to be edited, compiled
and downloaded to the DSA-1.
Firmware downloader
Updates the DSA-1's firmware.
The DSA-1 Manager runs on almost any PC running Windows 95, 98, 2000 or XP.
The PC must have a serial (COM) port available for connection to the DSA-1. Alternatively, a USB
port (1.0 or higher) can be used with the USB-COM adapter supplied.
This manual is provided in two different formats: as a conventional manual in 'pdf' format, and also as
'online help' which can be viewed whilst operating the DSA-1 Manager. The pdf version is best viewed
with Adobe Acrobat Reader, which can be downloaded free at
www.adobe.com
. The latest versions
of both software and manual are available from the Prism Sound website at
www.prismsound.com
.
Revision 1.00Prism Sound DSA-1 Manager
2
Introduction
2.1 PC requirements
2.2 About this manual
© 2005 Prism Media Products Ltd
1.2

Operation Manual
The following sections contain details of how to
install the DSA-1 Manager software
, and how to
connect the DSA-1 to the PC
.
To install the DSA-1 Manager software, run the installation executable 'setup.exe' in the 'DSA-1
Manager' folder and follow the instructions which appear on the screen during installation. The
installation executable is supplied with new DSA-1s on a USB flash disk. For existing DSA-1 owners,
or those who cannot read the USB flash disk (e.g. Windoes 95 or 98 users), the latest installation
executable can be downloaded free of charge from
www.prismsound.com
.
If the DSA-1 is to be connected to a COM port on the PC, simply connect the 9-way COM port
connector on the PC to the similar 'RS232C' connector on the DSA-1 using a null-modem ('cross-
over') cable, as supplied with the DSA-1.
If a USB port on the PC is to be used, it is first necessary to install the USB-COM adapter (supplied)
as described in the
USB-COM adapter
section.
Having connected the DSA-1, and installed the USB-COM adapter if required, the appropriate COM
port can be selected from within the DSA-1 Manager software using the 'Select COM port' option in
the DSA-1 menu.
To install the USB-COM adapter, run the installation executable 'setup.exe' in the 'USB-COM' folder
and follow the on-screen instructions. The end result is that a 'virtual COM port' is established for the
USB-COM adapter which can be nominated as the DSA-1 connection port within DSA-1 Manager.
Revision 1.00Prism Sound DSA-1 Manager
3
Getting started
3.1 Software installation
3.2 Connecting the DSA-1
3.2.1 USB-COM adapter
© 2005 Prism Media Products Ltd
1.3

Operation Manual
This section contains basic details of how to use the DSA-1 Manager. For more details, see the
Menu reference
and
Icons and Hotkeys reference
sections.
The DSA-1 Manager's user interface looks rather like any Windows text editor, for example Windows
Notepad. The text editor is used to edit DSA-1 Test Sequences prior to compilation and downloading
to the DSA-1. It is also used as a repository for uploaded Results Logs from the DSA-1.
The menus, icons and hotkeys which relate to the text editor will hopefully be familiar to Windows
users; they are not discussed here but are covered in the
Menu reference
and
Icons and Hotkeys reference
sections.
The following sections summarise operation of the DSA-1 Manager's four functions:
Results Log uploader
Uploads the contents of the DSA-1's non-volatile Results Log
to the PC for printing, inclusion in reports etc.
Remote Control window
Allows the DSA-1 to be remote controlled using screen and
mouse.
Test Sequence compiler/downloader
Allows user-defined Test Sequences to be edited, compiled
and downloaded to the DSA-1.
Firmware downloader
Updates the DSA-1's firmware.
The DSA-1 has a non-volatile Results Log into which the user can store test and measurement
results. Operation of the Results Log is described in section 6.8 of the DSA-1 Operation Manual.
The DSA-1 Manager can upload the contents of the Results Log into its text window. To do this,
select 'Upload Results Log' from the DSA-1 menu. Alternatively, you can use the
icon or
[F10]
hotkey. Note that the DSA-1 must be connected to the PC as described in the section
Connecting the DSA-1
, and must be switched on.
Once the Results Log is uploaded, it can be edited, saved or transferred into other Windows
applications via the clipboard.
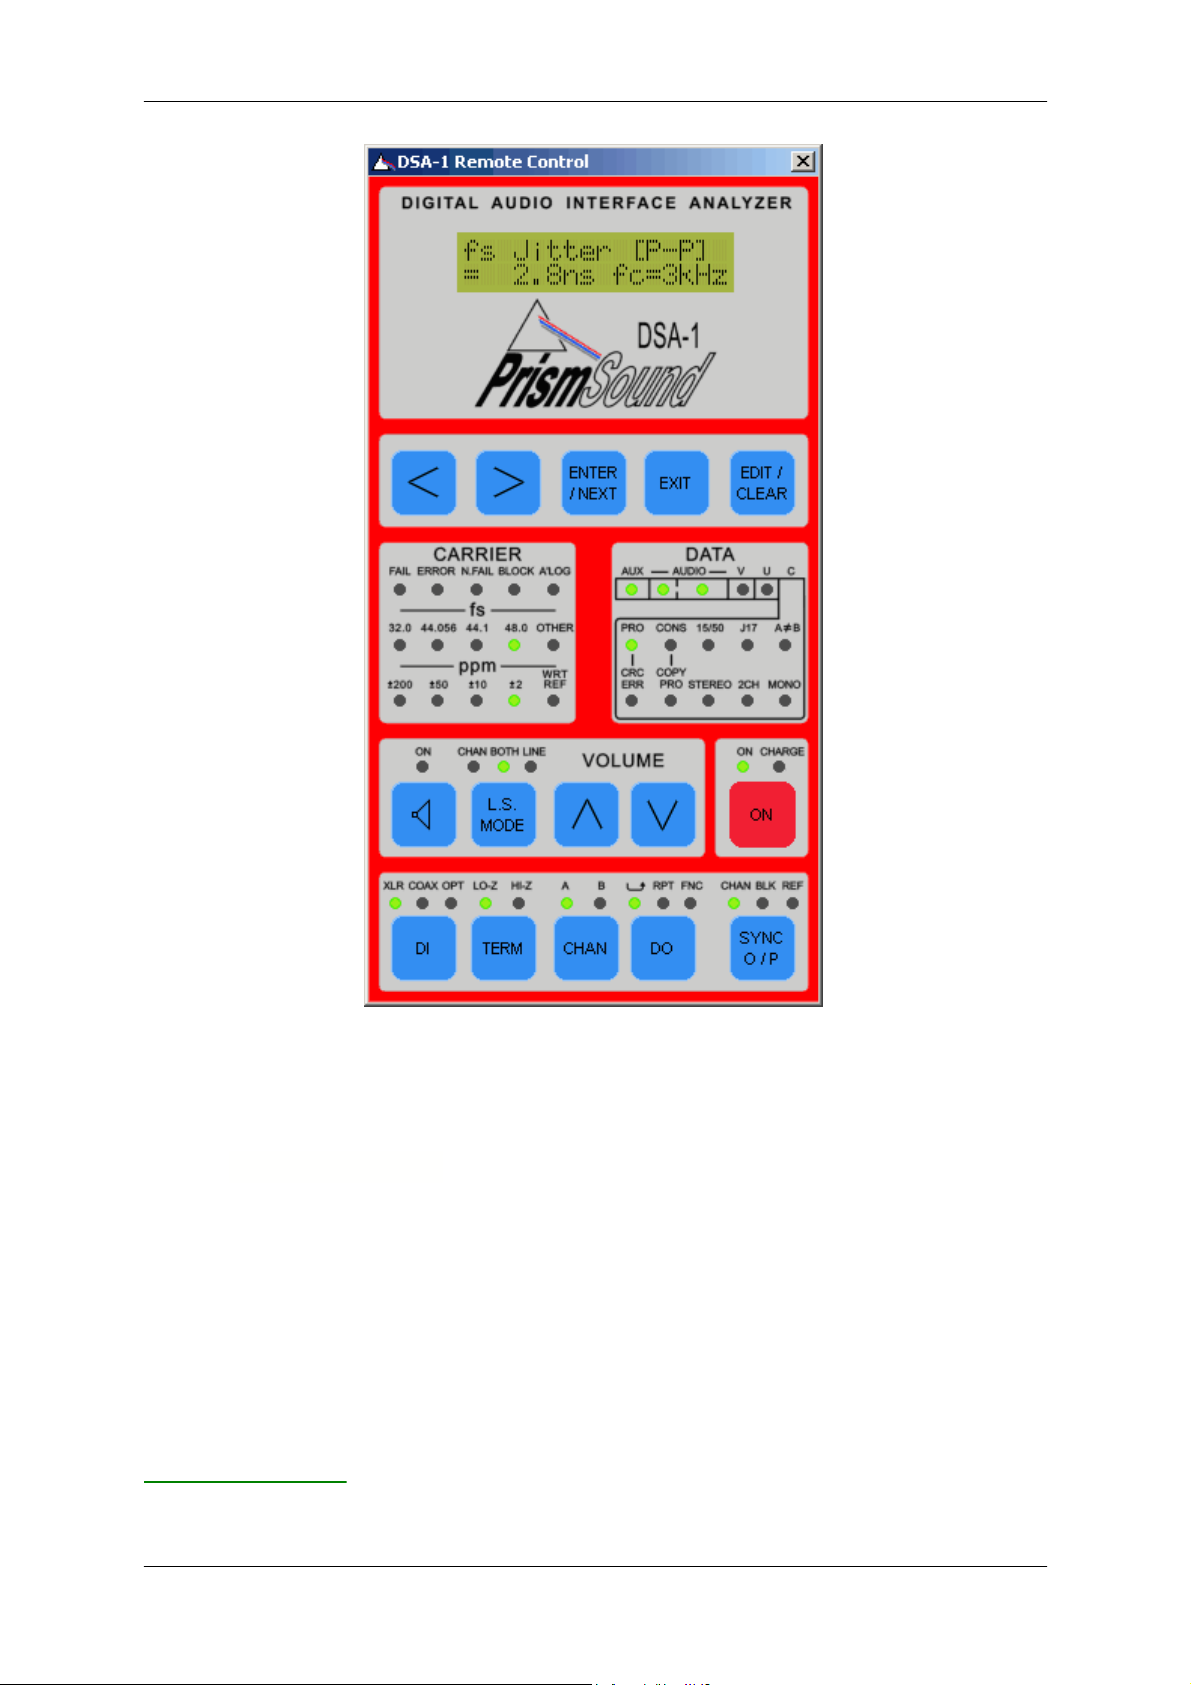
The DSA-1 can be remotely controlled from the screen and mouse of the PC.
To open the Remote Control window, select 'Remote Control' from the DSA-1 menu. Alternatively,
you can use the
icon or
[F8]
hotkey. Note that the DSA-1 must be connected to the PC as
described in the section
Connecting the DSA-1
, and must be switched on.
Revision 1.00Prism Sound DSA-1 Manager
4
Using the DSA-1 Manager
4.1 User interface
4.2 Uploading a Results Log
4.3 Remote Control
© 2005 Prism Media Products Ltd
1.4
Operation Manual
It is possible to use the Remote Control facility over a long distance by using a local area network or
an internet connection between the PC running the DSA-1 Manager software and a remote PC
connected to the DSA-1.
The DSA-1 has the capability to run 'Test Sequences'. These are pre-programmed series of tests
which are held in the DSA-1's non-volatile memory. Test Sequences allow an operator to run through
many tests in sequence at the press of a button. The DSA-1 draws the operator's attention to any
failures within the sequence of tests. Operation of the Test Sequence feature is described in section
4.5 of the DSA-1 Operation Manual.
The DSA-1 has four 'burned-in' Test Sequences which cannot be changed by the user, plus space for
up to four 'user' Test Sequences. The 'user' Test Sequences are created, compiled and downloaded
into the DSA-1 using the DSA-1 Manager.
Creating a source file
Revision 1.00Prism Sound DSA-1 Manager
4.4 Test Sequences
© 2005 Prism Media Products Ltd
1.5

Operation Manual
'User' Test Sequences are written in a special language, which is detailed in the
Test Sequence authoring guide
section. Test Sequences are initially written using the text window. It
may be useful to start from the 'source file' of one of the 'burned in' Test Sequences rather than
beginning your 'user' Test Sequence from scratch. These files are installed with the DSA-1 Manager,
and are listed in Appendix C of the DSA-1 Operation Manual.
The 'burned-in' Test Sequences are:
Test Name
Source file
Global Test
DSATST1.TXT, DSATST1A.TXT
Consumer Test
DSATST2.TXT, DSATST2A.TXT
General Pro Test
DSATST3.TXT, DSATST3A.TXT
Strict Pro Test
DSATST4.TXT, DSATST4A.TXT
Note that the 'A' versions are functionally identical to their non-A counterparts, but incorporate
'programmer-friendly units'. The original files (with native units) are provided only for backward
compatibility. It is recommended that the 'A' versions are used.
To begin work with one of these files, simply load it into the text window and you can begin to modify
it, for example changing limit values. You will notice that the source code is helpfully coloured by the
editor, which understands the syntax of the language. If the colouring needs to be manually
refreshed, use the 'Refresh Syntax Colour' option within the Test Sequence submenu of the DSA-1
menu, or use the 'F5' hotkey.
When the source code is complete, save it to disk before proceeding in order that your code is not
accidentally lost. If you began from one of the 'burned-in' Test Sequence source files, make sure that
you save your modified version to a different file name so that the original is not over-written.
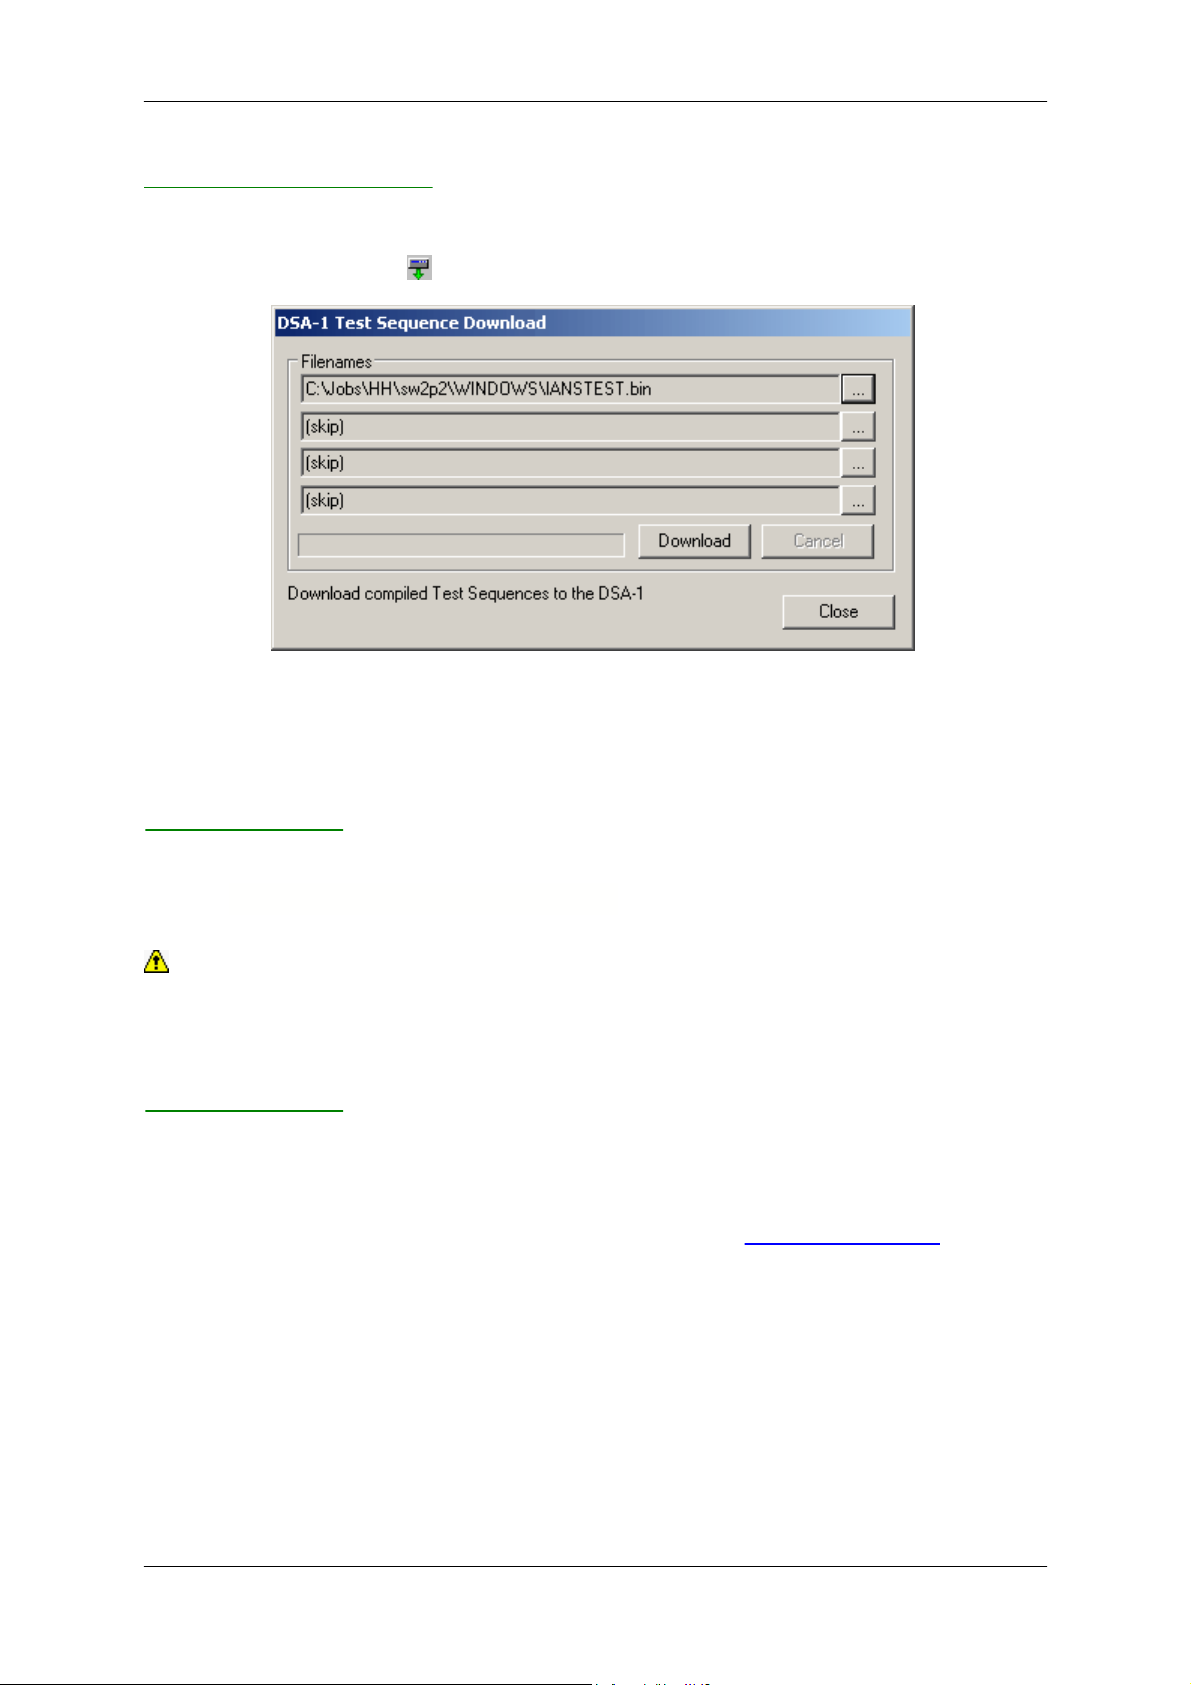
Compiling a Test Sequence
Once the source code is complete (and saved to disk), compile the Test Sequence by selecting the
'Compile...' option from the Test Sequence submenu in the DSA-1 menu. Alternatively, you can use
the
icon or
[F6]
hotkey. The following dialogue box is displayed:
It is possible (though usually unnecessary) to modify the file names and paths for the source file to be
compiled, as the destinations for the compilation listing (.LST) and executable (.BIN) files.
On clicking the
[Compile]
button, the Test Sequence is compiled. If success or failure of the
compilation is displayed in a message box. If the compilation failed (i.e. if there was an error in the
.TXT source file) then the .LST file is automatically loaded into the text window. The .LST contains a
line-by-line summary of the compilation, with error messages displayed where they were encountered.
Once the source of the error has been identified, the .TXT file must be reloaded, repaired, and
resaved before recompiling.
Revision 1.00Prism Sound DSA-1 Manager
© 2005 Prism Media Products Ltd
1.6
Operation Manual
Downloading a Test Sequence
Once the Test Sequence has been compiled successfully, it is downloaded into the DSA-1 by
selecting the 'Download...' option from the Test Sequence submenu in the DSA-1 menu.
Alternatively, you can use the
icon or
[F7]
hotkey. The following dialogue box is displayed:
A 'User' Test Sequence executable (.BIN) can be nominated for any of the four 'user' slots.
Alternatively, a slot can be left as it is by selecting 'skip', or cleared by selecting the 'BLANK.BIN'
executable.
On clicking the
[Download]
button, the selected Test Sequence executables are downloaded into the
DSA-1. Note that the DSA-1 must be connected to the PC as described in the section
Connecting the DSA-1
, and must be switched on.
WARNING! Care must be taken when updating the DSA-1 firmware. Interruption of the
process (for example if the null-modem cable or power supply is removed, or if the PC is
crashed) can leave the DSA-1 in an inoperable state. For this reason, it is recommended that
the firmware is only updated at such times as new versions of the firmware are released.
To update the DSA-1 firmware, connect the DSA-1 to the PC as described in the section
Connecting the DSA-1
. Ensure that the DSA-1 is connected to its external DC supply, and that the
supply is switched on. Turn the DSA-1 on by pressing the [ON] button WHILST THE [DI] AND
[EDIT/CLEAR] BUTTONS ARE PRESSED. The DSA-1 will display the message 'DSA-1 Download...
Waiting...' if the firmware download mode has been successfully entered.
In the DSA-1 Manager, select 'Download Firmware upgrade...' from the DSA-1 menu. Select the
desired firmware download (.DLD) file. The latest file is available at
www.prismsound.com
.
Revision 1.00Prism Sound DSA-1 Manager
4.5 Updating the DSA-1 firmware
© 2005 Prism Media Products Ltd
1.7

Operation Manual
Click the [Download] button to start the update, which takes approximately two minutes. The progress
of the update is shown in the dialogue box; the DSA-1's display also shows a diagnostic list of the
flash blocks being updated.
When the update is complete, the DSA-1 restarts automatically. Note that a firmware update causes
the DSA-1 settings to revert to the factory defaults, and clears both the Results Log and the user Test
Sequence slots.
Revision 1.00Prism Sound DSA-1 Manager
© 2005 Prism Media Products Ltd
1.8

Operation Manual
The menu reference section provides detailed descriptions of all the available menus options.
The available menus are as follows:
File menu
Loading and saving files, printing etc.
Edit menu
Editing operations; cut, paste etc.
Search menu
Search and replace functions
Format menu
Text formatting functions
DSA-1 menu
Accesses all DSA-1 specific functions: uploading the Results
Log, compiling and downloading Test Sequences, Remote
Control and firmware updates
Help menu
Access to on-line help and version information
The File menu accesses typical file-related functions, similar to those of any text editor.
File menu options are:
New
Opens a new document
Open...
Opens an existing document
Save
Saves the current document to same location
Save as...
Saves the current document to a new location
Print...
Prints the current document
Page setup...
Allows basic page formatting for print
Exit
Exits the DSA-1 Manager
The Edit menu accesses typical edit-related functions, similar to those of any text editor.
Edit menu options are:
Undo
Reverses the last edit action
Cut
Cuts selected text to the clipboard
Copy
Copies selected text to the clipboard
Paste
Inserts clipboard contents at cursor
Select All
Selects all text in the current document
Revision 1.00Prism Sound DSA-1 Manager
5
Menu reference
5.1 File menu
5.2 Edit menu
© 2005 Prism Media Products Ltd
1.9

5.3 Search menu
The Search menu accesses typical search-related functions, similar to those of any text editor.
Search menu options are:
Find...
Initiates finding of text in current document
Find Next
Finds the next instance of existing target
Replace...
Initiates replacement of text in document
The Format menu accesses typical text formatting functions, similar to those of any text editor.
Format menu options are:
Word Wrap
Enables or disables wrapping of text in entire document
Font...
Sets font of selected text
Colour...
Sets colour of selected text
Bold
Sets selected text to bold or non-bold
Italic
Sets selected text to italic or non-italic
Underline
Sets selected text to underline or non-underline
Paragraph
For paragraph at cursor: places/removes bullets, justifies
left, centre or right
The DSA-1 menu accesses all DSA-1 specific functions of the DSA-1 Manager.
These functions are described in the
Using the DSA-1 Manager
section; links to the appropriate
sections are included in the menu list below.
Upload Results Log
Uploads the DSA-1 Results Log to the text window
Launch Remote Control
Launches the Remote Control window
Test Sequence
Submenu for compilation and downloading of Test Sequences
Download firmware upgrade
Updates the DSA-1's firmware
Select COM port
Allows selection of COM port for DSA-1 connection
5.4 Format menu
Operation Manual
Revision 1.00Prism Sound DSA-1 Manager
5.5 DSA-1 menu
© 2005 Prism Media Products Ltd
1.10

5.6 Help menu
The Help menu contains two options:
Contents
Opens HTML Help file
About...
Displays DSA-1 Manager version
Operation Manual
Revision 1.00Prism Sound DSA-1 Manager
© 2005 Prism Media Products Ltd
1.11

Operation Manual
The following sections contain a description of the various
elements of a Test Sequence
and also a
detailed
language reference
.
This section gives a brief overview of the structure of a DSA-1 Test Sequence. It is recommended
that the reader refer to the listings of the built-in sequences (shipped with this software) which provide
useful examples.
The idea of a Test Sequence is that an operator can select and run a particular set of tests on an
input carrier, and be informed that these have all been accomplished successfully. This gives a high
degree of confidence in a very short time. Any failure is accompanied by an informative message,
after which the whole Sequence can be restarted, or the offending part can be repeated, or that part
can be skipped and the remainder of the Sequence can be run.
Thus Test Sequences are built up from one or more 'Segments'. Each Segment may run successfully
or may fail. The name and number of each Segment is displayed on the DSA-1's display while it is
running, and accompanies any failure message sent from that Segment. The Segment boundaries
are also the only point at which the Sequence can be restarted if partial execution is desired.
The body of each Segment is made up of a number of 'Instructions', 'Labels' and 'Comments'. Each
Segment has a Start Instruction (which includes the name of the Segment), and one or more End
Instructions. A PASS/FAIL flag must be appropriately set before executing the Segment End
instruction, in order to govern whether the Sequence will stop and display a message (FAIL) or carry
on to the next Segment (PASS).
The following example shows a very simple Segment called 'Carrier lock' which FAILS if the selected
DI is unlocked, displaying the message 'No carrier lock'; otherwise the Segment PASSES. It would be
unusual to write a Segment as simple as this, since normally a Segment contains a number of related
tests rather than just one. The operation of the example Segment should be clear to anyone who has
written a computer program in almost any language:
/* Segment 1: tests that carrier is locked */
SEGMENT( 1,'Carrier lock');
SET_FAIL;
TEST_UNLOCK_BIT; JUMP_IF_ZERO(@lock_ok);
MESSAGE( 'No carrier lock '); SEGMENT_END;
@lock_ok:
SET_PASS;
SEGMENT_END;
/*******************************************/
Instructions may appear on lines on their own, or with several on one line separated by semicolons
(';') as in the example above. Instructions may be 'simple', with no parameters, or they may be
'complex' with following parameters enclosed in brackets:
SET_PASS
is an example of a simple Instruction
MEAS_FS_JITTER(6)
is a complex Instruction
Complex Instructions are followed by one or more parameters in brackets, separated by commas.
Parameters may be:
·
Numeric (binary, base 10 or hexadecimal);
·
Text (in single quotes);
·
A Label (without the final colon);
Revision 1.00Prism Sound DSA-1 Manager
6
Test Sequence authoring guide
6.1 Elements of a Test Sequence
© 2005 Prism Media Products Ltd
1.12

Labels are typically targets for branching ('jump') Instructions. A Label is distinguished from an
Instruction by starting with the '@' character and ending with a colon (':'), for example:
@MYLABEL:
Labels may be on a line on their own, or may precede one or more Instructions on the same line.
Comments may be added to the segment definitions in two ways; enclosed within '/*' and '*/' delimiters
or with the '//' form which defines a Comment that lasts to the end of a line:
/* This is a comment */ JUMP(@start)
// So is this, anything on this line is ignored from here
Comment text is ignored by the compiler and serves only to make a Test Sequence source file easier
to read.
6.2 Language reference
This section details the use of all Test Sequence keywords.
Sequence Start and End
A HEADER Instruction MUST be the first Instruction in the source file. It defines the start of the Test
Sequence, and includes a 16 character text message that appears on the DSA-1 display when the
Sequence is selected or run, for example:
HEADER('Special Test ')
Similarly, the final Instruction of the Sequence should be:
END
Segment Start and End
These Instructions define the beginning and end of a Segment (the concept of a Test Sequence
Segment is described above). Here is an example of a Segment start Instruction; the first parameter
defines the running-order position of the Segment, the second is a message to be displayed when the
segment runs or fails:
SEGMENT( 3, 'fs Tests ')
The Segment end instruction has no parameters and causes the DSA-1 to skip to the beginning of the
next segment, or to end the sequence if there are no more Segments (or if the Segment has failed):
SEGMENT_END
Set switches
These Instructions have no parameters and are used to set the DSA-1 switched operating
parameters:
Operation Manual
Revision 1.00Prism Sound DSA-1 Manager
© 2005 Prism Media Products Ltd
1.13

Operation Manual
SELECT_COAX
SELECT_XLR
SELECT_OPT
Digital Input (DI) selection
SELECT_CHANA
SELECT_CHANB
Sub-frame (channel) selection
SELECT_JITTERCF_HI
SELECT_JITTERCF_LO
Jitter PLL corner-frequency selection
SELECT_EYE_AT_ZEROX
SELECT_EYE_AT_200MV
Threshold voltage for eye-narrowing measurement
SELECT_LOZ
SELECT_HIZ
Select DI termination state
CLEAR_ERROR_COUNT
Clear the biphase/parity error counter
CLEAR_LOG
INSERT_LOG_BLOCK
CLEAR_LOG_LAST_BLOCK
Clear the Results Log
Insert a Block Marker into the Results Log
Clear the Results Log back to last Block Marker
Test binary results
These Instructions cause a snapshot of a particlar DSA-1 operating parameter to be loaded into the
16-bit Test Register. For most of these Instructions, the value is only a single bit, which is loaded into
the least-significant bit of the Test Register with the upper 15 bits zeroed. Where indicated, a longer
value is loaded at the least-significant end of the Test Register with the remaining upper bits zeroed.
TEST_UNLOCK_BIT
TEST_NFAIL_BIT
TEST_BLOCKERR_BIT
TEST_ALOG_BIT
CARRIER panel 'FAIL' LED; 1 if lit
CARRIER panel 'N.FAIL' LED; 1 if lit
CARRIER panel 'BLOCK' LED; 1 if lit
CARRIER panel 'ALOG' LED; 1 if lit
TEST_AUX_BITS
TEST_AUDL_BITS
TEST_AUDMAIN_BITS
TEST_V_BIT
TEST_U_BIT
TEST_ANEB_BIT
TEST_CRCERR_BIT
DATA panel 'AUX' LED; 1 if lit
DATA panel 'AUDIO' (low-bits) LED; 1 if lit
DATA panel 'AUDIO' (main bits) LED; 1 if lit
DATA panel 'V' LED; 1 if lit
DATA panel 'U' LED; 1 if lit
DATA panel 'A<>B' LED; 1 if lit
DATA panel 'CRC ERROR' LED; 1 if lit
TEST_COAX
TEST_XLR
TEST_OPT
TEST_LOZ
TEST_HIZ
TEST_CHANA
TEST_CHANB
1 if [DI] is set to 'COAX'
1 if [DI] is set to 'XLR'
1 if [DI] is set to 'OPT'
1 if [TERM] is set to 'LO-Z'
1 if [TERM] is set to 'HI-Z'
1 if [CHAN] is set to 'A'
1 if [CHAN] is set to 'B'
TEST_JITTERCF_HI
TEST_JITTERCF_LO
TEST_EYE_AT_ZEROX
TEST_EYE_AT_200MV
1 if jitter PLL corner-frequency is low
1 if jitter PLL corner frequency is high
1 if threshold for eye-narrowing is at 0-xing
1 if threshold for eye-narrowing is at 200mV
TEST_LOG_FULL
1 if Results Log is full
TEST_REF_STATUS
(8-bit) loads Ref_Status register:
Bit1, 1 if Ref AES11 Rx is unlocked
Bit3, 1 if Ref Coax input is active
Bit4, 1 if Ref XLR input is active
Remaining bits undefined
TEST_CSBYTE(
n
)
(8-bit, n=0..23) loads DI Chan Status byte n
Measure numeric results
These Instructions cause a test to be performed using the specified DSA-1 function, after which the
numeric result is loaded into the Test Register in the units indicated. Some of the Instructions require
that a '
time
' parameter is specified which determines how long the measurement is averaged before
Revision 1.00Prism Sound DSA-1 Manager
© 2005 Prism Media Products Ltd
1.14

Operation Manual
loading the result.
MEAS_ERROR_COUNT
MEAS_FS_JITTER(
time
)
MEAS_DATA_JITTER(
time
)
MEAS_EYE_NARROW(
time
)
MEAS_DIF_AMPL
MEAS_CM_AMPL
MEAS_LOBAND_AMPL
MEAS_FS_BASE
MEAS_FS_ERROR
MEAS_PHASE
Biphase/parity error count
fs jitter (ns)
Data jitter (ns)
Eye-narrowing (ns)
Differential input amplitude (V)
Common-mode input amplitude (V)
Audio band input level (V)
Base fs of DI input
returns 0(32k), 1(44k056), 2(44k1), or 3(48k)
fs error from the standard rate (ppm)
Carrier phase versus Ref Sync (degrees)
Those Instructions which take
time
(i.e. measurement duration) as a parameter use units of seconds
if the 's' suffix is specified, or tenths of a second if not, e.g.:
MEAS_DATA_JITTER(4.5s)
or
MEAS_DATA_JITTER(45)
would both measure Data Jitter over a period of 4.5 seconds.
Boolean operators
These Instructions cause a boolean operation to be performed on the Test Register, and are used to
operate on the result of a previous TEST_.. Instruction (normally TEST_REF_STATUS or
TEST_CSBYTE(n), see above). Conditional branch Instructions may then be used to vary action
according to the results of the boolean operation.
AND(
value
)
OR(
value
)
XOR(
value
)
Bitwise AND operation: new result = old result AND value
Bitwise OR operation: new result = old result OR value
Bitwise XOR operation: new result = old result XOR value
'
value
' is a 16-bit word value expressed either as hexadecimal with a following 'h', binary with a
following 'b' or decimal without either. '
value
' is enclosed in brackets.
Sequence flow
These Instructions cause the DSA-1 to branch or 'jump' to another part of the Sequence. Care should
normally be taken never to branch outside the current Segment; although this is not specifically
prevented, it is only occasionally useful and, if used unwisely, can cause unpredictable results.
The conditional branch Instructions enable different responses to occur depending on the results of
previous TEST_.. or MEAS_.. operations. All JUMP_.. Instructions have a label description (starting
with a '@' character) as their last parameter. Some also have a hexadecimal, decimal or binary value
as the first parameter. Note that all the JUMP_.. Instructions have a 'short form' as shown in the list
below.
Conditional branch Instructions act upon the current contents of the Test Register but do not change
it, so that multiple JUMP_.. instructions may be used to test the same result several times.
Revision 1.00Prism Sound DSA-1 Manager
© 2005 Prism Media Products Ltd
1.15

Operation Manual
JUMP(@label)
or JMP(@label)
Unconditional
JUMP_IF_EQUAL(
value
, @label)
or JE(..
if result = value
JUMP_IF_NOT_EQUAL(
value
, @label)
or JNE(..
if result <> value
JUMP_IF_GREATER_THAN(
value
, @label)
or JG(..
if result > value
JUMP_IF_LESS_THAN(
value
, @label)
or JL(..
if result < value
JUMP_IF_GREATER_OR_EQUAL(
value
, @label)
or JGE(..
if result >= value
JUMP_IF_LESS_OR_EQUAL(
value
, @label)
or JLE(..
if result <= value
JUMP_IF_ZERO(@label)
or JZ(..
if result = 0
JUMP_IF_NOT_ZERO(@label)
or JNZ(..
if result <> 0
JUMP_IF_MASKED(
value
, @label)
or JMASKZ(..
if (result AND value) = 0
JUMP_IF_NOT_MASKED(
value
, @label)
or JMASKNZ(..
if (result AND value) <> 0
The @label parameter must begin with a '@' character. Note that labels when referred to in a
JUMP_.. instruction do not have a following colon (':') character. Jumps may be made backwards or
forwards.
The
JMASKZ
and
JMASKNZ
instructions are most useful for testing Channel Status fields.
Notes on the '
value
' parameter:
The value parameter can be expressed in a variety of units depending on what type of result is being
tested. Usually there is a 'user-friendly' unit which requires the use of a suffix. Omitting the suffix
causes the DSA-1's internal 'raw' units to be used:
Time (MEAS_FS_JITTER, MEAS_DATA_JITTER, MEAS_EYE_NARROW)
Use units of nanoseconds, with the suffix 'ns';
Raw DSA-1 units are multiples of 1/64th of a nanosecond;
JUMP_IF_GREATER( 6.5ns, @bad_jitter )
is equivalent to
JUMP_IF_GREATER( 4160, @bad_jitter )
Amplitude (MEAS_DIF_AMPL, MEAS_CM_AMPL, MEAS_LOBAND_AMPL)
Use units of Volts or millivolts, with suffixes of 'V' or 'mV';
Raw DSA-1 units are multiples of 10 mV;
JUMP_IF_LESS_THAN( 240mV, @no_level)
is equivalent to
JUMP_IF_LESS_THAN( 24, @no_level)
Frequency (MEAS_FS_ERROR)
Use units of parts per million depending on the sampling frequency in use, with suffixes:
Revision 1.00Prism Sound DSA-1 Manager
© 2005 Prism Media Products Ltd
1.16

Operation Manual
'PPM_480' if fs=48.0kHz
'PPM_441' if fs=44.1kHz
'PPM_440' if fs=44.056kHz
'PPM_320' if fs=32.0kHz
Raw DSA-1 units are multiples of 1/64 Hz;
Phase (MEAS_PHASE)
Use units of degrees with a suffix of 'DEG';
Raw DSA-1 units are multiples of 360/512 degrees (about 0.703 degrees);
JUMP_IF_GREATER_THAN( 45deg, @notinphase)
is equivalent to
JUMP_IF_GREATER_THAN( 64, @notinphase)
Segment pass/fail operators
These Instructions set and act upon the PASS/FAIL flag. If set to FAIL before a Segment end, this
flag causes the Sequence to abort. If set to PASS before a Segment end, the flag allows the
sequence to continue.
SET_PASS
SET_FAIL
Set flag to 'PASS'
Set flag to 'FAIL'
JUMP_IF_PASS(@label) or JPASS(..
JUMP_IF_FAIL(@label) or JFAIL(..
Jump if flag is set to 'PASS'
Jump if flag is set to 'FAIL'
Miscellaneous
This Instruction displays a message on the bottom line of the DSA-1's display. The text parameter
must be enclosed in single quotes:
MESSAGE(text)
The no-operation Instruction is:
NOP
This causes the DSA-1 to take no action and pass on to the next Instruction.
Long delays are accomplished with:
WAIT(delay)
The delay parameter can be expressed in seconds by using an 's' suffix, otherwise is assumed to be
expressed in tenths of a second. There are a number of circumstances where delays need to be
inserted, for example waiting for lock to be acquired after changing the [DI] selection.
Revision 1.00Prism Sound DSA-1 Manager
© 2005 Prism Media Products Ltd
1.17

Operation Manual
The following reference tables of icons and Hotkeys are available:
Toolbar icons
Hotkeys (short-cut keys)
The following toolbar icons operate in the DSA-1 Manager:
Open a new text document
Open an existing text document
Save a text document at the current location
Print the current document
Undo the last edit operation
Cut the selected text to the clipboard
Copy the selected text to the clipboard
Paste the contents of the clipboard at the cursor
Find specified text
Change the font of the selected text
Change the colour of the selected text
Bold/un-bold the selected text
Italic/un-italic the selected text
Underline/de-underline the selected text
Bullet/un-bullet the paragraph at the cursor
Left-justify the paragraph at the cursor
Centre-justify the paragraph at the cursor
Right-justify the paragraph at the cursor
Select the COM port for DSA-1 connection
Upload the Result Log from the DSA-1
Launch the DSA-1 Remote Control window
Compile a Test Sequence
Download a Test Sequence to the DSA-1
Update the DSA-1's firmware
Revision 1.00Prism Sound DSA-1 Manager
7
Icons and Hotkeys reference
7.1 Toolbar icons
© 2005 Prism Media Products Ltd
1.18

7.2 Hotkeys (short-cut keys)
In addition to the usual Windows hotkeys, the following application-specific hotkeys operate in DSA-1
Manager:
F1
Launch on-line help
Ctrl + N
Open a new text document
Ctrl + O
Open an existing text document
Ctrl + S
Save a text document at the current location
Ctrl + P
Print the current document
Ctrl + Z
Undo the last edit operation
Ctrl + X
Cut the selected text to the clipboard
Ctrl + C
Copy the selected text to the clipboard
Ctrl + V
Paste the contents of the clipboard at the cursor
Ctrl + A
Selects all text in the text window
Ctrl + F
Find specified text
Ctrl + H
Replace specified text
Ctrl + B
Bold/un-bold the selected text
Ctrl + I
Italic/un-italic the selected text
Ctrl + U
Underline/de-underline the selected text
F3
Find the next occurrence of previous find text
F5
Refresh Test Sequence syntax colouring
F6
Compile a Test Sequence
F7
Download a Test Sequence to the DSA-1
F8
Launch the DSA-1 Remote Control window
F9
Select the COM port for DSA-1 connection
F10
Upload the Result Log from the DSA-1
F11
Update the DSA-1's firmware
Operation Manual
Revision 1.00Prism Sound DSA-1 Manager
© 2005 Prism Media Products Ltd
1.19

Index
- J -
Justification 10
- A -
About DSA-1 Manager 11
- B -
Bullets 10
- C -
Cable 3
Colour 10
COM port 2, 3
Connection 3
Cut copy and paste 9
- D -
DSA-1 menu 10
- E -
Edit functions 9
Edit menu 9
- K -
Keyboard short-cuts 19
- L -
Loading documents 9
- M -
Manual 2
Menu reference 9
- N -
Null-modem cable 3
- O -
Operating system 2, 3
- P -
Printing documents 9
- F -
File menu 9
Finding text 10
Firmware 7
Font 10
Format menu 10
- H -
Help menu 11
Hotkeys (short-cut keys) 19
- I -
Icons 18
Installation 3
- R -
Remote Control 4
Replacing text 10
Results Log 4
RS232C 3
- S -
Saving documents 9
Search menu 10
Select All 9
Serial port 2
Short-cut keys 19
Software installation 3
- T -
Test Sequences 5, 12

Test Sequences 5, 12
authoring 12
compiling 5
downloading 5
elements 12
language reference 13
Text format 10
Toolbar icons 18
- U -
Uploading the Results Log 4
USB adapter 2
User interface 4
User Test Sequences 5
- V -
Version information 11
- W -
Windows 2
Word Wrap 10
 Loading...