

Page 1

Owners Manual
IMPORTANT: Read instructions before operation. Revised September 2014
Fridge/Freezers
Single Zone
Flexi Zone +
Page 2

Single Zone and Flexi Zone + Fridge/Freezers
www.companionbrands.com.au
2
3 GENERAL INFORMATION & SAFETY INSTRUCTIONS
4 APPLIANCES AND ACCESSORIES
5 GETTING STARTED
6 OPERATING YOUR FRIDGE/FREEZER - 12/24V DC
7 OPERATING YOUR FRIDGE/FREEZER 100-240V AC
8 TEMPERATURE CONTROL
9 SINGLE ZONE OPERATION
10 FLEXI ZONE + OPERATION
12 USING WITH SOLAR PANEL OR GENERATOR
13 TIPS AND SUGGESTIONS
13 MAINTENANCE & SERVICE
14 TROUBLESHOOTING
15 SPECIFICATIONS
15 WARRANTY DETAILS
Contents
Page 3

3
General Information & Safety Instructions
Read this manual thoroughly before first use,
even if you are familiar with this type of product.
The safety precautions enclosed herein reduce the
risk of fire, electric shock and injury when correctly
adhered to. Keep the manual in a safe place for
future reference, along with purchase receipt and
carton. If applicable, pass these instructions on
to the next owner of the appliance.
Always follow basic safety precautions and
accident prevention measures when using an
electrical appliance, including the following:
Electrical safety and cord handling
• Correct voltage: Make sure your local outlet
voltage and circuit frequency corresponds to the
voltage indicated on the appliance rating label.
NOTE : Intended use: This is a portable product,
designed for private use. It is exclusively designed
for use in cars, caravans and other vehicles
including mobile homes, campervans, rail cars and
boats. It is designed to cool food and beverages
and to be set up in dry, weather protected areas.
It is not intended for stationary extended use as
e.g. a second fridge at home.
• Safe connection: Insert the plug firmly into a
properly earthed AC mains or 12V DC socket.
Do not alter the plug.
• Protect from moisture: To protect against
electric shock, do not immerse the cable, plug
or the appliance itself in water or other liquid.
Ensure your hands are dry before handling the
plug or switching on the appliance. Do not use
it on wet surfaces.
NOTE : Installation of AC in boats should
be carried out by a qualified electrician.
• Protect the power cable. Do not kink or damage
the power cable. Do not wrap it around the
appliance. Do not pull the unit by the cable.
Do not use the cable as a handle, close a door
on the cable or pull the cable around sharp
edges or corners. Keep the cable away from
heated surfaces.
• Never touch uninsulated cables with bare
hands. This applies especially to handling
AC cables.
• For installations in boats: If the device is
AC mains operated, it is important that the
system is protected by a fuse and an earth
leakage protection device.
• Always ensure that the correct voltage
is applied to the Fridge/Freezer. The voltage
is stated on the Fridge/Freezer’s data plate.
• Never obstruct vents to the
Fridge/Freezer’s compressor.
• Defrost the Fridge/Freezer on a regular basis.
• Never use hard or sharp implements to remove
ice from the cooling compartment.
• Never use abrasive or solvent based materials
when cleaning the cooling compartment.
• Do not use any electrical appliances inside the
cooling compartment.
NOTE : This appliance is not intended for use
by persons (including children) with reduced
physical, sensory or mental capabilities, or lack
of experience and knowledge, unless they have
been given supervision or instruction concerning
use of the appliance by a person responsible for
their safety. Children should be supervised to
ensure that they do not play with the appliance.
• Do not expose to rain
• This appliance is suitable for camping use.
• This appliance may be connected to more than
one source of energy.
Page 4

Single Zone and Flexi Zone + Fridge/Freezers
www.companionbrands.com.au
4
Assembly and Parts
Single Zone
Fridge/Freezer
1. Lid Handle
2. Control Panel
3. Carry Handles
4. Power
Input Panel
5. 12V/24V DC
Power Cable
6. 240V AC
Power Cable
7. Inner Baskets
8. Internal Light
9. Air Flow Vent
1
9
5
6
8
77
94
2
3
5
6
77
8
Flexi Zone +
Fridge/Freezer
1. Lid Handle
2. Control Panel
3. Carry Handles
4. Power
Input Panel
5. 12V/24V DC
Power Cable
6. 240V AC
Power Cable
7. Inner Baskets
8. Internal Light
9. Air Flow Vent
1
2
9
94
3
NOTE : Images of PRI45LM (Single Zone) and PRI65LDZM (Flexi Zone +) shown
Page 5

5
Getting Started
Installation
After unpacking the Fridge/Freezer check that no
parts are missing. Place the unit in a dry place
which is protected against splashing water. Do not
place directly adjacent to sources of heat such as
heating, gas ovens, hot water, pipes or under the
blazing sun.
It is important that your appliance is installed and
operated in accordance with these instructions to
guarantee its performance, efficiency and operation.
Application and
operative cooling range
The cooling compartment has varying temperature
zones. The values indicated on the digital
display are related to the middle of the cabinet.
The Single Zone Fridge/Freezer is designed to
either refrigerate or freeze food. The Flexi Zone
Fridge/Freezer can be used as either a fridge or a
freezer or both simultaneously. The Fridge/Freezer
may be used for outdoor use such as for camping
purposes. If you wish to refrigerate medicines,
first check to ensure the Fridge/Freezer’s cooling
capacity meets the demands of the respective
medicines. The Fridge/Freezer is designed to
operate in ambient temperatures between -10°
and +55° C in a maximum air humidity of 90%.
The Fridge/Freezer can operate continuously
at an angle of 30° maximum.
Note: The normal operation of the appliance
requires heat to be radiated away from the
condenser located at the end of the cabinet.
Adequate airflow is required around the
compressor at all times. (Fig. 1).
The cooling system has been designed to operate
correctly when the appliance is positioned on
angles up to 30 degrees. It is recommended
that the time the unit is exposed to angles over
30 degrees is limited to a maximum of four (4)
hours continuous operation. (Fig. 2).
Fig. 1
30°
Fig. 2
Page 6

Single Zone and Flexi Zone + Fridge/Freezers
www.companionbrands.com.au
6
The Fridge/Freezer is designed to operate
on AC or DC voltage.
• AC input 220-240V AC at 50Hz
(e.g. electrical power point)
• DC input 12V or 24V DC
(e.g. car cigarette lighter or car battery)
• The power supply automatically switches
the Fridge/Freezer to mains operation when
connected to 100-240V mains power, even
if the 12V/24V DC power cable is connected.
• If the Fridge/Freeze is operating when the
vehicle ignition is switched OFF, the Fridge/
Freezer will switch OFF automatically when
the power source voltage falls below the
Battery Monitor cut-out setting.
• The Fridge/Freezer will automatically switch
back ON when the vehicle is re-started and
the power source voltage reaches the Battery
Monitor cut-in setting.
Operating your Fridge/Freezer
with 12/24V DC
• Plug the 12V/24V DC power cable into the
DC POWER socket (as circled) on the end of the
Fridge/Freezer and then connect to the vehicle
cigarette lighter socket or suitable 12V or 24V
DC power source.
• The Fridge/Freezer will automatically turn on,
there is no requirement to switch the appliance on.
• The display will automatically show the current
internal cabinet temperature.
• For optimum performance and efficiency, it is
important that the Fridge/Freezer has a reliable
DC power source available. Direct connection
to the battery is recommended and reduces the
risk of voltage dropping to the appliance.
• Use only the 1.5m DC power cable supplied with
the Fridge/Freezer.
IMPORTANT : If a DC extension cable is required
we recommended use of a 6mm dia. (AWG11)
4.58mm
2
Twin Sheath Two Core cable with direct
connection to the positive and negative battery
terminals with 15A inline fuse protection.
• The Fridge/Freezer is equipped with an electronic
control system that will prevent polarity reversal.
In the event that the battery connection is reversed
the unit will not start or operate. The power input
socket is fitted with a 15A blade fuse for protection.
12/24V DC Power Requirements
If your Fridge/Freezer is cutting out prematurely,
it could be due to:
1. The low voltage protection being set too high
on the Battery Monitor
2. DC power cable and/or connections are not
suitable to carry the required current. Check the
power cable and all connections and adjust the
Battery Monitor on the control panel.
• The Fridge/Freezer is equipped with a multilevel Battery Monitor that protects your vehicle
battery against excessive discharging when
the Fridge/Freezer is connected to 12V or
24V DC power source.
IMPORTANT : When using the Fridge/Freezer with
DC power supply, we recommended setting the
Battery Monitor to LOW (L).
NOTE : A battery charger may only be connected
to the battery when the Fridge/Freezer has been
disconnected from the DC power source.
• Over-voltage may cause damage to the
electronics of the Fridge/Freezer.
• Your Fridge /Freezer is equipped with reverse
polarity protection. It protects your Fridge/
Freezer against reverse battery connection and
short circuit.
• As a protection for your battery, the Fridge/Freezer
switches OFF automatically if the power source
voltage is insufficient.
NOTE : It is important that the correct cable size and
gauge is used for the installation of the DC supply
as over distance the voltage can decrease if the
incorrect cable size and gauge cable is being used.
• Always consult a qualified automotive electrician
when using a DC extension cable.
Power Requirements
Page 7

7
• Plug the 100-240V AC power cable into the
AC POWER socket (as circled below) on the
end of the Fridge/Freezer and then connect
to a suitable 100-240V AC power source.
• The Fridge/Freezer will automatically turn on, there
is no requirement to switch the appliance on.
• The display will automatically show the current
internal cabinet temperature.
• The Fridge/Freezer is equipped with a multivoltage internal power supply with priority circuit
for connecting to an AC voltage power source of
100 -24 0V.
• The power input socket is fitted with a 15A blade
fuse for protection.
CAUTION: Do not touch cables, plugs or switches
with wet hands or when your feet are in contact with
water! If you operate your Fridge/Freezer on board a
boat by means of a shore connection to a 220-240V
AC power source, the power connection must include
an earth leakage RCD residual current device.
DC Power Cable
12/24V DC Power Inlet Panel PRI45LM and PRI60LM
12/24V DC Power Inlet Panel
for all other models
Operating your Fridge/Freezer
with 100/240V AC
AC Power Cable
100-240V Power inlet
Page 8
Single Zone and Flexi Zone + Fridge/Freezers
www.companionbrands.com.au
8
When your Fridge/Freezer is first connected
to the AC or DC power input the appliance will
automatically switch on and the LCD control
panel will display the current cabinet temperature,
battery monitor and Eco setting as well as the
current input voltage.
• The Temperature Controller provides the ability
to set the desired temperature level and display
the current cabinet temperature. The electronic
controller has been programmed to maintain an
average of the set temperature.
• The compressor will start up when the internal
cabinet temperature increases 0.5 to 1.5 degrees
above the set temperature and will run until
the temperature is 0.5 to 1.5 degrees below
the set temperature.
Temperature Control
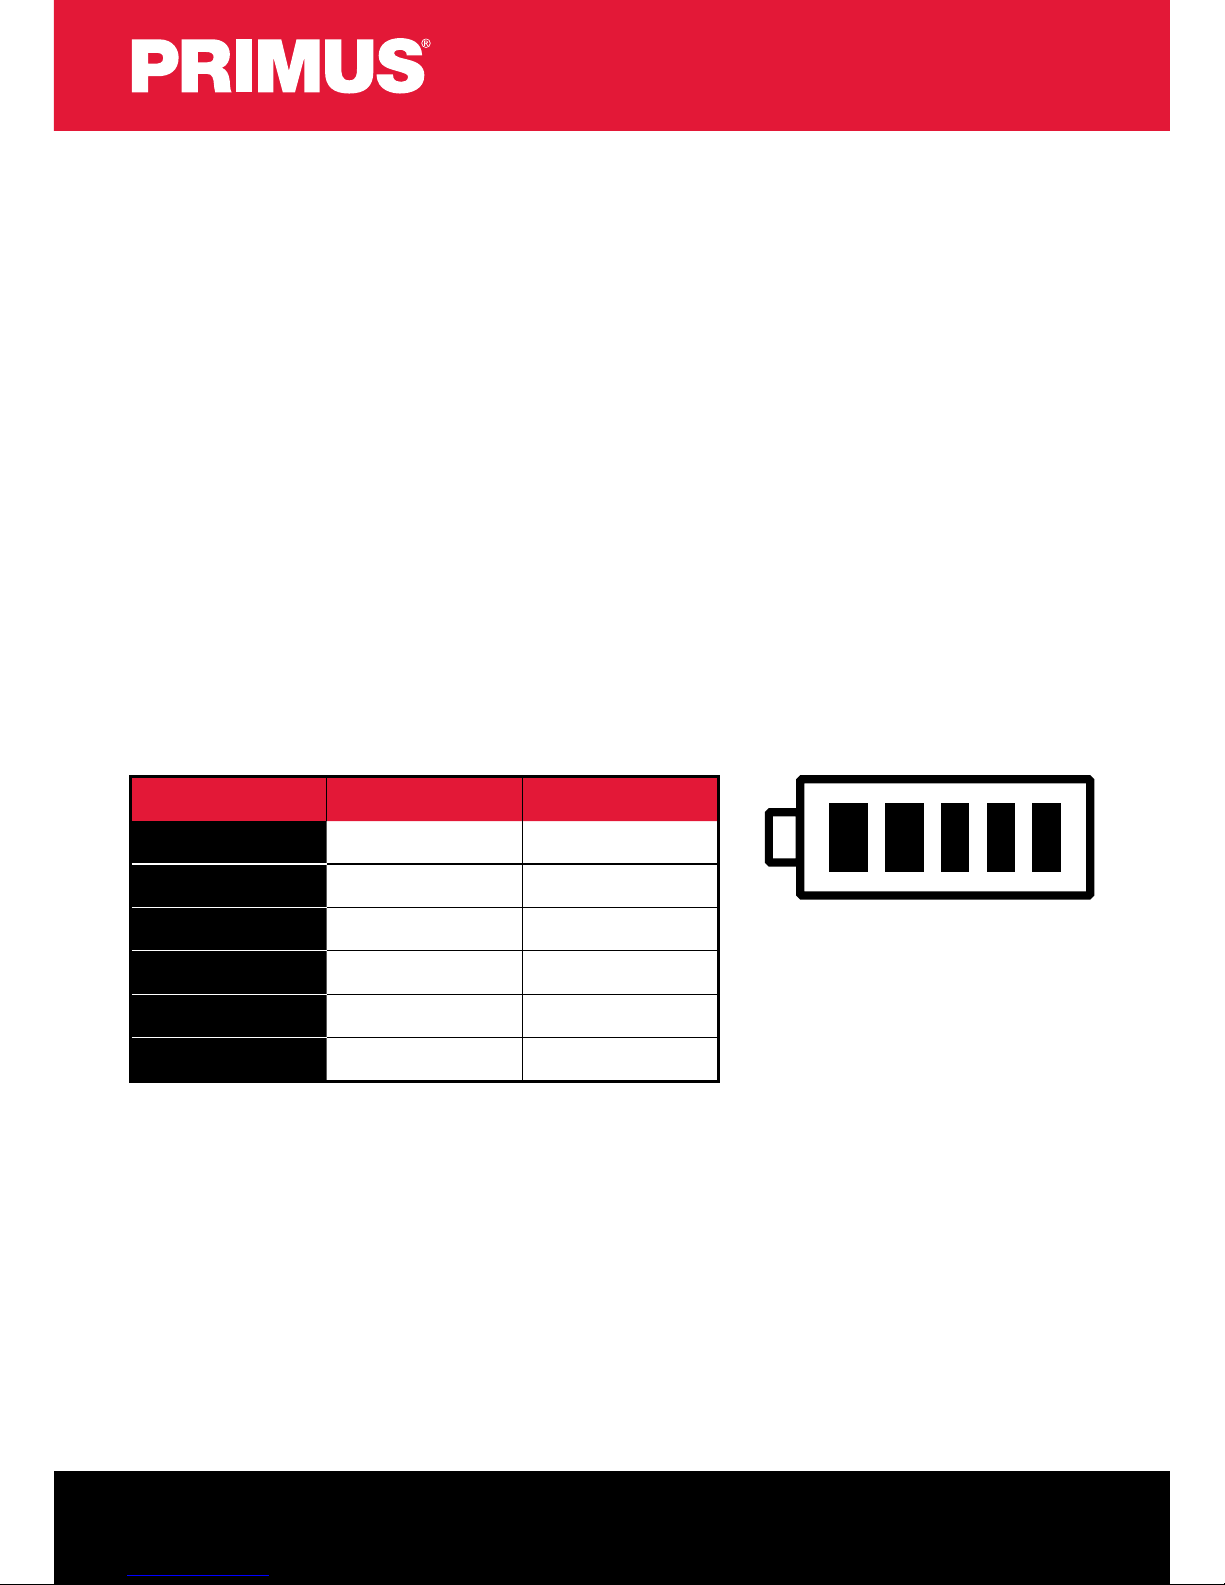
Battery Display
Voltage is measured at the input connection on the side of the appliance.
Battery Display 12V 24V
0 BARS 9.6V or less 21.3V or less
1 BAR 9.7V to 10.3V 21.4V to 22.4V
2 BARS 10.6V to 11.0V 22.7V to 23.5V
3 BARS 11.1V to 11.7V 23.6V to 24.6V
4 BARS 11.8V to 12.4V 23.7V to 25.7V
5 BARS 12.5V or above 25.8V or above
*Values are for reference only and may be subject to change depending on conditions and power supply.
Page 9

9
Power – Off and On
1. Press and hold the power button for 2 to 3
seconds and the unit will power off
2. Press and hold the power button
for 2 to 3
seconds and the unit will power up and display
the current cabinet temperature
Eco Function – Setting
3. Press the mode button twice (2) and
the current function will flash
4. Adjust between Eco & Max by pressing the
up
button for Max or down button for Eco
5. The selected function will continue to flash
for 3 to 5 seconds
Cabinet Temperature – Setting
1. Press the mode button once (1) and
the temperature display will flash with the
current setting.
2. Adjust the temperature by pressing up
to increase and down
to decrease until
the selected temperature is reached
NOTE : Maximum temperature settings are from
-18°C to 10°C.
3. The selected temperature will flash on the
display for 3 to 5 seconds before displaying
the current cabinet temperature
Battery Monitor – Setting
1. Press the mode button three times (3)
and the battery monitor will flash with the
current setting
2. Adjust the setting by pressing the up
or down
button until the desired setting
is shown.
3. The selected setting will continue to flash
for 3 to 5 seconds
12V DC Input Cut out Cut in
H (High) 11.1V 12.4V
M (Medium) 10.1V 11. 4V
L (Low) 9.6V 10.9V
24V DC Input Cut out Cut in
H (High) 24.3V 25.7V
M (Medium) 22.3V 23.7 V
L (Low) 21.3V 22.7V
Single Zone Operation
1
Input Voltage Display
2
Up Button
3
Down Button
4
Power On/Off Button
5
Mode Button
6
Battery Monitor Display
7
Temperature Display
8
Mode Display
2
34
8
7
6
5
1
Page 10

Single Zone and Flexi Zone + Fridge/Freezers
www.companionbrands.com.au
10
Flexi Zone + Operation
Power – Off and On
1. Press and hold the power button for 2 to 3
seconds and the unit will power off
2. Press and hold the power button
for 2 to 3
seconds and the unit will power up and display
the current cabinet temperature
Eco Function – Setting
1. Press the mode button three times (3) and
the current function will flash
2. Adjust between Eco & Max by pressing
the up
button for Max or down button
for Eco
3. The selected function will continue to flash
for 3 to 5 seconds
Battery Monitor – Setting
1. Press the mode button four times (4)
and the battery monitor will flash with the
current setting
2. Adjust the setting by pressing the up
button
or down
button until the desired setting
is shown.
3. The selected setting will continue to flash
for 3 to 5 seconds
12V DC Input Cut out Cut in
H (High) 11.1V 12.4V
M (Medium) 10.1V 11. 4V
L (Low) 9.6V 10.9V
24V DC Input Cut out Cut in
H (High) 24.3V 25.7V
M (Medium) 22.3V 23.7 V
L (Low) 21.3V 22.7V
1
Right Zone Temperature Display
2
Up Button
3
Down Button
4
Power On/Off Button
5
Mode Button
6
Voltage Display
7
Mode Display Button
8
Left Zone Temperature Display
9
Battery Monitor Display
1 2
34
8 9
7
5
6
Page 11

11
Cabinet Temperature – Setting
The temperature may be set independently
for each zone in the range -18° to +10°C.
Setting the left zone
1. Press the mode button once (1)
and
the temperature display will flash with the
current setting.
2. Adjust the temperature by pressing up
to increase and down
to decrease until
the desired temperature is reached
3. The selected temperature will flash on the
display for 3 to 5 seconds before displaying
the current cabinet temperature
Setting the right zone
1. Press the mode button twice
and the
temperature display for the right zone
will flash with the current setting.
2. Adjust the temperature by pressing up
to increase and down
to decrease until
the desired temperature is reached
3. The selected temperature will flash on the
display for 3 to 5 seconds before displaying
the current cabinet temperature
Shutting Down a Selected Zone
The Flexi Zone + cooling system will allow either
zone to be shut down independently to the other.
This is perfect for when the total cabinet space
is not required and provides improved power
efficiencies.
1. Press and hold the up button
and
the left zone will shut down
2. Repeat the same step and the left zone
will recommence operation
3. Press and hold the down button
and
the right zone will shut down
4. Repeat the same step and the right zone will
recommence operation
Left zone may be set to the same
temperature as the right zone
Left zone may be set to a warmer
temperature than the right zone
Left zone may be set to a cooler
temperature than the right zone.
Page 12

Single Zone and Flexi Zone + Fridge/Freezers
www.companionbrands.com.au
12
Using with Solar Panels
• The power consumption and efficiency of
your Fridge/Freezer makes it ideal to be used
in conjunction with solar panels to provide
recharging of the DC power source. Solar
panels will provide charge into the battery
during the daylight hours even while the
appliance is operating.
• As the output from solar panels changes
depending on the level of sunlight and intensity,
your Fridge/Freezer cannot be connected
directly to the solar panels. The appliance must
be connected to a suitable DC battery and then
the solar panels connected to the battery.
• We recommend the use of the quality portable
solar panel kits from 80 to 120 watts for use with
your Fridge/Freezer.
DO NOT connect the Fridge/Freezer directly to the
solar panel as it will not work. Connection must be
via the battery.
Using Portable Generators
• It is important that the correct generator size
is used with your Fridge/Freezer. An incorrect
generator or voltage output may result in reduced
performance or damage to your Fridge/Freezer
which may void your appliance warranty.
• If connecting directly to an AC generator, ensure
that only a digital or inverter type generator is
used. These provide a more reliable and constant
240V AC output power source and are specifically
designed for use with electronic and other power
sensitive appliances.
• Most generators are fitted with a DC power
output socket - DO NOT connect your fridge
directly to the DC power output of the generator
as this will result in damage to your Fridge/
Freezer and void warranty. Connection must be
via the battery.
• When charging the battery using a digital or
inverter type generator, we recommend only
using a ‘smart battery charger’ that is fully
automatic, spark proof and reverse polarity
protected. The battery charger is connected
directly to the AC power output of the generator.
Using with Solar Panel or Generator
Solar Panel Generator Battery Fridge/Freezer
Page 13

13
Tips and Suggestions
• Fresh and frozen foods should not be stored
right beside each other in the cabinet. Doing so
may cause a fresh food to freeze and/or spoil.
• When the appliance is being set at 0° or lower
temperatures, do not store glass bottles or
liquids such as beer, milk, juices or soft drinks
in the unit as these may freeze and shatter.
• Items such as fruit and vegetables should be
stored closer to the top of the cabinet as this
area is normally slightly warmer. This will reduce
the risk of spoiling and ensures that damage is
not caused by being crushed by heavier items.
• To improve the efficiency of your Fridge/Freezer
it is better to have the cabinet as full as possible
at all times. A full cabinet will provide lower
power consumption over 24 hours than a half
empty one. When the cabinet is full there is
little air space between the goods so the cold
air is trapped, but when there is lots of air the
coldness cannot be captured and held. On a trip
it is a good idea to replace finished products
with bottles of water or similar. This will fill the
empty spaces and allow the coldness to remain
within the cabinet.
• Frequent door opening will allow warm air to
enter the cabinet. Keep the number of times you
open the door to a minimum where possible.
• When located in the rear of a car or trailer,
it is recommended that the appliance be kept
away from direct sunlight to reduce the risk
of increased heat. It should also be provided
with suitable ventilation to guarantee efficient
power consumption and performance. You
must remember that when a vehicle is parked
in the sun that on a day where the ambient
temperature is +30°C, the interior of the vehicle
can reach +55°C.
Your Fridge/Freezer will be delivered cleaned from
the factory – you nevertheless should clean prior
to initial use. Take a cloth which has been slightly
moistened with lukewarm water. Pay attention
that no water drops into the seals and possibly
damages the electronics. Dry off the Fridge/Freezer
with a cloth after cleaning. Clean your Fridge /
Freezer periodically and as soon as it is dirty.
Attention:
• DO NOT use solvents or agents with sand or
acid parts for cleaning your Fridge/Freezer.
• DO NOT use brushes, graters or hard sharp
tools to clean your Fridge/Freezer.
• Before cleaning, the power cable should be
disconnected and the Fridge/Freezer
switched OFF.
• Clean the Fridge/Freezer inside and out with
a damp cloth. For stubborn dirt, use some sodium
bicarbonate dissolved in lukewarm water.
• After washing, rinse with clean water
and dry carefully.
• When storing your Fridge/Freezer for a long
period of time, DO NOT fully close the lid.
This will prevent mould and odours.
For additional queries, service and
maintenance please contact our
After Sales Support 1300 555 197.
They will provide you with expert advice
on further information you may require.
Disposal
When it comes to the end of its working life,
your Fridge/Freezer should be disposed
of responsibly to ensure that it does not
contaminate the environment. It would be
advisable to contact your local council for
advice on the disposal of this unit.
Maintenance & Service
Page 14

Single Zone and Flexi Zone + Fridge/Freezers
www.companionbrands.com.au
14
Issue Possible Solutions
The Fridge/Freezer will not turn on
Check the unit is switched ON – Press and hold button for 2 to 3 seconds
Check the power source (voltage may be too low)
Check the power cable and all connections from the battery to Fridge/Freezer
Check the fuse at the Power Input Panel
The contents of the fridge are freezing
The temperature has been set too low,
therefore increase the temperature setting.
Poor refrigeration performance
Too much food has been put inside the unit
Temperature of the food put inside the fridge is too high
Lid is not closed properly
Lid seal is damaged
There is poor ventilation around the fridge
Ambient temperature is very high
Temperature is not set correctly
There is a “water ow” type of noise from inside
the unit
This is normal, caused by the ow of refrigerant
There is a noise from the unit
Unit is not on a at level surface
Check for vibrations in surrounding objects
Fridge/Freezer does not work and display does
not illuminate
There is no voltage present in the 12V/24V cigarette lighter socket in your
vehicle. The ignition must be switched ON in most vehicles to apply current to the
cigarette lighter socket.
No voltage present in the AC voltage socket. Try using another plug socket.
The Fridge/Freezer fuse is defective. Replace the fuse.
The integrated mains adaptor is defective. This can only be repaired be an
authorised repair centre. Contact After Sales Support 1300 555 197.
Fridge/Freezer does not work and display
does not illuminate when operating from the
12V/24V cigarette lighter socket with ignition
switched ON.
The cigarette lighter socket fuse is defective and must be replaced.
The cigarette lighter socket must be cleaned or the plug has not been assembled
correctly.
The display shows an error message (E1)
and the Fridge/Freezer does not cool
Connected to DC power source, the Fridge/Freezer has switched off. This may be
due to low voltage. Check Battery Monitor setting is on LOW (L). Re-start vehicle
to increase battery voltage level. Test and charge battery.
The Fridge/Freezer has switched off due to an internal fault. Contact After Sales
Suppor t 1300 555 197.
Troubleshooting
Page 15

15
Specifications
PRI45LM PRI60LM PRI74LM PRI100LM PR I13 0LM PRI37LDZM PRI65LDZM PRI92LDZM PRI118LDZM
Gross
Capacity
45L 60L 74L 100 L 130L
37L
(24L + 13L)
65L
(39L + 26L)
100 L
(53L + 39L)
130 L
(66L + 52L)
Net Weight 22kg 24kg 28kg 31kg 34kg 24kg 29.5kg 32.5kg 35.5kg
Product
Dimensions
691L x
374W x
447Hmm
691L x
374W x
552Hmm
790L x
465W x
495Hmm
790L x
465W x
615Hmm
790L x
465W x
740Hm m
691L x
374W x
447Hmm
790L x
465W x
495Hmm
790L x
465W x
615Hmm
790L x
465W x
740Hm m
Compressor SECOP BD35F SECOP BD50F
SECOP
BD35F
SECOP BD50F
Connections AC 100V - 240V : DC 12V/24V
Current Draw
(average)
5.4A /12V : 2.7A/24V
Cooling
Range
+4 to -18°C
Power Input 85W
Insulation PU Foam
Thermostat Electronic control
Material Metal cabinet, lid and lining
Our goods come with guarantees that cannot be
excluded under the Australian Consumer Law. You
are entitled to a replacement or refund for a major
failure and compensation for any other reasonably
foreseeable loss or damage. You are also entitled
to have the goods repaired or replaced if goods fail
to be of acceptable quality and the failure does not
amount to a major failure.
For warranty and technical support please call
1300 555 197.
Warranty
Page 16

PRI 6716
Distributed by
Companion Brands
Bundoora VIC 3083
www.companionbrands.com.au
 Loading...