


 Loading...
041116-511441
User's Manual
© 2016 All rights reserved

Notices: The information in this document is subject to change without notice. NO WARRANTY OF ANY KIND IS MADE WITH REGARD TO THIS MATERIAL, INCLUDING, BUT NOT LIMITED TO, THE IMPLIED WARRANTIES OF MERCHANTABILITY AND FITNESS FOR A PARTICULAR PURPOSE. No liability is assumed for errors contained herein or for incidental or consequential damages in connection with the furnishing, performance, or use of this material. This document contains proprietary information that is protected by copyright. All rights are reserved. No part of this document may be photocopied, reproduced, or translated into another language without prior written consent.
Trademark Acknowledgments: Windows is a registered trademark of Microsoft Corporation. All other trademarks are the property of their respective owners.
Printing History
Edition 1.0, #041116, Copyright 2016 All rights reserved.
FCC Compliance Statement: This device complies with part 15 of the FCC rules. Operation is subject to the following two conditions: (1) this device may not cause harmful interference, and (2) this device must accept any interference received, including interference that may cause undesired operation.
For Users in the United States: This product is intended to be supplied by a UL listed Direct Plug-In Power Supply marked "Class 2"or a UL listed ITE Power Supply marked "LPS" with output rated 12VDC, 4.5A or higher. This equipment has been tested and found to comply with the limits for a Class A digital device, pursuant to Part 15 of the FCC Rules. In a domestic environment this product may cause radio interference, in which case the user may be required to take adequate measures. This equipment generates, uses, and can radiate radio frequency energy and, if not installed and used in accordance with the instructions, may cause harmful interference to radio communications. However, there is no guarantee that interference will not occur in a particular installation. If this equipment does cause harmful interference to radio or television reception, which can be determined by turning the equipment off and on, the user is encouraged to try to correct the interference by one or more of the following measures:
•Re-orient or relocate the receiving antenna.
•Increase the separation between the equipment and receiver.
•Connect the equipment into an outlet on a circuit different from that to which the receiver is connected.
•Consult the dealer or an experienced radio/TV technician for help.
Use of shielded cables is required to comply with the Class B limits of Part 15 of the FCC Rules. You are cautioned that any changes or modifications not expressly approved in this manual could void your authority to operate and/or obtain warranty service for this equipment.
For Users in Canada: This digital apparatus does not exceed the Class B limits for radio noise for digital apparatus set out on the Radio Interference Regulations of the Canadian Department of Communications. Le present appareil numerique n'emet pas de bruits radioelectriques depassant les limites applicables aux appareils numeriques de la class A prescrites dans le Reglement sur le brouillage radioelectrique edicte par le ministere des Communications du Canada.
CAUTION!
TO PREVENT FIRE OR SHOCK HAZARD, DO NOT EXPOSE THE UNIT TO RAIN OR MOISTURE. TO REDUCE THE RISK OF ELECTRIC SHOCK, DO NOT REMOVE EXTERIOR PANELS. NO USER-SERVICEABLE PARTS INSIDE. REFER SERVICING TO QUALIFIED SERVICE PERSONNEL. OPERATE THE UNIT WITH ONLY THE PROPER ELECTRICAL SPECIFICATIONS AS LABELED ON THE PRINTER AND AC ADAPTER.
CAUTION!
THIS PRODUCT CONTAINS A LASER DIODE OF A HIGHER CLASS THAN 1. TO ENSURE CONTINUED SAFETY, DO NOT REMOVE ANY COVERS OR ATTEMPT TO GAIN ACCESS TO THE INSIDE OF THIS PRODUCT. REFER ALL SERVICING TO QUALIFIED PERSONNEL. THE FOLLOWING LABEL APPEARS INSIDE YOUR UNIT:
CLASS 1 LASER PRODUCT LASER KLASSE 1
CAUTION!
USE OF CONTROLS OR ADJUSTMENTS OR PERFORMANCE OF PROCEDURES OTHER THAN THOSE SPECIFIED HEREIN MAY RESULT IN HAZARDOUS RADIATION.
ii

Table of Contents
Section 1: Getting Started............................................................................... |
1 |
|
A. |
Choosing a Good Location................................................................ |
1 |
B. |
Unpacking and Inspection................................................................. |
2 |
C. |
Identifying the Parts........................................................................... |
3 |
Section 2: Hardware and Software Setup.................................................... |
5 |
|
A. |
Installing Label Stock.......................................................................... |
5 |
B. |
Adjusting the Stock Gap Sensor Position........................................ |
7 |
C. |
Using Fan-fold Label Stock.............................................................. |
10 |
D. |
Installing the Ink Cartridge............................................................. |
10 |
E. |
Aligning the Ink Cartridge.............................................................. |
13 |
Section 3: Using the Status Monitor........................................................... |
14 |
|
A. |
Monitoring Ink Levels...................................................................... |
15 |
B. |
Set the Stock Sensor Mode............................................................... |
16 |
C. |
Output or Cut Mode (LX500c Only).............................................. |
17 |
D. |
Adjusting Label Offsets.................................................................... |
20 |
E. |
Using the Cost Estimator................................................................. |
22 |
F. |
Settings................................................................................................ |
23 |
Section 4: Printing Using a PC..................................................................... |
24 |
|
A. |
Using BarTender®............................................................................. |
24 |
B. |
Add Text, Barcodes and Graphics to BarTender Label................ |
28 |
C. |
Printing from BarTender®............................................................... |
29 |
D. |
Printer Driver Settings (PC)............................................................. |
30 |
E. |
Printing from other Programs......................................................... |
33 |
Section 5: Troubleshooting........................................................................... |
35 |
|
A. |
Solving Offset/Alignment Problems............................................. |
35 |
B. |
Creating a Full Bleed Print............................................................... |
38 |
C. |
Clearing a Label Jam......................................................................... |
39 |
D. |
Cleaning the Printer.......................................................................... |
39 |
E. |
Cleaning the Ink Cartridge.............................................................. |
40 |
F. |
Technical Support.............................................................................. |
40 |
Section 6: Label and Roll Specifications.................................................... |
41 |
|
Section 7: Technical Specifications............................................................. |
44 |
|
Index.................................................................................................................. |
|
45 |
iii

iv

Section 1: Getting Started
THANK YOU…
...for choosing an LX500 Color Label Printer. The LX500 Printer will print razor-sharp text and barcodes, vibrant colors, and even stunning photo-realistic photographs directly onto rolls of labels, card stock and fan-fold stock.
This User's Manual is your complete step-by-step guide to quickly and easily setting up and printing with your new Color Label Printer!
A.CHOOSING A GOOD LOCATION
•Place the printer on a flat surface in a location with adequate air circulation to prevent internal heat build up.
•Do not place the printer near heat sources such as radiators or air ducts, or in a place subject to direct sunlight, excessive dust, mechanical vibration or shock.
•Allow for adequate clearance in front of the printer to accommodate the printed label stock as it is leaving the printer to avoid the possibility of binding or jamming of the label stock.
•Allow for adequate overhead clearance for opening the top cover to allow easy access to the label stock and ink cartridge.
Getting Started 1
B. UNPACKING AND INSPECTION
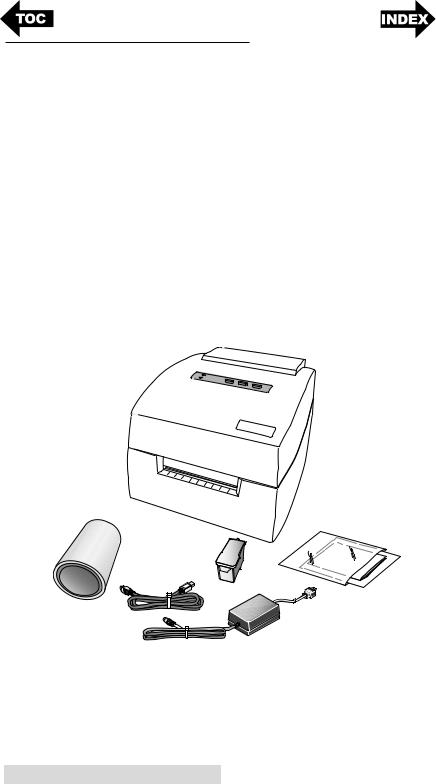
While unpacking your printer, inspect the carton to ensure that no damage has occurred during shipping. Make sure that all supplied accessories are included with your unit. The following items should be included:
•Printer
•Power Adapter
•Separate Power Cord
•6' USB Cable (If other USB cable is used, it must be 6' (2 M) or less.)
•Software Installer CD
•Color Ink Cartridge
•Starter roll of high gloss label stock
•Warranty Statement and Registration Card
•This manual and other printed information
Save the carton and packing materials. They will come in handy when transporting the printer.
2 Getting Started
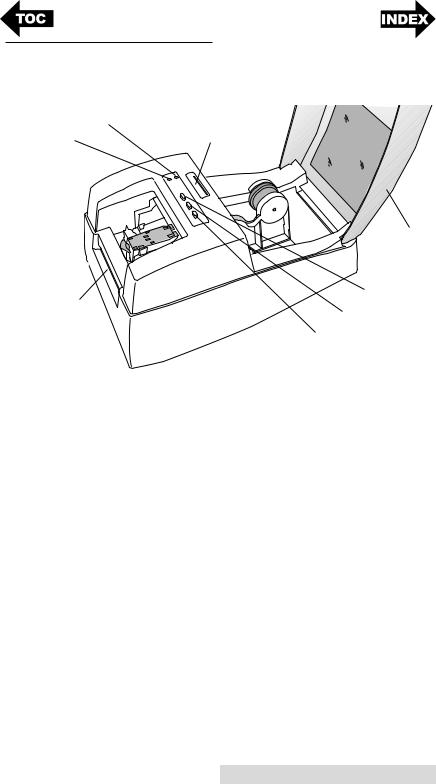
C. IDENTIFYING THE PARTS
This illustration shows the front of the printer with its control buttons and LED indicator lights.
Power LED |
Label Stock TOF |
|
Sensor Bar |
||
Ink Low LED |
||
|
Top Cover
Label Tear Bar
Ink Button
Load/Feed Button
Unload Button
The Ink Low LED will illuminate when a cartridge has 10% or less of its ink remaining.
The Power LED indicates that the printer is on and ready to receive print jobs.
The Ink Button moves the carriage to the center to allow for loading of the ink cartridge. Once the cartridge is loaded, press the ink button again.
The Load/Feed Button is pressed in order to load label stock or form feed the label stock through the printer.
The Unload Button will unload the installed label stock by reversing it through the printer. Make sure to tear off the printed labels before pressing the Unload Button.
The Label Tear Bar is a serrated edge for conveniently tearing your finished labels from the printer.
Getting Started 3

This illustration shows the input ports and power switch found on the rear panel of the printer.
Fan-fold Label Slot Power Switch |
USB Port |
Power Input Port |
4 Getting Started
Section 2: Hardware and Software
Setup
A. INSTALLING LABEL STOCK
Your printer will utilize a wide variety of paper label stock. As long as the label stock is paper and can receive ink jet printing and is within the
allotted size, it will work in the printer. Primera carries a large variety of paper label stock that has been converted and ready for use with your printer.
1.Open the Top Cover.
2.Pull the spring loaded label stock guide out far enough to fit the
label stock. |
Label Stock Guide |
3.Remove any shipping tape from your label stock roll to ensure that it can unroll freely, making certain that no adhesive portion is exposed. It is important to note that any exposed adhesive surface can attach itself to the inner workings of the print mechanism and cause a media jam.
Note: If you are using fan-fold label stock or label stock other than standard square / rectangular die cut labels, see Sections 2B and 2C for additional instructions.
Stock Guide Rollers
Hardware and Software Setup 5
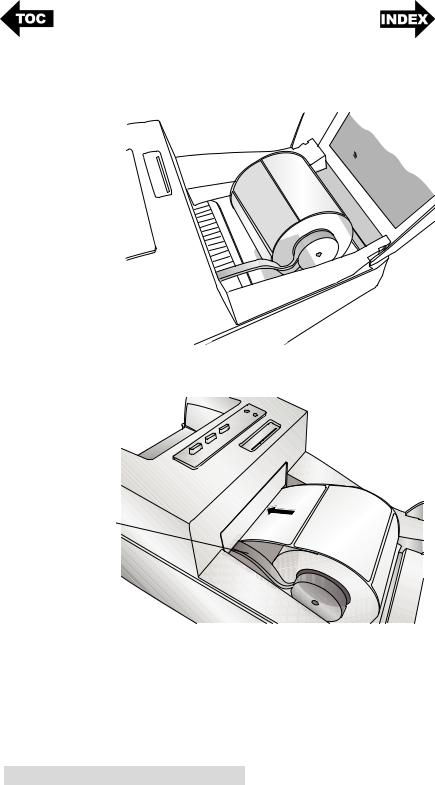
4.Place the label stock between the stock guide rollers and release the spring loaded stock guide to hold the label stock. The stock guide rollers allow the label stock roll to move freely.
5.Place the leading edge of the label stock between the throat guide and the side of the printer.
Throat Guide
6.Quickly continue feeding the label stock further into the printer until you feel resistance from the feed rollers. The printer will sense the label and automatically feed it through the printer. If the printer fails to feed the label stock, press the Load/Feed button to manually engage the feed roller while continuing to guide the label stock into the printer.
6 Hardware and Software Setup
Tip! To ensure that the label stock is fed straight be sure to push the label stock into the printer quickly until the entire front edge of the stock is touching the feed roller. For wider stock use both hands to feed the stock to maintain even forward pressure while you are pushing the stock into the printer.
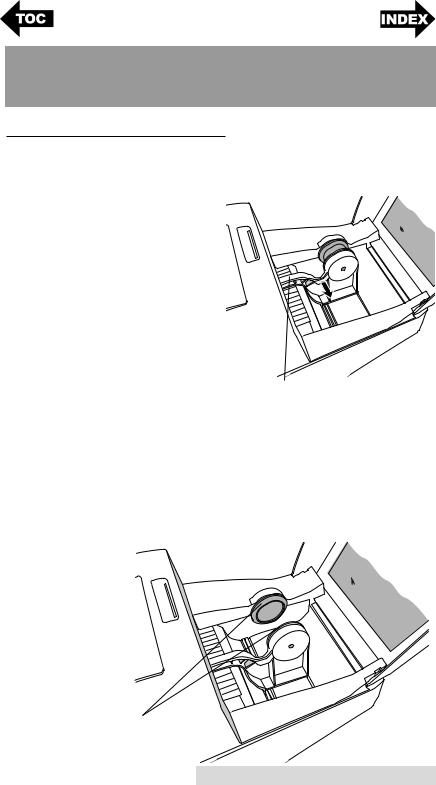
B. ADJUSTING THE LABEL STOCK GAP SENSOR POSITION
The stock gap sensor (TOF Sensor) "sees" the gap between label stock by shining light from the top of the label and attempting to read that light from a sensor on the bottom. By default, this sensor is set to read the gap .5" from the left side of the label stock. If the gap in your label stock intersects with gap position as shown on the slide bar you do not need to adjust this and you can skip this section. This does not need to be adjusted for most label stock.
Gap between Labels
Intersection Point
Gap Sensor
Position
in. |
0.5 |
1.0 |
1.5 |
2.0 |
mm |
12.7 |
25.4 |
38.1 |
50.8 |
Power Ink Load/Feed Unload
 Ink
Ink
Hardware and Software Setup 7

If you are using label stock other than standard square / rectangular die cut labels such as circular die-cut labels or through-hole stock use the instructions below to adjust the label stock TOF sensor.
in. |
0.5 |
1.0 |
1.5 |
2.0 |
mm |
12.7 |
25.4 |
38.1 |
50.8 |
Gap Sensor Slide Bar
Circular Labels
If you are using Circular Labels you must adjust the Stock Gap sensor to correspond with the very top of the label where the circles are closest together. If the sensor is too far to the right or the left the printer will still sense the label but the image may be offset downward because the printer will start printing at the wrong position. If you are using stock that has multiple labels across make sure the sensor corresponds to a place on the stock that has a label and not a vertical gap.
The Sensor Bar has a guide in inches and millimeters that will help you identify where to set the bar to align the sensor over any identifying mark or top of a circular shape. To do this, measure the distance from the edge of the label stock to
the correct position on the stock. Set the sensor bar to this measurement. For example, if you have a two inch circular die-cut label, measure from the edge of the label stock to the center of the circle. For this example it should be about
1 1/8 inches. Set the Sensor Bar to this value.
8 Hardware and Software Setup
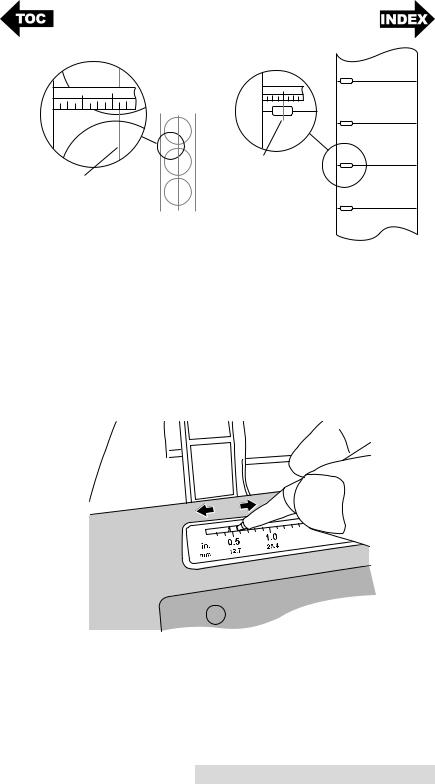
1/2”
1 1/8”
Center
of Hole
Center
of Circle
Circular Labels |
Through-Hole Labels |
Through Hole Labels
If you are using card stock or label stock that has a hole punch or a notch to identify a transition from backing to label, you can adjust the Sensor Bar to position it over the identifying mark.
To adjust the sensor position use a pen to move the slide bar to the correct postion.
Hardware and Software Setup 9
C. USING FAN-FOLD LABEL STOCK
It is possible to use fan-fold label stock by feeding it through the fan-fold slot in the the back of the printer.
Before feeding the fan-fold stock through the back of the printer, lock the stock guide in the out position so the stock
guide rollers will |
Unlocked |
Locked |
not interfere with |
|
|
the label stock. |
|
|
The stock guide |
|
|
is spring loaded |
|
|
and under |
|
|
normal |
Stock Guide |
|
circumstances it |
|
|
will pinch any |
|
|
label stock roll |
|
|
inserted into the |
|
|
printer. |
|
|
To lock the stock guide push the tab located on the bottom of the moveable stock guide to the out/ locked position.
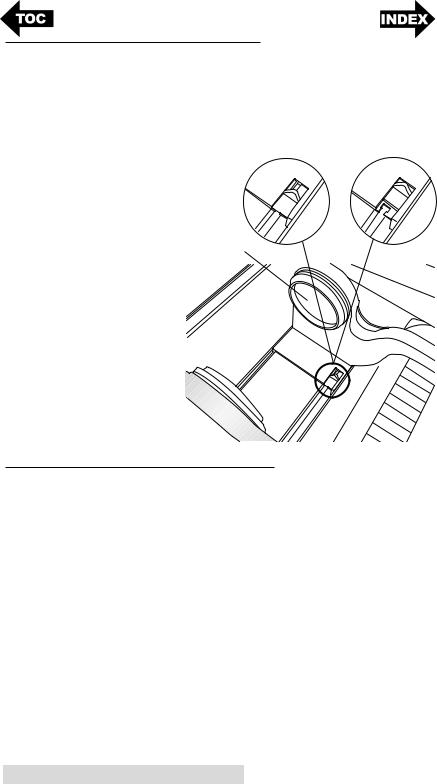
D. INSTALLING THE INK CARTRIDGE
When the cartridge reaches 10% remaining you will be prompted via the Status Monitor to replace the cartridge. If quality still looks acceptable you can choose to ignore this warning. However, you may waste labels if the cartridge runs out of ink before the next warning at 0%. If you choose to replace the cartridges follow the procedure below.
After installing a new cartridge, you may choose to run an alignment print to achieve maximum quality. However, this will require cancelling the print job. If you would like to enable smooth transitions between ink cartridge changes, you may choose to disable alignment print warnings. (See the next section).
10 Hardware and Software Setup

1.Open the Top Cover of the printer.
2.Press the Ink Button on the printer.
Power |
Ink |
Load/Feed Unload |
 Ink
Ink
3.The Cartridge Carrier will align itself to the center of the print area.
4.Press the Cartridge Cover Release to open the Cartridge Holder. Remove the cartridge (if installed).
5.Remove the new Cartridge from its packaging. Be sure to remove the protective tape covering the copper contacts.
Remove tape
6.Replace/install the cartridge copper end first.
Hardware and Software Setup 11

7.Push cartridge cover downward until it snaps in place.
Note: Ink Cartridge Levels are estimates based on analysis of the printed images by the driver during spooling. This analysis estimates the number of ink droplets(spits) required to print the image and subtracts that amount from the total amount in the cartridge. It displays the total remaining spits as a percentage. In other words, there is no real time sensor that shows the actual amount of ink in the cartridge.
8.Press the Ink button on the printer to indicate the new cartridge is now installed. You will be prompted to align the cartridge. A warning will appear stating that you must have installed label stock that is equal to or larger than 4" x 2" (101.6 mm x 50.8 mm). If your label stock meets this requirement click OK to align the cartridge. If your stock does not meet this size requirement see the next section before clicking OK.
Power |
Ink |
Load/Feed Unload |
 Ink
Ink
12 Hardware and Software Setup
Loading...