


For Macintosh and PC
USER’S MANUAL
110124-511276
*after registering your product. See www.primerawarranty.com for terms and conditions.
© 2011 All rights reserved
For the most recent version of this manual please visit http://primera.eu/europe/manuals.html

Notices: The information in this document is subject to change without notice. NO WARRANTY OF ANY KIND IS MADE WITH REGARD TO THIS MATERIAL, INCLUDING, BUT NOT LIMITED TO, THE IMPLIED WARRANTIES OF MERCHANTABILITY AND FITNESS FOR A PARTICULAR PURPOSE. No liability is assumed for errors contained herein or for incidental or consequential damages in connection with the furnishing, performance, or use of this material. This document contains proprietary information that is protected by copyright. All rights are reserved. No part of this document may be photocopied, reproduced, or translated into another language without prior written consent.
Trademark Acknowledgments: Windows is a registered trademark of Microsoft Corporation. All other trademarks are the property of their respective owners.
Printing History
Edition 1.0, #110124, Copyright 2011, All rights reserved.
FCC Compliance Statement: This device complies with part 15 of the FCC rules. Operation is subject to the following two conditions: (1) this device may not cause harmful interference, and (2) this device must accept any interference received, including interference that may cause undesired operation.
For Users in the United States: This product is intended to be supplied by a UL listed Direct Plug-In Power Supply marked “Class 2“ or a UL listed ITE Power Supply marked “LPS“ with output rated 12VDC, 4.5A or higher. This equipment has been tested and found to comply with the limits for a Class A digital device, pursuant to Part 15 of the FCC Rules. In a domestic environment this product may cause radio interference, in which case the user may be required to take adequate measures. This equipment generates, uses, and can radiate radio frequency energy and, if not installed and used in accordance with the instructions, may cause harmful interference to radio communications. However, there is no guarantee that interference will not occur in a particular installation. If this equipment does cause harmful interference to radio or television reception, which can be determined by turning the equipment off and on, the user is encouraged to try to correct the interference by one or more of the following measures:
•Re-orient or relocate the receiving antenna.
•Increase the separation between the equipment and receiver.
•Connect the equipment into an outlet on a circuit different from that to which the receiver is connected.
•Consult the dealer or an experienced radio/TV technician for help.
Use of shielded cables is required to comply with the Class A limits of Part 15 of the FCC Rules. You are cautioned that any changes or modifications not expressly approved in this manual could void your authority to operate and/or obtain warranty service for this equipment.
For Users in Canada: This digital apparatus does not exceed the Class A limits for radio noise for digital apparatus set out on the Radio Interference Regulations of the Canadian Department of Communications. Le present appareil numerique n'emet pas de bruits radioelectriques depassant les limites applicables aux appareils numeriques de la class A prescrites dans le Reglement sur le brouillage radioelectrique edicte par le ministere des Communications du Canada.
CAUTION!
TO PREVENT FIRE OR SHOCK HAZARD, DO NOT EXPOSE THE UNIT TO RAIN OR MOISTURE. TO REDUCE THE RISK OF ELECTRIC SHOCK, DO NOT REMOVE EXTERIOR PANELS. NO USER-SERVICEABLE PARTS INSIDE. REFER SERVICING TO QUALIFIED SERVICE PERSONNEL. OPERATE THE UNIT WITH ONLY THE PROPER ELECTRICAL SPECIFICATIONS AS LABELED ON THE PRINTER AND AC ADAPTER.
CAUTION!
THIS PRODUCT CONTAINS A LASER DIODE OF A HIGHER CLASS THAN 1. TO ENSURE CONTINUED SAFETY, DO NOT REMOVE ANY COVERS OR ATTEMPT TO GAIN ACCESS TO THE INSIDE OF THIS PRODUCT. REFER ALL SERVICING TO QUALIFIED PERSONNEL. THE FOLLOWING LABEL APPEARS INSIDE YOUR UNIT:
CLASS 1 LASER PRODUCT LASER KLASSE 1
CAUTION!
USE OF CONTROLS OR ADJUSTMENTS OR PERFORMANCE OF PROCEDURES OTHER THAN THOSE SPECIFIED HEREIN MAY RESULT IN HAZARDOUS RADIATION.
ii

Table of Contents
Section 1: Getting Started...................................................................................... |
1 |
||
A. |
Note on Model Differences...................................................................... |
2 |
|
B. |
Choosing a Good Location...................................................................... |
2 |
|
C. |
Unpacking and Inspection....................................................................... |
3 |
|
D. |
Identifying the Parts................................................................................. |
4 |
|
E. |
System Requirements............................................................................... |
6 |
|
F. |
Loading Media .......................................................................................... |
6 |
|
G. |
Installing Ink Cartridges.......................................................................... |
8 |
|
H. |
Setup the Kiosk Bin ................................................................................ |
10 |
|
Section 2: Creating Discs..................................................................................... |
12 |
||
A. |
Tutorial: Copy a Disc (PRINT ONLY FOR DISC PRINTER USERS) ...... |
12 |
|
B. |
Using PTPublisher .................................................................................. |
15 |
|
|
B1. |
Project Types .................................................................................... |
15 |
|
B2. |
Steps to Any Project ........................................................................ |
17 |
|
|
Step 1 Add Data............................................................................... |
17 |
|
|
Step 2 Add Print .............................................................................. |
18 |
|
|
Step 3 Start Project (Summary - Settings)........................................ |
19 |
|
B3. |
Robot Options.................................................................................. |
22 |
|
B4. |
Publisher Status ............................................................................... |
23 |
|
B5. |
Backup Project (PC Disc Publisher Only) ........................................ |
24 |
|
B6. |
Rip Audio (PC Disc Publisher Only) ................................................ |
27 |
|
B7. |
PTProtect (PC Disc Publisher Only).................................................. |
28 |
|
B8. |
Project Sets (PC Disc Publisher Only)............................................... |
29 |
C. |
Creating a Print Label Using SureThing (PC) .................................... |
31 |
|
D. |
Creating a Print Label Using Disc Cover (Mac)................................. |
32 |
|
E. |
Advanced Printer Settings..................................................................... |
36 |
|
F. |
Using Other Graphics Programs ......................................................... |
42 |
|
Section 3: Maintenance and Troubleshooting................................................. |
43 |
||
A. |
Interpreting the Publisher’s Indicator Lights..................................... |
43 |
|
B. |
Internal Blue LED Lights ....................................................................... |
44 |
|
C. |
Transporting the Publisher.................................................................... |
44 |
|
D. |
Cleaning the Print Head ........................................................................ |
45 |
|
E. |
Replacing the Print Head....................................................................... |
46 |
|
F. |
Technical Support ................................................................................... |
48 |
|
Section 4: Technical Specifications.................................................................... |
49 |
||
Index ........................................................................................................................ |
|
|
50 |
iii

iv

Section 1: Getting Started
THANK YOU…
...for purchasing a DP-4100 Series Disc Publisher. A Disc Publisher is the perfect all-in-one solution for producing professional looking discs. A wide variety of disc formats are supported, including audio CDs, DVD Video, data discs and more. Operation is simple and completely automatic once a project has been started.
To begin using your Disc Publisher, please read this manual carefully. This Operator's Manual is a complete step-by-step guide to quickly and easily create discs with your new Optical Disc Publisher.
A separate Help file is provided with your Publisher that explains the operation of the PTPublisher Software. Click the  icon in the software to access the help file.
NOTE ON TERMS AND CONVENTIONS:
From this point forward, the following terms and conventions will apply:
The DP-4101 and DP-4102 Disc Publisher will be abbreviated simply as the Publisher. The DP-4100 Disc Printer will be refered to as the Disc Printer.
Optical discs, which can include many different types of discs including CD-Rs, CD-RWs, DVD+/-Rs, BDRs and more are all referred to as CDs or discs. Please note that in order to copy and record BDRs, you will need to have purchased the Blu-ray version of the Publisher.
Getting Started 1

A. NOTE ON MODEL DIFFERENCES
The DP-4100 Series comes in five different models including:
•DP-4100 Disc Printer (No Drives) Print Only - See Section 3A, C and D.
•DP-4101 (1 DVD Drive) Burns and Prints CD, DVDs and DVD-DL
•DP-4102 (2 DVD Drives) Burns and Prints CD, DVDs and DVD-DL
•DP-4101 Blu (1 BDR Drive) Burns and Prints CD, DVD, DVD-DL, BDR and BDR-DL
•DP-4102 Blu (2 BDR Drives) Burns and Prints CD, DVD, DVD-DL, BDR and BDR-DL
These instructions are written to apply to all models. For example there are no special instructions for burning Blu-ray DiscsTM if you have a Blu-ray model. The software simply recognizes that you have Blu-ray capable drives and adds the BDR media type to the list of available media to burn.
Important Note: The DP-4101 Blu or DP-4102 Blu requires the Disc Publisher to be connected to the computer USB for printing AND eSata cable(s) for the drives. Both eSATA and USB are required!
The eSATA PCI express card included with the unit may need to be installed if you do not already have eSATA ports on your computer. Refer to the instructions included with the card for more details.
B.CHOOSING A GOOD LOCATION
•Place the Publisher in a location with adequate air circulation to prevent internal heat build up. You will need at least 24“ (61 cm) of overhead space to allow the top cover to open freely.
•Do not place the Publisher near heat sources such as radiators or air ducts, or in a place subject to direct sunlight, excessive dust, mechanical vibration or shock.
2 Getting Started
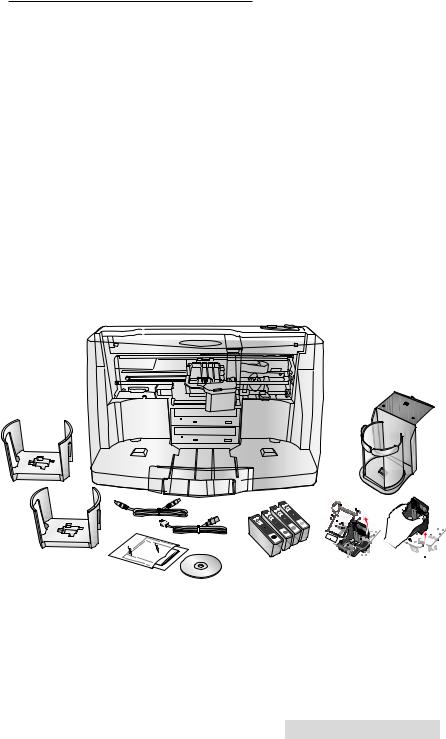
C. UNPACKING AND INSPECTION
While unpacking your Publisher, inspect the carton to ensure that no damage has occurred during shipping. Make sure that all supplied accessories are included with your unit.
The following items should be included:
•Optical Disc Publisher
•Gray Plastic Input and Output Bins
•Power Cord
•Cyan, Magenta, Yellow and Black Ink Cartridges
•Replaceable Print Head
•QuickStart Installer Disc
•USB 2.0 Interface Cable (Beige)
•eSATA cable(s) (Blu-ray only)
•eSATA card (Blu-ray only)
•Quick Start Guide and Other Printed Information
ELIGA
RF
Save the carton and packing materials. They will come in handy later if you ever need to transport the Publisher and/or any of its parts and accessories.
Getting Started 3
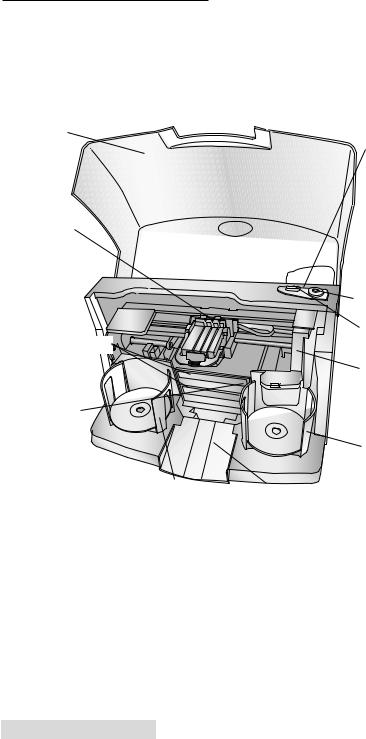
D. IDENTIFYING THE PARTS
Front Panel and Top
This illustration shows the DP-4102, its Control Panel, Buttons, LED indicator lights, Input and Output Bins and other components.
Front Cover |
Control Panel / |
|
Status Lights |
Ink Cartridge
Carrier
|
Power Button |
|
Ink Cartridge |
CD/DVD Recorders |
Button |
|
Robotic Disc |
|
Transporter |
Recorder Tray
Button
Input Bin
Output Bin |
|
Reject/Kiosk Area |
|
|
|
|
|
|
The Robotic Disc Transporter moves discs from the Input Bin, to a CD/DVD Recorder, to the printer, and finally to the Output Bin.
The CD/DVD Recorder is automatically loaded and unloaded by the Publisher's Robotic Disc Transporter.
The Recorder Tray Button manually opens or closes the Recorder Tray. In normal operation, the in/out movement of the Recorder Tray is controlled automatically and this button is not used.
4 Getting Started
The Control Panel contains LED Status Lights and Buttons to control the Publisher. The LED Status Lights indicate that Power is ON. They also blink in certain patterns to indicate an error or other condition of the Publisher. See Section 4 for a full explanation of the LED Status Light conditions.
The Power Button turns the Publisher's power ON and OFF.
When the front cover is opened, the Ink Cartridge Button is used to position the Ink Cartridge Carrier for easy ink cartridge replacement. When the front cover is closed, pressing the Ink Cartridge button will open or close the Printer Tray.
The Input/Output Bins are situated under the top cover of the Publisher. The bins will hold up to 50 discs. The right-side bin is the Input Bin for blank media; the left-side bin is the Output Bin for finished discs.
The Reject Area is where discs are dropped if they do not pass a software verification test. The discs slide down the ramp out in front of your Publisher.
The Front Cover is a durable plastic cover that will protect the Publisher from dust and interference.
The Ink Cartridge Carrier holds the print head and the individual CMYK cartridges.
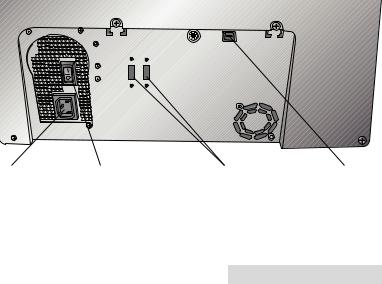
Rear Panel
This illustration shows the input ports and the power switch found on the rear panel of the Publisher:
Power Input Port |
Power Switch |
eSata port(s) (Blu-ray Only) |
USB 2.0 Port |
|
|
|
|
The USB 2.0 Port is connected to an open USB 2.0 port on your PC with the USB 2.0 cable, included with your Publisher.
Getting Started 5

The Power Input Port connects to the included power cable. The internal power supply is auto-switching in the range of 100-240v.
The Power Switch shuts off all power to the Publisher.
E. SYSTEM REQUIREMENTS
PC:
Before getting started, it is important for you to verify that your PC meets the minimum system requirements.
•Celeron processor or better running Windows XP, Vista or 7.
•1GB or greater RAM
•Free hard drive space of at least 10 GB.
•Available USB 2.0 Port. (This looks the same as a USB 1.0 port. Make sure you have a USB 2.0 port for optimal performance)
If your PC does not have at least these minimum system requirements, system performance may not be acceptable.
MAC:
•Intel CPU running OS X version 10.6 or higher
•512 MB RAM
•Free hard drive space of at least 10 GB
•Available USB 2.0 Port
•Do not connect the Publisher to any USB hubs or the USB port on your keyboard. It should be connected directly to an onboard USB 2.0 port.
If your computer does not have at least these minimum system requirements, system performance may not be acceptable.
F. LOADING MEDIA (DISCS)
NOTE: Your Publisher can print directly onto virtually any brand of inkjet printable-surface CD/DVD media. However, different brands of discs have different printable coatings. Because of this, you may need to adjust the printer driver settings to accommodate your specific brand of CD/DVD media. Refer to Section 2B.2 and 2E for further printer driver information.
6 Getting Started

Due to the wide variety of printable-surface CD/DVD media, you may find that certain brands of discs provide higher print quality than others. For maximum print quality, use CD/DVD media authorized by Primera.
Refer to the following steps when loading discs into the Publisher:
•Open the front cover of the Publisher
•The Publisher will automatically position the cartridge carrier and Robotic Disc Transporter to the center position allowing for easy access to the bins.
•Load the Input Bin (the bin located on the right-hand side of the Publisher) with 50 blank discs and place the bins on the mounting pegs.
Getting Started 7
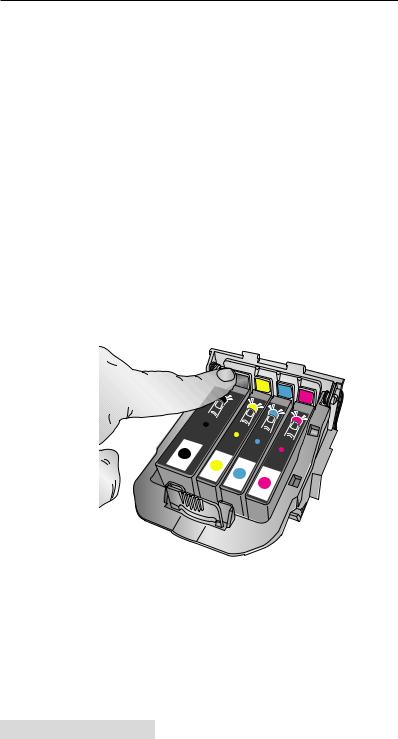
G. REPLACING INK CARTRIDGES / LOW INK WARNING
You can replace cartridges at any time or wait for the Low Ink Warning to prompt you to replace cartridges. Low Ink Warnings occur at the following levels:
•10% - If any cartridge is lower than 10% at the beginning of a job you will be prompted to change that cartridge. At this point you can change or ignore.
•0% - If any cartridge reaches 0% during a job you will be prompted to change that cartridge. At this point you can change or ignore. Under normal circumstances this will be your first warning. The 10% warning is only triggered at the start of a job.
•-10% - If at any point any cartridge is -10% you will be prompted to change that cartridge. You must change the cartridge to continue.
To change a cartridge, follow this procedure:
1.Open the Cover and press the Ink button.  The head carriage will move to the center of the print area for easy access.
8 Getting Started
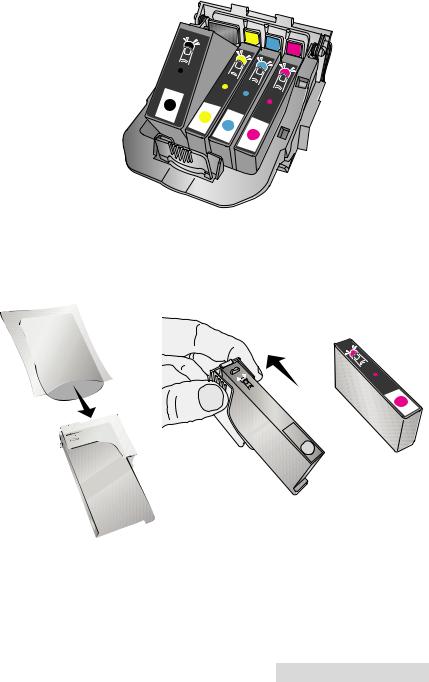
2.Remove the cartridge by pressing the corresponding colored tab on the back of the print head. The cartridge will pop up slightly.
3.Remove the cartridge.
4.Locate a new cartridge and remove it from its packaging. Remove the foil outer package and the clear plastic shrink wrap. Also remove the cartridge cap.
Note: If you opened a cartridge but are not currently using it you can store the cartridge in the plastic cap shown above to prevent it from drying out.
Getting Started 9

5.Place the new cartridge into its corresponding colored slot. Press down near the back of the cartridge until it clicks into position.
Important Note: Make sure the cartridge is securely in place. An improperly positioned cartridge will cause no ink of that color to be printed.
D. SETUP THE KIOSK BIN
Kiosk Mode allows you to use both of the Publisher's Bins as input, doubling your disc capacity from 50 discs to 100 discs. In this mode, the finished discs will be deposited through the front “reject area“ of the Publisher. In Kiosk mode all discs would be ejected in this manner. Rejects can be identified in the stack because they will not be printed. Refer to the following Kiosk Kit installation instructions.
10 Getting Started

• Attach the Output Bin |
|
|
|
|
Holder as shown, align- |
|
|
|
|
ing the Locating Tabs on |
|
|
|
|
the Output Bin Holder |
|
|
|
|
with the Slots located on |
|
|
|
|
the underside of the |
Slots |
|
|
|
Publisher allowing the |
|
|
|
|
holder to hang off the |
|
|
|
|
edge of the table. Notice |
|
|
|
|
the slots do allow for |
|
|
|
|
adjusting the |
|
|
|
|
position of the output bin. |
|
|
|
|
If your discs are not |
|
|
|
|
falling into the bin, you |
|
|
Locating Tabs |
|
|
|
|
|
|
will be able to move the |
|
|
|
|
bin slightly to align it. |
|
|
|
|
• Place the Output Bin on |
|
|
|
|
the Output Bin Holder as |
|
|
|
|
shown. |
|
|
|
|
To enable Kiosk Mode, Open |
|
|
|
|
PTPublisher - select Options |
|
|
|
|
from the Tools menu - find the |
|
|
|
|
Options tab - now check the |
|
|
|
|
Kiosk Mode box. On a Mac, |
|
|
|
|
Kiosk Mode can be enabled in |
|
|
|
|
the Robot Options menu. |
|
|
|
|
|
|
|
|
|
Getting Started 11

Section 2: Creating Discs
There are two main components to creating discs, printing and burning. For PC, SureThing CD Labler is used to design the image to print on the disc. For Mac, Disc Cover is used to design the image to print on disc. For Mac and PC, PTPublisher controls the recording and allows you to select the image to be printed to your discs.
A. TUTORIAL: COPY A DISC (PRINT ONLY FOR DISC PRINTER USERS)
Note: PTPublisher functions virtually the same on both Mac and PC. Every effort was made to make them look and function the same. However, due the unique benefits and limitations of both operating systems there are subtle differences. Where important, those differences will be highlighted. In general, these instructions will apply to both the Mac and PC editions.
Note for Disc Printer Users: Start at step 4 after choosing Print Only from the project starter window.
There are three basic steps to any project. 1. Add Data 2. Add a Print File. 3. Set the number of copies and adjust options (Summary). The instructions below explain how to do the most common project - A Copy Project.
A Copy Project can be used to copy any CD, DVD, DVD-DL or Blu-ray master. This job type reads the master disc from the Disc Publisher drive to the hard drive of your computer.
The master is stored in the Global Image format (*.gi) in a temporary location on your computer. PTPublisher uses this temporary file to make all subsequent copies that are requested. The master disc is read only once to create the initial temporary file.
Recommended for: All CD, DVD or Blu-ray content or disc types (Audio CD, Data CD, Software Install Disc, Video CD, DVD Video, Blu-ray Video: CDR, DVD-R, DVD+R, DVD-ROM, DVD+DL, DVD-DL, BDR, BDR-DL, etc.). This is best used for single runs where you will not need to make additional copies of the master disc at a later time.
This project requires a master disc. If you do not have one use another project type. (See Section 3B)
12 Creating Discs

1.Select Copy Project from the Starter Window or the New Project Panel on the left side of the screen. Step one of the Copy Disc wizard will be displayed.
2.You will be prompted to place the disc you would
like to copy into the drive inside the Disc Publisher. The tray door will open automatically. Place the disc in the drive and click OK.
3.The Publisher will close the drive and read the contents of the disc. It will display disc type (CD/DVD) and show the size of the disc in Megabytes. Verify this information is correct and click the next arrow to continue.
Disc Printer users Start here after choosing Print Only from the project starter window.
4.Select the print label file by clicking the select a label button. When you have selected print label file, click the next arrow. There are several ways to select a print file. See the explainations below for more information.
For any job type you choose you will be prompted to select a label file to print. You may select an existing label, create a label or choose to print nothing. Simply click the next arrow to print nothing on the disc. Otherwise follow the steps below.
4A. Select a Label
1.Click the browse button to open a browse window to choose your print file.
2.Double Click on the file to add it to your project. You may add any BMP, JPG, TIFF, SureThing (PC) or Disc Cover (Mac) file. SureThing or Disc Cover files are automatically formated correctly. All other file types should be 4.72" x 4.72" square. For best print quality the image resolution should be at least 300 dpi.
Creating Discs 13
 Loading...