

Page 1
PS49
USB MIDI Keyboard
Owner’s Manual
®
www.presonus.com
English
Page 2

Table of Contents
1 Overview — 1
1.1 Introduction — 1
1.2 About This Guide — 1
1.3 Technical Support — 1
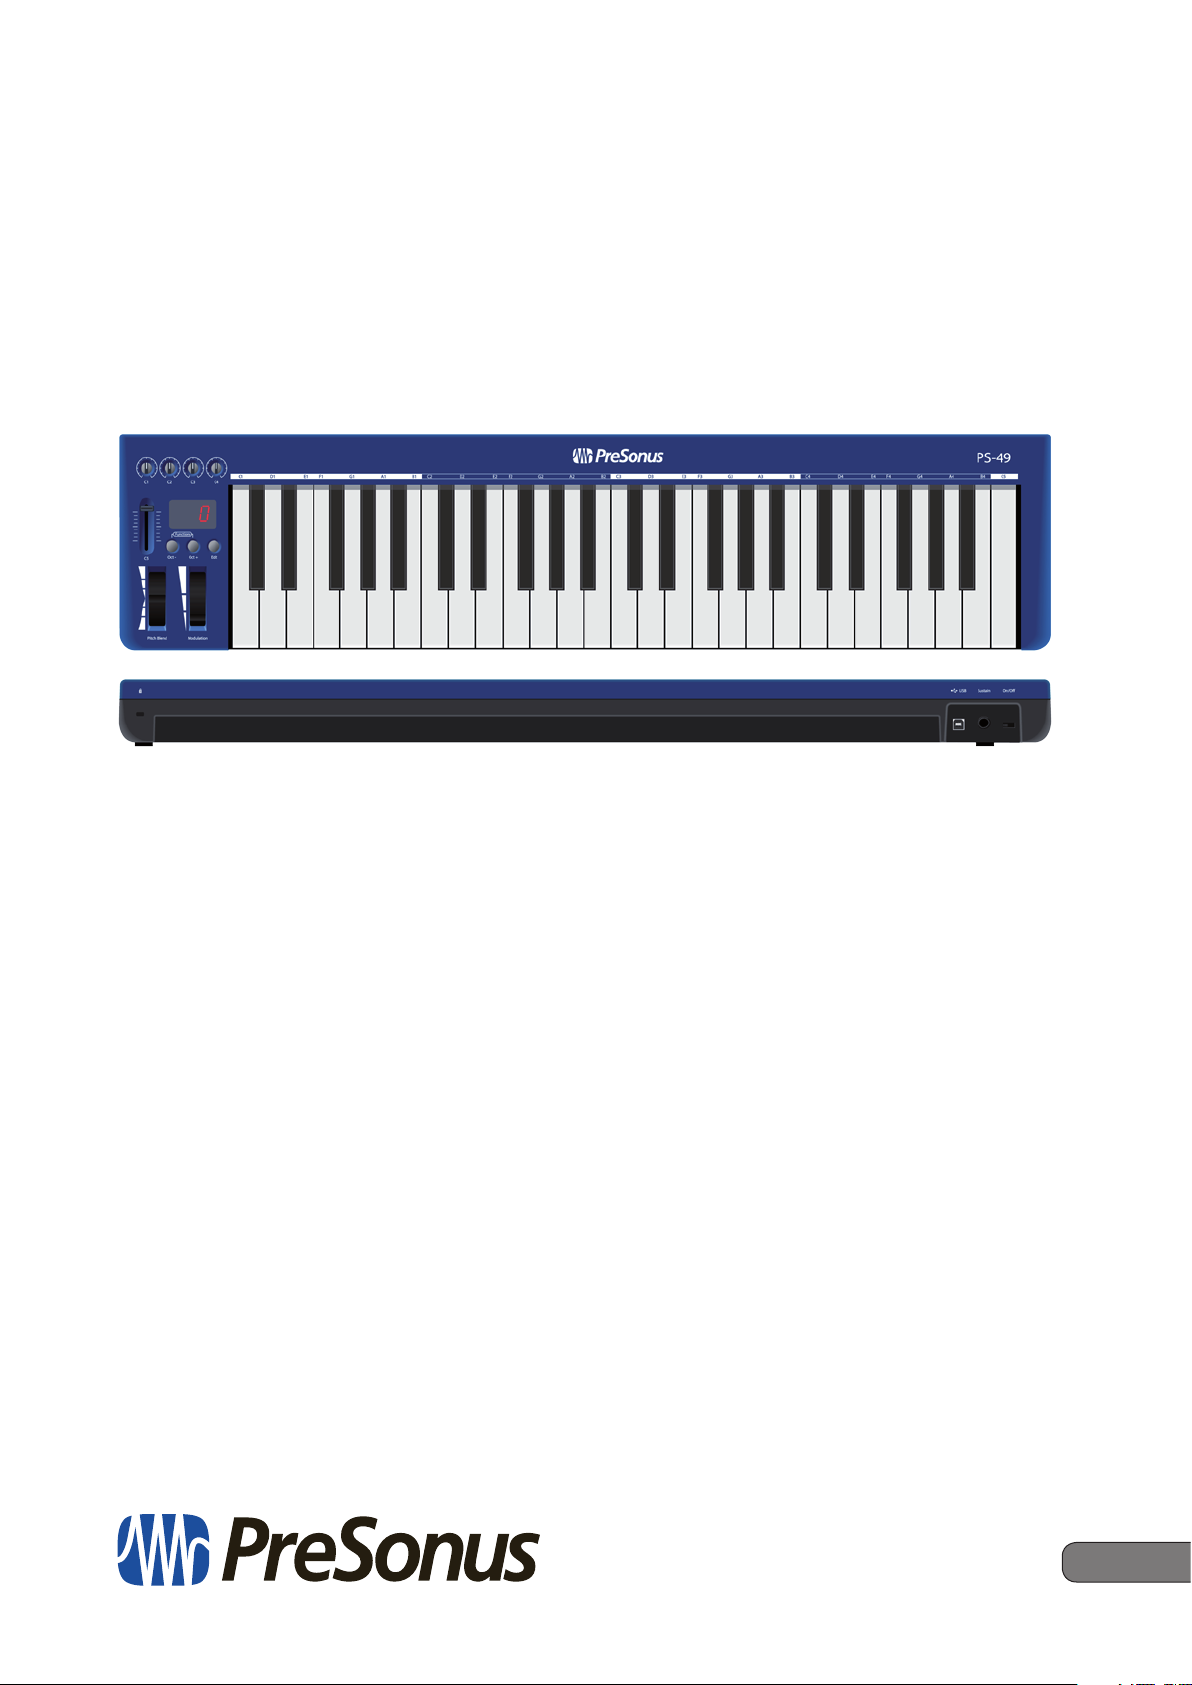
1.4 PS49 Features — 2
2 Hookup — 3
2.1 Front-Panel Controls — 3
2.2 Rear-Panel Connections — 4
3 Connecting to a Computer — 5
3.1 Mapping your PS49 Controls in Studio One — 5
4 Edit Mode — 6
4.1 Control Map — 6
4.2 Control Assign — 6
4.3 MIDI Channel — 8
4.4 Program Change — 9
4.5 Bank LSB and Bank MSB — 10
4.6 All Notes Off — 11
4.7 Reset All Controllers — 11
5 Resources — 13
5.1 Factory Reset — 13
5.2 Technical Specification — 13
Page 3
1 Overview
1.1 Introduction
1 Overview
1.1 Introduction
PS49
Owner’s Manual
Thank you for purchasing the PreSonus® PS49 USB MIDI Keyboard. The PS49
is a full-size, velocity-sensitive USB MIDI keyboard controller that has been
designed for easy integration with your Mac® OS X or Windows® computer,
making it an ideal tool for a variety of music-creation applications.
We encourage you to contact us with questions or comments regarding
this product. PreSonus Audio Electronics, Inc., is committed to constant
product improvement, and we value your suggestions highly. We believe
the best way to achieve our goal of constant product improvement is by
listening to the real experts: our valued customers. We appreciate the
support you have shown us through the purchase of this product.
1.2 About This Guide
We suggest that you use this manual to familiarize yourself with the features,
applications, and correct connection procedures for the PS49 before connecting it
to your computer. This will help you avoid problems during installation and setup.
Throughout this guide you will find Power User Tips. These
tips provide useful hints on how to best use the PS49 and take
advantage of unique workflow functions and features.
1.3 Technical Support
Many technical issues can arise when using a standard computer as a digital audio
workstation (DAW). PreSonus can only provide support for issues that directly
relate to the PS49, Studio One®, and Notion™. PreSonus does not provide support
for computer hardware or non-PreSonus hardware and software, and it may be
necessary to contact the manufacturer of these products for technical support.
Please check our Web site (www.presonus.com) regularly for
software information and updates, firmware updates, and support
documentation, including frequently asked questions.
Online technical support is available at www.presonus.com/support/ContactTechnical-Support. PreSonus telephone technical support is available to customers
in the USA on Monday through Friday from 9 a.m. to 5 p.m. Central Time by calling
1-225-216-7887. Customers outside of the USA should contact their national
or regional distributor for telephone technical support. A list of international
distributors is provided at www.presonus.com/buy/international_distributors.
Advanced troubleshooting guides can be found at
http://support.presonus.com/forums.
1
Page 4

1 Overview
1.4 PS49 Features
1.4 PS49 Features
PS49
Owner’s Manual
• 49-key, velocity-sensitive keyboard
• Pitch bend and modulation wheels (assignable)
• 1 assignable fader
• 4 assignable knobs for real-time control
• 3-character, red LED segment display
• 1 sustain-pedal input jack, type-sensing (pedal not included)
• Real-time quick-toggle functions: Octave, Transpose,
Program Change, MIDI Channel
• Advanced MIDI functions
• USB class-compliant — no driver needed
2
Page 5
2 Hookup
2.1 Front-Panel Controls
2 Hookup
2.1 Front-Panel Controls
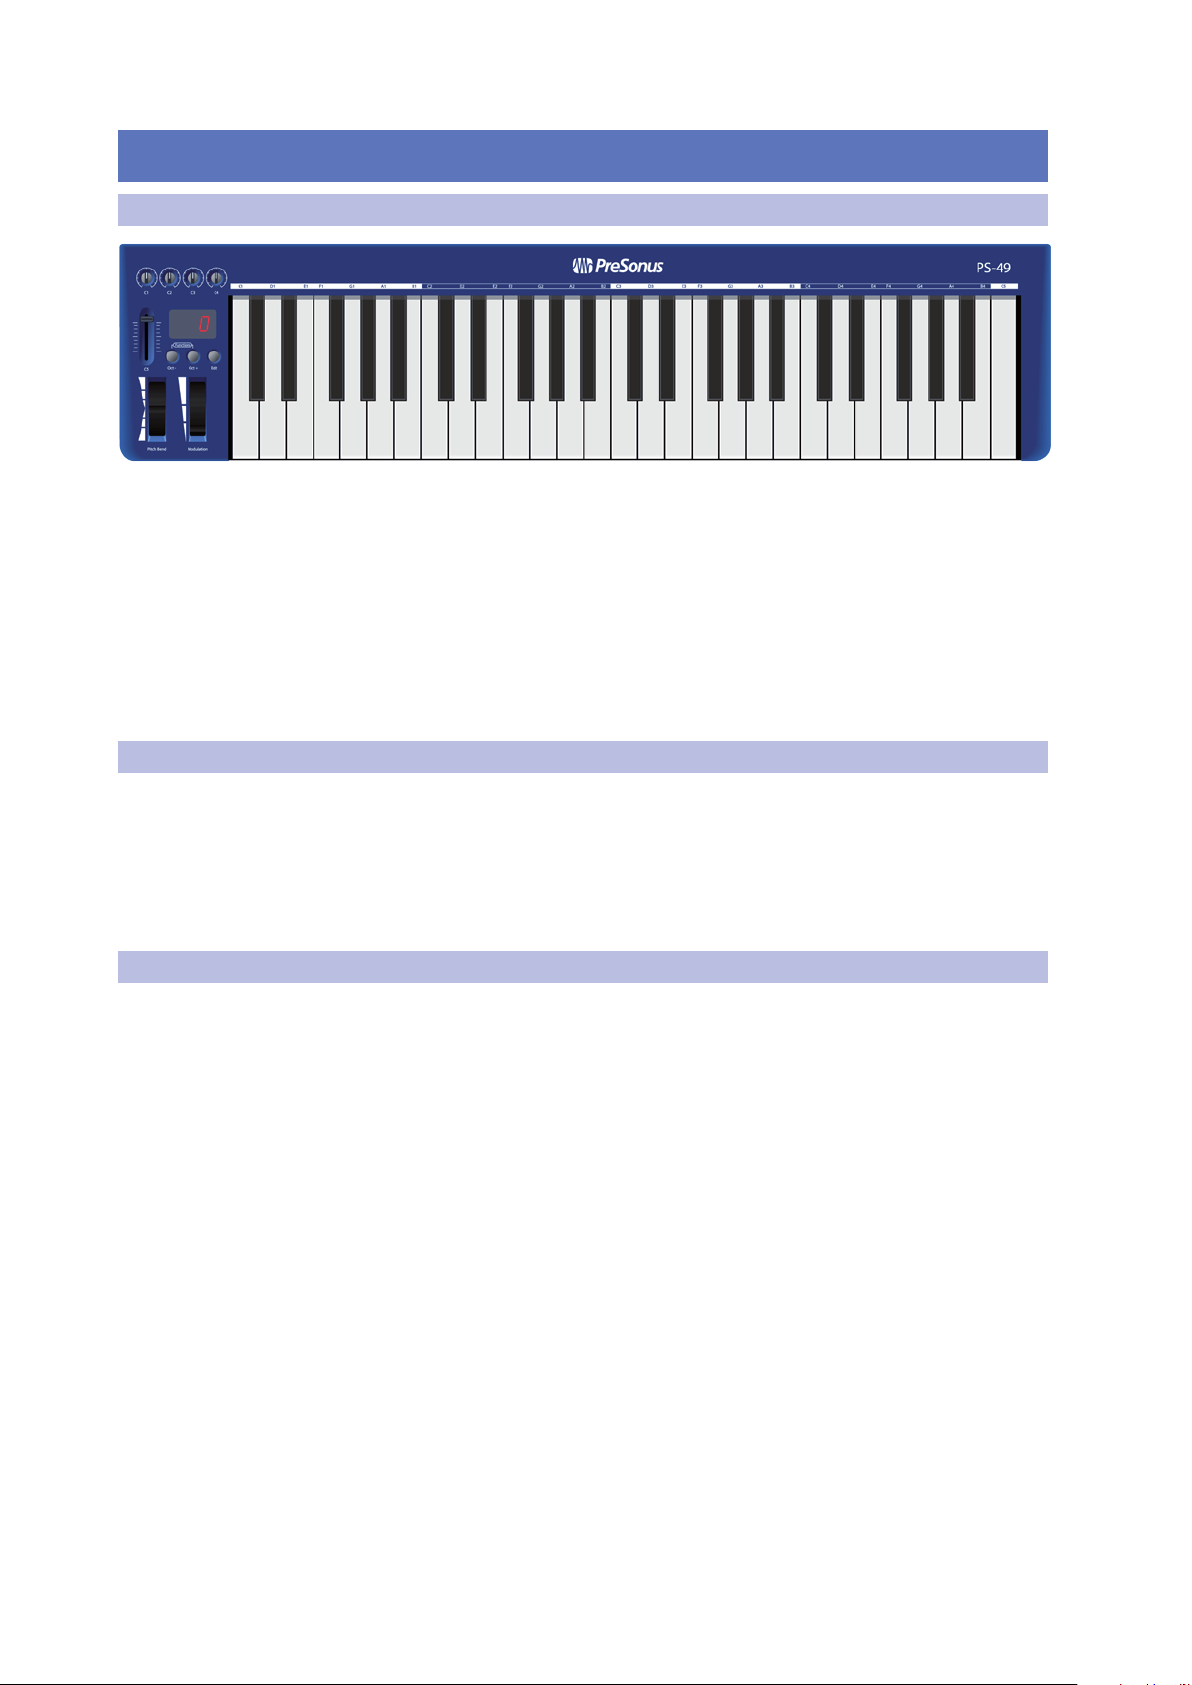
Pitch-Bend Wheel. The pitch-bend wheel is used to bend the notes up or down.
How far you can bend a note up or down is determined by the MIDI instrument
preset you are controlling. For example, if you are controlling a violin sample that
only allows you to bend a note one half step, moving the pitch-bend wheel all the
way up will only result in a half-step change.
The pitch-bend wheel is spring-loaded and will always return the center position
when released. The wheel provides 127 steps of control, from 0 (all the way down)
to 127 (all the way up), with a value of 64 at the center position. By default, the
pitch-bend wheel is assigned to MIDI Continuous Controller (CC) 144, Pitch Bend.
Power User Tip: You can use the pitch-bend wheel while playing keys on your PS49
or to control MIDI information being played back from your DAW application.
Modulation Wheel. By default, the modulation wheel is assigned to MIDI
Continuous Controller 01, Modulation. This controller is often used to control a
vibrato effect but the instrument preset you are controlling will determine what
exactly is being modulated.
Power User Tip: You can use the modulation wheel while playing keys on your PS49 or to
control MIDI information being played back from your DAW application.
PS49
Owner’s Manual
Volume Slider. By default, the volume slider is assigned to MIDI Continuous
Controller 07, Channel Volume. It sends values from 0 to 127.
Control Knobs. By default, the four control knobs send values from 0 to 127 on MIDI
channel 1 and are assigned to the following MIDI Continuous Controller numbers:
• Control knob C1: MIDI CC# 74, Brightness
• Control knob C2: MIDI CC# 71, Timbre
• Control knob C3: MIDI CC# 73, Attack Time.
• Control knob C4: MIDI CC# 72, Release Time
Power User Tip: All front-panel controls can be reassigned to any MIDI CC number. For
more information, see Section 4. Once reassigned, the new MIDI CC number will be
stored and become the new default setting for the controller that has been changed.
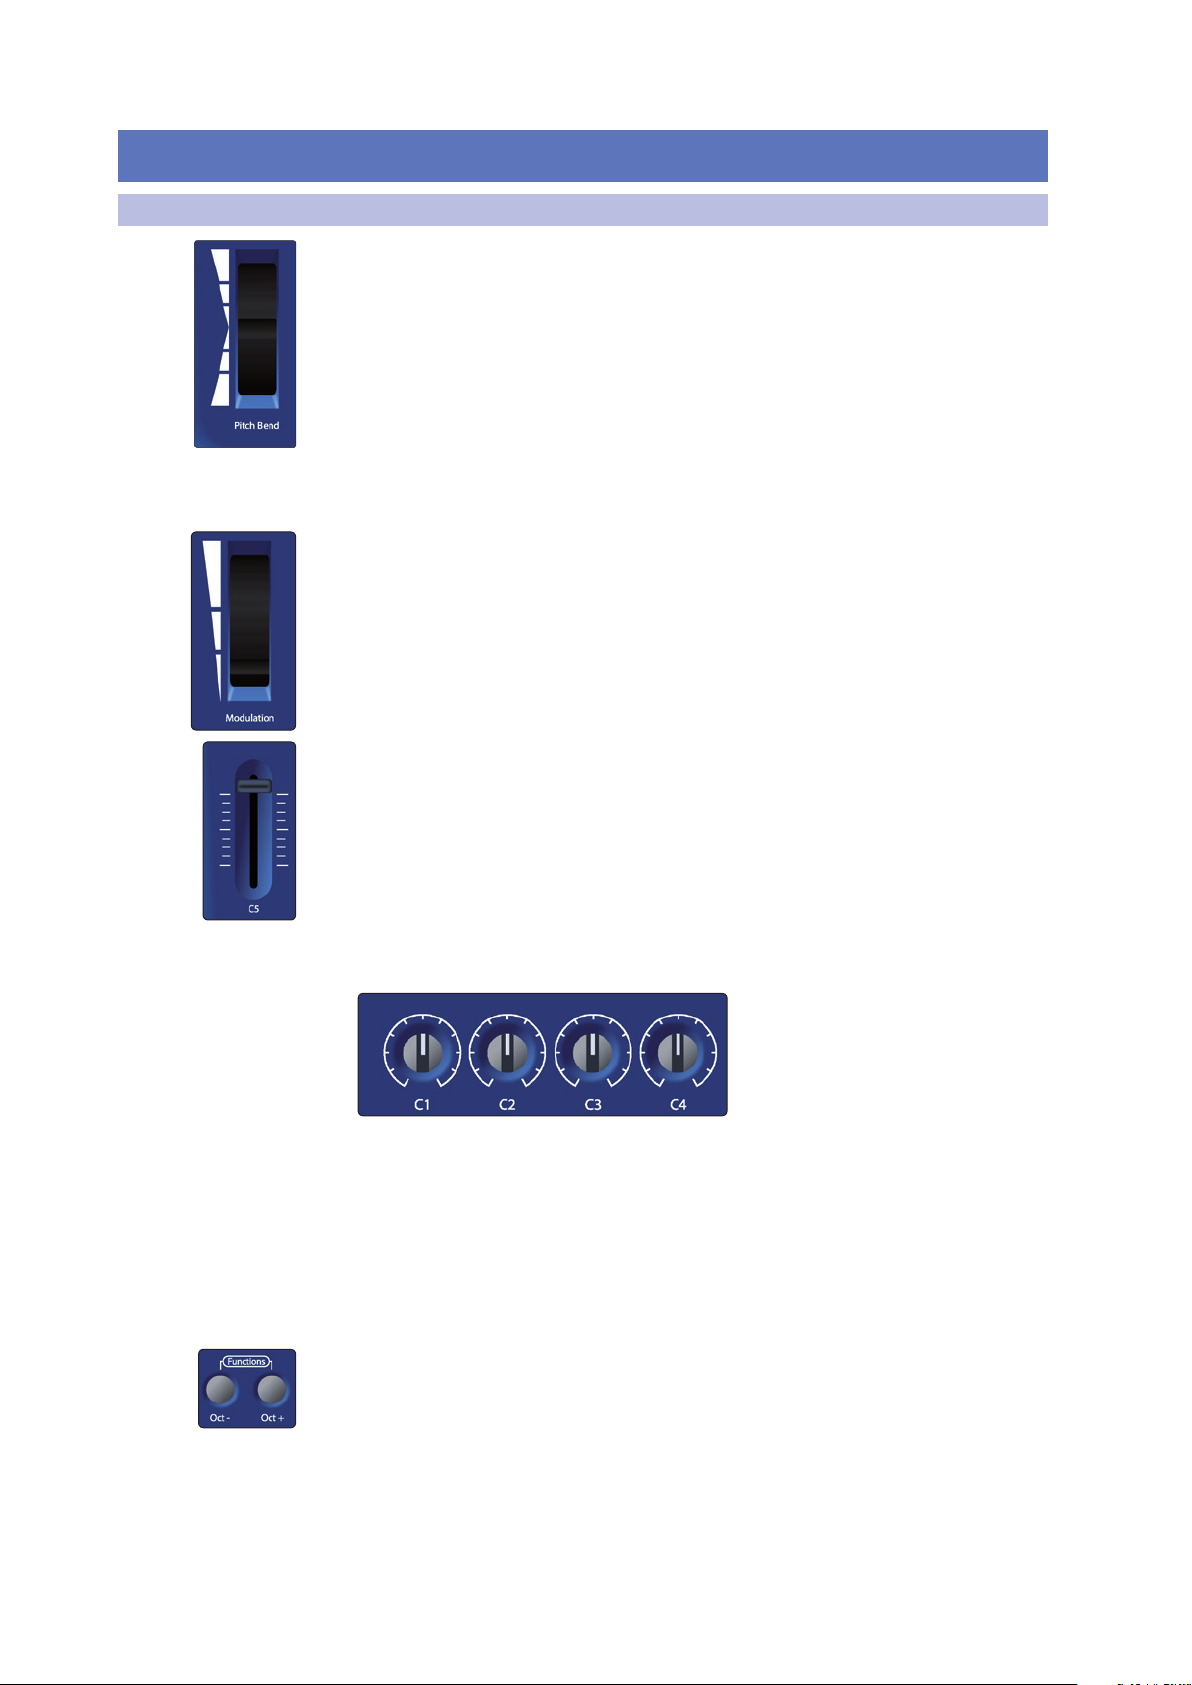
Octave Shift. Press the [Oct -] button to shift the keyboard down one octave. The
keyboard will continue to shift down as you press this button. Press the [Oct +]
button to shift the keyboard up one octave. The keyboard will continue to shift up as
you press this button. Your PS49 keyboard can be shifted up 4 octaves and down 3
octaves, covering the entire range of a full-size 88-key piano.
The LED display directly above the Octave Shift
buttons will display the current octave.
These buttons can also be assigned to control Transpose, Program Change, or MIDI
Channel. To change the function of the Octave Shift buttons, press the [Oct -] and the
3
Page 6
2 Hookup
2.2 Rear-Panel Connections
[Oct +] buttons at the same time, then release them; then you can use the buttons
to scroll up or down the through the list of available functions. Each function will
be displayed on the LED display. Once you have found the function you’d like to
use, simply wait for one second. The last selected option will then become active.
• Octave (OCT): As described earlier, each press of the Octave buttons will shift the
keyboard range by one octave.
• Transpose (TRA): When this function is selected, the Octave buttons will shift the
keyboard range by one half-step.
• MIDI Channel (CHA): When this function is selected, the Octave buttons will
change the MIDI channel your PS49 uses to transmit its MIDI messages. You can
select MIDI channels 1 through 16.
Power User Tip: The function of the Octave buttons will always
revert to Octave when you power down your PS49.
Edit button. Press this button to enter Edit mode. See Section 4 for details.
PS49
Owner’s Manual
2.2 Rear-Panel Connections
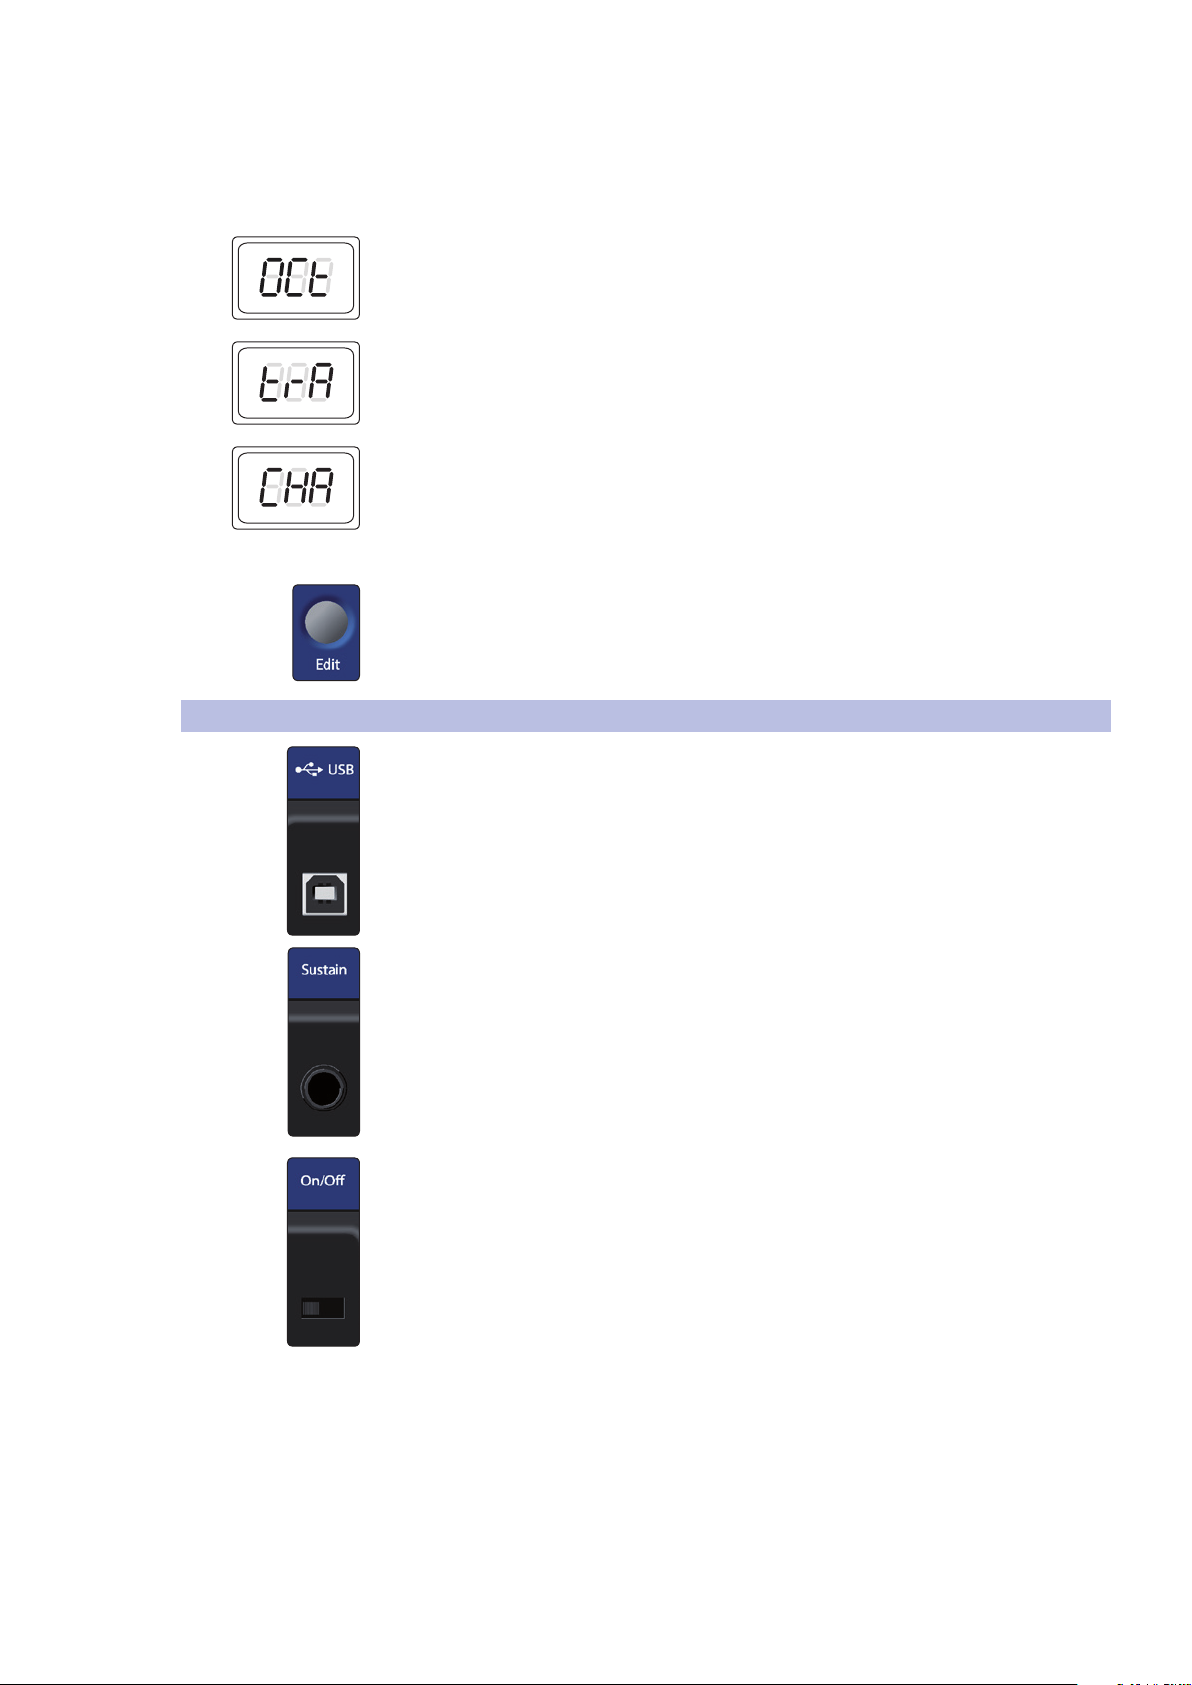
USB 2.0 Port. This is where you connect the USB cable from your PS49 to your
computer. The PS49 is bus-powered via this connection and does not require an
external power supply.
Sustain Pedal Connection. This is where you connect a momentary pedal (not
included). When pressed, the pedal will sustain the sound you are playing.
Power User Tip: Momentary pedals offer different polarity configurations.
Your PS49 is designed to pair with any pedal, regardless of its polarity. When
your PS49 powers on with a sustain pedal connected, it assumes the pedal
is in the “off” (up) position and automatically reconfigures itself accordingly.
Because of this, it is important to never depress the sustain pedal while your
PS49 is powering on; otherwise your sustain pedal will work backward.
On/Off Switch. This powers your PS49 on or off. Make sure this switch is in the “off”
position the first time you connect your PS49 to your computer.
4
Page 7

3 Connecting to a Computer
3.1 Mapping your PS49 Controls in Studio One
3 Connecting to a Computer
No driver installation is required for your PS49 USB MIDI Keyboard. Simply connect
it to a free USB port on your computer. If you do not have enough free USB
connections for your PS49, connect it to your computer using a powered USB hub.
You PS49 is preconfigured for use in Studio One so no
setup is required to use it as a controller.
3.1 Mapping your PS49 Controls in Studio One
The controls on your PS49 can be easily mapped to control any plugin using Studio One’s innovative Control Link system. You can map an
individual controller to many different functions in many different plug-ins.
The controller will follow the plug-in that is currently active. For example,
your C1 control knob can be mapped both to the Attack control of a
compressor plug-in and to the Feedback control for a delay plug-in.
Complete information about Studio One’s Control Link system can be found in
your Studio One user manual. This is a brief tutorial to get you started. By default,
the four controller knobs and the fader on your PS49 are already setup for Control
Link. All you have to do is pick the plug-in parameters you want them to control.
PS49
Owner’s Manual
1. Drag-and-drop the virtual instrument or effects plug-in you
want your PS49 to control into your Studio One session.
2. Using your mouse, move the parameter you want your PS49 to control. You
will see it displayed in the upper left-hand corner of the Arrange window.
3. Move the PS49 control you want to assign to that parameter.
4. You will see the control displayed next to the parameter in
the upper left-hand corner of the Arrange window.
5. Click the Link button between the parameter and control displays. You can
now use the control on your PS49 to move the parameter in Studio One.
5
Page 8

4 Edit Mode
C#1: Controller Assign
D#1: MIDI Channel
F#1: Program Change
G#1: Bank LSB
A#1: Bank MSB
C#2: All Notes Off
D#2: Reset Controllers
C1: Cancel
C5: Enter
D44E45F46G47A48B4
9
A31B32C4
3
G3
0
4.1 Control Map
4 Edit Mode
4.1 Control Map
PS49
Owner’s Manual
Your PS49 features an Edit mode that allows you to change the default MIDI
Continuous Controller number assigned to each front-panel control, send
Program Change and Bank Change messages from your PS49, and clear all
MIDI note and controller messages to help you troubleshoot MIDI issues.
To enter Edit mode, simply press the Edit button. The LED display will
blink “Edi” to alert you that your PS49 is now in Edit mode. All Editmode functions are mapped to your PS49 as illustrated below:
• C1: Cancel. Pressing C1: Cancel at any time while in Edit mode
will immediately exit the mode and return your PS49 to its
previous state, with all of its settings unchanged.
• C#1: Control Assign. Use this key to change the controller
assignments of the pitch-bend wheel, modulation wheel, fader, or
any of the four controller knobs. See Section 4.1 for details.
• D#1: MIDI Channel. By default, your PS49 uses MIDI channel 1 to transmit all of
its MIDI data. Use this key to change the MIDI channel. See Section 4.2 for details.
• F#1: Program Change. Use this key to send Program Change messages
to any MIDI instrument, device, or DAW. See Section 4.3 for details.
• G#1: Bank LSB and A#1: Bank MSB. Use these keys to send Bank Change
messages to any MIDI instrument, device, or DAW. See Section 4.4 for details.
• C#2: All Notes Off. Occasionally, a note will get “stuck.” You
can use this key to clear all outgoing MIDI Note On messages
to resolve this issue. See Section 4.5 for details.
• D#2: Reset All Controllers. Use this key to reset all controller
messages to their default values. See Section 4.6 for details.
• G3 – B4: Numeric Entry Keys. Use these keys to enter a numeric
value when it’s necessary to do so in any of the edit modes.
• C5: Enter. Use this key to confirm a parameter change or a
MIDI command. Once the Enter key is pressed, your PS49
will exit Edit mode and return to normal operation.
4.2 Control Assign
6
As previously mentioned, the pitch-bend wheel, modulation wheel,
fader, and four controller knobs have default MIDI Continuous
Controller mappings. These can be changed and remapped to any
of the CC numbers available in the General MIDI Specification.
Page 9

4 Edit Mode
C#1: Controller Assign
D#1: MIDI Channel
F#1: Program Change
G#1: Bank LSB
C1: Cancel
Pitch Bend Modulation
C#1: Controller Assign
D#1: MIDI Channel
F#1: Program Change
C1: Cancel
Pitch Bend Modulation
C5: Enter
D44E45F46G47A48B4
9
C4
3
C5: Enter
F46G47A48B4
9
4.2 Control Assign
PS49
Owner’s Manual
To change the controller message for any of the controls:
1. Press the Edit button.
2. The LED display will blink “Edi.”
3. Press the C#1: Controller Assign key.
4. The LED display will blink “Ctr.”
5. Move the control you want to reassign. The LED display will show the MIDI
Continuous Controller (CC) number assigned to it.
6. Enter the controller assignment you’d like to use by pressing the corresponding
Numeric Entry Keys. For example, if you’d like to use CC# 07, you’d press G4: 07. The
LED display will show the value you’ve entered.
7. Press C5: Enter to make your change effective and exit Edit mode.
Power User Tip: If you change the default CC number for any of the controls on your PS49,
you will need to reconfigure the control to work with Studio One and its Control Link
system. Only change these numbers if you are an experienced MIDI user.
7
Page 10

4 Edit Mode
C#1: Controller Assign
D#1: MIDI Channel
F#1: Program Change
G#1: Bank LSB
C1: Cancel
Pitch Bend Modulation
C#1: Controller Assign
D#1: MIDI Channel
F#1: Program Change
G#1: Bank LSB
A#1: Bank MSB
C1: Cancel
D44E45F4
6
A31B32C4
3
G3
0
C5: Enter
F46G47A48B4
9
4.3 MIDI Channel
4.3 MIDI Channel
PS49
Owner’s Manual
By default, your PS49 uses MIDI channel 1 to transmit all of its MIDI data.
You can assign the Octave Shift buttons to change the channel. In some
situations, you may know exactly the MIDI channel you’d like to use, and it
can be faster to simply use Edit Mode to enter the MIDI channel you want.
1. Press the Edit button.
2. The LED display will blink “Edi.”
3. Press the D#1: MIDI Channel key.
4. The LED display will blink “CHA.”
5. Enter the MIDI channel number by pressing the corresponding numeric-entry
keys. For example, if you’d like to use MIDI channel 10, press A3: 01, then G3:00. The
LED display will show the value you’ve entered.
8
6. Press C5: Enter to make your change effective and exit Edit mode.
Page 11

4 Edit Mode
C#1: Controller Assign
D#1: MIDI Channel
F#1: Program Change
G#1: Bank LSB
C1: Cancel
Pitch Bend Modulation
C#1: Controller Assign
D#1: MIDI Channel
F#1: Program Change
G#1: Bank LSB
A#1: Bank MSB
C#2: All Notes Off
C1: Cancel
C5: Enter
D44E45F46G47A48B4
9
C5: Enter
F46G47A48B4
9
4.4 Program Change
4.4 Program Change
Use this key to send Program Change messages to
any MIDI instrument, device, or DAW.
1. Press the Edit button.
2. The LED display will blink “Edi.”
3. Press the F#1: Program Change key.
PS49
Owner’s Manual
4. The LED display will blink “Prg.”
5. Enter the program number for the preset you want by pressing the corresponding
numeric-entry keys. For example, if you’d like to use Program 8, press A4: 08. The
LED display will show the value you’ve entered.
6. Press C5: Enter to make your change effective and exit Edit mode.
9
Page 12

4 Edit Mode
C#1: Controller Assign
D#1: MIDI Channel
F#1: Program Change
G#1: Bank LSB
C1: Cancel
Pitch Bend Modulation
C#1: Controller Assign
D#1: MIDI Channel
F#1: Program Change
G#1: Bank LSB
A#1: Bank MSB
C#2: All Notes Off
D#2: Reset Controllers
D44E45F4
6
A31B32C4
3
G3
0
C5: Enter
F46G47A48B4
9
4.5 Bank LSB and Bank MSB
4.5 Bank LSB and Bank MSB
Use these keys to send Bank Change messages to
any MIDI instrument, device, or DAW.
1. Press the Edit button.
2. The LED display will blink “Edi.”
3. Press the G#1: Bank LSB or A#1: Bank MSB key.
PS49
Owner’s Manual
4. The LED display will blink “LSB” or “MSB” accordingly.
5. Enter the bank number you want by pressing the corresponding numeric-entry
keys. The LED display will show the value you’ve entered.
6. Press C5: Enter to make your change effective and exit Edit mode.
Power User Tip: After a Bank Change message, you will usually need to send a Program
Change message to select a new preset on your receiving MIDI device.
10
Page 13

4 Edit Mode
C#1: Controller Assign
D#1: MIDI Channel
F#1: Program Change
G#1: Bank LSB
C1: Cancel
Pitch Bend Modulation
F#1: Program Change
G#1: Bank LSB
A#1: Bank MSB
C#2: All Notes Off
D#2: Reset Controllers
C#1: Controller Assign
D#1: MIDI Channel
F#1: Program Change
G#1: Bank LSB
C1: Cancel
Pitch Bend Modulation
4.6 All Notes Off
4.6 All Notes Off
PS49
Owner’s Manual
Occasionally, a note will get “stuck.” You can use this key to clear
all outgoing MIDI note on messages to resolve this issue.
1. Press the Edit button.
2. The LED display will blink “Edi.”
3. Press the C#2: All Notes Off key.
4. The LED display will blink “NOF.”
5. Your PS49 will exit Edit mode, and you should no longer
hear stuck notes on the selected MIDI channel.
4.7 Reset All Controllers
Resetting MIDI controller values can be a quick and easy way to troubleshoot
problems in your MIDI environment. Anytime something unexpected is
happening to a sound, you can simply reset everything to default settings
instead of trying to figure out which MIDI message is the culprit.
1. Press the Edit button.
2. The LED display will blink “Edi.”
11
Page 14

4 Edit Mode
G#1: Bank LSB
A#1: Bank MSB
C#2: All Notes Off
D#2: Reset Controllers
4.7 Reset All Controllers
3. Press the D#2: Reset All Controllers key.
4. The LED display will blink “res.”
5. Your PS49 will exit Edit mode, and unexpected modulation or effects should stop.
PS49
Owner’s Manual
12
Page 15

5 Resources
5.1 Factory Reset
Owner’s Manual
PS49
5 Resources
5.1 Factory Reset
To reset your PS49 USB MIDI Keyboard to its factory default state:
1. Turn the power switch to the “Off” position.
2. Hold down the [Oct -] and [Oct +] buttons while turning the PS49 on.
The LED display will read “888,” and all the default MIDI CC assignments
will be restored to their factory defaults as described in this manual.
5.2 Technical Specification
Type 49-key, full-size, velocity-sensitive, unweighted keyboard
Controls Pitch Bend, Modulation, Volume fader (assignable), four knobs (assignable),
Octave Up/Down. Advanced functions available in Edit mode.
Connections ¼” Sustain-pedal jack (polarity-sensing)
MIDI Via USB, class compliant
USB 2.0, provides power
Weight: 4.2 lbs (2 kg)
Dimensions: 31.5” (80 cm) x 7.5” (19 cm) x 3” (7.6 cm)
13
Page 16

Page 17

Dinner is Served
Added bonus: PreSonus’ previously Top Secret recipe for…
Redfish Couvillion
Ingredients:
• ¼ C Vegetable oil
• ¼ C flour
• 1 onion diced
• 1 clove garlic minced
• 1 green pepper diced
• 3 celery stalks diced
• 1 14oz can diced tomatoes
• 1 bottle light beer
• 2 bay leaves
• 1 tsp thyme
• 2 lbs Redfish fillets
Cooking Instructions:
1. In a heavy saucepan or large skillet, heat oil on medium high and slowly add flour a tablespoon at a time to create a roux.
Continue cooking the roux until it begins to brown, creating a dark blond roux.
2. Add garlic, onions, green pepper, and celery to roux.
3. Sauté vegetables for 3-5 minutes until they start to soften.
4. Add tomatoes, bay leaves, thyme, and redfish. Cook for several minutes.
5. Slowly add beer and bring to a low boil.
6. Reduce heat and simmer uncovered for 30-45 minutes until redfish and vegetables are completely cooked, stirring
occasionally. Break up redfish into bite size chunks and stir in. Add pepper or hot sauce to taste. Do not cover.
7. Serve over rice
Serves 6-8
While not one of Southeast Louisiana’s more famous dishes, Redfish Couvillion is a favorite way to serve our
favorite Gulf fish. Also known as Reds or Red Drum, Redfish is not only fun to catch, it’s also delicious!
© 2014 PreSonus Audio Electronics, Inc. All Rights Reserved. Active Integration, AudioBox, DigiMax, FireStudio, Nimbit, Notion, PreSonus, QMix-AI, StudioLive, Temblor, and XMAX
are trademarks or registered trademarks of PreSonus Audio Electronics, Inc. Capture, Impact, Mixverb, Presence, RedLightDist, SampleOne, Studio One, and Tricomp are trademarks
or registered trademarks of PreSonus Software Ltd. Mac and Mac OS are registered trademarks of Apple, Inc., in the U.S. and other countries. Windows is a registered trademark of
Microsoft, Inc., in the U.S. and other countries. Other product names mentioned herein may be trademarks of their respective companies. All specifications subject to change without
notice...except the recipe, which is a classic.
Page 18

PS49
USB MIDI Keyboard
Owner’s Manual
18011 Grand Bay Ct. • Baton Rouge,
®
Louisiana 70809 USA• 1-225-216-7887
www.presonus.com
Part# 820-PS0042-A
 Loading...