

Page 1
Page 2

Contents
How to Best Use this Guide ......................v
Technical Support ...............................v
Automatic Software Updates ...................vi
64-bit ........................................... vi
New in Notion 6.4 - Overview ..................vii
New in Notion 6 - Overview .................... ix
CHAPTER 1: Explore Notion
Startup Screen ................................1.2
Select Your Keyboard Shortcut Set ............1.3
Main Components .............................1.4
Menu Bar ......................................1.5
NTempo Mode or Edit Mode ...................1.6
Toolbar ........................................1.7
Virtual Instruments ...........................1.8
Score Area ....................................1.9
Entry Palette .................................1.10
Mixer .........................................1.13
Score Setup ..................................1.14
Set Up Audio .................................1.15
Set Up MIDI Devices ..........................1.17
Help Options .................................1.19
CHAPTER 2: Notion Files
Open a File ....................................2.2
Save, Save As, and Revert .....................2.3
Export to audio file ............................2.4
Export to MIDI or MusicXML Files .............2.5
Export for SMP Press ..........................2.5
iOS Integration ................................2.6
Print a Score ...................................2.7
Dynamic Parts .................................2.9
Close or Exit (Quit) ...........................2.11
CHAPTER 3: Customize Your View
Zoom and Resize/Move Window .............3.2
Change Page View .............................3.3
Hide/Show Any Instrument ...................3.4
Move Staves ...................................3.5
Notation Size and Style .......................3.6
Transposed or Concert Pitch ..................3.7
Change Theme ................................3.8
Set Up Measure Numbers .....................3.9
View One Part ................................3.10
Measures in Each System / System Breaks ....3.12
Measure / Sta / System Spacing .............3.13
Part Names and Abbreviations ...............3.14
Sequencer Overlay ...........................3.15
CHAPTER 4: NTempo Mode
Play or Perform a Score. . . . . . . . . . . . . . . . . . . . . . . . 4.2
Notion Score Library ..........................4.2
Heads-Up Display .............................4.3
Play a Score ...................................4.5
Perform a Score (NTempo) ....................4.7
NTempo Staff ..................................4.9
NTempo Keyboard Shortcuts .................4.10
Vamps ........................................4.11
Fades .........................................4.13
Skip Repeat ..................................4.14
MIDI Keyboard: Defaults .....................4.15
MIDI Keyboard: Customize ...................4.17
MIDI Keyboard: Live Play .....................4.19
CHAPTER 5: The Mixer
Channel Strips .................................5.2
VSTi / ReWire ................................5.2
Fader ........................................5.3
Pan, Mute, and Solo .........................5.4
Insert VST Effects. . . . . . . . . . . . . . . . . . . . . . . . . . . . 5.5
Plug-in Manager ..............................5.6
Master Channel Strip ..........................5.8
Buses ..........................................5.9
Output Button ................................5.11
Send to External Equipment .................5.13
CHAPTER 6: Editing Tools
Edit Mode Operation ..........................6.2
Select and Highlight. . . . . . . . . . . . . . . . . . . . . . . . . . . 6.4
Undo and Redo ................................6.6
Cut, Copy, and Paste ...........................6.7
Delete and Substitute .........................6.8
Clear and Clear Special .......................6.10
Hide/Show Score Objects ....................6.12
Duplicate .....................................6.13
Express Entry Mode ..........................6.14
ii
Page 3

CHAPTER 7: Create A New Score
Create a New File ..............................7.2
Create a New File from Template ..............7.3
Assign Initial Instruments .....................7.4
Assign Clef ....................................7.6
Assign Key Signature ..........................7.7
Assign Time Signature. . . . . . . . . . . . . . . . . . . . . . . . . 7.8
Assign Metronome Mark .....................7.10
CHAPTER 8: Enter Notes and Rests
Notation Overview ............................8.2
Note Audition .................................8.2
Enter Notes and Rests .........................8.4
Red Notes - Exceed Duration / Range ..........8.5
Accidentals ....................................8.6
Chords .........................................8.8
Triplets and Other Tuplets .....................8.9
Ties and Slurs .................................8.12
Slash Marks ..................................8.13
Alternate Noteheads .........................8.14
Multi-Voice Entry .............................8.15
Short Score Staff .............................8.17
Handwriting Recognition ....................8.19
CHAPTER 9: More Input/Sound Options
Step-Time Input ...............................9.2
Repitch existing notes .........................9.3
Real-Time MIDI Input ..........................9.5
MusicXML and MIDI File Import ...............9.7
Alternative Sound Sources ....................9.8
MIDI Out ....................................9.9
VST Instruments ...........................9.10
Presets ..................................9.10
Community Presets .....................9.10
Preset Expressions ......................9.11
Add a Multi-Channel Track ..............9.11
Rules Editor .............................9.13
ReWire ........................................9.15
CHAPTER 10: Edit Notation
Beam Tool ....................................10.2
Beaming Angle and Height ...................10.3
Stem Direction ...............................10.4
Change Note/Rest Time Values ...............10.5
Change Note Pitches .........................10.6
Transpose ....................................10.7
Octave Transposition Symbols ...............10.8
Add Interval ..................................10.9
Add Dynamics ...............................10.10
Edit Dynamics ...............................10.12
Articulations ................................10.15
Glissando and Portamento ..................10.18
Arpeggios ...................................10.19
Grace Notes .................................10.20
Ghost Notes .................................10.21
Trills .........................................10.22
Shortcut Slashes, Tremolos, and Shakes ....10.23
Holds ........................................10.24
Breaks .......................................10.26
Cue Notes and Tacet .........................10.28
Swing Control ...............................10.30
Fill Measures With Rests .....................10.32
CHAPTER 11: Edit Score
Add Staves ...................................11.2
Change or Delete a Staff .....................11.4
Add WAV Files ................................11.6
Change Instrument per Staff .................11.8
Change Instrument per Voice ...............11.10
Bar Lines ....................................11.12
Repeat Signs ................................11.14
First, Second, and Multiple Endings .........11.15
Repeat Measure Signs .......................11.16
Navigation Marks ...........................11.17
Rehearsal Marks .............................11.18
Change Measure Numbering ................11.19
Cut Marks ...................................11.20
Text ..........................................11.22
Lyrics ........................................11.24
Pickup/Partial Measures ....................11.25
System and Page Breaks ....................11.26
Change Part Names and Abbreviations .....11.28
Change Clef .................................11.29
Change Key Signature .......................11.30
Change Time Signature .....................11.32
Change Metronome Mark ...................11.33
Brace, Bracket, and Barline Groups ..........11.36
Edit NTempo Staff ...........................11.38
Handle Significant Tempo Changes .........11.40
Tempo Overdub .............................11.42
Velocity Overdub ............................11.44
iii
Page 4

CHAPTER 12: Instrument Markings
Common Markings ...........................12.2
Special Markings for Strings .................12.3
Special Markings for Woodwinds. . . . . . . . . . . . . 12.4
Special Markings for Brass ...................12.5
Special Markings for Keyboards ..............12.6
Special Markings for Harp ....................12.7
Special Markings for Percussion. . . . . . . . . . . . . .12.8
Special Markings for Mallets ................12.10
Special Markings for Drum Set ..............12.11
Special Markings for Guitar .................12.14
Reset Tab Numbers ..........................13.17
Finger Marks ................................13.18
Slides ........................................13.20
Palm Mute and Let Ring .....................13.21
Bends. . . . . . . . . . . . . . . . . . . . . . . . . . . . . . . . . . . . . . . .13.22
Vibrato and Whammy Bar ...................13.24
Guitar Taps and Bass Slaps ..................13.25
Hammer-ons and Pull-off Marks ............13.26
Harmonics ...................................13.27
Other Markings .............................13.28
CHAPTER 14: SequencerSta
CHAPTER 13: Fretted Instruments
The Tablature Staff ...........................13.2
Enter Tab Directly ............................13.3
Fretboard: Strings/Tunings ...................13.4
Fretboard: Enter ..............................13.6
Fretboard: Edit ...............................13.8
Enter Chord in Tab ............................13.9
Chord Names ................................13.10
Chord Diagrams .............................13.12
Play Chord Names ...........................13.15
Show Chords on First Page ..................13.16
About SequencerStaff ........................14.2
Import MIDI File ..............................14.3
Create a SequencerStaff ......................14.4
Input from MIDI Keyboard ...................14.5
Edit SequencerStaff ..........................14.6
Convert to Notation ..........................14.7
CHAPTER 15: Media Tools
Add wav le ..................................15.2
Video Setup ..................................15.4
Fit in Time and Hitpoints .....................15.5
Upsampling ..................................15.6
Transfer data to
and from PreSonus® Studio One® ............15.7
CHAPTER 16: Reference
Instrument Ranges ...........................16.2
Rules Editor Conditions ......................16.5
Rules Editor Techniques ......................16.7
Rules Editor Actions ..........................16.8
iv
Page 5

How To Best Use This Guide / Technical Support
This document divides topics into logical chapters that build in complexity as you progress into the guide. This
guide is best viewed in Adobe Acrobat or Apple Preview for Mac, which supply thorough search capabilities.
Where Can I Go for More Information?
In the Menu bar, under the Help menu heading:
8 Shortcuts to open a printable PDF sheet of all keyboard shortcuts arranged by set:
> English (U.S.) set (uses letters for durations, e.g., “E” for eighth note)
> International set (uses numbers for durations, e.g., 0 for whole note)
> Notion Numberpad (default number pad)
> Finale Numberpad (adds Finale number-pad durations)
> Sibelius Numberpad (adds Sibelius number-pad durations)
8 NTempo Tutorials: Since performing your compositions with full real-time control of tempo (the NTempo feature)
is such a fascinating and useful tool, we have provided, under Help, two score-based tutorials on how to use your
computer keyboard, or an external MIDI keyboard to perform all or part of any score. The advantage with these two
Help tutorials is that each is actually a score, so you can read them as you try out NTempo performance features in
real-time right away.
8 Demo Files are always helpful so you can see how nished compositions look, operate,
and sound in Notion.
Then there’s the Quick Reference Guide, included with Notion packaging—great to
use when getting started and for quick reference for keyboard shortcuts.
There’s Much More Online.
You will nd video tutorials, product information, and helpful hints at www.presonus.com/products/Notion,
the Notion Web site. Notion is part of the PreSonus family of hardware and software; check
out the whole range of supporting products at www.presonus.com.
Our dedicated YouTube channel contains many helpful videos on a variety of topics:
www.youtube.com/user/NotionMusicVideos.
Our support pages, http://support.presonus.com, provides a FAQ, alerts on
latest software updates, and similar software-specic information.
We also reserve Web space where you can connect with users around the world.
Specic pages you can explore in our Community section include:
8 The Notion forum: http://forums.presonus.com
8 The Notion blogs: http://blog.presonus.com
Find Notion on Facebook and Twitter: www.facebook.com/notionmusic and www.twitter.com/notionmusic.
Technical Support
For technical information, and to make a technical support ticket, go to http://support.presonus.com or
your My.PreSonus.com account. This area of the PreSonus Web site also alerts you to any major developments,
including installation tips, and enables you to download the latest updates to the software.
v
Page 6

Automatic Software Updates / 64-bit
For technical information, and to make a technical support ticket, go to http://support.presonus.com or
your My.PreSonus.com account. This area of the PreSonus Web site alerts you to any major developments,
including installation tips, and enables you to download the latest updates to the software.
Automatic Software Updates
You can set Notion to check and download software updates either automatically or manually:
To set up how you will update Notion software:
1. Go to the Menu bar and select Windows: File > Preferences; Mac: Notion > Preferences.
» A Preferences dialog box opens.
2. In the General Tab, look at the Check for updates checkbox at the bottom.
> For automatic updates, ensure this checkbox is selected.
> For manual updates, clear this checkbox. Then, when you are connected to the Internet, go to the Menu bar and
select Windows: Help > Check for Updates; Mac: Notion > Check for Updates. The software makes a behind-thescenes check with our site to see if an update is available. If so, Notion asks your permission before it downloads
and installs the latest software. Otherwise, it displays an information box letting you know you already have the
latest software installed (click OK to close the information box).
3. To save any changes, click OK.
Converting from 64-bit to 32-bit (for Plug-ins and ReWire Issues)
To run Notion as a 32-bit application after it has been installed as a 64-bit application on Mac:
8 Locate and right-click on Notion in your application folder
8 Select “Get Info”
8 Check the box beside “Open in 32-bit mode”
To run Notion as a 32-bit application after it has been installed as a 64-bit application
in Windows, you must reinstall Notion as a 32-bit application.
To run a 32-bit plug-in 64-bit mode, Notion recommends using a product such as J Bridge.
To see what mode you are running in, go to Help > About, and look in the
bottom left corner of the acknowledgements screen.
vi
Page 7

New in Notion 6.4 - Quick Overview
New in Notion 6.4
Further integration with PreSonus Studio One: for more details, check our Notion 6.4 blog post at presonus.com
New checkbox “Link to metadata” in Score>Add Title/Header/Footer. This unlinks a new text box from others of the
same style meaning you can create multiples of e.g. copyright notices. This is useful for e.g. creating long copyright
notices (such as those required for SMP Press)
Preset xes: for EWQL Full instruments, and LA Scoring Strings (for LASS, please redownload the preset from your
Audiobro account)
Surface Pen: some xes for Windows 10 and the Surface Pen
Plus over 20 xes and enhancements to paste action, langauge xes, video, and more - see the whole list here:
https://api.presonus.com/notion6/change_log.html
New in Notion 6.3
Export for SMP Press: File>Export for SMP Press, is a one-click process that creates an mp3 audio le and a single PDF
that contains full score and all parts in score order. These les can then be uploaded to SMP Press from Sheet Music Plus,
a self-publishing portal for composers.
Community Presets: Brand new space to upload, share, maintain, and download presets for popular 3rd party VST
instruments as well as access to Notion’s built-in presets. Find it at https://github.com/notionmusic/presets
New Preset Folder: Your custom presets can be saved here, and will populate Score Setup, just like a built-in Notion
instrument
Preset Expressions: New Preset Expressions to add any expressions in your libraries that are not found by default in
Notion.
Rules Editor: New rule test for “No articulation”; “Palm mute” and “slap” added to Techniques
Plus over 20 xes and enhancements to Studio One interop, MIDI import, audio devices, and more - see the whole
list here: https://api.presonus.com/notion6/change_log.html
New in Notion 6.2
Slur Control: Click a slur and drag a control point to adjust: start and end points; absolute position; the curve itself
Enhanced Studio One interop: now you can update audio and note data in existing Studio One and Notion documents.
Send tracks from Studio One, edit in Notion, and send them back, updating the original song.
Tempo tracks: Notion now sends and receives tempo tracks with Studio One, including all time signature and tempo
changes. If many tempo changes are received, Notion displays them as abbreviated metronome marks (which can be
easily selected and changed to full metronome marks, or simply hidden with right click>Tempo)
Brass Band: New Brass Band (UK style) template added. Go to File>New From Template>Brass Band. Some instruments
require the Brass Bundle Expansion Pack for playback.
New icons for drumpad: New pencil icon added to Drumpad to better enable/disable Steptime; new audition button to
hear the notes when building a ‘chord’, before entering on the page
Repeat previous entered chord: Tap the Enter key in Steptime to insert the same chord multiple times - this has always
worked this way for the fretboard, but now also works for the onscreen keyboard and drumpad.
Plus over 40 xes and enhancements to handwriting, Studio One interop, MIDI and MusicXML, glissandi - see the
whole list here: https://api.presonus.com/notion6/change_log.html
New in Notion 6.1.1
Touch: Notion now recognises whether a touch is nger/capacitive stylus or digitizer stylus (Windows), plus you can now
use the Microsoft Surface Pen button to bring up context menu
Importing drum les: when importing MIDI drum les, Notion uses GM mapping to put the notation in the expected
place, including with crosshead notes for cymbals
Drumpad cymbals: when using the onscreen drumpad, Notion now writes cymbals with crosshead notes
vii
Page 8

Studio One interop: Studio One application launcher added to the ‘Send to Studio One’ dialog
Positioning articulations: you can now select an articulation and use cursor arrow keys to position them - for ne
positioning, use Shift+arrow
Chords and enharmonics: you can now use the enharmonic tool (Shift+E) with attached chord symbols
Dynamic parts list: Score>Dynamic Parts is now in your current score order, rather than the order in which the
instruments were created
Home and End: End key now navigates to end of score (as Home does, to the start of a score)
School network: Notion now has the facility during network installs to copy preferences from the system level – this
saves a lot of time in the classroom every time a new user logs on to a dierent machine. For more information about
PreSonus’ Unlimited Site licences for education, contact musiceducation@presonus.com
Plus over 40 xes and enhancements to keyboard sound bundle, Studio One interop, Video, notation, Rules
Editor, MIDI and MusicXML - see the whole list here: https://api.presonus.com/notion6/change_log.html
New in Notion 6.1
Enter notes and chords with QWERTY keyboard: In Step time you can now use a,b,c,d,e,f,g to enter pitch. See
Preferences>General>Step Time to switch keyboard sets. See Chapter 9.2 and the Shortcuts pdf, available via
Help>Shortcuts
Create and extend range selections with keyboard shortcuts: Press Enter to start a range selection wherever the
cursor is. Or press Alt+A to select the current measure. You can extend the range selection with keyboard shortcuts, and
then edit as required. You can also press Enter again, to select individual notes within the selection.
Navigate around measures, staves and systems with keyboard shortcuts You can now navigate around your score in
all directions with just your keyboard. Check the Shortcuts pdf in Help>Shortcuts for full details
Selected items can be nudged with cursor keys: As well as dragging with the mouse, you can also use the arrow keys to
move rests, text, dynamics, fermata etc. Use Shift+arrow keys for ne tuning the position
New keyboard shortcuts: quicker ways around with new shortcuts - check the menus or the Shortcuts PDF for the full
list
Echo note entry and selection: Echo note entry and echo note selection now sounds notes on all methods of note entry
and any time a note is highlighted. To change, go to Preferences>General and uncheck. (Use the A key to Audition any
time)
Plus over 50 xes and enhancements to handwriting, Studio One interop, ReWire, MIDI and MusicXML,
video window, metronome - see the whole list here: https://api.presonus.com/notion6/change_log.html
viii
Page 9

New in Notion 6 - Quick Overview
New in Notion 6.0
General
Three new languages: Korean, Italian and Simplied Chinese now available
(alongside English U.S., English UK, German, Spanish, French and Japanese)
- Go to Preferences (Cmd/Ctrl+’) and select Language. Restart for the changes to take eect.
Export PDF on Windows: Go to File - Print to PDF to natively print PDF on Windows. Mac users have this built in to the
Print menu.
High DPI display on Windows: Notion now supports High-DPI displays. Some 3rd party VST instruments may not
support High-DPI, in which case you can set Notion to use legacy DPI scaling instead. Go to Preferences and check ‘Use
Legacy DPI scaling’
Touch gestures on Mac Trackpad: Pinch to zoom, and use two ngers to scroll.
New MIDI Preferences: You can now select MIDI Record and MIDI le Import preferences including whether to open
imported MIDI les with Notion’s Sequencer Sta view by default - Go to Preferences (Cmd/Ctrl+’)
Import compressed MusicXML les (.mxl): Notion has long been able to deal with MusicXML - now you can import the
compressed MusicXML le format too
Handwriting
Handwrite directly into score area: Select the handwriting icon - you can now draw notes, rests and other symbols
directly into the score. After a few seconds of inactivity, your handwriting will be converted into digital notation. To delete,
scribble over the notehead, or over the symbol or rest.
Use the optional handwriting zoom area: To avoid zooming in/out of large scores, or for combining note entry
methods, select the handwriting icon followed by the handwriting area icon. Tap in the score area where you want to
enter notes, and the handwriting area will jump to the correct spot.
Supported items: Write notes, rests, chords, articulations, measure lines, accidentals, time signatures, measure lines,
ledger lines, slurs, ties, clefs into a 5-line sta. To write into voices, select desired voice in the palette rst, as normal note
entry.
Transfer data to and from PreSonus® Studio One®
Notion can now send and receive audio and note data with Studio One version 3.3, the award winning DAW (digital audio
workstation) from PreSonus. Notion also now supports UCNET, PreSonus’ network protocol, which means that not only
can you transfer between applications on the same machine, but applications anywhere on the same network
Transfer audio: To send audio tracks and accompanying document data to Studio One, make sure you have Studio One
running on either the same machine, or somewhere on the same network. Go to File>Send to Studio One (or Cmd/Ctrl +
Shift + U). To only send a selection, use the mouse to select the measures and/or staves you want rst.
Transfer note data: To send note data and accompanying document and VST data to Studio One, make sure you have
Studio One running on either the same machine, or somewhere on the same network. Go to File>Send to Studio One (or
Cmd/Ctrl + Shift + U). To only send a selection, use the mouse to select the measures and/or staves you want rst.
Allow Network Discovery: If you don’t want want Notion to be discoverable by other PreSonus software on the network,
then go to Preferences, and uncheck ‘Allow Network Discovery’.
Content
New Lakeside Pipe Organ from Soundiron: Pipe organ manuals and pedals now available in the Keyboards category in
Score Setup. There are 5 stops available going from soft to loud - and a mighty pedal board to give your scores some
weight
New Olympus Micro Choir from Soundiron: Select SATB in the Vocal category in Score Setup. Switch between oohs and
aahs from the technique palette
Notion Harpsichord: The harpsichord is a 1972 instrument, made by Robert Goble & Son, Oxford, and features the
following stops: 4’, 8’ short/long/lute/nazard, 16’ - selected from the technique palette.
ix
Page 10

Notion Score Library: A collection of over 200 public domain scores all in the Notion format, that includes orchestral and
piano works that can be used in a variety of ways from accompaniment to score study. Make sure you download the
folder from your my.presonus.com account. A complete list of les can be found within the folder.
Layout controls
View/Hide Layout Handles: Go to View>Show Layout Handles or Cmd/Ctrl+L.
Respace measure widths: Show Layout Handles and drag to respace. To reset the width, shift click the box or right click
the measure>Reset Measure Width.
Respace staves / systems: Show Layout Handles and drag the larger system box to respace vertically. To reset the width,
shift click the box or right click the measure>Reset Measure Width.
Hide and show empty staves: For full control over the page, you can now custom hide or show empty staves, on a
system to system basis. Make a selection and go to View>Hide/Show Resting Staves
Hairpin angles: Show Layout Handles, then drag the single square on the closed end to angle the whole hairpin. Drag
the squares at the open end to adjust the opening angle of the hairpin
Drag hairpins vertically: Select and drag the hairpin up and down to adjust vertical placement.
Enter chords anywhere: Now you can place a chord anywhere over a long note or empty measure, and it will attach
automatically to the nearest beat.
Drag more items anywhere: articulations can be dragged in any direction, rests can now be dragged vertically,
articulations can now be dragged in any direction
Multi-measure rest feature completely redesigned: Now better looking and much more intuitive.
Part names: Part names can be added automatically, and also edited directly
Notation
Mid-sta instrument and transposition change: Changing from e.g. Flute to Alto Sax now shows key signature change
at point of instrument change
Mid-sta transposition change in same instrument: Change from e.g. Clarinet in A to Clarinet in Bb. Go to Change
Instrument (Shift+I), select New Instrument. Select its transposition from ‘Notation/Tab’. Click OK and click the change into
the score,.
Change enharmonic of indidual notes in a chord: Select the note you wish, and press Shift+E. To change the whole
chord, double click to select all the notes in the chord rst.
Write hammer-on directly into TAB: Add a slur directly into a tablature sta. Use Shift+S for slur. You can still use the
previous Notion ‘H’ for hammer on for playback
Paste lyrics from an external source: Copy and paste from a text editor application, and paste into Lyrics in Notion.
Notion will advance the lyrics on a space, and if you have entered hyphens (-) or underscores (_) in your text, it will space
syllables and melisma respectively across notes. Once you copied the text, go back into Notion, place the cursor on the
note you wish the rst word to appear, then go to Edit>Paste Lyrics and choose the verse number.
Ukulele chords: Now you can enter ukulele chords! Open the Chord Library - then select the ukulele sta. You will see the
chord library now shows 4-string ukulele chords.
Many MusicXML enhancements for seamless transfer with other notation apps: See a list of all xes at blog.presonus.
com
Audio/Video
Metronome now available in playback: Click the metronome icon in the taskbar
Preroll record feature: Select how many measures you wish to hear before you start your MIDI record in.
Video window control buttons: Frame advance, Add hitpoint, Play, Stop and Video audio control buttons added to Video
Window
Export audio as mp3: Now you can export your score as mp3. Select the option in the Export Audio menu
More FX slots: Now two banks of FX slots are available in the mixer. Select either 1-4 or 5-8.
MIDI Over ReWire: Now send MIDI in realtime over ReWire into your DAW
Fixes and Enhancements
There are many xes and enhancements in Notion 6 - check out our blog that outlines every single one of them:
http://blog.presonus.com/index.php/notion-6-new-features/
x
Page 11

CHAPTER 1: EXPLORE NOTION
Startup Screen ...........................1.2
Main Components .......................1.4
NTempo Mode or Edit Mode .............1.5
Keyboard Shortcuts .....................1.6
Menu Bar ................................1.7
Toolbar ..................................1.8
Score Area ..............................1.10
Entry Palette ............................1.11
Mixer ...................................1.13
Score Setup .............................1.14
Set Up Audio ............................1.15
Set Up MIDI Devices ....................1.17
Help Options ............................1.19
1.1
Page 12

Startup Screen
When you rst open Notion, you view the Startup screen. This oers a quick way for you to jump
right to the activity you want. You can also access Notion’s menu bar in this view.
The Notion Startup screen.
Start a Piece
Click New Score to create a blank new score.
Open a Score
If you want to open a Notion score that is not in the Recent Files list, select Open. The Open dialog box for your
computer’s operating system displays. Find the le you want to open and select it to begin this session.
Import a File
Another option is to create a brand new Notion score based on the contents of a MusicXML
or MIDI le. Click the Import button, and the Open dialog box for your computer’s
operating system will display. Find the le you want to open and select it.
8 A MusicXML le creates a score with standard notation staves.
8 A MIDI le creates a score with Sequencer Staves (see chapter “Import MIDI File”).
Once you open or create a le, the startup screen no longer displays.
Underneath are:
Recent. These are the names of the last ten scores you opened (newest on top). If you see the name of a score you want
to open, click its name in the list.
Templates. There are ten templates here, with further templates available from File>New From Template... .
1.2
Page 13

Select Your Keyboard Shortcut Set
Most beginning users point-and-click with the mouse to activate and control features.
This is a comfortable way to begin becoming familiar with Notion operations.
As a quicker alternative to mouse clicks alone, you can press keys on your keyboard to activate
or adjust Notion features (keyboard shortcuts). Although most users mix mouse clicks and
keyboard shortcuts, the more keyboard shortcuts you use, the less time it takes to Enter and
edit scores. There are also keyboard shortcuts you can use to play or perform a score.
There are two sets of shortcuts that you can choose to use in Preferences.
8 English (U.S.) set (uses letters for durations, e.g., “E” for eighth note and mouse to dene pitch).
8 International set (uses numbers for durations 6, 7, 8, 9, 0 for 32nd note to whole note).
There are three sets of numberpads:
8 Notion (uses numbers to add intervals to pitches)
8 Finale (adds Finale number-pad durations)
8 Sibelius (adds Sibelius number-pad durations)
Tip: In the Menu bar, under the Help heading, you can click to open a printable Shortcuts
guide as a handy reference to the many keyboard shortcuts available with Notion.
1.3
Page 14
Main Components
With Notion, you work with controls and indicators in two main windows,
plus small temporary windows called “dialog boxes.”
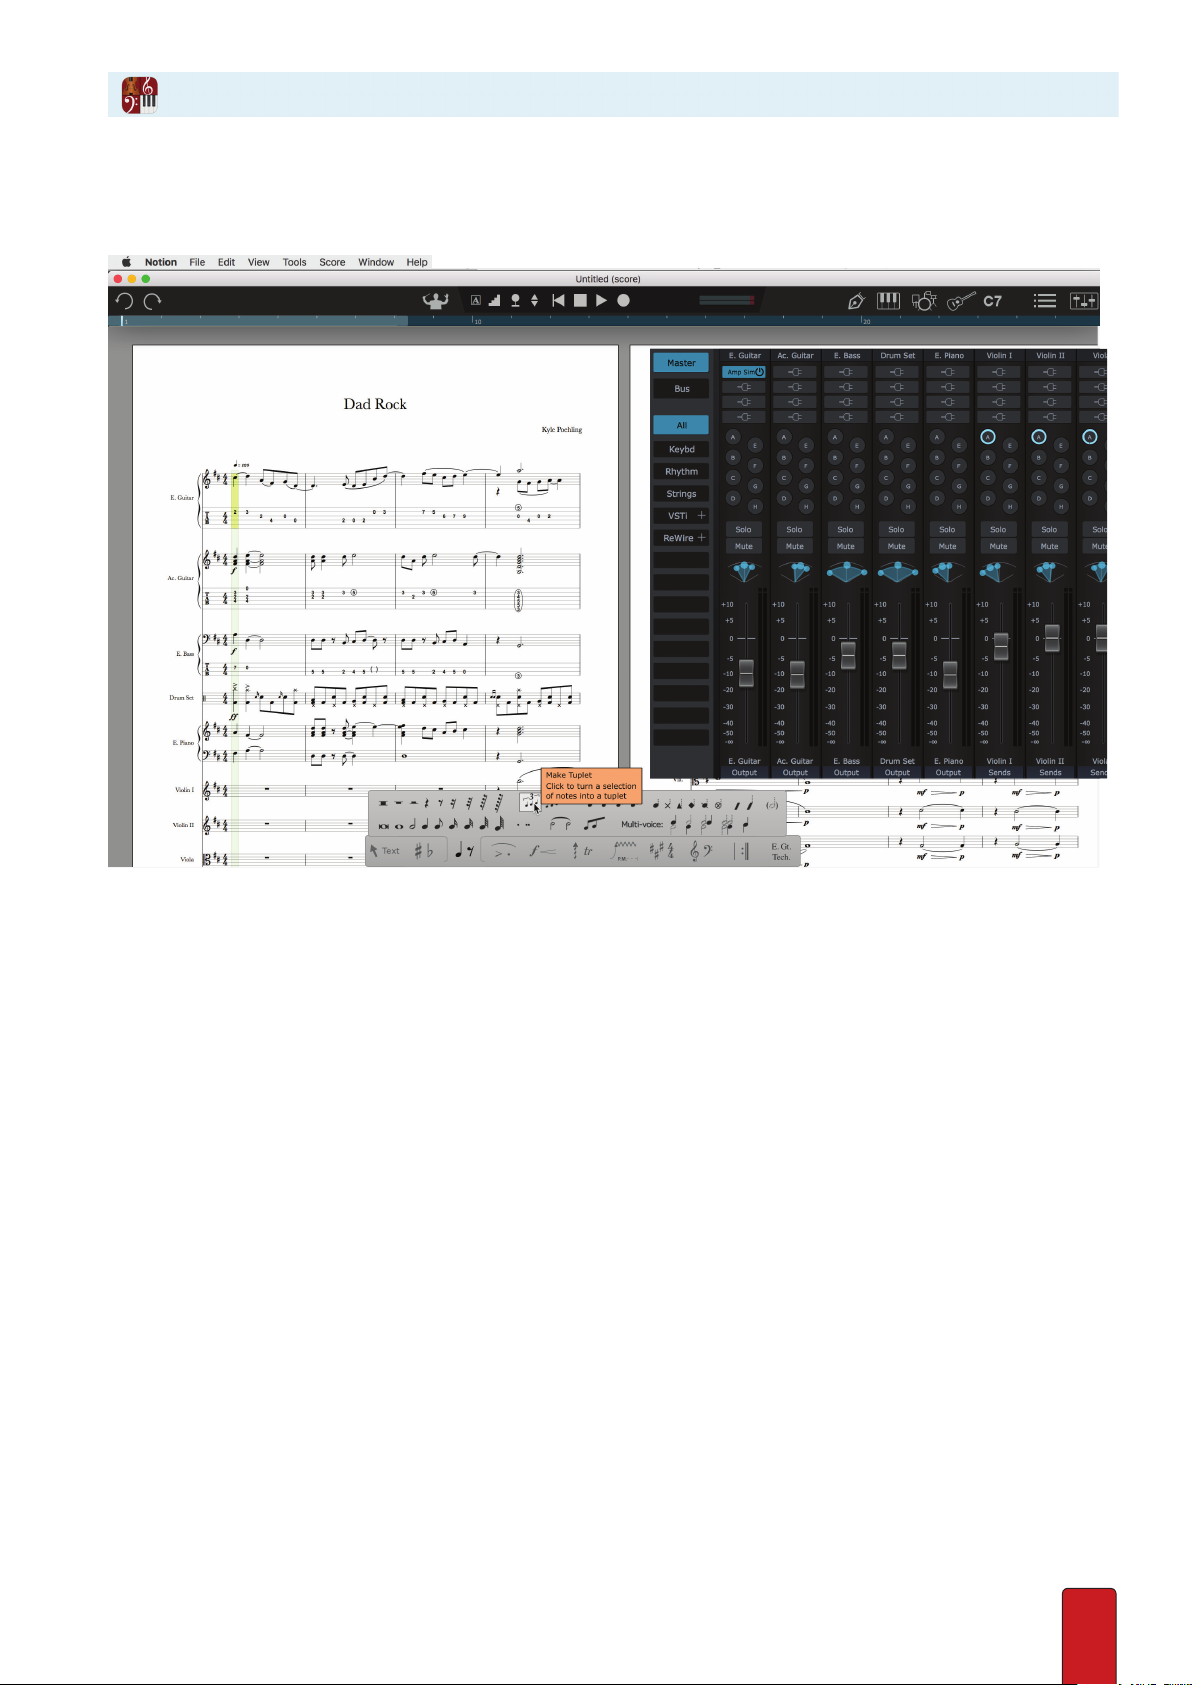
Major Notion components (Mac).
A Menu bar: A thin strip providing text-based access to commonly used Notion features.
B Toolbar: A control panel near the top with various buttons, controls, and indicators.
C Score area: The large area where you view scores and edit notes, rests, and other musical markings.
D Mixer: A separate window with controls for you to adjust audio parameters for individual instruments, settings for
mixing eects/VSTs, and sending audio to external equipment.
E Cursor: In the score area, you view the cursor in various shapes, including as a marker across the staves in a system (as
in the picture), as a pointer (also known as the Selection Tool), or with the representation of a symbol you can use to
edit the score (the Music Cursor).
F Entry Palette: A moveable panel with graphics-based access to common Notion score markings.
G Tooltip: When you hover your cursor over a button, control, or Entry Palette item, a small popup box appears with
summary information. In the box, (A) bold text identies the item, (B) text in brackets identies its keyboard shortcut
(if one exists), and, where helpful, (C) a short explanation.
H Channel strip: Each rectangular box in the Mixer represents an instrument or sta in the score.
1.4
Page 15

Menu Bar
With the Menu Bar, you click text to access commonly used features. In this thin strip are a few
headings. When you click a heading, a drop-down menu appears with more options.
Windows
At the far right appear standard Windows buttons to minimize, restore, and quit the program.
Press F11 for toggle full screen window
Mac
Note the three buttons on the left of the score window, to close the le, minimise the window, or make the window full
screen. To maximise the window size without going full screen, hold down Opt, and then click the green button
As you work with Menu Bar menus, keep in mind:
- By convention, this document and instructions in Notion show menu
selections with the “>” character between the options you select. For
example, the highlighted menu item in the example to the right is:
View > Zoom Out.
- If a keyboard shortcut exists for a menu item, you see a reminder of
these keys on the right side of the menu. In the example, the last four
menu items have keyboard shortcut equivalents.
- Menu items in gray are currently unavailable. Nothing happens if
you click on them. These unavailable features appear in the menu
to remind you where they are located so you can quickly nd these
options when they do become available.
1.5
Page 16
NTempo (Performance) Mode or Edit Mode
Notion operates in one of two modes of operation:
8 NTempo mode – This is Notion’s live-performance mode. This way, you can perform, navigate, and experiment with
no chance of accidentally editing the score.
8 Edit mode – Enables you to create and edit the score.
A number of features in Notion are available in both modes, and some features are available
only in one or the other mode. If a certain feature you want does not seem to be available,
check to see if you are in the correct operating mode that particular feature requires.
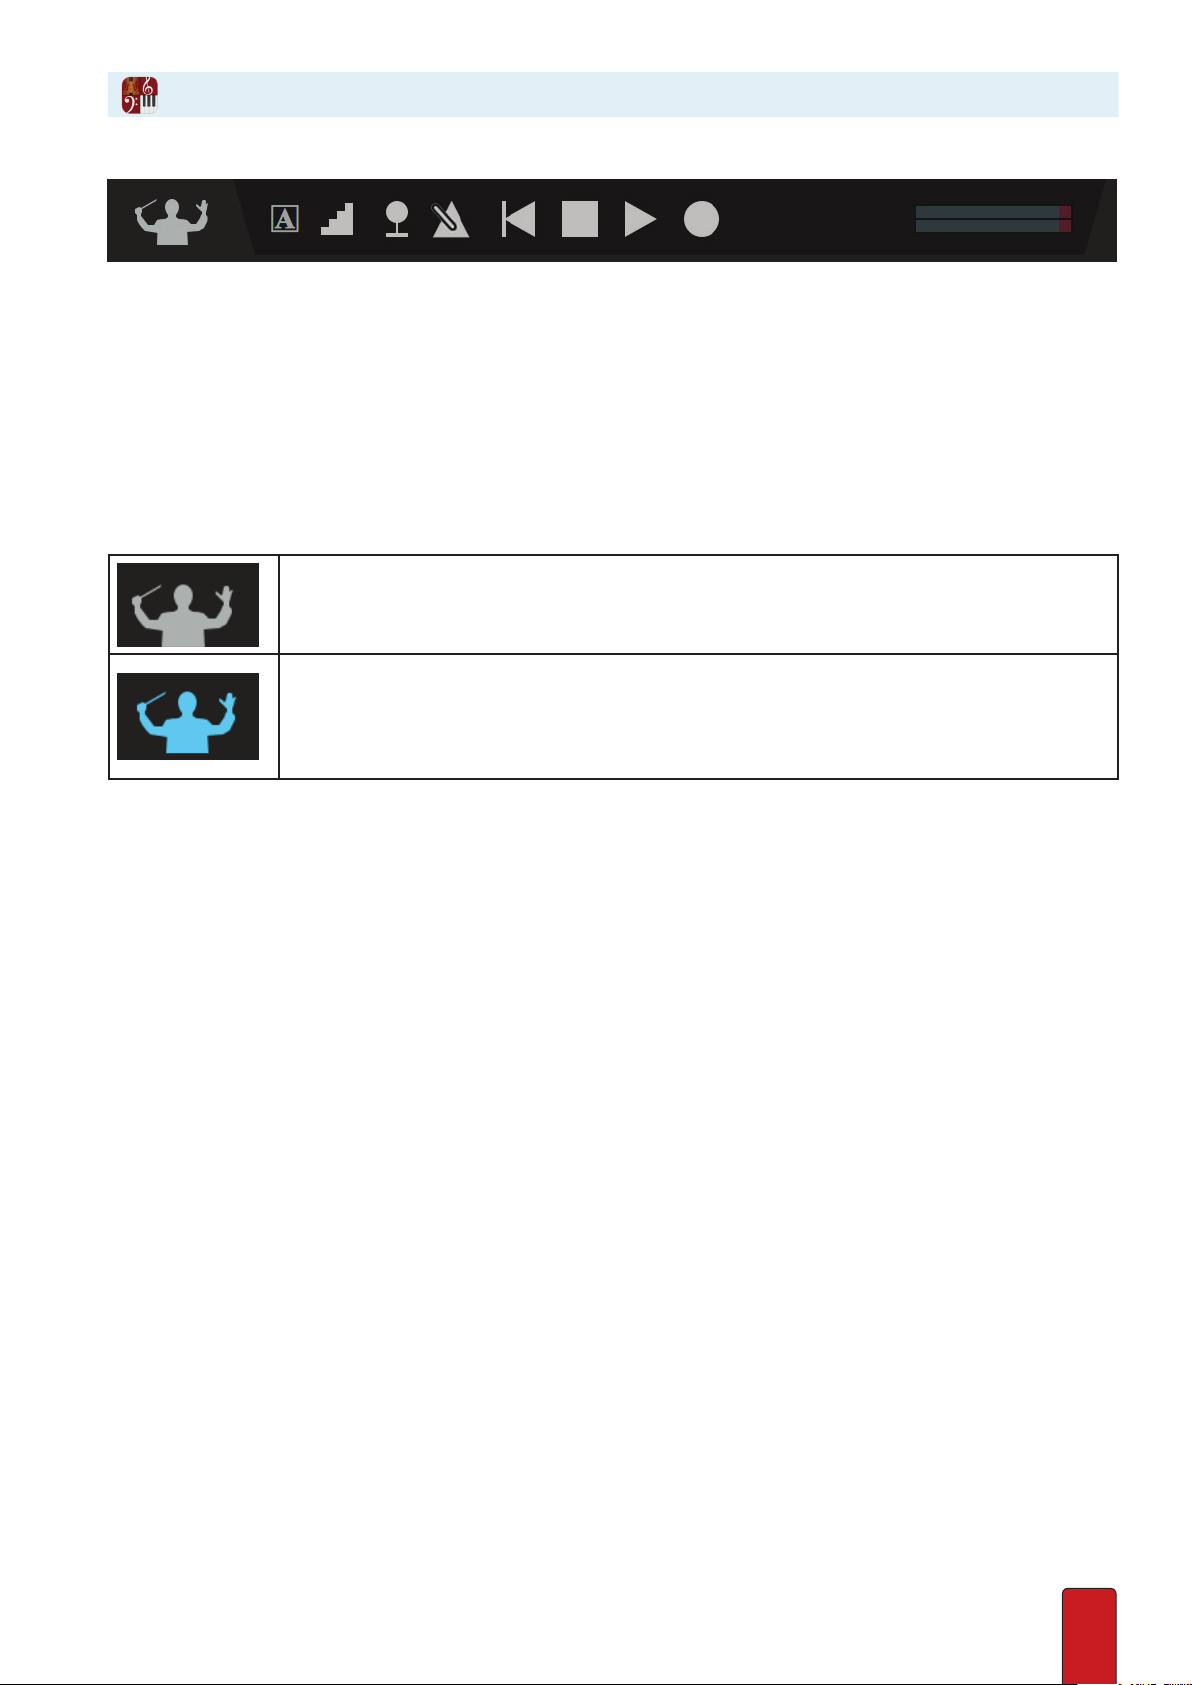
Switch Between Modes
In the toolbar click the NTempo button (or Shift+Enter) to switch between the mode you want.
A grey conductor shows you are currently in Edit mode.
A blue conductor shows you are currently in NTempo mode.
1.6
Page 17
Toolbar
The Toolbar
The icons located in the toolbar allow the user easy access to tools frequently used.
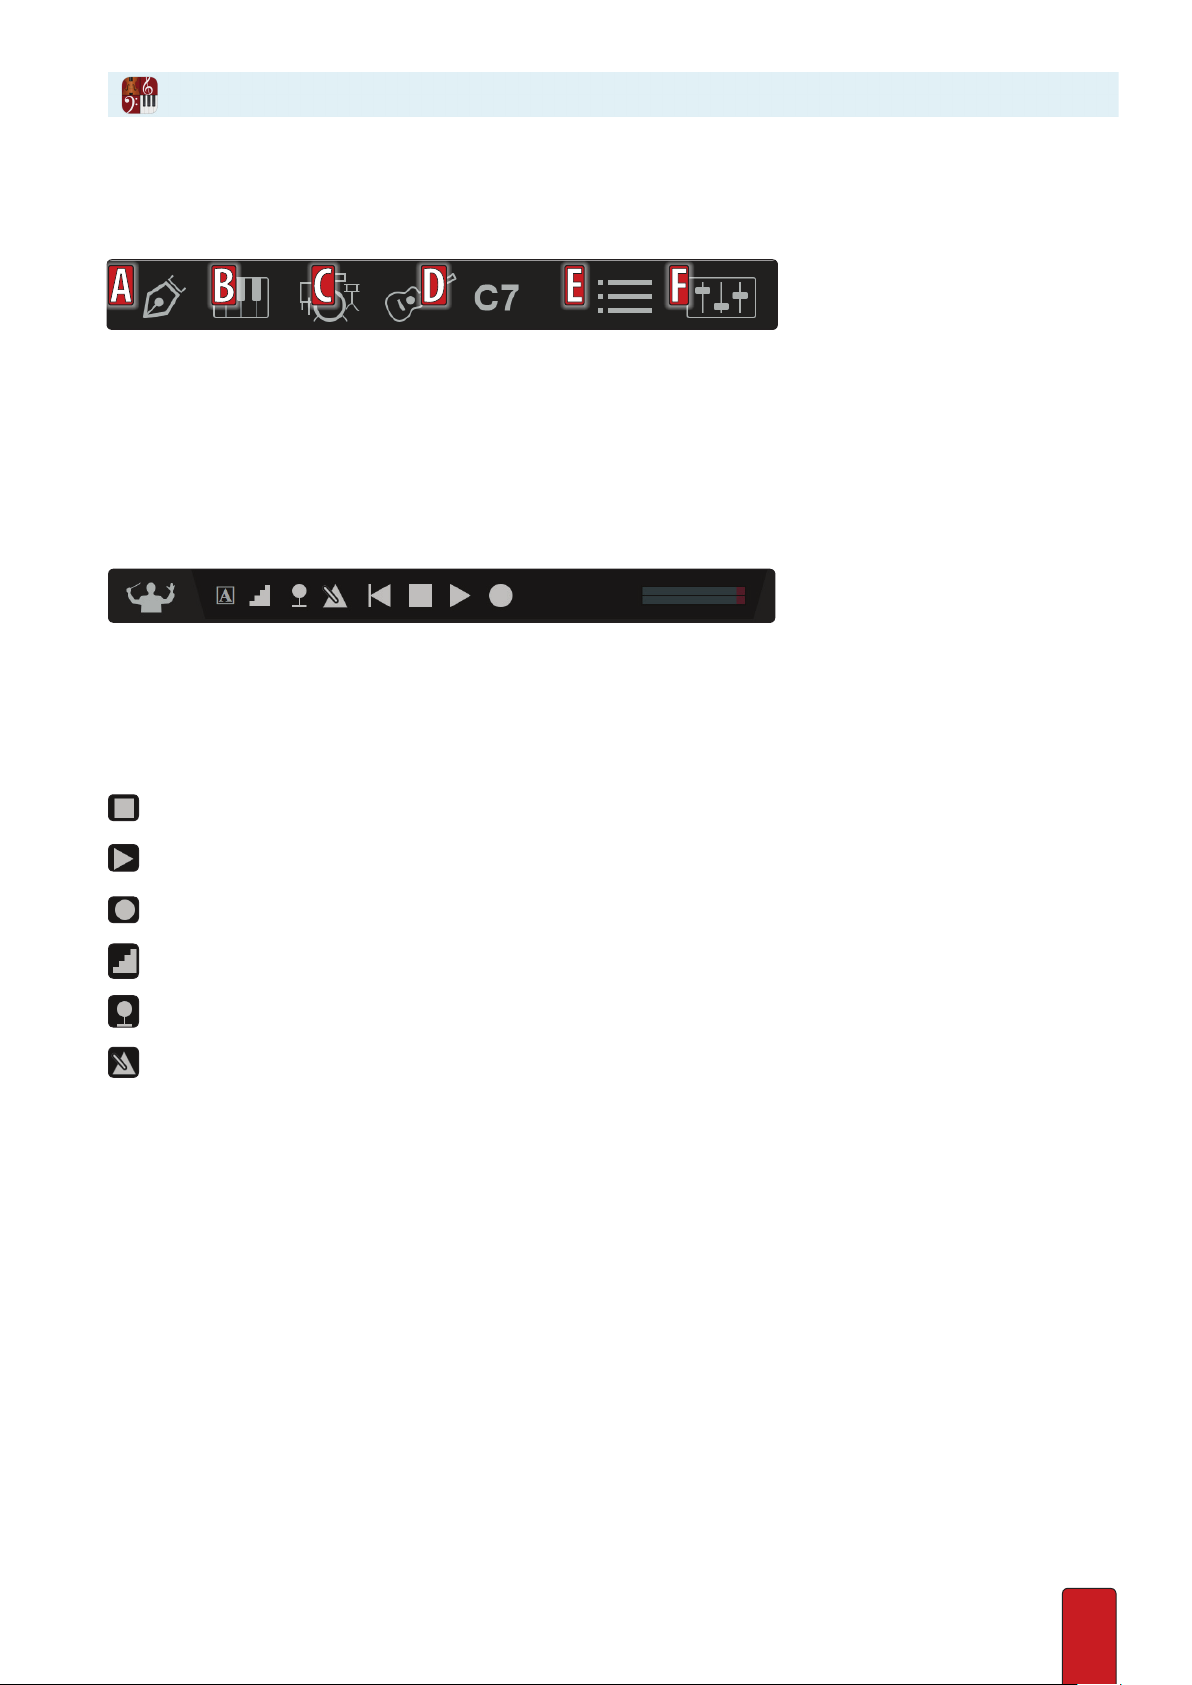
A - Handwriting Entry. Enter notes either directly into the Score Area, or turn on the optional handwriting zoom area
B - Virtual Keyboard. Enter notes and chords or audition a melody on this interactive keyboard.
C - Virtual Drumpad. Enter the desired drum or pitch while in step-time entry mode.
D - Virtual Fretboard. Enter notes and chords or audition a melody with the interactive fretboard.
E - Chord Library. Select, create and insert chords or chord diagrams into you score
F - Score Setup. Click this button so you can quickly add, change, edit or remove a sta in your score.
G - Mixer. Click this button to open the audio mixer console so you can adjust individual
instrument audio, edit eects, route output to external equipment, and more.
The Transport
Optional Buttons for Common Tasks
Rewind – Click once to return to the spot where you last started. Click twice to return to the beginning.
Stop – Halt playback but stay at that location.
Play – Have Notion play your score using metronome marks in your score to determine tempo.
Real-Time Record – Click to have Notion record notation as you play a MIDI device.
Step-Time Record – Click to Enter notation from a MIDI device a step at a time.
Also can be used with the fretboard.
Tempo Overdub – Using the NTempo feature specify and edit tempo, down to individual beats. Can be used to
reduce the number of metronome marks in a score.
Metronome – Turn metronome on/o in playback or recording
1.7
Page 18
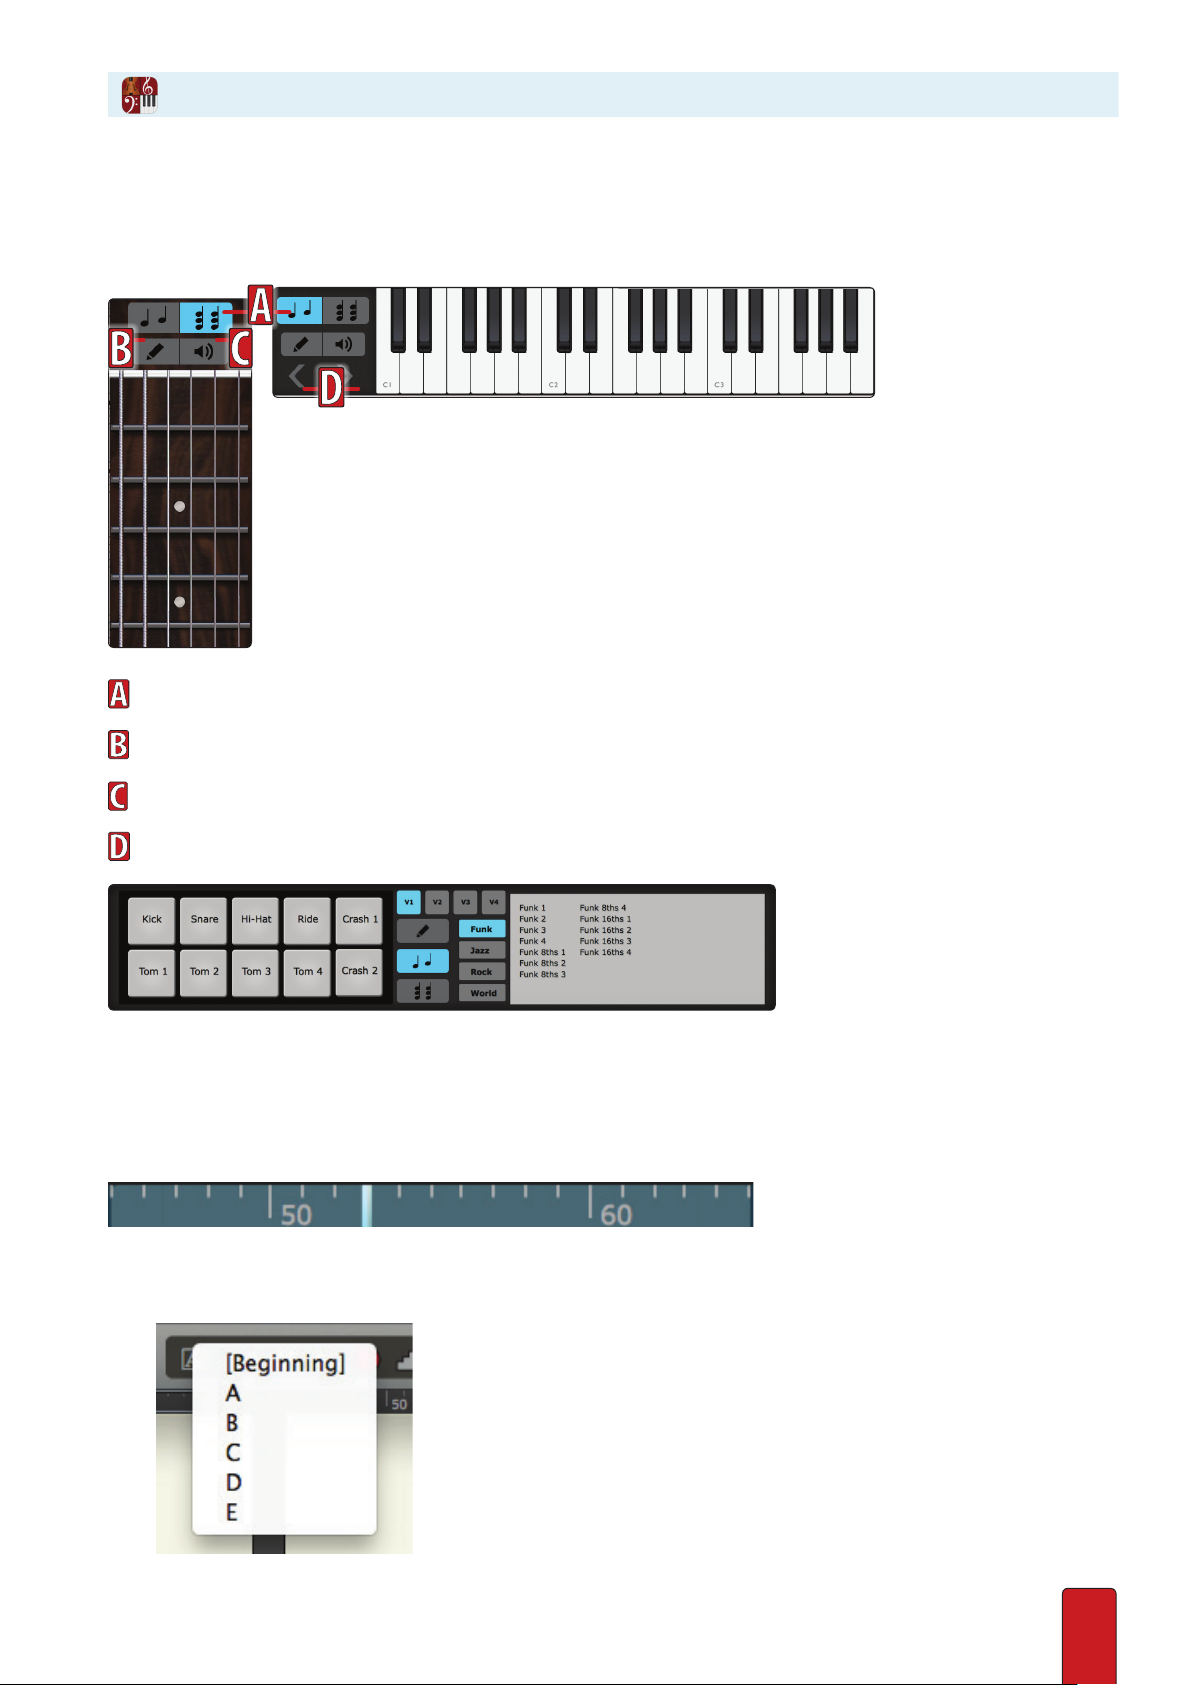
Virtual Instruments
The virtual instruments allow you to Enter or audition notes/chords by selecting a duration and clicking the note on the
instrument to either audition or Enter the note.
Choose whether you’d like to Enter music as single note (melody)
or multiple notes (chord). If entering chords, hit the Enter key to repeat the previous chord
Choose the pencil icon to Enter notes as you select them on the virtual instrument.
Choose the speaker icon to audition notes on the virtual instrument.
Select the octave you’d like to Enter/audition notes (virtual keyboard only).
The virtual drumpad works just like the other virtual instruments, with the addition of the drum library. To use
the drum library, select a style (funk, jazz, rock, or world), choose a pattern, and click in the score to place it.
Timeline - Numbers on the timeline represent measure numbers in the score. A thin red line indicates the
measure where the cursor or marker is at the moment, and it is within a box representing the measures
you can currently see onscreen. You can click the timeline to jump to a general segment of the score.
Rehearsal Marks – Click the [A] rehearsal-mark icon on the transport to display a list of the rehearsal marks in the
current score. Click an item in the list to jump to that location. You can also click F9 to open the rehearsal mark list.
◙ Rehearsals menu.
1.8
Page 19

Score Area
The largest section of the Notion window is the score area. Here you Enter and edit notes, rests, lyrics,
and other musical symbols onto a score. Although you can have multiple scores open, each one appears
in a separate window. Notion supports dierent page views you select on a per-score basis.
Cursor Used Three Dierent Ways
When you are in the score area, you will see the cursor take various shapes and colors depending on your current activity:
8 The Pointer – The standard mouse cursor appears in both NTempo and Edit modes.
> In NTempo mode, you use the Pointer for such tasks as making Menu bar selections and altering Mixer settings.
> In Edit mode, you also use the Pointer for editing tasks, such as choosing a score item from the Entry Palette or
selecting or highlighting score objects.
8 Marker – A bar that appears on the same beat on all staves in a system. The bar’s color (see examples below) gives
an at-a-glance indication of its current use.
8 The Music Cursor – A special cursor that only appears in the score area and only when you are in Edit mode. You
place a symbol (such as a note or a rest) on the Music Cursor to add it to the score.
Markers
A marker (a thin, semi-transparent, colored bar) appears in the score area across
all staves in a system. The ones you’ll encounter the most include:
8 The playback marker, a dark green bar, indicates your current location in the score during playback.
8 The editing marker, a light gray bar, indicates your current cursor location during editing. The actual place where
you clicked displays a box in a light yellow color.
8 An orange version of the playback marker alerts you if you are currently in a vamp.
Playback marker Editing marker Vamp marker
Borders Around the Playback Marker
At times the playback marker will have a double border around it and at other times it won’t.
8 A double border around the playback marker tells you at a glance that the software is ready to play (click the Play
button or Spacebar) or perform (begin tapping an NTempo key).
8 If the playback marker does not have a double border around it, you instantly know you are already in the midst
of playback. If you are performing, yet the marker isn’t moving, you may be in a fermata, or the software is simply
waiting for your next NTempo key press.
1.9
Page 20
Entry Palette
Click to Access Commonly Used Score Symbols
Only available in Edit mode, the Entry Palette enables you to access markings you can place on your score by clicking an
option appearing in popup menus. Most of the time, clicking on a graphic or text places a representation of that item
on your Music Cursor. A few options, such as key signature, open up a separate dialog box with properties you can edit.
For exibility, markings and features in the Entry Palette can also be reached by
the Menu Bar or keyboard shortcut, and in many cases, both.
Dock the Palette
The Palette automatically appears at the bottom of the score area when you switch from NTempo
Mode to Edit mode, if you have a checkmark at Window > Show Palette in the Menu bar. With this
setting, the Palette is “docked”; it will always appear in Edit mode at this one location. It will hide
when you switch out of Edit mode to NTempo mode or when you display Score Setup.
Undock the Palette
When you remove the checkmark at Window > Show Palette in the Menu bar, the Entry Palette does
not automatically show when you rst Enter Edit mode. You have the Palette appear, when you do
not have anything highlighted or click-selected, by right-clicking anywhere in the score area.
If the undocked Entry Palette is already visible, then a right-click moves the Palette closer to the spot where
you clicked with the Pointer in the score area. This way, the Palette is never far away from where you are
currently working or can be eortlessly repositioned around the score area without dragging.
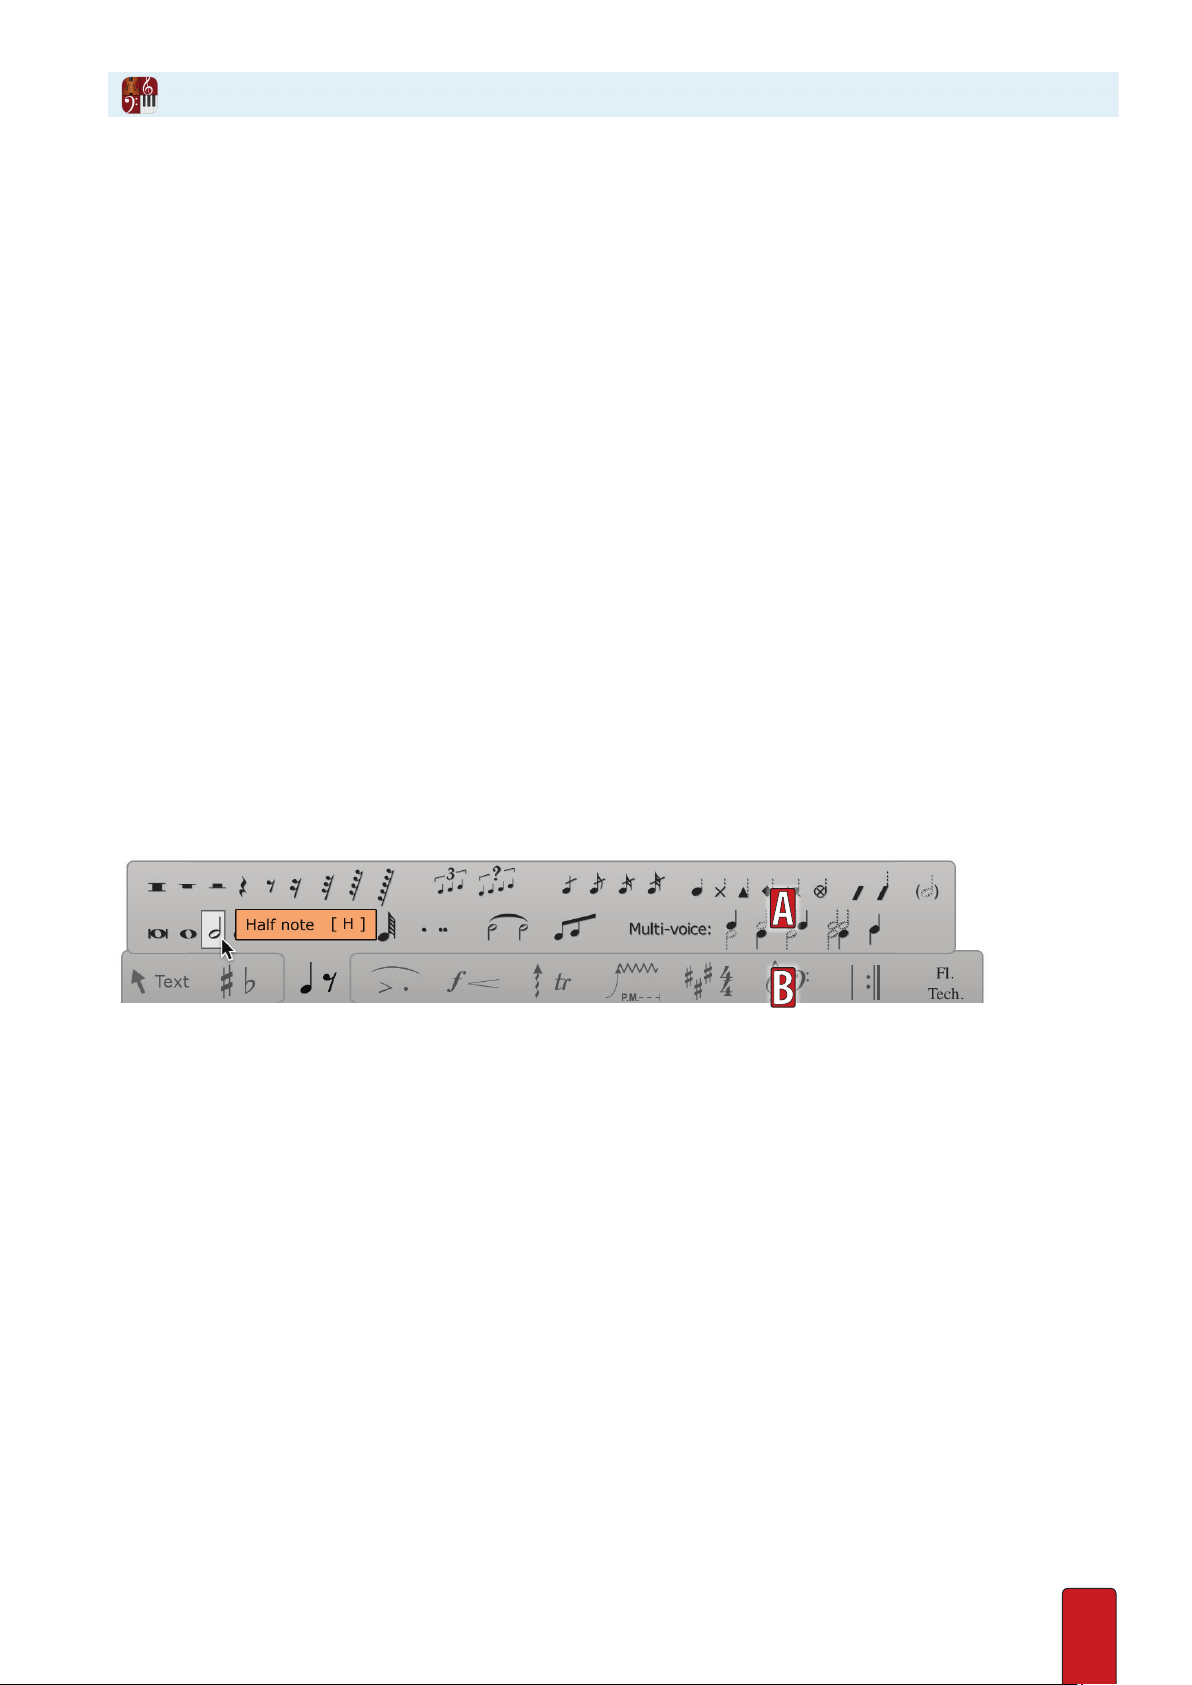
Two Separate Tiers
The Palette has two tiers:
A An upper tier containing score markings and a few dialog boxes (such as Time Signature).
B A lower tier grouping similar markings together. The box on the far right contains instrument-specic markings and
will change automatically depending on which sta is selected.
The two different tiers of the Palette.
1.10
Page 21
Hovering and Clicking
To access options, simply move your cursor over a visible graphic pane, and the upper tier automatically opens.
Moving your cursor to a dierent pane automatically closes the current menu of options
and opens a dierent one.
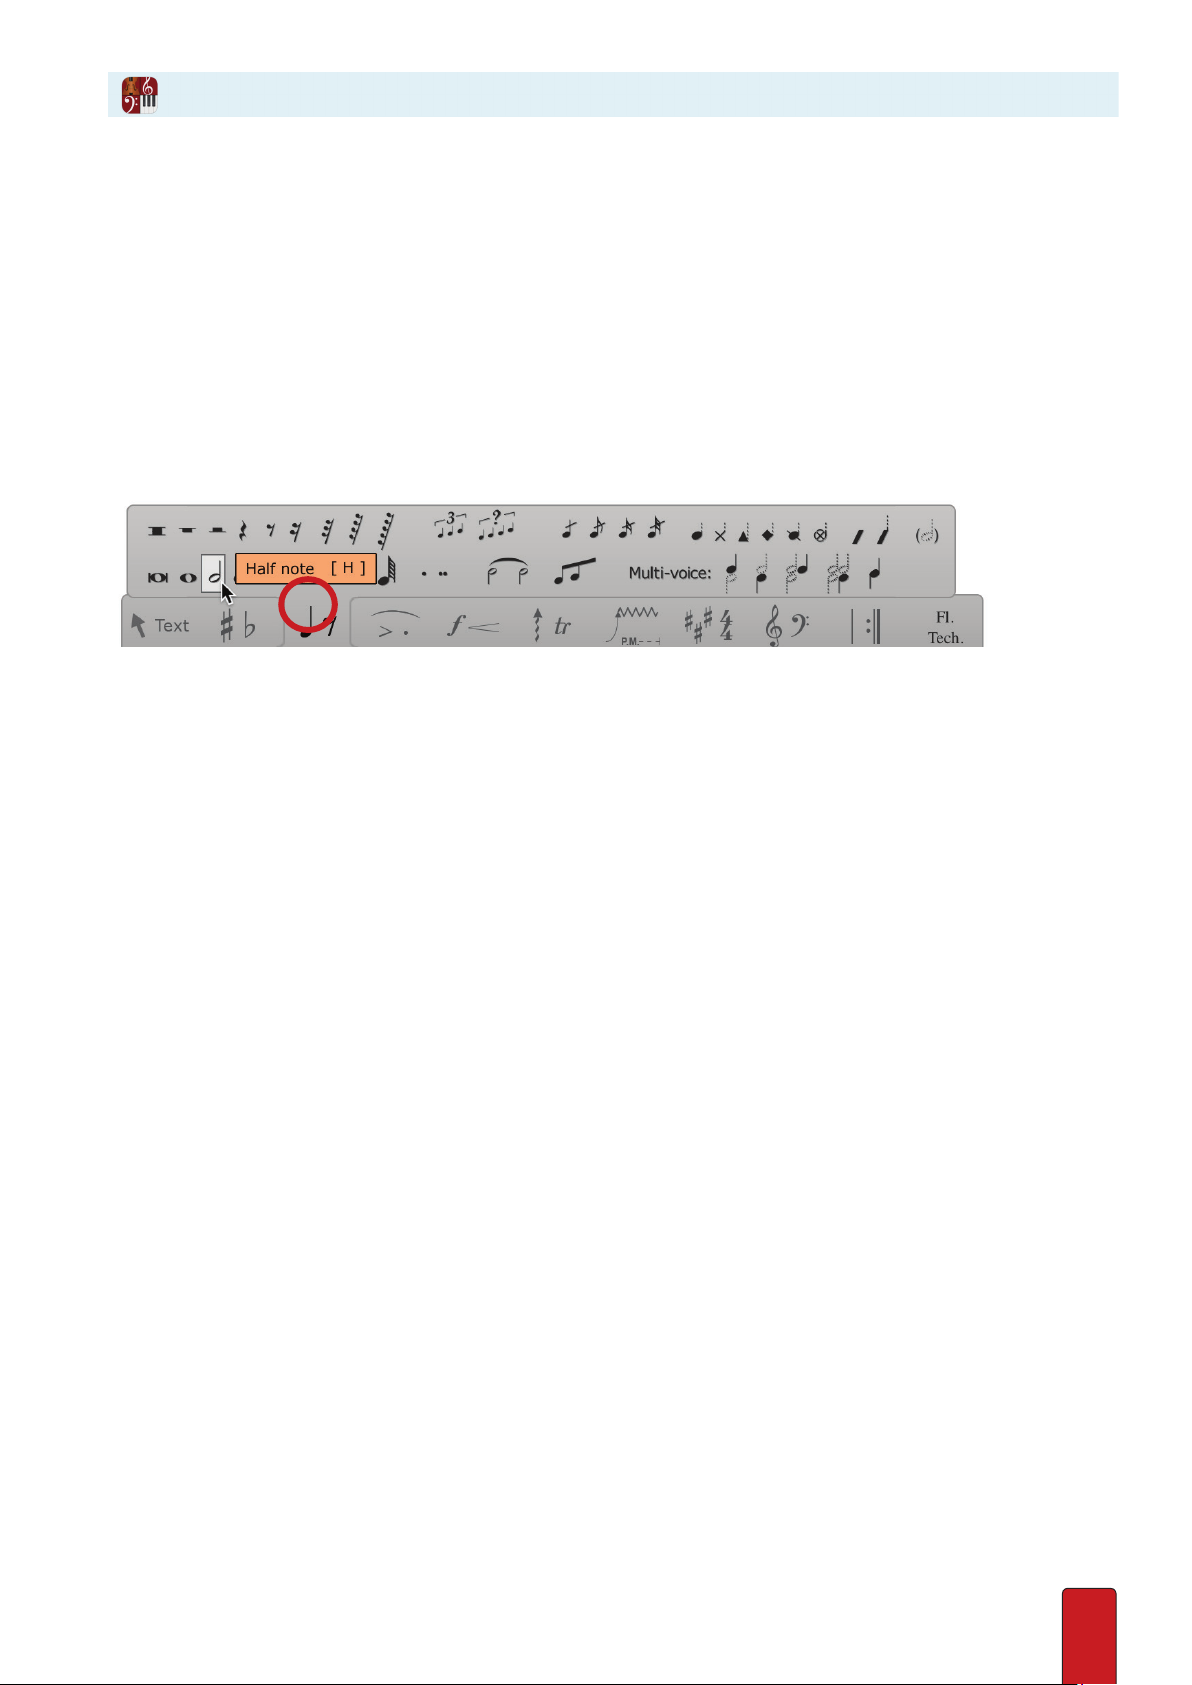
To lock the upper tier open, just click once on any bottom-tier pane.
Keeping a group of options locked open is especially useful for such activities as Entering notes
and rests into a score. Not only does this save time accessing dierent options o the same menu,
locking also enables you to combine (some) multiple options as a single unit. For example, once
you lock the notes/rests pane open (the third from the left), you can click the graphic for a single
note (such as quarter note), click an augmentation dot, and click the lower voice (multi-voice)
graphic. All three characteristics are now ready to be placed as a single note into your score.
Click once anywhere in the pane (marked by the red circle) to lock open the menu of options above it.
To unlock, do one of the following:
8 Click a dierent pane. This closes the rst menu and locks open the menu for the pane you just clicked; OR
8 Click the pane a second time. This closes its menu and restores the upper tier’s standard hovering operation.
Nomenclature
In this guide, we identify an bottom tier’s pane by its position, such as third from left, middle pane, or last pane.
1.11
Page 22

Pane Contents
Pane Contents
Pane Contents
Pointer and textcentric markings
Accidentals
Note/rest entry
Articulations
Dynamic marks
Instrument-specic
score markings
Chord library
Fretted-instrument
techniques
Score-level markings
Clefs and octave
transpositions
Barlines, Repeats
and Cuts
1.12
Page 23
Mixer
To control audio output, Notion provides an audio mixer. Created to resemble a hardware console, you
access this virtual mixing board by opening a separate window in either Edit mode or NTempo mode.
Open the Mixer
To display the Mixer window, complete one of the following:
8 Click the button at the left end of the toolbar, or
8 Press the Mixer open/close keyboard shortcut. Windows: Ctrl + / ; Mac: + / ; OR
8 Go to the Menu bar and select View > Show > Show Mixer
The Mixer opens on your monitor in a separate window. You can hear how
changing the settings in the Mixer aect playback in real time.
You can move the Mixer around your monitor by dragging on its title bar. You can resize the
window east-west but not north-south. On a Mac, you can adjust its window size by dragging
its bottom right corner. In Windows, you can drag the right or left window edge.
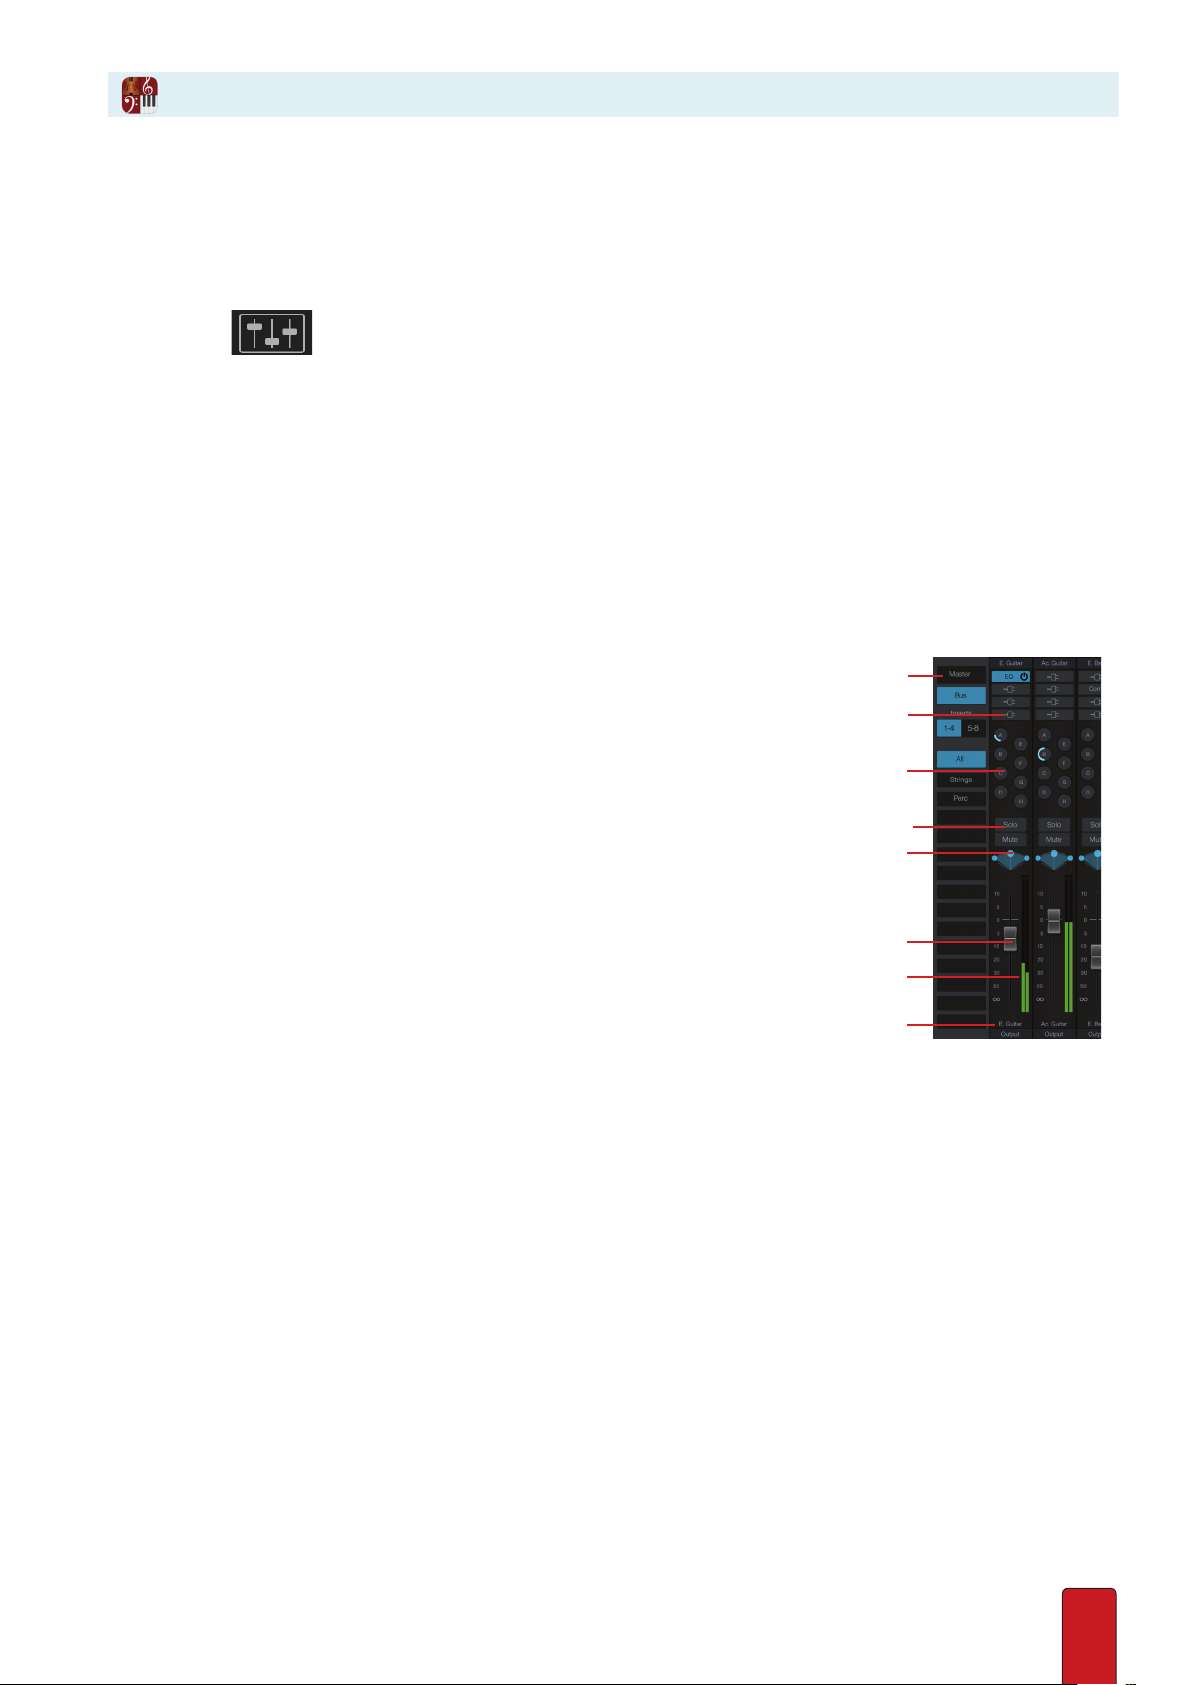
Quick Tour
Details on the Mixer appear in Chapter 5. Its key components include:
A Each rectangular box in the mixer is a channel strip or bus strip.
B The most prominent feature of each channel strip or bus is a fader—a sliding volume
control—near the bottom.
C Individual instrument volumes, in stereo, with a peak meter using color-coded bars.
D Controls for panning (the relative left and right positions in stereo output).
E Controls to quickly isolate (Solo) or silence (Mute) one or more instruments.
F Controls to send individual instrument sounds out to buses.
G Inserts for Virtual Studio Technology (VST) eects modules you own.
H Buttons to quickly nd specic groups of instruments and (on the right-hand side):
hide/show the buses and Master strip.
A labeled view of the Mixer.
H
G
F
E
D
Advanced users can click Output buttons at the very bottom of channel strips to assign
instruments to separate digital channels when connecting a computer to
an external mixing board or production equipment.
B
C
A
1.13
Page 24

Score Setup
One other Notion component you will use often is Score Setup. This semi-transparent overlay on
top of the score area enables you to very quickly add, move, change, and delete staves.
You must be in Edit mode to use Score Setup. There are various ways of opening it up. You can:
8 Click the button in the toolbar, or
8 Go to the Menu bar and select Score > Setup, or
8 Use the keyboard shortcut of Windows: Ctrl + T; Mac: + T.
Score Setup overlay over the score area (Mac).
C
B
A
To add a new instrument sta to your score:
A Select a sound source, such as Notion’s built-in sounds or a third-party library. You only see sources you have installed
on your computer, so your list may be shorter than the one shown above.
B After selecting the sound source, hover over an instrument family or click to lock it open. Click again to unlock.
C In a menu of available instruments within a family, select a particular instrument.
There is one exception: if you want to use a VSTi as a sound source other than EWQL
Symphonic Orchestra, Miroslav Philharmonik, or Vienna Symphonic Library, then:
A Click the generic VST Instruments option.
B Click the name of the VSTi you want to use.
C Verify by clicking the VSTi name; you assign instruments to channels inside the VSTi.
Score Setup also displays separate buttons to the left of measure one in each sta. These
buttons enable you to hide/show, delete, or change the appearance of individual staves.
To close Score Setup you can:
8 Click the Exit Score Setup button at the top, or
8 Press the Esc key, or
8 Click the button in the toolbar, or
8 Press the keyboard shortcut: Windows: Ctrl + T; Mac: + T.
1.14
Page 25
Set Up Audio
Troubleshoot Notion Sounds
In rare situations after an installation or major upgrade, Notion may not be able to work with the recorded samples
needed to produce instrument sounds in playback. Either you hear no instruments or you only hear a piano for each
instrument. Go to the Menu Bar and select
Windows: File > Preferences; Mac: Notion > Preferences.
In the dialog box, click the Audio Tab. Then click the Locate Samples button. Although the software
can take several minutes to complete this procedure, this often corrects an audio problem.
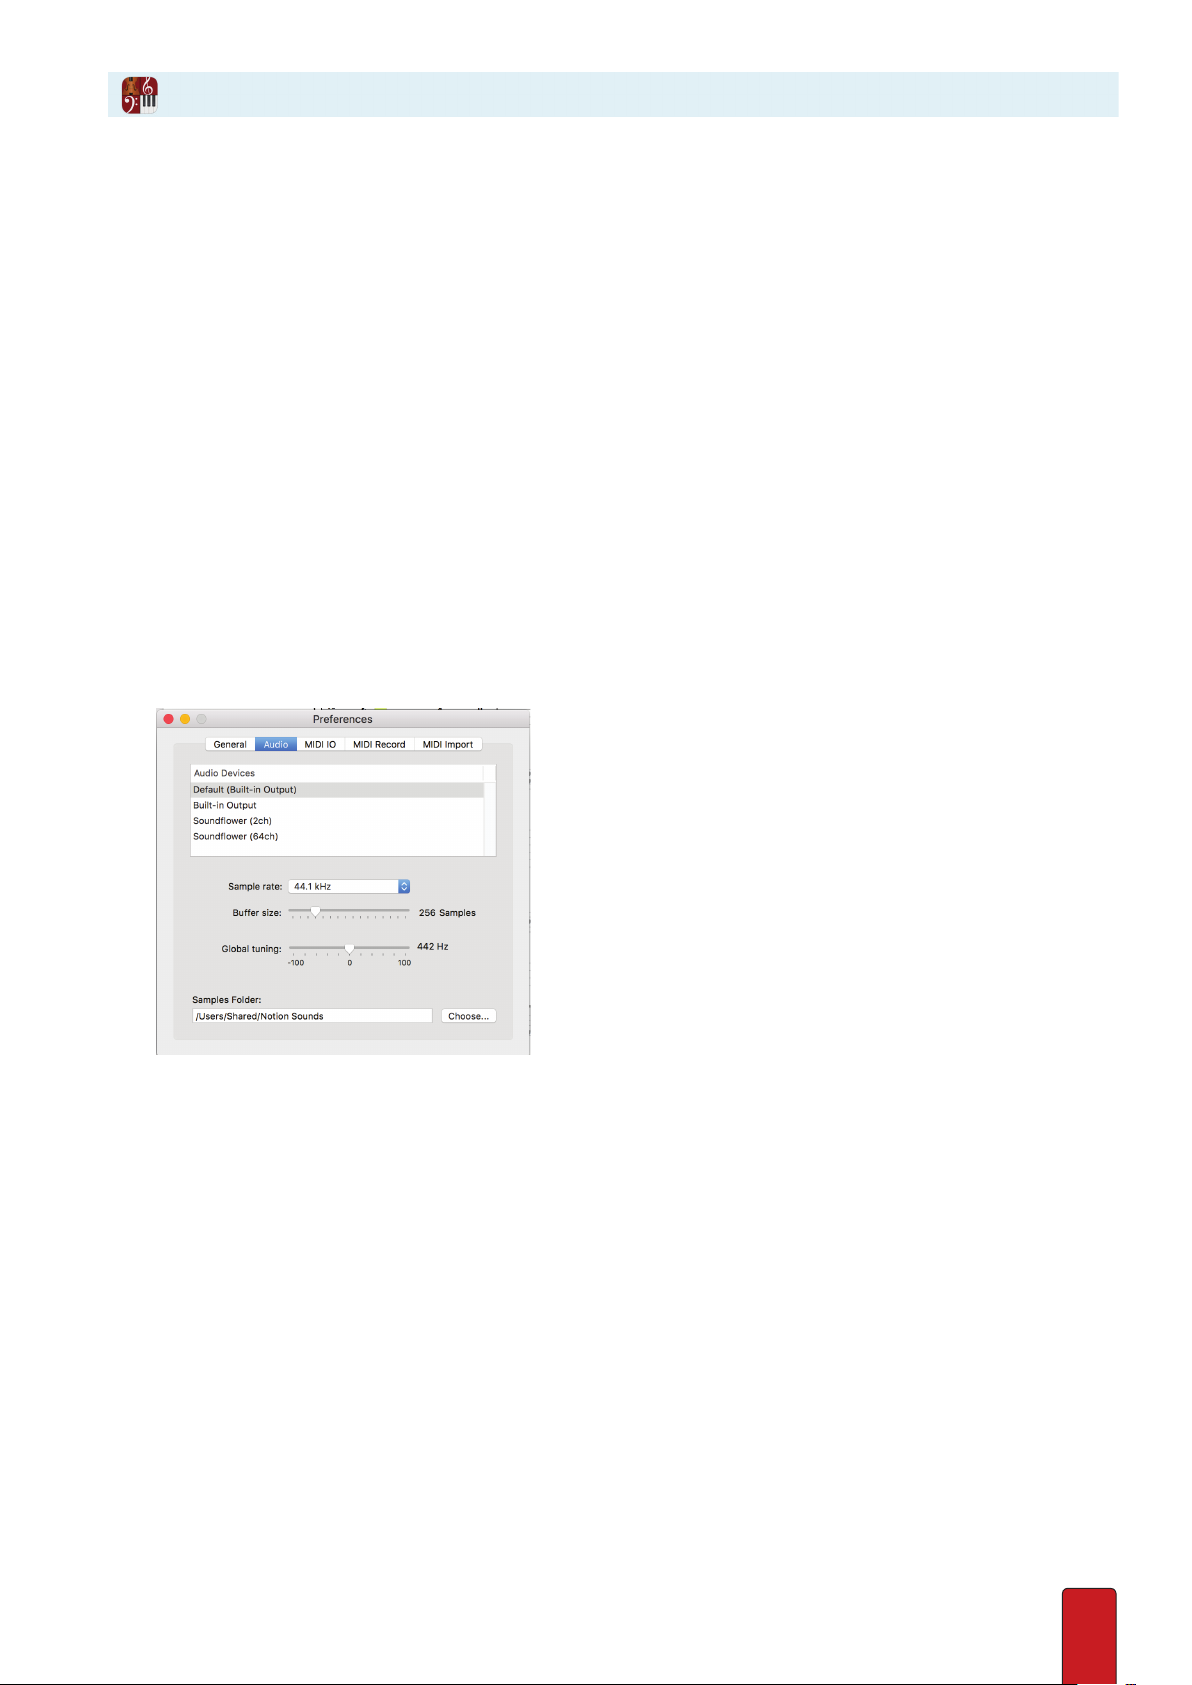
Set Up Audio
An installation of Notion on most computers sets up the audio automatically. But in situations where you use an audio
interface, you need to inform the software which hardware audio device you want to use for playback. Logically,
the devices you want to use must already be congured in the operating system of the computer you’re using.
On Windows Systems:
1. Go to the Menu bar and select File > Preferences. (Or Ctrl+,)
» A dialog box opens.
2. Click the Audio Tab.
» When you rst view the Tab, the device your computer currently uses for playback is already selected. If the active
device is an ASIO device, and a Windows control panel exists for this device, you can click the Control Panel button
to open that dialog box for updating.
◙ Audio Tab in Preferences (Mac).
1.15
Page 26
1. If the currently active device is not the one you want to use for playback, click one of the other radio buttons on
the left (Note: The Windows Default is the device you have currently congured in the Windows control panel for
audio; WASAPI is available on Vista and Windows 7 platforms only).
» Descriptors of all devices on your computer appear in the box on the right as you click dierent device-type
options.
2. In the large box on the right, click the descriptor for the particular device you want to use, even if there is only one
option listed. For DirectSound and WASAPI, only devices installed and working appear. For ASIO, all drivers for ASIO
devices – whether in operation or not – appear.
» An information dialog box displays (and automatically closes), alerting you that your computer is opening this
item for use with Notion. The software alerts you if a device cannot be opened (for example, an ASIO driver that
doesn’t have a corresponding working device).
3. To save your change, click OK.
» For best results, close and reopen Notion.
On Mac Systems:
If you want, you can set up an audio device for Notion that is totally dierent
than the default audio device for your computer.
1. Go to the Menu bar and select Notion > Preferences (or Cmd+,).
» A dialog box opens.
2. Click the Audio Tab.
» Underneath the Audio Devices heading, the device your computer currently uses for playback is in parentheses
beside the text “Default Audio Device.”
3. Decide what you want to do:
> If the device in parentheses is what you want for Notion output, just ensure the Default Audio Device line is
highlighted and close Preferences.
> If you want a dierent device to be the destination for Notion output, highlight that item in the list and close
Preferences. You now have a default for Notion output that is dierent than the default output for other
applications on your computer.
> If you want a dierent device to be the default audio device for the computer and Notion, close Preferences, and
set up the other device in the Mac System Preferences (Sound) as the default audio device for your Mac. Then
return to Notion > Preferences, highlight the Default Audio Device line, and close Preferences.
4. To nish, close the dialog box.
» For best results, close and reopen Notion.
1.16
Page 27

Set Up MIDI Devices
You have the option in Notion of setting up external MIDI devices as an alternative to a computer
keyboard or as sound sources to supplement Notion’s built-in sound library.
Set up a MIDI Keyboard
You have the option in Notion of using an external MIDI keyboard to:
8 Perform scores, instead of using a computer keyboard.
8 Use Live Play to play anything you want live using a Notion instrument’s sounds. With this free-form feature, only
available with a MIDI keyboard, you can play solo or play along with a Notion score.
8 Use a MIDI keyboard to input notation into a score (MIDI input).
The major advantage of using a MIDI keyboard (instead of a computer keyboard) with NTempo is that most models are
velocity sensitive. Therefore, you can control volume as well as tempo (the harder the tapping, the louder the sound).
1. Go to the Menu bar and select: Windows: File > Preferences; Mac: Notion > Preferences.
» A preferences dialog box opens.
◙ Preference dialog box, General Tab, top portion only.
2. With Echo MIDI input selected, you can play anything on the MIDI keyboard and hear it performed by Notion as
long as your MIDI keyboard is sending information that is not on the channel you specied in NTempo Channel. If
you want, you can disable the Live Play feature completely by clearing this checkbox.
3. At NTempo Channel on the MIDI IO Tab, you specify which MIDI channel will be reserved for performing with
NTempo features. All other channels enable the Live Play feature. If you are unsure how to switch MIDI send
channels on your MIDI keyboard, ensure there’s a “1” in this drop-down list, as most MIDI instrument output defaults
to Channel 1. Now you will be able to perform scores but not use Live Play. When you want to switch to Live Play,
select another channel (or None).
4. Unfortunately, MIDI keyboard manufacturers vary widely with respect to how they implement velocity. You can
reset the NTempo dynamics slider if you get too little or too much variation in volume with changes in velocity on
your particular keyboard model. With too low a setting (too far left), only score dynamics are read; velocity does not
seem to aect the volume of sound you hear. With too high a setting (too far right), you produce more variation in
dynamics than you intend or can control in a comforTable and natural manner.
5. Click the MIDI IO Tab.
1.17
Page 28
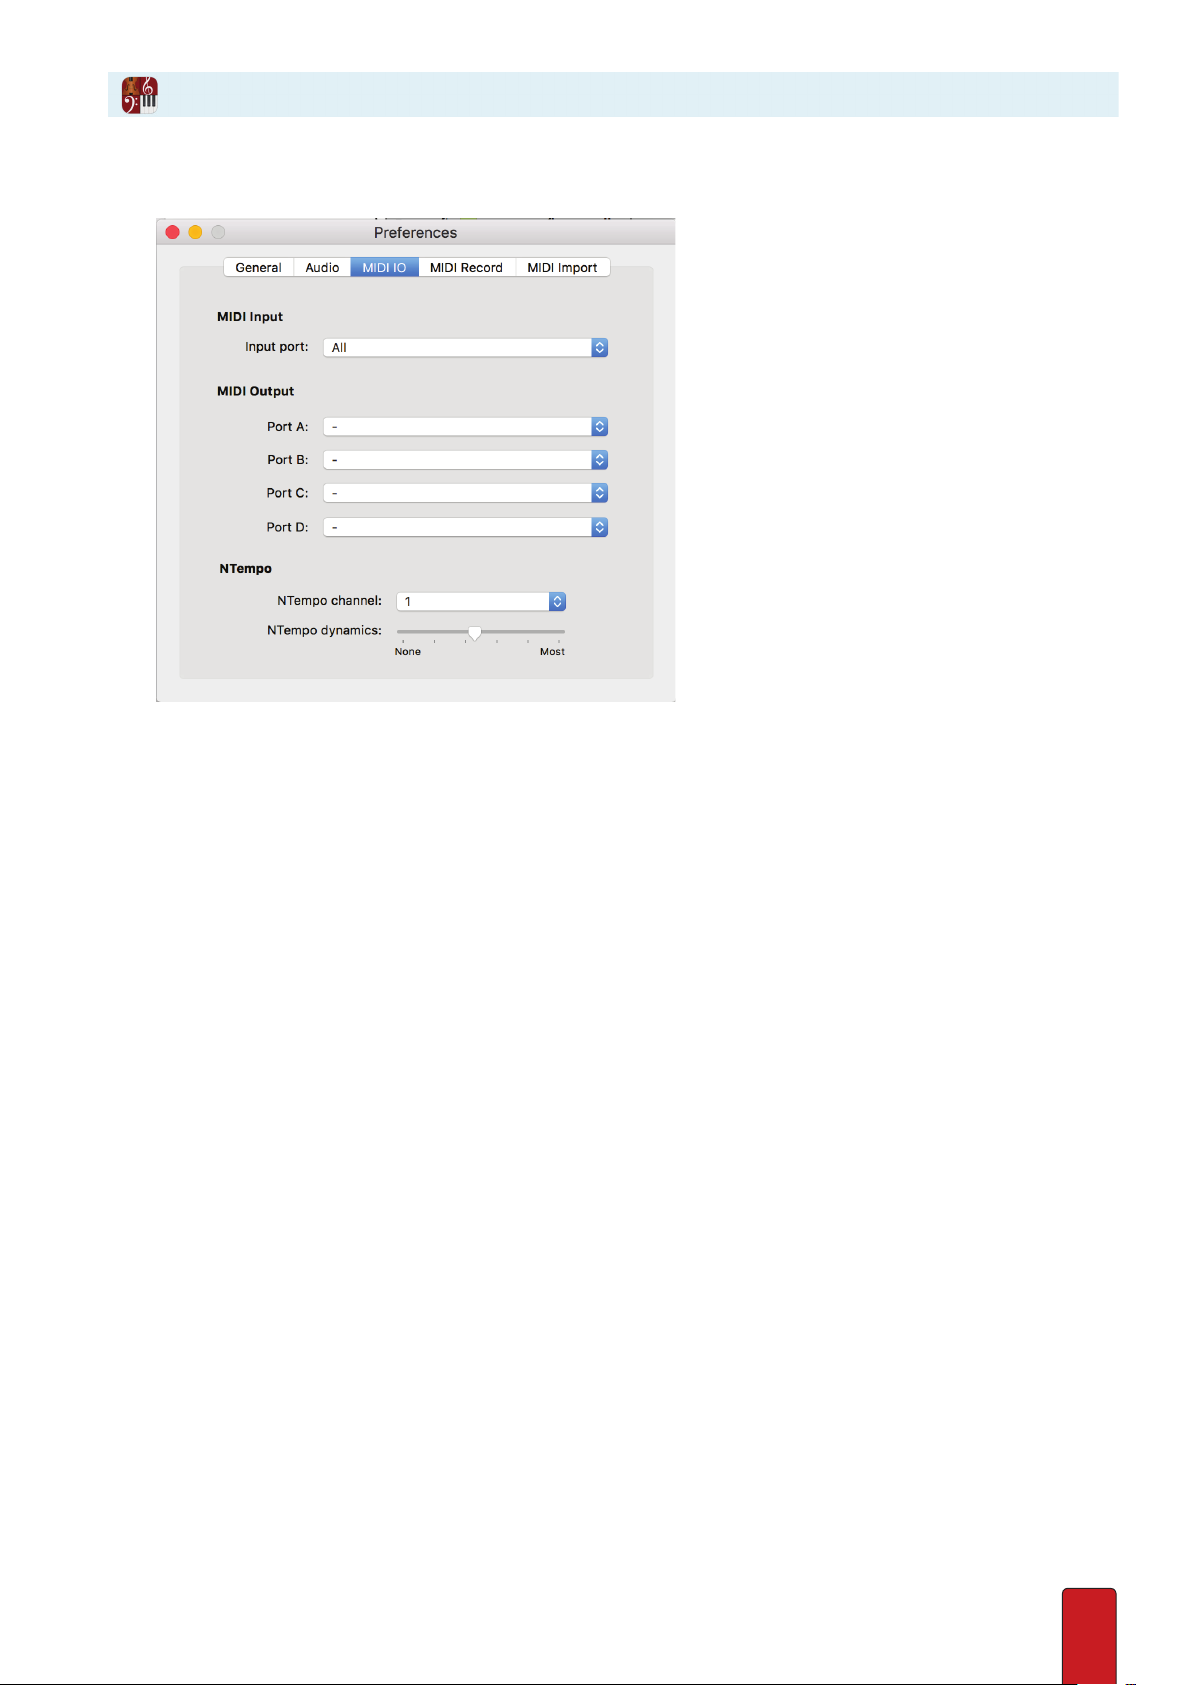
◙ MIDI IO Tab in Preferences.
1. Click the top drop-down list under the MIDI Input section.
» The list identies all MIDI devices registered and operating on your computer that are ready to send MIDI
information to applications such as Notion. Select one, or None; on a Mac, you also can enable All devices.
2. In Input type, specify if you will be using a MIDI keyboard (the default) or a MIDI guitar.
3. To nish: Windows: Click OK; Mac: Close the dialog box.
Set up four MIDI devices (MIDI Out)
Samplers, synthesizers, and similar MIDI devices provide digital samples of instruments and synthesized sounds.
You have the option of incorporating these sources alongside Notion’s built-in library. You can congure up
to four of these devices; each device will be referenced throughout Notion as the letter A, B, C, or D.
1. Go to the Menu bar and select File > Preferences.
» A Preferences dialog box opens.
2. Click the MIDI IOTab (see picture, top of page).
3. Use the four drop-down lists to assign up to four MIDI devices (already registered on your computer) to ports A
through D. Leave the default designation of None for any unused port.
4. To nish: Windows: Click OK; Mac: Close the dialog box.
1.18
Page 29
Help Options
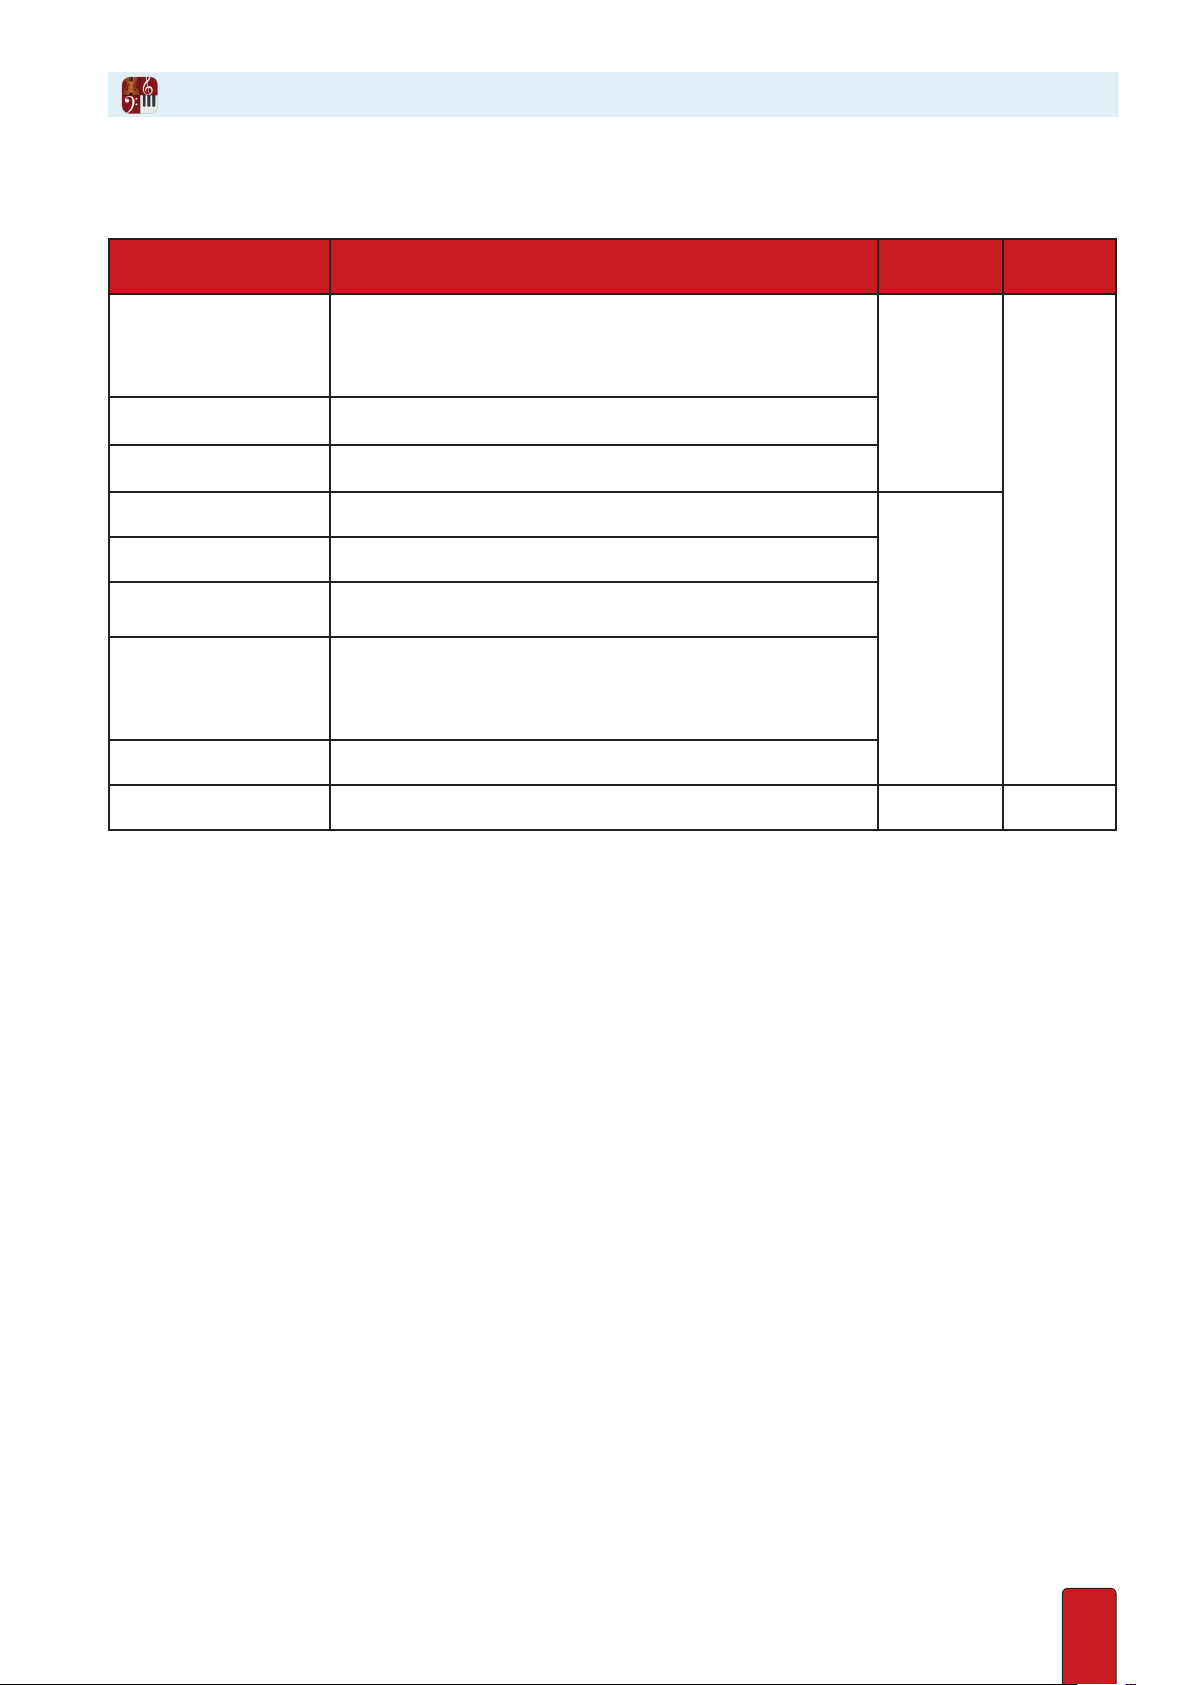
Help Menu Items
The menu items for help, maintenance, and learning to use the software include:
Menu Item Details Mac Menu
Displays the release version of Notion in the lower right
About
Check for Updates Discussed under Technical Support.
Software Activation Starts a wizard to activate your copy of Notion.
Quick Reference Guide Get going in Notion fast with this Quick Reference Guide.
User Guide This guide you are now reading.
Shortcuts
NTempo Tutorials (2)
Demo Files Opens a folder containing example Notion les.
Notion Score Library Opens a folder containing a variety of works to explore
corner. This information may be helpful to PreSonus
Technical Support if you encounter a problem. This dialog
box also introduces the team that brings Notion to you.
A quick reference to most of the keyboard
shortcuts in Notion, arranged by category.
Two scores you can open that introduce you to the features of
performing using NTempo on a computer keyboard and using
specic keys on a MIDI keyboard. A special feature of these les
is you can read instructions and try operations at the same time.
Notion
Help
Windows
Menu
Help
Drum Library
Notion includes a library of drum patterns. Simply add a drum-set instrument to your score, select
the drum pad (drum icon in toolbar), then select the genre and type of beat you’d like to use. Next
click on the pattern to select it then place it in your score with the mouse. Make sure your time
signature is the same as the pattern you’ve selected in order to maintain score formatting.
1.19
Page 30

CHAPTER 2: NOTION FILES
Open a File ...............................2.2
Save, Save As, and Revert ................2.3
Export to WAV/mp3 File .................2.4
Export to MIDI or MusicXML Files ........2.5
Print a Score .............................2.6
Dynamic Parts ...........................2.8
Close or Exit (Quit) ......................2.10
2.1
Page 31

Open A File
You can open an existing score to play, perform, or edit. You can double-click a Notion le (a le
that has an extension of .Notion) on your hard drive or use the Open dialog box or the Open
Recent list. You can open multiple les; each score appears in a separate Notion window.
Using the Open Dialog Box
You can use an Open dialog box to browse and open a Notion le.
1. Complete any of the following:
> In the Menu bar, select File > Open, or
> Windows: Press Ctrl + O; Mac: Press + O (the letter o).
» The Open dialog box displays.
2. Find and select the .Notion or .Notion (Notion 2) le you want and click the Open button.
Using the Open Recent List
Notion keeps a list of the most recent les you opened.
1. Go to the Menu bar and click File > Open Recent.
» A yout menu lists the names of les you last opened; the most recent on top.
2. Click the le you want.
Tip: If the list is getting long, you can clean out the le names by clicking Clear at the bottom of the yout menu.
2.2
Page 32

Save, Save As, and Revert
It is good practice to get in the habit of frequently saving the edits you make. You can
save your updates in the same le or as a new le in Notion format. You also have the
option of saving the score to another format (an export) other than Notion.
To keep in an existing le any new changes you made to the score or Mixer settings, either:
8 Use a keyboard shortcut: Windows: Ctrl + S; Mac: + S, or
8 Go to the Menu Bar and select File > Save.
The First Time You Save
The rst time you save edits to a new score, you create a new le. You can store it in a folder of your choice
and give this new le any name you want as long as no other le in the folder has the same name.
1. Create a new score. Make a few edits, if you want.
2. Complete any of the following to open the Save dialog box:
> Press Windows: Ctrl + S Mac: + S, or
> Select File > Save in the Menu bar.
3. Specify a folder location and a le name.
4. Click Save.
» This new le, with the extension of .Notion, is now ready for later retrieval.
Save as a Dierent Notion File
You have the option of saving edits to an existing score to a dierent le in a folder location of your choice.
1. To open a Save As dialog box, either:
> Press a keyboard shortcut: Windows: Shift + Ctrl + S; Mac: Shift + + S, or
> Go to the Menu bar and select File > Save As.
2. In the Save As dialog box:
> Specify a location for the new le.
> Specify a name for the new le.
3. Click Save.
» This new le, with the extension of .Notion, is now ready for later retrieval.
Revert
You can have Notion disregard all the changes you’ve made since the last save. This time-saver is quicker
than multiple presses of the Undo key to return your score to a known level of completeness.
1. Go to the Menu Bar and select File > Revert.
» A message appears, asking you to verify the revert. This is important; you cannot undo a revert later.
2. To proceed, click Revert.
» Notion returns your score to the way it looked right after your most recent save.
2.3
Page 33

Export to Audio File
You can export your scores from Notion to digital audio les so anyone can listen to your composition.
WAV (.wav) and mp3 les are easily added to recordable CDs or ash drives, or to post on the Web or
send in an e-mail. Or, you can import the contents of audio les into a digital audio workstation.
Audio File Export
WAV les are uncompressed les that are relatively large but contain the most information about each
sound. Mp3 les are compressed les that are best for attaching to emails or sharing over the web.
Notion records all or part of your score very quickly, using the metronome marks in the score to determine
tempos. (If you want an audio le of an NTempo performance, complete a Tempo Overdub rst.)
1. Ensure you are in Edit mode.
2. If you want to export the whole score, proceed to the next step. If you want to record a part of your score, highlight
the measures (and staves) you want included.
» Only the highlighted areas will be recorded to the audio le; this can be as brief as one note by one instrument. In
the absence of highlights, the entire score will be recorded.
3. Either:
> Go to the Menu Bar and select File > Export Audio, or
> Press a keyboard shortcut: Windows: Shift + Ctrl + E; Mac: Shift + + E.
» A dialog box opens.
4. Browse to the folder where you want to store this le.
5. Enter a le name.
6. Select required format (WAV or mp3) and bit depth
7. Choose whether you want to export one audio le from the master, from multiple audio les created from individual
buses, or from each instrument (bounce stems).
8. Click Save.
» The software creates an audio le, according to your requirements, very quickly.
Your .wav le is immediately available for use. Since you exported this information, your original Notion le is intact.
There’s Also .wav File Import
In addition to audio le export, you also have the option of WAV le import, where you bring
the contents of WAV les created in other programs into Notion. Details on how to incorporate
WAV les into your Notion compositions appear in Add WAV Files in Chapter 11.
Upload to Studio One™
Select File > Export Audio, then select
‘PreSonus Capture Session’ from the drop
down menu. Select a location and then
Notion will export the stems plus create a
Capture le in the same folder. Double click
this le, or drag and drop it onto Studio One.
Your stems will automatically be added to
a new project in Studio One, and include
information such as track name, volume,
pan and initial tempo and time signature.
Notion 6 also introduces new audio and note
data transfer to and from Studio One3 - either
on the same computer on anywhere on the
network. See the relevent chapter for more info!
2.4
Page 34

Export to MIDI or MusicXML / Export for SMP Press
Export to MIDI or MusicXML
You can export Notion scores to MIDI or MusicXML les, useful for sharing your work with people who do not have Notion.
Just as you can use MusicXML or MIDI import to bring scores created in other programs into Notion, you can
also export your work out to these other formats. With this feature, the essential information in scores you
create or update in Notion can be played and edited in other programs that support either format.
If you haven’t already, save any edits you’ve made.
Settings in the Realtime Record menu can aect MIDI import and export.
Go to the Menu and either:
Select File > Export MIDI, or
Select File > Export MusicXML.
Export dialog box (Mac).
By default, the existing le name displays in the dialog box. Since you will be changing the extension, you can
keep the same name for the new le. Otherwise, Enter a new name in: Windows: File Name; Mac: Export File.
Identify the folder where you want to store this le using Windows: Save In; Mac: Where.
Click Save.
» The new le is available for use. Since you exported this information, your original Notion le is intact.
Export for SMP Press
SMP Press from Sheet Music Plus, is a self-publishing portal for composers. Not
only can you upload your compositions and arrangements for sale, you can even take
advantage of arranging some of the 1000 pieces in ArrangeMe with all the legal copyright
sorted! If you’re ready to get your materials uploaded to SMP Press but not sure how to create a single PDF that includes
your score AND all your parts AND need to make an mp3, then this is the new feature for you...
• File>Export for SMP Press, is a one-click process that creates an mp3 audio le and a single PDF that contains full score
and all parts in score order
2.5
Page 35

iOS Integration
Exporting to Notion iPhone or iPad app
8 Save your Notion le as you normally would.
8 You can get the le to your iPad or iPhone in a few dierent ways. You can: email it; transfer it via iTunes on your
computer; placing it in Dropbox; or in your iCloud Drive folder (iCloud Drive is available on both Mac and Windows).
8 To export from the Notion iPhone or iPad app, consult the Notion iOS User documentation
Opening a File That Originated in the Notion iOS App
8 This process is like opening any other Notion le. Once the le is on your computer, simply open the le. It will open
in Notion.
2.6
Page 36

Print a Score
You can print an entire score, specic pages, or multiple parts with just one click. The software has a
“what you see is what you get” approach to simplify printing. Nearly everything that is visible in the
score area will be included; exceptions include highlight boxes and hidden objects/staves. Notion
components outside the score area, such as the Mixer and Fretboard, are not included in printouts.
A few guidelines to keep in mind:
8 Do not have a page view of Continuous; switch to either Pages Across or Pages Down.
8 Although the discussion in Chapter 3, “Customize Your View,” pertains to how your score appears on a computer
monitor, those options also directly aect the way your score will appear in print.
8 If you want to print a single instrument, see View One Part rst. That topic also details how to customize the
appearance of single parts.
8 If you want to print parts, go to File>Print Parts
8 If you only want to print a few instruments, see Hide/Show Any Instrument rst.
Windows
1. To open the Print dialog box, either:
> Select File > Print, or
> Press a keyboard shortcut: Ctrl + P.
2. Set the properties in this window as you do in other programs to select a printer, set page range, and specify
number of copies.
3. To access printer-specic properties, click the Preferences button.
4. To begin printing, click Print.
Output in PDF
You can output direct to pdf - select File>Print to Pdf.
Mac
1. To open the Print dialog box, either:
> Select File > Print, or
> Press + P
2. Set the properties in this window as you do in other programs to select a printer, number of copies, and page range.
3. There are other properties you can set (such as paper size, orientation, and scaling) under File > Page Setup.
4. To begin printing, click Print.
Output in PDF
In the Print dialog box appears a PDF button in the lower left. Select an option in the resulting drop-down list to save the
score as the type of PDF document you need. Consult your Apple documentation for details on the various PDF options.
2.7
Page 37

Page Setup
Be careful: Changing Page Setup options, especially your choice of page size, will aect the layout of your score.
Reducing paper size could move measures o one page and onto the next, throwing o any considerations you may
have built into a score for page turns, or may cut o staves in large scores at the bottom of sheets. If you must reduce
the paper size of your score, and you encounter these or similar spacing problems, see if reducing the font size helps.
Conversely, if a short score looks lost in a sea of paper, you can try increasing the font size for aesthetics and readability.
Print Cue Notes or Not
You have the option of including cue notes in print outs or not.
1. Go to the menu bar and select Score > Full Score Options (or, if you are looking at a Dynamic Part, then select
Score > Parts Options).
» The Options dialog box displays.
2. At the bottom, select or clear the Print cue notes checkbox.
◙ At bottom of Options dialog box [Mac view]
3. Click OK.
2.8
Page 38

Dynamic Parts
Since hardcopy printouts are based on what is currently visible on your computer monitor, you can
quickly print out specic parts (for individual musicians) by showing one instrument (Option 1) or
a select few instruments (Option 2) or by printing multiple parts with one click (Option 3).
Option 1: View a Dynamic Part
The major advantage of this option is that you can quickly set up and switch from one part to another.
1. Go to the Menu bar and click Score > Dynamic Parts.
» A yout menu displays, listing the parts in the score.
2. Click the instrument you want to print.
» Just the individual part appears in the score area.
Note: If you view all instruments in concert pitch in the full score, and you view a Dynamic Part for a transposing
instrument (such as a Bb Trumpet), Notion will automatically display that part in standard transposed keys so it’s
immediately ready for a musician to read and play correctly.
3. There are quite a number of ways to customize the appearance of the part (from font size to use of multi-bar rests)
by going to the Menu bar and selecting Score > Parts Options.
◙ Example of a multi-measure rest.
4. Ensure your Page View is either Pages Across or Pages Down (not Continuous).
5. Print.
Repeat this procedure as needed (select a dierent part and print). When you are done,
you can view all parts by selecting Score > Dynamic Parts > Full Score.
2.9
Page 39

Option 2: Use Score Setup
The one limitation with the previous option is that you always view and print out one part. If you happen
to want two or more instruments (say, for sectional rehearsals), you can use the procedure below.
1. To open Score Setup:
> Click the Score Setup button at the left end of the toolbar, or
> Press a keyboard shortcut: Windows: Ctrl + T; Mac: + T.
◙ Score Setup.
2. View the leftmost edge of the rst page so you see buttons on the margin at the start of each instrument
sta.
3. Click the button on a sta you do not want to see.
4. Go to other instruments you do not want to see and click their button.
5. When nished, close Score Setup:
> Click the Exit Score Setup button at the top, or
> Press the Esc key, or
> Press again the keyboard shortcut: Windows: Ctrl + T; Mac: + T.
» The parts you checkmarked no longer appear in the score area.
6. Ensure your page view is either Pages Across or Pages Down.
7. Print.
To restore staves, repeat this procedure so you add a checkmark to the scores you want to show.
Option 3: Print Multiple Parts
Go to File > Print Parts and select how many copies of each individual part you wish to print with one click.
2.10
Page 40

Close or Exit/Quit
With Close, you close an individual le but keep Notion running. With Exit
(Windows) or Quit (Mac), you quit the program completely.
Close a Score
To close individual le but keep Notion operating:
8 Press Windows: Ctrl + W; Mac: + W, or
8 Select File > Close from the Menu bar, or
8 Windows: Click the close button at the top right corner of the Notion window.
Mac: Click the close button at the top left corner of the Notion window.
» If you made changes to the score, Notion asks if you want to save your edits. Click [Windows: Yes ; Mac: Save] to keep
them or [Windows: No; Mac: Don’t Save] to disregard the changes. If this is the rst time you save changes to this score
le, you will also be prompted for a le name and a place to store a new version of the score le on your hard drive.
Exit (Windows)
Exit closes Notion completely when you have one Notion window open.
8 Press Ctrl + Q, or
8 Select File > Exit from the Menu bar, or
8 When you have no score open in the score area, click the button at the top right corner of the window.
Quit (Mac)
Quit closes Notion completely, no matter how many windows you have open.
8 Press + Q, or
8 Select Notion > Quit from the Menu bar.
With either Exit or Quit, if you made any changes to the score, Notion asks if you want to save your
edits. Click [Windows: Yes ; Mac: Save] to keep your edits or [Windows: No; Mac: Don’t Save] to
disregard them. If this is the rst time you save changes to this score le, you will also be prompted
for a le name and a place to store a new version of the score le on your hard drive.
2.11
Page 41

CHAPTER 3: CUSTOMIZE YOUR VIEW
Zoom and Resize/Move Window .............. 3.2
Change Page View ............................3.3
Hide/Show Any Instrument ...................3.4
Move Staves ..................................3.5
Notation Size and Style .......................3.6
Transposed or Concert Pitch .................. 3.7
Change Theme ................................ 3.8
Set Up Measure Numbers ..................... 3.9
View One Part ................................3.10
Measures in Each System / System Breaks ...3.12
Measure / Staff / System Spacing ............3.13
Part Names and Abbreviations ..............3.14
3.1
Page 42

Zoom and Resize/Move Window
Change Zoom Setting
Zoom settings adjust the magnication of what you see in the score area of the Notion
window. (Zoom is unavailable in the Mixer window.) To quickly jump from one factoryset zoom level to the next, you can use keyboard shortcuts or the Menu bar.
When you zoom with keyboard shortcuts in NTempo mode, the software focuses
the zoom on the current position of the playback marker.
Keyboard shortcut Menu bar
Zoom in
Zoom out
Alternately, most mouse manufacturers enable you to adjust the zoom level by holding
down the [Windows: Ctrl key; Mac: key] as you move your scroll wheel.
Or, you can use a dialog box to set a percentage of your own choosing:
1. Open a Zoom To dialog box by:
> Going to the Menu bar and selecting View > Zoom To, or
> Pressing [Windows: Ctrl + Shift + = ; Mac: + Shift] + = on your keyboard.
2. Enter a percentage in the text box. Actual size is 100.
◙ Zoom To:
3. Click the OK button.
Windows: Ctrl + = Mac: + =
Windows: Ctrl + - Mac: + -
View > Zoom In
View > Zoom Out
Resize a Window
If the Notion or Mixer window is less than full-screen, you can adjust its overall size. With Windows, drag
any edge of the window in or out. With a Mac, click-and-drag the lower right corner of the window to
the height and width desired (there is a minimum size) and release your mouse. You can also use Full
Screen on Mac, plus use the Tab Bar to organise mulitple open documents, or create new ones.
The window grab area on a Mac.
Move a Window
If the Notion or Mixer window is currently less than full-screen, you can move the window to a dierent
location in your computer monitor. Simply click-and-drag the bar at the top of the window in the direction
where you want it to go. When you have the window where you want it, release your mouse.
3.2
Page 43

Change Page View
Notion provides dierent ways of viewing a score. All views automatically update to the next location
in the score as you perform or play it and share the same operations in playback and editing.
Go to the Menu bar and click View. Select one of the three options at the top of the menu:
8 Pages Across – This traditional page view moves “west to east” through the score with visible page breaks.
Instrument abbreviations, clefs, and time/key signatures appear at the left edge of a new “page” where you expect
to nd them on published scores.
◙ Pages Across page view (Windows).
8 Pages Down – This option is much like Pages Across but the motion is “north to south” moving from one page to
the next.
8 Continuous – This uninterrupted view moves the green playback marker across the score area as you play, with no
page breaks. At the far left appears a margin: an overlay that identies each sta’s instrument abbreviation (in a red
color), current clef, key signature, and times signature.
◙ Continuous page view (Windows).
◙ Close-up of the margin.
3.3
Page 44

Hide/Show Any Instrument
With Notion, you can hide individual items on staves and can hide entire parts (instruments/staves)
in your score. This is very useful for reducing a score down to a few parts so a printout only has a
solo and piano parts, or to temporarily reduce screen clutter while editing a big score.
Since you are hiding a part, not deleting it, you can always show it whenever you want in the future.
Note: The quickest way to see a single part is to click the name of a part under Score > Dynamic Parts in the Menu Bar.
1. To open Score Setup, either:
> Click the Score Setup button at the left end of the toolbar, or
> Press a keyboard shortcut: Windows: Ctrl + T; Mac: + T.
◙ Score Setup:
2. View the leftmost edge of the rst page so you see buttons on the margin at the start of each instrument
sta.
3. Click the button on a sta you want to hide.
» To indicate a change is completed (the score itself doesn’t change yet), you will see when you hover over the
button. When you move your cursor, the button turns to an empty white circle.
4. Go to other instruments you do not want to see and click their button.
5. When nished, close Score Setup. You can press the Esc key, or the button in the toolbar, or
Windows: Ctrl + T; Mac: + T.
» The parts you checkmarked no longer appear in the score area.
To restore staves, repeat this procedure so you add a checkmark to the scores you want to show.
3.4
Page 45

Move Staves
The specic order you see instruments (staves) in a score follows the sequence found in
traditional orchestration practices. However, you can change the sequence.
Change Sta Order
The order you select aects the sequence of instruments in all systems throughout the entire score.
1. To open Score Setup, either:
> Click the Score Setup button at the left end of the toolbar, or
> Press a keyboard shortcut: Windows: Ctrl + T; Mac: + T.
2. Click to select a part you want to move; to show it is selected, a part displays a blue highlight. Hold the mouse
button down. TIP: You can move multiple parts by holding down the Shift key and clicking as many staves as you
want to move as a block.
3. Drag to a new location (between existing staves) until you see a thin, light orange bar between the staves where
you want the instruments to appear.
4. Release your mouse click.
» The parts are now rearranged.
◙ Dragging the clarinet and bass clarinet parts to appear above the English horn.
5. To close Score Setup, you can press the Esc key, or the button in the toolbar, or Windows: Ctrl + T;
Mac: + T.
3.5
Page 46

Notation Size and Style
You have the option of altering a current score’s font size or font choice (engraver or leadsheet style).
Alter the Notation Size
If you have a short, simple score, you can raise the size of markings and staves so they are
easier to read and ll the page more aesthetically. Alternately, if you have a score with many
instruments, you have the option of making the markings smaller to t a page better.
1. Go to the Menu bar and select Score > Full Score Options>Layout.
» The Options dialog box opens..
2. Go to the Notation size drop-down list and select any of the preset options from 3.0 to 7.0 or type over the current
number with a new number. Decimals are supported.
3. To nish, click OK.
◙ Example at 3.0. ◙ Example at 7.0:
Alter the Notation Style
In the Notation Style drop-down list on this dialog box, select whether you prefer to see
this score in Standard (engraver) or Jazz (lead sheet) style. This aects what you see on your
computer monitor and what you see on printouts. To save your change, click OK.
◙ Default Stava style. ◙ Same selection in Jazz style:
3.6
Page 47

Transposed or Concert Pitch
By default, you view the notes you Enter into Notion scores as they would appear coming from a
publisher. This includes having transposing instruments (such as the Bb trumpet) appear in transposed
notation. If you want, you have the option of displaying all instruments at concert pitch.
Viewing all instruments in the same tuning can be a help to beginning composers and
can be an aid to ne-tuning problem areas in orchestration even for more experienced
orchestrators. There are two major advantages this feature provides:
8 Even if you view all instruments in concert tunings in the score area, when you view (or print) a part in Score >
Dynamic Parts, transposing instruments will automatically be in standard transposed keys.
8 When you select Transposed, the entire score immediately displays transposed notation for all transposing
instruments. Thus, you can switch back and forth between standard and all-concert tunings just by clicking
a menu item.
To enable/disable automatic transposing, go to the Menu bar and click View. Either
Transposed, Concert Tuning, or Concert Pitch will have a checkmark.
In the View menu options (Mac).
8 To keep the default setting (standard notation), ensure View > Transposed has the checkmark.
8 To display transposing instruments in the same key as other “C” instruments (in their current octave), click View >
Concert Tuning so it receives the checkmark.
8 To display transposing instruments in the same key as other “C” instruments and in the actual octave (a piccolo, for
example, is written an octave lower than actual pitch), then click View > Concert Pitch so it receives the checkmark.
3.7
Page 48

Change Theme
The default light-gray background in the score area is easy on the eyes and is the preferred
“theme” for the score area for most users. But two other themes are available.
White Background
If you wish, you can switch to a higher-contrast white background. This is useful if
you wish to create screenshots to put into a worksheet or publication.
Black Background
If you will be performing Notion in an orchestra pit, stage, or other darkened area, you might encounter
some disadvantages with standard (or white background) viewing on a computer monitor:
8 Looking at a bright screen in a darkened area can lead to eyestrain or make it harder for you to see a conductor’s
gestures or other visual cues whenever you glance away from the monitor.
8 The brightness of the computer monitor may cast distracting light.
Notion provides an alternate theme that uses a “reverse video” approach to seeing your score: Normally white areas
become dark, and normally black items, such as notation and text, appear in an o-white color. The blue of the
NTempo sta appears in a gold color. This “gentle” display is both easier on the eye and generates far less light.
Change Theme
To set a dierent theme in the Notion window:
1. Go to the Menu Bar and select Windows: File > Preferences; Mac: Notion > Preferences.
» A dialog box opens.
◙ Preferences dialog box, bottom portion (Mac).
2. In the General Tab, make a selection from the Theme drop-down list: Dark for performing in the dark and avoiding
screen glare in the pit, Parchment for standard use, or White for high-contrast white background.
3. To make the switch: Windows: click OK; Mac: close the dialog box.
» The change is immediate.
3.8
Page 49

Set Up Measure Numbers
For quick reference, it’s helpful to know the measure number at each bar. When you look at the
score in Continuous view, a measure-number bar provides this on an ongoing basis at the top of
the score area. With other page views we recommend you have measure numbers appear at the
top of the score. Unlike the measure-number bar, these numbers do appear in printouts.
To specify how you want to see measure numbers on the score itself:
1. Go to the Menu Bar and select Score > Full Score Options.
» The Options dialog box opens.
2. Make a selection in the Measure numbers drop-down list. Notice that your choice and your selection of page view
aect when you see measure numbers above the top sta.
> None: On the score, you do not see measure numbers immediately above each system. (In Continuous page
view, you still see the measure number bar right under the timeline.)
> Each System: On the score, you view measure numbers only at the start of systems on each page in Pages Across
and Pages Down views; you do not see this in Continuous view.
> Each Measure: On the score, you see a measure number at the top of each bar in all page views.
◙ A measure number at the start of a new page. ◙ A measure number at the top of each bar.
3. To nish, click OK.
3.9
Page 50

View One Part
Usually, you view all the instruments in each system in the score area. If you want to reduce the number of staves
you see, Notion enables you to hide any number of instruments. But if you need to view (or print) only one part,
the quickest way to do this is with Dynamic Parts. They are dynamic in that a change you make to the notation in
the score appears in the part. The reverse is also true: If you decide to make a change to the notation in the part, it
appears in the full score. All parts are in the same le with the full score, so there are no le-management tasks.
Select Score > Dynamic Parts. You view a yout menu of the instruments in the score.
Simply click on an instrument name to view just that part. To return your view to the full
score, return to the Menu Bar and click Score > Dynamic Parts > Full Score.
Note: If you decided to view all transposing instruments (such as a Bb trumpet) in the concert
key (see “Transposed or Concert Pitch”), Notion saves you time by automatically placing a
transposing instrument into the correct transposed key when you view its part in Dynamic Parts.
This way, you can simply print out the part and have a live musician correctly play it.
Customize Appearance
When you print out a part, you can customize the appearance of the individual parts
with many of the features available for customizing the look of the full score. The Parts
Options dialog box has the same layout as the Full Score Options dialog box.
3.10
Page 51

The settings you specify here aect all individual parts, but do not aect the appearance of the full score.
Property See This Topic Location
Notation size
Notation Size and Style
Notation style
Measure numbers Set Up Measure Numbers
This chapter
First system titles
Part Names and Abbreviations
Following system titles
Measures per system Measures in Each System
Multi-measure rests See the discussion below this Table. This page
Chord summary Show Chords on First Page Chapter 13
Print cue notes Print a Score Chapter 2
Specify Multi-Measure Rests
You can set a limit to the number of bars covered by each multi-measure rest. This type
of symbol only displays when you view a single part. The number in the symbol tells a
musician reading your score how many measures to wait before playing again.
Click the Multi-measure rests drop-down list and select one of the options. With None, every
empty measure shows, and no multi-measure rest symbols appear. If the number you want is
not in the list, let the drop-down list roll up and then type the number in the box.
Keep Your Edits
To make your changes appear in the individual parts, click OK.
3.11
Page 52

Measures in Each System / System Breaks
Measures in Each System
One quick way to aect the readability of a score in your computer monitor or in a printout is to specify a default number
of measures you want to see in each system. The fewer measures in each system, the more space appears between notes,
rests, and bar lines.
1. Go to the Menu bar and select Score > Full Score Options>Page.
» The Options dialog box opens.
2. In the Measures per system drop-down list you decide how many measures will typically appear east-west for each
system on a page (in any page view other than Continuous). This is a default number that will be lower in number
when there are a large amount of spelled-out glissandos, 16th/32nd/64th/128th notes, German lyrics, or similar
size-busting score markings in one or more measures. With Automatic the software decides (based on font size,
page size, and current score markings) what the best number of measures is on a system-by-system basis.
3. When nished, click OK.
» The change is immediate. Remember: you can add/remove measures in each system (as space permits) by adding/
removing bar lines
System Breaks
One way to help visually separate one system from another (when you have more than one on a page) is to have the
software insert system-break marks throughout the score.
4. Go to the Menu bar and select Score > Full Score Options > More.
» The Options dialog box opens
5. In the System breaks drop-down list select either Don’t Show or Show.
6. When nished, click OK.
» The change is immediate.
◙ System-break mark between two systems.
3.12
Page 53

Measure / Sta / System Spacing
Measure Spacing
You can adjust the spacing of a measure, if for example, you wish to make a measure clearer, or to space out any objects
that are too close together. To adjust the spacing of a measure:
1. Go to View>Show Layout Handles (or Win: Ctrl+L Mac: Cmd+L)
2. Click and drag the squares that have appeared above the measures. The square will get lled in once you have dragged.
Or you can drag the measure line, or time signatures and key signatures.
3. Once you let go, Notion will rejustify the layout.
4. To reset spacing, shift click the layout square. Or right click the measure, go to the measure tools, Reset Measure Width.
Sta and System Spacing
You can adjust the spacing between staves and systems globally, or individually by dragging layout handles
Global spacing:
For Full Score go to: Score>Full Score Options>More,
For Parts go to: Score>Parts Options>More,
Individual staves/systems:
if for example, you wish to make a measure clearer, or to space out any objects that are too close together. To adjust the
spacing of a measure:
1. Go to View>Show Layout Handles (or Win: Ctrl+L Mac: Cmd+L)
2. Click and drag the squares that have appeared to the left of the staves. There is one large square at the top of each
system for system spacing. The square will get lled in once you have dragged.
3. Once you let go, Notion will rejustify the layout.
4. To reset spacing, shift click the layout square. Or right click the sta, go to the measure tools, Reset Sta/System spacing
3.13
Page 54

Part Names and Abbreviations
To help you quickly nd a particular part in a system, each sta identies its instrument with the
instrument’s name or abbreviation. With the setting below you can control how staves identify
their instruments in the score area in Pages Across or Pages Down page view.
1. Go to the Menu bar and select Score > Full Score Options.
» The Options dialog box opens.
2. In the First system titles drop-down list you decide how you want the rst system at the beginning of your score to
identify instruments. The options are None, Part name, and Part abbreviation.
◙ None: ◙ Part name: ◙ Part abbreviation:
3. In Following system titles you specify how you want to identify instruments throughout the remainder of your
score, at the start of each system. The same three options (None, Part name, and Part abbreviation) appear in this
drop-down list.
4. When nished, click OK.
» The change is immediate.
You have just set up how Notion will handle all part names and abbreviations as a group. To customize
individual texts for instruments, see Change Part Names and Abbreviations in Chapter 11.
3.14
Page 55

Sequencer Overlay
Notion allows you to view both notation and performance information within the same sta. This special mode is called
Sequencer Overlay and can be accessed via View > Show > Sequencer Overlay (or by pressing Tab).
When you enable Sequencer Overlay, you will see bars appearing on top of the noteheads in your score. Those bars
represent the note’s duration and position and even velocity or dynamic. By clicking and dragging on the end points of
the bars you can adjust the note’s start and end times as well as when the note starts in the measure.
These bars may have dierent colors or they may just be gray. Gray bars take their dynamics and velocity information
from the score. Colored bars represent custom or recorded velocity and override score dynamics in playback. The color of
the bars can go from blue to red, with blue representing low velocity and red representing high velocity.
Click on a note’s bar, and the velocity of that note will be indicated by a number immediately following the bar to the
right. To customize or adjust the velocity you can:
8 Double-click the middle point of the bar and manually type in your desired value.
8 Use [Windows: Alt+Up/Down Arrow; Mac: Option + Up/Down] to change in increments of 10.
8 Use [Windows: Shift+Alt+Up/Down Arrow; Mac: Shift + Option + Up/Down] to change in increments of 1.
8 Use Velocity Overdub to play in the velocities of the notes.
You can also change the duration of notes by sliding the beginning or the end of a note to the desired length.
Randomize Events
You can also bulk change the events of a selection. Go to Tools>Randomize Events. Here you can experiment with
dierent settings to humanize your output, from adjusting the start and end points of notes to the velocity. This is great
for a larger ensemble, to avoid all the players coming in exactly together - always a real giveaway!
Clearing your custom changes
Whether you’ve used the sequencer overlay, performed in with a MIDI keyboard, or used the Randomize Events feature,
you may want to strip these tweaks away.
Quantize to Notation:
To reset the duration of your Sequencer Overlay events:, make a selection, then Tools>Quantize to Notation.
Clear Velocities:
To remove all velocities, highlight a section of music and click Tools>Clear Velocities.
3.15
Page 56

CHAPTER 4: NTEMPO MODE
Play or Perform a Score ..................4.2
Heads-Up Display ........................4.3
Jump to Another Location ...............4.4
Play a Score ..............................4.6
Perform a Score (NTempo) ...............4.8
NTempo Staff ...........................4.10
NTempo Keyboard Shortcuts ...........4.11
Vamps ..................................4.12
Fades ...................................4.14
Skip Repeat .............................4.15
MIDI Keyboard: Defaults ................4.16
MIDI Keyboard: Customize .............4.18
MIDI Keyboard: Live Play ...............4.20
4.1
Page 57

Play or Perform A Score
Unlike most other music software, you don’t have to assign external sounds to instruments or set up MIDI channels
(until you want to). In fact, as soon as you place a note in a score, you can start listening to your work with sounds
of our built-in library. And as you add more notes and instruments, the sound just keeps getting better.
NTempo Mode
You can listen to Notion scores in either Edit or NTempo mode. However, you can perform your score in
NTempo mode. When the NTempo button is light gray, you know you are in NTempo mode. If the NTempo
button is dark, you know you are currently in Edit mode (click the button once to Enter NTempo mode: you
are immediately ready to begin playback operations). Alternatively use the shortcut Shift + Enter.
Perform or Play
The terms perform and play, though seemingly similar, have distinct meanings with Notion:
8 When you perform you continuously control tempo (and volume if using a MIDI controller) by tapping certain keys.
The faster you tap, the faster the tempo.
8 When you press play instead, tempo is completely controlled by metronome marks in the score (a passive mode of
operation), much like listening to a CD track.
To view this information in Table form:
Playback Options
Feature: Tempo Control By: Use This Feature to: Playback is Like:
NTempo Tapping keys Perform a score A live performance
Play Marks in the score Play a score Playing CD tracks
Notion Score Library
The Notion Score Library includes over 200 Notion les to explore, perform, study or accompany
- Use in class to teach a set work or orchestration
- Accompany a choir with the whole of the London Symphony Orchestra
- An instrumental teacher can accompany a student’s concerto with one nger
- Play scores for fun by tapping each beat
- Optionally hook up a MIDI keyboard to tap, for touch sensitive dynamics performed in realtime
- Accompany your opera arias with a whole orchestra in your salon
Getting the Notion Score Library
-Once you have activated your copy of Notion at my.presonus.com, the Notion Score Library (a zip
folder) will be available to download from your products area, within the Notion 6 Downloads area.
Scroll down to the bottom to nd Extra Downloads>Misc.
-Once the folder has downloaded, double click to unzip the folder, and choose its location on your
computer
-Open a le, and get playing!
-For more info, and list of scores, go to Help>Notion Score Library...
4.2
Page 58

Heads-Up Display
The Toolbar display at the middle of the Toolbar gives a summary of current playback
conditions. For more information about playback status, Notion provides a more detailed
Heads-Up Display (HUD). You decide when you want the display to appear.
An example of the Notion Heads-Up Display (HUD).
A
B
C
D
E
F
G
A Rehearsal mark – If the score has rehearsal marks, the top center area identies the mark that pertains to the current
measure where the playback marker is. You can click on this text for a menu of all the rehearsal marks in the score:
click one to jump to a particular place in the score.
B Meter status – Displays a ratio in small numbers: the current beat in the measure on the left followed by the total
meter count for the whole measure on the right. If the playback marker is currently on an o-beat, you will see an
asterisk after the number on the left.
C Playback Tempo - Tempo user is performing.
D Notated Tempo – Notated tempo of the piece.
E Vamp Information – Display the number of bars in the vamp.
F Measure Number – Shows the measure number your cursor is in.
G Time Code – Total time into the score, measured in hours:minutes:seconds:frames (based on 30 frames per second).
Hide or Show the HUD
To hide or show this display on a regular basis:
1. Go to the Menu bar and select Windows: File > Preferences; Mac: Notion > Preferences.
» A preferences dialog box opens.
2. Ensure you are in the General Tab.
3. At the Performance HUD drop-down list select:
> In performance – play or perform in NTempo mode only. This is the default.
> In playback – play or perform in both Edit mode and NTempo mode.
> Never – Never show the HUD.
4. To save your change: Windows: click OK; Mac: close the dialog box.
4.3
Page 59

Notion provides a number of dierent ways to move your current view of the score to
another location when you are stopped and not currently in playback.
Use Go To
In a G o To dialog box, specify a measure number or rehearsal mark anywhere
in the score to which you want the cursor to jump.
1. To open the Go To dialog box, either:
> Go to the Menu Bar and selecting View > Go To, or
> Use the keyboard shortcut of Windows: CTL+ G; Mac: + G, or
> Right-click the Timeline.
◙ Go To dialog box (Mac).
2. Enter the location you want.
> If you want to jump to a specic measure, type the measure number in the top box.
> If you want to jump to a rehearsal mark, type the letter in the lower box. This box is not case sensitive.
3. Press Go.
» The dialog box disappears and you jump to that location. If the measure or rehearsal mark does not exist, the
dialog box disappears, but you stay in the same location in the score.
Jump to Rehearsal Marks
If a score has rehearsal marks, you can instantly jump to a specic one by either:
8 Using the Go To dialog box (above)
8 Pressing Shift+ ] to go to the next one or Shift+ [ to go to the previous one
(For keyboards that do not have square brackets, you can also use Ctrl+Shift+Left/Right arrow)
8 Clicking the [A] rehearsal-mark icon to the left of the Toolbar Display and, in the menu that appears, click the
rehearsal mark you want
8 Press F9 and then select the rehearsal mark you want
8 Clicking the Rehearsal information at the top of the heads-up display. In the menu that appears, click the rehearsal
mark you want.
Timeline
You can click on the timeline to jump to that location in the score, or you can open the
Go To dialog box (see above) with a right click anywhere on the Timeline.
4.4
Page 60

Play a Score
This playback option has Notion interpret metronome marks in the score to determine playback tempo (you do
not tap). If the score does not have a metronome mark, then the software plays at the moderate speed of 90.
With this CD-like playback you can start at any measure, stop at any point
and jump back where you last started (or the beginning).
Play All Parts
Play operates the same in either NTempo or Edit mode.
1. Inform Notion where in the score you want to start. To move the marker, you can use any method discussed in Jump
to Another Location earlier in this chapter.
2. Click the Play button or press the Spacebar.
» You hear Notion play the score.
3. To ne-tune the overall volume or individual instrument volume, pan, and solo/mute settings, use the Mixer.
4. You can permit the playback to continue to the end – or at any point during playback:
> To stop, click the Stop button or press Esc or the Spacebar to halt playback. When you click the Play button or
Spacebar again, playback resumes from this point after repeating the last note played.
> Clicking the Rewind button or the Backspace key once stops playback and takes you back to the place in the
score where you last started. Clicking the button or the Backspace key twice takes you back to the beginning.
> You can quickly switch from play to perform: just start tapping any NTempo key (discussed in the next topic). If
you want to end NTempo and return to play, press R (the Auto-Resume feature).
Play One or a Few Select Parts
If you only want to hear one or a few parts, you can:
Click the Solo/Mute buttons for select instruments in the Mixer in both NTempo and Edit modes, or
In Edit mode (only) highlight just the measures/instruments you want to hear before you play.
Indicators
As you listen to your score play you will see:
The playback marker progress through the score in your choice of page view. When it advances
toward the right-hand side of the score area, your view of your score jumps ahead.
The top right area of the Toolbar display updates a timecode count by
hour:minute:second:frame (based on 30 frames per second).
The Heads-Up Display, if used, keeps you updated on current meter status, measure number, and more.
A vertical red line on the timeline moves to indicate where you are in the le. As you jump ahead in the score, the
silver box surrounding the red marker changes to indicate the measures you are currently viewing in the score area.
4.5
Page 61

Adjust Tempo
Even in Play, the software oers some limited control over tempo in real-time. By pressing Up Arrow (for faster)
or Down Arrow (for slower), you can adjust the speed while the score plays. Each press can alter the tempo
by 4 or 5 beats-per-minute: so this method is not as precise as NTempo control when you perform.
Keyboard Shortcuts
At a glance, here are the few keyboard shortcuts you can use to play a score.
8 To begin play, press the Spacebar.
8 To stop, press the Spacebar (while playing) or Esc.
8 During play you can change tempo speed by pressing the Up Arrow (faster) or the Down Arrow (slower) key.
8 After you stop playing a score:
> Press Backspace once to return to last place you started.
> Press Backspace twice (or Home) to return to beginning.
> Press ] to move forward by measures. Press [ to move backward by measures.
> Press the Right Arrow key to move forward by notes in the NTempo sta. Press the Left Arrow key to move
backward by notes in the NTempo sta.
> Press Shift + ] to jump to the next rehearsal mark; if none are found, you go to the end of the score. Press Shift + [
to jump to the previous rehearsal mark; if none are found, you go to the end of the score.
8 Loop measures in Edit mode to hear selected measures of your composition as a loop:
> Select the last measure of the required instruments with the mouse.
> Press Shift + Space, then x, then R (where x is the number of measures to loop back).
> The tempo is set by the time taken between pressing x and then R.
4.6
Page 62

Perform a Score (NTempo)
With NTempo you have continuous control of tempo as you listen to your score.
In NTempo Mode
To perform, it’s best to be in NTempo mode. When in this mode, the NTempo button on the left side of the Transport
will be light gray. If not, click the button. A green playback marker indicates where playback will begin. If the marker
has double lines along the edges (as in the close-up on the right), the software is ready for your rst key press.
Tap a Tempo
You press certain keys on your computer keyboard to continuously control the tempo. Press any key
on the “A” row (the row that begins with A, S, D, F on a standard computer keyboard). Optionally,
you can use a MIDI keyboard instead of a computer keyboard, detailed later in this chapter.
By default, each tap of an NTempo key corresponds to the pulse of the meter (examples: a quarter note in 4/4
time; an eighth note in 6/8 time). With each press, you see the playback marker move to the next beat and you
hear whatever notes in the score lie within that beat. The faster you tap these keys, the faster the tempo.
If the score has an NTempo sta – a single-line sta with blue notes on it – then your tapping follows the note
values on that sta rather than the current meter. See the next topic, NTempo Sta, for more details.
Tip: Experience has shown that to keep a steady, even beat, you should concentrate on keeping the beat
by hearing the music, and not as much by watching the movement of the green playback bar.
Indicators
Visually, a number of indicators help guide you through the score.
8 As you tap, you view the green playback marker progress through the score. To indicate that you are performing,
the playback marker no longer shows a double-lined border around it; when you decide to stop – not pause – (see
Pause/Stop, at bottom of next page) the double border returns. When the green marker approaches the right-hand
side of the score area, your view of your score jumps ahead.
8 In the Toolbar Display, on the right, you view your current beats-per-measure (bpm).
8 A vertical red line on the timeline moves to indicate where you currently are in the le. As you jump ahead in the
score, the silver box surrounding the red marker changes to indicate the measures you are currently viewing in the
score area.
8 The Heads-Up Display, if used, keeps you updated on current meter status, measure number, tempo speed, and
more.
8 As you jump ahead in the score, the measure numbers update in the Measure Number Bar (if you are using the page
view of Continuous).
4.7
Page 63

Helpful Tidbits
Other concepts to keep in mind:
8 To cut o your sound at the end of a piece, press an NTempo key one “extra” time.
8 One concept that is not immediately intuitive: you “perform” rests, too. If you happen to notice there are only rests in
the score (or, more likely, in the particular part/section you are performing), you still continue to tap.
8 Especially when rst getting used to the software, it is easy to get out of sync with the rest of the ensemble.
See Move Playback Marker in NTempo Keyboard Shortcuts for guidance on what you can do to recover
quickly (and quietly!).
Optional: Activate Auto-Cruise
You can continue tapping keys for the remainder of the score, or you have the option of setting a tempo
and letting the software take over at that pace. To do this, tap keys on the “A” row until you are satised
with a tempo, then press (once) the U key. Playback continues automatically at the tempo you set until
the marker reaches a metronome mark in the score, then playback continues at the notated tempo.
You are free to jump back to the “A” row if you need to readjust the speed at any point – or you can press Up
Arrow (for faster) or Down Arrow (for slower) if the tempo adjustment does not have to be precise.
Perform One or a Few Select Parts
If you only want to hear one or a few parts, you can:
8 Click solo/mute buttons for select instruments in the Mixer (in either NTempo or Edit mode), or
8 In Edit mode (only) highlight just the measures/instruments you want to hear before you perform.
Pause/Stop
To pause while performing, press the Q key. To end performing, press the Spacebar or Esc or
click the Stop button in the Transport. The main dierence between pause and stop is
what happens if you decide to tap again in the same location right after the halt:
Feature: Use: If you return to tapping at this spot:
Pause Q key Playback proceeds to the next note in the NTempo sta.
Stop
Since you end performing with a stop, the green playback marker halts and displays a double border around it. With
a pause, the playback marker halts without a border around it – as a visual indication you are still performing.
Spacebar, Esc, or
Playback repeats the last note you stopped on.
4.8
Page 64

NTempo Sta
By default, each tap of a key in NTempo playback corresponds to the pulse of the meter (examples: a
quarter note in 4/4 time; an eighth note in 6/8 time). If a score contains dramatic passages that require
more precise control, Notion oers an optional feature: the NTempo sta. Notes on this sta specify
a time value at each keypress that can be less (or more) than a beat in the current meter.
You will recognize this single-line sta by its distinctive blue-colored notes. The notes you place on this track determine
how much of a time value each press of an NTempo key covers; there are no pitches involved. Each time you tap,
the cursor moves from one note value in the NTempo sta to the next and you hear Notion play whatever music lies
between the two blue notes in the staves of the system. Thus, you tap as if you were playing a percussion instrument.
Example
The notes (rhythm) in the NTempo sta usually appear as regular beats, but at
key points in the score it may also subdivide the beats to better control rubato. In
the snippet to the right, most presses of an NTempo key covers a quarter note’s
duration. However, to accentuate the playback of a particular tuplet, the NTempo
sta departs from a quarter note beat at this location to spell out a quarter-note
triplet. During playback at this spot, each press of a key corresponds to one note
in the triplet. This provides complete control over this tuplet while performing:
you can play the three notes straight, syncopated, dramatically slow, or whichever way you feel inspired in real-time.
NOTE: If you encounter tied notes in the NTempo sta, you tap the group
once (like you do when you play a musical instrument).
Auto-Cruise: Rest Marks in the NTempo Sta
There is a way to “force” Auto-Cruise with score markings: by placing rests in the NTempo sta. At the point where
a rest appears in the NTempo sta, the program automatically goes into Auto-Cruise (using the tempo you used
at the last note before the rests). At the point where a note appears in the NTempo sta you resume tapping.
For this reason, never tap rests in the NTempo line (if you do, the marker leaps to the
next note in the NTempo sta ). Only tap to notes in the NTempo line.
Add or Edit an NTempo Sta
Since you have to be in Edit mode to add or delete an NTempo sta or edit the
notes on it, this is detailed in Chapter 11, “Edit NTempo Sta.”
4.9
Page 65

NTempo Keyboard Shortcuts
Notion provides some convenient keyboard shortcuts for use with NTempo.
Basic Shortcuts
Reminder: you can use a MIDI keyboard instead of a computer keyboard; this is discussed later in this chapter.
8 Perform – Tap any key on the row from A through the single-quote key.
8 Pause or Cuto – Press Q.
8 Stop – Press Spacebar or Esc.
8 Auto-Cruise – Set a tempo then press once the U key.
Move Playback Marker
It happens to all musicians: At some point in a live performance you discover that you’re a bit lost with respect
the rest of the ensemble. Most musicians playing instruments stop, look for a familiar landmark in the score,
and Enter back in when the ensemble reaches that point. With keyboard shortcuts, you can do the same thing:
Use the keyboard shortcuts below to move the dark green playback marker to a familiar place in the score,
then wait for the ensemble. When they reach that point, begin tapping again. As a convenience, once you
press any option below, your sound output stops so you can concentrate solely on moving the marker:
8 Move the green playback marker forward by measures: press the ] key or Shift + Right Arrow as many times as you
need (MIDI keyboard default: D below Middle C).
8 Move the green playback marker backward by measures: press the [ key or Shift + Left Arrow as many times as you
need (MIDI keyboard default: C an octave below Middle C).
8 Move the green playback marker forward by notes (in the NTempo sta): press the Right Arrow key as many times
as you need (MIDI keyboard default: D# below Middle C).
8 Move the green playback marker backward by notes (in the NTempo sta): press the Left Arrow key as many times
as you need (MIDI keyboard default: C# below Middle C).
Auto-Resume (Switch from Perform to Play)
If for any reason you want to continue playing a score but you want Notion to cease reading your tapping
and switch to the tempos written in the score (that is, switch from Perform to Play), either:
8 Press the keyboard shortcut of R, or
8 Press the G# above Middle C (default setting) on an attached MIDI keyboard.
Press the key at the point you would have tapped the next NTempo note. Once you activate Auto-Resume the software
continues automatically at the tempos set by metronome marks in the score: you immediately stop tapping.
You are free to jump back to the “A” row if you need to readjust the speed at any point – or you can press Up
Arrow (for faster) or Down Arrow (for slower) if the tempo adjustment does not have to be precise.
4.10
Page 66

Vamps
To add to the exibility of performing in live settings, NTempo oers various vamps
A vamp is a repeat with no predetermined number of playthroughs. Vamps supply audio interest during
scene changes in stage musicals or other activities that have the potential of varying in length from one
production to the next. You use keyboard shortcuts (or MIDI key presses) to control the duration of a vamp.
You can control two kinds of vamps: anticipated vamps with repeat signs already in the score
and sudden vamps when you need to cover surprise situations. With both kinds of vamps
there are special jump shortcuts so you can exit or restart a vamp on the next beat.
To alert you that you’re currently in a vamp, the playback marker takes on
an orange color (see right) for the duration of the vamp.
Anticipated Vamp
Usually, there are predicTable points to vamp, such as during scene changes. Scores often have repeat
signs already in place to indicate the measures needed. In this situation, you already know which
measures will be repeated; the unknown is the number of repeats for any particular production.
1. While performing a score, Enter the repeated section either by tapping (keys A through ‘) or auto-cruising (the U
key) or auto-resuming (the R key).
2. At any beat inside the repeat, start tapping with the Enter key (or tap C# or D# above Middle C on a MIDI keyboard if
you use default keys).
» While you control the tempo with each tap of the Enter key, Notion repeats the measures between the repeat
signs indenitely.
Note: The Heads-Up Display displays the current status of your vamp in bright orange characters. The rst number is
the current time through the repeat. The second number is how many repeats were originally specied in the score.
◙ Heads-Up Display during an anticipated vamp, which is currently in the fourth time through a repeated section.
3. Continue tapping with the Enter key until the vamp can end. Then, when you complete tapping the last beat in the
measure before the repeat end sign, begin tapping with any tapping key (A through ‘).
» You proceed to the next measure after the repeats.
4. You can continue tapping or esTablish a tempo and set playback on Auto-Cruise (press the U key).
4.11
Page 67

Sudden Vamp
IneviTably, the unexpected will happen. If there’s a delay or miscue you’d like to cover, or a dicult
spot a director or choreographer needs to have repeated often, you can use a sudden vamp. With this
emergency vamp you decide on-the-y which measures to repeat as well as the number of times.
1. As you perform through the score, glance ahead and determine a phrase you feel would make a good vamp.
Determine how many measures are involved.
2. While performing a score, play through to the last note of the part you want to repeat, then repeatedly tap in tempo
with any number key (1 to 8) on your keyboard that corresponds to the number of measures to jump back.
For example, if you determine that a certain two-measure theme would make a good vamp, play through the last
note of these two measures, then tap, in tempo, the 2 key. The cursor jumps back two measures and follows your
tapping with that number key, endlessly repeating both measures. (See the MIDI keyboard topics for equivalents on
that device.)
» Notice your cursor changes to an orange color to indicate you are in a vamp and the Heads-Up Display indicates
how many measures are involved in bright orange characters.
◙ Bottom of Heads-Up Display during a sudden vamp of two measures.
3. Continue tapping with the number key until the vamp can end. Then, when you complete tapping the last beat in
the repeated phrase, begin tapping with any NTempo key (A through ‘).
» You proceed in standard NTempo.
Jump Out/Back
Notion provides convenient NTempo shortcuts to immediately come out of a vamp or
to immediately return back to its rst beat. While you are vamping you can:
8 Jump out of the vamp: press the Tab key (or B below Middle C on a MIDI keyboard).
8 Jump back to the rst beat of the vamp: press the Backspace key.
4.12
Page 68

Fades
Although rarely used, automatic fades are available by computer keyboard or MIDI keys. The
advantage with either type of fade is you can concentrate on tempo and let the software take the
responsibility of altering the overall volume. The limitation is: although you control the tempo
of the fade, you do not control the degree of volume change heard with each press.
As soon as you press an NTempo key, the original volume level returns.
Fade Out
While you are in NTempo playback, you can press a keyboard shortcut that
automatically fades out playback as you tap – anywhere in the score.
1. In NTempo, at any beat you want to start decreasing your volume, continue tapping with the Z key.
» While you control the tempo with each tap, your output volume decreases smoothly.
2. Pressing any NTempo key (A through ‘) restores playback to the original volume level.
Fade In
Optionally, you can begin NTempo playback with a software-generated fade in. By tapping with the X key, playback
automatically begins at silence and gradually increases with each tap. You can continue using the X key for
tapping or – after you reach normal playing volume – you can switch at any point to the keys on the “A” row.
TIP: Don’t jump to a key on the “A” row too early: the rst press automatically restores normal playback volume.
4.13
Page 69

Skip Repeat
On scores with repeat bars, performing always follows repeat signs in the score. However,
if you need to take a repeated section once, and only take the second ending (if used),
there’s a Take Next Repeat keyboard shortcut/MIDI key you can press.
Take Next Repeat (Skip Repeat)
To inform Notion to disregard an upcoming repeat bar/rst ending:
1. Wait until you Enter a repeat (the playback marker passes the left repeat sign).
2. On an obeat, press the equals ( = ) key or A# above Middle C on a MIDI keyboard (default key). You do this on an
obeat because this does not play the next note in the NTempo sta.
TIP: if a section is marked to repeat three times, then press the equals key twice to specify the last time through.
Jump Out of a Repeat
If, for any reason, you need to jump immediately out of a repeat, you can press the Tab key (or B below
Middle C on a MIDI keyboard). This happens to be the same key you press to jump out of a vamp.
4.14
Page 70

MIDI Keyboard: Defaults
You can use an external MIDI keyboard to control NTempo to perform a score. The major advantage to using a hardware
controller instead of keys on a computer keyboard is most models are velocity sensitive: the harder you press keys, the
louder the sound. Thus, you can control tempo and volume at the same time with a MIDI keyboard. You can use the
defaults from the factory (detailed below) or customize one, some, or all the commands to suit your own preference.
Any key on your keyboard that is not already assigned a command will sound a
piano. This is convenient for pitches, tunings, and playing live.
Before you can use a MIDI device, you must inform Notion of the device you will use for MIDI
input signals. You only have to do this once (as long you use the same device).
MIDI Keyboard Defaults
By pressing certain keys within a two-octave range on the MIDI keyboard (from C3 to C5; middle C is
considered C4) you can access NTempo features to perform a score. Roughly speaking, the lower octave
covers navigation and special features; the upper octave primarily covers NTempo operation itself.
Listed Alphabetically by Function
Auto-Cruise F#4
Auto-Resume G#4
Cuto/Pause/Move to next note in NTempo sta D#3
Fade in A4
Fade out B4
Jump out of vamp or repeat B3
Move back by measure C3
Move forward by measure D3
Move back by note in the NTempo sta C#3
Move forward by note in the NTempo sta
or Cuto
Move to next rehearsal mark or song G#3
Move to previous rehearsal mark or song F#3
Move back where you last started A#3 once
Move back to the beginning A#3 twice
NTempo (perform) Any of the following: C4, D4, E4, F4, G4
Stop C5
Take next repeat / Skip repeat A#4
Vamp - anticipated (in a repeat) C#4 or D#4
Vamp - sudden (choose number of measures) A3 (previous measure), G3 (previous 2 measures),
D#3
F3 (previous 3 measures), E3 (previous 4 measures)
4.15
Page 71

Listed By Key:
C below Middle C Move back by measure
C# Move back by note in NTempo sta
D Move forward by measure
D# Move forward by note in NTempo sta; works as a cuto or pause
E Vamp previous four measures
F Vamp previous three measures
F# Move back to previous rehearsal mark
G Vamp previous two measures
G# Move forward to next rehearsal mark
A Vamp previous measure
A# Once: back to where you last started
Twice: back to the beginning
B Jump out of vamp or repeat
Middle C key NTempo
C# Vamp (anticipated)
D NTempo
D# Vamp (anticipated)
E NTempo
F NTempo
F# Auto-Cruise (tempo set by you)
G NTempo
G# Auto-Resume (tempos set by score)
A Fade in
A# Take next repeat / Skip repeat
B Fade out
C above Middle C Stop
4.16
Page 72

MIDI Keyboard: Customize
If for any reason you want to reassign any (or all) the keys on the MIDI keyboard for NTempo
commands, you can open Performance Commands to switch from factory-set default keys to your own
customized layout. The key assignments you specify will be in eect across all scores, until you make
another change. And it’s easy to return back to default settings at any time in the future.
You will press notes on the MIDI keyboard to assign keys to specic commands, so before you begin you need to inform
Notion of this MIDI input device (if you haven’t done that already). See Set Up MIDI Devices in Chapter 1 for details.
Explore Performance Commands
Since this is an application-level preference, not a score edit, you do not have to be in Edit mode. Go to the menu bar and
select File > Performance Commands (Mac - Notion>Performance Commands). The following dialog box displays.
Performance Commands dialog box.
A
B
C
D
E
F
G
H
A Current note – The key you are currently pressing down. On most keyboards Notion interprets Middle C as C4.
B Record button – The button you press rst to change a key assignment for a particular command.
C Command – A particular NTempo performance feature. Each row represents a separate command.
D Assigned key(s) – The one or more MIDI keyboard keys currently assigned to each command. A text of none indicates
the command is currently unavailable for use.
E Clear button – Automatically removes the current key assignment for a particular command and places none at the
assigned key area.
F Default button – Returns the default key setting for a particular command.
G Reset button – Returns the default key settings for all commands.
H Close button – Saves all your changes and closes the dialog box.
4.17
Page 73

Change a Command’s Key
You make changes to the layout one command at a time. You rst set to none a key you
want to use for another command; then assign that key to a new command.
1. In the row that has the command you want to change, press either the command text itself or the REC button.
» The two buttons turn red and the REC button’s text changes to STOP.
2. Press a key on the MIDI keyboard.
» The Current Note area at the top displays how Notion interprets the key’s pitch (while you hold down the key). If
the note appears in a red color, it is unavailable. If the note is available, its pitch appears next to the command.
3. If you want to assign multiple keys to the command, simply press another available key on the MIDI keyboard.
» The additional pitch appears next to the other(s) you selected, arranged in ascending pitch order.
4. When you nish selecting the key(s) you want to assign to this command, click the red STOP button.
5. When you have the layout to your liking, click the Close button.
Return to Defaults
8 To return a particular command to its factory-set key default, press the Default button. Nothing happens if that key
is currently assigned to a dierent command (set the key’s current command to none and try again).
8 To return the entire list back to factory-set default keys, press the Reset all to Defaults button at the bottom of the
dialog box.
8 When you have the layout to your liking, click the Close button
4.18
Page 74

MIDI Keyboard: Live Play
If you have a MIDI keyboard, you have the option of playing anything you want – with any instrument sounds
Notion can reach. With Live Play you can try out a solo on any available instrument (even from non-Notion
sources such as VSTi and MIDI Out) as a solo – or with accompaniment as you play any score. All you do is
select a part in a score, and everything you play will sound for that instrument. If the keyboard is velocity
sensitive, then you can also control volume levels as you play: the harder you strike, the louder the sound.
If you do not hear the instrument, check to ensure your MIDI keyboard is sending MIDI information to Notion through a
dierent channel than the one you are using for NTempo. You identied this channel in Chapter 1: Set Up MIDI Devices.
Play Alone
You can play an instrument’s sounds, completely free-form.
1. Open any composition that has a sta with the instrument you want (any sound source).
2. Ensure you are in Edit mode.
3. Click on any measure in the score for the instrument you want to play so a light yellow box appears at that spot in
an editing marker.
4. Play anything on the MIDI keyboard.
» Notion supplies the sound samples of the instrument you clicked for the keys you press. If you press a note that is
outside of the available samples for the instrument, you hear nothing during the key press.
5. You are free to click any measure assigned to a dierent instrument to change to a dierent instrument sound.
Play Along With a Score
It’s fun to play your choice of instrument with a Notion score supplying the accompaniment.
1. Open any score.
2. Ensure you are in Edit mode.
3. Add a sta and assign the instrument you want. Or, if there is an empty sta already in the score, you can use that.
NOTE: If the sta you select contains notes, then you will hear the sta’s written notation during play, which is not
what you want for soloing. But you are free to select a notated sta if this is exactly what you want (say, for doubling
or experimenting with ideas for a second voice part).
4. Click on any measure in the score for the instrument you want to play so a light yellow box appears at that spot in
an editing marker.
5. Click in the score where you want to start. Then either press the Spacebar or click the button.
» While you hear Notion play the score you are completely free to play anything (within the range of samples
available) on the MIDI keyboard.
6. You are free to click any empty sta assigned to a dierent instrument if you want to change to a dierent
instrument sound.
4.19
Page 75

CHAPTER 5: THE MIXER
Channel Strips ...........................5.2
Fader ................................5.3
Pan, Mute, and Solo .................5.4
Insert VST Effects ....................5.5
VST Manager ............................5.6
Master Channel Strip ....................5.8
CSR Hall Reverb .....................5.9
AmpliTube X-Gear ..................5.11
Buses ...................................5.12
Output Button ..........................5.14
Send to External Equipment ............5.16
5.1
Page 76

Channel Strips / VSTi + / ReWire
Each channel strip in represents a separate instrument in your score. Large scores will therefore have a
large number of separate instrument channel strips – too many than can be comforTably viewed at one
time. Thus, you view a few channel strips at a time, grouped by dierent instrument sections.
Click a Section Name to See Instruments in That Family
You view a particular section by clicking one of these buttons that appear to the left of the Mixer console window:
8 All instruments, in the order they appear (top to bottom) in the score. This button does not appear if there is only
one instrument in the score.
8 Brass instruments in the order they appear in the score.
8 Keyboard (Keybd) instruments in the order they appear in the score.
8 One or more Harps parts.
8 Percussion (Perc.) instruments in the order they appear in the score.
8 Rhythm instruments, such as guitars and drum kits.
8 SoundFX (eects) such as handclaps, thunder sheet, and whistles.
8 All Strings in the order they appear in the score.
8 All WWinds in the order they appear in the score.
If you do not have an instrument for a particular section, you do not see the button for that section.
If there are more channel strips in a section than can appear comfortably in this area,
then scroll left and right with the scroll bar at the bottom of the window
Show/Hide Master and Buses
Buttons on the left-hand side of the Mixer’s top panel enable you to see or hide the Buses, or Master channel
strips, or all eight. By hiding these, you get to view more instrument channel strips at a glance.
8 A blue Bus (auxiliary) button has the eight Bus channel strips shown. Click this button once to hide the buses.
8 A blue Master button has the Master channel strip show. Click this button once to hide it from view.
VST Insert Bank (1-4 and 5-8)
Click to toggle between the two banks of VST eects - there are 8 available per channel.
VSTi +
Click the VSTi button to setup multiple audio inputs from a VST instance in your score. You will also
need to setup the outputs from the VST (where multiple outputs are supported - e.g using something
like Kontakt or VSL Ensemble). See chapter on multi-channel tracks for more infor on page 9.12
ReWire
Click the ReWire button to setup up the incoming channels from slave applications, when
Notion is a ReWire host. See ReWire chapter on page 9.15 for full setup info
5.2
Page 77

Fader
On an individual instrument basis you can control gain (volume).
View Volume Levels
A familiar “LED” display represents the volume of the instrument during playback. This peak meter dynamically displays
a part’s current output volume - the louder the sound, the longer the bars become as they reach towards the top of
the display. You are warned with red bars when the output is saturated and is susceptible to distortion or clipping. The
same information you see displayed here also displays in the volume indicator next to the Mixer button in the toolbar.
If you happen to hear distortion in Notion output, watch these meters during playback. To help
you quickly identify instruments that might be producing distortion and need to be lowered
in volume, each channel strip that went into the red keeps the red portion of the meter lit,
even after the instrument softens or you stop playback. To remove this red warning, doubleclick anywhere in the red area. Then lower the instrument’s volume and try playback again.
TIP: If an instrument that once operated at an acceptable level now plays back overly
hot, determine if it is the addition or editing of a VST eect that has caused the dierence.
Adjust Volume
To raise or lower the total output volume of an instrument, go to its channel strip and drag the fader
knob up (louder) or down (softer). This knob controls output by decibels (dB). The optimal setting, 0dB,
is about a third of the way down from the top. All the way to the bottom reduces the volume by -60dB.
All the way to the top boosts the volume by +10dB. Be aware this means moving the knob below 0dB
produces volume changes at a much steeper logarithmic curve than movement above 0dB.
If you prefer to Enter numbers:
1. Double-click anywhere on the fader knob.
Volume too high.
» A temporary text box opens, with the current level displayed.
2. Replace the current number with the number you want (0-9 decimals are supported). Use the prex of a minus sign
at levels below 0db. Use the prex of a plus sign (or no prex) at levels above 0db.
3. Then either press Enter or click anywhere in the mixer away from the text box.
The Art of Mixing
For individual instruments, the best level is where the instrument you’re working on “ts” the best with all other
instruments playing at the same time. Mixing is mostly an art, subject to individual preferences. First play the score
at its loudest point to ensure you have the faders below the point they cause distortion, then adjust levels to suit.
When in doubt, begin mixing with faders at 0 dB (the recommended setting to leave the Master channel strip).
Of course, constantly adjusting the Mixer is counterproductive: set gross levels at the Mixer and either netune the dynamics in your score, or edit note velocities with Tempo Overdub, or a little of both.
5.3
Page 78

Pan, Mute, and Solo
Panning
Immediately above the fader are controls for panning (specifying the left-right placement of the instrument in stereo).
With the stereo sounds of Notion, you have two dimensions to specify: left/right placement and “width” of the sound.
You drag the L dot (for left speaker) and/or the R dot (for the right speaker) to specify the sonic
placement of the instrument in a stereo eld. The further away you want the instrument to sound,
the closer you bring the L and R dots together anywhere across the axis. Placing left stereo channel
far left and right stereo channel far right is optimum for a close- to medium-mic’d sounds.
TIP: “Studio” recordings often keep a fairly wide separation between the L and R dots, but plant the two dots
at dierent horizontal positions on all instruments for a “you are right there” feel. “Concert hall” recordings
shorten the separation between the L and R dots and plant them by sections as a conductor would expect to
hear them standing in front of an orchestra (remember to keep the L and R dots wide for solo instruments).
If you prefer to Enter numbers:
1. Double click on the C, L or R dot.
» A temporary text box opens, with the current level displayed.
2. Replace the current number with the number you want (0-9 decimals are supported). All the way to the leftmost
point is -1.0 and all the way to the rightmost point is +1.0. The cEnter is 0.0.
3. Then either press Enter or click anywhere in the mixer away from the text box.
Mute and Solo
Conveniently located on the Mixer panel for each instrument are Mute and
Solo buttons you can set up during editing or before playback.
8 To mute an instrument so it is not heard, click the Mute button.
> Click again to end the mute.
> You can click Mute in multiple panels to mute multiple instruments.
> Not only is this feature helpful to isolate sounds during editing, it also oers quick muting of one or more
instruments so you can have live musicians play those instruments along with Notion.
8 To automatically mute all instruments except one, click Solo. All other instruments all automatically become muted
> To listen to more than one solo instruments, click Solo on two or more instruments.
5.4
Page 79

Insert VST Eects
You can assign up to eight VST eects from third-party manufacturers to the Insert buttons at the
top of each Mixer channel strip. An Insert button that has an eect assigned to it turns blue.
TIP: The more you “share” the same eect across a number of instruments, the less computer
memory you consume (always a good idea for playback, especially with large scores).
When possible, place eects on all parts at once or any subset of instruments.
To assign a VST eect to a particular instrument or bus/master channel strip:
1. Click any Insert button in the channel strip. When you rst click an unused Insert button, a menu opens so you can
assign an eect.
» A menu lists the VSTs on your computer known to the VST Manager.
◙ Example VST list
If no menu items appear, or not all the VSTs you have on your computer appear in the list, open and use
the VST Manager (see next topic).
2. Click the VST name you want to open for this channel strip.
» Notion immediately opens the eects source you selected. You save this setting the next time you save your le.
Refer to the instructions from the third-party manufacturer on details on how to operate the VST you opened.
Access VST Eect
Click an Insert button once. You view the assigned VST’s graphic interface.
When there is an eect assigned, but you need to view the menu of VST options (perhaps to
switch to a dierent VST module), hold down Shift as you click the Insert button.
Integrated Guitar Amp (Amp Sim)
8 Open the Amp Sim in the mixer by selecting an insert in the mixer.
8 The Amp Sim should appear on the screen.
8 Select one of four amp types (Clean/Modern at 1”, Blues/Modern at 2”, Distorted/British, Heavy/Metal), and
customize the settings even further using Resonance frequency, High Pass Filter, Gain, and Output.
5.5
Page 80

Plug-in Manager
With the Plug-in Manager you make your choice of VSTs and VSTis known to Notion and selectively remove
from consideration other ones (while keeping them installed on your computer). If you have one or more
installed VSTs that do not appear in an Insert button’s menu, or installed a VSTi that does not appear
when you are in the process of adding a new sta in Score Setup, complete the following steps.
Open Plug-in Manager
8 Go to the Menu bar and select Windows: File > Plug-in Manager Mac: Notion > Plug-in Manager.
8 In the Mixer, click on any unlit Insert button. At the bottom of the menu is the Plug-in Manager.
8 When you add a new sta to your score, you can click the Plug-in Manager button located in the lower left corner
of the Instrument or Notation/Tab Ta b.
The dialog box opens with a list of VST/VSTi modules Notion currently knows.
Example of the Plug-in Manager .
Disable/Enable an Eect
When you decide to disable an eect in the list, its name will not appear on the Insert key menu
(of course, it remains installed on your computer). Click an enabled eect VST (or select multiple
ones by holding down the Windows: Ctrl Mac: key and clicking any number of them) and
click the Disable button. Now descriptions of these eects show not enabled on each.
You can enable any number of not enabled VSTs. Click a not enabled VST (or select multiple ones
by holding down the Windows: Ctrl; Mac: key and clicking any number of them) and click
the Enable button. Now descriptions of these eects show enabled eect on each.
Delete Altogether
If you uninstall a VST/VSTi from your computer, then the next time you open the Plug-in Manager
you will see that item with the status of Missing in this list. To remove the uninstalled VST/VSTi from
the Plug-in Manager, highlight it and press the Disable button. The item no longer appears.
5.6
Page 81

Add a New VST or VSTi
If you installed a VST eect or VSTi and it does not appear on this list, click Browse. In the Open dialog box,
browse to the location of the module. Either select certain ones directly (hold down the Windows: Ctrl
Mac: key and click any number of VSTs) or select the folder to enable all the items inside the folder.
Before you exit Plug-in Manager, ensure all your new entries are enabled.
If you are using Notion in 64-bit mode, then only 64-bit VST can be enabled. For 32-bit plug-ins we
recommend using J-Bridge - you may need to run as administrator when using J-Bridge.
Exit Plug-in Manager
When ready, click the Close button to keep your changes and close the Plug-in Manager dialog box.
If the next screen you view happens to be Score Setup, be aware that changes you make in the Plug-in
Manager will not appear right away in this screen’s palette of options on the right. However, if you close
Score Setup (such as by clicking the Exit Score Setup button near the top cEnter area of the score area)
and open it back up (such by clicking the button in the Toolbar), then your changes will appear.
PreSonus Native Eects™ from Studio One: EQ, Compressor, Limiter
To use the PreSonus eects, click the insert buttons in the mixer and select which eect you require.
EQ: The EQ lets you independently adjust levels of low, mid and high frequencies. Each frequency
band can be turned on or o. The top dial alters the frequency lter, with each band adjustable with
the gain control from -15dB to + 15dB. The lter Q (bandwith/resonance) can also be adjusted.
Compressor: The compressor lets you reduce gain for signals above a certain level. The Ratio species the amount
of compression (attenuation) that is applied; the threshold is the level at which the processor starts compressing,
the gain is to make up for the compression-induced reduction in level; attack time is the time it takes for the
signal to get fully compressed; release time is the time it takes for the signal to from the processed state back to
the original signal; the soft knee allows for a smoother transition between processed and unprocessed states.
Limiter: The Limiter prevents the output from exceeding a set level, to
prevent clipping. Select the required level with the Threshold knob.
5.7
Page 82

Master Channel Strip
By default, the sounds from all instruments generated by Notion or VSTi modules arrive at the Mixer’s
Master channel strip for nal mixing before the output goes to your computer’s sound card. Since
this is a centralized end point, this is a convenient place to control overall gain, pan, and eects.
Access the Master Channel Strip
If the Master channel strip is not currently visible, click the Master button (located in the upper right
of the Mixer window). This button turns blue when the Master channel strip is visible. Conversely, you
can click this button to hide the Master so you can see more instrument channel strips at a glance.
Control Gain, Pan, and Eects for All Instruments at Once
Familiar fader, panning, solo/mute, and Insert buttons appear on the Master and operate
the same way as they do on individual instrument channel strips: the dierence is
now your settings aect the total sound going to your computer’s sound card.
8 You reduce computer memory demands the more you “share” the same eect across as many
instruments as possible. For that reason, it is highly ecient to use Insert buttons on the Master,
to place up to eight eects on all instruments at once.
8 As a gain controller, for best results try to keep the Master channel strip at zero decibels (look
for the zeros about a third of the way down from the top in the fader) and then adjust individual
instruments to that setting.
8 Usually, you leave the default setting for panning. But for unique production requirements, such
as a digital audio workstation that will be drawing on other sound sources along with Notion, you
are free to alter the panning of Notion’s audio output.
*The default location of the built-in Notion reverb is in the Master Channel. Click
the insert on the Master Channel to view and edit reverb settings.
5.8
Page 83

Buses
The best way to ne-tune the audio for any subset of the instruments in your score is to use
buses. There are many creative ways to use buses, such as controlling the volume of any
number of instruments you select or placing particular eects on some instruments.
The Notion Mixer console supplies eight separate stereo buses (labeled A through H).
Access the Bus Channel Strips
If the bus channel strips are not currently visible, click the Bus button located in the upper right of the Mixer window.
Conversely, you can click this button to hide the buses so you can view more instrument channel strips at a time.
Control Gain, Pan, and Eects for Any Subset of Instruments
Familiar fader, panning, solo/mute, and Insert buttons appear and operate the same way as
they do on individual instrument channel strips: the dierence is now your
settings aect only the instrument sounds you send to a bus.
8 You reduce computer memory demands the more you “share” the same eect across as many
instruments as possible. For that reason, it is highly ecient to assign an eect to an Insert button
on a bus and send any number of instruments to that bus.
8 If pan or gain settings aect a group of instruments equally, it’s quicker to send these instruments to
a bus and control them with one control than going to each instrument and resetting these controls
individually.
The Send Controls on Instruments
The way you send instrument sounds to buses is by your setting of the
Sends controls on individual instrument channel strips.
Example of Sends near the middle of an instrument channel strip.
You’ll notice there are no on/o switches to the buses: every instrument has all eight
sends always enabled! However, the default setting for each bus send is zero (the same
eect as an “o” condition). If you display a number (up to 100) in a circle in the righthand column, you send that approximate percentage of the audio signal to the pertinent
bus – in addition to the signal going straight to the Master channel strip.
5.9
Page 84

To set a number in any circle, complete one of the following:
8 Click the circle once then drag your mouse upward to increase a number or downward to decrease it. (You can also
use a left/right motion, if you prefer). Then click anywhere in the mixer away from the circle to keep the number.
8 If you prefer to type in a number, click a circle once. A temporary text box opens with the current number displayed.
Replace the current number with a new value between 1 and 100. Decimals 1 through 9 are supported. Then click
anywhere in the Mixer away from the box to keep this number.
A ring travels around the circle (clockwise) in proportion to the percentage you Enter. This gives
you a quick graphical representation of the relative levels you Enter. Also, a circle still at zero has
a gray background; a circle with any number above zero has an orange background.
Example
With default settings, sounds from each instrument panel end up at the Master channel strip. When you use a send, you
split the sound between this path and at least one bus. Let’s say you wanted the strings (and only the strings) to have an
echo eect (say, for a suspenseful build-up in a stage production or soundtrack). First, you nd a VST with an echo eect
you like. Since you are going to put this eect on more than one instrument, you insert this VST onto a bus (let’s say Bus A).
Then you go to the channel strip for each string instrument and set the Send at Bus A to around 75. Now the straight
sounds of the strings arrive directly to the Master – along with an echo from Bus A. By the time you hear the signals out
of your sound card, it sounds like a single sound, but actually there are two signals coming together. By moving the fader
on Bus A you are actually adjusting how much the echo complements (or overpowers!) the direct sound of the strings.
Another Example
Let’s say you wanted the horn section (but only the horns) to sound like they are coming out of a 1940s car radio. One
way to do this is to dramatically reduce the frequency spread with an equalizer VST. Since you are going to put this eect
on multiple instruments, you insert this VST onto a bus. And then you set the Sends to this bus on all the horn channel
strips to a high number. But in this case you hear that the straight sounds coming from the instrument channel strips
contribute frequencies that actually spoil the “early radio” eect. In this example, you would like to hear how the horns
sound when they are heard through the VST only. This is easily done with the Output button, detailed in the next topic.
5.10
Page 85

Output Button
By default, all sounds from all instruments directly route to the Master channel strip. If you send to
a bus, then some audio signals also route to bus channel strips (and then join up with the direct
signals at the Master channel strip). Signals from the Master channel strip then route to your sound
card to analog outputs (such as line out and headphone connectors) on your computer.
With the Output button (located at the bottom of each channel strip), other options
become possible. You can go to certain instruments and have these signals:
8 Route entirely to one or more bus channel strips for processing. Then signals can either go to:
> The Master channel strip, or
> Out to external equipment.
8 Or, route immediately from instrument channel strips directly out to external equipment.
Also, you can use the Output button at the bottom of the Master channel strip
to route Notion audio out from there to external equipment.
While there are many creative uses of this button, this topic illustrates its use with two examples: play eect
only and control volume and pan for groups of instruments. The next topic discusses how you can use
the Out button to send instruments through certain digital audio channels to external equipment.
Access the Output Button Options
Clicking the Output button displays a menu of options where you designate where the instrument’s sounds will go.
8 Master is the default setting: the instrument’s sounds route to the Master channel
strip and will also route to one or more buses, if you use them.
8 Sends Only switches o routing sounds directly to the Master and routes all the instrument’s
sounds to one or more bus channel strips. From there you can decide whether to send the
processed sounds on to the Master (the default) or (using the Output button on the Bus
channel strip): directly out over digital audio channels to external equipment.
8 The various channel options direct the instrument’s sounds directly out a certain stereo
channel (for routing to audio card).
Top portion of menu
Play Eect Only
With the Output button, you have the option to completely stop sending an instrument’s sound directly to the
Master channel strip. This means the only sounds you hear in the Master’s nal output from this instrument are
sounds that have been through the bus channel strip only (no direct “pure” sounds route to the Master). This can
produce heightened or exaggerated results (depending on your settings) when used with one or more VST eects.
1. Set up a bus channel strip with the VST eects, pan, and other settings you want.
» NOTE: do not change the Output button default selection of Master on buses themselves. You only need to
change this button on individual instruments in steps 3-4.
2. Find the channel strip for an instrument you need to send to this bus.
3. Click the Output button at the bottom of the instrument’s channel strip.
» A menu appears. The default selection is Master.
5. Select Sends Only.
6. Enter a number in the appropriate bus’s circle. Since this adjusts in real time, you have the option of playing your
score while adjusting this number.
Repeat steps 2-5 for the remaining instruments you want to have the same sound.
» Your changes are saved the next time you save the le.
5.11
Page 86

Control Volume and Panning for Groups of Instruments
Since Notion reads and responds to dynamics and other score markings in an exacting manner, you can
go to a part that sounds a little drowned out and give that instrument a louder dynamic marking (or,
placing a softer dynamic marking on loud instruments). After you save your change, the score retains
the balance you wanted for every playback afterwards. This serves many situations well, especially
when Notion is operating alone or as an accompaniment. In situations where Notion contributes to a
larger production, such as a live theatrical performance, some directors are more comfortable having
the Notion operator have instant access to instrument sections of the Notion score for immediate
volume or panning adjustment to cover unforeseen events or varying hall characteristics on a tour.
The best way to do this is to use an external mixing board fed by the Notion computer (see next topic).
However, if budgetary or space considerations prevent this, the next best thing is to use the faders on
the bus channel strips just as you do the faders on a mixing board. As you did in the above example,
you cut o the direct signal to the Master and route all instrument through the bus channel strips.
1. Since there are eight buses (A through H), decide ahead of time how you will divide up the instruments in
your score between these eight channel strips.
2. Set up the bus channel strips at the same gain control level (try 0db to start).
TIP: to leave “room” to push a section louder, don’t set higher than 0 dB, to start. Also, unless there is
specic need for one group of instruments to have a specic eect, remove all eects on these channel
strips.
3. Find the channel strip for an instrument and click the Output button.
» A menu appears. The default selection is Master.
4. In the menu, click Sends Only.
5. Using the list you made in step 1, Enter a number (try 100, to start) in the appropriate bus circle in the
Sends area.
6. Complete steps 3-5 for all instruments.
7. During playback, use the faders on the eight bus channel strips as you would on a mixing board. You can
also adjust the panning controls, if needed.
5.12
Page 87

Send to External Equipment
By default, sounds from Notion instruments route to your computer’s sound card. All mixing of instrument
sounds and eects are completed by that point and you can hear your nished score played through
speakers, headphones, or a house amplication system you hook up to your computer’s analog output
connectors. But you can also quickly set up Notion to send digital signals to professional equipment in
theaters or studios, where nal mixing (and, in many cases, adding eects) is completed completely outside
of your computer, such as at a mixing board or a Digital Audio Workstation (DAW). To support this, your
computer must have a USB, Firewire, S/PDIF, or similar digital feed that can carry multiple stereo channels
to an external audio distribution box, digital mixer, DAW, or similar external production equipment.
There are two major ways to sent up external digital routing with Notion, one is ideal for eight or fewer
separate stereo channels, and the other is intended for up to 32 separate stereo channels.
Up to Eight Stereo Channels
In this procedure you send the various instruments in your score to the eight bus
channel strips for routing to your choice of eight stereo channels.
1. Since there are eight buses (A through H), decide ahead of time how you will divide up the instruments in your
score between these eight destinations.
2. Set up the bus channel strips at the same gain control level (0db is preferred) to start. Unless there is specic need
for one group of instruments to have a specic eect, remove all eects on these channel strips.
3. Click the Output button on each bus channel strip and select your choice of stereo channels (a dierent pair for
each bus).
4. Go to the channel strip for an instrument and click the Output button.
» A menu appears. The default selection is Master.
5. In the menu click Sends Only.
6. Using the list you made in step 1, Enter a number (try 100) in the appropriate bus circle.
7. Complete steps 4-6 for all instruments.
Up to 32 Stereo Channels
In this procedure you send the various instruments in your score to your choice
of up to 32 stereo channels, bypassing the buses altogether.
1. Decide ahead of time how you will divide up the instruments in your score between the 32 (or fewer) destinations.
2. Go to the channel strip for an instrument and click the Output button.
» A menu appears. The default selection is Master.
3. Using the list you made in step 1, select one of the stereo channel pairs for this instrument.
4. Complete steps 2 and 3 for all instruments.
5.13
Page 88

CHAPTER 6: EDITING TOOLS
Edit Mode Operation ....................6.2
Select and Highlight .....................6.4
Undo and Redo ..........................6.6
Cut, Copy, and Paste .....................6.7
Delete and Substitute ...................6.8
Clear and Clear Special .................6.10
Hide/Show Score Objects ...............6.12
Duplicate ...............................6.13
Express Entry Mode .....................6.14
6.1
Page 89

Edit Mode Operation
Notion operates either in NTempo mode or Edit mode. You are in Edit mode when the button in the toolbar
is grey. If it is blue, you are in NTempo mode (click the button to switch to Edit mode). As the names suggests, you
must be in Edit mode to make any change to a score. You will notice several changes from NTempo mode operation:
8 You can view and use the Entry Palette only in Edit mode.
8 You view a light gray editing marker, only seen in Edit mode (discussed below).
8 There’s a new type of cursor, called the Music Cursor, you use to add marks to a score.
8 Performing a score (NTempo playback) has a few dierences before you start and after you stop.
8 In Edit mode you can play or perform just the measures and instruments you highlight.
8 The number of keyboard shortcuts expand to oer editing options (see topics in this and following
chapters for details).
Editing Marker
As a visual alert you are in Edit mode, the playback marker takes on a light gray color, not seen in NTempo mode. When
you click on a sta with the Pointer in Edit mode, the place where you clicked receives a yellow box (see top sta in
illustration) and a light gray bar (called the editing marker) extends to all the other staves in the system at that beat.
Click a staff with the Editing marker
Use the Music Cursor
The Music Cursor is a special cursor that only appears in the score area and only when you are in Edit mode. Almost
everything you can add to a sta you rst place on the Music Cursor (from the Entry Palette or a keyboard shortcut, such
as pressing the p key for a mark). As you move the cursor around the score area, you view a representation of the
symbol in one of two ways:
8 When the Music Cursor hovers over an area where you can add the symbol, you see the symbol in a solid black color
along with a dark gray highlight bar at that beat across all the staves in the system. A transparent box in the gray bar
indicates the specic area involved .
8 When the Music Cursor hovers over an area of the score where you cannot add the symbol, you view the symbol in a
light gray color with no dark gray highlight bar.
◙ A metronome mark can be added here... ...but it cannot be added here (too high). Notice the mark is light gray in color.
6.2
Page 90

As an example of how the Music Cursor works, here are the steps to adding a Fermata symbol:
1. Ensure you are in Edit mode. Have the Entry Palette visible.
2. In the palette, hover over the fourth pane from the right: .
3. In the pop-up menu click the Fermata symbol.
» Notice you have a representation of that symbol on your Music Cursor.
4. Position the Music Cursor so the fermata is in the location where you want it to appear in the score.
◙ Position the symbol where you want it.
5. Either click your mouse or press Enter.
» Once you add the symbol to a sta, it appears in a solid black color.
◙ The symbol is now part of the score
To quickly return the cursor from the Music Cursor back to the Pointer shape, either:
8 Press Esc, or
8 In the Entry Palette, hover over the rst pane and, in the pop-up menu, click the Pointer symbol.
Use NTempo While in Edit Mode
Performing a score with NTempo has a few major changes in Edit mode, to ensure you can quickly make edits to the score:
8 You rst tell Notion that you want to use NTempo.
> To tell the software where you want to start tapping, click the beat you want to begin, in any sta.
» The editing marker appears at this beat across all staves in the system.
> Press Shift + Spacebar.
» Now you can begin tapping.
> You can set an automatic loop by selecting the number of measures to loop, followed by R. (e.g., 2, R).
To be complete, we should mention that you can also begin by playing a score (with the Spacebar or Play button)
and at any point switch to NTempo simply by tapping a key on the “A” row (or an NTempo key on the MIDI
keyboard).
8 Whenever you stop (with the Stop button , Esc, or Spacebar), you come out of NTempo playback and
immediately return to Edit mode. (You remain in NTempo playback if you use the Q key to pause.)
6.3
Page 91

Select and Highlight
To inform Notion which items in your score you want to edit, copy, or delete, you rst select or highlight them. With
click-select, you click your mouse on one or more existing items. With highlight, you “draw” a box around them.
Click-Select Items
With your cursor as the Pointer (select tool), you can click-select an existing item in your score to edit it.
8 A click-selected item turns orange in color to show it is selected.
8 To click-select multiple items, hold down the Shift or Ctrl key as you click any number and mix of items anywhere in
the score. Release the key only when you select all the items you want. Each item you click is orange in color.
8 To select a chord, double-click any note in the chord.
8 If you have a selection highlighted, you can also press Enter to select all the notes within the selection
Highlight Items
To quickly select large areas of your score, you can draw a highlight box around any number of contiguous items to create
a range selection.
1. Ensure your cursor is the Pointer. If needed, press Esc to switch to this cursor style.
2. Hold down a mouse click at the starting point and drag the Pointer. You can start and end in any direction within
one sta or across multiple staves (as in the example below).
» Notion highlights the area you select.
3. Release your click when you have highlighted the area you want.
TIP: To quickly highlight a large area or multiple pages, create a small
highlight at the beginning. Then hold down the Shift key and click an item in your score at the end point. Notion
automatically highlights all measures in-between.
4. To speed editing when you have multiple parts in a score, Notion draws boxes around other markings in other
staves that are also at this location. If a box is shaded, its contents are selected. If a box is unshaded, then its
contents will be left alone. Simply hold down
[Windows: Ctrl; Mac: ] and click a box to change its select status.
Drawing a highlight over two staves.
◙ The middle staff (with quarter notes) is not highlighted so it will not be edited.
» The highlighted items can now be edited as a single group.
5. You can also use keyboard shortcuts to achieve this. Press Enter at the point you wish the selection to start, then
extend the selection using Alt + up/down/left/right arrows
You can extend the selection by a measure too Windows: Ctrl + Alt + up/down/left/right arrows; Mac: + Alt +
up/down/left/right arrows.
6.4
Page 92

Quickly Highlight a Measure
To quickly highlight certain staves (same measure):
1. Ensure your Music Cursor is the Pointer, then either:
> Double-click anywhere in the measure, or:
> Press Alt + A
» Notion places an empty box in this one measure in all staves in the system. Only the sta you clicked is selected. If
this is all you need, you are done with this procedure.
2. To also include one or more of the currently unselected measures, hold down [Windows: Ctrl; Mac: ] and click
anywhere inside an empty box. In the example below, only the middle instrument is highlighted. By clicking the top
box, the measure’s two top instruments are highlighted.
◙ Quickly select the two top instruments.
Quickly Highlight an Entire Part
You can highlight a certain instrument throughout your score in just a few keystrokes:
1. With the Pointer, click anywhere in the sta for the particular instrument you want to highlight.
2. Press the keyboard shortcut of Windows: Shift + Ctrl + A; Mac: Shift + + A.
» Notion highlights only this instrument throughout the score.
Quickly Highlight Everything
To quickly highlight the entire score, either:
8 Go to the Menu bar and select Edit > Select All, or
8 Press Windows: Ctrl + A; Mac: + A.
» Notion highlights all items in your score.
6.5
Page 93

Undo and Redo
Part of the creative process involves changing your mind. Undo and Redo are two quick ways to alter recent
edits. Notion oers a number of other ways to delete or substitute items already on your score.
Undo
With Undo you reverse a previous edit (even after saving a le if you have not closed it yet). Selecting
Undo once reverses your last edit. Selecting Undo twice reverses the last two edits you completed, and
so on. These are always in reverse sequence and you cannot “skip” over an edit in the series.
To Undo an edit you completed in Edit mode, either:
8 In the Menu bar, click Edit > Undo, or
8 Press Windows: Ctrl + Z; Mac: + Z.
Redo
With Redo you reverse an Undo. This is often used when you press Undo too many
times. You must Undo at least once before you can Redo. Either:
8 In the Menu bar, click Edit > Redo, or
8 Press Windows: Ctrl + Y; Mac: Shift + + ZWith Undo you
Icon for Undo and Redo
You can also touch the Undo and Redo icons - especially useful if you are using Notion on a touchscreen
6.6
Page 94

Cut, Copy, and Paste
Cut, copy, and paste are useful features to help save time as you create or edit your score.
TIP: Notion also oers a time-saving method of copying and pasting
measures containing repeating notation. See Duplicate.
Cut
1. Highlight or click-select content of any size in your score.
2. Complete one of the following:
> Go to the Menu bar and select Edit > Cut, or
> Press Windows: Ctrl + X; Mac: + X, or
> Right-click and select Cut in the context menu.
Once cut, you can paste the content into new locations in the score.
NOTE: Don’t confuse this cut (remove) feature with the cut marks feature, where you place
marks on your score to identify sections you want Notion to skip over during playback.
Copy
1. Highlight or click-select content of any size in your score.
2. Complete one of the following:
> Select Edit > Copy from the Menu bar, or
> Press Windows: Ctrl + C Mac: + C, or
> Right-click and select Copy in the context menu.
Once copied, you can paste the content into new locations in the score (or other scores).
Paste Replace
You tell Notion where you want to start the paste: you don’t have to rst highlight the measures aected (though you can
if you wish).
1. First, copy or cut content of any size in your score.
2. With the Pointer, select where in the score you want to paste to start by clicking once.
» Notion places the editing marker at this beat across the staves in the system with a yellow box on the sta where
you clicked.
3. Complete one of the following:
> Select Edit > Paste from the Menu bar, or
> Press Windows: Ctrl + V; Mac: + V, or
> Right-click and select Paste in the context menu.
Paste Insert
The paste discussed above replaces existing notation. If you want a paste to be an insertion,
leaving existing notation in the score, then complete one of the following:
> Select Edit > Paste Insert from the Menu bar, or
> Press Windows: Ctrl + Shift + V; Mac: + Shift + V, or
Right-click and select Paste Insert in the context menu.
Copy and Paste In/Out of Individual Voices
Select region, then right click (or go to Edit Menu) and go to Select Special, and then select which voice you wish to copy
Then place cursor where you wish to paste. Right click and go to Paste
Special, and then select which voice you wish to paste into
6.7
Page 95

Delete and Substitute
For exibility and speed, Notion oers dierent ways to change items you placed in the score area. Selecting the
method to use depends partially on what you are doing at the moment and partially on your work style.
To remove/change items you placed on a score, you can:
8 Click-select and delete any number of items, or
8 Delete what you highlight, or
8 Delete an entire part (instrument), or
8 Substitute a new duration for a note/rest – or multiple notes/rests at once.
Also, the next topic discusses Clear Special where you can quickly delete your choice of score marks.
Click-Select and Delete
Clicking is a convenient method to delete a single item or to delete any mix of multiple
items. This is especially useful if the multiple items are not next to each other.
1. Have your cursor be the Pointer. If it is currently the Music Cursor, press the Esc key.
2. To select:
> A single item, click it once.
» The item turns orange in color to show it is selected.
> Multiple items, hold down the Shift key as you click any number of dierent items. Release the Shift key only
when you select all the items you want.
» All items remain in an orange color to show they are selected.
3. Complete one of the following:
4. Press either the Delete or Backspace key, or
5. Select either Edit > Delete or Edit > Clear in the Menu bar.
» The existing items disappear. Any remaining notes and rests in an edited measure move to the left.
Highlight and Delete
If you need to delete multiple items across many staves, or spanning a large area of
your score, this method deletes everything in an area you highlight.
1. Hold down a mouse click at any starting point and drag the Pointer. You can start and end in any direction within
one sta or across multiple staves.
» Notion highlights the area you select.
2. Release your click when you have highlighted the area you want to remove.
3. Speed editing when you have multiple parts in a score, Notion draws boxes around other markings in other staves
that are also at this location. If a box is shaded, then its contents are selected. If a box is unshaded, its contents are
left alone. Simply hold down WindoWs: Ctrl Mac: – and click a box to change its select status.
6.8
Page 96

In the example below, the middle box (with quarter notes) is unshaded and will not be deleted.
◙ The contents of the top and bottom measures will be deleted
1. Complete one of the following:
> Press the Delete key, or
> Select either Edit > Delete or Edit > Clear (to empty out measures) in the Menu bar, or
> Right-click and select Edit > Delete in the context menu.
Delete a Part (Sta)
If needed, you can quickly remove certain sta(s) in your score.
1. To open Score Setup, select Score>Setup or press WindoWs: Shift + T Mac: + T.
» The score area dims and new options appear.
2. To remove one instrument, click the button to the left of the instrument’s sta.
To remove multiple parts, hold down the Ctrl key as you select dierent instruments, or hold down Shift between
rst and last contiguous staves. The aected staves all have a blue highlight. Then press the button for any
highlighted instrument.
» The instrument(s) disappear from the score.
3. To end Score Setup, click the Exit Score Setup button or press Esc.
» The score area returns to normal.
Substitute a New Time Value for One Note or Rest
You can quickly change a note’s existing time value for another.
1. Place on the Music Cursor the note time value you want, either by clicking its icon in the Entry Palette or by pressing
its keyboard shortcut.
2. Position the Music Cursor image directly on top of the existing note.
3. Either click your mouse or press Enter.
»The substitution is complete. Since the replacement value diers from the original, adjust the time values of the
remaining notes/rests in the measure.
Substitute a New Time Value for Multiple Notes or Rests
You can quickly change the existing time values for any number of notes/rests at once.
1. If the notes/rests are contiguous, highlight the section involved. If the notes/rests are scattered, select the ones you
want to change.
2. Press the equals key (=), then press the keyboard shortcut for the time value you want.
»The substitution is complete. Since the replacement value diers from the original, adjust the time values of the
remaining notes/rests in the measures involved.
6.9
Page 97

Clear and Clear Special
Notion also provides a selective version of delete, called clear. Instead of a blanket removal, clear selects specic
items for deletion. This advanced form of deletion can save signicant time with updates and ne-tunings.
Edit > Clear
The dierence between Edit > Delete and Edit > Clear is how the removal treats bar lines (measures).
With a delete, everything highlighted/click-selected, including bar lines, are removed. However, with a clear,
everything inside of measures are removed, but not the measures (marked o by bar lines) themselves.
This can save time if you intend to replace notation inside of a number of existing measures.
You can also reach Clear if you highlight or click-select any portion of the score,
then right-click. In the context menu select Edit > Clear.
Notion also oers a bulk delete that only removes specic types of score markings, called Clear Special, detailed next.
Clear Special
If you want to keep notes, rests, and chords – and only delete certain score markings (say,
articulations and tempo marks) – Clear Special can save you time. You specify what exactly you
want removed, and Notion leaves everything else that is not on your list intact.
1. Highlight the area of your score where you want to delete certain markings. (Alternately, you can click-select, but
generally that’s not as useful as a highlight for this feature).
2. Go to the Menu bar and select Edit > Clear Special. Alternately, right-click and select Edit > Clear Special in the
context menu.
» A Clear Special dialog box opens.
3. At the top decide if you want deletions to be made to only the Upper voice (Voice 1), or only the Lower voice
(Voice 2), or both. In the Include hidden staves checkbox you can specify that your deletions should also involve
staves that are hidden.
◙ Clear Special dialog box (Mac).
6.10
Page 98

1. Below the dividing line are 15 options. Click as few or as many as you need deleted in one click:
– Accidentals
– Articulations
– Slurs
2. Click OK.
» You can undo your editing, if needed.
– Dynamics
– Pedal markings
– Instrument
changes
– Velocity overdubs
– Measure rests
– Tempo marks
– rit. & accel. marks
– Tempo overdubs
– Rehearsal marks
– Chord symbols
– Text boxes
– Lyrics
Clear Articulations
If you only want to clear articulations, there is a quick way of doing this - make a selection, then press == (the equals key,
twice). This will remove all articulations in that selection
6.11
Page 99

Hide/Show Score Objects
There can be a number of reasons why you want to hide objects on the score from your monitor and printouts, including:
8 Hide certain objects to reduce score clutter, temporarily.
8 Have Notion respond to a marking during playback (and .WAV le output) you do not want displayed in a printed
score to live musicians.
8 Place warning text, ngering, or other information-only marks to a score that can be hidden or
displayed in a few clicks.
This feature does not include essential score items, such as notes and bar lines. However, you are able to hide rests.
Hide Score Object
1. Complete one of the following.
> To hide an individual object, click the object with your Pointer (it turns orange in color to show it is selected).
> For multiple scattered objects, hold down the Shift key as you click the ones you want (each turns orange in color
when it is selected).
> For multiple objects close to each other, create a highlight box over as many beats or measures as you need. Do
not be concerned about including essential items such as notes and bar lines: these will be unaected.
2. Go to the Menu bar and select Edit > Hide.
» The object (or objects) disappear from sight and will not print. If, instead, they turn a light gray color, then you
have View > Show > Show Hidden Items in the Menu bar enabled. Click this again (so the checkmark disappears) if
you want the object(s) to completely disappear.
Alternately, you can right-click a single mark or highlight over multiple marks and
then right-click. A context menu appears with Hide as an option.
Reveal and Unhide Hidden Objects
Hidden objects can be revealed (on your monitor) – or unhidden (back to solid color and prinTable) at any point.
1. To locate the object(s) you need, go to the Menu bar and click View > Show > Show Hidden Items.
» All hidden objects throughout the score appear in a light gray color.
2. Complete one of the following:
> To show an individual object, click the object with your Pointer (it turns orange in color to show it is selected).
> For multiple scattered objects, hold down the Shift key as you click the ones you want (each turns orange in color
when it is selected).
> For multiple objects close to each other, create a highlight box over as many beats or measures as you need.
3. Go to the Menu bar and select Edit > Unhide.
» The objects now fully display and print.
6.12
Page 100

Duplicate
Many tunes make use of a recurring phrase that repeats exactly, or with a few changes, over a number of measures.
To help reduce the time to create your score, you can identify a repeating group of items and have Notion
automatically insert new measure(s) immediately to the right of your highlight to duplicate these items. You are then
free to make any changes, if needed, to the contents of the new measures without altering the original items.
To copy and paste a phrase of any size with very few keystrokes:
1. Highlight any-size contiguous collection of notation marks.
2. If your score has multiple instruments, Notion also draws boxes around the items in other staves at this location. If
you do not want those items to duplicate, ensure these boxes are empty. Hold down Ctrl and click a shaded box to
switch it to empty, and visa versa. In the example below, only the bottom box (a percussion part) will duplicate.
◙ Bottom measure highlighted (only).
3. Complete one of the following:
> Go to the Menu bar and select Edit > Duplicate, or
> Press Windows: Ctrl + D; Mac: + D, or
> Right-click and select Edit > Duplicate from the context menu.
» Notion creates new measure(s) next to the right-hand end of the highlight and duplicates the contents
of the highlight in the new measures.
◙ Measure duplicated.
6.13
 Loading...