

Page 1

Music Creation Suite
Quick Start Guide
Music Creation and Production System
ARTIST
notion
by PreSonus
®
www.presonus.com
English
Page 2

Table of Contents
5 Using Studio One Artist — 15
1 Overview — 1
1.1 Introduction — 1
1.2 About This Guide — 1
1.3 Technical Support — 2
1.4 Music Creation Suite Features — 2
1.4.1 AudioBox USB — 2
1.4.2 PS49 — 2
1.4.3 Studio One Artist — 3
1.4.4 Notion — 3
1.4.5 Nimbit — 3
1.5 What is in the Box — 4
2 Hookup — 5
2.1 Front-Panel Connections — 5
2.2 Rear-Panel Connections — 6
5.1 Configure Studio One Artist — 15
5.1.1 Selecting the AudioBox USB from the Start
Page — 15
5.1.2 Setting up your PS49 MIDI Keyboard
Controller — 16
5.2 Create a New Song in Studio One — 16
5.3 Record in Studio One Artist — 18
5.3.1 Recording Audio — 18
5.3.2 Recording with Virtual
Instruments — 19
5.4 Play Your Recording — 21
5.5 Using Your Studio One Recordings — 22
5.5.1 Level and Balance — 22
5.5.2 Adding Plug-in Effects — 22
5.5.3 Adding Audio and MIDI Files — 23
5.6 Exporting Audio — 23
3 Connecting to a Computer — 7
3.1 AudioBox USB Driver Installation — 7
3.1.1 Installation for Mac OS X — 7
3.1.2 Installation for Windows — 7
3.2 PS49 Installation — 7
3.3 Studio One: Installation and Authorization — 8
3.3.1 Running the Studio One Installer — 8
3.3.2 Activating Studio One Artist — 8
3.3.3 Installing Bundled Content for Studio One
Artist — 9
3.3.4 Installing Third-Party Content — 10
3.4 Notion Installation and Authorization — 10
3.4.1 Running the Notion Installer — 10
3.4.2 Activating Notion Online — 10
3.4.3 Installing London Symphony Orchestra
Sounds — 11
6 Using Notion — 26
6.1 Configure Notion — 26
6.1.1 Selecting the AudioBox USB Driver — 26
6.1.2 Setting up Your PS49 MIDI Keyboard
Controller — 27
6.2 Create a New Score in Notion — 28
6.3 Enter notes in Notion — 29
6.4 Edit in Notion — 31
6.5 Play and Perform Your Notion Scores — 32
6.6 Mixer — 33
6.7 Sharing your work — 34
6.7.1 Export Audio — 34
6.7.2 Export MIDI and MusicXML — 35
6.7.3 Notion for iPad — 36
4 Setting up and Recording — 12
4.1 Mounting Your Microphone — 12
4.2 Connect Your Music Creation Suite — 13
Page 3

Page 4

iv
Page 5

1 Overview
1.1 Introduction
1 Overview
1.1 Introduction
Music Creation Suite
Quick Start Guide
ARTIST
Music Creation and Production System
Thank you for purchasing the PreSonus® Music Creation Suite. All you need is a
computer with a USB connection—and a little inspiration—and you’ll have all the
tools required to create professional-quality studio productions and music scores.
Your Music Creation Suite includes:
• AudioBox USB. A 2x2 USB recording interface with 2 Class A microphone
preamplifiers, zero-latency analog monitoring, and MIDI I/O
• M7 Microphone Kit. Large-diaphragm condenser microphone
with shockmount, XLR cable, and desktop stand
• HD3 Professional Headphones. Lightweight, ergonomic
design with a patented, semi-open sound chamber
• PS49 MIDI Controller. USB-powered, 49-key MIDI controller with real-
time controls, including pitch bend and modulation wheels
• Studio One® Artist. Complete recording and production
software for Windows® and Mac OS X®
• Notion™. Composition and notation software for Windows
and Mac OS X, with orchestral samples recorded by the
London Symphony Orchestra at Abbey Road Studios
• Nimbit™. An online service to share, sell, and promote your creative content
We encourage you to contact us with questions or comments regarding
this product. PreSonus Audio Electronics, Inc., is committed to constant
product improvement, and we value your suggestions highly. We believe
the best way to achieve our goal of constant product improvement is by
listening to the real experts: our valued customers. We appreciate the
support you have shown us through the purchase of this product.
notion
by PreSonus
1.2 About This Guide
This guide is written to help you get acquainted with your Music Creation Suite.
Complete information about the AudioBox USB interface, PS49 MIDI keyboard
controller, Notion, and Studio One Artist are available through your MyPreSonus
user account. Notion and Studio One Artist user manuals are also available through
the respective Help menus in each application. We suggest that you use this guide
to familiarize yourself with the features, applications, and correct connection
procedures for the Music Creation Suite before trying to connect your AudioBox and
PS49 to a computer. This will help you avoid problems during installation and setup.
Throughout this guide you will find Power User Tips. These tips
provide useful hints on how to best use the Music Creation Suite and
take advantage of unique workflow functions and features.
1
Page 6

1 Overview
1.3 Technical Support
1.3 Technical Support
Many technical issues can arise when using a standard computer as a digital
audio workstation (DAW). PreSonus can only provide support for issues that
directly relate to the Music Creation Suite. PreSonus does not provide support
for computer hardware and non-PreSonus hardware and software, and it may be
necessary to contact the manufacturer of these products for technical support.
Please check our Web site (www.presonus.com) regularly for
software information and updates, firmware updates, and
support documentation for frequently asked questions.
Online technical support is available at www.presonus.com/support/ContactTechnical-Support. PreSonus telephone technical support is available to customers
in the USA on Monday through Friday from 9 a.m. to 5 p.m. Central Time by calling
1-225-216-7887. Customers outside of the USA should contact their national
or regional distributor for telephone technical support. A list of international
distributors is provided at www.presonus.com/buy/international_distributors.
Advanced troubleshooting guides can be found at
http://support.presonus.com/forums.
Please note: you must register your product at My.PreSonus.com
to validate your warranty and receive technical support.
Music Creation Suite
Quick Start Guide
1.4 Music Creation Suite Features
1.4.1 AudioBox USB
• 24-bit/48 kHz sampling rate
• 2 Class A microphone preamplifiers
• 2 instrument inputs
• MIDI I/O
• 2x2 USB 1.1 audio interface
• Headphone output
• Analog monitor mixing with playback/input mix control
• Rugged steel chassis
• Mac OS X- and Windows-compatible
1.4.2 PS49
• 49-key, velocity-sensitive keyboard
• Pitch bend and modulation wheels (assignable)
• 1 assignable fader
• 4 assignable knobs for real time control
• 3-character red LED segment display
• 1 sustain footswitch input jack, type-sensing (footswitch not included)
• Real-time quick-toggle functions: Octave, Transpose,
Program Change, MIDI Channel
• Advanced MIDI functions
• USB class-compliant — no driver needed
2
Page 7

1 Overview
1.4 Music Creation Suite Features
1.4.3 Studio One Artist
All PreSonus audio interfaces include PreSonus Studio One Artist recording
software, which comes with over 6 GB of plug-ins, loops, and samples, giving
you everything you need for music recording and production. This manual
will take you through the basics of recording and exporting audio; you
will find a complete user manual in the Studio One Artist Help menu.
• Unlimited track count, inserts, sends, and plug-in instantiations
• 21 high-quality PreSonus Native Effects™ plug-ins, in eight categories: amp
modeling (Ampire XT), delay (Analog Delay, Beat Delay), distortion (RedLight
Dist™), dynamics processing (Channel Strip, Compressor, Fat Channel, Gate,
Expander, Limiter, Tricomp™), equalizer (Channel Strip, Fat Channel, Pro EQ),
modulation (Autofilter, Chorus, Flange, Phaser, X-Trem), reverb (Mixverb™, Room
Reverb), and utility (Binaural Pan, Mixtool, Phase Meter, Spectrum Meter, Tuner)
• Four high-quality PreSonus virtual instruments, including: Presence™
sample player, Impact™ drum machine, SampleOne™ sampler,
and Mojito analog-modeled subtractive synthesizer
• Over 6 GB of loops, samples, and instruments
• Innovative and intuitive MIDI mapping
• Powerful drag-and-drop functionality for faster workflow
• Mac OS X- and Windows-compatible
Music Creation Suite
Quick Start Guide
1.4.4 Notion
1.4.5 Nimbit
• London Symphony Orchestra sample library
• Native 64-bit support (Mac and Windows)
• Interactive entry tools (Keyboard, Fretboard, Drum Pad, Chord Library)
• Compatibility with Notion and Progression iPad apps
• ReWire (64-bit) host and slave
• Sequencer overlay
• MIDI overdub
• Built-in guitar amp
• Real-time MIDI record
• Step-time MIDI input
• Save as PDF (Mac and Windows)
• Built-in integration with Vienna Symphonic Library Special Edition
Plus, Vols. 1, 2, 3, and 4; Miroslav Philharmonik; and others
• Save directly to SoundCloud™
• Improved compatibility with MusicXML, MIDI, and
Guitar Pro files (versions 3 through 5)
What You Can Do With Nimbit:
• Sell music, merchandise, and event tickets through beautiful
stores for Facebook, your web site, and Nimbit.com
• Marketing tools that help you organize and publish upcoming
events, manage your fan list and email supporters.
• Drive fans to your stores and grow your fanbase with sharable,
interactive promotions for Facebook, Twitter and email that feature
music and video players, personal messages, and free downloads.
3
Page 8

1 Overview
M7
1.5 What is in the Box
• Get additional funding with an in-cart “tip-jar” for purchases & free
• Understand your fans and build your career and business
Visit www.nimbit.com to get started!
1.5 What is in the Box
In addition to this manual, your Music Creation Suite package contains the following:
PreSonus AudioBox™ USB recording interface
2 6-foot (1.8m) USB cables
M7 large-diaphragm condenser microphone with shockmount and desktop stand
Music Creation Suite
Quick Start Guide
downloads. 1-in-20 transactions on Nimbit receive tips averaging $7.80.
thanks to detailed analytics and sales reporting.
9-foot XLR cable
HD3 headphones with 1/8” to 1/4” adapter
Powered USB hub with power supply
Registration card
Note: Studio One Artist and Notion are available as downloads from your
MyPreSonus user account. Follow the instructions on the Registration card to
register your Music Creation Suite and download your software bundle.
4
Page 9

2 Hookup
2.1 Front-Panel Connections
2 Hookup
2.1 Front-Panel Connections
48V Phantom Power. This
button activates phantom power
for both microphone preamps.
Power User Tip: Condenser
microphones, like the M7 microphone
included in your Music Creation Suite
require +48V phantom power to
operate. When using microphones
other than the one included in this
bundle, review the manufacturer’s
documentation to verify that
phantom power is required and will
not damage the microphone.
Phones Level. This knob controls
the output level for the headphone
connection on the back of the unit.
Input Gain/Trim Control.
These knobs adjust the input gain
level for their respective inputs.
Music Creation Suite
Quick Start Guide
Power LED. This LED indicates
bus power. It will illuminate red
when the AudioBox USB is being
properly powered by the USB
connection on your computer.
Main Level. This knob controls
the output level for the Main
Outs on the back of the unit.
Microphone / Instrument
Inputs. Each input channel has both
a microphone and an instrument
preamplifier. The combo connectors
allow you to use either a ¼” TS
or the included XLR cables. Use
the ¼” connection for guitars and
other unamplified instruments.
Use the XLR connections to
connect your M7 microphone.
Power User Tip: The complete instruction guide for your AudioBox USB
can be downloaded in PDF form from your MyPreSonus account.
Clip Indicator. Both channels feature
a clip LED next to each trim control.
This light will illuminate red when the
channel’s input signal reaches 0 dBFS.
Power User Tip: Never run your input
levels higher than the channel inputs can
handle. If you overdrive the analog-todigital converters, it will cause digital
distortion, which sounds terrible and will
ruin an otherwise wonderful recording.
Always set your input levels so that the
clip light rarely, if ever, comes on. It’s
important to remember that you can
usually increase the level of a recording
that is too quiet, but once a recording
is clipped, there is no way to undo it.
Mixer. The knob blends the analog
input signals with the playback
signal from your computer. This
allows you to monitor your input
signal with zero latency. If the knob
is positioned at 12 o’clock, the input
signal and the playback stream will
be equally balanced. Turning the
knob to the left will increase the
level of the input signal relative to
the playback stream; turning it right
will increase the level of the playback
stream relative to the input signal.
Power User Tip: In most instances
you will set the Mixer knob to
Inputs while you are recording and
Playback when you are listening to
your recordings in Studio One.
5
Page 10
2 Hookup
2.2 Rear-Panel Connections
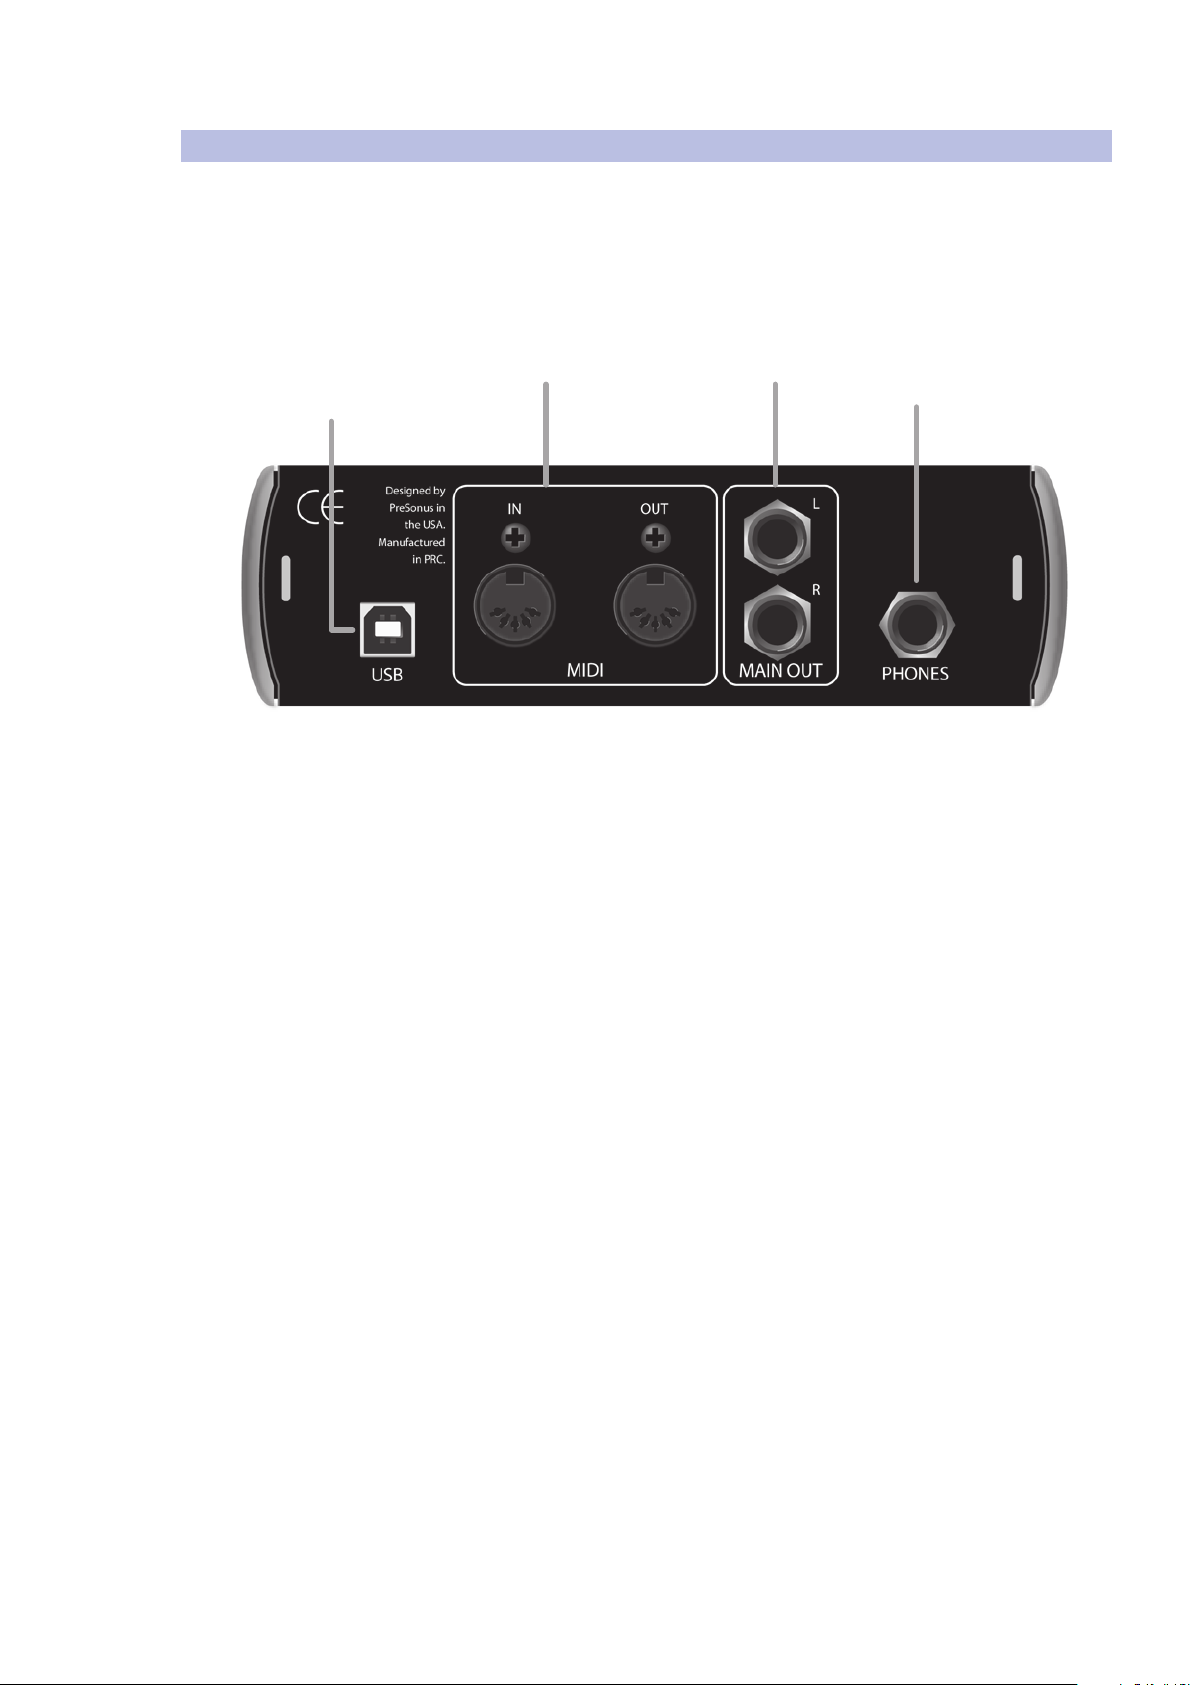
2.2 Rear-Panel Connections
Music Creation Suite
Quick Start Guide
USB Connection. This
is where you connect
the USB cable from your
AudioBox USB to your
computer. The AudioBox is
completely bus-powered
from this connection.
MIDI In and Out. The
MIDI connections are for
use with external MIDI
equipment for sequencing
and other MIDI functions.
Main Outputs. This is
where you connect your
studio monitors. The Main
knob on the front of the unit
controls the output level.
Headphone Output.
This is where you connect
your HD3 headphones.
The Phones volume knob
on the front of the unit
controls the output level.
6
Page 11

3 Connecting to a Computer
3.1 AudioBox USB Driver Installation
3 Connecting to a Computer
All Music Creation Suite software, including the AudioBox USB drivers for Windows
and the content packages and application installers for Studio One Artist and Notion,
are available for download from your MyPreSonus account on the PreSonus Web site.
Included with your Music Creation Suite is a registration card. Go to: my.presonus.
com/getstarted/MCS and follow the onscreen instructions. The PreSonus online
registration wizard will guide you through the entire process of downloading the
drivers, software, and content for your Music Creation Suite and will create a
MyPreSonus account for you.
3.1 AudioBox USB Driver Installation
3.1.1 Installation for Mac OS X
The AudioBox USB is a class-compliant Core Audio device. No driver
installation is necessary with Mac OS X. Simply connect the USB cable
from your AudioBox USB to your Mac to begin using the interface.
3.1.2 Installation for Windows
Music Creation Suite
Quick Start Guide
The AudioBox installer requires that your AudioBox USB be connected
to your computer. Connect your AudioBox USB to an available USB port
and run the AudioBox USB driver installer. It will guide you through
each step of the process. Please read each message carefully.
We recommend that you quit all applications before you start the installation.
After you have followed the onscreen instructions, you will be alerted
that the installation was successful and asked to reboot your computer.
Clicking “Finish” will automatically restart your computer.
3.2 PS49 Installation
No driver installation is required for your PS49 MIDI controller. Simply connect
it to a free USB port on your computer. If you do not have enough free USB
connections for both your AudioBox USB and your PS49 MIDI controller,
connect them to your computer using the included powered USB hub.
Complete connection diagrams can be found in Section 4.2.
Power User Tip: The complete instruction guide for your PS49 can be
downloaded in PDF form from your MyPreSonus account.
7
Page 12

3 Connecting to a Computer
3.3 Studio One: Installation and Authorization
3.3 Studio One: Installation and Authorization
Once you have installed the AudioBox drivers and connected the AudioBox
USB to your computer, you can use the included PreSonus Studio One Artist
music-production software to begin recording, mixing, and producing music.
Once you have downloaded the Studio One Artist from your MyPresonus
account, run the installer and follow the onscreen instructions.
3.3.1 Running the Studio One Installer
Windows: Launch the Studio One Artist installer
and follow the onscreen instructions.
Mac OS X: Double-click on the “PreSonus Studio One.dmg” and drag the Studio
One Artist application into the Applications folder on your hard drive.
3.3.2 Activating Studio One Artist
1. After installing Studio One Artist, launch the program, and the Activate Studio One
menu will appear.
Music Creation Suite
Quick Start Guide
2. Click on the Activate Online link.
3. Enter your MyPreSonus account username and password and the Studio
One product key provided by the PreSonus Registration Wizard.
4. Click on the Activate button to finish the activation process.
8
Page 13
3 Connecting to a Computer
3.3 Studio One: Installation and Authorization
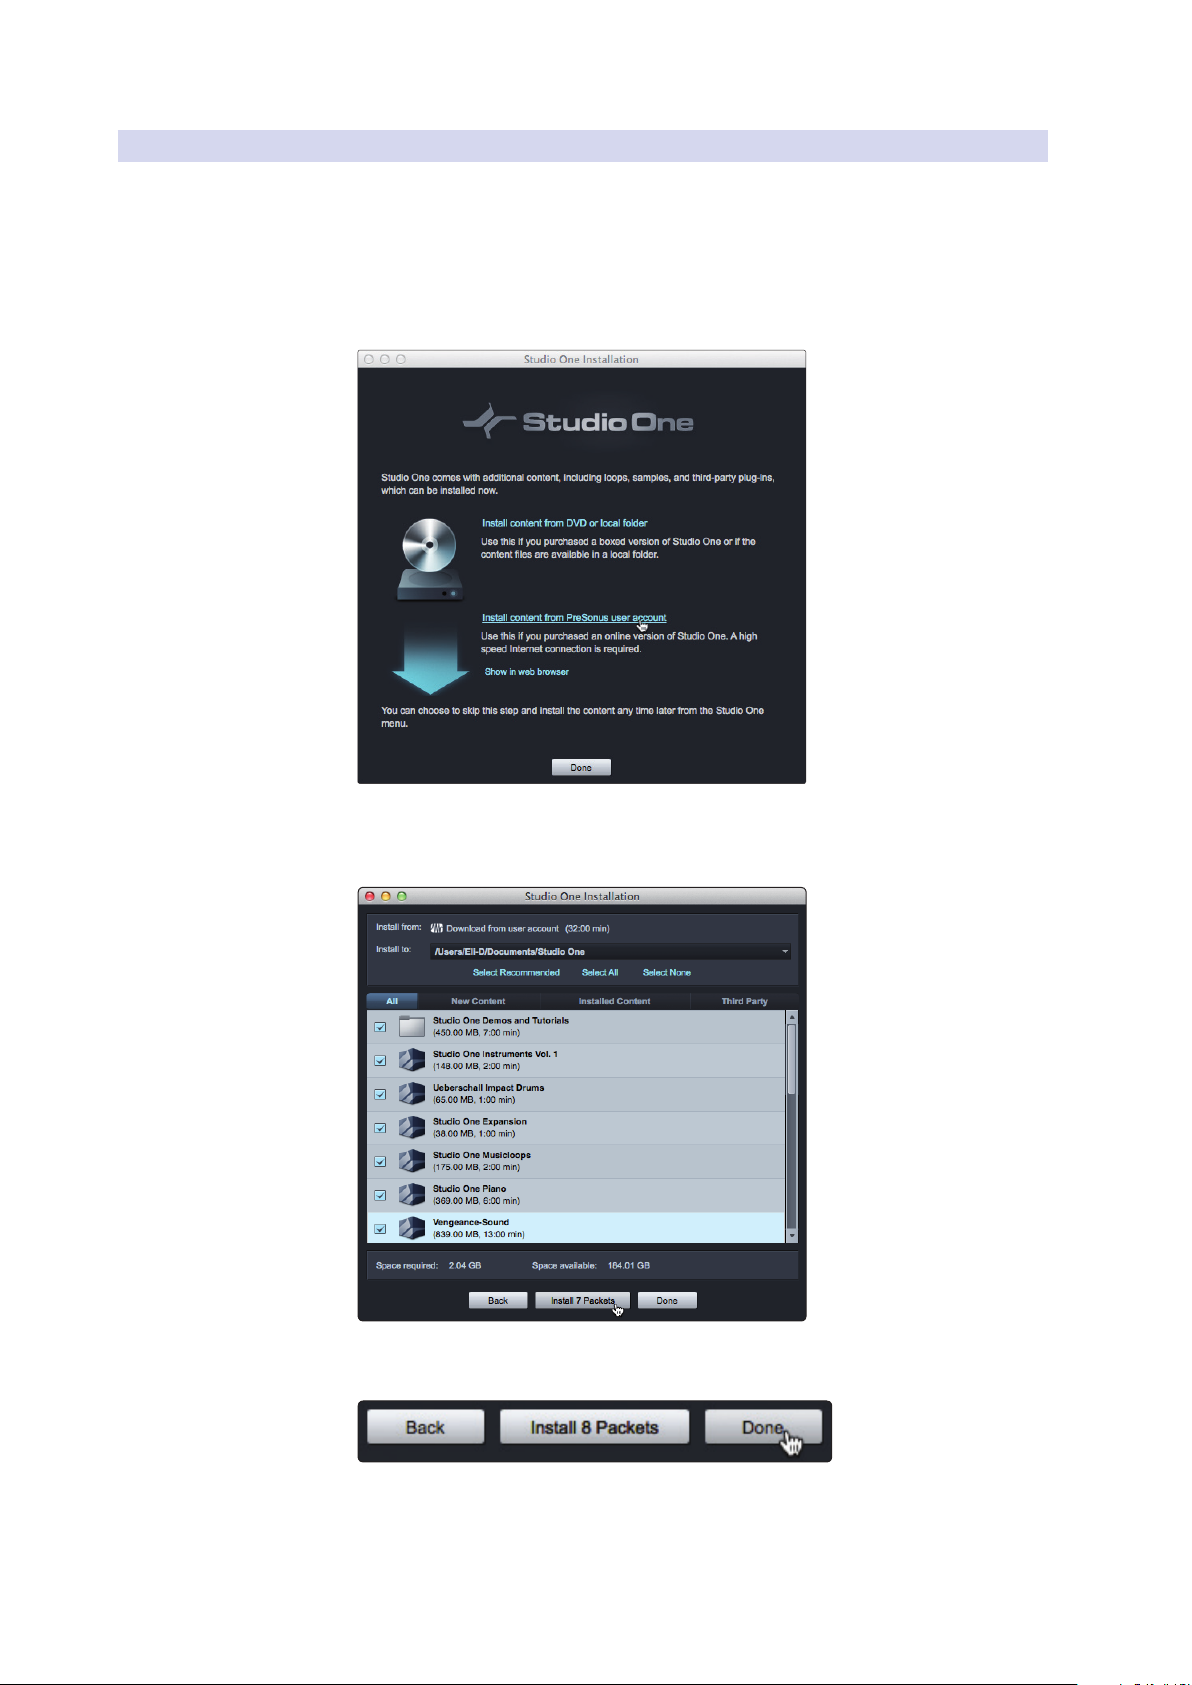
3.3.3 Installing Bundled Content for Studio One Artist
The Studio One Artist bundle provides all that you need to
begin producing music. This includes an array of demo material,
instruments, loops, samples, and other third-party content.
Upon completing the Studio One Artist installation and activation
process, the Studio One Content Installer will appear.
1. Click on “Install content from PreSonus user account.”
Music Creation Suite
Quick Start Guide
2. Click on the Install Packets button at the bottom of the window
to install the selected content. Content installation will take up to
three hours, based on the speed of your Internet connection.
3. If you would like to install the third-party content at this time, see the next
section. If you are finished, click on the Done button to exit the menu.
Power User Tip: Studio One Artist content can be installed at any time by
accessing the Studio One 2>Studio One Installation... menu. If you choose
not to install any portion of the content, you can install it at a later time.
9
Page 14

3 Connecting to a Computer
3.4 Notion Installation and Authorization
3.3.4 Installing Third-Party Content
To install any of the third-party content (Celemony Melodyne
Trial and Native Instruments Komplete Players), click on the arrow
button next to the appropriate name in the content list.
Notice that next to Native Instruments Komplete Players, a serial number is listed.
You will need this number to authorize the plug-in the first time you open it.
When you have finished installing content, click the Done button.
3.4 Notion Installation and Authorization
Music Creation Suite
Quick Start Guide
Once you have installed the AudioBox drivers and connected the AudioBox USB
and PS49 MIDI keyboard controller to your computer, you can use the included
PreSonus Notion score-editing and composition software to compose, arrange,
and hear your music played using samples by the London Symphony Orchestra!
To install Notion, run the downloaded installer and follow the
onscreen instructions to complete the installation process.
3.4.1 Running the Notion Installer
Windows: Launch the Notion installer and follow the onscreen instructions.
Mac OS X: Drag the Notion application into the
Applications folder on your hard drive.
3.4.2 Activating Notion Online
Your computer must be connected to the Internet to activate Notion.
1. Enter the activation code that you received from the
PreSonus Registration Wizard and click Activate.
10
Page 15

3 Connecting to a Computer
3.4 Notion Installation and Authorization
2. Completely fill in the user registration form. Click Next.
3. You will be alerted when your copy of Notion has been
successfully authorized. Clicking OK will launch Notion.
Music Creation Suite
Quick Start Guide
3.4.3 Installing London Symphony Orchestra Sounds
To install the bundled sounds, open the installer and follow the onscreen instructions.
You will need 8.27 GB of free hard-drive space. This will install the following
instruments:
Strings Woodwinds Horn Keys / Guitar / Bass Drums/Cymbals/Percussion
Violin Section Piccolo Trumpet Piano Standard Drum Set Caxixi
Viola Section Flute Tenor Trombone Electric Piano Bass Drum Ganza
Cello Section Oboe Tuba Clavinet Snare Drum Gong
Double-bass Section English Horn Bass Trombone Harpsichord Crash Cymbals Cowbell
Violin (solo) Clarinet Euphonium Harp Suspended Cymbal Sleigh Bells
Viola (solo) Bass Clarinet Celeste Crotales Maracas
Cello (solo) Bassoon Techno Synth Glockenspiel Tam-tam
Double-bass (solo) Piccolo Clarinet Electric Guitar Marimba Tambourine
Contrabassoon Acoustic Guitar Temple Blocks Triangle
Brass / Saxophones Electric Bass Timpani Concert Toms
Alto Saxophone Upright Bass Tubular Bells / Chimes Roto Toms
Tenor Saxophone Vibraphone Claves
Baritone Saxophone Xylophone Wood Block
Cabasa Guiro
Castanets -
NOTE: The Notion content package installer may take up to three hours to download,
depending on your Internet connection speed. Once the download has started, it
cannot be stopped and restarted, so plan your installation time accordingly.
11
Page 16

4 Setting up and Recording
4.1 Mounting Your Microphone
4 Setting up and Recording
4.1 Mounting Your Microphone
The M7 large-diaphragm condenser microphone and the included
shockmount and desktop microphone stand are designed to make
microphone placement quick and easy. Simply screw the shockmount
onto the top of the microphone stand and position your M7 microphone
so that it is vertical and the front of capsule is facing you.
When using the desktop mic stand included with your Music Creation Suite, the M7
should be angled back slightly to make it easier to use it from a seated position.
Music Creation Suite
Quick Start Guide
When singing into the M7, try to keep your mouth approximately six
inches from the microphone at all times. If you find your recordings
have excessive plosives (such as “p” or “b”) you may need to purchase
a pop filter. Pop filters can be found at most music stores.
12
Page 17

4 Setting up and Recording
4.2 Connect Your Music Creation Suite
4.2 Connect Your Music Creation Suite
Connect your microphone and headphones to the AudioBox USB and
connect the AudioBox USB and PS49 to a computer, with or without
the USB hub. Use the diagrams below as connection guides.
Note: Some laptop computers will not provide enough power from their
onboard USB ports to properly power both the AudioBox USB and the PS49.
If you are having any connection issues, try using the powered USB hub.
Music Creation Suite (no USB hub)
M7 mic
M7
Music Creation Suite
Quick Start Guide
AUDIOBOX USB
1 2
Mic• Instrument
Designed by
PreSonus in
the USA.
Manufactured
in PRC.
USB
48V
-10
IN OUT
MIDI
0 60
Clip
0 60
-10
+30
Clip
+30
1 11
PLAYBACKINPUTS
L
R
Power
-80 10
PHONES
computer
HD3 Headphones
13
Page 18

4 Setting up and Recording
4.2 Connect Your Music Creation Suite
Music Creation Suite (with USB hub)
M7 mic
M7
Music Creation Suite
Quick Start Guide
AUDIOBOX USB
1 2
Mic• Instrument
Designed by
PreSonus in
the USA.
Manufactured
in PRC.
USB
48V
-10
IN OUT
MIDI
0 60
Clip
0 60
-10
+30
Clip
+30
1 11
PLAYBACKINPUTS
L
R
Power
-80 10
PHONES
computer
HD3 Headphones
Note: When using the included USB hub with your Music
Creation Suite, you must connect its power supply.
14
Page 19

5 Using Studio One Artist
5.1 Configure Studio One Artist
5 Using Studio One Artist
5.1 Configure Studio One Artist
When Studio One Artist is launched, by default you will be taken to the Start page.
On this page, you will find document-management and device-configuration
controls, as well as a customizable artist profile, a news feed, and links to demos
and tutorials from PreSonus. If your computer is connected to the Internet, these
links will be updated as new tutorials become available on the PreSonus Web site.
In the middle of the Start page, you will see the Setup area. Studio One
Artist automatically scans your system for all available drivers and selects
a driver. By default, it will choose a PreSonus driver, if one is available.
Music Creation Suite
Quick Start Guide
5.1.1 Selecting the AudioBox USB from the Start Page
If you do not see “AudioBox USB” on the Start page when you launch Studio One,
click on the Configure Audio Device link in the Setup area to open the Audio Setup
Options window.
In the Audio Device menu, select “AudioBox USB.”
Click the Apply button and then OK.
After you have verified that the PreSonus AudioBox USB driver
has been detected, please continue to the next section.
15
Page 20

5 Using Studio One Artist
5.2 Create a New Song in Studio One Artist
5.1.2 Setting up your PS49 MIDI Keyboard Controller
No setup in Studio One is required for your PS49 MIDI keyboard
controller. Simply make sure your PS49 is connected to your
computer before launching Studio One Artist.
5.2 Create a New Song in Studio One Artist
1. Launch Studio One.
2. From the Start page, select “Create a new Song.”
Music Creation Suite
Quick Start Guide
3. In the browser window, name your Song and choose
the directory in which you’d like it saved.
4. Select the AudioBox USB template from the Interfaces tab. This will instantly
create a preconfigured Session with tracks armed and ready for recording.
16
Page 21

5 Using Studio One Artist
5.2 Create a New Song in Studio One Artist
5. Set the estimated length of your recording. You can also set the
time format you would like to use (Notation Bars, Seconds, Samples,
or Frames) as well as the Tempo and Time Signature.
Music Creation Suite
Quick Start Guide
6. If you plan to import loops into your Song, you may want to select “Stretch
audio files to song tempo” so that any loop of a known tempo in BPM (like
those in the included content library) will import at the correct tempo.
7. Click the OK button when you are finished.
17
Page 22

5 Using Studio One Artist
5.3 Record in Studio One Artist
5.3 Record in Studio One Artist
5.3.1 Recording Audio
Connect your Music Creation Suite as illustrated in Section 4.2
and enable phantom power on the AudioBox USB.
1. Turn up the Channel 1 level on the AudioBox USB while speaking into the
microphone. You should see the input meter in Studio One Artist react to the input.
If you do not see input metering, verify that your track is armed for recording.
Music Creation Suite
Quick Start Guide
2. Adjust the gain so the input level is near its maximum without clipping (distorting).
18
Page 23

5 Using Studio One Artist
5.3 Record in Studio One Artist
3. Turn the Mixer knob to the fully counterclockwise position so that you are only
listening to the audio from your AudioBox USB inputs that is being recorded.
4. Turn up the Phones level until you can listen at a comfortable volume.
Music Creation Suite
Quick Start Guide
5. In Studio One, click Record.
6. When you are done, click the Stop button in Studio One
or press the Space bar to stop the recording.
5.3.2 Recording with Virtual Instruments
You can add virtual instruments to your Song by draggingand-dropping from the Studio One Browser.
In the lower right corner of the Arrange window are three buttons. The Edit button
opens or closes the Audio editor or the MIDI piano-roll editor, depending on what
type of track is selected. The Mix button opens and closes the mixer window.
1. Next to the Mix button, you will find the Browse button. This button
opens the browser window, which displays all of the available
virtual instruments, plug-in effects, audio files, and MIDI files, as
well as the pool of audio files loaded into the current session.
19
Page 24

5 Using Studio One Artist
5.3 Record in Studio One Artist
2. At the bottom of the browser window, you will find six category
tabs. Click on the Instruments tab to open a list of all the available
virtual instruments that you have installed on you computer.
3. Select the instrument, or one of its patches, from the Instrument Browser
and drag it into the Arrange view. Studio One Artist will automatically
create a new track and load the instrument as the input.
4. Turn the Mixer knob to the fully clockwise “Playback” position so
that you are only listening to the audio being played back.
Music Creation Suite
Quick Start Guide
5. Play a few notes on your PS49 and turn up the headphone
level until you can listen at a comfortable volume.
6. In Studio One, click Record.
7. If you would like to play with a metronome, click on
the metronome icon in the Transport.
20
Page 25

5 Using Studio One Artist
5.4 Play Your Recording
8. When you are done, click the Stop button in Studio One
or press the Space bar to stop the recording.
5.4 Play Your Recording
1. Turn the Mixer knob to the fully clockwise position so that you
are only listening to the playback from Studio One.
2. Disable Record Arm on your audio tracks in Studio One.
Music Creation Suite
Quick Start Guide
3. Click the Return to Zero button in Studio One or press the
“,” key to return to the beginning of the Song.
4. Click Play in Studio One, or press the Space bar to listen to your recording.
Power User Tip: If you would like to listen to previously recorded material while
recording with your microphone, turn the Mixer knob to the 12 o’clock position to blend
the analog signal of your microphone with the playback signal from your computer.
The further you turn the Mixer knob to the left, the less of the playback signal you
will hear. Turning this knob to the right will increase the playback signal’s volume.
21
Page 26

5 Using Studio One Artist
5.5 Using Your Studio One Artist Recordings
5.5 Using Your Studio One Artist Recordings
5.5.1 Level and Balance
1. In the lower right corner of the Arrange window in Studio One you will
find three buttons. Click on the Mix button to open the mixer window.
2. Play your recording and use the level controls in the mixer to balance the tracks.
Music Creation Suite
Quick Start Guide
5.5.2 Adding Plug-in Effects
1. Click on the Effects tab at the bottom of the Browser window to open a list
of all available plug-in effects that you have installed on your computer.
2. Select the plug-in or one of its presets in the Effects Browser,
then drag the selection onto the channel or bus in the
mixer or over the track in the Arrange window.
22
Page 27

5 Using Studio One Artist
5.6 Exporting Audio
5.5.3 Adding Audio and MIDI Files
The Studio One Browser also lets you quickly locate, audition, and import audio
and MIDI files into your Song by dragging them from the file browser into the
Arrange view. If you drag the file to an empty space, a new track will be created
with that file placed at the position to which you dragged it. If you drag the
file to an existing track, the file will be placed as a new part on the track.
You can locate all the Studio One bundled sound content from the Sounds tab.
Music Creation Suite
Quick Start Guide
To audition samples and loops before you add them to your song, just click the
Play button in the preview transport at the bottom of the Browser window.
5.6 Exporting Audio
Once you’re satisfied with your recording, you need to mix down the
file so that it can be uploaded to the Internet or burned to a CD.
1. To begin, you must first set the start and end of the audio you’d like to
mixdown. There are several ways to do this in Studio One. A quick and easy
way is to loop the entire audio file. Start by selecting all the audio by going
to Edit>Select>Select All or by pressing [Ctrl]/[Cmd]+A on your keyboard.
23
Page 28

5 Using Studio One Artist
5.6 Exporting Audio
2. Next, go to Transport>Loop Selection or press [Shift]+P on your keyboard.
Music Creation Suite
Quick Start Guide
3. You’re now ready to export your mixdown. Go to Song>Export Mixdown.
4. Set the location where you’d like your new audio file stored.
5. You can choose to publish your recording directly to SoundCloud™ or
Nimbit®. This will require both an Internet connection and creating a
free account with either service. Nimbit provides you with the ability
to sell your recordings and fundraise and offers a customizable Web
portal for your (or your institution’s) Web site or Facebook page.
24
Page 29

5 Using Studio One Artist
5.6 Exporting Audio
6. Chose the format you’d like to use. If you’d like to burn your song
to a CD or upload it to Nimbit, select Wave. You do not need to
change the default settings for bit rate or sample rate.
Power User Tip: Studio One Artist does not support MP3s. To add this support,
the MP3 Converter for Studio One Artist must be purchased from the PreSonus
webstore. Go to: http://www.presonus.com/products/studio-one/buysoftware
Music Creation Suite
Quick Start Guide
7. Make sure that “Between Loop” is selected for the Export Range.
8. Click OK to begin the mixdown. If you’ve opted to publish the recording directly to
the Web, it will begin to upload as soon as the mixdown is created.
Power User Tip: More information about Nimbit and its services, as well as
tips on legally licensing copyrighted material, can be found at:
http://musiced.presonus.com/music-technology/nimbit
25
Page 30

6 Using Notion
6.1 Configure Notion
6 Using Notion
6.1 Configure Notion
When Notion is launched, by default you will be taken to the Quick
Start window. From here, you can find shortcuts to create a new score
or to open score templates; select recently opened files or browse all
files; import MIDI or MusicXML files; and open the user guide.
You can customize Notion from the Preferences window at any time. Windows
users should go to File>Preferences; Mac users should go to Notion>Preferences.
Power User Tip: It is recommended that Notion and Studio One Artist not be opened
at the same time to minimize the risk of sample rate and MIDI driver issues.
Music Creation Suite
Quick Start Guide
6.1.1 Selecting the AudioBox USB Driver
1. In Notion, go to the Preferences window.
2. Click on the Audio tab.
26
Page 31

6 Using Notion
6.1 Configure Notion
3. In the Audio Devices window, select “AudioBox USB.”
Music Creation Suite
Quick Start Guide
After you have verified that the AudioBox USB driver has been detected,
please continue to the next section to set up your PS49.
6.1.2 Setting up Your PS49 MIDI Keyboard Controller
This section will take you through setting up your PS49 MIDI keyboard
controller for both MIDI note input and NTempo performance. NTempo allows
you to perform your compositions with real-time control of the tempo. More
information about using NTempo can be found in the Notion user manual.
Make sure your PS49 keyboard is connected to a USB port on your
computer. If you are using the included powered USB hub, connect your
PS49 to the hub and connect the hub to a USB port on your computer.
1. In Notion, go to the Preferences window.
2. Click on the MIDI tab.
27
Page 32

6 Using Notion
6.2 Create a New Score in Notion
3. On the MIDI Input drop down menu, select “PreSonus PS49.”
6.2 Create a New Score in Notion
To go to the Score Setup window, click New Score from the Quick Start Window or
click the cogwheel in the top right-hand side of the main window at any time.
Music Creation Suite
Quick Start Guide
You can quickly add instruments by selecting the family and then clicking
the instrument you want. You can also see the additional instruments, sound
effects, and performance techniques that are available as expansion sounds
from the notionmusic.com Web site. If you have any VST libraries installed,
you can select them here and enable them in the Plug-in Manager window.
28
Page 33

6 Using Notion
6.3 Enter notes in Notion
The score settings section allows you to quickly hide and
remove staves, as well as access instruments:
• Click the green “eye” to the left of a new staff to
hide it from view (but still play back).
• Click the red “cross” button to delete the staff completely.
• Click the gray “cogwheel” to access the instrument settings window, where you
can change instrument name and abbreviation, instrument sound, transposition,
string tuning, and type of staff. You can also change the staff into a “Sequencer
Staff” for a MIDI-style view of notation when you are recording in real time.
To change instrument order, drag-and-drop individual staves to the desired position.
Music Creation Suite
Quick Start Guide
Press Escape to exit the Score Setup screen.
6.3 Enter notes in Notion
You can use the mouse to select durations and other items from the
palette at the bottom of the screen. To speed up entry, you can use
keyboard shortcuts: Just hover over the item in the palette to view
its shortcut (or view the Shortcuts pdf from the Help menu).
You can use the onscreen instruments for note entry or to audition a
melody: Select from a piano, drum pad, fretboard, and chord library.
You can select Step Time Record by clicking on the “steps” icon in the transport.
Use one hand on the computer keyboard to select the rhythmic duration
shortcuts and the other hand on your PS49 to select and enter the pitch.
29
Page 34

6 Using Notion
6.3 Enter notes in Notion
Finally, you can enter notes in real time: Click the Record button in
the Transport bar and select your options. There are also presets
for recording with a MIDI keyboard or MIDI guitar.
You can view your score in Pages Across, Pages Down, or Continuous View mode
and in Concert Pitch or Transposed modes. These options are in the View menu.
Music Creation Suite
Quick Start Guide
30
Page 35

6 Using Notion
6.4 Edit in Notion
6.4 Edit in Notion
Music Creation Suite
Quick Start Guide
Now that you have some notes, try adding score markings. The palette contains
most dynamic and articulation symbols, and if you hover over any of the
options, it will show you the keyboard shortcut. On the far right of the palette,
you will see an instrumental technique box that changes depending on which
instrument you have clicked on in the score above. To use a particular marking,
click it. You will see a representation of the marking appear in your cursor.
Position the marker over the note or rest where you want to place
it and either click your mouse or press the Enter key.
If you have recorded a part of your score with real-time record, press the Tab
key to see your score with sequencer overlay. This overlays a piano-roll view
so you can adjust the length of the notes in playback without affecting the
written notation. You can also double-click the note and directly overwrite
the MIDI velocity. If you wish to tighten up your playback, you can choose
Quantize to Notation and/or Clear Velocities from the Tools menu.
31
Page 36

6 Using Notion
6.5 Play and Perform Your Notion Scores
6.5 Play and Perform Your Notion Scores
1. To play your score, place the playback marker where you wish to start
and press the Space key or click the Play button in the Transport bar.
2. To perform your score live with NTempo, click the NTempo
button (the conductor icon). You can now use your computer
keyboard or PS49 MIDI keyboard to tap the tempo.
3. To save your live performance, add an NTempo staff to your score in
the Score Setup window. Press Escape to return to the score.
Music Creation Suite
Quick Start Guide
4. Select where you wish to start recording your
performance by clicking on the NTempo staff.
5. Then click the Record Performance on NTempo staff button on the
Transport and start performing. On playback, and on export audio,
Notion will remember your tempo and play exactly as you did!
Power User Tip: With your PS49, you can affect how loud or soft your score plays
back. You can fade in/out, loop measures, jump out of repeats, and navigate the
score and can customize which notes trigger these actions in the MIDI Device
Commands menu. For more, go to the Help menu and try out the NTempo tutorials.
32
Page 37

6 Using Notion
6.6 Mixer
6.6 Mixer
Music Creation Suite
Quick Start Guide
Click the Mixer icon in the top right or press [Ctrl]/[Cmd]+/. You will see a mixer
strip for each instrument, which can be viewed by instrument family if you have
a large score. There are also four buses and a master channel strip. On each
channel strip, you can set the send level to one or more buses, mute or solo
tracks, pan left and right, and select the output routing for that channel.
You can click the Insert buttons to insert effects. Notion comes with built in
reverb and a guitar amp but you can insert any VST effect you wish to use.
33
Page 38

6 Using Notion
6.7 Sharing your work
6.7 Sharing your work
6.7.1 Export Audio
To export a WAV audio file of your entire score, go to File>Export
Audio… or [Ctrl]/[Cmd]+Shift+E. You can select where to save the
score and can automatically save to your SoundCloud account.
Music Creation Suite
Quick Start Guide
You can select one staff and export, and you can even select one or
more measures if you wish to export a loop or single phrase.
Power User Tip: To only hear selected instruments, you can use the
Mute and Solo buttons in the mixer before exporting the audio.
34
Page 39

6 Using Notion
6.7 Sharing your work
6.7.2 Export MIDI and MusicXML
You can export your score or score region as a MIDI file, which you
can import into Studio One Artist. Highlight a region (or leave blank
to export the whole score), then go to File>Export MIDI.
Music Creation Suite
Quick Start Guide
To share Notion files with other notation programs, go to File>Export
MusicXML. This will retain a large amount of score data, enabling
you to work with your score in other notation software.
Power User Tip: You can also import MusicXML to bring in your back catalog
of scores: Choose Import from the Quick Start window or File>Import.
35
Page 40

6 Using Notion
6.7 Sharing your work
6.7.3 Notion for iPad
You can save your Notion file to an iTunes folder or Dropbox or
email it to yourself and then open it in Notion for iPad. Notion for
iPad is available for purchase from the Apple iTunes store.
Music Creation Suite
Quick Start Guide
36
Page 41

Dinner is Served
Added bonus: PreSonus’ previously Top Secret recipe for…
Chicken and Andouille Gumbo
Ingredients:
• 1 C All-Purpose flour
• ¾ C Vegetable Oil
• 1 large onion (diced)
• 1 small onion (quartered)
• 6 celery stalks (diced)
• 1 large green bell pepper (diced)
• 3 cloves garlic (2 minced, 1 whole)
• 1 lb link Andouille sausage
• 4 Chicken leg quarters
• 4 qt water
• 4 bay leaves
• 1 tsp thyme
• 1 tsp Old Bay seasoning
• 1-2 C frozen okra, sliced
• ¼ C fresh parsley, minced
• 6-8 eggs (optional)
Cooking Instructions:
1. In a large pot, combine whole chicken leg quarters, water, quartered onion, Old Bay, 2 bay leaves and 1 whole clove garlic.
Cover and bring to a low boil. Simmer stock until chicken is falling off the bone. Remove the chicken and set aside. Discard
the onion, bay leaves, and garlic, reserving the liquid.
2. In a heavy saucepan, heat 1 Tbsp of the oil on medium high heat and brown the andouille until it is cooked through. Set
aside sausage for later.
3. In the same saucepan, add and heat remaining oil. Slowly add flour 1-2 Tbsp at a time, stirring continuously. Continue
cooking and stirring the roux until it is a dark brown (it should look like melted dark chocolate). Be careful to not to get the
oil too hot or the flour will burn and you’ll have to start over.
4. Once roux has reached the correct color, add diced onion, celery, green pepper, and minced garlic. Cook until vegetables
are very tender. Do not cover.
5. Slowly add 1 quart of chicken broth and bring to a low boil, stirring constantly.
6. Transfer roux mixture to a soup pot and bring to low boil. Do not cover, the roux will settle on the bottom of the pot and burn.
7. Add remaining chicken broth, bay leaves, and thyme. Simmer for 30 minutes.
8. While gumbo is simmering, debone and shred chicken and slice the andouille.
9. Add chicken and andouille to gumbo and return to a simmer. Simmer for 30-45 minutes.
10. Stir in frozen okra and parsley and bring to a rolling boil.
11. Optional: Crack one egg into a teacup and quickly pour into the boiling gumbo. Repeat with the other eggs being careful
not to cluster them too closely. After all the eggs have risen back to the surface, reduce heat and simmer.
12. 12. Correct seasoning with salt and pepper (red, white and/or black) if necessary.
13. Serve over rice with potato salad.
Serves 12
© 2014 PreSonus Audio Electronics, Inc. All Rights Reserved. Active Integration, AudioBox, DigiMax, FireStudio, Nimbit, Notion, PreSonus, QMix-AI, StudioLive, and XMAX are
trademarks or registered trademarks of PreSonus Audio Electronics, Inc. Capture, Impact, Mixverb, Presence, RedLightDist, SampleOne, Studio One, and Tricomp are trademarks
or registered trademarks of PreSonus Software Ltd. Mac and Mac OS are registered trademarks of Apple, Inc., in the U.S. and other countries. Windows is a registered trademark of
Microsoft, Inc., in the U.S. and other countries. Other product names mentioned herein may be trademarks of their respective companies. All specifications subject to change without
notice...except the recipe, which is a classic.
Page 42

Music Creation Suite
Quick Start Guide
Music Creation and Production System
ARTIST
notion
by PreSonus
18011 Grand Bay Ct. • Baton Rouge,
®
Louisiana 70809 USA• 1-225-216-7887
www.presonus.com
Part# 825-AB0038-B
 Loading...