

Presonus AudioBox 1818 VSL Owner’s Manual
AudioBox™ 1818VSL
Owner’s Manual
OverviewHookupConnecting
to a
Computer
and Studio One Artist
Software: Virtual StudioLive
TutorialsTechnical
Information
and Warranty
Troubleshooting
www.presonus.com
™
Important Safety Instructions
The exclamation point within an equilateral triangle is intended
to alert the user to the presence of important operating and
maintenance (servicing) instructions in this manual.
The lightning ash with arrowhead symbol within an equilateral
triangle is intended to alert the user to the presence of
uninsulated “dangerous” voltage within the product’s enclosure that may
be of sucient magnitude to constitute a risk of electric shock to humans.
CAUTION: TO REDUCE THE RISK OF ELECTRIC SHOCK, DO NOT
REMOVE THE COVER. NO USER-SERVICEABLE PARTS INSIDE. REFER
SERVICING TO QUALIFIED PERSONNEL.
CAUTION: To reduce the risk of electric shock, do not expose this
appliance to rain and moisture. The apparatus shall not be
exposed to dripping or splashing liquids and no object lled with liquids,
such as vases, shall be placed on the apparatus.
CAUTION: These service instructions are for use by qualied
service personnel only. To reduce the risk of electric shock, do not
perform any servicing other than that contained in the operation
instructions. Repairs must be performed by qualied service personnel.
1. Read these instructions.
2. Keep these instructions.
3. Heed all warnings.
12. Use only with the cart, stand, tripod, bracket, or table
specied by the manufacturer or sold with
this apparatus. When a cart is used, use
caution when moving the cart/apparatus
combination to avoid injury from tip-over.
13. Unplug this apparatus during lightning storms or
when unused for long periods of time.
14. Servicing is required when the apparatus has been damaged in
any way, such as if a power-supply cord or plug is damaged; or
liquid has been spilled, or objects have fallen, into the apparatus;
or if the apparatus has been exposed to rain or moisture, does not
operate normally, or has been dropped. All PreSonus products in
the USA should be serviced at the PreSonus factory in Baton Rouge,
Louisiana. If your StudioLive requires a repair, contact techsupport@
presonus.com to arrange for a return-authorization number.
Customers outside the USA should contact their local distributor. Your
distributor’s contact information is available at www.presonus.com.
15. The apparatus shall be connected to a Mains power outlet
with a protective grounding/earthing connection.
16. Where the Mains plug or an appliance coupler
is used as the disconnect device, the disconnect
device shall remain readily operable.
4. Follow all instructions.
5. Do not use this apparatus near water.
6. Clean only with dry a cloth.
7. Do not block any ventilation openings. Install in
accordance with the manufacturer’s instructions.
8. Do not install near any heat sources, such as radiators, heat registers,
stoves, or other apparatus (including ampliers) that produce heat.
9. Do not defeat the safety purpose of the polarized or grounding-type
plug. A polarized plug has two blades, with one wider than
the other. A grounding-type plug has two blades and a third
grounding prong. The wide blade and the third prong are provided
for your safety. If the provided plug does not t into your outlet,
consult an electrician for replacement of the obsolete outlet.
10. Protect the power cord from being walked on or pinched,
particularly at plugs, convenience receptacles, and
the point where they exit from the apparatus.
11. Use only attachments/accessories specied by PreSonus.
EU Directives on the Protection of the
Environment and Other Euro Stu
RoHS This product is compliant with the EU Directive 2002/95/EG for
the Restriction of the use of Certain Hazardous Substances in Electrical
and Electronic Equipment. No lead (Pb), cadmium (Cd), mercury (Hg),
hexavalent chromium (Cr+6), PBB or PBDE is intentionally added to
this device. Any traces of impurities of these substances contained
in the parts are below the RoHS specied threshold levels.
REACh This product is compliant with the European Union Directive
EC1907/206 for the Registration, Evaluation, Authorization, and
Restriction of chemicals (REACh) and contains none or less than 0.1% of
the chemicals listed as hazardous chemicals in the REACh regulation.
WEEE As with the disposal of all old electrical
and electronic equipment, this product is not to
be treated as regular household waste. Instead it
shall be handed over to the applicable collection
point for the recycling of electrical and electronic equipment.
CE This product complies with the European Union Council Directives
and Standards relating to electromagnetic compatibility EMC Directive
(2006/95/EC) and the Low Voltage Directive (2004/108/EC).
AudioBox™ 1818VSL
1.0 Overview — 1
1.1 Introduction — 1
1.2 Summary of AudioBox 1818VSL
Hardware Features — 2
1.3 Summary of Studio One Artist
Software Features — 2
1.4 Summary of Virtual StudioLive
Software Features — 3
1.5 What is in the Box — 4
2.0 Hookup — 5
2.1 Front-Panel Connections — 5
2.2 Rear-Panel Connections — 7
2.3 Typical Band Hookup Diagram — 9
2.4 Speaker-Switching
Hookup Diagram — 10
4.1.5 Loading Scenes and
Presets from VSL — 29
4.1.6 Using VSL to Create
a Monitor Mix — 30
4.2 Studio One Artist Quick Start — 32
4.2.1 Installation and
Authorization — 32
4.2.2 Enabling the Audio Driver — 35
4.2.3 Conguring MIDI Devices — 35
4.2.4 Creating a New Song — 38
4.2.5 Creating Audio Tracks — 40
4.2.6 Creating MIDI Tracks — 41
4.2.7 Adding Virtual Instruments and
Plug-in Eects
to Your Song — 42
5.0 Tutorials — 44
5.1 Microphone Types — 44
5.1.1 Condenser — 44
OverviewHookupConnecting
to a
Computer
and Studio One Artist
Software: Virtual StudioLive
TutorialsTechnical
3.0 Connecting to a
Computer — 11
3.1 System Requirements — 11
3.2 Installation for Windows — 12
3.3 Installation for Mac OS X — 13
3.4 Using the AudioBox 1818VSL with
Popular Audio Applications — 14
4.0 Software: Virtual StudioLive
and Studio One Artist — 16
4.1 Virtual StudioLive — 16
4.1.1 Virtual StudioLive: Setup — 16
4.1.2 Virtual StudioLive:
Browser — 20
4.1.3 Virtual StudioLive: Overview
and Fat Channel Tab — 21
4.1.4 VSL Controls:
Denitions and Uses — 22
5.1.2 Dynamic — 44
5.1.3 USB Microphones
and Other Types — 44
5.1.4 Microphone Placement — 45
5.2 A Brief Tutorial on Dynamics
Processing — 48
5.2.1 Common Questions Regarding
Dynamics Processing — 48
5.2.2 Types of Dynamic
Processing — 49
5.2.3 Compression Settings: Some
Starting Points — 54
5.3 Equalizers — 56
5.3.1 What is an EQ? — 56
5.3.2 Equalization Settings: How to
Find the Best and
Leave the Rest — 58
5.3.3 General EQ Suggestions — 61
Information
and Warranty
Troubleshooting
iiiiii
PreSonus AudioBox™ 1818VSL
Overview Hookup Connecting
Computer
to a
Software: Virtual StudioLive
and Studio One Artist
5.4 Aux Bus Mixing — 64
5.4.1 Monitor Mixing — 64
5.4.2 Eects Processing — 64
5.5 Digital Eects — 65
5.5.1 Reverb — 65
5.5.2 Delay — 66
6.0 Technical Information — 67
6.1 Specications — 67
7.0 Troubleshooting and
Warranty — 69
7.1 Troubleshooting — 69
7.2 PreSonus Limited Warranty — 70
Index — 71
Tutorials Technical
Information
Troubleshooting
and Warranty
iviv

Owner’s Manual
OverviewHookupConnecting
to a
Computer
and Studio One Artist
Software: Virtual StudioLive
TutorialsTechnical
Information
and Warranty
Troubleshooting
vv

PreSonus AudioBox™ 1818VSL
vivi
Owner’s Manual
1.0 Overview
1.1 Introduction
Overview 1
Introduction 1.1
Overview
HookupConnecting
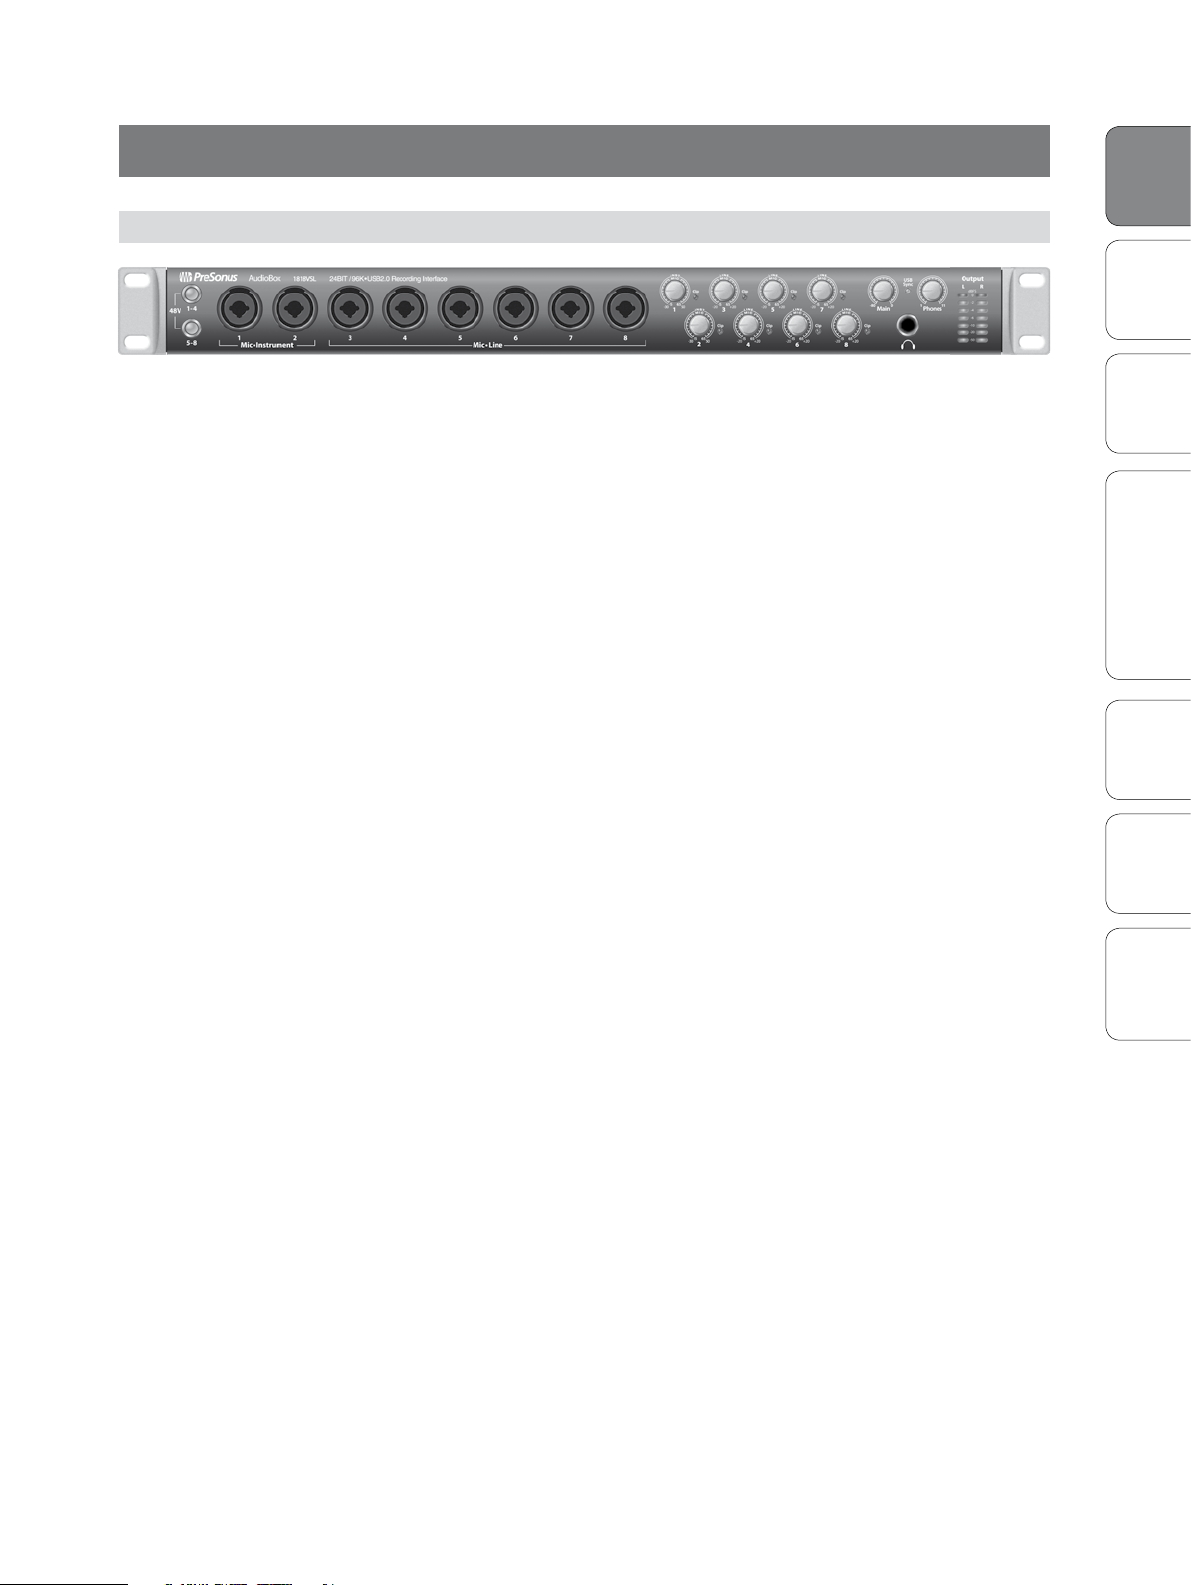
Thank you for purchasing the PreSonus AudioBox™ 1818VSL. PreSonus Audio
Electronics has designed the AudioBox 1818VSL utilizing high-grade components to
ensure optimum performance that will last a lifetime. Loaded with 8 high-headroom,
Class A, XMAX™ microphone preampliers; a built-in 18x18 USB 2.0 recording
and playback engine; MIDI I/O; S/PDIF I/O; ADAT I/O; BNC word clock output;
Fat Channel processing with 3-band EQs, compressors, limiters, and downward
expanders; delay and reverb eects; and more, AudioBox 1818VSL breaks new
boundaries for music performance and production. All you need is a computer with
a USB 2.0 connection, a few microphones and cables, powered speakers, and your
instruments, and you are ready to record in the studio or in front of a live audience!
We encourage you to contact us at 225-216-7887 (9 a.m. to 5 p.m. Central Time)
with questions or comments regarding your PreSonus AudioBox 1818VSL.
PreSonus Audio Electronics is committed to constant product improvement, and
we value your suggestions highly. We believe the best way to achieve our goal
of constant product improvement is by listening to the real experts: our valued
customers. We appreciate the support you have shown us through the purchase
of this product and are condent that you will enjoy your AudioBox 1818VSL!
ABOUT THIS MANUAL: We suggest that you use this manual to familiarize yourself with the
features, applications, and correct connection procedures for your AudioBox 1818VSL before trying
to connect it to your computer. This will help you avoid problems during installation and setup.
Throughout this manual you will nd Power User Tips that can quickly make you an
AudioBox 1818VSL expert. In addition to the Power User Tips, you will nd an assortment
of audio tutorials at the back of this manual. These tutorials cover everything from
microphone placement to equalizer and compression-setting suggestions.
to a
Computer
and Studio One Artist
Software: Virtual StudioLive
TutorialsTechnical
Information
and Warranty
Troubleshooting
11
1 Overview
1.2 Summary of AudioBox 1818VSL Hardware Features
PreSonus AudioBox™ 1818VSL
Overview
Hookup Connecting
Computer
to a
Software: Virtual StudioLive
and Studio One Artist
Tutorials Technical
1.2 Summary of AudioBox 1818VSL Hardware Features
• 24-bit/96 kHz sampling rate
• 8 Class A XMAX microphone preampliers
• 2 Instrument inputs
• 6 Line inputs
• MIDI I/O
• S/PDIF I/O
• ADAT I/O
• BNC word clock output
• High-denition analog-to-digital converters (114 dB dynamic range)
• 18x18 USB 2.0 audio interface
• Headphone output
• Rugged steel chassis
• Virtual StudioLive™ monitor-mixing software
• Studio One™ Artist
• Compatible with Cubase, Digital Performer, Logic, Nuendo,
Sonar, Studio One, and other audio-recording software
Information
Troubleshooting
and Warranty
• Mac OS X®- and Windows®-compatible
1.3 Summary of Studio One Artist Software Features
All PreSonus audio interfaces include PreSonus Studio One Artist recording
software, which comes with over 4 GB of plug-ins, loops, and samples, giving
you everything you need for music recording and production. The Studio
One Artist Quick Start Guide is located in Section 4.1 of this manual. You will
nd a complete user manual on the Studio One Artist installation DVD.
• Unlimited track count, inserts, and sends
• 20 high-quality, native plug-ins: amp modeling (Ampire), delay (Analog Delay,
Beat Delay), distortion (Redlight Dist), dynamics processing (Channel Strip,
Compressor, Gate, Expander, Limiter, Tricomp), equalizer (Channel Strip, Pro EQ),
modulation (Autolter, Chorus, Flange, Phaser, X-Trem), reverb (MixVerb, Room
Reverb), and utility (Binaural Pan, Mixtool, Phase Meter, Spectrum Meter, Tuner)
• Over 4 GB of loops, samples, and instruments, featuring: Presence
virtual sample player, Impact virtual drum machine, SampleOne virtual
sampler, Mojito virtual analog-modeled subtractive synthesizer
• Innovative and intuitive MIDI mapping
• Powerful drag-and-drop functionality for faster workow
• Mac OS X®- and Windows®-compatible
22

Owner’s Manual
Overview 1
Summary of Virtual StudioLive Software Features 1.4
1.4 Summary of Virtual StudioLive Software Features
Virtual StudioLive is a powerful monitor-mixing application that allows you to
add professional dynamics processing, EQ, and eects to your monitor mixes.
• Easy drag-and-drop workow
• Drag presets directly to channels
• Drag parts of presets directly to components in the Fat Channel
• StudioLive 16.0.2 Fat Channel with:
• High-pass Filter
• Downward Expander
• Compressor
• 3-band semi-parametric EQ
• Limiter
• Two eects buses with 32-bit oating-point reverbs and delays
• Quickly drop entire Scenes to the mixer for instant
recall of all channel and eects settings
• Load eects quickly by simply dragging and dropping
• Mixer overview:
• See all of the most-used mixer parameters at once
Overview
HookupConnecting
to a
Computer
and Studio One Artist
Software: Virtual StudioLive
TutorialsTechnical
• See the state of all Fat Channel settings at once
• See all Aux mixes at once
• See the current eects and parameter settings
Information
and Warranty
Troubleshooting
33
1 Overview
1.5 What is in the Box
PreSonus AudioBox™ 1818VSL
Overview
Connecting
Computer
to a
Software: Virtual StudioLive
and Studio One Artist
Tutorials Technical
1.5 What is in the Box
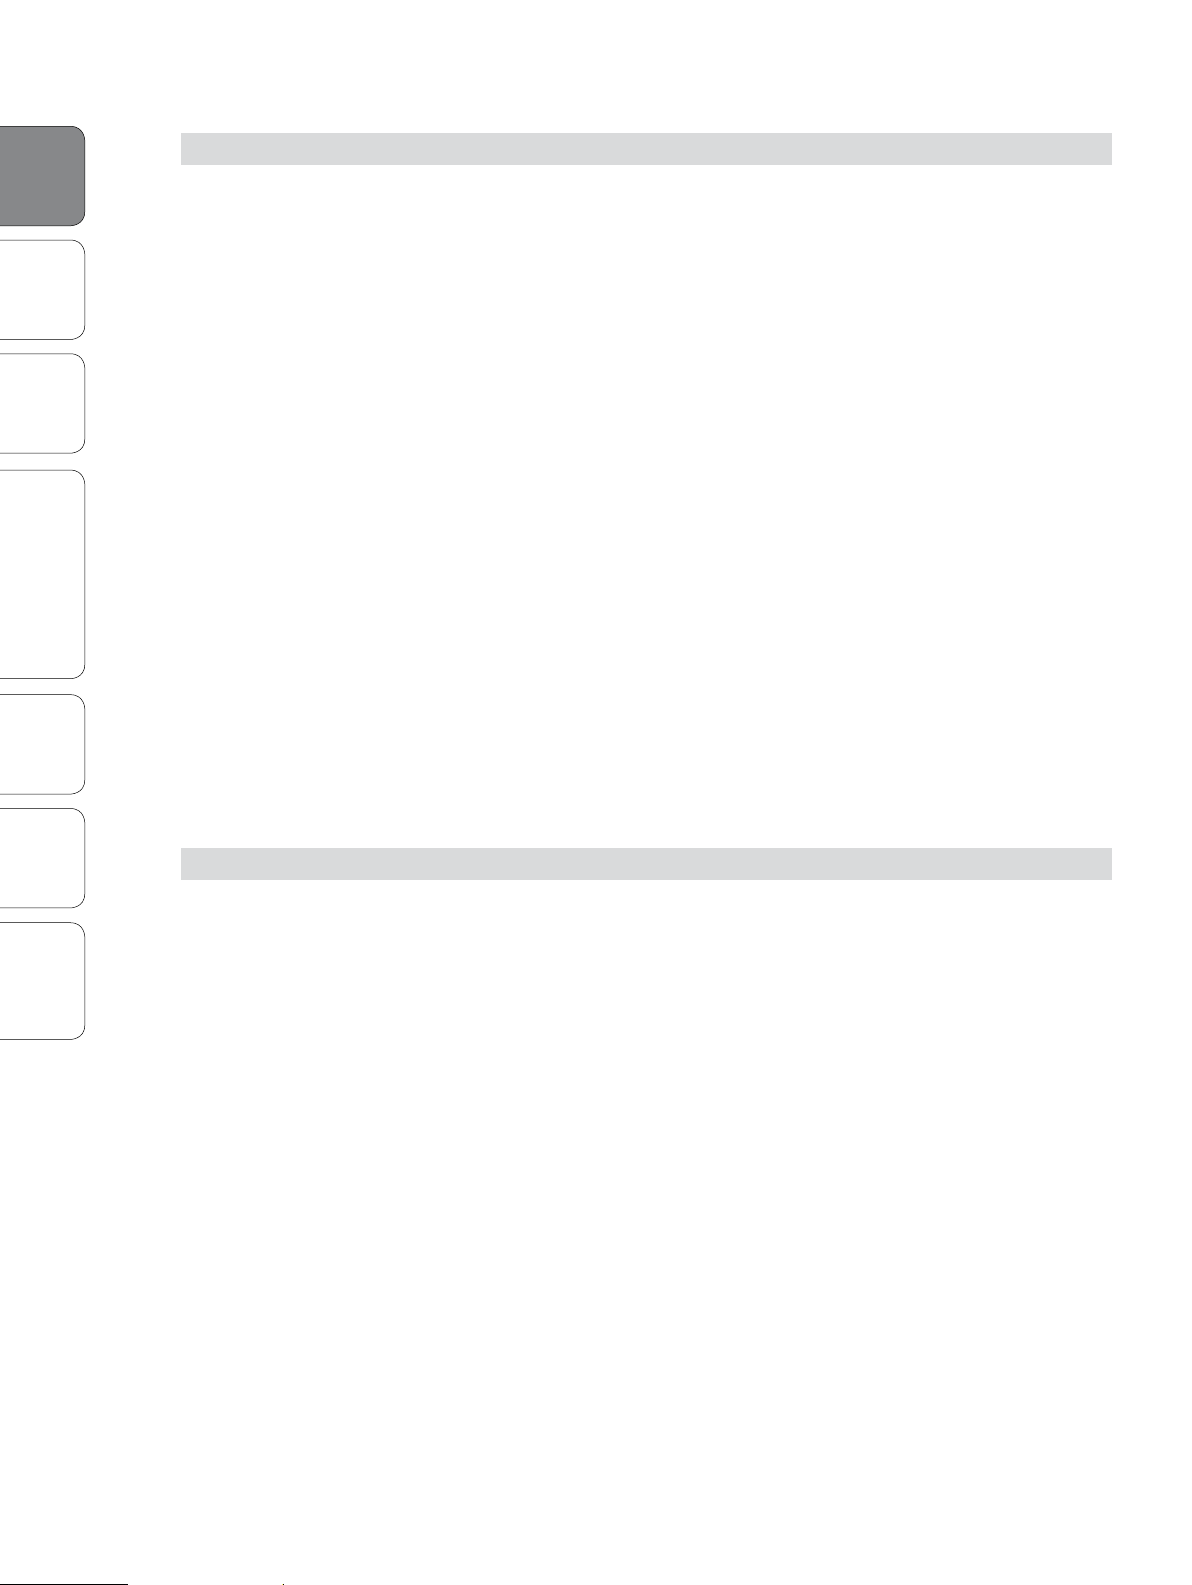
In addition to this manual, your AudioBox 1818VSL package contains the following:
PreSonus AudioBox 1818VSL USB 2.0 recording interface
6’ (1.8m) USB cable
External power supply
Information
Troubleshooting
and Warranty
Software library containing:
• PreSonus Studio One Artist program DVD plus gigabytes of third-party content
• PreSonus Virtual StudioLive and AudioBox driver CD
44
Owner’s Manual
2.0 Hookup
2.1 Front-Panel Connections
Hookup 2
Front-Panel Connections 2.1
OverviewConnecting
Hookup
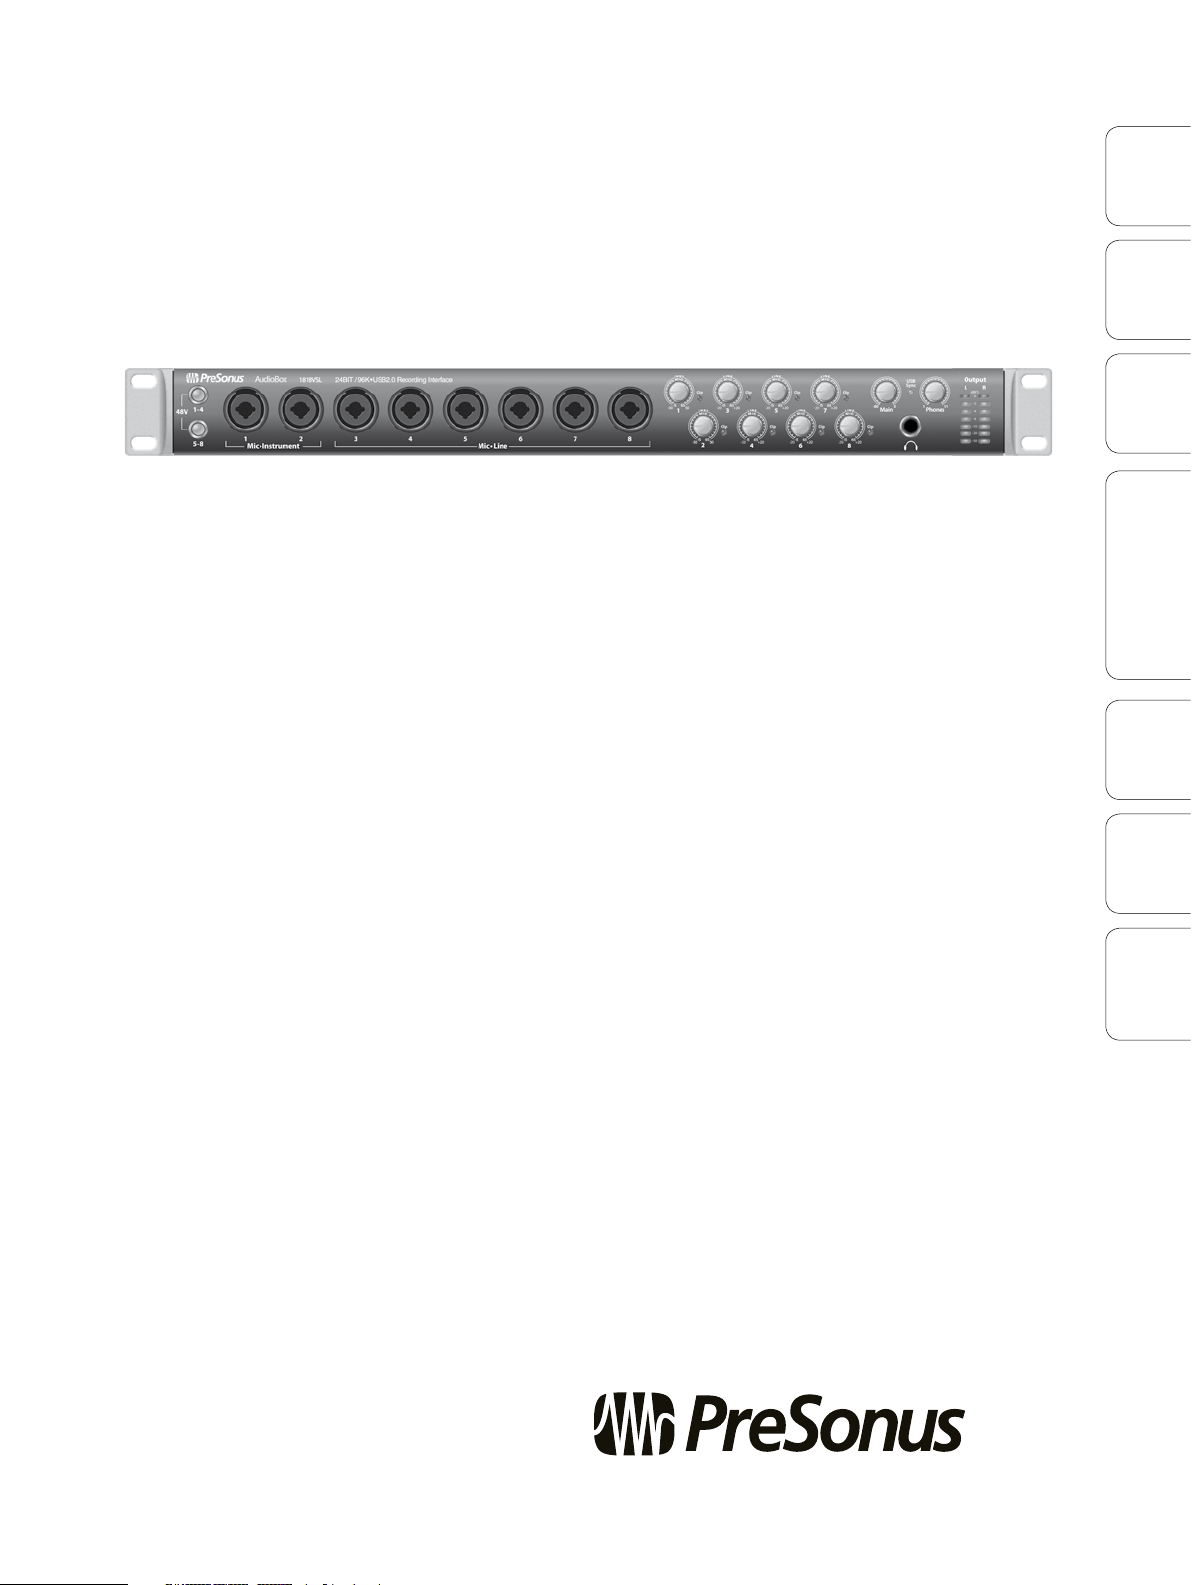
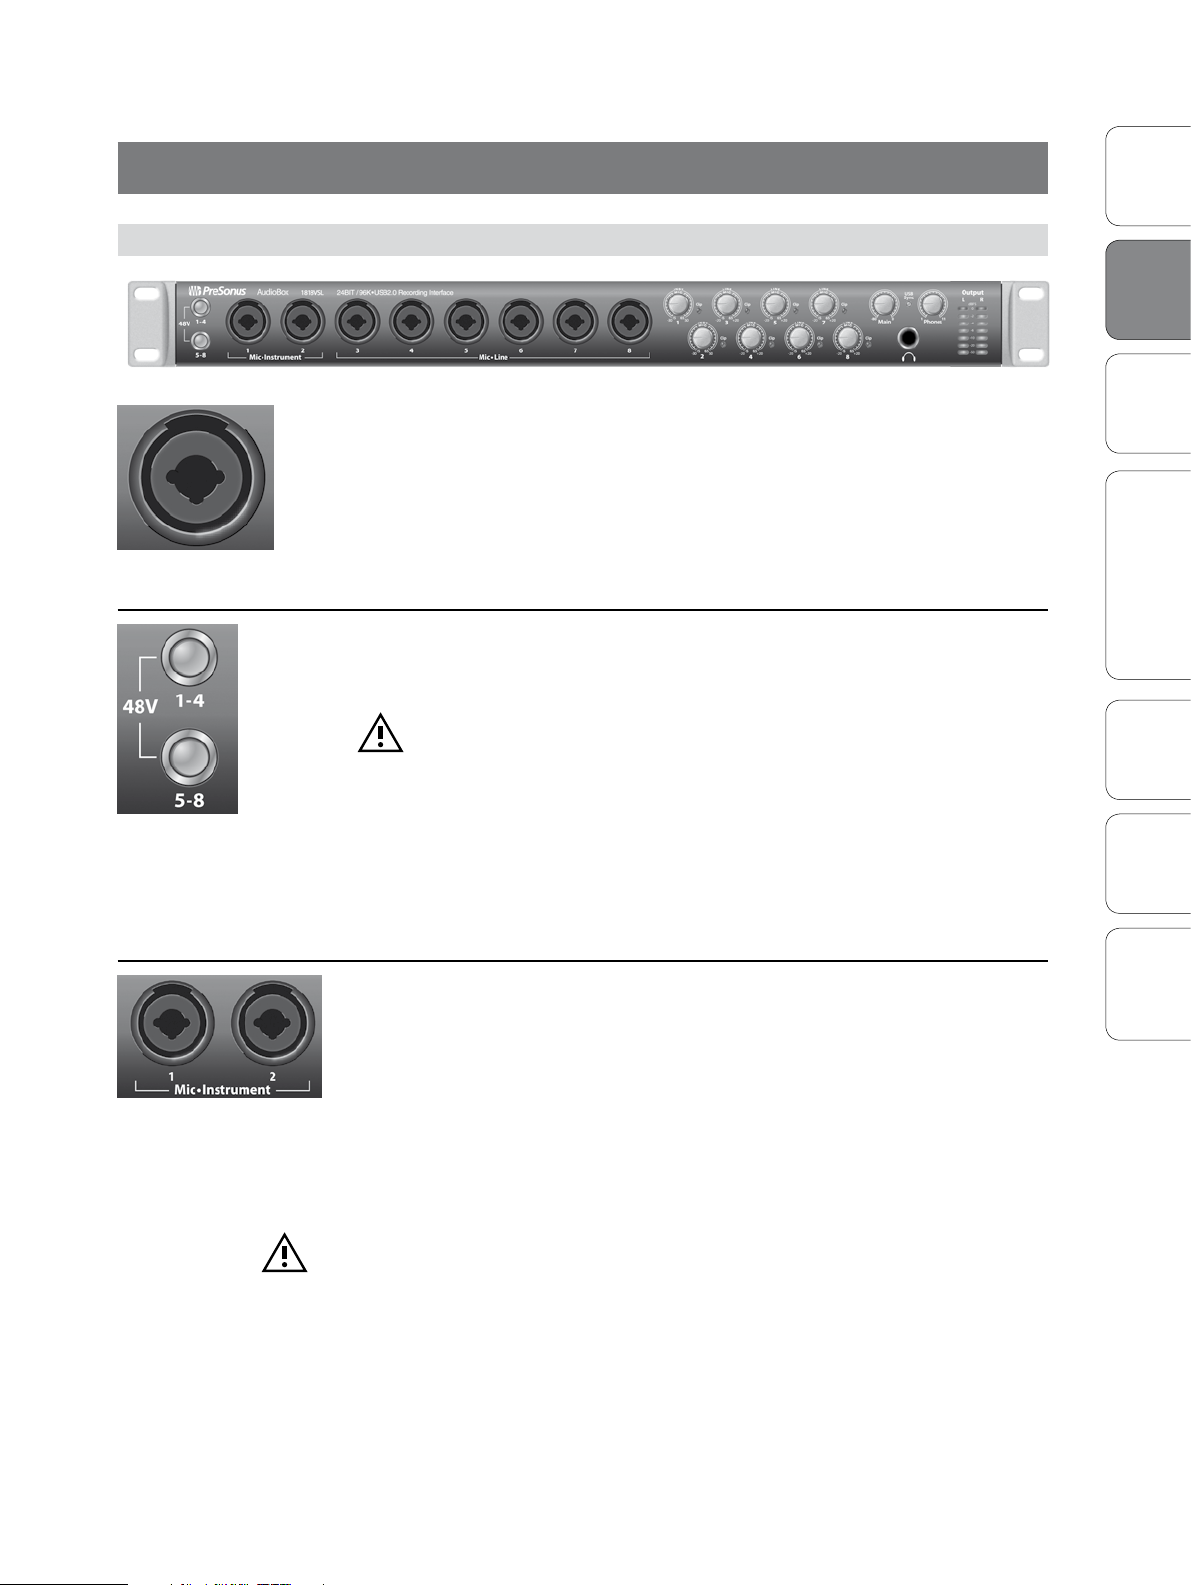
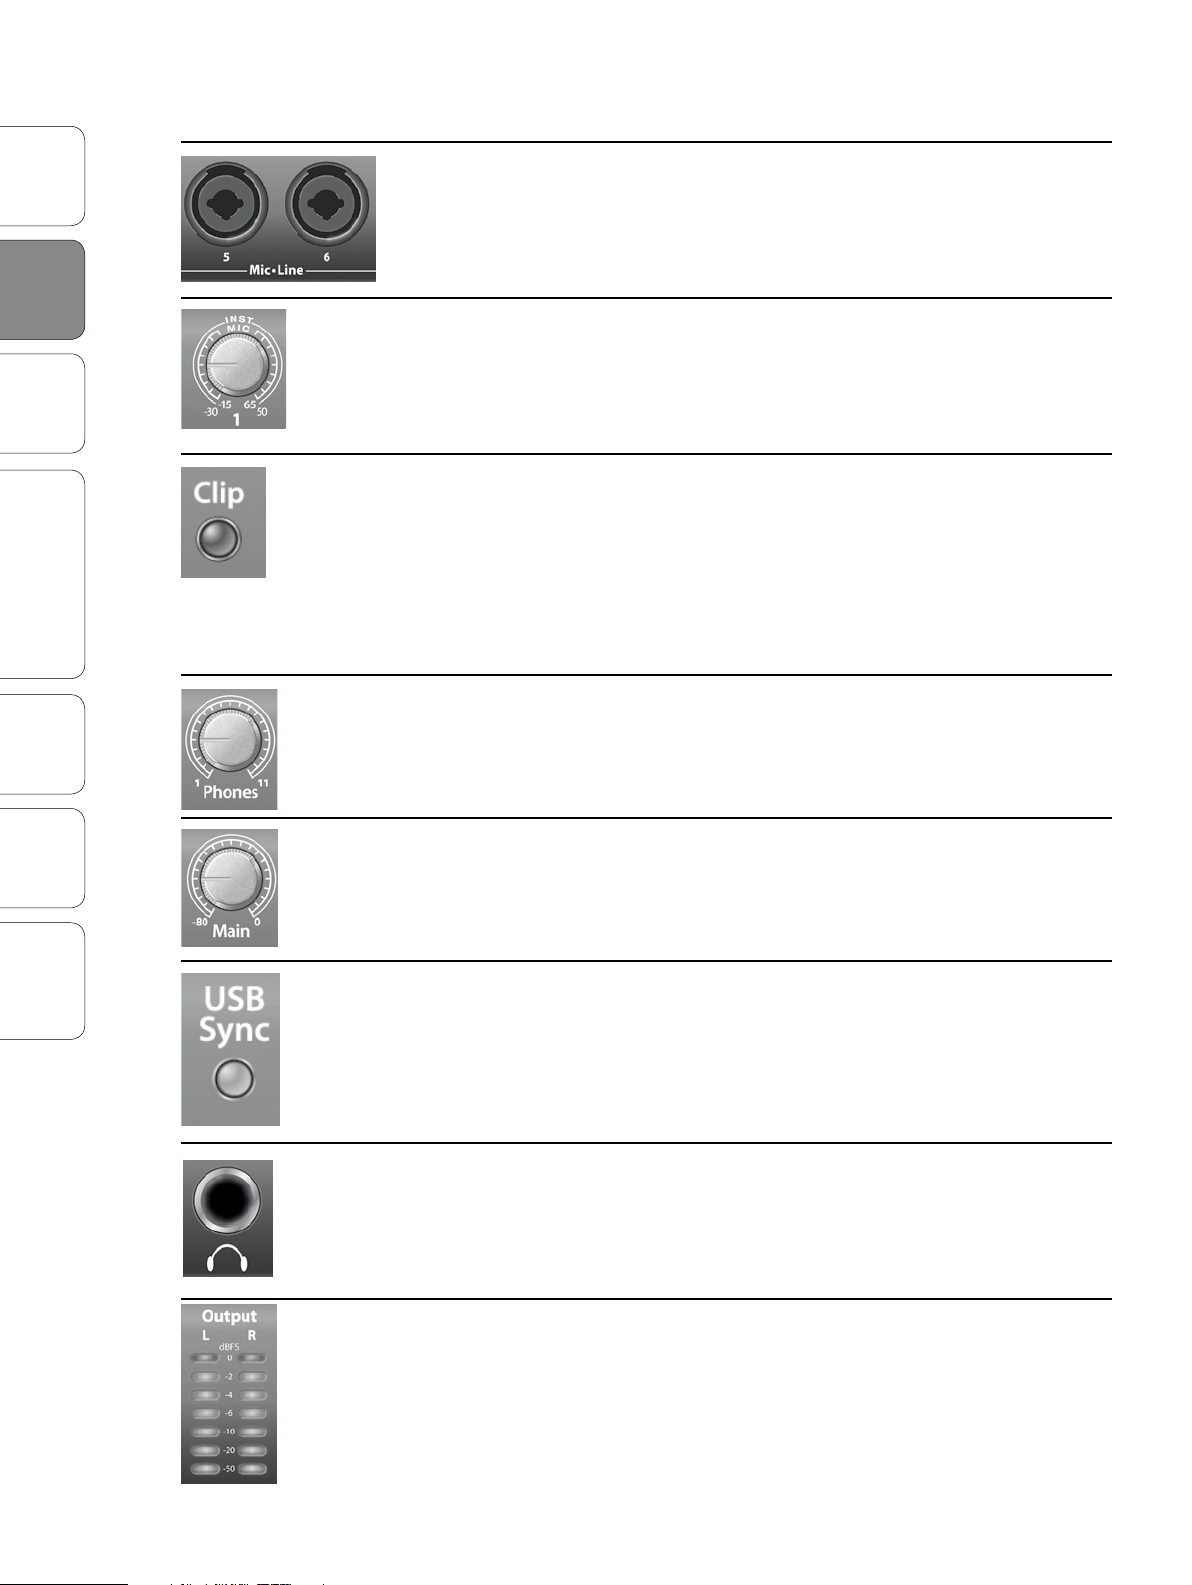
Microphone Inputs. Your AudioBox 1818VSL is equipped with PreSonus
XMAX microphone preampliers for use with all types of microphones.
The XMAX has a Class A input buer, followed by a dual-servo gain
stage. This arrangement results in ultra-low noise and wide gain control,
allowing you to boost signals without increasing background noise.
The eight analog inputs of the AudioBox 1818VSL feature combo jacks. This
convenient connector accepts either a ¼-inch phone plug or an XLR plug.
48-volt Phantom Power. The AudioBox 1818VSL provides 48V phantom power
for every microphone input, in banks of four. This feature can be individually
enabled for each bank, using the buttons on the left side of the front panel.
WARNING: Phantom power is only required for condenser micro phones and
can severely damage dynamic mics, especially ribbon mics. Therefore, switch
phantom power o for all channels where it is not required.
XLR connector wiring for phantom power:
Pin 1 = GND
Pin 2 = +48V
Pin 3 = +48V
Instrument Inputs. The ¼-inch TS connectors on channels 1 and 2 are for use with
instruments (guitar, bass, etc.). When an instrument is plugged into the instrument
input, the mic preamp is bypassed, and the AudioBox 1818VSL becomes an
instrument preamplier.
to a
Computer
and Studio One Artist
Software: Virtual StudioLive
TutorialsTechnical
Information
and Warranty
Troubleshooting
Power User Tip: Active instruments are those that have an internal preamp or a line-level output.
Active instruments should be plugged into a line input rather than into an instrument input.
Plugging a line-level source into the instrument inputs on the front of the AudioBox 1818VSL not
only risks damage to these inputs but also results in a very loud and often distorted audio signal.
Please note: As with any audio input device, plugging in a microphone or an instrument, or
turning phantom power on or o, will create a momentary spike in the audio output of your
AudioBox 1818VSL. Because of this, we highly recommend that you turn down the channel trim before
changing connections or turning phantom power on or o. This simple step will add years to life of
your audio equipment.
55
Overview Connecting
Hookup
2 Hookup
2.1 Front-Panel Connections
Line-level Inputs. Channels 3-8 of the AudioBox 1818VSL have a ¼-inch, balanced
TRS connection for line-level input. When these inputs are engaged, the microphonepreamp circuit is bypassed. Typical examples of line-level connections are synthesizer
outputs, CD/DVD-player outputs, and (with exceptions) signal-processor outputs.
Input Gain/Trim Control. These knobs provide the following gain structure:
PreSonus AudioBox™ 1818VSL
Computer
to a
Software: Virtual StudioLive
and Studio One Artist
Tutorials Technical
Information
Troubleshooting
and Warranty
• XLR Microphone / TS ¼-inch Instrument inputs: 80 dB
of variable gain (-15/-30 dB to +65/50 dB)
• TRS ¼-inch Line Level inputs: 40 dB of variable gain (-20 dB to +20 dB)
Clip Indicator. All channels feature clip LEDs next to the trim controls. The red clip
indicator LED will illuminate when the channel’s input signal reaches 0 dBFS. At this
level, your mic preamp/line trim signal will exhibit signs of clipping (distortion).
Power User Tip: Never run your input levels higher than the channel inputs can
handle. If you overdrive the analog-to-digital converters, it will cause digital
distortion (digital clipping), which sounds terrible. The XMAX™ preamps in your
AudioBox 1818 VSL provide plenty of headroom; take advantage of it.
Phones. The Phones knob controls the volume of the headphone output
on the front of the unit. The headphone amplier is quite powerful, and the
volume goes to 11, so use the maximum setting with extreme caution.
Main. The Main knob controls the output level for the Main Outputs on
the back of the AudioBox 1818VSL, with a range of -80 dB to 0 dB.
USB Sync LED. This LED will illuminate blue when the AudioBox 1818VSL is
properly powered and synced to a USB 2.0 connection. It will ash blue and
red when the unit is properly powered but no USB connection is detected.
¼-inch Phones Jack. This is where you connect
headphones to your AudioBox 1818VSL.
Main Output Meters. These meters display the signal level going to the Main and
Line 1/2 Outputs on the back panel of the AudioBox 1818VSL. The level set by
the Main Output knob on the front panel has no eect on the metered level.
Power User Tip: Because Outputs 1 and 2 share the same signal source, you can use these meters to
monitor that output pair as well.
66
Owner’s Manual
2.2 Rear-Panel Connections
Hookup 2
Rear-Panel Connections 2.2
OverviewConnecting
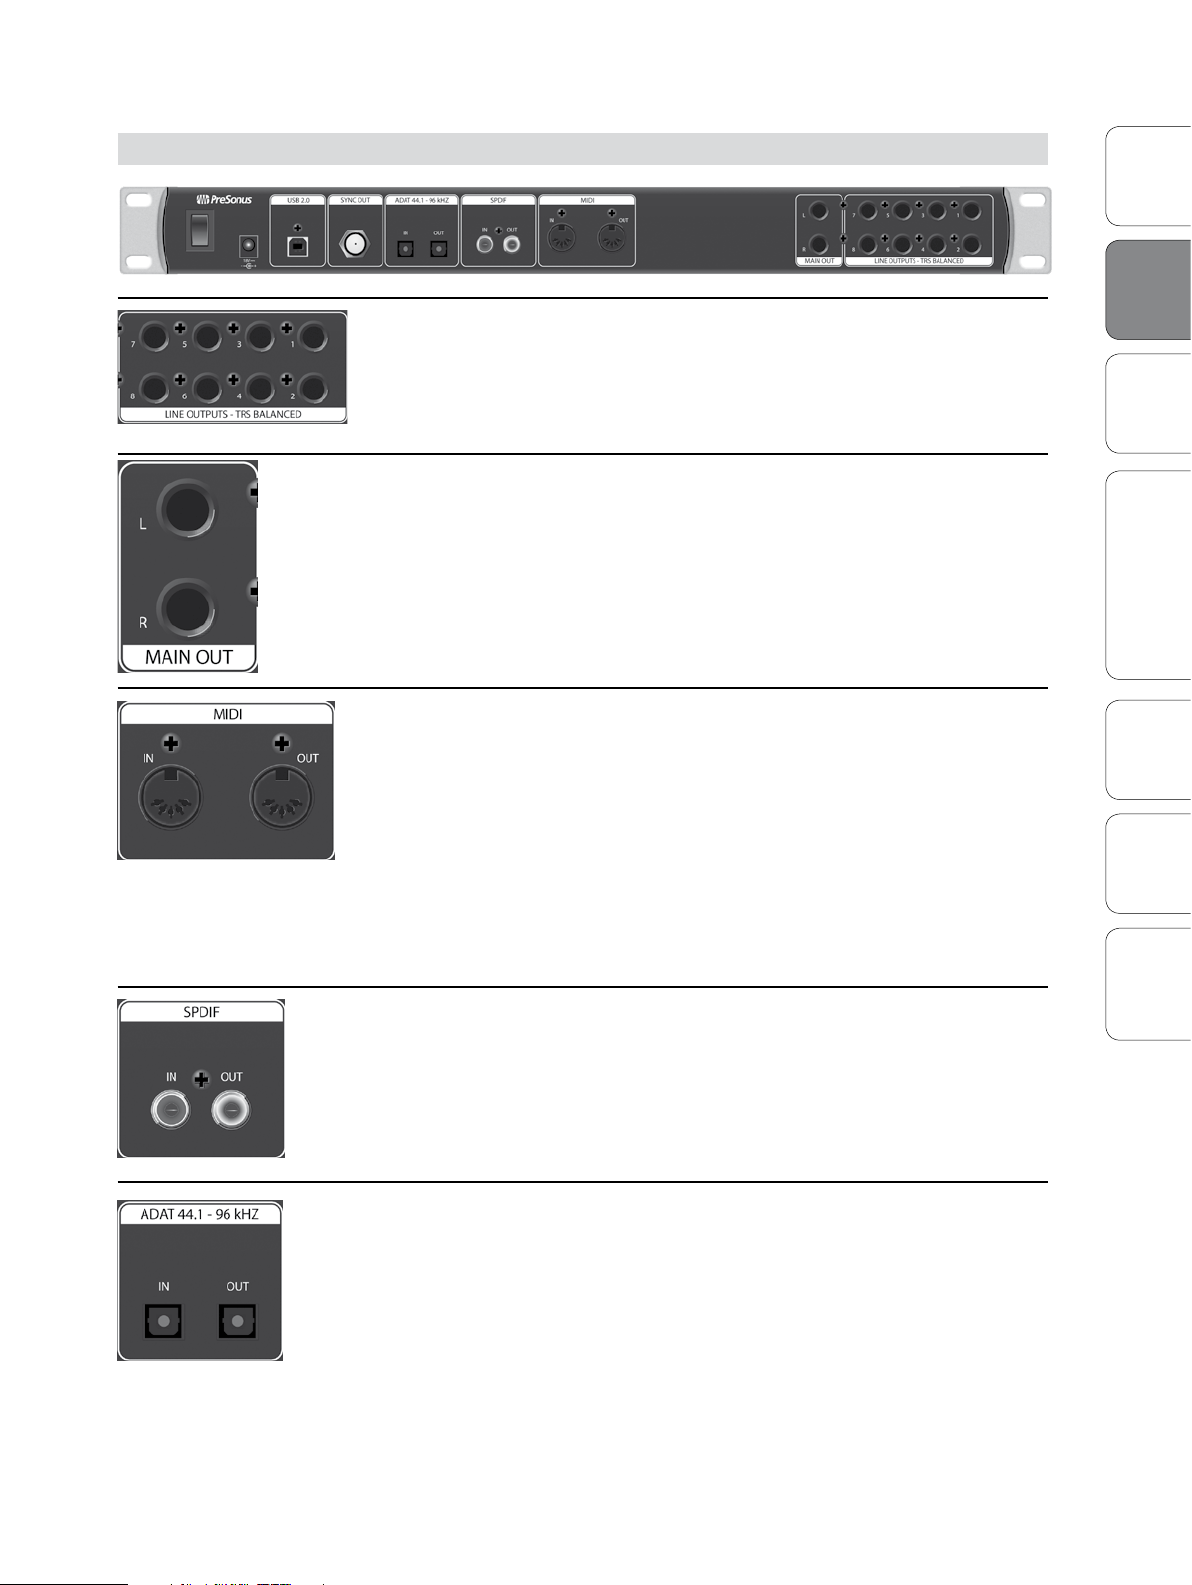
Line Outputs. The AudioBox 1818VSL has eight line outputs to route
to external devices, such as headphone amps and DJ mixers. Outputs
1 and 2 share their playback streams with the Main Outs. Outputs
7 and 8 share their playback streams with the headphone output.
Outputs 3 through 6 have independent playback streams.
Main Out. These are the main outputs for the AudioBox 1818VSL. The output level of
the Main Outs is controlled by the Main volume knob on the front of the unit.
MIDI I/O. MIDI stands for “Musical Instrument Digital Interface.” MIDI inputs
and outputs allow connection to, and communication with, external MIDI
equipment. One function of these ports is MIDI sequencing but the MIDI
protocol can be used for much more than instruments and sequencing.
NOTE: MIDI is not audio but is frequently used to trigger or control an audio
source (such as a plug-in or synthesizer). It’s important to ensure that your
MIDI data is correctly sent and received by the appropriate hardware or
software devices. If the devices generate audio, you may also need to return
the audio to an AudioBox 1818VSL input channel. Please consult the User’s
Manuals of your MIDI devices for help with MIDI setup and usage.
Hookup
to a
Computer
and Studio One Artist
Software: Virtual StudioLive
TutorialsTechnical
Information
S/PDIF In and Out Jacks. The S/PDIF standard allows two channels of audio
to be transmitted at rates up to 24 bit, 96 kHz. The S/PDIF I/O also allows the
AudioBox 1818VSL to send and receive word clock to external digital devices.
Power User Tip: Remember to set “S/PDIF” as the Clock Source and set the sample
rate to correspond to the external device in the AudioBox VSL Setup Tab (Windows)
or in Audio MIDI Setup (OS X) when using the S/PDIF input for external sync.
ADAT–S/MUX Input and Output. These are ADAT–S/MUX connections for your
external digital devices. When recording or playing back at 44.1 kHz or 48 kHz, the
ADAT input and output will stream 8 channels. When recording or playing back at
88.2 kHz or 96 kHz, each connection will stream 4 channels. The ADAT–S/MUX I/O
also allows the AudioBox to send and receive word clock to external digital devices.
Power User Tip: Remember to select “ADAT ” as the Clock Source and set the sample
rate to correspond the external device in the AudioBox VSL Setup Tab (Windows)
or in Audio MIDI Setup (OS X) when using the ADAT input for external sync.
and Warranty
Troubleshooting
77
2 Hookup
2.2 Rear-Panel Connections
Overview Connecting
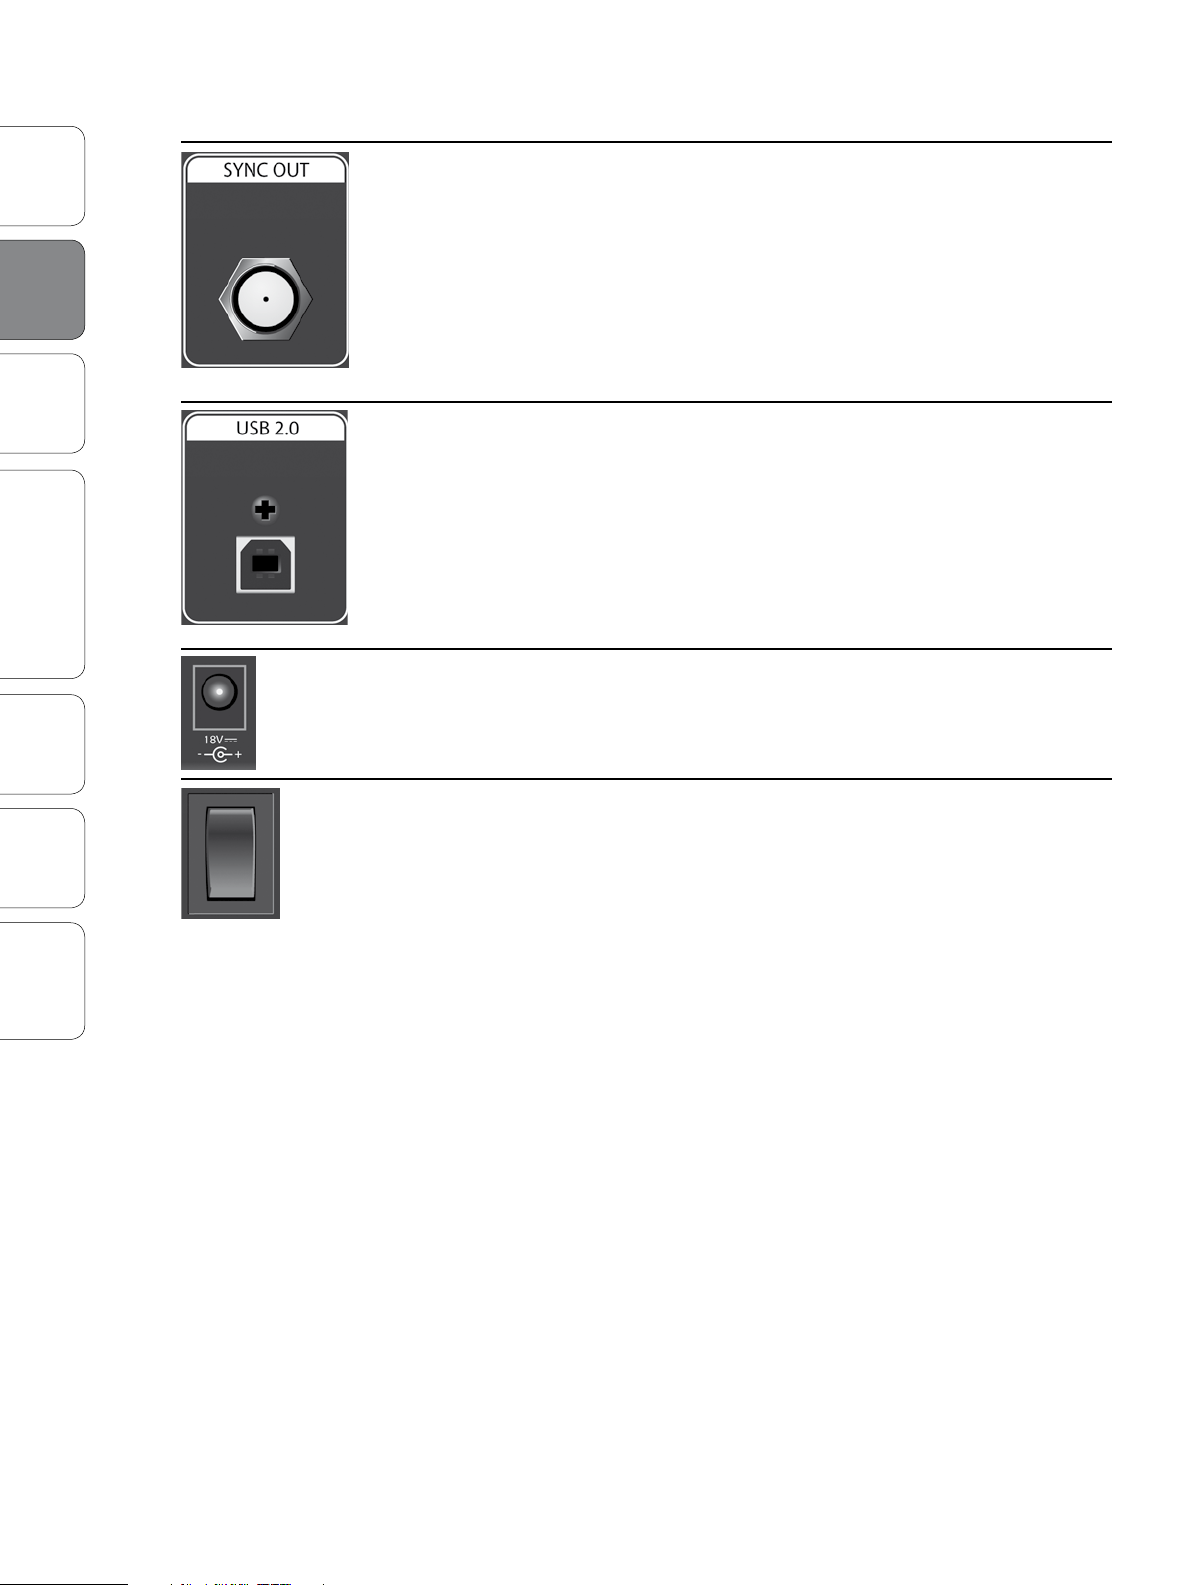
BNC Sync Output. This is a 75Ω word clock output that allows the AudioBox
1818VSL to transmit word clock information to other digital audio devices.
Power User Tip: A 75Ω BNC word clock cable is required to achieve proper sync.
Hookup
Computer
to a
Software: Virtual StudioLive
and Studio One Artist
USB 2.0 Port. This is where you connect the USB cable from your
AudioBox 1818VSL to your computer. The AudioBox 1818VSL
must be connected to a USB 2.0 port to work properly.
PreSonus AudioBox™ 1818VSL
Tutorials Technical
Information
Troubleshooting
and Warranty
Power Input. This is where you connect the power supply for your AudioBox
1818VSL. The AudioBox 1818VSL cannot be bus powered.
Power Switch. This is the On/O switch for your AudioBox 1818VSL.
88
Owner’s Manual
Hookup 2
Typical Band Hookup Diagram 2.3
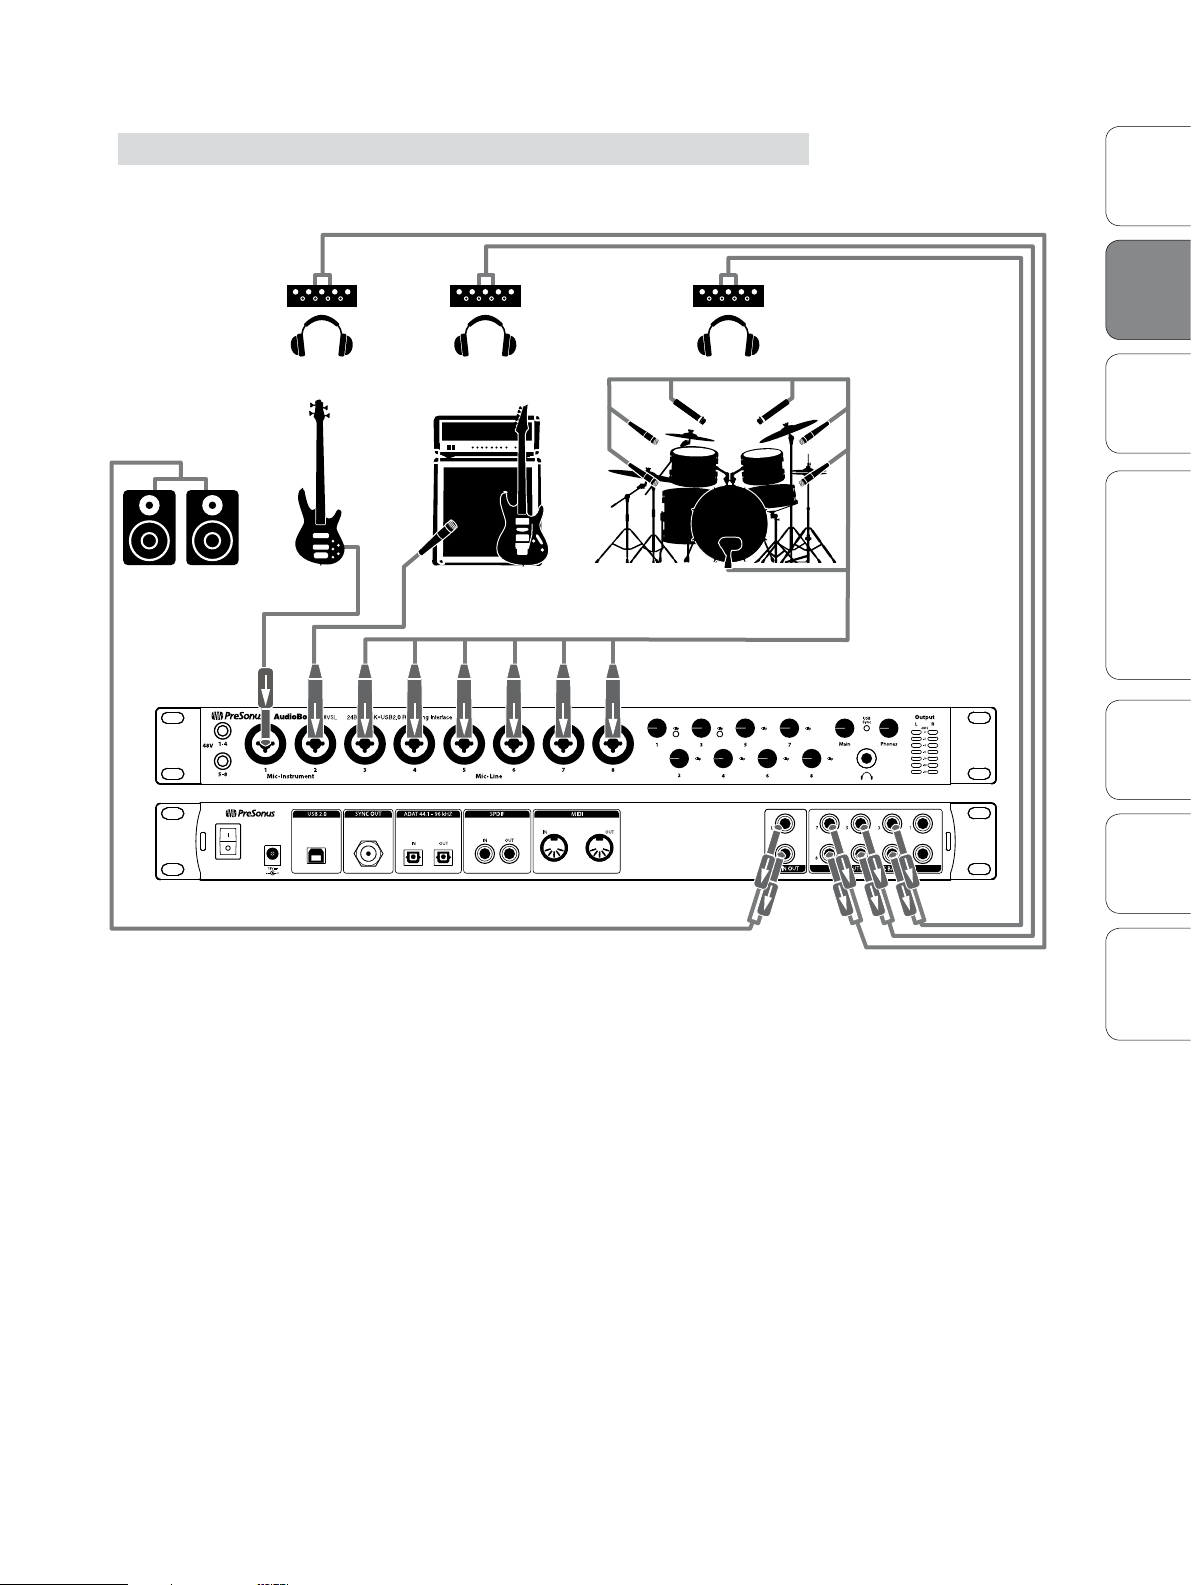
2.3 Typical Band Hookup Diagram
powered speakers
headphone amps
OverviewConnecting
Hookup
to a
Computer
guitar and ampbass
drumset
and Studio One Artist
Software: Virtual StudioLive
TutorialsTechnical
Information
and Warranty
Troubleshooting
99
2 Hookup
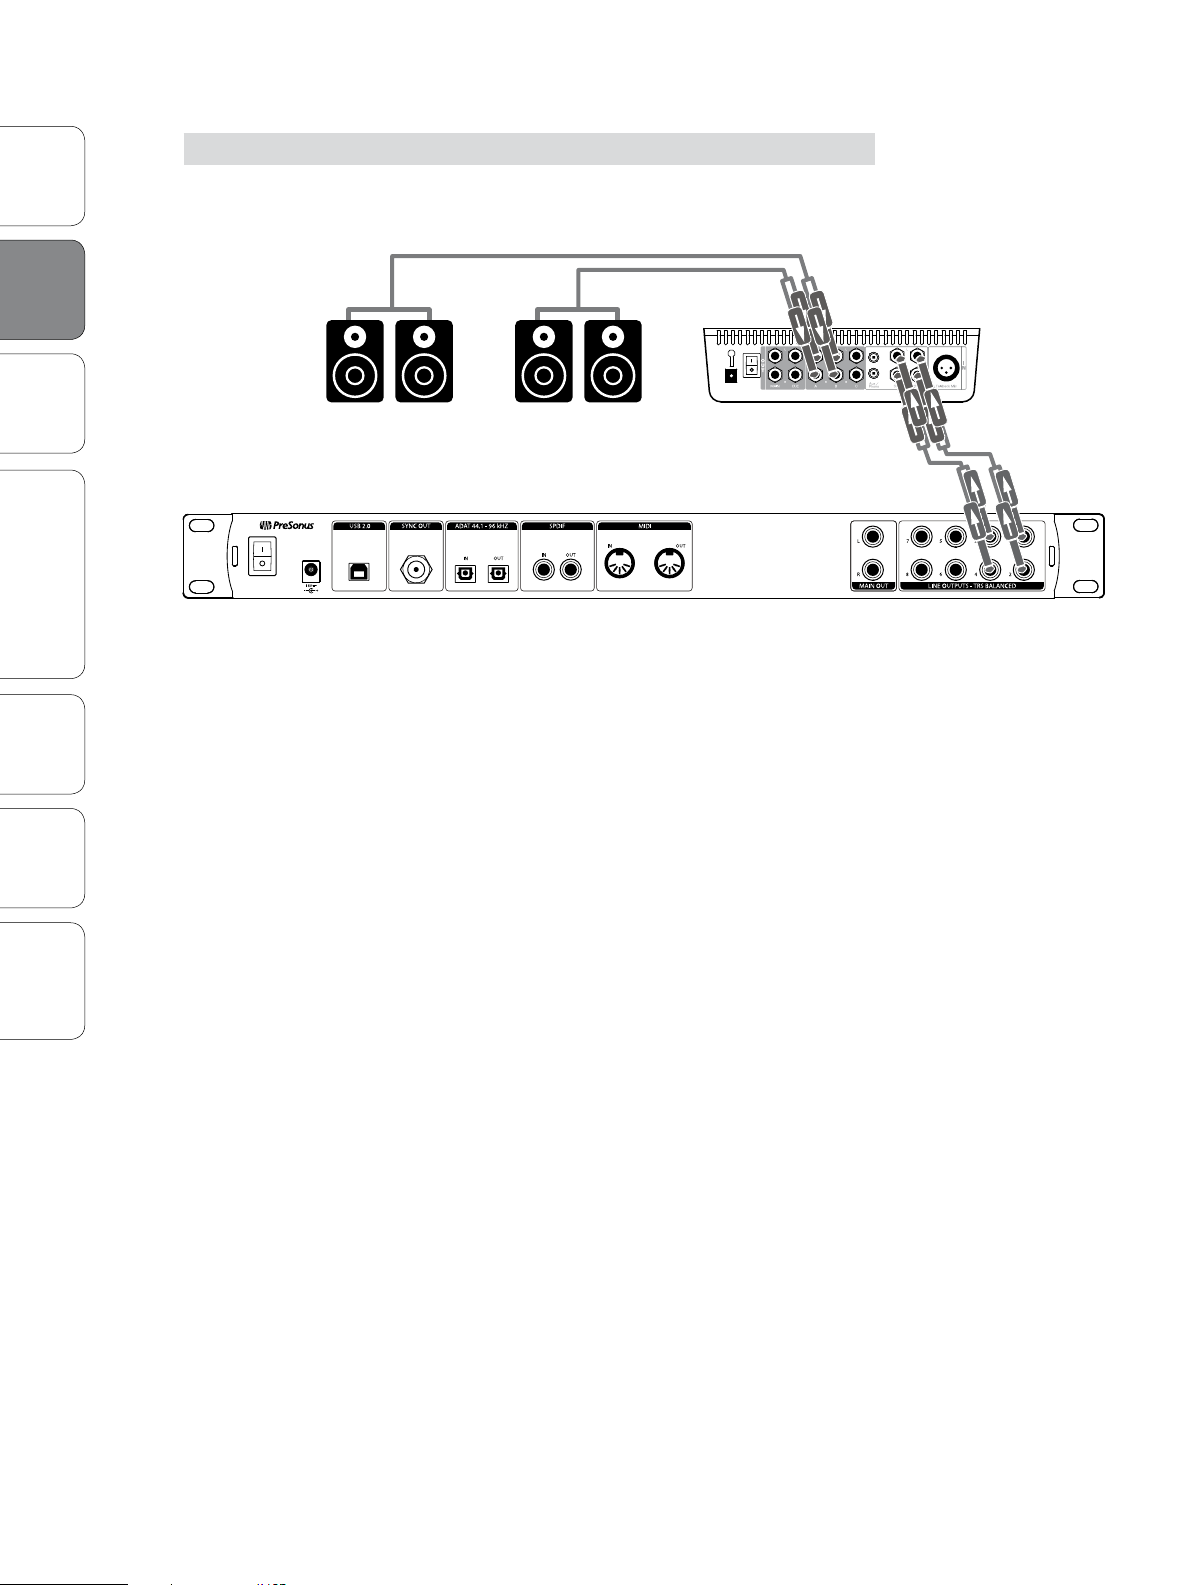
2.4 Speaker-Switching Hookup Diagram
PreSonus AudioBox™ 1818VSL
Overview Connecting
Hookup
Computer
to a
Software: Virtual StudioLive
and Studio One Artist
Tutorials Technical
2.4 Speaker-Switching Hookup Diagram
studio monitors monitor stationstudio monitors
Information
Troubleshooting
and Warranty
1010

Owner’s Manual
Connecting to a Computer 3
System Requirements 3.1
3.0 Connecting to a Computer
Your AudioBox 1818VSL is a rugged USB 2.0 audio interface with
exible monitoring control and professional audio tools.
3.1 System Requirements
Below are the minimum computer-system requirements for
PreSonus Studio One Artist and Virtual StudioLive software.*
Macintosh
• Operating Systems:
• Mac OS X 10.6.2 (Snow Leopard) or higher, including Mac OS X 10.7 (Lion)
• Hardware:
• Minimum: Intel Core 1 Solo 1.5 GHz processor, 1 GB RAM
• Recommended: Intel Core Duo or Intel Xeon processor, 2 GB or more RAM
Windows
• Operating Systems:
• Windows Vista 32-bit and 64-bit
OverviewHookupConnecting
Connecting
Software: Virtual StudioLive
TutorialsTechnical
to a
to a
and Studio One Artist
Computer
Computer
• Windows 7 32-bit and 64-bit
• Hardware:
• Minimum: Intel Pentium 4 1.6 GHz processor or AMD
Athlon 64 3000+ (Turion), 1 GB RAM
• Recommended: Intel Pentium 4 2.8 GHz EM64T or better or
AMD Athlon 64 XP 3000+ or better, 2 GB or more RAM
NOTE: The speed of your processor, amount of RAM, and capacity, size, and speed of your hard
drives will greatly aect the overall performance of your recording system. A faster processor
and more RAM can reduce signal latency (delay) and improve overall performance.
*Subject to change. Check www.presonus.com for updates.
Information
and Warranty
Troubleshooting
1111
3 Connecting to a Computer
3.2 Installation for Windows
PreSonus AudioBox™ 1818VSL
Overview Hookup Connecting
Connecting
Computer
Computer
to a
to a
Software: Virtual StudioLive
and Studio One Artist
Tutorials Technical
3.2 Installation for Windows
After you insert the Installation CD into your CD-ROM drive, the AudioBox 1818VSL
installer will take you through each step of the installation process. Please read each
message carefully to ensure the AudioBox 1818VSL driver is properly installed. It
is especially important that you not connect your AudioBox 1818VSL too soon!
We made the AudioBox 1818VSL installer as simple and easy to follow as
possible. Before beginning the installation setup, please close all applications,
including antivirus software. Do not connect your AudioBox 1818VSL to your
computer until prompted to do so by the installer. After the installation is
successfully completed, don‘t forget to reenable your antivirus protection!
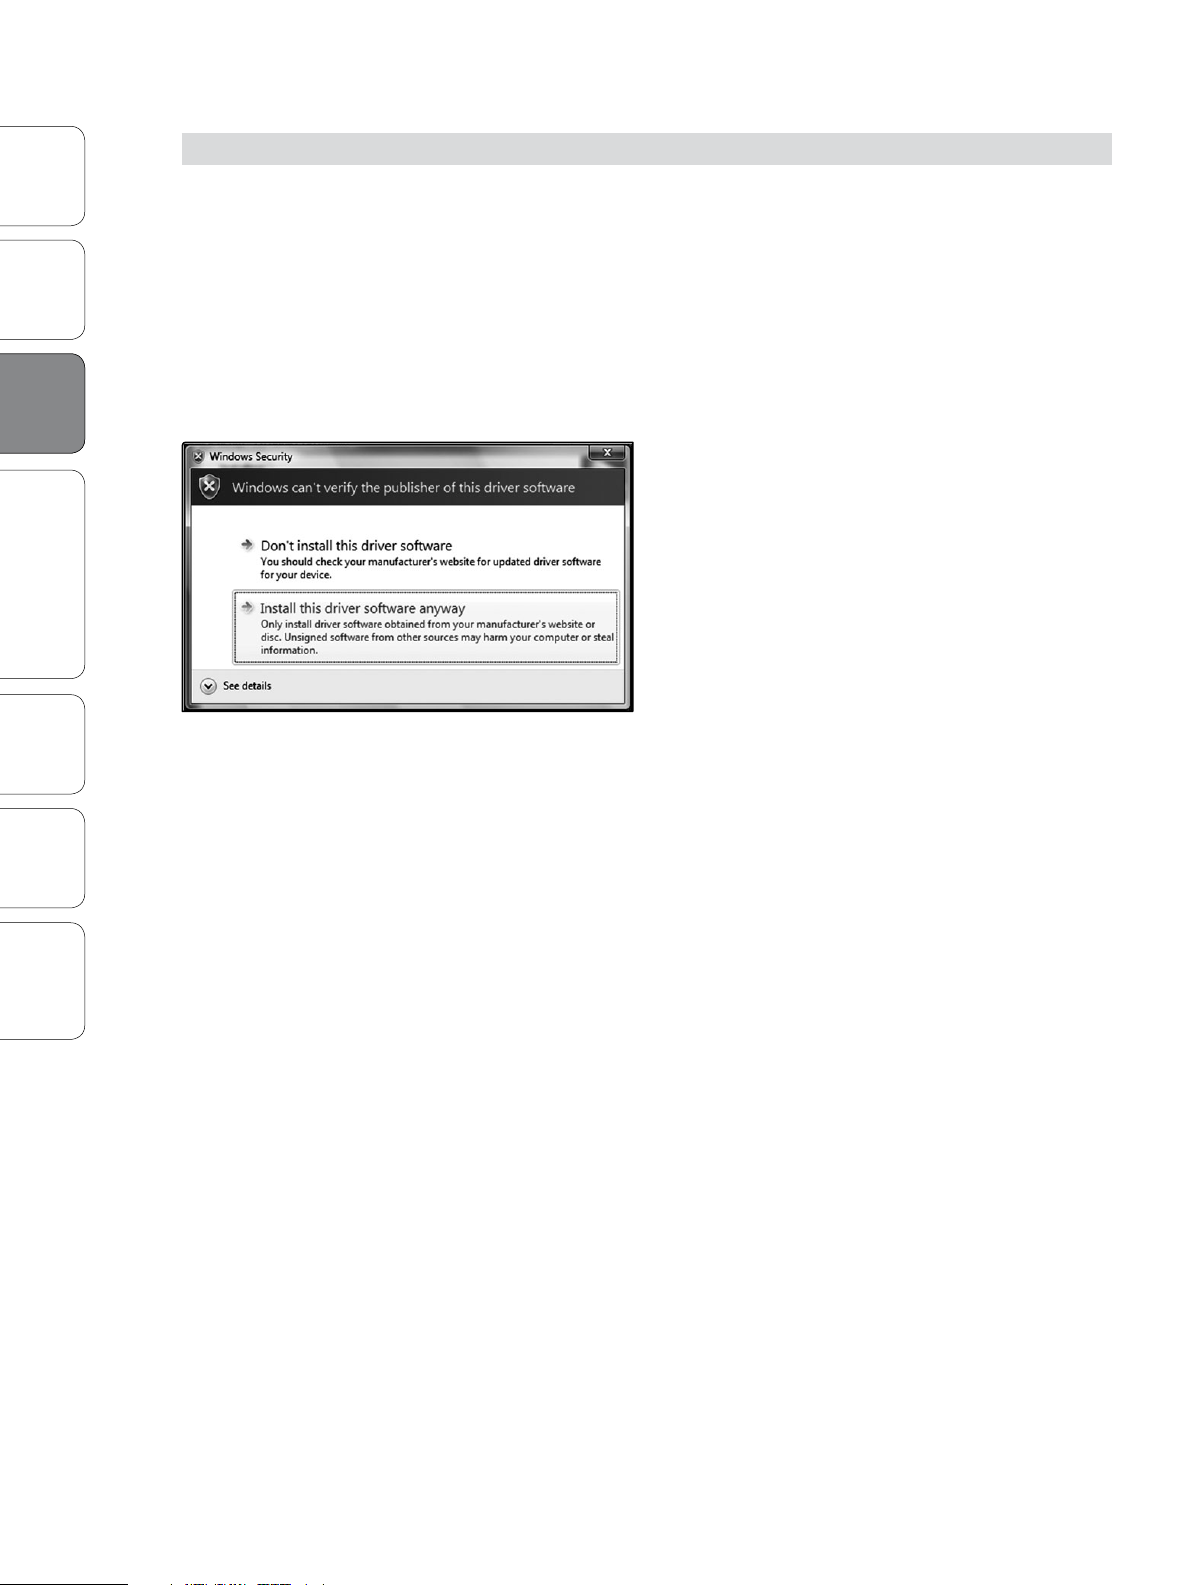
Windows Vista Users: If you see any Windows Security
alerts, click “Install this driver software anyway.”
Follow the onscreen instructions to complete
the installation. When the installer has nished,
it will prompt you to reboot your computer.
Click “Finish” to automatically restart your PC.
Once your computer has rebooted, the Found
New Hardware wizard will launch. Follow the
recommended steps. Your AudioBox 1818VSL is
now synced to your computer and ready to use!
Information
Troubleshooting
and Warranty
1212
Owner’s Manual
3.3 Installation for Mac OS X
Connecting to a Computer 3
Installation for Mac OS X 3.3
After inserting the Installation CD into your disc drive, browse the disc,
and run the AudioBox 1818VSL installer, which will take you through each
step of the installation process. Please read each message carefully, and be
especially careful that you do not connect your AudioBox too soon.
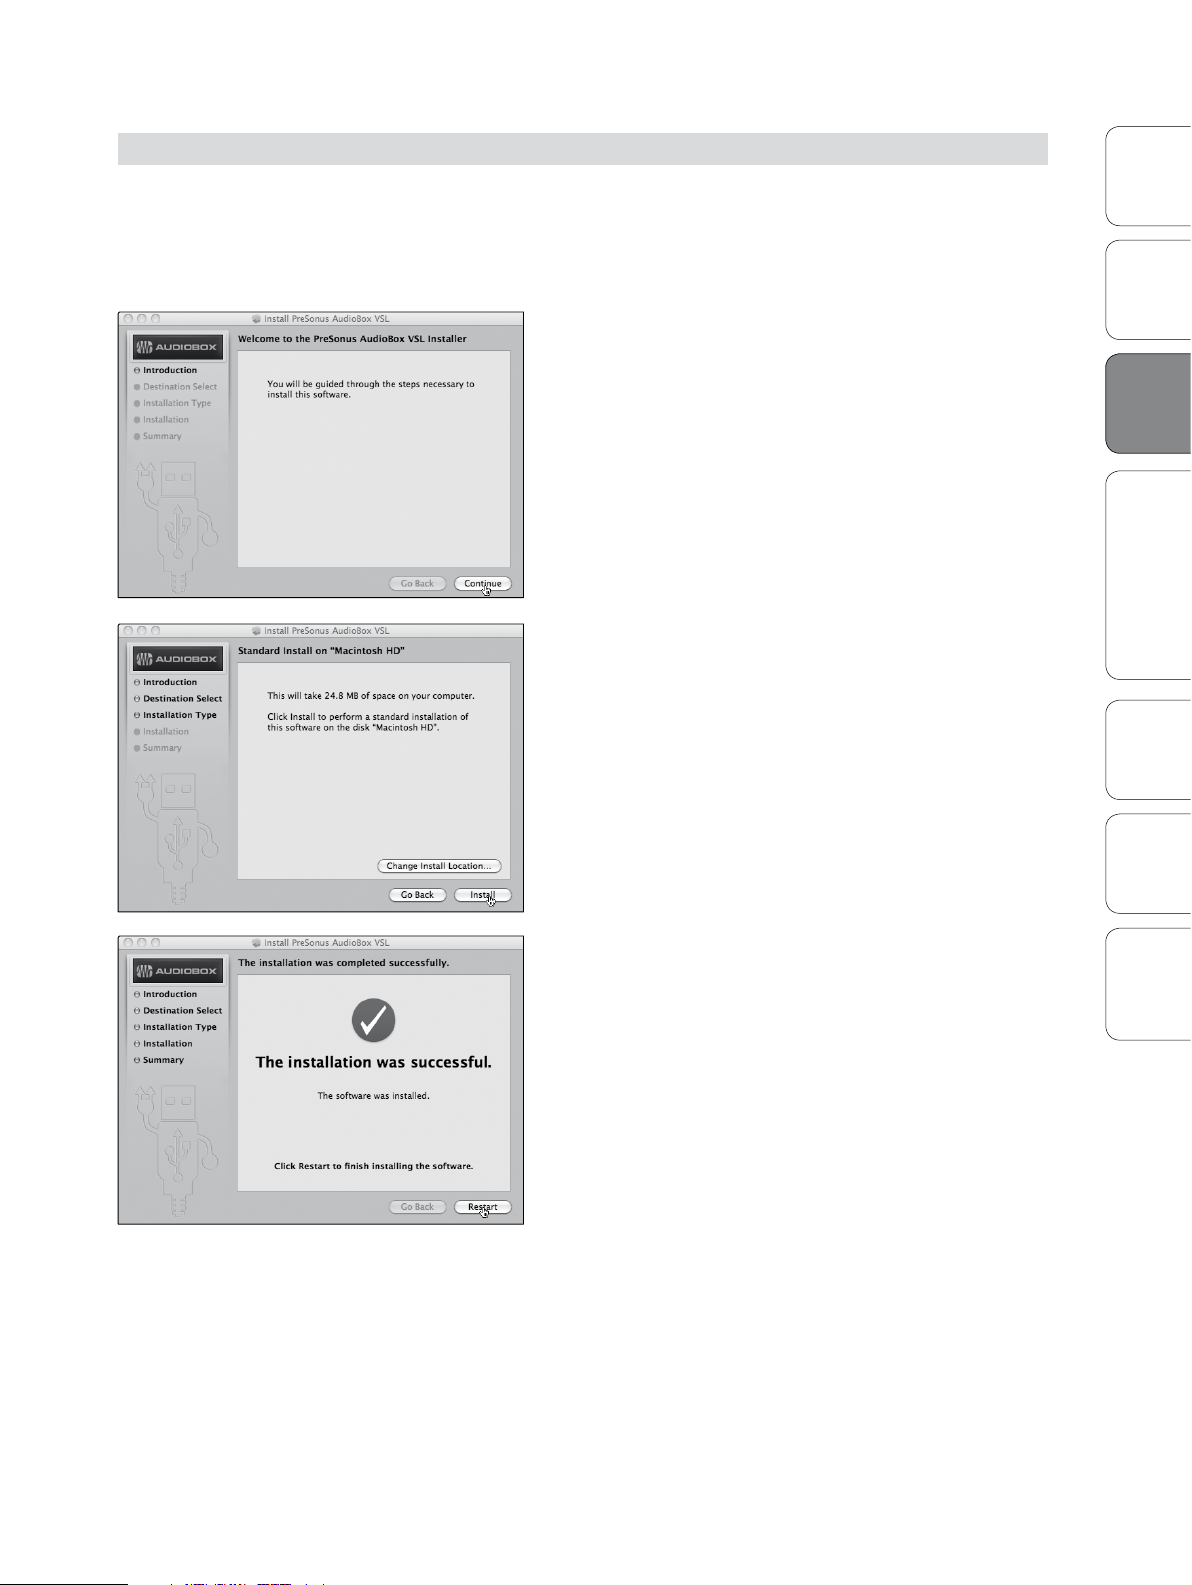
1. You will be directed to the Welcome screen. Click
“Continue” and follow the onscreen instructions.
2. You will be directed to choose the hard drive onto
which you want to install the drivers and Virtual
StudioLive software. You must choose your system
drive; storage drives and partitions cannot be used as
hosts for the driver.
OverviewHookupConnecting
Connecting
Software: Virtual StudioLive
to a
to a
and Studio One Artist
Computer
Computer
When installation is completed, you will nd the
Universal Control program in your Applications folder.
It is recommended that you place this in your Dock.
Click “Install.”
3. When installation is completed, your computer will
restart. Once it has rebooted, connect your
AudioBox 1818VSL to your Mac with a USB cable and
power it on. You are now ready to use your AudioBox
1818VSL!
TutorialsTechnical
Information
and Warranty
Troubleshooting
1313
3 Connecting to a Computer
3.4 Using the AudioBox 1818VSL with Popular Audio Applications
PreSonus AudioBox™ 1818VSL
Overview Hookup Connecting
Connecting
Computer
Computer
to a
to a
3.4 Using the AudioBox 1818VSL with Popular Audio Applications
Complete setup instructions for Studio One Artist and a brief tutorial on
its features can be found in Section 4.2 of this manual. However, you can
use your AudioBox 1818VSL with any audio-recording application that
supports Core Audio or ASIO. Please consult the documentation that came
with your audio application for specic instructions on how to select the
AudioBox 1818VSL driver as the audio-device driver for your software.
Below are basic driver-setup instructions for four popular audio applications.
Apple Logic Pro/Express 7+:
Software: Virtual StudioLive
and Studio One Artist
Tutorials Technical
1. Launch Logic Pro/Express.
2. Go to Logic | Preferences | Audio.
3. Click on the Devices Ta b.
4. On the Core Audio tab, check Enabled.
5. Select PreSonus AudioBox 1818VSL from the device menu.
6. You will be asked if you’d like to relaunch Logic. Click “try (re)launch.”
Information
Troubleshooting
and Warranty
7. Your AudioBox 1818VSL features custom I/O labels for faster workow.
To enable these labels for use in Logic, go to Options | Audio | I/O Labels.
8. The second column in the pop-up window will be named
“Provided by Driver.” Activate each of these labels for your
AudioBox 1818VSL. When you are done, close this window.
9. You are now ready to use your AudioBox 1818VSL.
Steinberg Cubase 4+
1. Launch Cubase.
2. Go to Devices | Device Setup.
3. Select “VST Audio System” from the Devices column in the Device Setup.
4. Select PreSonus AudioBox 1818VSL from the ASIO Driver dropdown list.
5. Click “Switch” to begin using the AudioBox 1818VSL driver.
6. Once you have successfully changed the driver, go to Devices |
VST Connections to enable your input and output buses.
1414

Owner’s Manual
Cakewalk Sonar 6+
Connecting to a Computer 3
Using the AudioBox 1818VSL with Popular Audio Applications 3.4
1. Launch Sonar.
2. Go to Options | Audio... and click on the Advanced tab.
3. Change the Driver Mode to “ASIO.” (Using WDM, rather than
ASIO, for pro-audio applications is not recommended.)
4. Click the “OK” button.
5. Restart Sonar.
6. Go to Options | Audio... and click on the Drivers tab.
7. Highlight all input and output drivers beginning with “PreSonus AudioBox 1818VSL.”
8. Go to Options | Audio... and click on the General tab.
9. Set the Playback Timing Master to “PreSonus AudioBox... DAW Out 1.”
10. Set the Recording Timing Master to “PreSonus AudioBox... Mic/Inst 1.”
OverviewHookupConnecting
Connecting
Software: Virtual StudioLive
to a
to a
and Studio One Artist
Computer
Computer
Ableton Live 5+
1. Launch Ableton Live
2. Go to Options | Preferences | Audio
3. Choose Driver Type: Asio | Audio Device: ASIO PreSonus AudioBox 1818VSL
4. Go to Input Cong: Enable and select the desired Input channels.
5. Go to Output Cong: Enable and select the desired Output channels.
6. You may now select the AudioBox 22/44VSL’s inputs
and outputs for each track created in Live.
TutorialsTechnical
Information
and Warranty
Troubleshooting
1515

4 Software: Virtual StudioLive and Studio One Artist
4.1 Virtual StudioLive
PreSonus AudioBox™ 1818VSL
Overview Hookup Connecting
4.0 Software: Virtual StudioLive and Studio One Artist
Your AudioBox 1818VSL comes with a powerful software bundle that
provides everything you need to record, produce and mix an album.
This software package, including Virtual StudioLive™ (VSL) and Studio
One™ Artist, is designed to help you get the most from your studio.
4.1 Virtual StudioLive
Computer
to a
Software: Virtual StudioLive
and Studio One Artist
Tutorials Technical
Information
4.1.1 Virtual StudioLive: Setup
Virtual StudioLive is a powerful monitoring software that essentially
turns your AudioBox 1818 into a mini-StudioLive™ 16.0.2. VSL
provides control of channel, eects bus, and Main bus levels; Fat
Channel parameters; and eects. VSL also includes a librarian,
allowing you to easily manage your presets and mix Scenes.
Controlling VSL is as easy as drag-and-drop. Load Fat Channel presets and
Scenes by simply dragging them onto the channel or mixer overview. You
can load Fat Channel presets as a complete channel strip or as individual
gate, compressor, and EQ presets. You can even drag presets out of the
browser and exchange them with other AudioBox 22/44/1818VSL owners.
The VSL Setup tab lets you set basic driver parameters such
as buer size and sample rate and enables you to adjust the
user preferences in VSL. To access the Setup options, click
on the Setup Tab button at the top of the VSL window.
Troubleshooting
and Warranty
Meter Decay Sets the Response Time for the Meters in the Device Window.
VSL gives you the option to set the response time for for the channel
meters. By default, this is set to Normal. Enable Slow Meter decay to more
accurately meter the peaks and falls of the signal. Enable Fast Metering to
monitor your signal in real time.
Meter Peak Hold Sets the Clip Indicator to Remain Illuminated.
When this option is enabled, the clip indicator on any given channel
meter in VSL will remain illuminated until manually cleared, even if the
signal is no longer clipping. The meters will also display the last peak
value until a new peak is established. To clear the clip indicator, click on it
with your mouse.
Meter Post Fader Sets the Channel Metering to Post Fader Signal
When this option is enabled, the channel meters in VSL will display the
signal level after it has been boosted or attenuated by the channel fader.
By default, all metering in VSL is pre-fader.
1616
16
Owner’s Manual
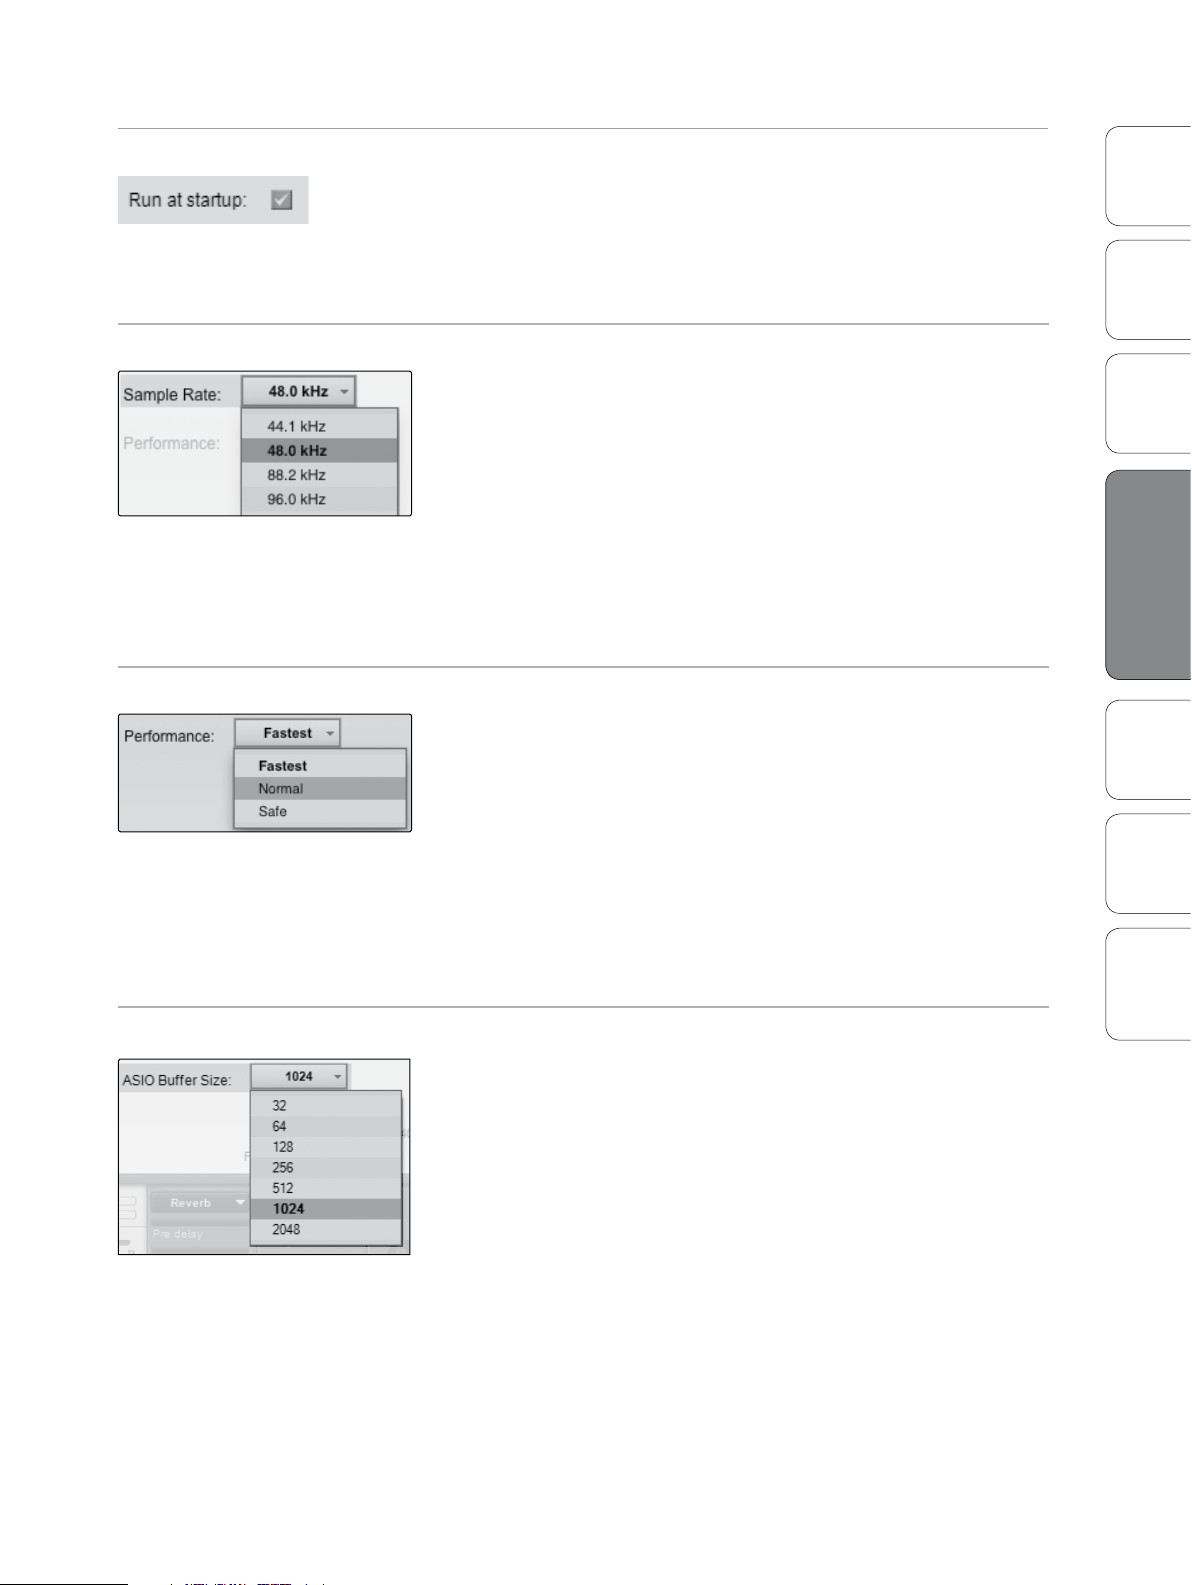
Run at Startup (Window Only) Launches the Virtual StudioLive Application Automatically on Startup.
Software: Virtual StudioLive and Studio One Artist 4
Virtual StudioLive 4.1
When this is enabled, VSL will automatically launch
each time you boot your Windows.
On the Mac, you can set this up rst by dragging VSL to your dock,
then by right-clicking it and selecting Options>Open at Login.
Sample Rate Selector (OS X Only) Changes Sample Rate.
Sets the sample rate to 44.1, 48, 88.2, or 96 kHz.
A higher sample rate will increase the delity of the
recording. It will also increase the le size and the amount
of system resources necessary to process the audio.
Changing the sample rate will produce a momentary popping noise.
Because of this, it is recommended that you turn the Main and Phones
volumes down on your AudioBox prior to changing the sample rate.
On Windows systems, the sample rate is set from
inside your host audio application.
Performance Changes VSL’s Input Monitoring Buffer Size.
VSL oers three Performance modes for input monitoring: Fastest,
Normal, and Safe. These modes allow you to adjust the VSL’s buer to
either lower the input latency or increase it depending on your
computer’s speed.
OverviewHookupConnecting
Software: Virtual StudioLive
Software: Virtual StudioLive
TutorialsTechnical
to a
and Studio One Artist
and Studio One Artist
Computer
• Fastest: Sets VSL’s input buer to 1 millisecond.
• Normal: Sets VSL’s input buer to 2 milliseconds.
• Safe: Sets VSL’s input buer to 4 milliseconds.
For most machines, Normal mode will provide
excellent stability with nominal latency.
Buer Size Selector (Windows only) Changes the Buffer Size.
You can set the buer size from 32 to 2048 samples. The buer size
determines the roundtrip time it takes audio data to be converted from
analog to digital and back to analog. As a general rule, the higher the
buer size, the better the system performance, but the less playable
virtual instruments and the like become. In general, 512 samples (11 to 12
milliseconds) will provide you with a large enough buer for optimum
system performance, but low enough to be unobtrusive. You should set
your buer size and sample rate prior to launching your host application.
On the Mac, the buer size is set from inside your host application.
Power User Tip: The buer size for monitoring in VSL is set by the Performance Mode.
The buer size you set in VSL (Windows) or in your audio application (Mac OS X),
applies only to the driver’s performance in your ASIO or Core Audio application.
Information
and Warranty
Troubleshooting
1717
17
4 Software: Virtual StudioLive and Studio One Artist
4.1 Virtual StudioLive
PreSonus AudioBox™ 1818VSL
Overview Hookup Connecting
Computer
to a
Software: Virtual StudioLive
and Studio One Artist
Tutorials Technical
ADAT Mode (Window Only) Sets ADAT I/O to ADAT or S/MUX Mode
When recording or playing back at 44.1 kHz or 48 kHz, the ADAT I/O
on the AudioBox 1818VSL will provide 8 audio channels over the
optical inputs and outputs. When recording or playing back at 88.2
kHz or 96 kHz, these connections will provide 4 audio channels.
In order to record or playback at 88.2 kHz or 96 kHz over
ADAT, you must set the correct Input and Output ADAT
Modes. AudioBox VSL provides two modes:
ADAT 8x8: Channels 1-8 (44.1/48 kHz)
ADAT SMUX 4x4: Channels 1-4 (88.2/96 kHz)
If you are recording at 88.2 kHz or 96 kHz, you must set the ADAT In Mode
to “ADAT SMUX 4x4” in addition to setting the correct sample rate.
If you are outputting audio through the optical outputs
on your AudioBox 1818VSL at 88.2 kHz or 96 kHz, you
must set the ADAT Out Mode to “ADAT SMUX 4x4” .
By default, these Modes are set to ADAT 8x8. As long
as you are using your AudioBox 1818VSL at 44.1 kHz or
48 kHz, you do not need to make any changes.
Power User Tip: Failure to set the correct ADAT Mode for the sample rate being used will result in audio
artifacts. Setting ADAT mode is not necessary when using Analog or S/PDIF I/O at higher sample rates.
Information
Troubleshooting
and Warranty
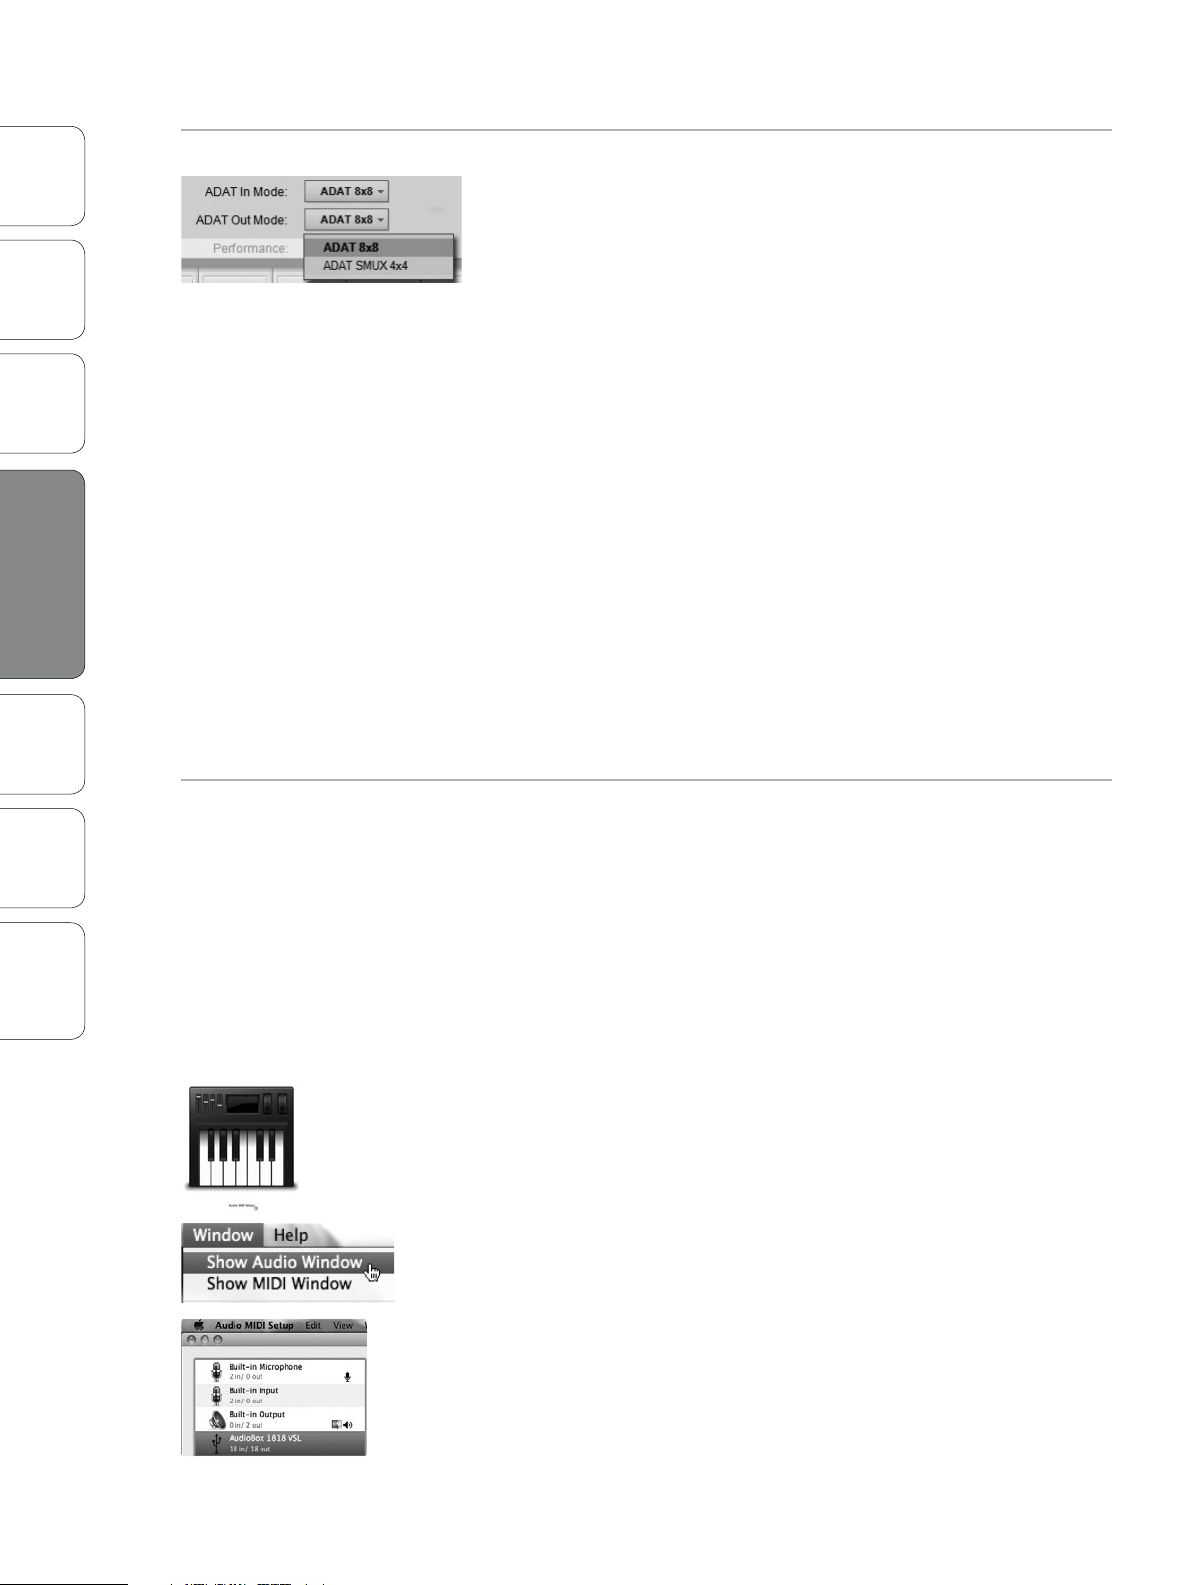
ADAT Mode (OS X Only) Sets ADAT I/O to ADAT or S/MUX Mode
When recording or playing back at 44.1 kHz or 48 kHz, the ADAT I/O
on the AudioBox 1818VSL will provide 8 audio channels over the
optical inputs and outputs. When recording or playing back at 88.2
kHz or 96 kHz, these connections will provide 4 audio channels.
In order to record or playback at 88.2 kHz or 96 kHz over ADAT,
you must set the correct Input and Output ADAT Modes. These
settings are available in OS X’s Audio MIDI Setup Utility.
By default, these Modes are set to 18ch -24bit. As long
as you are using your AudioBox 1818VSL at 44.1 kHz or
48 kHz, you do not need to make any changes.
To record or playback at 88.2 kHz or 96 kHz, open the Audio MIDI
Setup Utility on your Mac (Applications/Utilities/Audio MIDI Setup).
Once Audio MIDI Setup opens, click on the Audio window. If
the Audio window doesn’t open when Audio MIDI Setup rst
opens, go to Window and select “Show Audio window.”
Select “AudioBox 1818VSL” from the audio device list on the left. To the
left of the Sample Rate selection menu, you will nd the ADAT Mode
menu:
1818
18
18ch -24bit: Channels 1-8 (44.1/48 kHz)
14ch - 24bit: Channels 1-4 (88.2/96 kHz)
 Loading...