

Page 1

ATOM
Production and Performance Pad Controller
Owner’s Manual
®
www.presonus.com
English
Page 2

Table of Contents
1 Overview — 1
1.1 Introduction — 1
1.2 Product Registration — 1
1.3 What’s in the Box — 2
1.4 What’s in your My PreSonus Account — 2
1.5 Companion PreSonus Products — 3
1.6 Firmware Updates — 4
3.7 Zooming — 21
3.8 Customizing Knobs — 22
4 Advanced Ableton® Live
Integration — 23
4.1 Pad Mode: Session — 23
4.2 Pad Mode: Channel — 23
4.3 Pad Mode: Note — 23
4.4 User Mode — 23
4.5 Encoder Assignments — 24
2 Controls — 5
2.1 Top Panel Overview — 5
2.2 Note Repeat — 6
2.3 Quick Setup Mode — 7
2.3.1 Pad Modes — 7
2.3.2 Pressure Type — 8
2.3.3 Pressure Threshold — 9
2.3.4 Strike Velocity — 9
2.3.5 Internal MIDI Clock Tempo — 10
2.3.6 Panic — 10
3 Advanced Studio One
Integration — 11
3.1 Song Setup Mode — 11
3.1.1 Controlling Tempo — 11
3.1.2 Event Controls — 11
4.6 View Selection — 24
4.7 Transport Controls — 25
5 Studio One Artist Quick Start — 26
5.1 Installation and Authorization — 26
5.2 Setting Up Studio One — 28
5.2.1 Configuring Audio Devices — 28
5.2.2 Configuring MIDI Devices — 29
5.3 Creating a New Song — 32
5.3.1 Configuring Your Audio I/O — 32
5.3.2 Creating Audio
and Instrument Tracks — 34
5.3.3 Recording an Audio Track — 35
5.3.4 Adding Virtual Instruments
and Effects — 35
6 MIDI Mapping — 37
3.1.3 Navigating Tracks — 12
3.1.4 Adding an Instrument — 13
3.1.5 User Pads — 14
3.2 Set Loop — 15
3.2.1 Zooming — 16
3.3 Event Editor — 16
3.3.1 Adjusting Pitch — 17
3.3.2 Nudging — 18
3.4 Instrument Quick Controls — 18
3.5 Pattern Editor — 19
3.6 Transport Controls — 21
6.1 Pads and Banks — 37
6.2 Knobs — 38
6.3 Buttons — 39
6.4 Advanced Setup Mode — 40
6.4.1 Select Pad MIDI Channel — 40
6.4.2 Select Knob MIDI Channel — 40
6.4.3 Select Button MIDI Channel — 41
6.4.4 Select Pressure MIDI Channel — 41
6.4.5 Turn Pad Note On/Off — 42
6.4.6 Adjusting Brightness — 42
Page 3

1 Overview
1.1 Introduction
1 Overview
1.1 Introduction
ATOM
Owner’s Manual
Thank you for purchasing the PreSonus® ATOM production and performance
pad controller. With 16 full-size, velocity- and pressure-sensitive RGB pads and 8
assignable pad banks, ATOM lets you produce beats, play virtual instruments, and
trigger samples and loops with unsurpassed expressiveness and flexibility. More
than a compact, dynamic performance controller, when combined with Studio One®
and Ableton® Live, ATOM becomes a tightly integrated production environment.
You’ll love how ATOM’s expressive pads, flexible controls, and tight integration with
Studio One will open up your production environment and speed up your workflow.
PreSonus Audio Electronics is committed to constant product improvement,
and we highly value your suggestions. We believe the best way to achieve our
goal of constant product improvement is by listening to the real experts: our
valued customers. We appreciate the support you have shown us through the
purchase of this product and are confident that you will enjoy your ATOM!
About this manual: We suggest that you use this manual to familiarize yourself with
the features, applications, and workflows for your ATOM before trying to connect it
to your computer. This will help you to get better performances and faster results.
Throughout this manual, you will find Power User Tips that can quickly make
you an ATOM expert and help you get the most out of your investment.
1.2 Product Registration
PreSonus is committed to delivering the best experience for our
customers. My PreSonus is a one-stop portal for all our registered
customers’ needs. From your My PreSonus account, you can view all
your PreSonus hardware and software registrations; download drivers,
installers, and content; contact support; track orders and more.
To register your ATOM
Download the MyPreSonus app from the Apple App Store or Google Play.
Go to My.PreSonus.com and follow the onscreen instructions.
OR
1
Page 4
1 Overview
Go online to
my.presonus.com and
register your serial number.
To begin using your ATOM controller, connect it to
an available USB port on your computer. No driver
installation is necessary. Specialized operation is automatically engaged when connected to Studio One.
Please review your ATOM Operation Manual available at
www.PreSonus.com for more information.
Öffnen Sie die Webseite
My.PreSonus.com und
registrieren Sie Ihre
Seriennummer.
Um Ihren ATOM Controller zu nutzen, schließen Sie ihn an
einen freien USB-Port Ihres Computers an. Es muss kein
zusätzlicher Treiber installiert werden. Sofern Sie Studio
One verwenden, werden die speziellen Funktionen für
diese DAW automatisch aktiviert. Weitere Informationen
finden Sie unter www.PreSonus.com.
Allez sur my.presonus.com
et enregistrez votre numéro
de série.
Pour utiliser votre contrôleur ATOM, connectez-le à un
port USB libre de votre ordinateur. Aucune installation
de pilote n’est nécessaire. Lorsqu’il est connecté à Studio One, des actions spéciales sont automatiquement
disponibles. Veuillez consulter le mode d’emploi de votre
ATOM, disponible sur www.PreSonus.com pour plus
d’informations.
Navegue online a
my.presonus.com y registre
su número de serie.
Para comenzar a usar su controlador ATOM, conéctelo a
un puerto USB disponible en su ordenador. No se necesita instalar ningún driver. Cuando se conecte a Studio
One se activará de forma automática el modo de funcionamiento especializado. Por favor, consulte el Manual
de funcionamiento de ATOM que está disponible en
www.PreSonus.com para más información.
Production and Performance Pad Controller
Getting Started • Erste Schritte • Cómo empezar • Pour commencer
Part# 70-52000098-A
18011 Grand Bay Ct. • Baton Rouge,
Louisiana 70809 USA• 1-225-216-7887
www.presonus.com
®
ATOM Rear View
™
1.3 What’s in the Box
1.3 What’s in the Box
ATOM
Owner’s Manual
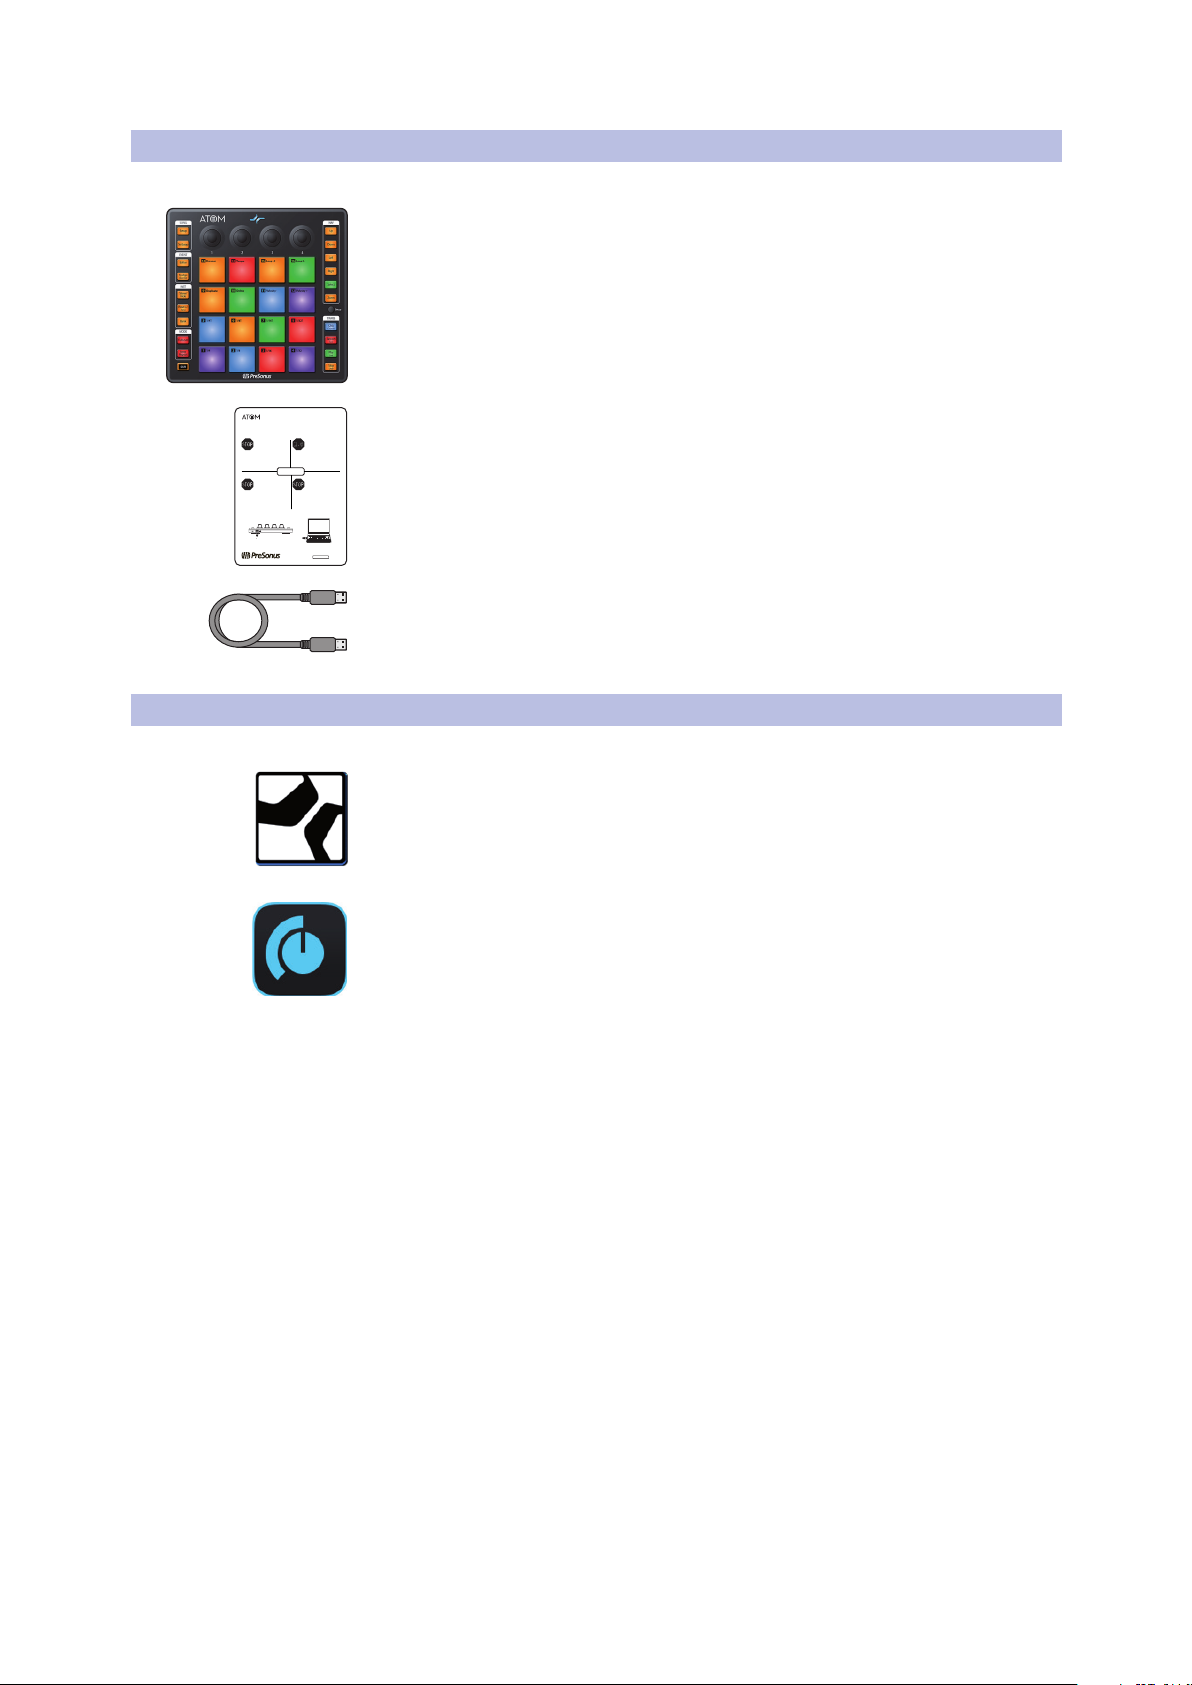
Your ATOM package contains the following:
ATOM production and performance pad controller
PreSonus ATOM Quick Start Guide
6’ (1.8m) USB cable
1.4 What’s in your My PreSonus Account
Once you register your ATOM, you will be able to download the following:
Studio One Artist recording software and content
Universal Control (necessary for firmware updates)
2
Page 5
1 Overview
1.5 Companion PreSonus Products
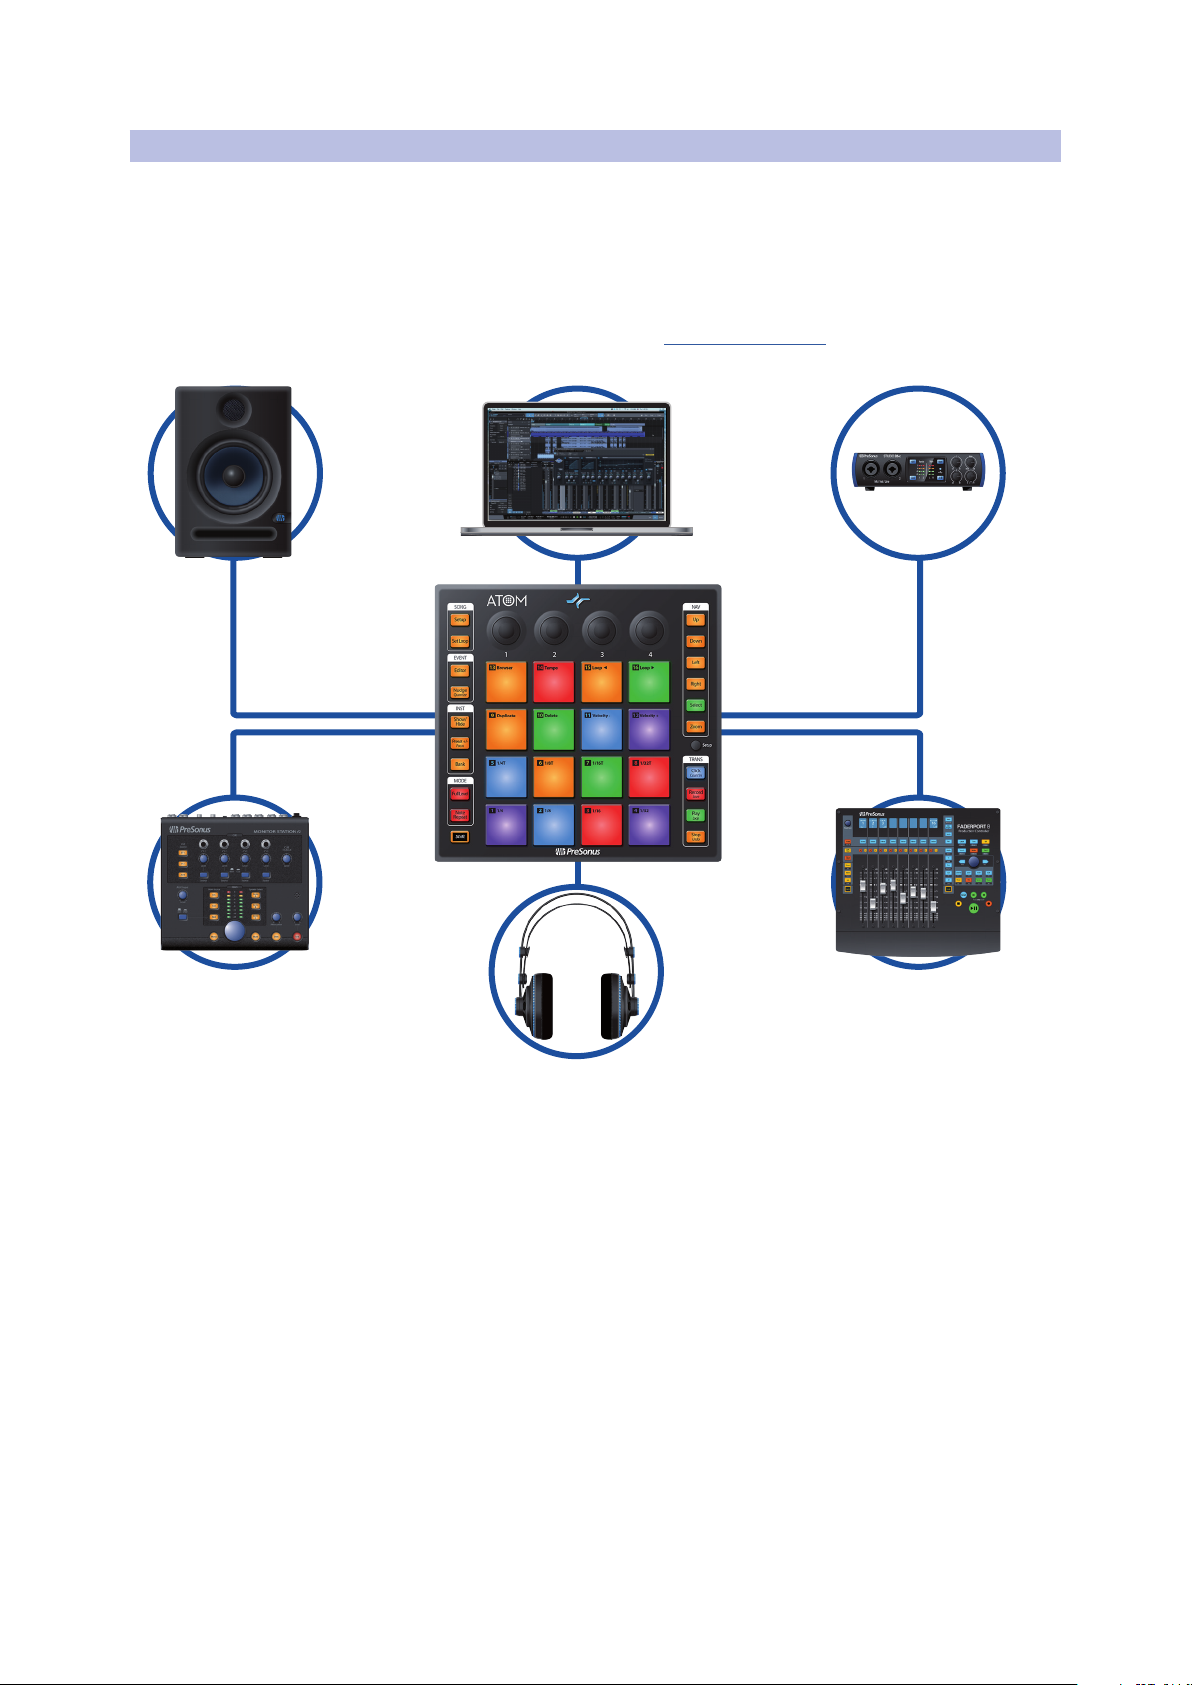
1.5 Companion PreSonus Products
Thanks for choosing PreSonus! As a solutions company, we believe the best way to
take care of our customers (that’s you) is to ensure that you have the best possible
experience from the beginning of your signal chain to the end. To achieve this goal,
we’ve prioritized seamless integration throughout every design phase of these
products from day one. The result is systems that communicate with each other
as intended—straight out of the box—without excessive configuration hassles.
We’re here for you. Find out more at www.presonus.com.
ATOM
Owner’s Manual
3
Page 6
1 Overview
ATOM Rear View
1.6 Firmware Updates
1.6 Firmware Updates
ATOM
Owner’s Manual
PreSonus is committed to constant product improvement. As part of
this commitment, we offer periodic firmware updates that add features,
improve functionality, and resolve issues that are discovered in the field.
Because of this, it is highly recommended that you download Universal
Control from your My PreSonus account after registering your ATOM.
Note: At the time of this manual’s publication, a firmware update is required for full
functionality of your ATOM. You must download and install Universal Control and run the
firmware update on your unit.
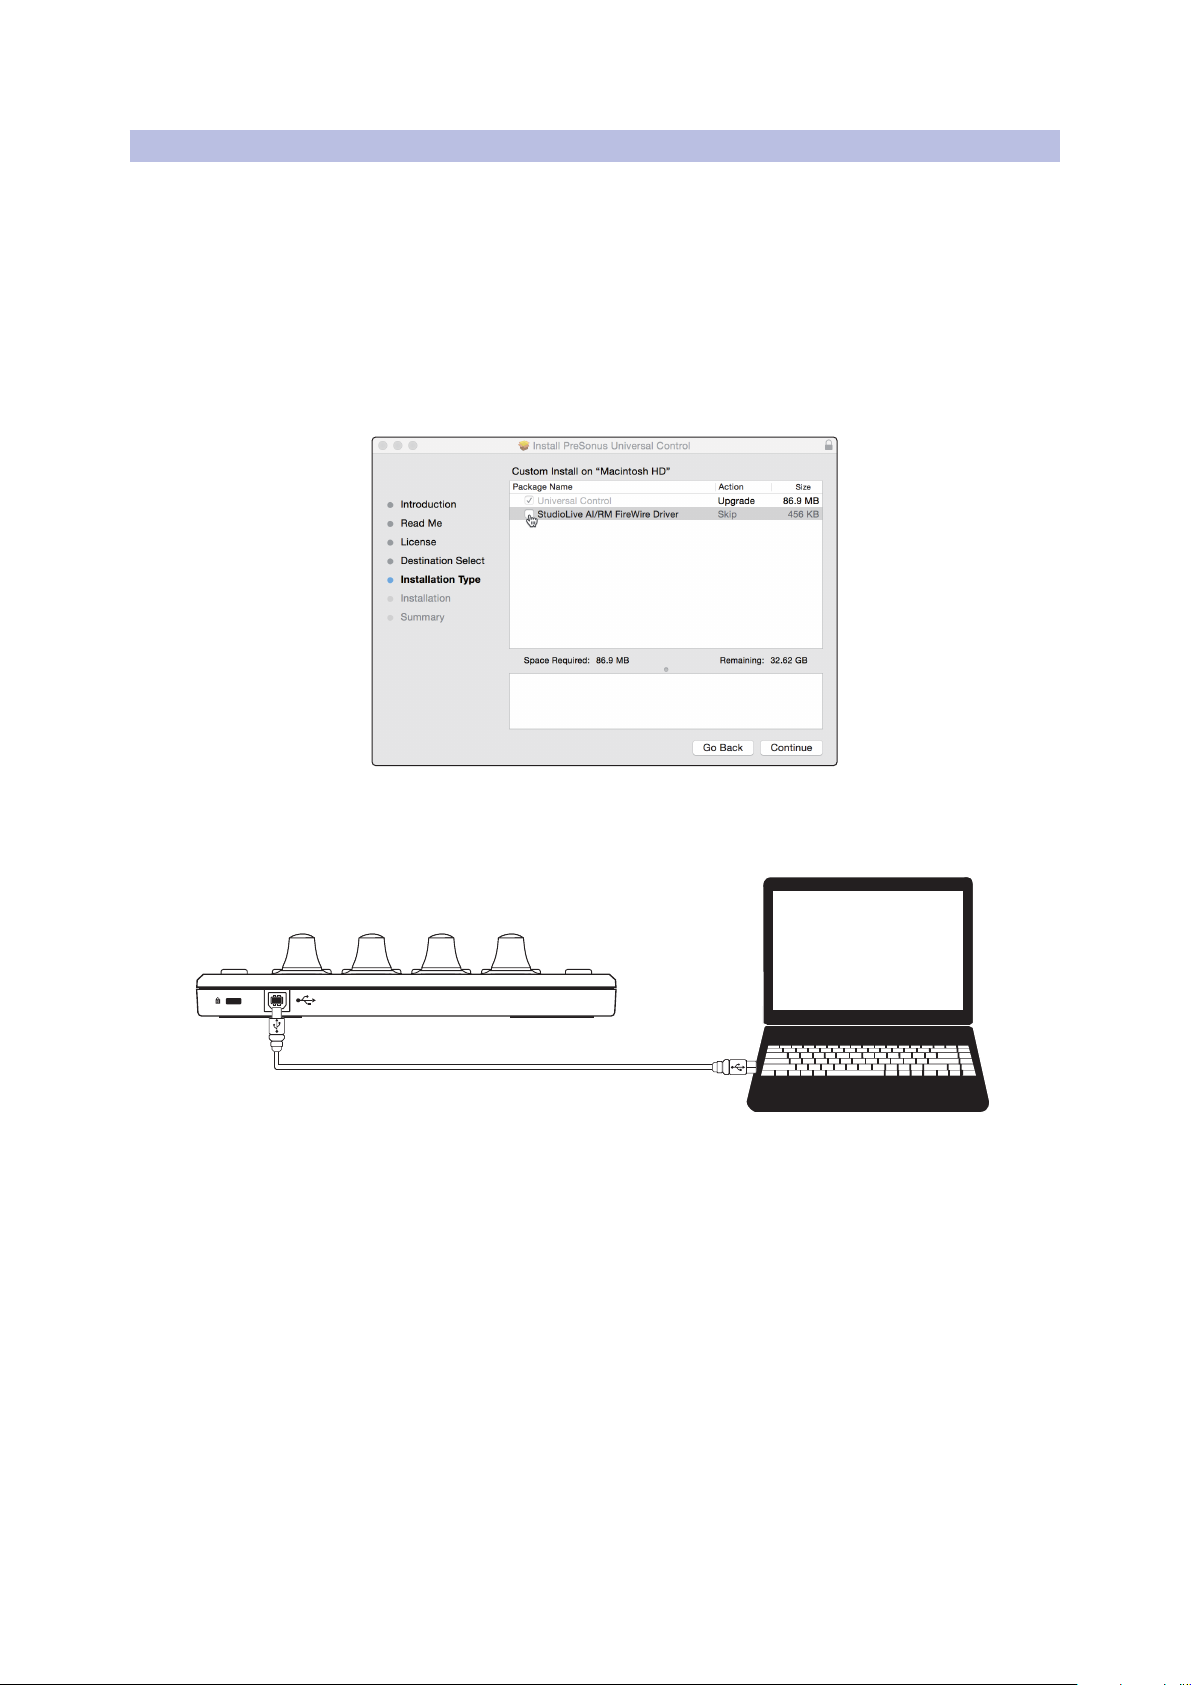
During installation, you will be given the option to install various PreSonus
audio drivers. No driver installation is required to use the ATOM.
Once installed, connect your ATOM to your computer. Your
ATOM is entirely bus powered. If you are using a USB hub, make
sure you are connecting your ATOM to a powered port.
Universal Control will alert you if there is new firmware available for your ATOM.
Clicking on the Update Firmware button will begin the update process. When
the firmware update is complete, your ATOM will reboot automatically.
4
Page 7

2 Controls
3
7
8
8
8
4
5
6
1
2
2.1 Top Panel Overview
2 Controls
2.1 Top Panel Overview
ATOM
Owner’s Manual
1. Status Indicator. This LED will change color to indicate whether Studio One
Native control is active or not. When Studio One or Ableton Live is connected,
the LED will illuminate blue. For other applications, it will illuminate green.
2. Knobs 1-4. These knobs transmit MIDI CC14-17 respectively. See Section 6.2.
3. Pressure- and Velocity-sensitive controller pads. These 16 pads can be used
to trigger samples and sounds within your software. Two different control
modes, as well as several advanced customization options, are available. Please
review Section 2.3 for details. MIDI Mapping can be found in Section 6.1.
4. Bank. Use this button to switch between pad banks 1-8. Each bank can
control a unique group of 16 individual sounds for a total of 128.
5. Full Level. When engaged, every pad will trigger its assigned sound at full strike
velocity (127) no matter how soft or hard you hit (application dependent).
6. Note Repeat. Also known as “roll,” note repeat allows you to
trigger a sound at a specified rate as long as the pad is held
(application dependent). See Section 2.2 for details.
7. Setup. This button provides access to advanced
configuration features. See Section 2.3 for details.
8. Assignable Controls. The remaining buttons have specialized functions in
Studio One or Ableton Live (see Sections 3 and 4 for details). These buttons
send unique MIDI CC messages and can be used for many purposes in other
applications. For a table of assigned MIDI CC messages, please see Section 6.3.
5
Page 8
2 Controls
2.2 Note Repeat
2.2 Note Repeat
ATOM
Owner’s Manual
As previously mentioned, Note Repeat allows you to repeatedly trigger a sound
at a specified rate for as long as you hold down the assigned pad. In this way, you
can, for example, trigger a series of ¼ notes simply by pressing and holding a pad.
The MIDI clock determines the tempo at which Note Repeat triggers a sound.
While on Internal Clock, this is set from the Quick Setup Mode. See Section
2.3.5 for details. When connected to a DAW or other application that provides
a master MIDI clock, the tempo is set from within that application.
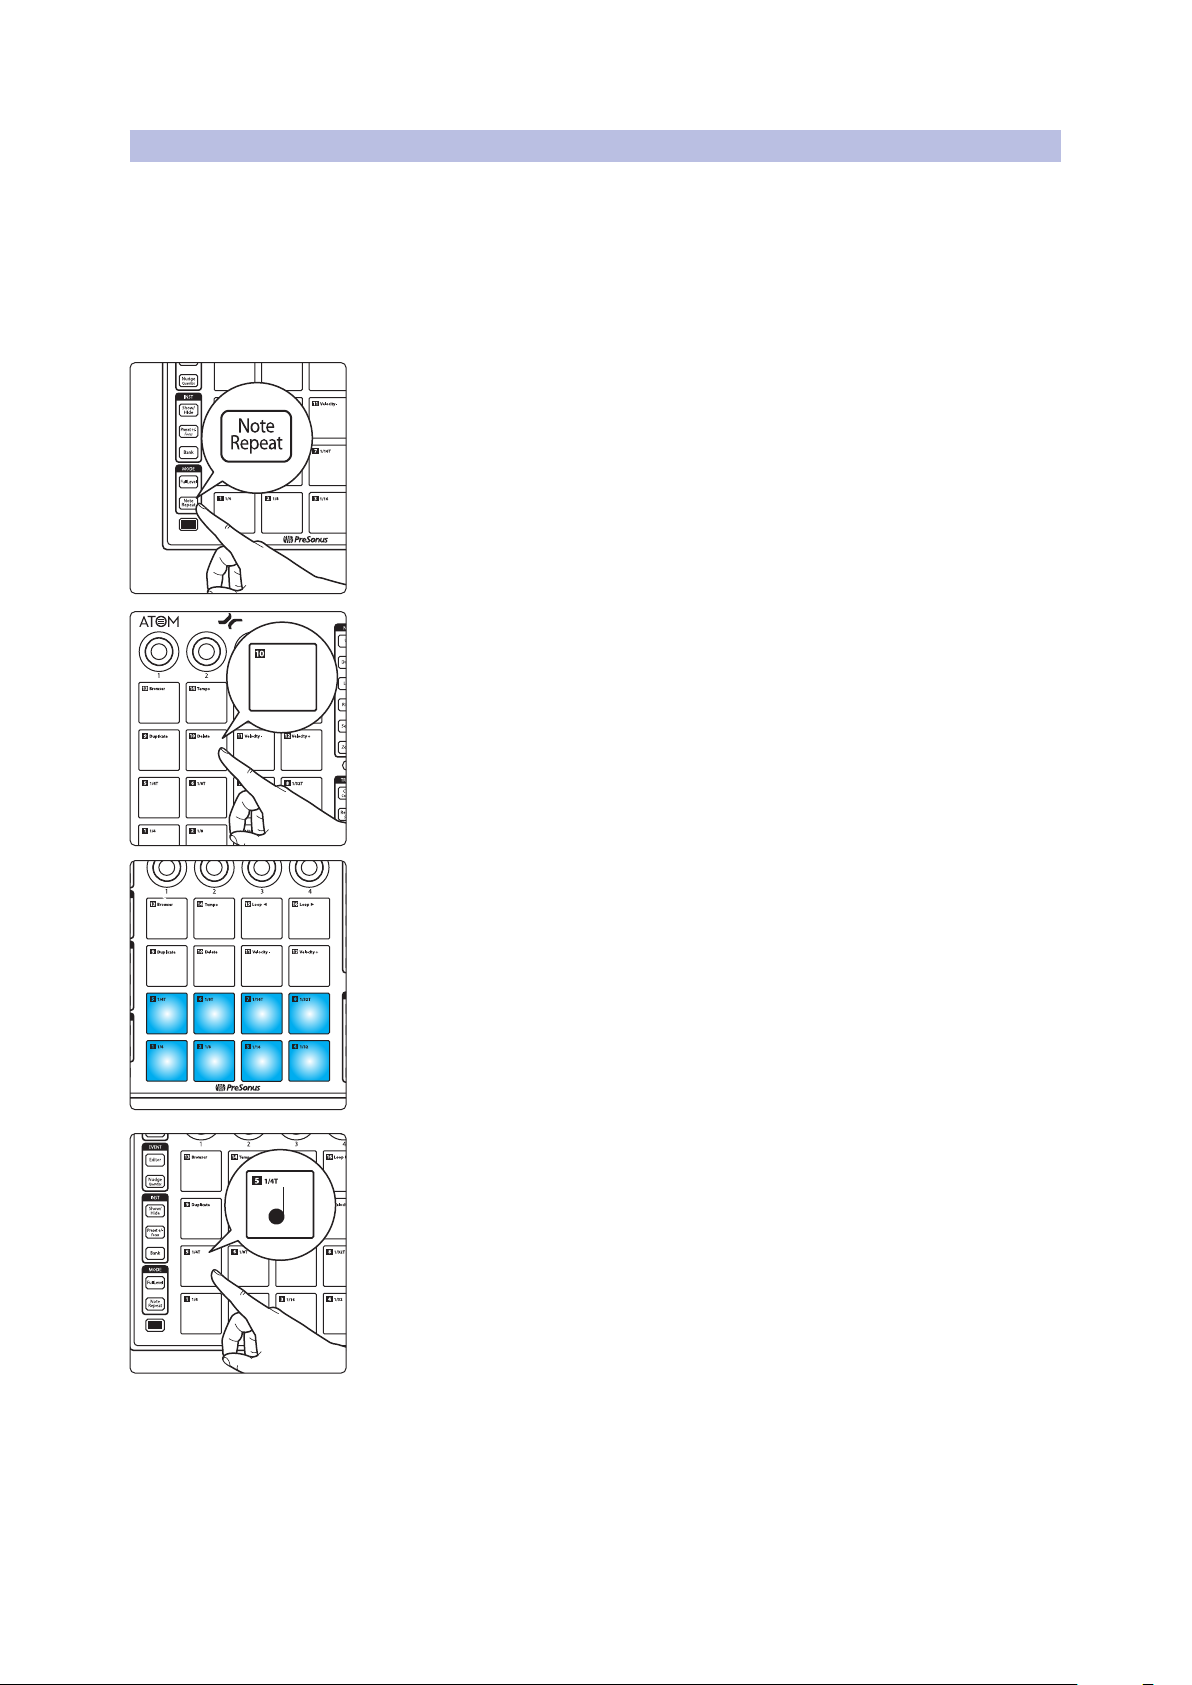
To engage Note Repeat, press the Note Repeat button while the desired bank is
active. All the pads will flash.
Press the pad assigned to the sound on which you’d like to enable Note Repeat.
Pads 1-8 will illuminate solid.
Press and hold the Note Value you would like to use. The Note Values displayed to the
right of each pad’s number.
The sound assigned to the selected pad will repeat at the selected value until you
release the pad.
Note: In Studio One, note repeat behaves slightly differently. The last pressed pad will be
the pad selected for note repeat.
To select a different pad while still in note repeat, press and hold the Select button and
select the desired pad. Upon release of the Select button, the new pad will be used for
note repeat.
Note: At the time of publication, Ableton Live does not support Note Repeat with ATOM.
6
Page 9
2 Controls
MIDI Drum mode (Default) MIDI Keyboard mode Mardi Gras mode
2.3 Quick Setup Mode
2.3 Quick Setup Mode
ATOM
Owner’s Manual
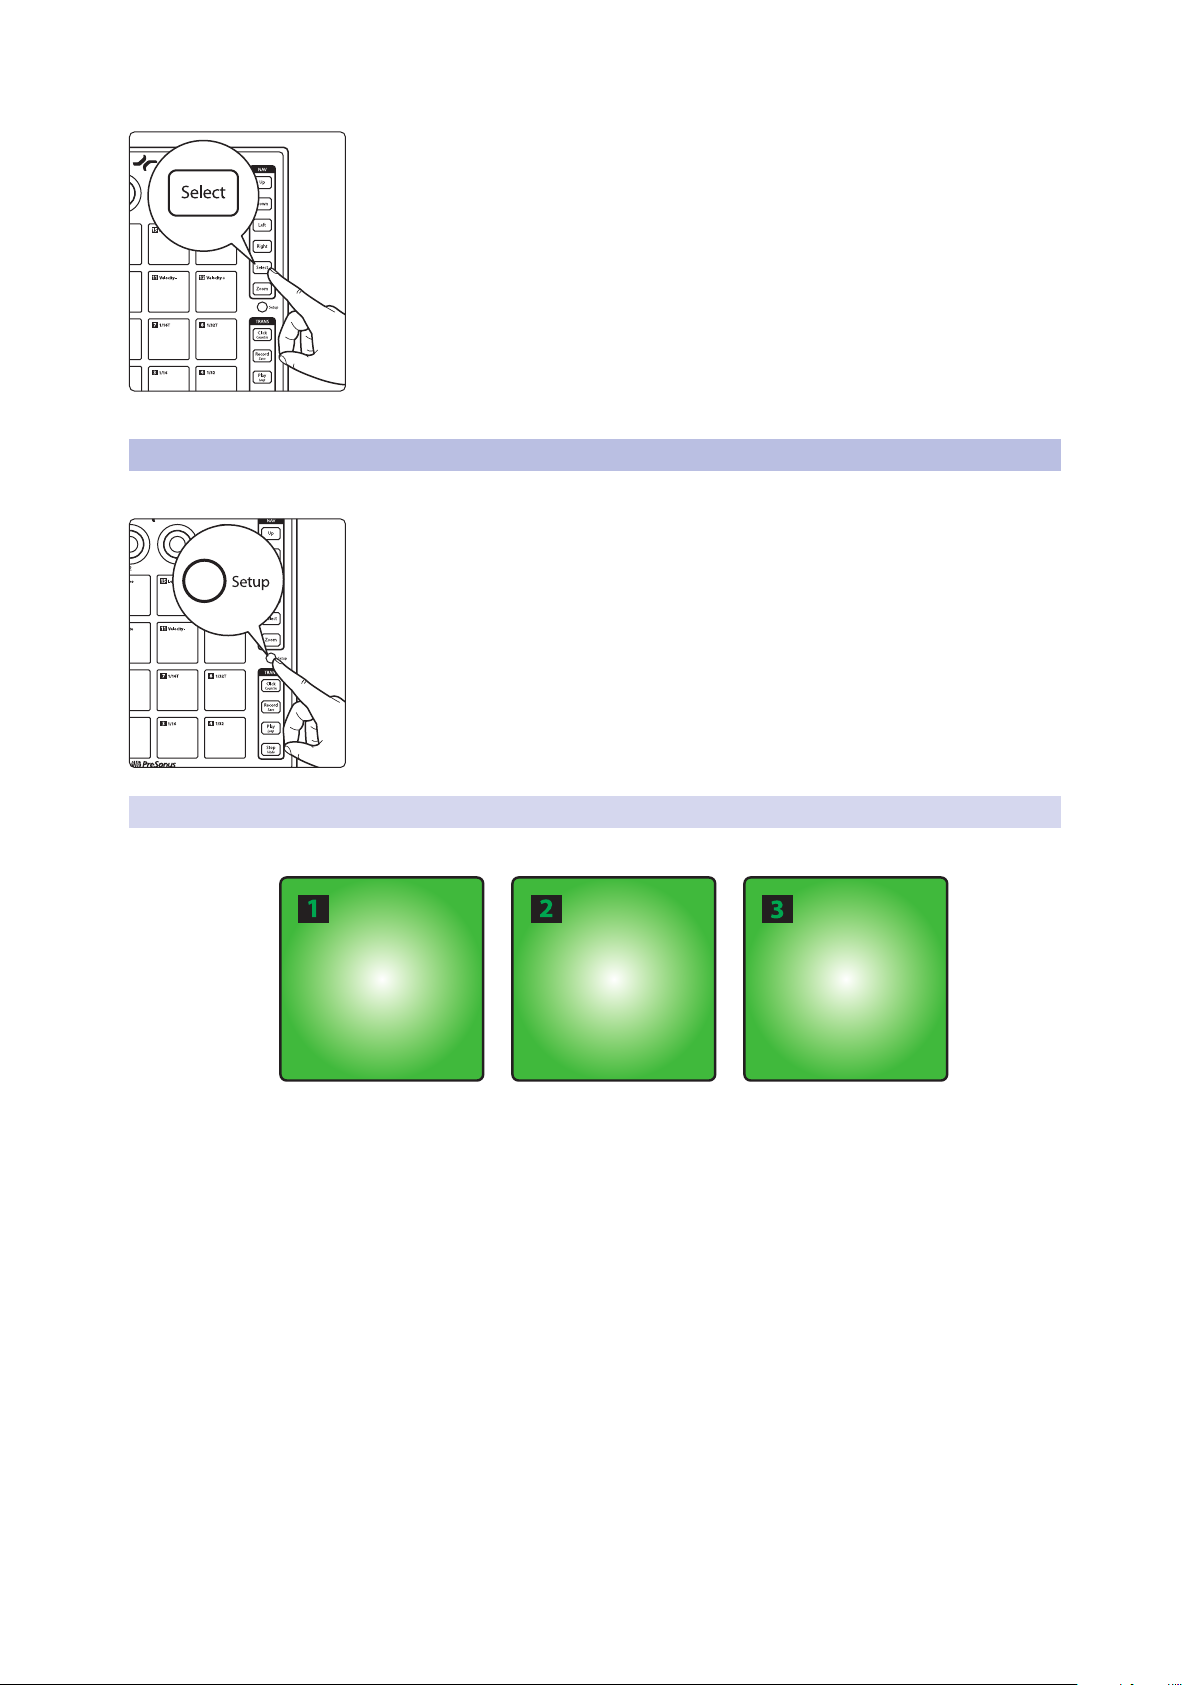
To change the sound that is being triggered, press the Select button and then press
the desired pad.
To exit Note Repeat, press the Note Repeat button again. The button
will remain illuminated as long as Note Repeat is active.
Your ATOM controller provides customization options via Quick Setup Mode.
To launch Quick Setup Mode, press and hold the Setup
button on the right side of your ATOM controller.
While Quick Setup Mode is active, the 16 pads on your ATOM controller will not send
MIDI messages, rather they will act as toggle buttons for Quick Setup functions.
Releasing the Setup button exits Quick Setup Mode.
For advanced customization features, please see Section 6.4
2.3.1 Pad Modes
While Setup is enabled, Pads 1-3 allow you to select
the behavior of the pads on your ATOM.
• MIDI Drum Mode. This is the default setting for your ATOM. While
in this mode, the pads of your controller will illuminate with the
same color for each bank. Pressing a pad will switch the color to
white, indicating that the MIDI message has been sent.
• MIDI Keyboard Mode. While in this mode, the pads on your
ATOM will illuminate following the pattern of a piano keyboard,
where white keys are indicated by yellow and black keys are
indicated by blue. See Section 2.3.1.1 for more information.
• Mardi Gras Mode. This is a test mode for your ATOM. While
active, the RGB LEDs will cycle through the available colors.
Note: At the time of publication, Pad Modes are not available while Studio One or Live
native control is active .
7
Page 10

2 Controls
Off CC Aftertouch Channel Pressure (Default)
2.3 Quick Setup Mode
2.3.1.1 MIDI Keyboard Mode
ATOM
Owner’s Manual
2.3.2 Pressure Type
C
OCTAVE
DOWN
G# A#
FE
C D
While MIDI Keyboard Mode is active, your ATOM pads will function
as a single octave keyboard from C to C in each octave. Pads
15 and 16 adjust the octave down or up respectively.
Note: Banking is disabled in this mode. Pad layout may vary depending on application.
C#
F#
OCTAVE
UP
BA
G
D#
You can select the type of message that is sent by pressure as follows:
• Off. This turns off pressure messages.
• CC. Post-strike pressure sends CC22.
• Aftertouch. Post-strike pressure sends Aftertouch
(also known as polyphonic aftertouch).
• Channel Pressure. This is the default setting for your ATOM. Post-strike pressure
sends Channel Pressure messages (also known as monophonic aftertouch).
8
Page 11
2 Controls
Low
0
Medium
0
High (Default)
0
Medium (Default) HardSoft
2.3 Quick Setup Mode
2.3.3 Pressure Threshold
ATOM
Owner’s Manual
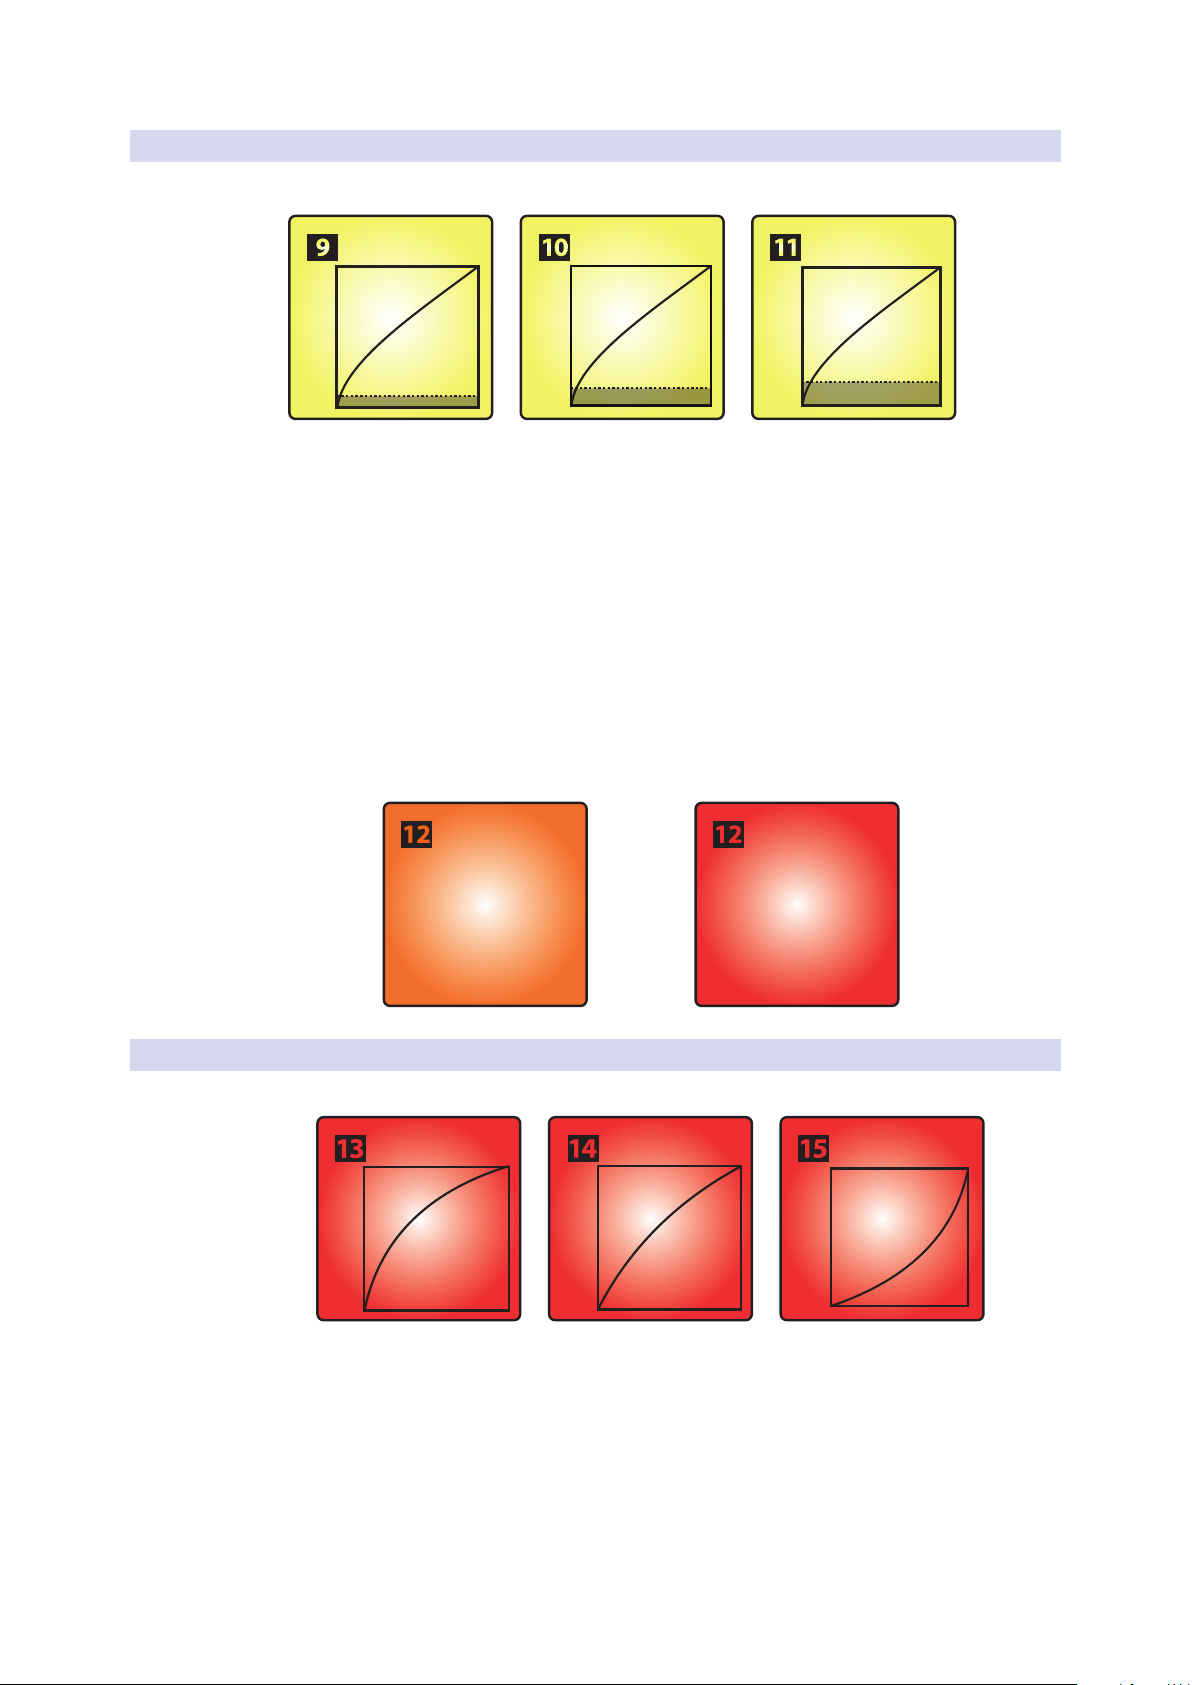
The Pressure Threshold for your ATOM controller pads has three settings:
• Low. This setting requires the least amount of pressure after the
initial strike before sending a MIDI pressure message.
• Medium. While this setting is enabled, the pressure
message is delayed slightly after the initial strike.
• High. This is the default setting for the ATOM and requires the greatest
amount of pressure after the strike for the MIDI pressure message to send.
Power User Tip: Regardless of the Pressure Threshold setting, the pressure value always
starts from 0 or 127 (depending on the Global Pressure setting).
The Global Pressure range can be toggled to transmit values from 0
to 127 or from 127 to 0. By default, the range is from 0 to 127.
2.3.4 Strike Velocity
Pressure Range Toggle
0 to 127
OR
127 to 0
(Default)
The Strike Velocity for your ATOM controller pads has three settings. Use Pads
13-15 to adjust how responsive your pads will be as you press them:
• Soft. This setting is optimized for players who prefer to play
softly. Soft pad strikes will result in higher MIDI values.
• Medium. This is the default setting for the ATOM and has been
optimized for a wide range of players and performance styles.
• Hard. This setting is optimized for players who prefer to play with a
lot of force. Harder pad strikes will result in lower MIDI values.
9
Page 12

2 Controls
2.3 Quick Setup Mode
2.3.5 Internal MIDI Clock Tempo
MIDI Clock Tempo
TAP
While in Quick Setup Mode, Pad 16 will flash in sync with the
Internal MIDI Clock tempo. By default, this is set to 120 BPM. To
adjust the Tempo, use this pad to tap the desired BPM.
This pad is disabled if External MIDI Clock is available and the
DAW transport playback is active. External MIDI Clock is enabled
automatically when Studio One Native control is active.
Power User Tip: Your MIDI Clock Tempo can also be adjusted by turning Knob 4 while in
Quick Setup Mode.
ATOM
Owner’s Manual
2.3.6 Panic
Panic
All Notes Off
To disable all MIDI signals, press Pad 4 while holding the Setup button.
10
Page 13
3 Advanced Studio One Integration
TAP
3.1 Song Setup Mode
3 Advanced Studio One Integration
3.1 Song Setup Mode
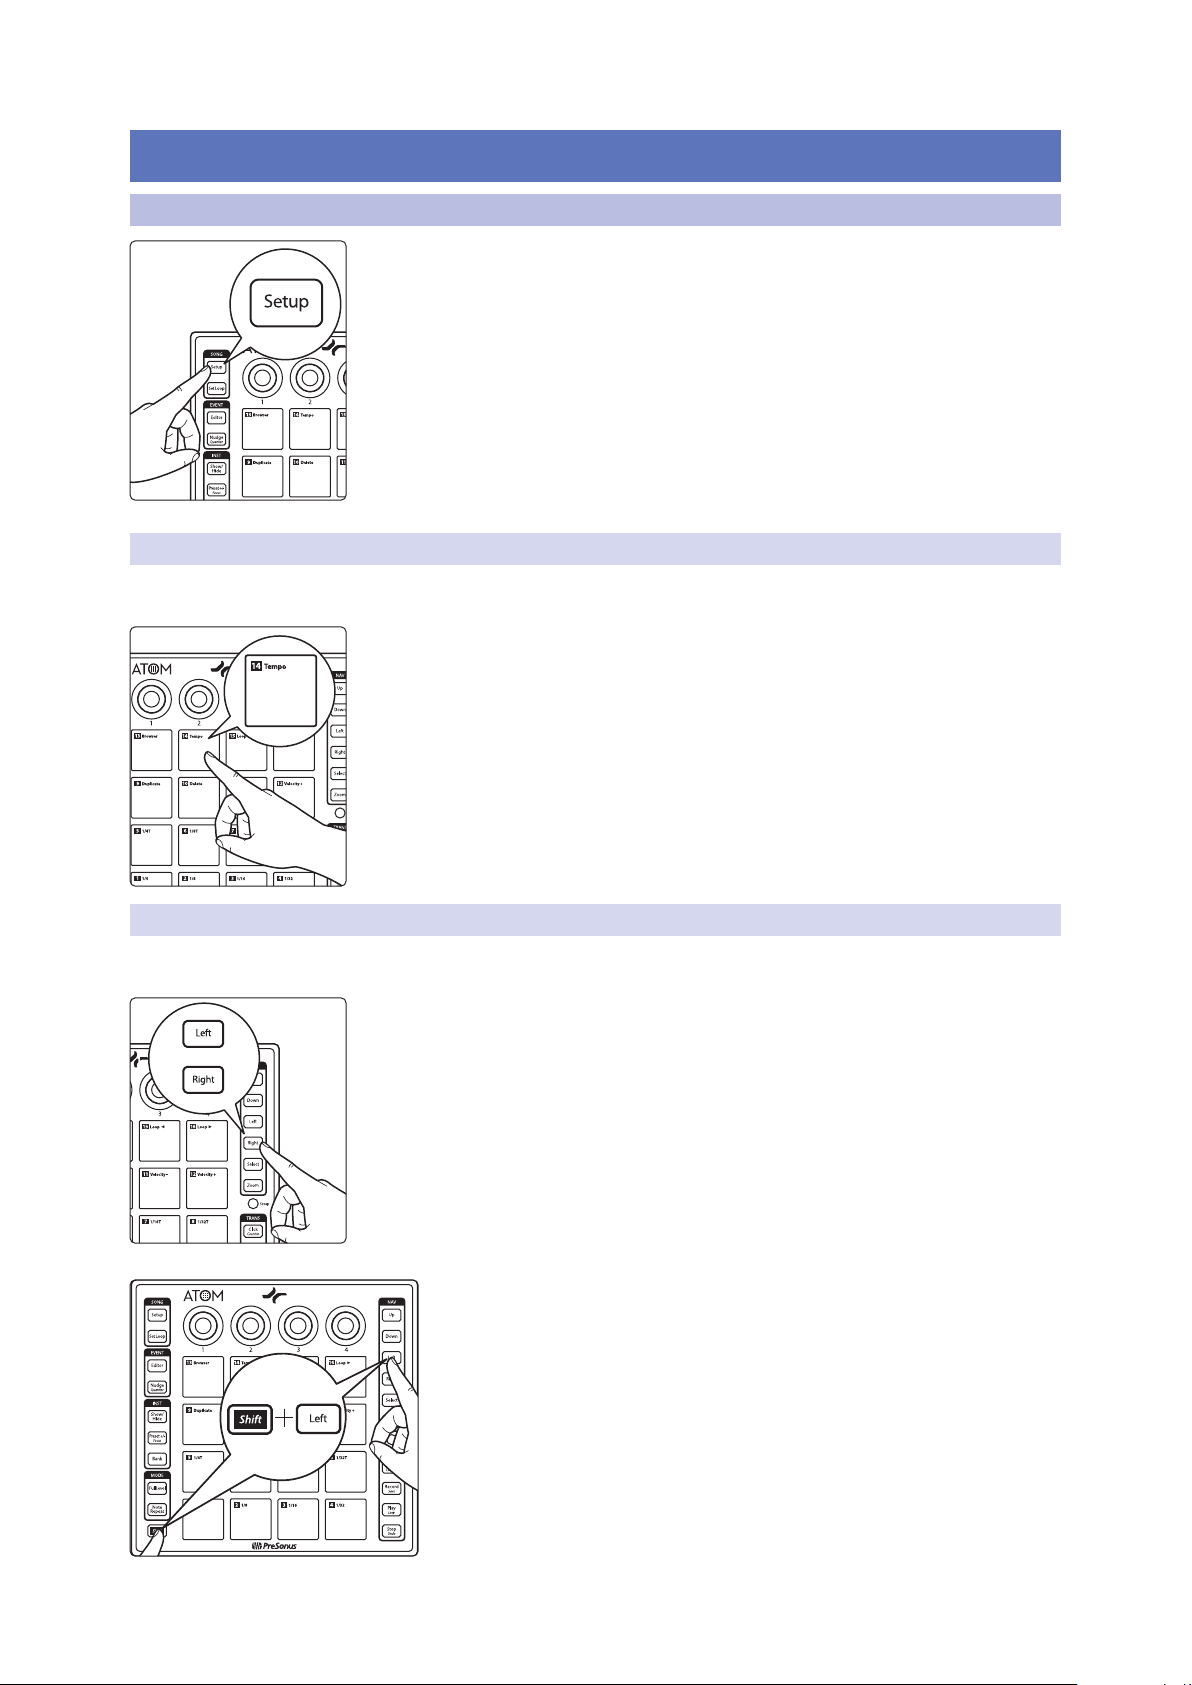
Pressing the Song Setup button allows you quickly open up the Instrument browser
in Studio One, select your Instrument plug-in, choose your desired preset, and create
a track, all from your ATOM controller as well as provide quick navigation functions.
While in Song Setup mode, the 16 pads on your ATOM will not function as controllers
for instruments.
Note: If a plug-in is currently in focus and the Browser is already open when you press the
Song Setup button, the knobs will control the plug-in and not function as described in
this section. To use the controls as described below, simply close the currently focused
plug-in window.
3.1.1 Controlling Tempo
Tap Tempo
While Song Setup mode is active, Pad 14 functions as the tap tempo control for your
Studio One session.
ATOM
Owner’s Manual
3.1.2 Event Controls
Selecting Events
Power User Tip: You can also use Knob 2 to adjust the tempo. Turning the knob clockwise
will increase the tempo. Turning the knob counterclockwise will decrease it.
While Song Setup is active, press the Left and Right buttons to select the previous
and next events on the currently selected track’s timeline.
Note: These buttons navigate the Browser when it is in focus.
Holding the Shift button while pressing the Left or Right buttons will select
multiple events.
11
Page 14
3 Advanced Studio One Integration
3.1 Song Setup Mode
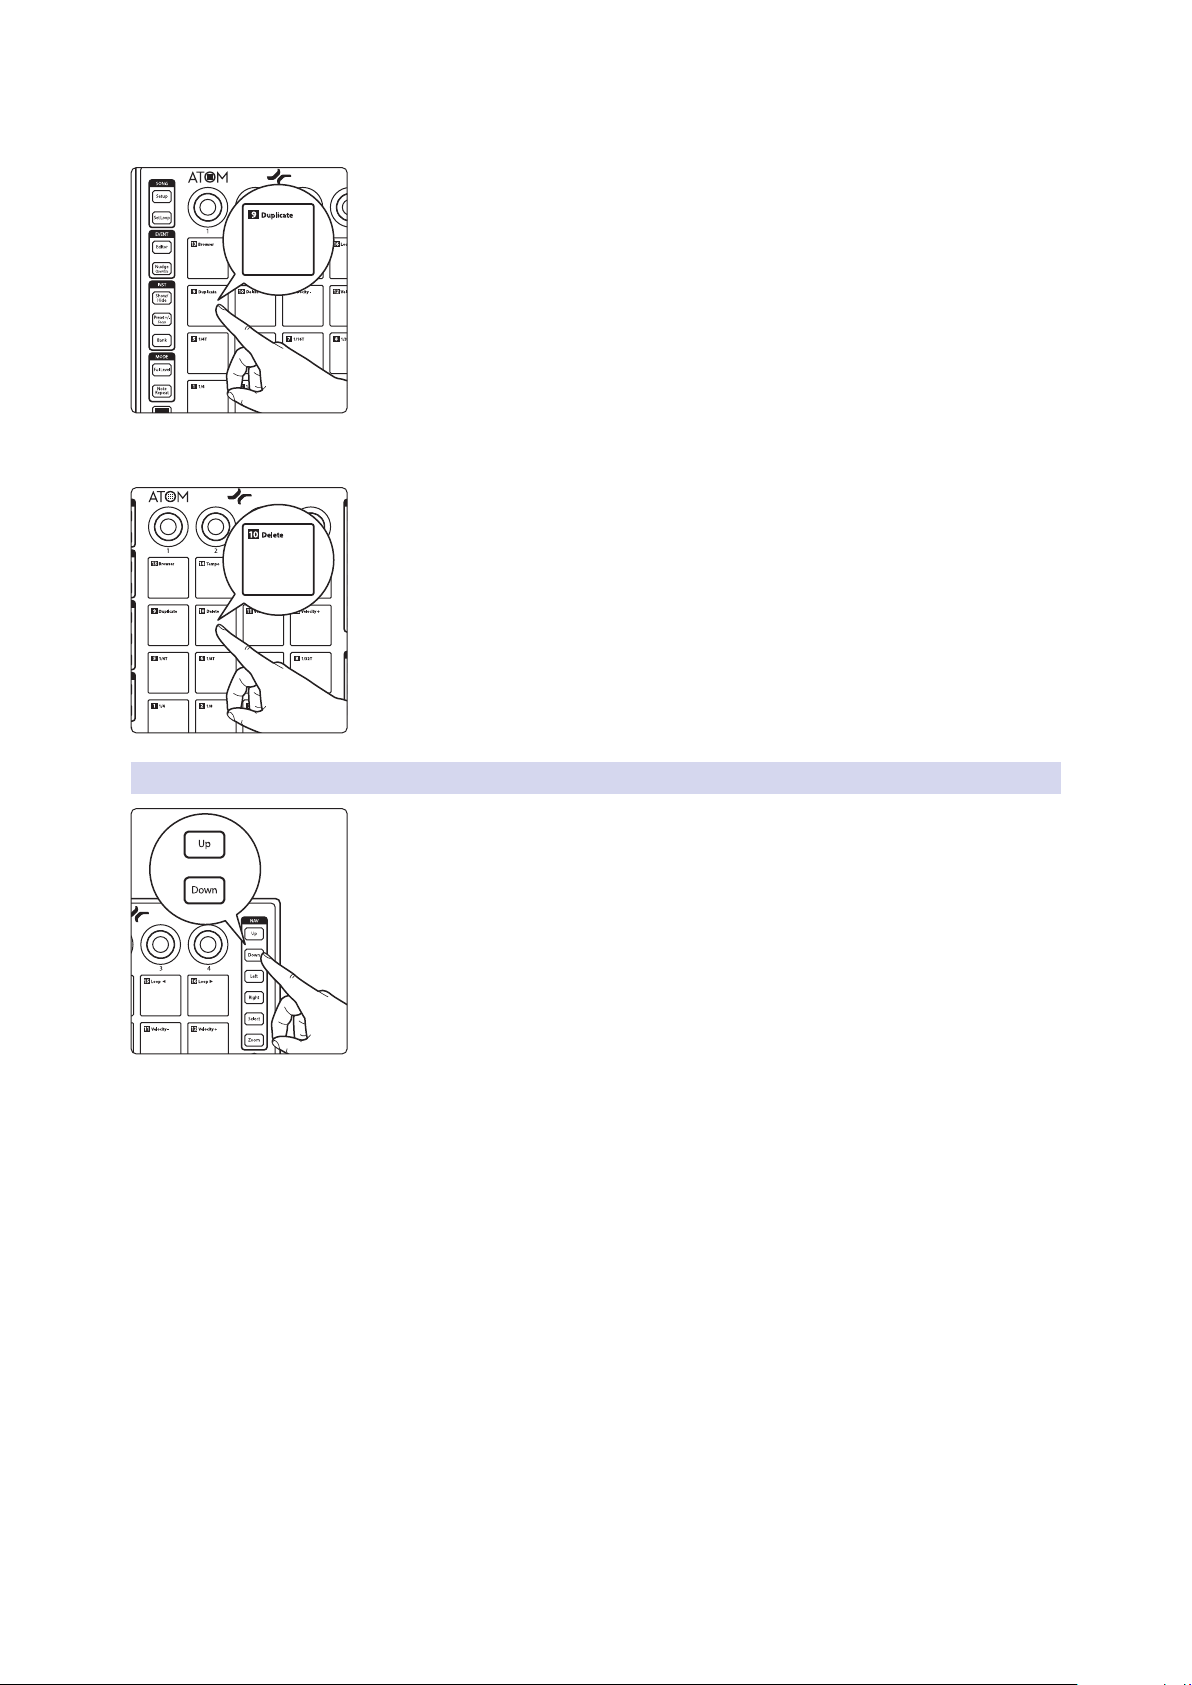
Duplicate Event
Press Pad 9 to duplicate the currently selected event.
Delete Event
Press Pad 10 to delete the currently selected event.
ATOM
Owner’s Manual
3.1.3 Navigating Tracks
Press the Up and Down buttons to navigate through the track list.
Note: These buttons navigate the Browser when it is in focus.
12
Page 15

3 Advanced Studio One Integration
3.1 Song Setup Mode
3.1.4 Adding an Instrument
Opening the Instrument Browser
Press Pad 13 to open and close your Instrument browser.
ATOM
Owner’s Manual
While the Browser is active, you can use the Up and Down buttons to navigate
through the list of available Instrument plug-ins.
13
Page 16

3 Advanced Studio One Integration
3.1 Song Setup Mode
Selecting a Preset
Pressing the Right button will expand the preset list.
Pressing the Left button will collapse the preset list.
Power User Tip: Press the Left button while navigating through the preset list to quickly
return to the top of the folder.
ATOM
Owner’s Manual
Creating a Track
3.1.5 User Pads
Pressing Select button will create a track and instantiate the currently selected
preset, or plug-in if no preset is selected, and bring it into focus for instantaneous
control.
Power User Tip: Selecting a preset from the Instrument Brower, rather than just selecting
the instrument plug-in itself, will allow you to work more quickly.
While in Song Setup Mode, Pads 1-8 are assignable User
functions. The default assignments are below:
14
Page 17

3 Advanced Studio One Integration
3.2 Set Loop
To reassign any User pad function, open the External Device editor in
Studio One and right-click on the desired pad. Select “Assign Command...”
from the drop-down menu to view a searchable list of commands.
To change User pad color assignments, left-click on the desired pad in the
External Device editor and select the desired color from the color selector.
3.2 Set Loop
Pressing the Set Loop button allows you to set the start and end points of a timeline
loop as well as position it within your session and focus on the loop area to quickly
zoom in to make edits.
Setting Timeline Loop
While Set Loop is active, use the right and left buttons to move forward and
backward on the timeline.
ATOM
Owner’s Manual
Press the Up button to set the loop start point.
Press the Down button to set the loop end point.
15
Page 18

3 Advanced Studio One Integration
3.3 Event Editor
To adjust the loop’s position in the timeline without
changing its length, press Pads 15 and 16.
Backward Forward
Power User Tip: To set the loop to the length of an object in the Arrange window, select
the object with your mouse and press SHIFT + Set Loop. This will set the loop length to
match the selection automatically.
3.2.1 Zooming
ATOM lets you quickly focus on your loop to make fast, detailed edits. While Set Loop
is active, press the Zoom button to focus your session on the loop area.
Note: Loop must be active.
ATOM
Owner’s Manual
3.3 Event Editor
Pressing the Editor button when an instrument part is selected will open the Music
Editor view in Studio One. For the best experience, PreSonus recommends closing
the Instrument Browser first.
Note: When a pattern event is selected, the Pattern Editor will launch, see Section 3.5 for
more information.
While Editor control is active, Pads 9-12 will control the following functions:
• Duplicate. Press Pad 9 to duplicate a note or event according to the set grid.
• Delete. Press Pad 10 to delete a note or event.
• Velocity -. Press to lower the note velocity by 10.
• Velocity +. Press to increase the note velocity by 10.
16
Page 19

3 Advanced Studio One Integration
(hold)
3.3 Event Editor
Use the Left and Right buttons to select the previous or next note in the timeline.
Power User Tip: To select multiple notes, press and hold the Shift button with the Left or
Right buttons to navigate through the timeline.
ATOM
Owner’s Manual
3.3.1 Adjusting Pitch
Use the Up and Down buttons to raise or lower the pitch by one half-step.
To close the Music Editor, press Shift and Editor simultaneously.
Press the Shift button with the Up or Down buttons to change the pitch by
an octave.
17
Page 20

3 Advanced Studio One Integration
3.4 Instrument Quick Controls
3.3.2 Nudging
Holding the Nudge button while pressing the Right button, moves the
selected event or note forward in the timeline according to the current grid
settings.
Holding the Nudge button will pressing the Left button, moves the selected
event or note backward in the timeline according to the current grid
settings.
ATOM
Owner’s Manual
Press Shift and Nudge simultaneously to quantize the current note or event
according to the quantization settings.
Note: Because the pads are always active for sound control when the Pattern
Editor is active, Music Editor controls are disabled when viewing the Pattern
Editor in Studio One.
3.4 Instrument Quick Controls
While in normal operation, ATOM provides quick access
to the Instrument plug-in Editor and presets.
Press the Show/Hide button to open or close the currently selected track’s
Instrument Editor window.
18
Page 21

3 Advanced Studio One Integration
3.5 Pattern Editor
Changing Presets
When the Instrument plug-in window is open, you can quickly change presets by
pressing Preset +/- button.
While holding the Preset +/- button, use the Up and Down buttons to audition
presets. To select the current preset, simply disengage the Preset +/- button.
3.5 Pattern Editor
Your ATOM controller can be used to edit the Pattern Editor in Studio One.
Note: Pattern Editor control is only available for Impact XT.
ATOM
Owner’s Manual
With the Pattern part selected, press the Editor button on ATOM. This will enable
Pattern Editor control.
Power User Tip: Pressing and holding the Shift button while tapping a pad will add an
“Accent” on that step.
Use the left or right buttons to navigate to additional steps for patterns with more
than 16 steps.
To select a new sound, use the Up and Down arrows to navigate through the list.
Power User Tip: Pattern-based sequencing treats musical phrases as individual elements,
to be switched and swapped at will, looped and finessed. To create a Pattern in Studio
One, select an Instrument Track, enable Song Setup on your ATOM and press Pad 5. An
empty Pattern will be created on the selected track. This is the default functionality.
19
Page 22

3 Advanced Studio One Integration
3.5 Pattern Editor
Press Shift and Editor simultaneously to completely close the Pattern Editor.
Press Nudge to use the Left and Right buttons to shift all the notes in the active lane
by one step.
ATOM
Owner’s Manual
Power User Tip: To Duplicate, Create, or Delete a new variation, open the Inspector by
click on the “i” in Studio One’s Pattern Editor and select the desired command. By default,
these commands are controlled by the user functions Pads 6-8. See Section 3.1.5 for
more information.
20
Page 23

3 Advanced Studio One Integration
3.6 Transport Controls
3.6 Transport Controls
Click
• Press the Click button to enable/disable the metronome.
• Press Shift + Click to turn the preroll on and off.
Record
• Press the Record button to engage recording at the current playback position.
• Pressing Record again will disable recording but continue playback
Play
• Press the Play button to begin playback at the current position.
Loop
• Press Shift + Play to toggle loop mode on and off.
Stop
• Press Stop once to stop playback at the current position.
• Press the Stop button twice to return playback to the loop start.
ATOM
Owner’s Manual
3.7 Zooming
Horizontal Zoom
Return to Zero
• Press Stop three times to return playback to the start position.
Save Session
• Press Shift + Record to Save your session.
Undo
• Press Shift + Stop to undo the last action.
While holding the Zoom button, the Navigation buttons allow you to adjust the
current view.
Pressing Zoom with either the Left or Right buttons simultaneously will zoom in or
out respectively.
21
Page 24

3 Advanced Studio One Integration
3.8 Customizing Knobs
Vertical Zoom
Pressing Zoom with either the Up or Down buttons simultaneously will zoom in or
out respectively.
3.8 Customizing Knobs
Any parameter for any plug-in or function in Studio One can be mapped
to any of the four knobs. By default, Studio One native plug-ins have
functions mapped to these controls already. For example, in Impact
XT, Knob 1 controls sample volume, Knob 2 controls sample pan, Knob
3 controls sample pitch, and Knob 4 controls sample decay.
To change these functions, move the knob you’d like to use, right-click on the desired
parameter, and select “Assign to Knob.”
ATOM
Owner’s Manual
22
Page 25

4 Advanced Ableton® Live Integration
4.1 Pad Mode: Session
4 Advanced Ableton® Live Integration
Ableton Live v.10.1.5 or later offers advanced integration with ATOM (v3.4
Firmware or later). When connected to Live, your ATOM pad controll will control
four tracks and four Scenes at a time. The tracks and scenes currently controlled
by ATOM are surrounded by a colored border in Live. The function of the
pads on ATOM themselves is determined by which Pad Mode is selected.
Power User Tip: Pressing and holding a mode button will change to another mode
temporarily. Once you release the button, ATOM will jump back instantly to the last
mode selected.
4.1 Pad Mode: Session
Pressing the Full Level button engages the SessionMode. While in this mode, each
pad will launch Clips.
Hold the Shift button to use the last column of pads to launch Scenes.
Hold the Zoom button to use the pads to jump to 4x4 quadrants of Clips to launch.
Use the Up/Down/Left/Right buttons to navigate in increments of one by default.
Press Bank to navigate in groups of 4.
ATOM
Owner’s Manual
4.2 Pad Mode: Channel
Pressing the Select button engages Channel Mode. While in this mode, each pad can
be used to control essential channel functions for four tracks at a time as follows:
• Arm Tracks. Use the top row of pads to arm each track for recording.
• Solo. Use the second row of pads to solo tracks.
• Select. Use the third row of pads to select tracks.
• Stop. Use the fourth row of pads to stop tracks.
Use the Up/Down/Left/Right buttons to navigate in increments
of one by default. Hold Bank to navigate in groups of 4.
4.3 Pad Mode: Note
Pressing the Note Repeat button engages Note Mode. Note Mode offers two
different pad layouts, depending on the content of the last armed track or the
currently selected track, if no track is armed:
• If a Drum Rack is loaded on the Track, the pads on the ATOM will control the
visible pads on the Drum Rack. Use the Up/Down buttons on your ATOM
to move the Drum Rack selector up/down in increments of 4 rows.
• If no Drum Rack is loaded, the pads on the ATOM will play
chromatic notes. Use the Up/Down buttons on your ATOM to
transpose the notes up/down in octave increments.
4.4 User Mode
User Mode also allows you to create custom mappings for every control on your
ATOM except for the Shift, Zoom, and Editor buttons. To engage User Mode, press the
Editor button. These assignments will only be available when User mode is active.
Note: While it is possible to reassign the Shift, Zoom, and Editor buttons in User mode,
PreSonus recommends that the function of these buttons should not be reassigned as
their primary function will be temporarily overwritten. Should one of these buttons get
reassigned, select the parameter to which it was reassigned and press Delete on your
computer keyboard. This will remove the user assignment and revert the function of the
button to its default state.
23
Page 26

4 Advanced Ableton® Live Integration
4.5 Encoder Assignments
4.5 Encoder Assignments
Press the Setup button the change the function of the four encoders on your
ATOM to control Volume, Pan, Send A, or Send B using the top row of pads:
Volume Pan Send A Send B
4.6 View Selection
Press the Show/Hide button to toggle the Detail View.
ATOM
Owner’s Manual
Press the Preset button to toggle between the Session and Arrangement views.
24
Page 27

4 Advanced Ableton® Live Integration
4.7 Transport Controls
4.7 Transport Controls
Click
• Press the Click button to enable/disable the metronome.
Record
• Press the Record button to toggle Session Record in Session View.
• In Arrangement View, press the Record button to toggle Arrangement Record.
Play
• Press the Play button to begin playback at the current position.
• Press Shift + Play to toggle Loop.
Stop
• Press Stop once to stop playback at the current position.
• Press Shift + Stop to undo the last action.
ATOM
Owner’s Manual
25
Page 28

5 Studio One Artist Quick Start
5.1 Installation and Authorization
5 Studio One Artist Quick Start
ATOM
Owner’s Manual
All registered ATOM users receive Studio One Artist recording and
production software. Whether you are about to record your first
album or your fiftieth, Studio One Artist provides you with all of the
tools necessary to capture and mix a great performance.
Power User Tip: As a valued PreSonus customer, you are eligible for a discount upgrade
to Studio One Professional. For more details on the Studio One upgrade program for
PreSonus customers, please visit https://shop.presonus.com/products/software/studioone-prods.
5.1 Installation and Authorization
Once you have installed the drivers for your audio interface and connected it
to your computer, you can use the included PreSonus Studio One Artist musicproduction software to begin recording, mixing, and producing your music. To
install Studio One Artist, log into your My PreSonus account and register your
ATOM. Your product key for Studio One Artist will automatically be registered
to your My PreSonus account, along with your hardware registration.
Downloading and Running the Studio One Installer
To install Studio One Artist, download the Studio One Artist installer from
your My PreSonus account to the computer on which you will use it.
26
Page 29

5 Studio One Artist Quick Start
5.1 Installation and Authorization
Windows: Launch the Studio One Artist installer
and follow the onscreen instructions.
Mac: Drag the Studio One Artist application into the
Applications folder on your Mac hard drive.
Authorizing Studio One
When Studio One is launched for the first time on your computer, it will
communicate with your My PreSonus account and verify your registration. To
ensure a seamless authorization process, make sure to download your installer
to the computer on which you will be using it, and be sure that your computer is
connected to the Internet when you launch the application for the first time.
ATOM
Owner’s Manual
Installing Bundled Content for Studio One Artist
Studio One Artist comes bundled with an array of demo and tutorial
materials, instruments, loops, and samples. The Studio One Artist
bundle includes all that you need to begin producing music.
The first time you launch Studio One Artist, you will be prompted
to install its companion content. Select the content you wish to
add and click “Install.” The content will automatically begin to
download and install from your My PreSonus user account.
Power User Tip: You may be prompted to enter your My PreSonus user account
information. Clicking “Remember Credentials” will allow you to have immediate access to
any content you purchase from the PreSonus Marketplace.
27
Page 30

5 Studio One Artist Quick Start
5.2 Setting Up Studio One
5.2 Setting Up Studio One
Studio One Artist was designed to work with PreSonus interfaces and provides
unique interoperability and simplified setup. When Studio One Artist is
launched, by default you will be taken to the Start page. On this page, you
will find document-management and device-configuration controls, as well
as a customizable artist profile, a news feed, and links to demos and tutorials
from PreSonus. If your computer is connected to the Internet, these links will
be updated as new tutorials become available on the PreSonus Web site.
Complete information on all aspects of Studio One Artist is available in
the Reference Manual PDF located within Studio One. The information
in this tutorial covers only the basic aspects of Studio One Artist and is
intended to get you set up and recording as quickly as possible.
5.2.1 Conguring Audio Devices
In the middle of the Start page, you will see the Setup area. Studio One
Artist automatically scans your system for all available drivers and selects
a driver. By default, it will choose a PreSonus driver if one is available.
ATOM
Owner’s Manual
1. Click on the Configure Audio Interface link to select your audio interface driver.
2. Select your audio interface from the Audio Device pulldown menu. From this page, you can also adjust your device
buffer block size. Click OK when you are finished.
28
Page 31

5 Studio One Artist Quick Start
5.2 Setting Up Studio One
5.2.2 Conguring MIDI Devices
From the External Devices window in Studio One Artist, you can configure
your MIDI keyboard controller, sound modules, and control surfaces. This
section will guide you through setting up other MIDI keyboard controllers
and sound modules. Please consult the Reference Manual located within
Studio One for complete setup instructions for other MIDI devices.
If you are using a third-party MIDI interface or USB MIDI-controller
keyboard, you must install any required drivers for these devices before
beginning this section. Please consult the documentation that came
with your MIDI hardware for complete installation instructions.
Note: Studio One will automatically configure your ATOM for control. No setup is
required.
Setting up a MIDI Keyboard controller
A MIDI keyboard controller is a hardware device that is generally used for playing
and controlling other MIDI devices, virtual instruments, and software parameters.
In Studio One Artist, these devices are referred to as Keyboards, and they must be
configured before they are available for use. In some cases, your MIDI keyboard
controller is also used as a tone generator. Studio One Artist views the controller
and tone-generation functions as two different devices: a MIDI keyboard controller
and a sound module. The MIDI controls (keyboard, knobs, faders, etc.) will be
set up as a Keyboard. The sound modules will be set up as an Instrument.
You can set up your external MIDI devices from the Setup area
in the Start page. Before setting up a new Song for recording,
take a moment to configure external devices.
Make sure you have connected the MIDI Out of your external MIDI controller to a
MIDI In on your PreSonus audio interface (if available) or another MIDI interface. If
you are using a USB MIDI controller, connect it to your computer and power it on.
ATOM
Owner’s Manual
1. Click on the Configure External Devices link in the Setup area on
the Start page to launch the External Devices window.
2. Click the Add button. This will launch the Add Device window.
29
Page 32

5 Studio One Artist Quick Start
5.2 Setting Up Studio One
3. From the menu on the left, select your MIDI controller from the list of
manufacturers and models. If you do not see your MIDI controller listed,
select New Keyboard. At this point, you can customize the name of
your keyboard by entering the manufacturer and device names.
ATOM
Owner’s Manual
4. You must specify which MIDI channels will be used to communicate with
this keyboard. For most purposes, you should select all MIDI channels.
If you are unsure of which MIDI channels to choose, select all 16.
5. Studio One allows you to filter out specific control functions. If you would
like Studio One to ignore Aftertouch, Pitch Bend, Program Change, or
all CC messages, enable filtering for any or all of these messages.
6. In the Receive From drop-down menu, select the MIDI interface
input from which Studio One Artist will receive MIDI data (that
is, the MIDI port to which your keyboard is connected).
Power User Tip: In the Send To drop-down menu, select the MIDI interface output
from which your Studio One Artist will send MIDI data to your keyboard. If your
keyboard controller doesn’t need to receive MIDI data from Studio One, you can
leave this unselected.
7. If this is the only keyboard that you will use to control your external
synthesizers and virtual instruments, you should check the box
next to Default Instrument Input. This will automatically assign your
keyboard to control all MIDI devices in Studio One Artist.
8. Click “OK.”
If you have a sound module that you’d like to connect, leave the External
Devices window open and proceed to the next part of this section.
If not, you can close the window and skip to the next section.
Setting up an External MIDI Sound Module
MIDI instrument controllers (keyboards, MIDI guitars, etc.) send musical information,
in the form of MIDI data, to tone modules and virtual instruments, which respond
by generating sound as instructed. Tone modules can be standalone sound devices
or can be integrated into a MIDI instrument, such as a keyboard synthesizer. Studio
One Artist refers to all tone generators as Instruments. Once you have set up your
MIDI keyboard controller, take a moment to configure your sound module.
30
Page 33

5 Studio One Artist Quick Start
5.2 Setting Up Studio One
Make sure you have connected the MIDI In of your external
sound module to the MIDI Out of your MIDI interface.
1. In the External Devices window, click the Add button.
2. Select your device in the menu on the left. If your device is not listed,
select New Instrument. At this point you can customize the name of
your keyboard by entering the manufacturer and device names.
ATOM
Owner’s Manual
3. Specify which MIDI channels will be used to communicate with this sound
module. For most purposes, you should select all MIDI channels. If you are
unsure of which MIDI channels to select, we suggest you select all 16.
4. In the Send To menu, select the MIDI interface output from which Studio One
Artist will send MIDI data to your sound module. Click “OK” and close the External
Devices window. You are now ready to start recording in Studio One Artist.
The rest of this Quick Start Guide will go over how to set
up a Song and will discuss some general workflow tips for
navigating through the Studio One Artist environment.
31
Page 34

5 Studio One Artist Quick Start
5.3 Creating a New Song
5.3 Creating a New Song
Now that you’ve configured your audio and MIDI devices, let’s create
a new Song. We’ll start by setting up your default audio I/O.
1. From the Start page, select “Create a New Song.”
2. In the New Song window, name your Song and choose the directory in
which you’d like it saved. You’ll notice a list of templates on the left. These
templates provide quick setups for a variety of devices and recording
situations. The section will describe creating a Song from an empty session.
ATOM
Owner’s Manual
3. Select “Empty Song” from the Templates list. At this point, you should give
your Song a name and select your preferred sample rate and bit depth for
recording and playback. You can also set the length of your Song and the
type of time format you would like the timeline to follow (notation bars,
seconds, samples, or frames). Click the OK button when you are finished.
Power User Tip: If you plan to import loops into your Song, make sure that the Stretch
Audio Files to Song Tempo option is selected. This will automatically import loops at the
correct tempo.
5.3.1 Conguring Your Audio I/O
1. Click on Song | Song Setup to set your sample rate and
resolution and configure your audio I/O.
32
Page 35

5 Studio One Artist Quick Start
5.3 Creating a New Song
2. Click on the Audio I/O Setup tab.
3. From the Inputs tab, you can enable any or all of the inputs on your
audio interface that you’d like to have available. We recommend that you
create a mono input for each of the inputs on your interface. If you plan
on recording in stereo, you should also create a few stereo inputs.
ATOM
Owner’s Manual
4. Click on the Outputs tabs to enable any or all of the outputs on your
audio interface. In the lower right corner, you will see the Audition
Select menu. This allows you to choose the output from which you
will audition audio files prior to importing them into Studio One
Artist. In general, you will want this to be the main output bus.
Power User Tip: If you would like this I/O configuration to be the same every time you
open Studio One, click the Make Default button.
33
Page 36

5 Studio One Artist Quick Start
5.3 Creating a New Song
5.3.2 Creating Audio and Instrument Tracks
1. In the upper left corner of the Arrange window, you will notice
several buttons. The button furthest to the right is the Add Tracks
button. Click on this button to open the Add Tracks window.
2. In the Add Tracks window, you can customize the track name and
color, add a preset rack of effects, and set the physical source for
the input and output of your audio tracks. Most important, you
can select the number and type of tracks you’d like to create.
ATOM
Owner’s Manual
Audio. Use this track type to record and playback audio files.
Instrument. Use this track to record and playback MIDI data to
control external MIDI devices or virtual instrument plug-ins.
Automation. This track type lets you create automated
parameter controls for your session.
Folder. This track helps you to manage your session as
well as to quickly edit multiple tracks at once.
Power User Tip: If you would like to add an audio track for each of the available
inputs, go to Track | Add Tracks for All Inputs.
Rec
Custom
Track
Color
ST/Mono
Audio Input
Source Select
Mute
Arm
Solo
Monitor
Track
Name
Meter
Note: Instrument tracks are nearly identical to audio tracks. The Input Source list for
Instrument tracks lists available external MIDI devices as well as any virtual instruments
that have been added to the Song.
34
Page 37

5 Studio One Artist Quick Start
5.3 Creating a New Song
5.3.3 Recording an Audio Track
1. To begin recording, create an audio track from the Add Tracks
window, set its input to Input 1 on your audio interface,
and connect a microphone to the same input.
2. Select Record Enable on the track. Turn up the Input 1 level on your audio
interface while speaking/singing into the microphone. You should see
the input meter in Studio One Artist react to the input. Adjust the gain
so the input level is near its maximum without clipping (distorting).
ATOM
Owner’s Manual
You are now ready to start recording. For complete instructions, please consult the
Studio One Reference manual located in Help | Studio One Reference Manual.
5.3.4 Adding Virtual Instruments and Eects
You can add plug-ins and instruments to your Song by dragging-and-dropping
them from the browser. You can also drag an effect or group of effects from one
channel to another, drag in customized effects chains, and instantly load your
favorite virtual-instrument preset without ever scrolling through a menu.
Opening the Browser
In the lower right corner of the Arrange window are three buttons:
Edit. The Edit button opens and closes the audio and MIDI editors.
Mix. The Mix button opens and closes the Mixer window.
Browse. The Browse button opens the Browser, which displays all of the
available virtual instruments, plug-in effects, audio files, and MIDI files,
as well as the pool of audio files loaded into the current session.
Drag-and-Drop Virtual Instruments
To add a virtual instrument to your session, open the browser and click on
the Instrument button. Select the instrument or one of its patches from the
Instrument browser and drag it into the Arrange view. Studio One Artist will
automatically create a new track and load the instrument as the input.
35
Page 38

5 Studio One Artist Quick Start
5.3 Creating a New Song
Drag-and-Drop Effects
To add a plug-in effect to a track, click the Effects button in the browser and
select the plug-in or one of its presets in the effects browser. Drag-and-drop
the selection over the track to which you would like to add the effect.
ATOM
Owner’s Manual
Drag-and-Drop Audio and MIDI Files
Audio and MIDI files can be quickly located, auditioned, and imported into
your Song by dragging them from the file browser into the Arrange view.
If you drag the file to an empty space, a new track will be created with
that file placed at the position to which you dragged it. If you drag the file
to an existing track, the file will be placed as a new part of the track.
36
Page 39

6 MIDI Mapping
6.1 Pads and Banks
6 MIDI Mapping
6.1 Pads and Banks
ATOM
Owner’s Manual
Pad Number
Bank 1 MIDI
Note Value
C1 E2 G#3 C5 E6 G#7 E-2 G#-1
C#1 F2 A3 C#5 F6 A7 F-2 A-1
D1 F#2 A#3 D5 F#6 A#7 F#-2 A#-1
D#1 G2 B3 D#5 G6 B7 G-2 B-1
E1 G#2 C4 E5 G#6 C8 G#-2 C0
Bank 2 MIDI
Note Value
Bank 3 MIDI
Note Value
Bank 4 MIDI
Note Value
Bank 5 MIDI
Note Value
Bank 6 MIDI
Note Value
Bank 7 MIDI
Note Value
Bank 8 MIDI
Note Value
F1 A2 C#4 F5 A6 C#8 A-2 C#0
F#1 A#2 D4 F#5 A#6 D8 A#-2 D0
G1 B2 D#4 G5 B6 D#8 B-2 D#0
G#1 C3 E4 G#5 C7 E8 C-1 E0
A1 C#3 F4 A5 C#7 F8 C#-1 F0
37
Page 40

6 MIDI Mapping
6.2 Knobs
ATOM
Owner’s Manual
Pad Numbers
Continued
Bank 1 MIDI
Note Value
A#1 D3 F#4 A#5 D7 F#8 D-1 F#0
B1 D#3 G4 B5 D#7 G8 D#-1 G0
C2 E3 G#4 C6 E7 C-2 E-1 G#0
C#2 F3 A4 C#6 F7 C#-2 F-1 A0
D2 F#3 A#4 D6 F#7 D-2 F#-1 A#0
Bank 2 MIDI
Note Value
Bank 3 MIDI
Note Value
Bank 4 MIDI
Note Value
Bank 5 MIDI
Note Value
Bank 6 MIDI
Note Value
Bank 7 MIDI
Note Value
Bank 8 MIDI
Note Value
6.2 Knobs
D#2 G3 B4 D#6 G7 D#-2 G-1 B0
Knob MIDI CC HEX Value Range
14 B0 0Eh 0-127
15 B0 0Fh 0-127
16 B0 10h 0-127
17 B0 11h 0-127
38
Page 41

6 MIDI Mapping
6.3 Buttons
ATOM
Owner’s Manual
Knob MIDI CC HEX Value Range
18 B0 12h 0-127
19 B0 13h 0-127
20 B0 14h 0-127
21 B0 15h 0-127
6.3 Buttons
Button MIDI CC HEX Value
27 B0 1Bh
28 B0 1Ch
29 B0 1Dh
30 B0 1Eh
23 B0 17h
31 B0 1Fh
85 B0 55h
86 B0 56h
Button MIDI CC HEX Value
102 B0 66h
103 B0 67h
104 B0 68h
105 B0 69h
106 B0 6Ah
107 B0 6Bh
108 B0 6Ch
109 B0 6Dh
87 B0 57h
89 B0 59h
90 B0 5Ah
110 B0 6Eh
111 B0 6Fh
112 B0 70h
39
Page 42

6 MIDI Mapping
6.4 Advanced Setup Mode
6.4 Advanced Setup Mode
6.4.1 Select Pad MIDI Channel
By default, the 16 pads send their MIDI messages on MIDI Channel 10. Pressing the
Song Setup button while Advanced Setup Mode is active will allow you to change
the MIDI channel for the 16 pads on your ATOM.
Press the number of the pad for the desired MIDI channel. For example, to changed
the MIDI channel to Channel 3, press Pad 3.
ATOM
Owner’s Manual
Your ATOM controller allows you to customize the MIDI channels
for several functions using Advanced Setup Mode.
To launch Advanced Setup Mode, press and hold the Shift and Setup
buttons simultaneously.
While Advanced Setup Mode is active, the 16 pads on your ATOM controller
will not send MIDI messages, rather they will act as channel select buttons.
Note: Changes made in Advanced Setup Mode will not be reflected while Studio
One Native control is active. This mode is designed to customize ATOM for use
with 3rd party applications.
To reset the MIDI Channel to default (MIDI Channel 10), press the Up button.
6.4.2 Select Knob MIDI Channel
By default, the 4 knobs send their MIDI messages on MIDI Channel 1. Pressing the Set
Loop button while Advanced Setup Mode is active will allow you to change the MIDI
channel for the 4 knobs on your ATOM.
Press the number of the pad for the desired MIDI channel. For example, to changed
the MIDI channel to Channel 3, press Pad 3.
40
Page 43

6 MIDI Mapping
6.4 Advanced Setup Mode
To reset the MIDI Channel to default (MIDI Channel 1), press the Up button.
6.4.3 Select Button MIDI Channel
By default, the 22 button functions listed in Section 6.3 send their MIDI messages
on MIDI Channel 1. Pressing the Editor button while Advanced Setup Mode is
active will allow you to change the MIDI channel for the buttons on your ATOM.
Press the number of the pad for the desired MIDI channel. For example, to changed
the MIDI channel to Channel 3, press Pad 3.
ATOM
Owner’s Manual
To reset the MIDI Channel to default (MIDI Channel 1), press the Up button.
6.4.4 Select Pressure MIDI Channel
By default, the 16 pads send their MIDI Pressure messages on MIDI Channel 10.
Pressing the Nudge button while Advanced Setup
Mode is active will allow you to change the MIDI
channel on which the 16 pads will send Pressure
messages.
Press the number of the pad for the desired MIDI
channel. For example, to changed the MIDI channel to
Channel 3, press Pad 3.
To reset the MIDI Channel to default (MIDI Channel 10), press the Up button.
41
Page 44

6 MIDI Mapping
6.4 Advanced Setup Mode
6.4.5 Turn Pad Note On/O
By default, the 16 pads on your ATOM send Note On/Off messages on every bank.
To reset to default, press the Up button.
ATOM
Owner’s Manual
Using Advanced Setup mode, you can configure any of
the pads on Bank 1 to only send CC messages. To
disable Note On/Off for any pad, press the Show/Hide
button while Advanced Setup Mode is active. Pads that
are illuminated have Note On/Off enabled. Pads that
are not illuminated will send CC messages only.
Note: You must be on Bank 1 when you enter Advanced
Setup mode for this option to be available.
6.4.6 Adjusting Brightness
To adjust the brightness of the LEDs on your ATOM, press the Bank button while
Advanced Setup mode is active. This will allows you to
advance through the three brightness options
available.
42
Page 45

Dinner is Served
Added bonus: PreSonus’ previously Top Secret recipe for…
Andouille & German Red Cabbage Po-Boys
Ingredients:
• 1 small Onion
• 3 Tbsp. fresh Ginger
• 1 small head Red Cabbage
• 1 tsp Salt
• 3 Tbsp. Honey
• ¼ cup Red Vinegar
• 12 oz Andouille or Bratwurst Sausage sliced lengthwise
• ¼ lb. Muenster Cheese
• Creole or German Mustard to taste
• 1 loaf French Bread
Cooking Instructions:
1. Heat 2 tablespoon vegetable oil in large skillet. Add onions and ginger, then cook them for about 3 minutes until onions
begin to wilt. Add cabbage, vinegar, and honey, and then cook for about 5 minutes. Add salt to taste and set aside.
2. Heat oil in a skillet till hot. Add sausage cut side down till nice and brown, turn and cook for about 5 minutes till thoroughly
cooked.
3. Slice bread lengthwise, lay a bed of cabbage, then sausage, and cheese on top. Toast under the broiler or in a hot oven till
cheese is melted and bread is crisp.
4. Spread mustard on bread. Sandwich can then be cut into 2-3 pieces and shared (or not if you’re really hungry).
BONUS: Extra cabbage can be used as a condiment with meat, eggs, sandwiches, etc.
© 2019 PreSonus Audio Electronics, Inc. All Rights Reserved. PreSonus is a registered trademark of PreSonus Audio Electronics, Inc. SampleOne and Studio One are trademarks
or registered trademarks of PreSonus Software Ltd. Ableton is a registered trademark of Ableton. Mac and Mac OS are registered trademarks of Apple, Inc., in the U.S. and other
countries. Windows is a registered trademark of Microsoft, Inc., in the U.S. and other countries. Other product names mentioned herein may be trademarks of their respective
companies. All specifications subject to change without notice...except the recipe, which is a classic.
Page 46

ATOM
Production and Performance Pad Controller
Owner’s Manual
18011 Grand Bay Ct. • Baton Rouge,
®
Louisiana 70809 USA• 1-225-216-7887
www.presonus.com
Part# 70-52000107-C
 Loading...