

Precor Elliptical Fitness Crosstrainer EFX User Manual
EFX
®
536i
Assembly Guide
TM
Elliptical Fitness Crosstrainer


Thank you for choosing Precor. For proper installation, please read this
guide thoroughly and follow the assembly instructions. If you do not
assemble the EFX according to these guidelines, you could void the Precor
Limited Warranty.
Required Tools
• ½-inch socket wrench with extension
• ⁹⁄₁₆-inch socket wrench
• ½-inch open end wrench
Obtaining Service
You should not attempt to service the EFX except for maintenance tasks
described in the owner’s manual. Should you need more information
regarding Customer Support numbers or a list of Precor authorized Service
Centers, visit the Precor web site at www.precor.com/corp/contact.
Unpacking the Equipment
The EFX is carefully tested and inspected before shipment. The unit is
shipped in one box. Ask for help from two or more people to unpack and
assemble the EFX. If any items are missing, contact your dealer.
•Crescent wrench
• Wire cutter
•Standard set of hex keys
• Standard set of metric hex keys
• Long-handle ⁵⁄₃₂-inch hex key
• #2 Phillips screwdriver
536i Elliptical Fitness CrossTrainer Assembly Guide 1

Installation Requirements
Follow these installation requirements when assembling the unit:
• Assemble the unit near the location where you plan to use it
because it is heavy.
• Provide ample space around the unit.
Open space around the unit allows for easier access.
• Open the box and assemble the components in the sequence
presented in this guide.
• Obtain assistance.
Ask another capable adult for assistance during the assembly process.
• Use your fingers or the appropriate tools to insert fasteners.
Proper alignment helps alleviate cross-threading. Do not fully wrench
tighten fasteners until instructed to do so.
• Set up the unit on a solid, flat surface.
A smooth, flat surface under the unit helps keep it level. A level unit has
fewer malfunctions.
When wrench tightening, the head of the fastener should be flush with
the product. If it is not, cross-threading has occurred. Do not attempt to
rework the assembly as more damage to the equipment will occur.
Contact Customer Support. Refer to Obtaining Service.
Important: Assemble the unit near the location where you plan to use it
and provide ample space around the unit. Consult the Product Owner’s
Manual for proper placement of your equipment.
536i Elliptical Fitness CrossTrainer Assembly Guide 2

Hardware Kit (not shown to scale)
Fasteners Quantity
(A) Hex head screws (¾-inch) 16
(B) Flat washers (⁵⁄₁₆-inch) 16
(C) Buttonhead screws (2¾-inch) 2
(D) Flat washers (³⁄₈-inch) 2
(E) Split washers (⁵⁄₁₆-inch) 16
(F) Phillips-head cap screws (¾-inch) 3
(G) Locknuts (³⁄₈-inch) 2
(H) Joint connector screws 2
(J) Joint connector nuts 2
536i Elliptical Fitness CrossTrainer Assembly Guide 3
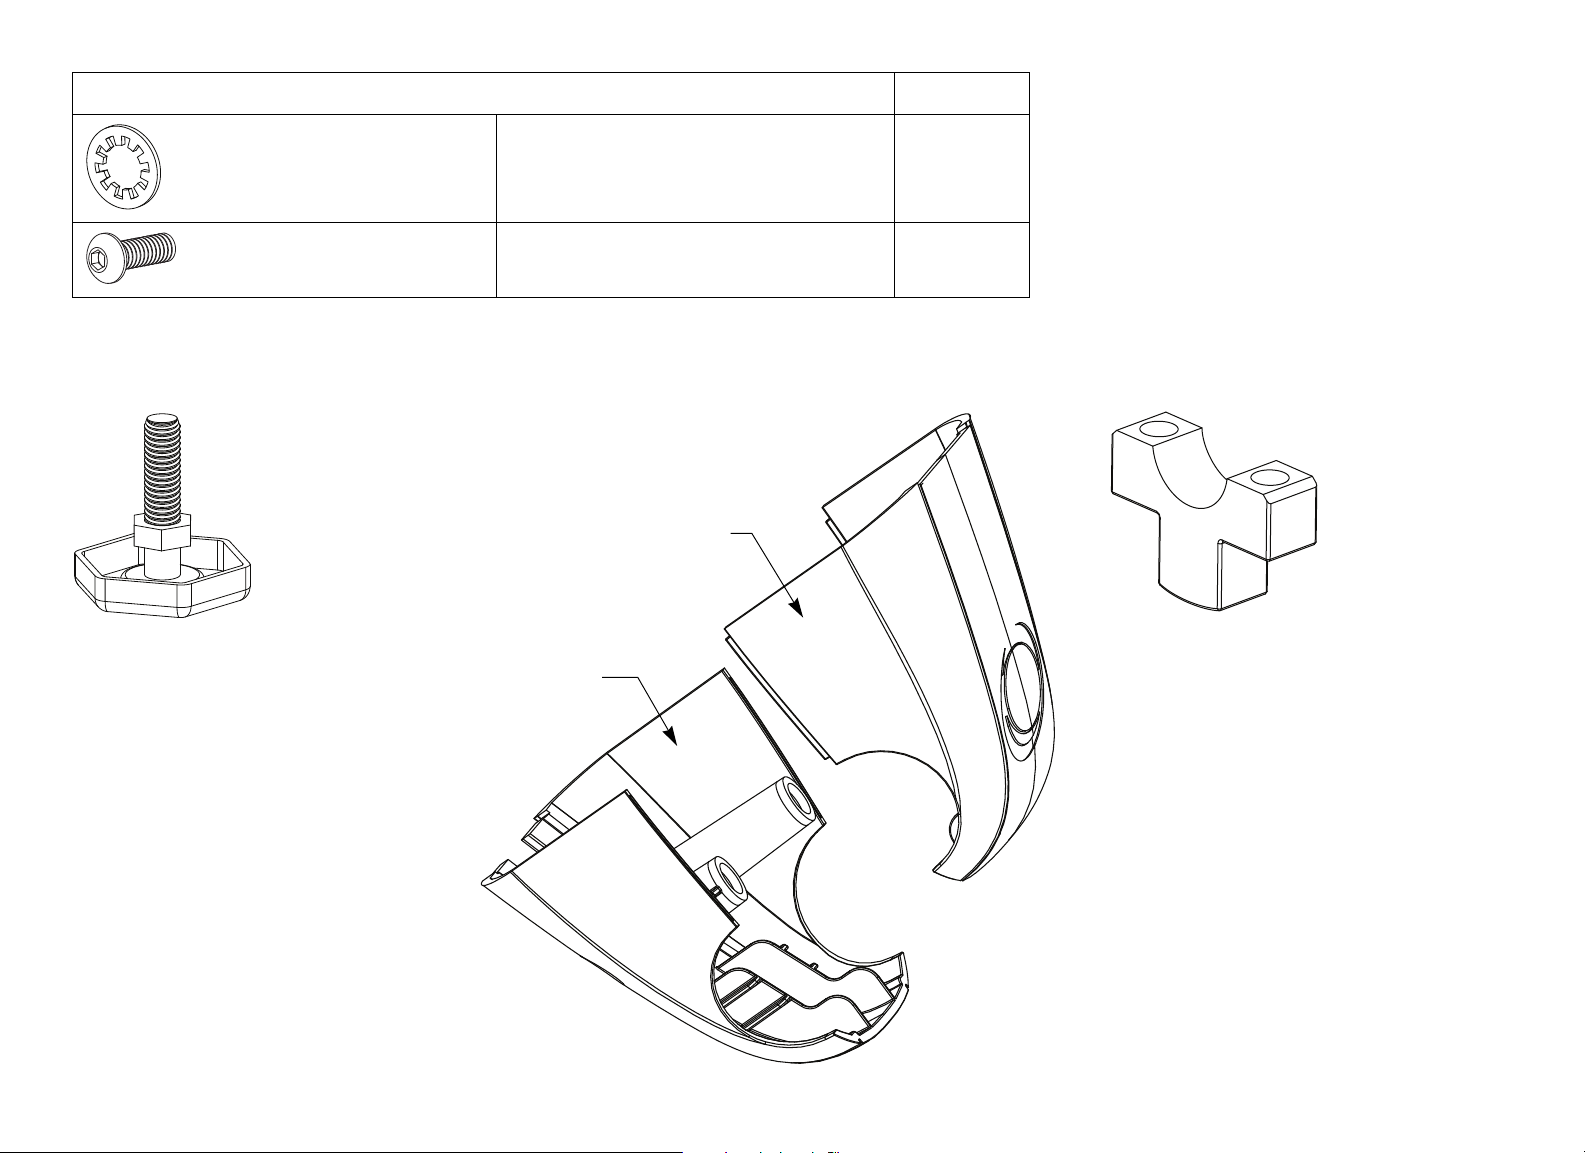
Fasteners Quantity
Top
Bottom
(K) Star washers (³⁄₈-inch) 2
(L) Buttonhead screws (⁷₈-inch) 10
Note: Since the hardware kit is used universally across several different product lines, extra fasteners remain once you complete this assembly.
2 — Levelers with hex nuts (M) 2 — Display covers (N)
2 — Clamps (O)
536i Elliptical Fitness CrossTrainer Assembly Guide 4

Assembly Steps
Remove the packaging around the ramp support covers.
Grasp the magazine rack at its base and slide it up and off the
front ramp support cover. Set it aside.
Use a long-handle ⁵⁄₃₂-inch hex key to remove the four
fasteners that secure the front ramp support cover. Set the
fasteners aside.
A tab on each side of the front ramp support cover holds the
front and back covers together. Gently squeeze the sides of
the back covers to release the tabs. Remove the front ramp
support cover.
While holding the foam pouch in place, ask your assistant to
lift and hold the ramp while you position the lift motor
assembly and slide the yoke into the ramp.
Note: The foam pouch has been placed over the end of the
ramp to avoid scratches to the cover. The pouch will be
removed once the stabilizers are attached and secure.
Secure the base of the ramp support assembly using two hex
head screws (A), two split washers (E), and two washers (B).
Finger tighten.
Secure the ramp to the yoke using two buttonhead
screws (C), two washers (D) and two locknuts (G).
Wrench tighten using the ⁷⁄₃₂-inch hex key and a ⁹⁄₁₆-inch
socket wrench.
Return to the base of the ramp support assembly and wrench
tighten the two fasteners using a ½-inch socket wrench.
536i Elliptical Fitness CrossTrainer Assembly Guide 5
Install the front ramp support cover. Align the mounts and
engage the side clips by pressing the front and back covers
together. Insert the four fasteners set aside in step 2. Wrench
tighten using the long-handle ⁵⁄₃₂-inch hex key.
Attach the magazine rack. Align the tabs and apply downward
pressure and lightly squeeze the magazine rack and back
cover together. An audible click is heard when the magazine
rack is secured properly.
536i Elliptical Fitness CrossTrainer Assembly Guide 6
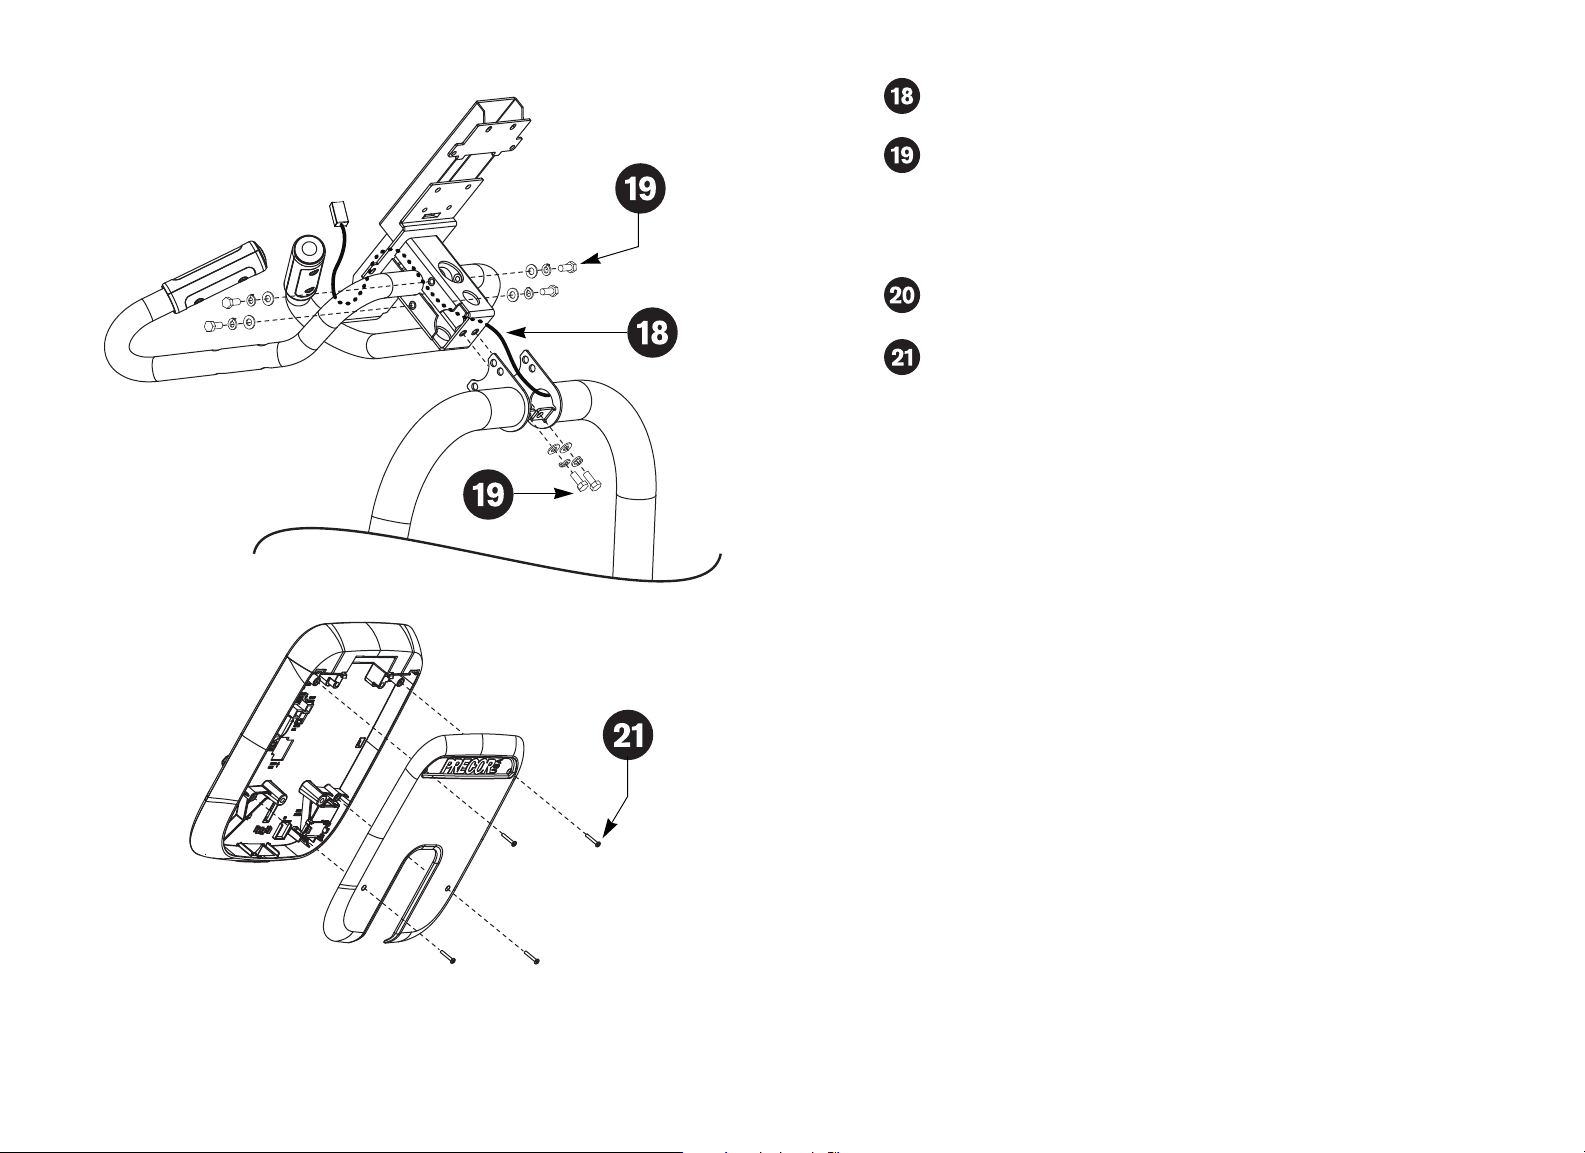
CAUTION: Avoid cross-threading. Make sure the moving arm
assembly is well-aligned with the pivot tube before wrench
tightening. Any damage caused during installation is not
covered by the Precor Limited Warranty.
Attach one moving arm assembly at a time. Align and thread it
carefully into the pivot tube. To secure it, use a ½-inch open
end wrench and tighten the moving arm pivot joint. Guide the
moving arm to its equilibrium point and let it rest there.
Perform the same step for the opposite side.
Attach the lower link arms onto the moving handlebars using
two joint connector screws (H), two star washers (K), and two
joint connector nuts (J). Perform this step on one handlebar at
a time. Wrench tighten using a 5mm hex key.
Important: Be aware of the handlebar locations during
assembly. When assembling the lower link arms, position
yourself at the front of the EFX.
536i Elliptical Fitness CrossTrainer Assembly Guide 7
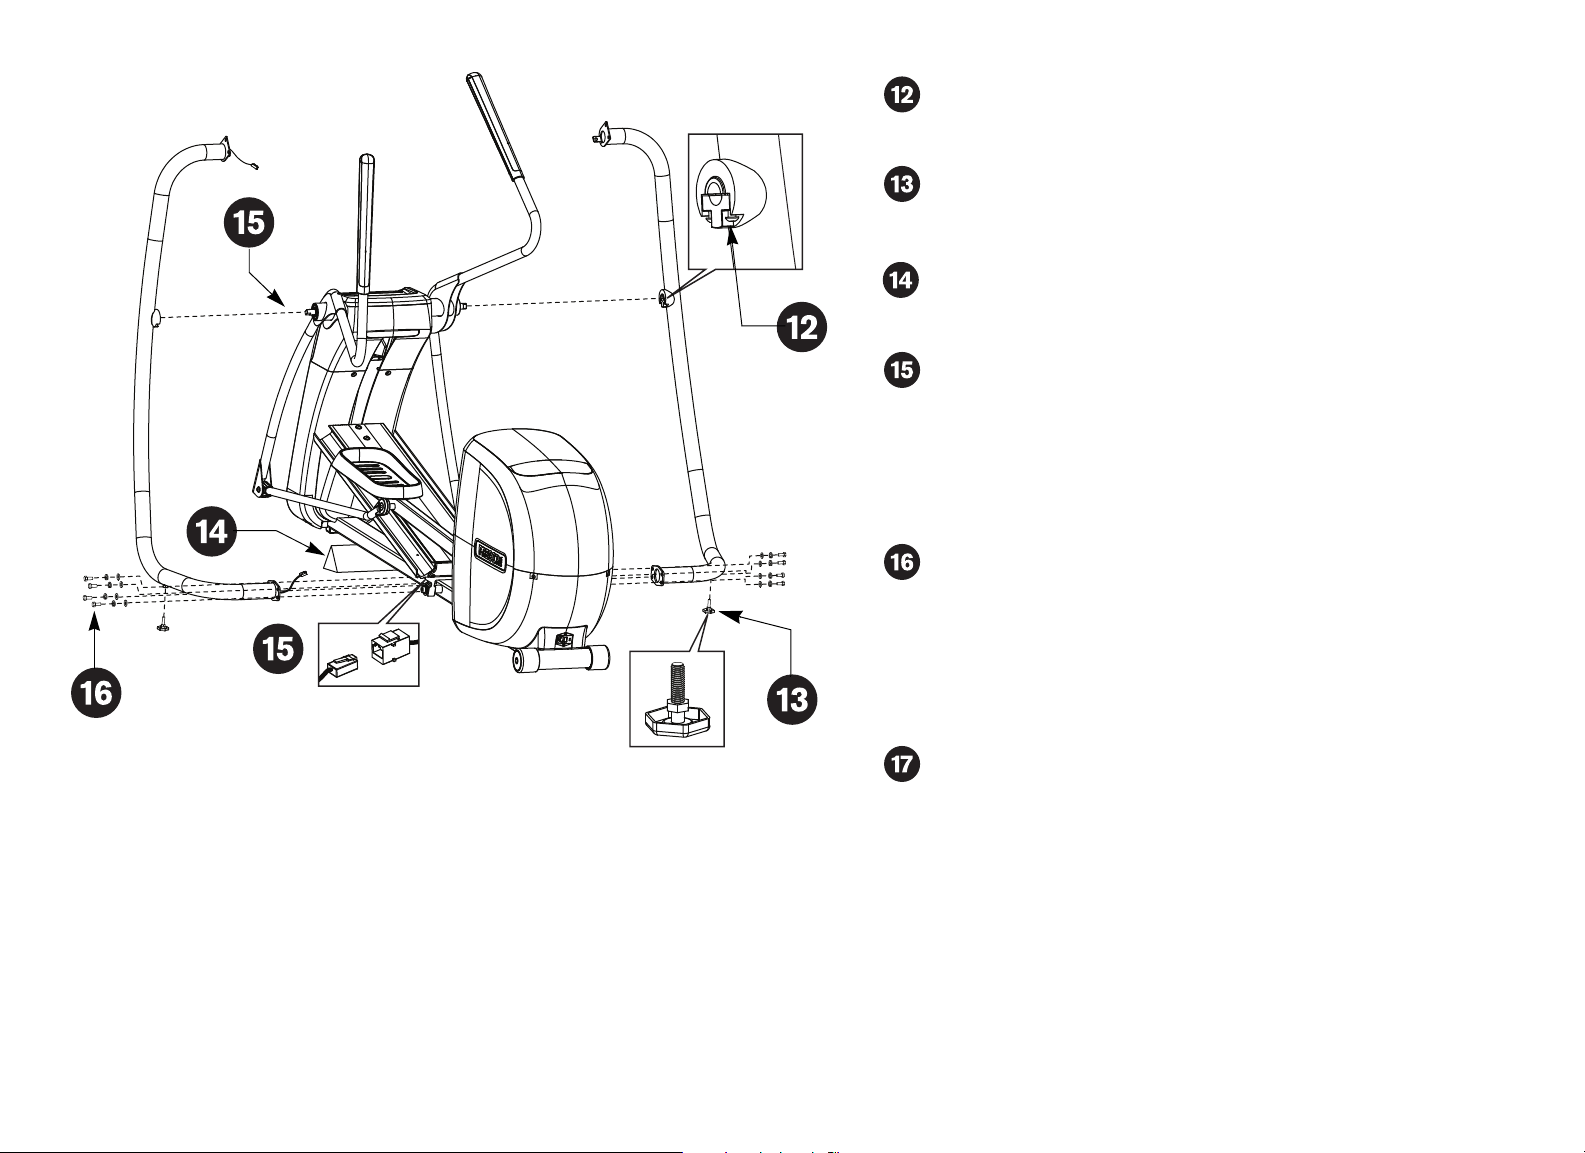
Prepare the stabilizers for installation. Insert a clamp (O)
into each stabilizer and secure it loosely with a buttonhead
screw (L).
Thread a leveler (K) onto each stabilizer.
Note: Make sure the nut is fully threaded onto the leveler.
Refer to the illustration.
For easier access to the base mounts, lift the front of the EFX
off the floor and place a wedge of packaging beneath its
base.
Ask your assistant to hold the stabilizer, which has the cable
protruding from both ends, next to the moving arm assembly
and base frame. While your assistant places the stabilizer on
the pivot tube and wrench tightens the clamp, you can
connect the base cable. An audible click is heard when the
cable is properly attached. Insert the cable into its receptacle
and place excess cable into the base frame.
Secure the stabilizer to the base frame using four hex head
screws (A), four split washers (E) and four washers (B).
Finger tighten.
Note: The split washers should be sandwiched between the
head of the screw and the flat washers. Also, if you encounter
difficulty aligning the base mounts, check the height of the
levelers and adjust them accordingly.
Attach the opposite stabilizer to the metal shaft and wrench
tighten the clamp. Secure the stabilizer to the base frame
using four hex head screws (A), four split washers (E), and
four washers (B). Finger tighten.
536i Elliptical Fitness CrossTrainer Assembly Guide 8
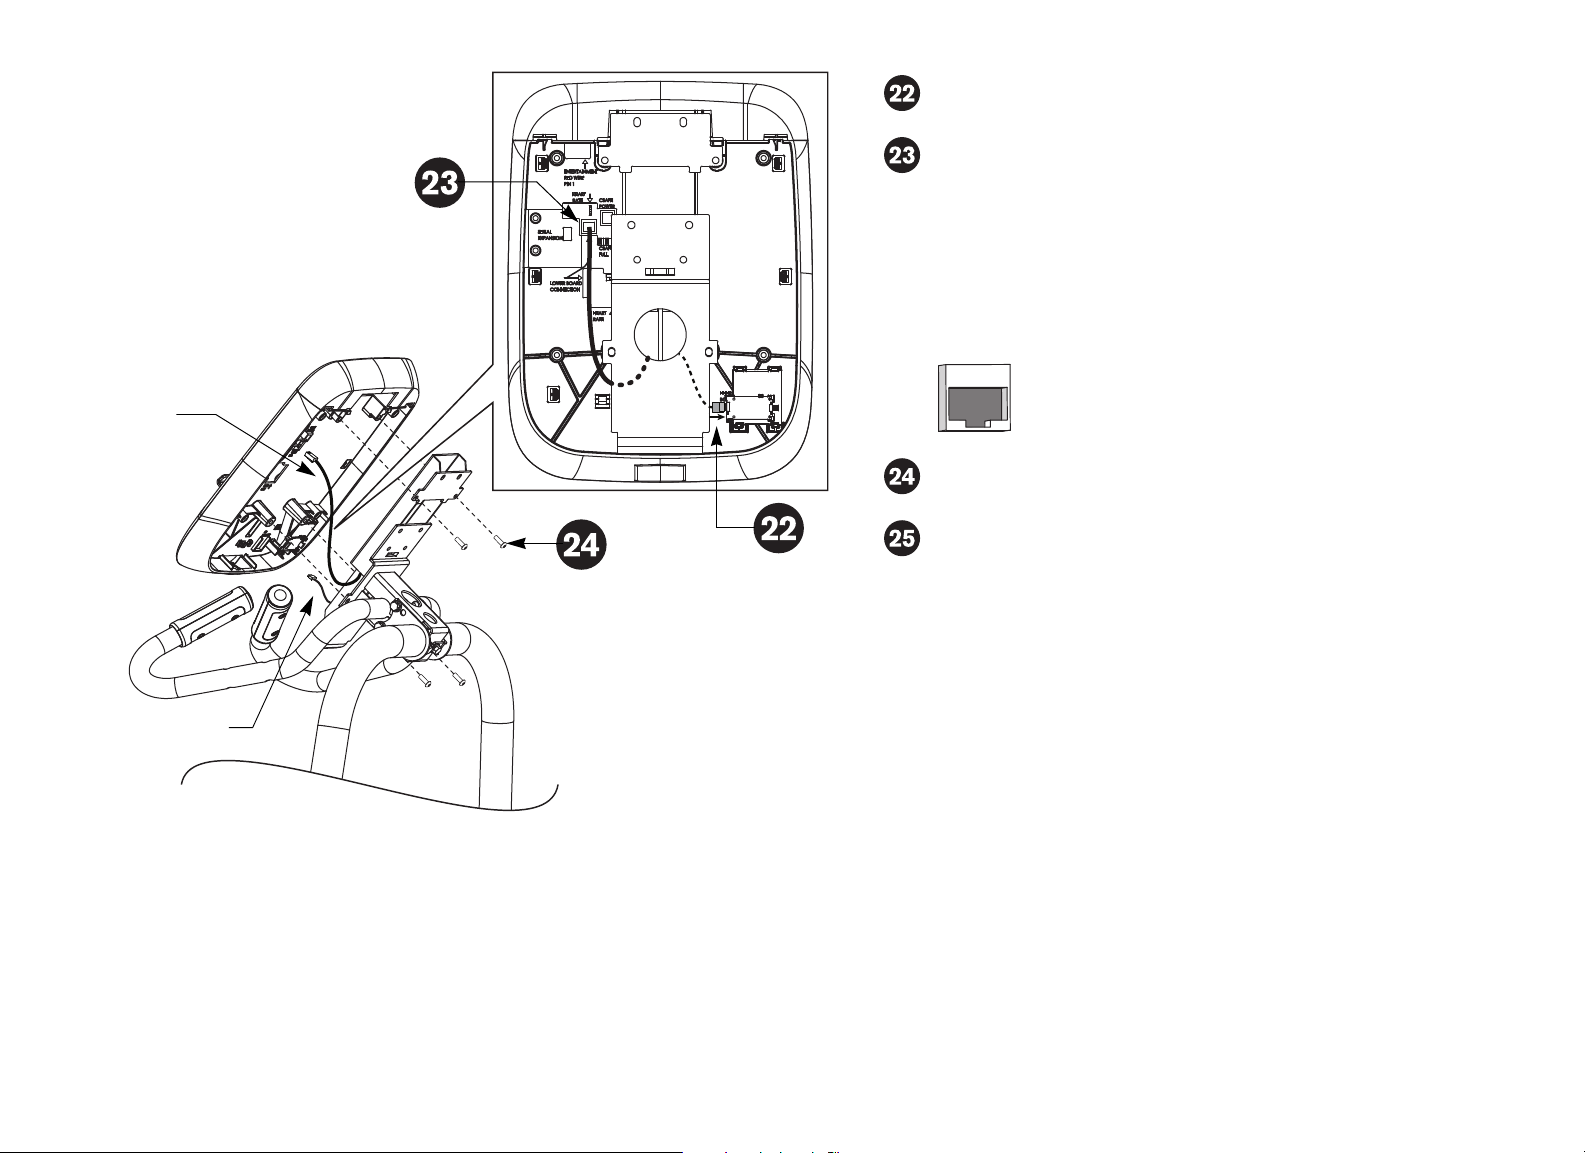
Unwrap the lower board cable and remove any kinks. Feed the
cable through the console bracket as shown in the illustration.
Lower the console bracket between the stabilizers and rest
the base of the bracket against the two bottom flanges. Align
the six mounting holes. Start with the side mounts and insert
the four hex head screws (A), with four split washers (E), and
four flat washers (B). Finger tighten.
Insert the two bottom hex head screws (A) with two split
washers (E), and two flat washers (B). Finger tighten.
Use a Phillips screwdriver to remove the four screws that
secure the back console plate to the display console. Set the
fasteners and cover aside.
536i Elliptical Fitness CrossTrainer Assembly Guide 9
Lower board
cable
Connect the heart rate cable to the 4-prong receptacle on the
electronics board.
Connect the RJ45 cable to its receptacle on the back of the
display console. An audible click is heard when the cable is
properly attached. Place excess cable inside the console
bracket.
Important: When connecting the RJ45 cable to the back of
the display, look for the receptacle that is in the same
orientation as shown in the illustration below. Text embossed
on the plastic states LOWER BOARD CONNECTION.
Secure the display console with four buttonhead screws (L).
Wrench tighten.
Wrench tighten the hex head screws. Start at the base of the
stabilizers and tighten all eight screws using a ½-inch socket
with an extension. Return to the console bracket. Wrench
tighten the four side screws, and then the two bottom screws.
Heart rate cable
536i Elliptical Fitness CrossTrainer Assembly Guide 10
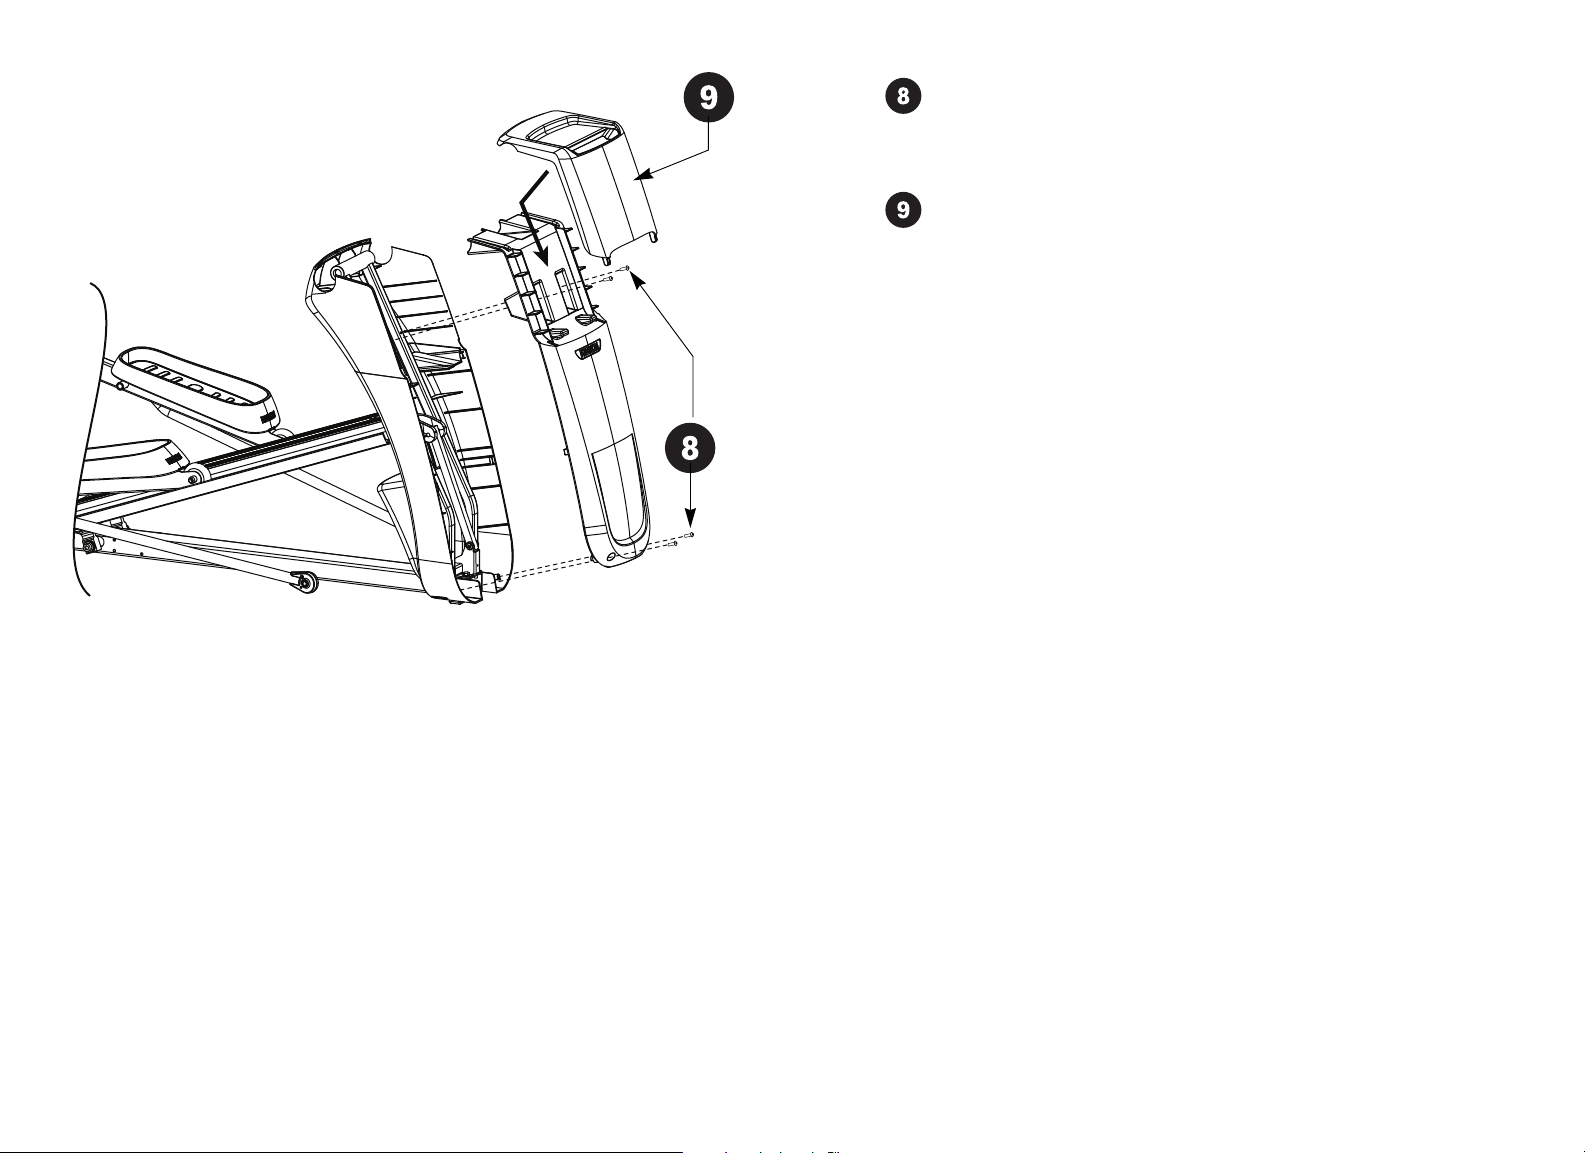
Remove the foam pouch from the ramp.
Place the display covers (N) around the console bracket. Insert
two buttonhead screws (L) and wrench tighten.
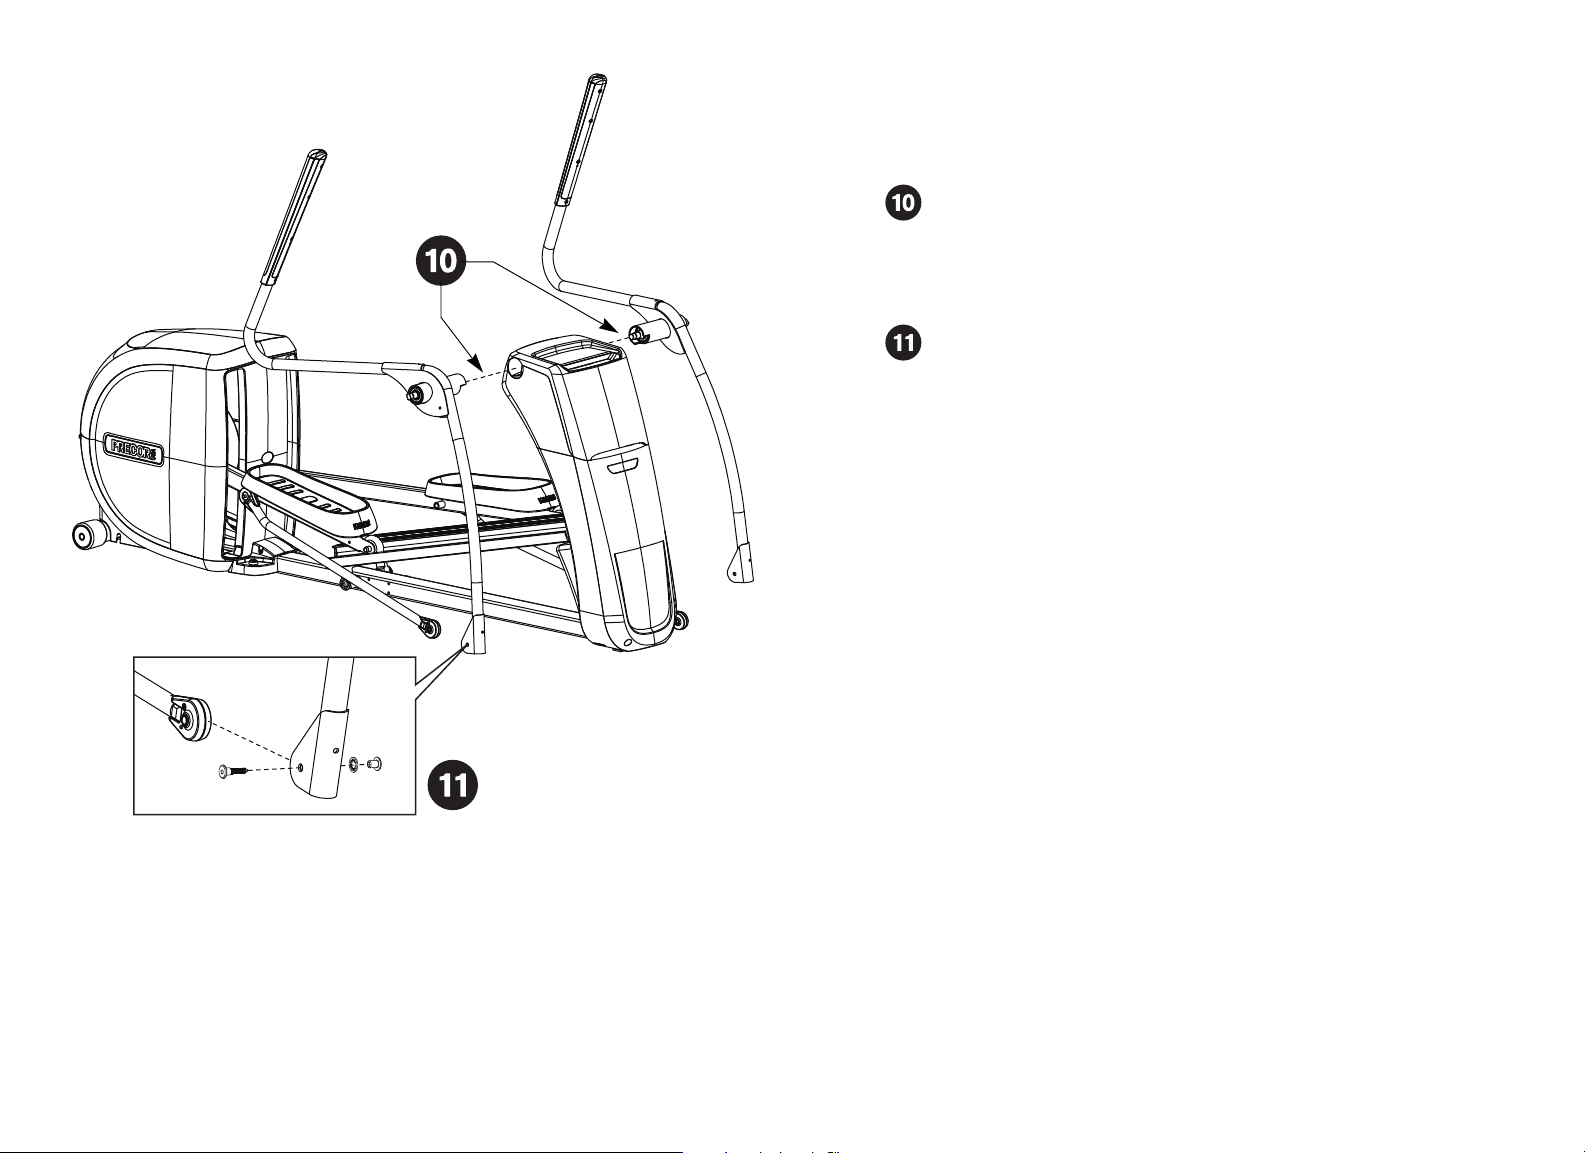
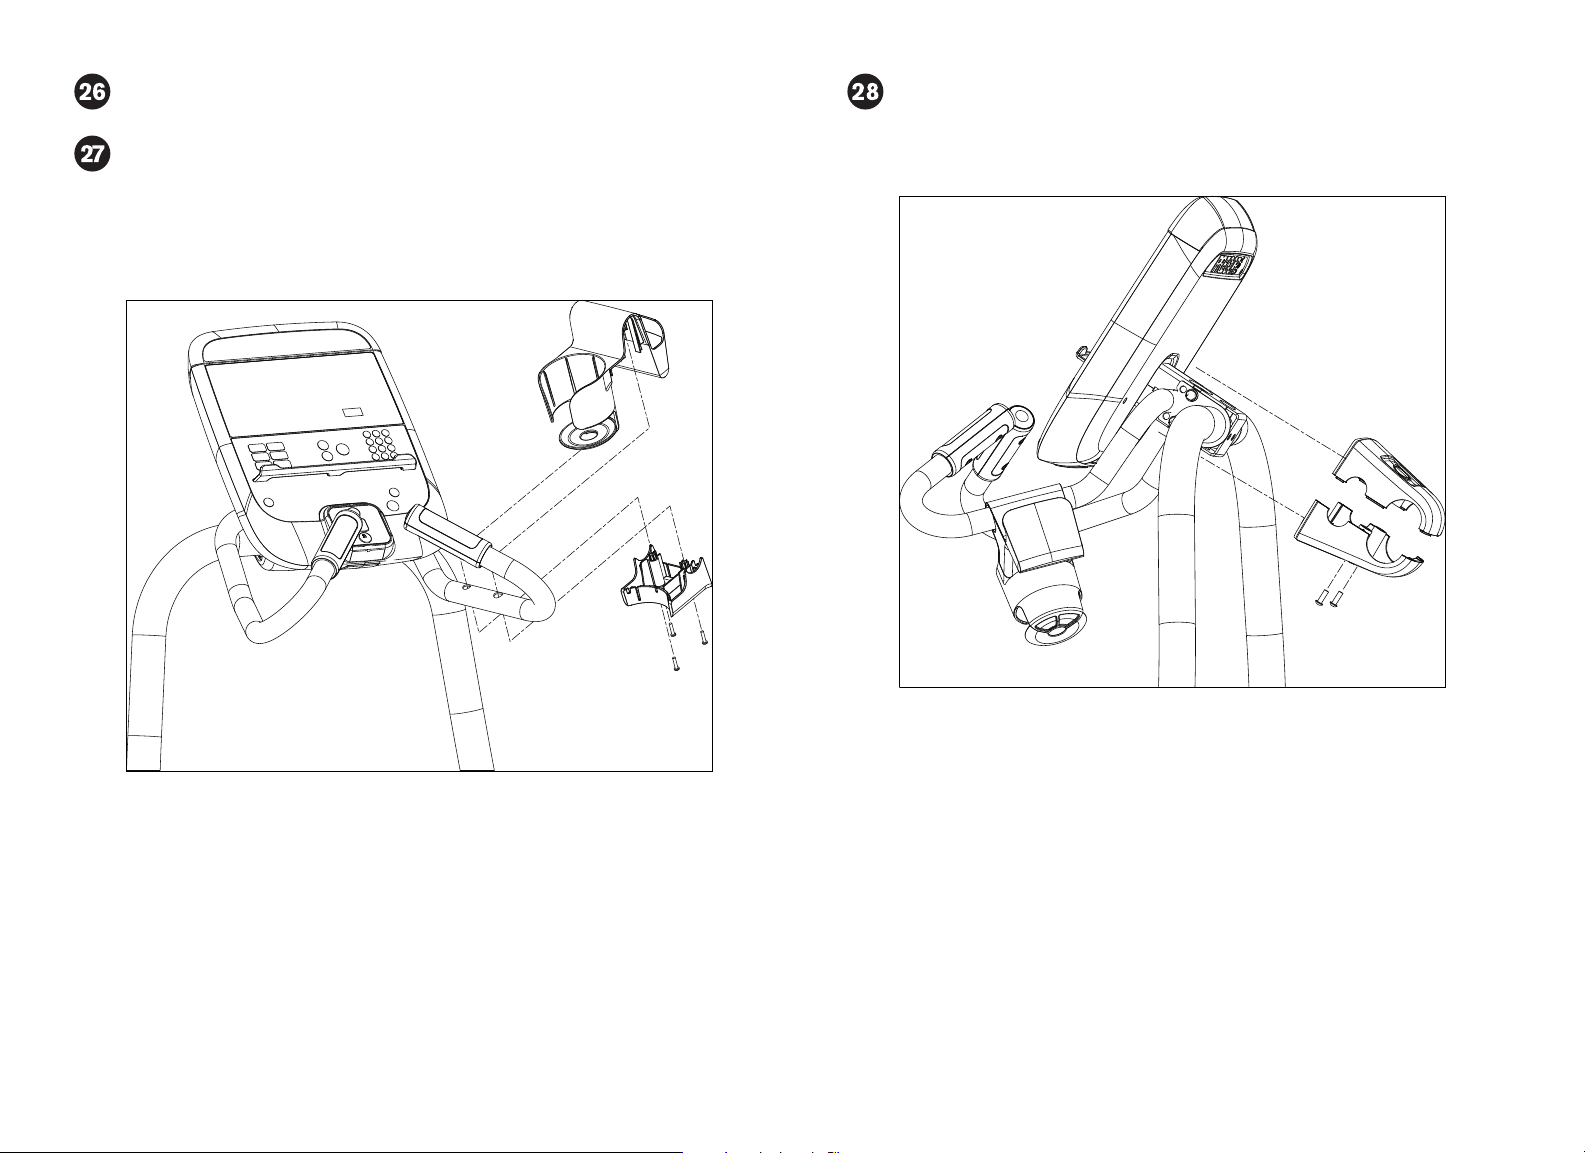
Position the water bottle holder as shown in the illustration. Place
the top section over the handrail and align the two mounting
holes. Position the base below the handrail and align the slits and
mounting pems with the top section. Slide the base into the top
section and secure it using three Phillips-head screws (F) and a
Phillips screwdriver.
Make sure the top cover’s front edge is flush with the display
console bracket before you secure it to the bottom cover.
536i Elliptical Fitness CrossTrainer Assembly Guide 11

Before exercising, make sure the EFX is level and does not
wobble from side to side.
Important: If the EFX is placed on a slightly uneven surface,
turning the levelers can help, but will not compensate for
extremely uneven surfaces.
1. Remove the packaging wedge from beneath the base of
the EFX.
2. Kneel by the side of the stabilizer and lift the base slightly so
you can access the levelers.
3. Rotate the levelers as needed.
4. When the EFX is level, tighten the lock nut with a crescent
wrench and lower the EFX to the floor.
Verify the heart rate display is operational.
1. Hold on to a stationary handrail and step on the foot pedals.
2. When you are comfortably situated, begin pedaling. A pedaling
speed above 40 strides per minute must be maintained for
several seconds.
3. Grasp both touch-sensitive grips.
4. Look at the HEART RATE display. After a few seconds, a
number appears indicating your heart rate.
5. If a number does not appear in the HEART RATE display, you
may need to disassemble the display and check the cable
connection. For troubleshooting tips, refer to the Product
Owner’s Manual.
536i Elliptical Fitness CrossTrainer Assembly Guide 12


Precor Incorporated
20031 142nd Avenue NE
P.O. Box 72 0 2
Woodinville, WA USA 98072-4002
1-800-347-4404
©2011 Precor Incorporated
www.precor.com
EFX536i AG 301736-101, en
30 December 2011
EFX®536i
EFX
®
532i
User's Reference Manual
Elliptical Fitness CrossTrainers


Important Safety Instructions
Read all instructions in the documentation provided with your
exercise equipment, including all assembly guides, user guides,
and owner’s manuals, before installation of this device.
The display apparatus (hereinafter referred to as the console) is
intended to be shipped with new Precor exercise equipment
(hereinafter referred to as the base unit). It is not packaged for
individual sale.
WARNING
To prevent injury, the console must be
attached securely to the base unit following
all assembly and installation instructions
shipped with the base unit. The console is
intended to be connected to AC mains power
through the furnished power supply ONLY. It
should be powered on only when installed as
described in the assembly and installation
instructions shipped with the base unit. The
console is intended for use only with Precor
fitness equipment, not as a standalone
device.
Make sure all users see a physician for a complete physical
examination before they begin any fitness program, particularly if
they have high blood pressure, high cholesterol or heart
disease; have a family history of any of the preceding
conditions; are over the age of 45; smoke; are obese; have not
exercised regularly in the past year; or are taking any
medication.
Il est conseillé de subir un examen médical complet avant
d’entreprendre tout programme d’exercise. Si vous avez des
étourdissements ou des faiblesses, arrêtez les exercices
immédiatement.
Do not allow children, or people unfamiliar with the operation of
this equipment, on or near it. Do not leave children
unsupervised around the equipment.
Make sure all users wear proper exercise clothing and shoes for
their workouts and avoid loose or dangling clothing. Users
should not wear shoes with heels or leather soles, and they
should check the soles of their shoes to remove any dirt and
embedded stones. They should also tie long hair back.
Safety Precautions
Always follow basic safety precautions when using this equipment
to reduce the chance of injury, fire, or damage. Other sections in
this manual provide more details of safety features. Be sure to read
these sections and observe all safety notices. These precautions
include the following:
Read all instructions in this guide before installing and using the
equipment and follow any labels on the equipment.
User's Reference Manual: Important Safety Instructions 1
Never leave the equipment unattended when it is plugged in.
Unplug the equipment from its power source when it is not in
use, before cleaning it, and before providing authorized service.
Note: The optional power adapter is considered a power
source for self-powered equipment.
Use the power adapter provided with the equipment. Plug the
power adapter into an appropriate, grounded power outlet as
marked on the equipment.

Care should be taken when mounting or dismounting the
equipment.
Read, understand, and test the emergency stop procedures
before use.
Keep the power cord or optional power adapter and plug away
from heated surfaces.
Route power cables so that they are not walked on, pinched, or
damaged by items placed upon or against them, including the
equipment itself.
Ensure the equipment has adequate ventilation. Do not place
anything on top of or over the equipment. Do not use on a
cushioned surface that could block the ventilation opening.
Assemble and operate the equipment on a solid, level surface.
Proper Location for Equipment
For all equipment other than treadmills: Locate at least
40 inches (1 meter) away from walls or furniture on
either side of the equipment, and 40 inches (1 meter)
away from objects behind the equipment.
For treadmills: Locate at least 40 inches (1 meter) away
from walls or furniture on either side of the treadmill, and
at least 80 inches (2 meters) away from objects behind
the treadmill.
Important: These location standards should also be used
when positioning equipment away from sources of heat, such
as radiators, heat registers, and stoves. Avoid temperature
extremes.
Keep equipment away from water and moisture. Avoid dropping
anything on or spilling anything inside the equipment to prevent
electric shock or damage to the electronics.
When using the treadmill, always attach the safety clip to your
clothing before beginning your workout. Failure to use the safety
clip may pose a greater risk of injury in the event of a fall.
Keep in mind that heart rate monitors are not medical devices.
Various factors, including the user’s movement, may affect the
accuracy of the heart rate readings. The heart rate monitors are
intended only as exercise aids in determining heart rate trends
in general.
Do not operate electrically powered equipment in damp or wet
locations.
Never operate this equipment if it has a damaged cord or plug,
if it is not working properly, or if it has been dropped, damaged,
or exposed to water. Call for service immediately if any of these
conditions exist.
Maintain the equipment to keep it in good working condition, as
described in the Maintenance section of the owner’s manual.
Inspect the equipment for incorrect, worn, or loose components,
and then correct, replace or tighten prior to use.
If you plan to move the equipment, obtain help and use proper
lifting techniques.
Equipment Weight Restrictions: Do not use the treadmill if you
weigh more than 500 pounds (225 kg). If you weigh more than
350 pounds (160 kg), do not run on the treadmill. For all other
fitness equipment, the weight limit is 350 pounds (160 kg).
Use the equipment only for its intended purpose as described in
this manual. Do not use accessory attachments that are not
recommended by Precor. Such attachments may cause injuries.
Do not operate the equipment where aerosol (spray) products
are being used or where oxygen is being administered.
Do not use outdoors.
User's Reference Manual: Important Safety Instructions 2

Do not attempt to service the equipment yourself, except to
follow the maintenance instructions in the owner’s manual.
Never drop or insert objects into any opening. Keep hands away
from moving parts.
Do not set anything on the stationary handrails, handlebars,
control console, or covers. Place liquids, magazines, and books
in the appropriate receptacles.
Important: For safety, make sure users step onto the running
belt while it is moving at or below 1 mile per hour (1.6
kilometers per hour).
Hold on to a stationary handrail or handlebar with one hand
whenever you operate the console keys with the other hand.
Hazardous Materials and Proper
Do not lean on or pull on the console at any time.
CAUTION: DO NOT remove the cover, or you may risk injury
due to electric shock. Read the assembly and maintenance
guide before operating. There are no user-serviceable parts
inside. Contact Customer Support if the equipment needs
servicing. For use with single phase AC power only.
Educating Users
Take time to educate users about the Important Safety Instructions
found in both the User Reference Manual and Product Owner’s
Manual. Explain to your club or facility patrons that they should
observe the following precautions:
Hold onto a stationary handrail or handlebar while assuming the
starting position on the equipment.
Face the console at all times.
Disposal
The batteries within self-powered equipment contain materials that
are considered hazardous to the environment. Federal law requires
proper disposal of these batteries.
If you plan to dispose of your equipment, contact Precor
Commercial Products Customer Support for information regarding
battery removal. Refer to Obtaining Service.
On treadmills, straddle the running belt and attach the safety
clip to clothing at waist level before touching the control
console.
User's Reference Manual: Important Safety Instructions 3

Product Recycling and Disposal
Regulatory Notices for Cardiovascular
This equipment must be recycled or discarded according to
applicable local and national regulations.
Product labels, in accordance with European Directive
2002/96/EC concerning waste electrical and electronic equipment
(WEEE), determine the framework for the return and recycling of
used equipment as applicable throughout the European Union. The
WEEE label indicates that the product is not to be thrown away,
but rather reclaimed upon end of life per this Directive.
In accordance with the European WEEE Directive, electrical and
electronic equipment (EEE) is to be collected separately and to be
reused, recycled, or recovered at end of life. Users of EEE with the
WEEE label per Annex IV of the WEEE Directive must not dispose
of end of life EEE as unsorted municipal waste, but use the
collection framework available to customers for the return,
recycling, and recovery of WEEE. Customer participation is
important to minimize any potential effects of EEE on the
environment and human health due to the potential presence of
hazardous substances in EEE. For proper collection and treatment,
refer to Obtaining Service.
Exercise Equipment
The regulatory information in this section applies to the exercise
equipment and its control console.
Safety Approvals for Cardiovascular Equipment
Precor equipment has been tested and found to comply with the
following applicable safety standards.
Cardiovascular Type Equipment:
CAN/CSA, IEC, EN 60335-1 (Household and similar electrical
appliances - Safety)
EN 957 (Stationary training equipment, class S/B compliant
equipment)
PVS Regulatory Notice
This Precor equipment has been tested and found to comply with
the following applicable safety standards.
CAN/CSA, UL, IEC, EN 60065 (Audio, video and similar
electronic apparatus - Safety)
User's Reference Manual: Important Safety Instructions 4

WARNING
Radio Frequency Interference (RFI)
European Applications
This Precor exercise equipment conforms to the following national
standards defining acceptable limits for radio frequency
interference (RFI).
Federal Communications Commission, Part 15
This equipment has been tested and found to comply with the
limits for a Class A digital device, pursuant to Part 15 of the FCC
Rules. These limits are designed to provide reasonable protection
against harmful interference in a commercial installation. The
equipment generates, uses, and can radiate radio frequency energy
and, if not installed and used in accordance with the owner’s
manual instructions, may cause harmful interference to radio
communications.
Per FCC rules, changes or modifications not
expressly approved by Precor could void the
user’s authority to operate the equipment.
Industry Canada
This Class A digital apparatus complies with Canadian ICES-003.
CE compliance is claimed to the following directives:
2004/108/EC EMC Directive
2006/95/EC LVD Directive
2002/95/EC RoHS Directive
Directive compliance has been verified to the following standards:
EN 55022
EN 55024
EN 60335-1
EN 60065 (P80 and PVS)
Cet appareil numérique de la classe A est conforme à la norme
NMB-003 du Canada.
ATTENTION: Haute Tension
Débranchez avant de réparer
User's Reference Manual: Important Safety Instructions 5

Electrical Recommendations: All Equipment Excluding Treadmills
Note: This is a recommendation only. NEC (National Electric
Code) guidelines or local region electric codes must be followed.
For equipment fitted with a P80 console or Personal Viewing
System (PVS) screen a separate power connection is required. For
a 20 amp branch circuit up to 10 screens can be connected. If the
branch circuit has any other devices plugged into the circuit the
number of screens must be reduced by the wattage of the other
devices.
Note: The typical splitter power cords that have IEC-320 C13 and
C14 plugs have a recommended maximum capacity of five
screens.
Figure 1: IEC-320 C13 and C14 plugs
User's Reference Manual: Important Safety Instructions 6
Electrical Recommendations: 120 V and 240 V Treadmills
Note: This is a recommendation only. NEC (National Electric
Code) guidelines or local region electric codes must be followed.
You should have received a power cable that meets your local
electrical code requirements along with the equipment. Precor
treadmills must be connected to a 20 amp individual branch circuit
that can be shared only with one PVS. If you need additional help
with the power connections contact your Precor authorized dealer.
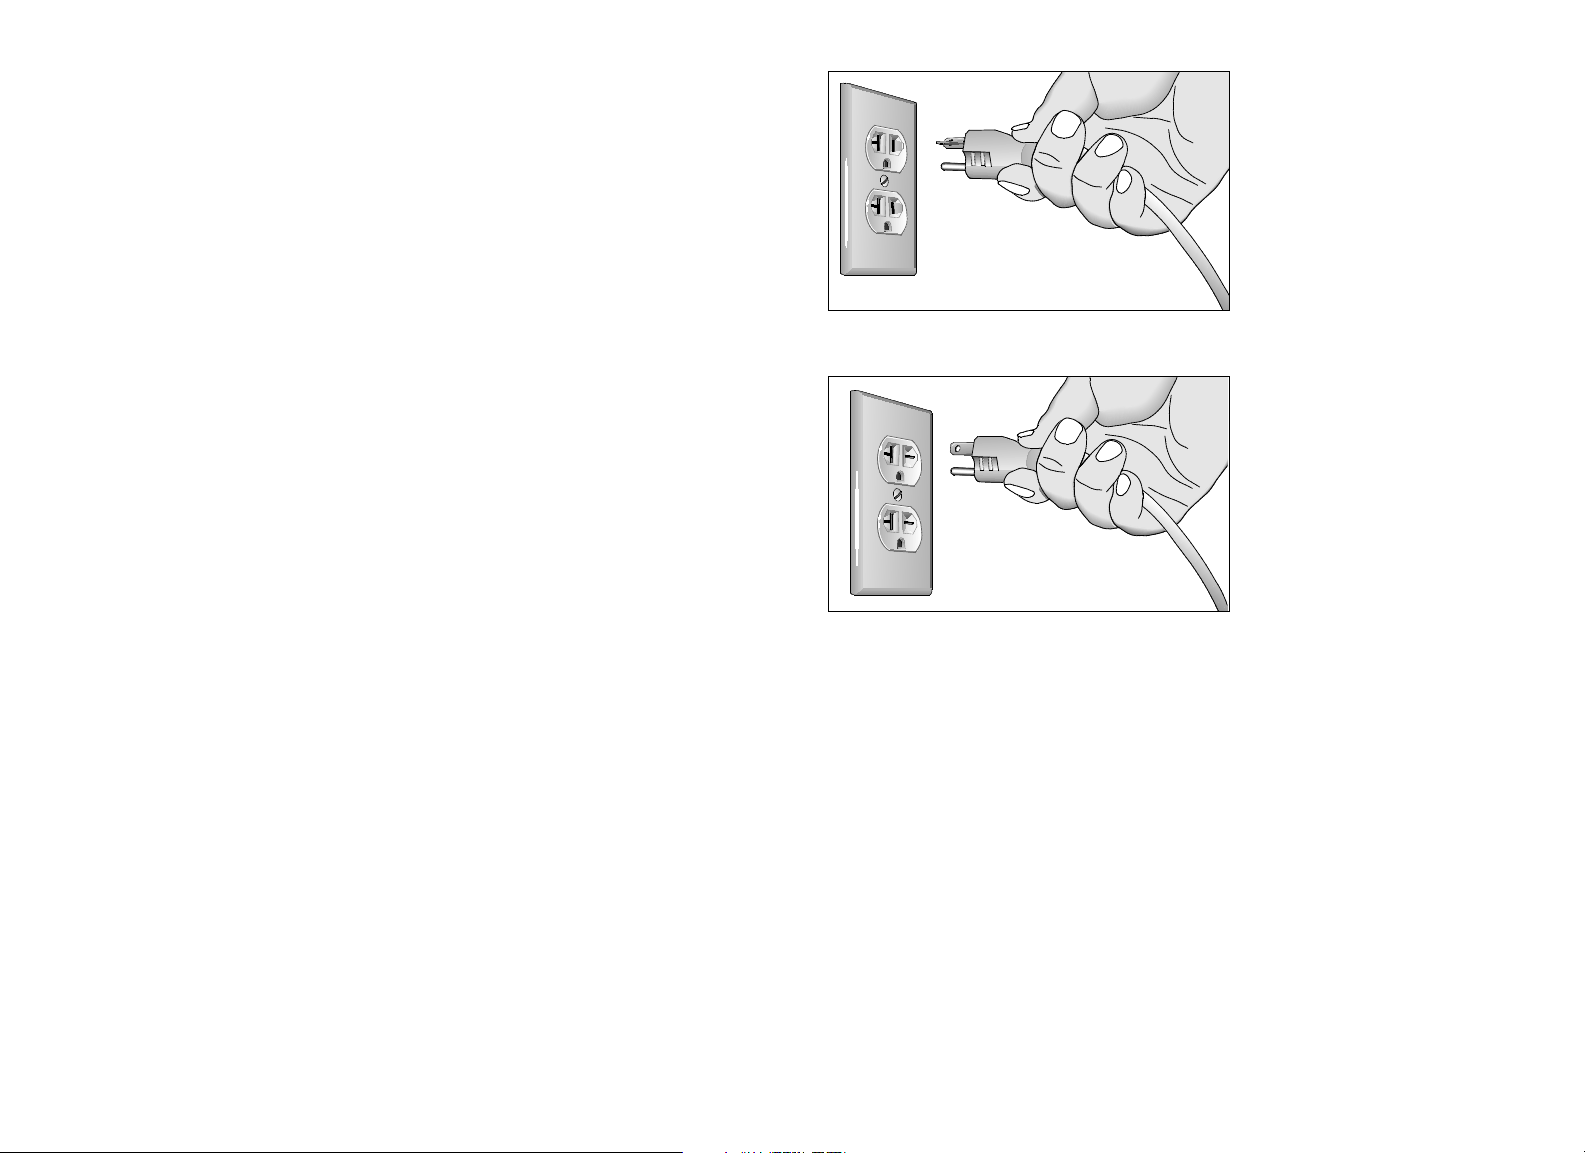
Important: An individual branch circuit provides a hot conductor
and neutral conductor to a receptacle. The conductors must not
be looped, "daisy-chained", or connected to any other conductors.
The circuit must be grounded according to NEC guidelines or
local region electric codes.
Figure 2: North American 120-volt, 20-amp power receptacle
Figure 3: North American 240-volt, 20-amp power receptacle
Obtaining Service
Do not attempt to service the equipment except for maintenance
tasks. If any items are missing, contact your dealer. For more
information regarding customer support numbers or a list of Precor
authorized service centers, visit the Precor web site at
http://www.precor.com.
User's Reference Manual: Important Safety Instructions 7

Table of Contents
Important Safety Instructions ............................................ 1
Safety Precautions ......................................................................... 1
Educating Users ............................................................................. 3
Hazardous Materials and Proper Disposal ............................... 3
Product Recycling and Disposal ................................................ 4
Regulatory Notices for Cardiovascular Exercise
Equipment ........................................................................................ 4
Electrical Recommendations: All Equipment
Excluding Treadmills ...................................................................... 6
Electrical Recommendations: 120 V and 240 V
Treadmills ......................................................................................... 7
Obtaining Service........................................................................... 7
EFX Features .......................................................................... 9
Self-Powered Features ................................................................. 9
Using the Stationary Handrails ..................................................10
Moving Handlebars Support the Total Body Workout ........10
CrossRamp Display .....................................................................10
Heart Rate Features .......................................................... 11
Important Use and Safety Information .....................................11
Wearing a Chest Strap ...............................................................13
Using the Touch-Sensitive Grips ..............................................14
Using SmartRate ..........................................................................15
Exercise to Your Target Heart Rate .........................................16
Heart Rate Analysis .....................................................................16
Troubleshooting Heart Rate .......................................................17
Display Console ................................................................... 18
More Information about the CrossRamp Display.................. 20
More Information about the Upper Display ............................ 20
More Information about the Lower Display ............................ 21
Keypads ......................................................................................... 23
Workout Options ................................................................. 27
Choosing QUICKSTART ........................................................... 28
Selecting a Program .................................................................... 29
Storing Workout Statistics ........................................................ 30
Changing Programs in Mid-session ........................................ 31
Cooling Down After a Workout ................................................ 31
Pausing During a Workout or the Cool-Down Period ......... 32
Ending a Workout ........................................................................ 32
Programs ............................................................................... 33
Choosing a Program ................................................................... 33
Program Tips ................................................................................. 33
Manual Program ........................................................................... 34
Interval Program ........................................................................... 34
Gluteal Program ........................................................................... 35
Heart Rate Program .................................................................... 35
Weight Loss Program ................................................................. 36
Cross Training Program ............................................................. 37
User's Reference Manual: Table of Contents 8

EFX Features
The EFX is equipped with certain items that, when used properly,
help sustain an enjoyable workout. These items include:
Self-powered features
Touch-sensitive grips
Moving handlebars (536i only)
Moving ramp
Self-Powered Features
The equipment does not require an electrical power connection. It
has an internal battery that is recharged every time you exercise for
a reasonable period of time. Meeting the minimum requirements for
operation causes the Precor banner to appear. You can press
QUICKSTART or select a program to begin exercising. For more
information, refer to Workout Options.
Important: Before exercising, review the safety instructions found
at the beginning of this manual.
If you do not meet the minimum requirements for operation, a
30-second shutdown process begins. Dots appear in the display
and all key presses are ignored. If no movement is detected, the
dots steadily disappear as the countdown continues.
If you wish to resume exercising, you need to do so before the dots
disappear from the display.
User's Reference Manual: EFX Features 9

Using the Stationary Handrails
CrossRamp Display
To maintain your balance, always grasp a stationary handrail when
you step on or off the equipment and when you use the keypads.
To learn more about the touch-sensitive grips, refer to Heart Rate
Features.
Moving Handlebars Support the Total Body Workout
On the 536i, moving handlebars provide an upper-body workout
which helps increase cardiovascular fitness. By adding the total
body movement to your cross training workout, you are actually
increasing your work effort and enhancing your overall fitness level.
The CrossRamp display indicates the muscles that are being
affected as you exercise, which may help you increase the overall
effectiveness of your session. Refer to More Information about the
CrossRamp Display.
User's Reference Manual: EFX Features 10

Heart Rate Features
Heart rate and SmartRate® features are available when you wear
the chest strap or grasp both touch-sensitive grips. When a
heartbeat is detected, the HEART RATE display shows your heart
rate and, if your age has been entered, the SmartRate LED blinks
and indicates your target zone.
Important Use and Safety Information
Read the following before using the heart rate or SmartRate
features.
Consult your physician before engaging in any vigorous
exercise. Do not use the heart rate programs until authorized by
your physician.
Know your heart rate and your physician-recommended heart
rate target zone. Individual heart rates vary according to several
physiological factors and may not correspond directly with the
following figure.
Always face forward on the equipment and use the stationary
handrail or handlebars for balance.
On self-powered equipment, maintain a comfortable rate of
motion above the minimum requirements. Check with the facility
manager to determine the requirements to maintain power.
User's Reference Manual: Heart Rate Features 11
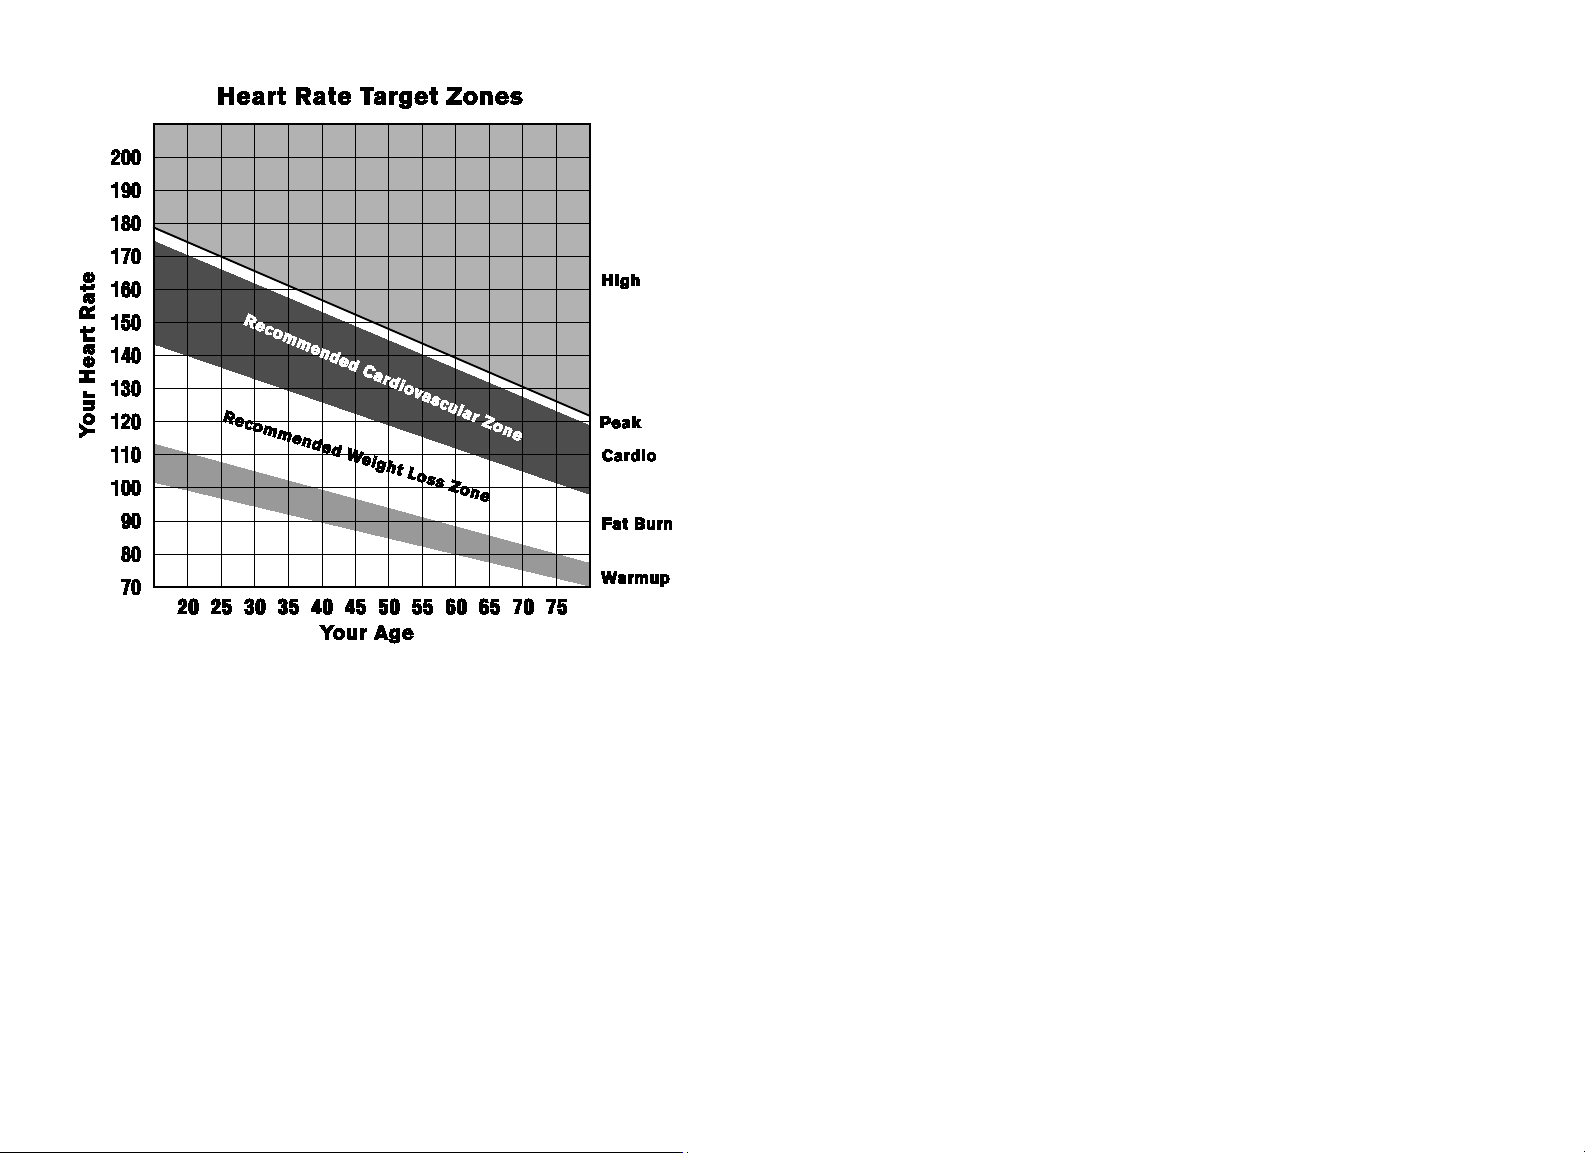
Figure 4: Heart rate target zones
After you put on the chest strap, face the display console for a
minimum of 15 seconds. This allows the receiver in the console
to recognize the signal from the chest strap.
If Hr blinks in the HEART RATE display, it is detecting a signal,
but has not yet determined your heart rate. Make sure the chest
strap is positioned properly around your chest and against your
skin.
If you prefer to use the touch-sensitive grips, grasp both and
wait five to ten seconds. Make sure both hands are moist (not
dry).
When a signal is detected, a number flashes in the
HEART RATE display and indicates your heart rate.
The calculation used for the heart rate target zone is:
(220 minus your age) multiplied by a percent.
For example:
Warmup range: (220 minus your age) multiplied by 55%
Peak range: (220 minus your age) multiplied by 85%
User's Reference Manual: Heart Rate Features 12
 Loading...