

Page 1
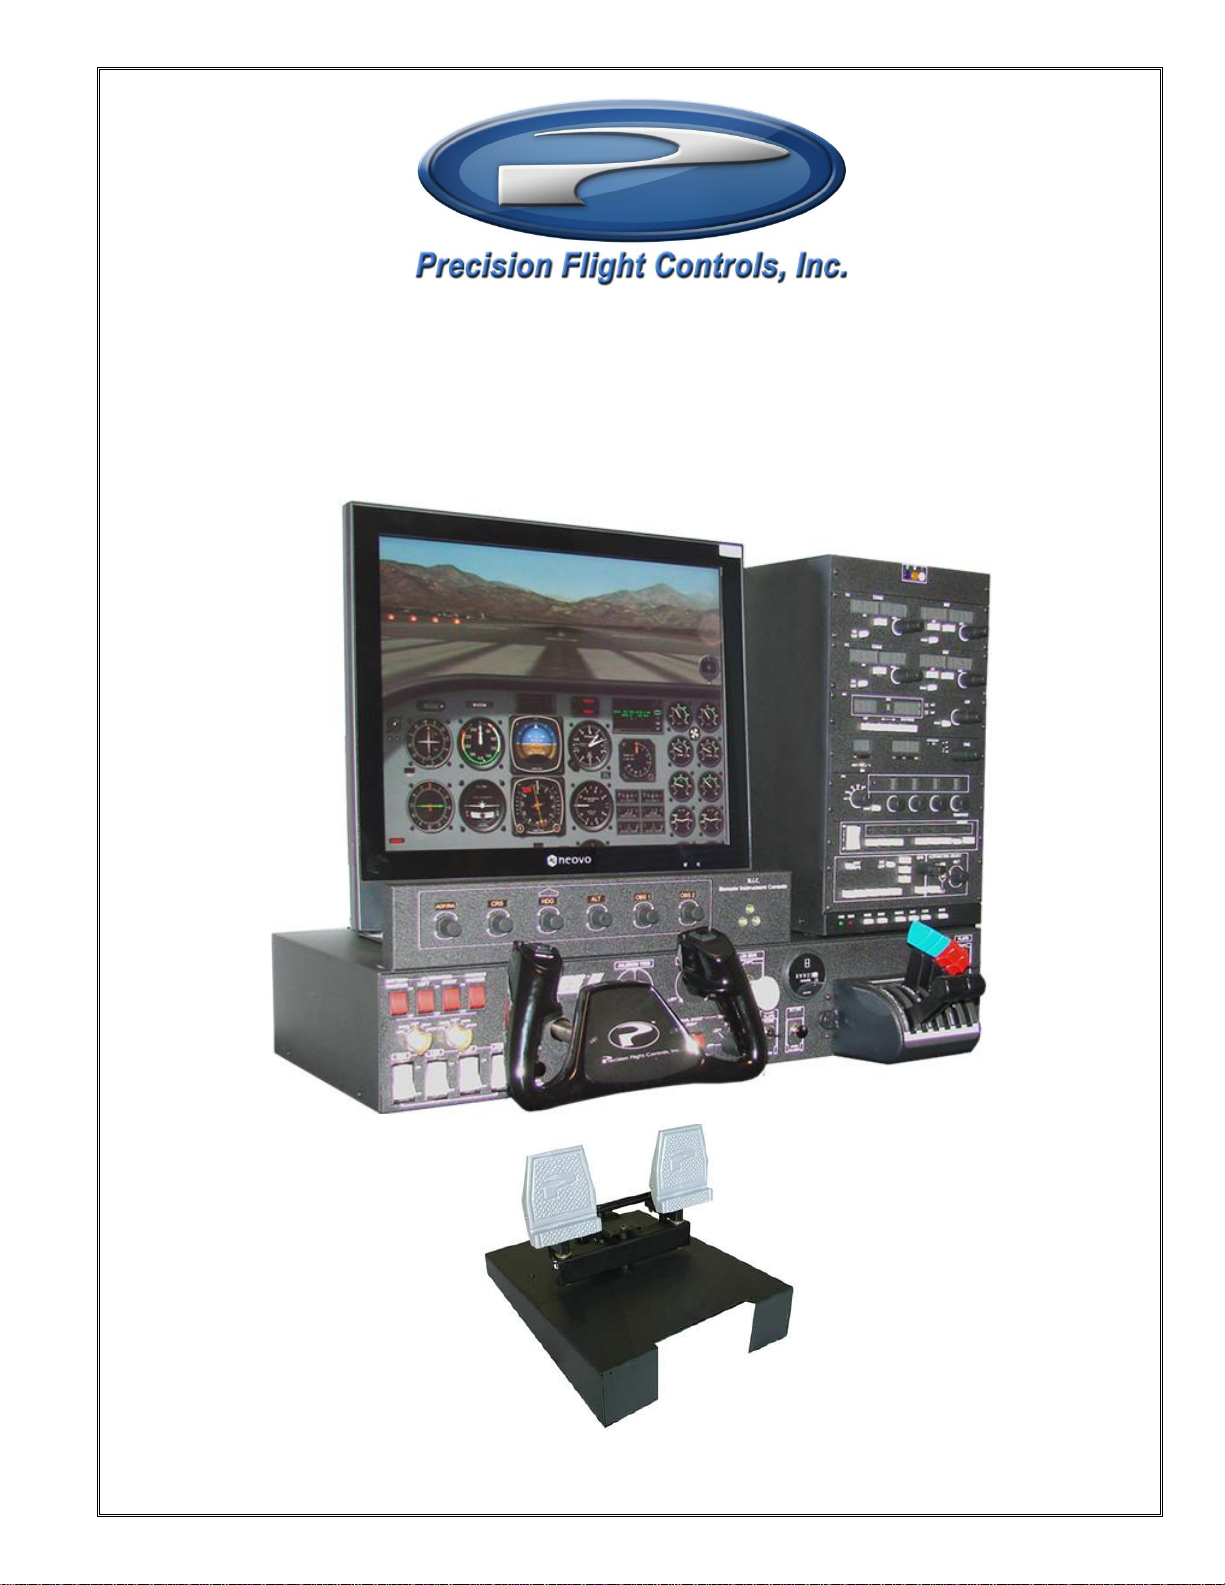
C A T I I S y s t e m a n d F S 2 0 0 4
S e t U p G u i d e
Page 2

Preface
This setup guide will walk you through the necessary steps to setup your CAT II System with Microsoft
Flight Simulator 2004. For connection diagram, please refer to the packet that you received with the
console.
This setup guide assumes that you have already installed the Microsoft Flight Simulator 2004. If you have
not installed the software, please install it now and refer to this guide once installation is complete.
It also assumes that you have the complete CAT II, please see component list below for a complete CAT II.
If you do not have the complete system, you will simply skip the part that does not apply to you.
CAT II System includes:
Cirrus II
Avionics
Cirrus Rudder Pedals
Page 3
A. Changing the Protocol
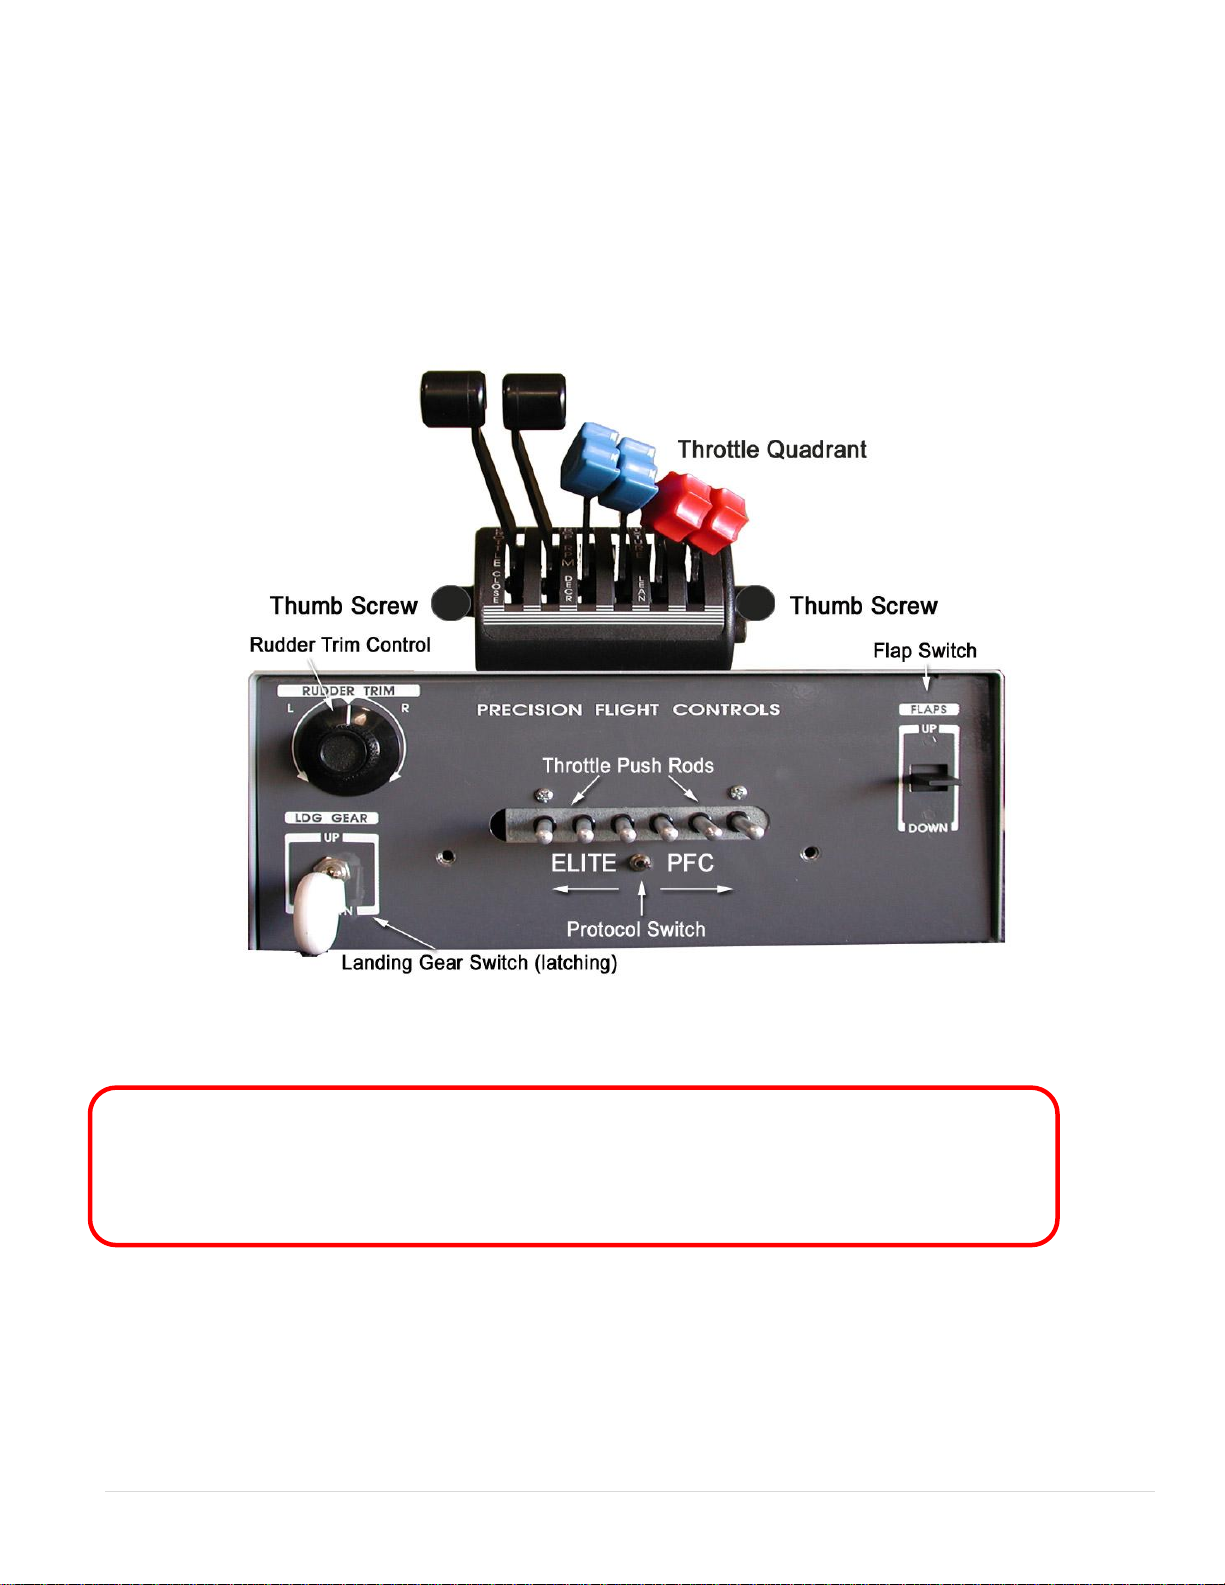
If your Cirrus II has this switch, this will give your whole system the capability to use it with FS2004 and
FS2004.
If your Cirrus II console does not have the protocol switch your whole system will not work with any version
of Microsoft Flight Simulator software.
If your Cirrus II is equipped, changing the position of this switch allows you to change the output data of
your Cirrus II to a data that FS2004 and FS2004 will understand.
This is a picture of the PFC THROTTLE QUADRANT CONSOLE but the location of the switch is the same,
behind the throttle quadrant lever.
To remove throttle quadrant you must:
1. Pull all the levers down (towards you). This will release the pressure from the push rods
2. Loosen the thumb screw by turning it counter clockwise
CAT 2 System and FS2004 Set Up Guide 3 | P a g e
Page 4
B. Changing the connections
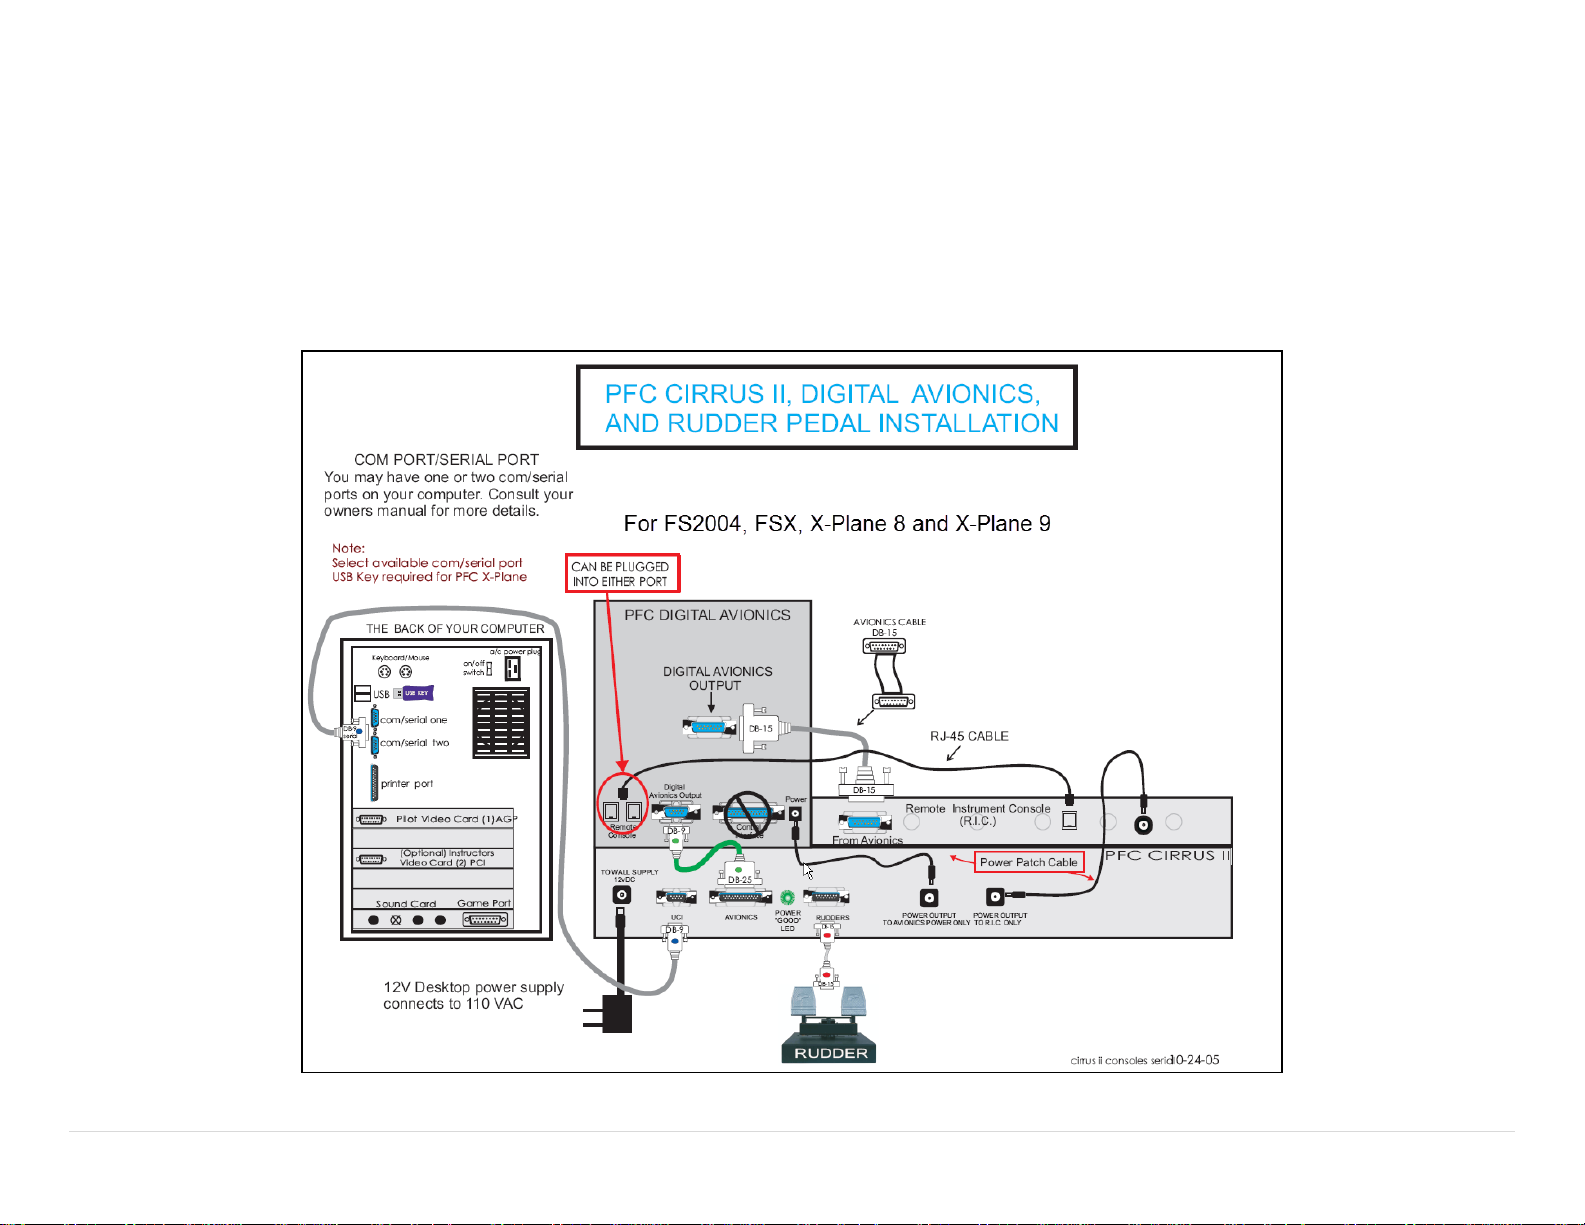
If you are using an ELITE UCI box, you will need to disconnect it when using the any Precision Flight Controls hardware with Microsoft Flight
Simulator. Please see the diagram below for the necessary connections.
If your console do not have the 9 Pin – 25 Pin – 15 Pin connections on the back, your console will not work FS2004
Additionally if your avionics has the name ELITE AP1000, AP2000 or AP3000 these are not compatible with any version of Microsoft Flight
Simulator.
CAT 2 System and FS2004 Set Up Guide 4 | P a g e
Page 5
C. Installation of PFC Driver (dll)
The PFC Driver, which includes the PFC.dll and FSUIPC.dll, is the software that allows serial Precision
Flight Controls, Inc. devices to communicate and work with Microsoft Flight Simulator 2004 and
Microsoft Flight Simulator 2004.
1. Go to our webpage and download the PFC driver:
https://www.flypfc.com/downloads/support/drivers/PFC_Serial_Driver_FS2004.exe
2. When you click on the link it will ask where you want to save the file, make sure that you save it on
your Desktop.
3. Now that you have downloaded the driver, please close your browser.
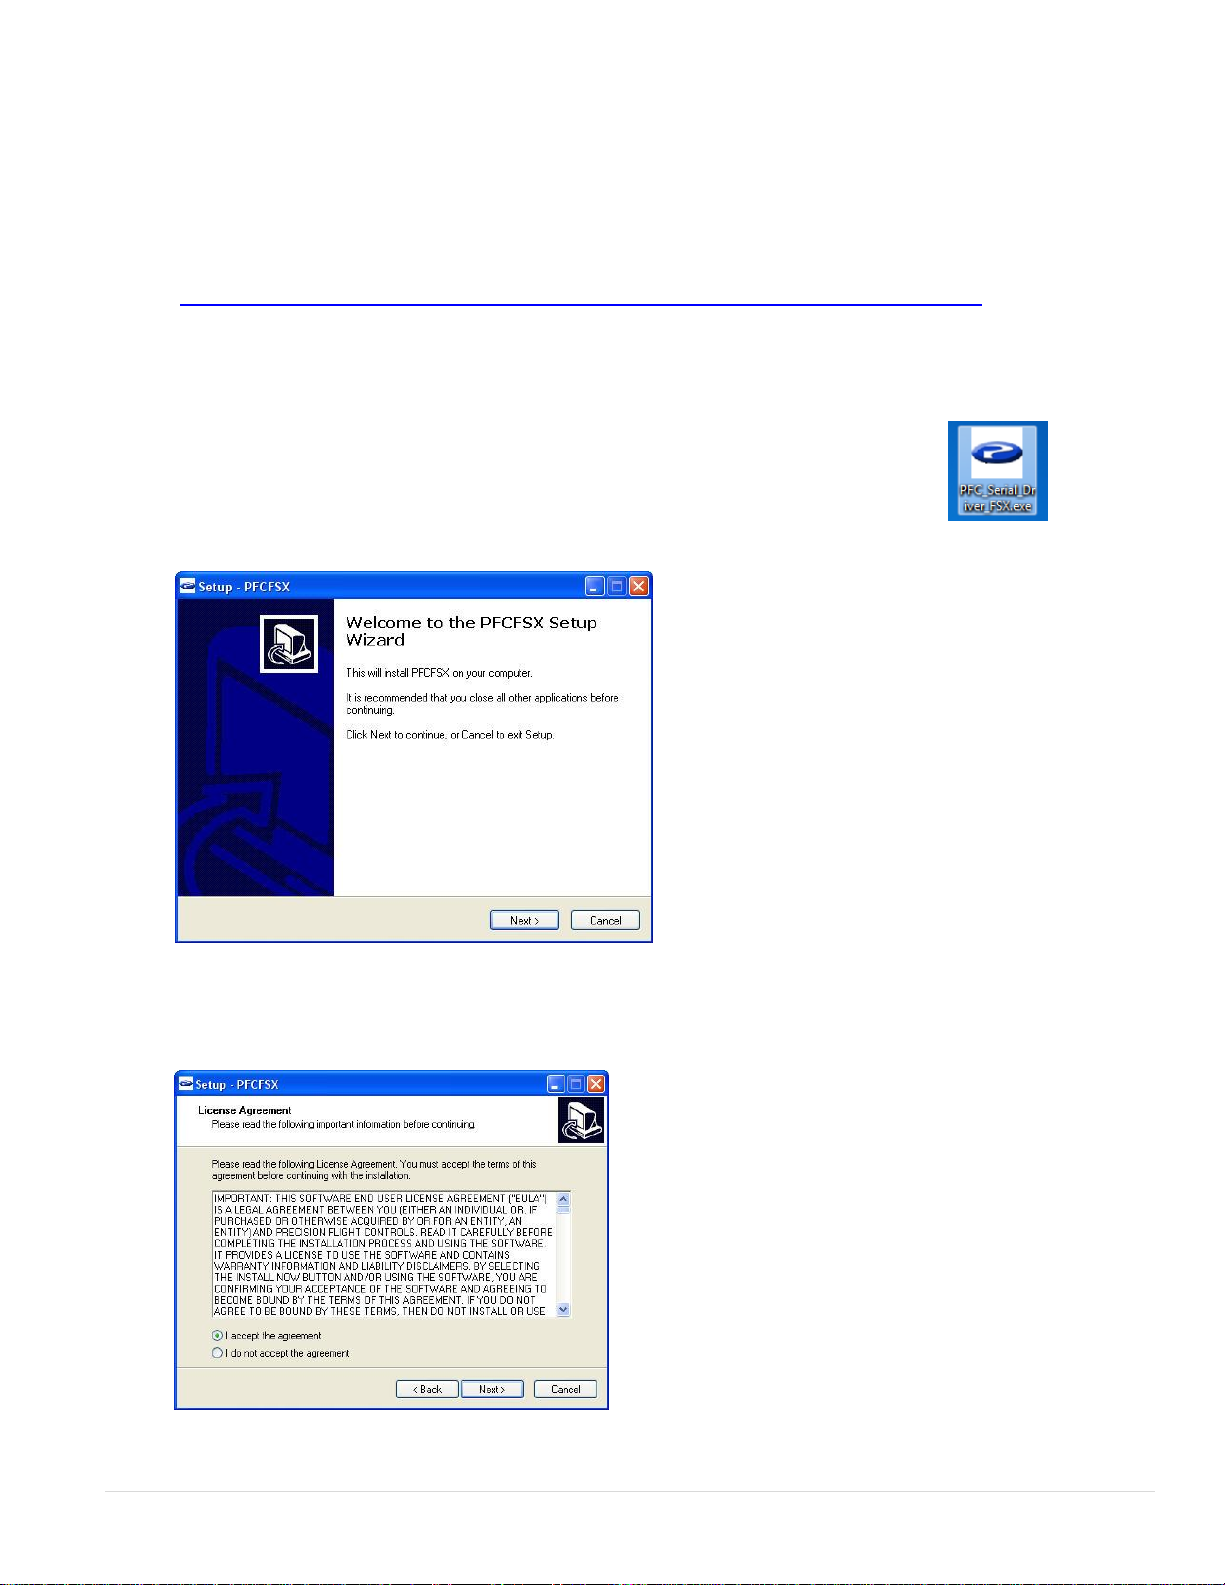
4. On your desktop, please look for the PFC_Serial_Driver_FS2004.exe, and
double click on it.
5. Click on Next
6. Read the license agreement. You will need to Accept the agreement to be able to use the driver.
Once you have agreed click on Next.
CAT 2 System and FS2004 Set Up Guide 5 | P a g e
Page 6
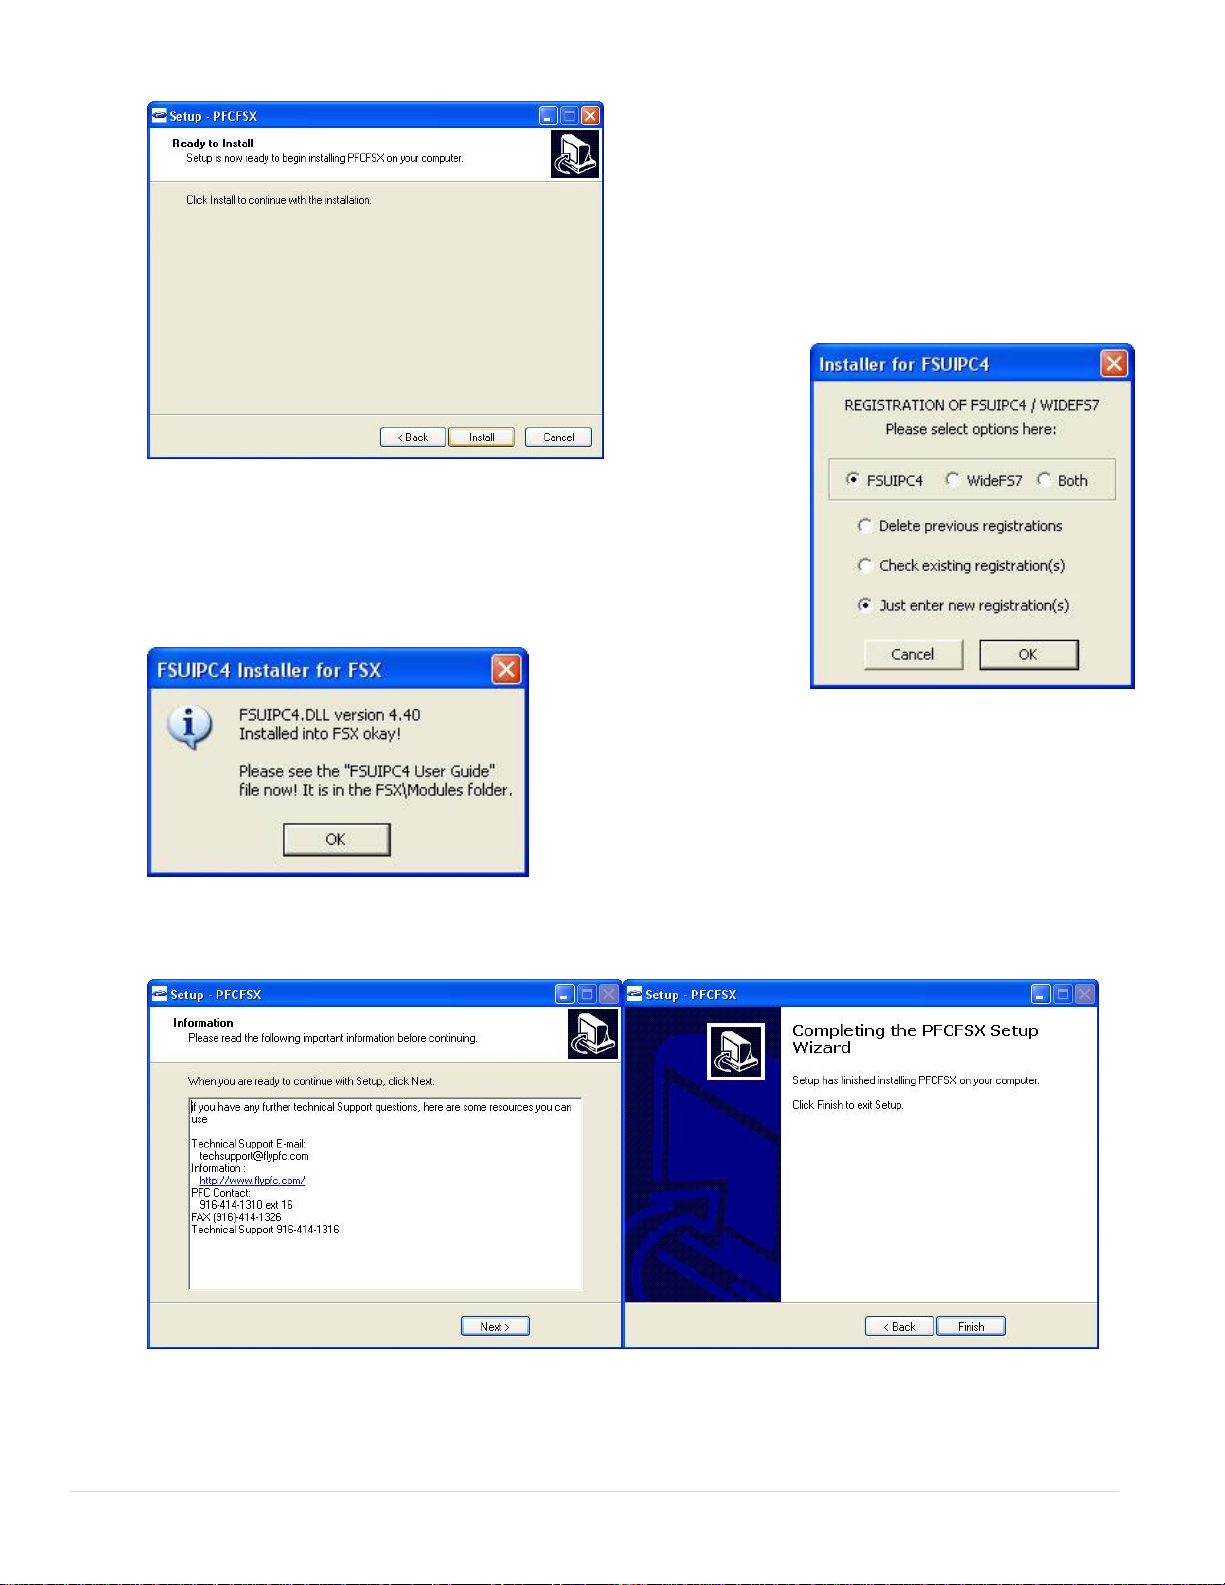
7. Now click on Install.
8. For most users, you will click on Cancel here. If you purchased
FSUIPC and/or WideFS previously, please refer to the instructions
that you have received.
9. Now click on OK.
10. Now click on OK then Finish.
CAT 2 System and FS2004 Set Up Guide 6 | P a g e
Page 7
D. Configure PFC FS2004 Driver for CAT2 and FS2004 Communication
Get the COM Port information
The COM port or serial port is a port used by the Cirrus II console to communicate to Microsoft Flight
Simulator. It is important to know the correct COM port number that your Cirrus II is connected to. This
information will be necessary for proper communication between Microsoft Flight Simulator and Cirrus
II. The steps below will guide you to find out the correct com port number.
1. Go to Start, Control Panel
2. If you see pick a category, then choose Performance & Maintenance then choose System
3. If you see icons such as Accessibility, Add/Remove Programs, choose System
4. From the Systems Window, choose Hardware then Device Manager
5. Expand the Ports list by clicking on the plus (+) sign
6. Make a note of the com port numbers as you will need this later in your setup.
7. My COM Port number/s :_____ and ______
8. Go ahead and close the System Window as well as the Control Panel Window
Setting the COM Port Information
9. Start FS2004
10. Once it has completely started, choose Free Flight.
11. Then click on Fly Now
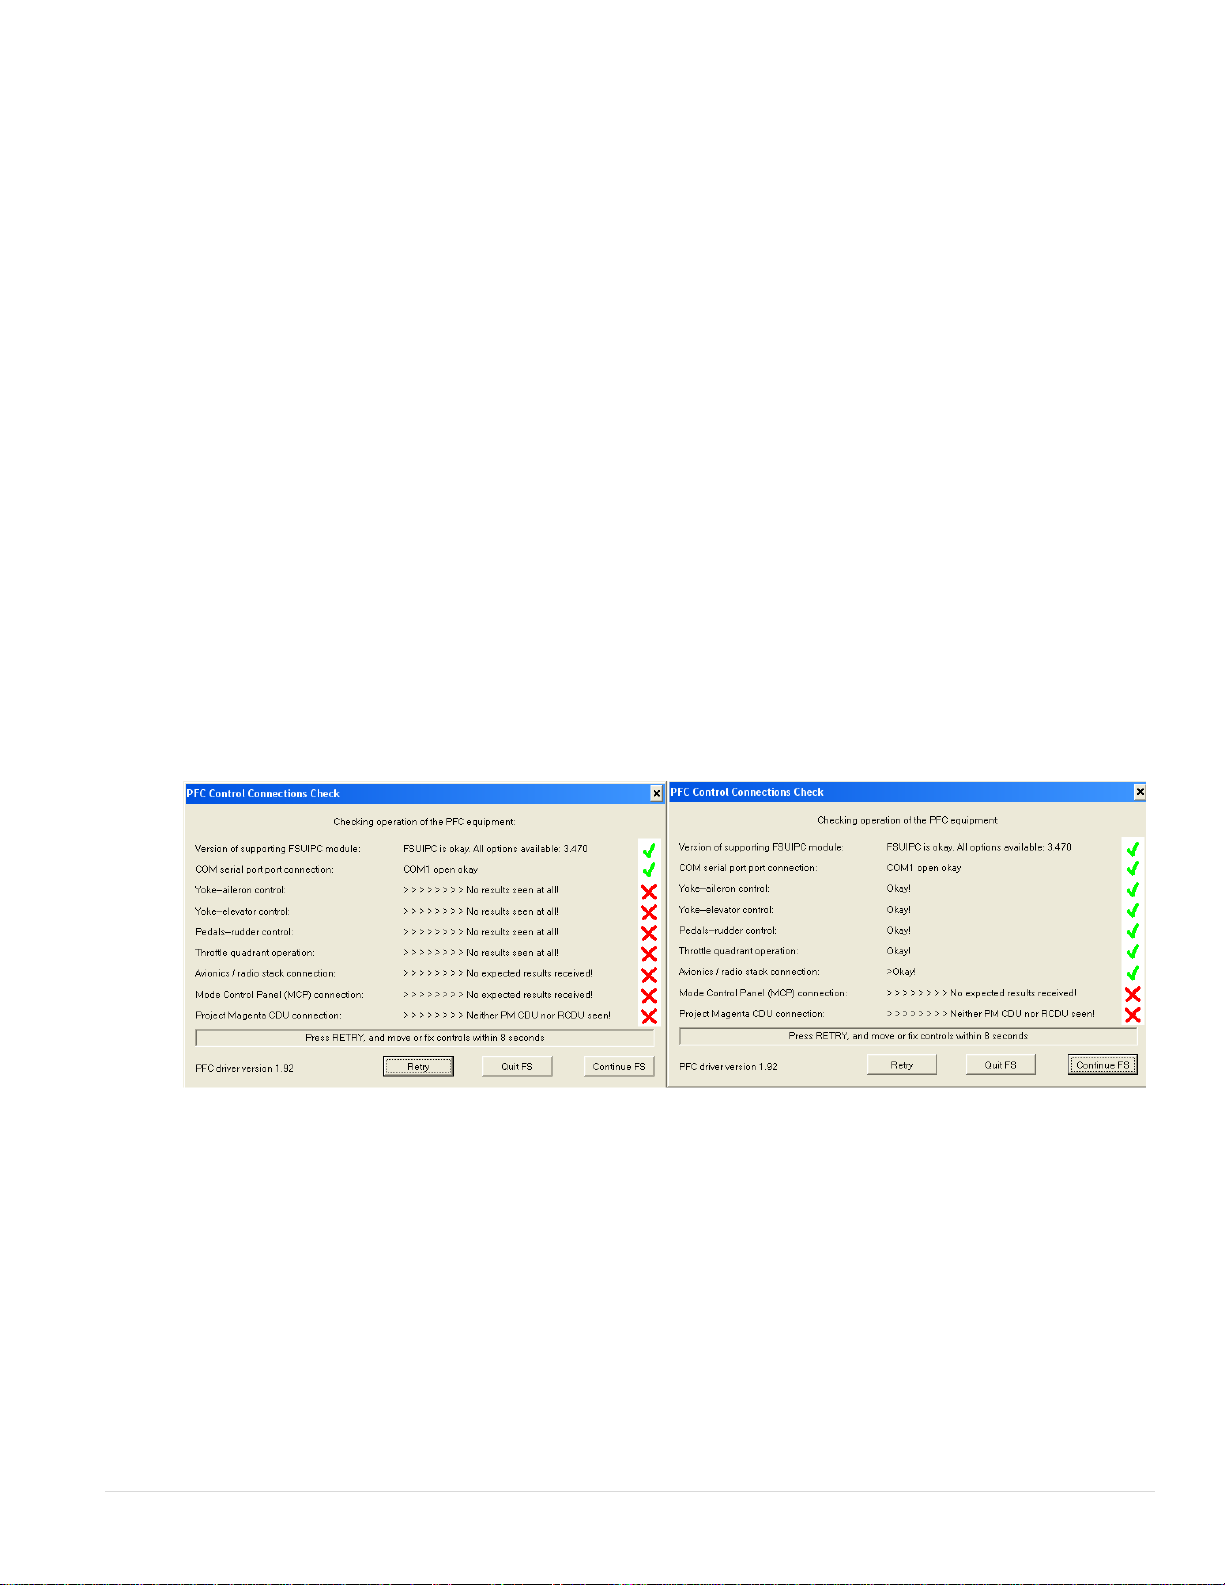
12. You will see the PFC Control Connections Check window.
13. Choose the com port that your hardware is connected to.
14. It should say COM (x) open-okay. If it does not say OK, look at you notes on Step 7 and look at the
second number that you wrote, change the COM port to that number and click on Retry.
15. Once the correct COM Port is selected, you should get a green check on the Yoke-aileron Control,
Yoke-Elevator Control, Pedal-Rudder Control, Throttle Quadrant Operation, and Avionics/Radio
Stack connection.
CAT 2 System and FS2004 Set Up Guide 7 | P a g e
Page 8
NOTE:
If you do not have PFC Cirrus Rudder Pedals the Pedals-Rudder Control Connection will not
turn green
If you do not have avionics panel the Avionics /Radio Stack Connection will not turn green
If you do not have The PFC Mode Control Panel (MCP) the Mode Control Panel (MCP)
Connection will not turn green.
If you do not have the Project Magenta CDU the Project Magenta CDU connection will not
turn green.
16. Now that all the controls that are applicable to you have checked OK, click on Continue FS.
17. Now press the ALT key on your keyboard go to Add-On then PFC
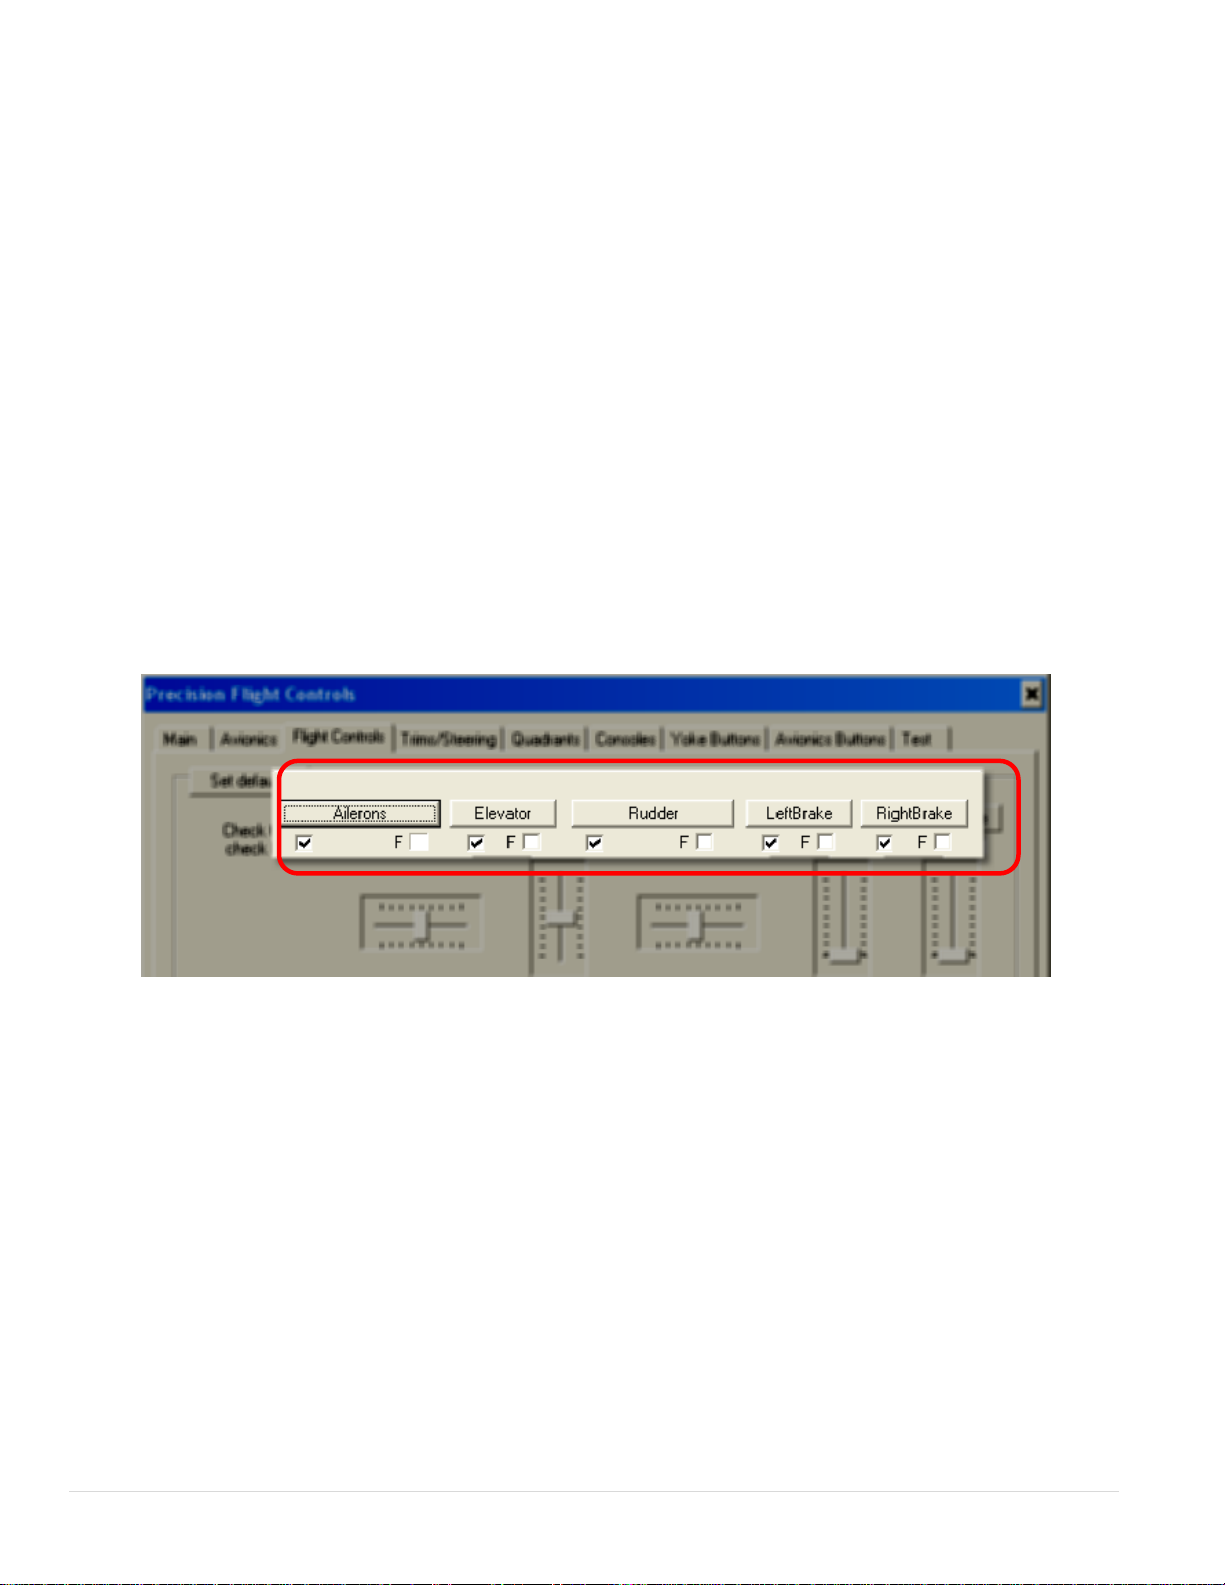
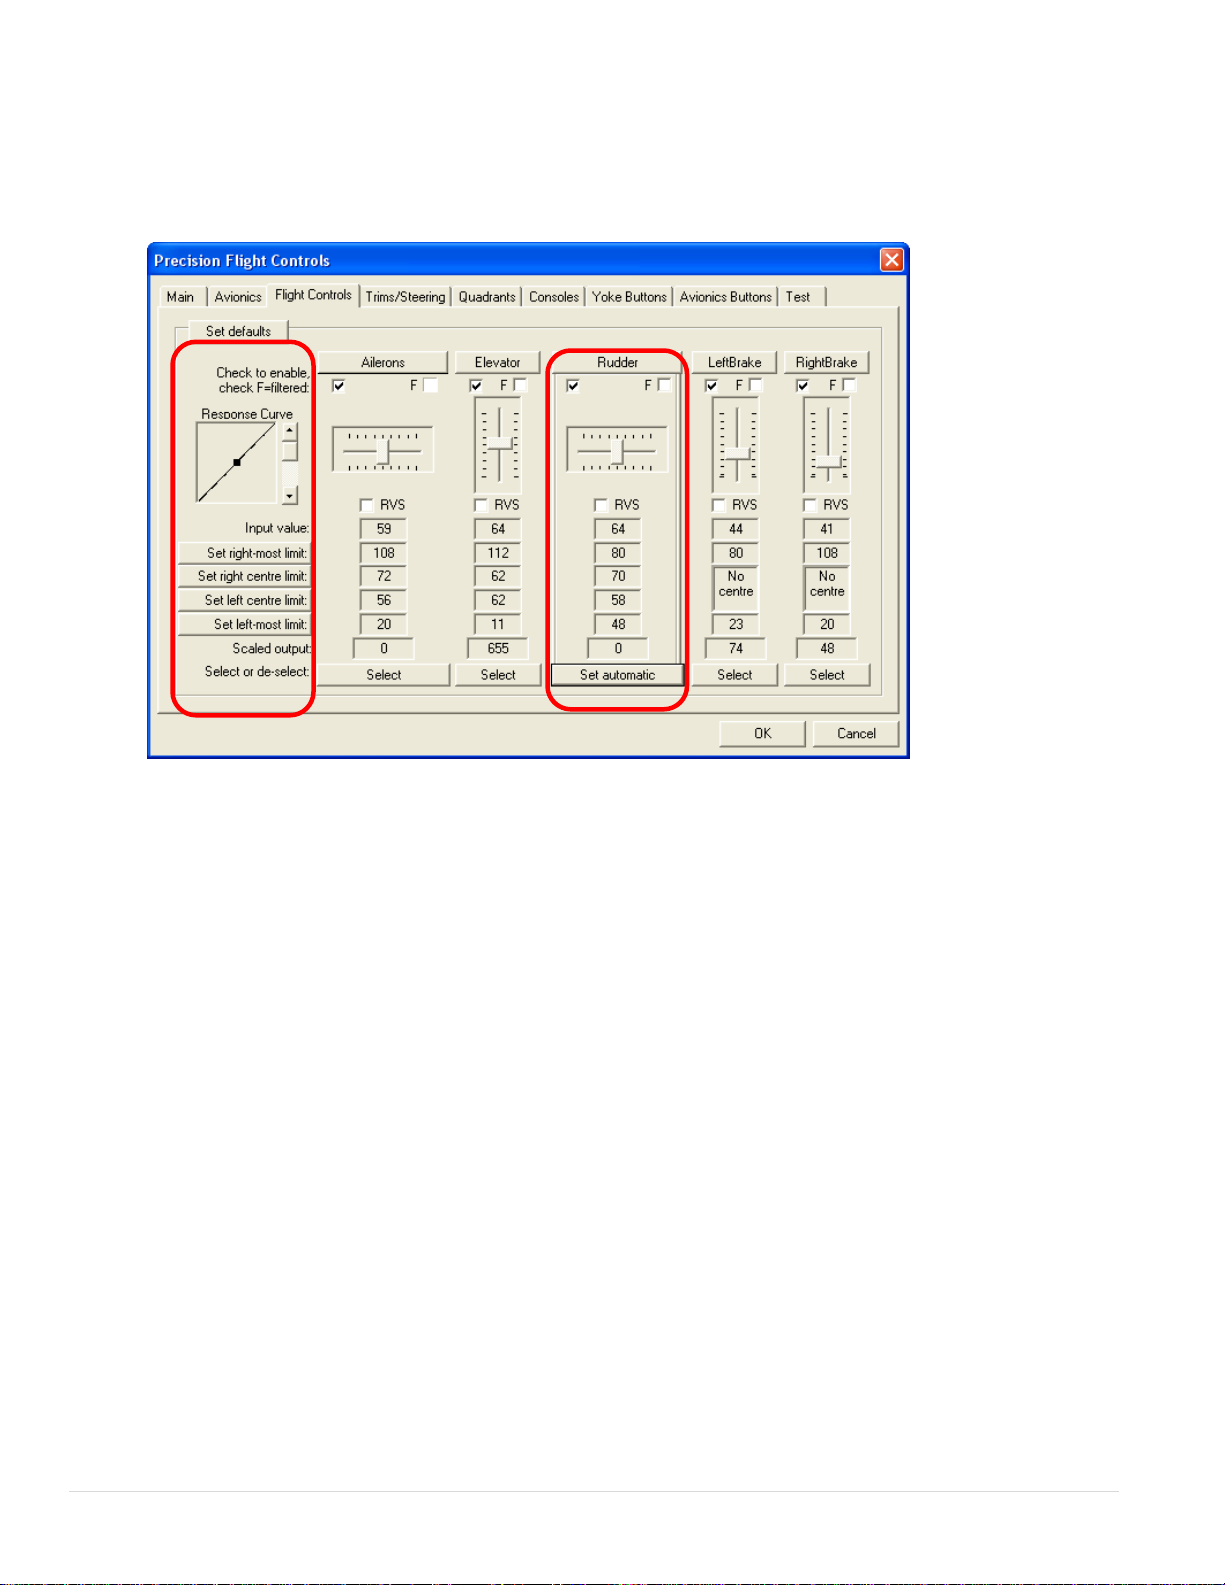
18. In the Precision Flight Controls window, choose Flight Controls.
E. Enable and Calibrate Flight Controls
Enable Flight Controls
1. Now choose the Flight Controls.
2. Now enable the Elevator and Aileron, by clicking on the enable box which is opposite of the F for
filter box.
CAT 2 System and FS2004 Set Up Guide 8 | P a g e
Page 9
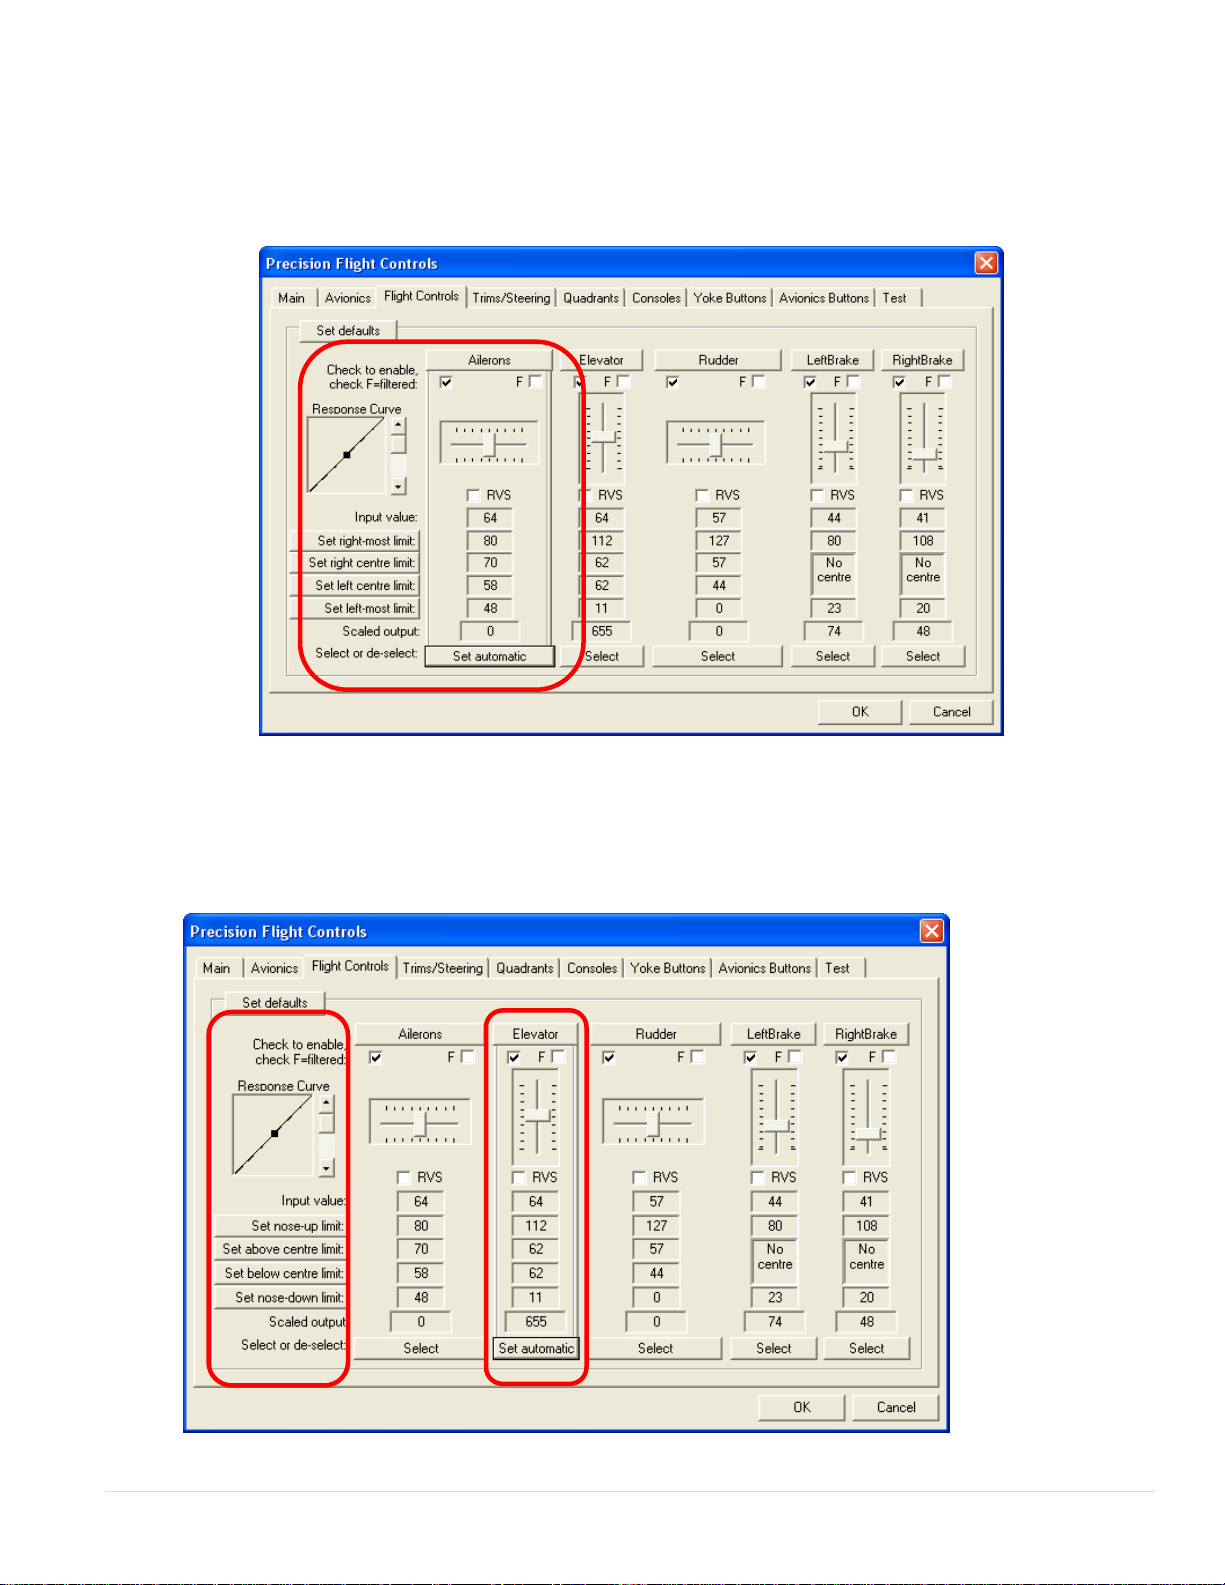
Aileron Calibration
3. Now click on Select button under the Aileron Axis. This should say Set Automatic now.
4. Turn your yoke all the way to the Left and hold it. Click on the Set left most limit.
5. Turn your yoke all the way to the Right and hold it. Click on the Set right most limit.
Elevator Calibration
6. Now click on Select button under the Elevator Axis. This should say Set Automatic now.
7. Pull your yoke all the way to the out and hold it. Click on the Set nose up limit.
8. Push your yoke all the way forward and hold it. Click on the Set nose down limit.
CAT 2 System and FS2004 Set Up Guide 9 | P a g e
Page 10
Rudder Calibration
9. Make sure that your Rudder Trim is in the center position.
10. Now click on Select button under the Rudder Axis. This should say Set Automatic now.
11. Push your left pedals all the way to the Left and hold it. Click on the Set left most limit.
12. Push your right pedals all the way to the Right and hold it. Click on the Set right most limit.
CAT 2 System and FS2004 Set Up Guide 10 | P a g e
Page 11
F. Enable and Calibrate Trims
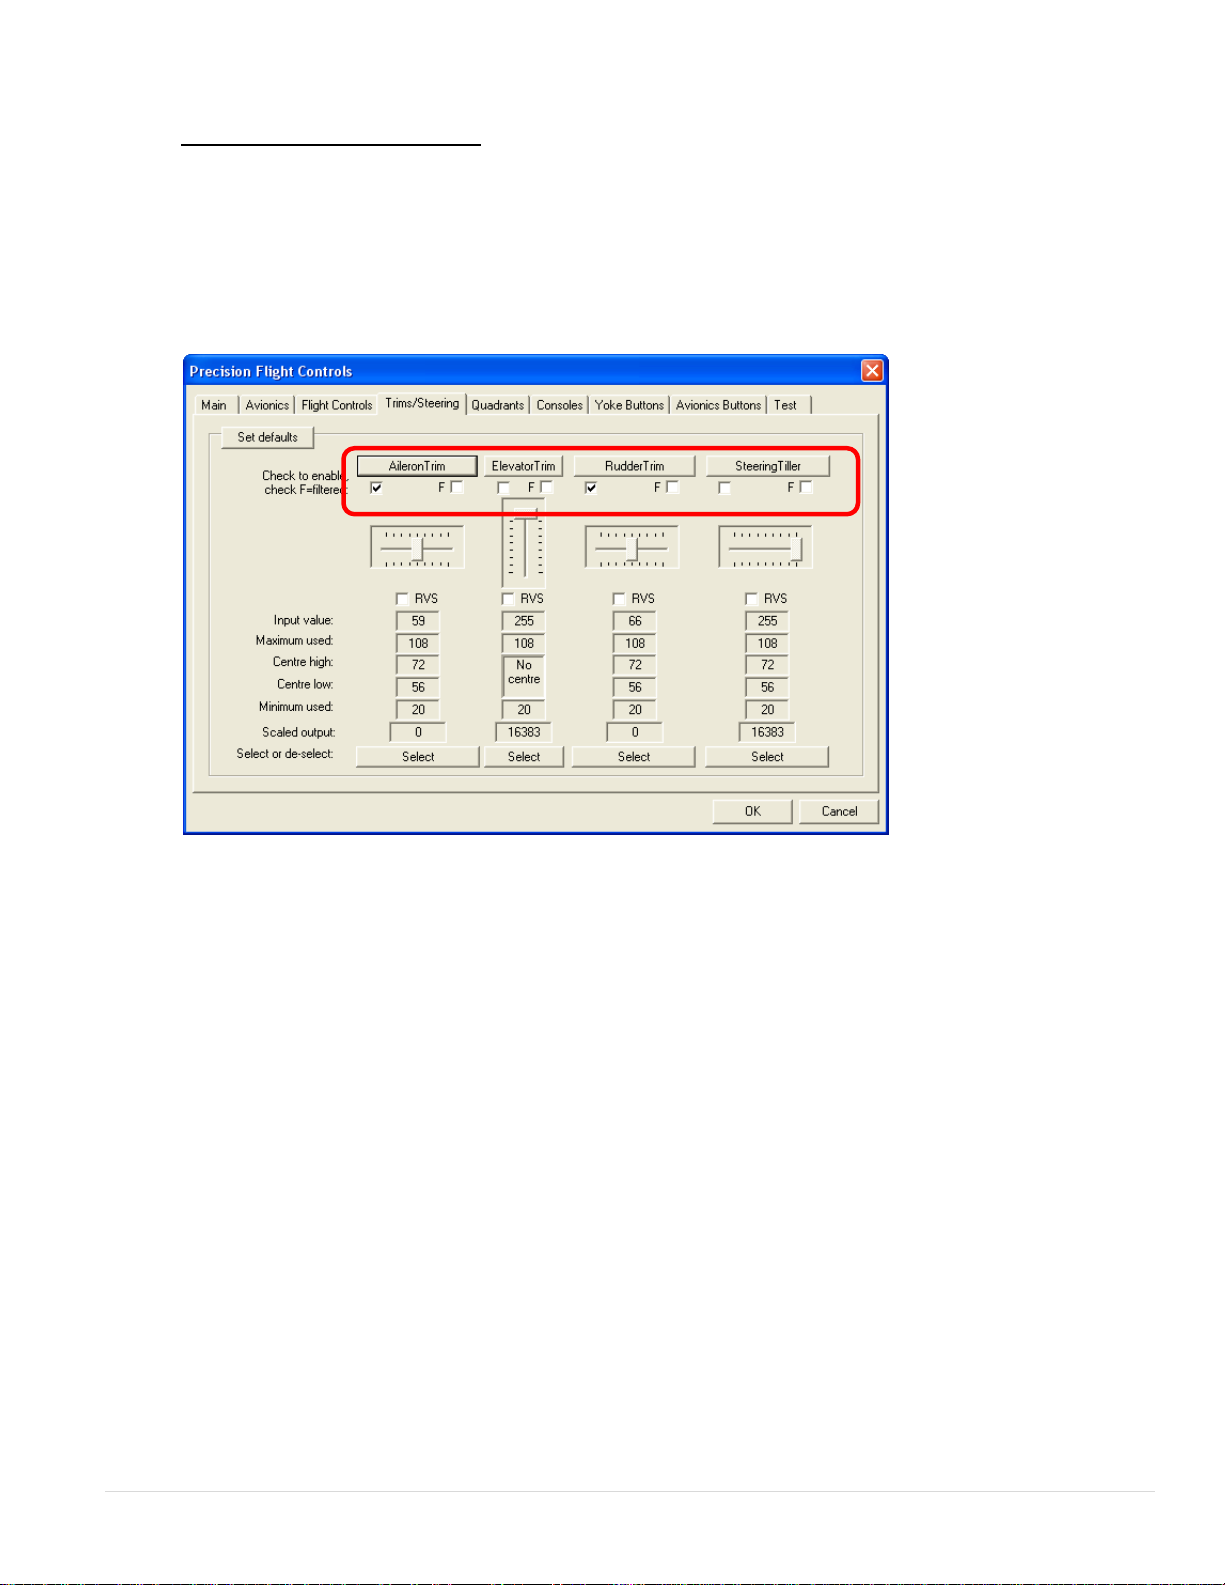
NOTE: If you do not have Aileron Trim but have Rudder Trim on your console, proceed to Enabling
Quadrants on page 13.
Enable Trims
1. Click on the Trims & Steering tab.
2. Enable the Aileron Trim and Rudder Trim and move them left to right and see if they are
responding.
CAT 2 System and FS2004 Set Up Guide 11 | P a g e
Page 12
Aileron Trim Calibration
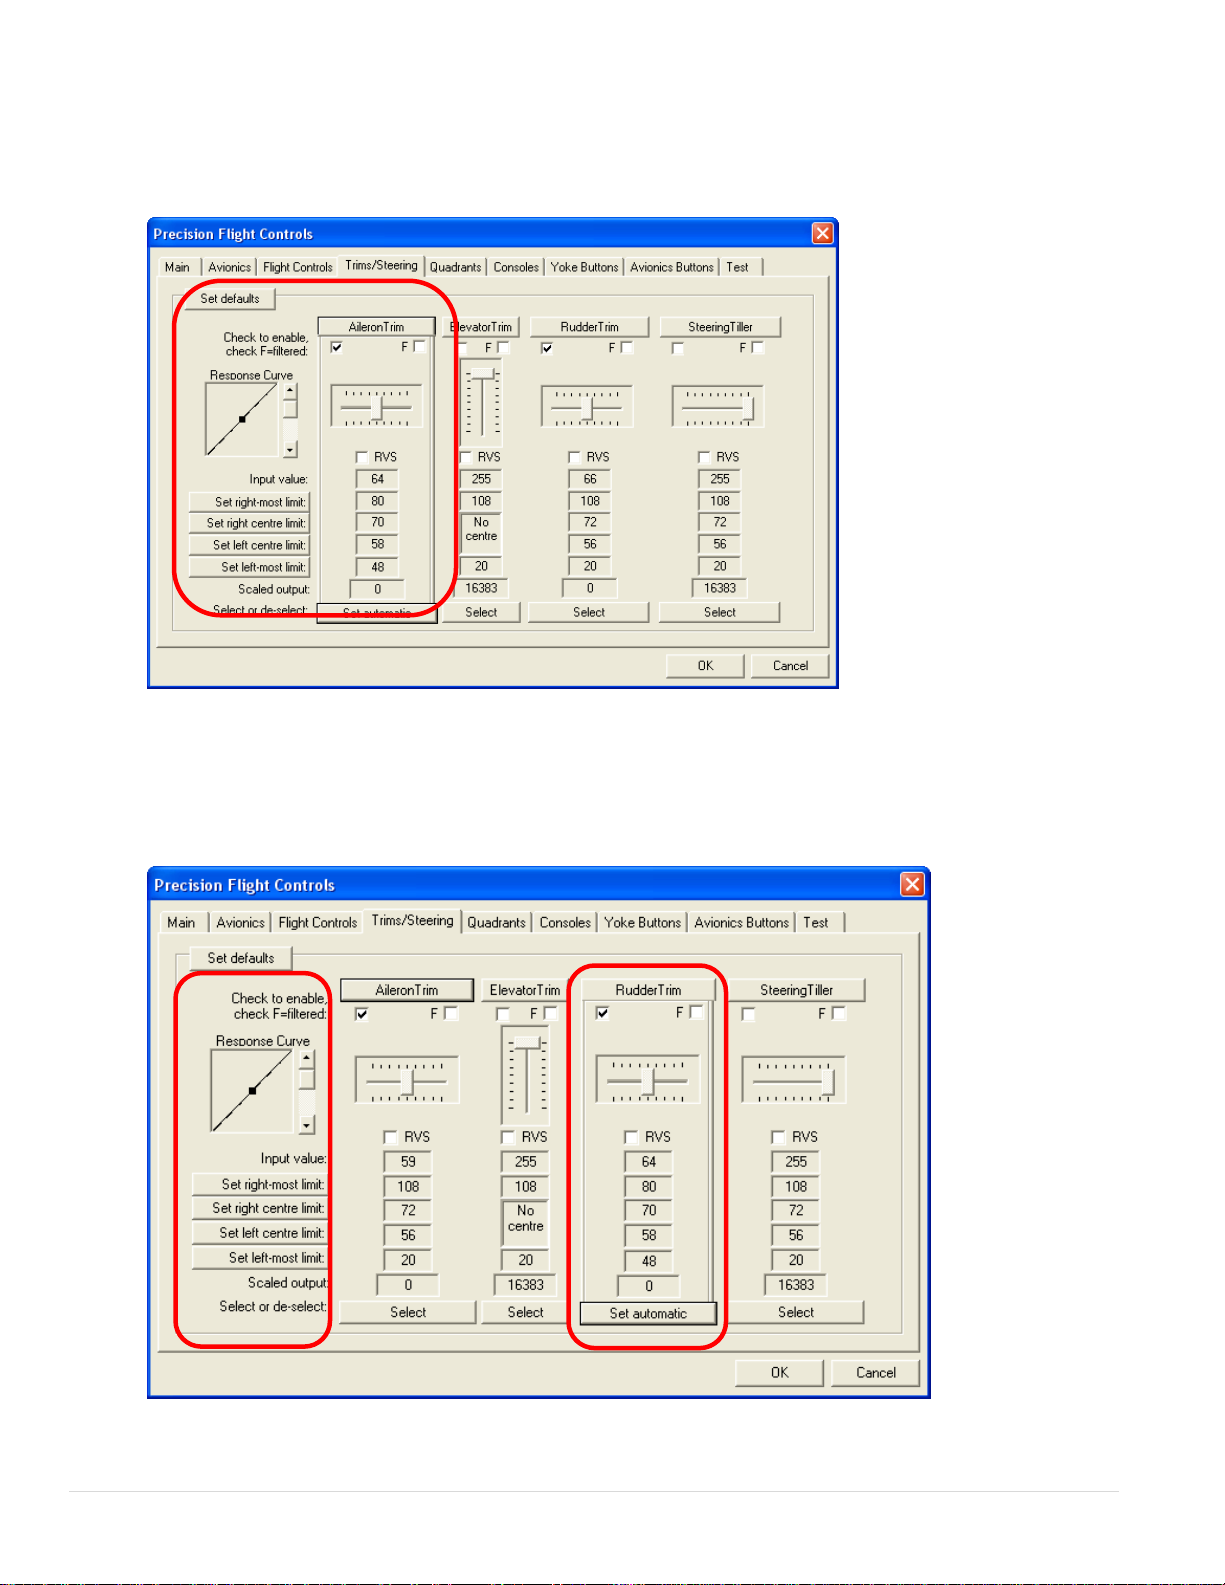
3. Now click on Select button under the Aileron Trim Axis. This should say Set Automatic now.
4. Turn your Aileron Trim knob the way to the Left. Click on the Set left most limit.
5. Turn your Aileron Trim knob all the way to the Right. Click on the Set right most limit.
Rudder Trim Calibration
6. Now click on Select button under the Rudder Trim Axis. This should say Set Automatic now.
7. Turn your Aileron Trim knob the way to the Left. Click on the Set left most limit.
8. Turn your Aileron Trim knob all the way to the Right. Click on the Set right most limit.
CAT 2 System and FS2004 Set Up Guide 12 | P a g e
Page 13
Enable Quadrants
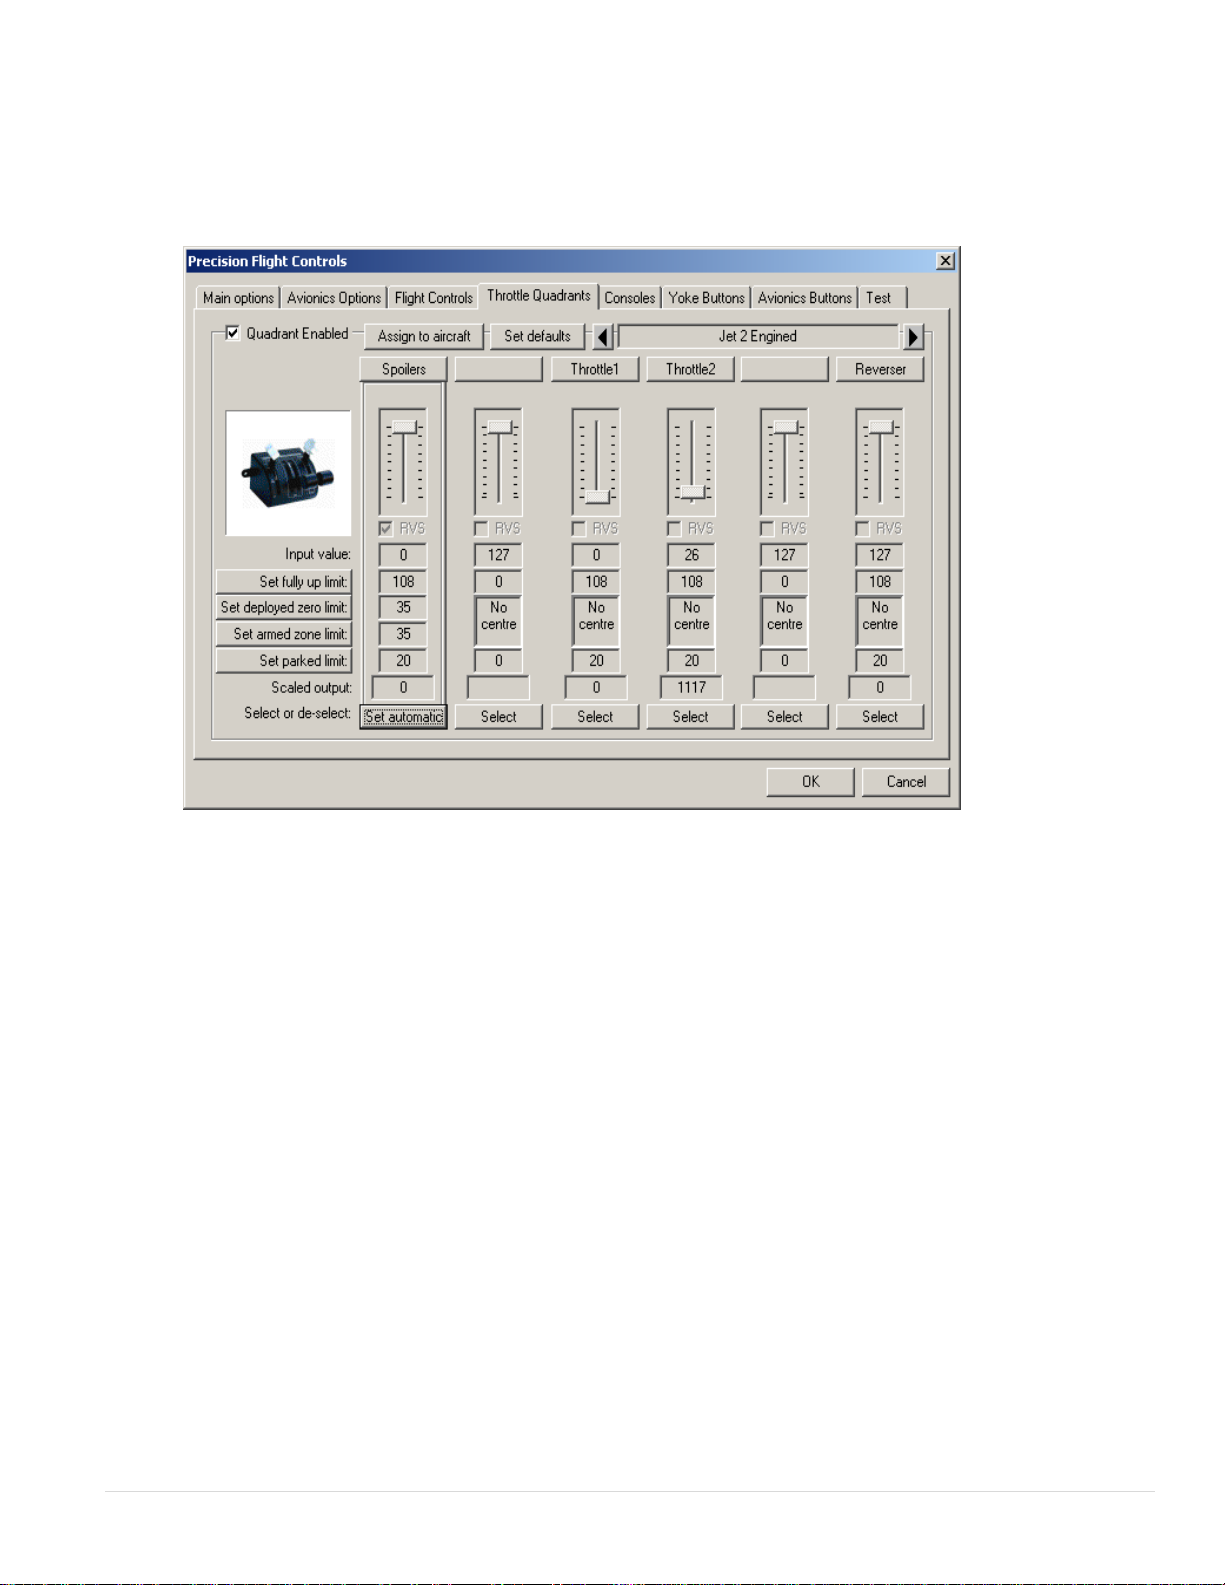
1. Now the next tab is the Quadrants.
2. You can enable the levers that you have by clicking on the Quadrant Enabled check box
3. Scroll through the list by clicking on the arrow on the right next to the “Single Prop Non
Carbureted.”Please also disable the one that you do not have.
CAT 2 System and FS2004 Set Up Guide 13 | P a g e
Page 14
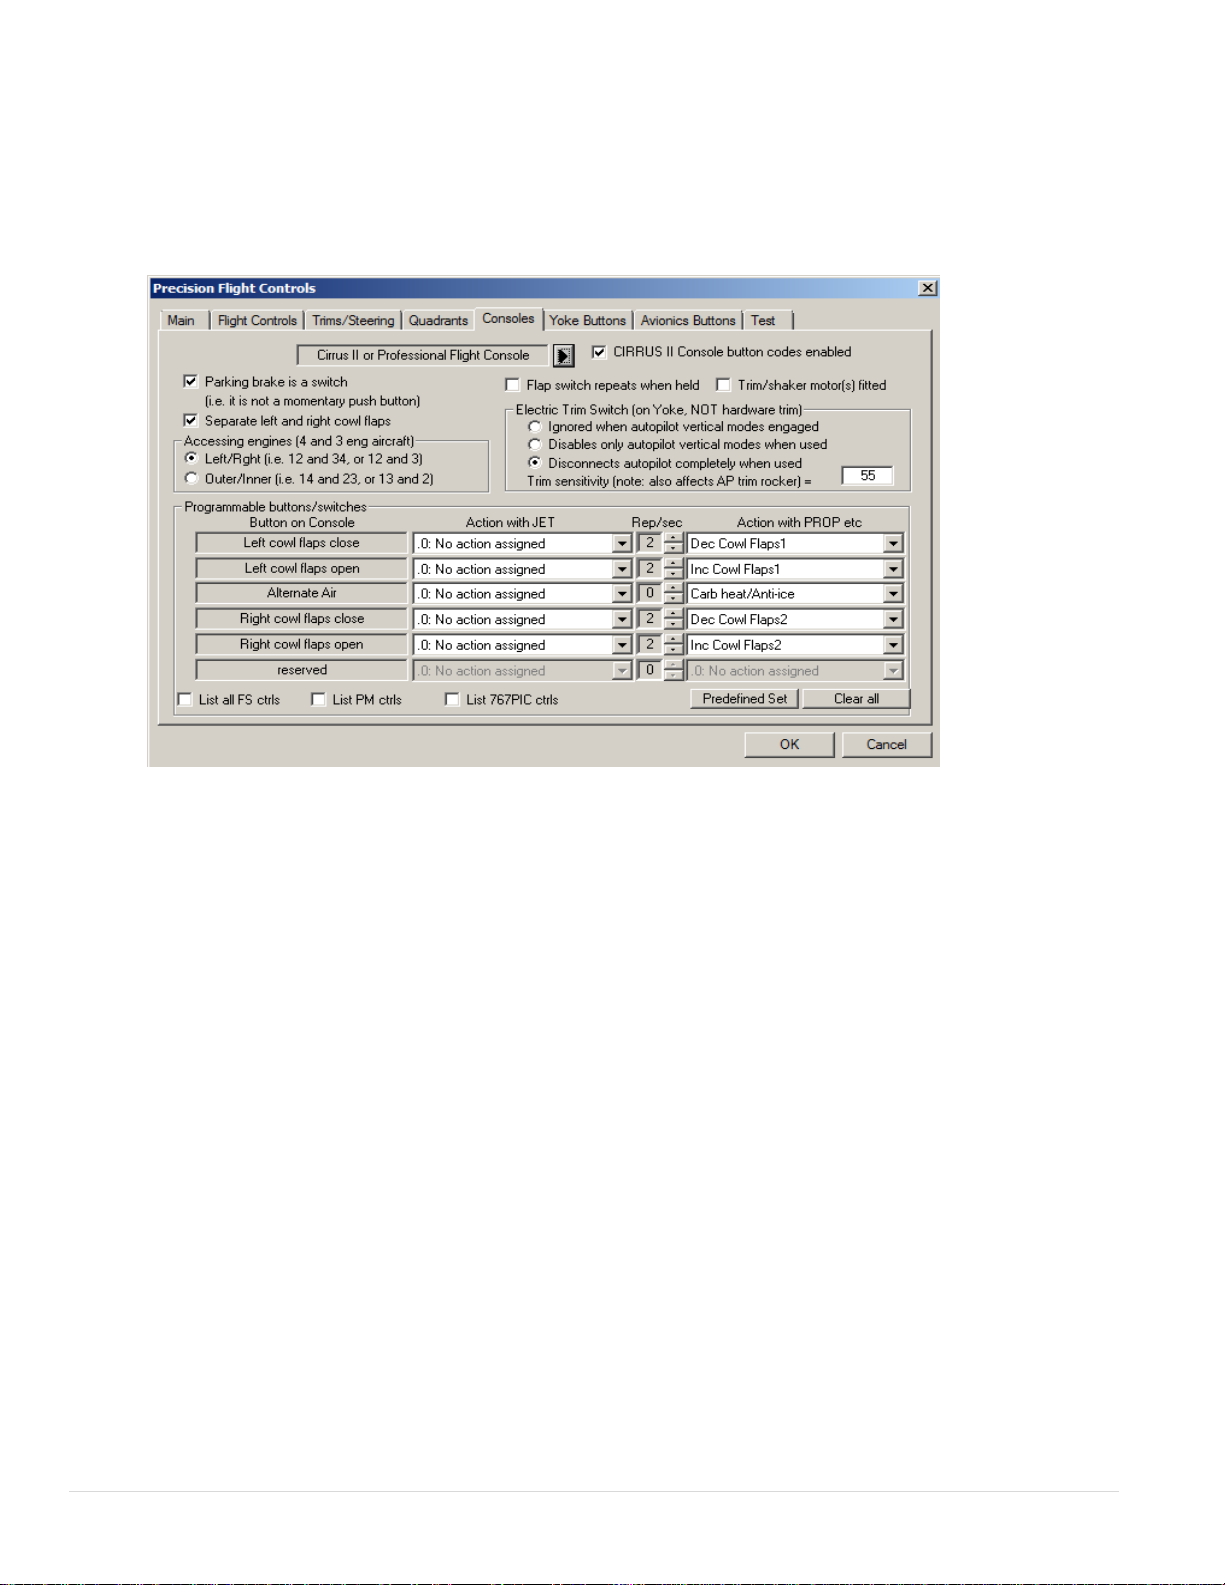
Additional Options
1. On the Consoles page, please check the box for Parking Brake is a switch.
2. Also on the same Consoles page, please increase the Trim Sensitivity from 16 to 55. This box is
located on the right hand side.
3. Check the box for the Separate left and right cowl flaps.
4. Click on the predefined set. This should have changed the Action with PROP etc
5. At this point, please click on OK.
6. Press the ALT key again and go to Flight and then Exit
7. Start Microsoft Flight Simulator again.
8. Start Flying!
CAT 2 System and FS2004 Set Up Guide 14 | P a g e
 Loading...