

Page 1
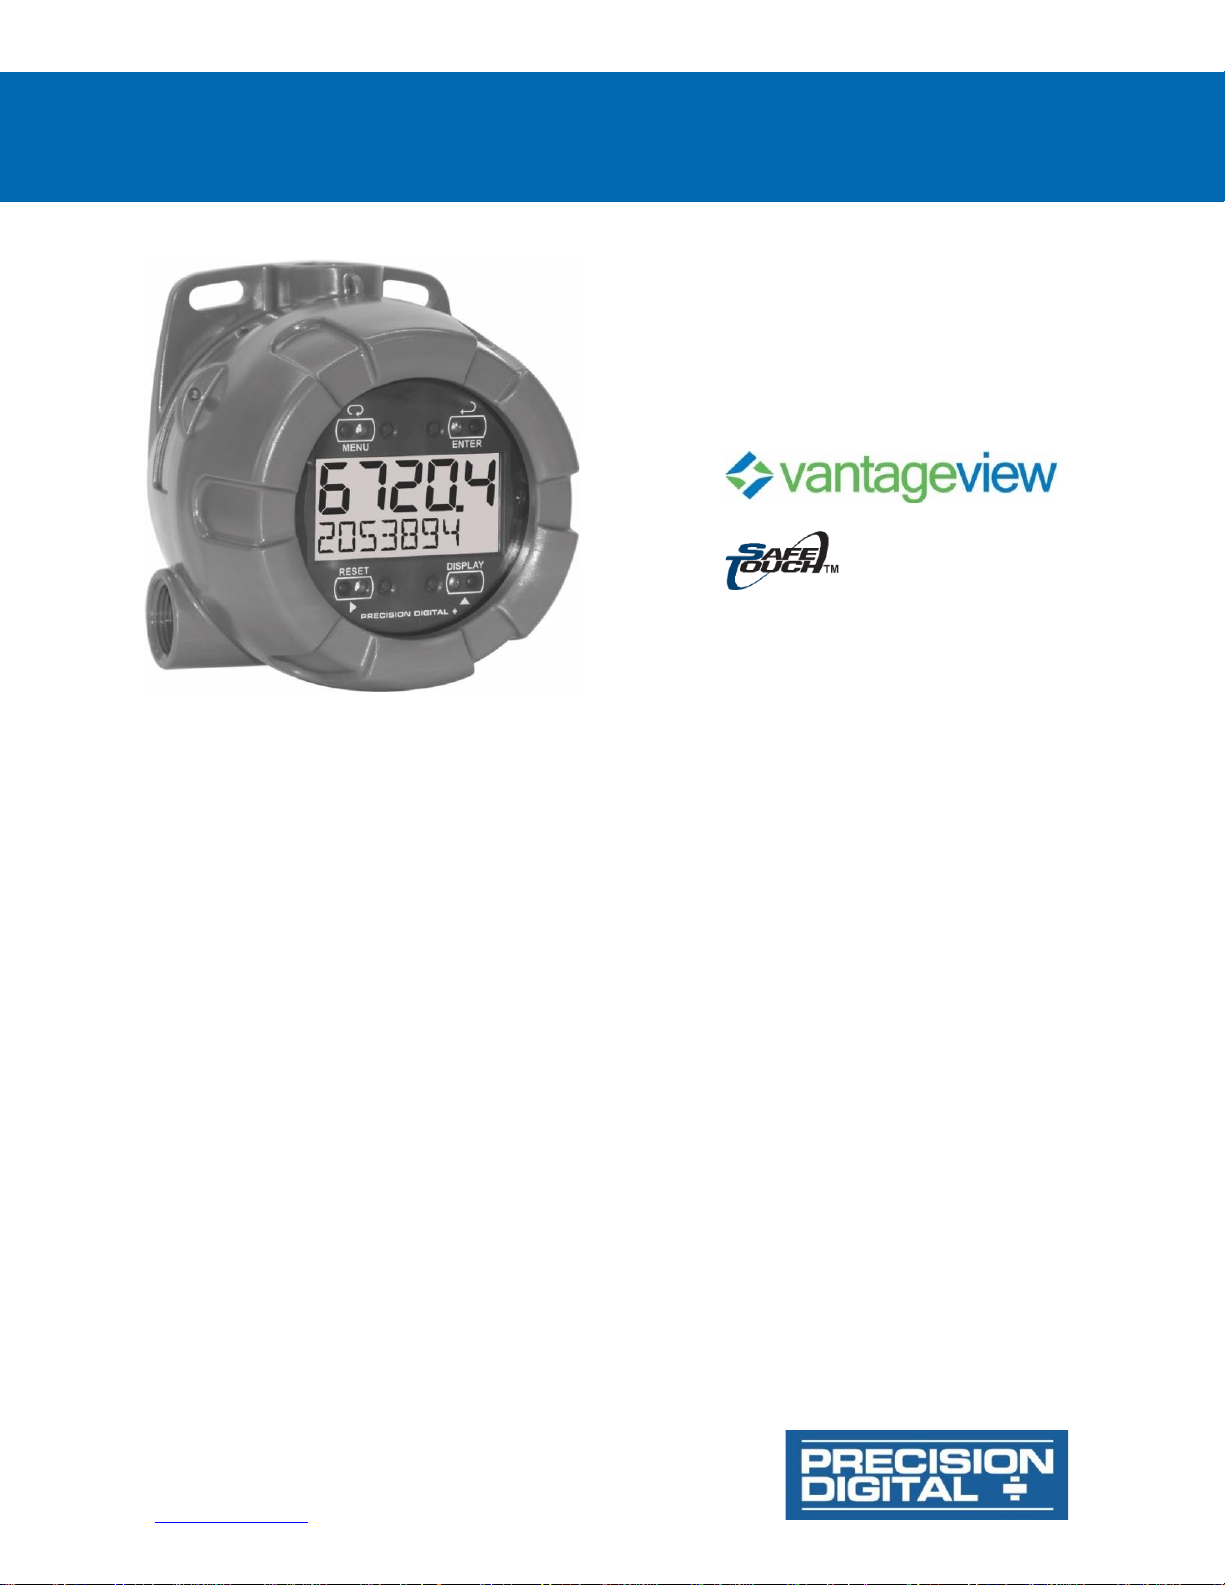
PD6720 Field-Mount Loop-Powered Rate/Totalizer
Instruction Manual
PRECISION DIGITAL CORPORATION
233 South Street • Hopkinton MA 01748 USA
Tel (800) 343-1001 • Fax (508) 655-8990
www.predig.com
• NEMA 4X, IP66 Loop-Powered Field-Mount Rate/Totalizer
• 4-20 mA Input with ±0.03% Accuracy
• 3.0 Volt Drop (6.0 Volt Drop with Backlight)
• Easy Field Scaling in Engineering Units without Applying an Input
• 0.7" (17.8 mm) 5 Digits Upper Display for Rate
• 0.4" (10.2 mm) 7 Alphanumeric Characters Lower Display for Total, Tag, or Units
• Simultaneous 5-Digit Rate and 7-Digit Total Display
• Rate in Units per Second, Minute, Hour, or Day
• Display Open Channel Flow with Programmable Exponent Feature
• Open Collector Pulse or Alarm Output
• Display Mountable at 0°, 90°, 180°, & 270°
• SafeTouchTM Through-Window Button Programming
• HART® Protocol Transparent
• Loop or External DC-Powered Backlight Standard
• Operating Temperature Range: -40 to 75°C (-40 to 167°F)
• Conformal Coated PCBs for Dust and Humidity Protection
• Password Protection for Programming Only
• 32-Point Linearization, Square Root Extraction and Programable Exponent Function
• Wide Viewing Angle
• Flanges for Wall or Pipe Mounting
• Plastic NEMA 4X, IP66 Enclosure
• Three 3/4" NPT Threaded Conduit Openings (Two Plugs Installed)
• Stainless Steel Tag Available
• 2" U-Bolt Kits Available
• 3-Year Warranty
Page 2
PD6720 Field-Mount Loop-Powered Rate/Totalizer
Instruction Manual
2
Disclaimer
The information contained in this document is
subject to change without notice. Precision
Digital Corporation makes no representations
or warranties with respect to the contents hereof;
and specifically disclaims any implied warranties
of merchantability or fitness for a particular
purpose.
• Read complete instructions prior to installation
and operation of the meter.
• Risk of electric shock or personal injury.
• This product is not recommended for life support
applications or applications where malfunctioning
could result in personal injury or property loss.
Anyone using this product for such applications
does so at his/her own risk. Precision Digital
Corporation shall not be held liable for damages
resulting from such improper use.
• Failure to follow installation guidelines could
result in death or serious injury. Make sure only
qualified personnel perform the installation.
WARNING
Cancer and Reproductive Harm - www.P65Warnings.ca.gov
Limited Warranty
Precision Digital Corporation warrants this
product against defects in material or
workmanship for the specified period under
“Specifications” from the date of shipment from
the factory. Precision Digital’s liability under this
limited warranty shall not exceed the purchase
value, repair, or replacement of the defective unit.
See Warranty Information and Terms &
Conditions on www.predig.com for complete
details.
© 2020 Precision Digital Corporation.
All rights reserved.
Introduction
The PD6720 is a rugged, field-mount, loop-powered
rate/totalizer fully featured for demanding applications
in harsh environmental conditions. The meter derives
all of its power from the 4-20 mA loop. It is
programmed using the four SafeTouch
through-window buttons, without removing the cover,
and can be scaled with or without a calibration signal.
The numeric rate display will read up to 99999 and
the alphanumeric total/tag display will read up to
9999999. The alphanumeric display can also be
programmed to show any combination of numbers
and letters up to seven characters long for use as
engineering units and/or the process identification tag.
The backlight lets you see the display under any
lighting condition and can be powered from either the
4-20 mA loop or from a separate DC power supply.
The enclosure is provided with three threaded conduit
holes and integrated pipe or wall mounting slotted
flanges.
Ordering Information
Model
Description
PD6720-0K1
Field-Mount Loop-Powered
Rate/Totalizer with Backlight
Accessories
Model
Description
PDAPLUG75P
3/4" NPT Plastic Conduit Plug
PDA1024-01
24 VDC Power Supply for DIN Rail
PDA6846
Steel 2" U-Bolt Kit. All Material: Zinc
Plated Steel; (1) U-Bolt for 2" Pipe with
(2 each) Washers, Lock Washers, and
Nuts.
PDA6846-SS
Stainless Steel 2" U-Bolt Kit. All
Material: Stainless Steel; (1) U-Bolt for
2" Pipe with (2 each) Washers, Lock
Washers, and Nuts.
PDA-SSTAG
Custom Stainless Steel Tag (see
website for convenient ordering form)
Page 3

PD6720 Field-Mount Loop-Powered Rate/Totalizer
Instruction Manual
3
Table of Contents
Introduction .......................................................................................................... 2
Ordering Information ........................................................................................... 2
Specifications....................................................................................................... 5
General ............................................................................................................. 5
Input .................................................................................................................. 5
Rate/Totalizer ................................................................................................... 6
Open Collector Output .................................................................................... 6
Safety Information ............................................................................................... 7
Installation ............................................................................................................ 7
Unpacking ........................................................................................................ 7
Pre-Installed Conduit Plug .............................................................................. 7
Mounting .......................................................................................................... 7
Dimensions ...................................................................................................... 7
Connections ..................................................................................................... 8
Wiring Diagrams .............................................................................................. 9
External Reset Connection............................................................................ 9
Open Collector Output Connections.............................................................. 9
Setup and Programming ................................................................................... 10
Overview ......................................................................................................... 10
SafeTouch Buttons ........................................................................................ 10
SafeTouch Button Tips and Troubleshooting .............................................. 10
Buttons and Display ...................................................................................... 11
Main Menu Display Functions & Messages ................................................ 12
Main Menu ...................................................................................................... 12
Setting Up the Meter (SETUP) ........................................................................ 13
Setting Numeric Values ............................................................................... 13
Setting the Decimal Point (dec.PT) .............................................................. 13
Programming the Meter (Prog) ................................................................... 14
Setting the Time Base (t.base) ................................................................... 15
Setting the Total Conversion Factor (totCF) .............................................. 15
Manual or Automatic Total Reset Function (t rST) .................................... 16
Setting the Tag Display (tag) ...................................................................... 16
Setting Up the Password (PASSWRD) ........................................................... 17
Locking the Meter ........................................................................................ 17
Making Changes to a Password Protected Meter ....................................... 17
Disabling Password Protection.................................................................... 17
Service Feature (SERVICE)............................................................................. 17
Advanced Features Menu ............................................................................. 18
Advanced Features Menu & Display Messages......................................... 18
Alarm & Pulse Output (OUTPUT) .................................................................. 19
Advanced Function Selection (FUNCTN) ...................................................... 20
Multi-Point Linearization (lnear) ................................................................. 20
Multi-Point Scaling (SCALE) ......................................................................... 20
Multi-Point Calibration (CAL) ........................................................................ 20
Square Root Linearization (Squar) ............................................................. 20
Low-Flow Cutoff (CUTOFF) ........................................................................... 20
Programmable Exponent Linearization (Prog.E)......................................... 21
Internal Calibration (ICAL) ........................................................................... 21
Operation ............................................................................................................ 22
Front Panel Buttons Operation .................................................................... 22
Maximum & Minimum Readings (MAXIMUM & MINIMUM) .............................. 22
Reset Meter to Factory Defaults ................................................................... 22
Factory Defaults & User Settings
................................................................. 22
Troubleshooting................................................................................................. 23
Troubleshooting Tips .................................................................................... 23
Quick User Interface Reference........................................................................ 24
Page 4

PD6720 Field-Mount Loop-Powered Rate/Totalizer
Instruction Manual
4
Table of Figures
Figure 1. Enclosure Dimensions – Front View .................................................... 7
Figure 2. Enclosure Dimensions – Side Cross Section View ............................ 7
Figure 3. Connector Board.................................................................................... 8
Figure 4. Connections without Backlight ............................................................ 9
Figure 5. Connections with Loop-Powered Backlight ........................................ 9
Figure 6. Connections with Externally-Powered Backlight.................................. 9
Figure 7. Reset Connections ................................................................................ 9
Figure 8. Connection to Device with Internal Pull-Up ........................................ 9
Figure 9. Output Connections .............................................................................. 9
Page 5

PD6720 Field-Mount Loop-Powered Rate/Totalizer
Instruction Manual
5
Specifications
Except where noted all specifications apply to operation at +25°C.
General
Display
Five digits
(-9999 to
99999)
0.70" (17.8 mm) high,
7-segment, automatic lead zero
blanking.
Seven
characters
0.4" (10.2 mm) high, 14-segment.
Symbols
High & Low Alarm, Password Lock
Display
Orientation
Display may be mounted at 90° increments
up to 270° from default orientation.
Display
Assignment
Upper display is assigned to rate and lower
display may be assigned to total, tag name/
engineering units, or to alternate between them.
Display
Update Rate
Ambient > -25°C: 2 Updates/Second
Ambient < -25°C: 1 Update/5 Seconds
Backlight
White; Loop-powered or externally powered.
Backlight can be enabled or disabled via
alternative wiring of terminal block. Looppowered backlight brightness will increase as
the input signal current increases. Externally
powered backlight has consistent brightness.
Externally
Powered
Backlight
Voltage
Range:
Maximum Power
9-36
VDC 9 VDC
12
VDC
24
VDC
36
VDC
0.2 W 0.25 W
0.5 W 0.75 W
Display
Overrange
Display flashes 99999
Display
Underrange
Display flashes -9999
Programming
Method
Four SafeTouch through-window buttons
when cover is installed. Four internal
pushbuttons when cover is removed.
Noise Filter
Programmable LO, med, HI, or OFF
Recalibration
Recalibration is recommended at least every
12 months.
Max/Min
Display
Max/Min readings reached by the process
are stored until reset by the user or until
power to the meter is turned off.
Advanced
Function
Linear, square root, or programmable
exponent
Password
Programmable password restricts
modification of programmed settings.
Non-Volatile
Memory
All programmed settings are stored in
non-volatile memory for a minimum of
ten years if power is lost.
Normal Mode
Rejection
64 dB at 50/60 Hz
Environmental
Operating temperature range: -40 to 75°C
Storage temperature range: -40 to 75°C
Relative humidity: 0 to 90% non-condensing
Connections
Screw terminals accept 12 to 22 AWG wire
Enclosure
NEMA 4X, IP65 plastic field enclosure
Color: grey
Three ¾" NPT threaded conduit openings.
Two ¾" NPT plastic conduit/stopping plug with
1.29" wrenching flats and screwdriver slot.
Mounting
May be mounted directly to conduit. Two slotted
flanges for wall mounting or NPS 1½" to 2½" or
DN 40 to 65 mm pipe mounting.
See Dimensions on page 7.
Overall
Dimensions
5.67" x 5.25" x 4.18" (W x H x D)
(144 mm x 133 mm x 106 mm)
Weight
1.65 lbs (26.4 oz, 0.75 kg)
Warranty
3 years parts and labor. See Warranty
Information and Terms & Conditions on
www.predig.com for complete details.
Input
Input
4-20 mA
Accuracy
±0.03% of calibrated span ±1 count,
square root & programmable exponent
accuracy range:
10-100% of calibrated span.
Temperature Drift
50 PPM/C from -40 to 75C ambient
Maximum Voltage
Drop &
Equivalent
Resistance
Without Backlight
or with Externally
Powered Backlight
With LoopPowered
Backlight
3.0 VDC @ 20 mA
6.0 VDC @ 20mA
150 Ω @ 20 mA
300 Ω @ 20 mA
Multi-Point
Linearization
2 to 32 points
Signal Input
Conditioning
Linear, square root, programmable
exponent
Programmable
Exponent
User selectable from 1.0001 to 2.9999
for open channel flow.
Low Flow Cutoff
0-99999 (0 disables cutoff function)
Point below at which display always
shows zero.
Decimal Point
User selectable decimal point
Minimum Span
Input 1 & Input 2: 0.10 mA
Calibration
Range
An Error message will appear if input 1
and input 2 signals are too close
together.
Input
Range
Minimum Span
Input 1 & Input 2
4-20 mA
0.10 mA
Input Overload
Over current protection to 2 A max.
HART
Transparency
The meter does not interfere with
existing HART communications; it
displays the 4-20 mA primary variable
and it allows the HART
communications to pass through
without interruption.
The meter is not affected if a HART
communicator is connected to the loop.
The meter does not display secondary
HART variables.
Page 6

PD6720 Field-Mount Loop-Powered Rate/Totalizer
Instruction Manual
6
Rate/Totalizer
Rate Display
0 to 99,999 leading zero blanking
Total Display
0 to 9,999,999 leading zero blanking
Total Decimal
Point
Up to six decimal places or none:
d.dddddd, d.ddddd, d.dddd, d.ddd,
d.dd, d.d, or ddddddd
Lower Display
Configuration
Can be programmed to display total,
tag name/engineering units, or to
alternate between them.
Totalizer
Calculates total based on rate, time
base of second, minute, hour, or day,
and field programmable multiplier;
stored in non-volatile memory upon
power loss.
Totalizer Reset
Via front panel SafeTouch button,
time delay, external contact closure,
or protected
Total Conversion
Factor
0.000001 to 9,999,999
Totalizer Rollover
Display rolls over when display
exceeds 9,999,999. Relay status
reflects the displayed value.
Total Reset Delay
Programmable from 0 to 99,999
seconds
Open Collector Output
Rating
Isolated open collector, sinking NPN
30 VDC @ 150 mA max.
Alarm Output
Assign to rate for high or low alarm trip
point.
Assign to total for total alarm trip point.
Deadband
0-100% FS, user selectable
Acknowledge
Front panel ACK button resets output
and screen indication.
Pulse Output
Scaler (Count)
The pulse output scaler (count) is
programmable from 0.0001 to 99999.
One pulse is generated for every total
increment selected (e.g. A pulse scaler
value of 100 will generate one pulse
every time the total is incremented by
100 units).
If the pulse output exceeds the
programmed output frequency, pulses
are accumulated as pending and are
not lost. Pulses will continue to output
until the buffer is emptied or the total is
reset from the front panel.
Pulse Output
Frequency
Programmable frequency:
2, 4, 8, 16, 32, 64, 128 Hz.
Minimum pulse width: 3.9 ms @ 128 Hz
Maximum pulse width: 250 ms @ 2 Hz
Factory default pulse width:
31 ms @ 16 Hz
EFT
±2 kV DC mains, ±1 kV other
Telco Surge
±1 kV
CRFI
3 V, 0.15-80 MHz, 1 kHz 80% AM
Page 7
PD6720 Field-Mount Loop-Powered Rate/Totalizer
Instruction Manual
7
Safety Information
• Read complete instructions prior to installation
and operation of the meter.
• Installation and service should be performed only
by trained service personnel. Service requiring
replacement of internal components must be
performed at the factory.
• If the meter is installed in a high voltage
environment and a fault or installation error
occurs, high voltage may be present on any lead.
Installation
Wiring connectors are accessed by opening the
enclosure. To access electrical connectors, remove
the 2 captive screws, then disconnect the ribbon
cable from the display module and set the display
module aside.
Unpacking
Remove the meter from box. Inspect the packaging
and contents for damage. Report damages, if any, to
the carrier.
If any part is missing or the meter malfunctions,
please contact your supplier or the factory for
assistance.
Pre-Installed Conduit Plug
The PD6720 is supplied with two pre-installed conduit
plugs for installations that do not require the use of all
three conduit entries.
Mounting
The PD6720 has two slotted mounting flanges that
may be used for pipe mounting or wall mounting.
Alternatively, the unit may be supported by the
conduit using the conduit holes provided.
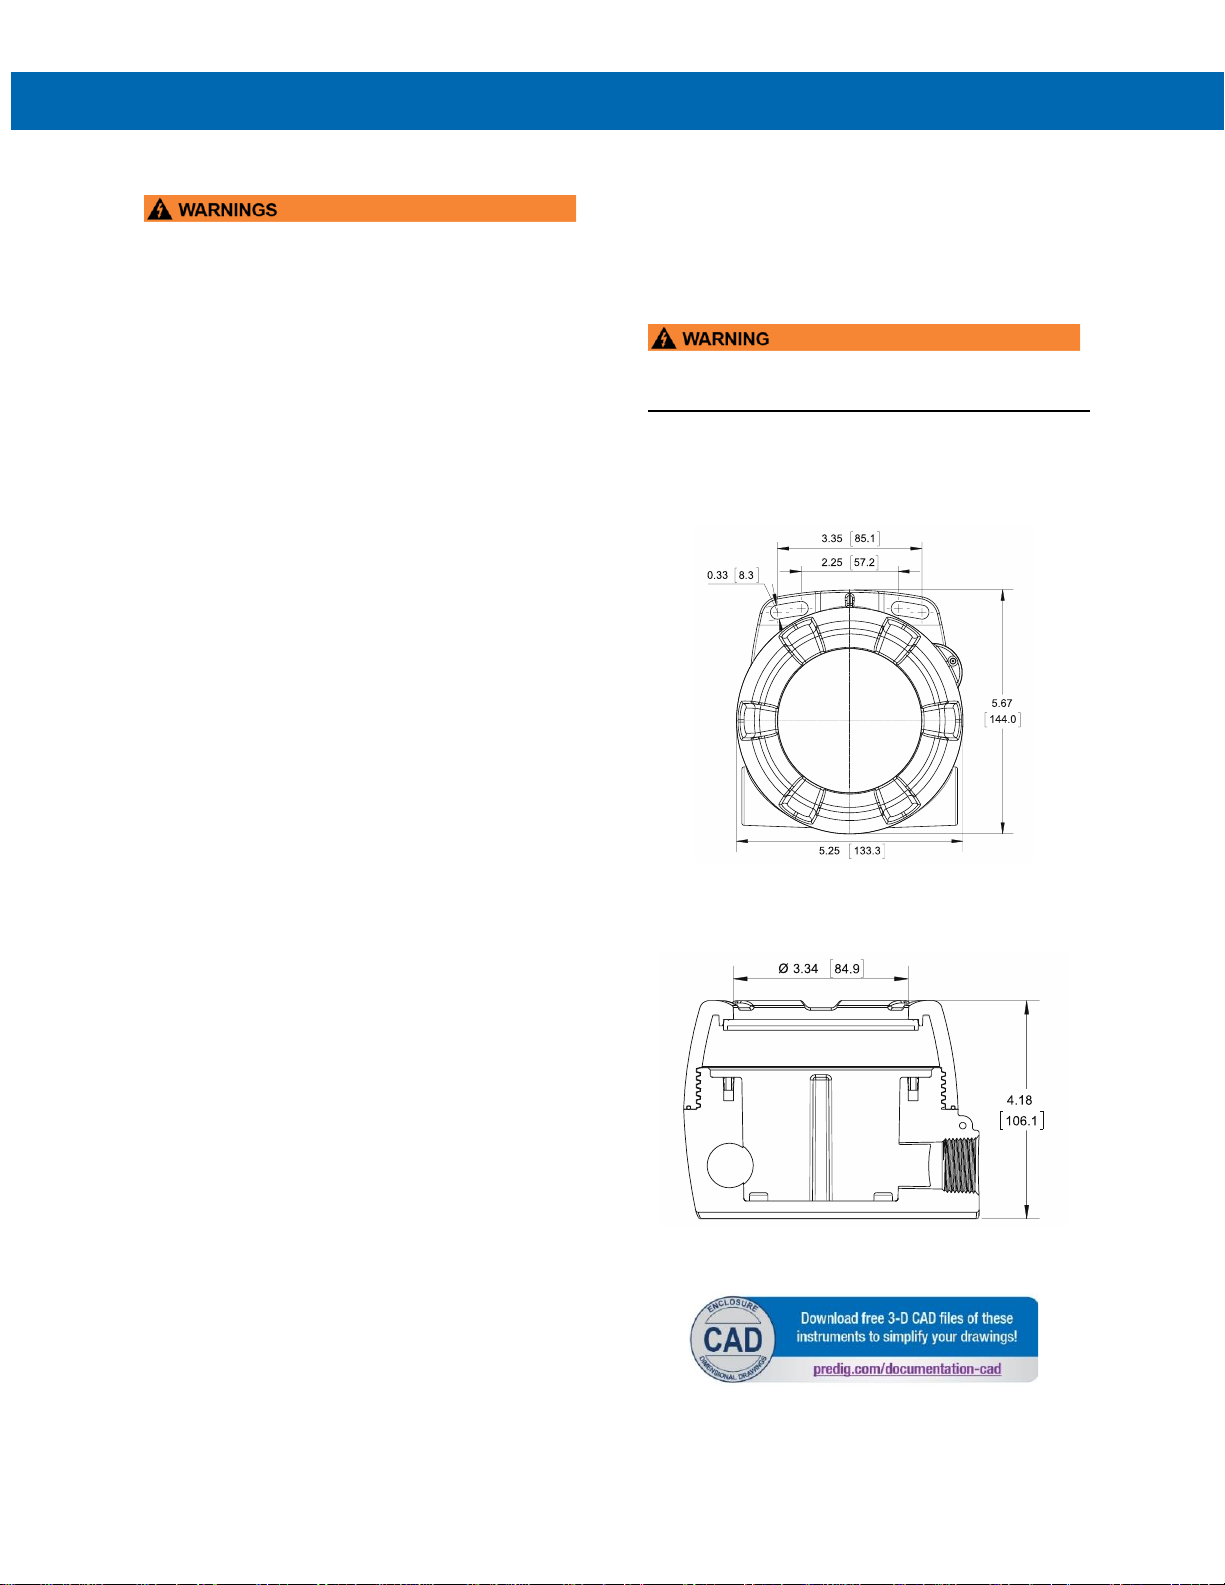
Refer to Figure 1 and Figure 2.
• Do not attempt to loosen or remove flange bolts
while the meter is in service.
Dimensions
All units: inches [mm]
Figure 1. Enclosure Dimensions – Front View
Figure 2. Enclosure Dimensions –
Side Cross Section View
Page 8
PD6720 Field-Mount Loop-Powered Rate/Totalizer
Instruction Manual
8
Connections
To access the connectors, remove the enclosure
cover and unscrew the two captive screws that fasten
the display module. Disconnect the ribbon cable and
remove the display module. Signal connections are
made to a four-terminal connector in the base of the
enclosure.
SIGNAL +
4-20 mA signal input positive
terminal connection
SIGNAL -
4-20 mA signal return/negative
terminal connection when not
using loop powered backlight.
BACKLIGHT +
+9-36 VDC when powering
backlight from external supply.
BACKLIGHT -
4-20 mA signal return/negative
terminal when using the
installed loop powered backlight
or ground/negative when
powering backlight from external
supply.
OUTPUT+
NPN open collector output
positive.
OUTPUT-
NPN open collector output
negative.
RESET +
Contact closure alarm
acknowledge pull up to 3 VDC.
RESET-
Contact closure alarm
acknowledge ground/negative.
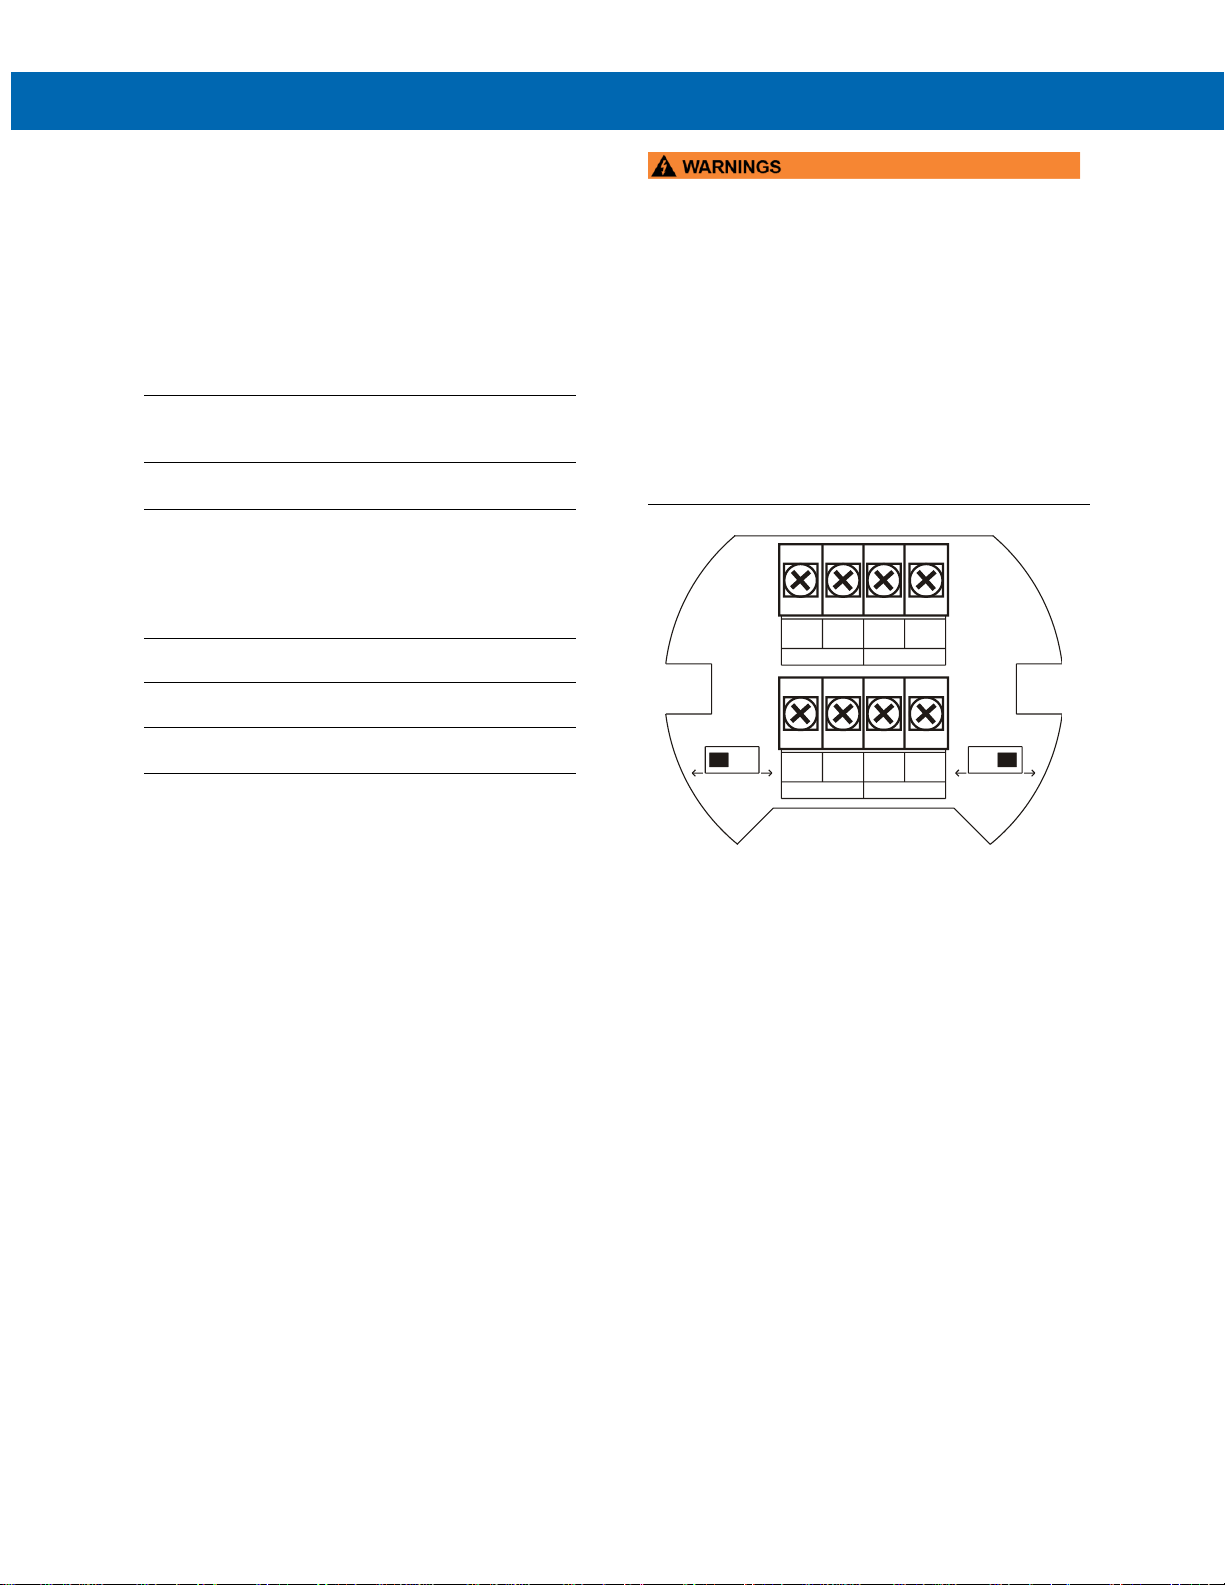
Refer to Figure 3 for terminal positions.
• Observe all safety regulations. Electrical wiring
should be performed in accordance with all
agency requirements and applicable national,
state, and local codes to prevent damage to the
meter and ensure personnel safety.
• Static electricity can damage sensitive
components.
• Observe safe handling precautions for
static-sensitive components.
• Use proper grounding procedures/codes.
• If the meter is installed in a high voltage
environment and a fault or installation error
occurs, high voltage may be present on any lead
or terminal.
Figure 3. Connector Board
SAFE-TOUCH
BUTTONS
BACKLIGHT
POWER
UNLOCK LOCK
LOOP
9-36 VDC
+
-
+
-
SIGNAL BACKLIGHT
+
-
+
-
OUTPUT RESET
Page 9
PD6720 Field-Mount Loop-Powered Rate/Totalizer
Instruction Manual
9
Wiring Diagrams
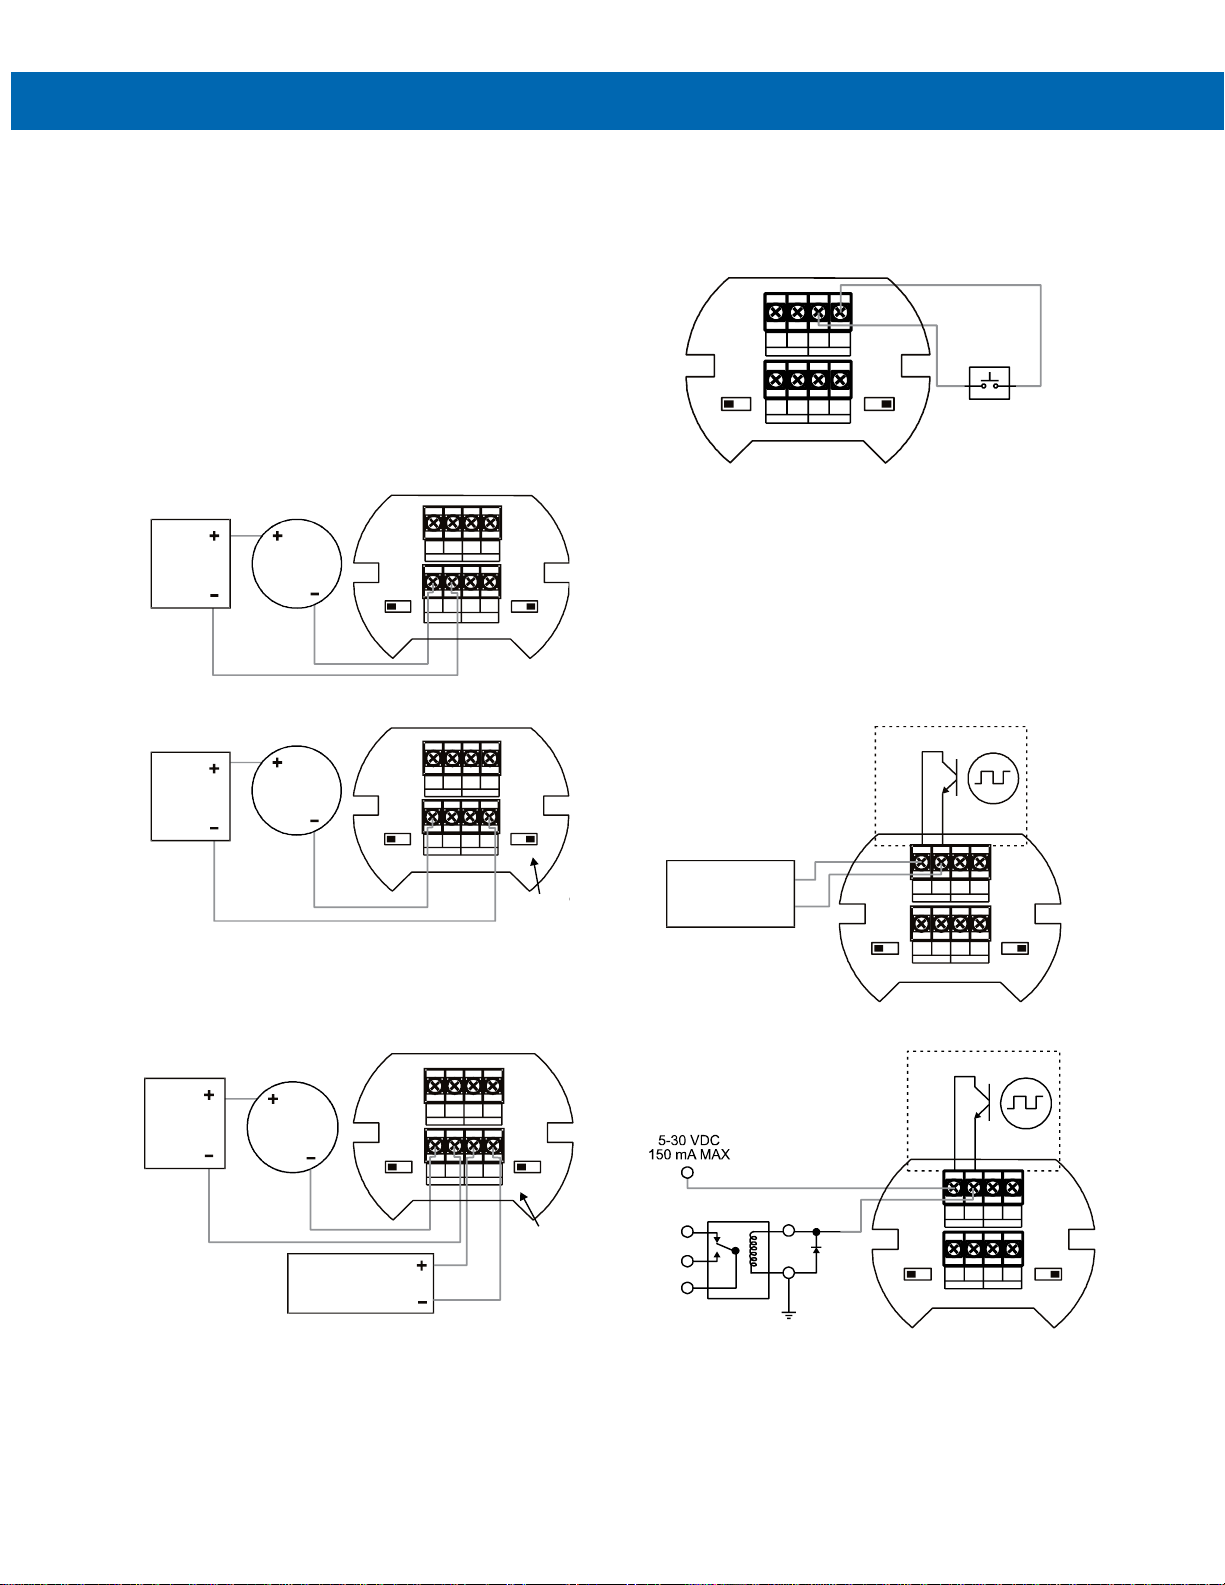
Signal connections are made to a four-terminal
connector mounted in the base of the enclosure per
Figure 3. Connector Board. The enclosure also
provides one internal and one external earth
grounding screw.
For installations that don’t use the backlight, the
maximum voltage drop is 3 V and connections are
made per Figure 4.
For installations that use the backlight powered from
the meter, the maximum voltage drop is 6 V and
connections are made per Figure 5.
For installations that use the backlight powered from
an external source, the maximum voltage drop is 3 V
and connections are made per Figure 6.
Figure 4. Connections without Backlight
Figure 5. Connections with Loop-Powered Backlight
Loop-powered backlight brightness will increase as
the input signal current increases. If constant
backlight brightness is desired, the backlight should
be powered by an external source.
Figure 6. Connections with Externally-Powered Backlight
It is possible to use the same transmitter (signal loop)
power supply for the externally powered backlight.
The backlight circuit will draw 25 mA in addition to the
loop circuit.
External Reset Connection
External reset connections are made to two terminals
labeled RESET. Connect to a contact closure source
such as a relay or a pushbutton as shown in Figure 7.
Figure 7. Reset Connections
Open Collector Output Connections
Output connections are made to two terminals labeled
OUTPUT. Connect to an input device such as alarm
indicator or pulse counter as shown in Figure 8 or drive
a relay as shown in Figure 9.
To avoid damaging the PD6720’s amplifying
components, use care not to wire incorrectly or
exceed output ratings. A diode, such as 1N4000
series, will provide protection from relay transients.
Figure 8. Connection to Device with Internal Pull-Up
Figure 9. Output Connections
4-20 mA
Transmitter
+
-
+
-
SIG NAL BACKLIG HT
Power
Supply
UNLOCK LOCK
SAFE -TOUCH
BUTTONS
LOOP9-36
VDC
BACKLIG HT
POW ER
+
-
+
-
OU TPUT RESET
UNLOCK LOCK
SAFE-TOUCH
BUTTONS
LOOP9-36
VDC
BACKLIG HT
POW ER
4-20 mA
Transmitter
+
-
+
-
SIGN AL BACKLIG HT
Slide Switch to
LOOP
Power
Supply
+
-
+
-
OU TPUT RESET
4-20 mA
Transmitter
+-+
-
SIGN AL B ACKL IGHT
Slide Switch to
9-36 VDC
Power Supply
Power
Supply
+
-
+
-
OU TPUT RESET
UNLOCK LOCK
SAFE-TO UCH
BUTTONS
LOOP9-36
VDC
BACKLIG HT
POW ER
+
-
+
-
SIGN AL BACKLIGHT
+
-
+
-
OU TPUT RESET
UNLOCK LOCK
SAFE-TOUCH
BUTTONS
LOOP9-36
VDC
BACKLIGHT
POW ER
+
-
+
-
SIGNAL BAC KLIGHT
+
-
+
-
OUT PUT RESET
+
Alarm Indicator/
Pulse Counter
(e.g. PD6300)
-
UNLOCK LOCK
SAFE-TO UCH
BUTTONS
LOOP9-36
VDC
BACKLIG HT
POW ER
+-+
-
SIGNAL BAC KLIGHT
+-+
-
OU TPUT RESET
UNLOCK LOCK
SAFE-TO UCH
BUTTONS
LOOP9-36
VDC
BACKLIG HT
POW ER
Page 10
PD6720 Field-Mount Loop-Powered Rate/Totalizer
Instruction Manual
10
Setup and Programming
There is no need to recalibrate the meter for
milliamps when first received from the factory.
The meter is factory calibrated for milliamps prior
to shipment. The calibration equipment is traceable
to NIST standards.
Overview
Setup and programming is done through the infrared
through-window SafeTouch buttons or using the
mechanical buttons when uncovered. There are two
slide switches located on the connector board. One is
used to select backlight power and the other is to lock
or unlock the SafeTouch Buttons.
After all connections have been completed and
verified, connect the ribbon cable to the display
module, fasten the display module to the base,
install enclosure cover, and then apply power.
SafeTouch Buttons
The PD6720 is equipped with four sensors that
operate as through-window buttons so that it can be
programmed and operated without removing the
cover and exposing the electronics to the
environment. These buttons can be disabled for
security by selecting the LOCK setting on the switch
located on the connector board in the base of the
enclosure. To actuate a button, press one finger to
the window directly over the marked button area.
When the cover is removed, the four mechanical
buttons located next to the sensors are used. The
sensors are disabled when a mechanical button is
pressed and will automatically be re-enabled after 60
seconds of inactivity.
The SafeTouch buttons are designed to filter normal
levels of ambient interference and to protect against
false triggering, however, it is recommended that the
SafeTouch buttons be disabled (slide switch to LOCK)
if there is an infrared interference source in line-ofsight to the display.
SafeTouch Button Tips and Troubleshooting
The SafeTouch buttons are designed to filter normal
levels of ambient interference and to protect against
false triggering, however, it is recommended that the
SafeTouch buttons be disabled (slide switch to LOCK)
if there is an infrared interference source in line-ofsight to the display.
SafeTouch Button Tips:
• To remove cover with power applied or to clean
the window, select SERVICE in the main menu
before opening the cover. This will temporarily
disable the SafeTouch buttons for 60 seconds to
prevent inadvertent use. Use the mechanical
buttons while the meter is open.
• To the extent possible, install the display facing
away from sunlight, windows, reflective objects
and any sources of infrared interference.
• Keep the window clean.
• Tighten the cover securely.
• Use a password to prevent tampering.
After all connections have been completed and
verified, apply power to the loop.
• SafeTouch buttons will not work if two or more
buttons are detected as being pressed
simultaneously. As a result, be careful to avoid
triggering multiple buttons or reaching across one
button location to press another.
Page 11
PD6720 Field-Mount Loop-Powered Rate/Totalizer
Instruction Manual
11
Buttons and Display
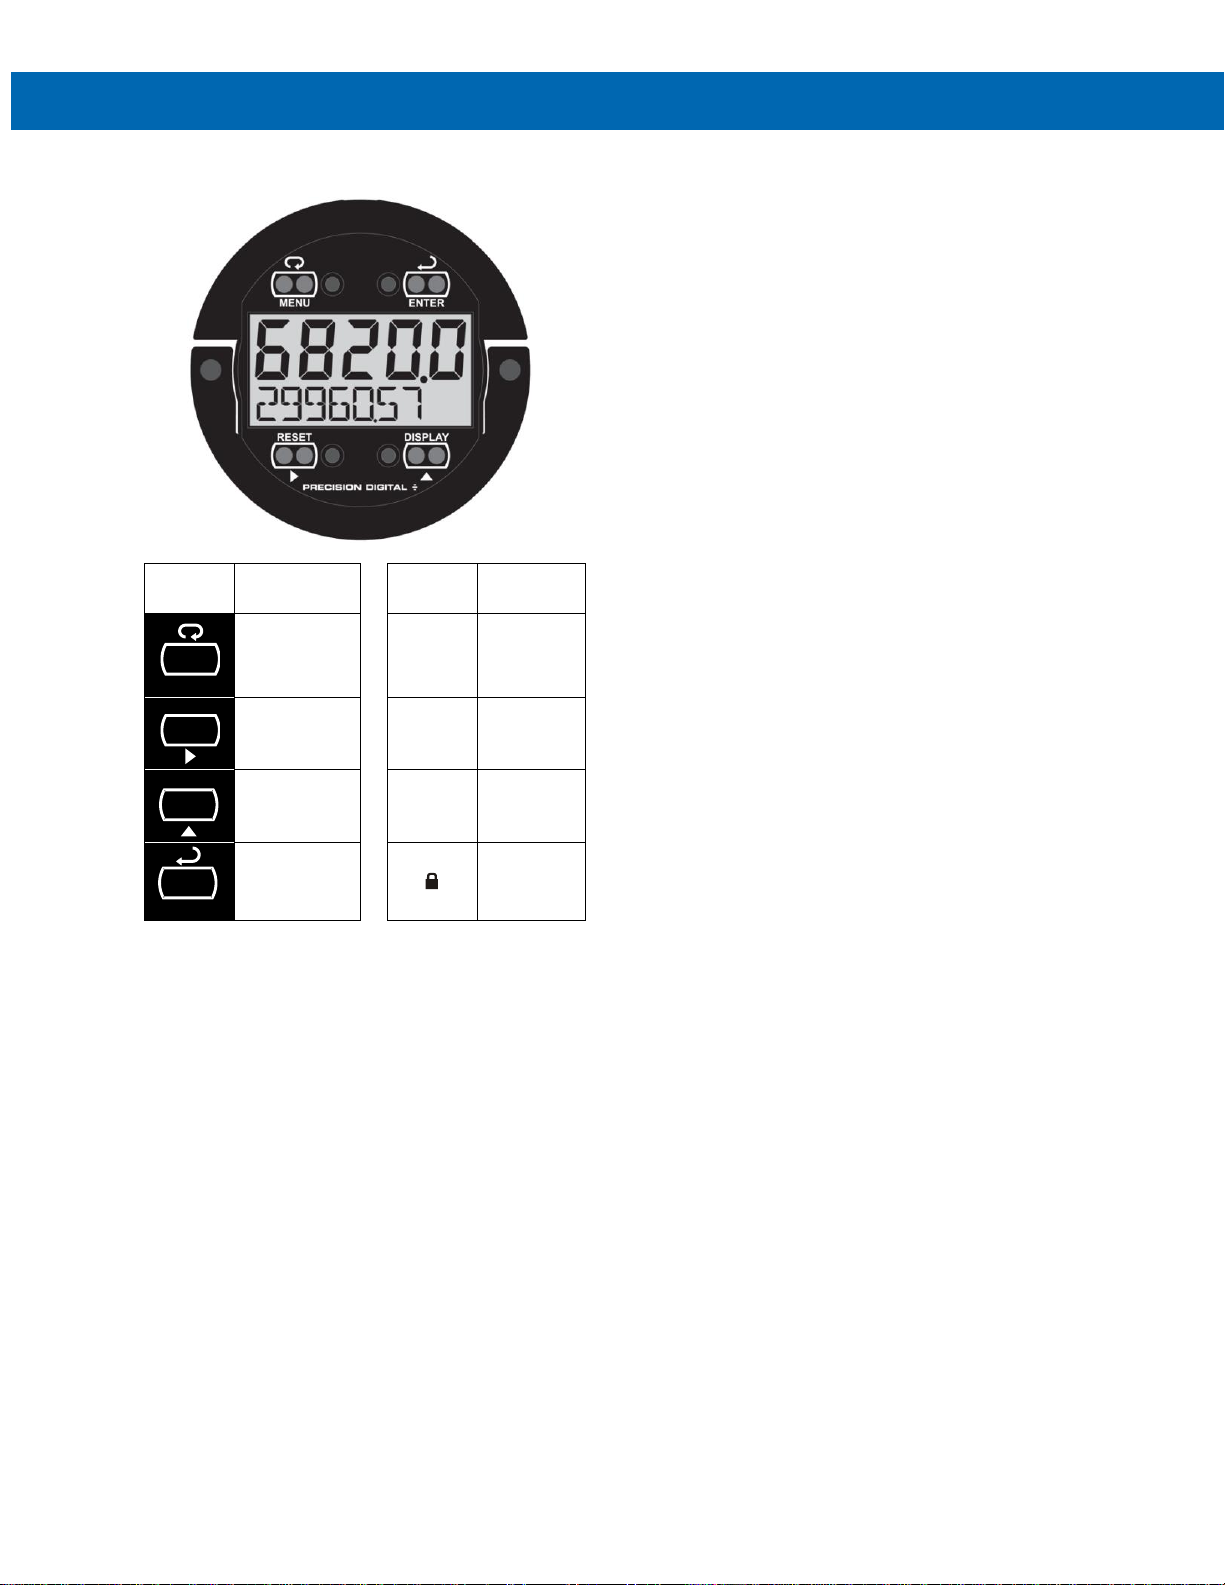
Button
Symbol
Description
Symbol
Status
Menu
HI
High
Alarm Set
Right
arrow/
Reset
LO
Low Alarm
Set
Up arrow/
Display
SET
Total
Alarm Set
Enter
Password
Enabled
Menu Button
• Press the Menu button to enter or exit the
Programming Mode at any time.
• Press and hold the Menu button for five seconds
to access the Advanced features of the meter.
Right / Reset Button
• Press the Right arrow button to move to the next
digit or decimal position during programming.
Up / Display Button
• Press the Up arrow button to scroll through the
menus, decimal point, or to increment the value
of a digit.
Enter Button
• Press the Enter button to access a menu or to
accept a setting.
The meter displays various functions and messages
during setup, programming, and operation. The
following table shows the main menu functions and
messages in the order they appear in the menu.
MENU
RESET
DISPLAY
ENTER
Page 12
PD6720 Field-Mount Loop-Powered Rate/Totalizer
Instruction Manual
12
Main Menu Display Functions & Messages
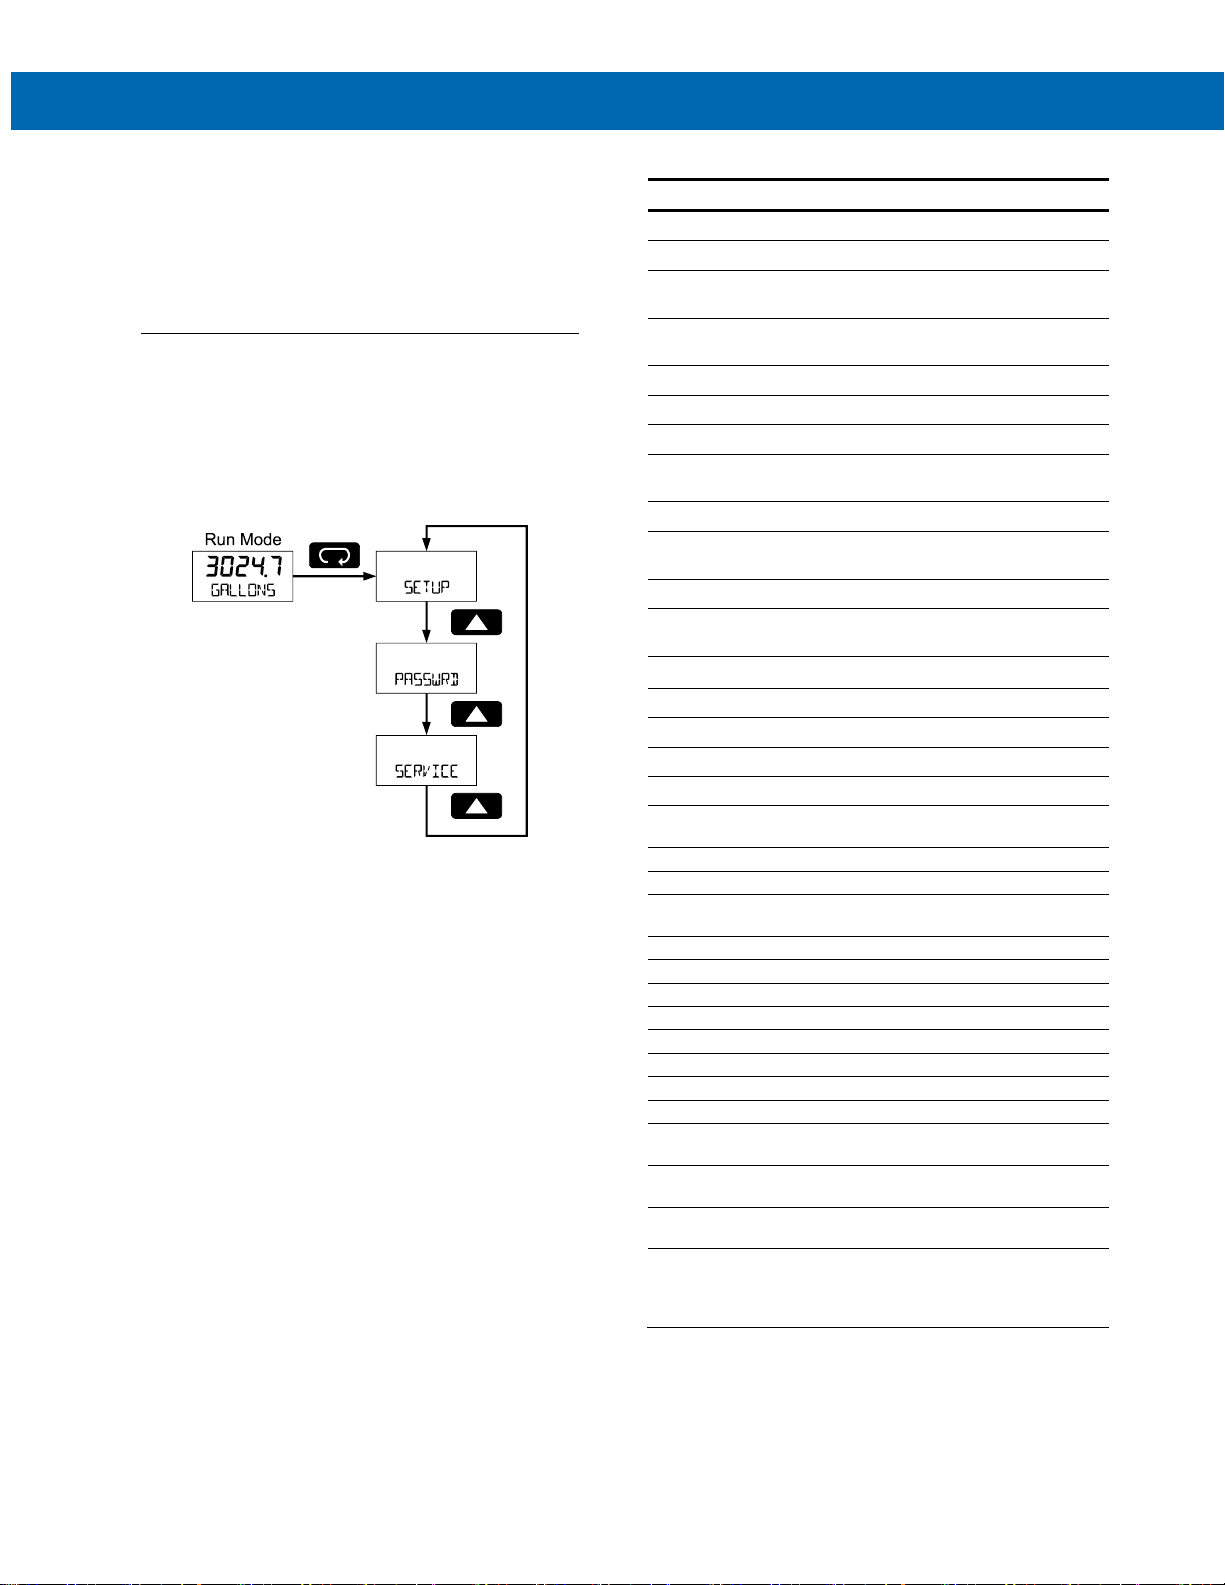
The meter displays various functions and messages
during setup, programming, and operation. The table
in the right column shows the main menu functions
and messages in the order they appear in the menu.
Main Menu
The main menu consists of the most commonly used
functions: Setup, Password, and Service.
Press MENU button to enter Programming Mode then
press the Up Arrow button to scroll through the main
menu.
• Press MENU, at any time, to exit and return to
Run Mode. Changes made to settings prior to
pressing Enter are not saved.
• Changes to the settings are saved to memory
only after pressing Enter.
• The display moves to the next menu every time
a setting is accepted by pressing Enter.
Display
Parameter
Action/Setting
SETUP
Setup
Enter Setup menu
DeC..pt
Decimal point
Enter Decimal Point menu
Rate
Rate decimal
Set rate display decimal
point
total
Total decimal
Set total display decimal
point
PRoG
Program
Enter the Program menu
sCalE
Scale
Enter the Scale menu
Cal
Calibrate
Enter the Calibrate menu
Inpt1
Input 1
Calibrate input 1 signal or
program input 1 value
DspL1
Display 1
Program display 1 value
Inpt2
Input 2
Calibrate input 2 signal or
program input 2 value
DsPl2
Display 2
Program display 2 value
Span
Error
Span
Error
Error, calibration not
successful, check signal
TbASE
Time Base
Enter the Time Base menu
sec
Second
Units per second
min
Minute
Units per minute
hour
Hour
Units per hour
day
Day
Units per day
TotCF
Conversion
Factor
Enter the Conversion Factor
menu
T rST
Total Reset
Enter the Total Reset menu
Auto
Automatic
Automatic Total Reset
T DELAY
Time Delay
Automatic Reset Time
Delay
man
Manual
Manual Total Reset
Enabl
Enable
Enable Manual reset
dsabl
Disable
Disable Manual reset
tag
Tag/Units
Enter the Tag/Units Menu
ON
Tag On
Enable Tag/Units
OFF
Tag Off
Disable Tag/Units
togle
Tag Toggle
Toggle Tag and Total
PASSWRD
Password
Enter the Password menu
UNLOCKD
Unlocked
Program password to lock
meter
LOCKED
Locked
Enter password to unlock
meter
99999
-99999
Flashing
display
Overrange condition
Underrange condition
SERVICE
Service
Select before
removing/installing cover for
service or to clean the
window
Page 13
PD6720 Field-Mount Loop-Powered Rate/Totalizer
Instruction Manual
13
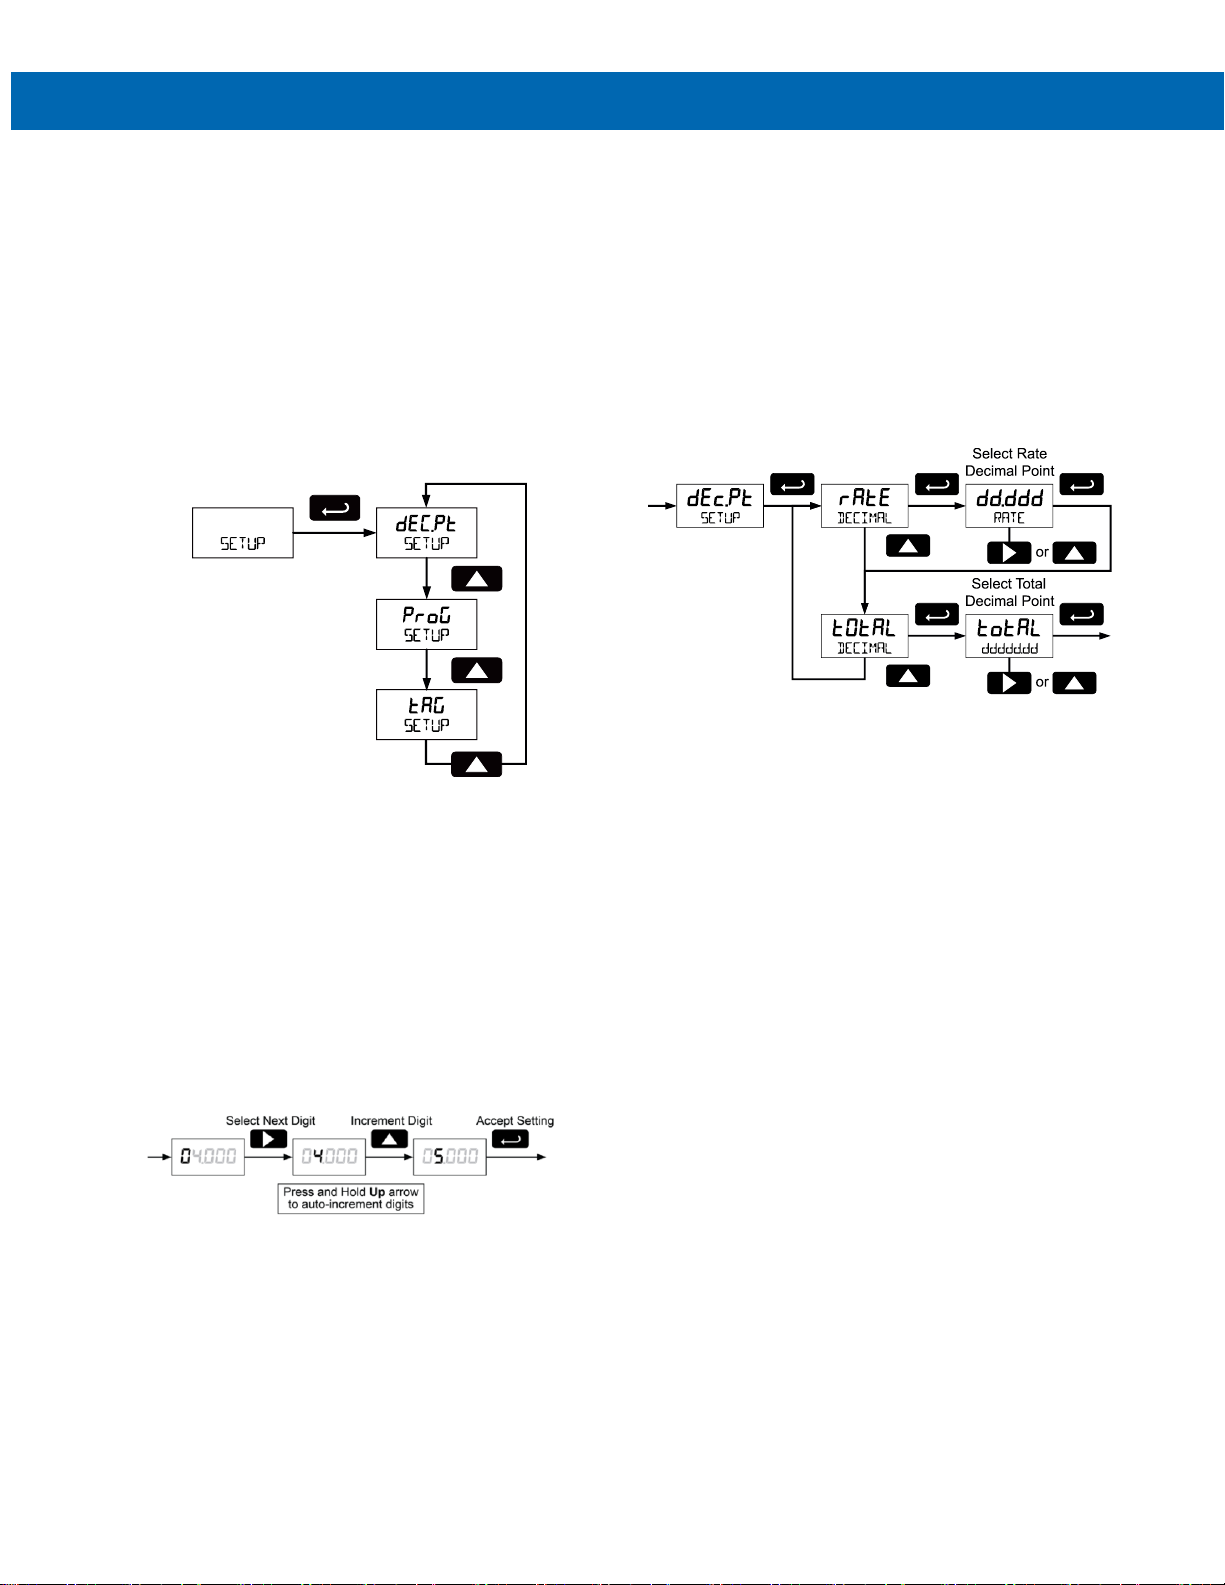
Setting Up the Meter (SETUP)
The Setup menu is used to select:
1. Rate and total decimal point position
2. Program menu
3. Rate and total tag display
4. Time base
5. Total conversion factor
6. Manual or automatic total reset function
Press the Enter button to access any menu or press
Up arrow button to scroll through choices.
Press the Menu button to exit at any time.
Setting Numeric Values
The numeric values are set using the Right and Up
arrow buttons.
Press Right arrow to select next digit and Up arrow
to increment digit.
The digit being changed blinks.
Press the Enter button, at any time, to accept a
setting or MENU button to exit without saving
changes.
The decimal point is set using the Right or Up arrow
button in the Setup-decimal point menu.
Setting the Decimal Point (dec.PT)
Rate decimal point may be set with up to four decimal
places or with no decimal point at all. Total decimal
point may be set with up to six decimal places or with
no decimal point at all. Rate decimal and total decimal
are programmed individually.
Pressing the Right arrow moves the decimal point
one place to the right until no decimal point is
displayed.
Pressing the Up arrow moves the decimal point one
place to the left.
Page 14
PD6720 Field-Mount Loop-Powered Rate/Totalizer
Instruction Manual
14
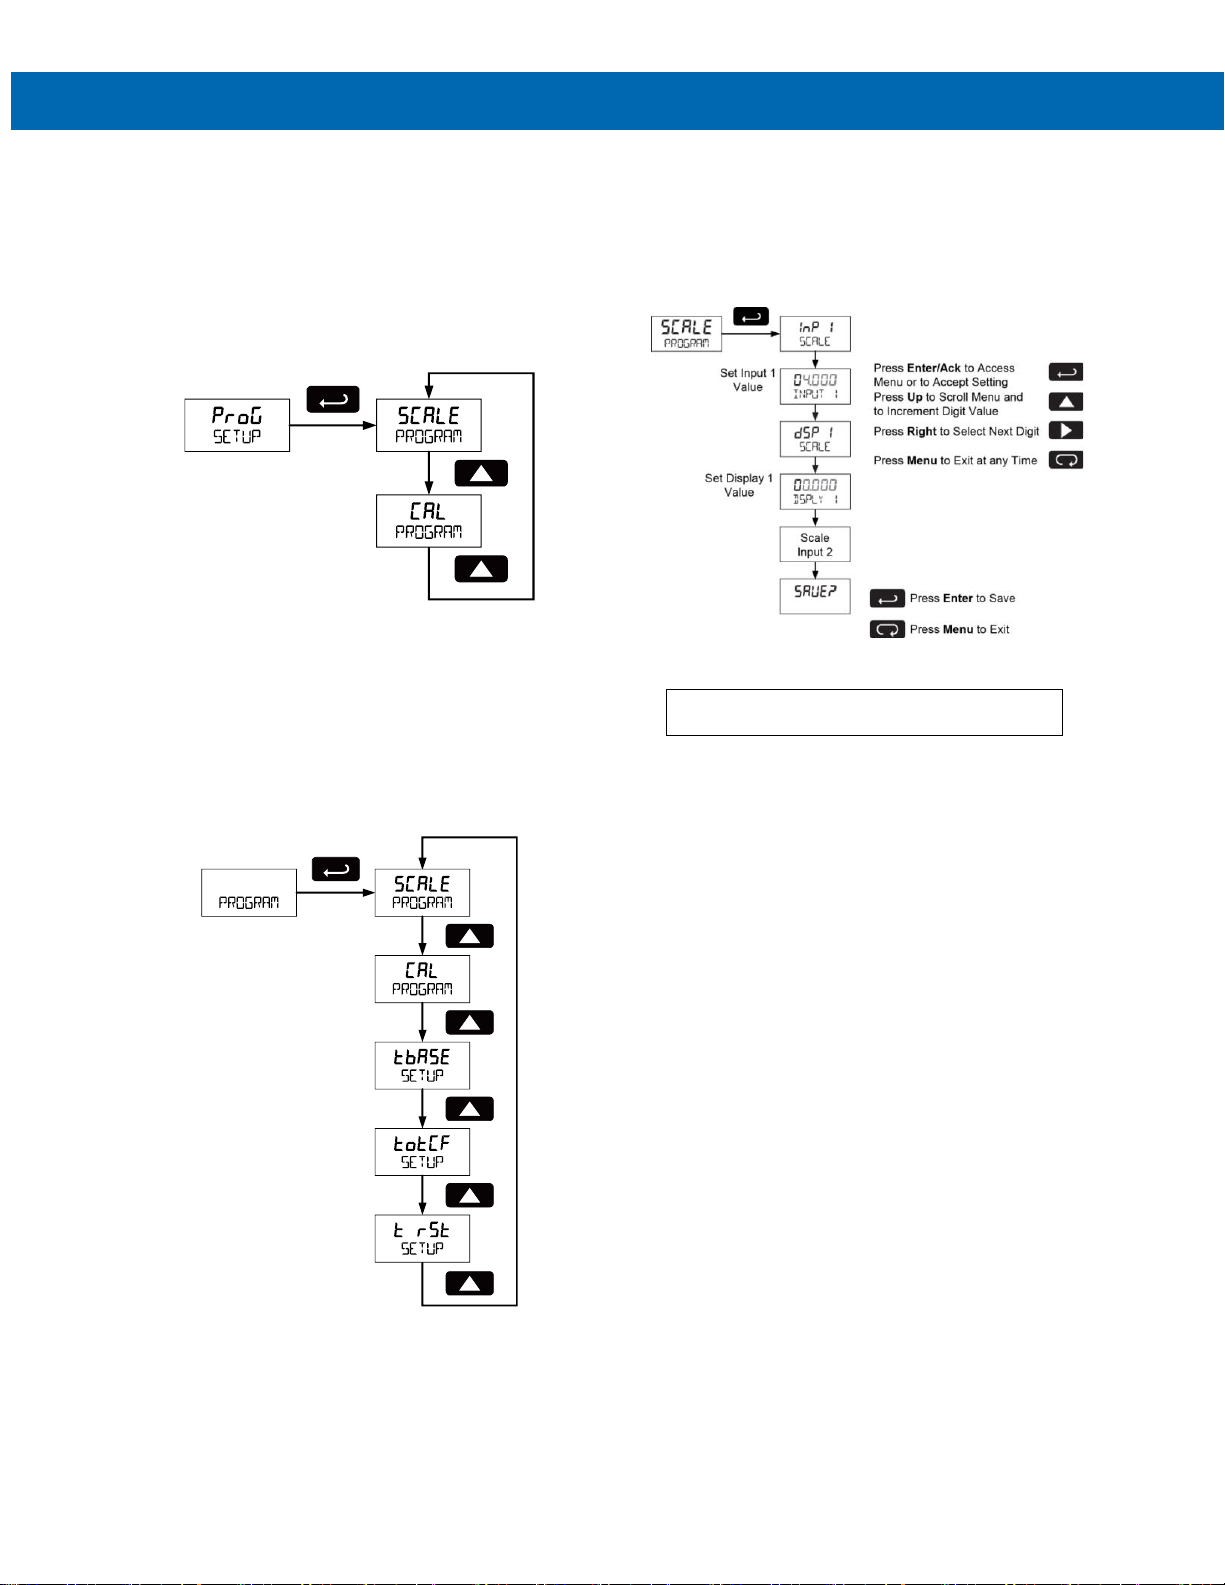
Programming the Meter (Prog)
The meter may either be scaled (SCALE) without
applying an input or calibrated (Cal) by applying an
input. The meter comes factory calibrated to NIST
standards, so for initial setup, it is recommended to
use the (SCALE) function. The Program menu contains
the Scale (SCALE) and the Calibrate (Cal) menus.
Process inputs may be scaled or calibrated to any
display within the range of the meter.
Note: The Scale and Calibrate functions are exclusive
of each other. The meter uses the last function
programmed. Only one of these methods can be
employed at a time. The Scale and Calibrate
functions can use up to 32 points (default is 2). The
number of points should be set in the Advanced
Features menu under the Multi-Point Linearization
(lnear) menu selection prior to scaling and calibration
of the meter, see Advanced Features Menu, page 18.
Scaling the Meter (SCale)
The 4-20 mA input can be scaled to display the
process in engineering units.
A signal source is not needed to scale the meter;
simply program the inputs and corresponding display
values.
For instructions on how to program numeric
values see Setting Numeric Values, page 13.
Page 15
PD6720 Field-Mount Loop-Powered Rate/Totalizer
Instruction Manual
15
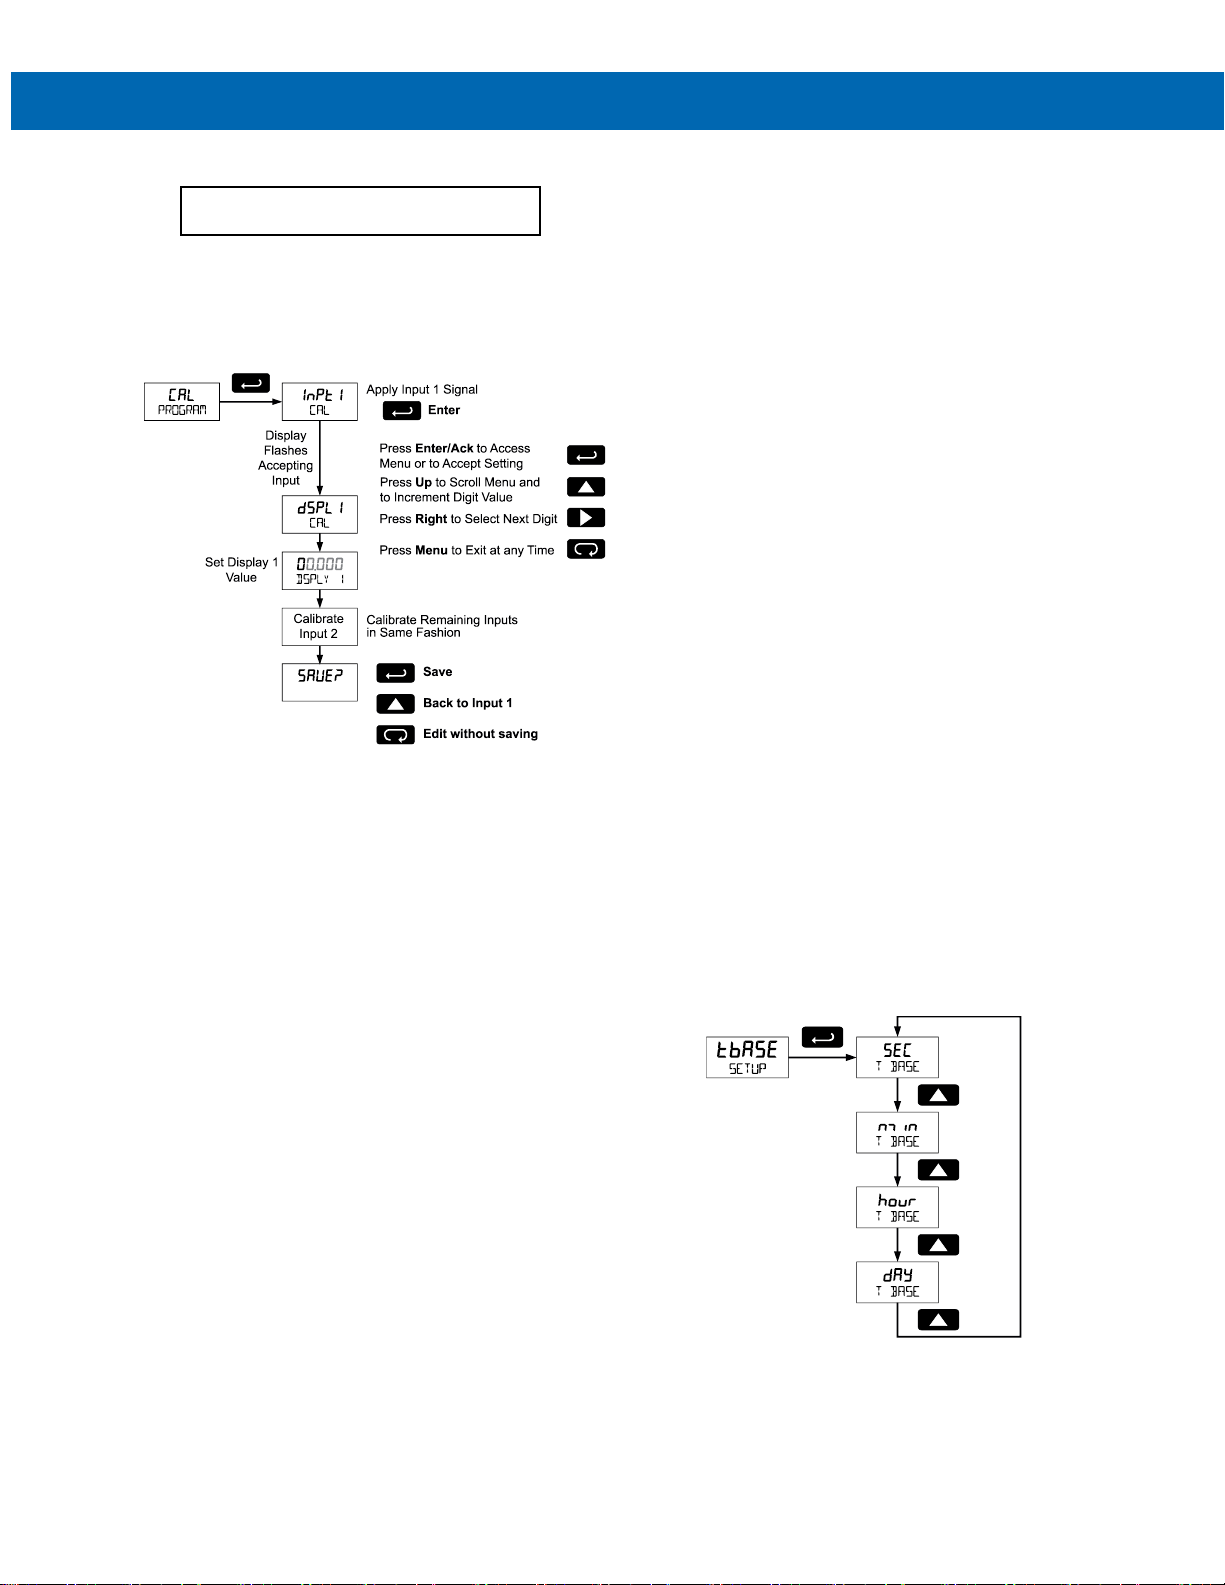
Calibrating the Meter (Cal)
To scale the meter without a signal source
refer to Scaling the Meter (SCale).
The meter can be calibrated to display the process in
engineering units by applying the appropriate input
signal and following the calibration procedure.
The use of a calibrated signal source is strongly
recommended.
1. Press the Up arrow button to scroll to the
Calibration menu (CAL) and press Enter.
2. The meter displays Inpt1. Apply a known
signal and press Enter.
The display will flash while accepting the
signal.
3. After the signal is accepted, the meter displays
dspl1 Press Enter.
Enter a corresponding display value for the
signal input, and press Enter to accept.
4. The meter displays Inpt2. Apply a known
signal and press Enter.
The display will flash while accepting the
signal.
5. After the signal is accepted, the meter displays
dspl2. Press Enter.
Enter a corresponding display value for the
signal input and press Enter to accept.
After completing calibration the save? display will
need to be acknowledged using the Enter key before
calibration will take effect.
Minimum Input Span
The minimum input span is the minimum difference
between input 1 and input 2 signals required to
complete the calibration or scaling of the meter.
The minimum span is 0.10 mA.
If the minimum span is not maintained, the meter
reverts to input 2, allowing the appropriate input
signals to be applied.
Re-Calibrating the Internal Calibration Reference (ICaL)
The Internal Calibration (ICAL) menu, located in the
Advanced features menu, is used to recalibrate the
internal calibration reference. Recalibration is
recommended at least every twelve months. Refer to
Input Signal Filter (FILTER)
The noise filter is available for unusually noisy signals
that cause an unstable process variable display. The
noise filter averages the input signal over a certain
period. The filter level can be set to low (LO), medium
(med), high (HI), or off (OFF). The higher the filter
setting, the longer the averaging time and so the
longer the display may take to find its final value.
The filter contains a noise filter bypass feature so that
while small variations in the signal will be filtered out,
large, abrupt changes to the input signal are
displayed immediately.
Internal Calibration (ICAL) page 21 for instructions.
Setting the Time Base (t.base)
The meter calculates total based on rate and a time
base of units per second, minute, hour, or day.
Press the Enter button, at any time, to accept a
setting or Menu button to exit without saving changes.
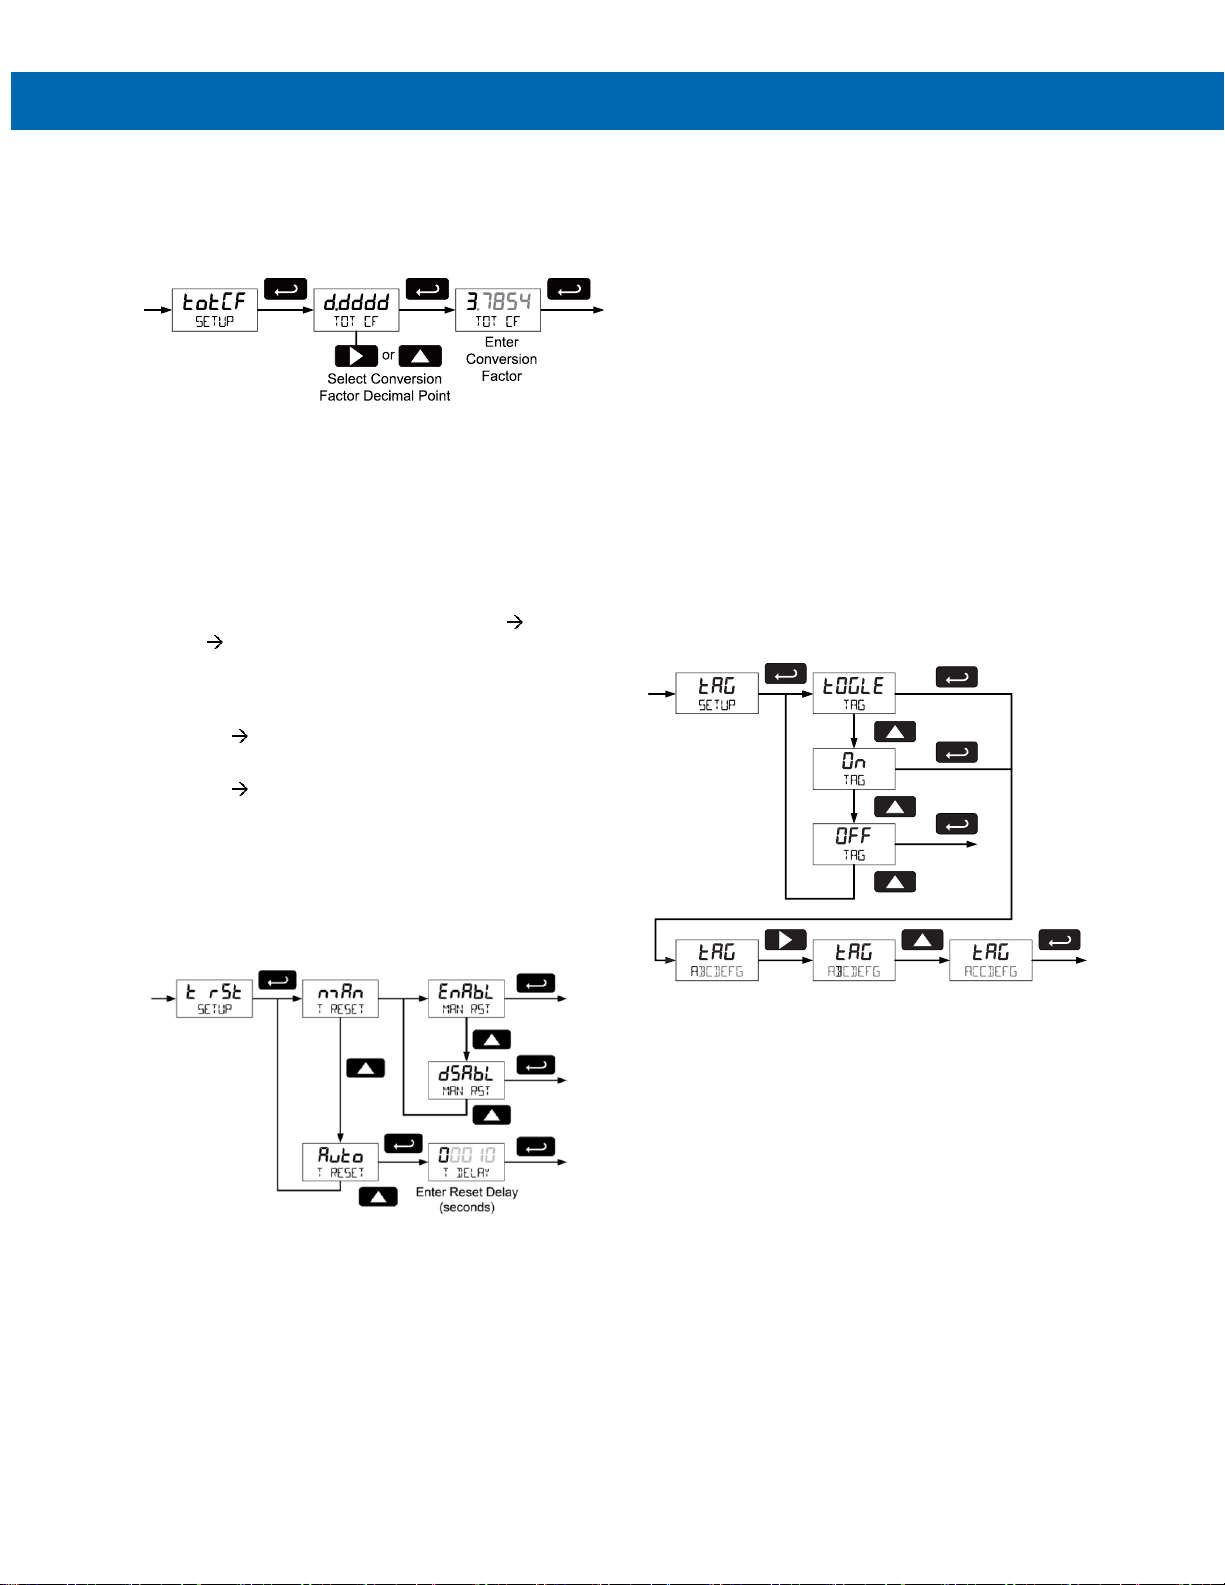
Setting the Total Conversion Factor (totCF)
Total Conversion Factor is used to convert to a
different unit of total display. For example, to display
Page 16
PD6720 Field-Mount Loop-Powered Rate/Totalizer
Instruction Manual
16
rate in gallons and total in liters, enter a conversion
factor of 3.7854. When rate and total units are the
same, the Conversion Factor should be 1.0000.
Press the Enter button, at any time, to accept a
setting or Menu button to exit without saving changes.
Manual or Automatic Total Reset Function (t rST)
The meter may be programmed to reset the total
either manually using the Reset button or
automatically. Manual reset button may be disabled to
avoid inadvertent total reset.
The automatic reset is based on the set point
programmed in the Advanced menu: OUTPUT
alrm total. Once the set point is reached, the
meter waits for a programmed amount of time (t dly)
and then resets the total to zero.
• To enable total reset by Reset button, choose
man Enabl.
• To disable total reset by Reset button, choose
man dsabl.
• To reset total upon total alarm set point, choose
auto, enter a time delay (t dly), and proceed to
programming the set point, see Alarm Output
(alrm) on page 19.
Press the Enter button, at any time, to accept a
setting or Menu button to exit without saving changes.
Setting the Tag Display (tag)
The meter can be set to display a combination of
seven alphanumeric characters for engineering units
(e.g. GALLONS) or for identification (e.g. TANK 3).
Press Right arrow to select next unit and Up arrow
to increment unit.
• To automatically cycle the lower display between
total reading for ten seconds and tag for two
seconds, choose tOgle.
• To disable the tag display and show only total
reading uninterrupted on the lower display,
choose Off.
• To show tag only on the lower display choose On.
Totalizing continues in the background, but it is
not shown while On is selected.
Selecting On or togle prompts for entry of the tag.
The unit being changed blinks.
Press the Enter button, at any time, to accept a
setting or Menu button to exit without saving changes.
Page 17

PD6720 Field-Mount Loop-Powered Rate/Totalizer
Instruction Manual
17
Setting Up the Password (PASSWRD)
The Password menu is used to program a five-digit
password to prevent unauthorized changes to the
programmed parameter settings. The lock symbol is
displayed to indicate that settings are protected.
Locking the Meter
Enter the Password menu and program a five-digit
password.
For instructions on how to program numeric values
see Setting Numeric Values, page 13.
Record the password for future reference. If
appropriate, it may be recorded in the space provided.
Model:
Serial Number:
Password:
__ __ __ __ __
Additional parameters, not needed for most
applications, are programmed with the Advanced
features menu, see Advanced Features Menu on
page 18.
Making Changes to a Password Protected Meter
If the meter is password protected, the meter will
display the message LOCKED when the Menu button
is pressed. Press the Enter button while the message
is being displayed and enter the correct password to
gain access to the menu. After exiting the
programming mode, the meter returns to its password
protected condition.
Disabling Password Protection
To disable the password protection, access the
Password menu and enter the correct password
twice, as shown below. The meter is now unprotected
until a new password is entered.
If the correct six-digit password is entered, the meter
displays the message UNLOCKD (unlocked) and the
protection is disabled until a new password is
programmed.
If the password entered is incorrect, the meter
displays the message LOCKED for about two seconds,
and then it returns to Run Mode. To try again, press
Enter while the Locked message is displayed.
Did you forget the password?
The password may be disabled by entering a
master password. If you are authorized to make
changes, enter the master password 50865 to
unlock the meter.
Service Feature (SERVICE)
Select SERVICE from the main menu to temporarily
disable the SafeTouch buttons to prevent inadvertent
use. Buttons will automatically resume operation after
60 seconds. The display blinks the message SERVICE
during this period. This should be used when cleaning
the window and when installing or removing the cover
while power is applied.
The service menu is not shown when the SafeTouch
buttons are disabled using the slide switch located on
the connector board.
Page 18
PD6720 Field-Mount Loop-Powered Rate/Totalizer
Instruction Manual
18
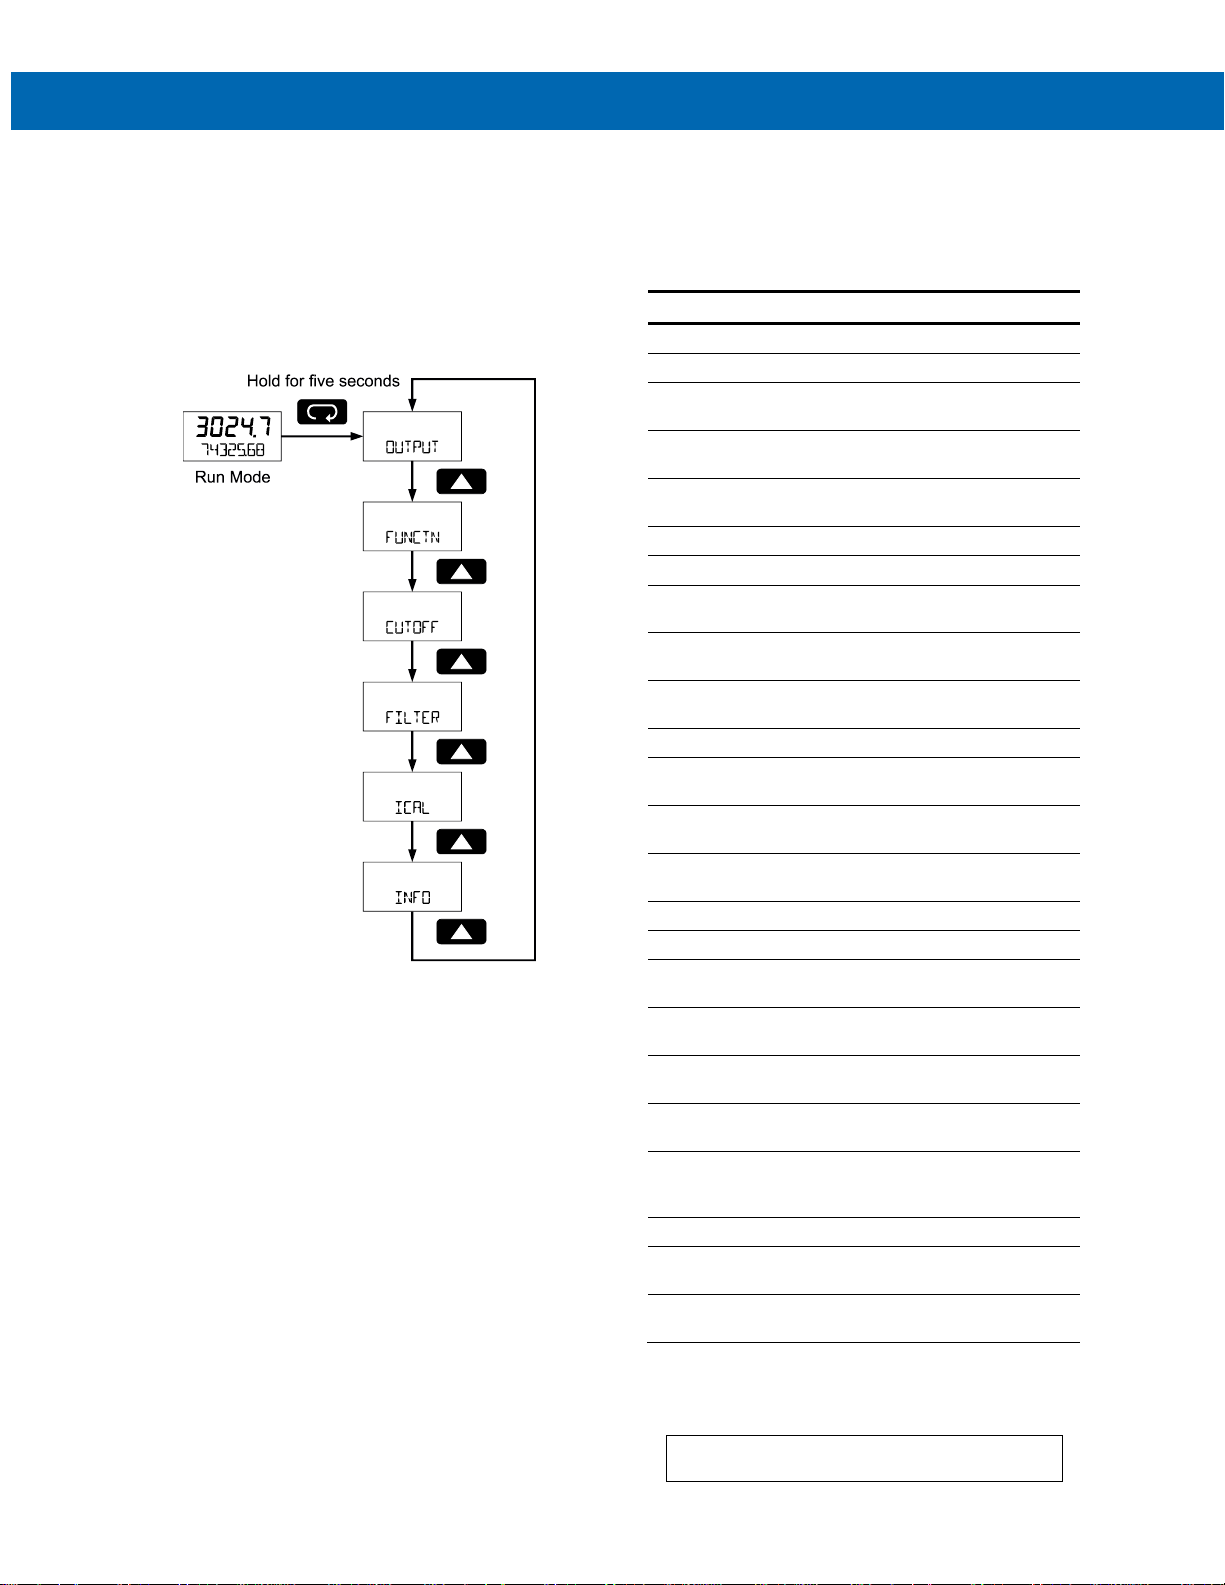
Advanced Features Menu
To simplify the setup process, functions not needed
for most applications are located in the Advanced
features menu. Press and hold the MENU button for
five seconds to access the Advanced features menu.
Press the Enter button to access any menu or press
Up arrow button to scroll through choices. Press the
Menu button to exit at any time.
Advanced Features Menu & Display Messages
The following table shows the Advanced features
menu functions and messages in the order they
appear in the menu.
Display
Parameter
Action/Setting
OUTPUT
Output
Enter output menu
OFF
Off
Disable output
Alrm
Alarm Output
Enter alarm output
menu
Rate
Rate Alarm
Assign alarm output to
rate
Total
Total
Assign alarm output to
total
Set
Set Point
Program set point
Reset
Reset Point
Program reset point
Pulse
Pulse Output
Program pulse output
Scaler (Count)
MAX HZ
Frequency
Program pulse output
maximum frequency
Funct
Function
Enter advanced function
menu
Lnear
Linear
Set linear scaling
Squar
Square Root
Set square root
extraction
Prog..E
Programmable
Exponent
Set programmable
exponent
CUTOFF
Low-Flow
Cutoff
Set low-flow cutoff
FILTER
Filter
Set noise filter
OFF
Filter Off
Disable noise filter
LO
Filter Low
Set noise filter to low
setting
mED
Filter Medium
Set noise filter to
medium setting
HI
Filter High
Set noise filter to high
setting
ICAL
Internal
Calibration
Enter internal reference
calibration
INFO
Meter
Information
Show software number
and version, or reset to
factory defaults
SFT
Software
Software number
ver
Software
Version
Software version
RESET
DFALTS?
Reset Defaults
Restore factory default
parameter settings
For instructions on how to program numeric
values see Setting Numeric Values, page 13.
Page 19
PD6720 Field-Mount Loop-Powered Rate/Totalizer
Instruction Manual
19
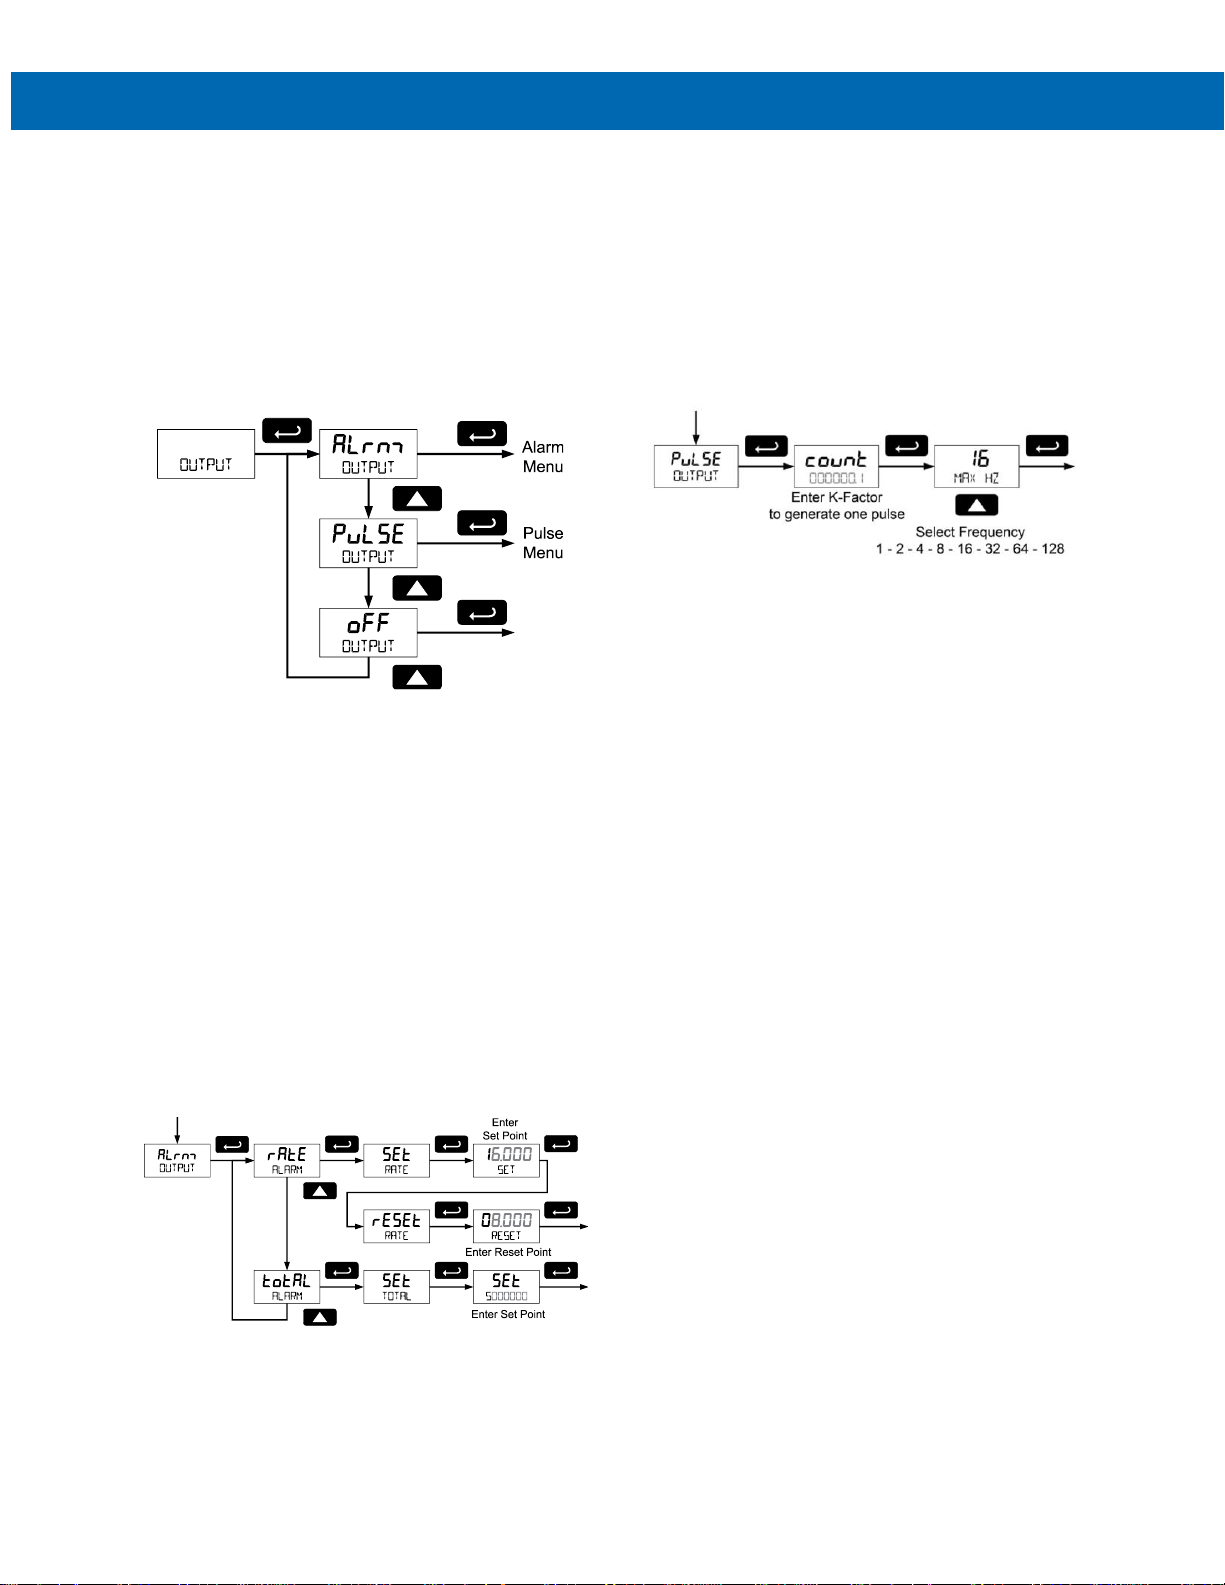
Alarm & Pulse Output (OUTPUT)
The PD6720 is equipped with an NPN open collector
output that may be set up for high or low rate alarm
trip point, total alarm trip point, or pulse output based
on K-factor. The pulse output frequency may be
programmed for 2, 4, 8, 16, 32, 64, or 128 Hz.
The output may be disabled by selecting off. When
alarm indication is enabled, the HI and LO symbols
are used accompanied by a flashing display. The
alarm status will show on the display even if the
output is not wired.
Alarm Output (alrm)
• Rate high alarm trip point: program set point
above reset point.
• Rate low alarm trip point: program set point
below reset point.
• Rate alarm deadband is determined by the
difference between set and reset points.
Minimum deadband is one display count. If set
and reset points are programmed the same,
output will reset one count below set point.
• Total alarm trip point: program total set point.
Alarm reset is triggered by total reset (There is no
reset parameter entered for total). If automatic
total reset is enabled, this setting will be the
trigger point for the timer. It is not necessary to
have the output wired for automatic reset function
to work.
To acknowledge an alarm, press the Enter button
once for acknowledge prompt and a second time
to confirm.
Pulse Output Scaler (count)
The pulse output scaler (count) corresponds to the
total units (e.g. gallons) needed to generate one
pulse. For example, if the pulse output scaler (count)
value is set to 10; one pulse is generated for every 10
counts incremented on the display.
If the pulse output exceeds the programmed output
frequency, pulses are accumulated as pending.
Pulses will continue to output until the buffer is
emptied or the total is reset from the front panel.
Page 20
PD6720 Field-Mount Loop-Powered Rate/Totalizer
Instruction Manual
20
Advanced Function Selection (FUNCTN)
The Advanced Function menu is used to select the
advanced function to be applied to the input: linear,
square root, programmable exponent, or round
horizontal tank volume calculation. The multi-point
linearization is part of the linear function selection.
Meters are set up at the factory for linear function with
2-point linearization. The linear function provides a
display that is linear with respect to the input signal.
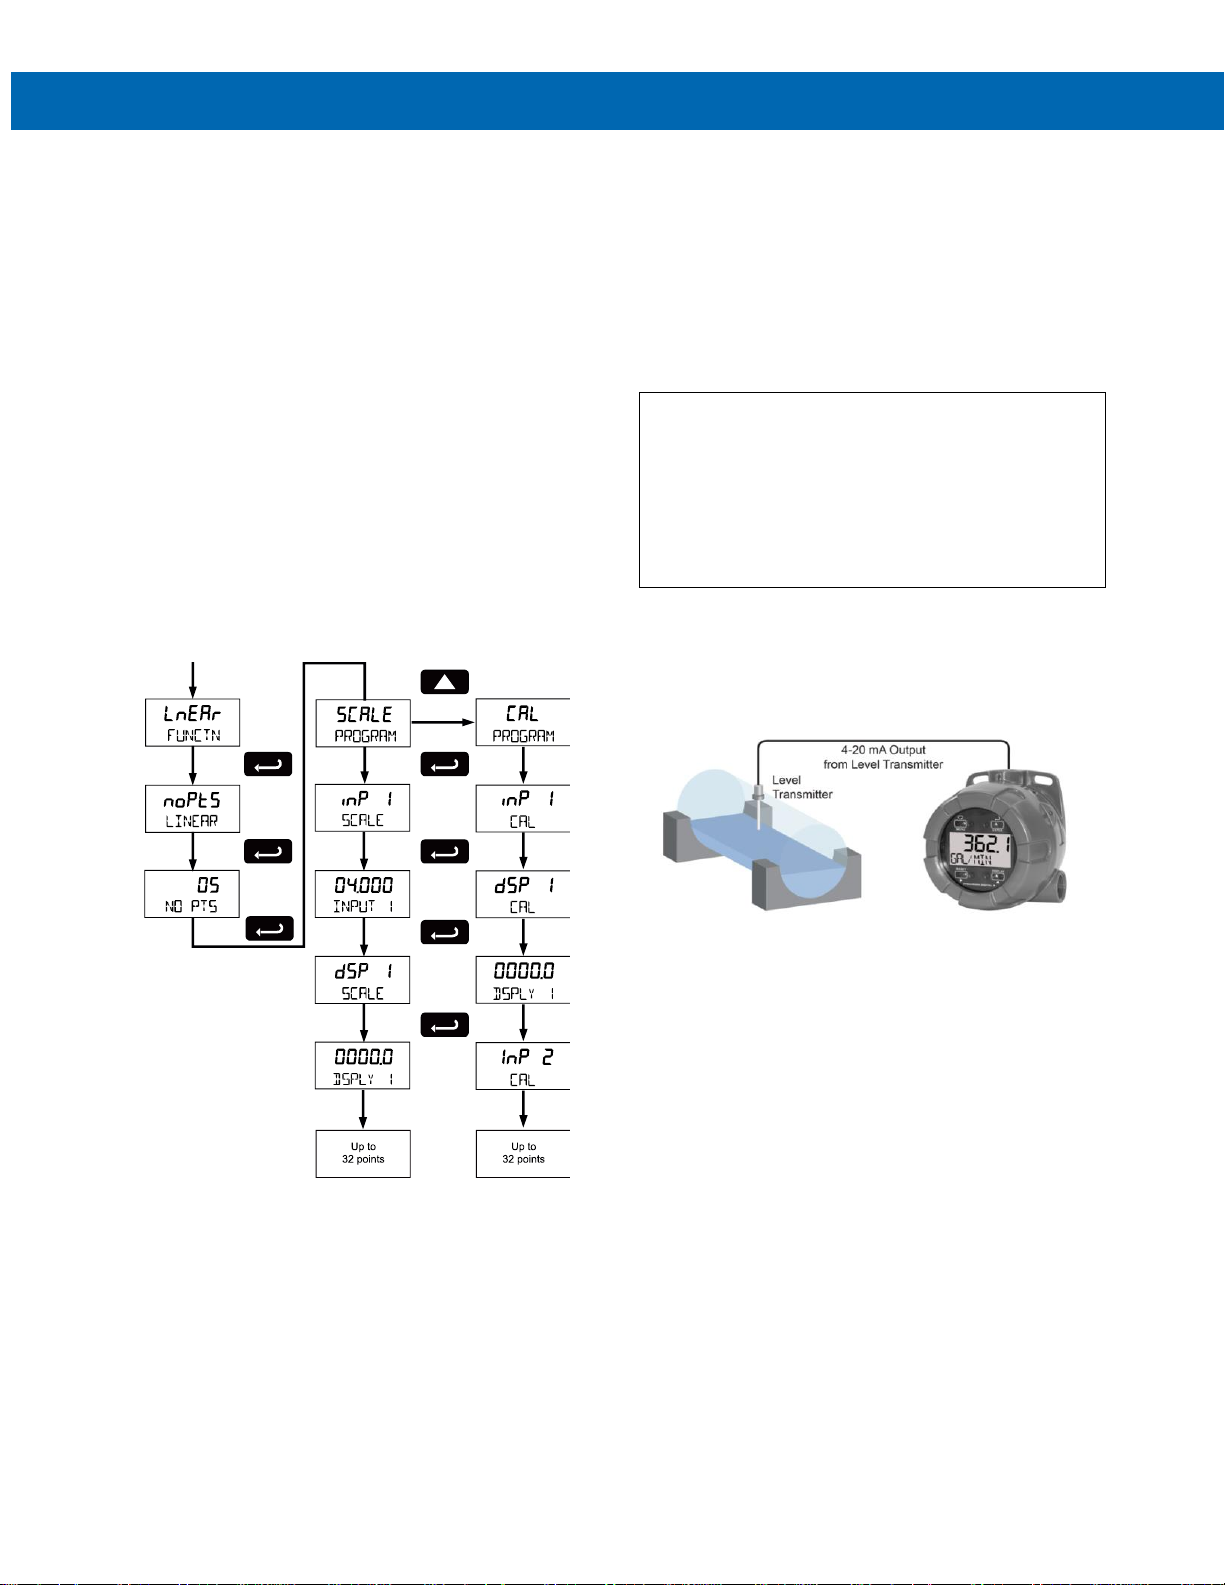
Multi-Point Linearization (lnear)
Up to 32 linearization points can be selected under
the Linear function. The multi-point linearization can
be used to linearize the display for non-linear signals
such as those from level transmitters used to
measure volume in odd-shaped tanks or to convert
level to flow using weirs and flumes that require a
complex exponent. These points are established via
direct entry (SCALE) or with a live calibration signal
source (CAL).
Multi-Point Scaling (SCALE)
The multi-point scaling is entered after selecting the
number of points (noPtS). The input signal levels
(InP 1-32) for up to 32 points, along with the
corresponding meter reading (dSP 1-32) should be
entered for each linearization point.
Multi-Point Calibration (CAL)
The meter can be calibrated using a current source
instead of using input scaling. This process will
override previously programmed scaling points.
Apply a live signal using a known accurate signal
source (InP 1-32) and then enter the corresponding
meter reading (disp 1-32) for that input signal level.
The use of a calibrated signal source is strongly
recommended.
Important Navigation Note
After entering the last display value, the linearization
entries must be saved (SAUE?) before they are put into
effect. However, you may move past this selection
using the Up arrow key if you need to go back and
correct and earlier entry. Once confident in the entries,
you must navigate back to the Save menu screen
(SAUE?) and press the Enter key to save the changes.
Square Root Linearization (Squar)
The square root function can be used to linearize
the signal from a differential pressure transmitter
and display flow rate in engineering units.
PD6720 Displaying Flow Rate by Extracting Square Root
from DP Transmitter Signal.
Low-Flow Cutoff (CUTOFF)
The low-flow cutoff feature allows the meter to be
programmed so that the often-unsteady output from a
differential pressure transmitter, at low flow rates,
always displays zero on the meter. The default cutoff
is zero to prevent negative readings, but this may be
overridden to allow them.
The cutoff value may be programmed from -0 to
99999. Below the cutoff value, the meter will display
zero. Selecting either square root or programmable
exponent will set the cutoff value to 0. Program the
cutoff value to 0 to disable.
Page 21
PD6720 Field-Mount Loop-Powered Rate/Totalizer
Instruction Manual
21
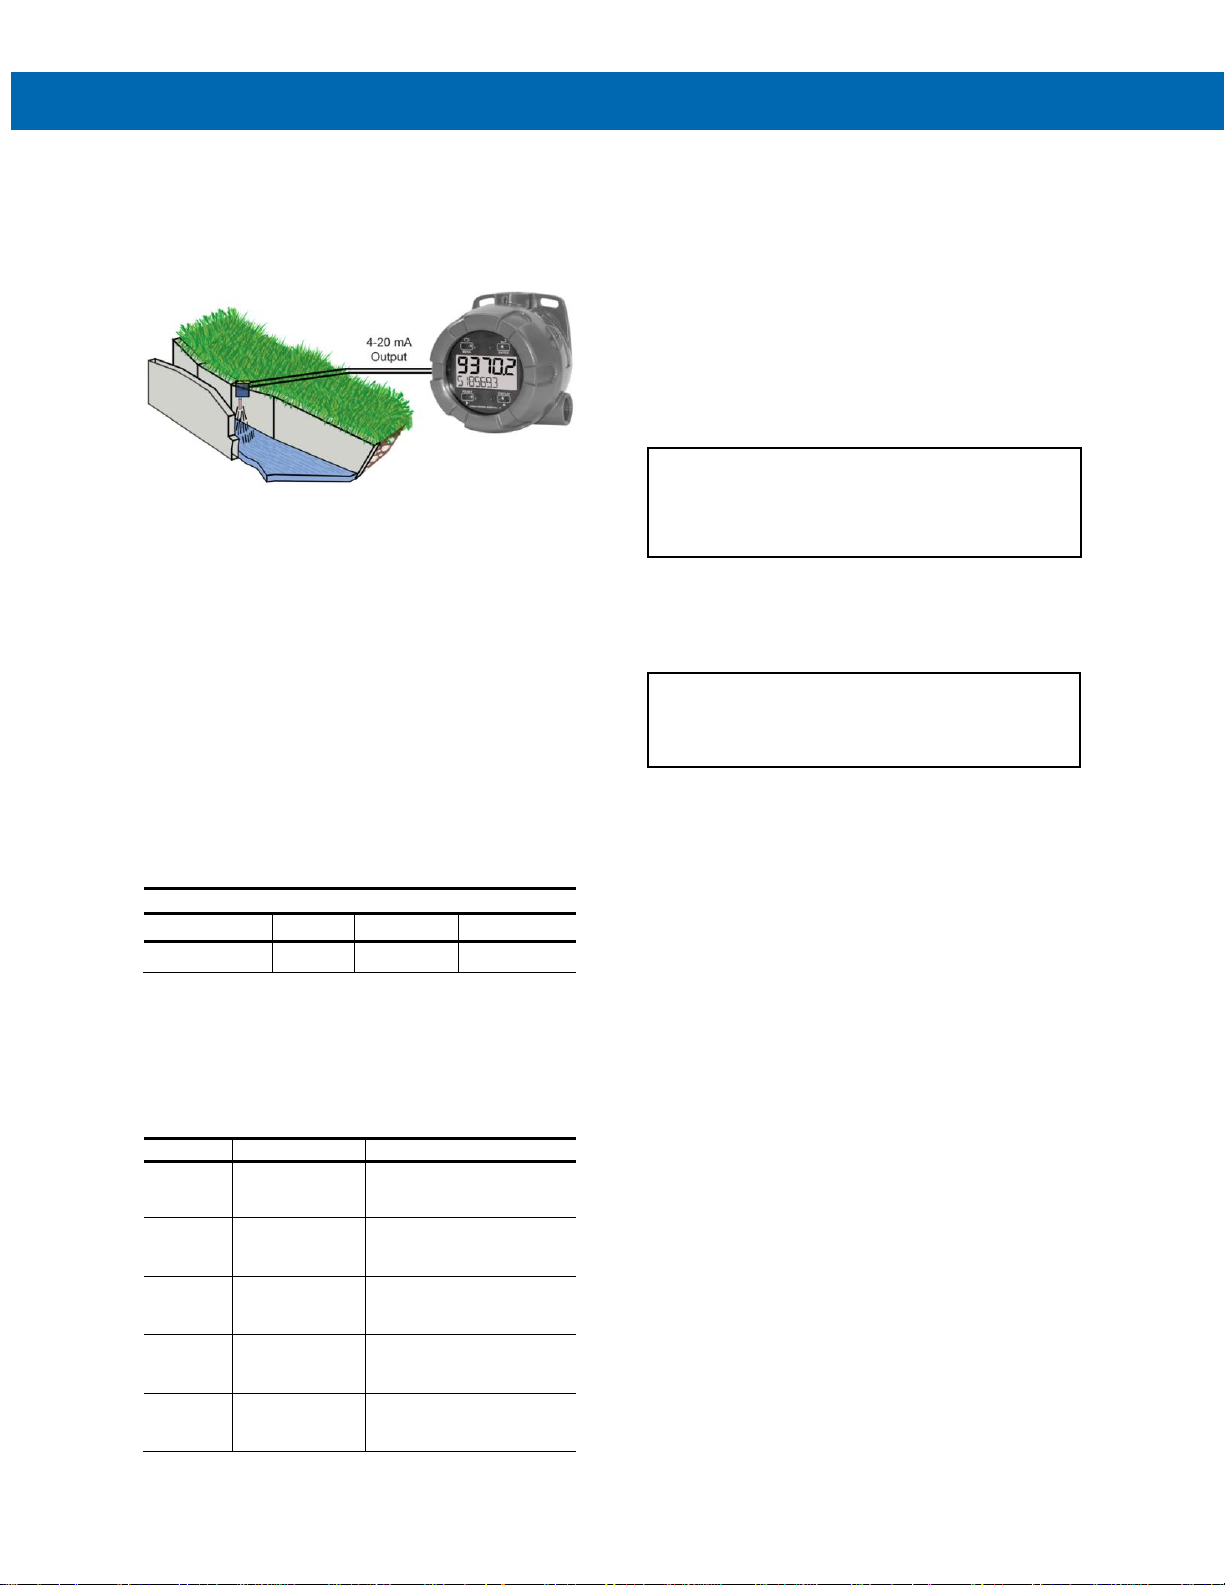
Programmable Exponent Linearization (Prog.E)
The programmable exponent can be used to linearize
the signal from level transmitters in open-channel flow
applications using weirs and flumes.
The PD6720, in combination with an ultrasonic level
transmitter, makes for an economical way to measure
and display open channel flow rate and total in most
weirs and flumes. A guide such as the ISCO Open
Channel Flow Measurement Handbook can provide
the user with all the information needed: the exponent
used in the flow equation for the desired flow units
and the flow rate for any given head height.
For example, to display the open channel flow rate
from a 3" Parshall flume, the ISCO handbook advises
the exponent is 1.547 and at the maximum head
height of 3.0 feet, the flow rate is 3.508 MGD.
3" Parshall Flume Discharge Table
Formula: CFS = 0.9920 H
1.547
GPM = 445.2 H
1.547
MGD = 0.6411 H
1.547
Where: H = Head in feet
Table 12-3
Head (Feet)
CFS
GPM
MGD
3.00
5.428
2436
3.508
ISCO Open Channel Flow Measurement Handbook, 3rd edition
With this information the PD6720 should be
programmed in the following fashion. This setup
assumes the level transmitter is programmed to
output 20 mA at the maximum head height of 1.10
feet; but any mA value at a head height with a known
flow rate may be used.
Function
Desired
Programming
Open
Channel
Flow
3" Parshall flume
Set Programmable Exponent to
1.547
Flow Rate
Millions of Gallons
per Day (MGD)
Set 4 mA = 0
20 mA = 3.508
Time base = Day
Total
Millions of Gallons
Set Totalizer Conversion Factor = 1
(password protect “total” to
avoid accidental reset)
NonResettable
Grand Total
Program meter so
grand total can
never be reset
Set non-resettable grand total
password
Display
Display Flow Rate,
Total, and Grand
Total
Set upper display for Grand
Total and lower display to
toggle between rate and total.
Input Signal Filter (FILTER)
The noise filter is available for unusually noisy signals
that cause an unstable process variable display. The
noise filter averages the input signal over a certain
period. The filter level can be set to low (LO), medium
(med), high (HI), or off (OFF). The higher the filter
setting, the longer the averaging time and so the
longer the display may take to find its final value.
The filter contains a noise filter bypass feature so that
while small variations in the signal will be filtered out,
large, abrupt changes to the input signal are
displayed immediately.
Internal Calibration (ICAL)
There is no need to recalibrate the meter for
milliamps when first received from the factory.
The meter is factory calibrated for milliamps prior
to shipment. The calibration equipment is traceable
to NIST standards.
The internal calibration allows the user to scale the
meter without applying a signal. The use of a
calibrated signal source is necessary to perform the
internal calibration of the meter. Check calibration
of the meter at least every 12 months.
Notes: The signal source must have a full-scale accuracy
of 0.002% or better between 4 and 20 mA in order to
maintain the specified accuracy of the meter.
Allow the meter to warm up for at least 15 minutes before
performing the internal calibration procedure.
The Internal calibration menu is part of the Advanced
features menu.
Press and hold the MENU button for 5 seconds to
enter the Advanced features menu. Press the Up
arrow button to scroll to the Internal Calibration menu
(ICAL) and press Enter.
The meter displays 4.000 mA. Apply a 4.000 mA
signal and press Enter. The display flashes for a
moment while the meter is accepting the signal.
After the signal is accepted, the meter displays 20.000
mA. Apply a 20.000 mA signal and press Enter. The
display flashes for a moment while the meter is
accepting the signal.
Error Message (SPAN ERROR)
An error message indicates that the calibration process
was not successful. After the error message is
displayed, the meter will revert to input 2 calibration
settings. The error message might be caused by
inadvertently leaving the signal at the previous level or
not maintaining the minimum span. Press the Menu
button to cancel the current calibration process if
necessary.
Information (INFO)
The Internal calibration menu is part of the Advanced
features menu. It shows software identification
number and version number. To determine the
software version of a meter:
Go to the Information menu (INFO) and press Enter
button.
Continue pressing Enter to scroll through the
software release number and software version.
Following the information display, the meter will exit
the Advanced features menu and return to run mode.
Page 22
PD6720 Field-Mount Loop-Powered Rate/Totalizer
Instruction Manual
22
Operation
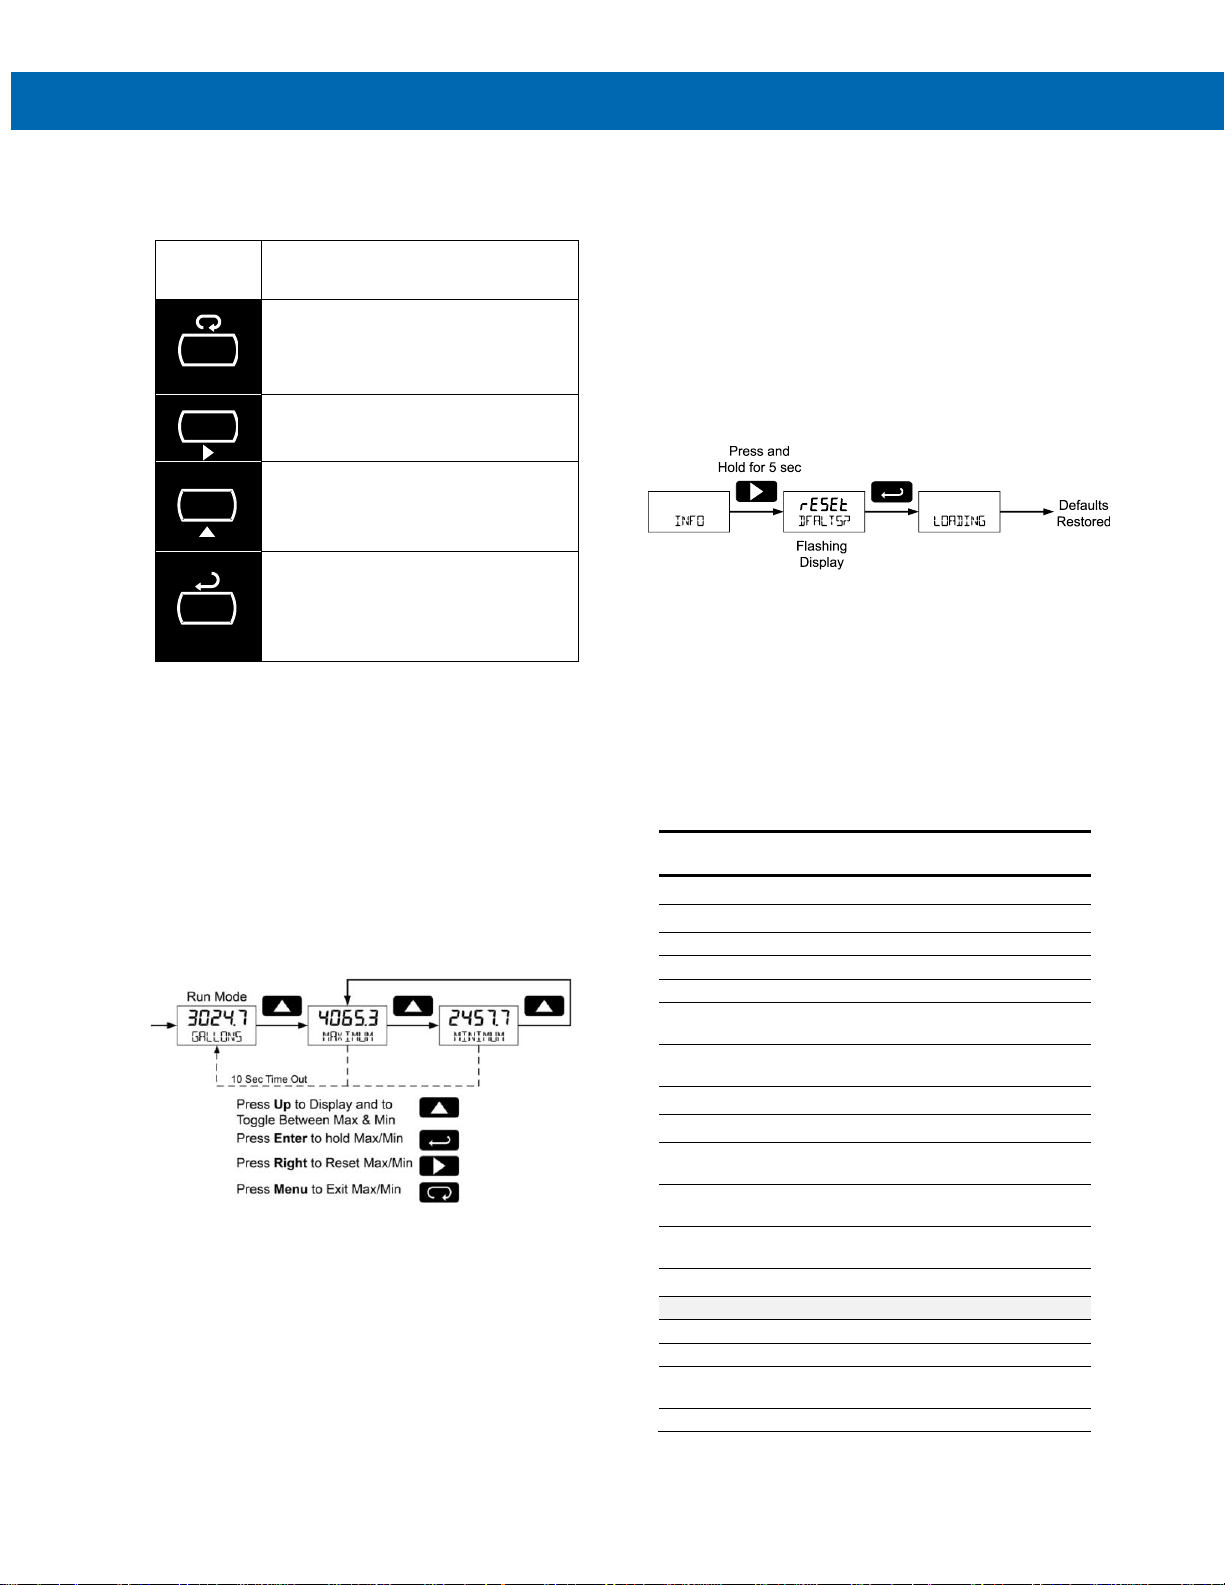
Front Panel Buttons Operation
Button
Symbol
Description
Press to enter or exit
Programming Mode or exit
Max/Min readings
Press to reset Max/Min readings
Press to display Max/Min
readings alternately
Press to display Max or Min
reading indefinitely while
displaying Max or Min
Maximum & Minimum Readings (MAXIMUM & MINIMUM)
The maximum and minimum (peak & valley) readings
reached by the process are stored in the meter since
the last reset or power-up. The meter shows MAXIMUM
or MINIMUM to differentiate between run mode and
max/min display. Press Enter to remain in Max/Min
display mode. If Enter is not pressed, the Max/Min
display readings will time out after ten seconds. The
meter will return to display the actual reading.
Reset Meter to Factory Defaults
When the parameters have been changed in a way
that is difficult to determine what’s happening, it might
be better to start the setup process from the factory
defaults.
Instructions to load factory defaults:
Enter the Advanced features menu.
Press and hold Reset button when INFO is shown.
Press Enter when RESET DFALTS? prompt is shown
Note: If Enter is not pressed within three seconds, the
prompt will stop flashing return to showing INFO.
Factory Defaults & User Settings
The following table shows the factory setting for most
of the programmable parameters on the meter. Next
to the factory setting, the user may record the new
setting for the particular application.
Model: ____________________________________
S/N: ______________________________________
Date: _____________________________________
Parameter
Display
Default
Setting
User
Setting
Programming
PROGRAM
Scale
Input 1
INPt1
4.000 mA
Display 1
Dspl1
4.000
Input 2
INPt2
20.00 mA
Display 2
Dspl2
20.000
Decimal point
rate
Dd.ddd
3 places
Decimal point
total
Dddddd.dd
2 places
Tag
tag
Off
Time Base
tbase
Minute
Conversion
Factor
TotCF
1.0000
Total Reset
Function
T rst
Manual Enabled
Password
PASSWRD
00000
(unlocked)
Programming
PROGRAM
Scale
Advanced Features
Output
OUTPUT
Off
Function
FUNCTN
Linear
Cutoff
CUTOFF
0
(disabled)
Filter
FILTER
Low
MENU
RESET
DISPLAY
ENTER
Page 23
PD6720 Field-Mount Loop-Powered Rate/Totalizer
Instruction Manual
23
Troubleshooting
Due to the many features and functions of the meter, it’s possible that the setup of the meter does not agree with
what an operator expects to see. If the meter is not working as expected, refer to the Diagnostics menu and consult
the recommendations described below.
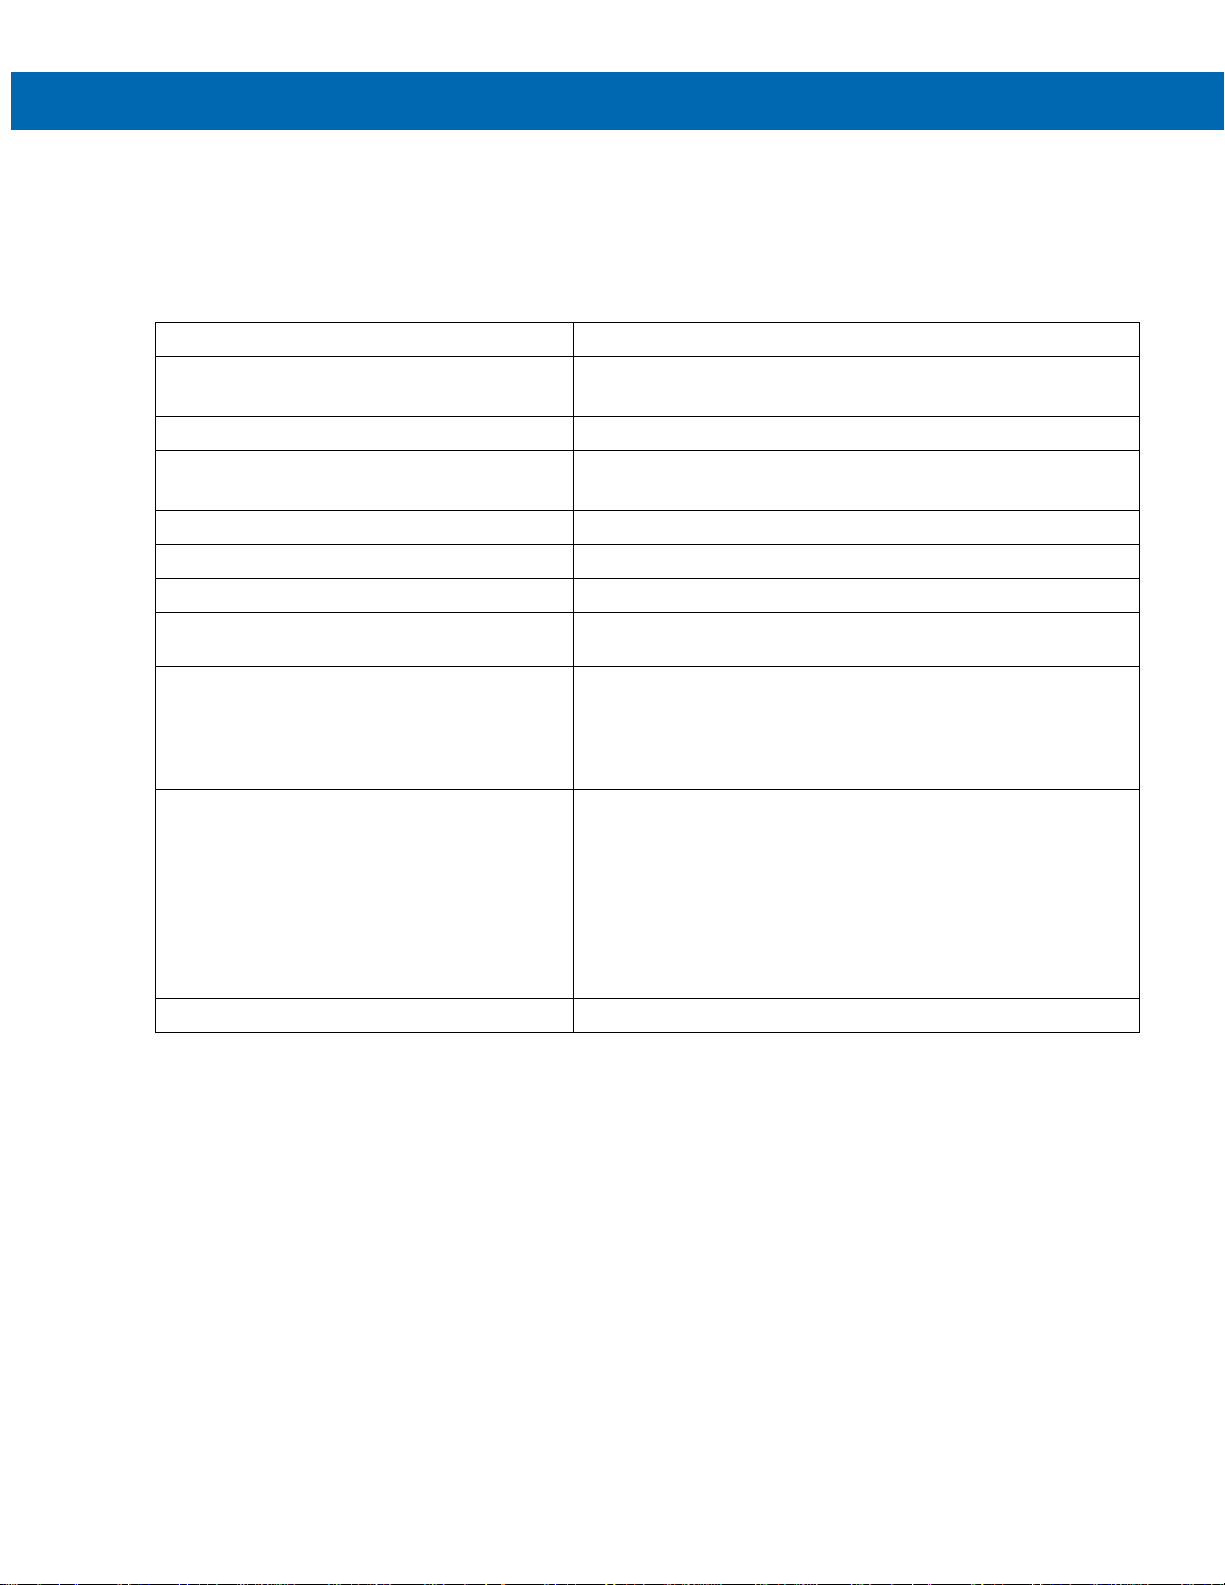
Troubleshooting Tips
Symptom
Check/Action
No display or faint display
Check input signal connections.
Perform hard reset by shorting S+ and S- terminals.
Rate display unsteady
Increase filter setting in Advanced menu.
Meter displays error message during calibration
(Span eRROR)
Check signal connections.
Verify minimum input span requirements.
Meter flashes 99999 or -9999
Check input signal is within scaled range of 99999 and -9999.
Display stuck displaying MAXIMUM or MINIMUM
Press Menu to exit Max/Min display readings.
Display response is too slow
Check filter setting to see if it can be lowered to LO or OFF.
If the display locks up or the meter does not
respond at all
Perform hard reset by shorting S+ and S- terminals.
Backlight does not appear.
Backlight is intended for viewing assistance in dim lighting
conditions. It may not be noticeable under good lighting conditions.
Check connections are as shown in Figure 5. Connections with
Loop-Powered Backlight or Figure 6. Connections with ExternallyPowered Backlight on page 9.
SafeTouch buttons do not respond
Service menu was selected, or mechanical button was pushed.
The SafeTouch buttons will be re-enabled automatically
60 seconds after the last button push.
If slide switch on connector board is in Lock position,
switch to Unlock.
Sunlight can interfere with the sensors. It is recommended to shield
the window from sunlight while operating the buttons by standing so
as to block direct sunlight.
Other symptoms not described above
Call Technical Support for assistance.
Page 24
PD6720 Field-Mount Loop-Powered Rate/Totalizer
Instruction Manual
24
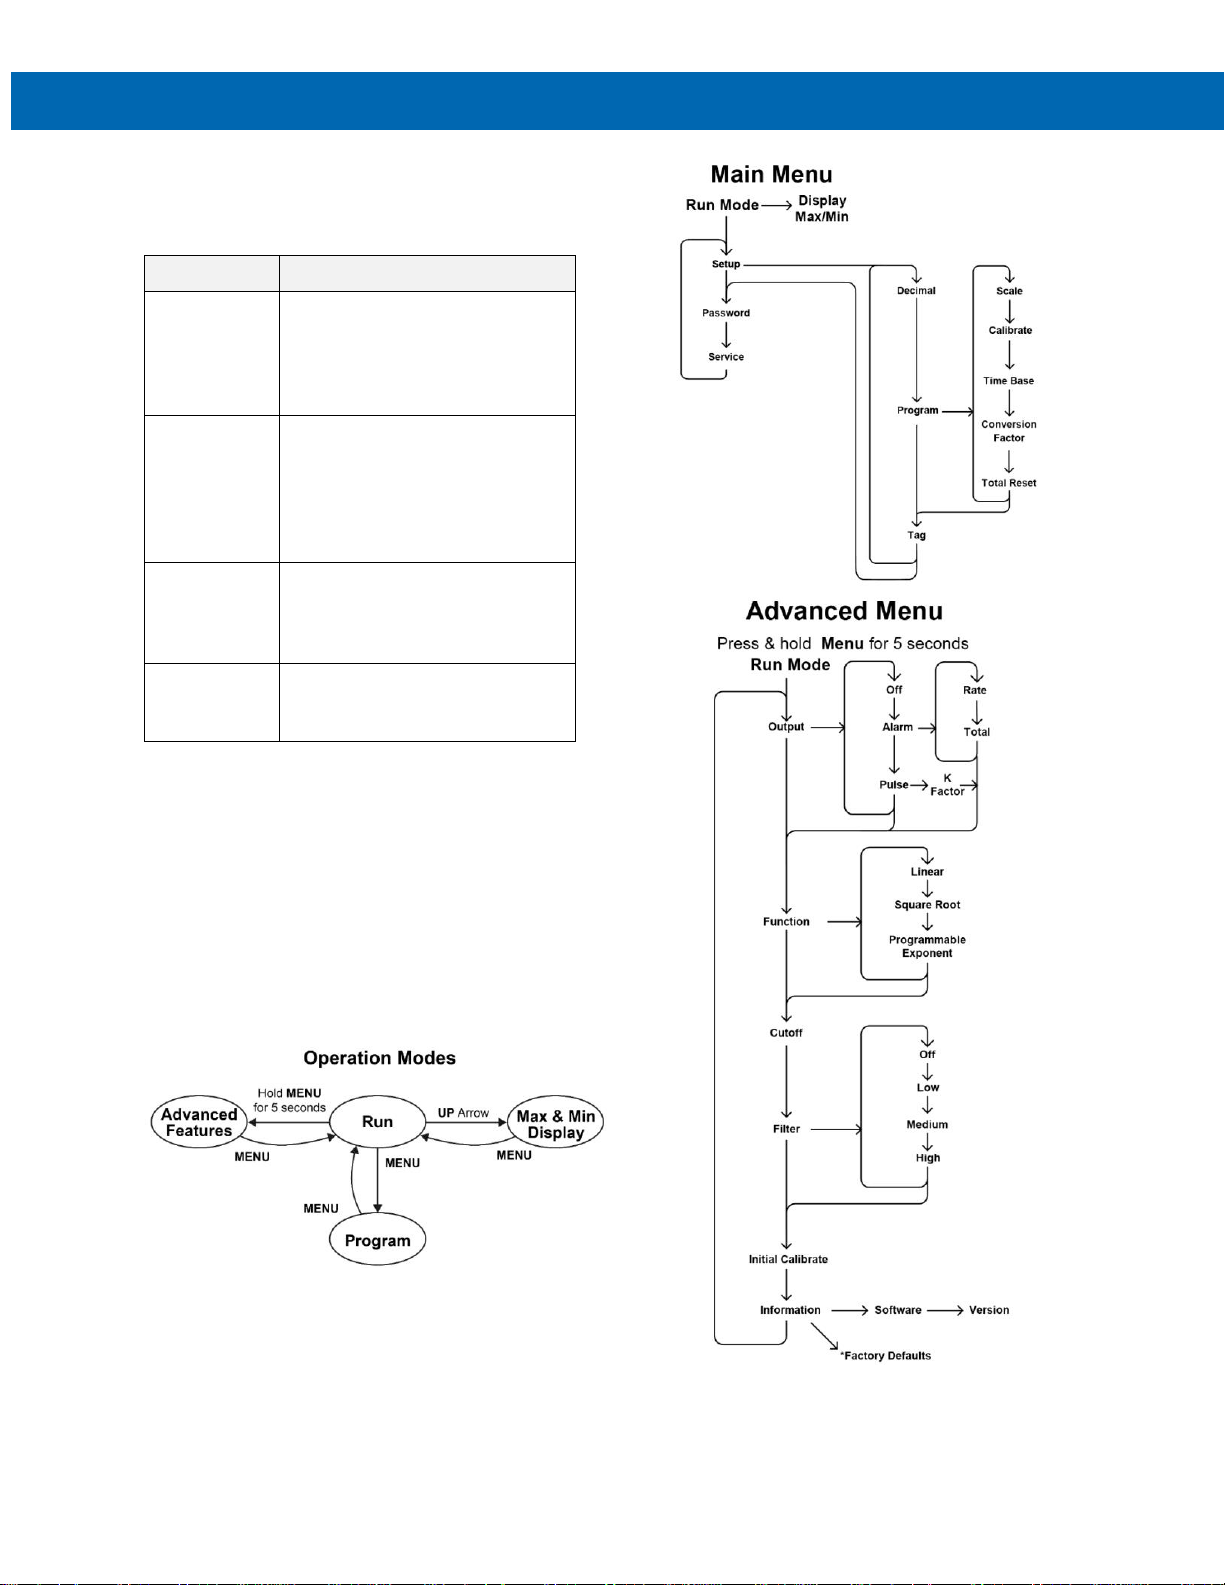
Quick User Interface Reference
Pushbutton
Function
MENU
Go to programming mode or
leave programming. Hold for 5
seconds to enter
Advanced Features menu
directly.
RIGHT
Arrow
Move to next digit. Go to
previous menu or
alphanumeric character
selection.
Reset max or min while
displayed.
UP
Arrow
Move to next selection or
increment digit. Cycle through
maximum, minimum,
and mA display mode.
ENTER
Accept selection/value and
move to next selection.
Acknowledge alarms.
Max/Min Mode
While in Run Mode, pressing Up Arrow will initiate
MAX/MIN Mode. Up Arrow toggles between MAX &
MIN displays, and Right Arrow resets the MAX/MIN
to the current value. Press Menu or wait 10 seconds
to return to Run Mode. Pressing Enter/Ack will
disable the 10 second timeout and continuously
display Max or Min.
To enter the Advanced Features Menu, hold the
Menu button for 5 seconds.
*Access by holding Right/Reset for 3 seconds
Page 25

PD6720 Field-Mount Loop-Powered Rate/Totalizer
Instruction Manual
PRECISION DIGITAL CORPORATION
233 South Street • Hopkinton MA 01748 USA
Tel (800) 343-1001 • Fax (508) 655-8990
www.predig.com
LIM6720_C
SFT049 Ver 1.200 & up
07/20
Contact Precision Digital
Technical Support
Call: (800) 610-5239 or (508) 655-7300
Fax: (508) 655-8990
Email: [email protected]
Sales Support
Call: (800) 343-1001 or (508) 655-7300
Fax: (508) 655-8990
Email: [email protected]
Place Orders
Email: [email protected]
For the latest version of this manual please visit
www.predig.com
 Loading...