

Page 1
1/18
www.praktica-users.com/cams/nova/sup ertlmanual.html
The definitive equipment listing for Prakticas on the internet
Main | Camera Bodies | Lenses | Accessories | Photo index | Contact
Cameras -> Praktica Nova -> Praktica Super TL -> Manual
Note:
If the 2nd half of the pictures won't load for you the first time, please hit "refresh" and they'll continue downloading.
Control parts of the PRAKTICA super TL - Special Features of the PRAKTICA super TL - Internal Measuring System of the
PRAKTICA super TL - How the PRAKTICA super TL works - Abridged instructions - Opening the camera back - Inserting
the film - Closing the camera back - Setting the film speed - Type of film and length of film - Preparing for the exposure Setting the exposure speed - Setting the diaphragm - Automatic exposure system - Focusing - Releasing and cocking the
shutter - Changing the film - Exchanging lenses - Flash exposures - Exchanging the power source - Maintenance of
camera and lens - Accessories
While congratulating you on having acquired a PRAKTICA super TL, we would also request you to treat your camera
kindly. Please take your time and read these Instructions for Use carefully.
Although of very rigid build, the PRAKTICA super TL is, nevertheless, a mechanical-optical precision instrument. Handled
with care, it will reward you, even when subjected to rigorous conditions, by giving you beautiful photos.
On the inside cover pages you will find specified illustrations. The reference numbers in the text are printed in
parentheses.
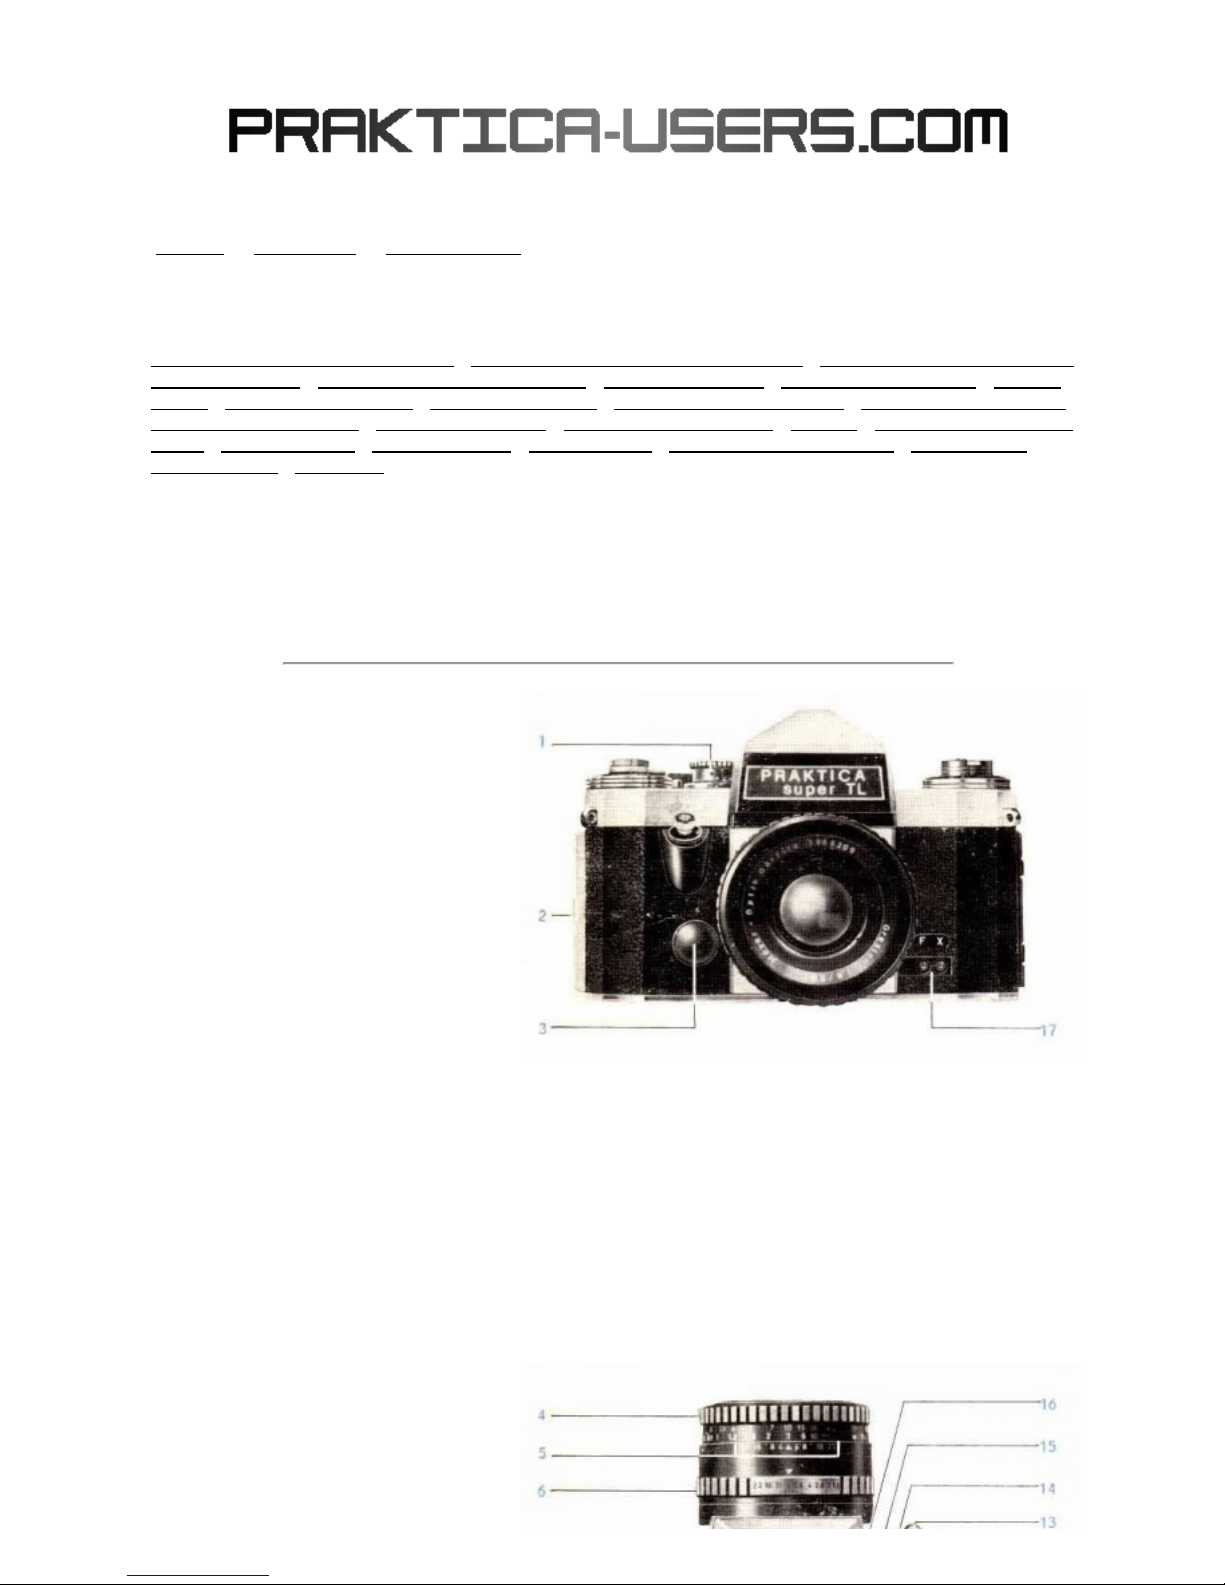
Control parts of the PRAKTICA super TL
1 Film speed indicator
2 Latch for camera back
3 Meter key
4 Distance setting ring
5 Depth-of-field indicator
6 Diaphragm setting ring
7 Length-of-film reminder dial
8 Rewind crank
9 Cocking lever
10 Rewind release knob
11 Film type reminder dial
12 Exposure counter
13 Shutter release
14 Setting knob for shutter speeds
15 Dial showing film speeds
16 Exposure speed index
17 Flash socket
18 Rewind knob
Page 2
2/18
www.praktica-users.com/cams/nova/sup ertlmanual.html
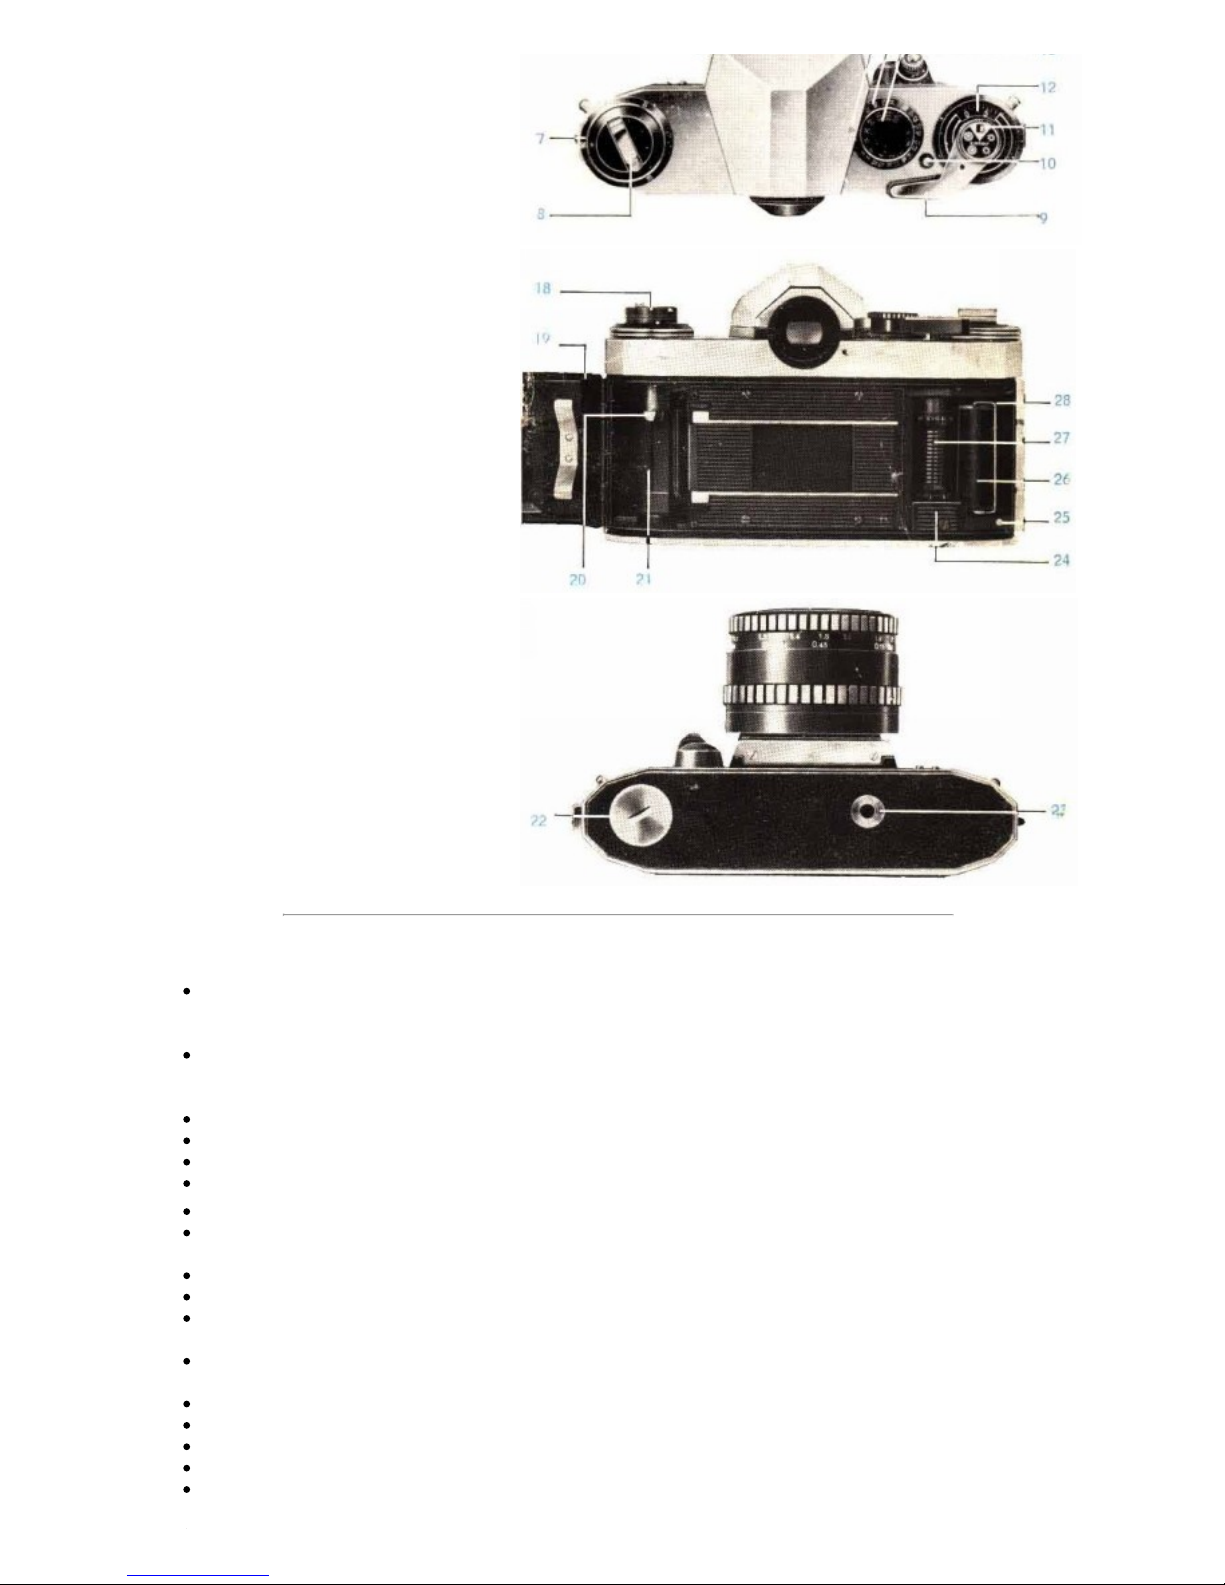
19 Camera back
20 Carrier shaft
21 Cartridge chamber
22 Cover plate for power source
23 Tripod socket
24 Supporting piece for PL system
25 Marking point
26 Take-up spool
27 Transport sprocket
28 Wire bracket
Special Features of the PRAKTICA super TL
The PRAKTICA super TL is the converging point of the modern PRAKTICA single-lens reflex system. Key to this new
system is photography is a newly devised method of automatic exposure based on the principle of internally
measuring the light in the path of rays by means of a photo resistor.
All values influencing the exposure, such as image angle, aperture, and extension factors for filters and in macro
and micro work, are taken into account by the meter system. The measuring range extends from 2 apostilbs at f/2
to 250.000 apostilbs at f/22.
Meter key connected to the metering system.
Power source for the metering system has a working life of approximately two years.
Range of film speeds from 9 DIN to 33 DIN or 6 ASA to 1600 ASA.
Focal-plane shutter giving exposure speeds from 1 sec. To 1/500 sec., and B.
Non-rotating dial for setting the shutter speeds.
Prism viewfinder with bright, unreversed and parallax-free finder image. Due to the instant return mirror it is
almost continuously visible.
Two possibilities of focusing on the bright viewfinder image in micro-prism screen or groundglass circle.
Synchronization for flash bulbs and electronic flash.
Conveniently placed rapid wind lever and smoothly working oblique shutter release with locking device against
accidental triggering.
Shutter cocking mechanism and film transport are coupled and provided with locking device against double
exposures and blanks.
Automatic exposure counter.
Automatic pressure diaphragm.
Film loading facilitated by PL System.
Swing-out rewind crank, self-locking rewind release knob.
Interchangeable lenses from 20 mm to 1000 mm focal length, with PRAKTICA fitting, mostly with automatic
pressure diaphragm.
Page 3
3/18
www.praktica-users.com/cams/nova/sup ertlmanual.html
Wide range of PRAKTICA accessories.
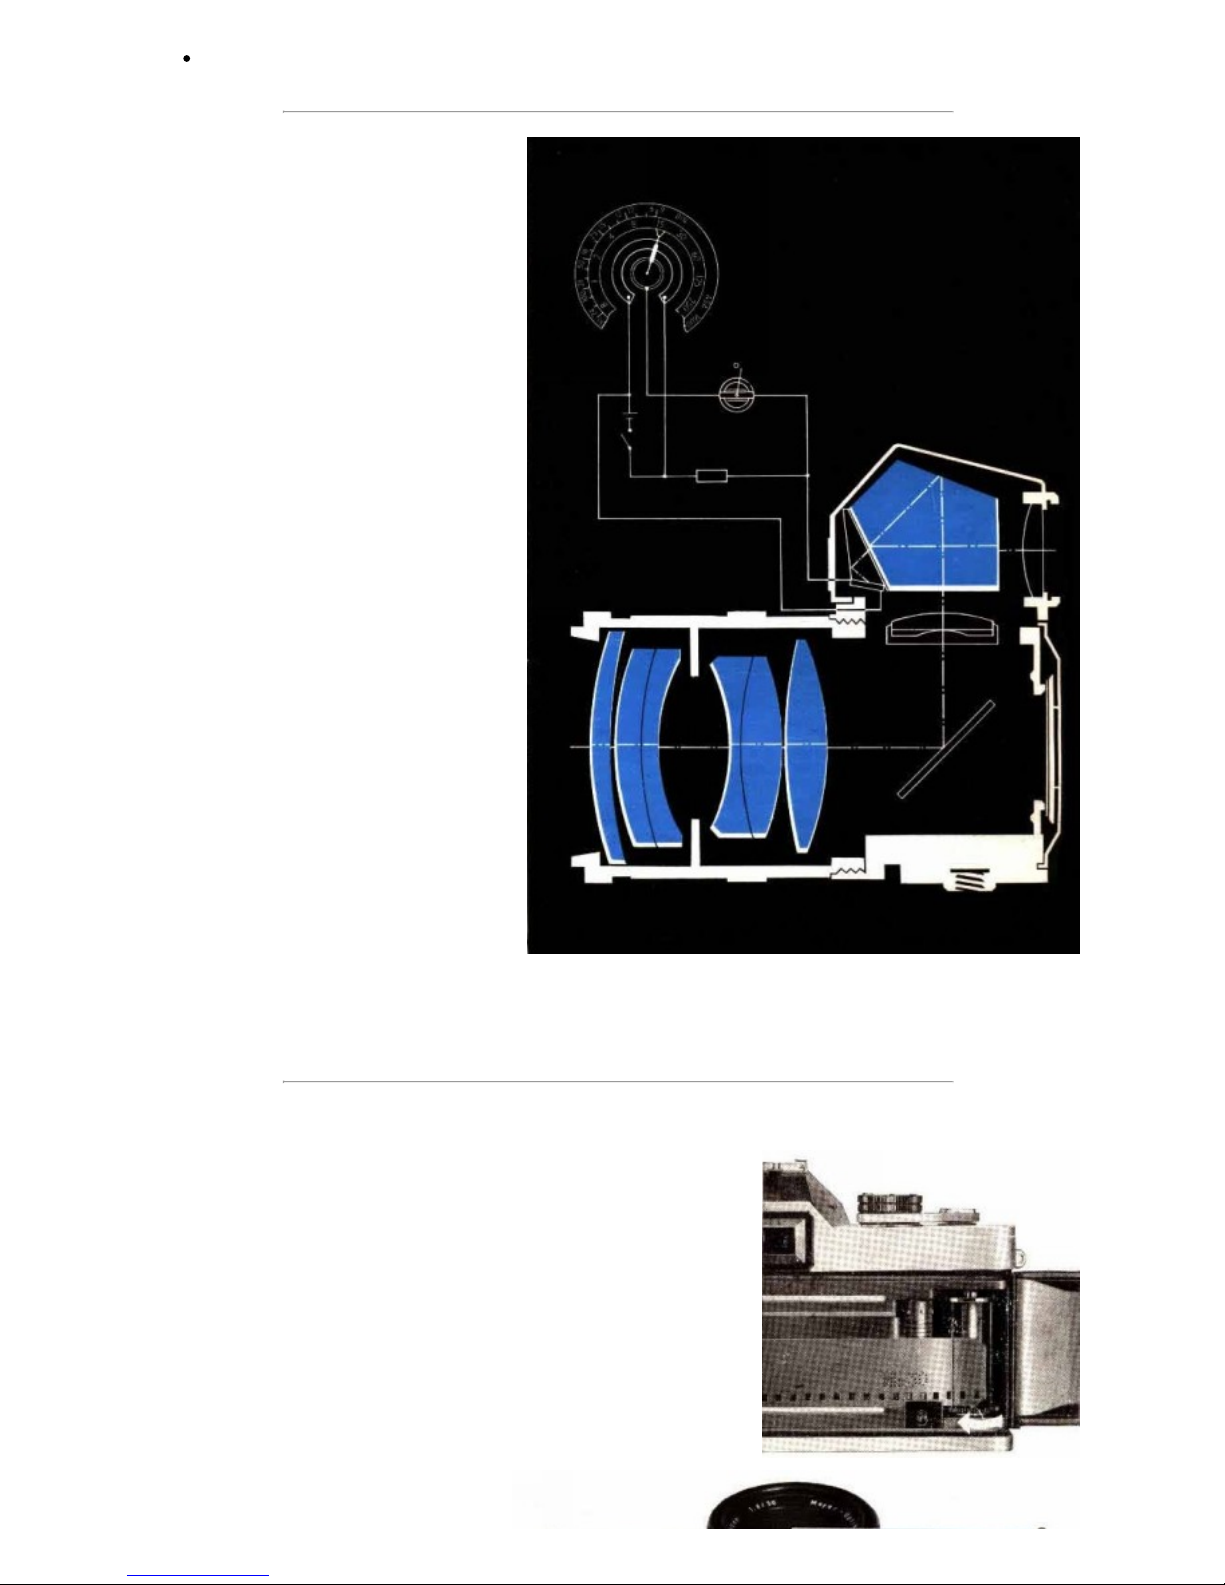
Internal Measuring System of the
PRAKTICA super TL
The path of rays forming the image of the
object is conducted through the lens, by way of
the instant return mirror, the Fresnel lens with
focusing system, the pentaprism and the ocular
to the eye of the viewer. Focusing is performed
by rotation of the distance setting ring on the
lens mount with the aid of the focusing system.
Part of the light coming from the entire image
area is deflected from the path of rays of the
viewfinder to the photo resistor. Any light
particles outside of the image angle, which
might cause incorrect measuring, are thus cut
off. All correcting factors to be observed
hitherto for the use of filters, close-ups and
micro attachments are, in the internal metering
system, directly taken into account. The meter
reading is ammeter. Power source of the
exposure meter system is a mercury oxide
battery installed in the base of the camera.
Pressure on the meter key closes the measuring
circuit.
How the PRAKTICA super TL works
When the shutter release is depressed the
instant return mirror moves out of its viewing
position into picture taking position. At the same
time, the pressure diaphragm of the lens is
automatically closed down to the selected
aperture. As soon as the focal-plane shutter has
run down the instant return mirror springs back
into viewing position and the pressure
diaphragm is fully opened again. This means
that the finder image is - except for the moment
of the exposure - continuously visible. In the
single-lens reflex system - even if interchangeable lenses of extremely long focal lengths or close-up attachments are
being used - there is never any danger of parallax.
The finder image is somewhat smaller than the final negative. Everything visible in the finder image is sure to appear on
the film, which means that the finder image may be utilized to its very edges.
Abridged instructions
A) Opening the camera back
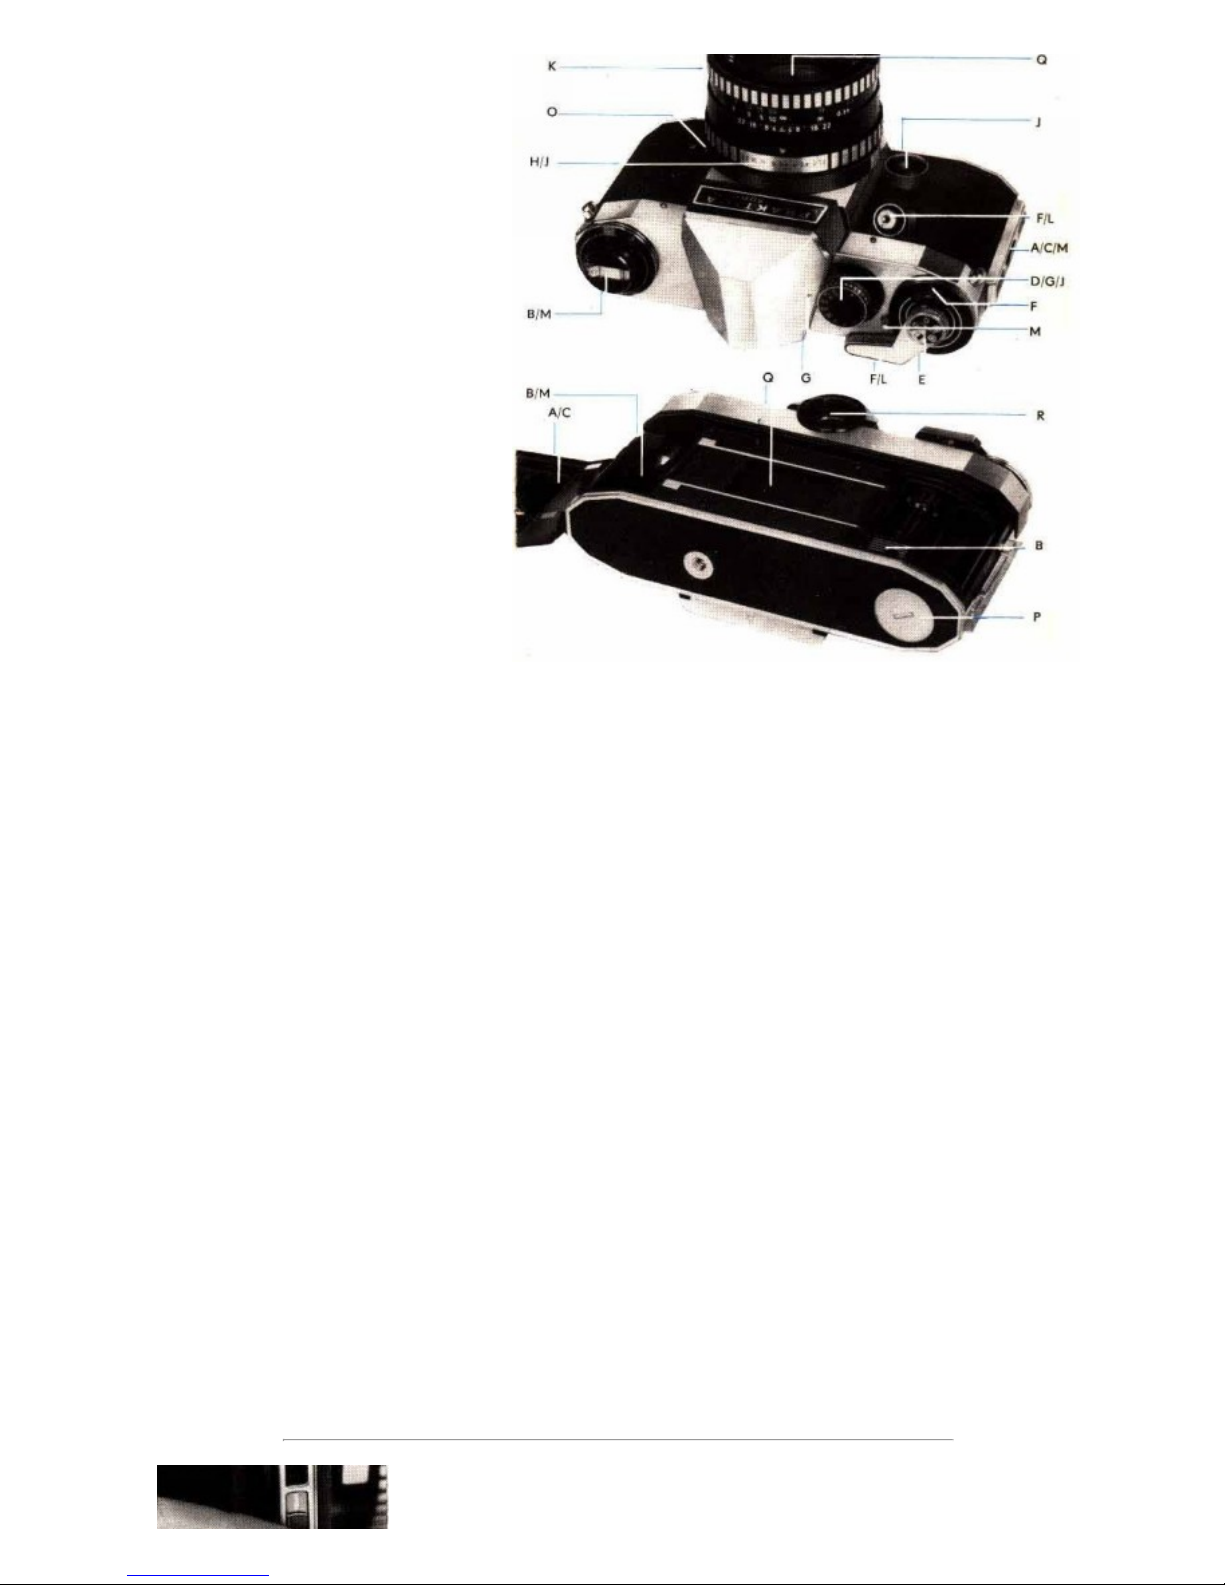
B) Inserting the film
Pull out rewind knob (18) as far as it will go. Place full cartridge into cartridge
chamber (21). Push rewind knob (18) in again. Push lower perforation of film
from above underneath the little support (24), across the transport sprocket
(27), place beginning of film strip on the core of take-up spool (26) as far as
marking point (25). Wire bracket (28) must not stand upwards!
Should the film show a pronounced tendency to warping we recommend to
additionally turn the knurled spool disc anti-clockwise till one of the catch
straps rests on the start of the film.
C) Closing the camera back
D) Setting the film speed
Lift setting knob (14) and rotate it either way.
Page 4
4/18
www.praktica-users.com/cams/nova/sup ertlmanual.html
The white dot (1) on the perimeter of the
setting knob (14) has to stand against the
required film speed numeral on dial (15).
E) Sett ing the type of film
Rotate film type reminder dial (11) until the
symbol marking the film meets the red dot.
F) Preparing for the exposure
Actuate shutter release (13) and cocking lever
(9) until exposure counter (12) stands on
number 1.
G) Setting the exposure speed
Rotate setting knob (14) (without lifting it)
until the desired speed numeral coincides with
red triangle (16).
H) Setting the diaphragm
Rotate diaphragm setting ring (6) on lens
mount to bring the desired diaphragm
numeral against the red mark.
I) Automatic exposure system
Preselect either the exposure speed or the
aperture. Depress meter key (3). While the
key is being depressed, adjust either the
aperture or the exposure speed so as to
centre the meter needle in the image field to
the circular marking point.
K) Focusing
Rotate distance setting ring (4) until the image in the circular micro-prism screen is perfectly sharp.
L) Releasing and cocking the shutter
Actuate shutter release (13). When the shutter has run down a red signal appears in the finder image. Swing cocking
lever (9) around until it stops and move it back again.
M) Changing the film
After the last exposure, depress rewind release knob (10). Swing out rewind crank (8) on rewind knob (18). Rewind film
in direction of arrow. Open camera back (19). Remove cartridge from camera.
N) Exchanging lenses
O) Flash exposures
P) Exchanging the power source
Q) Maintenance of camera and lens
R) Accessories
These abridged instructions are a short summary of the main points in the Instructions for Use. These points deserve
special attention. They are, however, not a substitute for the valuable information which you will only be able to gain by
reading the complete instructions.
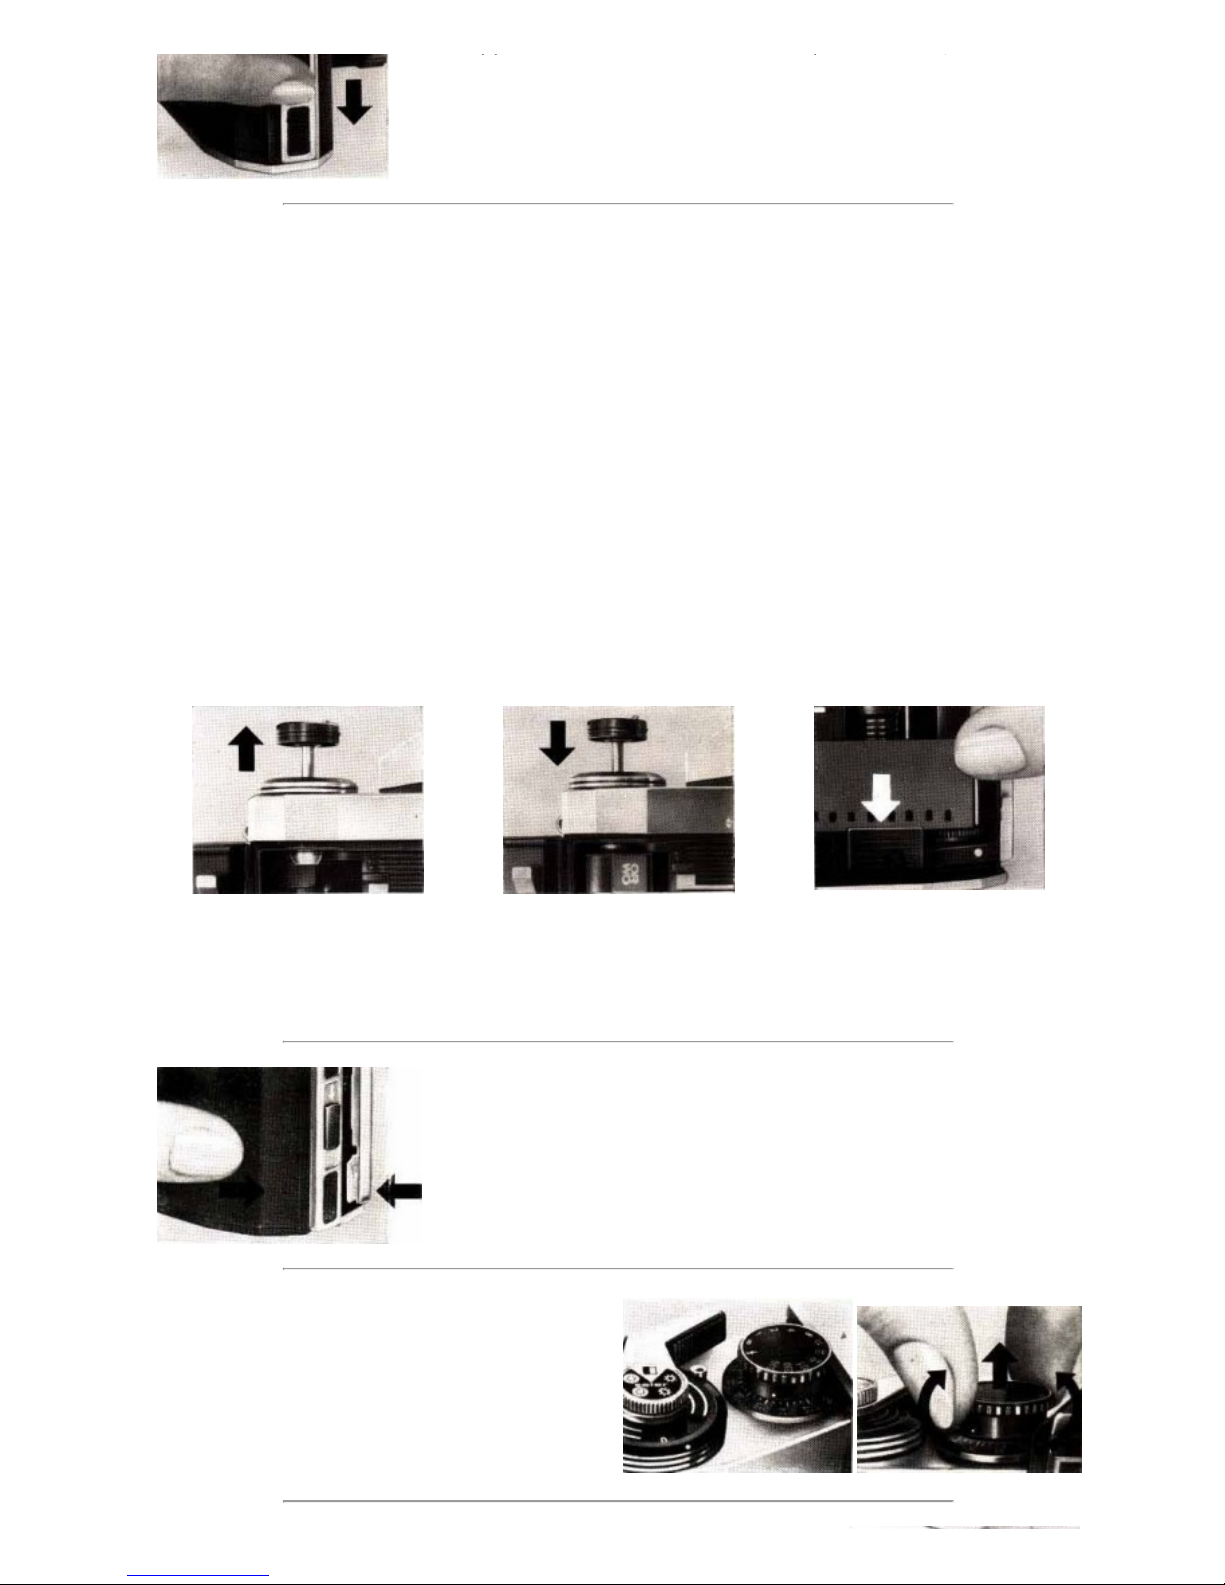
A) Opening the camera back
Push latch (2) for camera back in direction of arrow. Open camera back, and the
Page 5
5/18
www.praktica-users.com/cams/nova/sup ertlmanual.html
Push latch (2) for camera back in direction of arrow. Open camera back, and the
exposure counter (12) will automatically jump to zero.
B) Inserting the film
The PRAKTICA super TL accepts any type of perforated 35 mm film in commercially available standard cartridges. The
cartridges contain film lengths for 36 or 20 exposures in the 24 X 36 mm picture format - either on black-and-white film,
on colour negative film for colour prints, or on colour reversal film for colour transparencies.
The cartridges are light tight. Nevertheless, we would advise you not to insert films in direct sunlight - the shade provided
by your own body will suffice. Pull out rewind knob (18) as far as it will go. Place cartridge into cartridge chamber (21)
and push rewind knob (18) - with slight backward and forward movements - right back into the camera. Carrier shaft (20)
will engage in the core of the cartridge. Push lower perforation of film from above underneath the little support (24) over
the transport sprocket (27), place beginning of film strip on to the core of take-up spool (26) as far as marking point (25).
The wire bracket (28) must not stand upwards! Should this be the case, rotate lower milled ring of take-up spool (26) to
bring the brackets to horizontal position.
C) Closing the camera back
Close camera back (19) and press it on tightly. It locks automatically.
D) Setting the film speed
Lift setting knob (14) and rotate it either way. Dial (15) below
the knob remains in stationary position. The white dot (1) on
the perimeter of setting knob (14) has to be brought against
the required film speed numeral on dial (15). Setting knob
(14), when lowered, clicks in.
Page 6
6/18
www.praktica-users.com/cams/nova/sup ertlmanual.html
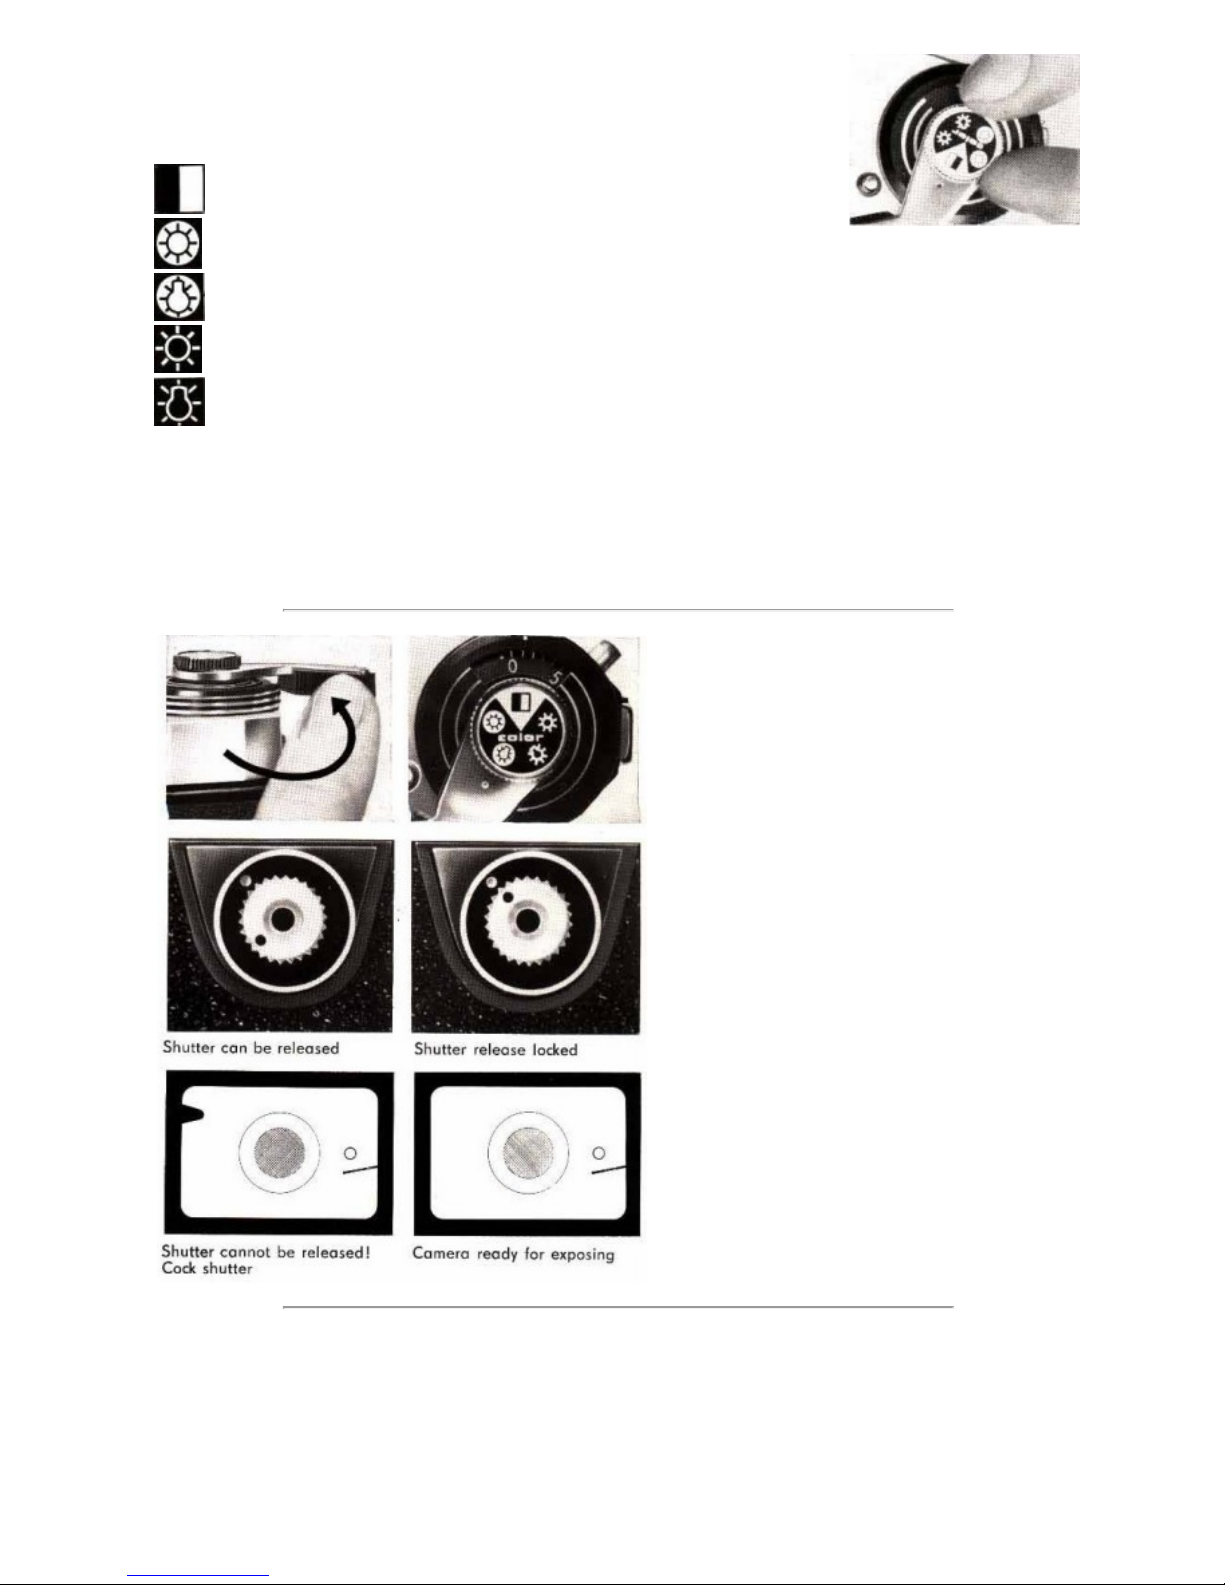
E) Type of film and length of film
The film type reminder dial (11) is to help you remember what kind of film you have
loaded in your camera.
Black-and-white film
Colour reversal film for daylight
Colour reversal film for artificial light
Colour negative film for daylight
Colour negative film for artificial light
The symbol corresponding to your film is set against the red marking point. You will thus always know which type of film
you have in your camera.
The length-of-film reminder dial (7) serves to mark the number of exposures possible with the film in the camera.
The selector of the length-of-film reminder dial (7) has to be set to the corresponding number (12, 20 or 36).
F) Preparing for the exposure
Swing cocking lever (9) around as far as it will go and
let it glide back. (Move cocking lever only in winding
direction. Forced movement in the opposite direction will
cause damage!) Actuate shutter release (13).
To avoid inadvertent tripping, the shutter release (13) is
provided with a locking device. The release mechanism
is locked when the red dots on the knob and on the
outer ring meet. The mechanism is unlocked by rotation
of the knob through 90°.
Repeat the cocking and releasing procedure described
above once more and then cock the shutter again.
Rewind knob (18) moves simultaneously in anticlockwise direction.
The automatic exposure counter (12) now stands on
frame number 1. Special setting of the exposure counter
is not necessary since it starts working automatically
when the camera back is closed.
Page 7

7/18
www.praktica-users.com/cams/nova/sup ertlmanual.html
G) Setting the exposure speed
The focal-plane shutter of the PRAKTICA super
TL is calibrated for exposure speeds from 1
sec. to 1/500 sec. The B setting is for any
desired length of time. (The shutter remains
open as long as the release knob (13) is
depressed or kept open by means of a cable
release with locking device.) For flashlight
exposures please refer to Section O.
The numerals on the setting knob stand for the
exposure speeds as follows:
Red numerals long exposure time
B, 1 = 1 sec., 2 = ½ sec.,
4 = ¼ sec., 8 = 1/8 sec.,
15 = 1/15 sec.
For these exposures a tripod has to be used.
White numerals short exposure time
30 = 1/30 sec., 60 = 1/60 sec.,
125 = 1/125 sec., 250 = 1/250 sec.,
500 = 1/500 sec.
The speeds are graduated so that each
numeral indicates double or one half of the
speed marked by the neighbouring figure on
the scale
Set the speed by rotating setting knob (14)
until the desired numeral meets the red
triangle (16). Setting knob (14) clicks in
noticeably at each speed stop, accidental
readjustment is thus impossible.
Please note that setting knob (14) must not be
lifted up for setting the exposure speeds (this
is done only to mark the speed of film). The
exposure speeds can be set either before or
after the shutter has been cocked.
H) Setting the diaphragm
On the lenses with automatic pressure diaphragm in the
PRAKTICA super TL the desired aperture numeral on the
diaphragm setting ring (6) need only to be brought to
meet the red index on the lens mount. The diaphragm
closes automatically when the shutter release is
depressed.
For the purpose of checking the depth of field, most
lenses can be stopped down to the preselected value by
Page 8

8/18
www.praktica-users.com/cams/nova/sup ertlmanual.html
a manually operable lever before the exposure is made.
I) Automatic exposure system
If lenses with automatic pressure diaphragm are being used, two ways
of metering are possible with the automatic exposure system of the
PRAKTICA super TL.
Exposure reading with shutter speed preselected (e. g. for
objects in motion)
Shutter speed is set! Depress meter key (3) and rotate diaphragm
setting ring (6) on lens mount until the meter needle in the image field
is centred to the circular mark.
Exposure reading with aperture preselected
(e. g. for a desired depth of field)
Aperture is set! Depress meter key (3) and rotate
setting knob (14) - using only click stops - until the
meter needle is centred to the circular mark. Should
the click stop settings of knob (14) not permit a
perfectly accurate centring of the needle, fine
adjustment has to be made by means of diaphragm
setting ring (6). On pressure of meter key (3) the
diaphragm is automatically closed to the preselected
Page 9

9/18
www.praktica-users.com/cams/nova/sup ertlmanual.html
value.
Measuring range of the PRAKTICA super TL
Film speed
Expsoure speed
DIN ASA
9 6 1 sec. ... 1/60 sec.
12 12 1 sec. ... 1/125 sec.
15 25 1 sec. ... 1/125 sec.
18 50 1 sec. ... 1/500 sec.
21 100 1 sec. ... 1/500 sec.
24 200 1 sec. ... 1/500 sec.
27 400 1 sec. ... 1/500 sec.
30 800 1 sec. ... 1/500 sec.
33 1600 1 sec. ... 1/500 sec.
Outside the range given above, the meter system of
the camera is out of action for the film speeds and
shutter speeds as indicated. The meter needle then
stands in its end position in the image field, and
exposure readings are not possible.
Should the meter needle make no signs of
deflecting if a reading, as described above, is to be
taken, the battery will have to be exchanged (see
Section P).
Exposure reading with lenses without
automatic pressure diaphragm
In principle, exposure meter readings as described above are possible also with these types of lenses. Only the diaphragm
has to be set to the desired value by hand. It is advisable, with such lenses, to do the focusing before taking the meter
reading, since the diaphragm does not reopen automatically.
Owing to the construction of their barrels, some of the older type lenses protrude into the space accommodating the
diaphragm mechanism and can, therefore, not be used, as they would render it impossible to release the shutter.
K) Focusing
The prism viewfinder of the PRAKTICA super TL is fitted with a Fresnel lens to brighten up the image. Focusing is
performed by rotating the distance setting ring (4) on the lens mount.
There are two different methods of determining the sharpness of the image:
Page 10

10/18
www.praktica-users.com/cams/nova/sup ertlmanual.html
Focusing on the central micro-prism screen
Correct focusing is achieved as soon as the image in the
micro-prism screen is clear and free from fuzziness.
If the image looks fuzzy or crumbles into screen
elements, it s out of focus.
Focusing is extremely reliable owing to the apparent
quick transition from unsharpness to sharpness and vie
versa. It is advisable to do the focusing with the lens at
the widest aperture (smallest diaphragm numeral).
Focusing on the circular groundglass area
The groundglass area encircling the micro-prism screen
may be used for focusing with the lens at a small
aperture (large diaphragm numeral) or in case of greater
scales of reproduction as, for instance, in close-up or
macrophotography. The remaining section of the finder
image is not meant for focusing.
Depth-of-field indication (5)
These are the figures on the right and left of the red
focusing index. The exposure distance is set against the
red mark. On the left of the mark, next to the desired
diaphragm numeral, you read on the distance scale
where the depth of definition begins, and on the right,
where it ends.
For the 50 mm Pancolar f/1.8 from Jena
In accordance with the aperture setting, the two black
marks refer to the depth of field. The distance figure
stand against the red index. On its left you see where the
depth of definition begins and on its right, where it ends:
You move forward from the marks on the white or black
rim surfaces towards the distance scale.
Depth of field can also be checked in the viewfinder
image on actuation of meter key (3), or of the manual
stop down lever on the lens mount after the exposure
reading has been taken.
All readings on the distance are in relation to the position
of the image plane. Taking lens and finder lens being one
and the same, there is no parallax error. Persons with
faulty eyesight may insert a corrective lens in special
mount into the eyepiece of the viewfinder (connecting point for further special finder equipment - see Section R).
For infra-red exposures the focusing point has to be slightly modified. By rotation of distance setting ring (4) the distance
reading which, after focusing, stands next to the red indicator, has to be moved to meet the red dot (infra-red dot) next to
the indicator. Thus, the image produced by the no longer visible infra-red rays, which is somewhat farther away from the
lens that the one designed by the visible light, is brought into correct position in relation to the film.
L) Releasing and cocking the shutter
Before releasing the shutter, please note the following:
1. Make sure that the shutter release is unlocked (Section F).
2. For exposure speeds slower than 1/30 sec. it is advisable to use a tripod and a cable release.
3. If signal is visible in viewfinder, the camera is not ready for exposing! Cock the shutter.
When taking your picture we advise you to hold your PRAKTICA super TL so that it lies firmly in both hands and you are
able to actuate the shutter release (13) comfortably.
The shutter release (13) has to be depressed smoothly - never with a jerk - as far as it will go, until the shutter has run
Page 11

11/18
www.praktica-users.com/cams/nova/sup ertlmanual.html
The shutter release (13) has to be depressed smoothly - never with a jerk - as far as it will go, until the shutter has run
down. Do not leave hold of the body release, or cable release, before the shutter closes completely, otherwise the
diaphragm will open before its time. (This refers especially to the slower exposure speeds.)
When once released, the shutter cannot be released a second time (lock against double exposure).
After release of the shutter, a red signal appears in the upper left-hand corner of the image field.
Cocking lever (9) has to be swung around again as far as it will go and moved back smoothly (see Section F). Once more
the camera is ready for action.
M) Changing the film
When exposure counter (12) shows the figure indicating
the number of frames marked on the film packet (12, 20
or 36), the film has to be exchanged.
Depress rewind release knob (10). Knob remains locked in
this position. Swing out rewind crank (8) on rewind knob
(18). Rotate rewind knob (18), not too quickly, in the
direction of the engraved arrow. Rewinding too quickly
causes electrostatic charge and statics on the film.
Towards the beginning of the film strip greater resistance
becomes noticeable. After this, the crank (8) turn more
easily, a sing that the film is fully rewound. Fold rewind
crank (8) down again.
Open camera back (19) by pushing latch (2) in direction of
arrow.
Pull out rewind knob (18) as far as it will go and remove
the cartridge.
On rewinding of cocking lever (9) or - should the shutter
be wound up - on actuation of shutter release (13), the
rewind release knob returns automatically to its initial
position.
Should you have attempted do expose more frames than
the number marked on your film packet, it may happen
that cocking lever (9) gets jammed and cannot be swung
around completely. In this case depress rewind release
knob (10), at the same time swinging cocking lever (9)
until it stops. The film can then be rewound as described above.
N) Exchanging lenses
The PRAKTICA super TL lenses are interchangeable regardless of their distance and aperture adjustability. Take hold of
the lens mount, as shown in the illustration, and turn it in anticlockwise direction. The exchange lens is inserted
Page 12

12/18
www.praktica-users.com/cams/nova/sup ertlmanual.html
the lens mount, as shown in the illustration, and turn it in anticlockwise direction. The exchange lens is inserted
accordingly.
The camera accepts all the lenses with PRAKTICA fitting (screw thread M 42 X 1) with focal lengths from 20 mm to 1000
mm.
Focusing, in connection with all the interchangeable lenses, is performed in the prism finder of the PRAKTICA super TL.
Since the taking lens also acts as finder lens you obtain, at any focal length, a finder image coinciding, free from parallax,
with the picture which you will get on your film.
Owing to the construction of their barrels some of the older type lenses protrude into the space accommodating the
diaphragm mechanism. Such lenses cannot be used as they would render it impossible to release the shutter (see Section
I)
Interchangeable lenses
aus Jena Flektogon 20 mm f/4 APD
PENTACON auto 29 mm f/2.8 APD
aus Jena Flektogon 35 mm f/2.8 APD
aus Jena Pancolar 50 mm f/1.8 APD
PENTACON auto 50 mm f/1.8 APD
Domiplan 50 mm f/2.8 APD
aus Jena T 50 mm f/2.8 APD
PENTACON auto 100 mm f/2.8 APD/PD
aus Jena S 135 mm f/3.5 APD
PENTACON auto 135 mm f/2.8 APD
PENTACON 135 mm f/2.8 PD
aus Jena S 180 mm f/2.8 APD
PENTACON 200 mm f/4 PD
PENTACON 300 mm f/4 PD
PENTACON 500 mm f/5.6 PD
aus Jena Mirror Lens 1000 mm f/5.6
APD = automatic pressure diaphragm
PD = pre-set diaphragm
O) Flash exposures
There are two ways of synchronizing flash light to the PRAKTICA super TL:
F synchronization
The F synchronization is designed to ignite short burning
flash bulbs. It ignites the flash already before the image
gate is completely uncovered. Thus it is possible to work
with an exposure speed of 1/30 sec.
Insert the flash cable into the flash socket (17) marked "F".
X synchronization
With the X
synchronization the
electronic flash, which
flares up practically
without delay, is ignited
when the focal-plane
shutter has completely
uncovered the image gate. For the exposure, adjust speed setting knob (14) to the
Page 13

13/18
www.praktica-users.com/cams/nova/sup ertlmanual.html
flash symbol . This is equal to about 1/40 sec., the shortest possible exposure speed
to be employed with electronic flash.
Insert flash cable into the flash socket (17) marked "X".
Regarding aperture settings you will find directions, in form of so-called "guide
numbers", given on the wrappings or in the literature coming with the bulbs and
electronic flash units. The aperture of the lens and the distance between flash unit and
subject are brought into balance on base of these guide numbers.
To find the correct aperture, divide the guide number for the flash in use by the flash-to-subject distance figure.
Diaphragm number =
Guide Number
flash-to-subject distance
P) Exchanging the power source
Power source for the automatic exposure system is a Mallory Mercury Oxide Battery PX 625, PX 13, or a similar type,
having a nominal voltage of 1.35 V.
Owing to the low consumption of current and the short working period of meter reading, the battery lasts about 2 years.
To exchange batteries, screw out the cover (22) in the bottom of the camera with the aid of a coin. Insert new battery,
making sure that the "+" sing is visible. Replace cover (22) and screw it tight.
Attention: Do not load the discarded battery or throw it into the fire. Both may cause an explosion!
Q) Maintenance of camera and lens
Perfect functioning and lasting service of your PRAKTICA super TL depend very largely on careful maintenance and proper
handling of the camera.
The PRAKTICA super TL is a highly valuable precision instrument. It must, therefore, be protected against shock and dust.
(Use everready case).
Never use force when operating the mechanism.
From time to time dust and film emulsion deposits have to be removed with a soft brush from cartridge chamber, spool
chamber and film track. Do not touch the optical parts (lens, eyepiece of viewfinder, and mirror) with your fingers.
Should you have done so accidentally, any fingerprints must be removed immediately with a soft brush or a piece of fine
linen.
R) Accessories
Many interesting results in picture composition are obtainable with the aid of accessories.
Page 14

14/18
www.praktica-users.com/cams/nova/sup ertlmanual.html
Everready case
It protects valuable PRAKTICA super TL from dust and shock.
Carrying Strap, adjustable
To be recommended if you are using your PRAKTICA super TL without the everready case, e. g. in combination with a
flash unit.
Cable Release
Indispensable for the slower shutter speeds and for many
Filters
For correct rendition of colour values and special effects
in black-and-white photography. Colour filters may be
used only in combination with black-and-white film. UV
filters and polarizing filters are also suitable for use with
colour films.
Page 15

15/18
www.praktica-users.com/cams/nova/sup ertlmanual.html
special activites.
Lens Hood
Eliminates disturbing counter-light flares.
Angle Finder
Aid in focusing on subjects difficult of access. Is
provided with a dioptre focusing mount.
Rubber Eye Cup
Keeps out stray light during focusing.
Mount for Correcting Lenses
For persons with faulty eyesight, to replace their
spectacles.
Focusing Telescope
Yields an additional 2.7 fold magnification of part of the finder
Page 16

16/18
www.praktica-users.com/cams/nova/sup ertlmanual.html
image. Adjustable to faulty eyesight by means of a dioptre
focusing mount.
Accessory Shoe
Is attachable to the eyepiece of the viewfinder for fixing
accessory equipment, e. g. flash units.
Intermediate Rings
To increase the scale of reproduction.
Reversing Ring
To insert lens into camera by its filter thread in order to
achieve utmost sharpness of the image at ratios
exceeding 1.5.
Intermediate rings with Plunger
Permit maintaining operation of the automatic pressure
diaphragm while extengind scale of reproduction.
Universal Tripod
Extremely rigid, permits varying positions of camera
from close to ground up to approximately eye level.
Adjustable column server as camera support.
Page 17

17/18
www.praktica-users.com/cams/nova/sup ertlmanual.html
Miniature Close-up Bellows A ttachment
For infinite variation of the picture ratio from approx. 0.9 to 2.8. a 7 mm ring has to be inserted between camera and
bellows attachment.
Close-up Bellows Attachment
Yields infinite variation of the picture ratio approx. 0.9 to 4.7.
A 7 mm ring has to be inserted between camera and bellows
attachment.
Special Intermediate Ring with Double Cable
Release
Keeps automatic diaphragm mechanism operative in
connections with close-up bellows attachment and
intermediate rings.
Focusing Slide
Of great advantage in close-up work on the universal tripod.
Makes it possible to adjust the distance between camera and
subject without having to move the tripod.
Micro Attachment Piece
For connecting camera and microscope.
Page 18

18/18
www.praktica-users.com/cams/nova/sup ertlmanual.html
Special literature on the above only briefly mentioned accessories for PRAKTICA super TL will be sent on request.
We ask you kindly to follow these Instructions for Use carefully. We can accept no liability for any damage which may be
caused by improper handling of the equipment.
Further development of the PRAKTICA super TL and its accessories may lead to slight alterations of the details given in
this booklet.
Back | Index | Top
 Loading...