


 Loading...
Preface
About this Manual
•The contents of this manual and the bundled Basic Reference are subject to change without notice.
•Note that the example screens and product illustrations shown in this User’s Guide may differ somewhat from the screens and configuration of the actual camera.
Copyright
This manual contains proprietary information protected by copyright. All rights are reserved. No part of this manual may be reproduced by any mechanical, electronic or other means, in any form, without prior written permission of the manufacturer.
© Copyright 2012
Federal Communications Commission (FCC) Compliance
This equipment has been tested and found to comply with the limits for a Class B digital device, pursuant to Part 15 of the FCC Rules. These limits are designed to provide reasonable protection against harmful interference in a residential installation. This equipment generates, uses, and can radiate radio frequency energy and, if not installed and used in accordance with the instructions, may cause harmful interference to radio communications. However, there is no guarantee that interference will not occur in a particular installation. If this equipment does cause harmful interference to radio or television reception, which can be determined by turning the equipment off and on, the user is encouraged to try to correct the interference by one or more of the following measures:
•Reorient or relocate the receiving antenna.
•Increase the distance between the equipment and the receiver.
•Connect the equipment to an outlet on a circuit different from that to which the receiver is connected.
•Consult the dealer or an experienced radio/TV technician for help.
Warning: A shielded-type power cord is required in order to meet FCC emission limits and to prevent interference to radio and television reception. Use only shielded cable to connect I/O devices to this equipment. Any changes or modifications not expressly approved by the manufacturer may void your warranty and service agreement.
Declaration of Conformity
This device complies with Part 15 of the FCC rules. Operation is subject to the following conditions:
•This device may not cause harmful interference.
•This device must accept any interference received, including interference that may cause undesired operation.
Trademark Recognition
Windows 2000/XP/Vista/Win7 are registered trademarks of Microsoft Corporation in the United States and/or other countries. Windows is an abbreviated term referring to the Microsoft Windows Operation System. All other companies or product names are trademarks or registered trademarks of their respective companies.
Safety and Handling Precautions
Camera Information
•Do not take apart or attempt to service the camera yourself.
•Do not expose the camera to moisture, or extreme temperatures.
•Allow the camera to warm up when moving from cold to warm temperatures.
•Do not touch and put pressure on the camera lens.
•Do not expose the lens to direct sunlight for extended periods.
•Do not use abrasive chemicals, cleaning solvents or strong detergents to clean the product. Wipe the product with a slightly damp soft cloth.
•Do not use the flash or LED Light near a person's eyes to prevent possible eye injury.
•To prevent you from falling over or resulting in traffic accident, please do not use the camera while you are walking, driving or riding a vehicle.
•Please handle the camera strap with care, and never place the strap around the neck of an infant or child. Wrapping the strap around a neck may cause suffocation.
•Do not subject the LCD monitor to impact.
•To prevent the risk of fire or electric shock, do not expose this appliance to rain or moisture.
1

Battery Information
•Turn off the camera before installing or removing the battery.
•Use only the provided batteries or type of battery and charger that came with your camera. Using other types of battery or charger may damage the equipment and invalidate the warranty.
•When using Li-ion battery in this product, ensure that they are inserted correctly. Inserting the battery upside down can cause damage to the product and possibly cause an explosion.
•When the camera is used for an extended period of time, it is normal for the camera body to feel warm.
•Download all pictures and remove the battery from the camera if you are going to store the camera for a long period of time.
•The type of battery and the battery power level may cause the lens to be stuck up. Ensure you use the correct battery type and use a fully charged battery.
•Risk of explosion if battery is replaced by an incorrect type. Dispose of used batteries according to the instructions.
•Please keep the batteries out of the reach of children to prevent from swallowing batteries, which might cause poisoning.
Using this Menu
Symbols used in this manual are explained below:
This indicates useful information when using your camera.
This indicates important message that should be read before using the function.
2
Table of Contents
Preface ........................................................................................................ |
1 |
About this Manual .................................................................................. |
1 |
Safety and Handling Precautions.............................................................. |
1 |
Using this Menu ..................................................................................... |
2 |
Introduction ................................................................................................. |
5 |
System Requirements ............................................................................. |
5 |
Main Features ........................................................................................ |
5 |
Package Contents................................................................................... |
6 |
Camera Views ........................................................................................ |
7 |
Camera Buttons ..................................................................................... |
9 |
Navigation Control................................................................................ |
10 |
Monitor Angle ...................................................................................... |
11 |
Getting Started ........................................................................................... |
12 |
Attach the Camera Strap ....................................................................... |
12 |
Inserting the Battery ............................................................................ |
13 |
Camera Memory................................................................................... |
14 |
Inserting an SD/SDHC/SDXC Memory Card............................................. |
14 |
Charging the Battery by USB ................................................................. |
15 |
Turning the Power On and Off ............................................................... |
15 |
Initial Settings...................................................................................... |
15 |
Modes ................................................................................................. |
16 |
Using the LCD monitor ................................................................................ |
17 |
LCD Monitor Layout .............................................................................. |
17 |
Changing the LCD Monitor Display to View finder.................................... |
21 |
Recording Images, Videos and Voices ........................................................... |
21 |
Taking Images ..................................................................................... |
21 |
Setting the Zoom Control ...................................................................... |
22 |
Using EV Compensation ........................................................................ |
23 |
Using Flash.......................................................................................... |
23 |
Using Self-timer ................................................................................... |
24 |
Setting the Focus Mode ........................................................................ |
24 |
Using the AE/AF LOCK Button................................................................ |
25 |
Using the Delete Button........................................................................ |
25 |
Recording Videos.................................................................................. |
27 |
Mode dial ............................................................................................ |
28 |
Using the Record Menu......................................................................... |
36 |
Using the Movie Menu .......................................................................... |
42 |
Playback .................................................................................................... |
43 |
Viewing in Single Navigation.................................................................. |
43 |
Viewing Thumbnails ............................................................................. |
43 |
Zooming images................................................................................... |
44 |
Playing Videos...................................................................................... |
44 |
Playing Voice Memo.............................................................................. |
46 |
Playback Menu..................................................................................... |
46 |
Using the Setup Menu ................................................................................. |
53 |
Setting Sounds..................................................................................... |
53 |
3 |
|
Setting Power Save............................................................................... |
53 |
Setting Date & Time ............................................................................. |
54 |
Setting Language ................................................................................. |
54 |
Setting Display Mode ............................................................................ |
54 |
Setting TV Settings............................................................................... |
55 |
Setting LCD Brightness ......................................................................... |
55 |
Setting Format ..................................................................................... |
56 |
Reset All .............................................................................................. |
56 |
Auto Rotation....................................................................................... |
57 |
Making Connections .................................................................................... |
59 |
Connecting the Camera to a TV ............................................................. |
59 |
Connecting the Camera to a PC ............................................................. |
59 |
Connecting the Camera to a Printer ....................................................... |
61 |
Setting the Print Mode Menu ................................................................. |
62 |
Appendix.................................................................................................... |
63 |
About Folder and File Names................................................................. |
63 |
Troubleshooting .......................................................................................... |
63 |
Specifications ............................................................................................. |
64 |
4
Introduction
Congratulations on your purchase of the new digital camera.
Capturing high-quality digital images is fast and easy with this state-of-the-art smart camera.
System Requirements
In order to get the most out of your camera, your computer must meet the following system requirements:
For Windows:
•Windows XP/Vista/Win7
•Processor: Intel Pentium D 3.0GHz or equivalent AMD Athlon, or faster
•Memory: 2 GB or above
•HDD space: 300MB or above
•32bit color display monitor
•Microsoft DirectX 9.0C
•USB port and CD-ROM drive
For Macintosh:
•Mac OS 10.3.9 ~ 10.7.2 <Mass storage>
•Memory: 1 GB or above
•Q. Time player ver. 6.0.3 or above
•USB port and CD-ROM drive
Main Features
•18 mega pixels resolution
•Up to 36x optical zoom and 5x digital zoom
•3.0 inch color LCD monitor
•128MB internal flash memory with optional external SD/SDHC/SDXC card
•Supports up to 4GB of SD card, and up to 32GB of SDHC card and to 64GB of SDXC card
•Easy-to-use button interface
•DCF, DPOF, PictBridge compatibility
•Slide Show to review still images
•A/V output and HDMI output to view your images and videos on your TV
•USB port to transfer images and videos to your PC
5
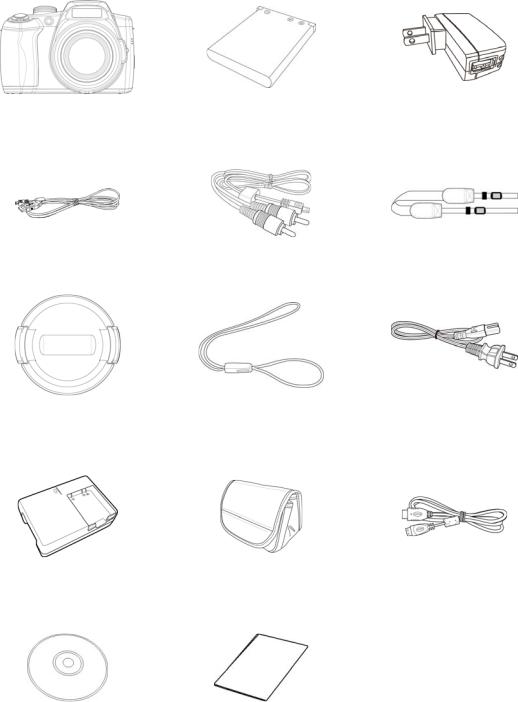
Package Contents
Please check the contents of your camera package. It should contain:
Digital camera |
Rechargeable battery x 1 pcs |
USB adapter |
|
|
(The type of plug may vary |
|
|
depending on the country or |
|
|
region) |
USB cable |
AV cable (optional) |
Neck strap |
Lens cover |
Lens Strap |
AC Cord |
|
|
(The type of plug may vary |
|
|
depending on the country or |
|
|
region) (optional) |
Battery charger (optional) |
Camera pouch |
HDMI cable (optional) |
|
(optional) |
|
CD-Rom (optional) |
Quick Start Guide/ |
|
User Manual (optional) |
6
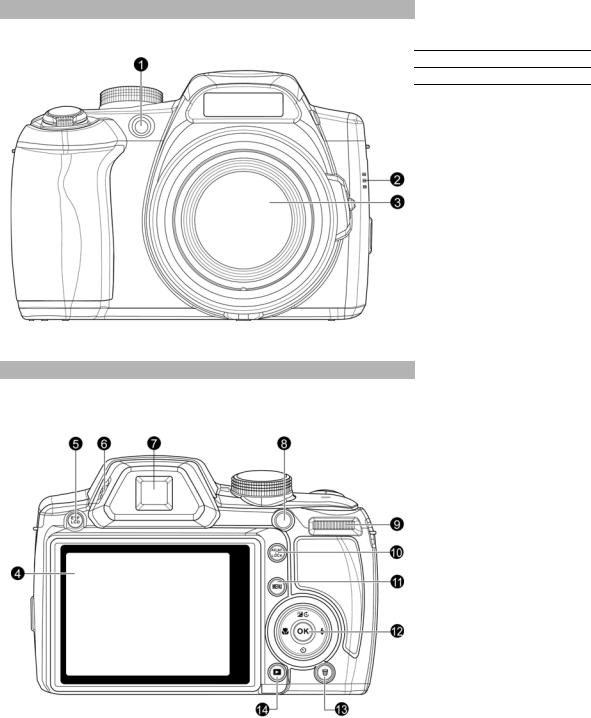
Camera Views
Front View
1. Self-timer LED/
AF Assist Lamp
2. Speaker
3. Lens
Back View
4. |
LCD monitor |
5. |
EVF LCD button |
6. |
Dioptric adjustment |
|
knob |
7. |
Viewfinder |
8. |
Movie button |
9. |
Command Dial |
10. |
AE/AF LOCK button |
11. |
Menu button |
12. |
OK button/4-way |
|
navigation control |
13. |
Delete button |
14. |
Playback button |
7

Top View
15. Zoom dial
16. Shutter button
17. Power button
18. LED indicator light
19. Mode dial
20. Microphone
Bottom View
21. Battery/Memory card compartment
22. Tripod screw hole
Right View
23. Strap ring
8
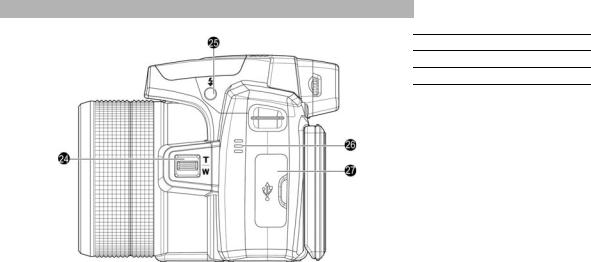
Left View
24. Side zoom control
25. Flash button
26. Speaker
27. USB/TV/HDMI Out
Camera Buttons
Your camera is equipped with different buttons for ease of use.
|
Button |
|
|
Description |
|
|
|
|
|
||
|
|
|
|
|
|
|
Power |
|
|
Press the Power button to turn the power on/off. |
|
|
|
|
|
|
|
|
Shutter |
|
|
Press to capture an image. |
|
|
|
|
|
|
|
|
Zoom dial |
|
|
In photo and movie mode, spin the zoom dial to left to zoom out, right to zoom in. |
|
|
|
|
In Playback mode, spin to zoom in to magnify image or zoom out to enter thumbnails. |
|
|
|
|
|
|
|
|
|
Menu |
|
|
Press to enter or exit menu/submenu. |
|
|
|
|
|
|
|
|
Delete |
|
|
In Playback mode, press to delete an image, or video clip. |
|
|
|
|
In Record mode, press Delete button to delete the last captured image directly. |
|
|
|
|
|
|
|
|
|
Mode dial |
|
|
There are 10 recording modes can be set. Once turning the mode dial, it enters the |
|
|
|
|
selected mode immediately even in Playback mode or during movie recording. |
|
|
|
|
|
|
|
|
|
|
|
|
|
|
|
Playback |
|
|
Press to enable Playback mode or return Record mode. |
|
|
|
|
|
|
|
|
Movie |
|
Press to start/stop recording video. |
|
|
|
|
|
|
|
|
|
EVF LCD button |
|
|
Press this button to switch the display view between LCD and EVF. Once displayed on |
|
|
|
|
one of them, the other should be close. |
|
|
|
|
|
|
|
|
|
|
|
|
|
|
|
Dioptric |
|
|
Turn this knob next to the viewfinder to adjust the focus of viewfinder. |
|
|
adjustment knob |
|
|
|
|
|
|
|
|
|
|
|
|
|
|
|
|
|
AE/AF LOCK |
|
|
Press this button on your camera to lock focus and exposure. See "Using the AE/AF |
|
|
button |
|
|
LOCK Button" on page 25 to know more about AE/AF LOCK button. |
|
|
|
|
|
|
|
9
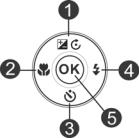
Navigation Control
The 4-way Navigation Control and the OK button allow you to access the various menus available from the On Screen Display (OSD). You can configure a wide range of settings to ensure maximum results from your images and videos. Further functions of these buttons are as follows:
No. |
Description |
|
|
1 |
EV/Rotate Button |
|
|
2 |
Macro Button |
|
|
3 |
Self-timer Button |
|
|
4 |
Flash Button |
|
|
5 |
OK Button |
|
|
|
Button |
|
|
|
Description |
|
|
|
|
|
|
||
|
|
|
|
|
|
|
|
OK |
|
|
1. |
Confirm a selection when using the OSD menus. |
|
|
|
|
2. |
In Playback Movie mode, press to start video playback. |
|
|
|
|
|
|
|
||
|
|
|
|
|
|
|
|
|
|
1. |
In Photo Mode, press to scroll through the flash mode options. |
||
|
|
|
|
|
(Auto Flash, Red-eye Reduction, Forced On, Slow Sync and Forced Off) |
|
|
Flash/Right |
|
2. |
In Playback mode, press to view the next image or video clip. |
||
|
|
3. |
In playback Movie mode, press to Forward video playback. |
|||
|
|
|
||||
|
|
|
4. |
In Menu, press to enter the submenu or to navigate through the menu |
||
|
|
|
|
|
selections. |
|
|
|
|
|
1. |
In Photo Mode, press to scroll through Focus options. |
|
|
|
|
|
|
(AF, Macro, Super Macro, Infinity and MF) |
|
|
Focus/Left |
|
|
2. |
In Playback mode, press to view the previous image or video clip. |
|
|
|
|
|
3. |
In Playback movie mode, press to Rewind video playback. |
|
|
|
|
|
4. |
In Menu, press to exit a submenu or to navigate through the menu selections. |
|
|
|
|
|
|
|
|
|
|
|
1. |
In Photo mode and Movie mode, press to change the EV settings. |
||
|
EV/Rotate/Up |
|
2. |
Playing Video file, press to Pause/Start video playback. |
||
|
|
3. |
In Playback photo mode, press to rotate the image clockwise 90 degrees by each |
|||
|
|
|
|
|
press of the button. This feature is applicable for still images only. |
|
|
|
|
4. |
In Menu, press to navigate through the menu and submenu selections. |
||
|
|
|
|
|
||
|
|
|
|
1. |
In Photo Mode, press to scroll through Self-time options. |
|
|
Self-timer/Down |
|
|
|
(Off, 10 sec., 2 sec. and Double) |
|
|
|
|
2. |
Playing video file, press to stop video playback. |
|
|
|
|
|
|
|
||
|
|
|
|
3. |
In Menu, press to navigate through the menu and submenu selections. |
|
|
|
|
|
|
|
|
10
Monitor Angle
When taking pictures with camera at high or low angle. The monitor can be opened outward from 0° to 80° and the screen can be flipped from 0° to 135°.
•The monitor could be fixed at various angles, but it would be firmly fixed at five places as the illustration above. (Monitor: 0°, 45° and 80°; Screen: 0° and 135°)
•Do not operate with excessive force when changing the angle of the monitor, otherwise the connection between camera and monitor may be damaged.
11
Getting Started
Attach the Camera Strap
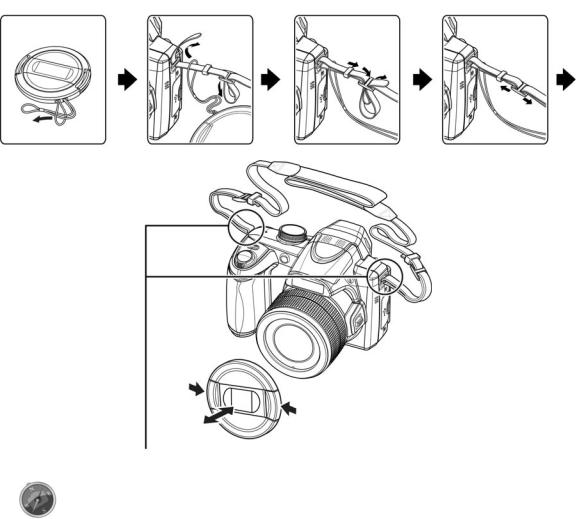
1.Please make sure the lens cap and the cap strap are well combined.
2.Attach the lens cap to the camera strap as the illustration.
3.Follow the steps below to attach the camera strap to the camera.
Please make sure the camera strap is attached at two places.
•In order to avoid dropping the camera, attaching the strap before using the camera is recommended.
•Wrapping the strap around your neck is dangerous. Take care that children do not hang the strap around their neck.
•The cap is the protection for the lens, please be careful not to lose the lens cap.
12
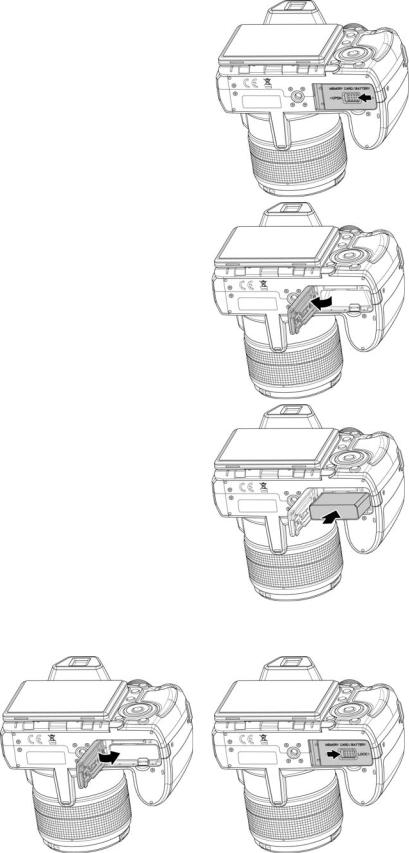
Inserting the Battery
Follow these instructions to insert the rechargeable battery into the battery/memory card compartment. Please read "Battery Information" on page 2 before inserting/removing batteries.
1. Make sure the power is off before inserting the battery.
2.Unlock and open the battery/memory card compartment at the bottom of the camera.
3.Insert the batteries into the compartment with the terminal facing inside the camera with correct orientation as shown.
4.Close and lock the battery/memory card compartment. In order to prevent the battery from dropping, please make sure the compartment is locked firmly.
13
Camera Memory
Internal memory
Your camera is equipped with 128 MB of internal memory. Users can store files up to approximately 67 MB. If there is no memory card inserted in the memory card slot, all images and videos recorded are automatically stored in the internal memory.
External storage
Your camera supports SD cards of up to 4 GB in size. It also supports SDHC cards with a maximum capacity of 32 GB. Then also supports SDXC cards with a maximum capacity of 64 GB. If there is a storage card inserted in the memory slot, the camera automatically saves all images and videos in the external storage
card. The icon  indicates the camera is using SD card.
Not all cards may be compatible with your camera. When purchasing a card, please check the card's specifications and take the camera with you.
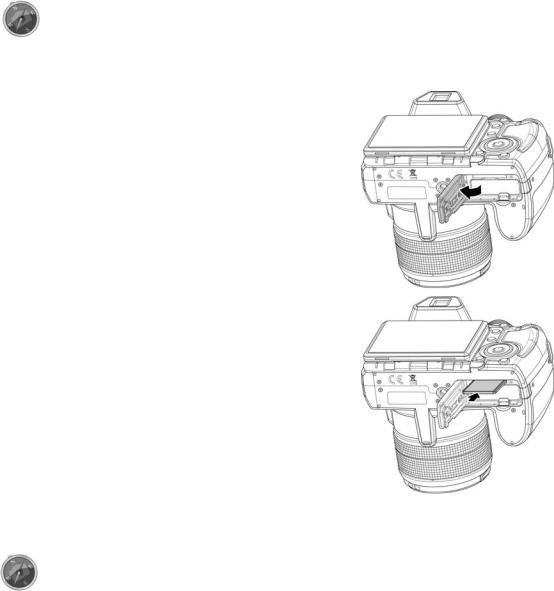
Inserting an SD/SDHC/SDXC Memory Card
Expand your camera’s storage by using SD, SDHC or SDXC memory cards.
1.Unlock and open the Battery/memory card compartment at the bottom of the camera.
2.Insert the SD/SDHC/SDXC card into the memory card slot with the metallic part facing the back side of the camera.
3.Push the SD/SDHC/SDXC card into the memory slot until it clicks into place.
4.Close and lock the Battery/memory card compartment.
To remove the SD/SDHC/SDXC card
5.Unlock and open the battery/memory card compartment.
6.Gently push the card until it pops out.
7.Pull out the card carefully.
•Windows 2000/XP does not support SDXC card (exFAT format). But in Windows XP (Service Pack 2 or 3), you can download exFAT patch update to support SDXC card.
•To use the SDXC card with Mac OS, the OS version should be 10.5 or higher.
•The memory card that is not inserted correctly may cause damage to the camera. Please be careful when inserting the memory card.
•To prevent children from swallowing the memory card, please keep the memory card out of reach of children.
14

Charging the Battery by USB
In other way charging the battery, you can use the USB cable to connect the camera with PC or USB adapter.
1.Connect the camera with the USB cable as shown.
2.Connect the other end with the USB adapter and plug it into a power outlet or with the USB port of PC directly for charging.
•When the battery is charging, the LED indicator flashes.
•When the battery is fully charged, the LED indicator goes off.
•When the battery is unusual charged, the LED indicator flashes rapidly.
•When the camera charges without the battery inside, the LED indicator goes off.
•It's recommended not operating the camera when charging.
Actual charging time depends on current battery capacity and charging conditions.
•You can also charge the battery with Apple adapter. Its power output meets the standard 5V/500mA.
•When the battery is removing during charging, it will recover charging after you unplugging and replugging USB.
Turning the Power On and Off
There are two ways to turn on the camera:
•The startup image displays briefly and the startup sound plays if enabled. The zoom lens extends and the camera is turned on in Record mode.
•The camera is turned on in Playback mode. The zoom lens is not extended.
To turn off the camera, press the Power button.
See "Modes" on page 16 to know more about Record and Playback mode.
Initial Settings
When you turn on your camera for the first time, you will be asked to do the initial settings of your camera. First is the setup of language menu. Specify in which language menus and messages are to be displayed on the LCD monitor.
Setting the Language
1.Press  ,
,  ,
,  or
or  to move through the selection.
2.Select a language, and then press OK to apply.
Setting the Date & Time
1.Press  or
or  to move through the selection.
2.Press  or
or  keys to change the value for the date and time.
3.Press OK to apply.
4.If necessary, press  to close the menu.
Now, you are ready to start taking images and videos.
Holding down  or
or  keys to change the values continuously.
15
Modes
Your camera has three modes:
Record Mode
This is the default mode while you turn on the camera every time. You are able to take images in this mode.
Playback mode
Press the Playback button  after the camera is turned on to view and edit captured images or playback videos. The recording of voice memo attached to images is available in this mode.
Movie mode
Press the Movie button  after the camera is start/stop recording video in this mode.
16
Using the LCD monitor
The LCD monitor shows all important information regarding camera settings as well as the visual image of your image or video. The display on the LCD monitor is called the On Screen Display or OSD.
LCD Monitor Layout
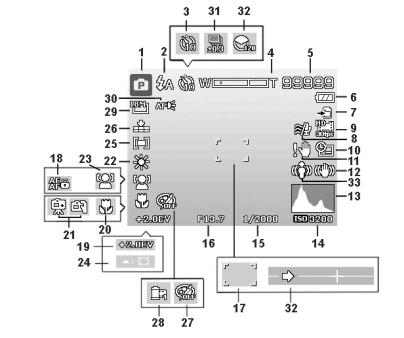
Photo Mode Screen Layout
|
No. |
|
|
Item |
|
|
Description |
|
|
|
|
|
|
|
|
|
|
|
1 |
|
|
Record Mode |
|
|
Indicates the current mode. |
|
|
2 |
|
|
Flash |
|
|
Indicates flash settings. |
|
|
|
|
|
|
|
|
|
|
|
3 |
|
|
Self-timer/Burst |
|
|
Indicates Self-timer settings. |
|
|
4 |
|
|
Zoom indicator |
|
|
Displays zoom. |
|
|
|
|
|
|
|
|
|
|
|
5 |
|
|
Shots remaining |
|
|
Indicates the remaining shots available. |
|
|
6 |
|
|
Battery |
|
|
Indicates battery level. |
|
|
|
|
|
|
|
|
|
|
|
7 |
|
|
Storage media |
|
|
Indicates current storage media in use. |
|
|
8 |
|
|
Wind Cut |
|
|
Reduces wind noise during movie recording. |
|
|
|
|
|
|
|
|
|
|
|
9 |
|
|
Movie size |
|
|
Indicates movie size. |
|
|
10 |
|
|
Date stamp |
|
Indicates date stamp is enabled. |
|
|
|
|
|
|
|
|
|
|
|
|
|
|
|
|
|
|
Indicates the light is not enough and the camera is shaking, which may |
|
|
11 |
|
|
Shake warning |
|
|
cause the captured image blurred. If the shake warning appears, you |
|
|
|
|
|
|
can still capture images. However, enable Stabilizer, flashlight or use |
|
||
|
|
|
|
|
|
|
|
|
|
|
|
|
|
|
|
tripod is recommended, these ways will stabilize the camera. |
|
|
12 |
|
|
Stabilizer |
|
|
Indicates stabilizer function is enabled. |
|
|
|
|
|
|
|
|
|
|
|
13 |
|
|
Histogram |
|
|
Graphic display of Brightness. |
|
|
14 |
|
|
ISO |
|
Displays ISO settings. |
|
|
|
|
|
|
|
|
|
|
|
|
15 |
|
|
Shutter speed |
|
|
Displays shutter speed settings. |
|
|
16 |
|
|
Aperture value |
|
Displays aperture settings. |
|
|
|
|
|
|
|
|
|
|
|
|
17 |
|
|
Focus area |
|
|
Indicates focus area. |
|
|
18 |
|
AE/AF Lock |
|
|
Indicates AE/AF Lock is enabled. |
|
|
|
|
|
|
|
|
|
|
|
|
19 |
|
|
EV Compensation |
|
|
Displays exposure compensation settings. |
|
|
|
|
|
|
17 |
|
||
20 |
Focus mode |
Indicates focus is enabled. |
|
|
|
21 |
Night mode |
Indicates night mode is enabled. |
22 |
White balance |
Displays white balance settings. |
|
|
|
23 |
Face tracking |
Indicates face tracking is enabled. |
24 |
Tracking AF |
Indicates tracking AF is enabled. |
|
|
|
25 |
Metering |
Displays metering settings. |
26 |
Quality |
Displays quality settings. |
|
|
|
27 |
Refine image |
Indicates Refine image function is enabled. |
28 |
Stylish |
Indicates Stylish function is enabled. |
|
|
|
29 |
Photo size |
Displays photo size settings. |
30 |
AF lamp |
Indicates AF lamp is enabled. |
|
|
|
31 |
Exposure bracketing |
Displays Exposure bracketing settings. |
32 |
Panorama |
Displays panorama settings. |
|
|
|
33 |
Motion detection |
Indicates motion detection is enabled. |
|
|
|
Movie Mode Screen Layout
|
|
Recording Layout |
|
|
|
No. |
Item |
Description |
|
|
|
1 |
Recorded time |
Displays recorded time. |
|
|
|
2 |
Recording status |
Indicates recording status. |
|
|
|
3 |
PIV available |
Indicates that you can capture screenshot without stopping movie recording. |
|
|
|
4 |
AE/AF Lock |
Indicates AE/AF Lock is enabled. |
|
|
|
18
Playback Mode Screen Layout
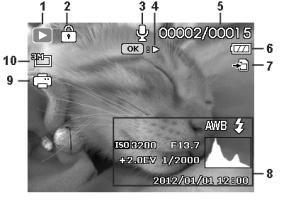
The Playback mode display varies depending on the type of image being viewed.
Playback mode display of still images:
|
No. |
|
|
Item |
|
|
Description |
|
|
1 |
|
|
Playback mode |
|
|
Indicates playback mode. |
|
|
|
|
|
|
|
|
|
|
|
2 |
|
|
Protect |
|
|
Indicates file is protected. |
|
|
|
|
|
|
|
|
|
|
|
3 |
|
|
Voice memo |
|
|
Indicates voice memo is attached. |
|
|
|
|
|
|
|
|
|
|
|
4 |
|
|
Button intro |
|
|
Indicates the button to press on the camera to play a video file. |
|
|
|
|
|
|
|
|
|
|
|
5 |
|
|
File no./Total no. |
|
|
Indicates the file number over the total number of files in the storage card. |
|
|
|
|
|
|
|
|
|
|
|
6 |
|
|
Battery |
|
|
Indicates battery level. |
|
|
|
|
|
|
|
|
|
|
|
7 |
|
|
Storage media |
|
|
Indicates used storage memory. |
|
|
|
|
|
|
|
|
|
|
|
8 |
|
|
Recording |
|
|
Displays recording information of the file. |
|
|
|
|
information |
|
|
|
||
|
|
|
|
|
|
|
|
|
|
9 |
|
|
DPOF |
|
|
Indicates the file is marked for printing. |
|
|
|
|
|
|
|
|
|
|
|
10 |
|
|
Image Size |
|
|
Displays the image size settings. |
|
|
|
|
|
|
|
|
|
|
19

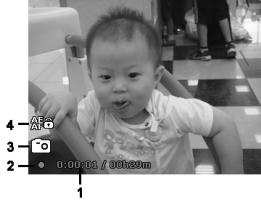
Playback mode of videos:
|
No. |
|
|
Item |
|
|
Description |
|
|
|
|
|
|
|
|
|
|
|
1 |
|
|
Playback mode |
|
|
Indicates playback mode. |
|
|
|
|
|
|
|
|
|
|
|
2 |
|
|
Protect |
|
Indicates file is protected. |
|
|
|
|
|
|
|
|
|
|
|
|
3 |
|
|
Video clip |
|
|
Indicates the file is a video. |
|
|
|
|
|
|
|
|
|
|
|
4 |
|
|
Button intro |
|
|
Indicates the button to press on the camera to play a video file. |
|
|
|
|
|
|
|
|
|
|
|
5 |
|
|
File no./Total no. |
|
|
Indicates the file number over the total number of files in the storage |
|
|
|
|
|
|
card. |
|
||
|
|
|
|
|
|
|
|
|
|
6 |
|
|
Battery |
|
Indicates battery level. |
|
|
|
|
|
|
|
|
|
|
|
|
7 |
|
|
Storage media |
|
|
Indicates used storage memory. |
|
|
|
|
|
|
|
|
|
|
|
8 |
|
|
Recording date & time |
|
|
Displays the date and time of the video clip. |
|
|
|
|
|
|
|
|
|
|
|
9 |
|
|
Video size |
|
|
Indicates the size of the video clip. |
|
|
|
|
|
|
|
|
|
|
|
10 |
|
|
Video length |
|
Display the total length of the video clip. |
|
|
|
|
|
|
|
|
|
|
|
|
11 |
|
|
Played time |
|
|
Indicates the played time of the video. |
|
|
|
|
|
|
|
|
|
|
|
12 |
|
|
Playing status |
|
Displays playing status. |
|
|
|
|
|
|
|
|
|
|
|
20
Loading...