

Page 1
Modular UPS System
Installation and Operation
Manual
164201416 Rev. A
9
320
10 kVA and 20 kVA
Modules
10 kVA to
60 kVA
System
Page 2

Page 3

Powerware 9320 (10 kVA and 20 kVA) Installation and Operation ii
164201416 REV. A 071103
IMPORTANT SAFETY INSTRUCTIONS
SAVE THESE INSTRUCTIONS
This manual contains important instructions for your Uninterruptible Power
Supply (UPS) system. You should follow these instructions during the
installation and maintenance of the UPS, options, accessories and batteries.
This equipment has been tested and found to comply with the limits for a Class A
digital device, pursuant to Part 15 of the FCC Rules. These limits are designed to
provide reasonable protection against harmful interference with the equipment is
operated in a commercial environment. This equipment generates, uses, and can
radiate radio frequency energy and, if not installed and used in accordance with the
instruction manual, may cause harmful interference to radio communications.
Operation of this equipment in a residential area is likely to cause harmful
interference in which case the user will be required to correct the interference at their
own expense.
Page 4

iii Powerware 9320 (10 kVA and 20 kVA) Installation and Operation
164201416 REV. A 071103
A
Introduction . . . . . . . . . . . . . . . . . . . . . . . . . . . . . . . . . . . . . . . viii
Basic System Configurations . . . . . . . . . . . . . . . . . . . . . . . . . . . ix
Using This Manual . . . . . . . . . . . . . . . . . . . . . . . . . . . . . . . . . . . ix
Conventions Used in This Manual . . . . . . . . . . . . . . . . . . . . . . . x
Safety Considerations . . . . . . . . . . . . . . . . . . . . . . . . . . . . . . . . xi
Getting Help . . . . . . . . . . . . . . . . . . . . . . . . . . . . . . . . . . . . . . . xii
Section I Installation
1 Getting Started
1.1 Installing the UPS . . . . . . . . . . . . . . . . . . . . . . . . . . . . . 1 - 1
1.1.1 Creating an Installation Plan . . . . . . . . . . . . . . . . . . . . 1 - 1
1.1.2 Preparing Your Site . . . . . . . . . . . . . . . . . . . . . . . . . . . 1 - 2
1.1.3 Environmental Considerations . . . . . . . . . . . . . . . . . . . 1 - 2
1.1.4 Preparing for Wiring the UPS System . . . . . . . . . . . . . . 1 - 2
1.1.5 Inspecting and Unpacking Each Cabinet . . . . . . . . . . . 1 - 3
2 Installing the UPS System
2.1 Preliminary Installation Information . . . . . . . . . . . . . . . 2 - 1
2.2 UPS Cabinet Installation . . . . . . . . . . . . . . . . . . . . . . . . 2 - 2
2.2.1 Unloading the Powerware 9335 (80kVA-120 kVA)
UPS Cabinet from the Pallet . . . . . . . . . . . . . . . . . . . . . . 2 - 2
2.2.2 Installing Remote Battery Power Wiring . . . . . . . . . . . . 2 - 2
2.2.3 Installing UPS External Power Wiring . . . . . . . . . . . . . . 2 - 3
2.2.4 Installing Customer Connections . . . . . . . . . . . . . . . . . . 2 - 4
2.2.5 Prepare for Installing Accessories . . . . . . . . . . . . . . . . 2 - 4
2.3 Battery Cabinet Installation . . . . . . . . . . . . . . . . . . . . . . 2 - 5
2.4 Initial Startup . . . . . . . . . . . . . . . . . . . . . . . . . . . . . . . . . 2 - 5
2.5 Completing the Installation Checklist . . . . . . . . . . . . . . 2 - 5
2.5.1 Installation Checklist . . . . . . . . . . . . . . . . . . . . . . . . . . . 2 - 6
3 Installing and Connecting Batteries
3.1 Important Safety Instructions . . . . . . . . . . . . . . . . . . . . 3 - 1
3.2 Internal Battery Modules . . . . . . . . . . . . . . . . . . . . . . . . 3 - 2
4 Installing a Remote EPO Control
4.1 Installation Procedures . . . . . . . . . . . . . . . . . . . . . . . . . 4 - 1
4.2 To Install a Remote EPO . . . . . . . . . . . . . . . . . . . . . . . 4 - 1
4.3 To Operate a Remote EPO . . . . . . . . . . . . . . . . . . . . . 4 - 2
Table of Contents
Page 5

Powerware 9320 (10 kVA and 20 kVA) Installation and Operation iv
164201416 REV. A 071103
Section II Operation
5 Understanding UPS Operation
5.1 Looking Inside the UPS System . . . . . . . . . . . . . . . . . 5 - 1
5.2 Normal, Battery and Bypass Modes . . . . . . . . . . . . . 5 - 3
5.2.1 Normal Mode . . . . . . . . . . . . . . . . . . . . . . . . . . . . . . 5 - 4
5.2.2 Bypass Mode . . . . . . . . . . . . . . . . . . . . . . . . . . . . . . . 5 - 6
5.2.3 Battery Mode . . . . . . . . . . . . . . . . . . . . . . . . . . . . . . . 5 - 8
5.2.4 Maintenance Bypass Mode . . . . . . . . . . . . . . . . . . . . 5 - 10
5.3 Functional Description . . . . . . . . . . . . . . . . . . . . . . . . 5 - 11
5.3.1 Input Rectifier . . . . . . . . . . . . . . . . . . . . . . . . . . . . . . . 5 - 11
5.3.2 Boost Converter . . . . . . . . . . . . . . . . . . . . . . . . . . . . . 5 - 11
5.3.3 Inverter and Filter . . . . . . . . . . . . . . . . . . . . . . . . . . . . 5 - 11
5.3.4 Battery and Battery Charger . . . . . . . . . . . . . . . . . . . . 5 - 11
5.3.5 Static Bypass . . . . . . . . . . . . . . . . . . . . . . . . . . . . . . . 5 - 12
5.3.6 Maintenance Bypass . . . . . . . . . . . . . . . . . . . . . . . . . 5 - 12
6 Operational Controls and Features
6.1
General . . . . . . . . . . . . . . . . . . . . . . . . . . . . . . . . . . . 6 - 1
6.2 UPS Operational Controls . . . . . . . . . . . . . . . . . . . . 6 - 3
6.2.1 Control Panel . . . . . . . . . . . . . . . . . . . . . . . . . . . . . . 6 - 3
6.2.2 System and Load ON/OFF . . . . . . . . . . . . . . . . . . . 6 - 3
6.2.3 Maintenance Bypass Switch . . . . . . . . . . . . . . . . . . 6 - 4
6.2.4 Cold Start Capability . . . . . . . . . . . . . . . . . . . . . . . . 6 - 4
6.3 UPS Standard Features . . . . . . . . . . . . . . . . . . . . . . 6 - 4
6.3.1 Customer Interface . . . . . . . . . . . . . . . . . . . . . . . . . . 6 - 4
6.3.2 Battery Management . . . . . . . . . . . . . . . . . . . . . . . . . 6 - 4
6.3.3 Installation Features . . . . . . . . . . . . . . . . . . . . . . . . . 6 - 4
6.4 Options and Accessories . . . . . . . . . . . . . . . . . . . . . 6 - 5
6.4.1 Remote EMERGENCY POWER OFF . . . . . . . . . . . 6 - 5
6.4.2 Battery Cabinets . . . . . . . . . . . . . . . . . . . . . . . . . . . . 6 - 5
6.4.3 Communications . . . . . . . . . . . . . . . . . . . . . . . . . . . . 6 - 5
6.4.4 Other Options . . . . . . . . . . . . . . . . . . . . . . . . . . . . . . 6 - 5
6.5 Safety Considerations . . . . . . . . . . . . . . . . . . . . . . . . 6 - 6
6.6 Symbols, Controls and Indicators . . . . . . . . . . . . . . . 6 - 7
7 Using the Control Panel
7.1 Description . . . . . . . . . . . . . . . . . . . . . . . . . . . . . . . . 7 - 1
7.2 Using the Control Panel . . . . . . . . . . . . . . . . . . . . . . 7 - 2
7.2.1 Power Management Display . . . . . . . . . . . . . . . . . . 7 - 2
7.2.2 LED Indicators . . . . . . . . . . . . . . . . . . . . . . . . . . . . . 7 - 2
7.2.3 Pushbutton Functions . . . . . . . . . . . . . . . . . . . . . . . 7 - 3
7.2.4 ON/OFF Shutdown and Startup Pushbuttons . . . . . 7 - 3
7.3 Description of the LCD Screen . . . . . . . . . . . . . . . . . 7 - 4
7.3.1 Status Screens . . . . . . . . . . . . . . . . . . . . . . . . . . . . . 7 - 4
7.3.2 LCD Display Structure and Navigation . . . . . . . . . . . 7 - 5
7.3.3 Main Menu Screen . . . . . . . . . . . . . . . . . . . . . . . . . . 7 - 6
7.3.4 Event Log Screen . . . . . . . . . . . . . . . . . . . . . . . . . . . 7 - 6
7.3.5 Measurements Screen . . . . . . . . . . . . . . . . . . . . . . . 7 - 6
7.3.6 Commands Screen . . . . . . . . . . . . . . . . . . . . . . . . . . . 7 - 7
7.3.7 UPS Data . . . . . . . . . . . . . . . . . . . . . . . . . . . . . . . . . . 7 - 8
7.3.8 Set-Up User . . . . . . . . . . . . . . . . . . . . . . . . . . . . . . . . 7 - 8
Page 6

v Powerware 9320 (10 kVA and 20 kVA) Installation and Operation
164201416 REV. A 071103
7.3.9 Set-Up Service . . . . . . . . . . . . . . . . . . . . . . . . . . . . . 7 - 9
7.4 Operating Modes . . . . . . . . . . . . . . . . . . . . . . . . . . . . 7 - 10
7.4.1 “ON-LINE” Mode (Inverter Mode) . . . . . . . . . . . . . . . 7 - 10
7.4.2 “OFF-LIINE” Mode (BYPASS or ECONOMY Mode) . 7 - 10
7.4.3 “MAINTENANCE BYPASS” Mode . . . . . . . . . . . . . . 7 - 11
7.4.4 Parallel Isolator (IA2) . . . . . . . . . . . . . . . . . . . . . . . . . 7 - 12
8 UPS Operating Instructions
8.1 Operation . . . . . . . . . . . . . . . . . . . . . . . . . . . . . . . . . 8 - 1
8.2 Start-Up Procedure for the UPS . . . . . . . . . . . . . . . . 8 - 1
8.3 Shut-Down Procedure for the UPS . . . . . . . . . . . . . 8 - 3
8.4 Load Transfer to Maintenance Bypass . . . . . . . . . . . 8 - 4
8.5
UPS Module Replacement in a Redundant 9320 System
. . . . . 8 - 6
8.5.1
Removing a Module from a Redundant Multi-Module System
. . . 8 - 6
8.5.2
Reinstalling a Module in a Redundant Multi-Module System
. . . 8 - 7
8.6 Module Replacement in a Capacity 9320 System . . . 8 - 8
8.6.1 Removing a Module from a Capacity Multi-Module System . . . . 8 - 8
8.6.2
Reinstalling a Module in a Capacity Multi-Module System
. . . . . 8 -10
9 Responding to System Events
9.1 Alarms . . . . . . . . . . . . . . . . . . . . . . . . . . . . . . . . . . . 9 - 1
9.2 Menu, Commands, Event Log, Measurements . . . . 9 - 1
9.3 Fault Identification and Correction . . . . . . . . . . . . . . 9 - 2
10 Communications
10.1 X – Slot Communication Modules . . . . . . . . . . . . . . 10 - 1
11 Options
11.1 Generator ON Facility . . . . . . . . . . . . . . . . . . . . . . . . 11 - 1
12 Maintaining the UPS System
12.1 General . . . . . . . . . . . . . . . . . . . . . . . . . . . . . . . . . . . 12 - 1
12.2 Important Safety Instructions . . . . . . . . . . . . . . . . . . . 12 - 1
12.3 Performing Preventive Maintenance . . . . . . . . . . . . . 12 - 2
13 Product Specifications
13.1 System Information . . . . . . . . . . . . . . . . . . . . . . . . . . 13 - 1
13.2 UPS System Input . . . . . . . . . . . . . . . . . . . . . . . . . . . 13 - 1
13.3 UPS System Output . . . . . . . . . . . . . . . . . . . . . . . . . . 13 - 2
13.4 Environmental Specifications . . . . . . . . . . . . . . . . . . 13 - 2
Appendix A – Customer Information . . . . . . . . . . . . . . . . . . A - 1
Warranty . . . . . . . . . . . . . . . . . . . . . . . . . . . . . . . . . . . . . . . . W - 1
Page 7

Powerware 9320 (10 kVA and 20 kVA) Installation and Operation vi
164201416 REV. A 071103
Figure 1 – 1 Powerware 9320 (10 kVA or 20 kVA module) UPS Cabinet
Figure 4 – 1 Typical Remote EPO Control
Figure 5 – 1 Main Elements of the UPS System
Figure 5 – 2 Path of Current through the UPS in Normal Mode
Figure 5 – 3 Path of Current through the UPS in Bypass Mode
Figure 5 – 4 Path of Current through the UPS in Battery Mode
Figure 5 – 5 Path of Current through the UPS in Maintenance Bypass Mode
Figure 6 – 1a Powerware 9320-CO3 Controls and Indicators
Figure 6 – 1b Powerware 9320-CO2 Controls and Indicators
Figure 6 – 2 Powerware 9320 (10 kVA or 20 kVA module) Control Panel
Figure 7 – 1 UPS Control Panel
Figure 7 – 2 LCD Screen and Pushbuttons
Figure 7 – 3 LCD Screen Navigation Chart
Figure 10–1a X – Slot Location on Front of Powerware 9320-CO3 UPS Cabinet
Figure 10–1b X – Slot Location on Front of Powerware 9320-CO2 UPS Cabinet
Figure 11–1 Generator ON Connection
L
ist of Figures
Page 8

vii Powerware 9320 (10 kVA and 20 kVA) Installation and Operation
164201416 REV. A 071103
Table 3 – 1 Internal battery combinations for 9320-CO2 UPS
Table 3 – 2 Estimated run time table for internal batteries (9320-CO2)
Table 4 – 1 Remote EPO Wire Terminations
Table 4 – 2 Remote EPO
L
ist of Tables
Page 9
Powerware 9320 (10 kVA and 20 kVA) Installation and Operation viii
164201416 REV. A 071103
Powerware 9320 UPS true double conversion online power protection can be utilized to
prevent loss of valuable electronic information, minimize equipment downtime, and/or
minimize the adverse effect on equipment production due to unexpected power issues.
The Powerware UPS System continuously monitors incoming electrical power and
removes the surges, spikes, sags, and other irregularities that are inherent in
commercial utility power. Working with your building’s electrical system, the UPS
System supplies clean consistent power that your sensitive electronic equipment
requires for reliable operation. During brownouts, blackouts and other power
interruptions, optional battery strings provide emergency power to safeguard your
operation.
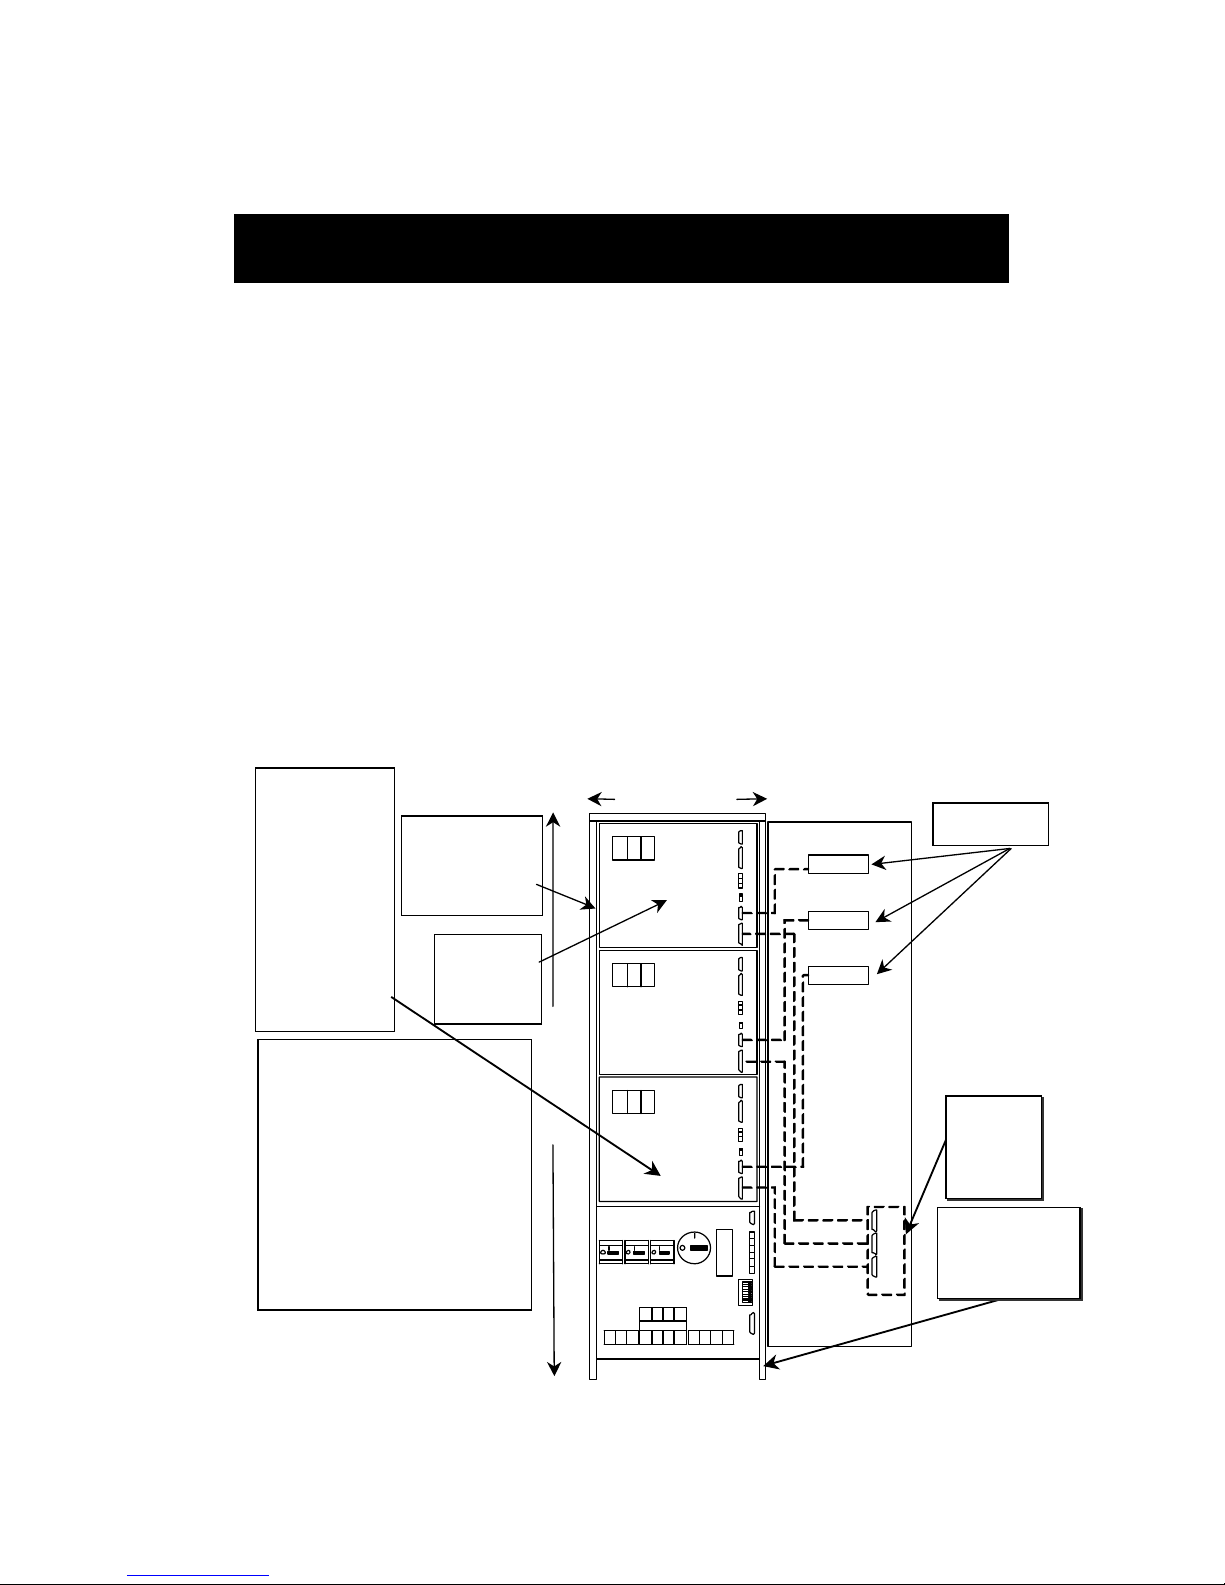
The UPS system is housed in free-standing cabinets. The cabinet sections are
matching in design and color, and have safety shields behind the front panels for
hazardous voltage protection. The following illustration depicts a typical Powerware
9320-CO3 (30 kVA and 60 kVA) UPS System, consisting of up to three parallel
modules in a single cabinet. Fewer than three modules may be used, depending on
application needs. When a 9320-CO2 is used, a maximum of two modules are
possible, with the third module space being used for internal batteries.
F2
Control Panel 3
UP S M od ule 3
JD2
JD1
X1
X2
X3
SW1-1
JD4
JD7
Control Panel 2
Control Panel 1
F2
UP S M od ule 2
JD2
JD1
X1
X2
X3
SW1-1
JD4
JD7
F2
UP S M od ule 1
JD2
JD1
X1
X2
X3
SW1-1
JD4
JD7
X1
X6
JD11
X2
X3
X4
X5
SW 2
JD8
Parallel isolator
IA2 -1 I A 2 - 2 IA 2 - 3
Mai nt e n anc e
Byp ass
IA1
X-slot
2A 2B 2C 2N
3A 3B 3C 3N
+N-- 1A 1B 1C 1N
JD41
JD42
JD43
NW4024
Rear view
I
ntroduction
750 mm (29.6 in.)
Cabinet depth
700 mm (27.6 in.)
Removable Conduit
Landing Panel at
bottom rear of
cabinet. See
A
ppendix for details
1800 mm (70.9 in.)
Operator
Control Panels
Blank Front
Module
Cover Panel
CAUTION:
When fewer than three
modules are installed in the
9320 cabinet, insure that
blank panels are installed,
both front and rear for
proper protection from
exposure to live electrical
connections inside the
cabinet in all unused
module locations.
Blank
Rear Fan
Grill
Rear view
of NW4024
located at
right side of
distribution
section
9320-CO2
uses this
space for
internal
batteries. A
maximum of
two UPS
modules may
then be
Page 10

ix Powerware 9320 (10 kVA and 20 kVA) Installation and Operation
164201416 REV. A 071103
Basic System Configurations
These basic UPS system configurations are possible:
• A Single Cabinet UPS with External Battery Cabinet, Single Utility Feed
(9320-CO3) and a maximum of three UPS modules or a Single Cabinet UPS
with internal batteries (9320-CO2) and a maximum of two UPS modules.
• One, two or three installed modules applied, in the case of two or three
modules to provide either redundant or capacity operation. When the 9320CO2 is used, only two modules are possible.
You can enhance any of these system configurations by ordering optional accessories,
such as Remote Emergency Power Off (EPO) control and X–Slot communications
connectivity features.
Using This Manual
Your UPS functions automatically and requires very little attention during normal
operation. However, you should read and understand the procedures described in this
manual to ensure trouble-free operation. In particular, you should be thoroughly familiar
with the Remote Emergency Power Off procedure described in Chapter 4 of this
manual.
The information in this manual is divided into the sections and chapters listed. The
system you are installing dictates which parts of the manual you should read. Everyone
should read the Introduction, Chapters 1, 2, 7, and 8.
Introduction
The introduction provides a brief description of the UPS system, a description of the
content of each chapter, safety, and text conventions used in the manual and reference
information.
Section I – Installation
• Chapter 1 – Getting Started – tells you how to prepare your site for the
installation of your UPS system. It discusses equipment environmental
requirements, inspecting, and unpacking cabinets.
• Chapter 2 – Installing the UPS System – describes how to install the UPS
cabinets and optional equipment.
•
Chapter 3 – Installing and Connecting Batteries
– provides battery safety,
installation and connection information.
•
Chapter 4 – Installing a Remote EPO Control
– contains information for
installing the optional Remote Emergency Power Off (REPO) control.
WARNING:
The UPS cabinet is factory pre-configured as a one, two or three*
module assembly. Only AUTHORIZED SERVICE PERSONNEL should
modify the UPS system configuration in the field. (*9320-CO3 only)
Page 11

Powerware 9320 (10 kVA and 20 kVA) Installation and Operation x
164201416 REV. A 071103
Section II – Operation
•
Chapter 5 – Understanding UPS Operation
– provides information on
understanding how your UPS works.
•
Chapter 6 – Operational Controls and Features
– describes the standard
and optional operational features and controls of the UPS system.
•
Chapter 7 – Using the Control Panel
– describes the controls and
indicators found on the Control Panel and shows the various information
screens displayed on the LCD screen.
•
Chapter 8 - UPS Operating Instructions
– contains startup and shutdown
procedures for the UPS system.
•
Chapter 9 – Responding to System Events
– lists all the alarm messages
and notices that can occur during operation of the UPS system.
• Chapter 10 – Communications
– describes the communication feature
available with the UPS system.
•
Chapter 11 – Options
– describes the available options for this UPS
system.
•
Chapter 12 – Maintaining the UPS System
– contains maintenance
instructions for the UPS system.
•
Chapter 13 – Product Specifications
– provides detailed specifications for
the UPS system.
•
Appendix A – Customer Information
– contains important information on
wiring requirements and recommendations, and important diagrams of the
cabinet’s mechanical details and electrical access.
•
Warranty
– provides the Powerware warranty for this product.
Read through each procedure before you begin. Perform only those procedures that
apply to the UPS system you are installing or operating.
Conventions Used in This Manual
The text in this manual uses these conventions:
• Bold type
highlights important concepts in discussions, key terms in
procedures, and menu options.
• Italic type highlights notes and new terms where they are defined.
• Rectangular boxes containing bold type are warnings or cautions that pertain
to the UPS system or its electrical connections.
In this manual, the term UPS refers only to the UPS cabinet and its internal elements.
The term UPS system refers to the entire power protection system-the UPS cabinet,
battery strings and options or accessories installed.
Page 12

xi Powerware 9320 (10 kVA and 20 kVA) Installation and Operation
164201416 REV. A 071103
Safety Considerations
The UPS cabinet is designed for industrial or computer room applications, and
contains safety shields behind the doors. However, the UPS system is a
sophisticated power system and should be handled with appropriate care, following
these guidelines:
• Keep surroundings clean and free from excess moisture
.
•
Do not operate the UPS system close to gas or electric heat sources.
•
The system is not intended for outdoor use.
•
The operating environment should be maintained within the parameters
stated in the manual.
•
Keep the cabinet doors closed and locked to ensure proper cooling
airflow and to protect personnel from dangerous voltages inside the unit.
•
The UPS system contains its own power source. Lethal voltages are
present even when the UPS is disconnected from utility power.
If service or routine maintenance is required:
•
Ensure all power is disconnected before performing installation or
service.
•
Ensure the area around the UPS system is clean and uncluttered.
• Battery maintenance or battery replacement should be performed only by
authorized service personnel.
•
Observe all DANGER, CAUTION and WARNING notices affixed to the
inside and outside of the equipment.
Getting Help
If you need to schedule initial startup, need regional locations and telephone
numbers, have a question about any of the information in this manual, or have a
question this manual does not answer, please call Invensys Global Service at:
United States 1 – 800 – 843 – 9433
Canada 1 – 800 – 461 – 9166
Outside the U.S. Call your local representative
WARNING:
Only AUTHORIZED SERVICE PERSONNEL should perform maintenance
on or service the UPS s
y
stem.
Page 13

Section I
Installation
Page 14

This page left intentionally blank
Page 15

Powerware 9320 (10 kVA and 20 kVA) Installation and Operation 1-1
164201416 REV A 071103
1.1 Installing the UPS
The complete UPS cabinet is shipped on a single pallet. Use a forklift or a pallet jack, rated
to handle the weight of the cabinets (refer to Table J in Appendix A for cabinet weights) to
move the packaged cabinet to the installation site, or as close as possible to the site, before
unloading from the pallet.
This is the basic sequence of the installation steps:
1.
Create an installation plan for the UPS system. (Chapter 1)
2. Prepare your site for the UPS system (Chapter 1)
3.
Inspect, unpack, and unload the UPS cabinet. (Chapter 1)
4.
Wire the system. (Chapter 2)
5. Install features, accessories, and/or options, as applicable. (Chapter 4 and 10)
6.
Complete the installation checklist. (Chapter 2)
7.
Have authorized service personnel perform preliminary operational checks and startup.
NOTE:
Startup and operational checks should be performed only by authorized service
personnel. This service is usually offered as part of the service contract for your
UPS. Contact Global Services in advance (usually a two week notice is required) to
reserve a preferred startup date.
1.1.1 Creating an Installation Plan
Before beginning to install the UPS system, read and understand how this manual applies to
the system being installed. Use the procedures and illustrations in the following chapters to
create a logical plan for installing the system.
1
Getting Started
Page 16

1-2 Powerware 9320 (10 kVA and 20 kVA) Installation and Operation
164201416 REV A 071103
1.1.2 Preparing Your Site
For your UPS to operate at peak efficiency, your installation site should meet the
environmental parameters outlined in this manual. If you intend to operate the system at an
altitude higher than 1500 meters (5000 feet), contact your local sales or service office for
important information about high altitude operation. The operating environment must meet
the weight, airflow, size and clearance requirements specified in Appendix A.
The basic environmental requirements of the UPS system are:
Ambient Temperature Range:
0 – 40˚C (32 – 104˚F)
Recommended Operating Range:
20 – 25˚C (68 – 77˚F)
Maximum Relative Humidity: 95% (non-condensing)
The UPS cabinet uses forced air cooling to regulate internal component temperature. Air
inlets are in the bottom sides and front of the cabinet, and outlets in the top of the cabinet.
You must allow clearance in back of the cabinet for proper air circulation. Refer to Table K
of Appendix A for clearance requirements.
1.1.3 Environmental Considerations
The life of the UPS system is adversely affected if the installation does not meet the
following guidelines:
1.
The system must be installed on a level floor suitable for computer or electronic
equipment.
2. The system must be installed in a temperature-controlled indoor area free of conductive
contaminants.
Failure to follow guidelines may invalidate the UPS warranty.
1.1.4 Preparing for Wiring the UPS System
For external wiring requirements, including the minimum AWG size of external wiring, refer
to Tables A and B in Appendix A for the Powerware 9320 (10 kVA or 20 kVA modules) UPS.
The power wiring connections for this equipment are rated using copper wire at 90˚C.
Note that wiring to an external battery cabinet, if used, may be either 75˚C or 90˚C rated.
Control wiring for EPO and optional accessories (such as building alarm and monitoring
interface) should be connected at the customer interface connections inside the front of the
UPS using NEC class 1 wiring methods.
Page 17
Powerware 9320 (10 kVA and 20 kVA) Installation and Operation 1-3
164201416 REV A 071103
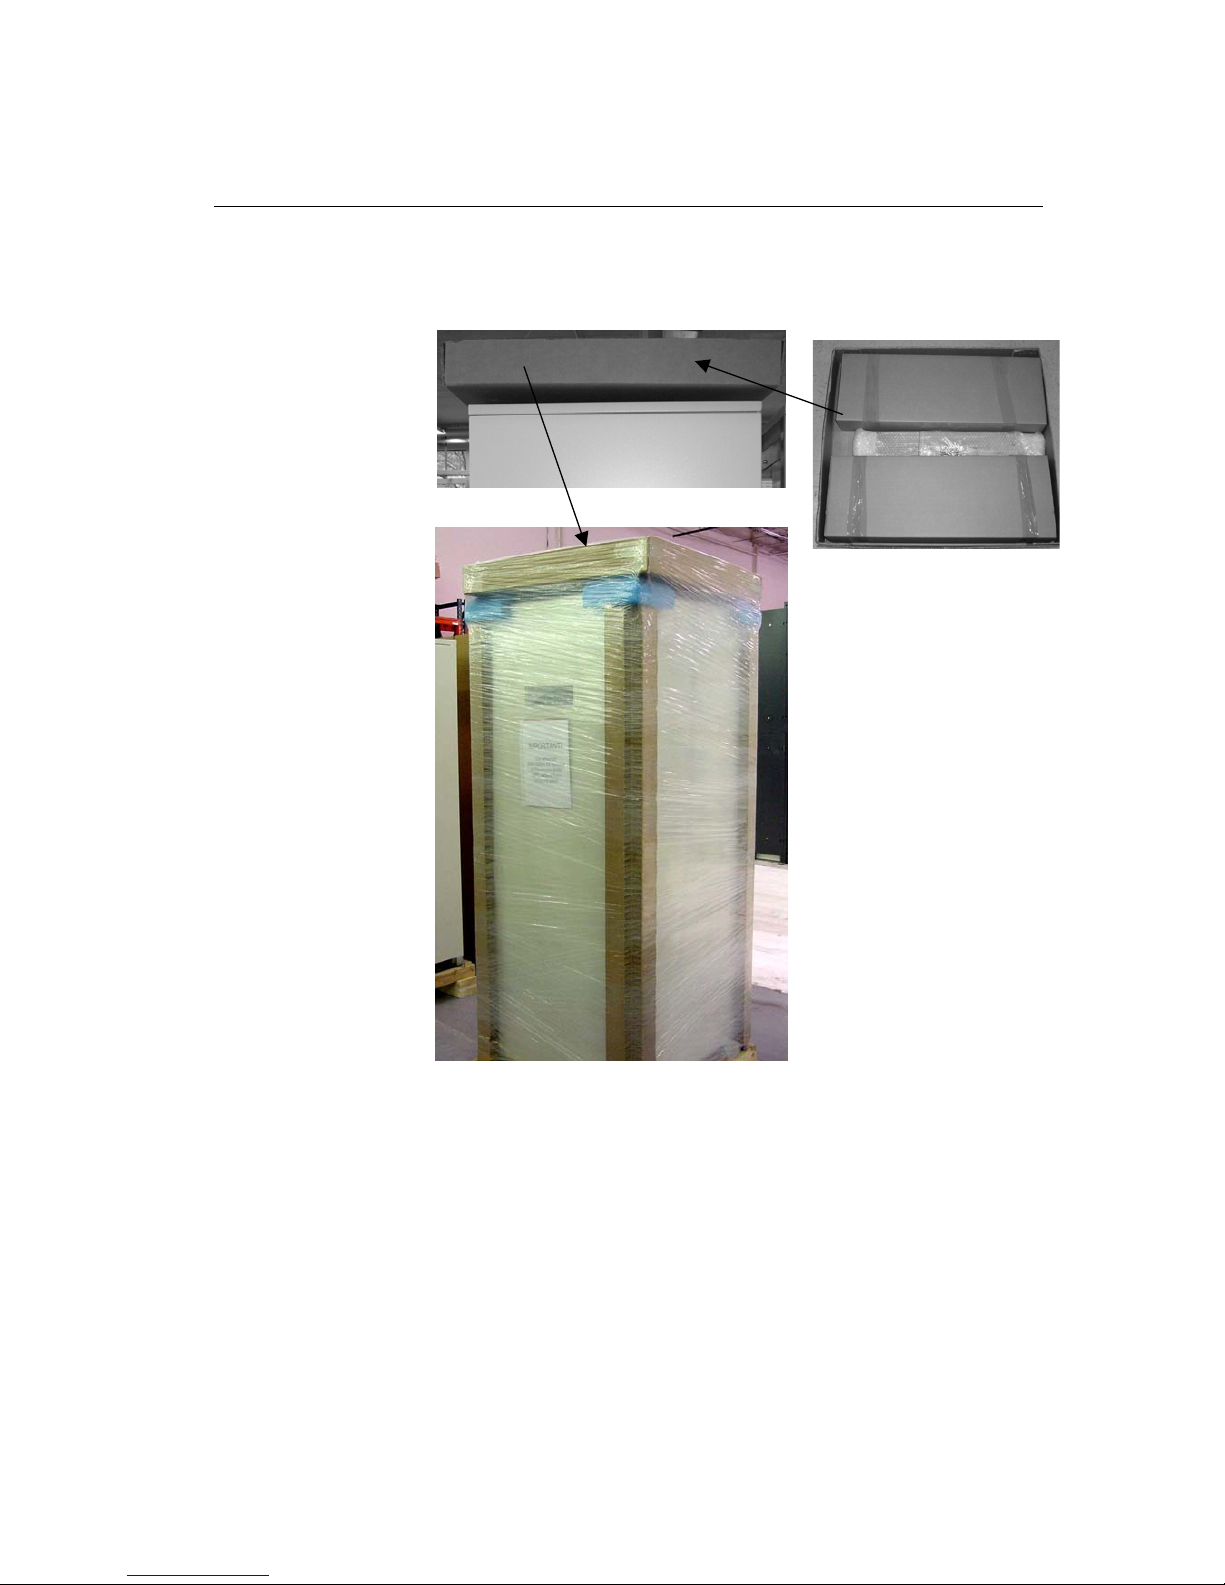
1.1.5 Inspecting and Unpacking Each Cabinet
The first task in preparing for installation is inspecting and unpacking the UPS. The UPS
and accessory cabinets are shipped bolted to wooden pallets, as shown in Figure 1
–
1, and
protected with outer protective packaging material.
Figure 1–1. Powerware 9320 (10 kVA or 20 kVA module) 3 module UPS Cabinet
Page 18

1-4 Powerware 9320 (10 kVA and 20 kVA) Installation and Operation
164201416 REV A 071103
1.
Carefully inspect the outer packaging for evidence of damage during transit.
2.
Use a forklift or other material handling equipment to move the cabinet to a
convenient unpacking area. Insert the forklift forks under the metal pallet supports
on the bottom of the unit.
3.
Set each cabinet on a firm, level surface, allowing a minimum clearance of 3 m.
(10 ft) on each side for removing the cabinets from the pallets.
4.
Remove the packing material, and discard or recycle them in a responsible manner.
5.
After removing the protective covering, inspect the contents for any evidence of
physical damage, and compare each item with the Bill of Lading. If damage has
occurred or shortages are evident, contact the Powerware Customer Service
Department immediately to determine the extent of the damage and its impact upon
further installation.
NOTE:
While awaiting installation, protect the unpacked UPS cabinet from moisture, dust,
and other harmful contaminants. Failure to store and protect the UPS properly may
invalidate the warranty.
6.
Remove jacking screws (4X) from accessory box and insert into threaded holes on
metal shipping brackets. Index all the screws down to the floor with a box end
wrench to elevate the two wooden pallets. Once elevated, remove the wooden
pallet by removing the nuts that attach them to the metal brackets.
7.
Lower all jacking bolts to enable the shipping brackets to support the unit weight.
Once on the ground, remove all 4 jacking bolts. Remove the screws that hold the
bracket to the unit legs.
8. Tilt the unit carefully (not more than 10 degrees) in order to remove the brackets.
CAUTION:
Do not install a damaged cabinet. Report any damage to the carrier and
contact your local sales or service office immediately
.
CAUTION:
Do not tilt cabinets more than
±
10 degrees from vertical.
CAUTION:
First, carefully remove the stretch wrap and remove accessory
installation kit before removing outer main cabinet packaging.
Approximate weight of accessory kit is 25 lbs. (11 kg.)
Page 19

Powerware 9320 (10 kVA and 20 kVA) Installation and Operation 2-1
164201416 REV A 071103
2.1 Preliminary Installation Information
Refer to the following while installing the UPS system:
•
Refer to Appendix A of this manual for installation drawings and additional
installation notes.
• Dimensions in this manual, unless otherwise noted, are in millimeters and (inches).
•
Do not tilt the cabinets more than
±
10 degrees during installation.
• The conduit landing plates are to be removed to add conduit landing holes as
required. Plate material is 14 gauge steel (2 mm. thick)
•
The cabinets must be installed on a level floor suitable for computer or electronic
equipment.
• If perforated floor tiles are required for ventilation, place them in front of the UPS.
Refer to Table J in Appendix A for equipment weight and point loading, and Figure
A-9 in Appendix A for air exhaust locations.
•
Details about control wiring are provided in each procedure for connecting options
and features. Figure A–1 and Tables G and H in Appendix A identify the control
wiring terminations.
2
WARNING:
Only qualified personnel should perform installation. All wiring
and installation of the UPS system must be done in accordance
with the most current NEC standards or local electrical code.
I
nstalling the UPS System
Page 20

2-2 Powerware 9320 (10 kVA and 20 kVA) Installation and Operation
164201416 REV A 071103
2.2 UPS Cabinet Installation
To install an UPS cabinet, perform the procedures in the following paragraphs.
2.2.1 Unloading the Powerware 9320 UPS Cabinet from the Pallet
The UPS cabinet is bolted to a wooden shipping base using two steel angles. To remove
the shipping material, perform the following procedure.
1.
Remove accessory installation kit located at the top of the unit (see figure 1.1) by
opening top of outer box.
Remove the 4 jacking bolts from the accessory pack.
Use a
forklift or other material handling equipment to move the cabinet to the installation
area. Insert the forklift forks under the unit and keep the unit elevated approximately
3 inches above the ground.
2. Remove the outer stretch wrapping. The two steel angles which connect the UPS
cabinet to the wooden shipping base contain 2 threaded holes for inserting jacking
bolts.
3.
Unbolt the wooden cross members on the shipping base by removing the four nuts
(10 mm) which fasten the wooden pallet to the steel brackets. Remove the wooden
cross members from the steel brackets. Insert the jacking bolts into the holes and
lower them to the ground, in order for the weight of the unit to be supported by the 4
bolts. Place small metal plates under the jacking bolts to prevent floor damage.
Ensure the unit does not tilt more than specified in the caution note above. Remove
the forklift or pallet jack once the unit is supported on thee jacking bolts. Slowly lower
the UPS by alternating between the four jacking bolts, until the steel brackets are on
the floor. Remove the jacking bolts.. Detach the UPS cabinet from the angle steel by
removing all of the M5 Phillips-head machine screws that fasten them, using a #3
Phillips head screwdriver. Tilt the unit slightly to enable the steel bracket to be
removed from beneath two legs. Lower the unit down to the floor.
4.
Repeat the process for the other side by tilting the unit and removing the steel bracket.
(See illustrated procedure packed on the outside of the shipping carton.)
5.
The UPS cabinet may now be moved to its final position for installation.
WARNING:
The UPS cabinet is heavy. Refer to Table J in Appendix A for weight of
cabinets. If unloading instructions are not closely followed, the cabinet may
CAUTION:
Do not tilt cabinets more than ±10 degrees from vertical. Do not cut the
outside protective cardboard packing box open. Damage to the enclosed
CAUTION:
Carefully open top of outer package and remove accessory installation kit
before removin
g
outer packaging. Approximate weight is 25 lbs. (11 kg.)
WARNING:
If
an external battery cabinet
is
used, do not
in
sta
ll internal
batteries
.
Page 21

Powerware 9320 (10 kVA and 20 kVA) Installation and Operation 2-3
164201416 REV A 071103
2.2.2 Installing External Battery Power Wiring
The Powerware 9320-C03 contains no internal batteries and must therefore be used with
an external battery system. The Powerware 9320-C02 contains internal batteries, however for extended runtime an external battery system will be required.
The procedure for wiring an external battery system to the 9320 is described as follows.
Also read the battery system manual to ensure proper interconnections on the battery
side.
1.
If not already done, open the UPS cabinet door using the provided operator handle
and remove the bottom internal protective panel. Retain hardware.
2. Route battery cables from the battery cabinet through the conduit landing plate at the
UPS cabinet bottom rear to the battery terminals at the bottom front of the cabinet.
Refer to Appendix A of this manual for wiring access information.
NOTE:
Remove the UPS cabinet input and output conduit landing plate to punch conduit
holes as required. When reinstalling, ensure that the protective ground wire is
reconnected if it has been removed for conduit hole punching in the plate.
3.
Connect positive, negative and neutral DC power wiring from the external battery
source to the DC input (positive and negative) and neutral (battery center tap)
terminals in the UPS cabinet. Refer to Appendix A of this manual for wiring and
termination requirements and wiring access information.
2.2.3
Installing UPS External Power Wiring
1.
Open the front cabinet door using the provided removable operator handle (packed
separately with the UPS). Remove the internal safety shield panel by removing the
fastening hardware to gain access to the input and output terminals at the bottom front
of the cabinet.
NOTE:
Remove the UPS cabinet input and output conduit landing plate to punch conduit
holes as required. When reinstalling, ensure that the protective ground wire is
reconnected if it has been removed for conduit hole punching in the plate.
2.
Route input and output cables through wireway to UPS terminal blocks. Refer to
Appendix A of this manual for wiring access information.
3.
For UPS input, connect phase A, B, C, Neutral (N) and earth ground (G) input power
wiring from the source to the rectifier input terminals (1A, 1B, 1C) in the UPS cabinet.
Refer to Appendix A of this manual for wiring and termination requirements, terminal
location and wiring access information.
DANGER:
Never connect the earth ground (G) to the Neutral connection (N) inside the
UPS equipment cabinet. A serious electric shock hazard or equipment
failure could result.
Page 22

2-4 Powerware 9320 (10 kVA and 20 kVA) Installation and Operation
164201416 REV A 071103
4.
Connect ground, phase A, B, C, and Neutral power wiring from the output terminals
(3A, 3B, 3C) on the In/Out Terminal Block to the critical load. Refer to Appendix A of
this manual for wiring and termination requirements and wiring access information.
5.
Secure the UPS by reinstalling the safety shield panels, and closing the front cabinet
door, latching the cabinet door with the removable door handle.
2.2.4 Installing Customer Connections
See Chapter 10, “Communications”
2.2.5
Prepare for Installing Optional Accessories
NOTE:
If you are installing accessories, including the Remote Emergency Power Off
(REPO) switch, you must install conduit between each device and the UPS
cabinet for wiring these options.
1.
Be sure the UPS system is turned off and all power sources are removed. (See the
operation section of this manual for shutdown instructions.)
2.
Remove Customer Interface conduit landing plate from the UPS cabinet. Drill or
punch conduit holes for interface wiring.
3.
Open UPS cabinet front door and remove the front safety shield panel to gain access
to the wire way to bring wires from the conduit landing panel at the bottom rear of the
cabinet.
4.
Locate required connection points by referring to Figure A–1 in Appendix A.
5.
Refer to Appendix A of this manual for wiring and termination requirements.
6. Reinstall Customer Interface conduit landing plate.
7.
Install conduit and wiring.
8.
When wiring is complete, secure UPS by reinstalling all panels removed in previous
steps.
WARNING:
The Powerware 9320 UPS requires a neutral input and output power
connection for proper operation, unless the output is delta connected, in
which case only an input neutral is needed. Internal input and output
neutrals are permanently connected inside the cabinet.
WARNING:
An insulated grounding conductor must be provided per NEC.
WARNING:
Units are shipped as single feed only.
Page 23

Powerware 9320 (10 kVA and 20 kVA) Installation and Operation 2-5
164201416 REV A 071103
2.3 Battery Cabinet Installation
The Powerware 9320-C03 has no batteries within the UPS cabinet. The Powerware
9320-C02 contains internal batteries, however for extended runtime an external battery
system will be required.
See installation instruction provided with the battery cabinet for proper installation of that
portion of the system.
2.4 Initial Startup
Startup and operational checks should be performed only by authorized service
personnel. Contact service in advance (usually a two week notice is required) to reserve
a preferred startup date.
2.5 Completing the Installation Checklist
The final step in installing your UPS system is completing the following Installation
Checklist. This checklist ensures that you have completely installed all hardware,
cables, and other equipment. Completing all items listed on the checklist will ensure a
smooth installation. You should make a copy of the Installation Checklist before filling it
out, and retain the original.
After your installation is complete, a service representative will be able to verify the
operation of your UPS system and commission it to support your critical load. The
service representative cannot perform any installation tasks other than verifying software
and operating setup parameters. Service personnel may request a copy of the
completed Installation Checklist to be sure you have completed all applicable equipment
installation.
NOTE:
The Installation Checklist MUST be completed prior to starting the UPS system
for the first time.
WARNING:
It is very important to ensure that a proper protective device is installed
between the battery system and the UPS DC input terminals. See Tables A
and B in Appendix A for proper wire and protective device sizing.
WARNING:
If
an external battery cabinet is used, do not
in
sta
ll internal
batteries
.
Page 24

2-6 Powerware 9320 (10 kVA and 20 kVA) Installation and Operation
164201416 REV A 071103
2.5.1
Installation Checklist
All packing materials and restraints have been removed from each cabinet.
Each cabinet in the UPS system is placed in the installed location.
All conduits and cables are properly routed to the UPS and auxiliary cabinets.
All power cables are properly sized and terminated.
A ground conductor is properly installed.
If the cabinet does not use all module mounting locations, the provided protective
covers are installed on the front and back of the cabinet.
Battery cabinet installation instructions have been completed.
Air conditioning equipment is installed and operating properly.
The area around the installed UPS system is clean and dust-free. (It is
recommended that the UPS be installed on a level floor suitable for computer or
electronic equipment.
Adequate workspace exists around the UPS and other cabinets.
Adequate lighting is provided around all UPS equipment.
Any optional accessories are mounted in their installed location and properly wired.
Summary alarms and/or building alarms are wired appropriately. (OPTIONAL)
Startup and operational checks performed by authorized service personnel.
All network connections are completed.
Page 25

Powerware 9320 (10 kVA and 20 kVA) Installation and Operation 3-1
164201416 REV A 071103
3.1 Important Safety Instructions
The Powerware 9320-C03 UPS does not contain batteries. It must, however, be used
with a properly configured battery cabinet or rack with a properly sized battery system for
proper operation.
The Powerware 9320-C02 UPS uses internal batteries. For extended runtime
applications, it may also be used with a properly configured battery cabinet or rack with a
properly sized battery system for proper operation.
The standard batteries of the Powerware 9320 two module system are sealed,
maintenance-free batteries, internally mounted and will typically be connected at the
time the UPS is commissioned.
The battery life depends very much on the ambient temperature. A temperature
range between +18° and +23°C will achieve the optimum battery life.
If the UPS is delivered without batteries, Powerware is not responsible for any
damage or malfunctioning caused to the UPS by incorrect wiring.
The installation of batteries should be performed or supervised by personnel
knowledgeable of batteries and their associated precautions. Keep unauthorized
personnel away from batteries.
3
I
nstalling and Connecting Batteries
CAUTION:
Refer to the battery manufacturers installation manual for battery installation
and maintenance instructions.
Page 26
3-2 Powerware 9320 (10 kVA and 20 kVA) Installation and Operation
164201416 REV A 071103
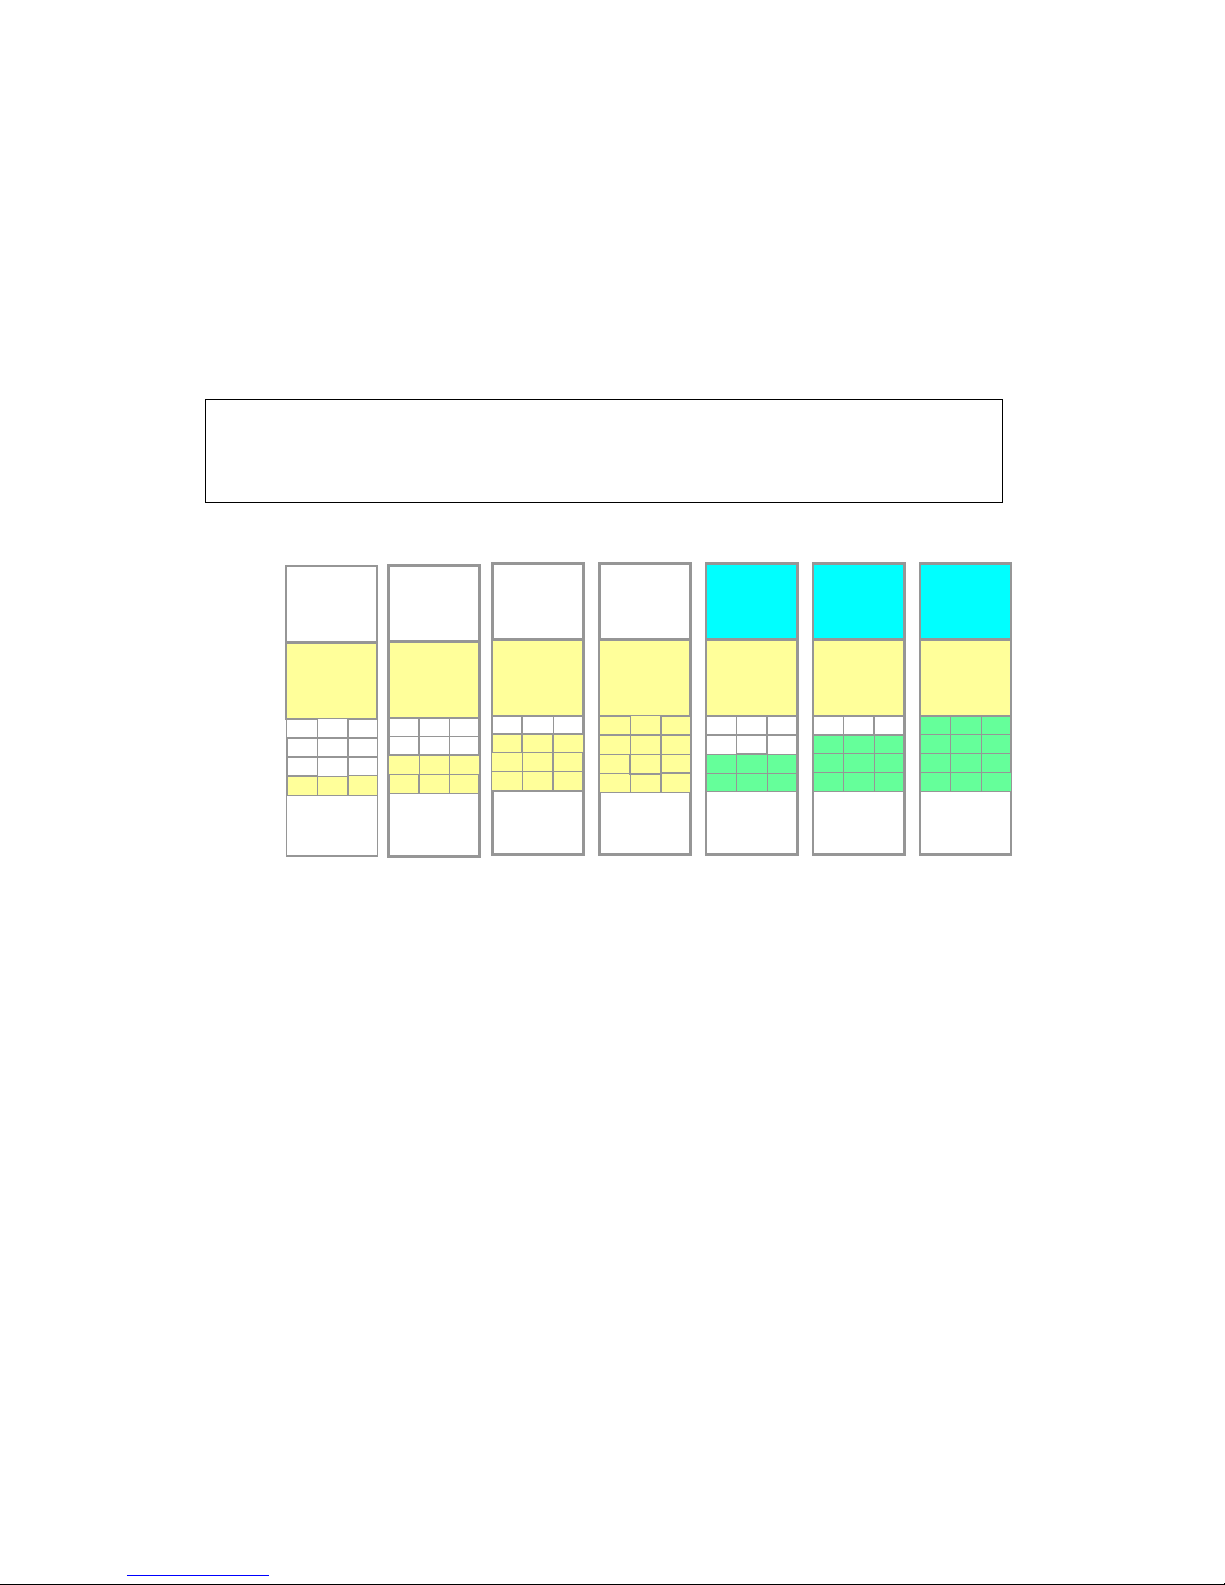
3.2 Internal Battery Modules
In the Powerware 9320-C02 there is space for up to 112 x 9 Ah batteries internally
.
In the drawing below, different Battery and Module configurations are shown. The
batteries may only be used as common batteries powering either one or two installed
modules of the 9320-C02. See the Table below for the expected autonomy time.
Table 3 – 1 Internal battery combinations for 9320-CO2 UPS
10 kVA 20 kVA 40 kVA
28 x 9 Ah 8 N/A N/A
56 x 9 Ah 21 8 N/A
84 x 9 Ah 35 15 N/A
112 x 9 Ah 50 21 8
Table 3 – 2 Estimated run time with internal batteries (9320-CO2)
UPS 1
10 kVA
Distribution
40kVA
56x9Ah
UPS 2
10 kVA
84
x
9Ah
UPS 1
10 kVA
Distribution
40kVA
9x9 2x5x9 9x9
9x9 2x5x9 9x9
9x9 2x5x9 9x9
UPS 2
10 kVA
Distribution
40kVA
84x9Ah
(
empty
)
112x9Ah
UPS 1
10 or 20
kVA
Distribution
40kVA
UPS 2
10 or 20
56x9Ah
UPS 1
10 kVA
Distribution
40kVA
2*5x9
9x9 9x9
(empty)
112x9Ah
UPS 1
10 or 20
kVA
Distribution
40kVA
(
empty
)
2*5x9
9x9
9x9
9x9
2*5x9
9x9
2*5x9
9x9 9x9
2*5x9
9x9 9x9
2*5x9
9x9 9x9
2*5x9
9x9 9x9
9x9 2x5x9 9x9
9x9 2x5x9 9x9
9x9 2x5x9 9x9
9x9 2x5x9 9x9 9x9 2x5x9 9x 9
9x9 2x5x9 9x 9
NOTE:
Set-up the correct number of battery blocks on Control Panel (Menu: ServiceSet-Up) as well as the number of battery strings used to insure the correct
28x9Ah
UPS 1
10 kVA
Distribution
40kVA
(empty)
2*5x9
9x9
9x9
2*5x9
9x9 9x9
9x9 2*5x9
9x9
UPS 1
10 or 20
kVA
Page 27

Powerware 9320 (10 kVA and 20 kVA) Installation and Operation 4-1
164201416 REV A 071103
4.1 Installation Procedures
Figure 4–1. Typical Remote EPO Control
4.2 To Install a Remote EPO:
NOTE: Before installing a Remote EPO, be sure you have prepared the UPS according
to the instructions in Chapter 2.
To Install a Remote EPO control:
1. Securely mount the remote EPO switch. Recommended locations include near
operator’s consoles or near exit doors. Refer to Remote EPO switch manufacturers
installation instructions for enclosure dimensions and wiring knockouts.
2.
Install wiring from the remote EPO switch using appropriate sized conduit through
the Customer Interface conduit landing plate on the bottom rear of the UPS cabinet.
Refer to Figure A–9 for conduit landing area.
3.
Connect the Remote EPO wiring as shown in Tables 4–1 and 4–2, on the next page.
4
EMERGENCY OFF
I
nstalling a Remote EPO Control
Page 28

4-2 Powerware 9320 (10 kVA and 20 kVA) Installation and Opation
164201416 REV A 071103
Table 4 – 1. Remote EPO Wire Terminations
From Remote
EPO Switch(s)
To X1 connector on customer interface panel
at the bottom of the UPS cabinet, not on modules
Remarks
X1 - 1
Refer to switch
manufacturers
installation
instructions
X1 - 2
Twisted
wires (2)
14-18
gauge
Table 4 – 2. Remote EPO
Remote EPO switch rating is 24 VDC, 1 Amp maximum
NOTE: This switch must be a dedicated switch not tied into any
other circuits.
4.
If you are installing multiple Remote EPO stations, wire all EPO switches in series
with each other.
5.
If required, install appropriate sized conduit and wiring from the Remote EPO switch
to trip circuitry of upstream protective devices. A separate contact block, with the
appropriate normally open or normally closed contacts, must be used for this
function. Remote EPO switch wiring must be in accordance with UL Class 1
requirements.
6. Secure the UPS by reversing all steps taken to prepare it for Remote EPO
installation.
4.3 To Operate a Remote EPO:
1.
Activation of an EPO switch will interrupt the EPO circuit and immediately shut off
UPS main circuit power to the load, as well as the DC input from the battery supply.
2. Even though the EPO switch is opened, the UPS will not re-energize until the normal
startup procedure is followed, which requires operator intervention at the UPS
cabinet controls.
X1 UPS
REMOTE
EPO
SWITCH
(N.C.)
TWISTED
WIRES (2)
Page 29

Powerware 932020 (10 kVA and 20 kVA) Installation and Operation
164201416 REV. A 071103
Section II
Operation
Page 30

Powerware 9320 (10 kVA and 20 kVA) Installation and Operation
164201416 REV A 071103
Page 31

Powerware 9320 (10 kVA and 20 kVA) Installation and Operation 5-1
164201416 REV. A 071103
5.1 Looking Inside the UPS System
The Powerware 9320 is a continuous duty, solid-state, transformerless (at 208 VAC) three
phase, true online system that provides conditioned and uninterruptible AC power to the
UPS systems output. The UPS supports process control, data processing,
telecommunications/PBX, and research equipment. The Powerware 9320 maintains power
to the critical loads during commercial electrical power brownout, blackout, overvoltage,
undervoltage and out-of-tolerance frequency conditions.
The basic system consists of: a rectifier, battery charger, DC booster, inverter,
monitoring/operation control panel, integrated communications server, and microprocessor
controlled logic.
In this manual, the power required by your equipment is called the critical load. The UPS
supplies the critical load with conditioned power that is synchronized with your utility power.
Figure 5–1 shows the main elements of the UPS.
Bat tery
Ch ar g er
Rectifier Booster
K4
K1
Inverte r
K2
F1
Batte ry
Brea ker
Batte ry
IA2-1
IA1
Input Filter
UP S M o du le 2
UP S M o du le 1
UP S M o du le 3
Fig. 5–1. Main Elements of the UPS System (UPS Module 3 in 9320-C03 systems only)
5
Understanding UPS Operation
Page 32

5-2 Powerware 9320 (10 kVA and 20 kVA) Installation and Operation
164201416 REV A 071103
If utility power is interrupted or falls outside the parameters specified in Chapter 13, “Product
Specifications,” the UPS uses a backup battery supply to maintain power to the critical load
for a specified period of time or until the utility power returns. For extended power outages,
the UPS is designed to operate with an alternative power system (such as a generator) or
will shut down your critical load in an orderly manner, if Powerware shutdown software is
used.
In the event of a severe output overload or failure of a critical internal UPS component, an
emergency bypass, consisting of a continuous duty static switch, and backfeed protection
contactor (K4) is utilized. The backfeed protection contactor is located in series with the
static switch, to ensure safety to anyone working upstream of the UPS system. For manual
transfers to bypass, the static switch is also used. The static switch is armed and ready
during both types of transfers.
If maintenance of the UPS system is required, an internal Maintenance Bypass switch
provides a means of isolating the UPS Rectifier/Booster/Inverter components for servicing,
while still supplying power to the critical load.
The operation of the UPS is described in greater detail in the following paragraphs.
Page 33

Powerware 9320 (10 kVA and 20 kVA) Installation and Operation 5-3
164201416 REV. A 071103
5.2 Normal, Battery and Bypass Modes
The UPS system functions automatically to supply AC electrical power to the critical load.
There are four standard operation modes.
•
In Normal mode, the critical load is supplied by the inverter, which derives its
power from rectified utility AC power. In this mode, the battery charger also
provides charging current for the battery, if needed.
• In Battery mode, the critical load is supplied by the inverter which derives its
power from the battery DC power.
•
In Bypass (Economy) mode, the critical load is directly supported by utility power
via the static switch. In this mode, the critical load is not protected.
•
In Maintenance Bypass mode, the critical load is directly supported by utility
power, but the UPS can be shut down for maintenance. The operator switching
the Maintenance Bypass Switch to the Bypass position accomplishes this,
however, the critical load is not protected.
The UPS continually monitors itself and the incoming utility power, and automatically
switches between these modes as required, with no operator intervention, except for the
Maintenance Bypass mode. The sophisticated detection and switching logic inside the
UPS ensures that operating mode changes are automatic and transparent to the critical
load.
System events are alarms and notices that are displayed on the LCD monitor panel.
They may or may not require operator intervention. See Chapter 9.
The following descriptions provide the differences in UPS operating modes.
Page 34

5-4 Powerware 9320 (10 kVA and 20 kVA) Installation and Operation
164201416 REV A 071103
5.2.1 Normal Mode
Figure 5–2 shows the path of electrical power through the UPS system when the UPS is
operating in Normal mode.
Normal Mode
Battery
Ch arge r
Rectifier Booster
K4
K1
Inv erter
F1
Battery
Breaker
Breaker Contactors
Closed
Open
Battery
IA2-1
IA1
Swi tches
Main Power
Trickle Current
Energized
De -Energ ize d
Inpu t Filter
UPS Module 2
UPS Module 1
UPS Module 3
K2
IA2-2
IA2-3
Figure 5–2. Path of Current Through the UPS in Normal Mode (UPS Module 3 in 9320-C03
systems only)
During normal UPS operation, power for the system is derived from a utility input source
through the input contactor K1 (and externally protected utility feed). “Load Protected”
appears on the LCD display and indicates the incoming power is within voltage and
frequency acceptance windows. Three phase AC input power is converted to DC using a
full-wave, six-pulse, solid-state rectifier block which supplies unregulated DC voltage to a
boost converter which in turn supplies a higher, regulated DC voltage to the inverter.
A separate internal battery charger is used to maintain the proper charge level on the
battery during normal operation. The battery charger derives its input from the booster
output and provides regulated DC voltage and charge current to the battery. The battery
charge condition is monitored by the UPS and, when abnormal, reported by the status
indicators located on the LCD display. The battery is always connected to the UPS and
ready to support the inverter should the utility input become unavailable.
Static Switch
Page 35

Powerware 9320 (10 kVA and 20 kVA) Installation and Operation 5-5
164201416 REV. A 071103
The DC boost converter derives power from the unregulated DC rectifier and produces a
higher, stable DC voltage and current source for the inverter. A fixed system neutral is also
carried through the boost converter to allow full support of single phase AC loads from any
phase of the inverter output. The output neutral of the system is connected to the required
neutral, both from the main utility supply and the bypass supply and should never be bonded
to protective earth ground at the UPS output.
The inverter produces three phase AC power to a customer load without the use of a
transformer. The inverter derives power from the boost converter regulated DC and utilizes
IGBT devices and pulse-width modulation (PWM) to produce a regulated and low harmonic
content AC output. The AC output of the inverter is delivered to the system output through
the output contactor K2.
If the utility AC power is interrupted or is out of specification, the UPS automatically switches
to Battery mode to support the critical load with no interruption. When utility power returns,
the UPS returns to normal mode.
If the UPS becomes overloaded or unavailable, the UPS switches to Bypass mode. The
UPS automatically returns to Normal mode when the overload condition is cleared and
system operation is restored within specified limits.
If the UPS experiences an internal failure, it switches automatically to Bypass mode and
remains in that mode until the failure is corrected and the UPS is back in service.
Page 36

5-6 Powerware 9320 (10 kVA and 20 kVA) Installation and Operation
164201416 REV A 071103
5.2.2 Bypass Mode
The UPS automatically switches to Bypass mode if it detects an overload, load fault, or
internal failure. The bypass source supplies the commercial AC power to the load directly.
Figure 5–3 shows the path of electrical power through the UPS system when operating in
the Bypass mode.
Figure 5-3. Path of Current Through the UPS in Bypass Mode (UPS Module 3 in 9320-C03
systems only)
CAUTION:
The critical load is not protected while the UPS is in the Bypass mode.
Static Bypass Mode
Battery
Charger
Rectifier Booster
K4
K1
Inverter
F1
Battery
Breaker
Breaker Contactors
Closed
Open
Battery
IA2-1
IA1
Switches
Main Power
Trickle Current
Energized
De-Energized
Input Filter
UPS Module 2
UPS Module 1
UPS Module 3
K2
Page 37

Powerware 9320 (10 kVA and 20 kVA) Installation and Operation 5-7
164201416 REV. A 071103
In BYPASS mode, the output of the system is provided with three phase AC power directly
from the systems input. While in this mode, the output of the system is not protected from
voltage or frequency fluctuations or power outages from the source. Some power line
filtering and spike protection is provided to the load but no active power conditioning or
battery support is available to the output of the system in the bypass mode of operation.
The internal bypass is comprised of a solid state silicon controlled rectifier (SCR) static
switch (SSW), and a back feed protection contactor (K4). The static switch is rated as a
continuous duty device that is used anytime the boost converter and inverter is unable to
support the applied load. The static switch is wired in series with the back feed protection
contactor and together are wired to enable the inverter and rectifier to be bypassed when
this path is active. The static switch, as an electronically controlled device, can be turned on
immediately to pick up the load from the inverter. The backfeed protection contactor is
normally always closed, ready to support the static switch unless the bypass input source
becomes unavailable.
During an outage, transfers to bypass are prohibited and for the safety of those who may be
working on the power lines upstream from the UPS, the back feed protection contactor is
opened, preventing system output voltage from bleeding across the static switch snubber
components to the bypass input source. In the bypass mode, the static switch is turned on
to supply the load current directly from the bypass supply, with the inverter ready to take
over the load if the bypass supply should vary outside preset limits.
If the inverter is unable to support the load on the output of the system, the UPS will transfer
the critical load to the internal bypass. The critical load will be transferred automatically to
the internal bypass if any of the following abnormal conditions occur on the output of the
system: If the output of the system exceeds acceptable voltage tolerances; Critical load
current exceeds the overload specifications of the inverter; Inverter failure. The transfer is
initiated by turning on the static switch and blocking the IGBT gate signal. This kind of
transfer is normally referred to as a Make-Before-Break transfer. The transfer takes place in
less than 4 ms (one-quarter cycle) to ensure loads on the systems output are not
interrupted. The static switch remains on until either the inverter is able to support the
system output or the unit is placed into a maintenance position where repairs can be made.
If the UPS initiates its own transfer to bypass for any reason other than operator
intervention, the UPS will attempt to restart the inverter (if not running already) and attempt
a retransfer back on line to support the output of the system. Three attempts will be made
within ten minutes to bring the inverter back on-line automatically before the UPS will lock
out any further attempts. After three attempts have been made, the UPS will remain in
bypass and an alarm condition will be annunciated. The UPS can also be transferred to
bypass using the front panel controls.
Bypass mode is a normal operating mode, not requiring an alarm condition. However, if the
UPS is unable to return to Normal mode following an automatic transfer to Bypass mode, an
alarm condition is recorded.
Page 38

5-8 Powerware 9320 (10 kVA and 20 kVA) Installation and Operation
164201416 REV A 071103
5.2.3 Battery Mode
The UPS transfers to battery mode automatically if a utility power outage occurs, or if the
utility power does not conform to specified parameters. In Battery mode, the battery
provides emergency DC power that the inverter converts to AC power.
Figure 5–4 shows the path of electrical power through the UPS system when operating in
Battery mode.
Battery Mode
Battery
Charger
Rectifier Booster
K4
K1
Inverter
K2
F1
Battery
Breaker
Breaker Contactors
Closed
Open
Battery
IA2-1
Switches
Main Power
Trickle Current
Energized
De-Energized
Input Filter
UPS Module 2
UPS Module 1
UPS Module 3
Figure 5–4. Path of Current Through the UPS in Battery Mode (UPS Module 3 in 9320-C03
systems only)
During a utility power failure, the rectifier no longer has an AC utility source from which to
supply the DC output current required to support the battery charger and boost converter.
The input contactor (K1) is opened, the battery charger is turned off, and the battery SCRs
(+ and -) both receive signals to turn on to provide battery power to the system. Because
the battery SCRs are electronic devices, battery power is instantly available to the boost
converter so that the inverter and customers load can be supported without interruption. In
a single feed installation, where the bypass input is connected to the rectifier input, the back
feed protection contactor (K4) will also open. The opening of contactors K1 and K4
Static Switch
Page 39

Powerware 9320 (10 kVA and 20 kVA) Installation and Operation 5-9
164201416 REV. A 071103
prevents static system voltage from bleeding backwards through the static switch and
rectifier snubber components and re-energizing the input source.
While in battery mode, the UPS will enunciate an audible horn, indicate the status change
on the front panel display with the message “MAINS NOT OK”, and make an entry into the
alarm event history. As the battery discharges, the boost converter and inverter constantly
make small adjustments to ensure a steady output. The UPS will remain in this operating
mode until the input power to the rectifier is again within the specified voltage or frequency
acceptance window.
If the input power fails to return or is not within the acceptance parameters required for
normal operation, the battery will continue discharging until a DC voltage level is reached
where the inverter output can no longer support the connected loads. When this occurs, the
unit will issue another set of audible and visual alarms indicating “BATTERY IN
DISCHARGE”. Unless the rectifier has a valid input soon, the critical load will only be
supported for about 3 minutes before the output of the system shuts down completely.
When this occurs, the LCD display will show the message “BATTERY DISCHARGED”.
If at any time during the battery discharge, the input power becomes available again,
contactors K1 and K4 are closed and the rectifier will begin to supply DC current to the
boost converter and inverter. The battery SCRs will be switched off while the battery
charger is turned back on to begin recharging the battery. At this point, the unit returns to
normal operation.
The systems total operating time on battery will depend on many factors. Some factors that
affect battery support times are battery type and capacity, number of parallel strings,
environmental temperatures, age of the battery, and fluctuations in load demand during the
discharge. The greater the load, the less support time the battery will provide. Decrease
the load and the battery support time will generally increase.
Page 40

5-10 Powerware 9320 (10 kVA and 20 kVA) Installation and Operation
164201416 REV A 071103
5.2.4 Maintenance Bypass Mode
An internal maintenance switch (IA1) is used to safely supply utility power to the system
output during periods of maintenance or repairs. Before this switch is used, the system
should be transferred to bypass. This switch has two positions: “O” (OFF) and “l” (ON).
When switched to “l” (ON), the bypass source supplies the commercial AC power to the
load directly.
While on internal (static) bypass, when a user rotates the maintenance switch from the
“O” (OFF) to the “l” (ON) position, the load is wrapped around the UPS, and power is
removed from the entire upper portion of the UPS allowing service work to be completed
on the UPS safely.
Figure 5–5 shows the path of electrical power through the UPS system when operating
in Maintenance Bypass mode.
Maintenance Bypass Mode
yp
Battery
Charger
Rectifier Booster Inverter
K2
F1
Battery
Breaker
Breaker Contactors
Closed
Open
Battery
IA1
Switches
Main Power
Trickle Current
Energized
De-Energized
Input Filter
UPS Module 2
UPS Module 1
UPS Module 3
K4
K1
IA2
Static Switch
Figure 5–5. Path of Current through the UPS in Maintenance Bypass
Mode (UPS Module 3 in 9320-C03 systems only)
CAUTION:
The critical load is not protected when the UPS is in the Maintenance Bypass mode.
DANGER:
LETHAL VOLTAGE PRESENT: This unit should not be operated with the cabinet
doors open or protective panels removed. Do not make any assumptions about the
electrical state of any cabinet in the UPS system.
Page 41

Powerware 9320 (10 kVA and 20 kVA) Installation and Operation 5-11
164201416 REV. A 071103
5.3
Functional Description
The UPS is an online double-conversion unit with a series power train. An uncontrolled
rectifier feeds a boost converter, which in turn powers the inverter. The internal static
bypass utilizes a static switch and an independent maintenance bypass switch is also
included internal to the UPS cabinet. The unit input must be 4-wire in (plus protective
ground) at the rectifier and 4-wire in (plus ground) at the bypass. The output can be
4-wire plus GND or 3-wire plus GND depending on customer requirements. The unit
does not incorporate any galvanic isolation, input to output. The battery string comprises
168 cells (336 volts nominal) arranged in a positive string of 84 cells and a negative
string of 84 cells with the center of the series connected strings tied to system neutral.
The battery is charged by positive and negative side chargers, which are powered from
the output of the boost converter.
5.3.1 Input Rectifier
The Input Rectifier is a full wave bridge uncontrolled rectifier, which produces
unregulated DC of approximately +170 and –170 volts DC. A pre-charge system precharges the DC bus prior to the input contactor being closed, to control inrush current to
no higher than rated current levels.
5.3.2 Boost Converter
A Boost Converter converts the raw DC input to a regulated DC link voltage of
approximately +225 and –225 volts DC. It is operated in the current mode and is
controlled using a variable modulation technique with a frequency in the range of
7 kHz. The neutral connection is maintained from the input to the output as a fixed
connection.
5.3.3 Inverter and Filter
The inverter is a traditional (current mode controlled) hard-switched IGBT 3-phase
topology. The IGBTs are modulated by a variable frequency, current-mode control
technique at approximately 7 kHz. An output filter filters out the high frequency
switching components (line to neutral).
5.3.4 Batteries and Battery Charger
The battery for the Powerware 9320 system is comprised of a positive string of 84 cells
and a negative string of 84 cells, each made up of fourteen 12-volt battery blocks The
battery charger is divided into a positive side charger and a negative side charger, each
powered from the respective positive and negative controlled DC bus voltages. The
chargers operate automatically in the constant current or constant voltage mode based
on battery condition.
The Powerware 9320-C03 has no batteries within the UPS cabinet. The Powerware
9320-C02 contains internal batteries, however for extended runtime an external battery
Page 42

5-12 Powerware 9320 (10 kVA and 20 kVA) Installation and Operation
164201416 REV A 071103
system will be required. The internal charger charges the entire battery system, with a
maximum current as indicated in Chapter 13, “Product Specifications”. Note that the
higher the battery capacity, the longer the recharge time required to fully recharge the
batteries.
5.3.5 Static Bypass
The bypass has a continuous-duty SCR switch and a back-feed contactor (K4) in the
Bypass circuit. In normal mode, the contactor connects the inverter to the output. A
contactor (K2) provides isolation to the inverter when the system is on bypass.
5.3.6 Maintenance Bypass
A user accessible shrouded 4-wire Mechanical Maintenance Bypass switch is provided
internal to the cabinet.
Page 43

Powerware 9320 (10 kVA and 20 kVA) Installation and Operation 6-1
164201416 REV. A 071103
6.1 General
The UPS system should function automatically and require very little attention during
normal operation. The controls and indicators identified in this section are used during
startup to monitor normal operation and during abnormal events.
Figure 6–1 identifies and shows the location of the controls and indicators on the
Powerware 9320-C03 UPS. The descriptions provide a brief overview of the UPS
controls, and standard and optional features.
NOTE: Read the Operation section of this manual and have thorough knowledge of UPS
operation before attempting to operate any of the UPS controls or optional
components.
Figure 6–1A. Powerware 9320-C03 Controls and Indicators
6
F2
Control Panel 3
UPS Module 3
JD2
JD1
X1
X2
X3
SW1-1
JD4
JD7
Control Panel 2
Control Panel 1
F2
UPS Module 2
JD2
JD1
X1
X2
X3
SW1-1
JD4
JD7
F2
UPS Module 1
JD2
JD1
X1
X2
X3
SW1-1
JD4
JD7
X1
X6
JD11
X2
X3
X4
X5
SW2
JD8
Parallel isolator
IA2-1 IA2-2 IA2-3
Maintenance
Bypass
IA1
JD41
JD42
JD43
NW4024
Rear view
2A 2B 2C 2N
3A 3B 3C 3N
+N-- 1A 1B 1C 1N
X slot
Operational Controls and Features
Maintenance
Bypass Switch
(IA1)
Parallel Isolator
Switches (IA2)
(used only for
inverter output
isolation
)
Customer
Power
Connections
Customer
Communication
Interfaces
System
configuration
DIP switches
(
SW1-1
)
Rear side of User
control panel
(mounted on UPS
cabinet door)
Rear view of
NW4024, located
on right side of
distribution
section
Page 44

6-2 Powerware 9320 (10 kVA and 20 kVA) Installation and Operation
164201416 REV A 071103
Figure 6–1B identifies and shows the location of the controls and indicators on the
Powerware 9320-CO2 UPS. The descriptions provide a brief overview of the UPS
controls, and standard and optional features.
NOTE:
Read the Operation section of this manual and have thorough knowledge of UPS
operation before attempting to operate any of the UPS controls or optional
components.
Figure 6–1B. Powerware 9320-C02 Controls and Indicators
F2
Control P anel 2
UPS Module 2
JD2
JD1
X1
X2
X3
SW1-1
JD4
JD7
Control Panel 1
F2
UPS Module 1
JD2
JD1
X1
X2
X3
SW1-1
JD4
JD7
Internal Battery
X1
X6
JD11
X2
X3
X4
X5
SW2-1
to SW2-9
JD8
Parallel isolators
IA2-1 IA2-2
Maintenance
Bypass
IA1
JD41
JD42
NW4024
Rear view
(inside
cabinet )
X-slot
2A 2B 2C 2N
3A 3B 3C 3N
+N-- 1A 1B 1C 1N
Q1
DC Battery Bkr
Parallel Isolator
Switches (IA2)
(used only for
inverter output
isolation
)
Customer
Power
Connections
Customer
Communication
Interfaces
System
configuration
DIP switches
(
SW1-1
)
Rear side of User
control panel
(mounted on UPS
cabinet door)
Rear view of
NW4024, located
on right side of
distribution
section
Maintenance
Bypass Switch
(IA1)
DC Battery
Circuit Breaker
Page 45

Powerware 9320 (10 kVA and 20 kVA) Installation and Operation 6-3
164201416 REV. A 071103
6.2 UPS Operational Controls
The UPS has many standard features that provide cost effective and consistently reliable
power protection.
6.2.1 Control Panels
Control Panels on the front of the UPS, pictured in Fig. 6–2, contains a LCD screen to
display the current status of the UPS system. There is an individual control panel for
each module installed in the UPS cabinet. You can view a statistical history and log of
system events and display a real-time representation of power flow through the system
components. LED status indicators show the operating mode of the UPS and alert you
to system events. Panel push buttons provide navigation through the information and
control screens. The load ON/OFF pushbuttons are located at the right of the control
panel. Both must be pressed simultaneously to activate the LOAD ON/OFF function.
Below the LCD screen are the user control pushbuttons, RESET, UP, DOWN, and
ENTER, which provide access to the control and measurement functions of the UPS.
The control panel is described in detail in chapter 7, “Using the Control Panel”.
Figure 6–2. Powerware 9320 (10 kVA to 20 kVA modules) Control Panel
6.2.2 System and Load ON/OFF
Two load ON/OFF pushbuttons are located on the right side of the LCD display.
Activating both pushbuttons simultaneously will effect immediate system shutoff of the
controlled module. This feature prevents accidental system shutdown if one of the
pushbuttons is inadvertently depressed. System turn on is achieved in the same
manner, by simultaneously depressing both buttons. Operation of the system ON/OFF
pushbuttons is described in detail in Chapter 7, “Using the Control Panel” and Chapter 8,
System
ON/OFF
LCD Display
Display and Operation
Push Buttons
System Status LEDs
LOAD PO1
PROTECTED
Page 46

6-4 Powerware 9320 (10 kVA and 20 kVA) Installation and Operation
164201416 REV A 071103
“UPS Operating Instructions.” For a parallel module 9320 system, the DIP Switch SW11, located on the front of each Module, will be in the
HIGH
position
6.2.3 Maintenance Bypass Switch
An internal Maintenance Bypass Switch is provided to completely isolate the main power
processing of the UPS during service. The Maintenance Bypass Switch is described in
detail in Chapter 8, “UPS Operating Instructions.”
6.2.4 Cold Start Capability
The 9320 UPS system cannot be powered up without a utility input initially present.
Accordingly, it is not able to power a load if the system is not started first on utility power.
6.3 UPS Standard Features
6.3.1 Customer Interface
Computer Interface
One serial communications port, using the standard Powerware XCP interface, is
provided via a plug-in interface card inserted in the communications slot on the front of
the unit. This interface is supplied as standard with each Powerware 9320. You can use
this port to link the UPS to the features described in Chapter 10, “Communications” and
Chapter 11, “Options.”
6.3.2 Battery Management
A two-stage charging system ensures that the initial recharge is done in an optimal time,
with current limited, constant current, DC applied to the batteries. When terminal voltage
reaches a certain level, the charger switches to constant voltage.
6.3.3 Installation Features
Power wiring can be routed through the rear and bottom of the UPS cabinet with
connections made to easily accessible terminal blocks at the bottom front of the cabinet.
External monitoring and communication control wiring must be installed in accordance
with approved wiring methods. Communication wiring can be routed through the top of
each cabinet.
Communication option cards are quickly installed in the slot behind the front door panel.
X-slot cards are hot pluggable.
WARNING:
To shut down a multi-module system you must depress both ON/OFF pushbuttons
on every UPS module. Activation of the ON/OFF buttons when the UPS is not in
maintenance bypass mode will interrupt the power supply to the load.
Page 47

Powerware 9320 (10 kVA and 20 kVA) Installation and Operation 6-5
164201416 REV. A 071103
6.4 Options and Accessories
Contact your sales representative for information about any of these available options:
6.4.1 Remote EMERGENCY POWER OFF
A REMOTE EMERGENCY POWER OFF pushbutton is an option to provide for
situations where you must instantaneously control the UPS output. The operation of the
REMOTE EMERGENCY POWER OFF pushbutton is described in detail in Chapter 8,
“UPS Operating Instructions.”
6.4.2 Battery Cabinets
A complete 9320-C03 UPS system requires one or more battery cabinets to provide the
necessary DC backup power. A complete 9320-C02 UPS system requires internal
batteries and may use one or more battery cabinets to provide the necessary DC backup
power. Battery cabinets are designed to match with the UPS cabinet, although they do
not directly bolt together.
6.4.3 Communications
See Chapter 10, “Communications”.
6.4.4 Other Options
Refer to Chapter 11 of this manual to review other options available for the Powerware
9320 and their use.
WARNING:
If
an external battery cabinet is used, do not
in
sta
ll internal
batteries
.
Page 48

6-6 Powerware 9320 (10 kVA and 20 kVA) Installation and Operation
164201416 REV A 071103
6.5 Safety Considerations
The UPS enclosure is designed for industrial or computer room applications and contains
safety shields. However, the system is sophisticated and should be handled with
appropriate care, following these guidelines.
•
Keep surroundings clean and free from excess moisture.
•
Do not operate the system close to gas or electric heat sources.
• The system is not intended for outdoor use.
• The system operating environment should be maintained within the parameters
stated in this manual.
• Keep the system doors closed to ensure proper cooling airflow and to protect
personnel from dangerous voltages inside the unit.
•
The system contains its own power source. Lethal voltages are present even
when the system is disconnected from utility power.
• When servicing modules or UPS is operated with modules missing, insure that
proper protective covers are installed at both the front and rear of the section
with the missing module(s).
If service or routine maintenance is required:
•
Ensure all power is disconnected before performing installation or service.
•
Ensure the area around the UPS is clean and uncluttered.
•
Battery cabinet maintenance or battery replacement should be performed only
by authorized service personnel.
• Observe all DANGER, CAUTION, and WARNING notices affixed to the inside
and outside of the equipment.
• Always conform to the more detailed safety precautions described in
“Important Safety Instructions” section of Chapter 12, “Maintaining the UPS
System”.
WARNING:
Only AUTHORIZED SERVICE PERSONNEL should perform service or
maintenance on the UPS.
Page 49

Powerware 9320 (10 kVA and 20 kVA) Installation and Operation 6-7
164201416 REV. A 071103
6.6 Symbols, Controls, and Indicators
These symbols may appear on your UPS system or on labels inside the UPS. Most
international safety agents accept them. Everyone in your organization who works with
your system should understand the meaning of these symbols:
ON
The principal power switch is in the “ON” position.
OFF
The principal power switch is in the “OFF” position.
CAUTION: REFER TO MANUAL
Stop and refer to the Operator’s Manual for more information
DANGER: RISK OF ELECTRIC SHOCK
There is a risk of electric shock present, and you should observe
associated warnings. The UPS contains high voltages.
PROTECTIVE GROUNDING TERMINAL
A terminal which must be connected to earth ground prior to
making any other connection to the equipment.
A
terminal to which or from which a direct current or voltage may
be a
pp
lied or supplied.
This symbol indicates the word “phase”.
Page 50

6-8 Powerware 9320 (10 kVA and 20 kVA) Installation and Operation
164201416 REV A 071103
This page left intentionally blank
Page 51

Powerware 9320 (10 kVA and 20 kVA) Installation and Operation 7-1
164201416 REV. A 071103
7.1 Description
This chapter describes the UPS Control Panel, including controls and indicators, and
how to monitor UPS operation. The control panels are located on the front of the UPS
(see Figure 7–1). Each UPS module in the 9320 cabinet has an individual Control
Panel.
Figure 7–1. UPS Control Panel
The Control Panel contains:
1) the main power ON/OFF switches
2) a flat Liquid Crystal Display (LCD) screen
3) a horizontal row of navigation pushbuttons
4) an array of multi-color LED status indicators
Refer to Chapter 8, “UPS Operating Instructions” for use of the operational controls.
7
Using the Control Panel
LINE 1
1
2
3
4
BATTERY
LINE 2
BYPASS
LOAD P01
PROTECTED
INV
Page 52

7-2 Powerware 9320 (10 kVA and 20 kVA) Installation and Operation
164201416 REV A 071103
7.2 Using the Control Panel
The Control Panel provides an operator interface with the UPS system. Figure 7–2
identifies the display and pushbutton areas discussed in the following sections as well as
LED indicators that provide a visual display of system operating status.
Figure 7–2. LCD Screen and Pushbuttons
7.2.1 Power Management Display
The 2 x 20 character LCD Screen simplifies the communication with the UPS and
provides the necessary monitoring information about the UPS. The menu driven LCD
Screen enables access to the
1) EVENT LOG
2) MEASUREMENTS
3) COMMANDS
4) UPS DATA
5) SETUP USER
6) SERVICE SETUP (Not accessable for users) requires a field service
technician
7.2.2 LED Indicators
The LED indicators display the general status of the UPS. Indicators show the power
flow status and in the event of power failure or load transfer from inverter to bypass or
vise-versa, the corresponding LED indicators will change color from green (normal) to
red (warning). The LINE 1 and LINE 2 LEDs indicate the availability of the input power
supply. The INVERTER and BYPASS LEDs, if green, indicate which of the two power
paths is supplying power to the critical load. When the battery is supplying the load, due
to supply failure, the BATTERY LED will be flashing. The ALARM LED is a visual
indication of any internal or external alarm conditions. At the same time, an audible
alarm will be activated.
LOAD P01
PROTECTED
ON/OFF
ON/OFF
RESET
A
LARM
NOTE:
See section 7.3.2 for further information.
Page 53

Powerware 9320 (10 kVA and 20 kVA) Installation and Operation 7-3
164201416 REV. A 071103
INDICATOR INDICATOR STATUS MEANING
ALARM OFF
RED + BUZZER
RED
No alarm condition
Alarm condition
Alarm condition persists
LINE 1 GREEN
RED
Utility supply to rectifier available
Utility supply to rectifier not available
LINE 2 GREEN
RED
Bypass supply available
Bypass supply not available or not OK
BYPASS GREEN
OFF
Load on bypass (Bypass or Eco-mode)
Bypass not operating (or switched off)
INV GREEN
RED
OFF
Load on inverter
Inverter fault or load not transferable to inverter
Inverter not operating (switched off)
BATTERY GREEN
RED
Flashing GREEN
Flashing RED
Battery OK, Battery charger OK
Battery fault or battery completely discharged
Battery nearly discharged or load OFF command issued
Battery disconnected, battery fuse open
7.2.3 Pushbutton Functions
The pushbuttons allow the user to operate the UPS to perform settings and adjustments,
to start-up and shutdown the UPS, and to monitor on the LCD display the voltages,
currents, frequencies and other variables of system operation.
KEYS FUNCTION
ON/OFF
ON/OFF
Turn-on UPS system (press both pushbuttons simultaneously), or
shutdown the UPS (press both pushbuttons simultaneously)
UP ( ) Move upwards through the menu
DOWN ( ) Move downwards through the menu
RESET Move to the top of the menu. Cancel the audible alarm. If the alarm
condition was only transient, the LED indicator (ALARM) will also
extinguish, otherwise it will remain on (RED)
ENTER Confirms a chosen menu item
7.2.4 ON/OFF Startup and Shutdown Pushbuttons
By pressing simultaneously both ON/OFF pushbuttons on the Control Panel, the UPS
can be switched on (if currently OFF) or shutdown immediately (if currently ON).
Requiring both to be simultaneously depressed prevents accidental operation of the
UPS. The two main ON/OFF pushbuttons are also used as a security ON/OFF switch,
making it possible to quickly disconnect the load from the UPS in emergency situations.
Upon startup from initial install or power off disconnect, the UPS starts in NORMAL
(inverter) mode. In subsequent startups, the system will return to the mode previously
used before shutdown, except that ECO mode will require operator intervention to
activate.
Page 54

7-4 Powerware 9320 (10 kVA and 20 kVA) Installation and Operation
164201416 REV A 071103
If, for security or emergency reasons, it is necessary to immediately disconnect the load
from the UPS, press the two red ON/OFF pushbuttons simultaneously. In this case,
make sure that the maintenance bypass switch (IA1) is in the “O” position (Normal=Off).
7.3 Description of the LCD Screen
7.3.1 Status Screens
DESCRIPTION
LCD DISPLAY
Load is protected by UPS power. It is
supplied by the inverter (normal operation)
Load is not protected by UPS power. It is
supplied by utility power. (load on bypass)
Load supply is completely interrupted. UPS
has been switched off by “ON/OFF” buttons
NOTE: On the right hand side of the LCD there is a 3 digit indicator defining the
Module “Position” in the Multi-Module system.
S
stands for Single Module. The system consists only of one Module.
P01 stands for Parallel Module in a Multi-Module system and 01 stands for the
first Module (
MASTER
) in the Multi-Module system.
P02
stands for Parallel Module in a Multi-Module system and 02 stands for the
second Module (SLAVE) in the Multi-Module system.
P03
stands for Parallel Module in a Multi-Module system and 03 stands for the
third Module (
SLAVE
) in the Multi-Module system.
CAUTION:
ACTIVATION OF THE ON/OFF PUSHBUTTONS WHEN THE UPS IS NOT IN
MAINTENANCE BYPASS MODE WILL INTERRUPT THE POWER SUPPLY TO
THE CRITICAL LOAD.
LOAD
P01
PROTECTED
LOAD
P01
NOT PROTECTED
LOAD OFF
P01
SUPPLY FAILURE
Page 55

Powerware 9320 (10 kVA and 20 kVA) Installation and Operation 7-5
164201416 REV. A 071103
7.3.2 LCD Display Structure and Navigation
The menu structure is shown in Figure 7–3, below. Navigation through the menu is
accomplished by using the “ENTER” pushbutton to go to the menu level, or to activate
an action, then using the “UP” or “DOWN” arrows to select a specific function within
each menu category. The “RESET” pushbutton will immediately return to the highest
screen. Values shown are typical and will vary based on actual user conditions.
Figure 7–3. LCD Screen Navigation Chart (each module has its own
display)
LOAD
PROTECTED
LOAD
NOT PROTECTED
LOAD OFF
SUPPLY FAIL
EVENT LOG
MEASUREMENTS
COMMANDS
UPS DATA
SET-UP USER
• HH-MM-SS
LOAD TO INV.
02-27-02 HH-MM-SS
LOAD TO BYP.
02-27-02 HH-MM-SS
LOAD OFF
LOAD TO INVERTER
LOAD TO
BYPASS
PERFORM
BATT.TEST
UPS SERIAL NUMBER
M-
DATE OF MANUFACTURE
DATE TIME
PRESS RESET, RETURNS TO TOP LEVEL
BATT. RUN TIME (MIN)
1
0.0
OUTPUT FREQUENCY (HZ)
60.00
BYPASS FREQUENCY (HZ)
60.00
BATTERY VOLTAGE (V)
+ 189 -189
BATT. CHARGE CUR. (A)
+ 0.0 -0.0
DISCHARGE CURRENT (A)
0
RECTIFIER VOLTAGE (V)
208 208 208
OUTPUT VOLTAGE (V)
208 208 208
BYPASS VOLTAGE (V)
208 208 208
OUTPUT CURRENT (A)
28 28 28
APPARENT POWER ((KVA)
17 17 17
REACTIVE POWER (KVAR)
4 4 4
ACTIVE POWER (kW)
15 15 15
BATT. CAPACITY (%)
98
OUTPUT POWER (%)
50.0 50.0 50.0
Page 56

7-6 Powerware 9320 (10 kVA and 20 kVA) Installation and Operation
164201416 REV A 071103
7.3.3 Main Menu Screen
DESCRIPTION LCD DISPLAY
•
Logging Control. A log of the last 64 events is
stored in the Power Management Display.
•
Menu Measurements allow monitoring voltages,
power, frequencies, current, battery run time,
and other information.
• Command Menu enables performance of
“Load to Inverter”, “Load to Bypass”, and
battery test functions.
• UPS Data Menu shows UPS serial number,
date of manufacture, current time & date.
• Set-Up Menu allows user to set Date/Time,
automatic battery test and gen-set mode
• Set-Up Menu for service allows trained.
service personnel to troubleshoot and
adjust system parameters.
7.3.4 Event Log Screen
DESCRIPTION LCD DISPLAY
• Logging Control (sample screen)
• A log of the last 64 events is stored
and presented under the Event Log.
• All events and alarms are displayed
with their date and time of occurrence.
7.3.5 Measurements Screen
DESCRIPTION LCD DISPLAY
• Battery Runtime remaining (in minutes)
•
UPS Output Frequency
•
Bypass Frequency
EVENT LOG
MEASUREMENTS
COMMANDS
UPS DATA
SET-UP USER
SET-UP SERVICE
BATT. RUN TIME (MIN)
10.
0
02-27-02 17-03-30
LOAD TO INV.
02-27-02 17-03-30
LOAD TO BYP.
02-27-02 17-03-30
LOAD OFF
OUTPUT FREQUENCY (HZ)
60.00
BYPASS FREQUENCY (HZ)
60.00
Page 57

Powerware 9320 (10 kVA and 20 kVA) Installation and Operation 7-7
164201416 REV. A 071103
• Battery Voltage
•
Battery Charger Current
•
Discharge Current
• Rectifier Voltage (all three phases)
• Bypass Voltage (all three phases)
•
Output Voltage (all three phases)
• Output Current (all three phases)
• Active Output Power (all three phases)
•
Reactive Output Power (all three phases)
• Apparent Output Power (all three phases)
• Output Power (%, all three phases)
•
Battery Capacity remaining
(typical values shown, actual values will depend on user environment)
7.3.6 Commands Screen
DESCRIPTION LCD DISPLAY
• Transfer Load to Inverter
•
Transfer Load to Bypass
• Battery Test
BATTERY VOLTAGE (V)
+189 -189
BATT. CHARGE CUR. (A)
+ 0.0 - 0.0
DISCHARGE CURRENT (A)
+ 0.0 - 0.0
RECTIFIER VOLTAGE (V)
208 208 208
BYPASS VOLTAGE (V)
208 208 208
OUTPUT VOLTAGE (V)
208 208 208
OUTPUT CURRENT (A)
28 28 28
ACTIVE POWER (kW)
5 5 5
REACTIVE POWER (kVAR)
1 1 1
APPARENT POWER (KVA)
6 6 6
OUTPUT POWER (%)
80% 80% 80%
BATT. CAPACITY (%)
98%
LOAD TO INVERTER
LOAD TO BYPASS
PERFORM BATT. TEST
Page 58

7-8 Powerware 9320 (10 kVA and 20 kVA) Installation and Operation
164201416 REV A 071103
7.3.7 UPS Data
DESCRIPTION LCD DISPLAY
•
Information displayed is installed
at the time of manufacture.
• Manufacturing Date
• EPROM Version
• Actual Date and Time (set by user
under user set-up menu.
7.3.8 Set-Up User
DESCRIPTION LCD DISPLAY
• Set-up Date and Time
(Press ENTER to access)
• Set-up Battery test
(Press ENTER to access)
•
Set-up operation with Gen-Set
(Press ENTER to access)
• Command to prevent battery charger
operation when on generator operation.
• Command to prevent use of static bypass
when on generator operation.
UPS SERIAL NUMBER
M-
DATE OF MANUFACTURE
DD-MM-YY
EPROM VERSION
V-000
DATE TIME
DD-MM-YY HH-MM-SS
SET-UP DATE/TIME
SET-UP BATT. TEST
SET-UP GEN-SET OPER.
BYPASS
LOCK/UNLOCK
REPETITIVE (Y/N)
(Y/N)
HOUR OF DAY
(0-23)
DAY OF MONTH
(1-31)
DD-MM-YY HH-MM-SS
BATTERY CHARGE LOCK
(Y/N)
Page 59

Powerware 9320 (10 kVA and 20 kVA) Installation and Operation 7-9
164201416 REV. A 071103
7.3.9 Set-Up Service
DESCRIPTION LCD DISPLAY
• This menu is reserved for authorized
service engineers. It is not to be
accessed by End-Users.
•
Type in password.
NOTE: Apart from the adjustment of voltages, frequencies, currents, power and battery
run time in the SET-UP Service menu, it is also possible to set and check the
following parameters:
•
UPS Rated Power
•
Module configuration S, P01, P02, . . .
•
Single (standard) or Dual Input feed
• F-converter, 50/60Hz or 60/50Hz
• Sync window (2-4%)
SET-UP SERVICE
PASSWORD
Page 60

7-10 Powerware 9320 (10 kVA and 20 kVA) Installation and Operation
164201416 REV A 071103
7.4 Operating Modes
7.4.1 “ON LINE” Mode (INVERTER MODE)
The ON-LINE Mode is the UPS Operating Mode in which the load is supplied through
the RECTIFIER and INVERTER. LED indicators are illuminated when shown shaded:
LED’s green
when shown
shaded
Using the control panel (see Figure 7–2) the UPS can easily be transferred to the ONLINE mode. The ON-LINE mode provides the highest degree of protection, especially in
the event of a supply disturbance or failure. This operating mode is always
recommended if the critical loads (computer systems) will not tolerate any interruption of
the supply, even for a very short time. In the unlikely event of an inverter fault or
overload condition, the UPS will transfer the load automatically and without interruption
to the static bypass-utility supply.
7.4.2 “OFF LINE” Mode (BYPASS or ECONOMY MODE)
In the OFF-LINE mode, the load is supplied from the utility supply through the bypass.
Using the control panel (see Figure 7–2), the UPS may be easily transferred to “Bypass
Mode”.
LED’s green
when shown
shaded
When the UPS is operating in “Bypass Mode”, the efficiency of the system is higher. In
the event of a utility supply failure the load will automatically be transferred from utility to
LINE 2 BYPASS
BATTERY
LINE 1 INV.
LINE 2 BYPASS
BATTERY
LINE 1 INV.
Page 61
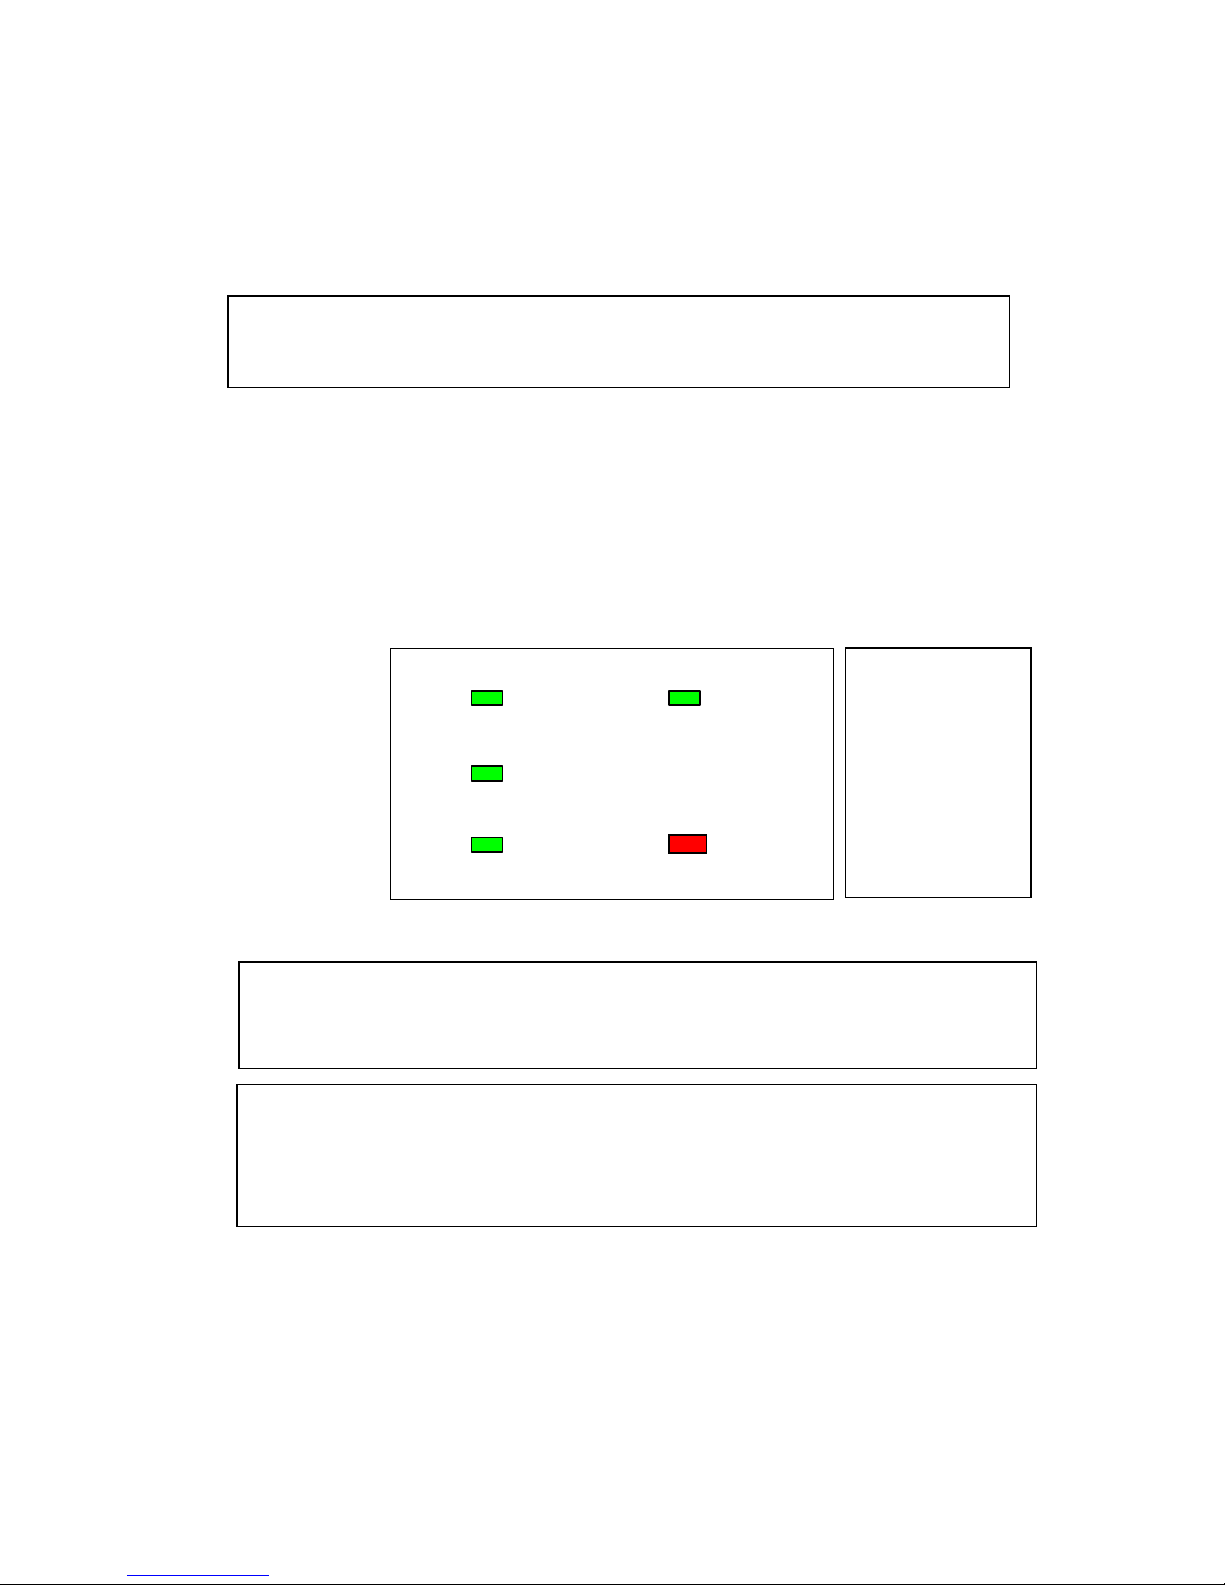
Powerware 9320 (10 kVA and 20 kVA) Installation and Operation 7-11
164201416 REV. A 071103
inverter within 5 milliseconds. The battery charger remains active in the “Bypass-Mode”.
The “Bypass-Mode” is recommended only if the loads can tolerate power interruptions of
up to 5 ms, the transfer time from Bypass Mode to ON-LINE Mode.
7.4.3 “MAINTENANCE BYPASS” Mode
The Maintenance Bypass Mode is performed by means of the IA1 BYPASS SWITCH on
the front of the UPS. When the switch is in the “O” (OFF) position, the Bypass Switch is
OPEN. This is the normal operating condition, where the load is supplied by the
inverter, or via the static bypass. When the switch is in the “I” (ON) position, the Bypass
Switch is CLOSED, causing load power to be supplied directly from the utility source.
LED’s green
when shown
shaded,
unless noted
CAUTION:
In order to provide the load with maximum protection, it is always
recommended that the load be supplied by the inverter (ON-LINE Mode).
CAUTION:
Before transferring the load to Maintenance Bypass using the IA1 switch,
always make sure that each module in the UPS cabinet is in the “Bypass-Mode”.
Failure to observe this
p
rocedure can cause equipment damage.
CAUTION:
When the UPS is operated in the Maintenance Bypass mode through the Bypass
Switch IA1, the load will not be protected in the event of a utility supply failure.
It is therefore strongly recommended that the user switch back to ON-LINE
(INVERTER ON) or BYPASS (OFF-LINE MODE) as soon as possible.
LINE 2 BYPASS
BATTERY
(Red)
LINE 1 INV.
LED indication
can be different,
depending upon
the status of the
UPS and LED
condition before
turning IA1 to
the closed
position
Page 62

7-12 Powerware 9320 (10 kVA and 20 kVA) Installation and Operation
164201416 REV A 071103
7.4.4 Parallel Isolator (IA2)
Each UPS module is provided with an output isolator switch (IA2) which, when opened,
isolates the corresponding unit from the PARALLEL BUS and from the LOAD. Once IA2
is open, there is no power coming from its inverter. In redundant parallel configurations
it is used to isolate a unit from the parallel system without the need of transferring the
load to bypass. This switch should always be in the “I” (ON) position, except for servicing
the UPS when in the maintenance bypass mode. Rotating this switch to the “O” (OFF)
position while the inverter is supplying power to the load will dump the critical load.
POSITION EFFECT
ON Normal Operation (Load supplied by UPS)
OFF
UPS-Module isolated from Parallel Bus for maintenance or module
replacement (UPS-Module not supplying load)
WARNING:
Rotating the output isolator switch (IA2) to the “O” (open) position when the
maintenance bypass switch (IA1) is in the “O” (open) position will interrupt
power to the critical load.
Page 63

Powerware 9320 (10 kVA and 20 kVA) Installation and Operation 8-1
164201416 REV. A 071103
8.1 Operation
The following procedures provide instruction for operating the UPS system. Refer to
Chapters 6 and 7 of this manual for a description of the UPS controls and monitor panel
functions.
NOTE:
Before starting the UPS, ensure all installation tasks are complete and
authorized service personnel have performed a preliminary startup. The
preliminary startup verifies all electrical interconnections to ensure the
installation was successful and the UPS operates properly.
8.2 Start-Up Procedure for the 9320 Modular UPS
To start the UPS system for normal operation, perform the following procedure:
1. Ensure the UPS switches and external customer circuit breakers are set as follows:
UPS Utility Supply Breaker (customer supplied) “O” (OPEN)
UPS Bypass Input Breaker (dual source, customer supplied) “O” (OPEN)
UPS Battery Cabinet Breaker (customer supplied) “O” (OPEN)
UPS Maintenance Bypass Switch (IA1) “O” (OFF)
UPS Parallel Isolator Switches (IA2-1, IA2-2, IA2-3*) “O” (OFF)
Verify Position of DIP Switch SW 1-1 on each module system ON (UP) position
Verify Position of DIP Switch SW 2–9 for single cabinet system ON positions
*Used in the 9320-C03 only
2. Close the UPS utility supply breaker. (Screen event “MAIN RECTIFIER FAULT”
appears)
3. Observe LED Line 1 indicator turns green and battery indicator LED flashes green.
(Screen event “LOAD OFF SUPPLY FAILURE” appears)
4. Press both ON/OFF pushbuttons on the Module 1
control panel simultaneously to
turn on the UPS module. “LOAD NOT PROTECTED” will appear on the LCD screen
and LED indicators will display as follows:
8
UPS Operating Instructions
CAUTION:
All the operations in this section must be performed by authorized service
technicians or by qualified internal personnel.
Page 64

8-2 Powerware 9320 (10 kVA and 20 kVA) Installation and Operation
164201416 REV A 071103
LED Indicator Color
LINE 1 Green
LINE 2 Green
BYPASS Green
INVERTER OFF
BATTERY Flashing Green
If module does not transfer to inverter automatically
5. Perform Command: LOAD TO INVERTER (see sections 7.3.2 and 7.3.6) On LCD
Display, “LOAD PROTECTED” will appear and the LED-indicators will display as
follows:
LED Indicator Color
LINE 1 Green
LINE 2 Green
BYPASS OFF
INVERTER Green
BATTERY Flashing Green
6.
Close any battery cabinet circuit breaker, internal or external.
7. Scroll through the measurements menu and verify that battery polarity and voltage
are proper and within prescribed limits (see sections 7.3.2 and 7.3.5). The voltages
should be about +189 and –189.
8. Repeat the same procedure for Modules 2 and 3 (9320-C03 only), as listed above.
9. Test Parallel Functions. The load to the system should remain disconnected.
A - All three UPS-Modules are on INVERTER MODE
B - Close Parallel Isolator IA2-1 (position ON) of Module 1
On LCD: “THIS UPS IS NOW MASTER” will appear in the event log
C - Close Parallel Isolator IA2-2 (position ON) of Module 2
On LCD: “THIS UPS IS NOW SLAVE” will appear in the event log
D - Close Parallel Isolator IA2-3 (position ON) of Module 3 (9320-C03
only)
On LCD: “THIS UPS IS NOW SLAVE” will appear in the event log
E - On output Terminal Block there is now UPS power and
On all three LCD’s: “LOAD PROTECTED” will appear.
For first time start-up only, complete through step 18. On subsequent startups, do only
step 15.
10. Perform load transfer to Maintenance Bypass to verify proper bypass operation.
• Use Menu COMMANDS on UPS control panel and choose “LOAD TO
BYPASS” on any of the control panels on the UPS-modules (see sections
7.3.2 and 7.3.6) to transfer the load to the bypass source.
• Close Maintenance Bypass Switch (IA1) to position “I” (ON). The LCD
display will show “MANUAL BYP. CLOSED” and the LED indicators will
appear as follows:
Page 65

Powerware 9320 (10 kVA and 20 kVA) Installation and Operation 8-3
164201416 REV. A 071103
LED Indicator Color
LINE 1 Green
LINE 2 Green
BYPASS Green
INVERTER Red
BATTERY Green
11. Connect load to the UPS output
12. Close external output circuit breakers in the load distribution panel. Both MBP and
static bypass should now be supplying the load.
• Verify on the LCD Display and LED indicators that the load is on Bypass.
13. Rotate the Maintenance Bypass Switch IA1 to the “O” (OFF) position. On the LCD
Display, “MANUAL BYP. OPEN” will appear followed by “LOAD NOT PROTECTED”.
And inverter red light turns off.
14. Using the Measurements menu (see sections 7.3.2 and 7.3.5) Check the output
power, voltage, current and frequency.
15. Perform Load transfer to Inverter
• Go to COMMANDS menu on UPS cabinet control panel and choose
command “LOAD TO INVERTER” on any of the control panels to transfer the
load to inverter output. (see sections 7.3.2 and 7.3.6)
•
On all LCD Displays, “LOAD PROTECTED” will appear.
16. Repeat step 14 above to verify that all voltages, currents, power and frequency are
correct.
17. Once the above procedure is performed at initial start-up, subsequent start-ups may
be performed using only step 15, as long as other conditions are unchanged.
THE POWERWARE 9320 UPS NOW PROTECTS THE LOAD.
8.3 Complete Shutdown Procedure for the UPS
The Powerware 9320 may be shut down completely if the load does not need input
power for an extended period of time.
The UPS system may be switched to Maintenance Bypass Mode for service or
maintenance purposes, or transferred to the ECO-Mode if the load does not need the
highest degree of protection and efficiency is to be maximized.
The load may be disconnected by means of the two ON/OFF (LOAD-OFF) pushbuttons
for security or operational reasons.
CAUTION:
If the Powerware 9320 will remain deactivated for an extended period of time,
provision must be made for periodic recharge of the system batteries.
CAUTION:
All the operations in this section must be performed by authorized service
technicians or by qualified internal personnel.
Page 66

8-4 Powerware 9320 (10 kVA and 20 kVA) Installation and Operation
164201416 REV A 071103
1. Verify that the loads are shut down and that there is no need for power supply to the
load.
2. If the loads are all disconnected, press simultaneously the two ON/OFF buttons on
the UPS control panel for all UPS-modules. On each Display, “MAINS BYP FAULT”
will appear and the LED-indicators will indicate as shown below:
LED Indicator Color
LINE 1 Green
LINE 2 OFF
BYPASS OFF
INVERTER OFF
BATTERY Flashing Green
3. Rotate all Parallel Isolator Switches (IA2-1, IA2-2, IA2-3*) to the “O” (OFF) position.
*Used in model 9320-C03 only
4. Open all battery breakers, internal or external.
5. Open the utility input supply breaker.
THE POWERWARE 9320 IS NOW VOLTAGE FREE.
8.4 Load Transfer to Maintenance Bypass
If it is necessary to perform service or maintenance on the UPS, it is possible to transfer
the UPS to MAINTENANCE BYPASS.
The load is protected by the Powerware 9320 UPS system in normal operation (all
installed modules of the UPS are operating on inverter).
CAUTION:
Activation of both ON/OFF buttons simultaneously during normal operation
will switch off the UPS output and no longer supply power to the load.
CAUTION:
ALL THE OPERATIONS IN THIS SECTION MUST BE PERFORMED BY
A
UTHO
RIZED ELECTRICIANS OR BY QUALIFIED INTERNAL PERSONNEL.
CAUTION:
BEFORE YOU ROTATE THE MAINTENANCE BYPASS SWITCH TO POSITION
“I” (ON ), MAKE SURE THAT THE LOAD HAS BEEN TRANSFERRED TO THE
BYPASS MODE. EVEN THOUGH THE UNIT IS IN BYPASS MODE, LETHAL
V
OLTAGE IS STILL PRESENT WITHIN THE UPS CABINET.
Page 67

Powerware 9320 (10 kVA and 20 kVA) Installation and Operation 8-5
164201416 REV. A 071103
1) Load transfer to Maintenance Bypass
•
Go to Menu COMMANDS and choose command “LOAD TO BYPASS” and
transfer the load to utility supply on any of the control panels on the UPS
cabinet.
On the LCD Display: “LOAD NOT PROTECTED” will appear.
• Rotate the Maintenance Bypass Switch IA1 to “I” (ON)
On LCD Display: “MANUAL BYP IS CLOSED” will appear and the alarm will
sound. The LED indicators will indicate as shown below:
• Press reset button to silence audible alarm.
2) Simultaneously press both ON/OFF pushbuttons on the UPS cabinet control panel for
each of the installed modules.
• On the LCD Display: “MAIN BYP FAULT” will appear and the LED indicators
will indicate as shown below:
LED Indicator Color
LINE 1 Green
LINE 2 OFF
BYPASS OFF
INVERTER OFF
BATTERY Flashing Green
• Press reset button
• On the LCD Display “LOAD OFF SUPPLY FAILURE” will appear.
3) Rotate all Parallel Isolator Switches to “O” (OFF).
4) Open all battery breakers, either internal or in external battery cabinets
THE LOAD IS NOW SUPPLIED BY THE UTILITY SOURCE AND IS NOT
PROTECTED.
LED Indicator Color
LINE 1 Green
LINE 2 Green
BYPASS Green
INVERTER Red
BATTERY Green
Page 68

8-6 Powerware 9320 (10 kVA and 20 kVA) Installation and Operation
164201416 REV A 071103
8.5 UPS-Module Replacement in a Redundant 9320 System
8.5.1 Removing a Module from a Redundant Multi-Module System
If in a redundant parallel system a UPS-module is faulty, the load will
continue to be protected by the remaining operating modules running in
On-Line-Mode (Inverter-Mode). The faulty module may be replaced
without having to transfer the load to bypass!
To extract the faulty module from the UPS-Frame in a Redundant MultiModule Configuration
proceed as follows:
1) Identify the faulty Module with the Alarm condition and RESET
the Alarm. The audible alarm will stop.
If the Alarm conditions persist (the LED-Indicator ALARM is red)
there is a fault in the UPS-Module.
2) Open the corresponding Parallel Isolator Switch IA2 of the faulty
Module (switch to position “OFF”);
NOTE:
Parallel Switch IA2-1 belongs to Module 1
Parallel Switch IA2-2 belongs to Module 2
Parallel Switch IA2-3 belongs to Module 3
*
(*Used in model 9320-C03 only)
3) On the faulty Module control panel press the two ON/OFFButtons simultaneously to shutdown the UPS-Module;
4) Disconnect cables from connectors JD4 and JD7 on the faulty
module only.
5) Unscrew the four screws on the front of the faulty UPS-module;
6) Pull Module forward slightly by means of the two black handles
until the rear connectors are disconnected.
WARNING:
All the operations in this section must be performed by properly trained personnel.
By opening, removing or replacing the UPS-modules and module covers you risk
exposure to dangerous voltages!
Do not leave the UPS-module compartment without an appropriate protective cover.
WARNING:
Before removing the UPS-module completely, wait 2 minutes until the
internal DC capacitors are discharged.
CAUTION:
Two persons are needed to pull the module from the UPS-Frame. The
weight of a 20 kVA module is 56 kg. (a 10 kVA module is 49 kg.)
Page 69

Powerware 9320 (10 kVA and 20 kVA) Installation and Operation 8-7
164201416 REV. A 071103
7) Remove UPS-Module completely by pulling it out horizontally.
8) Insert new UPS-Module (see Section 8.5.2) or cover the open-
ing (UPS-Module Compartment) with an appropriate protection
cover immediately and fasten with the provided four screws.
8.5.2 Reinstalling a Module in a Redundant Multi-Module System
Perform the following steps to install the new module into a Powerware
9320:
1) If necessary, remove UPS-Module compartment protection
covers.
2) Slide the UPS Module about ¾ into the dedicated UPS
compartment (Do not slide the UPS-Module into the cabinet far
enough to mate the rear connector).
3) Connect Control Panel cable to connector JD7.
4) Slide the UPS module to its final position and push firmly to
assure good contact on the rear connector.
5) Tighten the four screws on the front of the module.
6) Reconnect cable on connector to JD4.
7) Check if the LED LINE1 is green. If yes, the utility voltage is OK;
On the LCD: “LOAD OFF, SUPPLY FAILURE” will appear
and the LED-indicators will indicate as shown below:
LED Indicator Color
LINE 1 Green
LINE 2 OFF
BYPASS OFF
INVERTER OFF
BATTERY Flashing Green
WARNING:
All the operations in this section must be performed by properly trained personnel.
By opening, removing or replacing the UPS-modules and module covers you risk
exposure to dangerous voltages!
Do not leave the UPS-module compartment without an appropriate protective cover.
CAUTION:
Two persons are needed to insert the module into the UPS Frame. The weight of a
20 kVA module is 56 k
g. (
a 10 kVA module is 49 kg.
)
CAUTION:
This procedure must be followed in the order given because the rear UPS module
connector will have workin
g
voltage applied.
Page 70

8-8 Powerware 9320 (10 kVA and 20 kVA) Installation and Operation
164201416 REV A 071103
8) Make sure the bypass fuses (F2) are inserted (front of Module);
9) Simultaneously press both “ON/OFF” Buttons to start the UPS.
On LCD display: “LOAD NOT PROTECTED” will appear and
the LED-indicators will indicate as shown below
10) If “LOAD NOT PROTECTED” is displayed, transfer load to
Inverter Mode by means of COMMAND “LOAD TO INVERTER”
11) To test new module, perform COMMAND “LOAD to BYPASS”
then return to normal operation by performing COMMAND
“LOAD TO INVERTER”
12) Close the corresponding Parallel Isolator Switch IA2 of the
replacement Module (switch to position “ON”);
NOTE:
Parallel Switch IA2-1 belongs to Module 1
Parallel Switch IA2-2 belongs to Module 2
Parallel Switch IA2-3 belongs to Module 3
*
(*Used on model 9320-C03 only)
THE LOAD IS NOW PROTECTED BY REDUNDANT POWER FROM THE 9320 UPS.
8.6 UPS Module Replacement in a Capacity 9320 System
8.6.1 Removing a Module from a Capacity Multi-Module System
If in a capacity system, a UPS Module experiences a fault and there is
not enough capacity left to protect the load by the remaining operating
UPS Modules, the load will automatically be transferred to bypass and
will be supplied directly by the mains power supply.
Load Not Protected Load Protected
LED Indicator Color Color
LINE 1 Green Green
LINE 2 Green Green
BYPASS Green OFF
INVERTER OFF Green
BATTERY Green Green
WARNING:
All the operations in this section must be performed by properly trained personnel.
By opening, removing or replacing the UPS-modules and module covers you risk
exposure to dangerous voltages!
Do not leave the UPS-module compartment without an appropriate protective cover.
Page 71

Powerware 9320 (10 kVA and 20 kVA) Installation and Operation 8-9
164201416 REV. A 071103
To extract the faulty module from the UPS-Frame, proceed as follows:
1) Identify the faulty Module to be replaced.
See Section 9-3 for description of alarm conditions.
2) Verify that all UPS modules are in bypass mode.
In the majority of the events the LED-indicators on Control Panel of
the Faulty Module will show:
The LED-indicators on the Control Panels of the other Operating
Modules will show:
3) Close the Maintenance Bypass Switch IA1 (position ON)
On LCDs: “MANUAL BYP CLOSED” will appear, the alarm will
sound, and the LED-indicator will indicate
as shown below:
The load is now directly supplied by utility power and is not protected.
4) Open the corresponding Parallel Isolator Switch IA2 of the faulty
Module (switch to position “OFF”);
NOTE:
Parallel Switch IA2-1 belongs to Module 1
Parallel Switch IA2-2 belongs to Module 2
Parallel Switch IA2-3 belongs to Module 3 (model 9320-CO3 only)
5) On the faulty Module control panel press the two ON/OFF-Buttons
simultaneously to shutdown the UPS-Module;
LED Indicator Color
LINE 1 Green
LINE 2 Green
BYPASS Green
INVERTER RED
BATTERY Green
LED Indicator Color
LINE 1 Green
LINE 2 Green
BYPASS Green
INVERTER OFF
BATTERY Green
LED Indicator Color
LINE 1 Green
LINE 2 Green
BYPASS Green
INVERTER RED
BATTERY Green
Page 72

8-10 Powerware 9320 (10 kVA and 20 kVA) Installation and Operation
164201416 REV A 071103
6) Disconnect cables from connectors JD4 and JD7 on the faulty
module only.
7) Unscrew the four screws on the front of the faulty UPS-module;
8) Pull Module forward slightly by means of the two black handles until
the rear connectors are disconnected.
9) Remove UPS-Module completely by pulling it out horizontally.
10) Insert new UPS-Module (see Section 8.5.2) or cover the opening
(UPS-Module Compartment) with an appropriate protection cover
immediately and fasten with the provided four screws.
8.6.2 Reinstalling a Module in a Capacity Multi-Module System
To replace a Faulty Module in a
Capacity Multi-Module System
perform following steps:
Perform the following steps to install the new module in a Powerware
9320
:
1) If necessary, remove UPS-Module compartment protection
covers.
2)
2) Slide the UPS Module about ¾ into the dedicated UPS
compartment (Do not slide the UPS-Module into the cabinet far
enough to mate the rear connector).
3) Connect Control Panel cable to connector JD7.
4) Slide the UPS module to its final position and push firmly to
assure good contact on the rear connector.
CAUTION:
While the UPS is operating in the maintenance bypass-mode the load is not
protected and in the event of a supply failure the load supply will be interrupted
and the load will fail.
WARNING:
Before removing the UPS-module completely, wait 2 minutes until the
internal DC capacitors are discharged.
CAUTION:
Two persons are needed to pull the module from the UPS-Frame. The
weight of a 20 kVA module is 56 kg. (a 10 kVA module is 49 kg.)
CAUTION:
This procedure must be followed in the order given because the rear UPS module
connector will have workin
g
voltage applied.
CAUTION:
Two persons are needed to insert the module into the UPS Frame. The weight of
a 20 kVA module is 56 k
g. (
a 10 kVA module is 49 kg.
)
Page 73

Powerware 9320 (10 kVA and 20 kVA) Installation and Operation 8-11
164201416 REV. A 071103
5) Tighten the four screws on the front of the module.
6) Reconnect cables on connectors JD4 and JD7.
7) Check if the LED LINE1 is green. If yes, the utility voltage is OK;
On the LCD: “LOAD OFF, SUPPLY FAILURE” will appear
and the LED-indicators will indicate as shown below:
8) Make sure the bypass fuses (F2) are inserted (front of Module);
9) Simultaneously press both “ON/OFF” Buttons to start the UPS.
10) Insure that all modules are in the Bypass Mode. If not, perform
COMMAND “LOAD TO BYPASS” for each module not in Bypass
Mode.
11) Verify all modules are on bypass by observing the LED indicators
as shown below:
12) Close Parallel Isolator Switch IA2 corresponding to the replaced
module (position ON). All modules are now operating in parallel.
13) Open Maintenance Bypass (IA1) by turning it to position “OFF”.
The load is now supplied by the static circuit in all connected
modules. Check LED indicators on the corresponding control
panels to verify this. They should indicate as shown below:
LED Indicator Color
LINE 1 Green
LINE 2 OFF
BYPASS OFF
INVERTER OFF
BATTERY Flashing Green
Load on Bypass Load Protected
LED Indicator Color Color
LINE 1 Green Green
LINE 2 Green Green
BYPASS Green OFF
INVERTER OFF Green
BATTERY Green Green
LED Indicator Color
LINE 1 Green
LINE 2 Green
BYPASS Green
INVERTER OFF
BATTERY Green
Page 74

8-12 Powerware 9320 (10 kVA and 20 kVA) Installation and Operation
164201416 REV A 071103
14) Transfer load to inverter mode by means of COMMAND “LOAD
TO INVERTER” on any one of the three control panels. ON the
LCD panel, “LOAD PROTECTED” will appear and the LED
indicator will indicate as shown below:
THE LOAD IS NOW PROTECTED BY THE 9320 UPS
LED Indicator Color
LINE 1 Green
LINE 2 Green
BYPASS OFF
INVERTER Green
BATTERY Green
Page 75

Powerware 9320 (10 kVA and 20 kVA) Installation and Operation 9-1
164201416 REV. A 071103
9.1 Alarms
In the event of an alarm condition, the red LED-Indicator “Alarm”
and the audible alarm will turn on.
In this case proceed as follows:
A. Silence the audible alarm by pressing the "Reset" button.
B. Identify the cause of the alarm condition by means of the
EVENT LOG in the MAIN menu.
C.
In case of alarm conditions, please contact the Invensys
Global Service Center.
D. Fault identification and suggested corrective action is given
on the following pages.
9.2 Menu, Commands, Event Log, and Measurements
In Chapter 4 there is a detailed description of the Menu, Commands,
Event Log and Measurements that can be operated and displayed on the
LCD. The List of Alarms and Messages are shown in Section 9.3.
9
Resp
onding to System Events
Page 76

9-2 Powerware 9320 (10 kVA and 20 kVA) Installation and Operation
164201416 REV A 071103
9.3 Fault Identification and Correction
The major alarm conditions that will be encountered are shown in the following table:
Alarm Condition Meaning Suggested Solution
UPS FAULT
There is a fault in the UPS
and therefore normal
operation cannot be
guaranteed.
Call the authorized service center for
assistance
MAINS FAILURE
The utility power supply is
outside its prescribed tolerance.
The input power to UPS is too low or
missing.
If site power appears to be OK, check the
input circuit breakers etc. supplying the
UPS
OVERCURRENT OR
SHORT CIRCUIT
There is a short circuit at the
output of UPS. (on load side)
Check all output connections and repair
as required.
OVERLOAD
Load exceeds the UPS rated
power.
Identify which piece of equipment is
causing the overload and remove it from
the UPS.
OVERTEMPERATURE
UPS temperature has exceeded
the allowed value.
Check that the ambient temperature of the
UPS is less than 40° C. and that cooling
air flow is not blocked.
If the ambient temperature is normal call
the authorized service center for
assistance.
BATTERY CHARGER
OFF
The attached battery and the
battery charger set-up do not
correspond or battery charger
fault.
Call the authorized service center for
assistance.
INVERTER FAULT
Inverter is faulty. Call the authorized service center for
assistance.
NON-SYNCH
The inverter and utility power
are not synchronized.
The frequency of the input voltage to the
UPS is outside operational limits and the
UPS static bypass has been temporarily
disabled.
BATTERY LOW
The battery is nearly
discharged.
Shutdown load connected to UPS before
the UPS switches itself off to protect its
batteries
MANUAL BYP IS
CLOSED
Maintenance Bypass closed.
Load supplied by utility power.
This alarm is only displayed if the UPS is
on Maintenance Bypass
Page 77

Powerware 9320 (10 kVA and 20 kVA) Installation and Operation 10-1
164201416 REV. A 071103
10.1 X – Slot Communication Modules
This section describes the several types of X–Slot cards, which can be used with the
Powerware 9320. X-Slot cards allow the UPS to communicate to a variety of
environments and with different types of devices. The Powerware 9320 is compatible
with any X–Slot card, including, but not limited to:
• ConnectUPS
TM
SNMP/WEB Card – provides 10Base-T Ethernet connectivity for
web-based remote monitoring in addition to SNMP capabilities.
• ConnectUPS
M SNMP Card – provides 10Base-T Ethernet connectivity for
SNMP-based remote monitoring.
• Single-Port Card – provides one serial communication port.
• USB Card – provides a USB connection to your Windows PC.
• Multi-Server Card – provides additional serial communication ports that can
communicate with additional computers.
• Modbus Card – provides RS-485 and RS-232 Modbus RTU connectivity for
integration with building management systems.
• Relay Card – provides dry relay contacts for AS/400 signal compatibility.
Individual x-slot card documentation is supplied with the provided card or is available at
www.powerware.com
10
Communications
Page 78

10-2 Powerware 9320 (10 kVA and 20 kVA) Installation and Operation
164201416 REV A 071103
Figure 10–1a. X–Slot Location on Front of Powerware 9320-C03 UPS Cabinet
F2
Control Panel 3
UPS Module 3
JD2
JD1
X1
X2
X3
SW1
JD4
JD7
Control Panel 2
Control Panel 1
F2
UPS Module 2
JD2
JD1
X1
X2
X3
SW1
JD4
JD7
F2
UPS Module 1
JD2
JD1
X1
X2
X3
SW1
JD4
JD7
X1
X6
JD11
X2
X3
X4
X5
SW2
JD8
Parallel isolator
IA2-1 IA2-2 IA2-3
Maintenance
Bypass
IA1
2A
2B 2C 2N
3A 3B 3C 3N
+N
--
1A
1B 1C
1N
X-Slot
X-Slot for insertion of
X-Slot Cards
Page 79

Powerware 9320 (10 kVA and 20 kVA) Installation and Operation 10-3
164201416 REV. A 071103
F2
Control Panel 2
UPS Module 2
JD2
JD1
X1
X2
X3
SW1-1
JD4
JD7
Control Panel 1
F2
UPS Module 1
JD2
JD1
X1
X2
X3
SW1-1
JD4
JD7
Internal Battery
X1
X6
JD11
X2
X3
X4
X5
SW2-1
to SW2-9
JD8
Parallel isolators
IA2-1 IA2-2
Maintenance
Bypass
IA1
JD41
JD42
NW4024
Rear view
(inside
cabine t)
X-slot
2A 2B 2C 2N
3A 3B 3C 3N
+N-- 1A 1B 1C 1N
Q1
DC Battery Bkr
Figure 10–1b. X–Slot Location on Front of Powerware 9320-C02 UPS Cabinet
X-Slot for insertion of
X-Slot Cards
Page 80

10-4 Powerware 9320 (10 kVA and 20 kVA) Installation and Operation
164201416 REV A 071103
This page left intentionally blank
Page 81

Powerware 9320 (10 kVA and 20 kVA) Installation and Operation 11-1
164201416 REV. A 071103
11.1 Generator ON Facility
The generator ON facility must use a normally open contact that closes to indicate that a
generator is running and supplying input power to the UPS. When used, this facility
disables the UPS static bypass and prevents the UPS from transferring the load into the
generator power supply. The user may also elect prevention of battery charging while
on generator input. Both or either of these features may be selected via the control
panel. (See section 7.3.8, Set Up)
Figure 11–1. Generator ON Connection
11
Options
UPS Generator
p
ort (X2)
Generator alarm panel
Page 82

11-2 Powerware 9320 (10 kVA and 20 kVA) Installation and Operation
164201416 REV A 071103
This page left intentionally blank
Page 83

Powerware 9320 (10 kVA and 20 kVA) Installation and Operation 12-1
164201416 REV. A 071103
12.1 General
The components inside the UPS cabinet are secured to a sturdy metal frame. All
repairable parts and assemblies are located for easy removal, and very little
disassembly. This design allows authorized service personnel to perform routine
maintenance and servicing quickly.
You must schedule periodic performance checks of your UPS system to keep it running
properly. Regular routine checks of operation and system parameters will enable your
system to function efficiently for many trouble-free years.
12.2 Important Safety Instructions
Remember that your UPS system is designed to supply
power EVEN WHEN
DISONNECTED FROM THE UTILITY POWER.
The UPS cabinet interiors are unsafe
until the DC power source is disconnected and all capacitors are discharged. After
disconnecting the utility power and the DC power, authorized service personnel should
wait at least 5 minutes for capacitor bleed off before attempting internal access to the
UPS cabinet.
Since each battery string is an energy source in itself, opening the Battery Circuit
Breaker does not de-energize the voltage within the battery string
. DO NOT ATTEMPT
TO ACCESS ANY INTERNAL AREA OF THE BATTERY STRING YOURSELF.
VOLTAGES ARE ALWAYS PRESENT IN THE BATTERY STRING. If you suspect that
a battery string needs service, you should contact Invensys Global Services.
12
M
aintaining the UPS System
WARNING:
All the operations in this section must be performed by properly trained
personnel.
By opening, removing or replacing the UPS-modules and module covers you risk
exposure to dangerous voltages!
D
o not leave the UPS
-m
odule compartment
with
out an appropriate protective
DANGER:
LETHAL VOLTAGE PRESENT: This unit should not be operated with the cabinet
doors open or protective panels removed. Do not make any assumptions about
the electrical state of any cabinet in the UPS system
.
Page 84

12-2 Powerware 9320 (10 kVA and 20 kVA) Installation and Operation
164201416 REV A 071103
12.3 Performing Preventive Maintenance
The UPS system requires very little preventive maintenance. However, the system
should be inspected periodically to verity that the units are operating normally and that
the batteries are in good condition.
Perform the following checks DAILY:
1. Check the area surrounding the UPS system. Ensure the area is not cluttered,
allowing free access to the unit.
2.
Ensure the air intakes (vents on the bottom) and exhaust opening(s) on the back of
the cabinet are not blocked.
3.
Ensure the operating environment is within the parameters specified in Chapter 13,
“Product Specifications.”
4.
Ensure the UPS is in Normal mode. (Proper LED indicators are illuminated and the
LCD display shows “LOAD PROTECTED”). If the alarm LED is illuminated or the
Normal status LEDs are not illuminated, contact Invensys Global Services.
Perform the following check MONTHLY:
1. Review the Event Log for any operational issues that need attention.
ANNUAL maintenance:
Annual preventive maintenance should be performed only by authorized service
personnel familiar with maintenance and servicing of the UPS system. Contact Invensys
Global Services for more information about service offerings.
BATTERY Test:
The battery test takes approximately 3 minutes and should be performed only if:
•
There are no alarm conditions
•
The battery is fully charged
• Utility supply is present and normal
The battery testing can be carried out independently of the operation mode (OFF-LINE
or ON-LINE) and whether or not the load is connected. The battery test procedure can
be performed from the UPS front panel. See Chapter 7, “Using the Control Panel”.
BATTERY Maintenance:
Contact Invensys Global Services for battery maintenance. Only authorized service
personnel should perform Battery replacement and maintenance.
Page 85

Powerware 9320 (10 kVA and 20 kVA) Installation and Operation 13-1
164201416 REV. A 071103
13.1 System Information
The UPS systems are housed in freestanding cabinets with safety shields behind the
front panels. The UPS systems are available in 60 Hz configurations with a maximum
rating of 60 kVA output per cabinet. The following sections detail the input output,
environmental and battery specifications for each model
13.2 UPS System Input
Operating Input
Voltage (Nominal
+15 / -20%)
208 VAC for operation from 166 VAC to 239 VAC (60 Hz)
Operating Input
Frequency Range
45 – 65 Hz (continuous duty)
Maximum Input
Current 9320-C03
30 kVA Model (3 x 10 kVA modules) 90 amperes
60 kVA Model (3 x 20 kVA modules) 183 amperes
Maximum Input
Current 9320-C02
20 kVA Model (2 x 10 kVA modules) 60 amperes
40 kVA Model (2 x 20 kVA modules) 122 amperes
Input Current
Harmonic Content
Less than 10% input THD at full load
Power Factor Minimum 0.98
Battery Voltage
10 kVA modules: ±168 volt nominal (center point connected to
neutral)
20 kVA modules ±168 volts nominal (center point connected
to neutral)
Maximum Battery
Charge Current
Adjustable up to 12 amperes per module (batteries to 400AH)
13
P
roduct Specifications
Page 86

13-2 Powerware 9320 (10 kVA and 20 kVA) Installation and Operation
164201416 REV A 071103
13.3 UPS System Output
DC Ripple (less than 1% voltage ripple)
UPS Output Current-C03 166 amperes/cabinet maximum, actual based on
modules used
UPS Output Current-C02
110 amperes/cabinet maximum, actual based on
modules used
UPS Output Capacity
100% rated current at 0.8 power factor
Output Voltage Regulation
±
1.5% (10
–100% load)
Output Voltage Harmonic
Content
Less than 1%
Output Voltage Balance
Each phase may be loaded to 100% current
independently with voltage regulation within stated
tolerance.
Output Voltage Phase
Displacement
120 degrees between phases ± 0.01 degree
Output Transients
< ±4% for 0
–100% or 100% to 0% load change
Frequency Regulation
±0.1% free running
Synchronous to Bypass
No-break transfer
Frequency Slew Rate 1 Hz per second maximum
Overload Capacity @ 25˚C
(based on kVA rating)
101% to 110% for 10 minutes
111% to 150% for 30 seconds
Maximum Output
Capability
150% RMS for 30 seconds without bypass
13.4 Environmental Specifications
Dimensions (W x H x D) mm (in.) 550 (21.7) x 1800 (70.9) x 750 (29.6)
Weight lbs. (kg) 3 x 10 kVA / 3 x 20 kVA
modules Model 9320-C03
558 (253) / 598 (271)
Weight lbs. (kg) 2 x 10 kVA / 2 x 20 kVA
modules Model 9320-C02 (w/maximum batteries)
1171 (531) / 1197 (543)
Operating temperature 0 to 40˚C (32 to 104˚F)
Operating Altitude 1500 meters (5000 feet) with no derating
Storage Temperature 0 to 50˚C (32 to 122˚F)
Relative Humidity Maximum 95%, non-condensing
Audible Noise with 100%/75% Load 65/63 dBA
EMI Suppression
IEC 62040-3 & FCC A
Electrostatic Discharge (ESD) Immunity
IEC 801-2
Applicable Standards UL 1778 (Computer Room Suitable)
Page 87

Powerware 9320 (10 kVA and 20 kVA) Installation and Operation A-1
164201416 REV A 07/11/2003
A
The information in this appendix will help you plan for and install your UPS system. This
appendix contains the following:
Table A Power Wiring Installation Notes 9320 – CO3 (3 x 10 kVA) and 9320 – CO2
(2 x 10 kVA)
Table B Power Wiring Installation Notes 9320 – CO3 (3 x 20 kVA) and 9320 – CO2
(2 x 20 kVA)
Table C UPS Power Cable Terminations 9320 – CO3 and 9320 – CO2
Table D Power Cable Conduit Requirements 9320 – CO3 and 9320 – CO2
Table E Maximum Input Circuit Breaker Ratings (all models)
Table F Maximum Output Circuit Breaker Ratings (all models)
Table G Customer Interface Inputs and Outputs (all models)
Table H Customer interface to JD2
Table I Customer connections to JD1
Table J Equipment Weight
Table K System Clearances
Table L Air Conditioning or Ventilation Requirements
Figure A – 1 Front View of Powerware 9320 showing customer connections
Figure A – 2 Label of Powerware 9320
Figure A – 3 Oneline diagram of Powerware 9320
Figure A – 4a Power terminal connections for Powerware 9320-CO3
Figure A – 4b Power terminal connections for Powerware 9320-CO2
Figure A – 5, –6, -7 UPS Cabinet Dimensions
A
ppendix A – Customer Information
Page 88

Table A. INPUT/OUTPUT Ratings & External Wiring Requirements for
Basic unit ratings at
0.8 lagging PF load
AC
INPUT
A
AC Input to UPS (0.95 min. PF)
3 phase, 1 neutral, 1 ground
Minimum conductor size
*Max. amps include full load current plus
battery recharge current
Powerware 9320 – CO2 & CO3
Modules (kVA): 2 x 10 3 x 10
Ratings Units Rating @ 50/60 Hz
kVA
kW
INPUT/ OUTPUT
VOLTAGE
Amps*
AWG (each)
20
16
30
24
208 208
60
90
4 2
DC
INPUT
C
AC
OUTPUT
D
Note: Refer to Figure A – 3 on system one line diagram for the bold letter callout
locations.
Read and understand the following notes while planning your installation:
1. Refer to national and local electrical codes for acceptable external wiring practices.
2. Material and labor for external wiring requirements are to be provided by designated
3. For external wiring, use conductors rated for 90
4. Wire ampacities are chosen from Table 310-16 of the NEC.
5. A neutral feeder is required for both the main and bypass inputs to this system, sized to
DC Input - Ext. Battery source to UPS
(1) positive, (1) negative, (1) mid-point
Minimum conductor size AWG (each)
AC Output to Critical Load - Full Load
Current 3 phase, 1 neutral, 1 ground
Minimum conductor size AWG (each)
personnel.
Tables A and B.
VDC (nominal)
Amps
Amps
o
C operation. See the appropriate column in
+/- 168
54
2
+/- 168
80
1/0
56 84
4 2
provide for harmonic currents generated by non-linear loads, per NEC, in Tables A and B.
6. Refer to section 1 of this manual for installation instructions.
A-2 Powerware 9320 (10 kVA and 20 kVA) Installation and Operation 164201416
REV A 07/11/2003
Page 89

Table B. INPUT/OUTPUT Ratings & External Wiring Requirements for
Powerware 9320 – CO2 & CO3
Modules (kVA): 2 x 20 3 x 20
Ratings Units Rating 50/60 Hz
Basic unit ratings at
0.8 lagging PF load
INPUT/OUTPUT
AC
INPUT
A
DC
INPUT
C
AC
OUTPUT
D
AC Input to UPS (0.95 min.PF)
3 phase, 1 neutral, 1 ground
Minimum conductor size
*Max. amps include full load current plus
battery recharge current
DC Input - Ext. Battery source to UPS
(1) positive, (1) negative, (1) mid-point
Minimum conductor size AWG (each)
AC Output to Critical Load - Full Load
Current 3 phase, 1 neutral, 1 ground
Minimum conductor size AWG (each)
Note: Refer to Figure A – 3 on system one line diagram for the bold letter callout
locations.
7. Terminals are UL rated at 90
for conduit requirements. Figure A–1 shows the location of power cable terminals inside the
UPS.
o
C. Refer to Table C for power cable terminations and Table D
Table C. UPS Power Cable Terminations 9320 – CO3
Terminal Function Terminal Function Size of Pressure
Termination
AC Input to UPS
(Mains)
AC Output to
Critical Load
DC Input from
Battery to UPS
Customer Ground
Powerware 9320 (10 kVA and 20 kVA) Installation and Operation A-3
164201416 REV A 07/11/2003
A Phase A 1 - #6-350 kcmils 42.4 (375) 3/8
B Phase B 1 - #6-350 kcmils 42.4 (375) 3/8
C Phase C 1 - #6-350 kcmils 42.4 (375) 3/8
N Neutral 1 - #6-350 kcmils 42.4 (375) 3/8
A Phase A 1 - #6-350 kcmils 42.4 (375) 3/8
B Phase B 1 - #6-350 kcmils 42.4 (375) 3/8
C Phase C 1 - #6-350 kcmils 42.4 (375) 3/8
N Neutral 1 - #6-350 kcmils 42.4 (375) 3/8
+
N
-
Protective
Ground
Battery(+)
Mid-point
Battery (-) 1 - #6-350 kcmils 42.4 (375) 3/8
Protective
Ground
1 - #6-350 kcmils 42.4 (375) 3/8
1 - #6-350 kcmils 42.4 (375) 3/8
4 - #6-350 kcmils (As Required) 3/8
kVA
kW
VOLTAGE
Amps*
AWG (each)
VDC (nominal)
Amps
Amps
Tightening Torque
N-M (lb-in.)
+/- 168
40
32
60
48
208 208
122 183
2/0 250 kcmil
+/- 168
107
160
1/0 4/0
112 168
1/0 4/0
Int.Hex
Size (in.)
Page 90

Table C. (cont) UPS Power Cable Terminations 9320 – CO2
Terminal
Function
AC Input to
UPS
(Mains)
AC Output
to Critical
Load
DC Input
from
Battery to
UPS
Customer
Ground
8. Per NEC article 300-20 (a), all three-phase conductors must be run in the same conduit.
Neutral and ground must be run in the same conduit as the phase conductors.
Terminal Function Size of Pressure
Termination
Tightening Torque
N-M (lb-in.)
A Phase A 1- #12 - 4/0 Awg Slot
B Phase B 1- #12 - 4/0 Awg Slot
C Phase C 1- #12 - 4/0 Awg Slot
N Neutral 1- #12 - 4/0 Awg Slot
A Phase A 1- #12 - 4/0 Awg Slot
B Phase B 1- #12 - 4/0 Awg Slot
C Phase C 1- #12 - 4/0 Awg Slot
N Neutral 1- #12 - 4/0 Awg Slot
+
N
-
Protective
Ground
Battery(+)
Mid-point
Battery (-) 1- #12 - 4/0 Awg Slot
Protective
Ground
1- #12 - 4/0 Awg Slot
1- #12 - 4/0 Awg Slot
4 - #16 – 1 Awg Slot
Int.Hex
Size (in.)
9. Conduit is sized to accommodate one neutral conductor the same size as the phase
conductor and one protective ground wire of the same size.
10. Conduit sizes were chosen from NEC Table C1, type letters RHH, RHW, RHW-2, TW, THW,
THHW, and THW-2.
Table D. Power Cable Conduit Requirements Powerware 9320- CO3 & C02
Powerware
Product Model
9320–C03
30 kVA (3 x 10)
9320–C03
60 kVA (3 x 20)
9320–C02
20 kVA (2 x 10)
9320–C02
40 kVA (2 x 20)
11. External overcurrent protection is not provided by this product, but is required by codes.
Refer to A and B for wiring requirements. If an output lockable disconnect is required, it is to
be supplied by designated personnel.
Terminal Wires in
Conduit
Rectifier Input (A,B,C,N,G)
Ext. Battery Source (+,N,-,G)
Output (A,B,C,N,G)
Rectifier Input (A,B,C,N,G)
Ext. Battery Source (+,N,-,G)
Output (A,B,C,N,G)
Rectifier Input (A,B,C,N,G)
Ext. Battery Source (+,N,-,G)
Output (A,B,C,N,G)
Rectifier Input (A,B,C,N,G)
Ext. Battery Source (+,N,-,G)
Output (A,B,C,N,G)
5 2.0 inches 1
4 2.0 inches 1
5 2.0 inches 1
5 3.0 inches 1
4 2.5 inches 1
5 2.5 inches 1
5 1.5 inches 1
4 1.5 inches 1
5 1.5 inches 1
5 2.5 inches 1
4 2.0 inches 1
5 2.5 inches 1
Minimum Conduit
Size (in.)
No. of
Conduits
12. Table E lists the maximum rating for input circuit breakers.
A-4 Powerware 9320 (10 kVA and 20 kVA) Installation and Operation 164201416
REV A 07/11/2003
Page 91

13. Nominal battery voltage is computed at 2 volts per cell as defined by Article 480 of the NEC.
Rated battery current is calculated using the nominal computed
voltage.
Table E. Maximum Input Circuit Breaker Ratings [Amperes]
Input Voltage Rating Powerware Model
208 VAC DC
9320 – CO3 (3 x 10 kVA) 110 100
9320 – CO3 (3 x 20 kVA) 250 225
9320 – CO2 (2 x 10 kVA) 75 100
9320 – CO2 (2 x 20 kVA) 150 150
CAUTION:
To reduce the risk of fire, connect only to a circuit provided with maximum input
circuit breaker current ratings from Table E in accordance with the National
Electric code, ANSI/NFPA 70.
14. The input and bypass feeds should be symmetrical about ground.
15. The line-to-line unbalanced output capability of the Powerware 9320 UPS is limited only by
the full load per phase current values for AC output to critical load shown in Tables A and B.
16. Output overcurrent protection and output disconnect switches are to be provided by the
user. Table F lists the maximum rating for output circuit breakers satisfying the criteria for
both.
Table F. Maximum Output Circuit Breaker Ratings (Amperes)
Powerware Model
9320 – CO2 (2 x 10 kVA)
9320 – CO2 (2 x 20 kVA)
9320 – CO3 (3 x 10 kVA)
9320 – CO3 (3 x 20 kVA)
At Rated Output voltage of 208 VAC
70
150
110
225
1. Use Class 1 wiring methods (as defined by the NEC) for control wiring. Install the control
wiring in separate conduit from the power wiring. The wire should be rated at 150 volts, 5
amperes minimum.
2. Refer to tables G, H, and I and to Chapters 2, 4, and 11 of this manual for customer
interface wiring.
Powerware 9320 (10 kVA and 20 kVA) Installation and Operation A-5
164201416 REV A 07/11/2003
Page 92

Table G. Customer Interface Inputs and Outputs
Terminal Name Description
X1 Emergency Power Off X1 – 1 and X1 – 2 (no polarity)
X2 Generator On X2 – 1 and X2 – 2 (no polarity)
X3, X4, X5 Not used Not used
X6 Battery Shunt trip breaker control X6 – 1 and X6 – 2 (+12V & com)
JD-2-1 Utility Fail Alarm (NO) Utility Fail Alarm
JD-2-2 Utility OK Utility Present
JD-2-3 Common Common
JD-2-4 Load on Inverter message (NO) Load on inverter message
JD-2-5 Load on inverter message (NC) Load not on inverter message
JD-2-6 Common Common
JD-2-7 Battery Low Alarm (NO) Battery voltage low alarm
JD-2-8 Battery OK Battery voltage OK
JD-2-9 Common Common
JD-2-10 Load on utility (bypass mode) Load on utility/bypass
JD-2-11 Load on utility/bypass (NC) Load not on utility/bypass
JD-2-12 Common Common
JD-2-13 Common Alarm (NO) Common alarm
JD-2-14 No alarm condition No alarm
JD-2-15 Common Common
JD-2-16 Not used Not used
JD-2-17 Not used Not used
JD-2-18 Not used Not used
JD-2-19 Not used Not used
JD-2-20 Not used+12 volt customer input Not usedAux. Signal power input
JD-2-21 Not usedGround customer input Not usedGround input
JD-2-22 Ground Ground
JD-2-23 +12 volts +12 volts (I
= 100 ma.)
max.
JD-2-24 Not used Not used
JD-2-25 Not used Not used
A-6 Powerware 9320 (10 kVA and 20 kVA) Installation and Operation 164201416
REV A 07/11/2003
Page 93

Table H. Definition of pin connections on JD2 (25 pin DB-25P/F)
Pin Contact Signal Function
1
2
3
4
5
6
7
8
9
10
11
Mains failure
ALARM MNS Mains present
Common
Load on inverter
Message LD-INV
Common
Battery low
Alarm BATT_LOW Battery OK
Common
Load on Mains (BYPASS mode)
Message LD_MNS
12
13
14
15
16
-
19
20 For future use
21
22
23
24
25
Common
Common Alarm
Alarm COMMON_ALARM No Alarm Condition
Common
NC
For future use
PS_12 GND
PS_12 + 12V (Imax = 100 mA)
Not Connected
Not Connected
Not Connected
Contacts are rated at 60 volts maximum DC or 30 volts RMS AC, and 500 mA. maximum
current and should be supplied by a LVLE source in compliance with UL 1778
Powerware 9320 (10 kVA and 20 kVA) Installation and Operation A-7
164201416 REV A 07/11/2003
Page 94

Table J. Installed Equipment Weight lbs (kg) [+65 lbs for shipping weight]
Internal battery strings
Product
Power Modules
None 1 String 2 Strings 3 Strings 4 Strings
9320-CO2 20/10 1 x 10 324 (147) 507 (230) 690 (313) 873 (396) 1056 (479)
9320-CO2 40/20 1 x 20 338 (153) --- 703 (319) 886 (402) 1069 (485)
9320-CO2 20/20 2 x 10 439 (199) --- 805 (365) 988 (448) 1171 (531)
9320-CO2 40/40 2 x 20 465 (211) --- --- --- 1197 (543)
9320-CO3 30/10 1 x 10 329 (149) --- --- --- --9320-CO3 60/20 1 x 20 342 (155) --- --- --- --9320-CO3 30/20 2 x 10 443 (201) --- --- --- --9320-CO3 60/40 2 x 20 470 (213) --- --- --- --9320-CO3 30/30 3 x 10 558 (253) --- --- --- --9320-CO3 60/60 3 x 20 598 (271) --- --- --- ---
5. The clearances required around the UPS system are shown in Table K.
Table K. System Clearances
From Front of Cabinet 36 inches working space
From Back of Cabinet 6 inches for ventilation
From Right or Left side of Cabinet ~0 inches clearance
6. The basic environmental requirements for operation of the UPS system are:
Ambient Temperature Range: 0 – 40˚ C. (32 – 104˚ F.)
Recommended Operating Range: 20 – 25˚ C. (68 – 77˚ F.)
Maximum Relative Humidity: 95%
The UPS ventilation requirements for heat removal are shown in Table L.
Table L. Air Conditioning or Ventilation Requirements
During Full Load Operation
Powerware 9320 20 kVA and 40 kVA
Powerware Model Input/Output Voltage Heat Rejection
BTU/hr x 1000/hr (kW)
9320 – CO2 (2 x 10 kVA)
9320 – CO2 (2 x 20 kVA)
9320 – CO2 (2 x 10 kVA)
9320 – CO2 (2 x 20 kVA)
9320 – CO2 (2 x 10 kVA)
9320 – CO2 (2 x 20 kVA)
9320 – CO3 (3 x 10 kVA)
9320 – CO3 (3 x 20 kVA)
9320 – CO3 (3 x 10 kVA)
9320 – CO3 (3 x 20 kVA)
9320 – CO3 (3 x 10 kVA)
9320 – CO3 (3 x 20 kVA)
208/208 linear load pf = 0.8 4.9 (0.7)
208/208 linear load pf = 0.8 9.8 (1.4)
208/208 linear load pf = 1.0 5.4 (0.8)
208/208 linear load pf = 1.0 10.8 (1.6)
208/208 100% non-linear load 6.1 (0.9)
208/208 100% non-linear load 12.2 (1.8)
208/208 linear load pf = 0.8 6.8 (1.0)
208/208 linear load pf = 0.8 13.7 (2.1)
208/208 linear load pf = 1.0 8.1 (1.2)
208/208 linear load pf = 1.0 16.2 (2.4)
208/208 100% non-linear load 9.2 (1.4)
208/208 100% non-linear load 18.3 (2.7)
A-8 Powerware 9320 (10 kVA and 20 kVA) Installation and Operation 164201416
REV A 07/11/2003
Page 95

F2
UPS Module 2
F2
UPS Module 1
Internal Battery
JD1
JD2
SW1-1
JD7
JD4
JD1
JD2
SW1-1
JD7
JD4
Control Panel 2
X1
X2
X3
Control Panel 1
X1
X2
X3
LABEL DATA:
IA1 Maintenance Bypass
IA2-1,-2 Parallel Isolator (Mod. 1, 2)
JD1 Smart Port- RS232 (SUB-D9P/F)
JD2 Isolated Relay outputs (SUB-D25/F)
SW1-1 Single/Parallel Switch
SW2-1 to-9 System Configuration Switches
X1 Emergency Power OFF (EPO)
X2 Generator ON
X3 Battery Temperature Module #1
X4 Battery Temperature Module #2
X6 Battery Breaker control (EPO)
JD11 Serial Communication Port
SW1-1 Module Type
HIGH Parallel Module
LOW Single Module
Q1
DC Battery Bkr
+N
--
IA2-1 IA2-2
Parallel isolators
2A
2B 2C 2N
1A
1B 1C
1N
IA1
Maintenance
Bypass
X-slot
to SW2-9
3A 3B 3C 3N
JD11
SW2-1
JD41
X6
X1
X2
X3
X4
X5
JD42
NW4024
Rear view
(inside
cabinet)
JD8
SW2-1
to SW2-9
Figure A–1a. Front View of Model 9320 – CO2
Powerware 9320 – CO2 10 kVA or 20 kVA Modules
Two modules per cabinet – 20 to 40 kVA System
Front View showing customer connections
Powerware 9320 (10 kVA and 20 kVA) Installation and Operation A-9
164201416 REV A 07/11/2003
Single
Cabinet
1 ON
2 ON
3 ON
4 ON
5 ON
6 ON
7 ON
8 ON
9 ON
Page 96

LABEL DATA:
IA1 Maintenance Bypass
IA2-1,-2,-3 Parallel Isolator (Mod. 1, 2, 3)
JD1 Smart Port- RS232 (SUB-D9P/F)
JD2 Isolated Relay outputs (SUB-D25/F)
SW1-1 Single/Parallel Switch
SW2-1 to-9 System Configuration Switches
X1 Emergency Power OFF (EPO)
X2 Generator ON
X3 Battery Temperature Module #1
X4 Battery Temperature Module #2
X5 Battery Temperature Module #3
X6 Battery Breaker control (EPO)
JD11 Serial communication port
SW1-1 Module Type
HIGH Parallel Module
LOW Single Module
SW2-1
to SW2-9
Single
Cabinet
1 ON
2 ON
3 ON
4 ON
5 ON
6 ON
7 ON
8 ON
9 ON
F2
UPS Module 3
F2
UPS Module 2
F2
UPS Module 1
IA2-1 IA2-2 IA2-3
Parallel isolat or
2A 2B 2C 2N
IA1
Maintenance
Bypass
3A 3B 3C 3N+N-- 1A 1B 1C 1N
JD1
JD2
X1
X2
X3
SW1-1
JD7
JD4
JD1
JD2
X1
X2
X3
SW1-1
JD7
JD4
JD1
JD2
X1
X2
X3
SW1-1
JD7
JD4
X-slot
SW2-1
to SW2-9
JD11
JD8
Control Panel 3
Control Panel 2
Control Panel 1
JD41
X6
X1
X2
X3
X4
X5
JD42
JD43
NW4024
Rear view
(inside
cabinet)
Figure A–1b. Front View of Model 9320 – CO3
Powerware 9320-CO3 10 kVA or 20 kVA Modules
Three modules per cabinet – 30 to 60 kVA System
Front View showing customer connections
A-10 Powerware 9320 (10 kVA and 20 kVA) Installation and Operation 164201416
REV A 07/11/2003
Page 97

Left view Front view
a
b c
F2 Bypass
abc
NW4006
F4
F5
F1
NW4002
Right view
F3
F1
F2
F4
NW4003
F1
Main Fuse
Fuses
PCB
F1a,b, c 600Vac/30A
F4,F5 600Vdc/75AN W4006
UNINTERRUPTIBLE POWER SUPPLY 10 kVA
Left view Front view
abc
F1
Main Fuse
NW4006
F4
Fuses
F2a,b, c 600Vac/50A
a
b c
F5
F2 Bypass
PCB
RatingRating Fuses
F2
PCB
F1,F2 600Vac/32A
F2,F5 600Vdc/100AN W4003
F1,F3, F4 600Vdc/75AN W4003
N W4002
F1
NW4021
F2
Rating
Right view
F3
F5
0
F1
F2
F4
NW4022
F5
Fuses
PCB
F1a,b, c 600Vac/63A
F4,F5 600Vdc/75AN W4006
UNINTERRUPTIBLE POWER SUPPLY 20 kVA
Fuses
PCB
RatingRating Fuses
F2a,b, c 600Vac/63A
PCB
F1,F2 600Vac/32A
F2,F5 600Vdc/125AN W4022
F1,F3, F4 600Vdc/100ANW4022
Rating
N W4021
Figure A–2. Powerware 9320 series 10 kVA and 20kVA Module Labels
Powerware 9320 (10 kVA and 20 kVA) Installation and Operation A-11
164201416 REV A 07/11/2003
0
Page 98

9320 Battery Cabinet
(+)
DC
(+) (Center) (-)
CB1
9320-C03 Enclosure
F2
AC Input
F1
DC In
puts AC Output
K2
F2
AC Input
F1
(- )
DC Inputs AC Output
K2
Rectifier
Booster
Inverter
Rectifier
Booster
Inverter
K4
9320
UPS
Module
Static
Switch
K4
9320
UPS
Module
Static
Switch
Notes:
fer to National and Local
Re
ctrical Codes for acceptable
Ele
ernal wiring practices. Use
ext
o
C copper wire. Wire
90
pacities based from Table
am
10-16 of the NEC.
3
Wiring Provided by others
Over current Protection
Provided by others
D
F2
AC Input
F1
DC Inputs AC Output
K2
Rectifier
Booster
Inverter
K4
9320
UPS
Module
Static
Switch
A
C
A-12 Powerware 9320 (10 kVA and 20 kVA) Installation and Operation 164201416
DC
(+) (Center) (-)
AC INPUT
A B C N G
AC OUTPUT
A B C N G
Figure A–3. Oneline Drawing, 9320-CO3
REV A 07/11/2003
Page 99

Protective GND
External
Battery
Mains Input
Output
Figure A–4a. Power Terminals on Powerware 9320-CO3
External
Battery
Figure A–4b. Power Terminals on Powerware 9320-CO2
Powerware 9320 (10 kVA and 20 kVA) Installation and Operation A-13
164201416 REV A 07/11/2003
Mains Input
Output
Page 100

550 mm.
(
)
(21.7 in.)
1800 mm.
70.9 in.
Conduit Landing
Area (panel supplied
blank, holes shown
for illustration only)
Blank panel dimensions:
127 mm (5 in.) high
494 mm (19.44 in.) long
Conduit Landing Area
Figure A–5. 9320-CO2 (left) and 9320-CO3 (right) Dimensions (Rear View)
A-14 Powerware 9320 (10 kVA and 20 kVA) Installation and Operation 164201416
REV A 07/11/2003
 Loading...