

Page 1
SprintScan
4000
Installation Quickstart
Schnelleinstieg
Guía de instalación rápida
Guide de démarrage rapide
Guida rapida
Page 2

SprintScan 4000
English_______________________________3
Deutsch _____________________________ 17
Español _____________________________31
Français _____________________________45
Italiano _____________________________59
Page 3

System Requirements
Macintosh Systems
• Apple Macintosh or PowerBook computer with PowerPC or
later processor
• 32 MB available RAM
• 40 MB available hard disk space
• Macintosh Operating System 7.5 or later
PC Systems
• An IBM PC or compatible with Pentium-class processor
• 32 MB available RAM
• 40 MB available hard disk space
• Microsoft Windows 95, Windows NT, or Windows 98
operating system
• ASPI-compliant SCSI host adapter and appropriate
Windows drivers
English
3
Page 4
1
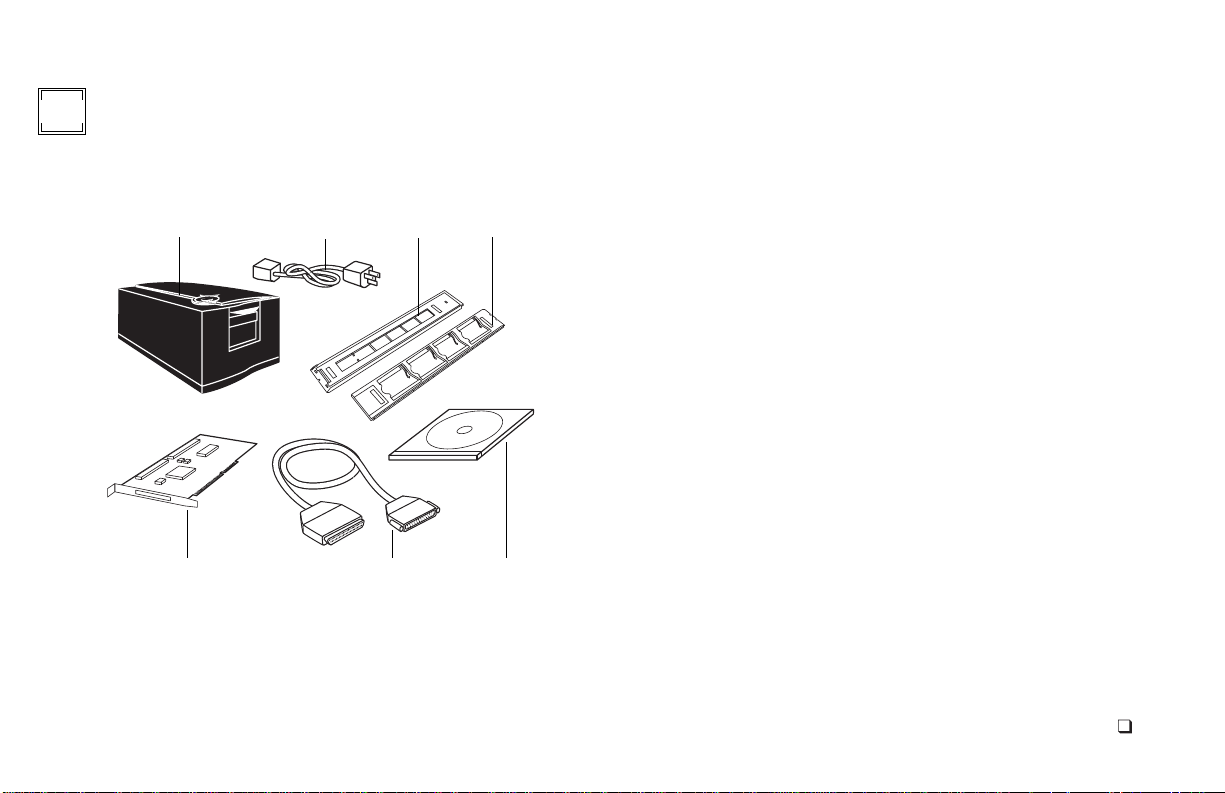
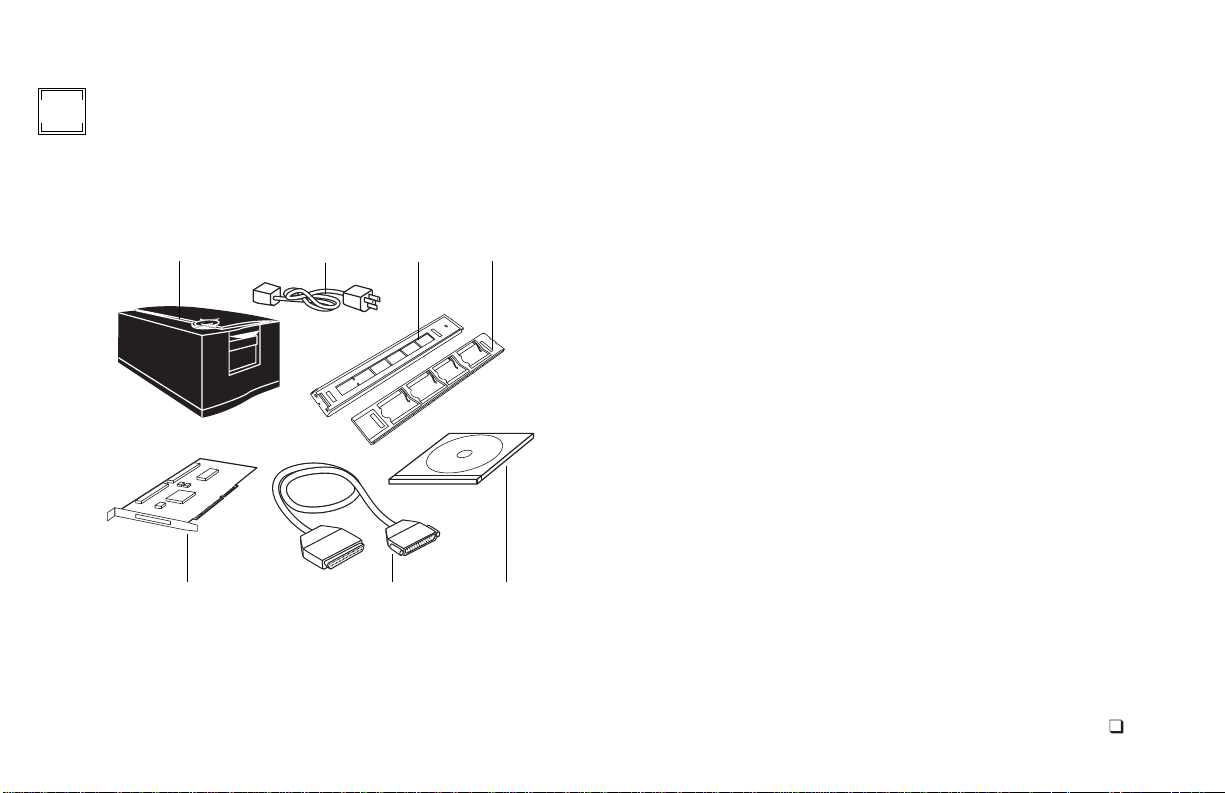
Unpack the Box
Make sure you have all the following components. Contact your
dealer if any is missing or damaged.
1
567
234
1
scanner
2
power cord (several provided to accommodate variations in
power sources)
filmstrip carrier
3
slide carrier
4
Windows SCSI host adapter installation kit (optional; contact
5
your dealer)
6
SCSI cable with 25-pin and 50-pin connector ends
7
PolaColor Insight Software CD containing:
•
PolaColor Insight software for Windows 95, 98, and NT
•
PolaColor Insight software for Power MAC and Power PC sys-
tems and an Adobe Photoshop plug-in
•
On-line user’s guide
Warning:
Nothing inside the scanner is user serviceable. Do not
disassemble the scanner. Doing so could result in severe electrical
shock and damage to the scanner. This action may also void your
warranty. Contact Polaroid Technical Support or your dealer if the
scanner is mal
U.S.A.,
tance
in the online user’s guide or visit
functioning. (To contact Polaroid from within the
call
1-800-432-5355
. Outside the U.S.A., see
www.polaroid.com
Getting assis-
on the
Wor l d Wi d e We b.)
English
4
Page 5
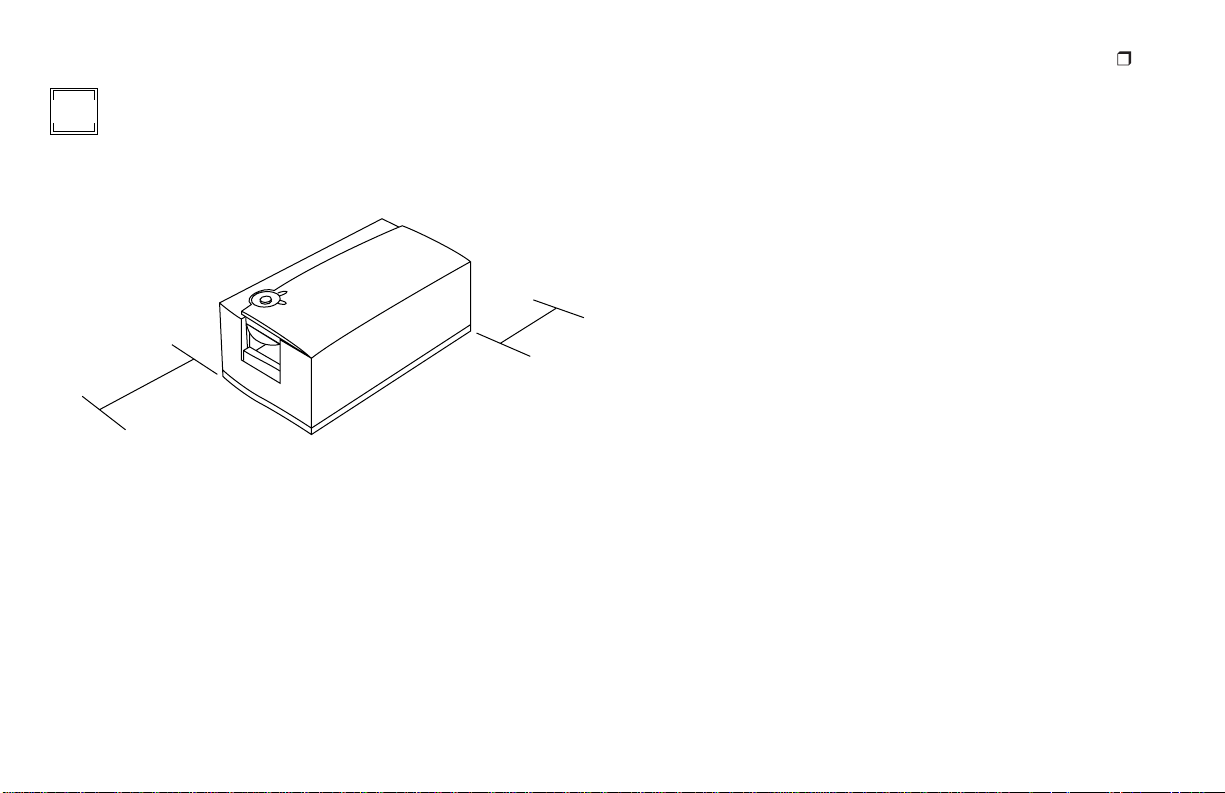
Position the Scanner
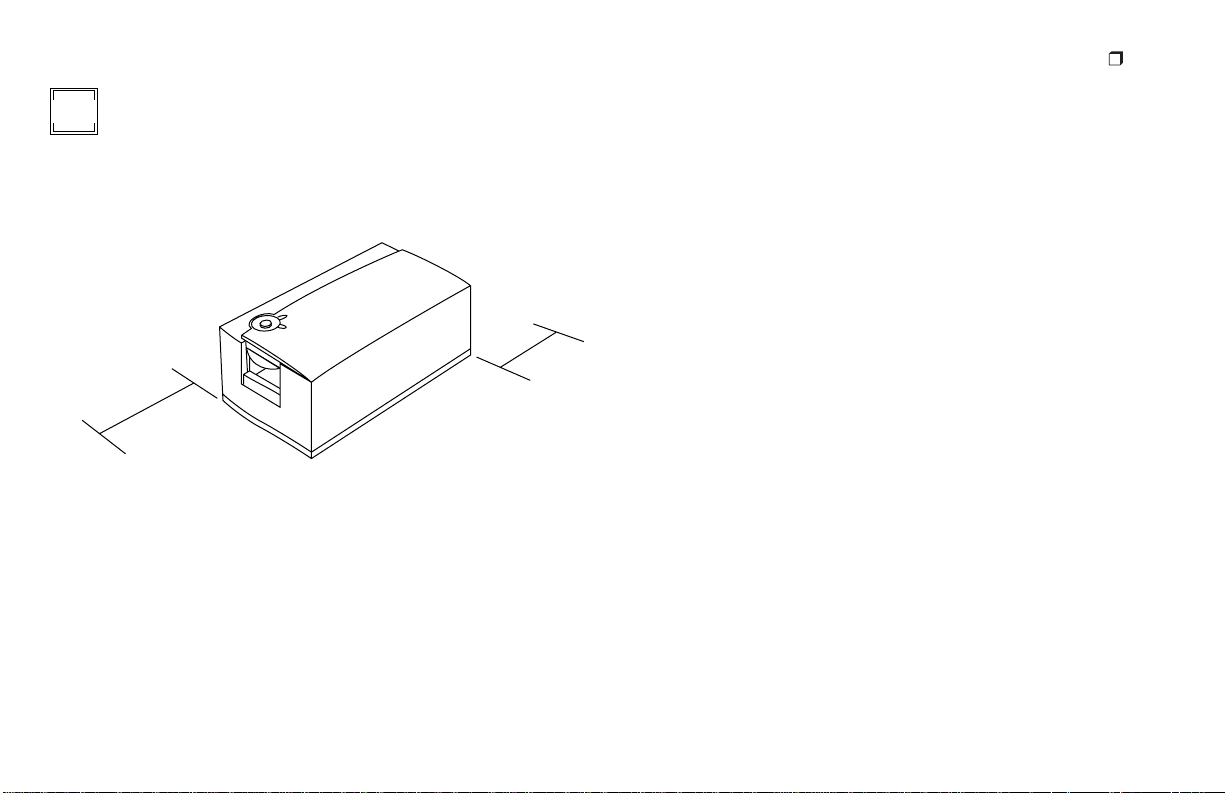
2
Place the scanner at a convenient working height. Allow sufficient
clearance front and rear for the film carriers as shown.
6 in.
14 in.
36cm
16cm
English
5
Page 6

Install the Software
3
1
Turn the computer on.
Close any applications that may be running.
2
3
Insert the Polaroid PolaColor Insight CD into the drive.
Power Mac or Power PC Windows 95, 98 or NT
Select Polaroid Pola-
1
Color Insight Installer.
Follow instructions on
2
the screen.
If you want to install
3
the Photoshop plug in,
double-click the Plug
In Installer in the PolaColor Insight folder
and follow the instructions on the screen.
Remove the CD from the drive.
4
Wait for the install
1
program to start.
If it does not, select
Run from the Start
menu. Click Browse
and select SETUP.EXE
on the CD-ROM.
Click OK.
2
Follow instructions on
the screen.
English
6
Page 7
English
7
Connect the Scanner to
4
the Computer
The SprintScan 4000 requires a SCSI host adapter in your computer. If your computer does not have an adapter, you must install
one (see page 14). If your computer is a PC-compatible with a
SCSI adapter, but the adapter is connected to a hard drive or CDROM drive, installing a second adapter is recommended.
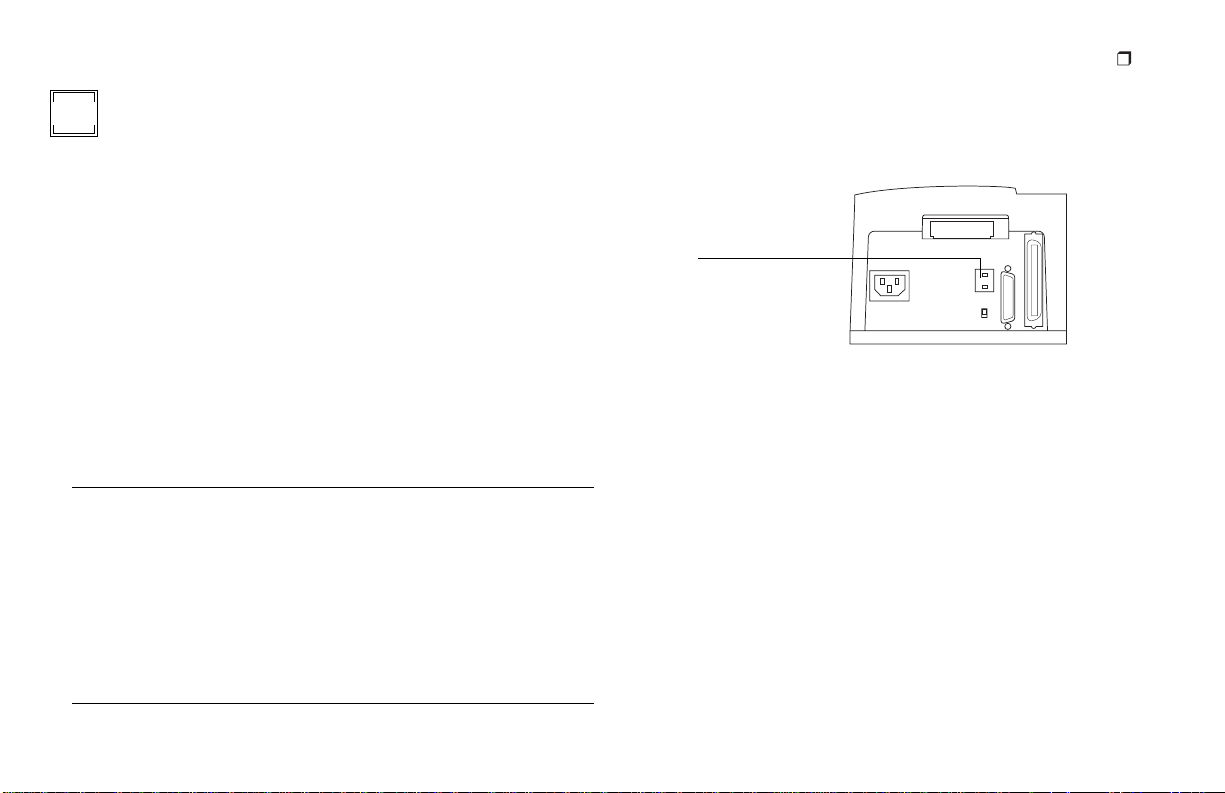
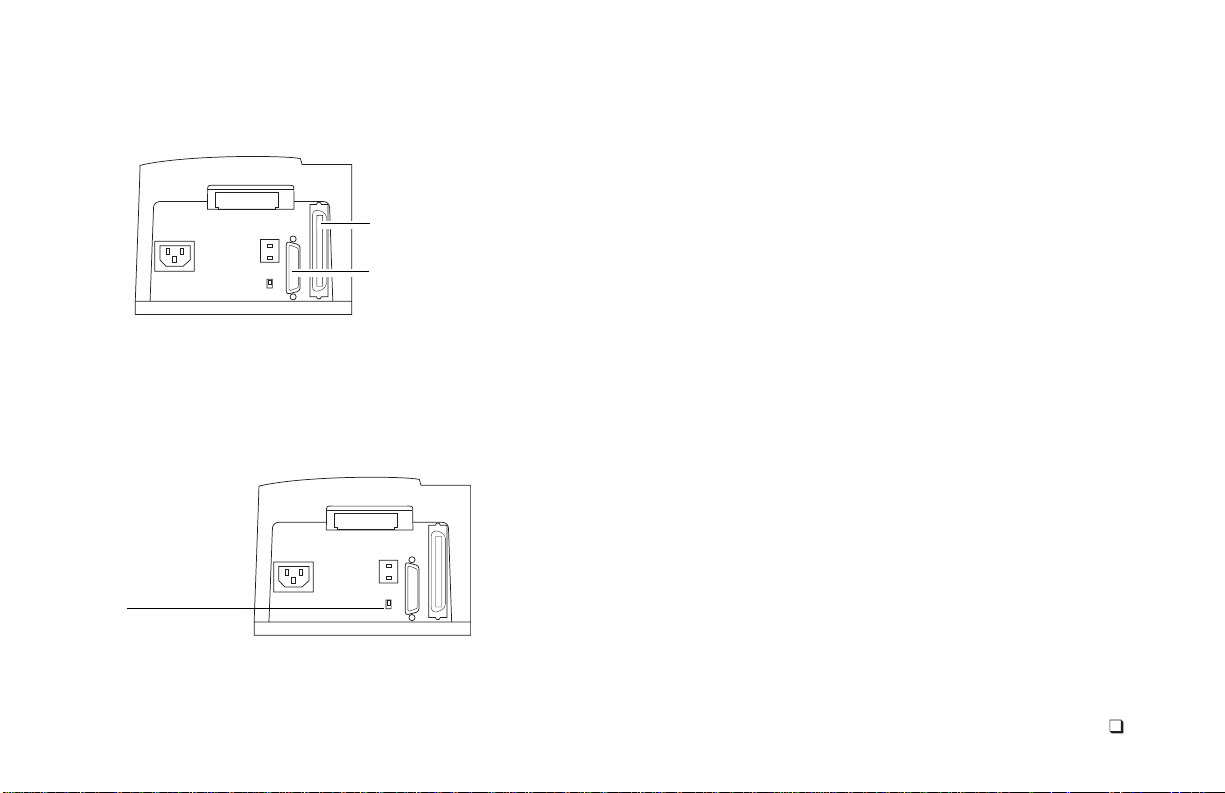
Set the scanner SCSI address:
Each device connected to a SCSI host adapter must have a unique
address from 0-6. To assure a unique address for the scanner,
determine the addresses of any other SCSI devices.
Power Mac or Power PC Windows 95, 98 or NT
1
Run Apple System Profiler
program, usually on the
Apple menu. If not, it may
be available from
www.apple.com/swupdates.
2
Click Devices and Volumes
to view the SCSI device
addresses.
Look at the address switch
on each SCSI device connected to your system. If
necessary, see instructions
provided with the devices.
Make sure the scanner is turned off and set the address switch to a
value not used by any other device.
SCSI
address
switch
Do not use 7, 8 or 9
(not valid addresses)
The address is preset to 6. Do not change it unless another
Note:
device is using 6. Other addresses typically available are 2, 4, and 5.
Page 8
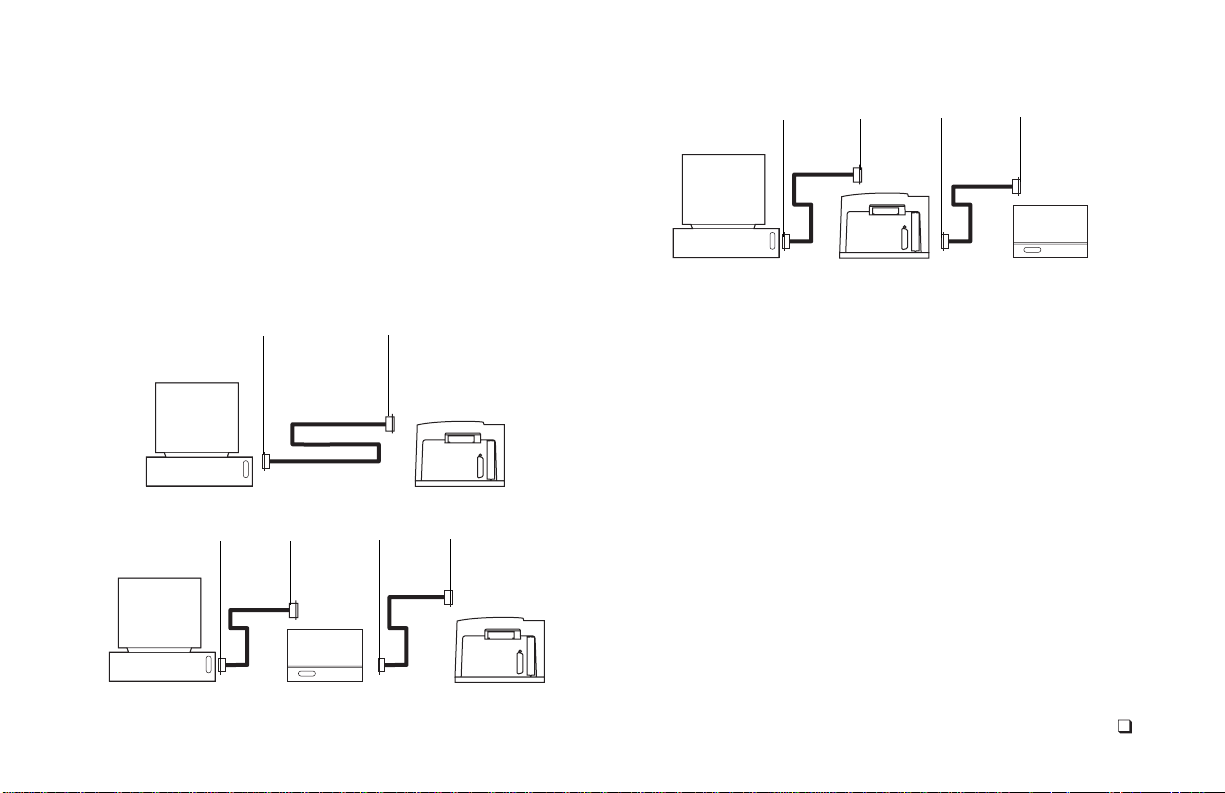
Connect the SCSI cables:
Place the scanner at the end of the SCSI chain or between the
computer and other SCSI devices as shown in the following diagrams. Use the shortest possible cables.
Note:
Turn the computer, scanner and all other SCSI devices off
before connecting or disconnecting any cables. Do not connect
the scanner to the parallel connector on your computer. Doing so
could damage the scanner or computer.
25 pins 50 pins
Computer
25
pins
50
pins
Scanner
(Termination off)
25
pins
50
pins
Other SCSI device
(Terminated)
You may need additional cables or adapters to connect the scanner.
Your cable must have a 50-pin Centronics M or DB-25 M connector at one end for attachment to the scanner, and the cable should
be as short as possible. To determine the connector you need for
attachment to your SCSI adapter, refer to instructions with the
adapter.
Computer Scanner
25
pins50pins
Computer
25
pins50pins
Other SCSI device
(Unterminated)
(Termination on)
Scanner
(Termination on)
English
8
Page 9
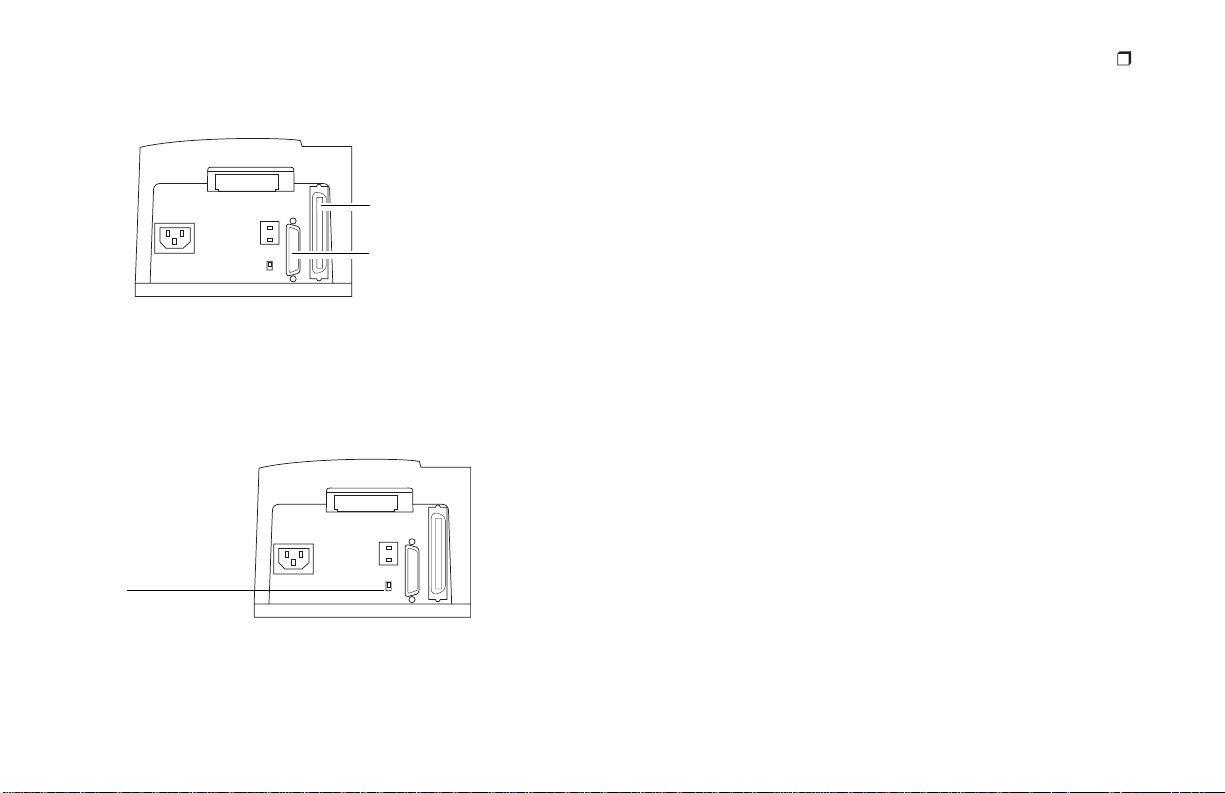
Set termination:
50-pin Centronics F
SCSI connector
DB-25 F
SCSI connector
Set the termination of the scanner and all other SCSI devices as
shown in the appropriate diagram in the previous section. The
last device in the SCSI chain must be terminated (or termination
on), while all other devices must be unterminated (or termination off).
Termination
switch
English
9
Termination instructions for your other SCSI devices are provided with the devices.
Page 10
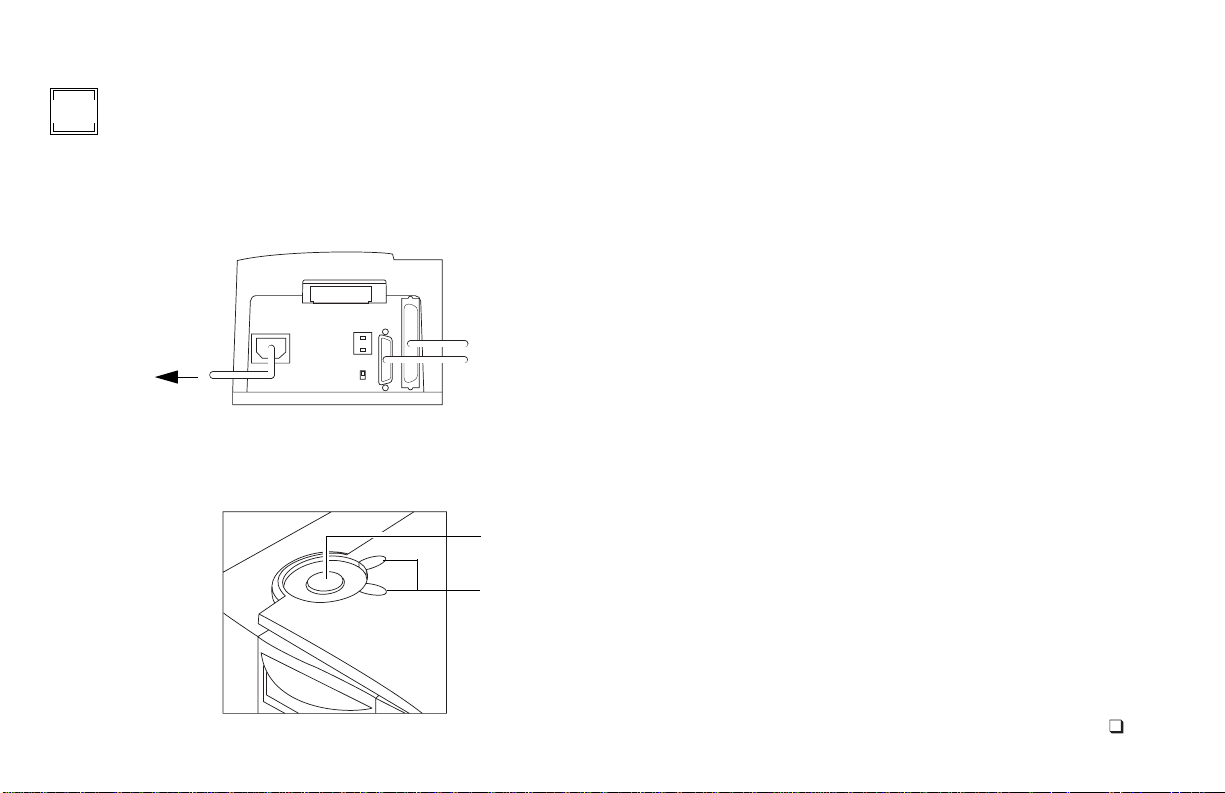
Connect the Scanner to
5
AC Power and Turn On
1
Connect the power cord as shown.
To AC
power
Turn the scanner on by pressing the power button (a). Check
2
the LEDs (b).
a
b
The green LED indicates power on. The yellow LED blinks
while the scanner initializes, remaining steady when the
scanner is ready. (The yellow LED also blinks while scanning.)
3
Turn the computer on.
Wait for the system to install the scanner driver and display
4
the normal desktop.
English
10
Page 11
Preview-Scan an Image
6
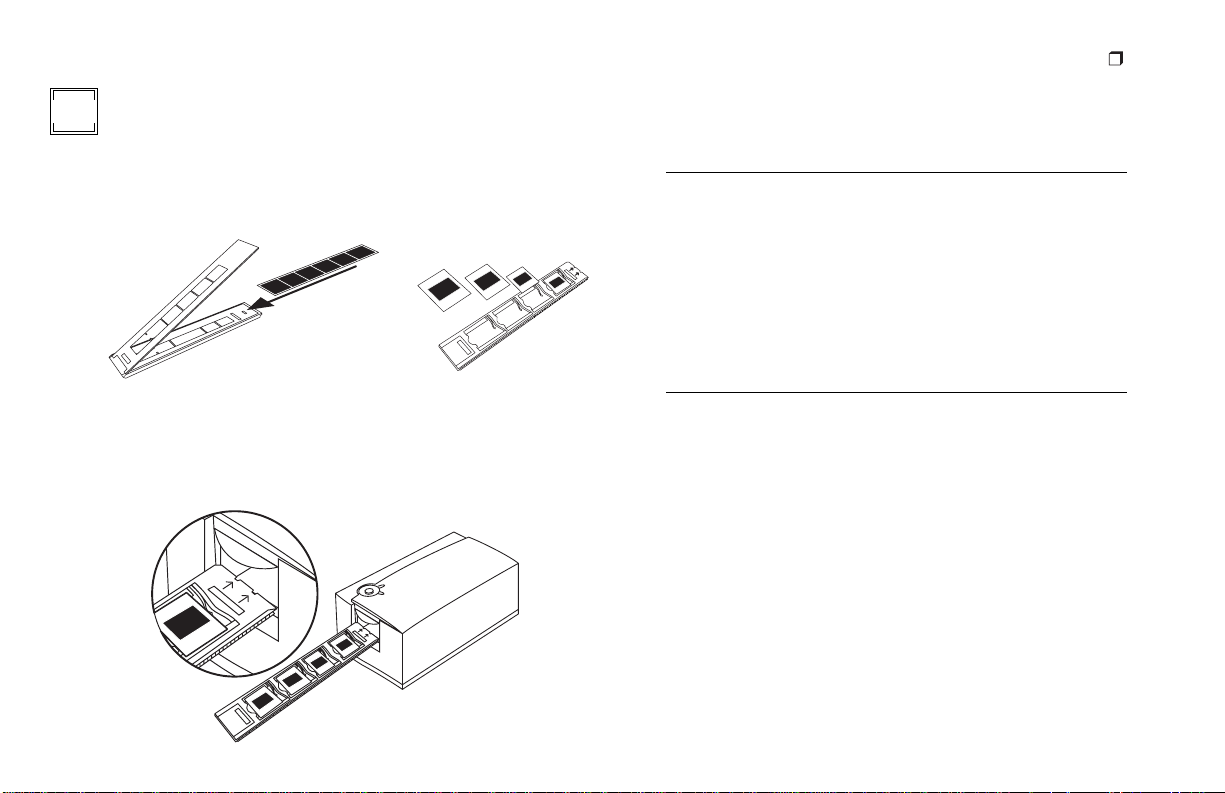
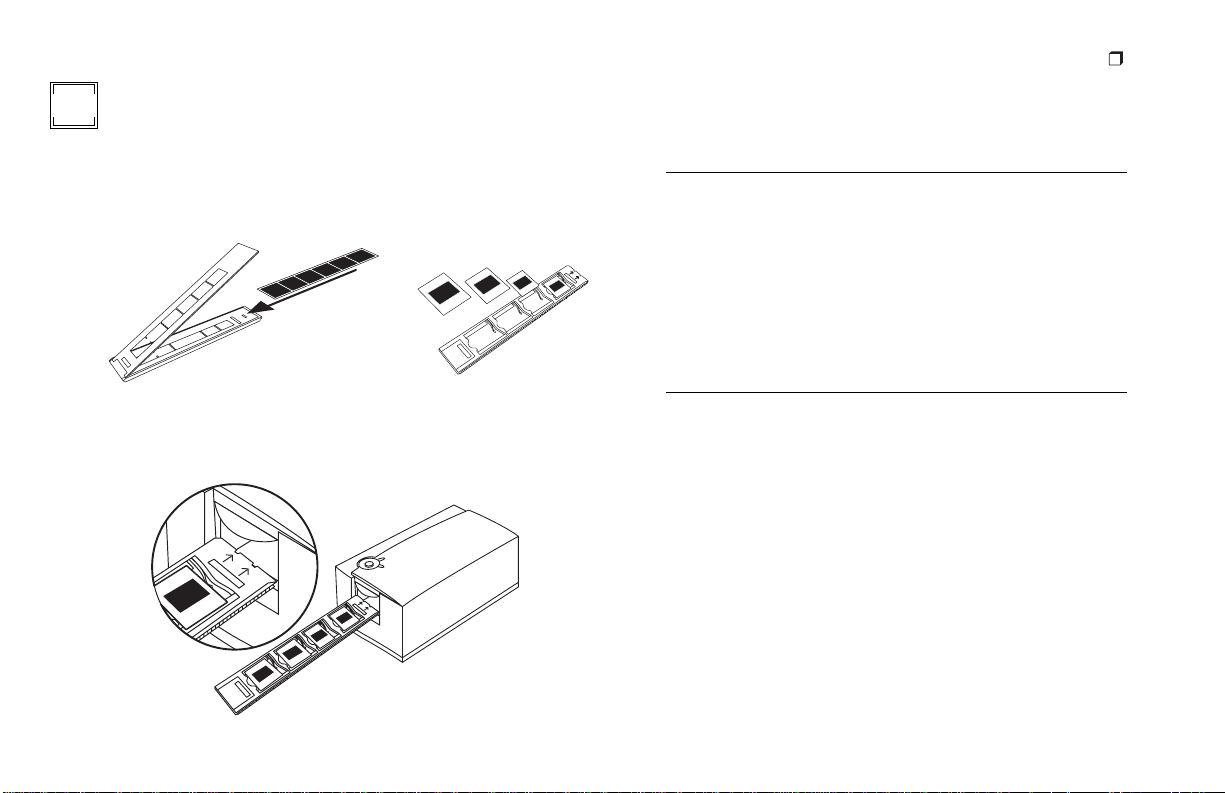
Load a filmstrip into the filmstrip carrier (a) or slides into
1
the slide carrier (b). The emulsion (dull) side of the film
should face downward.
a
2
Orient the carrier with the arrows facing upward, pointing
toward the scanner. Gently push the carrier into the scanner
until the yellow LED turns off.
English
11
3
Start the PolaColor Insight program:
Power Mac or Power PC Windows 95, 98 or NT
Double-click PolaColor
Insight.
To start the Photoshop
plug in within another
application, select Import
from the application’s File
menu and select Pola-
b
Color Insight.
Select the type of slide or negative you are scanning from the
4
Input list on the Preview panel.
5
Select your monitor type from the Display list.
Type or select the number of the carrier frame you want to
6
scan in the Frame Number box.
7
Click Preview.
The image appears on the Preview panel.
Select Programs from
1
the Start menu.
Point to Polaroid Pola-
2
Color Insight, then
select PolaColor
Insight.
Page 12

7
Enhance and Final-Scan the Image
Follow the on-line user’s guide instructions to enhance the image
and perform a final scan.
Viewing the online
Power Mac or Power PC Windows 95, 98 or NT
Double-click PolaColor
1
Insight, launching the
PolaColor Insight program.
Select PolaColor Insight
2
Help from the Help
menu.
PolaColor Insight User’s Guide
Select Programs from
1
the Windows Start
menu.
Point to Polaroid Pola-
2
Color Insight and select
User's Guide
:
.
English
12
Page 13

8
Remove the Carrier from the Scanner
Select Eject Film from the Scanner menu.
English
13
Page 14

Installing a SCSI Host Adapter
Limited Warranty
The SprintScan 4000 connects to a SCSI host adapter in your
computer. Most Macintosh computers have a SCSI adapter built
in, but most IBM PC compatible computers do not.
If you must install a SCSI adapter, turn the computer off and follow instructions provided by the adapter manufacturer. (The procedure usually includes software installation. If your PC uses the
Windows NT operating system, log in as an administrator before
installation.)
A SCSI host adapter may be provided as an option with
Note:
the Windows version of the scanner. If necessary, obtain an
adapter from your computer dealer. (Adapters are not available
for iMac computers.)
Polaroid Corporation warrants the SprintScan 4000 scanner
against defects in manufacture or workmanship for a period of
one year from the date of purchase. To verify the warranty period,
you should keep the invoice, sales receipt, or other proof of the
purchase date.
Should this product or any component or accessory included
with it, with the exception of software, prove to be defective at any
time during the warranty period, Polaroid Corporation will, at its
discretion, either replace or repair this item, without charge.
This warranty does not cover damage caused by accident, incorrect installation, unauthorized modification, and misuse or
abuse. A charge will be made for repair of such damage.
This warranty excludes all consequential damages. Some jurisdictions do not allow the exclusion or limitation of consequential damages, so the foregoing exclusion may not apply to you.
English
14
Page 15

English
15
Radio and television interference
FCC Notice (U.S.A.)
This equipment has been tested and found to comply with
Note:
the limits for a Class B digital device, pursuant to Part 15 of the
FCC Rules. These limits are designed to provide reasonable protection against harmful interference in a residential installation.
This equipment generates, uses and can radiate radio frequency
energy and, if not installed and used in accordance with the
instructions, may cause harmful interference to radio communications. However, there is no guarantee that interference will not
occur in a particular installation. If this equipment does cause
harmful interference to radio or television reception, which can
be determined by turning the equipment off and on, the user is
encouraged to try to correct the interference by one or more of
the following measures:
• Reorient/relocate the receiving antenna.
• Increase the separation between the equipment and receiver.
• Connect the equipment into an outlet on a circuit different
from that to which the receiver is connected.
• Consult the dealer or an experienced radio/TV technician for
help.
Note:
A shielded interface cable with a ferrite core installed on
the scanner connector end must be used with this equipment.
FCC Caution:
To assure continued compliance, any changes or
modifications not expressly approved by the party responsible for
compliance could void the user’s authority to operate the equipment.
Product: The Polaroid SprintScan 4000 Scanner
Marketed by: Polaroid Corporation, Cambridge, MA 02139
U.S.A. Telephone:
1-800-432-5355
This device complies with Part 15 of the FCC Rules. Operation is
subject to the following two considerations: (1) This device may
not cause harmful interference, and (2) this device must accept
any interference received, including interference that may cause
undesired operation.
© Copyright Polaroid Corporation, 1999. All rights reserved.
“Polaroid” and “SprintScan” are trademarks of Polaroid Corporation, Cambridge,
MA, U.S.A. All other product names may be trademarks of their respective
owners.
PN 100165A (PE 20008Q-1
)
Page 16

Page 17

Systemanforderungen
Macintosh-Systeme
• Apple Macintosh- oder PowerBook-Computer mit PowerPCProzessor (oder höher)
• 32 MB RAM
• 40 MB verfügbarer Festplattenspeicher
• MacOS 7.5 oder höher
PC-Systeme
• IBM-PC oder kompatibler mit Pentium-Prozessor
• 32 MB RAM
• 40 MB verfügbarer Festplattenspeicher
• Betriebssystem Microsoft Windows 95, Windows NT oder
Windows 98
• ASPI-kompatibler SCSI-Hostadapter und entsprechende
Windows-Treiber
Deutsch
17
Page 18
1
Auspacken des Kartons
Überprüfen Sie zunächst den Inhalt der Verpackung. Sollte eines
der nachfolgend genannten Teile fehlen oder beschädigt sein,
wenden Sie sich an Ihren Händler.
1
567
234
1
Scanner
2
Netzkabel (für unterschiedliche Spannungsquellen stehen
verschiedene Netzkabel zur Verfügung)
Filmstreifenhalter
3
Diahalter
4
SCSI-Hostadapter-Installationskit für Windows (als Option
5
erhältlich; wenden Sie sich diesbezüglich an Ihren Händler)
6
SCSI-Kabel mit 25poligem und 50poligem Stecker
7
PolaColor Insight-Software-CD mit:
•
PolaColor Insight-Software für Windows 95, 98 und NT
•
PolaColor Insight-Software für Power MAC- und Power PC-
Systeme und einem Adobe Photoshop-Plugin
•
Online-Benutzerhandbuch
Warnung:
Der Scanner enthält keine Komponenten, die durch
den Benutzer gewartet werden können. Nehmen Sie den Scanner
nicht auseinander, da dies gefährliche elektrische Schläge und eine
Beschädigung des Scanner sowie einen Verfall Ihrer
Garantieansprüche zur Folge haben könnte. Wenden Sie sich bei
Funktionsstörungen des Scanners an die technische Unterstützung
von Polaroid bzw. an Ihren Händler. (Innerhalb der USA können
Sie Polaroid unter der Rufnummer
1-800-432-5355
erreichen.
Kunden außerhalb der USA können die Kontaktrufnummern dem
Abschnitt
Polaroid-Web-Site unter
Unterstützung
im Online-Benutzerhandbuch oder der
www.polaroid.com
entnehmen.)
Deutsch
18
Page 19
Aufstellen des Scanners
2
Stellen Sie den Scanner in einer leicht erreichbaren Arbeitshöhe
auf. Lassen Sie vor und hinter dem Gerät genügend Platz für den
Filmstreifenhalter frei. (Siehe Abbildung.)
16cm
36cm
Deutsch
19
Page 20

Installieren der Software
3
Schalten Sie den Computer ein.
1
2
Schließen Sie alle Anwendungen.
3
Legen Sie die Polaroid PolaColor Insight-CD in das
CD-ROM-Laufwerk ein.
Power Mac oder PowerPC Windows 95, 98 oder NT
1
Wählen Sie den
Polaroid PolaColor
Insight-Aktualisierer.
2
Folgen Sie den
Anweisungen auf dem
Bildschirm.
1
Warten Sie, bis das
Installationsprogramm
automatisch gestartet
wird.
Sollte dies nicht
eintreten, wählen Sie
aus dem Menü
den Befehl
Klicken Sie auf die
Schaltfläche
Durchsuchen
wählen Sie auf der CDROM die Datei
SETUP.EXE. Klicken
Sie auf OK.
Ausführen
Start
, und
Power Mac oder PowerPC Windows 95, 98 oder NT
Wenn Sie das
3
Photoshop-Plugin
installieren möchten,
doppelklicken Sie im
Ordner
Insight
entsprechenden
Aktualisier, und folgen
Sie den Anweisungen
auf dem Bildschirm.
Nehmen Sie die CD aus dem Laufwerk.
.
4
PolaColor
auf den
Folgen Sie den
2
Anweisungen auf dem
Bildschirm.
Deutsch
20
Page 21

Anschließen des Scanners an
4
Deutsch
21
den Computer
Zum Anschließen des SprintScan 4000-Scanners benötigen Sie in
Ihrem Computer einen SCSI-Hostadapter. Dieser muß
gegebenenfalls nachinstalliert werden (siehe Seite 29). Wenn es
sich bei Ihrem Computer um ein PC-kompatibles Gerät mit
SCSI-Adapter handelt, dessen Adapter an das Festplatten- oder
CD-ROM-Laufwerk angeschlossen ist, empfiehlt sich die
Installation eines zweiten Adapters.
Festlegen der SCSI-Adresse des Scanners:
Jedem an einen SCSI-Hostadapter angeschlossenen Gerät muß
eine eindeutige Adresse im Bereich von 0 bis 6 zugeordnet
werden. Um Konflikte mit anderen Geräten auszuschließen,
sollten Sie zunächst die Adressen aller anderen SCSI-Geräte
ermitteln:
Power Mac oder PowerPC Windows 95, 98 oder NT
1
Führen Sie den Apple
System Profiler aus. In der
Regel finden Sie dieses
Programm im Apple-Menü.
Andernfalls können Sie das
Programm von
www.apple.com/swupdates
herunterladen.
2
Klicken Sie auf
Volumes
der SCSI-Geräte
anzuzeigen.
Geräte und
, um die Adressen
Überprüfen Sie an jedem
SCSI-Gerät, das an Ihr
System angeschlossen ist,
den SCSI-Adressenschalter.
Nähere Informationen
finden Sie gegebenenfalls in
den Unterlagen, die Sie mit
den entsprechenden Geräten
erhalten haben.
Page 22

Prüfen Sie, ob der Scanner ausgeschaltet ist, und stellen Sie den
Adressenschalter auf einen Wert, der noch von keinem anderen
Gerät belegt ist.
SCSIAdressenschalter
7, 8 und 9 sind keine
gültigen Adressen
und dürfen nicht
verwendet werden
Hinweis:
Standardmäßig ist die Adresse 6 voreingestellt. Ändern
Sie diesen Wert nur dann, wenn er bereits von einem anderen
Gerät belegt ist.
In der Regel sind auch die Adressen 2, 4 und 5
verfügbar.
Deutsch
22
Page 23

Anschließen der SCSI-Kabel:
Schließen Sie den Scanner am Ende der SCSI-Kette oder zwischen
dem Computer und einem anderen SCSI-Gerät an. (Siehe
nachstehende Abbildung.) Verwenden Sie nach Möglichkeit kurze
Kabel.
Deutsch
50polig25polig
23
Hinweis:
Vor dem Anschließen und Abziehen von Kabeln
sollten Sie den Computer, den Scanner und alle anderen SCSIGeräte grundsätzlich abschalten. Verbinden Sie den Scanner auf
keinen Fall mit dem Parallelanschluß Ihres Computers, da dies zu
einer Beschädigung des Scanners bzw. des Computers führen
kann.
Computer
Computer
anderes SCSI-Gerät
(nicht terminiert)
Scanner
(Terminierung ein)
50polig50polig 25polig25polig
Scanner
(Terminierung ein)
Page 24

25polig
Computer
25polig
Scanner (Terminierung
aus)
50polig50polig
anderes SCSI-Gerät
(terminiert)
Zum Anschließen des Scanners sind unter Umständen noch
weitere Kabel oder Adapter erforderlich. Scannerseitig muß Ihr
Kabel über einen 50poligen Centronics M- oder DB-25
M-Stecker verfügen. Außerdem sollte es so kurz wie möglich sein.
Hinweise dazu, welchen Steckertyp Sie für Ihren SCSI-Adapter
benötigen, finden Sie in den Unterlagen, die Sie mit dem Adapter
erhalten haben.
Festlegen der Terminierung:
50poliger
Centronics F
SCSI-Stecker
DB-25 F
SCSI-Stecker
Legen Sie die Terminierung des Scanners und aller anderen SCSIGeräte gemäß der entsprechenden Abbildung im vorstehenden
Abschnitt fest. Das jeweils letzte Gerät in der SCSI-Kette muß
terminiert sein (d. h. die Terminierung ist aktiviert). Bei allen
anderen Geräten muß die Terminierung deaktiviert sein.
Terminierungsschalter
Die Terminierungsanweisungen für Ihre anderen SCSI-Geräte
finden Sie in den entsprechenden Unterlagen.
Deutsch
24
Page 25

Netzanschluß und Einschalten
b
a
5
des Scanners
1
Schließen Sie das Netzkabel wie in der Abbildung dargestellt
an.
zur
Steckdose
Deutsch
2
Drücken Sie den Netzschalter (a), um den Scanner
einzuschalten. Überprüfen Sie die LEDs (b).
Die grüne LED zeigt an, daß das Gerät eingeschaltet ist. Die
gelbe LED blinkt, während der Scanner initialisiert wird.
Sobald die LED ständig leuchtet, ist der Scanner
betriebsbereit. (Beim Scanvorgang blinkt die gelbe LED
ebenfalls.)
Schalten Sie den Computer ein.
3
4
Warten Sie, bis das System den Scannertreiber installiert hat
und wieder den normalen Desktop anzeigt.
25
Page 26

Erstellen eines Vorschau-Scans
6
1
Legen Sie einen Filmstreifen in den Filmstreifenhalter (a)
bzw. Ihre Dias in den Diahalter (b) ein. Die Emulsionsseite
des Films muß dabei nach unten zeigen.
a
2
Drehen Sie den Halter so, daß die Pfeile nach oben und zum
Scanner zeigen. Schieben Sie den Halter vorsichtig in den
Scanner, bis die gelbe LED verlischt.
3
Starten Sie die PolaColor Insight-Software:
Power Mac oder PowerPC Windows 95, 98 oder NT
Doppelklicken Sie auf
PolaColor Insight
Zum Aufrufen des
Photoshop-Plugins aus
einer anderen Anwendung
wählen Sie aus dem Menü
Ablage
der Anwendung den
Befehl
b
4
Wählen Sie im Listenfeld
Vorschau
5
Wählen Sie im Listenfeld
Wählen Sie im Feld
6
Halter aus, oder geben Sie die entsprechenden Nummer über
die Tastatur ein.
7
Klicken Sie auf
Das Bild wird auf der Registerkarte
Importieren
klicken Sie auf
Insight
.
den gewünschten Dia- oder Negativtyp aus.
.
, und
PolaColor
Bildnummer
Vorschau
Eingabe
Anzeige
.
Klicken Sie im Menü
1
Start
auf
Programme
Zeigen Sie auf
2
Polaroid PolaColor
Insight
, und klicken
Sie auf
PolaColor
Insight
.
der Registerkarte
Ihren Monitortyp aus.
das zu scannende Bild im
Vorschau
angezeigt.
.
Deutsch
26
Page 27

7
Korrigieren und abschließendes Scannen des Bildes
Zum Korrigieren und abschließenden Scannen des Bildes folgen
Sie den Anweisungen im Benutzerhandbuch.
Deutsch
27
Anzeigen des Online-
Power Mac oder PowerPC Windows 95, 98 oder NT
Doppelklicken Sie auf
1
PolaColor Insight
das PolaColor InsightProgramm zu starten.
Wählen Sie aus dem
2
Menü
Hilfe
PolaColor InsightHilfe
.
PolaColor Insight-Benutzerhandbuchs
Klicken Sie im
1
, um
den Befehl
Windows-Menü
auf
Programme
Zeigen Sie auf
2
PolaColor Insight
klicken Sie auf
Benutzerhandbuch
Start
.
Polaroid
:
, und
.
Page 28

8
Entfernen des Halters aus dem Scanner
Wählen Sie aus dem Menü
Scanner
den Befehl
Film ausgeben
.
Deutsch
28
Page 29

Deutsch
29
Installieren eines SCSI-Hostadapters
Zum Anschließen des SprintScan 4000-Scanners benötigen Sie in
Ihrem Computer einen SCSI-Hostadapter. Während die meisten
Macintosh-Computer bereits über einen integrierten SCSIAdapter verfügen, ist dies bei IBM-kompatiblen PCs in der Regel
nicht der Fall.
Wenn Sie einen SCSI-Adapter installieren müssen, schalten Sie
den Computer aus, und folgen Sie den Anweisungen des AdapterHerstellers. (In vielen Fällen ist auch die Installation der
entsprechenden Software erforderlich. Wenn Sie unter dem
Betriebssystem Windows NT arbeiten, melden Sie sich vor der
Installation als Administrator an.)
Hinweis:
Scanners als Zusatzgerät bereits ein SCSI-Hostadapter bei. Sollte
dies nicht der Fall sein, erwerben Sie einen geeigneten Adapter
von Ihrem Computerhändler. (Für iMac-Computer sind keine
Adapter erhältlich.)
Unter Umständen lag Ihrer Windows-Version des
Beschränkte Gewährleistung
Polaroid gewährleistet, daß der SprintScan 4000-Scanner für
einen Zeitraum von einem Jahr ab Kaufdatum keine Materialoder Verarbeitungsfehler aufweist. Als Nachweis für die
Gewährleistungsfrist sollten Sie die Rechnung, die
Einkaufsquittung oder einen anderen Kaufbeleg sorgfältig
aufbewahren.
Sollte dieses Produkt oder beiliegende Zubehörteile (mit
Ausnahme der Software) innerhalb der Gewährleisungsfrist
Mängel aufweisen, wird die entsprechende Komponente durch
die Polaroid Corporation nach eigenem Ermessen ersetzt oder
repariert.
Die vorliegende Gewährleistung gilt nicht für Schäden, die durch
Unfälle, fehlerhafte Installation, nicht genehmigte
Modifikationen, Mißbrauch oder mißbräuchliche Verwendung
verursacht wurden. Die Reparatur solcher Schäden erfolgt daher
nur gegen Gebühr.
Weiterhin sind von der Gewährleistung sämtliche
Folgeschäden ausgeschlossen. Da einige Staaten und Länder
den Ausschluß oder die Einschränkung von Folgeschäden nicht
zulassen, ist der vorgenannte Ausschluß für Sie möglicherweise
nicht zutreffend.
Page 30

Rundfunk- und Fernsehstörstrahlung
FCC-Hinweis (USA)
Hinweis:
digitale Geräte, entsprechend Paragraph 15 der FCC-Richtlinien
getestet. Diese Grenzwerte wurden im Hinblick auf die
Vermeidung von schädigenden Störstrahlungen beim Betrieb von
Geräten in Wohngebieten festgelegt. Das Gerät erzeugt und
arbeitet mit Hochfrequenzenergie und kann diese abstrahlen. Bei
unsachgemäßer Installation und einer nicht mit den
Empfehlungen übereinstimmenden Verwendung kann es zu einer
Beeinträchtigung des Rundfunkverkehrs kommen. Es wird keine
Garantie dafür gegeben, daß bei einer bestimmten Installation
keine Störstrahlungen auftreten. Sollte dieses Gerät den Funkund Fernsehempfang stören (Sie können dies testen, indem Sie
das Gerät aus- und wieder einschalten), ist der Benutzer dazu
angehalten, die Störungen durch eine oder mehrere der
nachfolgend genannten Maßnahmen zu beseitigen:
• Neuausrichtung der Antenne
• Vergrößerung des Abstands zwischen Gerät und Empfänger
• Anschluß des Geräts an eine vom Empfängerstromkreis
• Beratung durch den Händler oder einen erfahrenen
Dieses Gerät wurde nach Maßgabe der Klasse B,
unabhängige Steckdose
Rundfunk- oder Fernsehtechniker
Hinweis:
Dieses Gerät darf ausschließlich mit einem
geschirmten Schnittstellenkabel verwendet werden, dessen
scannerseitiger Stecker mit einem Ferritkern versehen ist.
FCC-Warnung:
Um eine dauerhafte Kompatibilität zu
gewährleisten, können jegliche Änderungen oder
Modifikationen, die nicht ausdrücklich von den zuständigen
Stellen genehmigt wurden, dazu führen, daß dem Benutzer die
Berechtigung zum Betreiben des Geräts entzogen wird.
Produkt: Polaroid SprintScan 4000-Scanner
Vertrieb durch: Polaroid Corporation, Cambridge, MA 02139
USA. Telefon:
1-800-432-5355
Dieses Gerät entspricht den Bestimmungen in Artikel 15 der
FCC-Richtlinien. Der Betrieb unterliegt den folgenden beiden
Bedingungen: (1) Das Gerät darf keine schädlichen
Störstrahlungen verursachen; (2) das Gerät darf durch
empfangene Störstrahlungen, einschließlich solcher, die einen
unerwünschten Betrieb verursachen können, nicht beeinträchtigt
werden.
© Copyright Polaroid Corporation, 1999. Alle Rechte vorbehalten.
„Polaroid“ und „SprintScan“ sind Warenzeichen der Polaroid Corporation,
Cambridge,
Warenzeichen der jeweiligen Eigentümer.
PN 100165A (PE 20008Q-1
MA, USA. Alle anderen Produktnamen sind möglicherweise
)
Deutsch
30
Page 31

Requisitos del sistema
Sistemas Macintosh
• Apple Macintosh u ordenador PowerBook con procesador
PowerPC o posterior
• 32 MB de memoria RAM disponibles
• 40 MB de espacio disponible en disco duro
• Macintosh Operating System 7.5 o posterior
Sistemas PC
• Un PC IBM o compatible con procesador tipo Pentium
• 32 MB de memoria RAM disponibles
• 40 MB de espacio disponible en disco duro
• Sistemas operativos Microsoft Windows 95, Windows NT o
Windows 98
• Adaptador SCSI compatible con ASPI y controladores
apropiados de Windows
Español
31
Page 32

1
Desembalaje de la caja
Asegúrese de que tiene todos los componentes siguientes.
Póngase en contacto con su distribuidor si algo está dañado o no
está incluido en la caja.
1
567
234
1
escáner
2
cable (se proporcionan varios para adaptarse a distintas
fuentes de corriente)
portador de tira de película de negativo
3
portadiapositivas
4
kit de instalación del adaptador SCSI Windows (opcional;
5
contacte con su distribuidor)
6
cable SCSI con conectores de 25 y 50 clavijas
7
CD del software PolaColor Insight con
•
software PolaColor Insight para Windows 95, 98 y NT
•
software PolaColor Insight para sistemas Power MAC y
Power PC y una extensión Adobe Photoshop
•
manual del usuario en línea
Advertencia:
Nada de lo que hay en el interior del escáner puede
ser utilizado por el usuario con otra finalidad que no sea aquella
para la que originalmente fue fabricado. No desmonte el escáner.
Hacerlo podría producir una fuerte descarga eléctrica y daños en
el escáner. Dicha acción puede también anular la garantía.
Póngase en contacto con el servicio de atención técnica de
Polaroid o con su proveedor si advierte un mal
del escáner. (Para contactar con Polaroid dentro de EE.UU.,
al teléfono
asistencia
www.polaroid.com
900 974471
. Fuera de EE.UU., remítase a
en el manual del usuario en pantalla o visite
de Internet.)
funcionamiento
llame
obtención de
la página
Español
32
Page 33

Colocación del escáner
2
Coloque el escáner a una altura adecuada para trabajar. Deje,
como se indica, un espacio suficiente en la parte anterior y
posterior para los portadores de película.
36 cm
16 cm
Español
33
Page 34

Instalación del software
3
Encienda el ordenador.
1
2
Cierre cualquier aplicación que se esté ejecutando.
3
Introduzca el CD Polaroid PolaColor Insight en la unidad.
Power Mac o Power PC Windows 95, 98 o NT
1
Seleccione el programa
de instalación Polaroid
PolaColor Insight.
2
Siga las instrucciones
de la pantalla.
3
Si desea instalar la
extensión Photoshop,
haga doble clic en el
programa de
instalación Plug In de
la carpeta PolaColor
Insight y siga las
instrucciones de la
pantalla.
4
Extraiga el CD de la unidad.
1
Espere a que se inicie el
programa de
instalación.
Si esto no ocurre,
seleccione Ejecutar del
menú de Inicio. Haga
clic en Examinar y
seleccione SETUP.EXE
en el CD-ROM. Haga
clic en OK.
2
Siga las instrucciones
de la pantalla.
Español
34
Page 35

Conexión del escáner al
4
Español
35
ordenador
El escáner SprintScan 4000 necesita un adaptador SCSI en el
ordenador. Si el ordenador no dispone de un adaptador, deberá
instalar uno (consulte la página 42). Si su ordenador es un PC
compatible con un adaptador SCSI, pero el adaptador está
conectado con una unidad de disco o a una de CD-ROM, es
recomendable la instalación de un segundo adaptador.
Establezca la dirección SCSI del escáner.
Cada uno de los dispositivos conectados a un adaptador SCSI
debe tener una única dirección entre 0-6. Con el fin de asegurar
una dirección única para el escáner, determine las direcciones del
resto de los dispositivos SCSI.
Power Mac o Power PC Windows 95, 98 o NT
1
Ejecute Perfil de sistema
Apple que se encuentra
normalmente en el menú
Apple. Si no se encuentra
ahí, puede obtenerlo en
www.apple.com/swupdates.
2
Haga clic en Dispositivos y
Volúmenes para ver las
direcciones del dispositivo
SCSI.
Asegúrese de que el escáner está apagado y establezca un valor
para la dirección que no haya sido anteriormente utilizado para
otro dispositivo.
Dirección
SCSI
No utilice los
valores 7, 8 o 9
(direcciones no
válidas)
Mire la dirección de cada
dispositivo SCSI conectado
al sistema. Si es necesario,
consulte las instrucciones
que acompañan a los
dispositivos.
Page 36

El valor de la dirección está predefinido como 6. No lo
Nota:
cambie a menos que exista otro
dispositivo que también lo utilice.
Otras direcciones disponibles normalmente son 2, 4 y 5.
Conexión de los cables SCSI:
Coloque el escáner al final de la cadena SCSI o entre el ordenador
y otros dispositivos SCSI tal como se muestra. Utilice los cables
más cortos que le sea posible.
Nota:
Antes de conectar o desconectar cualquier cable, apague el
ordenador, el escáner y todos los demás dispositivos SCSI. No
conecte el escáner al conector paralelo de su ordenador. Hacerlo
podría dañar el escáner o el ordenador.
50 clavijas25 clavijas
Ordenador Escáner
(Terminación activada)
25
clavijas
Ordenador
25
clavijas
Ordenador Escáner
50
clavijas25clavijas
Otro dispositivo SCSI
(No Terminado)
50
clavijas
clavijas
(Terminación
desactivada)
25
50
clavijas
Escáner
(Terminación activada)
50
clavijas
Otro dispositivo
SCSI (Terminado)
Necesitará cables o adaptadores adicionales para conectar el
escáner. El cable debe tener un conector Centronics M o DB-25 M
de 50 clavijas en un extremo para conectarse con el escáner; el
cable debe ser lo más corto posible. Con el fin de determinar el
conector necesario para la conexión al adaptador SCSI, consulte las
instrucciones del adaptador.
Español
36
Page 37

Establecimiento de la terminación:
Conector
Centronics F SCSI
de 50 clavijas
Conector SCSI
DB-25F
Establezca la terminación del escáner y de todos los demás
dispositivos SCSI como se muestra en el diagrama
correspondiente de la sección anterior. El último dispositivo de la
cadena SCSI debe estar terminado (o su terminación activada)
mientras que el resto no debe estar terminado (o su terminación
desactivada).
Interruptor
de
terminación
Español
37
Las instrucciones de terminación para los otros dispositivos SCSI
vienen dados por estos.
Page 38

Conexión del escáner a
5
corriente alterna y encendido
1
Conecte el cable de alimentación como se indica.
A
corriente
alterna
Encienda el escáner pulsando el botón de encendido (a).
2
Compruebe los indicadores LED (b).
a
b
El LED verde indica que el escáner está encendido. El LED
amarillo parpadea mientras el escáner se está iniciando,
quedando fijo cuando éste está listo. (El LED amarillo
parpadea también cuando se escanea.)
Encienda el ordenador.
3
4
Espere a que el sistema instale la unidad de escáner y muestre
el escritorio habitual.
Español
38
Page 39
Escaneado preliminar de una
6
3
Inicie el programa PolaColor Insight:
Español
39
imagen
1
Cargue una película en el portador de película (a) o unas
diapositivas en el portador de diapositivas (b). La cara
posterior (mate) de la película debe quedar hacia abajo.
a
2
Oriente el portador con las flechas hacia arriba y apuntando
hacia el escáner. Empuje suavemente el portador dentro del
escáner hasta que el LED amarillo se apague.
b
Power Mac o Power PC Windows 95, 98 o NT
Haga doble clic en
PolaColor Insight.
Para iniciar la extensión
Photoshop dentro de otra
aplicación, seleccione
Importar del menú
Archivo de la aplicación y
elija PolaColor Insight.
4
Seleccione el tipo de diapositiva o negativo que está
explorando en la lista de Origen en el panel de Presentación
preliminar.
5
Seleccione el tipo de monitor de la lista Monitor.
Escriba o seleccione el número del marco portador que desea
6
examinar en la casilla Número de marco.
7
Haga clic en Presentación preliminar.
La imagen aparece en el panel Presentación preliminar.
1
Seleccione Programas
del menú Inicio.
2
Señale Polaroid
PolaColor Insight,
después seleccione
PolaColor Insight.
Page 40

7
Mejora y escaneado final de la
imagen
Siga las instrucciones del manual del usuario en pantalla para
retocar la imagen y realizar un examen final.
Consulta de la guía del usuario en línea
Power Mac o Power PC Windows 95, 98 o NT
Haga doble clic en
1
PolaColor Insight para
iniciar el programa
PolaColor Insight.
2
Seleccione la Ayuda de
PolaColor Insight desde
el menú Ayuda.
PolaColor Insight
Seleccione Programas en
1
el menú Inicio de
Windows.
2
Señale Polaroid
PolaColor Insight y
seleccione
usuario
Guía del
.
:
Español
40
Page 41

8
Extracción del portador del escáner
Seleccione Expulsar película del menú Escáner.
Español
41
Page 42

Instalación del adaptador SCSI
Garantía limitada
El escáner SprintScan 4000 se conecta a un adaptador SCSI en el
ordenador. La mayoría de los ordenadores Macintosh llevan un
adaptador SCSI, sin embargo, no ocurre lo mismo con los PC
IBM.
Si tiene que instalar un adaptador SCSI, apague el ordenador y
siga las instrucciones proporcionadas por el fabricante de dicho
adaptador. (El proceso incluye normalmente la instalación de
software. Si su ordenador utiliza el sistema operativo Windows
NT, conéctese como administrador antes de la instalación.)
Nota:
Puede suministrarse, como opción, un adaptador SCSI
con la versión Windows del escáner. Si es necesario, solicite un
adaptador a su proveedor de ordenadores. (No hay adaptadores
disponibles para los ordenadores iMac.)
Polaroid Corporation garantiza el escáner SprintScan 4000 contra
defectos de fabricación o de materiales por un período de un año
desde la fecha de compra. Para verificar el período de garantía,
deberá conservar la factura, el ticket de compra o cualquier otra
prueba de la fecha de compra.
Si este producto o cualquiera de sus componentes o los accesorios
suministrados con él, a excepción del software, resultaran ser
defectuosos durante el período de garantía, Polaroid
Corporation, según estime conveniente, remplazará o reparará el
artículo sin recargo alguno.
Esta garantía no incluye el daño provocado por accidente,
instalación incorrecta, modificación no autorizada y mal uso o
abuso del producto. En dichos casos, se cobrará un recargo por la
reparación.
Esta garantía excluye todos los daños consecuenciales. Algunas
jurisdicciones no permiten la exclusión o limitación de daños
consecuenciales, por lo que la exclusión siguiente no le será
aplicada.
Español
42
Page 43

Interferencia de radio y televisión
Aviso de la FCC (EE.UU.)
Nota:
Este equipo ha sido probado y se ha determinado que
cumple con los límites para dispositivos digitales clase B, de
acuerdo con la sección 15 del Reglamento de la FCC. Estos límites
están diseñados para garantizar una protección razonable frente a
interferencias perjudiciales en entornos residenciales. Este equipo
genera, utiliza y puede emitir energía de radiofrecuencia y si no se
instala o utiliza de acuerdo con las instrucciones, puede producir
interferencias perjudiciales en las comunicaciones de radio. Sin
embargo, no se garantiza que no se produzcan interferencias en
una instalación particular. En caso de que este equipo produjera
interferencias perjudiciales para la recepción de radio o televisión,
lo que puede comprobarse apagando y encendiendo el equipo, se
recomienda al usuario que trate de corregirlas adoptando una o
varias de las medidas siguientes:
• Cambiar la orientación o ubicación de la antena receptora.
• Aumentar la distancia entre el equipo y el receptor.
• Conectar el equipo a una toma de corriente de un circuito
eléctrico distinto al del receptor.
• Consultar al distribuidor o a un técnico experto en radio o
TV para obtener asesoramiento.
Nota:
Con este equipo debe utilizarse un cable de interfaz
Español
blindada con núcleos de ferrita instalado en el extremo del
conector del escáner.
Advertencia de la FCC:
Con el fin de asegurar la
conformidad con el reglamento, cualquier cambio o
modificación en el dispositivo que no esté expresamente
aprobado por la parte responsable de garantizar la conformidad
puede anular el derecho del usuario a utilizarlo.
Producto: El escáner Polaroid SprintScan 4000
Distribuido por: Polaroid Corporation, Cambridge, MA 02139
EE.UU. Teléfono:
1-800-432-5355
Este dispositivo cumple con la sección 15 del Reglamento de la
FCC. Su funcionamiento está sujeto a las dos condiciones
siguientes: (1) Este dispositivo no puede producir interferencias
perjudiciales y (2) este dispositivo debe aceptar las interferencias
que reciba, incluyendo aquellas que ocasionasen un
funcionamiento no deseado.
© Copyright Polaroid Corporation, 1999. Reservados todos los derechos.
“Polaroid” y “SprintScan” son marcas comerciales de Polaroid Corporation,
Cambridge,
comerciales de sus respectivos propietarios.
PN 100165A (PE 20008Q-1
MA, EE.UU. El nombre del resto de los productos son marcas
)
43
Page 44

Page 45

Configuration requise
Macintosh
• Ordinateur Apple Macintosh ou PowerBook doté d'un
processeur Power PC ou supérieur
• 32 Mo de RAM
• 40 Mo d'espace disque disponible
• Système d'exploitation Macintosh 7.5 ou ultérieur
PC
• PC IBM ou compatible doté des processeurs de la gamme
Pentium
• 32 Mo de RAM
• 40 Mo d'espace disque disponible
• Système d'exploitation Microsoft Windows 95, Windows NT
ou Windows 98
• Adaptateur hôte SCSI compatible avec l'interface ASPI et
pilotes Windows appropriés
Français
45
Page 46

1
Déballage du coffret
Assurez-vous qu'il ne manque aucun des éléments répertoriés cidessous. A défaut, ou si un élément est endommagé, contactez
votre revendeur.
1
567
234
1
scanner
2
cordon d'alimentation (plusieurs cordons sont fournis en
fonction des différentes sources d'alimentation)
passe-vues pour négatifs
3
porte-diapositives
4
kit d'installation de l'adaptateur hôte SCSI Windows (en
5
option ; contactez votre revendeur)
6
câble SCSI doté de deux connecteurs de 25 et 50 broches
7
CD-ROM du logiciel PolaColor Insight contenant :
•
le logiciel PolaColor Insight pour Windows 95, 98 et NT
•
le logiciel PolaColor Insight pour les systèmes Power MAC et
Power PC ainsi qu'un module externe Adobe Photoshop
•
le guide de l'utilisateur en ligne
Avertissement :
Aucune pièce interne du scanner ne peut être
manipulée par l'utilisateur. Ne démontez pas le scanner sous peine
de l'endommager et de vous exposer à de sérieux risques de
décharges électriques. Dans l'éventualité d'une telle intervention,
votre garantie risque d'être annulée. Dans le cas d'un
dysfonctionnement,
technique de Polaroid. (Pour contacter Polaroid aux Etats-Unis,
composez le
1-800-432-5355
vous à la section
ligne ou visitez notre site Web à l'adresse
contactez votre revendeur ou le support
. En dehors des Etats-Unis, reportez-
Pour obtenir de l'aide
du guide de l'utilisateur en
www.polaroid.com
.)
Français
46
Page 47

Emplacement du scanner
2
Placez le scanner sur une surface de travail suffisamment élevée.
Laissez assez d'espace à l'avant et à l'arrière du scanner pour le
passe-vues (voir illustration).
16 cm
36 cm
Français
47
Page 48

Installation du logiciel
3
Allumez l'ordinateur.
1
2
Fermez les applications en cours le cas échéant.
3
Insérez le CD-ROM Polaroid PolaColor Insight dans le
lecteur.
Power Mac ou Power PC Windows 95, 98 ou NT
4
Retirez le CD-ROM du lecteur.
1
Sélectionnez le
programme d'installation
Polaroid PolaColor
Insight Installer.
2
Suivez les instructions à
l'écran.
3
Pour installer le module
externe Photoshop,
cliquez deux fois sur le
programme d'installation
du module (Plug In
Installer) situé dans le
dossier PolaColor
Insight, puis suivez les
instructions à l'écran.
1
Le programme
d'installation doit
normalement démarrer
automatiquement après
quelques secondes.
A défaut, sélectionnez la
commande Exécuter à
partir du menu
Démarrer. Cliquez sur
Parcourir, puis
sélectionnez le fichier
SETUP.EXE du CDROM. Cliquez sur OK.
2
Suivez les instructions à
l'écran.
Français
48
Page 49

Connexion du scanner à
4
l'ordinateur
Le scanner SprintScan 4000 doit être connecté à l'ordinateur via
un adaptateur hôte SCSI. Si votre ordinateur n'est pas doté d'un
tel adaptateur, vous devez l'installer (voir page 57). Si votre
ordinateur est compatible PC mais que l'adaptateur SCSI est
connecté à un disque dur ou à un lecteur de CD-ROM, il est
recommandé d'installer un second adaptateur.
Définition de l'adresse SCSI du scanner :
A chaque périphérique connecté à un adaptateur hôte SCSI
correspond une adresse unique de 0 à 6. Pour qu'une adresse
spécifique soit associée au scanner, définissez les adresses des
autres périphériques SCSI.
Français
Power Mac ou Power PC Windows 95, 98 ou NT
1
Lancez l'application Apple
System Profiler située en
principe dans le menu
Pomme. Si ce programme
n'est pas disponible, il peut
être téléchargé à partir de
l'adresse suivante :
www.apple.com/swupdates.
2
Cliquez sur Volumes et
Périphériques pour afficher
les adresses des
périphériques SCSI.
Vérifiez le commutateur
d'adressage de chaque
périphérique SCSI connecté
au système. Si nécessaire,
consultez les instructions
fournies avec les
périphériques.
49
Page 50

Assurez-vous que le scanner n'est pas sous tension et réglez le
commutateur d'adressage sur une valeur qui n'est pas utilisée par
un autre périphérique.
Connexion des câbles SCSI :
Placez le scanner en fin de chaîne SCSI ou entre l'ordinateur et les
autres périphériques SCSI, comme illustré dans les schémas ciaprès. Utilisez des câbles le plus court possible.
Commutateur
d'adressage
SCSI
N'utilisez pas les
valeurs 7, 8 ou 9
(adresses non
valides)
Remarque :
changez pas sauf si un autre
L'adresse est prédéfinie sur la valeur 6. Ne la
périphérique utilise cette même
valeur. Les autres adresses les plus courantes sont 2, 4 et 5.
Remarque :
Eteignez l'ordinateur, le scanner et les autres
périphériques SCSI avant de connecter ou de déconnecter les
câbles. Ne raccordez pas le scanner au connecteur parallèle de
l'ordinateur car vous risqueriez d'endommager le scanner ou
l'ordinateur.
Français
50
Page 51

Français
51
Ordinateur
broches
Ordinateur
50 broches25 broches
25
50
broches25broches
Autre périphérique SCSI
(terminaison désactivée)
Scanner
(terminaison activée)
50
broches
Scanner
(terminaison activée)
broches
Ordinateur
25
50
broches
(terminaison
désactivée)
25
broches
Scanner
50
broches
Autre périphérique
SCSI (terminaison)
Vous devrez peut-être utiliser des câbles ou des adaptateurs
supplémentaires pour connecter le scanner. Le câble doit être
muni d'un connecteur Centronics M ou DB-25 M de 25 broches à
l'une de ses extrémités et doit être le plus court possible. Pour
savoir quel connecteur utiliser pour l'adaptateur SCSI, reportezvous aux instructions fournies avec l'adaptateur.
Page 52
Définition de la terminaison :
Connecteur SCSI
Centronics F 50
broches
Connecteur SCSI
DB-25 F
Définissez la terminaison du scanner et des autres périphériques
SCSI comme illustré dans le schéma approprié de la section
précédente. La terminaison du dernier périphérique de la chaîne
SCSI doit être activée tandis que celle des autres périphériques
doit être désactivée.
Commutateur de
terminaison
Les instructions relatives à la terminaison des autres
périphériques SCSI sont fournies avec ces derniers.
Français
52
Page 53

Français
53
Branchement et mise sous
5
tension du scanner
1
Branchez le câble d'alimentation comme illustré ci-dessous.
Ver s
prise
2
Pour allumer le scanner, appuyez sur le bouton
d'alimentation (a). Vérifiez les voyants lumineux (b).
Le voyant vert indique la mise sous tension. Le voyant jaune
clignote pendant l'initialisation du scanner, puis reste fixe
lorsque le scanner est prêt (il clignote également lors de la
numérisation).
Allumez l'ordinateur.
3
4
Attendez que le système installe le pilote du scanner et affiche
le bureau normal.
a
b
Page 54

Prévisualisation d'une image
6
avant sa numérisation
Insérez un négatif dans le passe-vues (a) ou placez des
1
diapositives dans le porte-diapositives (b). Le côté du négatif
sur lequel a été appliquée l'émulsion (côté mat) doit être
orienté vers le bas.
a
2
Le porte-diapositives doit être inséré flèches vers le haut en
direction du scanner. Faites-le coulisser doucement dans le
scanner jusqu'à ce que le voyant jaune s'allume.
3
Lancez le programme PolaColor Insight :
Power Mac ou Power PC Windows 95, 98 ou NT
Cliquez deux fois sur
PolaColor Insight.
Pour lancer le module
externe Photoshop à partir
d'une autre application,
cliquez sur la commande
Importer du menu Fichier
de l'application, puis
sélectionnez PolaColor
b
Insight.
4
Sélectionnez le type de diapositive ou de négatif à numériser
à partir de la liste déroulante Entrée du volet Prévisualisation.
5
Sélectionnez le type de moniteur à partir de la liste
déroulante Affichage.
Entrez ou sélectionnez le numéro de l'image à numériser
6
dans la zone Numéro d'image.
7
Cliquez sur Prévisualiser.
L'image apparaît dans le volet de prévisualisation.
Cliquez sur la
1
commande Programmes
du menu Démarrer.
Pointez le curseur sur
2
Polaroid PolaColor
Insight, puis
sélectionnez PolaColor
Insight.
Français
54
Page 55

7
Retouche et numérisation de l'image
Suivez les instructions du guide d'utilisation en ligne pour
rehausser l'image et la numériser.
Français
55
Consultation du
Power Mac ou Power PC Windows 95, 98 ou NT
Cliquez deux fois sur
1
PolaColor Insight pour
lancer le programme
PolaColor Insight.
Cliquez sur Aide de
2
PolaColor Insight à
partir du menu Aide.
Guide de l'utilisateur PolaColor Insight
Cliquez sur la
1
commande Programmes
du menu Démarrer de
Windows.
Pointez le curseur sur
2
Polaroid PolaColor
Insight, puis cliquez sur
Guide de l'utilisateur
en ligne :
.
Page 56

8
Retrait du passe-vues ou du porte-diapositives du scanner
Cliquez sur la commande Ejecter le film du menu Scanner.
Français
56
Page 57

Français
57
Installation d'un adaptateur hôte SCSI
Le scanner SprintScan 4000 doit être connecté à l'ordinateur via
un adaptateur hôte SCSI. La plupart des ordinateurs Macintosh
sont dotés d'un adaptateur SCSI contrairement aux ordinateurs
compatibles PC IBM.
Si vous devez installer un adaptateur SCSI, éteignez l'ordinateur
et suivez les instructions fournies avec l'adaptateur. (Cette
procédure inclut généralement l'installation du logiciel. Si votre
ordinateur utilise le système d'exploitation Windows NT,
connectez-vous en tant qu'administrateur avant de procéder à
l'installation.)
Remarque :
option avec la version Windows du scanner. Si nécessaire,
procurez-vous un adaptateur auprès de votre revendeur
informatique (les adaptateurs ne sont pas disponibles pour les
ordinateurs iMac).
Un adaptateur hôte SCSI est peut-être fourni en
Garantie limitée
Polaroid Corporation garantit le scanner SprintScan 4000 contre
tout défaut de fabrication pour une période d'un an à compter de
la date d'achat. Pour vérifier la période de garantie, conservez la
facture, la note ou toute autre preuve de la date d'achat.
Si ce produit ou l'un de ses composants ou accessoires
(à l'exception du logiciel) s'avérait défectueux au cours de la
période de garantie, Polaroid Corporation s'engage, à sa
discrétion, à le remplacer ou le réparer à ses propres frais.
Cette garantie ne couvre pas les dommages provoqués dans les
cas suivants : accident, installation incorrecte, modification non
autorisée, utilisation incorrecte ou abus d'utilisation. Toute
réparation entrant dans le cadre de tels dommages sera facturée.
Cette garantie exclut tous les dommages indirects. Certaines
juridictions n'autorisant pas l'exclusion ou la limitation des
dommages indirects, il est donc possible que l'exclusion
susmentionnée ne s'applique pas à votre cas.
Page 58

Interférences radio et télévisuelles
Avis de la FCC (Etats-Unis)
Remarque :
normes relatives au matériel informatique de la classe B, fixées
par l'article 15 des règlements de la FCC, destinées à assurer une
protection suffisante contre les interférences dans une installation
domestique. Cet équipement génère et utilise des fréquences
radio qui, en cas d'utilisation et d'installation incorrectes, peuvent
être à l'origine d'interférences dans la réception radio et
télévision. Toutefois, rien ne garantit qu'il n'y aura pas
d'interférences. Si elles se produisent, il est possible de déterminer
si elles sont dues au matériel en éteignant et en rallumant
l'appareil, et, si c'est le cas, l'utilisateur est invité à corriger le
problème de l'une des manières suivantes :
• modifier l'orientation ou l'emplacement de l'antenne de
réception,
• éloigner l'équipement du récepteur,
• connecter l'équipement à une prise située sur un circuit
différent de celui du récepteur,
• consulter son revendeur ou un technicien radio/télévision
expérimenté.
Remarque :
blindé doté d'un noyau en ferrite.
Cet équipement a été testé et déclaré conforme aux
Le scanner doit être utilisé avec un câble d'interface
Avertissement FCC :
Tout changement ou modification de
l'unité non autorisé explicitement par la partie responsable de la
conformité risque d'annuler le droit de l'utilisateur de faire
fonctionner cet équipement.
Produit : Scanner Polaroid SprintScan 4000
Commercialisé par : Polaroid Corporation, Cambridge, MA
02139 Etats-Unis. Téléphone :
1-800-432-5355
Cet équipement est conforme à l'article 15 des règlements de la
FCC et son fonctionnement répond aux deux conditions
suivantes : (1) cet équipement ne doit pas provoquer
d'interférences et (2) doit accepter toutes les interférences reçues,
y compris celles qui risquent d'affecter son fonctionnement.
© Copyright Polaroid Corporation, 1999. Tous droits réservés.
« Polaroid » et « SprintScan » sont des marques de Polaroid Corporation,
Cambridge,
leur propriétaire respectif.
R
éf. 100165A
MA, Etats-Unis. Tous les autres noms de produits sont des marques de
(PE 20008Q-1
)
Français
58
Page 59

Requisiti del sistema
Sistemi Macintosh
• Computer Apple Macintosh o PowerBook con processore
PowerPC o superiore
• 32 MB di RAM disponibile
• 40 MB di spazio disponibile su disco fisso
• Sistema operativo Macintosh 7.5 o superiore
Sistemi PC
• PC IBM o compatibile con processore di classe Pentium
• 32 MB di RAM disponibile
• 40 MB di spazio disponibile su disco fisso
• Sistema operativo Microsoft Windows 95, Windows NT or
Windows 98
• Adattatore host SCSI ASPI compatibile e relativi driver per
Windows
Italiano
59
Page 60

1
Apertura della confezione
Verificare che la confezione contenga tutti i componenti illustrati.
Nel caso uno dei componenti non sia incluso o risulti
danneggiato, rivolgersi al rivenditore locale.
1
567
234
1
Scanner
2
Cavo di alimentazione (diverso a seconda del tipo di
alimentazione)
Supporto per negativo
3
Supporto per diapositive
4
Kit di installazione opzionale dell’adattatore host SCSI
5
(per informazioni, rivolgersi al rivenditore locale)
6
Cavo SCSI con connettori a 25 e 50 pin
7
CD del software PolaColor Insight contenente:
•
Software PolaColor Insight per Windows 95, 98 e NT
•
Software PolaColor Insight per sistemi Power MAC e Power
PC e plug-in Adobe Photoshop
•
Guida in linea dell'utente
Avvertenza:
Lo scanner non contiene componenti riparabili
dall'utente. Non smontare lo scanner per evitare di danneggiarlo o
di incorrere nel rischio di scosse elettriche. Tale operazione può
inoltre invalidare la garanzia. In caso di
malfunzionamento,
contattare l’Assistenza tecnica Polaroid o rivolgersi al rivenditore
locale. Per contattare la Polaroid negli Stati Uniti,
numero
Uniti possono consultare la sezione
Guida dell'utente o visitare il sito
1-800-432-5355
. Gli utenti che risiedono fuori dagli Stati
Come ricevere assistenza
www.polaroid.com
chiamare il
nella
.
Italiano
60
Page 61

Posizionamento dello scanner
2
Posizionare lo scanner ad un'altezza adeguata. Lasciare sufficiente
spazio davanti e dietro lo scanner per i supporti della pellicola,
come illustrato nella figura.
16 cm
36 cm
Italiano
61
Page 62

Installazione del software
3
Accendere il computer.
1
2
Chiudere tutte le applicazioni in esecuzione.
3
Inserire il CD di Polaroid PolaColor Insight nell'unità.
Power Mac o Power PC Windows 95, 98 o NT
4
Rimuovere il CD dall'unità.
1
Selezionare il programma
di installazione di
Polaroid PolaColor
Insight.
2
Attenersi alle istruzioni
visualizzate sullo schermo.
3
Se si desidera installare il
plug-in di Photoshop,
fare doppio clic sul
relativo programma di
installazione nella
cartella di PolaColor
Insight e seguire le
istruzioni visualizzate
sullo schermo.
1
Attendere l'avvio del
programma di
installazione.
Se il programma non
viene avviato,
selezionare Esegui nel
menu Avvio. Fare clic su
Sfoglia e selezionare
SETUP.EXE nel CDROM. Fare clic su OK.
2
Seguire le istruzioni
visualizzate sullo
schermo.
Italiano
62
Page 63

Italiano
63
Collegamento dello scanner al
4
computer
Lo scanner SprintScan 4000 richiede la presenza di un adattatore
host SCSI nel computer. Se il computer non è dotato di
adattatore, è necessario installarlo (vedere pagina 70). Se il
computer utilizzato è PC compatibile ed è dotato di un adattatore
SCSI, ma tale adattatore è collegato al disco fisso o ad un’unità
CD-ROM, si consiglia di installare un altro adattatore.
Impostazione dell’indirizzo SCSI dello scanner:
Ad ogni periferica collegata all’adattatore host SCSI deve essere
assegnato un indirizzo univoco da 0 a 6. Per verificare che
l’indirizzo dello scanner non sia già in uso, individuare gli
indirizzi di tutte le periferiche SCSI.
Power Mac o Power PC Windows 95, 98 o NT
1
Eseguire Apple System
Profiler, disponibile
generalmente nel menu
Apple. In alternativa, è
possibile scaricarlo dal sito
www.apple.com/swupdates.
2
Fare clic su Dispositivi e
Volumi per visualizzare
l’indirizzo delle periferiche
SCSI.
Verificare che lo scanner sia spento, quindi impostare il selettore
dell'indirizzo SCSI su un valore non utilizzato da altre periferiche.
Selettore
indirizzo
SCSI
Non utilizzare gli
indirizzi 7, 8 o 9
(non validi)
Nota:
L’indirizzo predefinito è 6. Non modificare tale indirizzo
meno che non sia già in uso. Gli altri indirizzi generalmente
disponibili sono 2, 4 e 5.
Individuare il selettore
dell’indirizzo su ciascuna
periferica SCSI collegata al
sistema. Se necessario,
consultare le istruzioni
relative alle periferiche.
a
Page 64

Collegamento dei cavi SCSI:
Posizionare lo scanner alla fine della catena SCSI o in una
posizione intermedia tra il computer e le altre periferiche SCSI,
come indicato nei diagrammi riportati di seguito. Utilizzare cavi
di lunghezza ridotta.
Prima di collegare o scollegare i cavi, accendere il
Nota:
computer, lo scanner e le altre periferiche SCSI. Non collegare lo
scanner al connettore parallelo del computer in quanto ciò
potrebbe danneggiare lo scanner o il computer.
50 pin25 pin
25 pin
Computer
25 pin
Scanner
(terminazione
disattivata)
50 pin50 pin
Altra periferica SCSI
(terminata)
Per il collegamento dello scanner, è possibile che siano necessari
altri cavi o adattatori. Un'estremità del cavo deve terminare con un
connettore Centronics M o DB-25 M a 50 pin per il collegamento
dello scanner e il cavo deve essere di lunghezza ridotta. Per
individuare il connettore richiesto per il collegamento
dell'adattatore SCSI, consultare il manuale fornito con l'adattatore.
Computer
Computer
Altra periferica SCSI
(non terminata)
Scanner
(terminazione attivata)
50 pin50 pin 25 pin25 pin
Scanner
(terminazione attivata)
Italiano
64
Page 65

Impostazione della terminazione:
Connettore SCSI
Centronics F a
50 pin
DB-25 F
Connettore SCSI
Impostare la terminazione dello scanner e tutte le altre periferiche
SCSI come indicato nel diagramma riportato nella sezione
precedente. Solo l’ultima periferica della catena SCSI deve essere
terminata o avere la terminazione attivata.
Interruttore
terminazione
Per istruzioni sulla terminazione delle altre periferiche SCSI,
consultare la relativa documentazione.
Italiano
65
Page 66

Collegamento dello scanner a
5
una presa di alimentazione CA
1
Collegare il cavo di alimentazione come illustrato di seguito.
Collegare
alla presa di
alimentazione CA
Accendere lo scanner premendo il pulsante di accensione (a).
2
Controllare i LED (b).
a
b
Il LED verde indica che lo scanner è acceso. Il LED giallo
lampeggia durante la fase di inizializzazione dello scanner
mentre rimane fisso quando lo scanner è pronto. Il LED
giallo lampeggia anche durante la scansione.
Accendere il computer.
3
4
Attendere l’installazione del driver dello scanner e la
visualizzazione del desktop.
Italiano
66
Page 67

Anteprima e scansione di
6
3
Avviare il programma PolaColor Insight:
Italiano
67
un'immagine
1
Caricare un negativo o delle diapositive nel rispettivo
supporto (a) o (b). Il lato di emulsione (opaco) della
pellicola deve essere rivolto verso il basso.
a
2
Orientare il supporto verso lo scanner, con le frecce rivolte
verso l'alto. Inserire con cautela il supporto nello scanner
fino a che il LED giallo non si spegne.
Power Mac o Power PC Windows 95, 98 o NT
Fare doppio clic su
PolaColor Insight.
Per avviare il plug-in di
Photoshop da un'altra
applicazione, selezionare il
comando Importa nel
menu File
dell'applicazione, quindi
b
selezionare PolaColor
Insight.
4
Selezionare il tipo di diapositiva o negativo da sottoporre a
scansione nell'elenco Input della scheda Anteprima.
5
Selezionare il tipo di monitor nell'elenco Schermo.
Nella casella Numero riquadro, digitare o selezionare il
6
numero di riquadri che si desidera sottoporre a scansione.
7
Fare clic su Anteprima.
L'immagine viene visualizzata nella scheda Anteprima.
1
Selezionare Programmi
nel menu Avvio.
2
Scegliere Polaroid
PolaColor Insight,
quindi PolaColor
Insight.
Page 68

7
Miglioramento e scansione
finale dell'immagine
Per migliorare l'immagine ed eseguire la scansione finale,
attenersi alle istruzioni riportate nella Guida dell'utente.
Visualizzare la
Power Mac o Power PC Windows 95, 98 o NT
Fare doppio clic su
1
PolaColor Insight per
avviare il programma.
2
Nel menu di aiuto,
selezionare la Guida in
linea di PolaColor
Insight.
Guida dell'utente di PolaColor Insight
Selezionare Programmi
1
nel menu Avvio di
Windows.
2
Scegliere Polaroid
PolaColor Insight e
selezionare
dell'utente
Guida
.
:
Italiano
68
Page 69

8
Rimozione del supporto dallo scanner
Nel menu Scanner, selezionare Espelli pellicola.
Italiano
69
Page 70

Installazione di un adattatore host SCSI
Garanzia limitata
Lo scanner SprintScan 4000 si collega ad un adattatore host SCSI
del computer. Al contrario dei computer IBM PC compatibili, la
maggior parte dei computer Macintosh è dotata di un adattatore
SCSI incorporato.
Se è necessario installare un adattatore SCSI, spegnere il
computer e attenersi alle istruzioni fornite dalla casa produttrice
dell’adattatore. Tale procedura include generalmente
l’installazione del software. Se il PC utilizza il sistema operativo
Windows NT, collegarsi come amministratore prima di procedere
all'installazione.
Nota:
L’adattatore host SCSI è disponibile come opzione nella
versione per Windows dello scanner. Se necessario, acquistare
l’adattatore presso il rivenditore di computer. Gli adattatori non
sono disponibili per computer iMac.
La Polaroid Corporation garantisce, per un periodo di un anno a
partire dalla data di acquisto, che lo scanner SprintScan 4000 è
privo di difetti di materiale e fabbricazione. Per verificare il
periodo di garanzia, conservare la fattura, lo scontrino o altra
prova della data di acquisto.
Nel caso in cui questo prodotto o qualsiasi componente o
accessorio dello stesso, ad eccezione del software, risultasse
difettoso, la Polaroid Corporation potrà a sua discrezione
sostituirlo o ripararlo durante il periodo di garanzia senza alcun
costo per il cliente.
La presente garanzia non è valida per danni al prodotto dovuti a
incidenti, installazione errata, modifica non autorizzata, uso
erroneo o improprio, per i quali sono previste spese di
riparazione.
La presente garanzia esclude tutti i danni consequenziali. Nelle
giurisdizioni in cui l'esclusione o la limitazione di danni
consequenziali non è consentita, quanto sopra potrebbe non
essere valido.
Italiano
70
Page 71

Interferenze radiotelevisive
Notifica FCC (U.S.A.)
Nota:
Questa apparecchiatura è stata collaudata ed è risultata
conforme ai limiti stabiliti per i dispositivi digitali di Classe B, ai
sensi della parte 15 delle norme FCC. Tali limiti sono stati stabiliti
per fornire ragionevole protezione contro interferenze dannose in
caso di installazione del dispositivo in ambiente residenziale.
Questa apparecchiatura genera, utilizza e può irradiare energia in
radiofrequenza e, se non installata e utilizzata secondo le
istruzioni, può causare interferenze dannose alle comunicazioni
radio. Tuttavia, non vi è alcuna garanzia che una particolare
installazione non provochi interferenze. Qualora il dispositivo
causi interferenze dannose alla ricezione radiofonica e televisiva,
verificabile accendendo o spegnendo l'apparecchiatura, l'utente
potrà tentare di eliminare l'interferenza adottando le misure
seguenti:
• Riorientare l'antenna di ricezione.
• Aumentare la distanza tra l'apparecchiatura e il ricevitore.
• Collegare l'apparecchiatura a una presa di corrente
appartenente a un circuito diverso da quello a cui è collegato
il ricevitore.
• Consultare il rivenditore o un tecnico televisivo qualificato.
Nota:
È necessario utilizzare con l'apparecchiatura un cavo di
Italiano
interfaccia schermato con nucleo in ferrite all'estremità del
connettore dello scanner.
Avvertenza FCC:
Eventuali modifiche non espressamente
approvate dalla casa produttrice o da chi provvede alla
registrazione dell'apparecchiatura possono invalidare il diritto
all'utilizzo della suddetta ai sensi delle norme FCC.
Prodotto: Scanner Polaroid SprintScan 4000
Distribuito da: Polaroid Corporation, Cambridge, MA 02139
U.S.A. Numero telefonico:
1-800-432-5355
Questa apparecchiatura è conforme alla Parte 15 delle normative
FCC. Il funzionamento del dispositivo è soggetto alle due
considerazioni seguenti: (1) non può provocare interferenze
dannose e (2) dovrà accettare eventuali interferenze ivi comprese
quelle che potrebbero determinare un funzionamento non
corretto.
© Copyright Polaroid Corporation, 1999. Tutti i diritti riservati.
“Polaroid” e “SprintScan” sono marchi di Polaroid Corporation, Cambridge,
U.S.A. I nomi di tutti gli altri prodotti sono marchi dei rispettivi proprietari.
N/P 100165A (PE 20008Q-1
)
MA,
71
Page 72

PE-20008Q-1 4/99
 Loading...