

Page 1
Page 2

S
P
E C
T R
A
S
EI
Page 3
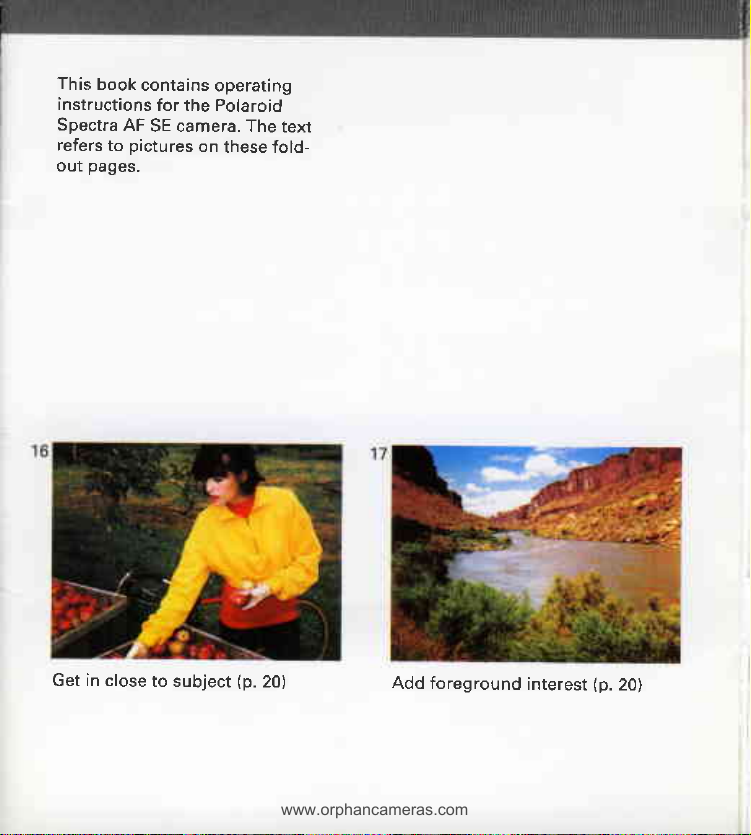
This
www.orphancameras.com
book
contains
instructions
Spectra
refers
out
AF
pictures
to
pages.
SE camera. The
operating
for the Polaroid
on
these fold-
text
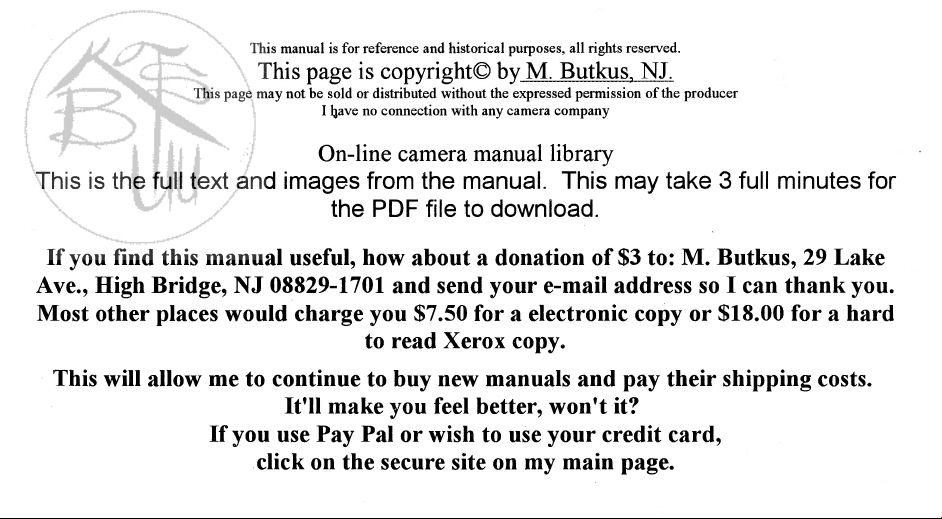
Get in close
to subject
(p.
20)
Add foreground
interest
(p.
20)
Page 4
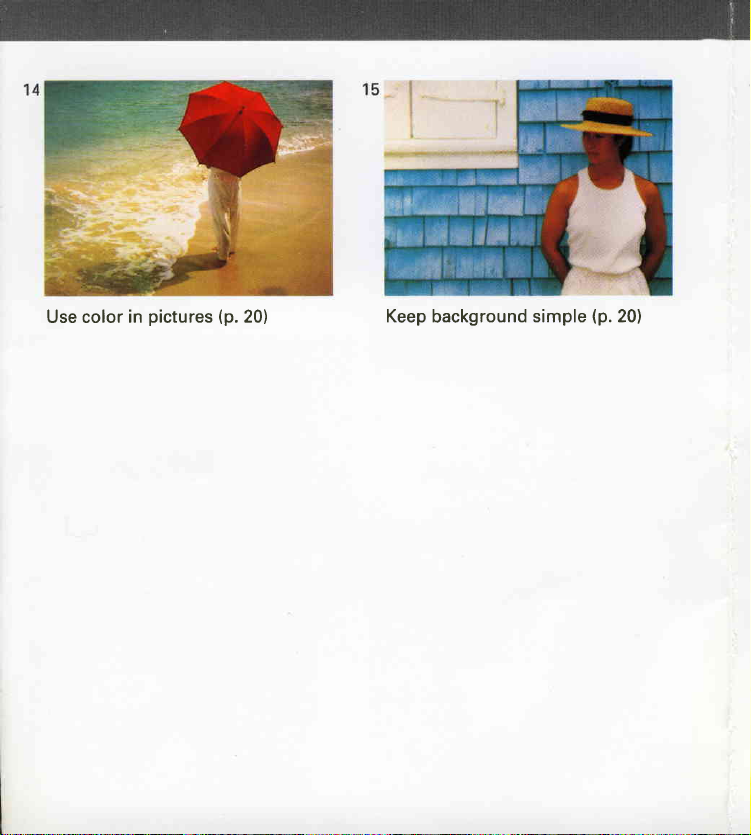
Use color
pictures
in
(p.
20)
Keep
background
simple
(p.20)
Page 5
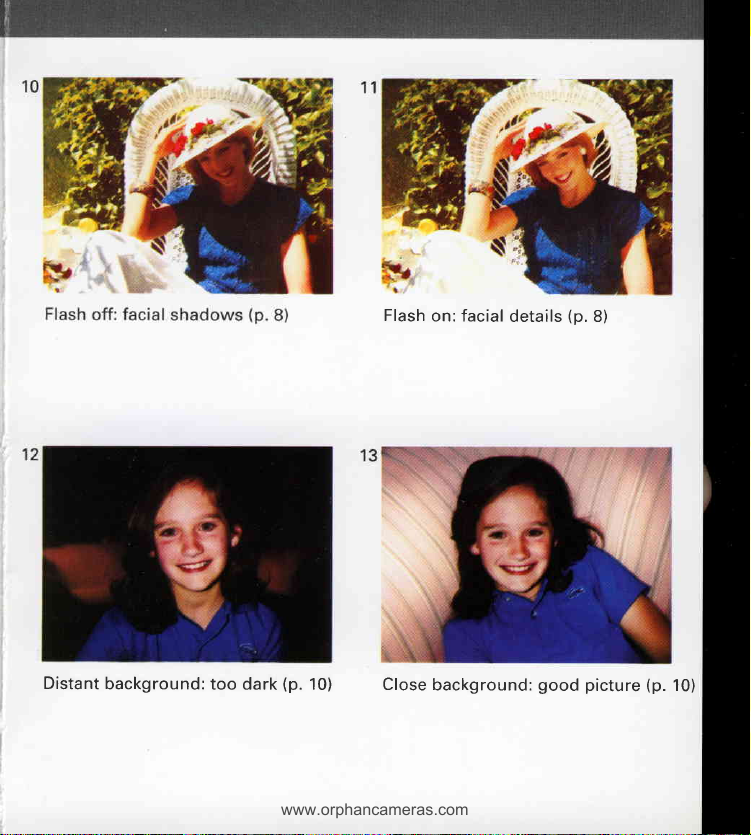
Flash
www.orphancameras.com
on: facial
details
(p.
8)
Distant
background:
too dark
(p.
10)
Close
background:
good picture
1p.
10)
Page 6
Page 7
www.orphancameras.com
Page 8
Page 9
IMPORTANT
www.orphancameras.com
SAFEGUARDS
As
with
any
these
basic
battery
safety
operated
precautions:
equipment,
observe
1 FOLLOW
2
CLOSELY
BEING
DO
3
DROPPED
BEEN
POLAROID
4 TO
DO
OR REPAIR
AN
CENTER. INCORRECT
CAUSE ELECTRICAL
IS USED
WATER
PLEASE
ALL
OF THESE
SUPERVISE
USED BY
NOT
USE
OR DAMAGED
EXAMINED
AVOID
NOT
DISASSEMBLE
AUTHORIZED
AGAIN.
OR
OR NEAR
CAMERA
AT
SERVICE
ELECTRICAL
WORK
POLAROID
DO
OTHER FLUIDS.
INSTRUCTIONS.
CAMERA
IF IT
-
AN
AUTHORIZED
CENTER.
SHOCK
CAMERA.
MUST
BE DONE
REASSEMBLY
SHOCK
NOT IMMERSE
KEEP
WHEN
CHILDREN.
HAS
UNTIL IT HAS
HAZARDS,
SERVICE
WHEN
THESE
INSTRUCTIONS
IT IS
BEEN
SERVICE
ONLY BY
CAN
CAMERA
IN
Page 10

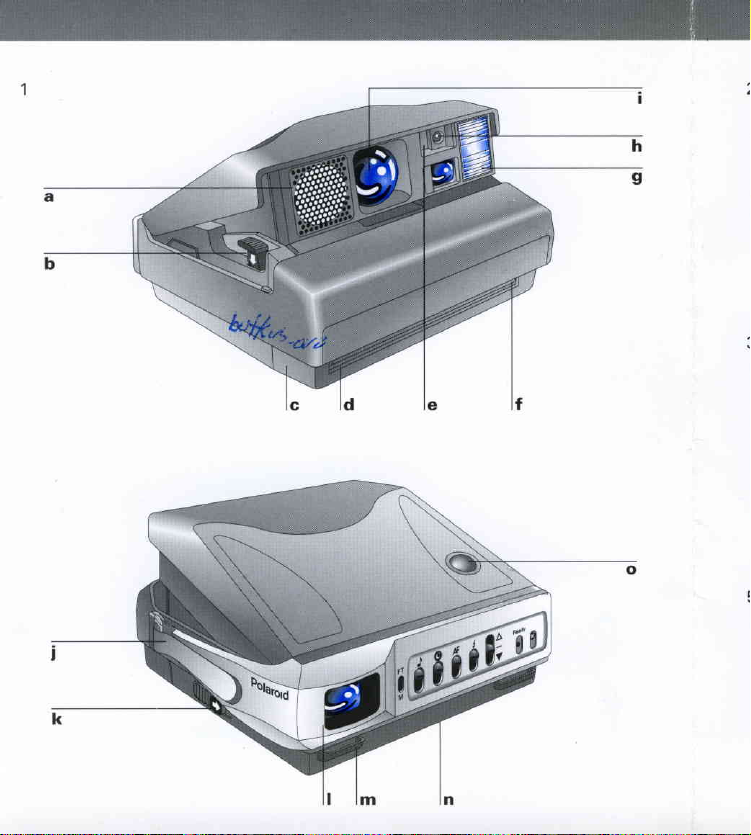
The
camera
The
The
camera
control
panel
2
3
Using the camera
C C
9
tr
g
Features AF
EE
AV
o
AF'
a6
to better
Guide
pictures
?
m
Open the camera
Check the control
Load
Position
Take
To remove
The
The
The
The recharge
Flash ra nge
t
The exposu
The
Photographing through
Lens ca
Pictu re ca
Film care
For
Full lifetime warranty
Troubleshooting
copy
Picture-taking tips
Cam era,
film
the
your
subject
picture
the
empty
an
re
re
re
system
indicator
control
autofocus
viewfinder
programmed
self timer
information
service
film specifications
pa
nel
film
displays
flash
help
and
guide
pack
glass
4
4
4
4
5
5
6
7
8
8
9,
9
11
12
back
Page 11

The
www.orphancameras.com
camera
(picture
1)
a Sonar rangefinder
(sends
out sound waves
measure
to
your
to
Film
b
Film
c
Film
d
Photocell-silicon
e
todiodes
light from
light from
indoors
f Film
picture
the
it
exits the
g
Programmed
h
Self-timer indicator
i Patented
(g
lass-coated,
ment
zone
(.6m)
feet
j
Hand
the distance
subject).
release
door
door
exit
slot
(measures
the
scene and
flash,
the
and outdoors).
(protects
shade
from light
camera).
flash
Ouintic lens
front
125mm lens).
focusing
strap
from 2
to infinity.
(adjustable).
k Release latch
I
m Neck
n Tripod
pho-
'
o Two-stage
as
ele-
Ten-
(opens
and
closes the camera).
Viewfinder
strap
(see
attachment instructions that come with neck
strap).
neath
button
restore
press
to take the
delay ejecting
hold
the shutter
down).
connector
shutter
halfway
green
rest
of the way
picture.
the
(under-
button
socket
the camera).
(press
the
the
to
lighU
To
picture,
Page 12

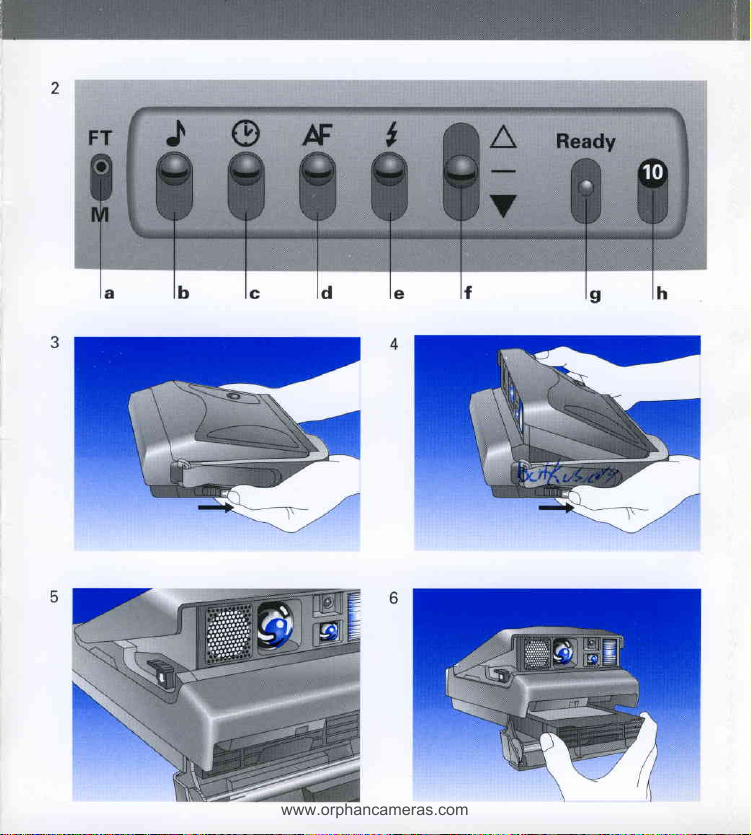
The control
(picture
T
f
2)
panel
Feet
a
tor
the tip of a ball-point
pen,
reading in the viewfinder
will
Audio
b
(slide
want
warning tone, beeps, or
chimes).
Self-timer switch
c
(slide
your
Sonar autofocus o.ver-
d
ride
down
autofocus
Programmed
e
(slide
turn off the
meters
or
(slide
it
down using
and the distance
in meters).
be
signal switch
it
to turn off the
it down to
picture).
(slide
to turn off the
the switch down to
down
the switch
system).
flash).
when
get
flash
selec-
you
into
f Exposure control
(adjust
darken a
g
Rapid-recharge
tor= Green light
flash is
the
you
and
ture).
h Picture counter
down to show
pictures
pack).
film
lighten
it to
picture).
ready
can take a
how many
left in the
are
or
indica-
(means
fire
to
pic-
(counts
,,,M
o"6'"
Page 13

Open
www.orphancameras.com
(pictures
1
the
3, 4)
camera
Place
both hands
release latch
the
automatically.
To close the
ished
using the camera, close it to
Hold
the camera as shown.
Push
back.
under the camera as shown. Slide
back. The
camera
both sides of the
camera
(picture
Slide the
will
open
4): When
cover down until
you
have fin-
protect
the
release latch
lens.
it locks.
Check the
control
Load
(pictures
Position
panel
the film
5 & 6)
your
subject
you
When
sure all the
Note: When the
mode,
self-timer) visible on the
Use
Polaroid
Push
open.
all the
You
both indoors and
feet
Indoors:
(.6m
ject
Outdoors: Your
away from
want the
switches are
is a red
there
Polaroid
only
films
film
the
Hold
the film
way
into
can take the most
(.9m
to
Your
4.6m)
to
should also
the camera.
camera to be
switches are not in the
mark
Spectra color film.
cannot be used
door release
pack
the camera.
outdoors,
1.5m)
away.
subject should
flash range. For
near a light-colored
be
subject
fully
automatic,
in
a row as shown in
(or
green
panel.
with
down.
by its edges only and
pleasing pictures
when
within
be
best
should be at
automatic
symbol
Other
this camera.
The film
they are 3 to
door will
the 2 to
results,
background.
least
2 feet
picture
for
people,
of
15
your
be
the
slide
5
foot
sub-
(.6m)
2.
it
,l
Page 14

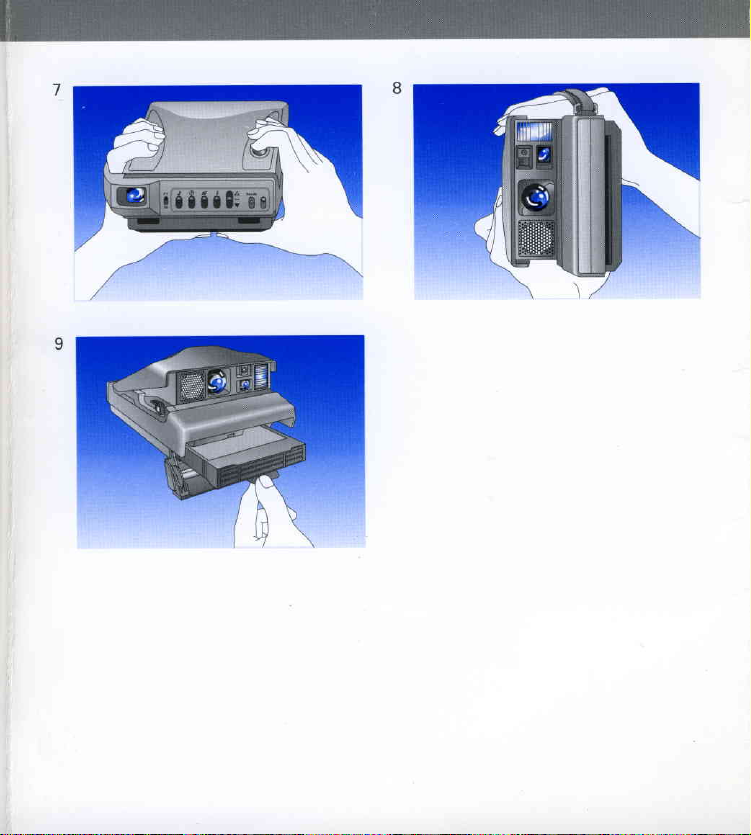
Take
the
(pictures
picture
7,8)
your
Slide
hold
For horizontal
picture
with the flash
best
left
the camera
7. For
results.
hand
through
you
as
pictures,
vertical
on top as
pictures,
the hand
would
hold
the camera
position
shown in
pair
a
picture
strap
and
of
binoculars.
as
shown in
the
camera
get
8 to
the
ki
To remove
pack
film
an empty
(pictures
5 & 9)
you
After
sets to zero
remove
Push
Pull
When
You will
camera
You
zero in
shutter
take
the
the film
the blue
the camera
hear
will hear
the viewfinder
button halfway
the tenth
and
three
chimes
empty film
door release
tab to remove
three
three chimes
pack.
contains
chimes when
when
picture,
the
sound to remind
down
to open
film
the
an empty film
you
and
then see a flashing
you press
picture
the film
pack.
open
and hold
counter
pack:
the
you
the
to
door.
Page 15

The
www.orphancameras.com
autofocus system As
press
you
waves
sound
the central
in
white,
see illustration).
The
sound waves
person
the
is
that
closest
A
built-in
provide
The
ject.
vents
lens
be clear
When
everyone
When
focus
the correct lens
sound waves
lf
an
the
will focus
and
photographing
taking a
system.
the
shutter button,
-
within
10
thousandths
part
of the
scene
are used
or
computer
object
sound waves from
in focus.
the
(in
object
to the camera.
on that object,
same distance from
picture
the central
then uses
setting,
must have
(candlestick,
more
through
your
camera
(approximate
measure
to
this
a
centerpiece,
reaching
and
than
of a second
part
measurement
so be sure
path
clear
your
your
person, place
one
the
camera.
glass,
turn off the auto-
sends
-
area circled
the distance
of the scene)
to
that:
your
to
etc.)
subject
sub-
pre-
subject,
will
to
to
the
not
Page 16

viewfinder
The
displays
good picture
The
symbol
you
When
the shutter
viewfinder to
When
the distance
number
dations
When
conditions
shutter
When
hear a warning
before
help
The number
shutter
ject.
have
button
you
see a
will
throughout
you
see a
are
button
you
see
taking
you
identify the
button and
to
help
1: Your subject
a film
help
number
your
you
green
right
the
flashing
a
tone,
picture.
the
pack
in the camera
halfway,
you
this
for taking a
rest of the
stand
a display
take the
subject
follow the distance
"good picture"
you
problem.
best
viewfinder,
in the
(in
feet
book.
good
way.
yellow
"caution"
should
The distance
at
correct a
When
is
too
least 2feet
appears
possible
meters).
or
symbol,
picture.
reading
you
close.
(.6m)
press
and
in the
picture.
you
it tells
This
recommen-
the
Press the
symbol
problem
will
see:
Release the
from sub-
and
"t
number from
A
range.
flash
your
er to
4.6m) flash
to
A number
the
Slide
on.
back
Distance
Note:
ject
is beyond
20: Your subject
16 to
Release the shutter
keep within
subject
from 2to
flash switch up
to
range.
15: The flash
readings
feet
20
do
(6.2m).
to turn
not appear
is
beyond
button and
the 2 to
the
15
is off.
flash
when
the
move clos-
(.6m
foot
t
@
your
sub-
Page 17

programmed
www.orphancameras.com
The
(pictures
The
recharge
indicator
10,
11)
flash
Every
doors,
with
for
the
In
the
flash
facia
You r
amount
details
The Polaroid
with
green
flash
Load
Take
Press
Open
you
time
your
just
enough
best
sample
(picture
I
shadows.
camera
of flash
(picture
recharge
light
on
will
automatically
film
into
picture
a
the
shutter
the
camera
take
camera
flash
possible
outdoor
10),
bright
blends
to
soften
1 1).
Spectra
times
the
control
the
camera
button
picture,
a
blends
provide
to
picture.
scene,
sunlight
sunlight
shadows
features
usually
panel
begin
halfway
indoors
light
photographed
with
a
less
to charge
from
the
the right
has
created
just
and reveal
rapid
recharge
than
a
will
come
or
the right
every
out-
scene
lighting
without
harsh
facial
flash
second. The
on
and
the
you:
time
Ready&
when
fire.
you
lf
gone
turn
green
the
The
light
want
to
off, lightly
green
the
will
take
press
light
light
comes
stay
picture
a
and release
back
on fo r
on.
on,
20
after
the flash
to
30
seconds.
green
the
the
shutter
is ready
light
has
button
to
to
Page 18

Flash
range
4.6m)
away.
Your subject
from the
Indoors:
to
Outdoors:
(.6m)
should
camera.
Your subject
be
should
2to
be at
15 feet
2 feet
least
(.6m
The exposure
,/\
V
ffi
hten
a lig
/\
V
ffi
rken
bda
ffi:
c center
control
picture
the
Use
picture
When
Slide
When
Slide
Any
The control
direction.
After
get
Special
Pictures taken
snow
set the
before
to
retaking
control
the
retaking a
control
the
partial
you
return
to
scenes
control
king th
ta
make
adjustments
must be
have
situations
control
it lighter
picture
a
all the
picture
the
all
adjusted
finished
the control
people
of
turn
often
way up to
the
all
is
type
you
when
or darker.
make
to
way uP
make
to
way down
not
will
all
the
taking
normal
to the
highly
in
out too
pictu
of
re.
want to
it lighter:
(a).
it
darker:
(b).
your
affect
way
the
picture,
position
reflective
You
dark.
lighten setting
the
retake
exposure.
in
either
not
do
(c).
beach
want
may
a
for-
or
to
(a)
*fs'
Page 19

Backgrounds
www.orphancameras.com
(pictures
1
2, 131
B:
too
dark?
lf
the
background
your
subject
background
Moving
correct
is
Retake
ground
to
the
this
in
the normal
the
and
4.6m)
flash
picture,
of
is
well
illuminated
is
too
far
control
problem,
to
position.
placing
keeping
range
picture
a flash
away.
the lighten
so
be
sure
your
both
within
(picture
13).
is
too
(picture
setting
the
exposure
subject
th e 2
to ls foot
dark
12),
will
near
but
the
not
control
a
back-
(.6m
Page 20

The
self-timer
o
@
ffi
b
o
@
The
self-timer
To
use this
other steady support.
table tripod, be sure the
of the tripod's
your picture
Frame
shutter button
"good
pictu
button.
Slide the self-timer switch
now have 12
During
you
camera.
Two
red light will
steady signal
After
film
the
not
you
lf
switch
Note:
circle
first
the
will
see a
seconds before the camera
the camera
until
close the
want
(c)
up
When
visible
you get
lets
feature,
re"
to stop the
place
you
lf
camera
legs for
halfway
seconds to
flashing red light
stay
to
you
camera before
to turn off the timer.
the self-timer switch
in
the control
proper
in
the
to be
sym bol.
10
remind
Then release
get
seconds,
on and the beeps
you
has
taken the
the self-timer switch up
slide
12-second
your picture.
into
the camera
attach the
positioned
is
support.
viewfinder
you get
sure
way
all the
your picture.
into
the camera
(b)
on the
takes the
will
hold
to
panel.
still and smile.
picture,
you
slide the switch
countdown, slide the
is on there
on
a tripod
camera
over one
press
and
green
the
the sh utter
(a).
down
will
beep and
front
picture,
become a
it will not
is
or
a
to
the
You
of the
eject
(c).
up.
green
a
the
Do
."tt
Page 21

Photographing
www.orphancameras.com
through
AF
^-.
-
-
W
g
-
AF
^G.
GA
-
glass
,
@
b
t
ffi
d
To
reflection,
sliding both switches
When
for
ture to be taken
Be
camera and in
Frame
ter button
because the autofocus
When
the
lf
hear a warning
good pictu
lmportant
When
autofocus
up
avoid
you
distant
sure the
the
you
pictu
you
see
you
(c,
dl.
focusing
turn off the autofocus and flash
turn off the autofocus
scenes
picture
halfway
see the
re.
the
re.
have
and
(15
in
scene
daylight.
in
flashing
tone, there
finished
flash
on the
a
special
is
at
the
(you
green
systems by sliding
glass
down, as shown
feet
to infinity), requiring
way:
least
viewfinder
will
not
system is
"good
yellow
is
taking
getting
and
system, the
15 feet
(4.6m)
and
see a distance
off).
picture"
"caution"
not
enough
picture,
the
flash
a
systems by
(a,
b).
lens
sets
pic-
the
from
the
press
the
shut-
reading
symbol, take
symbol
both switches
and
light
to take a
turn on the
Page 22

Lens care
It is important to
fingerprints, breathe
or
dust
gently
with
a clean,
cone-treated
eyeglass
avoid touching
on the
facial
soft
tissues.
tissue.
lens. To remove
the
lens
and
Do not
wipe it
sili-
use
Picture
Film care
care
The development
therefore, developing
During the
picture gently.
the
disturb
development
delay ejecting
down until
the
Hold the developing
Keep
Note:
hot surfaces
For best
and
results, use
(35'C).
95"F
process
first 60 seconds
Fanning or
development
picture
as the
picture
the
can
like
protect
hood of a
the
Spectra
See
picture
film box
you
the developing
place
takes
Spectra
pictures
of development,
bending
process.
exits the
holding the
by
picture
the
its wide
by
picture
car.
film between
for more details.
inside the
be stacked.
can
handle
picture
the
Wind can also
shutter
from
white
from
55'F
You
the
border.
camera.
away
f ilm;
will
affect
can
button
wind.
(13'C)
*od'tr
Page 23

For information
www.orphancameras.com
help
and
you
lf
are
instruction
incorrect
and
before
your
see
you
and, if
return
dealer
write,
possible,
address.
unable to
book. Picture
use
you
please
get
good pictures,
problems
of the camera. lf
your
return
or contact the nearest
explain
enclose
the
sample
u.s.A.
Polaroid
784 Memorial
Cambridge, Massachusetts
Representatives
from
Tel: 1-8OO-343-5OOO
Canada
Polaroid
350 Carlingview
Rexdale,
Tel:
Toll free:
M6xico
Polaroid
Paseo
Col.
06500 M6xico, D.F.
Tel:
Resource
8 a.m.
to 8
Canada, lnc.
Ontario MgW
(416)
675-368O
800-268-6970
M6xico
de
la Reforma
de
Cuaht6moc
(O5l
70,3-1111
Center
Drive
ava i lable weekdays
p.m.,
Eastern
TDD: 1-800-448-6708
Drive
sco
(Torontol
No. 195
review
are often
you
need further
camera for repair,
nature
of the
pictures.
02 1 39-4688
time:
due to
Polaroid
problem
Include
this
help,
please
office. lf
your
Page 24

fr:
V,
v,
r
Full
U. S.
lifetime
warranty
A. offer only
lf
camera
this
option
long as
warranty options.
Your
Polaroid at the toll-free
call
Polaroid
Cambridge,
not cover damage
does
tampering
repairs.
such
warranty
This
have other
warranty
states doe
so the
ages
warranty options:
Your
Replacement You can
camera at
purchase
the
ticipating
camera.
toll-free
at the
bished
made 3-5 business
be
Repair: Call the
est authorized
weeks from the
5
3 to
The repaired camera
reimbursement of
applies
proves
replace or
either
you
own the camera
Resource Center,784
Massachusetts 01
with the
rights which
excludes all
not allow the
no
Polaroid
lf the failure
camera of
to new cameras
camera, and a charge
gives you
foregoing exclusion
charge.
you
date,
dealer and
number listed and
equal or better
number
Polaroid repair location.
your
U.S.A.
to be defective,
repair it without charge
(original
To obtain
number listed or
caused by accident,
specific
vary from state to state.
consequential damages.
exclusion of consequential
choose to
lf
failure occurs
the
return the
can
occurs after that
from
days
listed for
receipt of
returned to
will be
postage
purchased
we will,
owners only).
warranty service,
Memorial
239-4688.
rights, and
may not apply to
you
the
your
cost.
Drive,
This warranty
will be made
receive a
within 90 days
camera to any
will receive a
period,
will
we
ship
Replacement
value.
receipt
address
the
Please allow
camera
you
This warranty
in retail stores
write to the
misuse, or
you
replacement
of
for
your
at
may
call
you
your
of the
the
along
for as
See
please
for
also
This
Some
dam-
you.
par-
new
Polaroid
refur-
a
will
camera.
near-
repair.
with
a
in the
of
Page 25

Blurry
www.orphancameras.com
picture
Gause
.
When
tered
in
sound
subject
distance
ground.
subject
because
on
the
Object
vented
measuring
focuses
ing
unclear
dark
subject.
subject
waves
background.
in foreground pre-
is
not
picture,
the
pass
by the
and measure
to
the
back-
This
causes
to be
unsharp
the lens
sound
on
focuses
waves
correctly.
object,
possibly
and
caus-
cen-
the
the
the
from
Lens
Solution
.
Center
picture.
your
keep
ter, frame
the middle
viewfinder.
hold
the
halfway
rect
lens
reframe
center
and
shutter
the way.
.
The
sound
to the
central
scene.
Be
no
objects
your
subject.
the
subject in
you
Or, if
subject
your
subject
of the
Press
shutter
to lock
setting. Then
your
button
subject
press
the rest
waves
part
sure
there
in front
button
in
the
want
off
cen-
and
the cor-
off
the
travel
of the
are
of
to
in
of
.
When
low
light
etc.)
shutter
open for
seconds.
ment
can
ture
to
picture
(dusk,
as long
Camera
cause
be
blurry.
is
can
taken in
shade,
stay
as 2.8
move-
pic-
the
Hold
you
as
place
firm
the
camera
take
the
camera
support.
the
steady
picture,
on
a
or
Page 26

Repeated
pattern
bar
spots
or
Cause
Developer
film door
the
ned.
clea
rollers
need to
inside
be
Solution
.
film door
Open
light
direct
remove
ing rollers,
lint-free
a
with
dampened
(do
film).
clean
with
in in-
not
While
them
cloth
water.
turn-
Damaged
picture Cause
.
Picture
forth or
and
after
me ra.
ca
.
Picture
slot,
down
rface.
su
was shaken
bent
it ejected
left
was
camera
and
table
on a
back
shortly
from the
in
the
was set
other
or
exit
.
.
Solution
60 seconds
During
development,
print
by
and
bend
slot
first
gently;
wide
its
do
it.
Remove
as soon
not
print
hold
white
wave
as
handle
it onlY
border,
or
from exit
it
ejects.
of
Page 27

Subject
www.orphancameras.com
too
dark
Gause
Camera's
sured
the
light,
causing
to be
too
photocell
bright
window
the
dark.
mea-
subject
Solution
.
Reposition
from
the
g
rou
nd.
subject
bright
away
back-
Background
too
dark
.
When
a bright
(lamplight,
light
light,
etc.)
part
of
the
front
of
the
camera's
measure
causing
too
Gause
Background
from
Subject
beyond
the
dark.
subject.
may
flash
source
candle-
is in
the
scene
and in
subject,
photocell
the
bright
subject
was
too far
have
range.
of
central
the
will
light,
to
be
been
.
Move
the
to
one
side
ject
so it
Solution
subject
control
15
feet
keep
the normal
part
and keep
central
Place
ground
ture
position.
Stay within
2to
and
trol in
tion.
source
of
is not
of
near
in
flash
(.6m
picture
the
of light
your
sub-
in
the
the
scene.
a
back-
pic-
the
the normal
range
of
to 4.6m1,
con-
posi-
Page 28

Picture
too
or
too blue
redlyellow
Gause
Pictures taken at
below 55'F
atures
have a blue
can
temper-
(13'C)
tint.
Solution
weather,
In cold
camera
possible.
as
place
developing
in a warm
minute, being
least a
careful
not
film
and
lmmediately
pocket
bend
to
keep
warm
as
picture
for at
it.
Pictures taken at temper-
above
atures
have a
can
tint.
95"F
red or
(35"C),
yellow
Avoid storing
places,
hot
film in
glove
ments of
heat source,
ra d iato
luggage compart-
or
a car, or
r.
camera
such
and
such
near
a
as
as
a
Page 29

Gopy
www.orphancameras.com
Service
(U.S.A.
onlyl
Polaroid
Spectra
8
For details,
order form
in
For information
Reprint
x 10
your
inches.
offers
photographs
see the
ejected when
camera.
Catalog,
copies
and enlargements
in
these
mailer
you
or a copy of
call
toll
free
sizes: 4 x
in the film
load
your
1-800-421-1030.
box and/or
each new
Accessory
your
of
5, 5 x 7, and
the
pack
film
and
Picture-taking
(pictures
14-17l'
tips
Golor
Vibrant,
Spectra film
the scene in
toys or flowers
Distance
You
when
era
and
Background
Indoors,
Outdoors, keep
Gomposition
When
in
dimension
bold colors
can take the
they are
(picture
attention
the
15).
try to have
photographing
foreground
(picture
(pictu
the viewfinder.
focuses
are vividly
re
141. Look
can add interest
pleasing
most
3 to 5 feet
Backgrounds
on
a light-colored
the
background
landscapes,
to establish a feeling
17).
reproduced
for
Colorful
(.9m
to 1.5m)
become less
your
subjects.
on
color when framing
props
such as
to
the scene.
pictures
background.
simple
include
people
of
from
the cam-
distracting
(picture
something
of depth
16).
or
Page 30

Gamera, film
specifications
Aperture/shutter
specifications
Apertures:
Shutter
to 2.8
Gamera
Length:
Width:
Height:
Camera
1 lb.
without
trom f/10
speeds: trom
seconds.
body size
6.82 inches
5.46 inches
3.07 inches
weight
12 1/2
oz.
a film
Film advance
Automatic
ized
Film
Outer
(10.1
f mage
(9.1
Film
ISC
Film
Polaroid
only. Starts
seconds.
film
picture
ejection.
size
border: 4 x 4.06
x 10.3cm)
area:
3.60
x 7.2cm)
speed
(approx.)
600/29s
type
Spectra color film
developing in
Ten
Lens
lass-coated,
G
125mm
lens
focusing
system. Ten-zone
from 2 feet
infinity.
system
to tl45.
11245
(17.3cm)
(13.87cm)
(7.78cm)
(.8k9
approx.),
pack.
advance; motor-
inches
x2.90
inches
pictures
front
per pack.
element
(.6m
)
Photocell
Dual-filter,
Green filtered
visible
light;
measures infrared
better indoor
Power
source
A fresh,
6-volt battery
pack powers
film
functions.
Programmed
Built-in fill
indoors
used
Recharge
time:
seconds. Flash
1i3000
to
flash
(.6m
U20,000
to 4.6m).
ndoor
f
feet
Sonar autofocus
puterized
Com
tem uses sound
sure accurately
your
subject
Sonar ranging
50 thousandths
photodiodes.
silicon
cell measures
black filtered
light for
flash
exposures.
all
flash
flash
designed
and outdoors.
from
duration: from
of a second.
range: from
system
a utofocus
waves
the distance
and set
time: from 10
of a second.
in
each
camera
to be
.1
2.8
to
2to 15
sys-
mea-
to
lens.
the
cell
{
to
I
I
to
I
l
Viewfinder
(no
100% viewing
(1.8m)-
feet
taking distance.
prisms,
and
vide
to
sharp, clear viewing.
Viewfinder
(subiects
appear
parallax)
popular
a
picture-
Six lenses,
mirrors
pro-
four
magnifications:
half
lifesize).
at 6
two
{
.5x
OPN7349 7194 "Polaroid"
"Spectra"@
and
Printed
in
Great Britain
 Loading...