

Page 1

Instant Print Digital Camera
USER MANUAL
To enhance your experience, download the free mobile app for iOS and Android.
Page 2

Table of Contents
EN
Section Title Page
1 What’s in the Box 3
2 Get to Know Your Camera 3
3 Using Your Camera 4–6
4 About the Printer 6
5 First-time Setup 6
6 Taking Pictures and Video 7–11
7 Gallery 12
8 Printing Photos 13
9 Deleting 14
10 Device Settings 15–16
11 About the Mobile App 17
12 Error Messages 17–18
13 Firmware 18
14 Compliance 18-19
2 | EN
Page 3
1
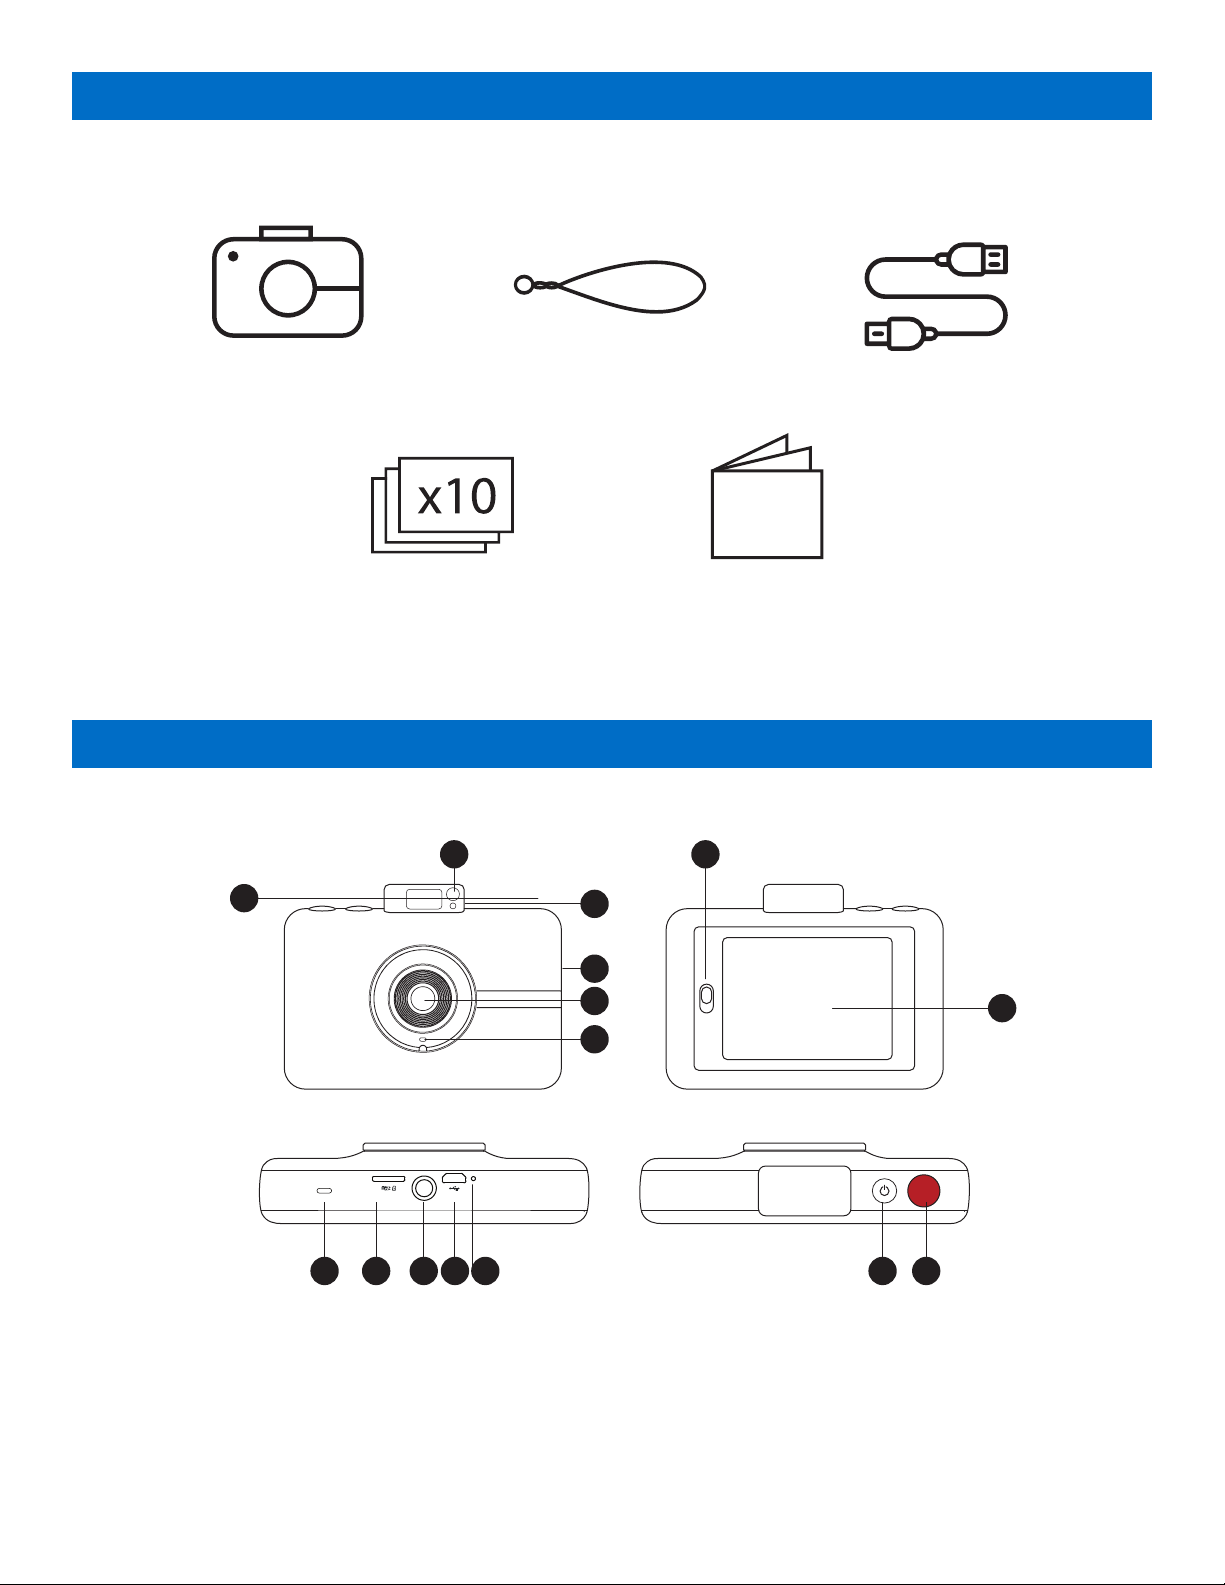
What’s in the Box
Polaroid SNAP Touch™
Instant Print Camera
Polaroid ZINK® Paper 10-pack User guide
1
Camera strap
& warranty
2
Get to Know Your Camera
2 7
3
Micro USB cable
9 151410 11 12 13
1. Pop-up flash
2. Selfie mirror
3. AF sensor
4. Photo print exit slot (side)
5. Lens
6. Microphone
7. Paper compartment door latch
8. Touchscreen LCD viewfinder
9. Speaker
4
5
6
10. MicroSD card slot
11. Tripod mounting socket
12. Micro USB port
13. Reset button*
14. Power button
15. Shutter button
* To reset camera, insert a pin and hold for about 2 seconds.
3 | EN
8
Page 4

3
Using Your Camera
Familiarize yourself with the basic camera functions and then proceed to First-Time Setup. (Section 5)
Turning On & Off
Press the power button. If the flash mechanism is in the closed position, it will open and the camera will power on.
To turn the camera off, press down the flash mechanism.
To wake the camera from sleep mode, press the power button. The camera will turn on.
When you unpack your camera the pop-up flash mechanism should be open. To turn on the camera, gently press down on
the mechanism until it clicks to close it, and then press again to open it.
Battery Charging
Charge the camera’s built-in battery by connecting it via the included micro USB cable to your computer’s USB port
or to a wall charger. The status indicator bar will show the charging progress. If the camera is turned off, the LCD will
automatically turn on and display the battery charging status for a few seconds and then turn off. You can check the
charging status at any time by tapping the screen.
It takes approximately 2 hours to fully charge the battery. Under normal conditions, the charge lasts for about 25 prints.
Memory
The camera’s internal memory can hold up to 10 photos. Insert a microSD card to expand the memory. The camera
accepts a microSD card up to 256GB.
Auto Shutoff
The camera will automatically turn itself off after being idle for 5 minutes (the default time) to conserve battery power. You
can change the length of time in Settings > Auto Off. (See section 10)
LCD Screen Timeout
The LCD viewfinder will turn off after a minute if the camera is not in use. You can change this setting by going to
Settings > Screen Timeout. (See section 10)
Shutter button
Press the shutter button to take still photos and photobooth shots, and to start and stop recording video. Press and hold
down the button to take photo burst shots (quick succession of photos.) Also, pressing the shutter button will bring you
back to the live viewfinder whenever you’re in a different screen.
Touchscreen LCD Viewfinder
Once you’ve set up your camera (See “First-Time Setup,” section 5), you’ll be taken to the live viewfinder and main
screen. From here you’ll be able to take photos and videos, access settings, and view the gallery. You can get back to this
screen directly from any screen on the camera by pressing the shutter button. Tap anywhere on the viewfinder (except on
the icons) to hide/show icons. The icons will also disappear if no action is taken after 3 seconds.
4 | EN
Page 5
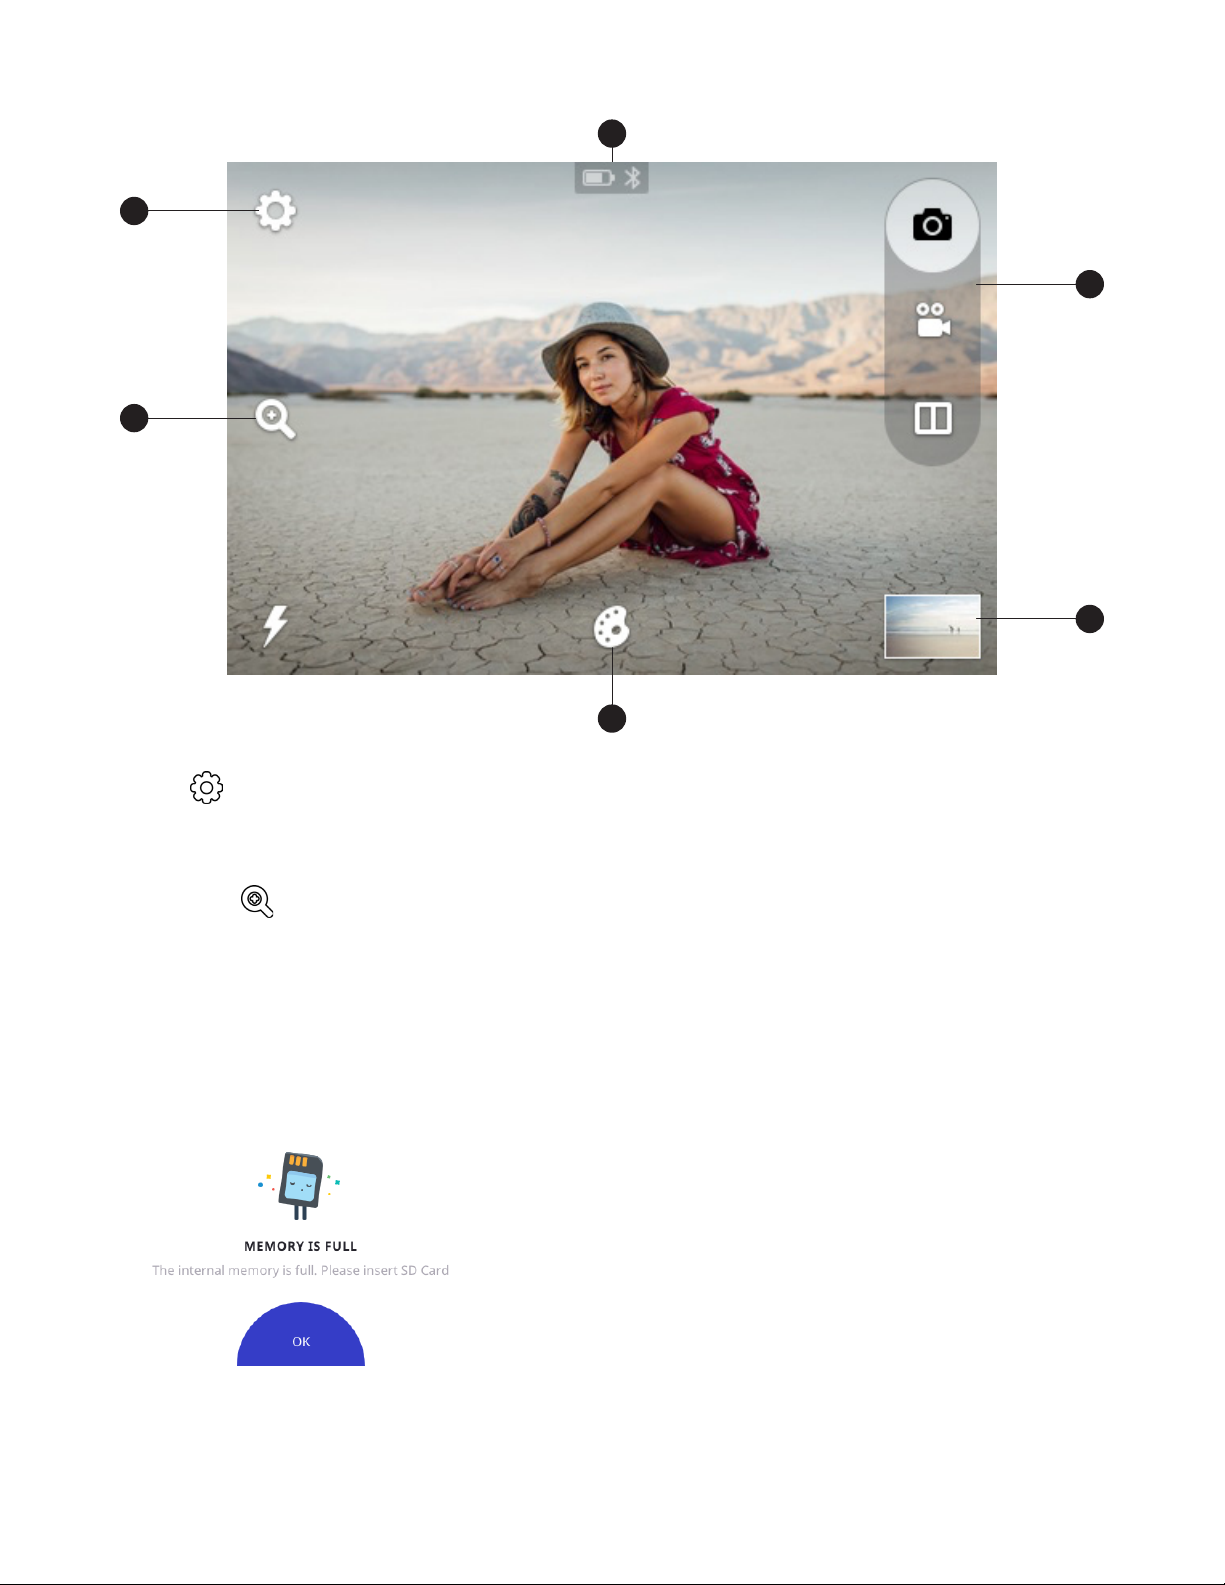
Live Viewfinder
C
A
D
B
E
F
A. Device Settings
Tap this icon view to a menu of general camera settings that let you adjust screen timeout, screen brightness, auto
power off, volume, print settings, and more. (See section 10 for details)
B. Zoom
Tap the zoom icon on the left side of the screen to bring up the Zoom menu. Tap the plus to increase zoom level and
tap the minus to decrease it.
C. Status Indicator Bar
Displays the SD card, battery, and Bluetooth® connection icons.
SD card icon: Icon will be white if a card is inserted, and gray if no card is inserted. If your memory is full you will
receive a notification on the LCD screen.
5 | EN
Page 6
Battery icon: The battery icon will appear full (all white) when the battery is fully charged. As the battery loses
charge, the battery icon will appear incrementally less full. When the battery level reaches 35%, the icon will appear
mostly empty and turn red. When the battery level reaches 10% the icon will become a flashing red outline.
D. Capture Modes
The camera features 3 capture modes: still photo (including burst function), photobooth (3 layout options using
multiple images), and video recording . The camera icon (still photos) appears by default. Tap the video icon or the
photobooth icon to quickly switch modes.
E. Gallery
In the gallery you’ll be able to view all your captured photos, videos, and photobooth layouts. You can also edit and
print photos and access other options from the gallery. (See section 7 for details)
F. Extras
Tap the extras icon to open a menu for adding borders, digital stickers, and filters to your photos. (See section 6
for full details) You can add extras before or after taking single shots. You can also add these extras to your completed
photobooth layout.
4
About the Printer
The built-in printer gives you high-quality, 2” x 3” full-color photos printed on special adhesive-backed paper that you can
share on the spot. You can choose to print your photos right after taking them, or later. (See section 8 for details)
Loading Photo Printing Paper
This camera uses only Polaroid 2x3”Premium ZINK® Zero Ink® Paper.
1. Open the paper compartment by sliding the latch located on the left side of the LCD screen. The screen will pop up.
2. Insert the entire pack of paper, making sure the blue ZINK Smart Sheet is on the bottom, barcode facing down. Do
not throw away the Smart Sheet before the camera has been calibrated.
3. Close the paper compartment.
4. The blue ZINK Smart Sheet will be detected and ejected after you close the paper compartment door once the
camera is on.
5
First-Time Setup
Turn the camera on (See section 3) to begin setup. Follow the screen prompts to select your language, and the current
date and time. That’s it! You’re ready to snap and share!
Note: You can change these settings by tapping the device settings icon .
6 | EN
Page 7

6
Taking Pictures and Video
Still Photos
By default, the Polaroid Snap Touch is set to the camera (still photo) capture mode.
The LCD screen is your viewfinder. You can focus your shot in two ways:
1. Press the shutter button and the camera will automatically focus before taking the shot.
2. To focus on any area of the image other than the center, touch and hold the desired area of the image on the LCD
screen for about 2 seconds. (If you move the camera, the same area of the image will be focused.) When you press
the shutter button the Auto Focus will focus on the selected area.
After a photo is captured, you’ll see a preview for 2 seconds before the screen displays the live viewfinder again (unless
you tap an icon.)
Automatic Printing
If you have set your camera to the Auto Print mode (See section 8), your photo will print as soon as you’ve taken the picture.
If the camera is not in Auto Print mode, you can print your photo by tapping the printer icon that will appear after
you’ve taken a photo. You can also choose to print any photo at a later time.
7 | EN
Page 8

Deleting Photos
After taking a photo, the screen will display your captured image for 2 seconds or until you tap an icon. You can also
choose to delete the photo by tapping the trash can icon on the left side of the screen. You will then see screen
prompts to confirm deletion.
If you do not choose “YES DELETE”, your photos will be stored in, and can be accessed from, the gallery. (See section 7)
Tap on the gallery icon to review photos. You can also delete photos from the gallery by repeating the process described
above.
Burst Photography
To capture a photo burst (a rapid succession of still shots), hold down the shutter button. Burst capture will continue as
long as you hold down the button. A counter will appear to tell you how many images you’ve captured. You can capture up
to 25 images with one burst. Each burst series of images becomes a file. Each individual photo is also a file. Note: When
printing a burst series, you can only print the first 10 photos. You can print any of the individual photos from the gallery.
After burst capture, the LCD screen will display the first shot of your burst series and say, “TAP TO VIEW BURST” and
will also show the number of shots in the burst series. When you tap the screen you can view the individual photos and
navigate with the arrow icons, and print, edit, or delete the images.
If you do not tap the screen within 2 seconds, the screen will return to the live viewfinder. You can review all your images
at a later time by accessing the gallery.
In the gallery, the screen displays the first photo of your series with the number of individual shots in that series. You
will be able to print and delete that entire burst series at once. If you’d like to delete only one photo in the burst, you can
enter the burst first, and then print or delete just that photo.
8 | EN
Page 9

Photobooth
The photobooth mode gives you a fun way to shoot photos in layouts of 2, 3, or 4 images. You can also add stickers,
filters, and borders to your layouts.
Select the photobooth icon from the top right corner of the live viewfinder screen. .
Tap the icon for a 2-, 3-, or 4-image layout. In the example below, a 3-image layout has been selected.
Once you’ve made your selection you’ll be taken back to the live viewfinder and the icon for the selected layout type will
display at the top right of the screen.
9 | EN
Page 10

Composing Your Photobooth Layout
2-photo layout
3-photo layout 4-photo layout
The left portion of the screen acts as the live viewfinder until you press the shutter button. Your first shot will then appear
on the left. The live viewfinder portion will successively move, left to right, and then top to bottom, to the next frame with
each shot taken. (Note: You cannot choose the order of which image appears in which frame.)
Borders and Filters
Filters StickersBorders Rotate Resize
To select a border or filter, press the border or filter icon. A menu of 5 options will display above the Extras menu. The
camera can hold only 5 options at a time. The Polaroid Snap Touch App (See section 11) offers additional stickers and
borders. You can swap 5 of these extras at a time with the 5 on your camera.
After you’ve selected a border or filter, the initial Extras menu will collapse and the selected border/filter will display.
Tapping anywhere on the photo will collapse the menus and you’ll be able to see the entire photo with the extra applied.
If you decide that you don’t want that particular selection, press the back button and you will be taken back to the initial
extras menu; your photo will not change. If you want to apply the selection, press the check mark. The edited photo will
automatically be saved in the gallery, along with your original unedited version. You will be taken back to the initial extras
menu and you will be able to select another extra to apply. You may apply as many as you’d like.
Stickers
When you select a sticker, it will display on the photo and the menus will collapse. You can choose to move the sticker by
dragging it or tapping elsewhere on the photo. You can also shrink or enlarge the sticker via the + and - icons on the top
corners, as well as rotate it 45 degrees at a time by tapping the icons on the bottom corners. Select the check mark
or back arrow to apply or remove the sticker.
10 | EN
Page 11

Rotate (in file view only)
Each press of the rotate icon in the center of the photo will rotate it 90° clockwise. Select the check mark to apply or
press the back button to cancel the rotation.
Size (in file view only)
You can enlarge your photo by 300% maximum. You cannot minimize less than 100%.
Each tap of the plus symbol will enlarge the photo by 25%; each tap of the minus symbol will reduce it by 25%. You will
also see 4 arrows at the edges of the image. Tapping an arrow will move the image over in increments of 10% of the
photo’s height or width. You cannot move an image unless it has been enlarged.
Video
Select video mode by pressing the video capture mode icon. Once selected, the screen will display the live
viewfinder. Press the shutter button once to begin the video recording. The screen will display an indicator that the
camera is recording as well as time elapsed. Press the shutter button again to end video recording.
You can also change the video quality by pressing the icon in the bottom left corner of the screen. The available video
quality options are 1080p, 720p, and VGA.
After recording, you can tap the play button to view the video. You will also be able to forward, rewind, or pause. If no
action is taken within 3 seconds, the playback controls will disappear.
11 | EN
Page 12

7
Gallery
Tap the icon to open the gallery.
View your photos and videos by using the navigation arrows on the right side of the screen, which allow you to manually
scroll up or down through the files in your gallery. Each photo, video, burst series, and photobooth layout is considered a
file. Tap on the image to open a full view.
For burst shots, the screen displays the first photo of your series with the number of individual shots in that series.
When you select any of the files in the gallery, all the options that you are able to choose for that particular file will display.
The only difference is that the back button will take you back to the most recently viewed page in the gallery.
Quick Print
Tap the select icon in the top right corner of the gallery. You can choose to print multiple copies (up to 10 prints at one
time.) Press the printer or cancel icon.
12 | EN
Page 13

8
Printing Photos
Note: Always make sure that the paper pack is properly loaded into the camera. (See section 4)
You can print your captured photo immediately after taking it by tapping the printer icon that will appear in the bottom
right of the LCD screen.
To automatically print a photo immediately after it is taken, you must set the camera to Auto Print. By default, the Auto
Print function is off. To activate Auto Print, tap the settings icon at the top left of the LCD screen. Scroll down the list until
you find the option for “AUTO PRINT” and toggle the switch to “ON.”
You can also print from the gallery (“Quick Print”) (See section 7).
Once print is selected, you will see a screen with a progress bar where you will be able to cancel the print command for
2 seconds.
If the printer is still preparing to print, you can still cancel. The printer icon in the status indicator bar will be surrounded
by a color and will be clickable. Click to be taken back to the printing progress screen where you will be able to cancel
printing.
If there are multiple photos in the print queue, then the printer icon in the status indicator bar will be clickable, and you
will be able to cancel the rest of the print queue in its entirety, or any individual prints in the current print queue. You
will be asked to confirm which prints in the queue you would like to cancel. There can be a maximum of 10 prints in the
queue.
You will not be able to perform certain functions while an image is printing.
13 | EN
Page 14

9
Deleting
You can delete any file by pressing the delete icon on the top right of the screen from any captured shot view or
video as well as from the gallery. There will be a screen prompting you to confirm that you indeed want to delete.
If you do select delete there will be a confirmation message for 2 seconds after deleting. You will return to the live
viewfinder if you deleted from a preview of your captured photo or video, or to the gallery if you deleted from the gallery.
If you opt not to delete, the camera will return to the previous screen.
Deleting Burst Shots
You can delete a burst file (entire series) or any individual photo in that series.
14 | EN
Page 15

Device Settings
Tap the device settings icon to open the menu.
10
Capture Settings:
Timer
This lets you set a timer for the camera to automatically take a shot after either 3, 6, or 10 seconds. When Delay is
selected, a countdown will display in the live viewfinder once the shutter button is pressed.
HDR
HDR stands for High Dynamic Range, a method that adjusts the ratio of light to dark in a photograph by using
different exposures.
White Balance
Here you can adjust how the camera will adapt the capture of your photo to the lighting of the environment you are in. Your
options are: AWB (Auto White Balance) – which will automatically adjust according to what the camera perceives is needed,
incandescent, fluorescent, sunny, cloudy, and shade. AWB is the default setting on the camera.
Light Frequency
You can change the light frequency in which the camera will capture video. Your options are 50 or 60Hz. This will usually
be pre-set according to the country you’re in. For example, in the USA, Canada, and Japan it’s usually 60Hz, and in most
other countries it’s usually 50Hz.
General Settings
Bluetooth®
Your camera will come with the Bluetooth turned on. You can tap on “BLUETOOTH” and then on the OFF/ON toggle
to switch between on and off.
You will need to download the Polaroid Snap Touch App to your smartphone in order to connect it to your camera.
You will know that Bluetooth is on and if it’s connected from the status indicator bar (See section 3) in the live viewfinder.
Storage
Here you will see the status of the internal device memory if no microSD card is inserted, or the status of your microSD
card’s memory. From this menu, you can also choose to format the microSD card.
Screen Timeout
The LCD screen will automatically turn off after 60 seconds of inactivity. You can change this to 30 seconds or to 120
seconds if you tap “SCREEN TIMEOUT.”
Auto Power Off
15 | EN
Page 16

The camera will shut itself off after 5 minutes of inactivity to save battery power. You can change this to 3 minutes or 10
minutes by tapping “AUTO POWER OFF.”
Screen Brightness
Adjust the brightness of the LCD screen by tapping “SCREEN BRIGHTNESS.” Tap the plus or minus symbols to increase or
decrease brightness in 5% increments.
Language
Tap to open a menu of language choices.
Volume
Tap “VOLUME” to adjust the volume of the camera sounds and then tap the plus or minus symbols to increase or decrease
the volume in 5% increments. You can also turn off the touch sounds.
Date and Time
Tap to enter the date and time setting controls. Press the arrows up and down to set the date.
You can also change the time here by selecting “TIME” in the top right corner. If the 24- hour toggle is turned on, there will
be no AM/PM option.
About
Here you’ll be able to check the version of your firmware. (See Section 14) Your camera’s model and serial numbers are also
listed here.
Legal
Legal information.
Print Settings
Color Correction
You can adjust the brightness and color of your photo prints by moving the four sliders on the screen. The changes
will show in the image preview on the right. The printer icon on the top right of the preview photo will allow you
to test-print the changes you’ve just made. Pressing ‘X’ will return you to the print settings screen without saving
your changes. Pressing the check mark will bring up a confirmation screen. If confirmed, your selected brightness and
color changes will be saved.
Important: The changes you make will apply to all of the photos that print from your camera, including those you print
from the app.
Auto Print (photo capture only)
You can choose to automatically print your photo immediately after capturing it. Tap “AUTO PRINT” to turn this feature
on and off.
16 | EN
Page 17

11
About the Polaroid Snap Touch App
Use the Polaroid Snap Touch App to print photos from your phone.
The app gives you lots of fun extras, including a wide array of different stickers and borders that you can swap with the
ones that are already available on your Polaroid Snap Touch camera.
Enjoy additional editing features like mosaic effects, applying text or drawings to your photos, and much more!
So, go ahead… snap, edit, print, and share the fun!
12
Error Messages
When there’s an error, a screen will pop up telling you what the problem is and how you can fix it. The error screen will
disappear once the problem resolved and you press “OK.”
YOUR DOOR LATCH IS NOT FULLY CLOSED — PLEASE LOCK INTO PLACE
The paper compartment door is open or the latch isn’t fully engaged.
YOU ARE OUT OF PAPER — PLEASE ADD MORE PAPER TO PRINT
This message will display if you attempt to print when there’s no paper inside the camera. Load paper and press “OK.” If
paper isn’t loaded the printer icon in the status indicator bar will be red.
PAPER JAM — PLEASE RELOAD THE PAPER AND TRY AGAIN
To fix the jam, open the paper compartment door and gently remove the jammed paper from the camera. Reload paper.
When you press “OK” to remove the message screen, you will be taken back to the screen from which you selected the
print command. Press the printer icon again.
UNRECOGNIZED PRINTER PAPER — POLAROID SNAP TOUCH ACCEPTS ZINK PAPER ONLY
This message will display if the paper in the camera is not Polaroid 2x3” Premium ZINK® Zero Ink® Paper or if the paper
is not loaded properly. Using the wrong paper in the camera can damage it.
PRINTER ERROR — PLEASE TRY AGAIN
Try to start the print sequence again. If this does not work, turn the camera off and then on again in a few seconds.
PAPER FEED ERROR — PLEASE RELOAD PAPER
The paper did not feed properly due to the roller grabbing 2 sheets or not being able to grip the paper. Remove and then
reload the paper.
BLUETOOTH CONNECTION LOST
You may have moved out of range. Bluetooth may be turned off on the camera and/or your phone. Check your Bluetooth
connection on both devices and move the camera closer to your phone. You will know if Bluetooth is on and if it’s
connected by checking the status indicator bar in the live viewfinder.
SD CARD NOT SUPPORTED
You may have a card that is not formatted properly or is damaged. Replace the microSD card.
INTERNAL MEMORY FULL — PLEASE INSERT SD CARD
The camera’s internal memory is full and there’s no memory card inserted. You will not be able to capture photos or video,
edit, or add extras, as long as there is no free space. Please insert a microSD card to add memory and press OK. You can
also delete some photos in the gallery to free up some space.
17 | EN
Page 18

SD MEMORY FULL — YOUR MEMORY IS FULL
This means that the memory card you’ve inserted has reached its maximum capacity. You will not be able to capture
photos or video, edit, or add extras, as long as there is no free space.
13
Firmware
Firmware Updates
When you connect to the Mobile App it will automatically check if there’s an update available for your device. You’ll be
prompted to perform a 2-step process: downloading and installing.
First you will be asked if you want to download the update now or later. If you press “DOWNLOAD NOW” the download
will start and you will not be able to use your camera or turn the camera off for a few minutes until the download has
completed.
When the download has completed, you will be asked if you want to install the update. Press “INSTALL NOW” to
begin the installation process. You will not be able to use your camera or turn the camera off for a few minutes until the
installation has completed. A progress bar will show you the installation status. After the firmware update has been
installed, the camera will automatically turn off. You will have to turn the camera on again.
If you choose to delay the installation process, it will automatically begin before the camera turns off. You can also go to
settings > ABOUT to download and install firmware.
14
Compliance
Warning: Changes or modifications to this unit not expressly approved by the party responsible for compliance could void
the user’s authority to operate the equipment.
NOTE: This equipment has been tested and found to comply with the limits for a Class B digital device, pursuant to
Part 15 of the FCC Rules. These limits are designed to provide reasonable protection against harmful interference in a
residential installation. This equipment generates, uses and can radiate radio frequency energy and, if not installed and
used in accordance with the instructions, may cause harmful interference to radio communications.
However, there is no guarantee that interference will not occur in a particular installation. If this equipment does cause
harmful interference to radio or television reception, which can be determined by turning the equipment off and on, the
user is encouraged to try to correct the interference by one or more of the following measures:
Reorient or relocate the receiving antenna.
Increase the separation between the equipment and receiver.
Connect the equipment into an outlet on a circuit different from that to which the receiver is connected.
Consult the dealer or an experienced radio/TV technician for help.
The device must not be co-located or operating in conjunction with any other antenna or transmitter.
Shielded cables must be used with this unit to ensure compliance with the Class B FCC limits.
This device complies with RSS247 of Industry Canada. This device complies with Industry Canada license-exempt RSS
standard(s). Operation is subject to the following two conditions: (1) this device may not cause interference, and (2) this
device must accept any interference, including interference that may cause undesired operation of the device. Radiation
Exposure Statement: The product complies with the Canada portable RF exposure limit set forth for an uncontrolled
environment and are safe for intended operation as described in this manual.
Further RF exposure reduction can be achieved if the product can be kept as far as possible from the user’s body or set
the device to lower output power if such function is available.
This Class B digital apparatus complies with Canadian ICES-003.
18 | EN
Page 19

Users have to use the connection to USB interfaces with USB 2.0 version or higher.
Caution:
Risk of explosion if battery replaced by an incorrect type.
Dispose of used batteries according to the instructions.
This Polaroid Snap Touch is in compliance with the essential requirements and other relevant provisions of Directive
1999/5/EC.
Customer Service:
cspolaroid@camarketing.com
800-226-6534
Polaroid, Polaroid & Pixel, Polaroid Classic Border Logo, Polaroid Color Spectrum, and Polaroid Snap Touch are trademarks of PLR IP Holdings, LLC,
used under license. All other trademarks are the property of the respective owner, who has not sponsored, endorsed or approved this product. PLR IP
Holdings, LLC does not manufacture this product or provide any Manufacturer’s Warranty or support.
ZINK, ZERO INK, and the ZINK logo are trademarks of ZINK Holdings, LLC.
Bluetooth is a trademark of Bluetooth SIG, Inc. USA.
Android is a trademark of Google Inc.
microSD is a trademark of SD-3C, LLC.
IOS is a trademark of Cisco in the U.S. and other countries and is used under license.
Distributed by:
C&A Marketing, Inc., 114 Tived Lane East, Edison, NJ 08837 USA.
C&A Marketing UK LTD, 167 Hermitage Road, Crusader Industrial Estate, London N4 1LZ, United Kingdom
meetpolaroid.com
© 2019 All Rights Reserved
19 | EN
 Loading...