

Page 1

FHD 1080p Driving Recorder
S3601W-24
User Guide
China toll free No.:
400-8401 030
(For other region, please
contact the local agent.)
China toll free No.:
400-8401 030
(For other region, please
contact the local agent.)
Page 2

Trademark
Polaroid, Polaroid & Pixel, Polaroid Classic Border Logo, and Polaroid Color
Spectrum are trademarks of PLR IP Holdings, LLC, used under license. PLR IP
Holdings, LLC does not manufacture this product. Fairyard Enterprises Limited
will provide manufacturer warranty and support.
Copyright © 2017, All Rights Reserved.
Manufactured By:
Fairyard Enterprises Limited
RM 7B, 12/F, HOPEFUL FACTORY CENTRE 10-16 WO SHING STREET,
FO TAN, N.T., Hong Kong
www.polaroidcarcam.com
EN-1
Pola roid · S3601W-24
Abou t t hi s G ui de ... .. .. ..... .. .. ..... .. .. .. ..... .. .. ..... .. .. ....... .. .. ..... .. .. ..... .. .. .. ..... .. .. ..... 1
Note s on In st allat io n ... .. .. ..... .. .. .. ..... .. .. ..... .. .. ....... .. .. ..... .. .. ..... .. .. .. ..... .. .. ..... .. .1
Caut io n .... .. .. ....... .. .. ..... .. .. ..... .. .. .. ..... .. .. ..... .. .. .. ..... .. .. ..... .. .. ..... .. .. .. ..... .. .. ..... .. 2
1 Int ro ducti on .. ..... .. .. .. ..... .. .. ..... .. .. .. ..... .. .. ..... .. .. ....... .. .. ..... .. .. ..... .. .. .. ..... .. .. ....3
1.1 F ea tu res ....... .. .. ..... .. .. .. ..... .. .. ..... .. .. ....... .. .. ..... .. .. ....... .. .. ..... .. .. ..... .. .. .. ..... .. 3
1.2 Packa ge Conte nt s . .. ....... .. .. ..... .. .. ..... .. .. ....... .. .. ..... .. .. ....... .. .. ..... .. .. ..... .. .. .. .3
1.3 Pr oduct Over vi ew .. .. ..... .. .. ....... .. .. ..... .. .. ....... .. .. ..... .. .. ..... .. .. .. ..... .. .. ..... .. .. ...4
2 Ge tting Star ted.... .. .. ..... .. .. ..... .. .. .. ..... .. .. ..... .. .. .. ..... .. .. ..... .. .. ....... .. .. ..... .. .. ..... 5
2.1 Inse rt in g th e Memory Ca rd .. ....... .. .. ..... .. .. ..... .. .. .. ..... .. .. ..... .. .. ....... .. .. ..... .. .. ..5
2.2 Instal li ng i n Veh ic les.. .. .. ....... .. .. ..... .. .. ....... .. .. ..... .. .. ..... .. .. ....... .. .. ..... .. .. ....... 5
2.2. 1 Co nn ectin g to Powe r… …………… …… …… …………… …. .. ....... .. .. ..... .. .. .....5
2.2. 2 I ns ta lling in Veh ic les…… …… …… …………… …… …… …...... .. .. ..... .. .. ..... .. .. 6
2.3 P ow ering th e Devi ce On / Off . .. ....... .. .. ..... .. .. ....... .. .. ..... .. .. ..... .. .. .. ..... .. .. ..... .6
2.3. 1 Au to Po we r O n / Of f . .. ....... .. .. ..... .. .. ..... .. .. .. ..... .. .. ..... .. .. ....... .. .. ..... .. .. ..... .. .6
2.3. 2 M an ua l P ower O n / Off and Re se t . .. ..... .. .. ..... .. .. ....... .. .. ..... .. .. ....... .. .. ..... .. .6
2.3. 2. 1 M an ual Powe r O n / Off ... .. .. .. ..... .. .. ..... .. .. ....... .. .. ..... .. .. ....... .. .. ..... .. .. ..... .6
2.3. 2. 2 R es et the De vi ce ..... .. .. .. ..... .. .. ..... .. .. ....... .. .. ..... .. .. ..... .. .. .. ..... .. .. ..... .. .. ...7
2.4 Set t he D ate / Tim e. ..... .. .. .. ..... .. .. ..... .. .. ....... .. .. ..... .. .. ..... .. .. .. ..... .. .. ..... .. .. .....7
2.5 Mode Select io n. ..... .. .. ....... .. .. ..... .. .. ..... .. .. ....... .. .. ..... .. .. ....... .. .. ..... .. .. ..... .. .. .7
3 Usi ng th e D rivin g R ec or der... .. .. ..... .. .. .. ..... .. .. ..... .. .. ....... .. .. ..... .. .. ..... .. .. .. ..... .7
3.1 Recordi ng Vide os ..... .. .. ....... .. .. ..... .. .. ..... .. .. ....... .. .. ..... .. .. ....... .. .. ..... .. .. ..... .. 7
3.1. 1 The Re co rding Sc re en ... .. .. .. ..... .. .. ..... .. .. ....... .. .. ..... .. .. ..... .. .. .. ..... .. .. ..... .. .. 8
3.1. 2 A key Pr ot ec tion . .. ..... .. .. .. ..... .. .. ..... .. .. ....... .. .. ..... .. .. ....... .. .. ..... .. .. ..... .. .. .. ..8
3.1. 3 Parki ng Mo ti on .. .. ..... .. .. .. ..... .. .. ..... .. .. ....... .. .. ..... .. .. ..... .. .. .. ..... .. .. ..... .. .. .....8
3.1. 4 G- se nsor Co ll is ion Recor di ng P rotec ti on ..... .. .. ....... .. .. ..... .. .. ..... .. .. .. ..... .. .. ..9
3.1. 5 Switch Re cordi ng Mode …… …… ……..... .. .. ..... .. .. ....... .. .. ..... .. .. ..... .. .. .....…. 9
3.1. 6 Au di o On / O ff .. ....... .. .. ..... .. .. ....... .. .. ..... .. .. ..... .. .. .. ..... .. .. ..... .. .. ....... .. .. ..... .. 9
3.1. 7 Turn on th e Wi -Fi.. .. .. .. ..... .. .. ..... .. .. ....... .. .. ..... .. .. ....... .. .. ..... .. .. ..... .. .. .. ..... .. 9
3.1. 8 Vi deo Menu Opera ti on .. ..... .. .. ..... .. .. ....... .. .. ..... .. .. ..... .. .. .. ..... .. .. ..... .. .. ....... 9
3.1. 9 Vid eo Mode M en u O ption s . .. ..... .. .. ....... .. .. ..... .. .. ..... .. .. ....... .. .. ..... .. .. ....... .. 9
3.2 Taking Sna ps ho t ..... .. .. ....... .. .. ..... .. .. ..... .. .. .. ..... .. .. ..... .. .. ....... .. .. ..... .. .. ....... .1 0
3.2. 1 C ap tu re Scree n . .. ..... .. .. .. ..... .. .. ..... .. .. ....... .. .. ..... .. .. ....... .. .. ..... .. .. ..... .. .. .. .10
3.2. 2 C ap tu re Men u O pt io ns ... .. .. .. ..... .. .. ..... .. .. ....... .. .. ..... .. .. ....... .. .. ..... .. .. ..... .. 10
3.3 Pla yb ac k Mode …… …… .. ..... .. .. ....... .. .. ..... .. .. ....... .. .. ..... .. .. ..... .. .. .. ..... .. .. ...12
3.3. 1 P layin g Vid eos .. ..... .. .. .. ..... .. .. ..... .. .. ....... .. .. ..... .. .. ....... .. .. ..... .. .. ..... .. .. .. ...12
3.3. 2 Pla y Video Scre en .. ..... .. .. .. ..... .. .. ..... .. .. ....... .. .. ..... .. .. ....... .. .. ..... .. .. ..... .. .. .1 3
3.3. 3 Vi ew in g Pic tu re s………… …… .. ..... .. .. .. ..... .. .. ..... .. .. ....... .. .. ..... .. .. ....... .. .. ..13
3.3. 4 P layba ck Menu O pt ions. .. .. .. ..... .. .. ..... .. .. ....... .. .. ..... .. .. ..... .. .. .. ..... .. .. ..... .. .1 3
3.3. 5 Delet in g Fil es …… …… …………… …… …… …………… …… …… ….... .. .. ....... 14
4 HDMI In te rf ace…… …… …… …………… …… …… …… …………… …… …… ……..1 4
5Wi-Fi Co nn ectin g… …… …………… …… …… .… …………… …… …… …………… 14
6Spec ifi ca tions .. .. ..... .. .. ..... .. .. .. ..... .. .. ..... .. .. ....... .. .. ..... .. .. ..... .. .… …… ..... .. .. .15
7 Frequ en tl y As ked Que st io ns... .. .. ..... .. .. .. ..... .. .. ..... .. .. .. ..... .. .. ..... .. .. ...…… …1 6
Page 3

About this Guide
The content in this document is for information purpose and is subject to
change without prior notice. We made every effort to ensure that this User
Guide is accurate and complete. However, no liability is assumed for any
errors and omissions that may have occurred.
The manufacturer reserves the right to change the technical specifications
without prior notice.
Notes on Installation
· This product shall be installed near the rear view-mirror, at the center of
windshield, if possible, for optimal viewing.
· Make sure that the lens is within the wiping range of the windscreen wiper to
ensure a clear view even when it rains.
· A protective film on the lens will affect the video or photographic effect, remove
the protective film before using the device.
· Do not touch the lens with your fingers. Finger grease may be left on the lens
and will result in unclear videos or snapshots. Clean the lens on a regular basis.
· Do not install the device on a tinted window. Doing so may damage the tint film.
· Make sure that the installation position is not hindered by the tinted window.
· To use the contained car power adaptor only. In order to avoid equipment burn
or cause the battery explosion, please do not use other brand car power adaptor.
Do not attempt to disassemble or alter any part of the device that is not
described in this guide.
Caut ion
· Due to local laws and vehicles safety considerations, do not operate the
device while driving.
· Set up time and date accurately before you use this device.
· This product gets warm when in use, this is normal.
· Do not place the device near a heat source or directly expose it to flame or
heat.
· Never place the device in vicinity of equipment generating strong
electromagnetic fields. Exposure to strong magnetic fields may cause
malfunctions or data corruption and loss.
· The system is used only for non-commercial use, within the maximum limits
permitted by applicable law. Our company does not accept any responsibility
for any data loss during the operation.
· Improper use or operation of the product may result in damage of the product
or its accessories and void the warranty.
Before you start using the system, it is assumed that you agree to the
above statement.
EN -2EN -1
Pola roid · S3601W-24
Pola roid · S3601W-24
Page 4

EN -4EN -3
1.3 Pr oduct O vervi ew
1 Introduction
Thank you for purchasing this advanced Driving Recorder. This device is
specifically designed for real time video and audio recording.
1.1 Features
· Full HD Panoramic Driving Recorder
· FHD 1920 X 1080p @30fps
· 5 Mega pixel CMOS Sensor
· 2.5” LCD color screen
· 360˚ Panorama, 360° dual screen mode, 220˚ wide angle lens, F/1.8
· Built in Wi-Fi function
· 3-Axis G-Force sensor
· Built in WDR (Wide Dynamic Range)
· Super night vision function
· Seamless looping recording
· Motion Detection
· Support Parking Mode (24hrs)
· Support up to 64GB Class 10 Micro SDHC
(Suggest to use Micro SDHC 95 MB/s R, 60 MB/s W)
1.2 Package Contents
The package contains the following items. In case there is any missing or
damaged item, contact your dealer immediately.
Drivi ng Recorder
User Ma nual/Warranty Card
Quick S tart Guide
1
7
6
5
10
9
2 3
4
8
1
2
3
4
5
6
7
8
9
10
USB Sl ot
Powe r-lin e expor t
HDMI
Lens U p butto n
Down b utton
Menu / M ode but ton
REC / OK b utton
IR LED
TF Car d slot
Rese t butto n
BMW Cab le
Inside your
package
Pola roid · S3601W-24
Pola roid · S3601W-24
Page 5
EN -6EN -5
2 Getting Started
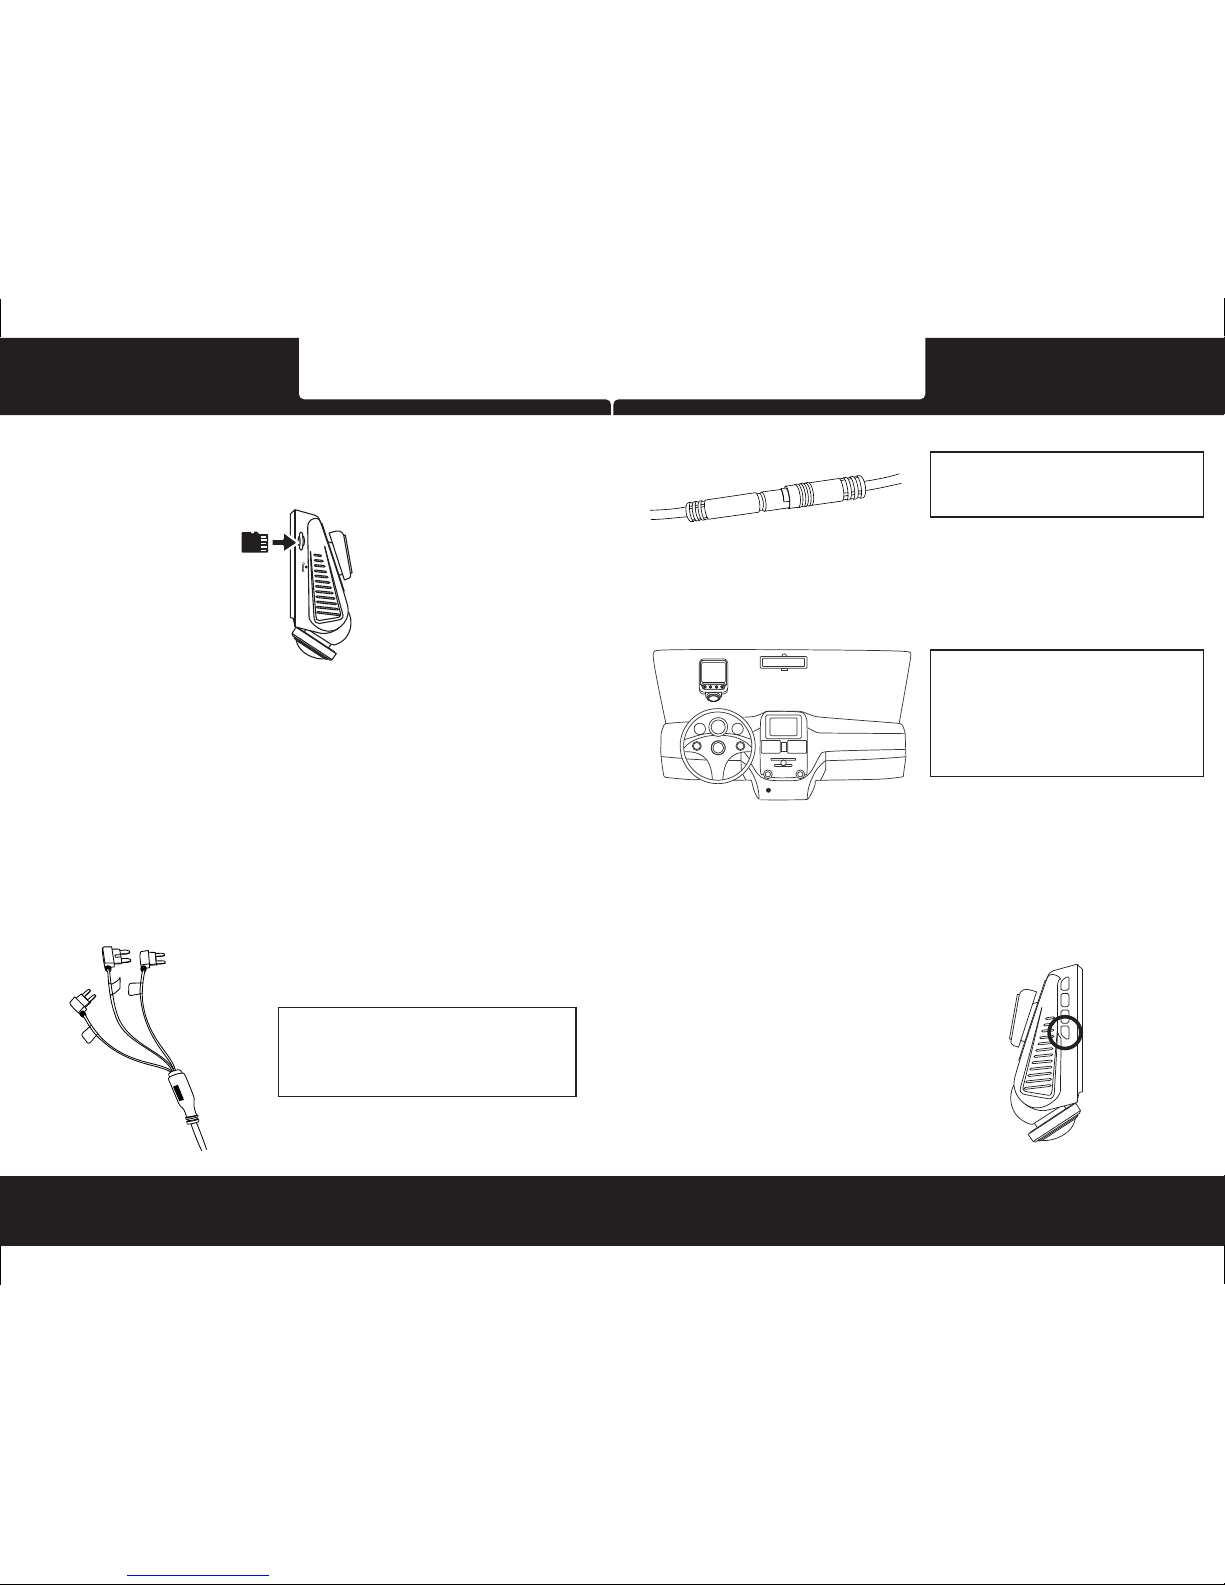
2.1 Inserting the Memory Card (not included)
Follow the direction indicated by the silk printing on the device to push the
memory card in until a click sound is heard, indicating the card is in position.
(not i nclud ed)
To remove the memory card, push to eject the memory card out of the slot.
Note:
1. Do not remove or insert the memory card when the device is turned on.
This may damage the memory card.
2. Please use a Class 10 or higher rating Micro SD card, max. up to 64GB.
(Suggest to use Micro SDHC 95 MB/s R, 60 MB/s W)
3. Please format the micro SD card before the initial use.
4. When removing the memory card, be careful that the card may spring out
and get lost. The memory slot has this spring-out feature for easy removal
of the card.
2.2 Installing in Vehicles
2.2.1 Connecting to Power (Recommend for professional installation)
← Yellow w ire (BAT+) c onnec t to the
vehi cle's b atter y anode .
Red wi re (ACC ) conne ct to ACC.
Blac k wire (G ND) con nect to g round .
← Conn ect t he male connector
to the female conn ector.
2.2.2 Install ing in Vehicles
← Tear off 3M stic ker and g lue to
the fr ont gla sses, a djust t he
lens a down, m ake sur e the
LCD sh ows fro nt view a nd
left / r ight / re ar wind shiel d
unde r 360° du al scre en mode .
2.3 Powering the Device On / Off
2.3.1 Aut o Power O n / Off
Once the vehicl e engine is started, the device automati cally turns on and
recording (mu st have SD Card). After the car engine stop ped, the device will
automatical ly save the last recorded file and change to pa rking mode.
2.3.2 Manual Po wer On / Off and Reset
2.3.2.1 Manua l Power On / off
Long press OK but ton to power on,
long press the OK b utton for 3
seconds to powe r off .
OK
OK
Pola roid · S3601W-24
Pola roid · S3601W-24
Page 6
EN -8EN -7
Pola roid·C270T
2.3.2.2 Reset the Device
In case the device fails to function normally due
to unknown causes, press the reset button waiting
or power off, and then long press OK button
for 3 seconds power on.
2.4 Set the Date/Time
To set the correct date and time, press Menu button to enter the menu,
then press Up/Down button to select Date&Time setting, press OK button
to enter Date&Time setting, then press Up/Down button to adjust
the value, press OK button switch to next setting, after finished all the
settings, press OK button to back General Settings Option, press Menu
button to exit from menu setting.
2.5 Mode Selection
The default setting is Video Mode , Long press Menu button can switch
to Still Capture Mode , Playback Mode .
3 Using the Driving Recorder
3.1 Recording Videos
Before starting recording, please insert a SD card into the TF card slot. Press
REC buttonto start recording, the video recording iconflashes on the
screen. The recorded files are saved on the TF card. To stop recording, press
REC buttonagain.
With car power adaptor connected the device will automatically turn on and
start recording when the car engine starts. When the engine stops, the device
will automatically save the last file and change to parking mode.
OK
OK
OK
OK
OK
OK
OK
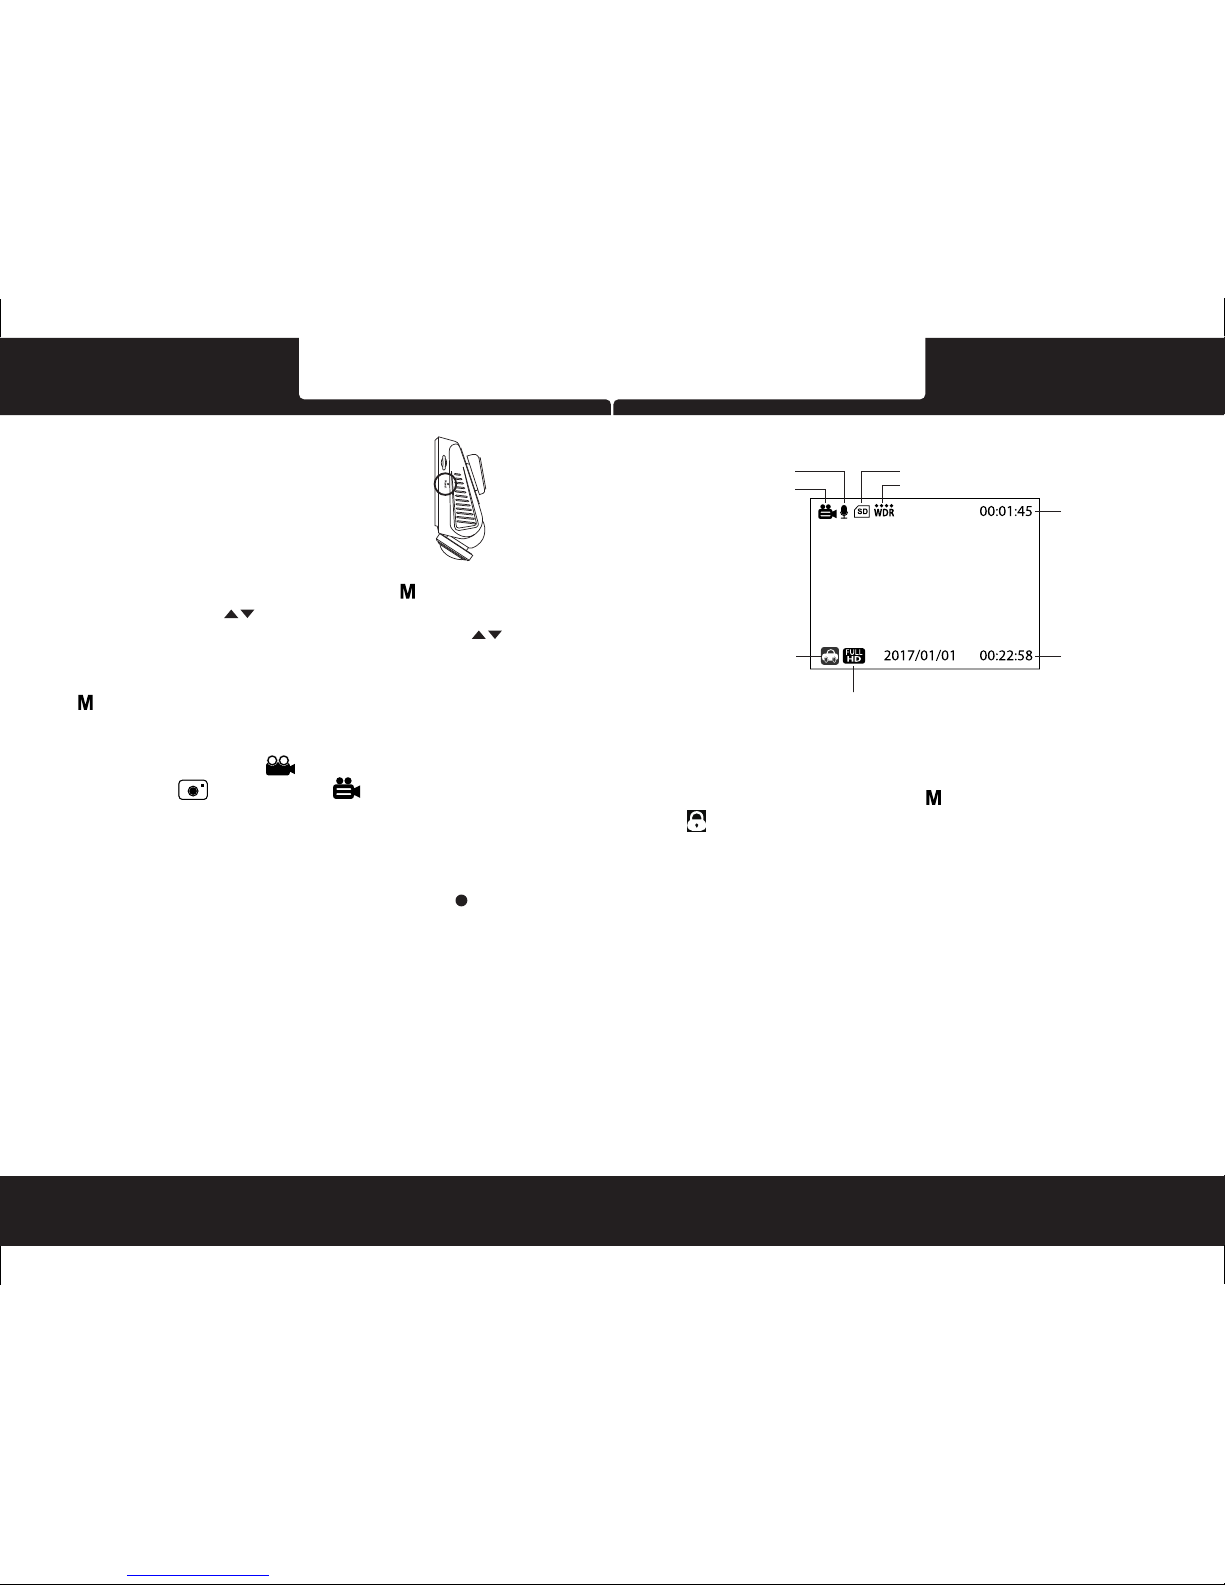
3.1.1 The Recor ding Screen
Aud io stat us
Res oluti on
Dat e &Time
Vid eo r ec ord ing mod e
WDR
Rec ordin g time
Rec ordin g mode
SD CA RD STATUS
3.1.2 A Key Pr otect ion
Start a key prote ction function, do the followin g:
During record ing, press Menu button to protect c urrent video, the lock
icon will be show n immediately on the screen, the cu rrent v ideo is created
as a new file, which w ill be protected to avoid being overwrit ten by normal
cycling recor ding. (The default setting for a vi deo is 3 mi nutes), the next video
will unlock aut omatically and can be overwritten by nor mal cycling recording if
the SD card is full .
3.1.3 Parking M ode
3.1.3.1 When th e vehicle engine is turned off, the came ra will automatically
switch to the par king surveillance mode.
3.1.3.2 The d ispla y prompts to switch to 360° dual scre en mode and a "P"
word will appea r in the lower left corner of the displ ay.
3.1.3.2 Manua lly rotate the lens adown, it will start to re cord 360° dual screen
parking surve illance video with 5 frames per second.
3.1.3.3 In dark e nvironment, the camera will aut omati cally turn on the infrared
LED to fill light, a nd switch to black and white video recordi ng.
Pola roid · S3601W-24
Pola roid · S3601W-24
Page 7

EN -10EN -9
3.1.3.4 When the vehicle battery voltage is at 12V, it will automatically protect
the current video and power off, in order to save enough battery to start the
vehicle.
3.1.3.5 Every hour has beep sound to remind driver while recording.
3.1.4 G-sensor Collision Recording Protection
When a collision is detected while recording, the default setting is the lock icon
will appear on the right corner of the screen, then the current video will be
protected automatically and cannot be overwritten by normal cycling recording.
3.1.5 Switch Recording Mode
Press up buttonto switch between 360° dual screen mode and 220°
ultra-wide angle mode.
3.1.6 Audio On / Off
In the video mode, press downbutton can turn off / on the audio.
3.1.7 Turn on the Wi-Fi
In the video mode, long press downbutton can turn On / Off the Wi-Fi.
3.1.8 Video Menu Operation
Press Menu buttonto enter menu setting, press Up / Down buttonto
select sub menu, then press REC buttonto enter the setting, press
Up / Down buttonto select the option, and then press REC button
confirm. After finished the setting, press Menu buttonto exit menu setting.
3.1.9 Video Mode Menu Options
Set ting
Dat e & Time
Main Menu
Function List
Description
Available Option
Setting for video mode.
2 in 1/ P anora ma 220
/Rou nd Mode
Setting for enabling automatic loop record and
the video time.
Off - The recording will stop when the SD card
is full.
1 Minute / 3 Minutes / 5 Minutes - Select to
limit recording time per file. 3 Minutes, for
example, the recording time for per file is 3
minutes. If 21 minutes of video is recorded,
then 7 files of 3 minutes in length is created.
Off /
1mi n/3mi n/5mi n
Setting for the sensitivity of G-sensor to detect
collision to protect the recording video .
OFF-Disable the G-sensor function.
Level1~Level4-The higher sensitivity
the collision will be detected easier.
The default setting is Level4.
YY/MM/DD
/ MM/DD/YY
/ DD/MM/YY
Set the date and the time. Change the format
of the date and time is displayed on the screen:
YY/MM/DD - Year, Month, Day
MM/DD/YY - Month, Day, Year
DD/MM/YY - Day, Month, Year
Manage the backlighting and presentation of
the LCD. It is advisable to enable this feature
to preserve battery power.
OFF - Select to disable power saving mode for
the LCD. This is the default setting for this option.
1 Minute / 3 Minutes / 5 Minutes - The driving
recorder automatically powers off the LCD after
1 Minute / 3 Minutes / 5 Minutes of inactivity or
during video recording.
Note: If enabled, the driving recorder continues
to record video even when the LCD is shut off.
Press any button to power up the LCD.
OFF / 1 minut e
/ 3mi nutes / 5 minut es
Select the desired OSD language.
Setting for activating audio in the video
On - This enables the audio recording.
This is the default setting for this option .
Off - This records video without audio .
On / Of f
Sett ing
Mode
Loop Re co rd
G-sen so r
Date& Ti me
Scree n Sa ve
Langu ag e
MIC
Format
Formats the inserted micro SD card.
Yes - Selecting this option completes the
format process.
Exit - Select this to abort the format and return
to the previous menu.
Warning: ALL Video and photo les are be
permanently deleted and CANNOT be
recovered once the memory card is formatted .
Yes / Exi t
OFF / L evel1 / L evel2
/ Lev el3 / Lev el4
Pola roid · S3601W-24
Pola roid · S3601W-24
Page 8
EN -11 EN -12
Def ault se tting
Yes/E xit
Thi s optio n sets th e drivi ng reco rder to t he
ori ginal f actor y defau lt sett ings. An d
dis plays t he curr ent rew ire num ber of th e
dri ving re corde r. This in forma tion ma y be
imp ortan t for ser vice an d suppo rt
com munic ation s.
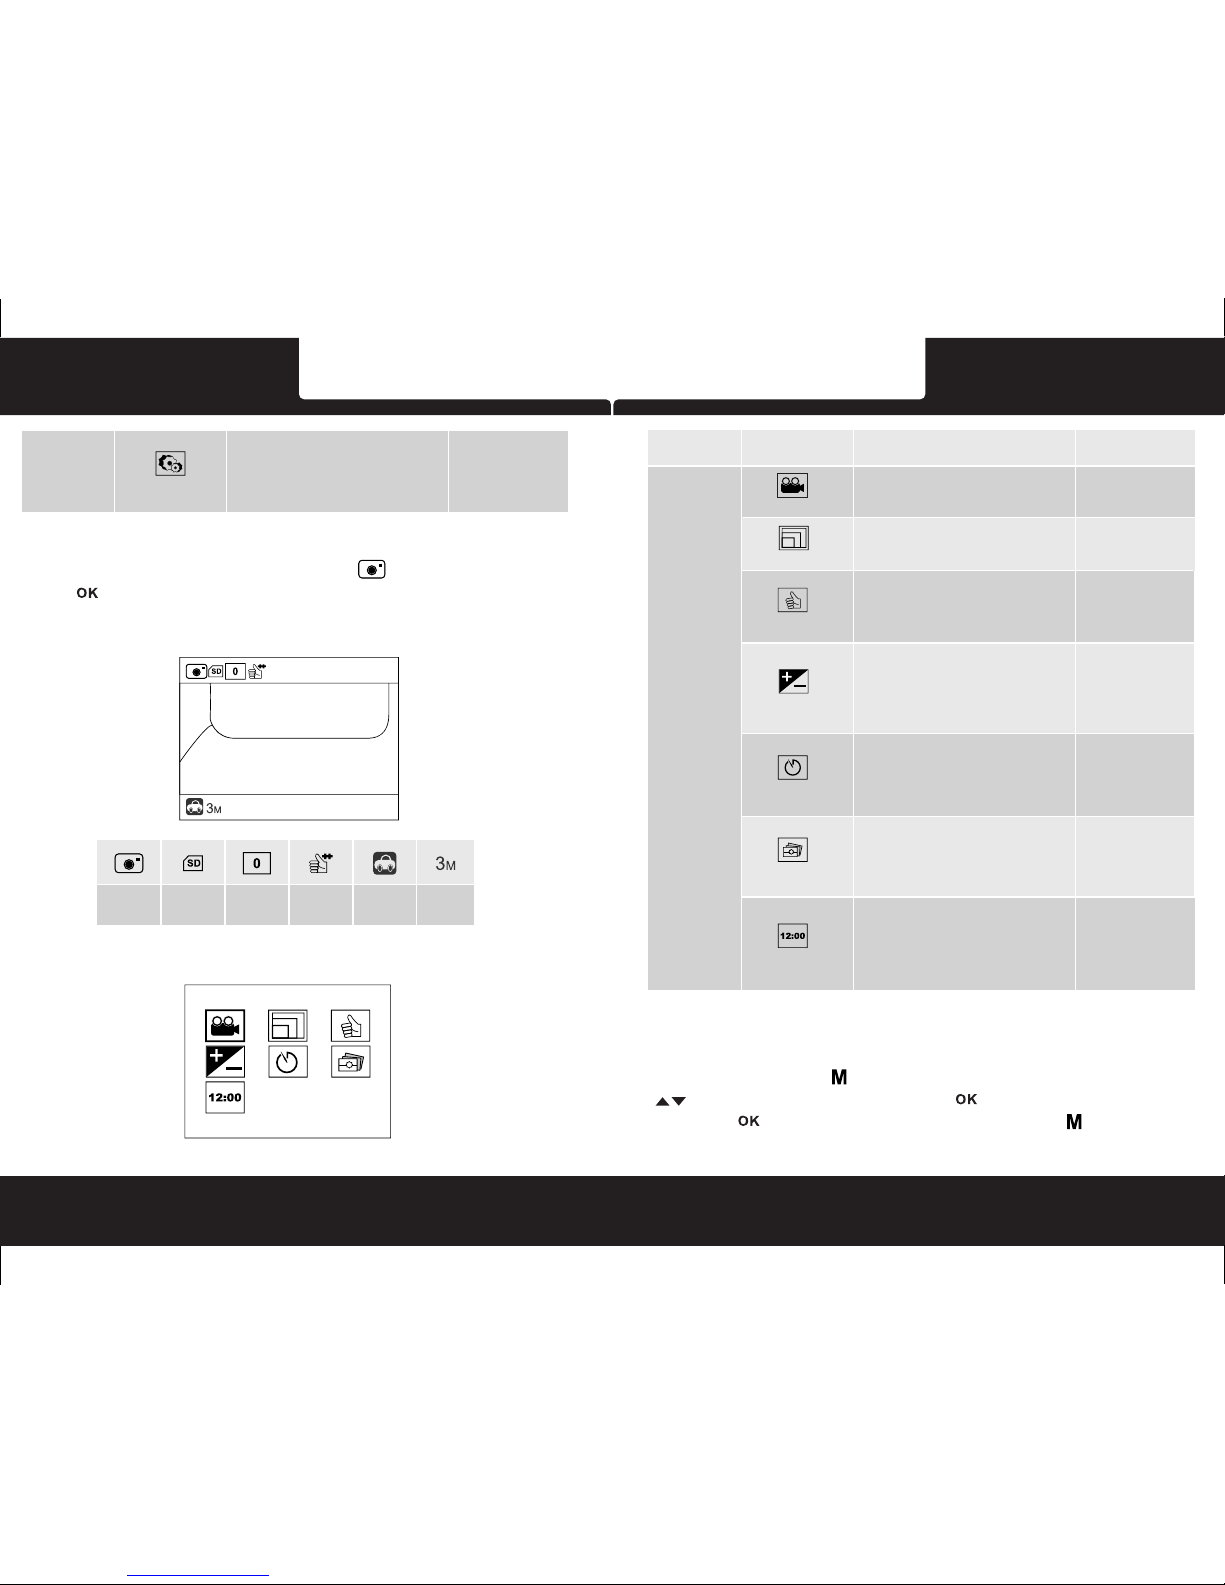
3.2 Taking Picture
To take a picture make sure the Capture Modeis selected. Press the REC
buttonto take a picture. The pictures are saved in TF Card.
3.2.1 Capture Screen
Capture
Mode
SD CARD
STATUS
Photo
Quality
Record
Mode
Resolution
Exposure
Value
3.2. 2Capture Menu Options
Snapshot
Mode
Main Menu
Function List
Description
Available Option
Setting for video mode.
2 in 1/ P anora ma 220
/Rou nd Mode
Set the photo resolution.
12M / 8 M / 5M / 3M
Set the photo quality.
Excellent - This option generates the best
quality for the picture.
Good - Normal quality.
Normal - Poor quality.
-2~2
Manually compensate for low or bright
light levels. The more negative “-“in scale,
the darker the Photo appears. The more
positive “+”, the lighter the recorded
video appears.
0 is the neutral setting for this option and
is the default value.
Set the shooting time.
Off - The drive recorder will taking picture at
once.
3 seconds / 5 seconds / 10 seconds - The
driving recorder will taking picture in 3
seconds / 5 seconds / 10 seconds.
Off / 3 s econd s /
5 sec onds / 10 s econd s
Set to activating burst shooting
Off - Disable to burst shooting photos.
This is the default setting.
3 Image / 5 Image /10 Image - Enable the
driving recorder to burst shooting 3 Image /
5 Image / 10 Image.
Setting for the indication of date and time
stamp on the pictures.
Off - No date or logo is displayed on the
photo.
Date - Only date is displayed on the photo.
Date / Time - Date and time is displayed
on the photo.
Off / D ate&Ti me / Date
Snap shot
Mode
Res ol ut io n
Quali ty
EV
Self Sn ap sh ot
Photo B ur st
Time St am p
Exc ellen t / Good
/ Nor mal
Off / 3 I mage / 5 Im age
/ 10 Im age
3.3 Playback Mode
3.3.1 Playing Videos
Long Press Mode buttonswitch to playback mode, press Up / Down button
to review videos, press REC buttonto playing video, then press
REC buttontopause the playing, press Mode buttonto stop playing.
Pola roid · S3601W-24
Pola roid · S3601W-24
Page 9
EN -13 EN -14
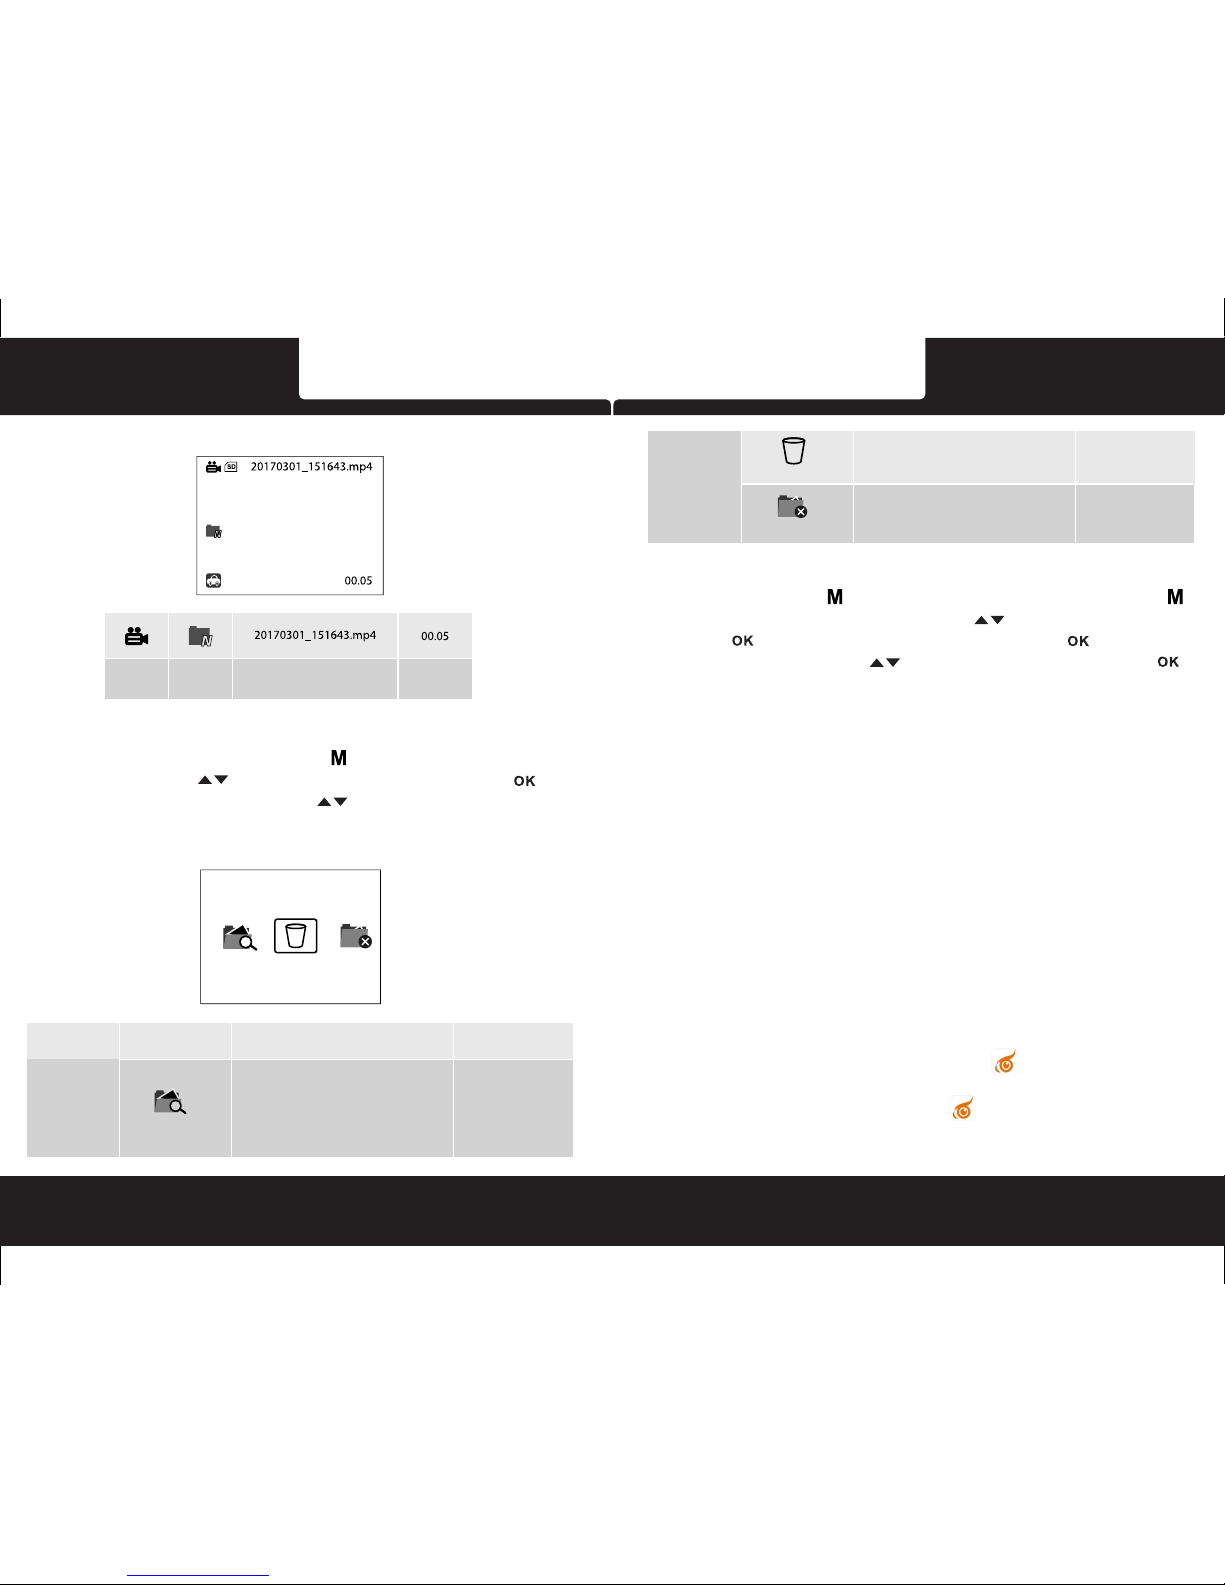
3.3.2 Play Video Screen
Video
Video folder
File name Record Time
3.3.3 Viewing Pictures
In the Playback mode, Press Menu button to enter menu setting, and
press Up / Down button to select Folder, hen press OK button to
enter sub menu, press Up / Down button to select snapshot file.
3.3.4 Playback Menu Options
Playb ac k
Folde r se le ct
A single video or photo to be deleted from the
micro SD memory card per action.
Delete the folder include
normal / event / snapshot.
Delet e Fi le
Delet e Fo ld er
3.3.5 Deleting Files
Long press modebutton switch to Playback mode pressMenubutton to
enter Playback menu pressUp / Downbutton to select Delete, then press
OK button to select Delete Current, press OKbutton to enter sub
menu, pressUp / Downbutton to select OK, then press OK button to
confirm the erase.
To delete all the files in the SD card, including videos, pictures and any other
files, please format the SD card.
Note: Deleted files cannot be recovered. Ensure the files have backup
before deletion.
4 HDMI Interface
Connect the device to the high definition Television Set by the HDMI cable,
switch the TV set to the HDMI status. In this case, the LCD will be turn off, all
the operation manual and display will be showing in the TV screen. However,
the operation procedure will all be the same as the display showing in the
LCD screen.
5Wi-Fi Connecting
The camera built-in Wi-Fi allows you to connect to your mobile devices via the
App. The specific steps are as follows:
1.Install the App on your mobile devices.
1.1Android system search keywords "OTCam"to download and install
on Android market, Baidu mobile guards and other security market.
1.2 IOS system search keyword "OTCam" to download and install on APP
Store.
1.3PoweronthecameraandturnonWi-Fi,searchthehotspotIDfromWi-Filist
Main Menu
Function List
Description
Available Option
Folder Select-Select Normal/Event/Snapshot
file.
Normal-Storenormal cycling recording
videos. Can be overwritten.
Even-Store A key protection videos and
G-sensor protected videos, cannot be
overwritten.
Snapshot-Store the pictures.
0-1 0
Folde r Se le ct
Play ba ck
Pola roid · S3601W-24
Pola roid · S3601W-24
Page 10

EN -15
in your mobile devices and then enter the password to connect it.
Hotspot ID: DVR360-WIFI
Hotspot password: 87654321
Open the App after connection, then you can control the camera through your
mobile devices.
LCD display 2.5"IPS high definition panel
Image sensor
1440 x 1080 30fps
1920 x 1080 30fps
Vid eo r es ol ut io n
Photo resolution
3M
Vid eo f or ma t
MP4
Photo format
JPG
Memory
Support up to 64GB Class 10 Micro SDHC
Microphone
Built-in
Speaker
Built-in
G-sensor
Yes
Power source
BMW Cable 12V Power supply
Wi-Fi
Support(802.11b/ g/ m)
Interface
Mini USB port, TF c ar d sl ot, H DM I
Dimensions
Wei gh t
Vie w an gl e
360˚ Panorama, 360° dual screen mode ,
220˚ wide angle lens, F/1.8
Video comp ress io n
H.264
6 Spec ificat ions
Operating
temperature
0°~ 45° C
5MP COM S Se ns or
Pola roid · S3601W-24
EN -16
Pola roid · S3601W-24
7 Frequently Ask ed Questions
7.1 Micro SD card does not display o r cannot read.
·Make sure using c lass 10 (on or above) Micro SD card.
·Format Micro SD c ard before using.
7.2 Cannot power on or crash.
·Check the power c onnection ensure the indicator light o f car charger turns
on, connect to th e camera charging about 30 minute s.
·Remove the Micr o SD card and reset the camera, then pr ess pow er button
power on the came ra.
7.3 Automatically stops recor ding when recording.
·Check whether t he video recorded in the camera playback m ode is fully
protected.
·Make sure cycle r ecording function has been set, and Micr o SD card has
been formatte d.
7.4 The camera preview screen ha s horiz ontal streak interference.
·According to th e local power supply frequency, set t he corresponding
50HZ or 60HZ.
·It is a normal phen omenon that in the event of generator powe r generation
may lead to horiz ontal streak more obvious.
7.5 When computer plays record ed vide os, the video is not coheren t.
·Copy the record ed videos from Micro SD card to the com puter h ard drive.
·Replace the Mic ro SD card according to the actual situati on.
7.6 The recorded video is fogged .
·Check the lens fil m is take off, or the lens or windscreen of ve hicle may not
clean. If the pro blem remains, try to restart the ca mera. The problem is still
not resolved, t hen please contact our authoriz ed deal ers.
7.7 When connec t to Wi-Fi the c amera t emperature rise up is normal
phenom enon.
Friendly remi nder: If the problem cannot be solv ed, ple ase contact our
authorized de alers will provide after-sales servi ce to customers directly,
including ret urn, replacement and technical suppo rt.
69x104x52mm
132g
Page 11

全高清 1080p 行車記錄儀
S3601W-24
China toll free No.:
400-8401 030
(For other region, please
contact the local agent.)
使用說明書
Page 12

EN-1
有關本手 冊 .... .. ... .. ..... .. ... .. ... .. ..... .. ... .. ... .. ... .. .. ... .. ... .. ... .. .. ... .. ... .. ... .. ..... .. ... .. .1
安裝須知 ... .. ... .. ... .. ..... .. ... .. ... .. ..... .. ... .. ... .. ... .. .. ... .. ... .. ... .. .. ... .. ... .. ... .. ..... .. ... .. 1
安全注意 事項 .. ... .. ... .. ... .. .. ... .. ... .. ... .. ..... .. ... .. ... .. ... .. .. ... .. ... .. ... .. .. ... .. ... .. ... .. .. ..1
1 導論 . .. ... .. .. ... .. ... .. ... .. ..... .. ... .. ... .. ... .. .. ... .. ... .. ... .. .. ... .. ... .. ... .. ..... .. ... .. ... .. ... .. .3
1.1 功 能 .. ....... ..... ....... ..... ....... ..... ..... .. ..... ..... ....... ..... ....... ..... ..... .. ..... ..... ....... ..... ....... 3
1.2 包 裝内容 .. .. ..... ..... ....... ..... ....... ..... ..... .. ..... ..... ....... ..... ....... ..... ....... ..... ..... .. ..... ..... 3
1.3 產 品概要 .. .. ..... ..... ....... ..... ....... ..... ..... .. ..... ..... ....... ..... ....... ..... ....... ..... ..... .. ..... ..... 4
2 開始 . .. ... .. .. ... .. ... .. ... .. ..... .. ... .. ... .. ... .. .. ... .. ... .. ... .. .. ... .. ... .. ... .. ..... .. ... .. ... .. ... .. .5
2.1 插入存儲 卡 .. ..... ....... ..... ..... .. ..... ..... ....... ..... ....... ..... ....... ..... ..... ....... ..... ....... ..... ....5
2.2 安裝於車 内 .. ..... ....... ..... ..... .. ..... ..... ....... ..... ....... ..... ....... ..... ..... ....... ..... ....... ..... ....5
2.2.1 連接 電源 ……………… …………… ……….... ..... ....... ..... ..... .. ..... ..... ....... ..... ....... ..... .…5
2.2.2 安裝位置 …………… ………………… …………… ………………. ..... ....... ..... ..... .. ..... ..... .…6
2.3 設備開/關機 . ..... ..... ....... ..... ....... ..... ..... .. ..... ..... ....... ..... ....... ..... ..... .. ..... ..... ....... ..... 6
2.3.1 自動開/關機 ... ....... ..... ..... .. ..... ..... ....... ..... ....... ..... ..... .. ..... ..... ....... ..... ....... ..... ..... 6
2.3.2 手動開/關 機及重置設備 ... .. ..... ..... ....... ..... ....... ..... ..... .. ..... ..... ....... ..... ....... ..... ....6
2.3.2. 1 手動開/關機 ..... ....... ..... ....... ..... ..... .. ..... ..... ....... ..... ....... ..... ..... .. ..... ..... ....... ....6
2.3.2. 2 重置設備 ... ..... ....... ..... ....... ..... ....... ..... ..... .. ..... ..... ....... ..... ....... ..... ..... .. ..... ..... .7
2.4 時間設定 ....... ....... ..... ..... ....... ..... ....... ..... ....... ..... ..... .. ..... ..... ....... ..... ....... ..... ..... .. .7
2.5 模式選擇 ....... ....... ..... ..... ....... ..... ....... ..... ....... ..... ..... .. ..... ..... ....... ..... ....... ..... ..... .. .7
3 使用行車記錄儀 .... .. ... .. ... .. .. ... .. ... .. ... .. ..... .. ... .. ... .. ... .. .. ... .. ... .. ... .. .. ... .. ... .. ... .7
3.1.1 錄影畫面 ...... ..... ..... ....... ..... ....... ..... ....... ..... ..... .. ..... ..... ....... ..... ....... ..... ..... .. ..... .8
3.1.2 一鍵保護 ...... ..... ..... ....... ..... ....... ..... ....... ..... ..... .. ..... ..... ....... ..... ....... ..... ..... .. ..... .8
3.1.3 停車監控 ...... ..... ..... ....... ..... ....... ..... ....... ..... ..... .. ..... ..... ....... ..... ....... ..... ..... .. ..... .8
3.1.4 重力感應 ...... ..... ..... ....... ..... ....... ..... ....... ..... ..... .. ..... ..... ....... ..... ....... ..... ..... .. ..... .9
3.1.5 切換錄影 模式 ……… …………….. ..... ....... ..... ....... ..... ..... .. ..……. ..... ....... ..... ....... ..... 9
3.1.6 關 閉/開啓錄音 ... ....... ..... ....... ..... ..... ....... ..... ....... ..... ....... ..... ..... .. ..... ..... ....... ..... .9
3.1.7 打開 Wi- Fi . ..... ....... ..... ..... .. ..... ..... ....... ..... ....... ..... ..... .. ..... ..... ....... ..... ....... ..... ..9
3.1.8 進入 錄影模式菜單 …… ………………… …………… ……..... ..... ....... ..... ....... ..... ..... .. ..... 9
3.1.9 錄影 模式菜單選 項 . ..... ..... ....... ..... ....... ..... ..... .. ..... ..... ....... ..... ....... ..... ....... ..... ....9
3.2 圖像拍攝 . .. ..... ..... ....... ..... ....... ..... ....... ..... ..... ....... ..... ....... ..... ....... ..... ..... .. ..... ..... .11
3.2.1 圖像 拍攝畫面 .. ..... ....... ..... ....... ..... ....... ..... ..... .. ..... ..... ....... ..... ....... ..... ..... .. ..... ..11
3.2.2 圖像 拍攝菜單選 項 ..... ....... ..... ....... ..... ..... .. ..... ..... ....... ..... ....... ..... ....... ..... ..... .. ..11
3.3 回放模式 ... ..... ....... ..... ....... ..... ....... ..... ..... .. ..... ..... ....... ..... ....... ..... ..... .. ..... ..... .....12
3.3.1 播放錄影 ..... ..... ..... .. ..... ..... ....... ..... ....... ..... ....... ..... ..... ....... ..... ....... ..... ....... ..... 12
3.3.2 錄 影回放畫面 ..... ..... .. ..... ..... ....... ..... ....... ..... ..... .. ..... ..... ....... ..... ....... ..... ....... ...13
3.3.3 瀏覽 照片…… ……… ……… ……… ……… ……… ……. .............. ... ... ... ... ... ... ... ... ... .......13
3.3.4 錄影回放/照 片瀏覽菜單 選項 …………… ………………… ..... ....... ..... ..... ....... ..... ....13
3.3. 5 删除文 件 …………… …………… …………… ……….. ..... ..... .. ..... ..... ..... ..... ..... ..... ..... ..14
4 HDM I 高清功能 ... ... .. ... .. ... .. ..... .. ... .. ... .. ... .. .. ... .. ... .. ... .. .. ... .. ... .. ... .. ..... .. ... .1 4
5 Wi -F i 連接 …… …… ……… …… ……… …… ……… …… …………… …… ….. .. ... .. ..1 4
6 技術規格 .. .. ... .. ... .. .. ... .. ... .. ... .. ... .. ... .. ... .. ... .. ... .. ... .. .. ... .. ... .. ... .. ... .. ... .. ... .. ..1 5
7 行車 記錄儀常 見問題 及解決方 法. .. . ... ... . .. . ... . .. . ... ... . .. . ... ... . .. . ... ... . .. . ... . .. . ... ... 1 6
Pola roid · S3601W-24
Page 13

有關本手冊
本手冊中的內容資訊僅供參考,如有更改,恕不另行通知。本公司已儘量確保本使
用手冊的正確與完整,但有任何錯誤與遺漏,概不負責。廠家保留不需事先通知,
直接更改技術規格的權利。
安裝須知
· 本產品應安裝在靠近後視鏡之處,並儘量接近前擋風玻璃中央位置,以獲得最好的
視野。
· 確定鏡頭是在擋風玻璃雨刷的範圍內,確保視野良好,即使雨天也同樣好。
· 鏡頭上的保護膜會影響錄影或拍照效果,使用前務必撕掉鏡頭上的保護膜。
· 不要用手指觸摸鏡頭。手指上的油脂可能會留在鏡頭上,導致攝像或攝影不清楚。
定期清潔鏡頭。
· 不要將產品安裝在有色車窗上。因為這樣會損壞淺色薄膜。
· 確定安裝位置不會受有色車窗的阻礙。
· 本設備僅適用產品所附之車載充電器,請勿使用其他廠牌以免設備燒毀或導致電池
爆炸。
如本指南未說明,請勿拆卸或改動本產品的任何配件或零部件。
安全注意事項
· 使用者須遵守當地法律並以行車安全為優先考量,請勿於行車中操作本設備。
· 使用設備前請先確認日期與時間已設置完成。
· 本產品使用時會變熱,這屬於正常現象。
· 請勿將本產品靠近熱源或與火焰、高溫接觸。
· 請勿將本產品靠近產生強大電磁場的設備或環境,與強磁場接觸可能會導致發生
故障或資料損壞、丟失。
TC- 2TC- 1
· 本設備僅供使用於非商業用途,適用法律允許的最大限度內,本公司對使用者因
使用本設備造成之損失不承擔任何責任。
· 產品使用或操作不當可能導致產品或其附件損壞,並會使保修失效。
開始使用本設備視為同意以上聲明事項。
Pola roid · S3601W-24
Pola roid · S3601W-24
Page 14

1 導論
謝謝購買這套先進的行車記錄儀。這套設備專門用在行車時的即時錄影、錄音。
1.1 功能
· 全高清全景行車記錄儀
· FDH 1920 X 1080p @30fps
· 5 萬像素 CMOS 傳感器
· 2.5 吋彩色液晶顯示屏
· 360 度全景圓模式/ 360 度全景二分割模式/ 220 度超廣角模式, F1.8 光圈
· 內置 Wi-Fi 模組
· 3 軸 G-Force 傳感器
· 内置 WDR(寬動態範圍)
· 弱光超强夜視模式
· 無縫循環錄影
· 移動偵測功能
· 停車監控模式(24小時)
·
(建議使用快速卡:讀取速度 95MB 每秒,寫入速度 60MB 每秒)
1.2 包裝內容
以下為包裝清單。如果有任何遺漏或損壞項目,請立即聯繫您的經銷商,外觀請
依實際內容物為主。
TC- 4TC- 3
包裝內容
行車記錄儀
使用說明書、保用證、
快速入門手冊
1. 3 產品 概要
寶馬線
1
7
6
5
10
9
2 3
4
8
1
2
3
4
5
6
7
8
9
10
USB 接口
電源線出 口
HDMI 接 口
向上鍵
向下鍵
菜單鍵/ 模式 鍵
確認键/ 錄影 鍵
紅外燈
TF 卡槽
復位鍵
Pola roid · S3601W-24
Pola roid · S3601W-24
支援 Micro SDHC 等級 10 或以上,高達 64GB 的外置 microSD 存儲卡(不包含)
Page 15

TC- 6TC- 5
2 開始
2.1 插入存儲卡(不包含)
按產品絲印指示方向插入存儲卡,推入存儲卡直到咔噠一聲,插入定位爲止。
取出存儲卡
往裏推存儲卡,彈出插槽。
注意:
1. 設備在開機狀態時,不要取出或插入存儲卡,以免損壞存儲卡。
2. 請使用 microSD 卡等級 10 以上,最高支援 64GB。
(建議使用快速卡:讀取速度 95MB 每秒,寫入速度 60MB 每秒)
3. 使用前請先格式化 microSD 存儲卡。
4. 爲便於用戶易于取出存儲卡,存儲卡插槽具有彈片特性,故取出存儲卡時請小
心存儲卡快速彈出而導致遺失。
2.2 安裝於車内
2.2.1 連接電源(建議專業人士安裝)
← 黄线(BAT+)接入汽車 電瓶正極
红线(ACC)接入汽車打火 器開關
黑线(GN D)接地。
2.2.2 安装位置
← 將 3M 膠撕掉 ,貼在前面玻璃上,
安裝位置 以鏡頭朝下 360 度二分
割模式下 ,LCD 預覽上分割能看
到車頭前 方和下分割能看到左右
車窗及后 擋風玻璃。
2.3 設備 開/ 關機
2. 3. 1 自動開/ 關 機
汽車引擎 一旦發動,設備就自動開機并開 始錄影(須有 TF 卡情況下)。
汽車引擎 停止后,設備會自動保存最後錄 製的文檔并切換到停車監控模式 。
2. 4. 2 手動開/ 關 機及重置設備
2. 4. 2.1 手動開/ 關機
長按OK鍵 3 秒開 機,再長按 OK
鍵 3 秒關機。
OK
OK
← 將機器主 線連接到汽車拉出來的
寶馬線母 頭接口上。
Pola roid · S3601W-24
Pola roid · S3601W-24
(不包含)
Page 16

TC- 8TC- 7
2.3. 2.2 重置設備
當設備因 不明因素導致無法正常操作,
請用针状 物插入復位孔,按壓内部復位
鍵即可, 在設備關機后,再長按 OK 鍵
3秒開機。
2. 4 時間 設定
開機后按 菜單鍵 進入功能表菜單,再按向上/ 向 下鍵 選擇到日期/ 時
間,再按 O K 鍵 進入日期和時間設置,按向上/ 向下 鍵 調整數值,按
OK 鍵 進入下 一項設置,全部完成正確設置後 ,再按 OK 鍵 確認并返
回到設置 功能表,再短按菜单鍵 退出菜單設 置。
2.5 模式 選擇
出廠預設 設置爲錄影模式 ,長按菜單鍵 依次可 切換到圖形拍攝模式
,回放模 式 。
3 使用行車 記錄儀
開始錄影 前,請確保已選擇錄影模式并已 插入 TF 卡。按錄影鍵 開始錄像 ,
錄影圖示 閃 爍;錄影檔案保存在 TF 卡上;若需 停止錄影,請再按錄影鍵 。
如設備在 車内連接車載充電器,預設設置 爲汽車引擎開啓時自動開機并開 始錄
影,汽車 引擎停止后保存文檔并切換到停 車監控模式。
3.1.1 錄影畫面
錄影模式
解析度
日期時間
3.1.2 一鍵保護
在錄音過程中,按菜單鍵 進行一鍵保護當前錄影片段,有”鎖定當前文件“
提示,且顯示屏的右下角會出現鎖形圖示 ,這時錄製的當前片段(時長取決
於單段影片時間設置,默認 3 分鐘)會被保護起來,被保護的片段不會被替換;
下一個錄影片段會自動取消錄影保護。
3.1.3 停車監控
3.1 .3.1 當汽車引擎熄火後,設備會自動切換爲停車監控模式。
3.1 .3.2 顯示屏會提示需切換到 360 度全景二分割模式,且顯示屏左下角會顯示
一個“P”字。
3.1 .3.2 此時需手動將鏡頭旋轉至朝下方向,方可進行 5 幀/秒 3 60 度全方位錄影
停車監控。
3.1 .3.3 當周圍環境亮度很暗時,設備會自動開啓紅外 L ED 補光,切換到黑白影
像錄影。
3.1 .3.4 當長時間錄影導致汽車電瓶電壓低至 1 2V 時,會自動保護當前錄影并自
動關機,防止汽車電瓶虧電導致無法打火。
3.1.3.5 當錄製時每小時會有滴滴提示音。
OK
OK
OK
OK
OK
OK
麥克風
寬動態
錄音時間
行車模式
SD卡圖標
Pola roid · S3601W-24
Pola roid · S3601W-24
Page 17

TC- 1 0TC- 9
3.1.4 重力感應
當行車時遇到碰撞、搖晃或震動等情況時,預設設置設備會自動啓動重力感應功
能,這時顯示屏上方會提示“鎖定當前文件”并有 顯示,當前錄製片段會被
保護起來不會被替換。
3.1.5 切換錄影模式
錄影模式下,按向上鍵 可切換 360 度二分割和 220 度超廣角錄影模式。
3.1.6 關閉/ 開啓錄音
錄影模式下,按向下鍵 可關閉/ 開啓錄音。
3.1.7 打開 W i- Fi
錄影模式下,長按向下鍵 可關閉/ 開啓 Wi-Fi。
3.1.8 進入錄影模式菜單
短按菜單鍵 進入錄影模式菜單,再按向上/ 向下鍵 來選擇功能表,再按
錄影鍵 進入選項,按向上/ 向下鍵 確定所要的選項,再按錄影鍵
確認。完成設置後,按菜單鍵 可退出菜單設置。
3.1.9 錄影模式菜單選項
主菜單
功能選項
描 述
選 項
設置錄影模式。
360 度 全景模式/
220 度 超廣角模式/
360 度 全景圓模式
設置循環錄影時間的片段時間。
關閉 - 選擇此選項在卡錄滿時會自動停止錄像。
1 分鐘/ 3 分鐘/ 5 分鐘 - 設置循環錄像分段單
個錄像片段時間。例如選擇 3 分鐘,則循環錄
像的每個錄像片段爲 3 分鐘,如果錄像 21 分鐘,
則會有 7 個 3 分鐘的錄像片段。
關閉/ 1 分鐘/
3 分鐘/ 5 分鐘
設置重力感應碰撞的靈敏度。
關閉 - 關閉重力感應功能,碰撞時不會重力感應
保護當前文檔。
超高/ 高/ 中/ 低 - 重力感應的靈敏度等級越高就
越容易感應到碰撞,保護當前文檔。
關閉/ 超高/ 高/ 中/ 低
設置本機的時間/日期和日期格式。
設置在錄像過程中是否關屏省電以及關屏時間。
關 - 不關屏省電,默認設置此選項。
1 分鐘/ 3 分鐘/ 5 分鐘 - 錄像時在 1 分鐘/ 3 分
鐘/ 5 分鐘内如果無操作,會自動關屏。
注:選擇自動關屏時間後,會繼續錄像,可以
按任一鍵開屏。
关闭/ 1 分鐘/
3 分鐘/ 5 分鐘
設置各國語言。
依據客 戶需求
開啓或關閉錄影時的聲音。
關閉 - 關閉聲音,錄影的文件爲無聲。
打開 - 開啓聲音。此選項爲默認設置。
打開/ 關閉
系統設定
模式
系统设定
模式
循环录影
G-sen so r
靈敏度
日期&時間
省電模式
語言
麥克風
格式化
恢復預設值
格式化存儲卡。
確認 - 選擇此選項確認格式化。
退出 - 選擇此選項放棄格式化動作。
警告: 選擇格式化後,所有的錄像及照片文件
會被全部刪除,不可恢復。
確認/ 退出
恢復出廠設置及顯示當前的軟件版本號。
此信息對售後服務很重要。
確認/ 退出
Pola roid · S3601W-24
Pola roid · S3601W-24
Page 18

TC- 1 1 TC - 12
3.2 圖像拍攝
拍照前,請確保已選擇拍照模式 ,再按拍照鍵 拍照,照片會保存在 TF 卡上。
3.2.1 圖像拍攝畫面
拍照模式
SD 卡圖標
拍照品質
行車模式
圖片解析度
自動曝光值
3.2.2 圖像拍攝菜單選項
拍照模式
時間水印
主菜單
功能選項
描 述
選 項
設置錄影模式。
360 度 全景模式/
220 度 超廣角模式/
360 度 全景圓模式
設置所要拍攝照片的分辨率。
12M / 8 M / 5M / 3M
設置照片質量。
高 - 最好的照片質量。
中 - 標準的照片質量。
普通 - 較差的照片質量。
高/ 中/ 普通
手動調整補光。負值越大,光綫會越暗,正值
越大,光綫越明亮。此選項的默認設置是 0,
爲自然的光亮度。
設置定時自動拍照。
關閉 - 按錄影鍵立即拍照。
3 秒/ 5 秒/ 10 秒 - 設置按錄影鍵後在 3 秒/
5 秒/ 10 秒後進行拍照。
關閉/ 3 秒/ 5 秒/ 10 秒
開啓或關閉連續拍照。
關閉 - 不連拍。
三連拍/ 五連拍/ 十連拍 - 按錄影鍵後會連續拍
照三张/ 五张/ 十张。
關閉/ 三連 拍/
五連拍/ 十 連拍
設置顯示在拍照文件上的信息。
關 - 無日期或商標信息在拍照文件上。
日期 - 僅顯示日期信息在拍照文件上。
日期&時間 - 顯示日期和時間在拍照文件上。
關閉/ 日期/ 日 期&時間
拍照模式
模式
解析度
拍照品質
EV 值
自拍
連拍
時間水印
-2~2
3. 3 回放 模式
3. 3. 1 播放錄 影
長按模式 鍵 切換到回放模式,按向上/ 向下鍵 選擇 所需的影片,按
錄像鍵 播放 ,再按錄像鍵 暫停播放,按菜單鍵 停 止播放。
Pola roid · S3601W-24
Pola roid · S3601W-24
Page 19

TC- 1 3 TC - 14
影片圖標
錄影文件夾
3. 3. 2 錄影回 放畫面
文件夾名稱
錄影時間
3. 3. 3 瀏覽照 片
短按菜單 鍵 進入回放菜單,按向上/ 向下鍵 選擇到 拍照模式,按 OK
鍵進入照 片文件夾,根據所需要可以瀏覽 全部或每日的照片。
3.3. 4 錄影回 放/照片瀏覽菜單選項
回放
删除文件
刪除單個存儲卡上所有日期的視頻或照片。
删除普通,事件,照片目錄。
解析度
拍照品質
3. 3. 5 刪除文 件
長按模式 鍵 切換到錄影回放/ 照片瀏覽模式,再 按菜單鍵 進入回放菜
單,按向 上/ 向下鍵 選擇“删除檔案”,再按錄 影鍵 進入删除子菜單,
按向上/ 向下 鍵 選擇需要删除的錄影文檔或照片 所在文件夾,再按錄影鍵
進入该文 檔文件夾,按向上/ 向下鍵 選擇 確認需 要删除的文檔或照
片,再按 錄影鍵 確認删除。如要删除目錄( 包括錄影文件、照片、以 及
存入 SD 卡的 所有文件),請選擇删除目錄。
注:删除 的文件 不能恢復。删除前,請確保文件 留有備 份。
4 HDMI 高 清功能
用 HDMI 線 將設備連接到高清電視,并將電 視調節到高清狀態,此時 顯示屏 關
閉,畫面 會顯示到高清電視上,設備可進 行視頻回放,删除等操作。
5 Wi -F i 連接
本設備可 跟安卓,苹果系統的手機或平板 電腦通過 Wi-Fi 連接,具 體操作 步驟
如下:
1. 在 手機或 平板電腦上安裝 App ;
1.1 安卓 系統可在安卓市場,百度手機助 手等平臺搜索關鍵字“OTCam” ,
按提示下 载安裝。
1.2 苹果 系統可在 App sto re 上搜索關鍵詞“OTCam” 下載安裝。
2. 開啓記 錄儀并打開 Wi-Fi 後,可以用手 機或平板搜索此 Wi-Fi 熱 點進行 連接;
熱點名稱 :DVR360-WIFI
熱點密碼 :87654321
3. 在連接 後再打開 APP ,就可以在手機上進 行各項參數設置及功能使 用了。
主菜單
功能選項
描 述
選 項
目錄選擇 - 可選擇普通錄影、保護錄影和照片
的文檔。
普通 - 存放正常行車記錄影片,可循環錄影,
可刪除。
事件 - 存放一鍵保護或 G-sensor 保護影片。
不可删除拍照模式 - 存放所拍攝的照片。
0-1 0
回放模式
模式
Pola roid · S3601W-24
Pola roid · S3601W-24
Page 20

TC- 3
Pola roid·DS231GSW
TC- 1 5
顯示器
2.5 吋高清亮屏
影像傳感器
1440 x 1080 30 fp s
1920 x 1080 30 fp s
影像分辨率
照片分辨率
3M
錄像格式
MP4
照片格式
JPG
存儲卡
最高支援 64GB Micro SDHC Class 10
麥克風
是
揚聲器
是
重力感應
是
工作電壓
寶馬線 12V 供電
Wi-Fi
支持(802.11 b/ g/ m)
接 口
Mini USB 接口、T F 卡槽 ,HD MI 接 口
尺 寸
重 量
視 角
220 度超廣角模式/ 3 60 度 全景 二分 割模式/ 360 度全景圓模 式
存儲壓縮方式
H.264
工作溫度
0°~ 45° C
6 技術規格
5 MP CO MS 傳感器
Pola roid · S3601W-24
Pola roid · S3601W-24
TC- 1 6
7 行車記錄儀常見問題及解決方法
7.1 TF 卡無顯示或不讀卡
· 確保使用的 TF 卡是 10 級及以上的 TF 卡。
· 在使用前在機器里格式化 TF 卡。
7.2 不開機,死機
· 檢查電源綫是否正常,確保車充燈亮,并連接機器充電 30 分鐘左右。
· 拔出卡后復位機器,再按開機鍵看是否能開機。
7.3 拍攝錄影時自動停止
· 檢查機器回放模式所錄視頻是否全部保護。
· 確保已設置好自動循環錄影,格式化 TF 卡。
7.4 機器預覽畫面有橫條紋干擾
· 根據當地供電頻率,設置相應的 50HZ 或者 60HZ。
· 如遇到發電機發電,可能導致橫條紋更明顯,爲正常現象。
7.5 視頻用電腦播放時卡機,視頻不連貫
· 將卡拷貝到電腦硬盤播放。
· 根據實際情況更換高速 Class10 TF 卡。
7.6 拍攝視頻出現蒙霧的情況
· 檢查鏡頭膜是否撕掉,或者是因爲鏡頭或者車身擋風玻璃不乾净。如上都沒問
題,將機器重啓。問題仍不能解決的話就要咨詢售後。
7.7 當機器連接 Wi-Fi 時,機器的溫度高屬正常狀態
友情提示: 如上述方式不能解決機器問題,請聯絡我們的授權經銷商直接提供售
後服務,包括返還,更換及技術支持。
69x104x52mm
132g
Page 21

全高清 1080p 行车记录仪
S3601W-24
China toll free No.:
400-8401 030
(For other region, please
contact the local agent.)
使用说明书
Page 22

EN-1
有关本手 册 .. .. ... .. ... .. ... .. .. ... .. ... .. ... .. .. ... .. ... .. ... .. ..... .. ... .. ... .. ..... .. ... .. ... .. ... .. .. ... 1
安装须知 . ..... .. ... .. ... .. ... .. .. ... .. ... .. ... .. .. ... .. ... .. ... .. ..... .. ... .. ... .. ..... .. ... .. ... .. ... .. .. ..1
安全注意 事项 ... .. ... .. ... .. ... .. ... .. ... .. . .. ... .. ... .. ... .. ... .. ... .. ... .. ... .. ... .. ... .. . .. ... .. ... .. ..1
1 介绍 . ... .. .. ... .. ... .. ... .. .. ... .. ... .. ... .. ..... .. ... .. ... .. ... .. .. ... .. ... .. ... .. .. ... .. ... .. ... .. .. ... .. .3
1.1 功能 ..... ....... ..... ....... ..... ..... .. ..... ..... ....... ..... ....... ..... ..... .. ..... ..... ....... ..... ....... ..... ..... 3
1.2 包 装内容 ..... .. ..... ..... ....... ..... ....... ..... ....... ..... ..... .. ..... ..... ....... ..... ....... ..... ..... .. ..... ...3
1.3 产 品概要 ..... .. ..... ..... ....... ..... ....... ..... ....... ..... ..... .. ..... ..... ....... ..... ....... ..... ..... .. ..... ...4
2 开始 . ... .. .. ... .. ... .. ... .. .. ... .. ... .. ... .. ..... .. ... .. ... .. ... .. .. ... .. ... .. ... .. .. ... .. ... .. ... .. .. ... .. .5
2.1 插入存储 卡 ....... ..... ....... ..... ....... ..... ..... .. ..... ..... ....... ..... ....... ..... ..... .. ..... ..... ....... ..... 5
2.2 安装于车 内 ....... ..... ....... ..... ....... ..... ..... .. ..... ..... ....... ..... ....... ..... ..... .. ..... ..... ....... ..... 5
2.2.1 连 接电源 ………… …………… ………………. ..... ....... ..... ....... ..... ..... .. ..... ..... ....... ..... ....5
2.2.2 安装位置 ……… ………………… …………… ………………… ….... ....... ..... ..... .. ..... ..... …...6
2.3 设备开/关 机 .... ..... ....... ..... ....... ..... ....... ..... ..... .. ..... ..... ....... ..... ....... ..... ..... .. ..... ..... ..6
2.3.1 自动开/关 机 . ....... ..... ..... .. ..... ..... ....... ..... ....... ..... ....... ..... ..... .. ..... ..... ....... ..... ....... 6
2.3.2 手动 开/关机及重置设备 . .. ..... ..... ....... ..... ....... ..... ....... ..... ..... ....... ..... ....... ..... ......6
2.3.2. 1 手动开/关 机 ... .. ..... ..... ....... ..... ....... ..... ..... .. ..... ..... ....... ..... ....... ..... ....... ..... ..... 6
2.3.2. 2 重置设 备 . ....... ..... ....... ..... ....... ..... ..... ....... ..... ....... ..... ....... ..... ..... .. ..... ..... ....... .7
2.4 时 间设定 ..... .. ..... ..... ....... ..... ....... ..... ....... ..... ..... .. ..... ..... ....... ..... ....... ..... ..... .. ..... ...7
2.5 模 式选择 ..... .. ..... ..... ....... ..... ....... ..... ....... ..... ..... .. ..... ..... ....... ..... ....... ..... ..... .. ..... ...7
3 使用行 车记录仪 .. .. ... .. .. ... .. ... .. ... .. .. ... .. ... .. ... .. ..... .. ... .. ... .. ... .. .. ... .. ... .. ... .. .. ... .7
3.1.1 录影画面 .... ..... ..... .. ..... ..... ....... ..... ....... ..... ..... .. ..... ..... ....... ..... ....... ..... ..... .. ..... ..8
3.1.2 一键保护 .... ..... ..... .. ..... ..... ....... ..... ....... ..... ..... .. ..... ..... ....... ..... ....... ..... ..... .. ..... ..8
3.1.3 停车监 控 . ....... ..... ..... .. ..... ..... ....... ..... ..... .. ..... ..... ....... ..... ..... .. ..... ..... ....... ..... ....8
3.1.4 重力感 应 . ....... ..... ..... .. ..... ..... ....... ..... ..... .. ..... ..... ....... ..... ..... .. ..... ..... ....... ..... ....9
3.1.5 切换录影模式 ……... ..... ..... .. ..... ..... .....…. ..... ....... ..... ....... ..... ..... ....... …………… …9
3.1.6 关闭/开 启录音 ... ....... ..... ....... ..... ..... .. ..... ..... ....... ..... ....... ..... ..... .. ..... ..... ....... ....9
3.1.7 打开 Wi-F i...... ..... ..... .. ..... ..... ....... ..... ....... ..... ....... ..... ..... ....... ..... ....... ..... ....... ....9
3.1.8 进入录影模式 菜单 … …………… …… …………… ..... .. ..... ..... ....... ..... ....……… ....… ….9
3.1.9 录影 模式菜单选 项 .... ..... ....... ..... ....... ..... ....... ..... ..... .. ..... ..... ....... ..... ....... ..... ..... .9
3.2 图像拍摄 . ..... ..... .. ..... ..... ....... ..... ....... ..... ..... .. ..... ..... ....... ..... ....... ..... ..... .. ..... ..... ...11
3.2.1 图像拍摄 画面 ... ..... ....... ..... ....... ..... ..... .. ..... ..... ....... ..... ....... ..... ..... .. ..... ..... ......1 1
3.2.2 图像拍摄菜 单选项 ... ....... ..... ..... .. ..... ..... ....... ..... ....... ..... ....... ..... ..... ....... ..... .....11
3.3 回放模式 ...... .. ..... ..... ....... ..... ....... ..... ..... .. ..... ..... ....... ..... ....... ..... ....... ..... ..... .. ..... 12
3.3.1 播放录影 ... ..... ....... ..... ....... ..... ..... .. ..... ..... ....... ..... ....... ..... ..... .. ..... ..... ....... ..... .12
3.3.2 录影回放 画面 ... ..... ....... ..... ....... ..... ..... .. ..... ..... ....... ..... ....... ..... ..... .. ..... ..... ......1 3
3.3.3 浏览 照片 ……… ……… ……… ……… ……… ….. ... ... ... ... .............. ... ... ... ... ... ... ... .…. .13
3.3.4 录 影回放/照片浏 览菜单选项 …… ………………… ……... ....... ..... ....... ..... ..... .. ..... ..13
3.3.5 删除文件 ………… ……… ……… ……… ……… ... ... ........ ... ... ... ... ... ... ... ........ ... ... .…. .14
4 HDMI 高清功能 .... .. ... .. ... .. .. ... .. ... .. ... .. ..... .. ... .. ... .. ... .. .. ... .. ... .. ... .. .. ... .. ... .. .14
5 Wi -F i 连接 …… …… ……… …… …… ……… …… ……… …… ……… …… ….. .. .. ... .. .14
6 技术 规格 . .. . .. . .. ... ... ... ... ... ... .. . .. . .. . .. . .. ... ... ... ... ... ... .. . .. . .. . .. . .. ... ... ... ... ... ... .. 1 5
7 行车记录 仪常见 问题及解决 方法.. .. ... ... .. ... .. ... .. . .. ... .. ... .. ... ... .. ... .. ... .. . .. ... .. ... .1 6
Pola roid · S3601W-24
Page 23

SC -2SC- 1
有关本手册
本手册中的内容信息仅供参考,如有更改,恕不另行通知。本公司已尽量确保本使
用手册的正确与完整,但有任何错误与遗漏,概不负责。厂家保留不需事先通知,
直接更改技术规格的权利。
安装须知
· 本产品应安装在靠近后视镜之处,并尽量接近前挡风玻璃中央位置,以获得最好的
视野。
· 确定镜头是在挡风玻璃雨刷的范围内,确保视野良好,即使雨天也同样好。
· 镜头上的保护膜会影响录影或拍照效果,使用前撕掉镜头上的保护膜。
· 不要用手指触摸镜头。手指上的油脂可能会留在镜头上,导致摄像或摄影不清楚。
定期清洁镜头。
· 不要将产品安装在有色车窗上。因为这样会损坏浅色薄膜。
· 确定安装位置不会受有色车窗的阻碍。
· 本设备仅适用产品所附之车载充电器,请勿使用其他厂牌以免设备烧毁或导致电池
爆炸。
如本指南未说明,请勿拆卸或改动本产品的任何配件或零部件。
安全注意事项
· 使用者须遵守当地法律并以行车安全为优先考量,请勿于行车中操作本设备。
· 使用设备前请先确认日期与时间已设置完成。
· 本产品使用时会变热,这属于正常现象。
· 请勿将本产品靠近热源或与火焰、高温接触。
· 请勿将本产品靠近产生强大电磁场的设备或环境,与强磁场接触可能会导致发生
故障或数据损坏、丢失。
· 本设备仅供使用于非商业用途,适用法律允许的最大限度内,本公司对使用者因
使用本设备造成之损失不承担任何责任。
· 产品使用或操作不当可能导致产品或其附件损坏,并会使保修失效。
开始使用本设备视为同意以上声明事项。
Pola roid · S3601W-24
Pola roid · S3601W-24
Page 24

SC -4SC- 3
1. 3 产品 概要
1 介绍
谢谢购买这套先进的行车记录仪。这套设备专门用在行车时的实时摄像与录音。
1.1 功能
· 全高清全景行车记录仪
· FDH 1920 X 1080p @30fps
· 5 万像素 CMOS 传感器
· 2.5 寸彩色液晶显示屏
· 360 度全景圆模式/ 360 度全景二分割模式/ 220 度超广角模式, F1.8 光圈
· 內置 Wi-Fi
· 3 轴 G-Force 传感器
· 内置 WDR(宽动态范围)
· 弱光超强夜视模式
· 无缝循环录影
· 移动侦测功能
· 停车监控模式(24小时)
·
(建议使用快速卡:读取速度 95MB 每秒,写入速度 60MB 每秒)
1.2 包装内容
以下为包装清单。如果有任何遗漏或损坏项目,请立即联系您的经销商,外观请依
实际内容物为主。
行车记录仪
使用说明书、保修卡
快速入门手册
宝马线
打开包装
1
7
6
5
10
9
2 3
4
8
1
2
3
4
5
6
7
8
9
10
USB 接口
电源线出 口
HDMI 接 口
向上键
向下键
菜单键/ 模式 键
确认键/ 录影 键
红外灯
TF 卡槽
复位键
Pola roid · S3601W-24
Pola roid · S3601W-24
支持 Micro SDHC 等级 10 或以上,高达 64GB 的外置 microSD 存储卡(不包含)
Page 25

SC -6SC- 5
2 开始
2.1 插入存储卡(不包含)
按产品丝印指示方向插入存储卡,推入存储卡直到咔嗒一声,插入定位为止。
取出存储卡
往里推存储卡,弹出插槽。
注意:
1. 设备在开机状态时,不要取出或插入存储卡,以免损坏存储卡。
2. 请使用 microSD 卡等级 10 或以上,最高支援 64GB。
(建议使用快速卡:读取速度 95MB 每秒,写入速度 60MB 每秒)。
3. 使用前请先格式化 microSD 存储卡。
4. 为便于用户易于取出存储卡,存储卡插槽具有弹片特性,故取出存储卡时请小
心存储卡快速弹出而导致遗失。
2.2 安装于车内
2.2.1 连接电源(建议专业人士安装)
(不包含)
← 黄线(BAT+)接入汽车 电瓶正极
红线(ACC)接入汽车打火 器开关
黑线(GN D)接地。
2.2.2 安装位置
← 将机器主 线连接到汽车拉出来的
宝马线母 头接口上。
← 将 3M 胶撕掉 ,贴在前面玻璃上,
安装位置 以镜头朝下 360 度二分
割模式下 ,LCD 预览上分割能看
到车头前 方和下分割能看到左右
车窗及后 挡风玻璃。
2.3 设备 开/ 关机
2. 3. 1 自动开/ 关 机
汽车引擎 一旦发动,设备就自动开机并开 始录影(须有 TF 卡情况下)。
汽车引擎 停止后,设备会自动保存最后录 制的文档并切换到停车监控模式 。
2. 4. 2 手动开/ 关 机及重置设备
2. 4. 2.1 手动开/ 关机
长按 OK 键 3 秒开 机,再长按OK
键 3 秒关机。
OK
OK
Pola roid · S3601W-24
Pola roid · S3601W-24
Page 26

SC -8SC- 7
2.3. 2.2 重置设备
当设备因 不明因素导致无法正常操作,
请用针状 物插入复位孔,按压内部复
位键即可 ,在设 备关机后,再长按
OK 键 3 秒开机 。
2. 4 时间 设定
开机后按 菜单键 进入功能表菜单,再按向上/ 向 下键 选择到日期/ 时
间,再按 O K 键 进入日期和时间设置,按向上/ 向下 键 调整数值,按
OK 键 进入下 一项设置,全部完成正确设置后 ,再按 OK 键 确认并返
回到设置 功能表,再短按菜单键 退出菜单设 置。
2.5 模式 选择
出厂预设 设置为录影模式 ,长按菜单键 依次可 切换到图形拍摄模式
,回放模 式 。
3 使用行车 记录仪
开始录影 前,请确保已选择录影模式并已 插入 TF 卡。按录影键 开始录像 ,
录影图示 闪 烁;录影档案保存在 TF 卡上;若需 停止录影,请再按录影键 。
如设备在 车内连接车载充电器,预设设置 为汽车引擎开启时自动开机并开 始录
影,汽车 引擎停止后保存文档并切换到停 车监控模式。
3.1.1 录影画面
录影模式
解析度
日期时间
3.1.2 一键保护
在录影过程中,按菜单键 进行一键保护当前录影片段,有“锁定当前文件”
提示,且显示屏的右下角会出现锁形图示 ,这时录制的当前片段(时长取决
于单段影片时间设置,默认 3 分钟)会被保护起来,被保护的片段不会被替换;
下一个录影片段会自动取消录影保护。
3.1.3 停车监控
3.1 .3.1 当汽车引擎熄火后,设备会自动切换为停车监控模式。
3.1 .3.2 显示屏会提示需切换到 360 度全景二分割模式,且显示屏左下角会显示
一个“P”字。
3.1 .3.2 此时需手动将镜头旋转至朝下方向,方可进行 5 帧/秒 3 60 度全方位录影
停车监控。
3.1 .3.3 当周围环境亮度很暗时,设备会自动开启红外 L ED 补光,切换到黑白影
像录影。
3.1 .3.4 当长时间录影导致汽车电瓶电压低至 1 2V 时,会自动保护当前录影并自
动关机,防止汽车电瓶亏电导致无法打火。
3.1.3.5 当录制时每小时会有滴滴提示音。
OK
OK
OK
OK
OK
OK
麦克风
宽动态
录影时间
行车模式
SD 卡图标
Pola roid · S3601W-24
Pola roid · S3601W-24
Page 27

SC -9
3.1.4 重力感应
当行车时遇到碰撞、摇晃或振动等情况时,预设设置设备会自动启动重力感应功
能,这时显示屏上方会提示“锁定当前文件”并有 显示,当前录制片段会被
保护起来不会被替换。
3.1.5 切换录影模式
录影模式下,按向上键 可切换 360 度二分割和 220 度超广角录影模式。
3.1.6 关闭/ 开启录音
录影模式下,按向下键 可关闭/ 开启录音。
3.1.7 打开 W i- Fi
录影模式下,长按向下键 可关闭/ 开启 Wi-Fi。
3.1.8 进入录影模式菜单
短按菜单键 进入录影模式菜单,再按向上/ 向下键 来选择功能表,再按
录影键 进入选项,按向上/ 向下键 确定所要的选项,再按录影键
确认。完成设置后,按菜单键 可退出菜单设置。
3.1.9 录影模式菜单选项
SC -1 0
主菜单 功能选项
描 述
选 项
设置录影模式。
360度 全景模式/
220度 超广角模式/
360度 全景圆模式
设置循环录影时的片段时间。
关闭 - 选择此选项在卡录满时会自动停止录像。
1 分钟/ 3 分钟/ 5 分钟 - 设置循环录像分段单个
录像片段时间。例如选择 3 分钟,则循环录像
的每个录像片段为 3 分钟,如果录像 21 分钟,
则会有 7 个 3 分钟的录像片段。
关闭/ 1 分钟/
3 分钟/ 5 分钟
设置重力感应碰撞的灵敏度。
关闭 - 关闭重力感应功能,碰撞时不会重力感
应保护当前文档。
超高/ 高/ 中/ 低 - 重力感应的灵敏度等级越高
就越容易感应到碰撞,保护当前文档。
关闭/ 超高/ 高/ 中/ 低
设置本机的时间/日期和日期格式。
设置在录像过程中是否关屏省电以及关屏时间。
关 - 不关屏省电,默认设置此选项。
1 分钟/ 3 分钟 / 5分钟 - 录像时在 1 分钟 /3 分
钟/ 5 分钟内如果无操作,会自动关屏。
注:选择自动关屏时间后,会继续录像,可以
按任一键开屏。
关闭/ 1 分钟/
3 分钟/ 5 分钟
设置各国家语言。
依据客 户需求
开启或关闭录影时的声音。
关闭 - 关闭声音,录影的文件为无声。
打开 - 开启声音。此选项为默认设置。
打开/ 关闭
系统设定
模式
系统设定
模式
循环录影
G-sen so r
灵敏度
日期&时间
省电模式
语言
麦克风
格式化
恢复预设值
格式化存储卡。
确认 - 选择此选项确认格式化。
退出 - 选择此选项放弃格式化动作。
警告: 选择格式化后,所有的录像及照片文件
会被全部删除,不可恢复。
确认/ 退出
恢复出厂设置及显示当前的软件版本号。
此信息对售后服务很重要。
确认/ 退出
Pola roid · S3601W-24
Pola roid · S3601W-24
Page 28

SC -1 1 S C- 1 2
3.2 图像拍摄
拍照前,请确保已选择拍照模式 ,再按拍照键 拍照,照片会保存在 TF 卡上。
3.2.1 图像拍摄画面
拍照模式
SD 卡图标
拍照品质
行车模式
图片解析度
自动曝光值
3.2.2 图像拍摄菜单选项
拍照模式
时间水印
主菜单 功能选项
描 述
选 项
设置录影模式。
360 度 全景模式/
220 度 超广角模式/
360 度 全景圆模式
设置所要拍摄照片的分辨率。
12M / 8 M / 5M / 3M
设置照片质量。
高 - 最好的照片质量。
中 - 标准的照片质量。
普通 - 较差的照片质量。
高/中/普通
手动调整补光。 负值越大,光线会越暗,正值
越大,光线越明亮。 此选项的默认设置是 0,
为自然的光亮度。
设置定时自动拍照
关闭 - 按录影键立即拍照
3 秒/ 5 秒/ 10 秒 - 设置按录影键后在 3 秒/
5 秒/ 10 秒后进行拍照。
关闭/ 3 秒/ 5 秒/ 10秒
开启或关闭连续拍照。
关闭 - 不连拍。
三连拍/ 五连拍/ 十连拍 - 按录影键后会连续拍
照三张/五张/十张。
关闭/ 三连 拍/
五连拍/ 十 连拍
设置显示在拍照文件上的信息。
关 - 无日期或商标信息显示在拍照文件上。
日期 - 仅显示日期信息在拍照文件上。
日期&时间 - 显示日期和时间在拍照文件上。
关闭/ 日期/ 日 期&时间
拍照模式
模式
解析度
拍照品质
EV值
自拍
连拍
时间水印
-2~2
3. 3 回放 模式
3. 3. 1 播放录 影
长按模式 键 切换到回放模式,按向上/ 向下键 选择 所需的影片,按
录像键 播放 ,再按录像键 暂停播放,按菜单键 停 止播放。
Pola roid · S3601W-24
Pola roid · S3601W-24
Page 29

SC -1 3 S C- 1 4
影片图标
录影文件夹
3. 3. 2 录影回 放画面
文件夹名称
录影时间
3. 3. 3 浏览照 片
短按菜单 键 进入回放菜单,按向上/ 向下键 选择到 拍照模式,按 OK
键进入照 片文件夹,根据所需可以浏览全 部或每日的照片。
3.3. 4 录影回 放/照片浏览菜单选项
回放
删除文件
删除单个存储卡上所有日期的视频或照片。
删除普通,事件,照片目录。
解析度
拍照品质
3. 3. 5 删除文 件
长按模式 键 切换到录影回放/照片浏览模式,再 按菜单键 进入回放菜
单,按向 上/ 向下键 选择“删除档案”,再按录 影键 进入删除子菜单,
按向上/ 向下 键 选择需要删除的录影文档或照片 所在文件夹,再按录影键
进入该文 档文件夹,按向上/ 向下键 选择 确认需 要删除的文档或照
片,再按 录影键 确认删除。如要删除目录( 包括录影文件、照片、以 及
存入 SD 卡的 所有文件),请选择删除目录。
注:删除 的文件 不能恢复。删除前,请确保文件 留有备 份。
4 HDMI 高 清功能
用 HDMI 线 将机器连接到高清电视,并将电 视调节到高清状态,此时 显示屏 关
闭,画面 会显示到高清电视上,机器可进 行视频回放,删除等操作。
5 Wi -F i 连接
本机可跟 安卓,苹果系统的手机或平板电 脑通过 Wi-Fi 连接,具体 操作步 骤
如下:
1. 在手机 或平板电脑上安装 App;
1.1 安卓 系统可在安卓市场,百度手机助 手等平台搜索关键字“OTCam” ,
按提示下 载安装。
1.2 苹果 系统可在 App sto re 上搜索关键词“OTCam” 下载安装。
2. 开启记 录仪并打开 Wi-Fi 后,可以用手 机或平板搜索此 Wi-Fi 热 点进行 连接;
热点名称 :DVR360-WIFI
热点密码 :87654321
3. 在连接 后再打开 APP ,就可以在手机上进 行各项参数设置及功能使 用了。
主菜单 功能选项
描 述
选 项
目录选择-可选择普通录影、保护录影和照片
的文档。
普通 - 存放正常行车记录影片,可循环录影,
可删除。
事件 - 存放一键保护或 G-sensor 保护影片。
不可删除拍照模式 - 存放所拍摄的照片。
0-1 0
回放模式
模式
Pola roid · S3601W-24
Pola roid · S3601W-24
Page 30

SC -1 5
显示器
2.5 寸高清亮屏
影像传感器
1440 x 1080 30 fp s
1920 x 1080 30 fp s
影像分辨率
照片分辨率
3M
录像格式
MP4
照片格式
JPG
存储卡
最高支援 64GB Micro SDHC Class 10
麦克风
是
扬声器
是
重力感应
是
工作电压
宝马线 12V 供电
Wi-Fi
支持(802.11 b/ g/ m)
接 口
Mini USB 接口、T F 卡槽 ,HD MI 接 口
尺 寸
重 量
视 角
220 度超广角模式/ 3 60 度 全景 二分 割模式/ 360 度全景圆模 式
存储压缩方式
H.264
6 技术规格
工作温度
0°~ 45° C
5 MP CO MS 传感器
Pola roid · S3601W-24
Pola roid · S3601W-24
SC -1 6
7 行车记录仪常见问题及解决方法
7.1 TF 卡无显示或不读卡
· 确保使用的 TF 卡是 10 级及以上的 TF 卡。
· 在使用前在机器里格式化 TF 卡。
7.2 不开机,死机
· 检查电源线是否正常,确保车充灯亮,并连接机器充电 30 分钟左右。
· 拔出卡后复位机器,再按开机键看是否能开机。
7.3 拍摄录影时自动停止
· 检查机器回放模式所录视频是否全部保护。
· 确保已设置好自动循环录影,格式化 TF 卡。
7.4 机器预览画面有横条纹干扰
· 根据当地供电频率,设置相应的 50HZ 或者 60HZ。
· 如遇到发电机发电,可能导致横条纹更明显,为正常现象。
7.5 视频用电脑播放时卡机,视频不连贯
· 将卡拷贝到电脑硬盘播放。
· 根据实际情况更换高速 Class10 TF 卡。
7.6 拍摄视频出现蒙雾的情况
· 检查镜头膜是否撕掉,或者是因为镜头或者车身挡风玻璃不干净。如上都没问
题,将机器重启。问题仍不能解决的话就要咨询售后。
7.7 当机器连接 Wi-Fi 时,机器的温度高属正常状态。
友情提示: 如上述方式不能解决机器问题,请联络我们的授权经销商直接提供售
后服务,包括返还,更换及技术支持。
69x104x52mm
132g
 Loading...