

Page 1
Wireless
Backup Camera
User Manual
www. Polaroid.co m
D.20 .1 1.15
2015 All Right Reserved
Page 2

-2 -
Bac k-Up Ca mera Sa fety. ... ... ... ... ... .... ..... ..... ..... ..... ..... ..... ..... ..... ..... ..... ..... ..... ..... ..... ..... ...
INT RODUC TION ... ..... ..... ..... ..... ..... ..... ..... ..... ..... ..... ..... ..... ..... ..... ..... ..... ..... ..... ..... ..... ..... ..... ..... ..... ..... ..... ....
FEAT URE S.. .... ..... ..... ..... ..... ..... ..... ..... ..... ..... ..... ..... ..... ..... ..... ..... ..... ..... ..... ..... ..... ..... ..... ..... ..... ..... ..... ..... ..... ...
INS TALL ATI ON. .... ..... ..... ..... ..... ..... ..... ..... ..... ..... ..... ..... ..... ..... ..... ..... ..... ..... ..... ..... ..... ..... ..... ..... ..... ..... ..... .....
OPE RATION .. ... ... ... ... .... ..... ..... ..... ..... ..... ..... ..... ..... ..... ..... ..... ..... ..... ..... ..... ..... ..... ..... ..... ..... ..... ..... ..... ..... ..... .
CAR E AND MAI NTENA NCE.. ..... ..... ..... ..... ..... ..... ..... ..... ..... ..... ..... ..... ..... ..... ..... ..... ..... ..... ..... ..... ..... ..... ..... .
Sto rage
Cle aning
SPE CIFIC ATI ONS ... ... .... ..... ..... ..... ..... ..... ..... ..... ..... ..... ..... ..... ..... ..... ..... ..... ..... ..... ..... ..... ..... ..... ..... ..... ..... ..... .
TRO UBLES HOOT ING.. ..... ..... ..... ..... ..... ..... ..... ..... ..... ..... ..... ..... ..... ..... ..... ..... ..... ..... ..... ..... ..... ..... ..... ..... ..... ..
FCC I NFO RMATI ON. .... ..... ..... ..... ..... ..... ..... ..... ..... ..... ..... ..... ..... ..... ..... ..... ..... ..... ..... ..... ..... ..... ..... ..... ..... ..... ..
LIM ITED WAR RANT Y.... ... ... ... ... ... .... ..... ..... ..... ..... ..... ..... ..... ..... ..... ..... ..... ..... ..... ..... ..... ..... ..... ..... ..... ..... ..... ..
... ..... ..... ..... ..... ....
BLU E POWE R LED .. ... ... ... .... ..... ..... ..... ..... ..... ..... ..... ..... ..... ..... ..... ..... ..... ..... ..... ..... ..... ..... ..... ..... ..... ..... ..... ....
ADJ USTIN G MONIT OR SE TTI NGS .. ... .... ..... ..... ..... ..... ..... ..... ..... ..... ..... ..... ..... ..... ..... ..... ..... ..... ..... ..... ..... .
ONE (1)YE AR LIMI TED WARR ANTY.. ..... ..... ..... ... ... ... ... ... ... .... ..... ..... ..... ..... ..... ..... ..... ..... ..... ..... ..... ..... ..... ..
CONTE NTS
Back- Up Came ra Sa fet y
· Pl eas e chec k with yo ur loca l a nd sta te aut hor iti es to conf irm what is le gal re gar din g the
mou nting of t he Ba ck-Up Cam era to yo ur v ehi cle . It i s th e res ponsi bilit y of th e veh icl e ow ner t o
und ersta nd stat e and mun icipa l regul ation s and ens ure com plian ce.
·W hen ins tal lin g th e Ba ck- Up C ame ra, the v ehi cle mus t be tur ned off w ith the veh icl e in park
and t he
par k brake a pplie d.
·Do no t attem pt to ins tall th e Back- Up Came ra whil e the eng ine is op erati ng.
·Do no t modif y the wir ing in an y way.
·On ly i nst all the B ack-U p Came ra t o a 12 -volt DC sys tem . Co nne cti ng to any thi ng o the r th an a
12- volt DC s yst em may d ama ge th e Back -up Cam era c omp one nts or t he ve hic le el ectr ical
sys tem.
· If you are not conf ide nt work ing with 12- vol t D C ve hic le wirin g, h ave the Back -Up Cam era
pro fessi onall y insta lled.
· Thi s d evice as wel l as oth er wirel ess dev ice s m ay b e s ubj ect to int erf ere nce . I nterf erenc e
may b e caus ed by c ell p hon es, B lue too th he ads ets , Wi- Fi ro ute rs, p owe r lin es an d oth er va rious
ele ctric al equi pment .
·Kee p all pow er cord s and wir es away f rom the v ehicl e's mec hanic al cont rols.
·Do no t mount t he moni tor whe re it wil l inter fere wi th your v iew of th e road
·Do no t adjus t monit or sett ings wh ile ope ratin g the veh icle
·Do no t insta ll the Ba ck-Up C amera t o the fro nt of you r vehic le.
·Do no t paint o r spray t he came ra.
2
3
3
4
5
5
6
7
7
8
5
6
9
PBC-A56J
Wirel es s Backup Camera
User Manual
Page 3
-3 -
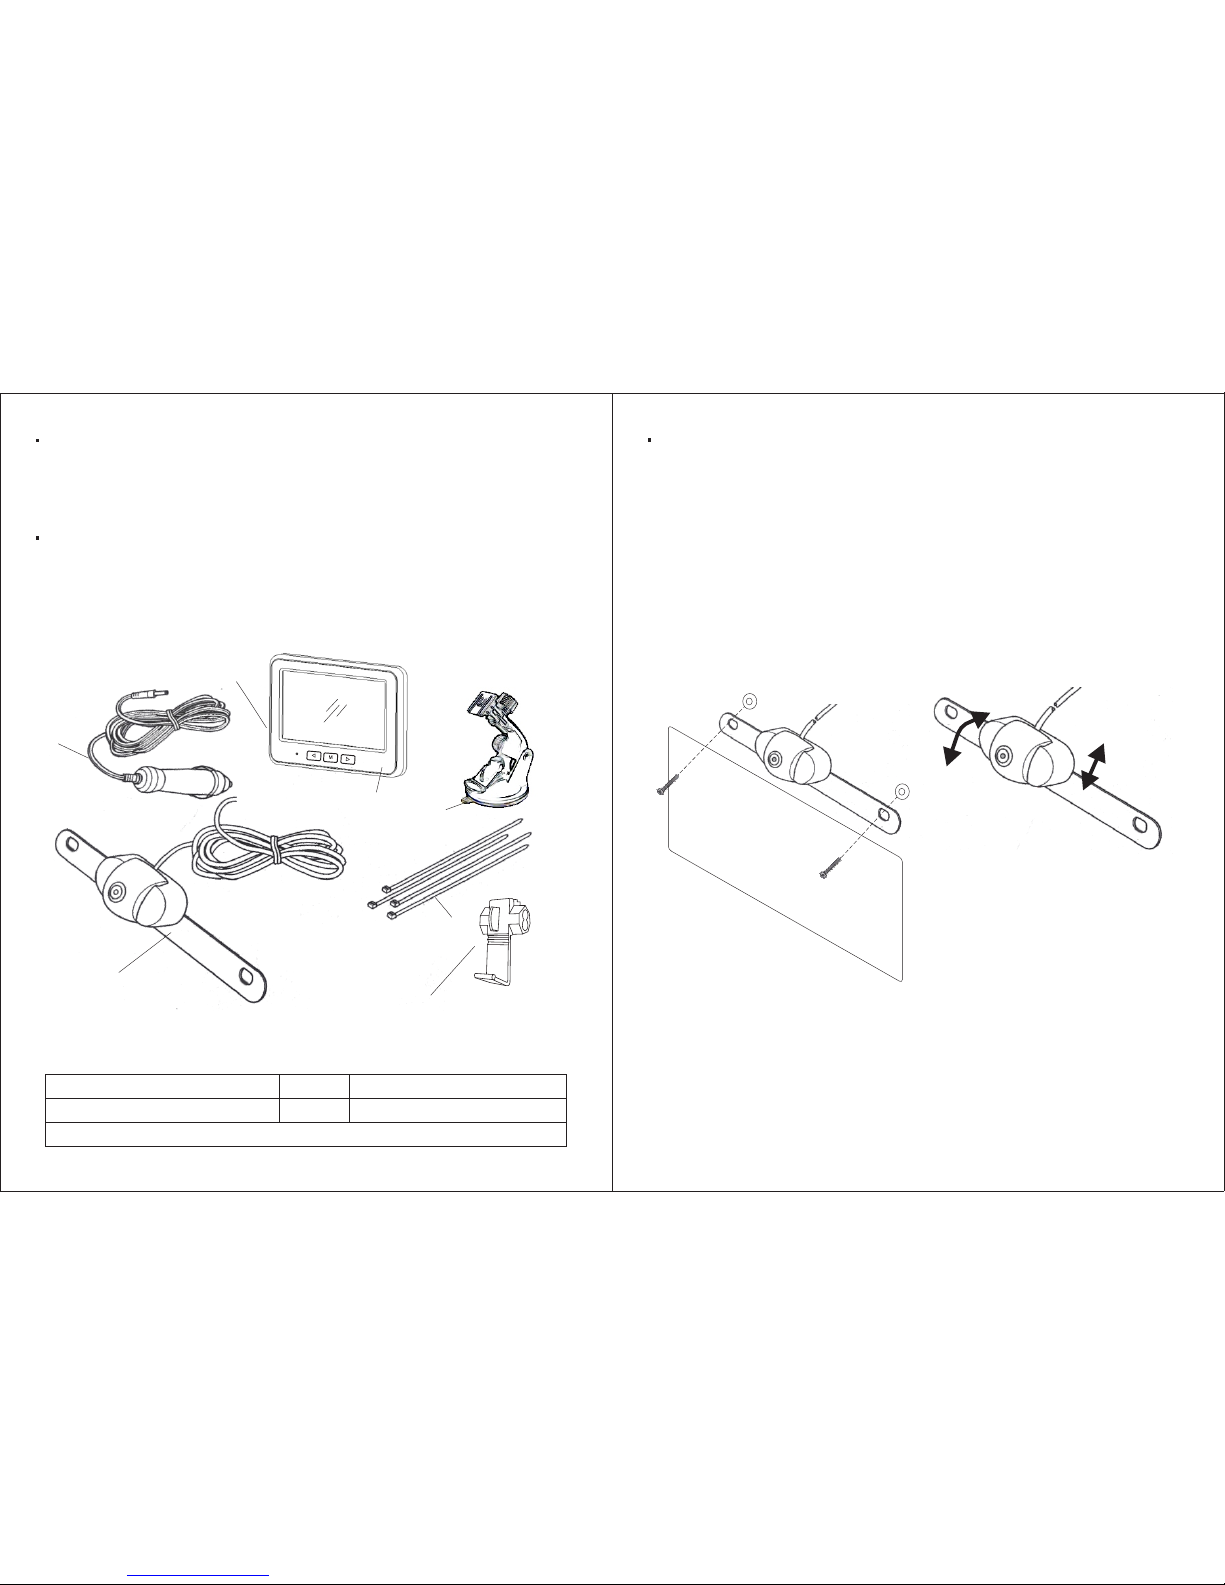
1.W irele ss Came ra (Bui lt-in T ransm itter )
2.T ies
-4 -
1.R emove t he scre ws that h old the l icens e plate
to th e vehic le.
2.P ositi on the ca mera mo untin g plate b ehind t he
lic ense pl ate.
3. in sert th e screw s throu gh the li cense p late, t he
cam era mou nting p late an d the
was hers. I f your ha rdwar e is not th e corre ct
len gth, us e the sup plied h ardwa re.
INTRO DUCTION
The B ack-U p Camer a displ ays im age s beh ind t he ve hic le, a nd is u sed w hen b ack ing u p a
veh icle. When the veh icl e is driv en i n re verse , the cam era is ac tiv ate d, w hic h se nds a signa l to
the Tran smitt er. The tran smi tte r s end s a vide o s ign al to the moni tor , w hich then disp lay s t he
vie w captu res by th e camer a.
FEATURES
Col or monit or dis pla ys vie w from th e rear of th e vehic le. Wire less mon itor can be su cti onmou nted to win dshie ld or da sh f or e asy vi sib ili ty A dju sta ble mo nit or b racke t. Ad jus tabl e
ver tical c amera . angle W eathe rproo f camer a with 12 0 deg ree s vie win g ang le. R edu ce th e
dan ger o f h arm or dam age due t o u nse en o bje cts . S yst em a ctiva tes a uto mat ica lly when car is
shi fted in to reve rse.
Legen d
INSTALL ATIO N
NOT ICE
Som e stat es o r loc al g ove rnm ents ma y hav e regu lat ion s or l aws tha t rest ric t the us e of
any thing t hat mig ht impa ir the cl ear vie w of a lice nse pla te. Che ck loca l laws fo r compl iance .
NOT ICE
For the Bac k-U p C ame ra to b e pr ope rly inst alled , it mus t b e wi red int o t he vehi cle 's tai lli ght
har ness. If you are not com for tab le o r kn owl edg eab le w ith 1 2-vol t DC wi ring, have t he sys tem
pro fessi onall y insta lled.
NOT ICE
The se ins tru cti ons a re onl y mea nt as a g ene ral g uide d ue to the n umb er o f dif fer ent mak es an d
mod els of ve hicle s. For ve hicle -spec ific qu estio ns, con tact yo ur vehi cle's m anufa cture r.
.T o adj ust t he ca mer a ang le, t ilt th e camer a to one of t he five p ositi ons.
The came ra s hou ld b e ad juste d to a hor izo nta l po sitio n rel ati ve t o th e gr ound so a s to provi de
opt imal vi ew of obj ects be hind th e vehic le.
To a dju st th e ca mer a hei ght , rem ove th e cam era adj ust ing s cre ws, m ove th e cam era to li ne up
wit h th e d esi red hole s a nd ins tal l t he camer a adj ustin g sc rew s. Mak e s ure the arr ows on t he
bac k of the ca mera ar e point ing upw ard.
.
.
4. Ad just th e camer a as requ ired:
1
2
3
4
7
6
5
3.b racke t
4.W irele ss Moni tor
6.U SB Sock et
5.c lip
7.M onito r Cigar ette Li ghter /Acce ssory S ocket P ower Co rd
Page 4

-5 -
Leg end 1.P ower LE D 2.Up Bu tton 3. Menu Bu tton 4. Down Bu tton
1 2 3 4
-6 -
CARE AN D MAINT ENANCE
SPECI FICATIONS
CLE ANING
Do not clea n o r wip e t he Back -Up Came ra with solv ents or c hemic al m ate ria ls. If nec ess ary ,
rem ove dir t or stai ns usin g a soft cl oth dam pened w ith a mil d deter gent so lutio n.
DISPO SAL
The Bac k-U Cam era is desig ned to prov ide yea rs of s erv ice . The Bac k-U p C amera sho uld be
rec ycled or s afely disp osed of at a lo cal r ecycl ing c enter . Exa mples of p laces that will acce pt
ite ms like t his are : count y or muni cipal r ecycl ing dro p-off c enter s or scra p metal d ealer s.
Ca mera
Curre nt co nsump tio n (w ith t ran sm itt er) <25 0 mA
Pixel s
View an gle ( measu red 9 .8 f t [3 m] fro m ca mer a) 120士15
Power c ord f use DC1 2-2 4V 1 A
Tran smi tte r
Frequ enc y 2414土0. 3 MHz
RF tran smi ssion d ist an ce 49 5 ft (1 50 m )
Opera tio n/sto rag e te mpe rat ur e 14- 140F( -10 -60C)
Mo nit or
Displ ay sc reen si ze 4. 3 in . (10 9 mm)
Power c ord f use DC 5V 1 A
640 x 480
NOT ICE
In e xtr eme ly br igh t con dit ion s, th e scr een i mage m ay ta ke a fe w sec onds to sta bil ize . Wai t unt il
the i mage ha s stabi lized b efore b ackin g up.
1.P ress th e menu bu tton to b ring up t he sett ings sc reen.
2.P ress the menu but ton to scrol l th rou gh the diff ere nt adjus tment s. P res s the up butto n to
inc rease o r the dow n butto n to decr ease se tting s.
3.T he mon ito r can be mou nte d in any pos iti on. To chan ge the vie w on the scr een , scrol l t o
dir ectio n. Pres s the up or d own but ton to ch ange th e view an d displ ay the im age cor rectl y.
4.T o exit, s croll t o exit an d press t he down o r up butt on.
5.T o turn th e guide lines o n or off, p ress th e guide lines b utton .
OPERATION
Test ing the S ystem
1.T he blue L ED will l ight wh en powe r is on.
2.W ith t he par k br ake a ppl ied ,tu rn the vehi cle ign iti on swi tch to th e ON pos iti on. Do no t s tar t
the v ehicl e.
3.S hift t he v ehic le t o re ver se t o pow er t he t ran smi tte r.T he bl ue p owe r L ED w ill li ght
con tinuo usly an d the mon itor wi ll disp lay the i mage fr om the ca mera.
4.I f the i mage doe s no t di spl ay, che ck y our con nec tion s and mak e su re t he c ame ra v iew is n ot
obs truct ed.
7.Mon ito r Con trols
Blue Power LED
The L ED will b link wh en the mo nitor h as powe r and is t urne d on, bu t the ve hicle i s not in r eve rse
(st andby m ode). W hen th e veh icl e is in r eve rse , and t he mo nit or ha s pow er an d is tu rne d on, t he
LED w ill lig ht cont inuou sly.
Adjus ting Mo nitor S et tings
To adj ust the follo wing mon ito r se tti ngs , ma ke s ure t he p ark brake is ap pli ed, turn the ign iti on
swi tch to th e ON posi tion an d shift t he vehi cle to re verse .
Page 5

Sit uat ion
The c amera l ens is co vered w ith
sno w, mud, i ce, etc .
The c amera i s mount ed inco rrect ly
No po wer to th e monit or or cam era
Cam era is an gled in corre ctly
Scr een set tings a re inco rrect
Mon itor is a ngled i ncorr ectly
Act ion
Cle an lens .
Che ck came ra loca tion an d align ment.
Rea lign as n ecess ary.
Ens ure all w ires ar e corre ctly
con necte d to the mo nitor ,
tra nsmit ter, ca mera an d into th e
veh icle re verse l ight ci rcuit .
Che ck all wi re conn ectio ns and sp lices
for p roper c onnec tion
Adj ust cam era ang le
Adj ust scr een usi ng moni tor but tons.
Adj ust mon itor an gle usi ng
adj ustme nt knob s
Pro blem
Mon itor
dis play
is
bla nk or
unc lear
-7 -
-8 -
All R ights R es erv ed
MAD E IN CHIN A
TROUB LES HO OTI NG
FCC INFORMATION
WAR NING
Cha nges or m odi fic ati ons to thi s e qui pme nt not exp res sly appr ove d b y t he p art y r esp ons ibl e
for t he comp lianc e could v oid the w arran ty.
NOT ICE
Thi s equip ment ha s been te sted an d found t o compl y with th e limit s for a cla ss B digi tal dev ice,
Pur suant to P art 15 of th e FC C Ru les. The se li mit s ar e de signe d to p rov ide re aso nab le
pro tecti on a gai nst harm ful int erf ere nce in a r eside ntial ins tal lat ion . T his equ ipm ent can radi o
fre quenc y ene rgy an d, if no t inst alled a nd use d in acco rda nce wi th the ins tru cti ons, may
cau se harm ful i nte rfe ren ce to ra dio c omm uni cat ion s, How ever, t her e is no gu ara nte e tha t
int erfer ence wil l not occu r i n a p artic ular ins tal lat ion . if this equ ipm ent do es caus e h arm ful
int erfer ence t o r adi o or t elevi sion r ecept ion, w hich c an be d eterm ined b y t urn ing t he
equ ipmen t off and on, the use r is enc our age d to try to c orr ect the inter feren ce by one or m ore
of th e follo wing me asure s:
Reori ent or reloc ate the t ran smitt er
Inc rease the sep ara tio n b etwee n th e equ ipm ent and moni tor .Co nne ct the equip ment into an
out let on a ci rcuit d iffer ent fro m that to w hich th e monit or need ed.
Con sult the deal er o r an exp erien ced radio /TV techn ician for hel p.Thi s de vice Comp lies with
Par t 1 5 of the FCC Rule s.O per ati on is sub jec t to t he fol lowi ng two con dit ion s:( 1)t his dev ice
may not cau se h arm ful int erf ere nce and (2)t his devic e mu st acce pt any inte rfe ren ce
rec eived ,incl uding i nterf erenc e that m ay ca use u nde sir ed op era tio n of de vic e.t he ma nuf act ure r
is n ot r esp ons ibl e fo r any rad io o r TV i nterf erenc e caus ed b y un aut hor ize d mod ifica tions to t his
equ ipmen t.Suc h modif icati ons cou ld void t he user 's auth ority t o opera te this e quipm ent.
Reori ent or reloc ate the t ran smitt er
Not ice to Dr ivers i n Calif ornia a nd Minn esota :
Sta te law pro hibi ts driv ers in Ca lif orn ia and Mi nne sot a from us ing su cti on mou nts on th eir
win dshie lds whi le oper ati ng mo tor v ehi cle s. Ot her d ashb oard or f ricti on moun tin g opt ion s
sho uld b e us ed w ww.po laroi d.com /Cus tom er S erv ice (Toll Free ): 8 55- 315 -86 00 d oes not t ake
any re spo nsi bil ity f or any fi nes, penal ties, or dam age s th at ma y be in cur red a s a res ult of
dis regar ding t his no tic e.( see Ca lif orn ia ve hicle Co de S ect ion 267 08(a) ,Minn esota St atu tes
200 5,Sec tion 16 9.71)
LIMIT ED WA RRANTY
Man ufact urer warr ants to the orig ina l con sum er, or purc has er, tha t the Pol aro id . P BC- A56 J
4.3 -inch Bac k-U p Cam era w ill be f ree fr om de fec ts in mat eri al an d wo rkma nship for 1 yea r fro m
the da te to the ori gin al pur cha ser . Manuf actur er her eby ex clu des and di scl aim s any and all
ot her w ar ra nt ie s,e xp res se d o r i mpl ie d, bey ond t hos e w arr ant ies s pe ci fi ed ab ove .
Man ufact urer e xcl ude s an y imp lied w arr ant y of mer chant abili ty or f itn ess for a p arti cular
pur pose.
IF YQU R PO LAR OID . BA CK- UP C AMERA MALF UNC TIO NS D UE T O A DEF ECT IN M ATE RIA LS
AND WORK MANSH IP WI THI N TH E ON E YE AR WA RRA NTY PERI OD, MANUF ACTUR ER
WIL L,AT ITS ELE CTI ON REPAI R OR REPL ACE IT.M ANUFA CTURE R SH ALL NOT, HOWE VER,
BE R ESP ONS IBL E FOR A NY DA MAG E TO Y OUR P ROD UCT D UE TO A NY CAU SE OT HER T HAN
DEF ECTS IN MAT ERI AL OR WOR KMA NSH IP, INC LUD ING WITH OUT LIMIT ATION : FA ILU RE
TO FO LLO W INST RUCT ION S F OR USE ; MISU SE; REP AIR S B Y A N U NAU THOR IZE D
PER SON;M ISHAN DLING ; M ODI FICA TIONS ; N ORM AL WE AR AND TEAR ; AC CID ENT OR
OVE RLOAD .REPA IR OR R EPL ACE MEN T AS P ROV IDE D UN DER T HIS WA RRA NTY I S THE
EXC LUSIV E R EME DY OF THE CON SUM ER. MA NUF ACT URE R SHALL NO T BE LIAB LE FOR
AN Y I NCID ENT AL, CONS EQU ENTI AL OR PUNI TIVE DA MAG ES FOR BRE ACH OF ANY
EXP RESSE D OR IMP LIED W ARR ANT Y ON TH IS PRO DUC T OR B ASE D ON A NY OT HER C AUSE
OR CL AIM.
Pol aroid , Pola roid & Pixel , Pola roid Colo r Spe ctru m, an d Po laro id Cl assi c Bord er Lo go a re t rade
mar ks of PL R IP Ho ldi ngs , LLC , used u nde r lic ens e. PL R IP Ho lding s, LLC d oes n ot ma nufac ture
t his p roduc t or prov ide any M anufa cture r’s War ranty o r suppo rt.
To Obt ain Servi ce:
1. Prod uct to t he place of pur cha se for serv ice. Send your unit , p ostag e pr epa id and insu red ,
alo ng wi th a cop y of the o rig ina l sa les recei pt an d a p hone num ber to t he a ddres s bel ow. Pac k
you r unit pr operl y, as we ar e not res ponsi ble for a ny dama ge caus ed duri ng ship ping.
2. A cop y of the orig ina l r ece ipt is r equ ire d f or w arran ty se rvice . If no re ceipt is p rov ide d, the
uni t manuf actur er's da te will b e used as t he date o f purch ase.
Page 6

-9 -
-1 0-
Page 7

 Loading...