

Page 1
GB
llSTRUCTlON
MANUAL
HEART RATE MONITOR
Page 2
.................
How to wear your Polar Edge..
Selecting heart rate monitoring mode..
Setting target zone
Setting alarm clock..
Setting time of day
While exercising
Using your Polar Heart Rate Monitor..
Exercise intensity
Exercise duration and frequency
Selected activities
Precautions
Care and maintenance
Troubleshooting
Technical data..
Accessories..
...............................................
Books
Service
Limited one year warranty
Disclaimer
Training diary
CONTENTS
.......................................
...................................
......................................
..........................................
........................................
...................................
.......................................
..............................
....................................
.....................................
.......................................
......................................................
..........................
.................................................
..........................................
...*
.....................
................
.......
.........
......
....
...
..
.4
.6
7
.8
11
13
15
16
17
18
18
19
.20
.21
22
22
.22
.23
.24
25
Page 3
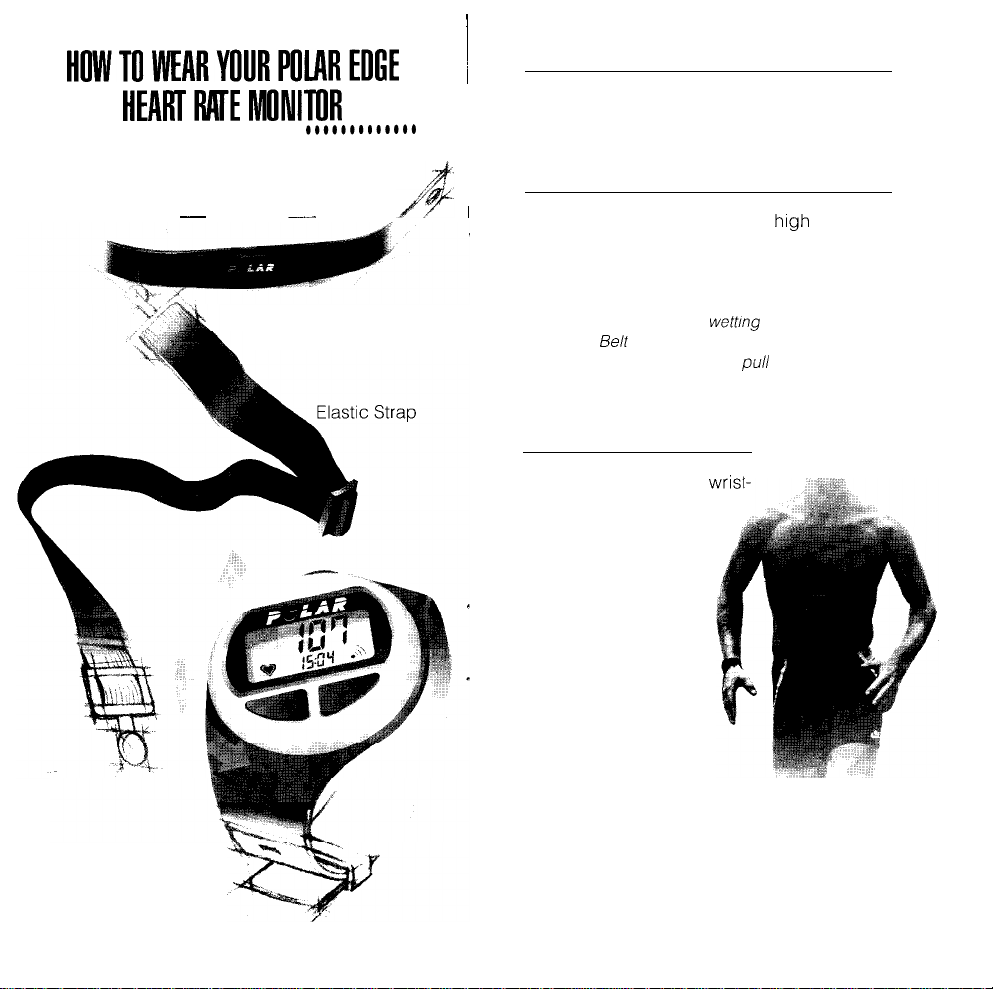
HOWTOWEARYOURPOlAREDGE
. . . . . . . . . .
HEARTRATEMONITOR
Your Polar Heart Rate Monitor
Contains Three Components:
-
*Electrodes
Chest Belt Transmitter
..*e*~~~~~*a@
-
~
I
1. WET THE ELECTRODES
Wet the electrodes (the two grooved rectangular areas on the underside of the Belt Transmitter) thoroughly with water or saliva.
2. SECURE THE BELT TRANSMITTER
I
Secure the Belt Transmitter as
Pectoral Muscles (breasts) as IS comfortable.
The Belt Transmitter should fit snugly and comfortably and allow normal breathing.
NOTE: To insure proper
with the Belt Transmitter in place, grasp the center
of the Belt Transmitter and
chest so that the Nectrodes are exposed Re-wet
the Electrodes in this position.
I
3. WEAR THE RECEIVER
Wear the Receiver as a wrisi
watch or mount it in the Polar
Bike Mount or Clip accessories (sold separately).
The Belt Transmitter will
transmit your heart rate
to the Receiver from a
distance of up to ca 1
meter (3 feet).
high
wetting
of the Electrodes*,
pull
it away from the
under the
Wristwatch Receiver
4
Page 4

SELECTING HEART
RA[E
SETTING
TARGET
ZONE
MONllURING
•e*o~~~**o*e~~
Begin with display showing
Time of Day.
I.
TO START
With wet electrodes and the Belt
Transmitter fastened in place, push the right
button on the Receiver. Your heart rate will
registerapproximately5secondsafterthe
OR with wet electrodes and the Belt Transmit-
ter fastened in place, hold the face of the
Wristwatch Receiver
Transmitter. Your heart rate will register approximately 5 seconds after the beep.
2. TARGET ZONE ALARM SIGNAL
When the Alarm
Rate Monitoring Mode display, you will hear an
alarm sound with each heart beat if you go
above the Upper Target Zone (High) Limit or
below the Lower Target Zone (Low) Limit.
Push
the right button
Alarm Signal ON and OFF.
3. VISUAL TARGET ZONE ALARM
Above the High Limit or below the Low Limit the
heart ratedisplaywill blinkwith each heart beat.
4. TO STOP
Push the left button twice
to return to the Time of Day
mode. OR remove.the Belt
Transmitter. The Receiver
display will automatically return to the Time of Day in
approximately 5 minutes.
6
MODE
to the center
symbol.+
appears in the Heart
to turn the Target Zone
L
’
beep.
of the Belt
_&dnl
Begin
with display showing Time of Day.
SET UPPER TARGET ZONE (HIGH) AND
LOWER TARGET ZONE (LOW) LIMITS
Push the left button and a bar 1 will appear
in the upper left corner of the
High Limit blinking
Push the right button
the High Limit will increase in 5
beat increments The highest
possible setting is 240. If the
setting is increased after
reaching 240 it will reset to the
number at which the Low
Limit is set.
NOTE: The High L/m/t w///not
at which the Low Limit is set. It may be
necessary to reduce the Low
number(see
I
return to set the High Limit.
When the desired High Limit
is set, push
and the Low Limit will appear
with a bar 1 in the lower left
corner.
Push
the right button
Limit will increase in 5 beat increments. When
the Low Limit number reaches the High Limit
number it will reset to 15, the lowest possible
setting.
When the desired Low Limit is set, return to the
Time of Day by pushing
below)
firstand thr
the left button
the left button
display with the
ant
setbelow
and the Low
the
nuhber
I__
twice.
Page 5

NOTE.
ToreturntoTimeofDayatan
point in the setting procedure,
push both buttons
simuitaneousiy.
I
1. SET ALARM CLOCK
With Time of Day showing
push both buttons sirnull
taneously: Alarm Signal Symbol will blink.
Set Alarm Clock ON (symbol
ON) or OFF (symbol OFF) by
pushing
the right button
2. SET AM/PM
The AM or PM showing will
blink. Push the right
button
Once set, push the left
button.
to set AM or PM.
Once set, push the left
button.
8
3. SET THE ALARM CLOCK TIME
Set the hour digit by pushing
the right button.
~
Page 6

Push
the left button to se-
lect
the tens of minutes digit.
NOTE,
To return to
setting procedure, push both buttons
I
simultaneously.
fime
of Day at any
point in
the
Set the tens of minutes digit
by pushing the right
button.
Push the left button and
repeat for the minutes digit.
4. STORE ALARM SETTING
Push
both buttons
OR: Push the left button and set Time of
Day.
simultaneously.
If you have just set the Alarm Clock, go to
(The AM or PM showing will blink.)
OR: With Time of Day showing, push
both buttons simultaneously.
Alarm Signal Symbol will
blink.
1. PUSH THE LEFT
BUTTON 5 TIMES
2. SET
The AM or PM showing will
Push the right
AMorPM. _
3. SET TIME OF DAY
Push the left button to
select the hour digit.
Set the hour digit by pushing
the right button.
AM/PM
button
to select
#2.
-
_..+-
Page 7

Push
the left button
select the tens of minutes
diait. Set the tens of minutes
digit by
button
Push the left button and
repeat for the minutes digit.
pushrng
the right
to
1
.THE
ELAPSED TIME
The Polar Edge shows the elapsed time (the time that you
have been in the Heart Rate
Monitoring Mode) in the lower
line of the Heart Rate Display.
NOTE: Whenyouleave the Heart
Rate Monitoring Mode and reenter, the elapsed
I
to
0:OO
However,
of Day while exercising, just bring the Receiver
face to the center of the Belt Transmitter and hold
until the beep sounds (approximately 5 seconds).
Time of Day shows for 5 seconds after the beep.
I
2. EXERCISE FEEDBACK
t/me
is reset
ifyou
wish to view Time
I
*
’
4. STORE TIME OF DAY
SETTING
Push
the left button
Exercise feedback computes and displays the
time spent above the Low Limit while showing
heart rate and elapsed time. At 30 minutes and
60 minutes spent above the Low Limit the Polar
.
Edge will beep.
1 block
NOTE: The maximum amount of time for the elapsed time and exercise feedback is
minutes elapsed time and exercise feedback both
I
reset to
2 blocks
0.00.
-
3 blocks
-
1 block
(starts over)
59:59.
At 60
13
Page 8

3. TO STOP
To stop recording after exerci-
sing
push the left but
and you can see time
spent above the Low Li
and total elapsed time.
USING YOUR POLAR
HEART RATE MONITOR
Push the left button
return to the Time of Day.
4. TO RECALL
To retrieve previous exercise time
above Low Limit with Time of Day
showing,
ton 3 times.
Push the left button once
to
push the left but-
return to Time of Day.
to
-
Regular exercise can help improve the way you
feel, look and work.
PO&
Heart Rate Monitor
exercising
fitness goals in less time
Whether you are exercising for weight control
(fat burning) or to improve your overall health
andfitness
will
help you achieve
(strengthen your cardiovascular system)
the PoLar
Edge HRM
Usingyour
(HRM)
your
with
greater safety.
willguide
while
personal
you
to effective exercise.
14
15
 Loading...