

Pocketbook PC User Manual

User’s Manual

Revision: R00
Trademarks
Microsoft, Windows, the Windows logo, Windows Media, Outlook and
ActiveSync are registered trademarks or trademarks of Microsoft Corporation in
the United States and/or other countries. Microsoft products are licensed to
OEMs by Microsoft Licensing, Inc., a wholly owned subsidiary of Microsoft
Corporation. The Bluetooth word mark and logo are owned by the Bluetooth
SIG, Inc. All other brand and product names are trademarks or registered
trademarks of their respective companies.
Note
The information in this document is subject to change without notice.

Table of Contents
Preface ..................................................................................................v
1 Getting Started...............................................................................1
1.1 Identifying Hardware Components......................................................1
Front Components...............................................................................1
Back Components ...............................................................................3
Left-Side Components.........................................................................4
Right-Side Components.......................................................................5
Top Components.................................................................................5
Bottom Components............................................................................6
1.2 Getting Your Device Ready for Use ....................................................7
Performing Initial Startup.....................................................................7
Connecting to AC Power and Charging the Battery............................8
1.3 Using Your Device in a Vehicle ...........................................................9
1.4 Turning Your Pocket PC On and Off.................................................11
Turning Off to Suspend......................................................................11
Turning On to Resume ......................................................................11
1.5 Installing Microsoft ActiveSync..........................................................11
1.6 Expanding Your Pocket PC...............................................................13
Using a SD/MMC Card......................................................................13
Accessories .......................................................................................13
2 Basic Skills...................................................................................14
2.1 Using the Stylus.................................................................................14
2.2 Using the Navigation Stick.................................................................15
2.3 Today Screen ....................................................................................15
Landscape View ................................................................................16
2.4 Navigation Bar and Toolbar...............................................................16
2.5 Running Programs.............................................................................17
2.6 Shortcut Menus..................................................................................17
2.7 Notifications .......................................................................................18
i

2.8 Entering Information ..........................................................................18
Entering Text Using the Input Panel..................................................19
Writing on the Screen........................................................................21
Drawing on the Screen......................................................................23
Recording a Message........................................................................25
Using My Text....................................................................................26
2.9 Locking Your Pocket PC....................................................................27
3 Managing Your Pocket PC..........................................................29
3.1 Managing Power................................................................................29
Low Battery Signals and Actions.......................................................29
Power-Saving Tips.............................................................................30
3.2 Customizing Your Pocket PC ............................................................31
3.3 Searching and Organizing Information..............................................33
3.4 Adding or Removing Programs .........................................................34
Adding Programs...............................................................................34
Removing Programs..........................................................................36
4 Microsoft Pocket Outlook ...........................................................37
4.1 Calendar: Scheduling Appointments and Meetings ..........................37
Creating an Appointment...................................................................38
Using the Calendar Summary Screen...............................................39
4.2 Contacts: Tracking Friends and Colleagues .....................................40
Creating a Contact.............................................................................40
Using the Contacts Summary Screen ...............................................42
4.3 Tasks: Keeping a To Do List .............................................................43
Creating a Task .................................................................................43
Using the Tasks Summary Screen....................................................44
4.4 Notes: Capturing Thoughts and Ideas...............................................45
Creating a Note..................................................................................45
4.5 Messaging: Sending and Receiving E-mail Messages .....................47
Synchronizing E-mail Messages .......................................................47
Connecting Directly to an E-mail Server............................................48
Using the Message List.....................................................................48
Composing and Sending Messages..................................................50
Managing Email Messages and Folders...........................................51
5 More Programs ............................................................................53
5.1 Microsoft ActiveSync .........................................................................53
Synchronizing Data............................................................................54
5.2 Word Mobile.......................................................................................55
Creating a Document.........................................................................55
Opening a Document.........................................................................56
ii

5.3 Excel Mobile ......................................................................................57
Creating a Workbook.........................................................................57
Opening a Workbook.........................................................................58
5.4 PowerPoint Mobile.............................................................................59
5.5 Pocket MSN.......................................................................................60
5.6 Windows Media Player for Pocket PC...............................................61
5.7 Pictures & Videos ..............................................................................62
5.8 Additional Programs ..........................................................................63
SysInfo...............................................................................................63
eCalc..................................................................................................64
6 Getting Connected.......................................................................66
6.1 Wireless Network Connection (For T620 Only).................................66
Turning On and Off the Wi-Fi Radio..................................................66
Connecting to a Wireless Network ....................................................67
Starting and Ending the Wireless Network Connection.....................67
6.2 Bluetooth Feature (For T620 Only)....................................................68
Turning On and Off the Bluetooth Radio...........................................68
Transferring Files via Bluetooth Technology.....................................69
Bluetooth Partnership........................................................................70
6.3 Connection Settings...........................................................................72
Modem Connection............................................................................72
Network (Ethernet) Card Connection................................................73
6.4 Using Internet Explorer Mobile ..........................................................74
Viewing Mobile Favorites and Channels...........................................74
Browsing the Internet.........................................................................75
The Mobile Favorites Folder..............................................................75
7 Troubleshooting and Maintenance ............................................79
7.1 Resetting Your Pocket PC.................................................................79
7.2 Restoring Last State..........................................................................80
7.3 Power Problems ................................................................................81
7.4 Memory Problems..............................................................................81
7.5 Screen Problems ...............................................................................82
7.6 Connection Problems ........................................................................83
ActiveSync Connection Problems .....................................................83
Modem Connection Problems...........................................................84
Network Connection Problems..........................................................85
7.7 Taking Care of Your Pocket PC ........................................................86
General Guidelines............................................................................86
Travel Guidelines...............................................................................87
iii

A Regulatory Information ...............................................................89
A.1 Regulations Statements.....................................................................89
European Notice................................................................................89
A.2 Safety Precautions.............................................................................90
About Charging..................................................................................90
About the AC Adapter........................................................................90
About the Battery...............................................................................91
About the Radio Frequency Exposure...............................................91
iv

Preface
Welcome
Congratulations on purchasing this Windows® Mobile™ for Pocket PC with
built-in GPS and Bluetooth functions. Due to the size and capabilities of the
device, you can keep your most important business and personal information
up-to-date and close at hand. Microsoft
®
ActiveSync® increases the power of
your Pocket PC by allowing you to synchronize the information on your desktop
or Microsoft Exchange Server with your Pocket PC.
About this Manual
This manual contains comprehensive information of your Pocket PC to help you
operate the device.
Throughout the manual, the following conventions are used to distinguish
elements of text.
NOTE: provides additional hints or information that requires special attention.
CAUTION: identifies important information which, if not followed, may result in loss of data
or damage to your device.
Any name of menu, command, icon or button that you can see on the screen is
shown in a bold typeset. For example:
On the
Start menu, tap Settings.
v

Where to Find Information
For information on See this source
GPS navigation operation The manual supplied with the GPS software
Programs on your Pocket PC
This User’s Manual or online Help on your
Pocket PC
Connecting to and synchronizing
with a desktop computer
Chapter 6 of this manual or ActiveSync
Help on your desktop computer
The latest on Windows Powered
Pocket PCs
The Microsoft Mobile Devices Web site:
www.pocketpc.com
vi
1 Getting Started
This chapter introduces you to the external components of your Pocket PC and
guide
he
s you through the process of setting up your Pocket PC for use.
NTOE: Depending on the model you purchased, the cabinet color and the look of t
accessories may be different from the ones shown in this manual.
1.1 Identifying Hardware Components
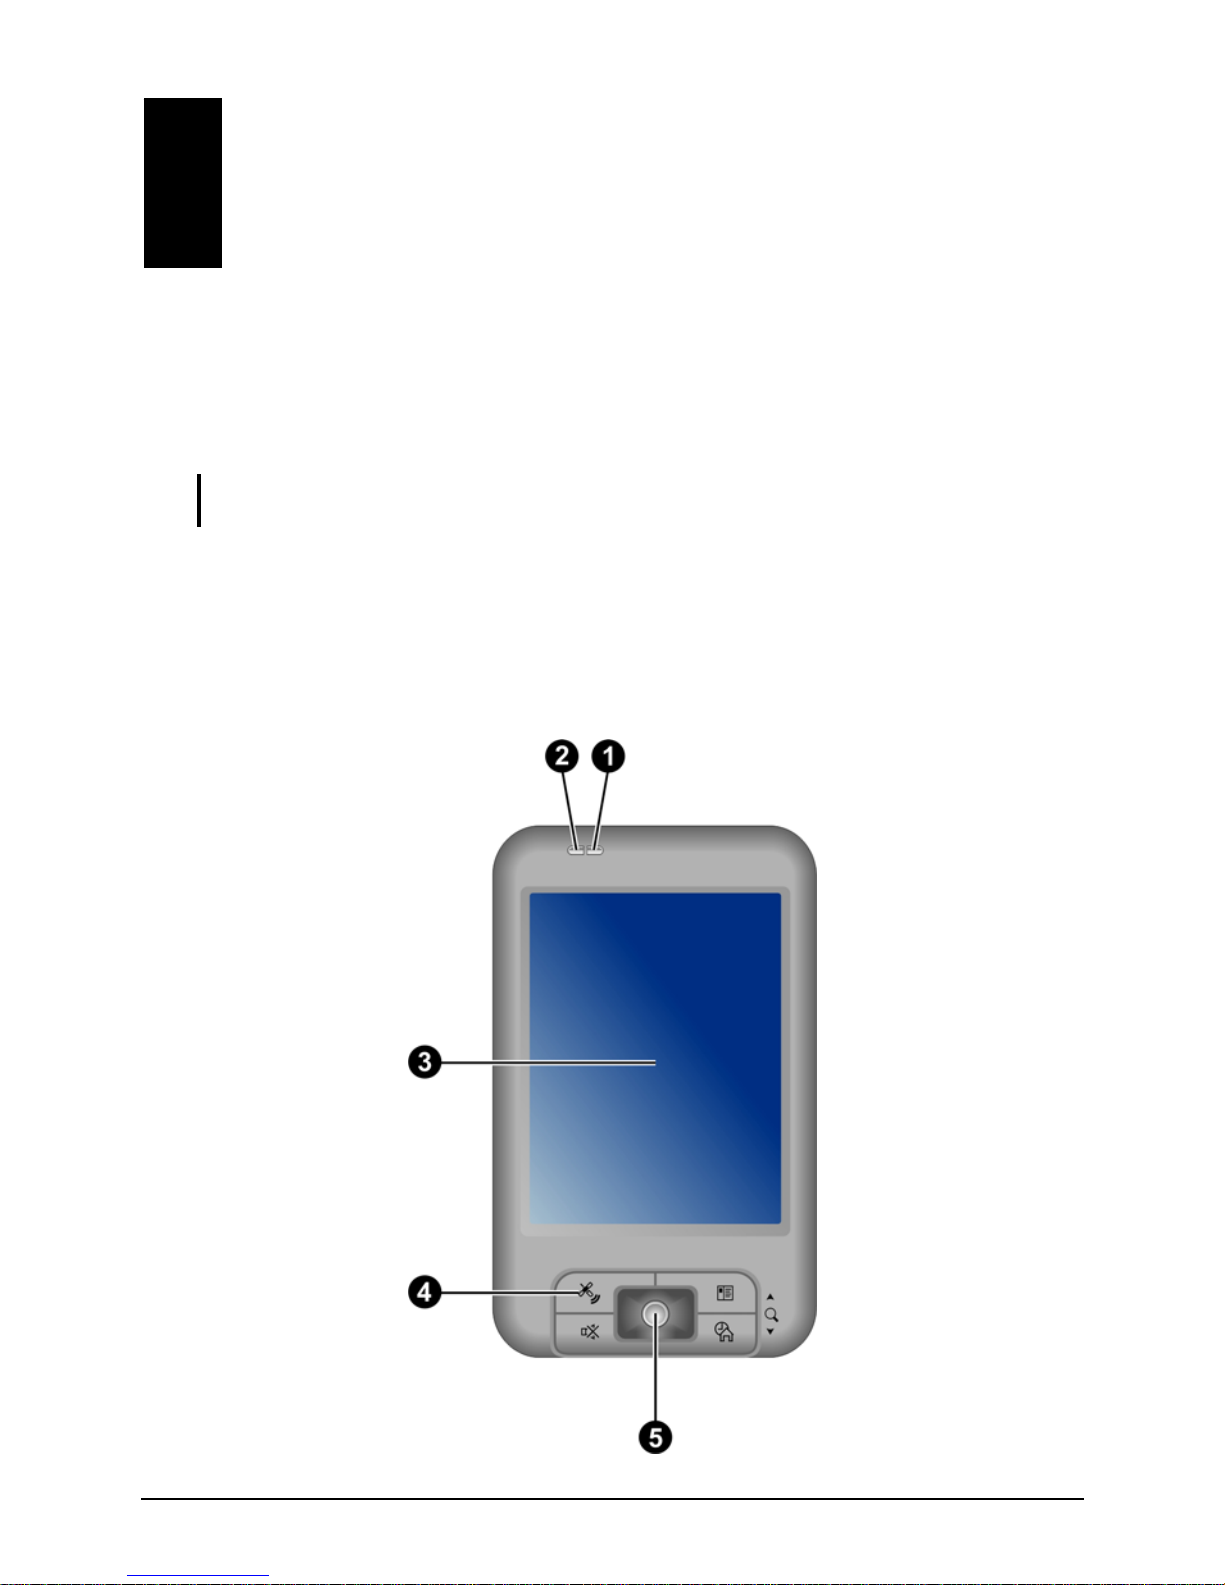
Front Components
1

Ref Component Description
Charge Indicator
(T610)
Glows in amber to indicate that battery charging is in
progress.
Glows in amber to indicate that battery charging is in
progress.
Flashes in amber to inform you of scheduled appointments,
alarms and reminders.
Glows in blue to indicate that the Bluetooth radio is turned
on.
n
Multi-Functional
Indicator
(T620)
Glows in blue and flashes in light purple alternately when
the Bluetooth radio is t urned on and a notifi cation c omes up.
Notification
Indicator
(T610)
Flashes in red to inform you of scheduled appointments,
alarms and reminders.
o
WLAN Indicator
(T620)
Glows in red to indicate that the Wi-Fi radio is turned on.
p
Touch Screen
Displays the output of your Pocket PC. Tap the screen with
the stylus to select menu commands or enter information.
q
Program Buttons
Each of the three buttons provides a quick way to use a
program or function. The buttons are customizable. (By
default, no functions are assigned to the buttons.)
Moves up, down, left or right by pushing the button toward
the corresponding direction.
r
Navigation Stick
Selects by pressing.
2
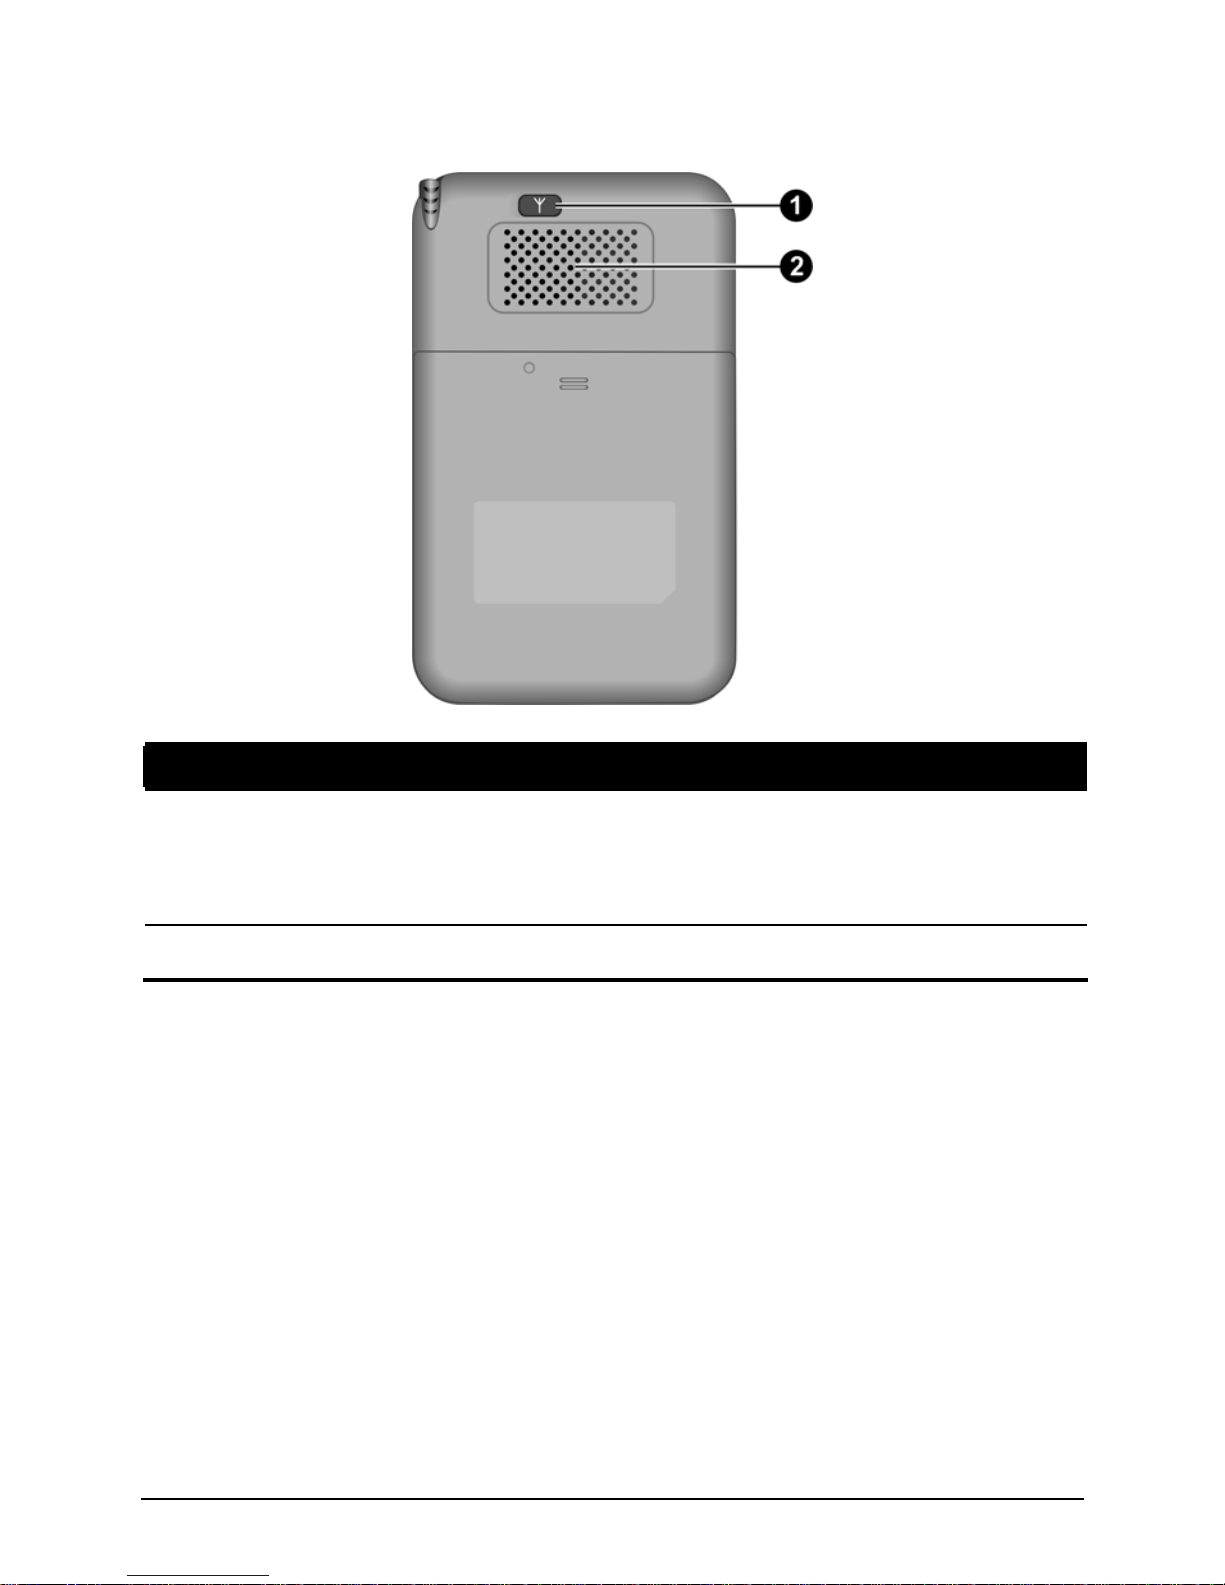
Back Components
Ref Component Description
n
Car Antenna
Connector
This connector (under rubber dust cover) allows use of an
optional external antenna with magnetic mount, which may
be positioned on top of the car for better signal reception in
areas with poor reception.
o
Speaker
Sends out music, sounds and voice.
3
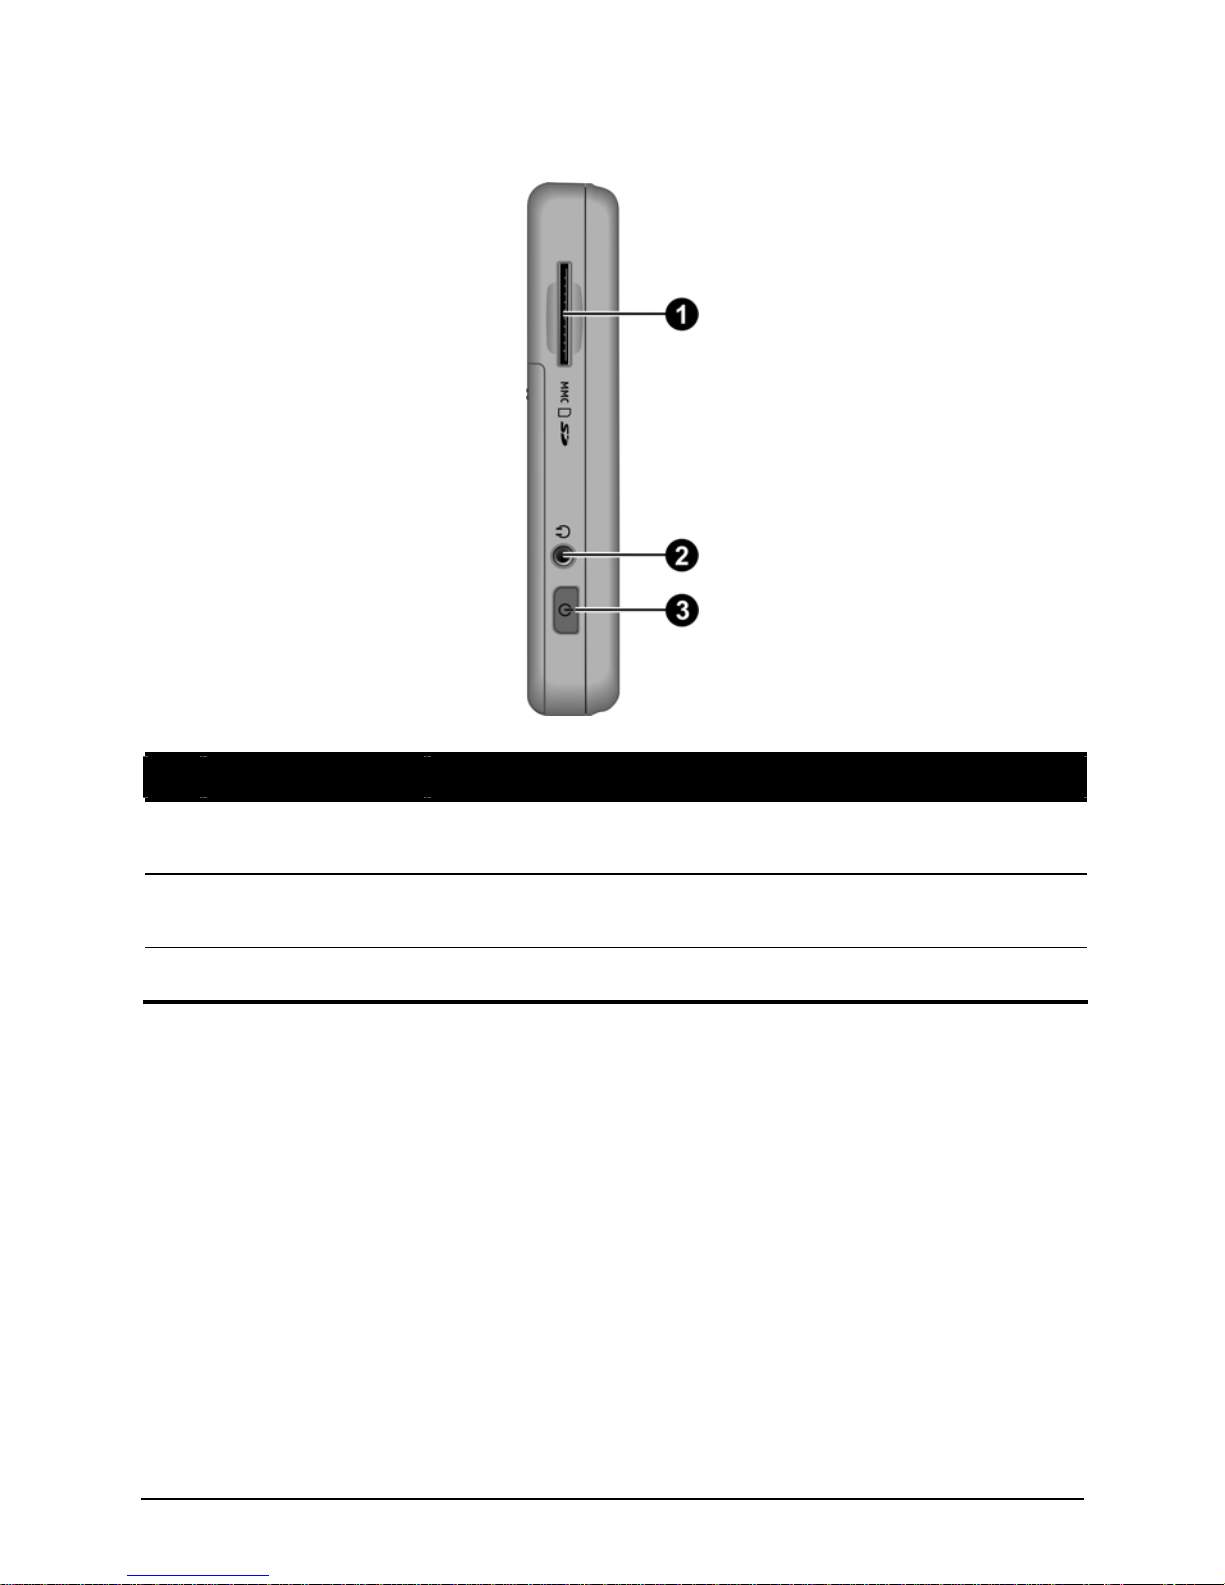
Left-Side Components
Ref Component Description
n
SD/MMC Slot
Accepts an optional SD (Secure Digital) or MMC
(MultiMediaCard) card for removable storage.
o
Headphone
Connector
Connects to a pair of stereo headphones.
p
Power Button
Turns your Pocket PC on or off by pressing briefly.
4
Right-Side Components
Ref Component Description
n
Microphone
Receives sound and voice to record voice.
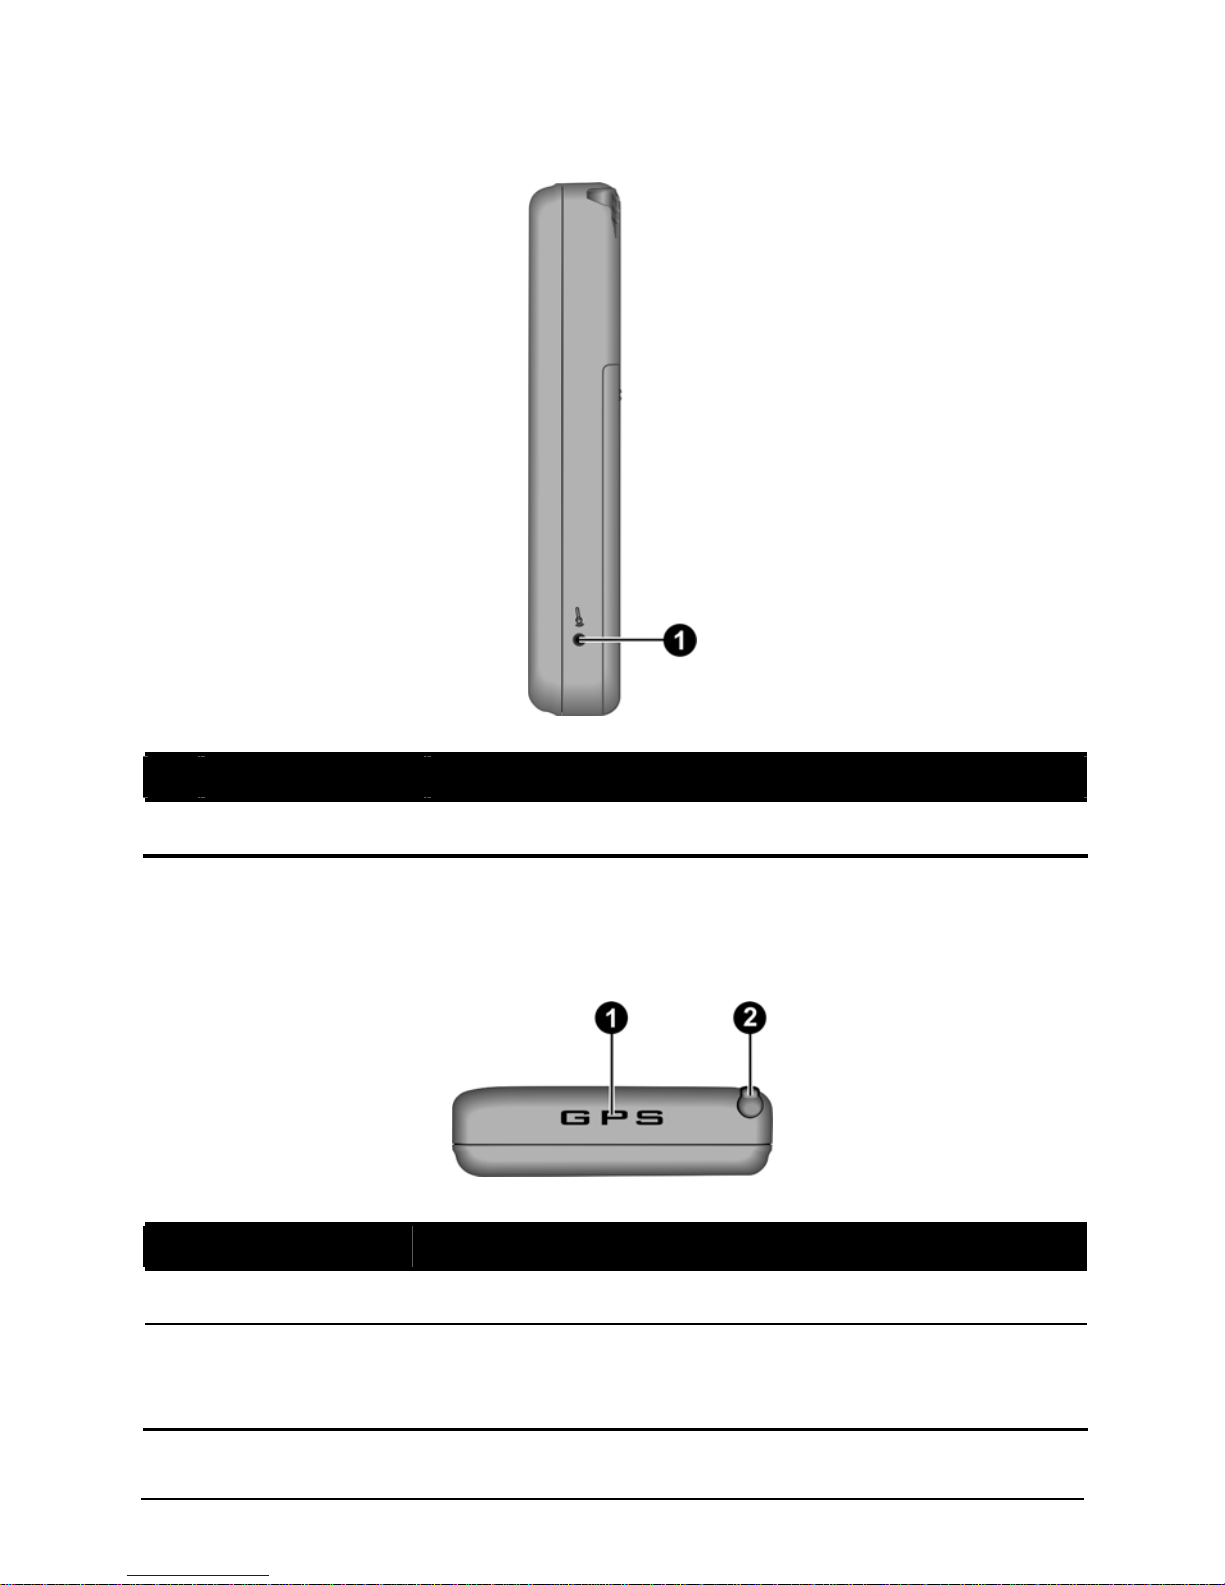
Top Components
Ref Component Description
n
GPS Antenna
Receives signals from the GPS satellites overhead.
o
Stylus
Tap on the touch screen to make selections and enter
information. Pull the stylus out of its slot to use and store it in
the slot when not in use.
5
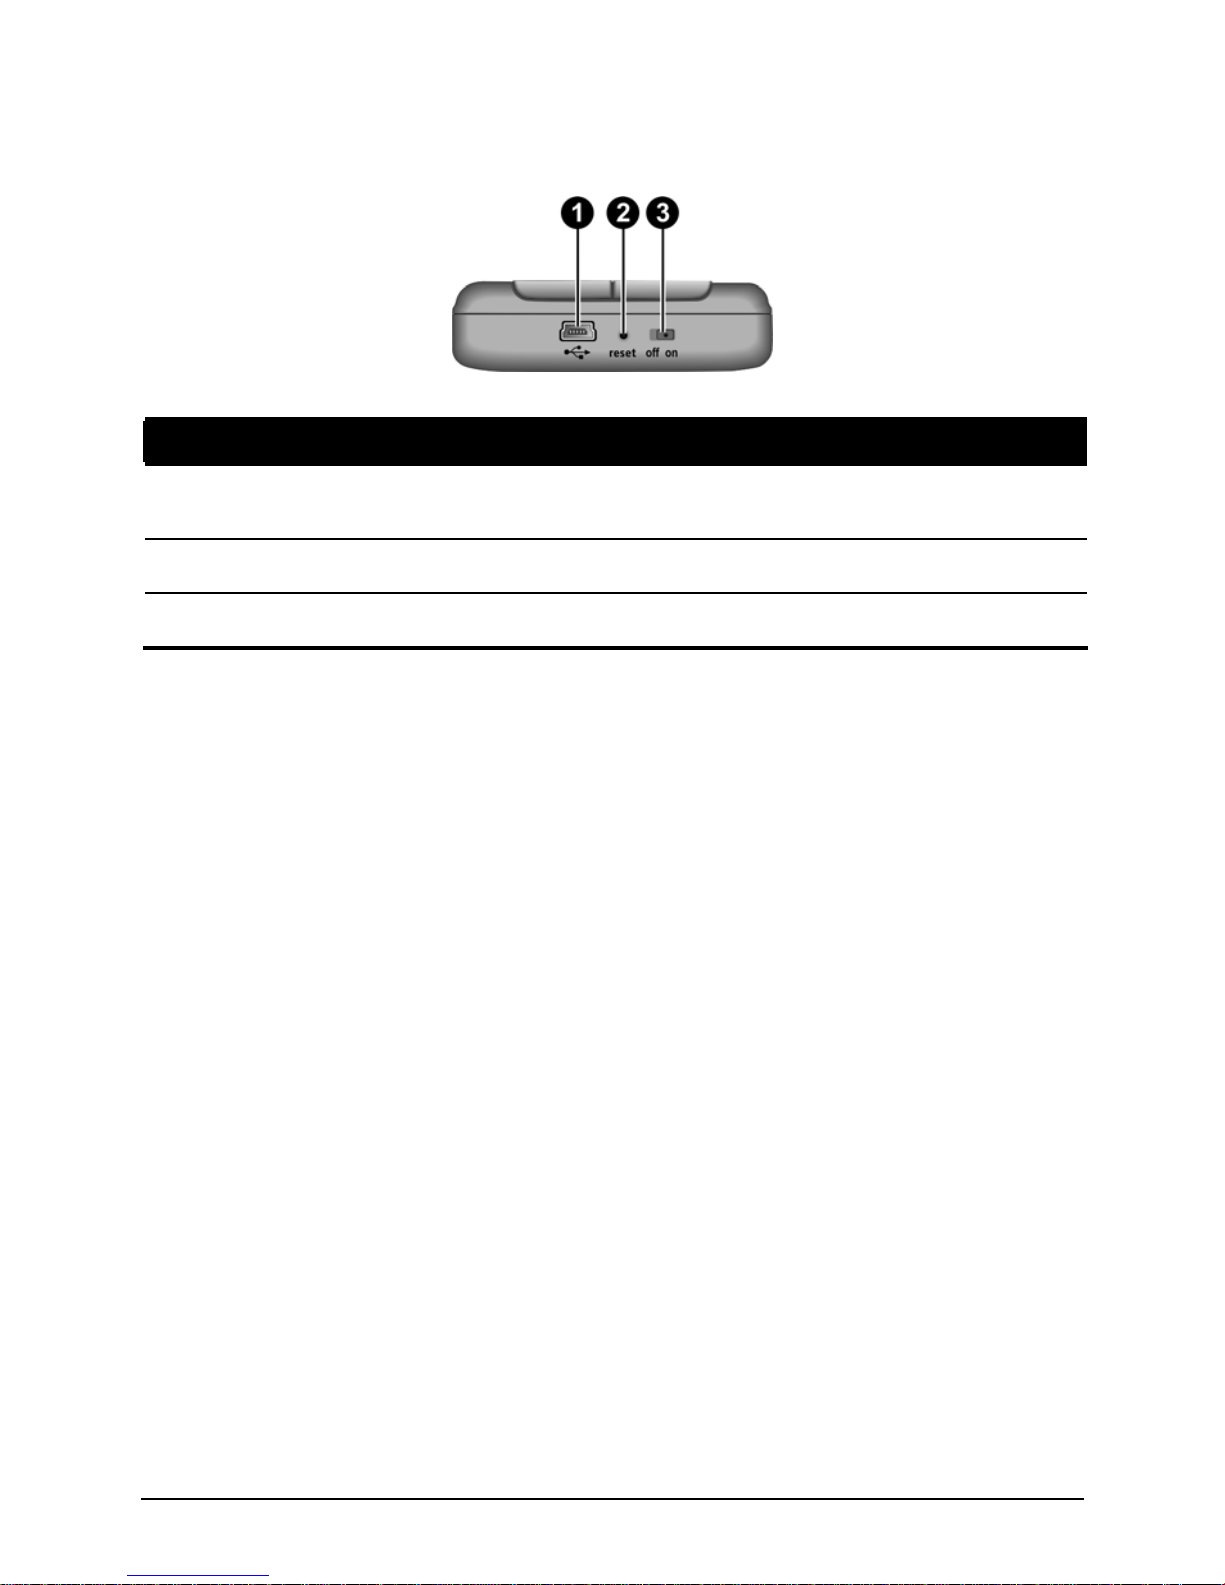
Bottom Components
Ref Component Description
n
Mini-USB
Connector
Connects to the AC adapter or USB cable.
o
Reset Button
Restarts your Pocket PC.
p
ON/OFF Switch
The main power/battery cutoff switch.
6
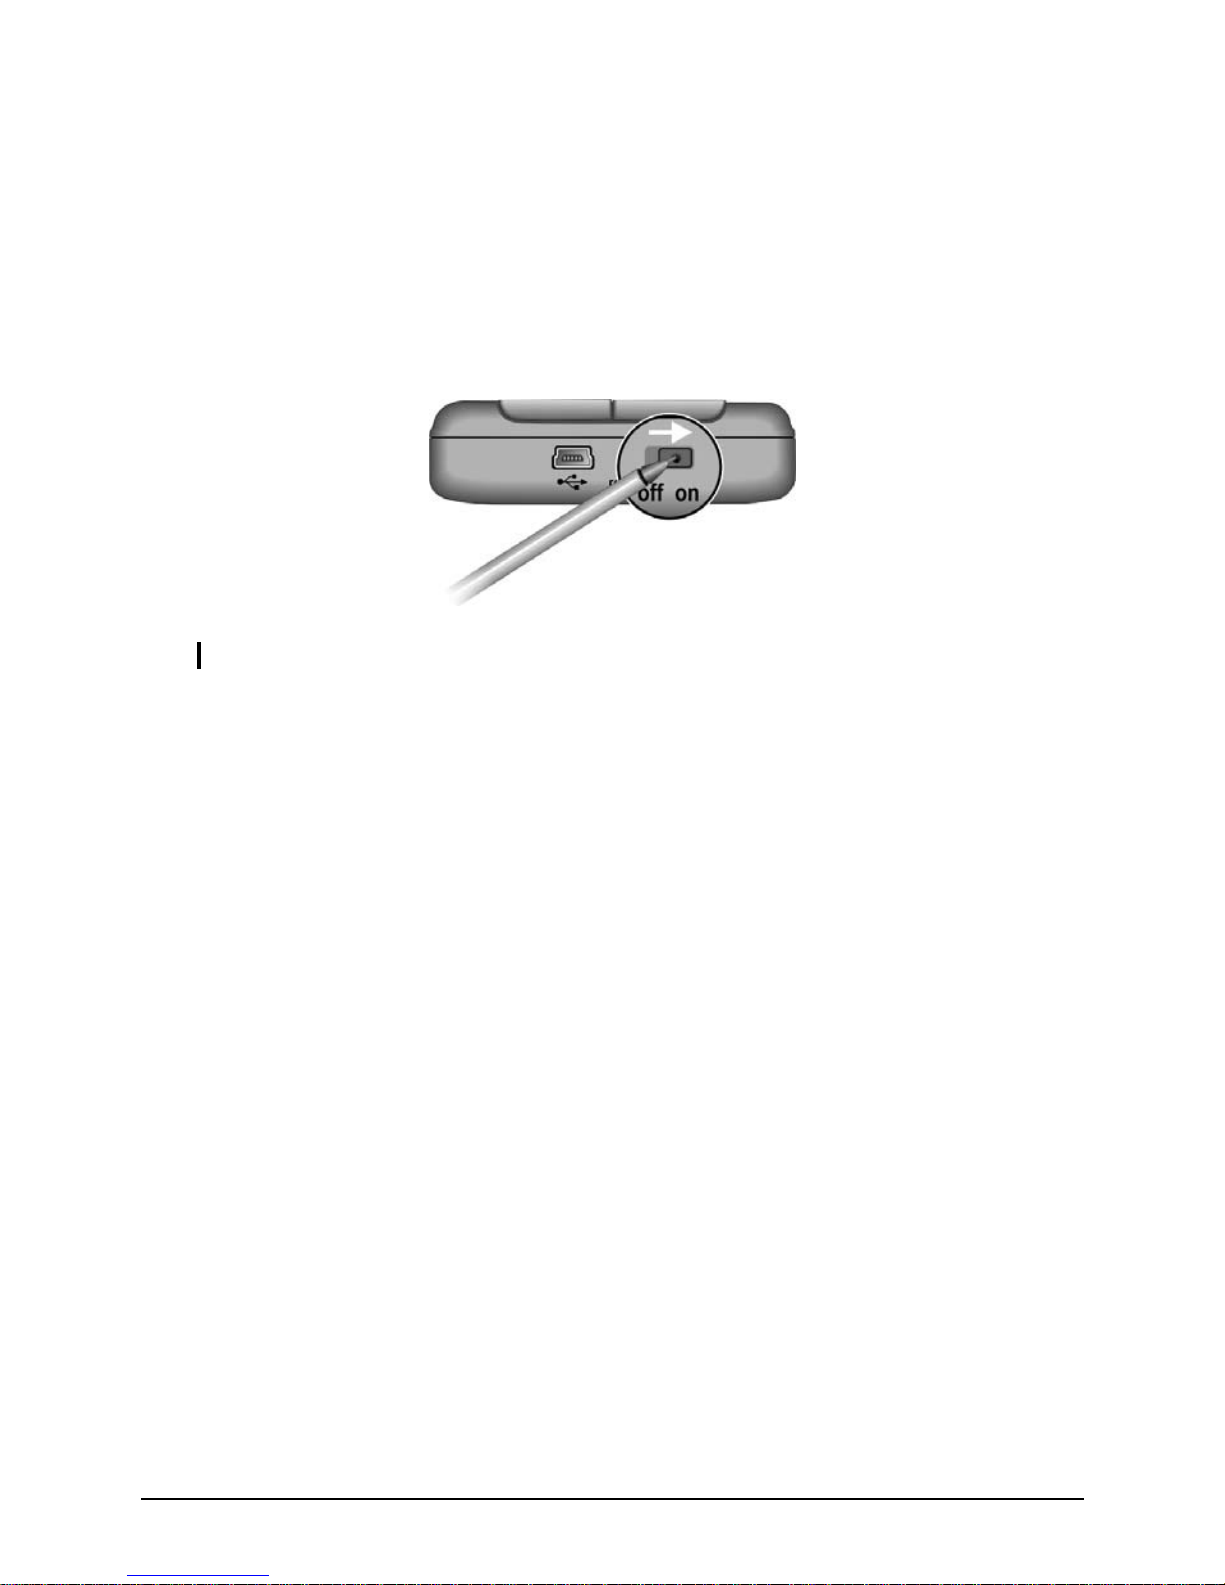
1.2 Getting Your Device Ready for Use
Performing Initial Startup
Initial startup includes setting the ON/OFF switch and completing the setup
wizard.
1. Pull out the stylus and use it to slide the ON/OFF switch to the ON position.
CAUTION: Always leave the ON/OFF switch in the ON position for normal operation.
2. Your device will automatically turn on. Connect the AC adapter as described
in the next sub-section.
3. Follow the onscreen instructions to complete the setup wizard. You will then
see the Today screen.
7
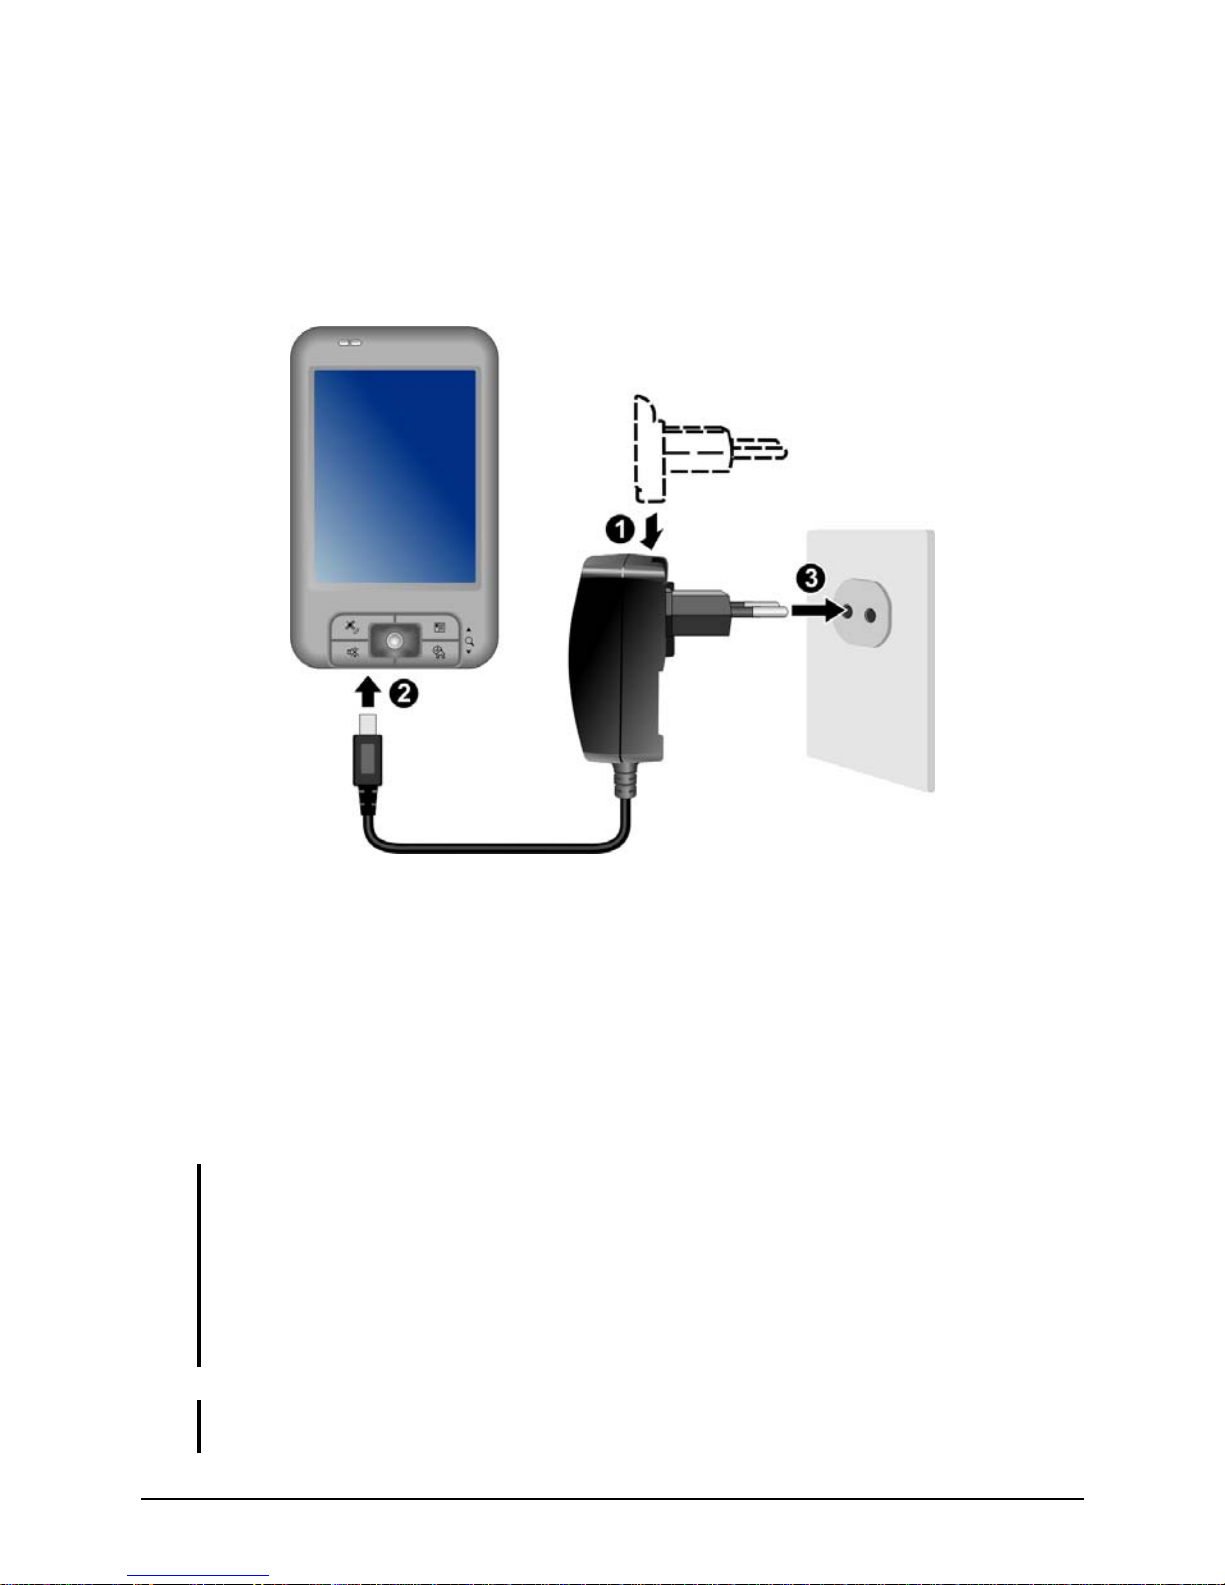
Connecting to AC Power and Charging the Battery
Fully charge the battery before starting to use your Pocket PC for the first time.
1. Fit the converter plug to the AC adapter (n). Connect the mini-USB end of
the AC adapter to your device (o) and the other end to a wall outlet (p).
2. The amber indicator glows when charging is in progress. Do not disconnect
your Pocket PC from AC power until the battery is fully charged, as
indicated by the amber indicator going off. This will take a couple of hours.
When charging the battery for the very first time, charge it for at least 8
hours.
Whenever possible, keep your Pocket PC connected to the AC adapter and a
power source. Doing so keeps the battery charged.
CAUTION: For optimal performance of the lithium battery, take note of the following:
z Do not charge the battery where the temperature is high (e.g. in direct sunlight).
z There is no need to fully discharge the battery before charging. You can charge the
battery before it is discharged.
z If you will not use the product for a long period of time, be sure to fully charge the
battery at least once every two weeks. Over discharge of the battery can affect the
charging performance.
NOTE: Your Pocket PC can also be charged when it is connected to a desktop computer
via the USB cable.
8
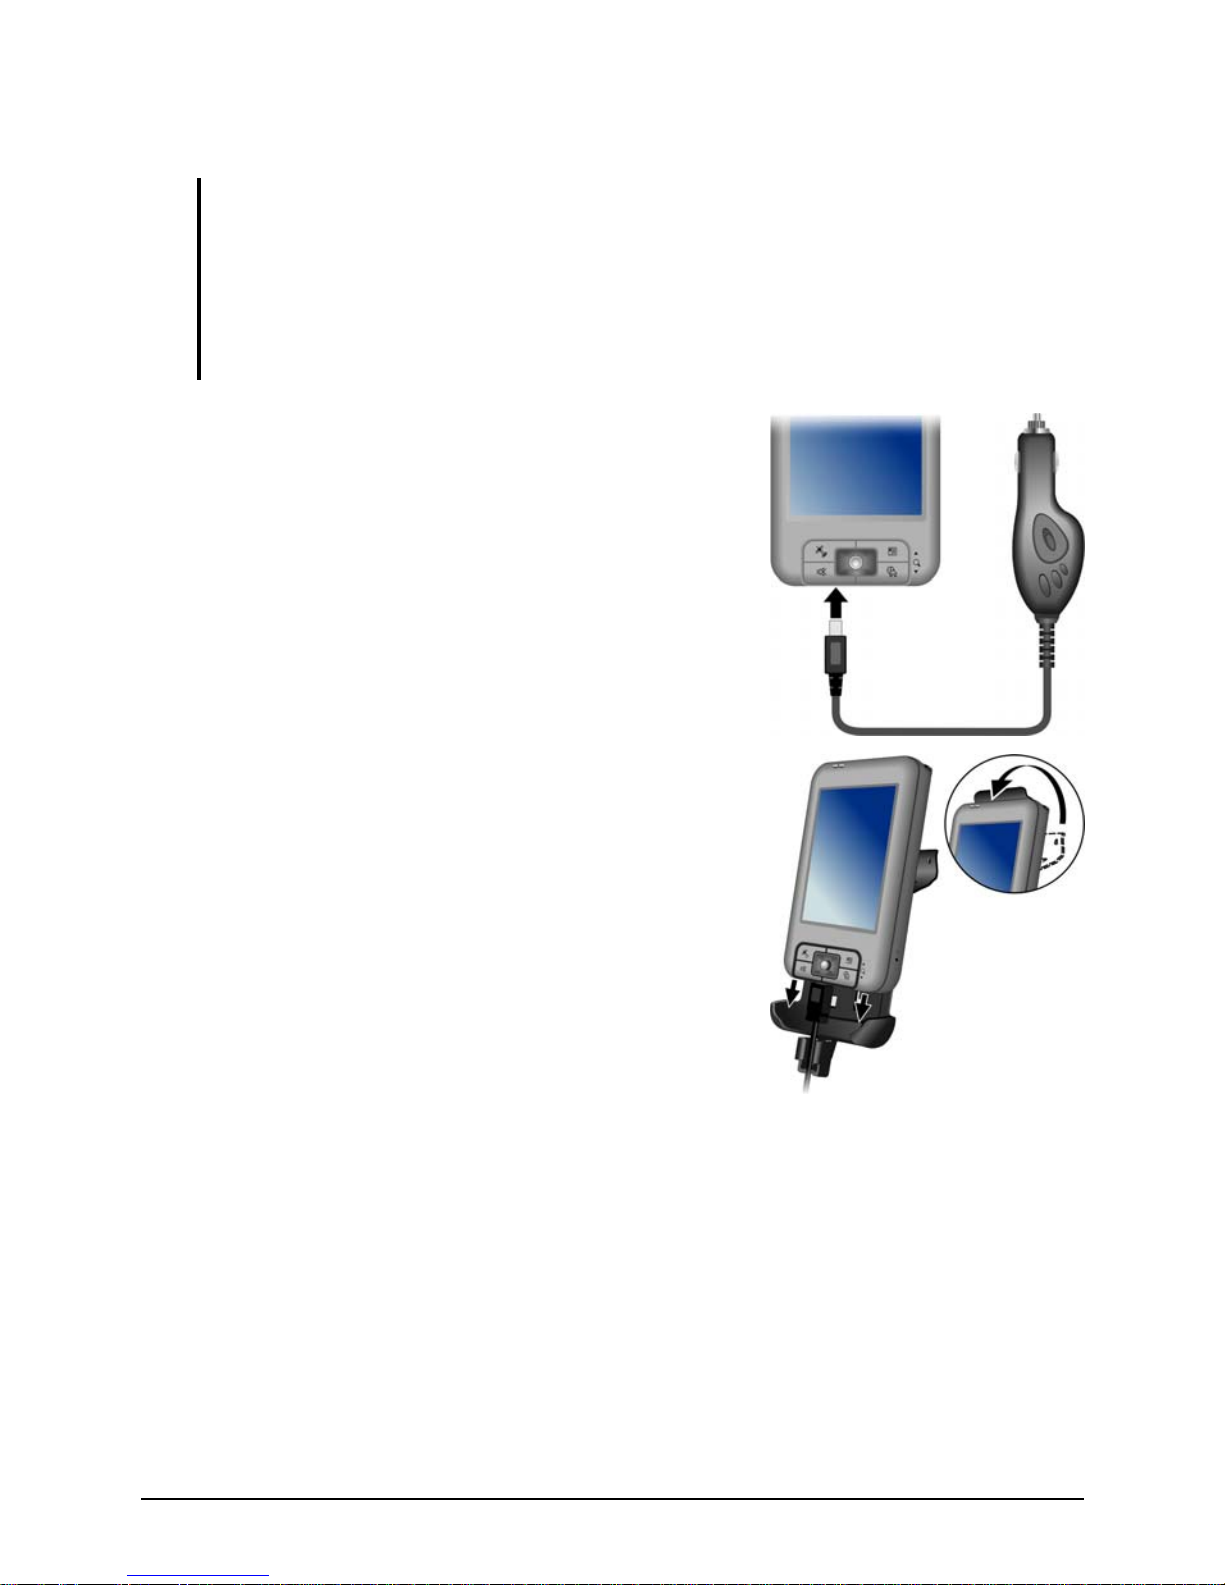
1.3 Using Your Device in a Vehicle
CAUTION:
z When placing the car holder, make sure that the device does not obstruct the driver’s
view, or interfere with the operation of vehicle airbags and safety devices.
z If the car’s windshield is tinted with a reflective coating, an external antenna (optional)
may be needed to route the antenna to the top of the car through a window.
z To protect your device against sudden surges in current, connect the car charger only
after the car engine has been started.
1. Connect one end of the car charger to the bottom
of your device.
2. Slide your device into the bracket. Make sure
that the cable fits inside the bracket’s cable
holder. Then, close the top of the bracket so that
it holds the device in place.
9
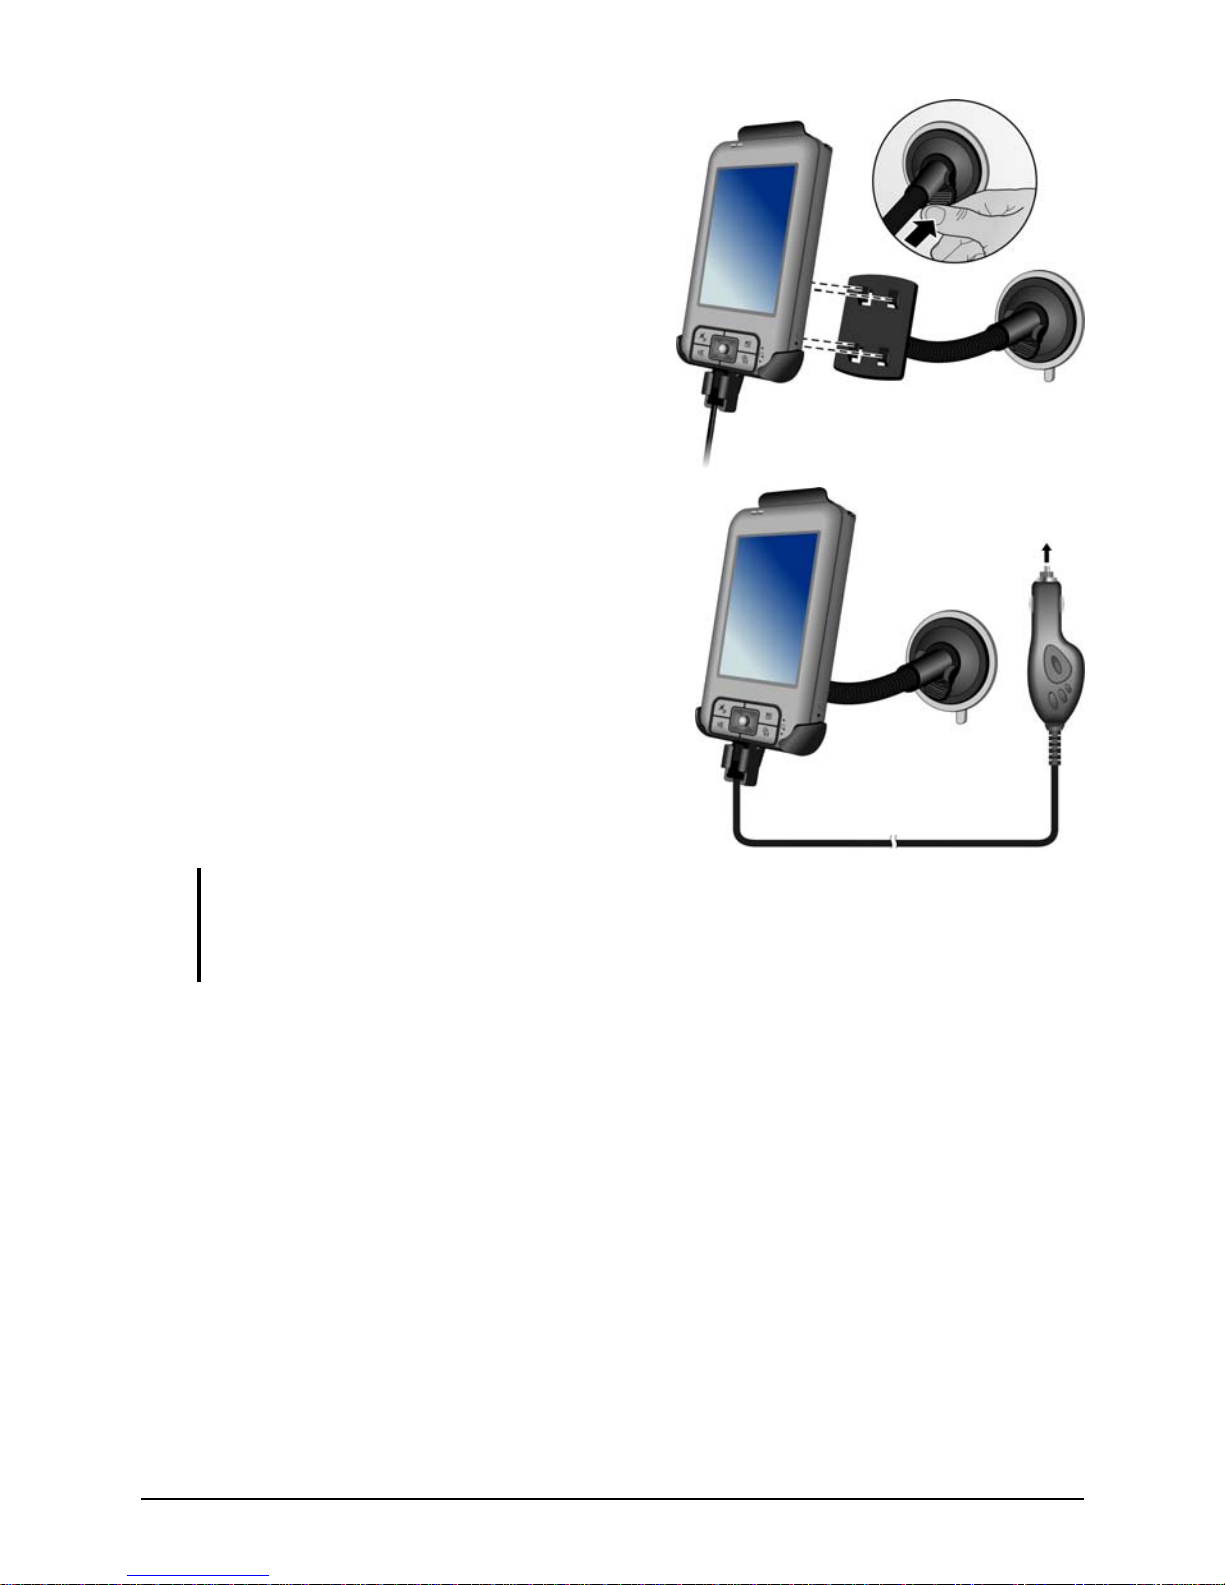
3. Assemble the bracket and the arm stand.
4. Clean the windshield where you will
apply the suction cup. Attach the suction
cup firmly to the windshield and press
the locking tab to secure the cup.
5. Connect the other end of the car charger to
the cigarette lighter in the car to power and
charge your device.
CAUTION:
z When bending the arm, use both hands to adjust gently. Never use force.
z To retain adhesion of the car holder’s suction cup, detach and then re-attach the suction
cup at least once a month.
10

1.4 Turning Your Pocket PC On and Off
After the initial startup, your Pocket PC enters a suspend state when you turn it
off and resumes when you turn it on.
Turning Off to Suspend
You suspend your Pocket PC by briefly pressing the power button.
By default, your Pocket PC will also automatically suspend after 3 minutes of
inactivity when operating on battery power. (To change these settings, tap
Æ
Settings Æ System Æ Power Æ Advanced.)
Turning On to Resume
You resume your Pocket PC by briefly pressing the power button. You may also
press one of the program buttons to resume.
1.5 Installing Microsoft ActiveSync
You can use Microsoft ActiveSync technology to synchronize information on
your desktop computer and/or a Microsoft Exchange Server with the information
on your Pocket PC. ActiveSync compares the information on your Pocket PC
with the information on the desktop computer and/or the server and updates all
locations, keeping you up-to-date with the most recent information.
ActiveSync is already installed on your Pocket PC. You need to install
ActiveSync on your desktop computer. Follow the procedure below:
CAUTION:
z Before installation, make sure that you have Microsoft Outlook installed on your desktop
computer.
z Do not connect your Pocket PC to your desktop computer before ActiveSync is installed.
z ActiveSync connection problems may occur in some specific cases. They are likely
caused by interoperability with desktop firewall applications or applications that manage
network traffic. For troubleshooting information, visit the Microsoft web site:
www.microsoft.com/windowsmobile/help/activesync.
1. Turn on your desktop computer.
11
2. Insert the Getting Started CD into the
CD-ROM drive of your desktop computer.
3. Click
Next to continue.
4. The setup wizard will install Microsoft
ActiveSync. Follow the onscreen instructions
to install ActiveSync.
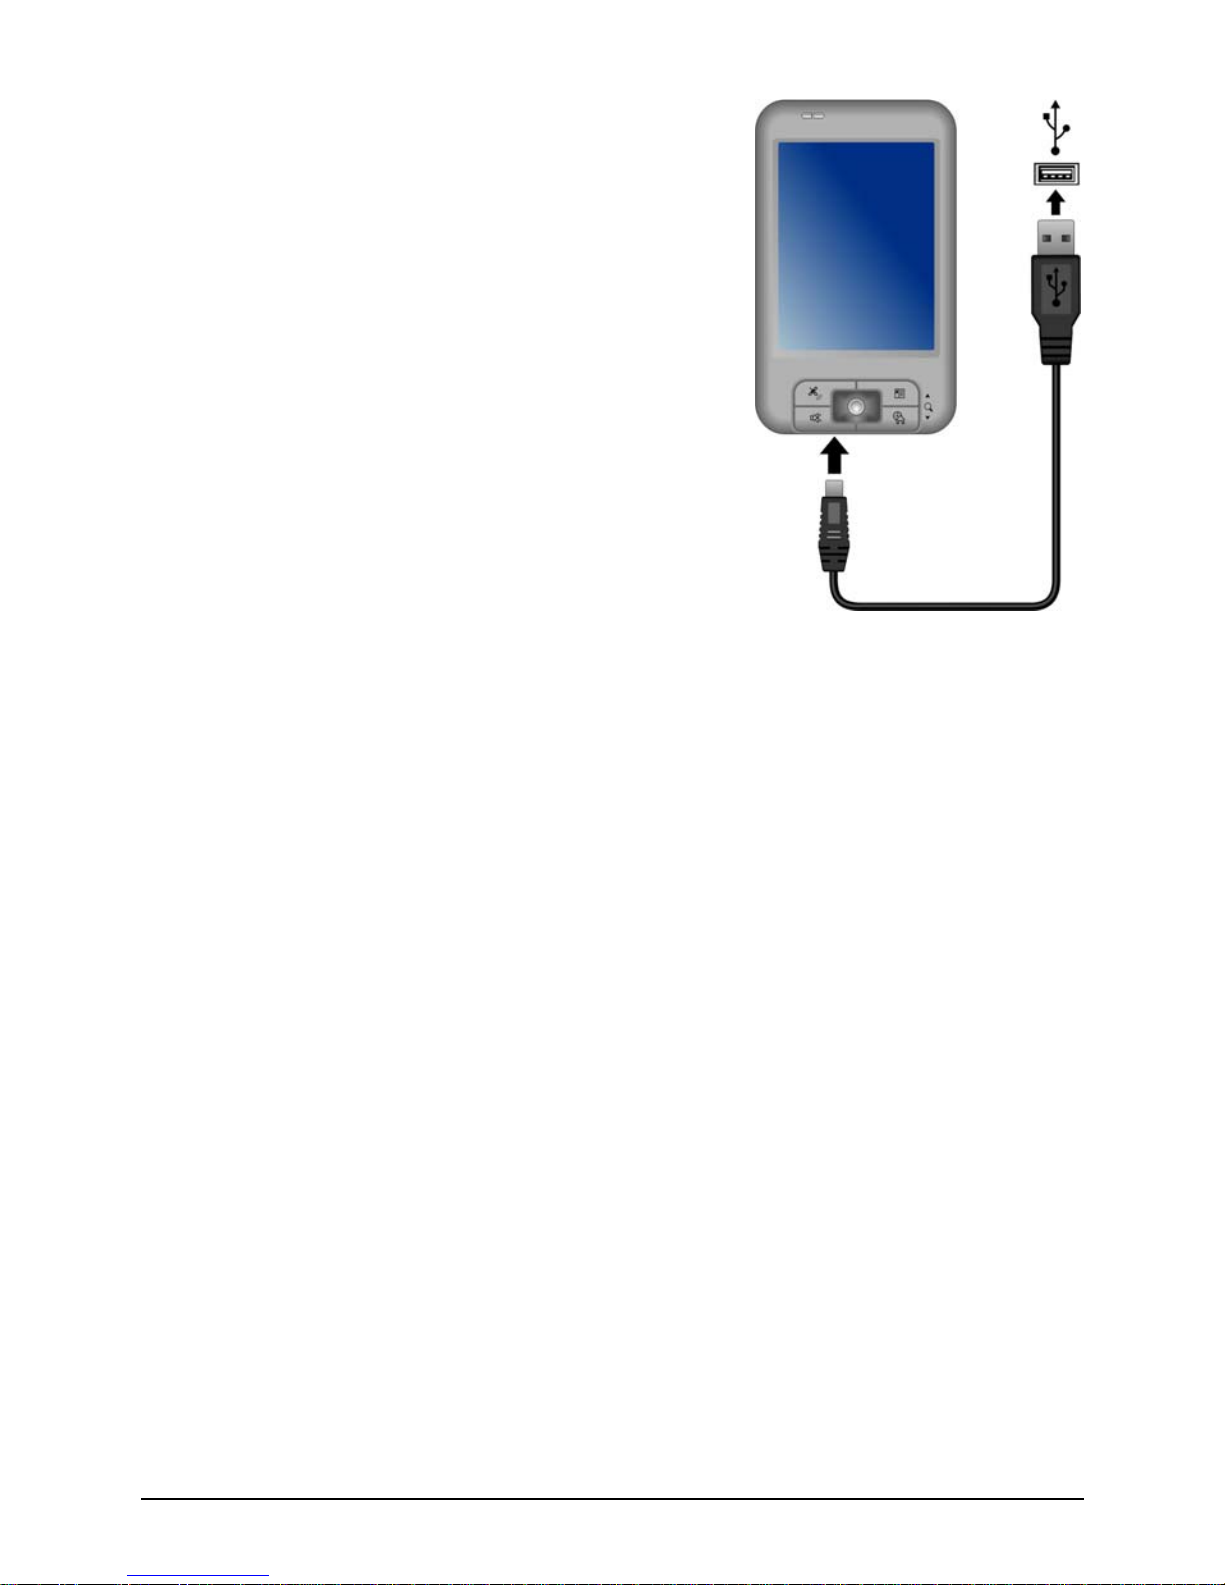
5. When prompted, connect the mini-USB end
of the USB cable to the bottom of your Pocket
PC and the other end to a USB port on your
desktop computer.
6. Follow the onscreen instructions to establish a
synchronization relationship and synchronize
your Pocket PC with your desktop computer.
After your first synchronization, the data you have stored on your desktop
computer such as Calendar, Contacts and Tasks is copied to your Pocket PC.
You are now ready to take it along with you when you go.
12
1.6 Expanding Your Pocket PC
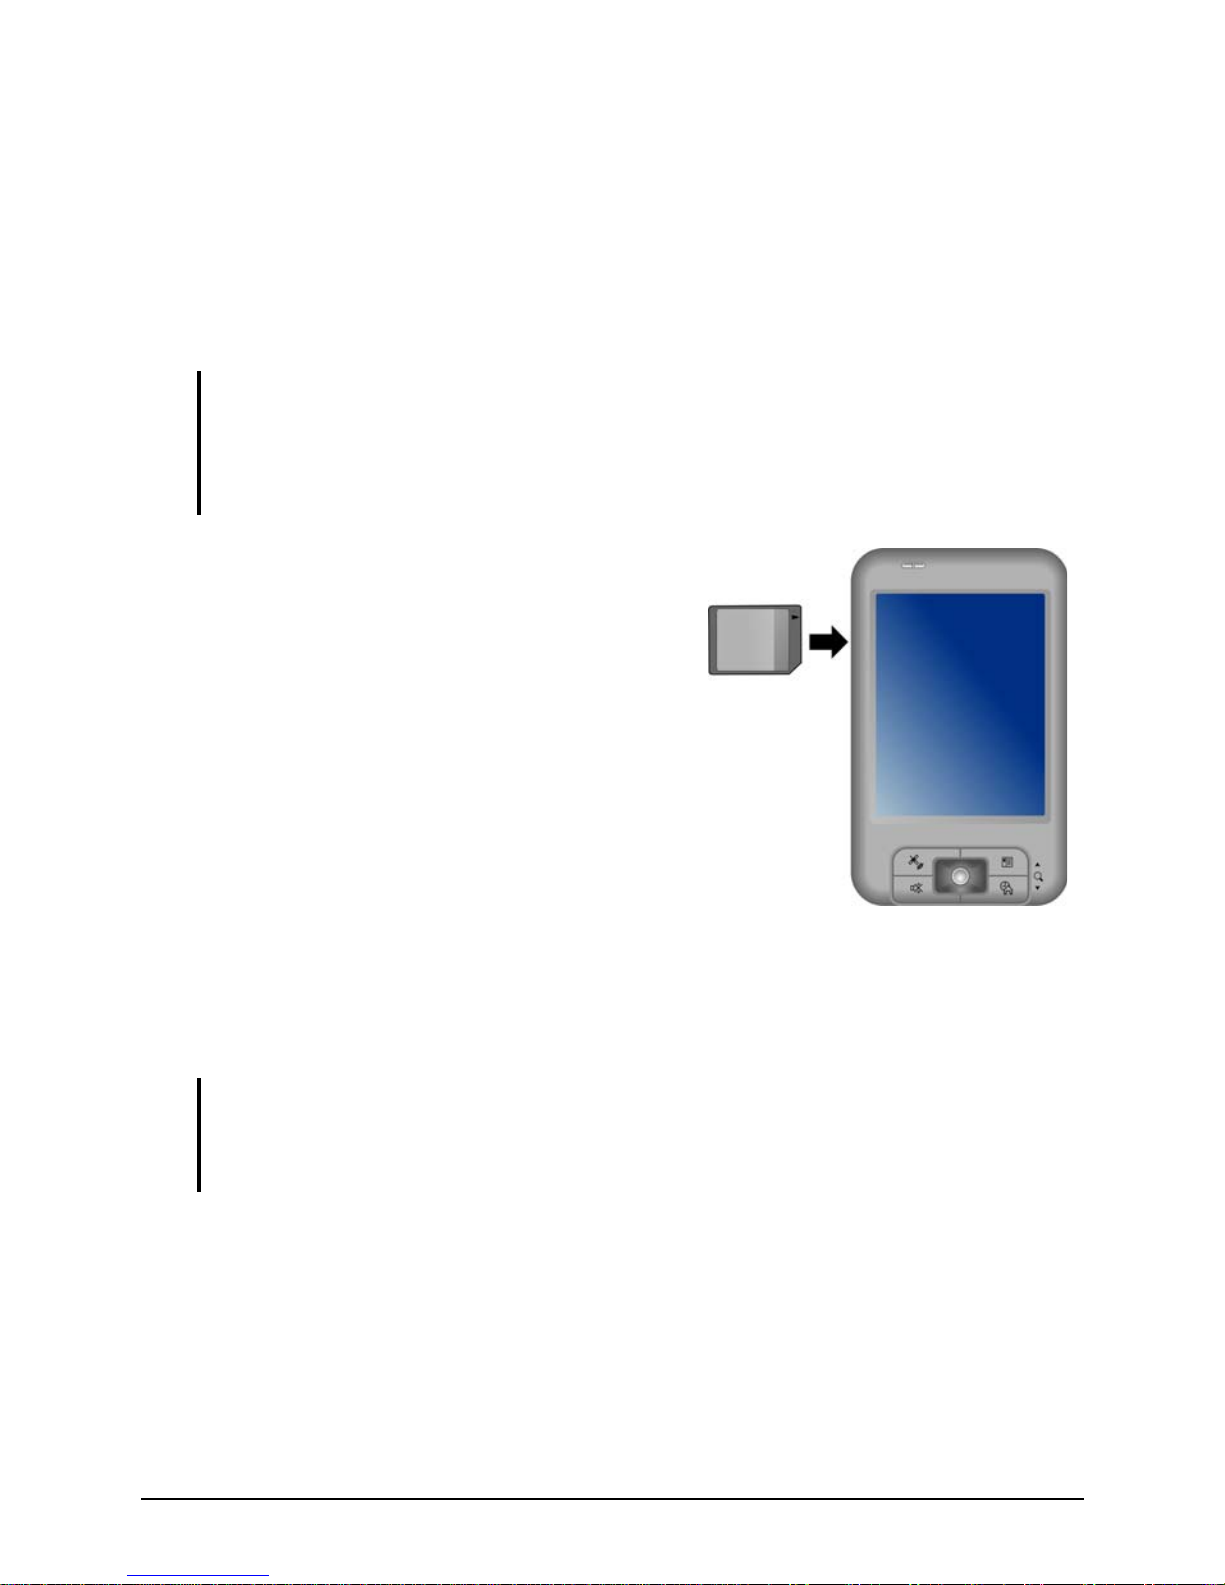
Using a SD/MMC Card
Your Pocket PC has a SD/MMC slot where you can insert an optional Secure
Digital or MultiMediaCard storage card. With the removable memory, you can
store or backup your data and exchange data with other devices.
NOTE:
z A storage card is also called a memory card.
z Make sure that no foreign objects enter the slot.
z Keep a SD or MMC card in a well-protected box to avoid dust and humidity when you are
not using it.
To use a SD/MMC card, insert it into the slot,
with the connector pointing to the slot and its
label facing the front of the Pocket PC. Follow
the instructions supplied with the card for
more information.
To remove a card, first make sure that no
application is accessing the card, then slightly
push the top edge of the card to release it and
pull it out of the slot.
Accessories
By purchasing accessories designed for your Pocket PC, you can expand the
capabilities of your Pocket PC, replace lost parts or facilitate your operation.
NOTE:
z Please contact your dealer for the availability of accessories from your Pocket PC
manufacturer.
z The use of unauthorized accessories will void your Warranty.
For detailed information on using the accessories, see the instructions supplied
with the accessories.
13
2 Basic Skills
This chapter familiarizes you with the basic operations of your Pocket PC such
as using the stylus, navigation stick, Today screen, menus, and prog
rams. You
will also know how to enter information and lock your Pocket PC.
t of the slot and extend it for ease of use. Store it in the slot
when not in use.
z
stylus to
s and select options.
z
ges.
multiple items.
z
e
ears, tap the action
you want to perform.
2.1 Using the Stylus
Use the stylus to navigate and select objects on the screen.
Pull the stylus ou
Tap
Touch the screen once with the
open item
Drag
Hold the stylus on the screen and drag
across the screen to select text and ima
Drag in a list to select
Tap and hold
Tap and hold the stylus on an item to see a
list of actions available for that item. On th
shortcut menu that app
14

2.2 Using the Navigation Stick
With the navigation stick, you can move up, d own, left
and right within a menu. This is particularly useful for
one-hand operation.
To move in a direction, simply push the button toward
the corresponding direction.
To activate the selected item, press the button.
Up
Left
Right
Down
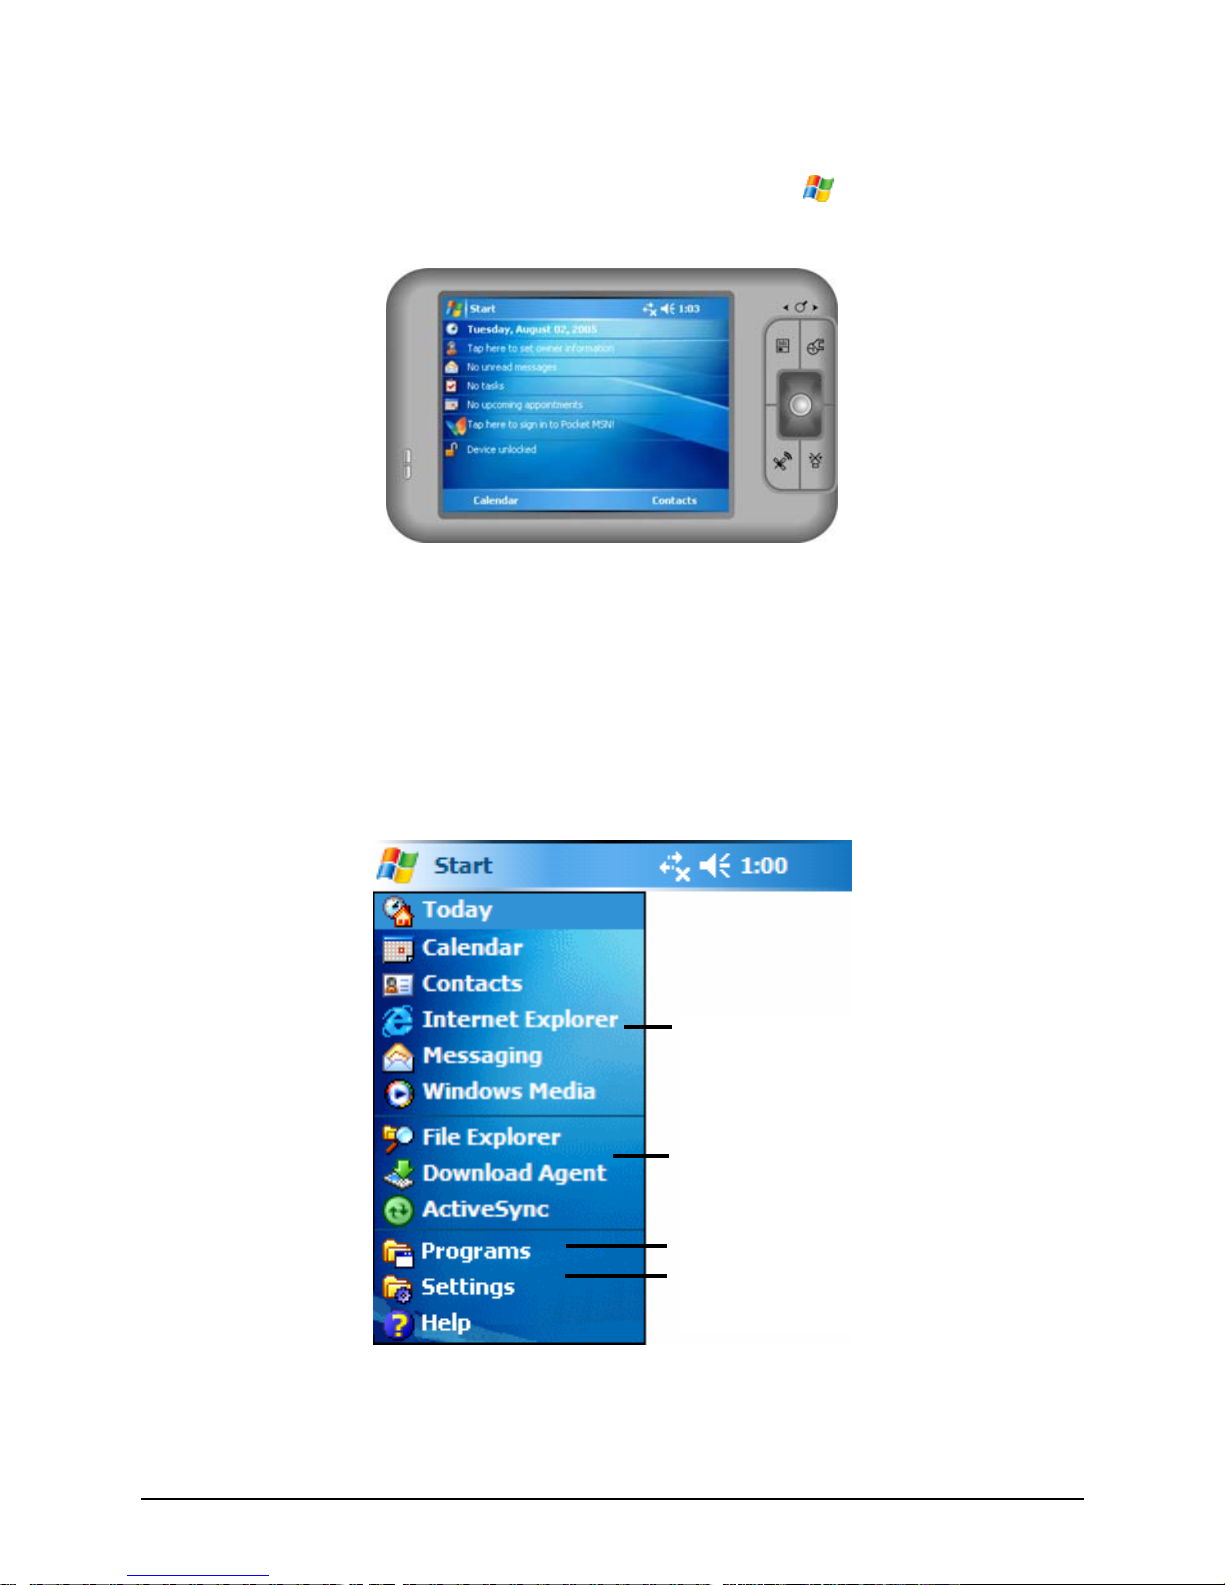
2.3 Today Screen
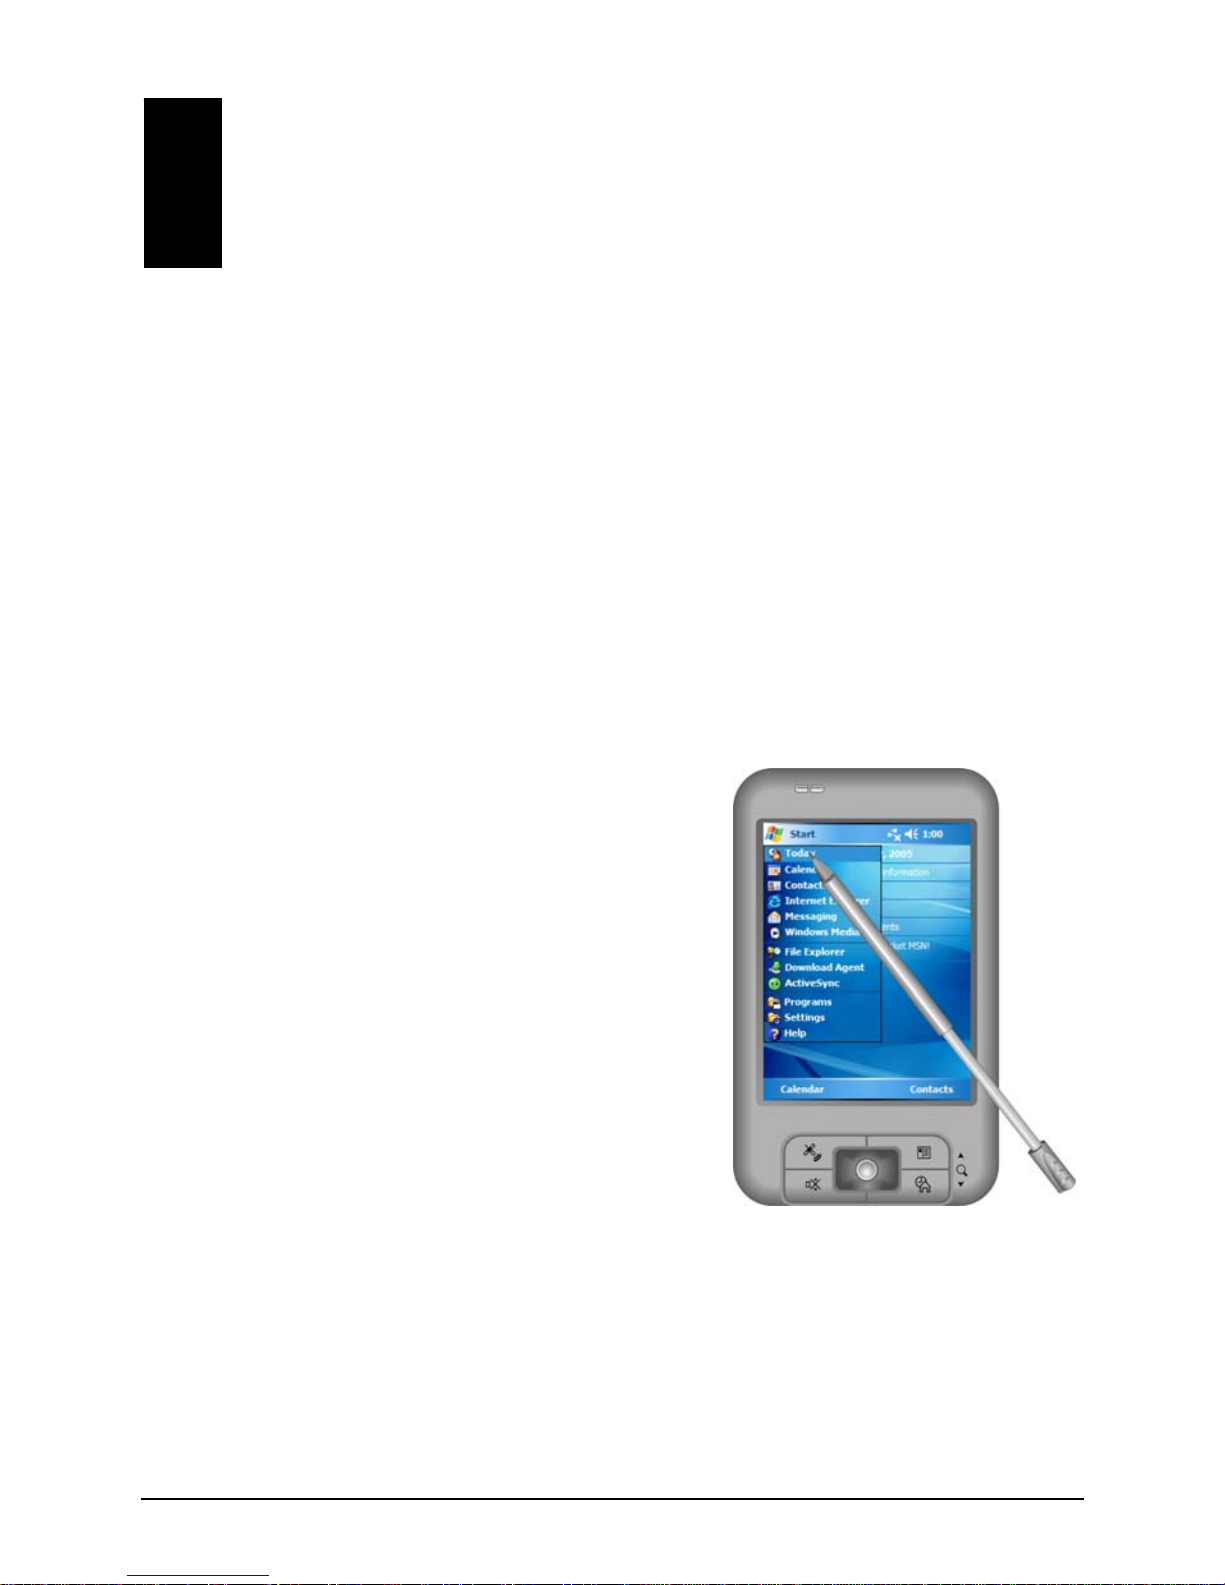
When you turn on your Pocket PC for the first time each day, you will see the
Today screen. The Today screen shows your upcoming appointments, active
tasks, and information about e-mail messages. Along the top of the Today screen
you will see the volume icon, the clock, and connectivity indicators. You can tap
a section of the Today screen to open the program that is associated with that
section. The Today screen is accessible from anywhere by tapping
and then
Today.
Tap to change date and time.
Tap to change volume or mute all sounds.
Tap to switch to a
program.
Left Soft Key
Right Soft Key
Your day at a glance.
Tap an item to access associated
program so that you can view or
change information.
Tap to connect.
15
Landscape View
You can use your Pocket PC in a landscape manner. Tap Æ Settings Æ System
Æ
Screen Æ Landscape.
2.4 Navigation Bar and Toolbar
The Navigation bar is located at the top of the screen. It displays the active
program and current time and allows you to switch programs and close screens.
The Navigation bar and Start menu:
Tap to select a program.
Tap to quickly select a program you
have recently used.
Tap to see additional programs.
Tap to customize the Pocket PC.
16
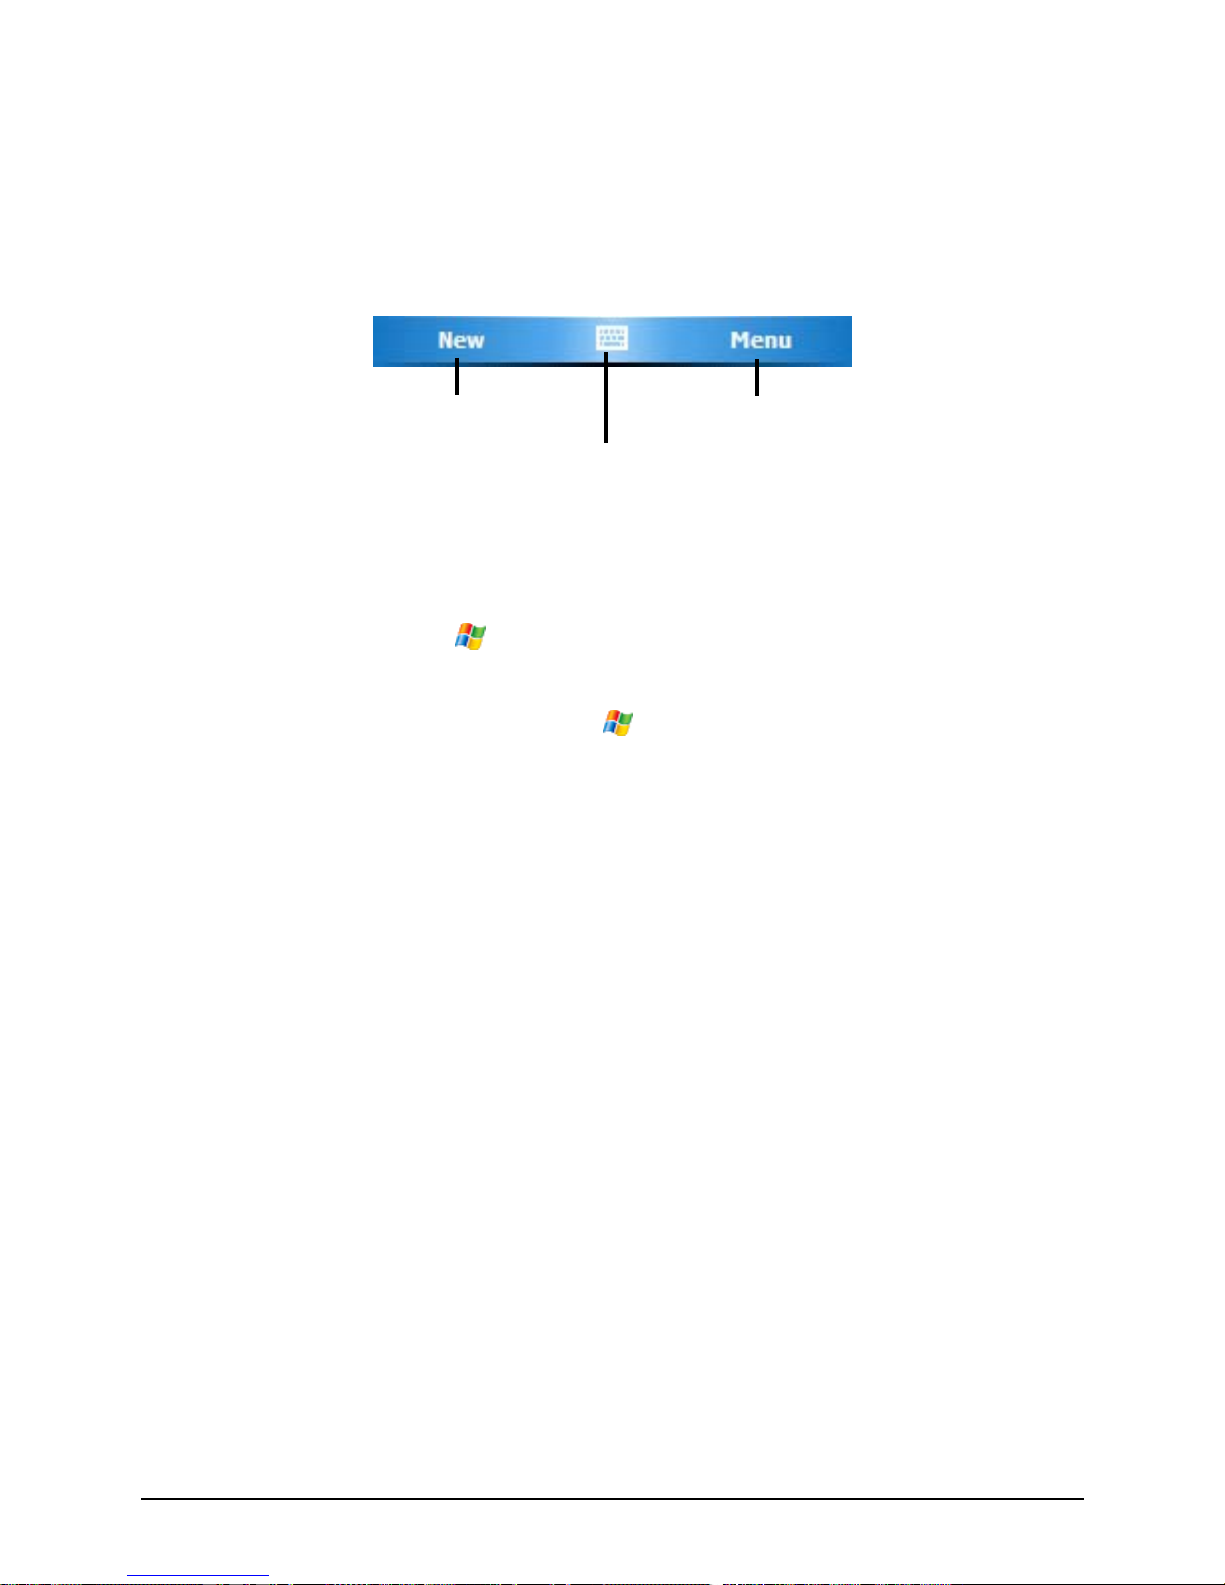
Use the toolbar at the bottom of the screen to perform tasks in programs. The
toolbar includes a left soft key, a right soft key, and the Input panel button in
between. The right soft key is usually
Menu while the left soft key varies with
programs.
An example of the toolbar:
Input panel
button
Left Soft Key
Right Soft Key
2.5 Running Programs
You can switch from one program to another without closing any program.
z To run a program, tap
at the left-top corner of the screen and select from
the Start menu.
z To access additional programs, tap
Æ
Programs and tap the program icon.
z You can press a program button on the front of your Pocket PC. The icons on
the buttons identify the default programs they are associated with.
2.6 Shortcut Menus
With shortcut menus, you can quickly choose an action for an item. For example,
you can use the shortcut menu in the contact list to quickly delete a contact, make
a copy of a contact or send an email message to a contact. The actions in the
shortcut menus vary from program to program. To access a shortcut menu, tap
and hold the stylus on the name of the item that you want to perform the action
on. When the menu appears, lift the stylus and tap the action you want to
perform. Or tap anywhere outside the menu to close the menu without
performing an action.
17
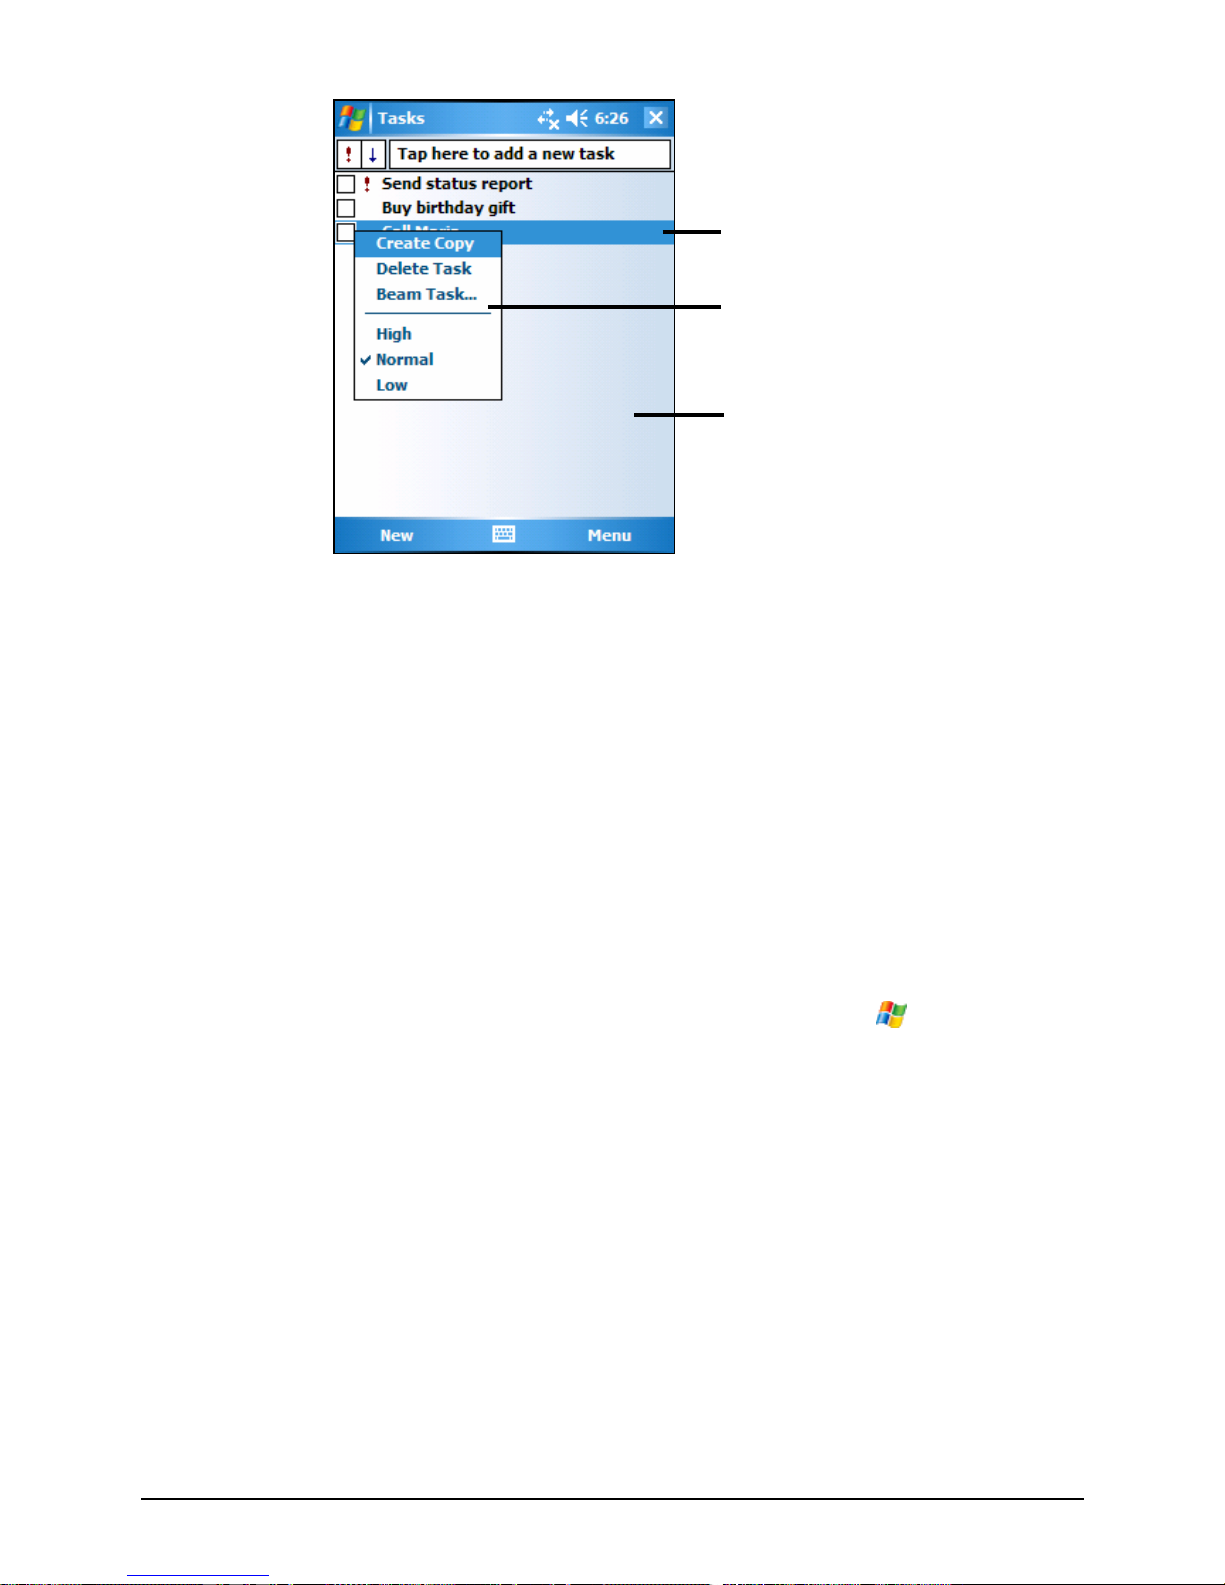
Tap and hold to display the
shortcut menu.
Lift the stylus and tap the action
you want.
Tap outside the menu to close it
without performing an action.
2.7 Notifications
Your Pocket PC reminds you in a variety of ways when you have something to
do. For example, if you have set up an appointment in Calendar, a task with a due
date in Tasks or an alarm in Clock, you will be notified in any of the following
ways:
z A message appears on the screen.
z A sound, which you can specify, is played.
z The notification indicator flashes.
To choose reminder types and sounds for your Pocket PC, tap
Æ
Settings Æ
Personal Æ Sounds & Notifications.
2.8 Entering Information
You have several options for entering new information:
z Use the Input panel to enter typed text, either by using the soft keyboard or
other input methods.
z Write directly on the screen.
z Draw pictures on the screen.
z Speak into the microphone to record a message.
18
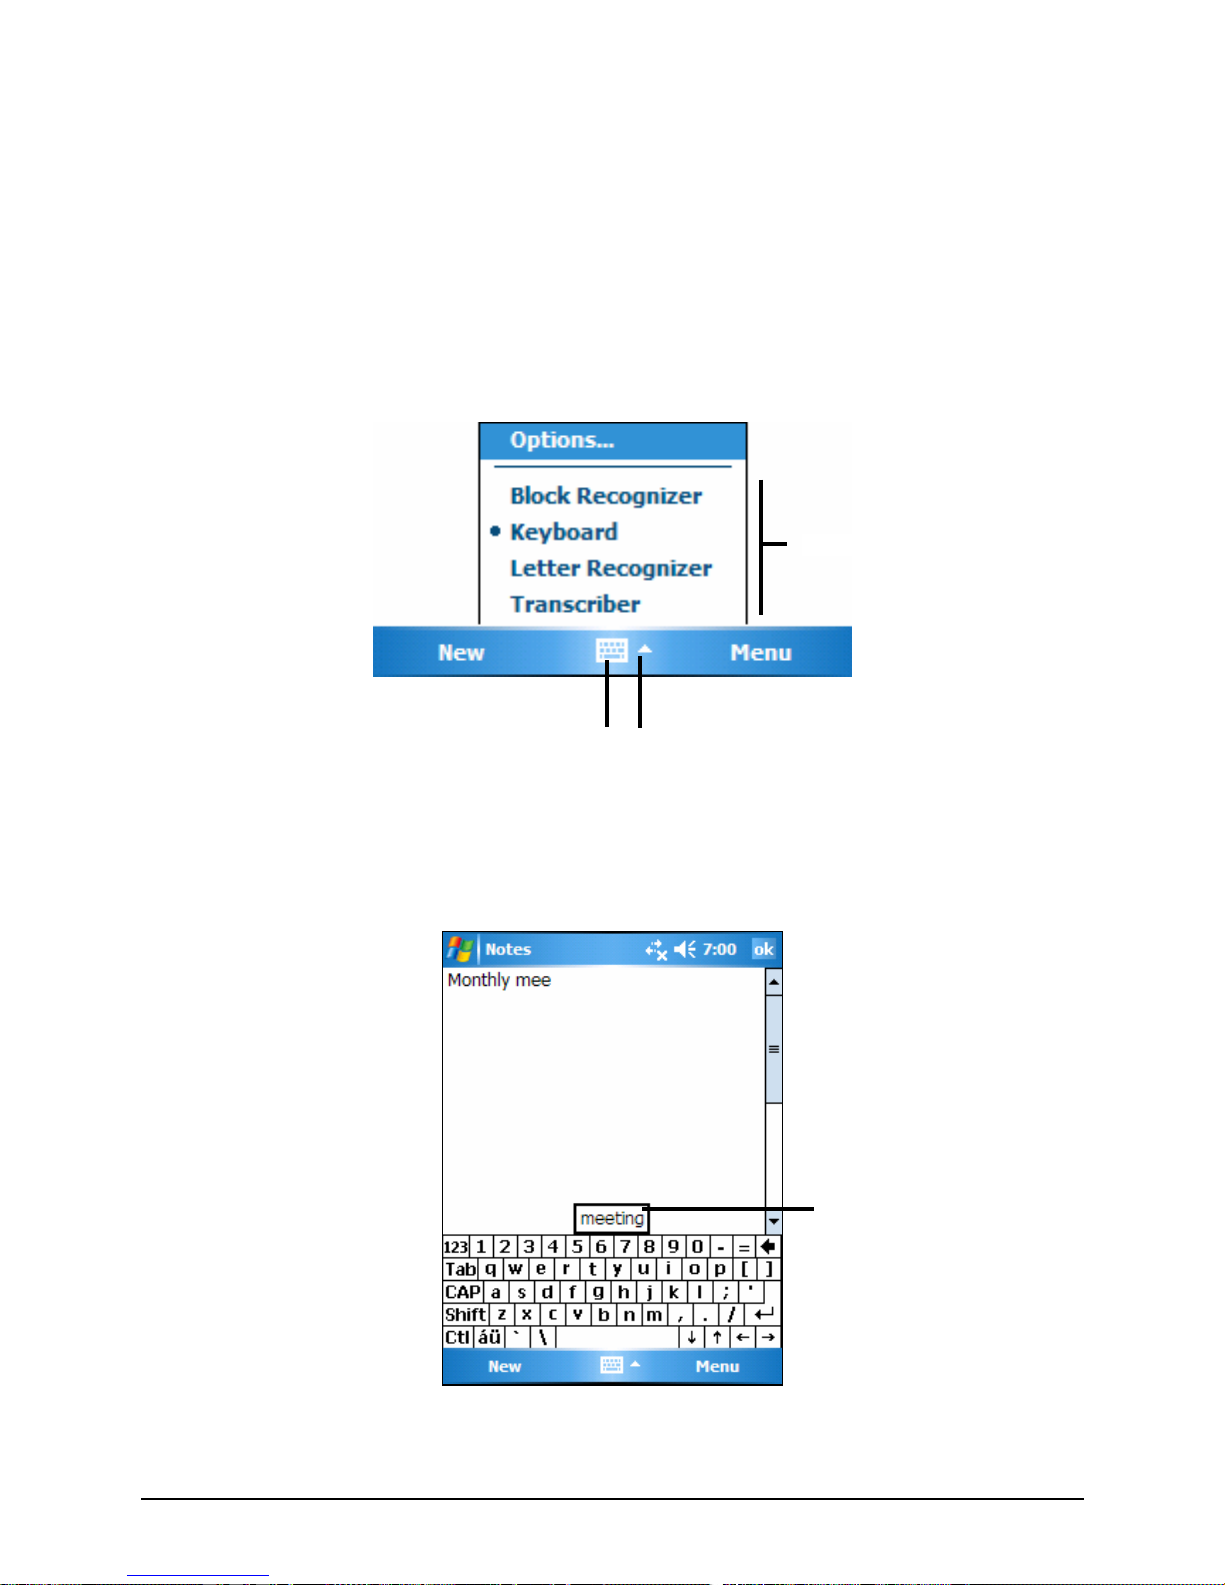
Entering Text Using the Input Panel
Use the Input panel to enter information in any program on your Pocket PC. You
can either type using the soft keyboard or write using the soft keyboard, Block
Recognizer, Letter Recognizer or Transcriber. In any case, the characters appear
as typed text on the screen.
To show or hide the Input panel, tap the
Input panel button. Tap the arrow next to
the Input panel button to see your choices.
When you use the Input panel, your Pocket PC anticipates the word you are
typing or writing and displays it above the Input panel. When you tap the
displayed word, it is inserted into your text at the insertion point. The more you
use your Pocket PC, the more words it learns to anticipate.
Select an input method.
Tap to see your choices.
Tap here if this is
the right word.
Input panel button.
19

NOTE: To change word suggestion options, such as the number of words suggested at one
time, tap
Æ Settings Æ Personal Æ Input Æ Word Completion.
Block Recognizer
With Block Recognizer, you can use the stylus to input characters using strokes
that are similar to the Palm™ Graffiti® method.
To type with Block Recognizer:
1. Tap the arrow next to the Input panel button and then tap
Block Recognizer.
2. Write a letter in the box.
When you write a letter, it is converted to typed text that appears on the screen.
For specific instructions on using Block Recognizer, open Block Recognizer and
then tap the question mark next to the writing area.
Letter Recognizer
With Letter Recognizer, you can write letters using the stylus just as you would
use a pen on paper.
To type with Letter Recognizer:
1. Tap the arrow next to the Input panel button and then tap
Letter Recognizer.
2. Write a letter in the box.
When you write a letter, it is converted to typed text that appears on the screen.
For specific instructions on using Letter Recognizer, open Letter Recognizer and
then tap the question mark next to the writing area.
Transcriber
With Transcriber you can write anywhere on the screen using the stylus just as
you would on paper. Unlike Letter Recognizer and Block Recognizer, you can
write a sentence or more of information; then, you pause and let Transcriber
change the written characters to typed characters.
To type with Transcriber:
1. Tap the arrow next to the Input panel button then tap
Transcriber.
2. Write anywhere on the screen.
20

For specific instructions on using Transcriber, open Transcriber and then tap the
question mark in the lower-right corner of the screen.
Writing on the Screen
In any program that accepts writing, such as the Notes program, you can use
your stylus to write directly on the screen. Write the way you do on paper. You
can edit and format what you have written and convert the information to text
later.
Writing
To write on the screen, tap Menu Æ Draw to switch to drawing mode. This action
displays lines on the screen to help you write.
NOTE: Not all program support the drawing mode.
Editing Your Writing
If you want to edit or format writing, you must first select the writing and then
edit it.
1. Tap and hold the stylus next to the text you want to select until the insertion
point appears. Without lifting, drag the stylus across the text you want to
select.
21
2. Tap and hold the selected words and then tap an editing command (cut, copy
or paste) on the shortcut menu or tap the command on the
Menu Æ Edit menu.
If you accidentally write on the screen, tap
Menu Æ Undo Ink and try again.
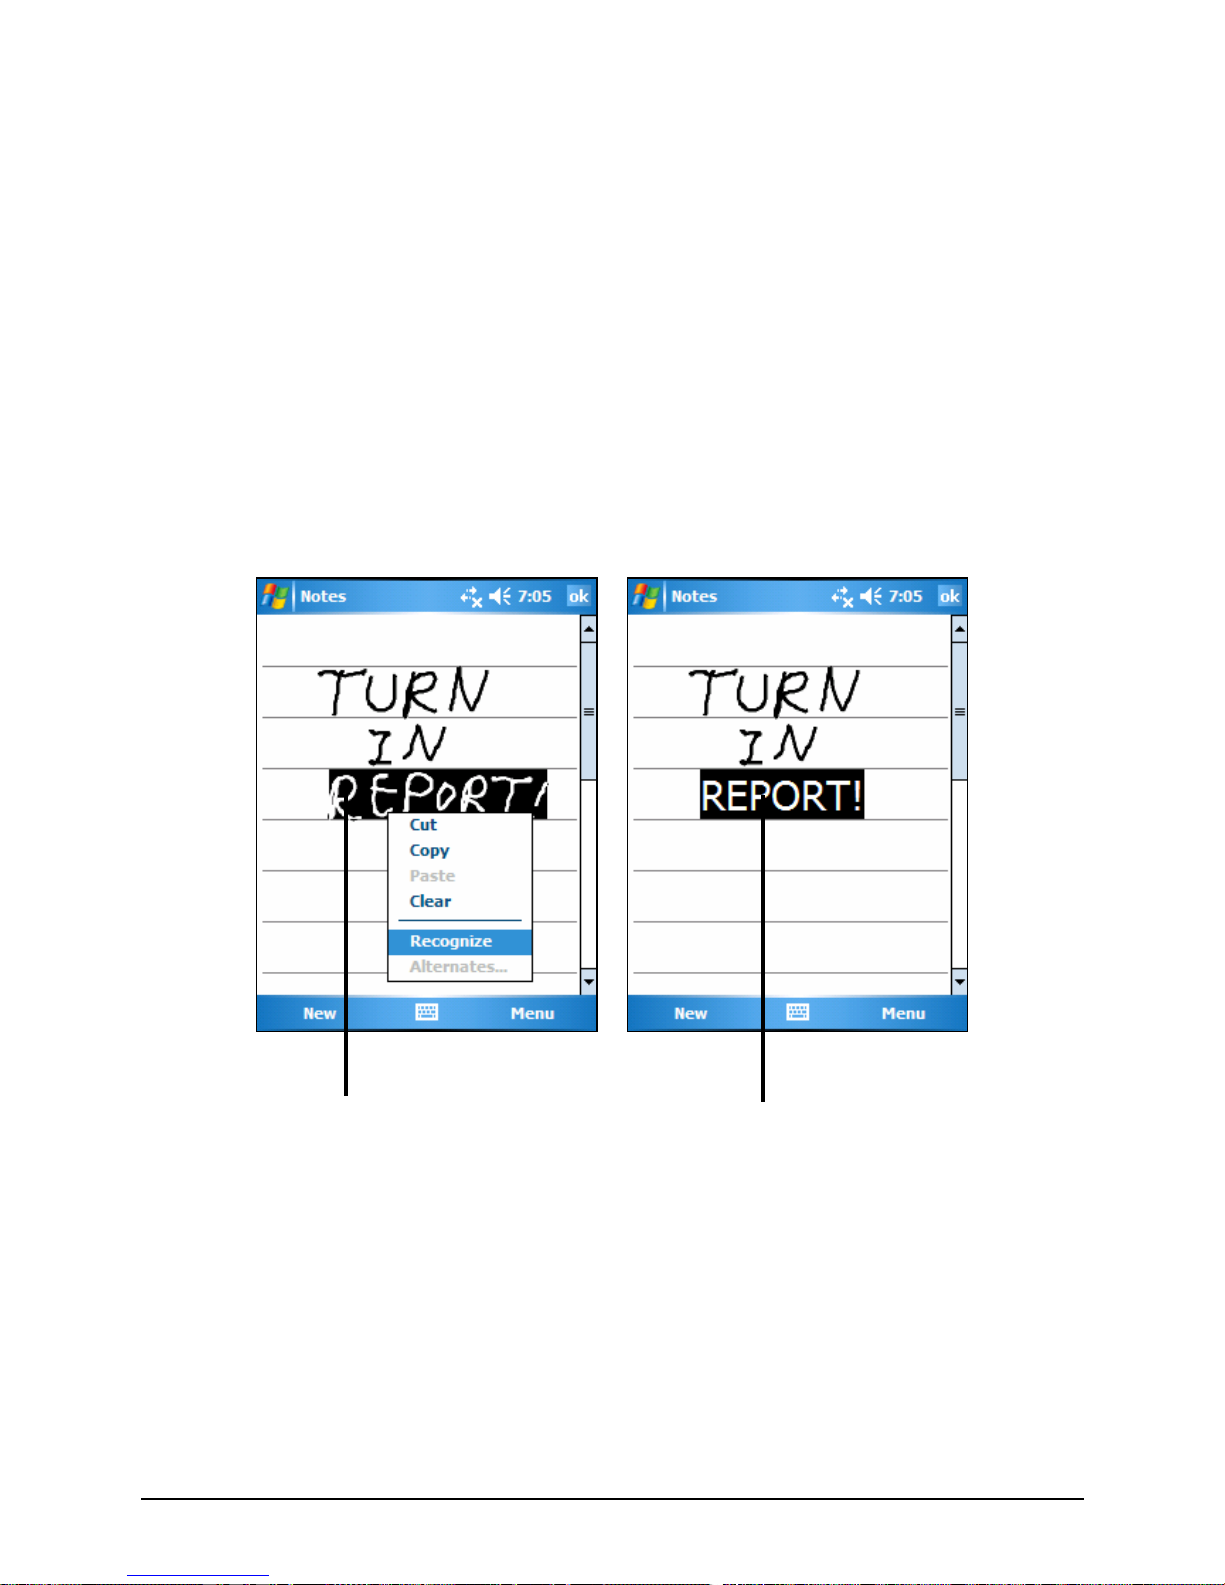
Converting Your Writing to Text
1. If you want to convert only certain words, select them before going to the
next step.
2. To convert writing to text, tap
Menu Æ Tools Æ Recognize or tap and hold the
selected words and then tap
Recognize on the shortcut menu. Your writing is
turned into text.
If a word is not recognized, it is left as writing.
Select the text you want to
convert and tap Recognize
on the shortcut menu.
The writing is turned into
text.
If the conversion is incorrect, you can select different words from a list of
alternates or return to the original writing.
1. Tap and hold the incorrect word (tap one word at a time).
2. On the shortcut menu, tap
Alternates. A menu with a list of alternate words
appears.
3. Tap the word you want to use or tap the writing at the top of the menu to
return to the original writing.
22
 Loading...