


InkPad 3

User Manual

Table of Contents
SAFETY PRECAUTIONS ............................................ 6
APPEARANCE ........................................................ 11
TECHNICAL SPECIFICATIONS ................................. 12
GETTING STARTED ................................................ 13
Charging Battery 13
Device management 15
Main menu overview 16
Gestures 18
Working with On-Screen Keyboard 19
Frontlight 21
Connecting to the Internet 22
Inserting Micro SD Card 25
APPLICATIONS ...................................................... 26

Book Store 27
Browser 29
Calendar & Clock 31
Scribble 31
Calculator 31
Gallery 32
Games 33
Klondike 33
Sudoku 33
Chess 33
Audio-player 34
Interactive Apps 36
RSS News 36
Dropbox PocketBook 37
Send-to-PocketBook 39
READING BOOKS ................................................... 43
Gestures in Reading Mode 44
Reading Menu 45

Social networks & ReadRate 46
Contents 51
Bookmarks 52
Dictionary 53
Notes 54
Text-to-Speech (voice) 55
Reading settings 58
Following Links 62
Loading Files 62
Library 68
PocketBook Cloud 71
SETTINGS .............................................................. 76
Wi-fi 76
Accounts and Synchronization 77
Personalize 80
Languages 84
Date/Time 84
Saving Battery 84
Maintenance 85

Software 87
About Device 88
FIRMWARE UPDATE ................................................... 89
TROUBLESHOOTING ................................................... 92
CUSTOMER SUPPORT ................................................. 94
COMPLIANCE WITH INTERNATIONAL STANDARDS ... 95

Safety Precautions
Before start working with the Device, please, read this section
carefully. Following these instructions will help you ensure your
safety and extend service life of the Device.
Storage, Carriage and Usage Conditions
Device operating temperature range is 0°C to 40°C, so don’t ex-
pose the Device to excessively high or low temperatures. Never
leave cables near heat sources. Heated cables or their insulation
may become deformed or damaged, which could lead to fire or
electric shock.
Try to avoid next impacts:
Direct
sunlight
Direct flame
or smoke
Liquids or
damp
Strong electro-
magnetic fields
UV electromag-
netic radiation
Electrostatic
charges
Excessive mechani-
cal pressure

Safety Precautions 7
Maintenance
Do not leave the Device for a long time in poorly venti-
lated environment, e.g. in a car or in closed tight boxes/
packaging.
Neither drop nor try to bend the Device.
Protect the screen from objects that may scratch or
damage it. To ensure adequate protection of the screen,
we recommend storing the Device in a protective and/or
hard cover.
Keep away from children.
Do not disassemble or modify the book reader.
Do not use the Device with a damaged battery or charger (bro-
ken case, poor contact, broken feed cable). If the battery is dam-
aged (cracked case, leakage of electrolyte, off-shape etc.) it should
be replaced by the authorized personnel. Usage of home-made
Safety Precautions 8
or modified batteries may cause an explosion and/or damage the
Device.
Do not use organic or inorganic solvents (e.g. benzoyl etc.) to
clean the screen/case.
Use a soft cloth to remove dust from the Device’s surface. Apply
a few drops of distilled water to remove dirt.
Up to five faulty pixels are acceptable in the screen and do not
constitute a warrantable defect of the screen.
If the device has not been used for a long time, the battery charge
indicator may not work when the charger is connected. In this
case, connect the charger, let the device charge for 1 hour, then
disconnect and reconnect the charging device or USB cable. The
device can then be used as normal.
To prevent possible hearing damage, do not listen at
high volume levels for long periods.

Safety Precautions 9
By the end of product guarantee term, please contact the near-
est authorized service facility for examination on the subject of
security is maintained.
For detailed information about service centres in your region
please visit the official website of PocketBook International: http://
www.pocketbook-int.com.
RF Safety
The Device receives and transmits radio frequencies and may in-
terfere with radio communications and other electronic equip-
ment. If you use personal medical Devices (e.g. a pacemaker or
hearing aid) please contact your doctor or the manufacturer to
learn whether or not such medical devices are protected against
external RF signals.
Do not use wireless communication in places where it is prohib-
ited, e.g. onboard a plane and in hospitals — this may affect air-
borne avionics or medical equipment.
Safety Precautions 10
Utilization
Incorrect disposal of this Device may have adverse im-
pacts on the environment and public health. To prevent
such consequences follow the device-specific disposal
requirements. Recycling of these materials helps pre-
serve natural resources. For more information regarding recycling
issues please contact local municipal authorities, your domestic
waste collection service, store where you purchased the Device, or
the authorized service centre.
Disposal of electric and electronic components (the Directive is ap-
plicable to the EU and other European countries where separate
waste disposal systems exist). In other countries dispose batteries
accordingly to local laws.
Do not destroy the battery by burning it to avoid the danger of
explosion
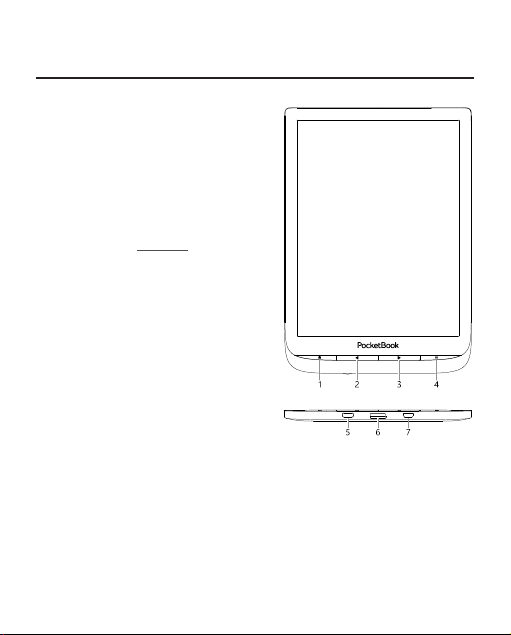
Appearance
1. Home – return to Main menu;
2. Backward – in reading mode turns
page backward; in navigation mode – goes
to the previous menu or page of the list;
3. Forward – turns page forward;
4. Menu – open context menu (if avail-
able). Continuous press switches the front-
light on/off (See Frontlight section of the
manual);
5. On/Off (power button) – continuous
press turns the Device on/off;
6. MicroSD slot - to install external mi-
croSD/SDHC card (up to 32 GB);
7. Micro-USB - connect the Device to a PC
or charge using USB-cable.
NOTE: You can configure key mapping to your own in Settings > Personalize > Key
mapping. Navigation and page turning buttons mapping depends on screen orientation.

Technical Specifications
Display
7.8’’ (19.8 cm) E Ink Carta™, 1404 × 1872
display, 300 dpi, B&W
Frontlight Yes
SMARTlight Yes
Processor Dual Core (2×1 GHz)
RAM 1 GB
Storage 8 GB *
Operating system Linux®
Communications
Micro-USB
Wi-Fi (b/g/n)
G-sensor Yes
Cover sensor Yes
Battery Li-Ion Pol, 1900 mAh **
Memory slot microSD/SDHC up to 32 GB
Book formats
PDF, PDF(DRM), EPUB, EPUB(DRM), DJVU,
FB2, FB2.ZIP, DOC, DOCX, RTF, PRC, TXT,
CHM, HTM, HTML, MOBI, ACSM.
Image formats JPEG, BMP, PNG, TIFF
Audio format MP3 (via micro USB adapter)
Dimensions 195 x 136.5 x 8 mm
Weight 210 g
* The actual available internal storage size may vary depending on the software
configuration of your device.
** Battery life and values mentioned above might vary depending on usage mode,
connectivity and settings.

Getting Started
In this chapter you will learn how to prepare the Device to
work and about its main control features.
CHARGING BATTERY
To extend battery lifetime, it’s recommended to charge the
Device for the first time from 8 to 12 hours.
You can charge the battery from (1) PC using USB-cable or
from (2) the power line using a charger (optional).
1 2

Getting Started 14
To charge the battery for the first time, do the following:
• Connect the Device to a computer or charger with
USB-cable. The device will turn on as soon as charging
starts.
• When the battery is fully charged, you can discon-
nect the cable from the Device which is ready for usage.
If the Device is on when you connect the cable to PC, a
dialog window asking to select action – PC link or Charge–
will appear. Charging starts only if the appropriate mode
was selected.

Getting Started 15
DEVICE MANAGEMENT
Turn on
Press On/Off button. When the Device is ready to operate, Main
menu or last opened book will appear, depending on settings.
Turn off
Press and hold On/Off button for about two seconds until the
Device goes off.
Lock
You can lock your Device in three ways:
1. Press On/Off button.
2. Invoke Task Manager. Touch icon to block your
Device.
3. You can set automatic key lock or power off: go to
Settings> Saving Power> Power off after or Lock device after, and
set the idle time before power off or locking Device.
Unlock Press On/Off button.
Restart
In case if your Device ‘freezes’ (don’t respond to keys presses or
screen touches, you must give the device time (up to 30 seconds)
to process commands. If it does not help, you can restart it by
pressing Restart button.
Task
Manager
You can invoke Task Manager in two ways:
• by touching at the notification bar icon;
• by continuous press on the Home button.
Task Manager gives quick access to some Device control features:
• close running applications: press against an
application in the list.
• Lock Device. To unlock, press On/Off button.
• Open wireless connections list.
• Take a screenshot.
• Turn off the Device.

Getting Started 16
MAIN MENU OVERVIEW
Slide down to open a
Notification panel
Touch to open Calendar
‘Recent Books’ is a
list of recently
opened books
Last downloaded books
Slide up to open an
Application panel
Getting Started 17
Notification panel
Touch or slide down the icon to open a Notifica-
tion panel.
NOTE: You can open Notification panel also pressing a Menu button.
Notification panel gives an easy access to configuration of
Wi-Fi and Frontlight, Sync of network services, Task man-
ager, device Settings and Search.
Also the news on ReadRate are displayed on it.
NOTE: To see the ReadRate news, please, authorize to the service
first. Go Settings > Accounts and Synchronization > ReadRate and
Log in the service.

Getting Started 18
GESTURES
CAUTION! Touch screen of the Device is sensitive enough and is a
fragile detail. To avoid its damage, please, touch it carefully while
controlling the Device with gestures.
Tap
Opens an element (book, file, folder application or
menu item).
Touch & hold
Opens context menu of an element (if available).
Slide
Turns pages of a book or a list; moves an image:
slide your finger across the screen.

Getting Started 19
Flick
Scrolls lists: move your finger across the screen
rapidly.
Scaling
Changes the image scale: place two fingers
on a screen and pinch them together to
zoom out or spread them apart to zoom in.
WORKING WITH ON-SCREEN KEYBOARD
On-screen keyboard is used when it’s necessary to enter
text information, for example, for search or network con-
nection credentials.
To type a symbol, press a key.
To switch to another input language, press the current
language button. To add the language to the on-screen
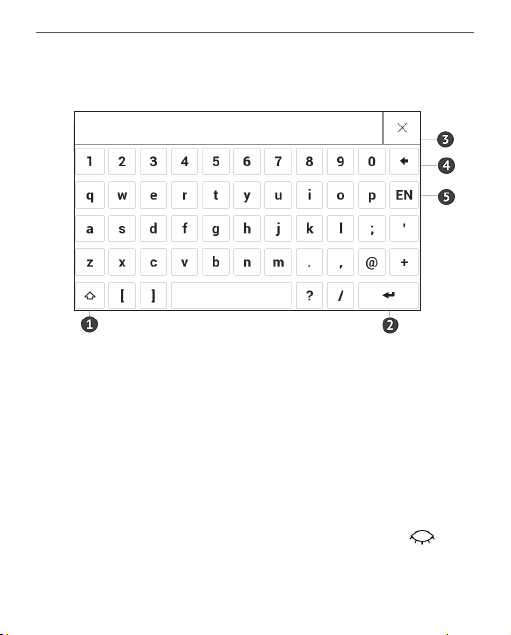
Getting Started 20
keyboard layout go to Settings > Languages > Keyboard
Layouts.
1. Change case;
2. Enter the typed text;
3. Close the on-screen keyboard;
4. Erase last typed symbol;
5. Change input language.
As you type a password (e.g. Wi-Fi credentials) icon
will appear on a text field. Touch it to see typed symbols.
Getting Started 21
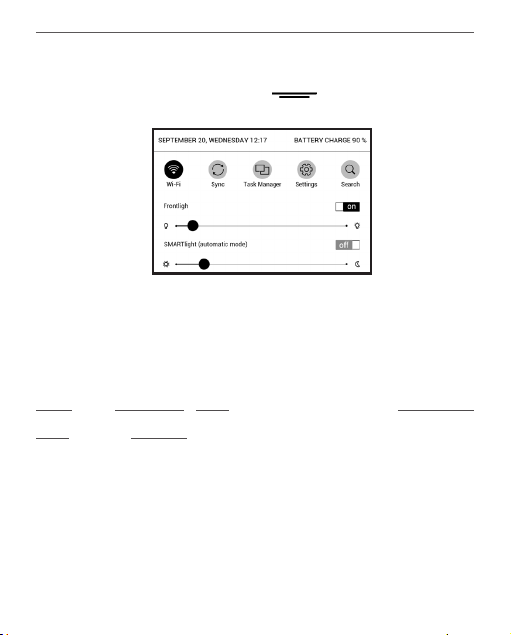
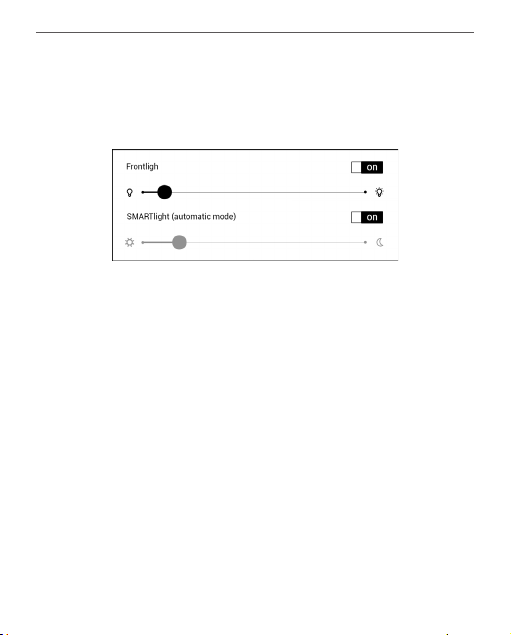
FRONTLIGHT
Open the Notification bar to display the Frontlight control
menu. The Frontlight control menu has two parts:
1. General frontlight control. This includes an ON/OFF
switch to turn the light on and off and a brightness slider.
NOTE: To turn the frontlight on or off without opening the Noti-
fication bar, hold the Menu button for one second.
2. SMARTlight frontlight temperature control. By de-
fault, this function is in automatic mode (the switch is in
the ON position). This means that the device determines
the optimal temperature depending on the time of day
(from neutral white in the morning to warmer hues in the
evening).

Getting Started 22
When the automatic mode is off (the switch is in the OFF
position), the slider on the screen is activated and you can
manually select the frontlight temperature.
NOTE: The device should have the correct time to ensure that
it works correctly in automatic mode. To adjust the time setting,
enable “Automatic time synchronization” (Settings – Date/time)
or set the time manually.
CONNECTING TO THE INTERNET
The Device can be connected to the Internet using
Wi-Fi networks. When you open an application that re-
quires an Internet connection (eg, Browser or BookStore)
Wi-Fi connection is established automatically. If a known
network is not available, the list of available wireless con-
nections opens. If the network to which you want to con-
nect is secured, enter the network password using the on-
screen keyboard.

Getting Started 23
Also, Wi-Fi connection can be enabled/disabled by clicking
the icon on the notification panel. If a known network
is available, the connection is established automatically,
otherwise - opens a list of available networks.
Advanced Settings
If it is needed to configure network settings manually se-
lect Settings > Wi-Fi, go to the selected network and click
More… at the bottom of the screen:
• You can change IP address configuration:
• DHCP — get IP address automatically (if DHCP
server is configured);
• Manual (for skilled users) — enter networks
parameters manually from the on-screen keyboard.
• If the network you need to connect to has a proxy
server, you can specify its parameters in Proxy configura-
tion section.

Getting Started 24
Connection to a hidden network
1. Select Settings > Wi-Fi.
2. Open Connection to a hidden network and enter
its SSID from the on-screen keyboard in the Network name
(SSID) field.
3. Select security type in the corresponding list:
• None – for an open network;
• Simple (WEP) – after you select this option, you
will need to specify WEP Authentication type – Open
System or Shared Key either.
• WPA/WPA2 PSK – you will need to enter net-
work key (up to 64 symbols).
4. To check network configuration and connect to a
network, return to the Connection to hidden network sec-
tion and press Connect.
Getting Started 25
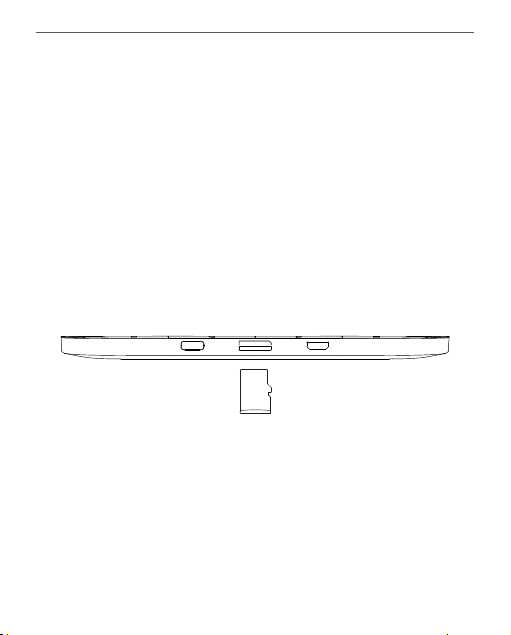
INSERTING MICRO SD CARD
The Device already has 8 GB of internal storage, but you
can extend it by using micro SD card (up to 32 GB). Insert
it to the slot, like it is shown on a figure, and slightly push
until card will be fixed.
ATTENTION! Please turn off the device before setting or removing
the SD card!
To eject the card, slightly press on its edge until it will be
unfixed, and pull it to get.
ATTENTION! If your SD card get stuck, do not try to eject it by
yourself and immediately call Customer Support.
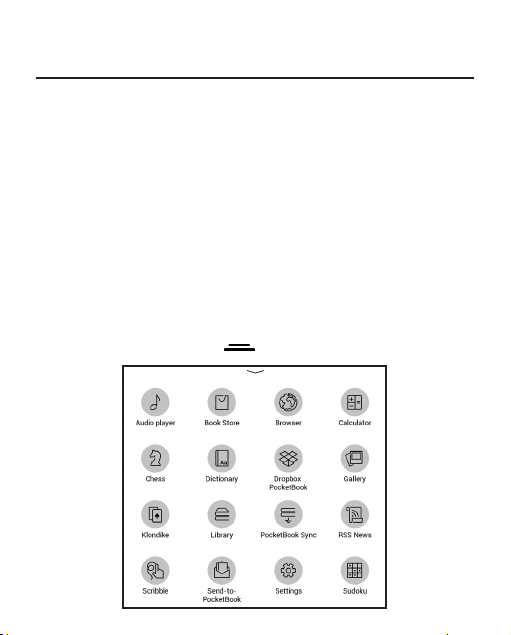
Applications
In this chapter you will learn about applications wich are
preinstalled on your Device.
There is three apps which is brought out to the main menu:
• Library;
• BookStore;
• Browser.
The rest of the apps are available at the application bar. To
invoke it touch the icon at the main menu.
Applications 27
LIBRARY
Library is e-books file manager, which allows to group,
sort, change appearance of the section and perform
search. Read more about this app at Library.
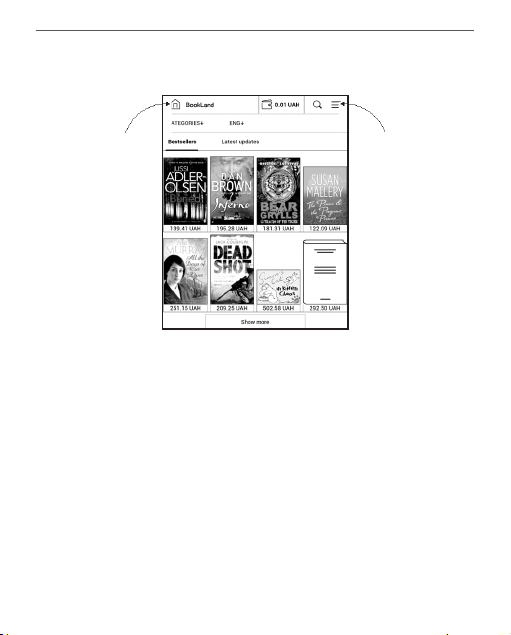
BOOK STORE
Book Store application provides quick and conve-
nient licensed content download from Store portal
(http://www.bookland.com/) to your Device. The internet
connection must be active.
If you are already registered at the portal
http://www.bookland.com/, press I already have an ac-
count BookLand and check if the login and password are
entered correctly at Store settings.
Enter your account data at Store in the section Settings >
Accounts and Synchronization in your Device.
Applications 28
If the connection with an account is set properly, you get
access to all the features of a portal.
Press the Personal Room to expand options for work
with a personal account:
• Top up the balance – top up the balance on a site
BookLand or directly on the Device using the bank card
(Visa, MasterCard, Maestro);
• Purchase history – the list of goods, purchased at
the store;
• My cards – used bank cards;
• Exit.
Home Personal room

Applications 29
Select the book and press Buy to purchase goods. Choose
the format of a downloading book and press Buy and
download on the page Your purchase. The bought file is
moved to the folder Library > Downloads and is displayed
on the wall of Last events of the Main Menu.
NOTE: If there is no money on your balance, it will be offered to
you to top up the balance on a site BookLand or directly on the
Device using the bank card (Visa, MasterCard, Maestro).
BROWSER
This is an application for viewing web-pages. As you start
Browser, you are suggested to connect to one of available
wireless networks.
To enter website address, touch address bar, type an ad-
dress from on-screen keyboard appeared and press Enter.
To follow a link, just touch it. If a web-page doesn’t fit a
screen, you can scroll it: place your finger on the screen

Applications 30
and move a page. Also, you can change scale of a web-
page using zooming gestures (pinch or spread two fingers).
Hardware buttons / are used to scroll page vertically:
scrolls down and scrolls up, respectively.
From browser menu you can view history of visited web-
sites, downloads, favorites, adjust scale of displaying web-
pages, rotate a screen and configure the browser from
Settings section. Under Settings you can clear history and
cookies, disable/enable JavaScript and loading images.
To exit Browser, touch the corresponding item in browser
menu.
 Loading...