

Page 1
USER GUIDE_
PLANTRONICS DISCOVERY™645
BLUETOOTH®HEADSET WITH DSP
72136-01 (11/05)
V2.0
Page 2

TABLE OF CONTENTS
Package Contents & Features 3
Charging 4
Powering 6
Pairing 7
Adjusting Fit 8
Using Your Headset 9
Indicator Lights 11
Optional Accessories 12
Troubleshooting 13
Technical Assistance 14
Warranty 14
Regulatory Notices 15
REGISTER YOUR PRODUCT ONLINE
Visit www.plantronics.com/productregistration to register your product online
so we can provide you with the best possible service and technical support.
Page 3
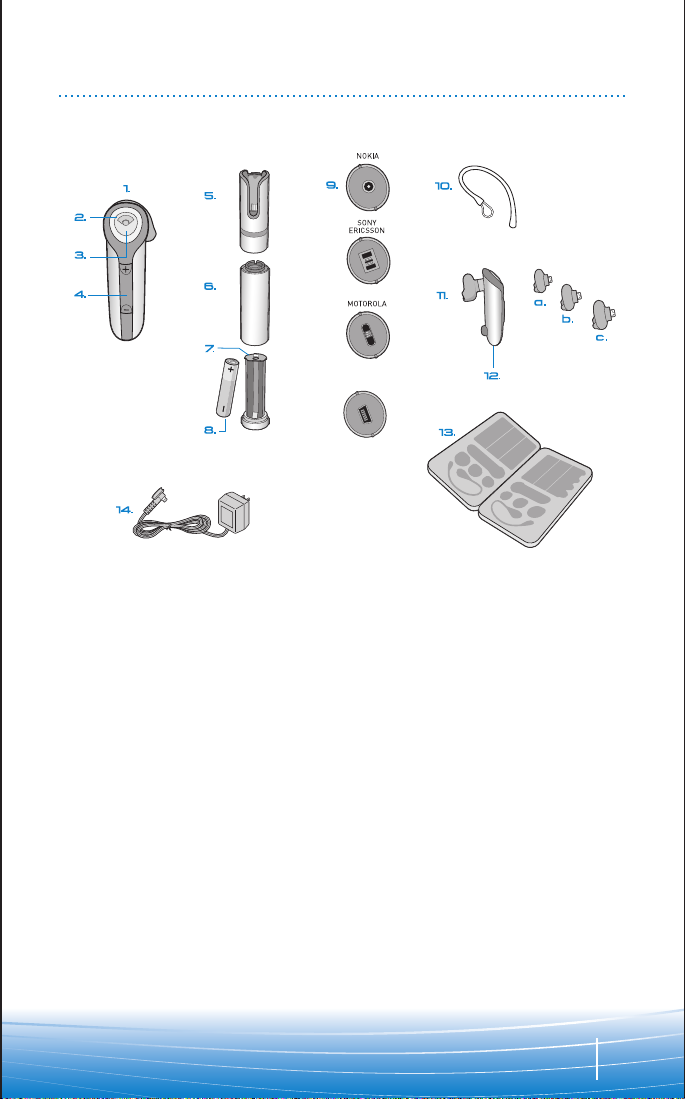
PACKAGE CONTENTS & FEATURES
RAZR
(Mini USB)
1. Headset
2. Indicator Light
3. Call Control Button (On/Off)
4. Volume/Mute Button
5. Headset Carrying Pocket
6. Battery Charger
7. Battery Holder
8. Battery (AAA)*
9. Charging Adapters**
10. Optional Ear Stabilizer
11. Soft Gel Ear Tips
a. Small
b. Medium
c. Large
12. Microphone
13. Storage Case
14. AC Power Adapter
CHARGING CAUTIONS
* Only replace with a non-rechargeable
AAA battery.
** Use only chargers approved and provided
by the cell phone manufacturer to
charge with the charging adapters
provided. Maximum charger output is
15V 800mA.
3
Page 4
CHARGING
AB
Before using, you must first charge your headset.
1 hour = minimum charge
3 hours = full charge
There are 3 options to charge headset:
• Using included AC power adapter
• Using AAA battery
• Using the AC adapter from your mobile phone
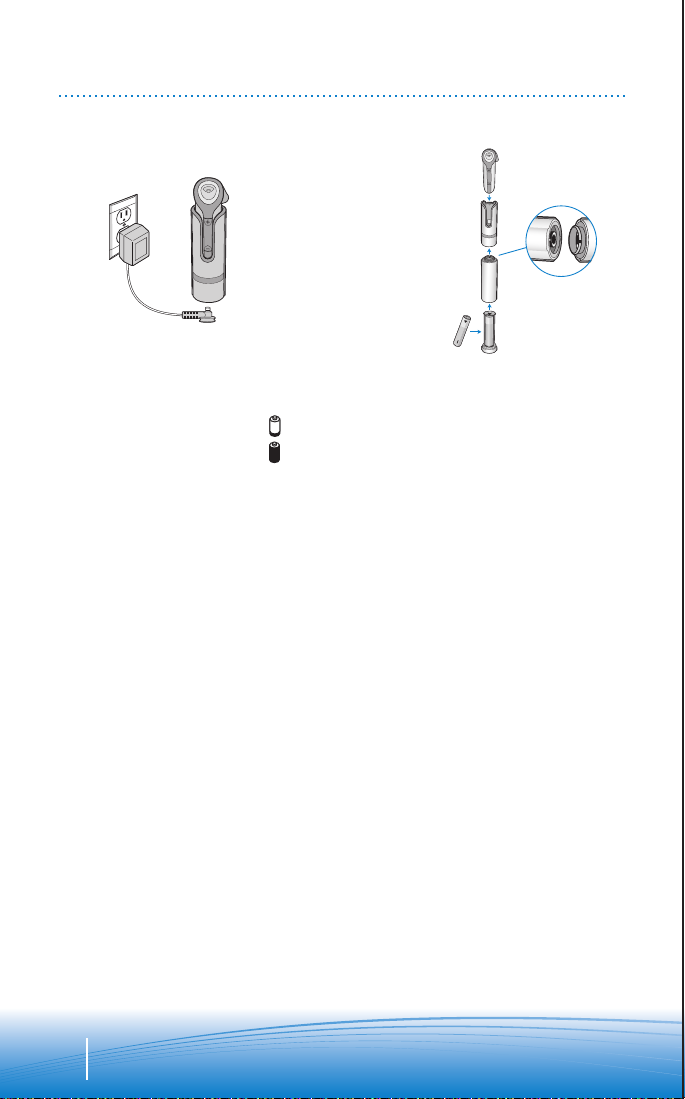
Option A: Using the included AC power adapter
The indicator light flashes red while charging and turns off when fully charged.
1. Plug the AC power adapter into the base of the headset carrying pocket and
connect it to your power source.
2. Insert the headset into the headset carrying pocket.
Option B: Using AAA battery
One battery will operate the headset for up to 9 hours of talk time.
1. Twist the bottom of the battery charger counter-clockwise and release the
battery holder.
2. Insert the battery into the battery holder.
3. Slide the battery holder back into the battery charger and turn clockwise.
4. Snap battery charger to headset carrying pocket. Ensure that the indent on the
attachment lines up with the shirt clip on the headset carrying pocket.
5. Insert the headset into the headset carrying pocket.
4
Page 5
CHARGING
R
AZR
(Mini USB)
C
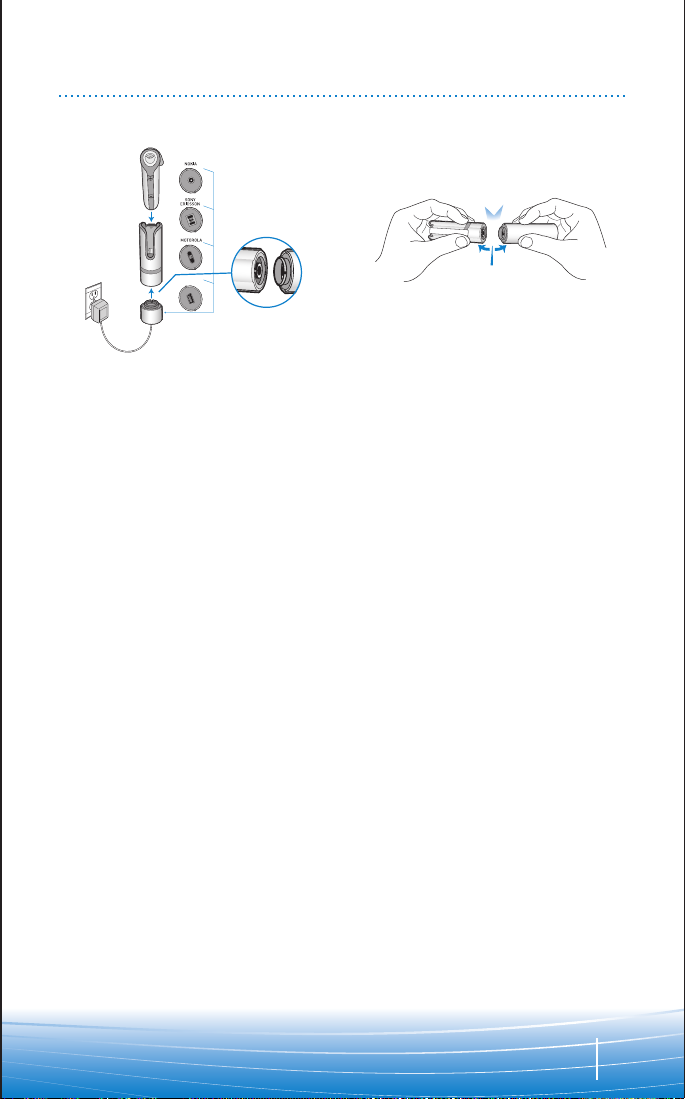
Option C: Using the AC adapter from your mobile phone
1. Select the appropriate charging adapter for your phone and connect the
charging adapter to the base of the headset carrying pocket. Ensure that the
indent on the attachment lines up with the shirt clip on the headset carrying
pocket.
2. Plug the AC power adapter for your phone into the charging adapter and
connect the AC power adapter to your power source.
3. Insert the headset into the headset carrying pocket.
DISCONNECTING COMPONENTS
To separate the components, grasp both the headset carrying pocket and
attachment with the shirt clip facing you. Bend the outsides back and the
components will snap apart.
NOTE Do not twist the components apart.
5
Page 6
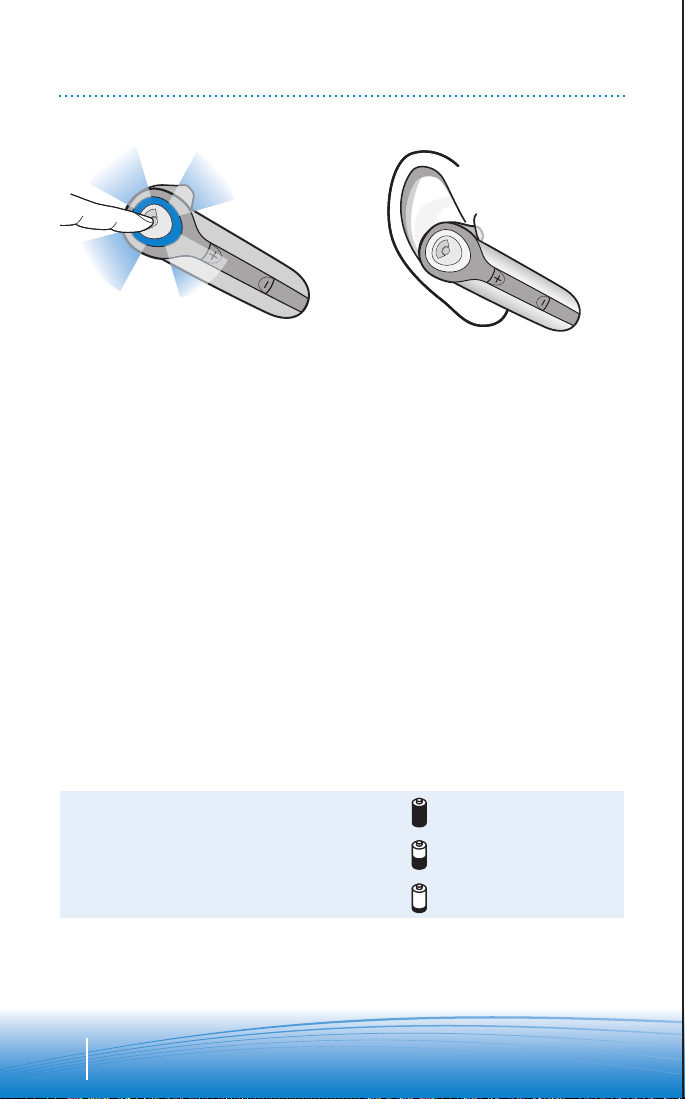
POWERING
“BEEP”
1. Turn on the headset by pressing
and holding the call control button
until the indicator light glows blue.
If you are wearing the headset, you
will hear a beep when the power
turns on. The indicator light will
flash blue every 5 seconds when
the power is on.
NOTE When the headset is on, the
indicator light will indicate the charge
level of the headset.
CHARGING INDICATOR LIGHTS
3 red flashes = greater than 2/3 battery charge
2 red flashes = 1/3 to 2/3 battery charge
1 red flash = less than 1/3 battery charge
2. Turn off the headset by pressing
the call control button for 6-8
seconds until the indicator light
glows red or until you hear the
beep. The indicator light remains
unlit when the power is off.
6
Page 7
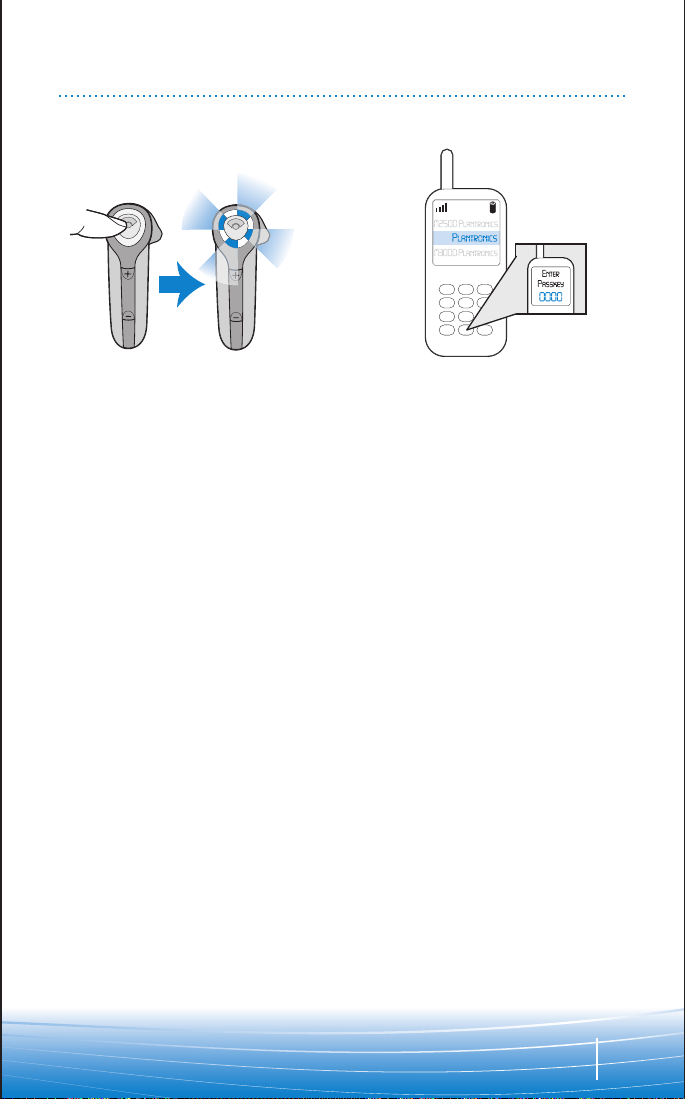
PAIRING
645
1.
Before using your headset for the first time, you must pair it with your Bluetooth
phone or device. Be sure the headset is fully charged. For set up and pairing
instructions with Bluetooth devices other than mobile phones, please consult your
Bluetooth device user guide.
Begin with headset turned off.
1. Press and hold down the call
control button until the headset
status indicator briefly glows blue,
then flashes red and blue. The
headset is now in pairing mode for
the next 60 seconds.
2. While the headset is flashing red
and blue, use the phone menu to
search for Bluetooth devices and
select “645 Plantronics.”
3. When prompted for passkey enter
0000. Headset will flash blue when
paired successfully.
2.
3.
7
Page 8
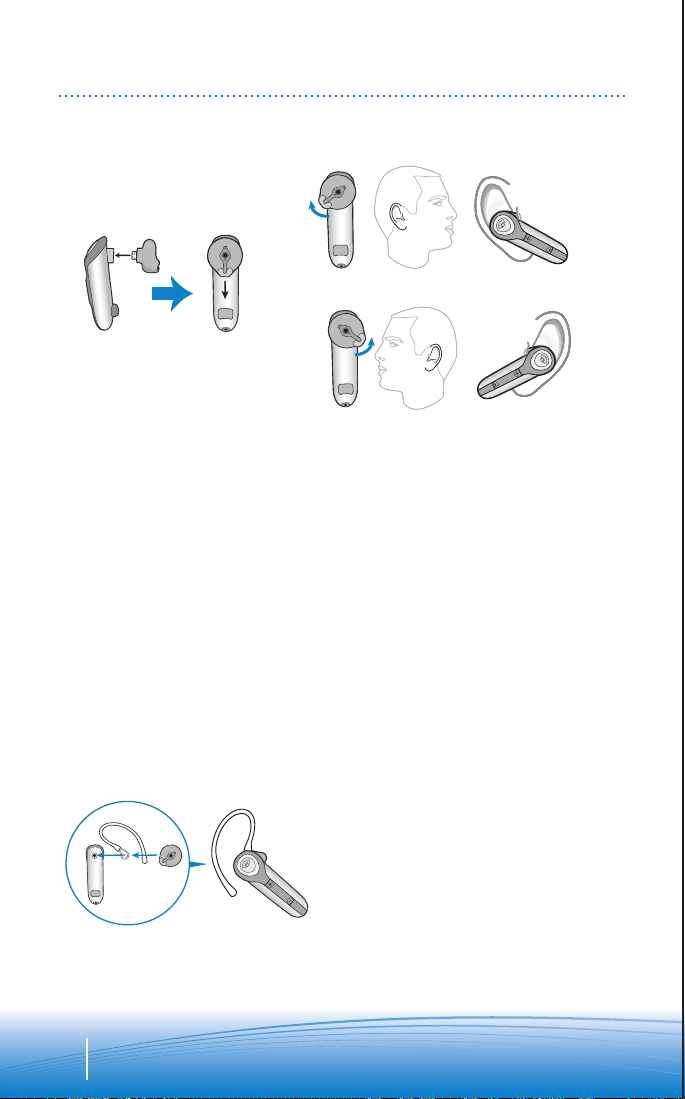
ADJUSTING FIT
Neutral
position
Right ear
R L
R L
Left ear
1.
2.
The Discovery 645 headset comes
with 3 soft gel ear tips and an optional
ear stabilizer. The medium-sized ear
tip is installed for wearing on the right
ear.
• Twist to the L for left ear wearing
and R for right ear wearing.
• Place the headset into your ear with
the elongated side of the ear tip
pointing up and forward. Point
headset toward your mouth.
If the fit is not comfortable, either too
tight or too loose, remove the ear tip
from the headset by turning the tip to
the neutral position and pulling the
ear tip away from the headset. Select
the ear tip size that fits most
comfortably in your ear.
1. Hold the ear tip with the elongated
edge pointing down and push the
ear tip post into the opening on
the headset. This is the neutral
position.
2. Twist the ear tip to the L for left
ear wearing and R for right ear
wearing.
USING THE INCLUDED EAR STABILIZER
The ear tip stabilizer may be attached
to the headset to improve stability.
1. Remove the ear tip from the
headset by turning the ear tip to
the neutral position and pulling
the ear tip away from the headset.
2. Attach the stabilizer between the
ear tip and the headset.
3. Replace the ear tip.
8
Page 9

USING YOUR HEADSET
ANSWERING/
ENDING/MAKING
CALLS
To answer or end a call, briefly press
the call control button.
To make a call, enter number on your
phone, press send, and the call is
automatically transferred to headset;
no need to press call control button.
AUTO ANSWER
If the headset is in the headset
carrying pocket when a call is
received, the carrying pocket will
vibrate. Removing the headset from
the pocket will automatically answer
the call. Returning the headset to the
headset carrying pocket will end the
call.
ADJUSTING
VOLUME
To increase listening volume, press
the upper end (+) of the volume/mute
button.
To decrease listening volume, press
the lower end (-).
MUTE A CALL
To turn the mute on while on a call,
press both sides of the volume/mute
button simultaneously until you hear a
beep.
To turn the mute off, press both
buttons again.
9
Page 10

USING YOUR HEADSET
ADDITIONAL FEATURES
Redialing Last Number
To activate last number redial, double
click the call control button. You will
hear a high tone for each key press.
Power Saving Mode
Power saving mode temporarily
disables the digital signal processing
(DSP) feature of the Discovery 645 to
provide a longer talk-time. To enable
power saving mode, press both the
volume up and down keys at the same
time before you make a call. To reenable DSP, press both the volume up
and down keys at the same time.
Power saving mode cannot be turned
on while engaged in a call.
NOTE After you turn off the headset,
DSP will be re-enabled the next time
you turn it on.
Using Voice Dialing
With the headset on, press the call
control button for 2 seconds to
activate the voice dialing.
NOTE To use voice activated dialing,
the voice dialing feature must be
enabled on your phone. See your
Bluetooth phone manual for
instructions.
Rejecting a Call
When receiving an incoming call,
press the call control button for 8
seconds to reject the call.
Switching a Call From Phone to Headset
To switch an active call from your
phone to your headset, briefly press
the call control button.
Switching a Call From Headset to Phone
To switch an active call from your
headset to your phone, press the call
control button for 2 seconds.
MOVING OUT OF RANGE
As the headset moves more than 33' away from the Bluetooth device:
• Audio quality will degrade
• A beep will be heard in the headset when the connection drops between headset
and Bluetooth device
• When out of range, only the power off function will operate
If any of the above occur, move closer to your Bluetooth device.
10
Page 11

INDICATOR LIGHTS
Headset Status Headset Indicator Light
Powering on Blue appears and flashes every 6 seconds
Power on Blue flashes every 5 seconds
Powering off Red appears and goes off
Power off —
Charging battery Red light flashes every 5 seconds
Battery fully charged Red goes off
Low battery Red light flashes every second
Pairing mode Blue/red flashes for 60 seconds
Missed call Blue/red flashes infrequently. Press any button
Ringing Blue/red flashes rapidly
On Line Indicator (OLI) Blue flashes every 10 seconds
to cancel
11
Page 12

OPTIONAL ACCESSORIES
Vehicle Power
Charger
AVAILABLE FOR PURCHASE
To order, please contact your Plantronics supplier or go to www.plantronics.com
12
Page 13

TROUBLESHOOTING
PROBLEM SOLUTION
My headset does not work with my
phone.
I did not enter my passkey.
Callers cannot hear me.
I cannot hear caller/dialing tone.
Headset was not in pairing mode
when mobile phone menu selections
were made. See page 7 “Bluetooth
Pairing”.
Incorrect menu selections were made
on your mobile phone. See page 7
“Bluetooth Pairing”.
Your phone did not locate the headset.
Repeat the pairing process on page 7.
Incorrect menu selections were made
on your mobile phone. Repeat the
pairing process on page 7.
Mute is turned on. Press both sides of
the volume/mute button
simultaneously.
The headset is not turned on. Press
the call control button for 2 seconds
until you hear a beep or see the
indicator light glow blue to turn
headset on.
Your headset is out of range. Move the
headset closer to the phone or
Bluetooth device.
Your headset battery is drained.
Charge your battery using the AC
power adapter supplied, the AC
adapter from your mobile phone, or
an AAA battery.
The listening volume is too low. Press
the top part of the volume/mute
button to increase the sound heard in
the headset.
13
Page 14

TECHNICAL ASSISTANCE
Visit our Web site at www.plantronics.com/support for technical support including
frequently asked questions, compatibility and accessibility information. The
Plantronics Technical Assistance Center (TAC) is also ready to assist you on
866-363-BLUE (2583).
WARRANTY
LIMITED WARRANTY
• This warranty covers defects in materials and workmanship of products
manufactured, sold or certified by Plantronics which were purchased and used
in the United States.
• The warranty lasts for one year from the date of purchase of the products.
• This warranty extends to you only if you are the end user with the original
purchase receipt.
• We will at our option, repair or replace the products that do not conform to the
warranty. We may use functionally equivalent
reconditioned/refurbished/remanufactured/pre-owned or new products or parts.
• To obtain service in the U.S., contact Plantronics at (866) 363-BLUE (2583).
• THIS IS PLANTRONICS’ COMPLETE WARRANTY FOR THE PRODUCTS.
• This warranty gives you specific legal rights, and you may also have other rights
that vary from state to state. Please contact your dealer or our service center for
the full details of our limited warranty, including items not covered by this
limited warranty.
14
Page 15

REGULATORY NOTICES
FCC REQUIREMENTS PART 15
This device complies with Part 15 of the FCC Rules. Operation is subject to the
following two conditions:
1. This device may not cause harmful interference, and
2. This device must accept any interference received, including interference that
may cause undesired operation.
This equipment has been tested and found to comply with the limits for a Class B
digital device, pursuant to Part 15 of the FCC Rules. These limits are designed to
provide reasonable protection against harmful interference in a residential
installation. This equipment generates, uses, and can radiate radio frequency
energy and, if not installed and used in accordance with the instructions, may cause
harmful interference to radio communications.
However, there is no guarantee that interference will not occur in a particular
installation. If this equipment does cause harmful interference to radio or television
reception which can be determined by turning the radio or television off and on, the
user is encouraged to try to correct interference by one or more of the following
measures:
1. Reorient or relocate the receiving antenna.
2. Increase the separation between the equipment and receiver.
3. Connect the equipment into an outlet on another circuit.
4. Consult the dealer or an experienced radio/TV technician for help.
EXPOSURE TO RADIO FREQUENCY
RADIATION
This device and its antenna must not be co-located or operated in conjunction with
any other antenna or transmitter. To comply with FCC RF exposure requirements,
only use supplied antenna. Any unauthorized modification to the antenna or device
could void the user’s authority to operate this device.
15
Page 16

Plantronics, Inc.
345 Encinal Street
Santa Cruz, CA 95060 USA
Tel: (800) 544-4660
www.plantronics.com
© 2005 Plantronics, Inc. All rights reserved. Plantronics, the logo design, Plantronics Discovery and Plantronics
Sound Innovation are trademarks or registered trademarks of Plantronics, Inc. The Bluetooth name and the
Bluetooth trademarks are owned by Bluetooth SIG, Inc. and are used by Plantronics, Inc. under license. All
other trademarks are the property of their respective owners. Patents U.S. 5,210,791; EM 392600-0001 and
392600-002; Patents Pending.
Printed in U.S.A.
Page 17

Impreso en EE.UU.
p
ropietarios. Patentes de EE.UU. 5.210.791; EM 392600-0001 y 392600-0002; pendiente de otras patentes.
las utiliza en virtud de una licencia. Todas las demás marcas registradas son propiedad de sus respectivos
nombre Bluetooth y las marcas comerciales Bluetooth son propiedad de Bluetooth SIG, Inc., y Plantronics, Inc.
Discovery yPlantronics Sound Innovation son marcas comerciales o marcas registradas de Plantronics, Inc. El
©
2005 Plantronics, Inc. Todos los derechos reservados. Plantronics, el diseño del logotipo, Plantronics
www.plantronics.com
Teléfono: 831 458 7700
Santa Cruz, California, EE.UU.
345 Encinal Street
Plantronics, Inc.
Page 18

15
anular el derecho del usuario a utilizar este dispositivo.
proporcionada. Toda modificación no autorizada en la antena o dispositivo podría
exposición a la radiación de radiofrecuencia, utilice únicamente la antena
ninguna otra antena o transmisor. Para cumplir con los requisitos de la FCC sobre
Ni el dispositivo ni la antena deben colocarse o utilizarse en combinación con
RADIOFRECUENCIA
EXPOSICIÌN A LA RADIACIÌN DE
con experiencia para obtener ayuda.
4. Póngase en contacto con el distribuidor o con un técnico de radio o televisión
3. Conecte el equipo a una toma de corriente de un circuito distinto.
2. Aumente la distancia de separación entre el equipo y el receptor.
1. Vuelva a orientar o colocar la antena receptora.
interferencias mediante alguno de los siguientes procedimientos:
y encendiendo la radio o el televisor, se recomienda que el usuario corrija dichas
peligrosas en la recepción de radio o televisión, que se puede determinar apagando
instalación concreta. En el caso de que este equipo produjera interferencias
Sin embargo, no se garantiza que no se puedan producir interferencias en una
comunicaciones por radio.
utiliza según las instrucciones, puede causar interferencias peligrosas en las
equipo genera, utiliza y puede radiar energía de radiofrecuencia y, si no se instala y
razonable contra interferencias peligrosas en instalaciones residenciales. Este
de la FCC. Dichos límites se han establecido para garantizar una protección
dispositivos digitales de Clase B, de conformidad con la sección 15 de las normas
Este equipo se ha probado y se ha demostrado que cumple los límites para
interferencias que puedan causar un funcionamiento no deseado.
2. Este dispositivo debe aceptar cualquier interferencia recibida, incluidas las
1. Este dispositivo no debe causar interferencias peligrosas.
El funcionamiento está sujeto a las siguientes dos condiciones:
Este dispositivo cumple lo establecido en la sección 15 de las normas de la FCC.
REQUISITOS DE LA FCC (SECCIÌN 15)
AVISOS SOBRE NORMATIVA
Page 19

14
Plantronics.
póngase en contacto con el distribuidor o con el centro de mantenimiento de
completa sobre esta garantía limitada, incluidos los elementos no cubiertos,
añadir otros derechos que varían de un estado a otro. Para obtener información
• Esta garantía le garantiza derechos legales concretos, a los que se pueden
PRODUCTOS.
• ÉSTA ES LA GARANTÍA COMPLETA DE PLANTRONICS PARA ESTOS
Plantronics llamando al 866 363-2583.
• Para obtener asistencia técnica en Estados Unidos, póngase en contacto con
nuevos, de segunda mano, refabricados, renovados o reacondicionados.
que funcionen de forma equivalente. Estas piezas o productos podrán ser
criterio, repararse o sustituirse. Para ello, podrán utilizarse piezas o productos
• Los productos que no cumplan esta garantía podrán, según nuestro propio
compra original.
• Esta garantía sólo es válida para el usuario final en posesión de la factura de
del producto.
• La garantía tiene un periodo de validez de un año a partir de la fecha de compra
en Estados Unidos.
fabricados, vendidos o certificados por Plantronics que se adquieran y utilicen
• Esta garantía cubre los defectos de materiales y mano de obra de los productos
GARANTÈA LIMITADA
GARANTÍA
contacto con el centro de asistencia técnica de Plantronics (TAC) en el 866-363-2583.
web en la dirección www.plantronics.com/support. También puede ponerse en
frecuentes e información sobre compatibilidad y accesibilidad, visite nuestro sitio
Si desea obtener asistencia técnica y consultar el archivo de las preguntas más
ASISTENCIA TÉCNICA
Page 20

13
el volumen del auricular.
botón de volumen/silencio para subir
bajo. Presione la parte superior del
El volumen de escucha es demasiado
AAA.
del teléfono celular o una batería
CA suministrado, el adaptador de CA
cargarla, utilice el transformador de
La batería está descargada. Para
dispositivo Bluetooth.
Acérquese más al teléfono o al
El auricular está fuera de alcance.
azul.
estado del auricular se ilumina en
sonido o vea que el indicador de
dos segundos, hasta que oiga un
botón de control de llamada durante
encender el auricular, presione el
El auricular no está encendido. Para
simultánea.
volumen/silencio de manera
Presione ambos lados del botón de
La función Silencio está activada.
de la página 7.
Repita el proceso de emparejamiento
del teléfono celular no son correctas.
Las opciones seleccionadas del menú
de la página 7.
Repita el proceso de emparejamiento
auricular.
El teléfono no pudo localizar el
persona que llama.
No puedo oír el tono de llamada o a la
La persona que llama no me escucha.
No introduje la clave.
"Emparejamiento" de la página 7.
Consulte la sección
del teléfono celular no son correctas.
Las opciones seleccionadas del menú
"Emparejamiento" de la página 7.
teléfono celular. Consulte la sección
seleccionó las opciones del menú del
modo de emparejamiento cuando
El auricular no se encontraba en
teléfono.
El auricular no funciona con el
PROBLEMA SOLUCIÓN
RESOLUCIÓN DE PROBLEMAS
Page 21

12
Vehicle Power
Charger
visite www.plantronics.com.
Para realizar un pedido, póngase en contacto con el proveedor de Plantronics o
TAMBIÉN DISPONIBLES
ACCESORIOS OPTATIVOS
Page 22

11
Indicador de utilización (OLI) Parpadea en azul cada diez segundos
Llamada entrante Parpadea en rojo y azul con rapidez
(presione cualquier botón para cancelar)
segundos
Llamada perdida Parpadea en rojo y azul de vez en cuando
Modo de emparejamiento Parpadea en rojo y azul durante 60 segundos
Batería baja Parpadea en rojo cada segundo
Carga de la batería completa Se apaga
Carga de la batería Parpadea en rojo cada 5 segundos
Apagado —
Apagándose Se enciende en rojo y se apaga
Encendido Parpadea en azul cada 5 segundos
Encendiéndose Se enciende en azul y parpadea cada seis
Estado del auricular Luz indicadora del auricular
LUCES INDICADORAS
Page 23

el botón de control de llamada.
teléfono al auricular, pulse brevemente
Para transferir una llamada activa del
al t
eléf
ono
Transferencia de una llamada del auricular
llamada.
brevemente el botón de control de
teléfono al auricular, presione
Para transferir una llamada activa del
auricular
Transferencia de una llamada del teléfono al
durante 2 segundos.
pulse el botón de control de llamada
Para rechazar una llamada entrante,
Rechazo de una llamada
teléfono Bluetooth.
característica, consulte el manual del
instrucciones sobre cómo activar esta
en el teléfono. Para obtener
marcación por voz debe estar activada
activada por voz, la característica de
NOTA para utilizar la marcación
voz.
segundos para activar la marcación por
botón de control de llamada durante 2
Si el auricular está encendido, pulse el
Uso de la marcación por voz
10
Si se da alguno de los casos arriba indicados, acérquese más al dispositivo Bluetooth.
de apagado.
• Cuando el auricular se encuentre fuera de alcance, sólo se podrá utilizar la función
• El auricular emitirá un sonido cuando pierda la conexión con el dispositivo Bluetooth.
• La calidad del sonido disminuirá.
Si el auricular se encuentra a más de 33 pies (100 metros) del dispositivo Bluetooth:
RADIO DE ALCANCE
de nuevo.
volverá a activar cuando lo encienda
auricular; la tecnología DSP se
NOTA A continuación, apague el
una llamada.
energía no puede activarse durante
volumen. El modo de ahorro de
te del
ambos botones de ajus
tecnología DSP, pulse simultáneamente
la llamada . Para volver a activar la
ajuste del volumen antes de realizar
simultáneamente ambos botones de
ahorro de energía, presione
conversación. Para activar el modo de
proporcionar un mayor tiempo de
Discovery 645 con el fin de
señales digitales) del auricular
Signal Processing, procesamiento de
característica DSP (del inglés, Digital
desactiva temporalmente la
El modo de ahorro de energía
Modo de ahorro de energèa
presione el botón.
Oirá un tono agudo cada vez que
veces el botón de control de llamada.
último número marcado, presione dos
Para activar la función de llamada al
Último número marcado
CARACTERÍSTICAS DE MANOS LIBRES
USO DEL AURICULAR
Page 24

9
vuelva a presionar ambos botones.
Para desactivar la función Silencio,
un sonido.
de manera simultánea hasta que oiga
lados del botón de volumen/silencio
durante una llamada, presione ambos
Para activar la función Silencio
SILENCIO
LA FUNCIÓN
ACTIVACIÓN DE
inferior (-).
Para disminuirlo, pulse el extremo
del botón de volumen/silencio.
escucha, pulse el extremo superior (+)
Para aumentar el volumen de
VOLUMEN
AJUSTE DE
bolsillo.
colocar el auricular en el estuche de
Para finalizar la llamada, vuelva a
el auricular del estuche de bolsillo.
automáticamente a la llamada, retire
recibir una llamada. Para responder
estuche de bolsillo, éste vibrará al
Si el auricular se encuentra en el
AUTOMÁTICA
RESPUESTA
botón de control de llamada.
auricular sin necesidad de pulsar el
transferirá automáticamente al
botón de envío. La llamada se
número en el teléfono y presione el
Para realizar una llamada, marque el
botón de control de llamada.
llamada, presione brevemente el
Para contestar o poner fin a una
FIN DE LLAMADAS
RESPUESTA Y
REALIZACIÓN,
USO DEL AURICULAR
Page 25

8
Neutral
position
Right ear
R L
R L
Left ear
plástico.
3. Vuelva a colocar el extremo de
extremo de plástico y el auricular.
2. Coloque el estabilizador entre el
dirección contraria al auricular.
posición neutra y tire de él en
del auricular, colóquelo en
1. Para retirar el extremo de plástico
mayor estabilidad.
en el auricular para garantizar una
extremo de plástico puede colocarse
El estabilizador para la oreja del
OREJA (INCLUIDO)
USO DEL ESTABILIZADOR PARA LA
para la derecha.
auricular en la oreja izquierda y R
2. Elija la posición L para utilizar
posición neutra.
abertura del auricular. Ésta es la
y empújelo hasta que encaje en la
con el lado más largo hacia abajo
1. Sostenga el extremo de plástico
más cómodo le resulte.
tamaño de extremo de plástico que
contraria al auricular. Seleccione el
neutra y tire del extremo en dirección
extremo de plástico en posición
del auricular. Para ello, coloque el
suelto, retire el extremo de plástico
demasiado ajustado o demasiado
Oreja izquierda
cómodo, ya sea porque está
Si el ajuste del auricular no le resulta
auricular a la altura de la boca.
arriba y hacia delante. Colóquese el
del extremo de plástico quede hacia
de manera que el lado más largo
• Colóquese el auricular en la oreja
oreja izquierda y R para la derecha.
• Elija la posición L para su uso en la
su uso en la oreja derecha.
de tamaño mediano ya instalado para
suministra con el extremo de plástico
optativo para la oreja. El auricular se
de plástico blando y un estabilizador
Plantronics se incluyen tres extremos
Con el auricular Discovery 645 de
2.
neutra
Posición
Oreja derecha
1.
AJUSTE
Page 26

7
645
corr
ectamente.
emparejamiento se haya realizado
parpadeará en azul cuando el
0000. La luz del auricular
especifique la clave, introduzca
3. Cuando se le solicite que
“645Plantronics”.
Bluetooth y seleccione el auricular
teléfono para buscar dispositivos
rojo y azul, utilice el menú del
2. Mientras el auricular parpadea en
60 segundos.
modo de emparejamiento durante
El auricular permanecerá en el
después parpadee en rojo y azul.
se ilumine brevemente en azul y
indicador de estado del auricular
control de llamada hasta que el
1. Mantenga pulsado el botón de
auricular esté apagado.
Para empezar, asegúrese de que el
3.
celulares.
configuración y emparejamiento con otros dispositivos que no sean teléfonos
guía del usuario del dispositivo Bluetooth encontrará más instrucciones de
dispositivo Bluetooth. Asegúrese de que el auricular esté totalmente cargado. En la
Antes de utilizar el auricular por primera vez deberá emparejarlo con un teléfono o
2.
1.
EMPAREJAMIENTO
Page 27

cuando el auricular esté apagado.
indicadora no se encenderá
hasta que oiga un sonido. La luz
luz indicadora se ilumine en rojo o
seis a ocho segundos, hasta que la
el botón de control de llamada de
2. Apague el auricular presionando
6
Parpadeo en rojo 1 vez = carga inferior a un tercio
Parpadeo en rojo 2 veces = carga entre uno y dos tercios
Parpadeo en rojo 3 veces = carga superior a dos tercios
LUCES INDICADORAS DE CARGA
nivel de carga del auricular.
encendido, la luz indicadora señala el
NOTA: cuando el auricular está
encendido.
cada cinco segundos cuando esté
indicadora parpadeará en azul
sonido cuando se encienda. La luz
lleva puesto el auricular, oirá un
indicadora se ilumine en azul. Si
de llamada hasta que la luz
presionado el botón de control
1. Encienda el auricular manteniendo
“SONIDO”
ENCENDIDO
Page 28

5
RAZR
(Mini USB)
NOTA no intente separar los componentes girándolos.
extremos hacia atrás hasta que los componentes se separen.
manera que el clip para camisas le quede de frente. A continuación, doble ambos
Para separar los componentes, sujete el estuche de bolsillo y el accesorio de
DESCONEXIÓN DE LOS COMPONENTES
3. Inserte el auricular en el estuche de bolsillo.
conéctelo a la red de alimentación eléctrica.
2. Conecte el transformador de CA del teléfono al adaptador de carga y luego
esté alineada con el clip para camisas del estuche de bolsillo.
la base del estuche de bolsillo. Asegúrese de que la hendidura del accesorio
1. Seleccione el adaptador de carga más apropiado para el teléfono y conéctelo a
Opción C con el adaptador de CA del teléfono celular
C
CARGA
Page 29

4
5. Inserte el auricular en el estuche de bolsillo.
bolsillo.
hendidura del accesorio esté alineada con el clip para camisas del estuche de
4. Coloque el cargador de baterías en el estuche de bolsillo. Asegúrese de que la
3. Vuelva a colocar el soporte en el cargador de baterías y gírelo hacia la derecha.
2. Coloque la batería en el soporte.
soporte de la batería.
1. Gire la parte inferior del cargador de baterías hacia la izquierda y suelte el
con una sola batería.
El auricular podrá funcionar durante un máximo de nueve horas de conversación
Opción B con baterías AAA
2. Inserte el auricular en el estuche de bolsillo.
red de alimentación eléctrica.
1. Conecte el transformador de CA a la base del estuche de bolsillo y luego a la
La luz indicadora parpadea en rojo durante la carga y se apaga cuando ésta finaliza.
Opción A con el transformador de CA (incluido)
• Con el adaptador de CA del teléfono celular
• Con baterías AAA
• Con el transformador de CA (incluido)
Existen tres opciones para recargar el auricular:
El tiempo de carga total es de tres horas
El tiempo de carga mínimo es de una hora
Recargue el auricular antes de utilizarlo.
AB
CARGA
Page 30

3
RAZR
(Mini USB)
c) Grande
b) Mediano
a) Pequeño
plástico blando
cargador es de 15 V, 800 mA.
proporcionados. La salida máxima del
recargar con los adaptadores de carga
fabricante del teléfono celular que va a
aprobados y proporcionados por el
** Utilice únicamente cargadores
recargables.
* Utilice únicamente baterías AAA no
PRECAUCIONES DE CARGA
14. Transformador de CA
auricular
13. Estuche para guardar el
12. Micrófono
11. Extremos de auricular de
oreja
10. Estabilizador optativo para la
9. Adaptadores de carga**
8. Baterías (AAA)*
7. Soporte para baterías
6. Cargador de baterías
5. Estuche de bolsillo
4. Botón de volumen/silencio
(encendido/apagado)
3. Botón de control de llamada
2. Luz indicadora
1. Auricular
PACKAGE CONTENTS & FEATURES
Page 31

De esta manera, podremos proporcionarle el mejor servicio y asistencia técnica.
Para registrar el producto en línea, visite www.plantronics.com/productregistration.
REGISTRO DEL PRODUCTO EN LÈNEA
Avisos sobre normativa 15
Garantía 14
Asistencia técnica14
Resolución de problemas 13
Accesorios optativos 12
Luces indicadoras 11
Uso del auricular 9
Ajuste 8
Emparejamiento 7
Encendido 6
Carga 4
Contenido del paquete y características 3
ÍNDICE
Page 32

72136-01 (11/05)
V2.0
CON DSP
645
™
®
AURICULAR BLUETOOTH
PLANTRONICS DISCOVERY
GUÍA DEL USUARIO_
 Loading...