

Page 1
USER GUIDE_ GUÍA DEL USUARIO_
PLANTRONICS DISCOVERY™640
BLUETOOTH® HEADSET
Page 2
2
3
c.
10.
11. 12.
13.
14.
a.
b.
c.
1.
2.
3.
4.
10.
a.
b.
c.
1.
5.
6.
7. 9.
8.
2.
3.
4.
10.
11. 12.
13.
14.
a.
b.
c.
10.
11. 12.
13.
14.
a.
b.
c.
10.
11. 12.
b.
c.
10.
11. 12.
13.
WELCOME
This User Guide provides instructions on the
setup and usage of the Plantronics Discovery™
640 Bluetooth® Headset.
Before getting started, please review the safety
booklet included in your package. For additional
help, service or support information, refer
to your product warranty card or visit www.
plantronics.com.
BIENVENIDO
En la presente guía del usuario se proporcionan
instrucciones para instalar y utilizar el
auricular Discovery™ 640 Bluetooth® de
Plantronics.
Antes de empezar, lea el folleto de información
sobre seguridad que se proporciona con
el producto. Si desea obtener más ayuda,
asistencia o información acerca de la
compatibilidad, consulte la tarjeta de garantía
del producto o visite www.plantronics.com.
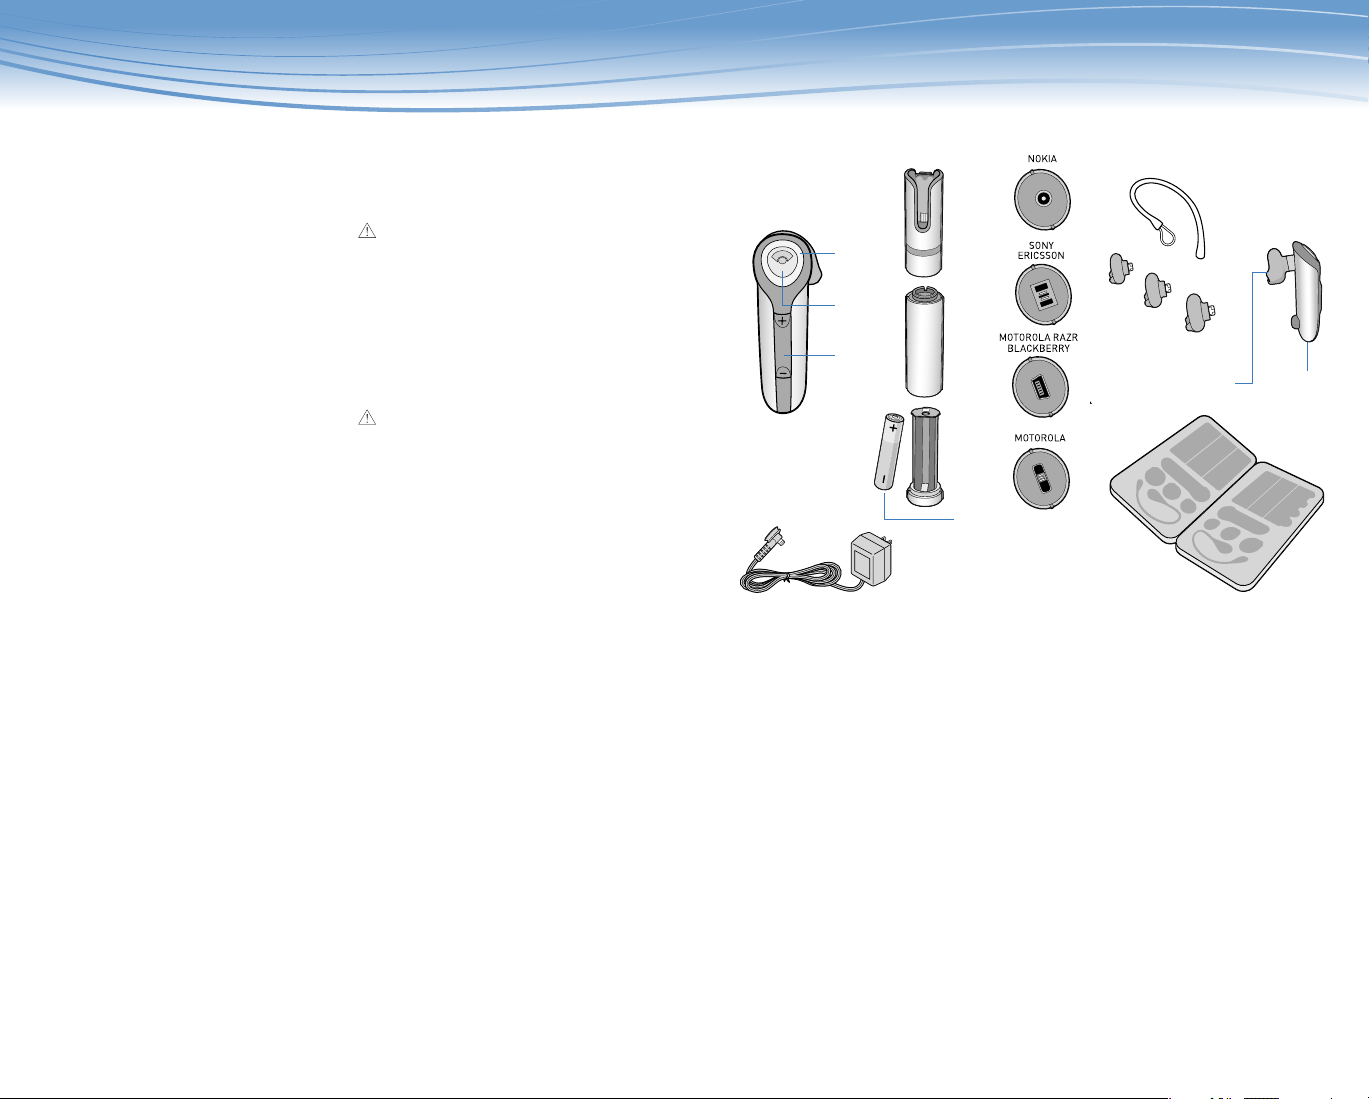
FEATURES
1. Headset
2. Headset Status Indicator
3. Call Control Button (On/Off)
4. Volume/Mute Button
5. Headset Carrying Pocket
6. Battery Charger
7. Battery Holder
8. **Battery (AAA)
9. *Charging Adapters
10. Optional Ear Stabilizer
11. Soft Gel Ear Tip
a. Small
b. Medium
c. Large
12. Microphone
13. Storage Case
14. AC Power Adapter
CHARGING CAUTIONS *Use only chargers
approved and provided by the cell phone
manufacturer to charge with the Charging
Adapters provided. Maximum Charger output
is 15V 800mA.
**Only replace with a non-rechargeable
AAA battery.
CARACTERÍSTICAS
1. Auricular
2. Indicador de estado del auricular
3. Botón de control de llamada
(encendido/apagado)
4. Botón de volumen/mute
5. Estuche del auricular
6. Cargador de la batería
7. Soporte de la batería
8. **Pila (AAA)
9. *Adaptadores de carga
10. Estabilizador optativo para la oreja
11. Extremos del auricular de plástico blando
a. Pequeños
b. Medianos
c. Grandes
12. Micrófono
13. Estuche para guardar el auricular
14. Transformador de CA
PRECAUCIONES DE CARGA *Para la carga,
utilice sólo los cargadores aprobados
y proporcionados por el fabricante del
teléfono móvil con los adaptadores de carga
correspondientes. La salida del cargador es de
15 V/800 mA como máximo.
**Reemplace sólo las pilas AAA no recargables.
Page 3

4
5
“SNAP”
CONNECTING THE
COMPONENTS
The Battery Charger and Charging Adapter are
connected to the Headset Carrying Pocket by
pushing the two components together. Be sure
that the indent on the attachment lines up with
the shirt clip on the Headset Carrying Pocket.
To separate the components, grasp both the
Headset Carrying Pocket and attachment with
the shirt clip facing you. Bend the outsides back
and the components will snap apart.
CAUTION Do not twist the components apart.
CONEXIÓN DE LOS
COMPONENTES
El cargador de la batería y el adaptador de
carga se conectan al estuche del auricular
presionándolos hasta que encajen. Asegúrese
de que la muesca en el accesorio se alinee con
la pinza para la ropa del estuche del auricular.
Para separar los componentes, tome el estuche
del auricular y el accesorio con la pinza para la
ropa mirando hacia usted y doble los extremos
hacia atrás; los componentes se separarán.
PRECAUCIÓN No tuerza los componentes
para separarlos.
CHARGING YOUR HEADSET
The Plantronics Discovery 640 Headset must be
charged for a minimum of 1 hour prior to use,
and up to 3 hours to be fully charged. An AC
Power Adapter is included. You may also charge
the Headset using the AC Power Adapter
for your cellular phone with the appropriate
Charging Adapter, or using a AAA battery. The
Headset Status Indicator glows red during
charging and turns off when fully charged.
USING THE INCLUDED AC POWER ADAPTER
1. Plug the AC Power Adapter into the base
of the Headset Carrying Pocket and
connect it to your power source.
2. Insert the Headset into the Headset
Carrying Pocket.
USING THE AC ADAPTER FROM YOUR
CELLULAR PHONE
1. Select the appropriate Charging Adapter
for your phone and connect the Charging
Adapter to the base of the Headset
Carrying Pocket.
2. Plug the AC Power Adapter for your phone
into the Charging Adapter and connect the
AC Power Adapter to your power source.
3. Insert the Headset into the Headset
Carrying Pocket.
USING THE AAA BATTERY
One battery will operate the Headset for
up to 15 hours of talk time.
1. Twist the bottom of the Battery Charger
counter-clockwise and release the
Battery Holder.
2. Insert the Battery into the Battery Holder.
3. Slide the Battery Holder back into the
Battery Charger and turn clockwise.
4. Snap Battery Charger to Headset
Carrying Pocket.
5. Insert the Headset into the Headset
Carrying Pocket.
CARGA DEL AURICULAR
El auricular Discovery 640 de Plantronics se
debe cargar durante un mínimo de una hora
antes usarlo; tres horas si se desea cargarlo
por completo. Se incluye un transformador de
CA. También puede cargar el auricular usando
el transformador de CA del teléfono móvil con
el adaptador de carga adecuado o usando pilas
AAA. El indicador de estado del auricular se
ilumina en rojo durante la carga y se apaga
cuando el auricular está totalmente cargado.
USO DEL TRANSFORMADOR DE
CA INCLUIDO
1. Conecte el transformador de CA a la
base del estuche del auricular y a la red
de alimentación eléctrica.
2. Inserte el auricular en el estuche.
USO DEL ADAPTADOR DE CA DEL
TELÉFONO MÓVIL
1. Seleccione el adaptador de carga
del teléfono y conéctelo a la base del
estuche del auricular.
2. Conecte el transformador de CA del
teléfono al adaptador de carga y a la red
de alimentación eléctrica.
3. Inserte el auricular en el estuche.
USO DE LAS PILAS AAA
Una batería permitirá que el auricular funcione
durante hasta 15 horas de tiempo de
conversación.
1. Gire hacia la izquierda la parte inferior
del cargador de la batería y suelte el
soporte de la batería.
2. Inserte la pila en el soporte.
3. Vuelva a colocar el soporte de la batería
en el cargador y gírelo hacia la derecha.
4. Coloque el cargador de la batería en el
estuche del auricular.
5. Inserte el auricular en el estuche.
Page 4
6
POWERING ON AND OFF
1. Turn on the Headset by pressing and
holding the Call Control Button until the
Headset Status Indicator glows blue. If you
are wearing the Headset, you will hear a
beep when the power turns on. The Headset
Status Indicator will fl ash blue every 6
seconds when the Headset power is on.
NOTE When the Headset is turned on, the
Headset Status Indicator will indicate the
charge level of the Headset.
Greater than 2/3 battery charge =
3 red fl ashes.
1/3 to 2/3 battery charge =
2 red fl ashes.
Less than 1/3 battery charge =
1 red fl ash.
2. Turn off the Headset by pressing the Call
Control Button for 6-8 seconds until the
Headset Status Indicator glows red or until
you hear the beep. The Headset Status
Indicator remains unlit when the power is off.
”BEEP”
ENCENDIDO Y APAGADO
1. Encienda el auricular manteniendo
presionado el botón de control de llamada
hasta que el indicador de estado del
auricular se ilumine en azul. Si lleva
puesto el auricular, escuchará un sonido
cuando se encienda. El indicador de
estado del auricular parpadeará en azul
cada 6 segundos cuando el auricular esté
encendido.
NOTA Cuando el auricular esté encendido,
el indicador de estado del auricular
mostrará el nivel de carga del auricular.
Más de 2/3 de la batería cargada =
3 parpadeos de la luz roja.
De 1/3 a 2/3 de la batería cargada =
2 parpadeos de la luz roja.
Menos de 1/3 de la batería cargada =
1 parpadeo de la luz roja.
2. Apague el auricular presionando el botón de
control de llamada de 6 a 7 segundos hasta
que el indicador de estado del auricular
se ilumine en rojo o hasta que escuche un
sonido. El indicador de estado del auricular
permanece sin iluminación cuando el
auricular está apagado.
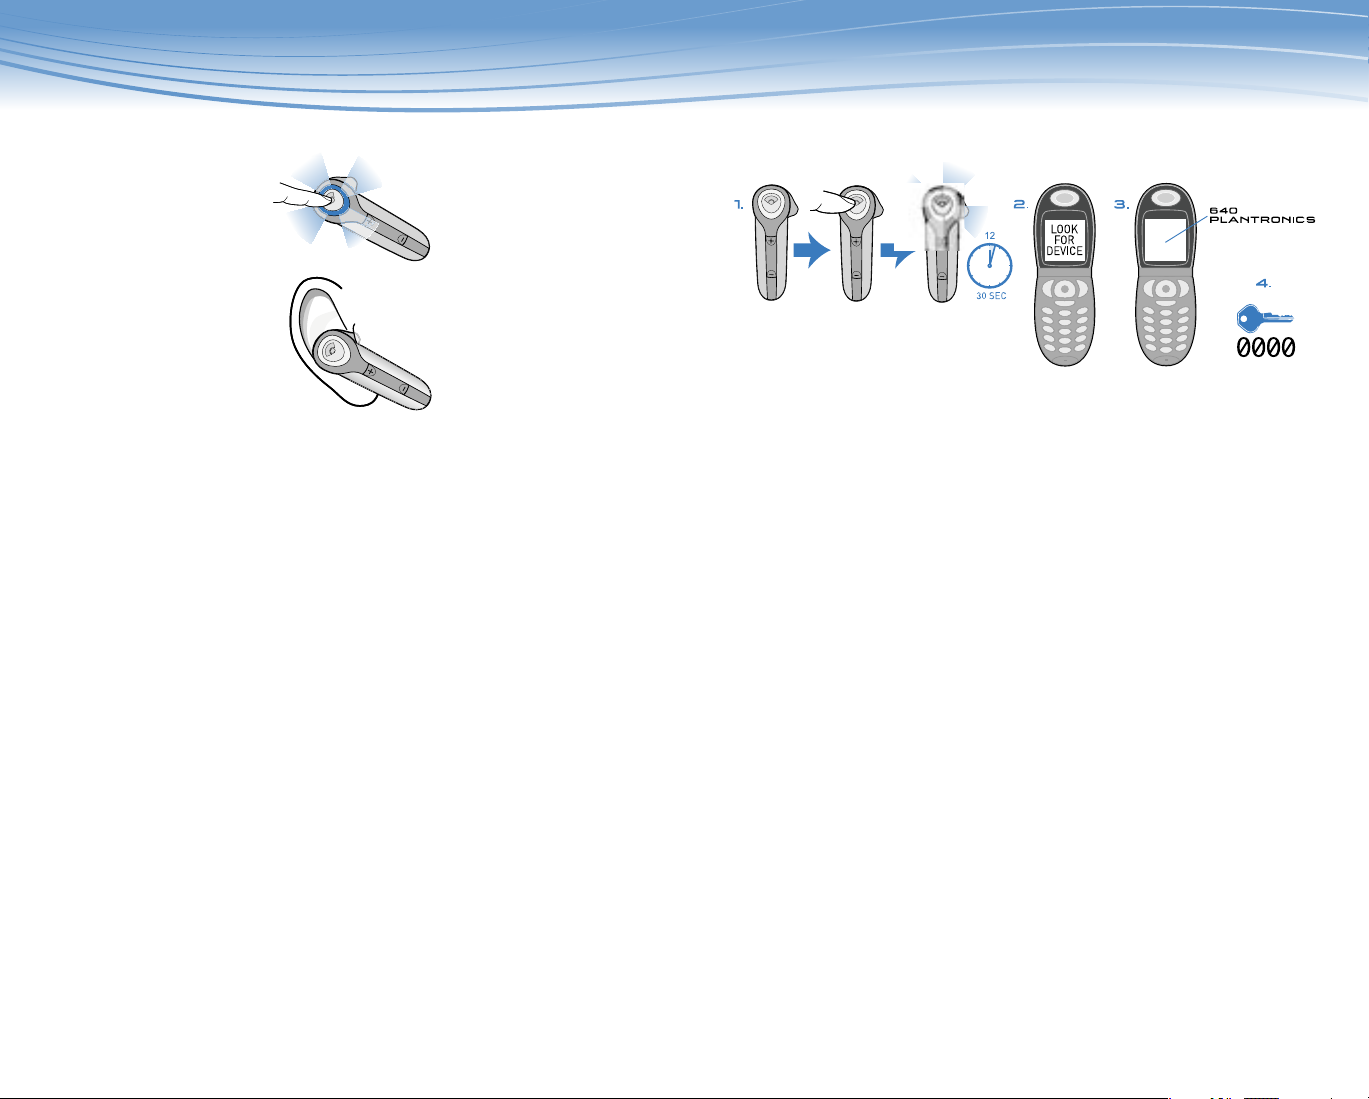
BLUETOOTH PAIRING
Before using your Headset for the fi rst time,
you must pair it with another Bluetooth device,
such as a mobile phone. Make sure the Headset
is fully charged.
• Look in your Bluetooth device manual for
the section that describes how to set up a
Bluetooth wireless connection.
• Move through the menu selections on your
phone until the phone display shows “Look
for Devices,” or equivalent, as a selection.
1. With your Headset turned off, hold down the
Call Control Button until the Headset Status
Indicator briefl y glows blue, then fl ashes red
and blue. The Headset is now in discovery
mode and will stay that way for 30 seconds.
2. On your phone, highlight and select “Look
for Devices,” or equivalent, to activate the
scan for the Headset.
3. When the phone display shows the scan
results, select “640 Plantronics”. The phone
will continue to search for the Headset.
4. When the phone display asks for a passkey,
type “0000” and press Enter.
Your Headset is now linked to your phone.
EMPAREJAMIENTO DE
BLUETOOTH
Antes de utilizar el auricular por primera vez,
debe emparejarlo con otro dispositivo Bluetooth,
como un teléfono móvil. Asegúrese de que la
batería del auricular esté totalmente cargada.
• Revise el manual del dispositivo Bluetooth
para buscar la sección que describe cómo
confi gurar una conexión inalámbrica Bluetooth.
• Desplácese por las opciones del menú
del teléfono hasta que aparezca la
opción“Búsqueda de dispositivos” o su
equivalente en la pantalla del teléfono.
1. Con el auricular apagado, mantenga
presionado el botón de control de llamada
hasta que el indicador de estado del
auricular se ilumine en azul y después
parpadee en rojo y azul. El auricular entra
así en modo de detección y permanecerá en
él durante 30 segundos.
2. En el teléfono, resalte y seleccione
“Búsqueda de dispositivos” o su equivalente
para activar la característica de exploración
del auricular.
3. Cuando el teléfono muestre los resultados
de la exploración, seleccione “640
Plantronics”. El teléfono continuará
buscando el auricular.
4. Cuando se solicite una clave en la
pantalla del teléfono, escriba “0000”
y presione Entrar.
El auricular queda así vinculado con el teléfono.
7
Page 5

8
9
USING MULTIPOINT (MORE
THAN ONE BLUETOOTH
DEVICE)
Plantronics Discovery 640 supports Multipoint
technology, which permits simultaneous
connections with two different Bluetooth
audio devices.
TO PAIR ANOTHER BLUETOOTH DEVICE
Repeat the previous pairing steps with the
new device.
INITIATE A CALL The headset will assume
you wish to initiate a call on the device
recently used.
TO USE THE SECOND DEVICE Initiate the
call using the controls on the second device.
The second device will form the link with
the headset.
ANSWER A CALL An incoming call on either
device will ring through the headset. In
most cases, the ring tone from the device
will transfer through to the headset,
allowing the user to determine which
device is ringing. In some cases, however,
the headset will apply a ring tone to the
incoming call. In either case, the user may
be able to determine which device is ringing
through the distinct ring tone.
To answer the call, press the Call
Control Button.
TO ANSWER A CALL ON ONE DEVICE
WHILE TALKING ON THE OTHER There is
no capability for placing one call on hold
while answering another. Therefore, to
answer the second call, the fi rst call must
be terminated.
Terminate the fi rst call by pressing the call
control button once.
Wait for the beep and then answer the
second call by pressing the Call Control
Button again. If you choose not to answer
the second call, and you have voice mail
on the second device, the call will go to
voice mail.
CONECTIVIDAD MULTIPOINT
(MÁS DE UN DISPOSITIVO
BLUETOOTH)
El auricular Discovery 640 de Plantronics es
compatible con la tecnología Multipoint, que
permite establecer conexiones simultáneas con
dos dispositivos de sonido Bluetooth distintos.
PARA EMPAREJAR EL AURICULAR CON
OTRO DISPOSITIVO BLUETOOTH Repita los
pasos de emparejamiento anteriores con el
nuevo dispositivo.
INICIO DE UNA LLAMADA El auricular
asumirá que desea iniciar la llamada con el
último dispositivo utilizado.
PARA USAR EL SEGUNDO DISPOSITIVO
Inicie la llamada usando los controles del
segundo dispositivo. El segundo dispositivo
establecerá un enlace con el auricular.
RESPUESTA A UNA LLAMADA Las llamadas
entrantes que se reciban en cualquiera de
los dispositivos sonarán en el auricular. En
la mayoría de los casos, el tono del timbre
del dispositivo se transmitirá a través del
auricular de manera que el usuario pueda
determinar qué dispositivo está sonando.
Sin embargo, en algunos casos, el auricular
aplicará un tono de timbre a la llamada
entrante. En cualquier caso, el usuario
podrá determinar qué dispositivo está
sonando por los distintos tonos de timbre.
Para responder a la llamada, presione el
botón de control de llamada.
PARA RESPONDER A UNA LLAMADA EN
UN DISPOSITIVO MIENTRAS HABLA POR
EL OTRO No se ofrece una función para
poner una llamada en espera mientras
se responde a otra. Por lo tanto, para
responder a una segunda llamada, debe
poner fi n a la primera.
Finalice la primera llamada presionando el
botón de control de llamada una vez.
Espere hasta escuchar un sonido y, a
continuación, responda a la segunda
llamada presionando de nuevo el botón de
control de llamada. Si decide no responder a
la segunda llamada y dispone de un servicio
de correo de voz en el segundo dispositivo,
la llamada se desviará al correo de voz.
FITTING YOUR HEADSET
The Headset comes with 3 Soft Gel Ear Tips
and an Optional Ear Stabilizer. The mediumsized Ear Tip is installed for wearing on the
right ear.
1. Twist the Ear Tip to the right for left
ear wearing.
2. Place the Headset into your ear with the
elongated side of the Ear Tip pointing up and
forward.
If the fit is not comfortable, either too tight or
too loose, remove the Ear Tip from the Headset
by turning the Ear Tip to the neutral* position
and pulling the Ear Tip away from the Headset.
1. Select the Ear Tip size that fi ts most
comfortably in your ear.
2. Hold the Ear Tip with the elongated edge
pointing down and push the Ear Tip post into
the opening on the Headset.
3. Twist the Ear Tip to the left for right ear
wearing or to the right for left ear wearing.
4. Place the Headset into your ear with the
elongated side pointing up and forward.
USING THE OPTIONAL EAR STABILISER
The Ear Tip Stabiliser may be attached to the
Headset to improve stability.
1. Remove the Ear Tip from the Headset
by turning the ear tip to the neutral
position* and pulling the ear tip away
from the Headset.
2. Attach the Stabilizer in-between the Ear Tip
and the Headset.
3. Replace the Ear Tip.
AJUSTE DEL AURICULAR
El auricular se proporciona con 3 extremos de
plástico blando y un estabilizador optativo para
la oreja. El extremo de tamaño mediano viene
confi gurado para su uso en la oreja derecha.
1. Gire el extremo hacia la derecha para usarlo
en la oreja izquierda.
2. Colóquese el auricular en la oreja con el
lado más largo del extremo mirando hacia
arriba y hacia adelante.
Si el auricular no le resulta cómodo, ya sea
porque está muy ajustado o muy suelto, retire
el extremo del auricular moviéndolo a la
posición neutra* y tirando de él hacia fuera.
1. Seleccione un extremo de otro tamaño que
se ajuste mejor a su oreja.
2. Sostenga el extremo con el lado más largo
hacia abajo y empújelo hasta que encaje en
la abertura del auricular.
3. Gire el extremo a la izquierda para usarlo en
la oreja derecha y a la derecha, para usarlo
en la oreja izquierda.
4. Colóquese el auricular en la oreja con
el lado más largo mirando hacia arriba y
hacia adelante.
USO DEL ESTABILIZADOR OPTATIVO PARA LA
OREJA
El estabilizador para la oreja se puede colocar
en el auricular para mejorar su estabilidad.
1. Retire el extremo del auricular girándolo a la
posición neutra* y tirando de él hacia afuera.
2. Coloque el estabilizador entre el extremo y
el auricular.
3. Vuelva a colocar el extremo.
Page 6

10
11
ANSWERING AND
ENDING CALLS
1. To answer a call, briefl y press the Call
Control Button or the Volume/Mute Button.
2. To end a call, briefl y press the Call
Control Button.
If the Headset is in the Headset Carrying
Pocket when a call is received, the Carrying
Pocket will vibrate. Removing the Headset from
the pocket will answer the call.
Returning the Headset to the Headset Carrying
Pocket will end the call.
RESPUESTA Y
FINALIZACIÓN DE UNA
LLAMADA
1. Para responder a una llamada, presione
brevemente el botón de control de llamada
o el botón de volumen/mute.
2. Para poner fi n a una llamada, presione
brevemente el botón de control de llamada.
Si el auricular está en el estuche cuando se
recibe una llamada, el estuche vibrará. Al
sacar el auricular del estuche, se responderá a
la llamada.
Al volver a meterlo en el estuche, se pondrá fin
a la llamada.
ADJUSTING THE VOLUME
To increase the listening volume of the Headset,
press the upper end (+) of the Volume/Mute Button.
To decrease the listening volume, press
the lower end (-).
AJUSTE DEL VOLUMEN
Para aumentar el volumen de escucha del
auricular, pulse el extremo superior (+) del
botón de volumen/mute.
Para disminuirlo, presione el extremo
inferior (-).
LAST NUMBER REDIAL
To activate last number redial, double click the
call control button. You will hear a high tone for
each key press.
ÚLTIMO NÚMERO MARCADO
Para activar el último número marcado,
presione dos veces el botón de control de la
llamada. Usted escuchará un tono alto cada
vez que presione el botón.
USING THE MUTE
To turn the mute on while on a call, press
both sides of the Volume/Mute Button
simultaneously until you hear a beep.
To turn the mute off, press both buttons again.
USO DE LA FUNCIÓN MUTE
Para activar la función mute durante una
llamada, presione ambos lados del botón de
volumen/mute de manera simultánea hasta
que escuche un sonido.
Para desactivar la función mute, presione
ambos botones de nuevo.
MOVING OUT OF RANGE
As the Headset is moved away from the
cellular phone or Bluetooth device,
• Audio quality will degrade.
• A beep will be heard in the Headset.
• Only the power off function will operate.
After 30 seconds, the Headset will make one
attempt to reconnect to the phone or device.
FUERA DE ALCANCE
Si el auricular se aleja del teléfono móvil o el
dispositivo Bluetooth:
• La calidad del sonido disminuye
• Se escuchará un sonido en el auricular
• Sólo funcionará la función de apagado
Pasados 30 segundos, el auricular intentará
volver a conectarse al teléfono o al dispositivo.
Page 7

12
13
USING VOICE ACTIVATED DIALING
To use voice activated dialing, the voice activated dialing feature must be
enabled on your device. See your Bluetooth device manual for instructions.
With the Headset on, one long press on the Call Control Button will activate
the voice activated dialing feature on the Headset.
MULTIPLE USES OF A LONG PRESS ON THE CALL
CONTROL BUTTON
HEADSET FUNCTION
Turn on power Power off Turns the power on
Re-link to
Bluetooth device
Reject call
Transfer a call between
Headset and Bluetooth device
Voice activated dialing
STATE OF THE
BLUETOOTH DEVICE
Power on
Link dropped
Power on
Linked
Incoming call
Power on
Linked
On a call
Power on
Linked
No call
RESULT
Re-links the device
Disconnects the call or sends the call to
voice mail depending on your device
Transfers the call from
one device to another
Activates the voice recognition feature
USO DE LA CARACTERÍSTICA DE
ACTIVACION DE MARCACION POR VOZ
Para usar la característica activacion de marcacion por voz, ésta debe estar activada en el
dispositivo. Consulte el manual del dispositivo Bluetooth para obtener instrucciones.
Si el auricular está encendido, al presionar el botón de control de llamada de forma
prolongada se activará la característica activacion de marcacion por voz del auricular.
USOS DE LA PULSACIÓN PROLONGADA DEL BOTÓN
DE CONTROL DE LLAMADA
FUNCIÓN DEL AURICULAR
Encendido Apagado Se enciende el auricular
Restablecimiento del enlace con
el dispositivo Bluetooth
Rechazo de una llamada
Transferencia de una
llamada entre el auricular
y el dispositivo Bluetooth
Activacion de marcacion por voz
ESTADO DEL DISPOSITIVO
BLUETOOTH
Encendido
Enlace perdido
Encendido
Enlace activo
Llamada entrante
Encendido
Enlace activo
Llamada en curso
Encendido
Enlace activo
No hay ninguna llamada
STATUS INDICATORS INDICADORES DE ESTADO
HEADSET STATUS HEADSET STATUS INDICATOR
ESTADO DEL AURICULAR INDICADOR DE ESTADO DEL AURICULAR
RESULTADO
Se restablece el enlace
con el dispositivo
Se desconecta la llamada o se envía al
correo de voz en función del dispositivo
Se transfiere la llamada
de un dispositivo al otro
Se activa la característica
de reconocimiento de voz
Powering on Blue light appears and flashes every 6 seconds
Power on Blue light flashes every 6 seconds
Powering off Red light appears and goes off
Power off Indicator is not lit
Charging battery Red light is on
Battery fully charged Red light is off
Discovery state Indicator flashes blue and red for 30 seconds
Missed call
Ringing Rapid flashing blue/red
On Line Indicator (OLI) Blue flash every 10 seconds
Low battery Flashes red
Infrequent flashing blue/red
Press any button to cancel
Encendido Luz azul que parpadea cada 6 segundos
Encendido Luz azul que parpadea cada 6 segundos
Apagado Luz roja que se apaga
Apagado Indicador no iluminado
Carga de la batería Luz roja iluminada
Batería completamente cargada Luz roja no iluminada
Estado de detección Indicador que parpadea en azul y rojo por 30 segundos
Llamada perdida
Timbre sonando Parpadeo rápido en azul/rojo
Indicador de uso Parpadeo en azul cada 10 segundos
Batería baja Parpadeo en rojo
Parpadeo azul/rojo no frecuente
Presione cualquier botón para cancelar
Page 8

14
15
TROUBLESHOOTING
RESOLUCIÓN DE PROBLEMAS
MY HEADSET DOES NOT WORK WITH MY PHONE.
POSSIBLE CAUSE SOLUTION
Headset was not in discovery mode when
mobile phone menu selections were made.
Incorrect menu selections were
made on your cellular phone.
See page 7 “Bluetooth Pairing”.
See page 7 “Bluetooth Pairing”.
I DID NOT ENTER MY PASS KEY.
POSSIBLE CAUSE SOLUTION
Your phone did not locate the Headset. Repeat the Pairing process on page 7.
Incorrect menu selections were
made on your cellular phone.
Repeat the Pairing process on page 7.
CALLERS CANNOT HEAR ME.
POSSIBLE CAUSE SOLUTION
Mute is turned on.
Press both sides of the
Volume/Mute Button simultaneously.
I CANNOT HEAR CALLER/DIALLING TONE.
POSSIBLE CAUSE SOLUTION
The Headset is not turned on.
Your Headset is out of range.
Your Headset battery is flat.
The listening volume is too low.
Press the Call Control Button for 2 seconds until you hear
a beep or see the Headset Status Indicator glow blue.
Move the Headset closer
to the phone or Bluetooth device.
Charge your battery using the AC
Power Adapter supplied, the AC Adapter
from your mobile phone, or a AAA battery.
Press the top part of the Volume/Mute Button
to increase the sound heard in the Headset.
EL AURICULAR NO FUNCIONA CON EL TELÉFONO.
POSIBLE CAUSA SOLUCIÓN
El auricular no se encontraba en el modo de
detección cuando se seleccionaron las opciones de
emparejamiento en el teléfono móvil.
Las opciones de emparejamiento seleccionadas en
el teléfono móvil son incorrectas.
Consulte “Emparejamiento de Bluetooth” en la página 7.
Consulte “Emparejamiento de Bluetooth” en la página 7.
NO INGRESÉ LA CLAVE.
POSIBLE CAUSA SOLUCIÓN
El teléfono no detectó el auricular.
Las opciones de emparejamiento seleccionadas
en el teléfono móvil son incorrectas.
Repita el proceso de emparejamiento
descrito en la página 7.
Repita el proceso de emparejamiento
descrito en la página 7.
LA PERSONA QUE LLAMA NO ME OYE.
POSIBLE CAUSA SOLUCIÓN
La función mute está activada.
Presione ambos lados del botón de
volumen/mute de manera simultánea.
NO PUEDO OÍR EL TONO DE LLAMADA NI A LA
PERSONA QUE LLAMA.
POSIBLE CAUSA SOLUCIÓN
El auricular no está encendido.
El auricular está fuera de alcance. Acerque al auricular al teléfono o dispositivo Bluetooth.
La batería del auricular está totalmente descargada.
El volumen de escucha es demasiado bajo.
Presione el botón de control de llamada durante 2
segundos hasta que escuche un sonido o vea que el
indicador de estado del auricular se ilumina en azul.
Cargue la batería usando el transformador de CA que
se proporciona con el auricular, el adaptador de CA del
teléfono móvil o unas pilas AAA.
Presione la parte superior del botón de volumen/mute
para subir el volumen del auricular.
Page 9

16
17
SPARE PARTS
PIEZAS DE REPUESTO
TO ORDER
To order, please contact your Plantronics
supplier or go to www.plantronics.com
PARA REALIZAR
UN PEDIDO
Póngase en contacto con su proveedor de
Plantronics o visite www.plantronics.com
Page 10

18
19
REGISTER YOUR PRODUCT
ONLINE
This is not a condition of your warranty, but will assist
us in providing the best possible service and technical
support for your product. Visit www.plantronics.
com/productregistration.
REGISTRO DEL PRODUCTO
EN LÍNEA
No se trata de una condición de validez de la garantía,
pero nos será útil a la hora de ofrecerle la mejor
asistencia técnica y de mantenimiento para el
producto. Visite
www.plantronics.com/productregistration.
GENERAL WARRANTY
For warranty information, please contact your local
Distributor.
GARANTÍA GENERAL
Para obtener información sobre la garantía, póngase
en contacto con su distribuidor local.
TECHNICAL ASSISTANCE
The Plantronics Technical Assistance Center (TAC)
is ready to assist you on 866-363-BLUE (2583), or
visit the Support section of our Web site at www.
plantronics.com for technical support. You can also
call the Technical Assistance Center for accessibility
information.
ASISTENCIA TÉCNICA
El Centro de asistencia técnica (TAC) de Plantronics
está a su disposición en el teléfono 866-363-BLUE
(2583). También puede visitar la sección de Asistencia
técnica de nuestro sitio Web (www.plantronics.
com) para obtener asistencia técnica. Para obtener
información sobre accesibilidad, llame al Centro de
asistencia técnica.
FCC REGISTRATION
INFORMATION
FCC REQUIREMENTS PART 15
This device complies with Part 15 of the FCC
Rules. Operation is subject to the following
two conditions:
1. This device may not cause harmful
interference, and
2. This device must accept any interference
received, including interference that may
cause undesired operation.
This equipment has been tested and found to
comply with the limits for a Class B digital
device, pursuant to Part 15 of the FCC Rules.
These limits are designed to provide reasonable
protection against harmful interference in
a residential installation. This equipment
generates, uses, and can radiate radio frequency
energy and, if not installed and used in
accordance with the instructions, may cause
harmful interference to radio communications.
However, there is no guarantee that
interference will not occur in a particular
installation. If this equipment does cause
harmful interference to radio or television
reception which can be determined by turning
the radio or television off and on, the user is
encouraged to try to correct interference by
one or more of the following measures:
1. Reorient or relocate the receiving antenna.
2. Increase the separation between the
equipment and receiver.
3. Connect the equipment into an outlet on
another circuit.
4. Consult the dealer or an experienced radio/
TV technician for help.
EXPOSURE TO RADIO FREQUENCY RADIATION
This device and its antenna must not be colocated or operated in conjunction with any
other antenna or transmitter. To comply with
FCC RF exposure requirements, only use
supplied antenna. Any unauthorized
modification to the antenna or device could void
the user’s authority to operate this device.
Page 11

Plantronics Inc
345 Encinal Street
Santa Cruz, CA 95060 USA
Tel: (800) 544-4660
ww w.plantronics.com
www.plantronics.com
© 2005 Plantronics, Inc. All rights reserved. Plantronics, the logo design, Plantronics Discovery
and Sound Innovation are trademarks or registered trademarks of Plantronics, Inc. The Bluetooth
name and the Bluetooth trademarks are owned by Bluetooth SIG, Inc. and are used by Plantronics,
Inc. under license. All other trademarks are the property of their respective owners.
Patents U.S. 5,210,791; Patents Pending.
Printed in U.S.A. 69327-09 (10.05)
 Loading...