

Page 1

Plantronics Discovery® 925
User Guide
Page 2

Welcome
Thank you for purchasing the Plantronics Discovery® 925 earpiece.
This guide contains instructions for setting up and using
your new earpiece.
Please refer to the Safety Information in this booklet for important
product safety information prior to use of the product.
Getting Assistance
The Plantronics Technical Assistance Center is ready to assist you.
You can find answers to frequently asked questions, ask a question
using e-mail, receive service over the Internet, or speak directly
with a representative. Visit www.plantronics.com/support or call
1-866-363-BLUE (2583).
NOTE If you are considering returning this earpiece, please contact
the Technical Assistance Center first.
Registering Your Product
Visit www.plantronics.com/productregistration to register your product
online so we can provide you with the best service and technical support.
For pairing your Earpiece, your PIN code, or “Passkey,” is 0000.
NOTE
ii
Page 3

Contents
Package Contents, Features and Accessories ......................................1
Charging Your Earpiece ........................................................................ 2
Using the AC or USB charger ...................................................... 2
Using the Charging Case .............................................................3
Checking the Battery Level .......................................................... 3
Recharging the Charging Case ....................................................4
Pairing Your Earpiece ............................................................................ 5
Plantronics QuickPair™ Technology ............................................ 5
How to Pair Your Phone With Your Earpiece for the First Time ..... 6
Adjusting the Fit ....................................................................................7
How to Install a Different Gel Eartip .............................................. 7
Earpiece Controls ................................................................................. 8
Hands-Free Features ............................................................................ 9
Range ................................................................................................10
Indicator Lights and Tones .................................................................. 10
Troubleshooting .................................................................................. 12
Using More Than One Bluetooth Phone ..............................................14
How to Turn the Multipoint Feature On and Off .......................... 14
How to Initiate a Call..................................................................14
How to Answer a Call While Talking on the Other Phone ...........14
Product Specifications ........................................................................ 15
Limited Warranty.................................................................................16
Important Safety and Operational Information ..................................... 17
Regulatory Notices .............................................................................20
EN
iii
Page 4

Package Contents and Features
Call Control Button
Volume Control Button
Charging Jack
Eartip
Stabilizing Eartips
(small, medium, and large)
Earpiece
Charging Case
AC Charger
100 – 240V
USB Charging Cable
Product Name & Number Accessories*
Vehicle Power Charger
#78583-01
* Not included. To order, please contact your Plantronics supplier or go
to www.plantronics.com
1
USB Lanyard
#74948-01
Page 5
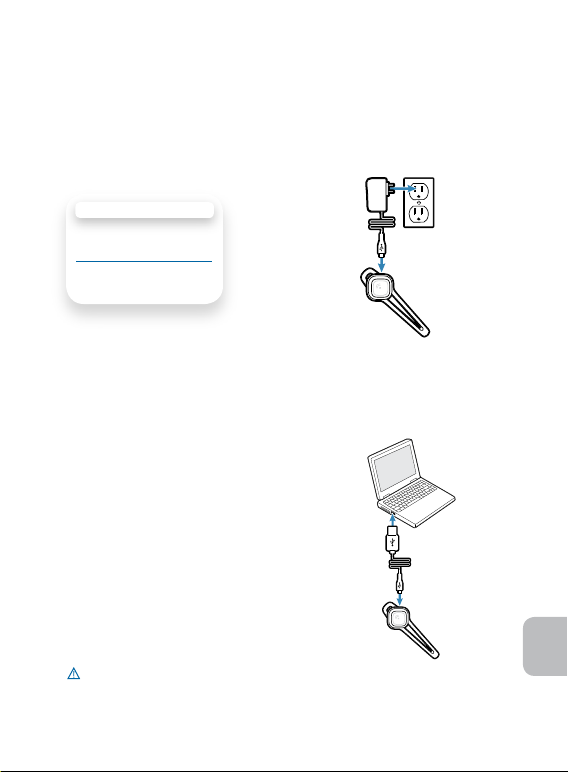
Charging Your Earpiece
Your new earpiece performs best when fully charged. While your
earpiece is charging, the indicator light slowly flashes red. When your
earpiece is fully charged, the indicator light turns off. This applies to
all charging options.
1
CH AR GING TIM E
3 hours ..... Full charge using
AC or USB
1 hour ....... Minimum charge
before first use
Option A: Using the AC Charger
1 Plug the AC charger into a power outlet.
2 Connect the AC charger to the charging jack on the earpiece.
Option B: Using the USB Charger
1 Connect USB charger to the USB
port on a computer or laptop.
2 Connect the USB charger to the
charging jack on the earpiece.
3 Turn the computer or laptop on.
2
3
1
2
EN
WARNING Do not use your earpiece while it is
connected to the charger.
2
Page 6

Charging Your Earpiece
1
CH AR GING TIM E
3 hours ..... Full charge using
charging case
1 hour ....... Minimum charge
before first use
Option C: Using the Charging Case
1 Open the cover of the case. Align the charging jack on the
earpiece with the micro USB connection in the case. Gently
push the earpiece onto the micro USB connection until you
feel it click into place.
IMPORTANT
Incorrect removal of the earpiece from the case will
damage the micro USB port in the case. To properly remove the
earpiece, use your thumb to gently push the earpiece in a diagonal,
not vertical, direction away from the micro USB connector.
Checking the Battery Level of Your Earpiece
1
Call Control Button
Volume Button
CHA RGE IND ICATO R LI GHT S
Red Flashes Battery Level
1 Full battery
2 1/3 to 2/3 full
3 Less than 1/3 full
1 With the earpiece on, simultaneously press and hold the call
control button and the volume button for about 2 seconds.
The indicator light flashes red to show the charge level.
3
Page 7

Charging Your Earpiece
The charging case provides one full charge to your earpiece before the
battery within the case requires charging.
1
Indicator Light
Charging Jack
Recharging the Charging Case
2
CH AR GING TIM E
9 hours .... Full charge
using USB
3 hours .... Full charge
using AC
1 To check the battery status of the charging case, you must
connect the earpiece to the case. If the earpiece does not
begin charging mode (indicator light slowly flashes red) then
both the earpiece and case need recharging.
2 Plug either the AC charger or the USB charger to power
source before connecting to the charging jack on the bottom
of the case.
While the case is charging, the indicator light on the bottom of the case
slowly flashes red. When fully charged, the indicator turns off.
If recharging with the AC charger, the charging case will feel
NOTE
warm to the touch during the charging cycle. Once fully charged, the
case will cool down. See “Safety Information” on page 17 for more
information.
EN
4
Page 8

Pairing Your Earpiece
Pairing is the process of introducing your earpiece to your phone.
Before using your earpiece for the first time, you must pair it with
your Bluetooth® wireless technology enabled phone. Normally you
need to pair your earpiece with your phone only once.
To see a demo of the pairing process, visit www.plantronics.com/
EasyToPair.
Plantronics QuickPair™ Technology
Your new earpiece includes Plantronics QuickPair technology to simplify
the Bluetooth setup process. The first time you turn your earpiece on,
your earpiece automatically enters pairing mode for 10 minutes. Once
paired successfully, your earpiece stays on for instant use.
If not successfully paired after 10 minutes, your earpiece automatically
powers off. When you turn the earpiece on again, it automatically goes
into pairing mode until successfully paired with a Bluetooth phone.
5
Page 9
Pairing Your Earpiece
SETTINGS
SETTINGS
Time and Date
Phone Settings
Bluetooth
Sound Settings
Network Services
Security
Reset Settings
SETTINGS
SETTINGS
Time and Date
Phone Settings
Bluetooth
Sound Settings
Network Services
Security
Reset Settings
BLUETOOTH
BLUETOOTH
9XXPlantronics
PASSKEY
0000
BLUETOOTH
BLUETOOTH
9XXPlantronics
PASSKE Y
0000
1
3
4
2
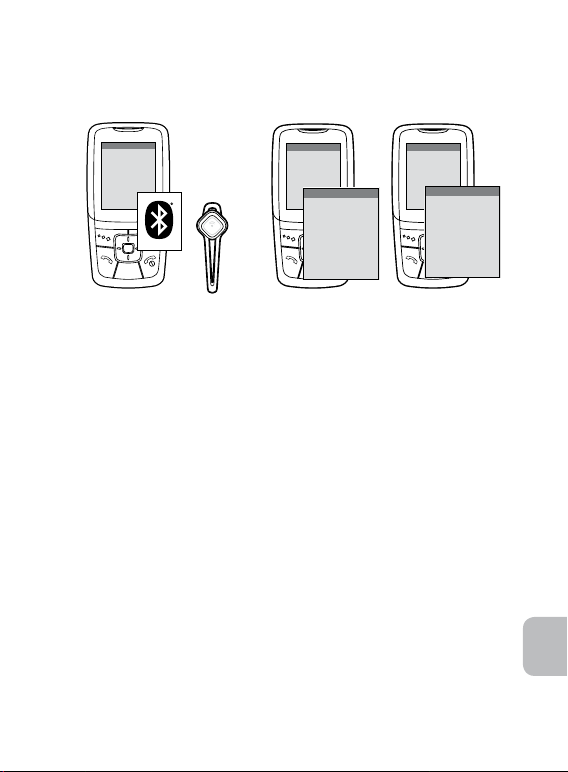
How to Pair Your Phone with Your Earpiece for the First Time
1 Turn on the Bluetooth feature on your phone.
For most phones, select Settings/Tools > Connections >
Bluetooth > On. See your phone’s user guide for more information.
2 Turn the earpiece on.
Press and hold the call control button until the indicator flashes
red/blue. The earpiece is now in pairing mode.
If you don’t see the red/blue flash, press and hold the call control
button to turn your earpiece off, and then press and hold the call
control button again until you see the red/blue flash.
3 Use the commands on your phone to locate your earpiece.
For most phones, select Settings/Tools > Connections > Bluetooth
> Search > 9XXPlantronics. See your phone’s user guide for more
information.
4 When prompted for the PIN code or Passkey, enter 0000.
Pairing is successful when the indicator on your earpiece flashes
blue. Your earpiece is now connected and ready to use.
EN
6
Page 10

Adjusting the Fit
For optimal voice clarity,
point the boom towards
the corner of your mouth.
Correct Fit Incorrect Fit
How to Install a Different Gel Eartip
If the earpiece does not feel stable, the eartip needs adjusting or it may
be the wrong size for your ear. The earpiece comes with the medium
eartip installed, but you can replace it with the optional small or large
eartip provided.
1
2 3
Eartip
Speaker housing
1 Remove the earpiece from your ear. Rotate the eartip on the
earpiece to position the stabilizer to rest comfortably in your
ear. If the earpiece still feels unstable, then remove the earpiece from your ear and change the eartip to a different size.
2 To remove the eartip, gently pull the stabilizer loop of eartip
off of the speaker housing.
3 To fit a new eartip, position the eartip over the speaker
housing with the stabilizer pointed away from the microphone
boom and gently press the eartip onto speaker housing.
7
Page 11

Earpiece Controls
Turn on the earpiece Press and hold the call control button for 2
seconds until the indicator glows blue. If earpiece
flashes red 3 times when you turn on the earpiece
then the battery is very low and should be
recharged.
NOTE When your earpiece is in standby mode, the indicator
is off. To confirm that your earpiece is on, press any button.
You should see a blue light flash.
Turn off the earpiece Press and hold the call control button for 4
seconds until the indicator glows red. When
power is off, indicator stays off.
NOTE If you’re wearing the earpiece, you hear ascending
tones when the power turns on and descending tones when
the power turns off.
Answer or reject
a call
When your earpiece rings, tap the power button
once; you should hear 1 low tone.
To reject a call and send the caller to voice mail,
press the call control button for 2 seconds.
NOTE Your phone may ring before your earpiece rings.
Wait until you hear the ring in your earpiece to press the call
control button and answer the call.
End a call During active call, tap the call control button.
Make a call
When the earpiece is paired to your phone and in
range, enter phone number on your phone and
press send. The call automatically transfers to
your earpiece.
Transfer a call
between earpiece
and phone
During an active call, press and hold the call
control button for 2 seconds. You will hear a
single low tone followed by a double low tone.
EN
8
Page 12

Earpiece Controls
Turning the
multipoint feature on
Turn on the online
indicator
Adjust the volume During an active call, tap the volume button.
WARNING Do not use headphones/Earpieces at high volumes for an extended
period of time. Doing so can cause hearing loss. Always listen at moderate levels. See
www.plantronics.com/healthandsafety for more information on Earpieces and hearing.
To prolong battery life, the multipoint feature
is turned off by default. To turn on feature, see
“Turning the Multipoint Feature On and Off” on
page 14.
Press and hold volume button for 4 seconds
while the earpiece is on. Earpiece will flash blue
2 times. Repeat action to deactivate online
indicators. Earpiece will flash blue 4 times. You
will hear a single low tone, silence and then a
double low tone.
There are 3 volume settings. Each tap will
increase the volume until maximum is reached
and you hear two low tones. Tapping again will
drop volume to minimum setting and subsequent
taps will increase volume until maximum is again
reached.
Hands-Free Features
If your phone and your wireless service provider both support hands-free
operation, you can use the following features:
Redial the last number
you called
Voice activated dialing
Tap the call control button twice. You will
hear two low tones.
When the earpiece is on, press and hold
the call control button for 2 seconds until
you hear 1 low tone.
9
Page 13

Range
To maintain a connection, keep your earpiece within 33 feet (10 meters)
of the Bluetooth phone. If there are obstacles between your earpiece and
the phone you may experience interference. For optimal performance,
place your earpiece and phone on the same side of your body.
Audio quality degrades as you move out of range. When you are
far enough away to lose the connection, you hear a high tone in the
earpiece.
The earpiece attempts to reconnect for 60 seconds. If you move back in
range, you can manually reconnect by pressing the call control button.
NOTE Audio quality is also dependent upon the device with which the
Earpiece is paired.
Indicator Lights and Tones
Light Tone
Status check 1 blue flash None
Charging 1 red flash every 10 seconds None
Fully charged None None
Low battery 2 red flashes for 2/3 full battery None
Very low battery 3 red flashes every 10 seconds 3 high tones every
10 seconds
Pairing Red and blue flashes 1 low tone
Paired Blue flashes 1 low tone
Turning on Solid blue for 2 seconds Ascending tones
Turning off Solid red for 4 seconds Descending tones
EN
10
Page 14

Indicator Lights and Tones
Light Tone
Incoming call 3 blue flashes every 2 seconds 3 rapid low tones
Answer call 1 blue flash 1 low tone
Call in progress 1 blue flash every 2 seconds None
Volume up or
down
End call 1 blue flash 1 low tone
Missed call 3 purple flashes every 10
Out of range None 1 high tone
Back in range
Turning on
multipoint
Turning off
multipoint
NOTE
By default, the online indicators are turned off. To turn on the
online indicator, see “Earpiece Controls” on page 9.
1 blue flash for each volume
adjustment
seconds for 5 minutes
Flashes to match current
earpiece state
2 blue flashes None
1 blue flash None
every 2 seconds
1 tone with volume
corresponding to
volume level
2 low tones to
indicate maximum
volume level
reached
None
1 low tone
11
Page 15

Troubleshooting
My earpiece
does not work
with my phone.
My phone did not
locate the earpiece.
I could not enter
my PIN code.
I cannot hear
caller/dial tone.
Make sure the earpiece is fully charged.
Make sure earpiece is paired with the Bluetooth
phone you are trying to use.
See “Pairing Your Earpiece” on page 6.
Turn both your phone and earpiece off and on,
and then repeat the pairing process on page 6.
Turn both your phone and earpiece off and on,
and then repeat the pairing process on page 6.
Your PIN code, or Passkey, is 0000.
The earpiece is not turned on. Press the call
control button for approximately 2 seconds until
you hear a tone or see the indicator glow blue.
Your earpiece is out of range. Move the earpiece
closer to the Bluetooth phone.
Your earpiece battery is drained. Charge your
battery. See “Charging Your Earpiece” on page 2.
The listening volume is too low. Incremental
tapping of the volume button will adjust volume.
See instructions for adjusting the volume in
“Earpiece Controls” on page 9.
Make sure that the eartip fits properly. See
“Adjusting the Fit” on page 7.
EN
12
Page 16

Troubleshooting
Audio quality
is poor.
Callers cannot
hear me.
The eartips do not
fit my ear.
My earpiece falls
out of my ear.
My eartip needs to
be cleaned.
Make sure that earpiece is sitting correctly in ear
with boom pointing towards corner of mouth.
See “Adjusting the Fit” on page 7.
Your earpiece is out of range. Move the earpiece
closer to the Bluetooth phone. See “Range” on
page 10.
Try a different size eartip. See “Adjusting the Fit”
on page 7.
Make sure that Earpiece is sitting correctly in ear
with boom pointing towards corner of mouth.
See “Adjusting the Fit” on page 7.
Remove the eartip from the earpiece and wash it
in warm soapy water and dry thoroughly. When
the eartip is completely dry, put it back on your
earpiece.
13
Page 17

Using More Than One Bluetooth Phone
Plantronics Discovery 925 supports multipoint technology, which allows
you to use one earpiece with two different Bluetooth mobile phones.
How to Turn the Multipoint Feature On and Off
To use more than one phone, you must turn the multipoint feature on.
When this feature is off, your earpiece can connect to only one Bluetooth
phone.
1 With your earpiece turned off, press and hold the volume and
call control buttons simultaneously until earpiece turns on and
indicator flashes blue 2 times.
2 To pair earpiece to a second phone, see “Pairing Your
Earpiece” on page 6.
NOTE To turn the multipoint feature off, repeat step 1. The indicator
flashes blue 1 time to indicate multipoint is off.
How to Initiate a Call
The earpiece initiates a call on the phone you most recently used. To
use the second phone, initiate the call using the controls on the second
phone. The second phone forms an active link with the earpiece.
How to Answer a Call While Talking on the Other Phone
To answer the second call, the first call must be terminated. There is no
function for placing one call on hold while answering another call from the
earpiece.
1 Press the call control button once to hang up the existing call.
2 Press the call control button again to answer the new call from
the other phone.
NOTE If you choose not to answer the second call, and you have voice
mail on the second phone, the call will go to voice mail.
EN
14
Page 18

Product Specifications
Talk Time* Battery enables up to 5 hours
Standby Time* Battery enables up to 175 hours with
Charge Time Charging headset using AC = 3 hours
Range Up to 33 feet (10 meters)
Earpiece Weight
Battery Type Headset: Lithium ion polymer
Storage/Usage
Temperature
Version Bluetooth 2.0 + EDR (Enhanced Data Rate)
Bluetooth Profiles Headset Profile (HSP) for talking on the phone
* Performance may vary by device.
multipoint feature OFF
Battery enables up to 100 hours with
multipoint feature ON
Charging headset using USB = 3 hours
Charging headset using the case = 3 hours
Charging the case using AC = 3 hours
Charging the case using USB = 9 hours
8 grams
Charging Case: Nickel-metal hydride
50F–104F (10C – 40C)
Hands-free Profile (HFP) for talking on the
phone and operating the phone
15
Page 19

Limited Warranty
This warranty covers defects in materials and workmanship of products manufactured,
sold or certified by Plantronics which were purchased and used in the United States
and Canada.
The warranty lasts for one year from the date of purchase of the products.
This warranty extends to you only if you are the end user with the original
purchase receipt.
We will, at our option, repair or replace the products that do not conform to the
warranty. We may use functionally equivalent reconditioned/refurbished/remanufactured/
pre-owned or new products or parts.
To obtain service in the U.S., contact Plantronics at 1-866-363-BLUE (2583). To obtain
service in Canada call (800) 540-8363.
THIS IS PLANTRONICS’ COMPLETE WARRANTY FOR THE PRODUCTS.
This warranty gives you specific legal rights, and you may also have other rights that
vary from state to state. Please contact your dealer or our service center for the full
details of our limited warranty, including items not covered by this limited warranty.
EN
16
Page 20

IMPORTANT SAFETY AND OPERATIONAL
INFORMATION
Please read the following safety and operational instructions before using your
Bluetooth earpiece and accessories. Please keep these instructions for your reference.
Additional warnings may be present on the product, packaging, or in the user
instructions.
This symbol identifies and alerts the user to the presence of important safety
warnings.
GENERAL:
Operating and storage temperature is 10°C to +40°C (50°F to +104°F)
WARNINGS
Exposure to high volume sound levels or excessive sound pressure may damage your
hearing. Although there is no single volume setting that is appropriate for everyone,
you should always use your earpiece with the volume set at moderate levels and avoid
prolonged exposure to high volume sound levels. The louder the volume, the less time
is required before your hearing could be affected. You may experience different sound
levels when using your earpiece with different devices. The device you use and its
settings affect the level of sound you hear. If you experience hearing discomfort, you
should stop listening to the device through your earpiece. To protect your hearing, some
hearing experts suggest that you:
1. Set the volume control in a low position before putting the earpiece on your ears.
2. Limit the amount of time you use earpiece at high volume.
3. Avoid turning up the volume to block out noisy surroundings.
4. Turn the volume down if the sound from the earpiece prevents you from hearing
people speaking near you.
See www.plantronics.com/healthandsafety for more information on earpiece and
hearing.
• Use of a earpiece that covers both ears will impair your ability to hear other
sounds. Use of such an earpiece while operating a motor vehicle or riding a
bicycle may create a serious hazard to you and/or others, and is illegal in most
regions.
• Check local laws regarding use of a mobile phone and earpiece while driving.
If you use the earpiece while driving ensure your attention and focus remain on
driving safely.
• Observe all signs and instructions that require an electrical device or RF radio
product to be switched off in designated areas, such as gas/refueling stations,
hospitals, blasting areas, potentially explosive atmospheres, or aircraft.
17
Page 21

• Keep all products, cords, and cables away from operating machinery. As with
all corded products, there is a danger of strangulation if a cord should become
wrapped around your neck.
• This product is not a toy. Never allow children to play with the product– small
parts may be a choking hazard.
• Install and use eartips and earbuds in accordance with the instructions provided.
Do not force eartips or earbuds down the ear canal. If either becomes lodged in
the ear canal, seek medical attention immediately.
• Ensure eartips and earbuds are kept clean and free of ear wax buildup to
maintain the specified product performance.
• Applying excessive pressure to the earpiece may injure the outer ear. Do not wear
the earpiece while sleeping or in other situations where pressure may be exerted
against the earpiece.
• Do not disassemble or insert anything into the product or charger because this
may cause damage to the internal components or cause injury to you.
• If the product or charger: overheats; has a damaged cord or plug; has been
dropped or damaged; has been dropped into water, disconnect any charger from
its supply, discontinue use of the product and contact Plantronics.
• Prevent rain, moisture or other liquid from coming into contact with the product
to protect against damage to your earpiece or injury to you. This warning is not
applicable for ruggedized or sports products which are designed to withstand
contact with moisture.
CHARGING WARNINGS
• To reduce the risk of electric shock, explosion or fire, use only the charger
supplied by Plantronics to charge the product. Do not use the chargers with
other products or for any other purpose. Ensure that the voltage rating corresponds to the local mains or power supply you intend to use.
• If your earpiece is designed to be charged with your mobile phone charger using
a custom adapter, use only mobile phone chargers approved and provided by
your mobile phone manufacturer.
• Charge the earpiece according to the instructions supplied with the unit.
• Ensure the mains (AC Power) socket-outlet for the charger is located near the
equipment and is easily accessible.
EN
18
Page 22

BATTERY WARNINGS
To avoid the risk of explosion, fire or leakage of toxic chemicals, please observe the
following warnings:
• Do not dispose of the product or battery in a fire. The battery cells may explode.
• Do not open or mutilate the battery. There may be corrosive materials which can
cause damage to eyes or skin and may be toxic if swallowed.
• Always store batteries where children cannot reach them.
• If your product has a non-replaceable battery, do not attempt to open the product
or remove the battery.
• If your product has a replaceable battery, use only the battery type supplied by
Plantronics. Observe the correct polarity when installing the battery. Remove
the battery if it will not be used for an extended period; remove a spent battery
promptly.
• If your product is designed to be recharged from a non-rechargeable battery: use
only the battery type specified in the product instructions; do not use a rechargeable battery.
• Do not allow any battery or its holder to contact metal objects such as keys or
coins.
RECYCLING: Your product and batteries must be recycled or disposed of properly.
Contact your local recycling center for information on proper disposal.
19
Page 23

Regulatory Notices
FCC REQUIREMENTS PART 15
Operation is subject to the following two conditions:
1. This device may not cause harmful interference.
2. This device must accept any interference received, including interference that may
cause undesired operation.
This equipment has been tested and found to comply with the limits for a Class B digital
device, pursuant to Part 15 of the FCC Rules.
These limits are designed to provide reasonable protection against harmful interference in a residential installation. This equipment generates, uses, and can radiate radio
frequency energy and, if not installed and used in accordance with the instructions, may
cause harmful interference to radio communications.
However, there is no guarantee that interference will not occur in a particular installation.
If this equipment does cause harmful interference to radio or television reception which
can be determined by turning the radio or television off and on, the user is encouraged
to try to correct interference by one or more of the following measures:
1. Reorient or relocate the receiving antenna.
2. Increase the separation between the equipment and receiver.
3. Connect the equipment into an outlet on another circuit.
4. Consult the dealer or an experienced radio/TV technician for help.
EXPOSURE TO RADIO FREQUENCY RADIATION
This device and its antenna must not be collocated or operated in conjunction with any
other antenna or transmitter. To comply with FCC RF exposure requirements, only use
supplied antenna. Any unauthorized modification to the antenna or device could void
the user’s authority to operate this device.
EN
20
Page 24

Page 25

Discovery® 925 de Plantronics
Guía del usuario
Page 26

Bienvenido
Gracias por comprar el auricular Discovery® 925 de Plantronics. Este
guia contiene instrucciones para configurar y utilizar el nuevo auricular.
Antes de utilizar el producto, consulte la información de seguridad
de este folleto para obtener información importante relacionada con la
seguridad.
Asistencia técnica
Si necesita ayuda, tiene a su disposición el Centro de asistencia técnica
de Plantronics. Puede encontrar las respuestas a las preguntas más
frecuentes, resolver sus dudas por correo electrónico, recibir servicio
por Internet o hablar directamente con un representante. Visite
www.plantronics.com/support o llame al 1-866-363-BLUE (2583).
NOTA
Si desea devolver este auricular, póngase en contacto primero con
el Centro de asistencia técnica.
Registro del producto
Visite www.plantronics.com/product registration y registre su producto por
Internet para que podamos proporcionarle el mejor servicio y asistencia
técnica posibles.
El código PIN o “clave” para emparejar el auricular es 0000.
NOTA
ii
Page 27

Índice
Contenido de la caja, características y accesorios ................................1
Carga del auricular ...............................................................................2
Uso del cargador de CA o USB ...................................................2
Uso del estuche de carga ............................................................ 3
Comprobación de la carga de la batería ...................................... 3
Recarga del estuche de carga ..................................................... 4
Emparejamiento del auricular ................................................................ 5
Tecnología QuickPair™ de Plantronics ........................................5
Emparejamiento del teléfono con el auricular por primera vez ......6
Ajuste ................................................................................................... 7
Instalación de otro tapón de gel ..................................................7
Controles del auricular .......................................................................... 8
Características de manos libres ............................................................ 9
Alcance ..............................................................................................10
Indicadores luminosos y acústicos ...................................................... 10
Solución de problemas ....................................................................... 12
Uso de más de un teléfono Bluetooth ................................................. 14
Activación y desactivación de la función multipunto ................... 14
Inicio de una llamada .................................................................14
Contestar una llamada durante una conversación
por el otro teléfono .................................................................... 14
Especificaciones del producto ............................................................15
Garantía limitada ................................................................................. 16
Información importante sobre la seguridad y el funcionamiento ..........17
Avisos sobre normativas ..................................................................... 20
ES
iii
Page 28

Contenido del paquete y características
Botón de control de llamadas
Botón de control del volumen
Conector de carga
Extremo del
auricular
Tapones estabilizantes
(pequeño, mediano y grande)
Auricular
Estuche de carga
Cargador de CA
de 100-240 V
Cable de carga USB
Nombre y número de los accesorios del producto*
Cargador para vehículos,
n.º 78583-01
* No incluidos. Para realizar un pedido, póngase en contacto con el
proveedor de Plantronics o vaya a www.plantronics.com.
1
Cinta para el cuello USB,
n.º 74948-01
Page 29

Carga del auricular
El nuevo auricular funciona mejor cuando está totalmente cargado.
Mientras el auricular se está cargando, la luz indicadora roja parpadea
lentamente. Cuando el auricular está totalmente cargado, la luz indicadora
se apaga. Esto ocurre con todas las opciones de carga.
TI EMPO DE CAR GA
3 horas ..... carga completa
con CA o USB
1 hora ....... carga mínima antes
del primer uso
Opción A: con el cargador de CA
1
2
1 Conecte el cargador de CA a una toma de corriente.
2 Conecte el cargador de CA a la entrada de carga del auricular.
Opción B: con el cargador USB
1 Conecte el cargador USB al puerto
USB de la computadora o laptop.
2 Conecte el cargador USB a la
entrada de carga del auricular.
1
3
3 Encienda la computadora o la
laptop.
ADVERTENCIA No use el auricular mientras está conectado
al cargador.
2
ES
2
Page 30

Carga del auricular
1
TI EMPO DE CAR GA
3 horas ..... Carga completa
con el estuche de
carga
1 hora ....... Carga mínima
antes del primer
uso
Opción C: con el estuche de carga
1 Abra la cubierta del estuche. Alinee la entrada de carga del
auricular con la conexión micro USB del estuche. Presione
suavemente el auricular contra la conexión micro USB hasta
que escuche un clic.
IMPORTANTE
Si se retira incorrectamente el auricular del estuche,
se dañará puerto micro USB del estuche. Para quitar correctamente
el auricular, presione suavemente el auricular con el pulgar en sentido
diagonal, no vertical, separándolo del conector micro USB.
Comprobación de la carga de la batería del auricular
1
Botón de control de
llamadas
Botón de control
del volumen
LUC ES I NDI CADO RAS DE CARG A
Parpadeos
en rojo
Nivel de carga
1 Carga completa de
2 1/3 a 2/3 de carga
3 Menos de 1/3 de
de la batería
la batería
carga
1 Con el auricular colocado, mantenga presionados
simultáneamente el botón de control de llamadas y el botón del
volumen durante aproximadamente 2 segundos. La luz indicadora
roja empezará a parpadear para indicar el nivel de carga.
3
Page 31

Carga del auricular
El estuche de carga puede cargar por completo la batería del auricular
hasta uno tiempo, antes de que sea necesario recargar la batería del
estuche.
1
Luz indicadora
Conector de carga
Recarga del estuche de carga
2
1 Para comprobar el estado de la batería del estuche de carga,
debe conectar el auricular al estuche. Si el auricular no inicia
el modo de carga (con la luz indicadora roja parpadeando
lentamente), significa que es necesario recargar tanto el
auricular como el estuche.
2 Conecte el cargador de CA o el cargador USB a una toma
de corriente antes de conectarlo a la entrada de carga de la
parte inferior del estuche.
Mientras se carga el estuche, la luz indicadora roja de la parte inferior
del estuche parpadea lentamente. La luz se apaga cuando el estuche
está totalmente cargado.
Si se utiliza el cargador de CA, el estuche estará caliente al tacto
NOTA
durante el ciclo de carga. El estuche se enfriará cuando esté totalmente
cargado. Consulte la “Información de seguridad” en la página 17 para
obtener más información.
TI EMPO DE CAR GA
9 horas .... Carga completa
por USB
3 horas .... Carga completa
por CA
ES
4
Page 32

Emparejamiento del auricular
El emparejamiento es el proceso de conexión del auricular con el
teléfono. Antes de usar el auricular por primera vez, es necesario
emparejarlo con un teléfono con tecnología inalámbrica Bluetooth®.
Normalmente, sólo es necesario emparejar el auricular con el teléfono
una vez.
Tecnología QuickPair™ de Plantronics
Su nuevo auricular incluye la tecnología QuickPair de Plantronics
para simplificar el proceso de configuración del Bluetooth. La
primera vez que prenda el auricular, éste pasará automáticamente al
modo de emparejamiento durante 10 minutos. Una vez emparejado
correctamente, el auricular permanecerá prendido para que pueda
usarlo de inmediato.
Si no se ha emparejado correctamente al cabo de 10 minutos, el
auricular se apagará automáticamente. Al volver a prender el auricular,
pasará de nuevo automáticamente al modo de emparejamiento hasta
que lo empareje correctamente con un teléfono Bluetooth.
5
Page 33

Emparejamiento del auricular
SETTINGS
SETTINGS
Time and Date
Phone Settings
Bluetooth
Sound Settings
Network Services
Security
Reset Settings
SETTINGS
SETTINGS
Time and Date
Phone Settings
Bluetooth
Sound Settings
Network Services
Security
Reset Settings
BLUETOOTH
BLUETOOTH
9XXPlantronics
PASSKEY
0000
BLUETOOTH
BLUETOOTH
9XXPlantronics
PASSKE Y
0000
1
3
2
Emparejamiento del teléfono con el auricular por primera vez
1 Active la función Bluetooth del teléfono.
En la mayoría de los teléfonos, seleccione Ajustes/ Herramientas >
Conexiones > Bluetooth > Activado. Consulte el manual del usuario
de su teléfono para obtener más información.
2 Prenda el auricular.
Mantenga oprimido el botón de control de llamadas hasta que el
indicador empiece a parpadear en rojo y en azul. Eso significa que el
auricular está en modo de emparejamiento.
Si no parpadea en rojo y en azul, mantenga oprimido el botón de
control de llamadas para apagar el auricular y después, oprímalo de
nuevo hasta que vea que empieza a parpadear en rojo y en azul.
3 Use los comandos del teléfono para localizar su auricular.
En la mayoría de los teléfonos, seleccione Ajustes/ Herramientas
> Conexiones > Bluetooth > Buscar > 9XXPlantronics. Consulte el
manual del usuario de su teléfono para obtener más información.
4 Cuando el sistema le pida el código o la clave, escriba 0000.
Una vez que el auricular esté correctamente emparejado, el
indicador empezará a parpadear en azul. Eso indica que el auricular
ya está conectado y listo para usarse.
4
ES
6
Page 34

Ajuste
Para obtener la máxima
claridad de la voz, dirija el
brazo del micrófono hacia
la comisura de su boca.
Ajuste correcto Ajuste incorrecto
Instalación de otro tapón de gel
Si el auricular se siente inestable, es probable que necesite ajustar el
tapón o cambiarlo por otro de un tamaño más apropiado para usted.
El auricular viene con el tapón de tamaño medio instalado, pero puede
cambiarlo por los tapones pequeño o grande suministrados.
1
2 3
Extremo del auricular
Alojamiento de la
bocina
1 Quítese el auricular de la oreja. Gire el tapón del auricular para
colocar el estabilizador de manera que se apoye cómodamente
en su oreja. Si aún siente inestable el auricular, quíteselo y
cambie el tapón por otro de un tamaño distinto.
2 Para quitar el tapón, tire suavemente del gancho estabilizador
del tapón para desprenderlo del alojamiento de la bocina.
3 Para cambiar el tapón. Coloque el tapón nuevo sobre el
alojamiento de la bocina con el estabilizador en dirección
opuesta al brazo del micrófono y presione suavemente el tapón
contra el alojamiento de la bocina.
7
Page 35

Controles del auricular
Prenda el auricular Mantenga oprimido el botón de control de llamadas
durante 2 segundos hasta que el indicador se
ilumina en azul. Si el auricular parpadea tres veces
en rojo al encenderlo, significa que la batería está
muy baja y es necesario recargarla.
NOTA Cuando el auricular está en modo de espera, el
indicador está apagado. Para confirmar que el auricular
está prendido, oprima cualquier botón. Al hacer esto, debe
encenderse momentáneamente una luz azul.
Apague el auricular Mantenga oprimido el botón de control de llamadas
durante 4 segundos hasta que se encienda el
indicador rojo. Cuando el auricular se apaga, el
indicador también se apaga.
NOTA Si lleva puesto el auricular, escuchará tonos
ascendentes al encenderlo y tonos descendentes al
apagarlo.
Contestar o rechazar
una llamada
Cuando suene el auricular, toque una vez el botón de
encendido; debería escuchar un tono grave.
Para rechazar una llamada y enviarla al buzón de
voz, oprima el botón de control de llamadas durante
2 segundos.
NOTA Es posible que el teléfono suene antes que el
auricular. Espere a escuchar el timbre en el auricular antes
de oprimir el botón de control de llamadas para contestar.
Colgar Durante una llamada activa, toque el botón de control
Marcar Cuando el auricular esté emparejado con el teléfono
Transferencia de
una llamada entre el
auricular y el teléfono
de llamadas.
y dentro del alcance, marque el número en el
teléfono y oprima enviar. La llamada se transferirá
automáticamente al auricular.
Durante una llamada activa, mantenga presionado el
botón de control de llamadas durante 2 segundos.
Escuchará un tono grave seguido de dos tonos
graves.
ES
8
Page 36

Controles del auricular
Activación de la
función multipunto
Encendido del
indicador de uso
Ajuste del volumen Durante una llamada activa, toque el botón del
ADVERTENCIA No use nunca los audífonos o auriculares a un volumen alto
durante periodos prolongados. Esto puede causar pérdida de audición. Use siempre
un volumen moderado. Visite www.plantronics.com/healthandsafety para obtener más
información acerca de los auriculares y la audición.
De manera predeterminada, la función multipunto
está desactivada para prolongar la duración de
la batería. Para activar esta función, consulte
“Activación y desactivación de la función multipunto”,
en la página 14.
Mantenga presionado el botón del volumen durante
4 segundos cuando el auricular esté encendido.
El indicador azul del auricular parpadeará 2 veces.
Repita el procedimiento para desactivar los
indicadores de uso. El indicador azul del auricular
parpadeará 4 veces. Escuchará un tono grave
seguido de un silencio y de dos tonos graves.
volumen. Hay 3 ajustes de volumen. Cada vez que
toque el botón, el volumen aumentará hasta alcanzar
el máximo; entonces escuchará dos tonos graves.
Si vuelve a tocar el botón, el volumen disminuirá al
mínimo y volverá a aumentar progresivamente cada
vez que vuelva a tocar el botón hasta alcanzar de
nuevo el volumen máximo.
Características de manos libres
Si su teléfono y su proveedor de servicios inalámbricos admiten el uso
con manos libres, puede usar las siguientes funciones:
Volver a marcar el último
número
Marcación activada
por voz
9
Toque dos veces el botón de control de
llamadas. Escuchará dos tonos graves.
Cuando el auricular esté prendido, mantenga
oprimido el botón de control de llamadas
durante dos segundos hasta que escuche un
tono grave.
Page 37

Alcance
Para mantener la conexión, mantenga el auricular a menos de
10 metros del teléfono Bluetooth. Si hay obstáculos entre el auricular
y el dispositivo, podrían producirse interferencias. Para un rendimiento
óptimo, coloque el auricular y el teléfono del mismo lado de su cuerpo.
La calidad del sonido disminuye a medida que se aleja del radio de
alcance. Si se aleja lo suficiente como para que se pierda la conexión,
escuchará un tono agudo en el auricular.
El auricular intentará reconectarse durante 60 segundos. Cuando vuelva
a estar dentro del radio de alcance, puede reconectarlo manualmente
oprimiendo el botón de control de llamadas.
NOTA La calidad del sonido también depende del dispositivo con el que está
emparejado el auricular.
Indicadores luminosos y acústicos
Luz Tono
Comprobación
del estado
Carga 1 parpadeo rojo cada 10 segundos Ninguno
Totalmente
cargado
Batería baja 2 parpadeos rojos cuando la
Batería muy baja 3 parpadeos rojos cada
Emparejamiento Parpadeo azules y rojos 1 tono grave
Emparejado Parpadeo azules 1 tono grave
Encendido Azul continuo durante 2 segundos Tonos ascendentes
Apagado Rojo continuo durante 4 segundos Tonos
1 parpadeo azul Ninguno
Ninguna Ninguno
batería esté cargada en un 66%
10 segundos
Ninguno
3 tonos agudos
cada 10 segundos
descendentes
ES
10
Page 38

Indicadores luminosos y acústicos
Luz Tono
Llamada entrante 3 parpadeos azules cada
Contestar una
llamada
Llamada en
curso
Subir o bajar el
volumen
Colgar 1 parpadeo azul 1 tono grave
Llamada perdida 3 parpadeos morados cada
Fuera del alcance Ninguna 1 tono agudo
Dentro del
alcance
Activación
de la función
multipunto
Desactivación
de la función
multipunto
NOTA De manera predeterminada, los indicadores de uso están desactivados.
Para activar el indicador de uso, consulte “Controles del auricular” en la página 9.
2 segundos
1 parpadeo azul 1 tono grave
1 parpadeo azul cada
2 segundos
1 parpadeo azul cada vez
que se ajuste el volumen
10 segundos durante 5 minutos
Parpadeo según el estado
actual del auricular
2 parpadeos azules Ninguno
1 parpadeo azul Ninguno
3 tonos graves
rápidos cada 2
segundos
Ninguno
1 tono al volumen
correspondiente
2 tonos indican que
se alcanzó el nivel
máximo de volumen
Ninguno
1 tono grave
11
Page 39

Solución de problemas
El auricular no
funciona con mi
teléfono.
El teléfono no
encuentra el
auricular.
No puedo ingresar
el código PIN.
No escucho el tono
para marcar o de
llamada.
Asegúrese de que el auricular esté totalmente
cargado.
Asegúrese de que el auricular esté emparejado con
el teléfono Bluetooth que está intentando usar.
Consulte “Emparejamiento del auricular” en la página 6.
Apague y vuelva a prender tanto el teléfono como el
auricular, y repita el procedimiento de emparejamiento
descrito en la página 6.
Apague y vuelva a prender tanto el teléfono
como el auricular, y repita el procedimiento de
emparejamiento descrito en la página 6.
El código PIN (o clave) es 0000.
El auricular no está encendido. Oprima el botón
de control de llamada durante 2 segundos
aproximadamente hasta que escuche un tono o vea
que el indicador se ilumina en azul.
El auricular está fuera del alcance. Acerque el
auricular al teléfono Bluetooth.
La batería del auricular está agotada. Cargue la
batería. Consulte “Carga del auricular” en la página 2.
El volumen de recepción es demasiado bajo. Si
toca varias veces el botón del volumen, ajustará el
volumen. Consulte las instrucciones para ajustar el
volumen en “Controles del auricular”, en la página 9.
Asegúrese de que el tapón esté correctamente
ajustado. Consulte “Ajuste” en la página 7.
ES
12
Page 40

Solución de problemas
La calidad del
sonido es mala.
La otra persona no
me oye.
Los tapones no se
ajustan a mi oído.
El auricular se me
cae.
Necesito limpiar el
tapón.
Asegúrese de que el auricular esté correctamente
colocado en la oreja, con el brazo del micrófono
dirigido hacia la comisura de su boca. Consulte
“Ajuste” en la página 7.
El auricular está fuera del alcance. Acerque el
auricular al teléfono Bluetooth. Consulte “Alcance” en
la página 10.
Pruebe con un tapón de tamaño distinto. Consulte
“Ajuste” en la página 7.
Asegúrese de que el auricular esté correctamente
colocado en la oreja, con el brazo del micrófono
dirigido hacia la comisura de su boca. Consulte
“Ajuste” en la página 7.
Quite el tapón del auricular, lávelo con agua
jabonosa tibia y séquelo bien. Cuando el tapón esté
completamente seco, colóquelo de nuevo en el
auricular.
13
Page 41

Uso de más de un teléfono Bluetooth
El Discovery 925 de Plantronics admite la tecnología multipunto, que le
permite usar el mismo auricular con dos teléfonos celulares con Bluetooth
distintos.
Activación y desactivación de la función multipunto
Para usar más de un teléfono, es necesario activar la función multipunto.
Si esta función está desactivada, el auricular sólo se puede conectar con
un teléfono Bluetooth.
1 Con el auricular desactivado, mantenga oprimidos los botones
de control de llamadas y del volumen simultáneamente hasta que
el auricular se encienda y el indicador el indicador parpadee dos
veces en azul.
2 Para emparejar el auricular con un segundo teléfono, consulte
“Emparejamiento del auricular” en la página 6.
NOTA Para desactivar la función multipunto, repita el paso 1. El indicador emite un
solo parpadeo azul que indica que la función multipunto está desactivada.
Inicio de una llamada
El auricular inicia la llamada en el último teléfono utilizado. Para usar el
segundo teléfono: inicie la llamada usando los controles del segundo
teléfono. El segundo teléfono establece un enlace activo con el auricular.
Contestar una llamada durante una conversación por el otro teléfono
Para responder a una segunda llamada, debe poner fin a la primera. No
se puede poner una llamada en espera mientras se contesta otra desde
el auricular.
1 Oprima una vez el botón de control de llamadas para colgar la
llamada en curso.
2 Oprima de nuevo el botón de control de llamadas para
contestar la nueva llamada desde el otro teléfono.
NOTA Si decide no responder a la segunda llamada y dispone de un buzón de voz
en el segundo dispositivo, la llamada se desviará al buzón de voz.
ES
14
Page 42

Especificaciones del producto
Tiempo de
conversación*
Tiempo de espera* La batería permite tener el dispositivo encendido
Tiempo de carga Carga del auricular con CA = 3 horas
Alcance Hasta 10 metros
Peso del auricular 8 gramos
Tipo de batería Auricular: polímero de iones de litio
Temperatura de
almacenamiento/uso
Versión Bluetooth 2.0 + EDR (Enhanced Data Rate,
Funciones de Bluetooth Función de auricular (HSP) para hablar por
* El rendimiento puede variar de un dispositivo a otro.
Hasta 5 horas, con batería.
hasta 175 horas con la función multipunto
desactivada.
La batería permite tener el dispositivo encendido
hasta 100 horas con la función multipunto
activada.
Carga del auricular por USB = 3 horas
Carga del auricular con el estuche = 3 horas
Carga del estuche con CA = 3 horas
Carga del estuche por USB = 9 horas
Estuche de carga: níquel e hidruro metálico
10 ºC – 40 ºC
velocidad de datos mejorada)
teléfono.
Función de manos libres (HFP) para hablar por
teléfono y controlar el teléfono.
15
Page 43

Garantía limitada
Esta garantía cubre los defectos de materiales y mano de obra de los productos
fabricados, vendidos o certificados por Plantronics que se adquieran y se utilicen
en Estados Unidos y Canadá.
La garantía tiene una vigencia de un año a partir de la fecha de compra del producto.
Esta garantía sólo es válida para el usuario final en posesión de la factura de compra
original.
Los productos que no cumplan con lo estipulado en esta garantía podrán, según
nuestro propio criterio, repararse o sustituirse. Con este fin, podrán utilizarse piezas
o productos que funcionen de forma equivalente. Estas piezas o productos podrán
ser nuevos, de segunda mano, refabricados, renovados o reacondicionados.
Si necesita servicio en EE. UU., póngase en contacto con Plantronics llamando
al 1-866-363-BLUE (2583). Para obtener servicio técnico en Canadá, llame al
(800) 540-8363.
ESTA ES LA GARANTÍA COMPLETA QUE OFRECE PLANTRONICS PARA SUS
PRODUCTOS.
Esta garantía le otorga derechos legales específicos, a los que se pueden añadir otros
derechos que varían de una jurisdicción a otra. Si desea obtener más información
sobre nuestra garantía limitada y los artículos que no están cubiertos por esta garantía,
póngase en contacto con su distribuidor o con el centro de servicio.
ES
16
Page 44

INFORMACIÓN IMPORTANTE SOBRE LA
SEGURIDAD Y EL FUNCIONAMIENTO
Lea las siguientes instrucciones de seguridad y de funcionamiento antes de usar el
auricular Bluetooth® y los accesorios. Conserve estas instrucciones como referencia.
Puede haber advertencias adicionales en el producto, en la caja o en las instrucciones
de uso.
Este símbolo identifica y avisa al usuario de la presencia de advertencias de seguridad importantes.
GENERAL:
La temperatura de funcionamiento y almacenamiento es de 10 °C a 40 °C.
ADVERTENCIAS
La exposición a un volumen alto de sonido o a una presión de sonido excesiva puede
dañar su sistema auditivo. Aunque no existe un solo ajuste de volumen apropiado
para todo el mundo, utilice siempre sus auriculares a un volumen moderado y evite la
exposición prolongada a un volumen alto. Mientras más alto sea el volumen, menos
tiempo se necesita para que su oído resulte afectado. Puede probar a variar el nivel de
sonido cuando use el auricular con diferentes dispositivos. El dispositivo que utilice y su
configuración afectarán al nivel de sonido que escucha. Si siente molestias en el oído,
debe dejar de escuchar el dispositivo a través de los auriculares. Para proteger su oído,
algunos expertos recomiendan:
1. Establecer el control de volumen en un nivel bajo antes de colocarse los auriculares o audífonos en los oídos.
2. Limitar el tiempo de uso de los auriculares a un volumen elevado.
3. Evitar subir el volumen para contrarrestar el ruido del ambiente.
4. Bajar el volumen si el sonido de los auriculares le impide oír a las personas que
hablan cerca de usted.
Visite www.plantronics.com/healthandsafety para obtener más información acerca
de los auriculares y la audición.
• Si utiliza un auricular que cubra las dos orejas, no podrá oír otros sonidos. El
uso de un auricular de este tipo mientras maneja un vehículo con motor o una
bicicleta puede resultar muy peligroso para usted y para los demás, y es ilegal en
la mayoría de los sitios.
• Consulte la legislación local referente al uso de auriculares y teléfonos celulares
mientras maneja. Si usa el auricular mientras maneja, asegúrese de centrar toda
su atención en manejar de manera segura.
• Observe todos los letreros y señales que indiquen que debe apagar los dispositivos
eléctricos o de radiofrecuencia en las áreas designadas, como hospitales, gasolineras, zonas de explosiones, atmósferas potencialmente explosivas o aeronaves.
17
Page 45

• Mantenga todos los productos y cables alejados de cualquier máquina en funcionamiento. Al igual que ocurre con todos los productos con cable, existe riesgo
de asfixia si el cable se enrolla alrededor de su cuello.
• Este producto no es un juguete. No deje nunca que los niños jueguen con las
piezas pequeñas del producto; existe riesgo de asfixia.
• Instale y use los tapones y auriculares tal como se indica en las instrucciones
suministradas. No inserte a la fuerza los tapones en el canal auditivo. Si un tapón
se queda atorado en el canal auditivo, acuda al médico de inmediato.
• Asegúrese de mantener los tapones limpios y sin cerumen, para mantener el
rendimiento especificado del producto.
• Si aplica una presión excesiva al auricular, puede sufrir lesiones en el oído
externo. No use el auricular mientras duerme ni en situaciones en las que pueda
ejercerse presión contra el auricular.
• No desmonte el producto ni inserte nada en él ni en el cargador, ya que podría
dañar algún componente interno o sufrir daños personales.
• Si el producto o el cargador se sobrecalientan, presentan daños en el cable o
en un conector, se han caído o han sufrido daños, o se han sumergido en agua,
desconéctelos de la toma de corriente, no vuelva a utilizarlos y póngase en
contacto con Plantronics.
• Impida que la lluvia, la humedad u otros líquidos entren en contacto con el
producto a fin de evitar que el auricular se dañe o que usted pueda sufrir alguna
lesión. Esta advertencia no se aplica a los productos reforzados o especiales
para deporte, que están diseñados de manera que no les afecte el contacto con
la humedad.
ADVERTENCIAS RELACIONADAS CON EL CARGADOR
• Para reducir el riesgo de descargas eléctricas, incendio o explosión, use única
mente el cargador suministrado por Plantronics para cargar el producto. No
use el cargador para otros productos ni para ningún fin que no sea el indicado.
Asegúrese de que el voltaje indicado para el producto coincida con el voltaje de
la red eléctrica o de la fuente de alimentación que desea utilizar.
• Si el auricular está diseñado para usar el mismo cargador que su teléfono celular
por medio de un adaptador específico, use únicamente el cargador aprobado y
suministrado por el fabricante del teléfono celular.
• Cargue el auricular siguiendo las instrucciones suministradas con esta unidad.
• Compruebe que la toma de corriente CA a la que va a conectar el cargador está
ubicada cerca del equipo y es fácilmente accesible.
-
ES
18
Page 46

ADVERTENCIAS RELACIONADAS CON LA BATERÍA
Para evitar el riesgo de la explosión, el fuego o la salida de productos químicos tóxicos,
observe por favor las advertencias siguientes:
• No tire el producto ni la batería al fuego. Las celdas de la batería podrían explotar.
• No abra ni destruya la batería. La batería puede contener materiales corrosivos que
pueden causar daños oculares o cutáneos, o ser tóxicos si se ingieren.
• Guarde siempre las baterías en un lugar que esté fuera del alcance de los niños.
• Si el producto tiene una batería permanente, no intente abrir el producto ni extraer la
batería.
• Si el producto tiene una batería que se puede cambiar, use únicamente el tipo de
batería suministrado por Plantronics. Al instalar la batería, observe la polaridad
correcta. Retire las baterías gastadas lo antes posible.
• Si el producto está diseñado para recargarse con un cargador de baterías no
recargables. No utilice una batería recargable.
• No permita que cualquier batería o su sostenedor entre en contacto con objetos de
metal tales como llaves o monedas.
RECICLADO: el producto y las baterías deben reciclarse o desecharse adecuadamente.
Póngase en contacto con el centro de reciclado local para obtener información acerca
de la manera adecuada de desechar el producto.
19
Page 47

Avisos sobre normativas
REQUISITOS DE LA FCC (SECCIÓN 15)
Su uso está sujeto a las dos condiciones siguientes:
1. Este dispositivo no puede causar interferencias nocivas.
2. Este dispositivo debe aceptar todas las interferencias recibidas, incluidas aquellas
que puedan causar un funcionamiento no deseado.
El uso de este dispositivo cumple con los límites establecidos para un dispositivo digital
de clase B, de acuerdo con la parte 15 de las Reglas de la FCC.
Estos límites tienen como finalidad proporcionar una protección razonable contra las
interferencias nocivas en una instalación residencial. Este equipo genera, usa y puede
radiar energía de radiofrecuencia. Si no se instala y se usa según las instrucciones,
puede causar interferencias nocivas a las comunicaciones por radio.
Sin embargo, no se garantiza que no vayan a producirse interferencias en una determinada instalación. Si este equipo causa interferencias nocivas con la recepción de
señales de radio o televisión (lo cual puede determinarse apagando y volviendo a
prender el aparato), el usuario puede adoptar algunas de las medidas siguientes para
intentar corregir las interferencias:
1. Reoriente o reubique la antena receptora.
2. Aumente la separación entre el equipo y el receptor.
3. Conecte el equipo a una toma de corriente que esté en otro circuito.
4. Consulte a su distribuidor o pida ayuda a un técnico de radio/TV con experiencia.
EXPOSICIÓN A LA RADIACIÓN DE RADIOFRECUENCIA
Este dispositivo y su antena no deben colocarse ni utilizarse conjuntamente con
ninguna otra antena o transmisor. Para cumplir con los requisitos de exposición a RF de
la FCC, use únicamente la antena suministrada. Cualquier modificación no autorizada
de la antena o el dispositivo podría anular la autorización del usuario para usar este
dispositivo.
ES
20
Page 48

Plantronics, Inc.
345 Encinal
Santa Cruz, CA 95060
United States
Tel: 800-544-4660
www.plantronics.com
©2007 Plantronics, Inc. All rights reserved. Plantronics, the logo design, Plantronics
Discovery, and Sound Innovation are trademarks or registered trademarks of Plantronics,
Inc. The Bluetooth® word mark and logos are owned by the Bluetooth SIG, Inc. and
any use of such marks by Plantronics, Inc. is under license. All other trademarks are the
property of their respective owners.
US patent 5,210,791 and Patents Pending
©2007 Plantronics, Inc. Reservados todos los derechos. Plantronics, el diseño del
logotipo, Plantronics Discovery y Sound Innovation son marcas comerciales o registradas
de Plantronics, Inc. El nombre y los logotipos de Bluetooth® son propiedad de Bluetooth
SIG, Inc. y Plantronics, Inc. los utiliza bajo licencia. Todas las demás marcas registradas
son propiedad de sus respectivos propietarios.
Patente estadounidense 5,210,791; otras patentes en trámite
78647-02
 Loading...