

Page 1

CORDLESS HEADSET
TELEPHONE
CT11/12
CT11
CT12
PRODUCT INFORMATION BOOKLET
Page 2

WELCOME
This Product Information Booklet contains features
and operations not described in the Quick Start Guide
(QSG). The QSG also includes warranty information,
FCC and the Industry Canada Notice.
BASICS . . . . . . . . . . . . . . . . . . . 3
Caller ID Options . . . . . . . . . . . 3
Making and Receiving Calls. . . . 6
Ringer Tone Setting. . . . . . . . . . 7
Ringer Volume Setup . . . . . . . . 8
Ringer Mute (temporarily) . . . . . 8
Redialing a Call . . . . . . . . . . . . 9
Distinctive Ringer Setup. . . . . . 10
Adjusting Headset Volume . . . 11
Mute Microphone . . . . . . . . . . 11
Tone Dialing Switch-over . . . . . 12
Traveling Out-of-Range . . . . . . 12
Selecting a Different Channel . 13
Find Remote. . . . . . . . . . . . . . 13
Flash and Call Waiting . . . . . . 14
Voice Mail LED. . . . . . . . . . . . 14
PHONEBOOK . . . . . . . . . . . . . 15
Steps to Enter Names
and Special Characters . . . . . . 16
Storing Names, Phone
Numbers, Distinctive Rings,
and Speed Dial. . . . . . . . . . . . 17
Phonebook Storage Process . . 18
Viewing the Phonebook. . . . . . 20
Making Phonebook Calls. . . . . 22
Speed Dialing . . . . . . . . . . . . . 23
Editing the Phonebook . . . . . . 23
Chain Dialing . . . . . . . . . . . . . 25
One Touch Dialing . . . . . . . . . 26
CALLER ID . . . . . . . . . . . . . . . 28
Viewing the Caller ID List . . . . 31
Deleting Information from
the Caller ID List . . . . . . . . . . . 32
Using Caller ID Message List . . 33
Call Waiting Deluxe Features . . 35
MORE. . . . . . . . . . . . . . . . . . . 36
Changing the Digital
Security Code . . . . . . . . . . . . . 36
Installing the Beltclip . . . . . . . . 38
Note on Power Sources. . . . . . 39
Maintenance . . . . . . . . . . . . . 40
General Information . . . . . . . . 41
TROUBLESHOOTING . . . . . . . 42
PARTS & ACCESSORIES . . . . . 44
INDEX . . . . . . . . . . . . . . . . . . 47
BASICS
There are three Caller ID setup options
available: AUTOTALK, CIDCW (Caller ID
on Call Waiting), and AREA CODE.
AUTOTALK allows
you to answer the
phone without
pressing TALK/FLASH. If the phone rings
when AutoTalk is On, simply remove the
remote from the base and the phone
automatically answers the call. Or if the
remote is not in the base, press any number
key, ✱/TONE, or # to answer the call. If you
set AutoTalk to Off, you must press talk/flash
to answer the call. Setting AutoTalk follows
in this section.
CIDCW (Caller ID on Call Waiting)
performs the same as
regular Caller ID on a
call waiting number.
CW Deluxe allows you to handle call waiting
calls in seven different ways. See page 28
for the Caller ID (CID) section and page 35
for CW Deluxe.
You must subscribe to CID and CIDCW from
your phone company in order to use this
feature.
The CW Deluxe is a separate service
available through your phone company.
BASICS
TIP
Any key answer
can be used only
when AutoTalk is
set to On.
2
3
Page 3
ENTERING YOUR AREA CODE
TIP
Standby Mode:
The remote is
not in use, is off
the base, and
TALK/FLASH
has not been
pressed. A dial
tone is not
present.
4
AREA CODE allows you to enter your local
area code so CID will not show the area
code from local callers. See the next page
for area code instructions.
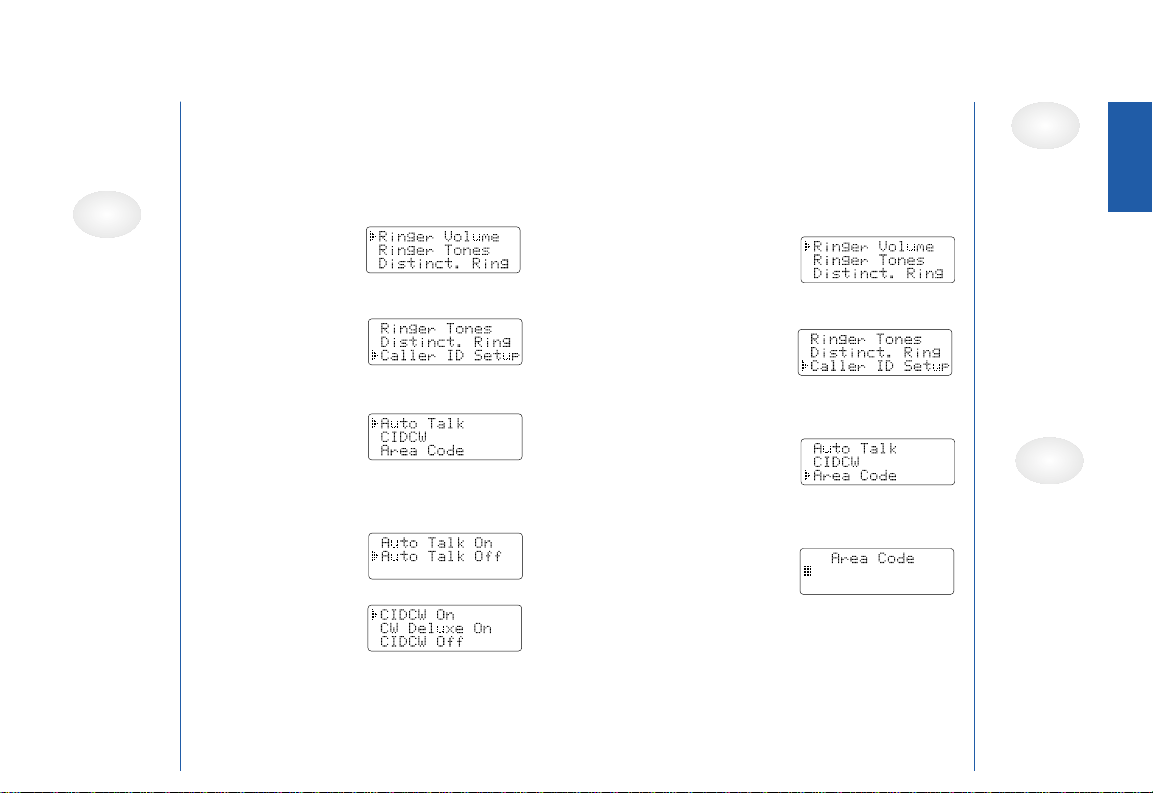
To change your Caller ID options:
1) When the phone
is in the standby
mode, press
MENU/MUTE.
2) Press ▲ or ▼ to
move the pointer
to “Caller ID
Setup”, then press SELECT/CH.
3) Press ▲ or ▼ to
choose “Auto
Talk” or “CIDCW”,
then press SELECT/CH.
4) Press ▲ or ▼ to change the selection.
AutoTalk: “Auto Talk
On” or “Auto Talk
Off”
CIDCW: “CIDCW
On”, “CW Deluxe
On” or “CIDCW Off”
5) Press SELECT/CH, and you will hear
a confirmation tone.
6) Press END to exit.
If you enter a 3-digit area code number in
the “Area Code” option, your local area
code does not appear in Caller ID messages.
For calls received from outside your local
area code, you will see a full 10-digit
number.
1) When the phone
is in the standby
mode, press
MENU/MUTE.
2) Press ▲ or ▼ to
move the pointer
to “Caller ID
Setup”, then
press SELECT/CH.
3) Press ▲ or ▼ to
move the pointer
to “Area Code”,
then press
SELECT/CH.
4) Use the number
keypad (0 to 9)
to enter a 3-digit
area code.
5) Press SELECT/CH, and you will hear
a confirmation tone.
6) Press END to exit.
TIP
BASICS
If your calling
area requires
10-digit dialing,
do not program
this option.
TIP
If the area code
has already been
stored in
memory, the
stored area code
will be displayed
in this mode. To
change it, press
delete and the
number keypad
to enter the new
area code.
5
Page 4
MAKING AND RECEIVING CALLS
RINGER TONE SETTING
To make or receive a call, you need to connect the Firefly™
headset to the remote unit. (See the Quick Start Guide.)
Put on the headset.
Remote On Base Remote Off Base
To answer Pick up the remote Press TALK/FLASH
and press TALK/FLASH OR
OR (AutoTalk) Press any
(AutoTalk) Pick up number key, ✱/TONE,
the remote. or #.
To make 1) Pick up the remote. Dial the number, then
a call 2) Dial the number, then press TALK/FLASH.
NOTE: The
remote must be
out of the base
during calls.
Replacing the
remote will
cause the call
to disconnect.
To hang up Press END, or return the remote to the base.
To enter When you dial the number, press
a pause PAUSE/REDIAL. “P” appears in the
within display which represents a pause.
the dialing
sequence
The headset LED will continue flashing during Talk Mode.
press TALK/FLASH.
OR OR
1) Pick up the remote. 1) Press TALK/FLASH.
2) Press TALK/FLASH. 2) Listen for the dial tone.
3) Listen for the dial tone. 3) Dial the number.
4) Dial the number.
When you press DELETE during a call, the call will be placed
on hold and you will hear a ring tone. To resume the call, press
TALK/FLASH or DELETE. If the remote remains idle for 5 minutes,
the phone hangs up and returns to the Standby automatically.
6
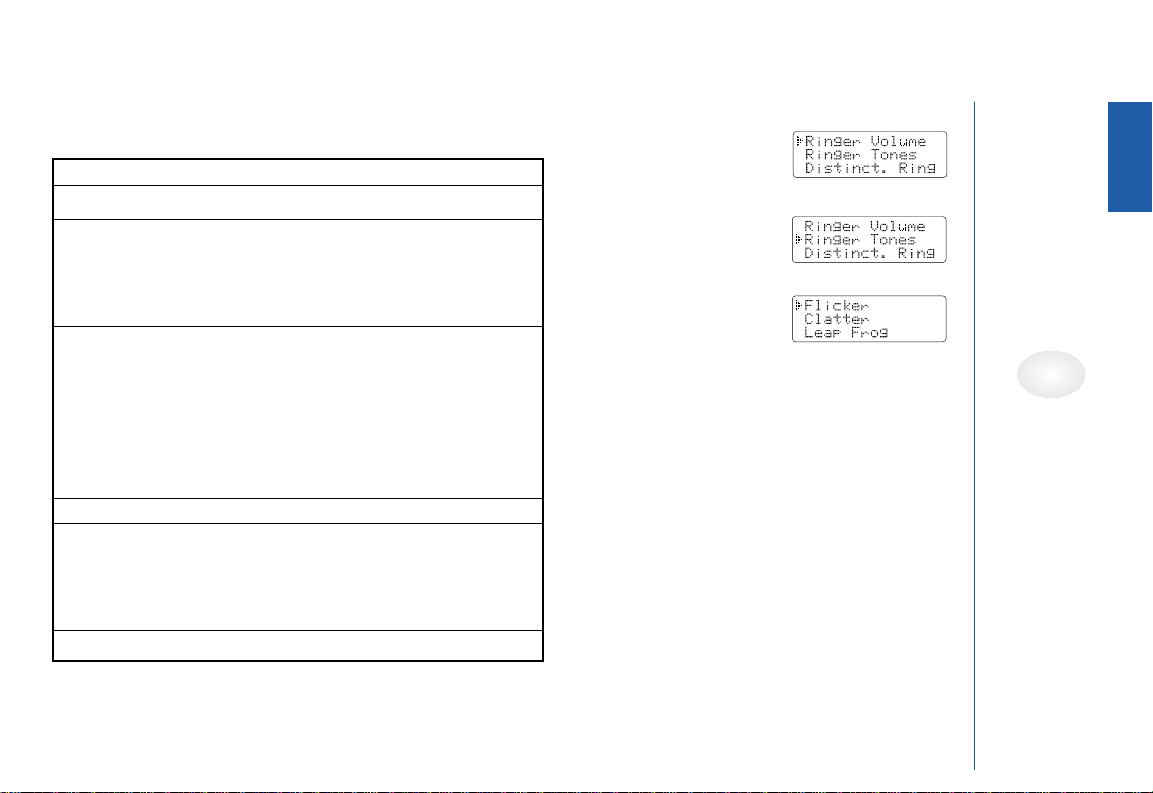
1) When the phone
is in the standby
mode, press
MENU/MUTE.
2) Press
▲ or ▼ to
move the pointer
to “Ringer Tones”.
You can choose
from 6 ringers or
4 melodies:
Ringers [Flicker,
Clatter, Leap Frog, Ping Ball, Reminder,
Soft Alert]
Melodies [Beethoven 9, For Elise (Elise),
Merry Christmas (Merry-Xmas), Home
Sweet Home (Hm Swt Hm)]
3) You will hear the ringer or the melody
as you scroll through the options.
4) Press SELECT/CH and you will hear a
confirmation tone.
5) Press END to exit.
BASICS
TIPS
Standby mode is
when the remote
is charged and
the Talk button
has not been
pressed. The
display is blank.
If you set the
ringer to Off, the
ringer tone will
not sound.
7
Page 5
RINGER VOLUME SETUP
REDIALING A CALL
TIP
If you select
“Ringer Off”,
<Ringer Off>
appears on the
display when you
make or receive
calls, or when
charging the
remote.
RINGER M
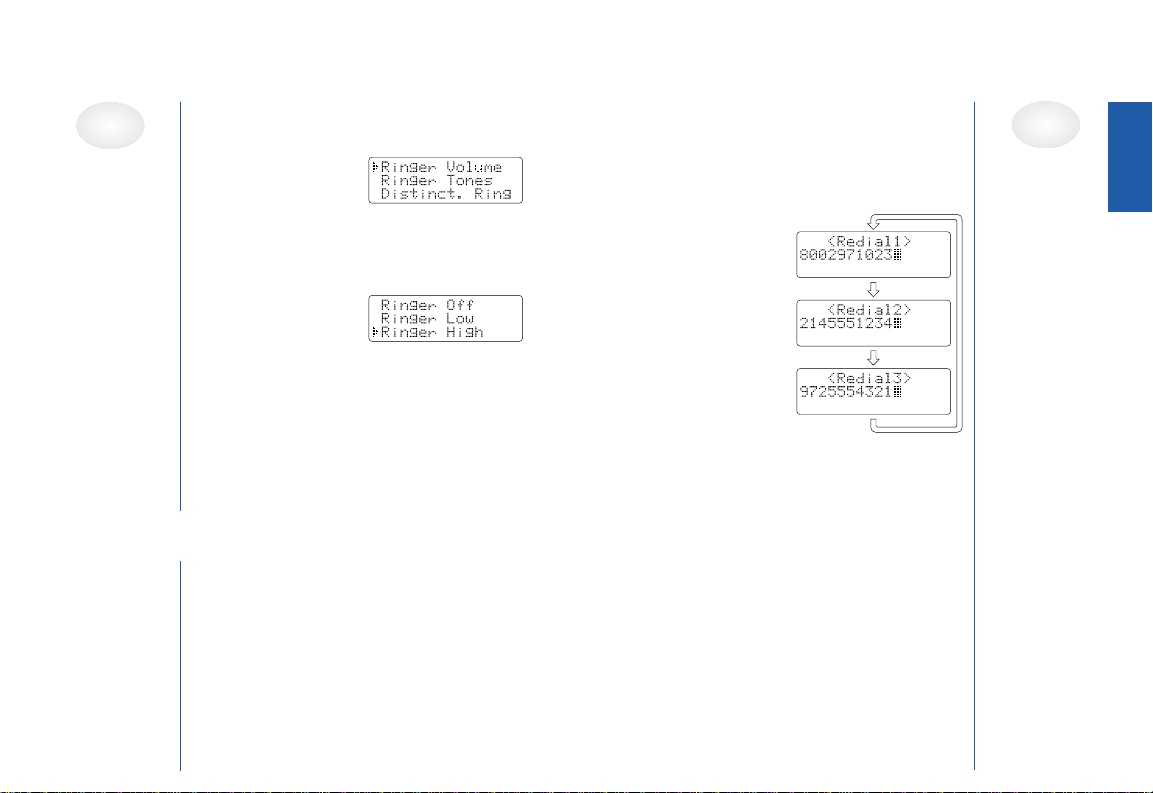
1) When the phone is in the standby mode,
press MENU/MUTE.
2) Press
▲ or ▼ to
move the pointer
to “Ringer Volume”,
then press SELECT/CH.
3) Press
▲ or ▼ to move the pointer
through the ringer settings (Ringer Off,
Ringer Low, or
Ringer High).
You will hear a
ringer or melody
at the selected volume (or does not ring
when you select “Ringer Off”).
4) Press SELECT/CH, and you will hear
a confirmation tone.
5) Press END to exit.
UTE (TEMPORARILY
)
You can temporarily mute the ringer tone.
When the remote is off the base and the
phone is ringing, press END. The ringer
tone will return to the previous setting
starting with the next incoming call.
The last three phone numbers dialed can be
quickly redialed.
REDIALING FROM STANDBY
MODE
1) Press PAUSE/
REDIAL. The
phone number
that was last
dialed appears
on the display.
PAUSE/REDIAL
2) Press PAUSE/
REDIAL again.
Each press of
PAUSE/REDIAL
PAUSE/REDIAL
will display one
of the last three
PAUSE/REDIAL
numbers
dialed.
3) Press TALK/FLASH. The selected number
is dialed.
4) Press END to hang up.
REDIALING FROM
TALK M
ODE
1) Press TALK/FLASH.
2) Press PAUSE/REDIAL. The last number
dialed will be displayed and redialed.
3) Press END to hang up.
TIPS
BASICS
If the number
exceeds 32 digits,
only the first 32
digits are
retained in
redial memory.
If the redial
memory is empty,
you will hear a
beep.
If you have not
pressed any key
for 30 seconds,
the phone returns
to standby mode.
If you press END,
the operation is
canceled and the
phone will return
to the standby
mode.
When using the
redial feature in
talk mode, only
the last number
dialed will be
displayed.
8
9
Page 6
DISTINCTIVE RINGER SETUP
DJUSTING THE
A
HEADSET VOLUME
TIP
See ”Storing
Phone Numbers,
Names,
Distinctive Rings,
and Speed Dial”
on page 17 for
storing a
Distinctive Ring
in the Phonebook.
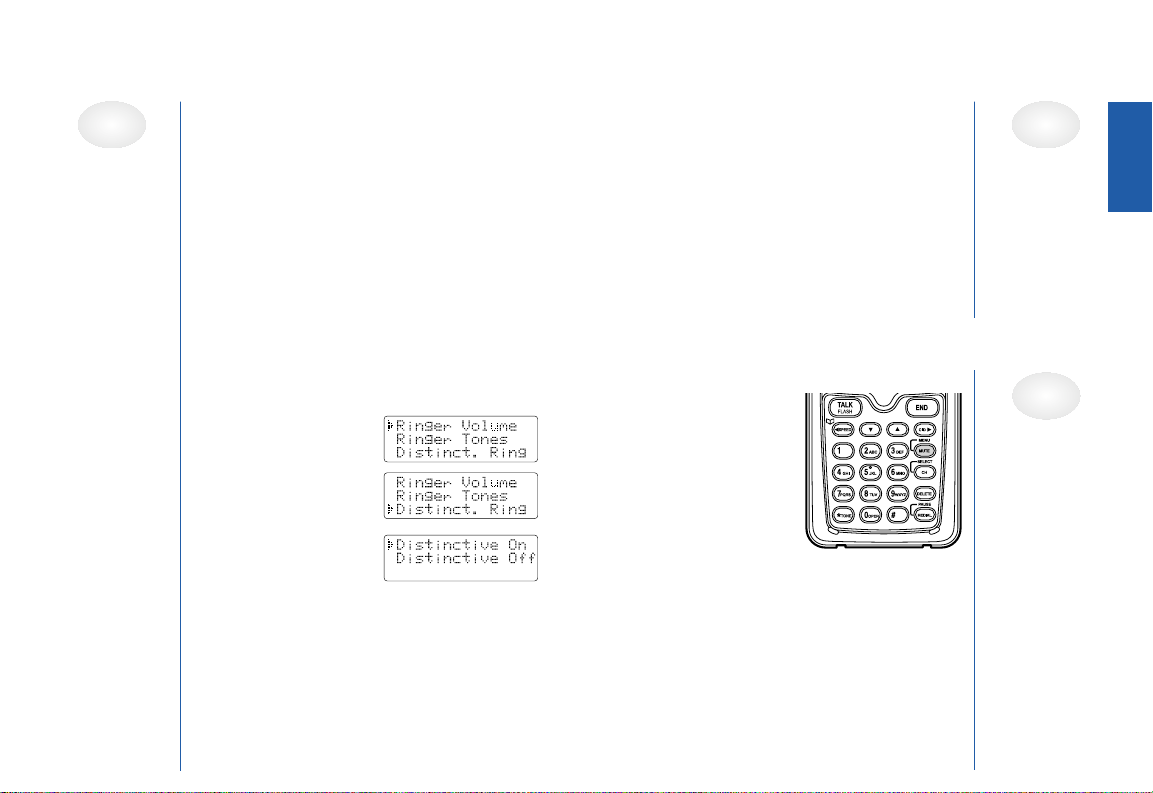
“Distinctive Ringer” allows you to preset
memory locations with a designated ring
tone. When an incoming call is received
and the Caller ID information matches the
information in one of the memory locations,
the Distinctive Ring that has been stored for
that particular caller will sound.
If you have set multiple memory locations
with distinctive rings, switching the setting to
“Distinctive Off” will result in no distinctive
ringing. All incoming calls will have a normal
ring tone. Switching to “Distinctive On” will
activate all programmed distinctive ring
memory locations.
1) When the phone is
in the standby
mode, press
MENU/MUTE.
2) Press
3) Press
4) Press SELECT/CH, and you will hear a
5) Press END to exit.
▲ or ▼ to
move the pointer to
“Distinct. Ring”,
then press
SELECT/CH.
▲ or ▼ to choose “Distinctive On”
or “Distinctive Off”.
confirmation tone.
The remote headset volume settings (Volume
Low, Volume Medium, Volume High, and
Volume Maximum) can only be adjusted
during a call. Press
volume setting. When you hang up, the
phone keeps the last volume setting
selected.
You can temporarily
turn Off the microphone so that the
person you are talking
with cannot hear you.
1) During a telephone
call press and hold
MENU/MUTE for a
few seconds to turn
Off the microphone, and “Mute” appears
on the display.
2) Press MENU/MUTE again to cancel muting.
▲ or ▼ to select the
MUTE M
ICROPHONE
TIP
BASICS
When you press
▲ in maximum
volume level or
▼ in lowest
volume level,
an error tone
sounds.
TIP
Do not press
END to cancel
muting. END will
disconnect the
call and the
phone will return
to standby mode.
10
11
Page 7

TONE DIALING SWITCH-OVER
TIP
The tone feature
only applies
when the dial
mode is set to
pulse.
A tone number
can be stored in
a memory
location. This is
referred to as
Chain Dialing.
(See page 25.)
TRAVELING
Some telephone
companies use
equipment that
require pulse dialing
(sometimes referred
to as rotary dialing).
If you need to enter
tone dialing digits,
you can switch-over to tone dialing during
the call. For example, entering your bank
account number after you have called your
bank.
Initially make your call with the pulse
dialing mode. Once your call connects,
press ✱/TONE. Enter the desired number.
These digits will be sent as tone dialing.
Once the call ends, the tone mode is
canceled and pulse dialing mode resumes.
OUT-
During a call, as you begin to move your
remote too far from your base unit, static
increases. If you pass the range limits of the
base unit, your call will terminate within 30
seconds.
OF-RANGE
ELECTING A
S
If you encounter interference while using
your phone, you can manually change the
phone’s channel for clear operation. This
function works only when the phone is in use.
Press SELECT/CH. “Scanning” appears
on the display, indicating the phone is
changing to another channel.
To locate the
remote, press
PAGE on the
base. The
remote beeps
for 60 seconds,
and “Paging”
appears on the display.
Paging is canceled when pressing any key
on the remote or PAGE on the base.
Additionally, if you receive an incoming
call, PAGE is canceled.
DIFFERENT CHANNEL
FIND R
EMOTE
BASICS
TIP
If the remote
battery is
completely
drained, the
remote will not
beep when
paging.
12
13
Page 8

FLASH AND CALL WAITING
USING THE PHONEBOOK
TIP
You must
subscribe
through your
local
telephone
company to
receive Call
Waiting Service.
If you have Call
Waiting service and
a call waiting tone
sounds while you are
on a call, press
TALK/FLASH to
accept the waiting
call. There is a short
pause, then you will
hear the new caller. To return to the original
caller, press TALK/FLASH again.
MESSAGE LED
The message
waiting LED on the
remote is designed
to work with your
voice mail service
provided by your
local telephone company. The LED flashes
when you have new incoming messages in
the voice mail service.
You may need to occasionally reset the
indicator if it remains On after you’ve
retrieved your messages. To reset the
indicator, when the phone is in the standby
mode press and hold PAGE on the base until
the paging sound stops (about 5 seconds).
Phonebook allows you to dial a number
using just a few key presses. It stores
names/numbers in the Phonebook memory
location, and you can search names in
alphabetical order. You have a total of 100
locations that can be used for the
Phonebook (including the Speed dials) and
Caller ID messages.
If any of the following occurs while using
the Phonebook function, operation will be
canceled.
• Press END. The phone will return to the
standby mode (or the call will be
disconnected).
• Press TALK/FLASH.
• Place the remote in the base.
• Press DELETE, or receive an incoming call
or PAGE (from the standby mode only).
• Receive a CIDCW (Caller ID on Call
Waiting) (during a call only).
PHONEBOOK
TIP
If the remote
remains idle for
30 seconds, the
phone will return
to the standby
mode (or back
to the call).
14
15
Page 9

STEPS TO ENTER NAMES AND SPECIAL
CHARACTERS USING THE KEYPAD
Refer to the letters on the number keys to select the desired
characters. With each press of a number key (0– 9), the
displayed character appears in the following order: Upper case
letters first, lower case letters next and finally the number
corresponding to the key.
USING THE PHONEBOOK
When entering names and/or phone
numbers, each of the four steps in the entry
process must be completed. A “Done”
message and a beep indicate the
name/phone number is complete.
When the phone is in the standby mode
(Talk button not pressed), press /tSPEED.
The remote displays the number of the
Phonebook locations used, and information
on searching and storing Phonebook
locations.
(1ST LINE) The
number of the
Phonebook entries
(2ND LINE) Press the number keypad,
▲ or ▼ to search
(3RD LINE) Press SELECT/CH button to
begin the storage process.
PHONEBOOK
IF YOU MAKE A MISTAKE WHILE ENTERING A NAME
Use /
character. Press DELETE to erase the wrong character, then enter the
correct character. To delete all characters, press and hold DELETE.
tSPEED or CIDs to move the cursor to the incorrect
16
17
Page 10

PHONEBOOK STORAGE PROCESS
TIP
All four steps
must be entered
to complete the
storage process.
The display will
read DONE and
you will hear a
beep.
TIPS
When the
memory is full,
you will hear a
beep and
“Memory Full”
appears. You
cannot store
any more names
and numbers.
18
TEP 1: STORING
S
NAMES
1) From Standby (the Remote charged and
the Talk Button not pressed —display is
blank), press the /tSPEED button.
2) Press the SELECT/CH
button to begin the
storage process.
“Store/Edit Name”
appears.
3) Enter the name (up to 16 characters) by
using the number keypad.
• See the “Steps for entering names and
special characters” (see the previous
table).
s and t to move the cursor to
• Use
the desired location.
• Use DELETE to delete characters as
needed.
• Press and hold DELETE to delete all the
characters.
• If a name is not required, skip step 3
and go to step 5.
4) Press SELECT/CH to store the name, then
“Store/Edit No.” appears ready for the
next step.
STEP 2: STORING PHONE NUMBERS
5) From the
“Store/Edit No.”
display. press the
number keypad to enter the phone
number (up to 20 digits).
6) Press SELECT/CH to store the number.
TEP 3: DISTINCTIVE
S
7) “Distinctive Ring”
appears. Then
press ▲ or ▼ to
move the pointer to hear and choose one
of the distinctive ring options.
8) Press SELECT/CH to store the distinctive ring.
STEP 4: S
PEED DIAL
9) “Speed Dial”
appears. Then
press ▲ or ▼ to
move the pointer to select the speed dial
location (10 locations: SPD1–SPD0).
10) Press SELECT/CH to store.
You will hear a confirmation tone and
“Done!” appears on the display.
This completes your entry into the Phonebook.
Now in the standby mode when you press the
/tSPEED button, the Phonebook will
show another entry.
RINGS
TIPS
The pause key
counts as one
digit. Pressing
PAUSE/REDIAL
more than once
increases the
length of pause
between
numbers.
If you choose
not to store a
“Distinctive
Ring”, simply
select the “No
Selectn” option.
If you select
a speed dial
location where a
number is already
stored, the new
number will
replace the old
number, and the
old number will
remain in the
Phonebook, but
no longer be on
speed dial.
19
PHONEBOOK
Page 11

IEWING THE P
V
HONEBOOK
TIP
“/SD” appears on
the display when
you review the
One Touch Dial,
and “/SPDn”
appears when
you review a
Speed dial.
Your phone stores names/numbers in the
Phonebook memory locations, and you can
search names in alphabetical order. You can
view the Phonebook during a call as well as
when the phone is in the standby mode.
1) Press /tSPEED. If you press
/tSPEED during
a call, the screen on
the right appears.
2) Press ▲ or ▼, or the
number keypad to
view the Phonebook
locations.
A) ALPHABETICAL O
RDER
Ascending order: Press ▼ to view loca-
tions. The location in the One Touch
Dial appears first in the display. Each
time ▼ is pressed, Phonebook loca-
tions appear in ascending order.
Descending order: Press ▲ to view
locations. A name starting with a number or a mark, or <No Name>
appears first. Each time ▲ is pressed,
Phonebook locations appear in
descending order.
B) FROM A N
UMBER KEY
Refer to the letters on the number keys
to select the first letter of the desired
name. Press a number key until any
name with the same initial is displayed
(See the table in “Steps for Entering
Names and Special Characters” on
page 16).
For example, to search for “John” press
5 once. Press ▼ or ▲ until the name is
displayed. If you press ▲ while the first
name in “J” is displayed, a name starting with “I” will appear, or if you press
▼ while the last name in “J” is dis-
played, a name starting with “K” will
appear.
3) To end viewing your Phonebook, press
/tSPEED (if you view the Phonebook
during a call) or END.
PHONEBOOK
20
21
Page 12

MAKING CALLS USING THE PHONEBOOK
SPEED DIALING
FROM STANDBY MODE
1) When the phone
is in the standby
mode, press
/tSPEED.
2) Press ▲ or ▼ to view the Phonebook
locations (see “Viewing the Phonebook”
on page 19).
3) Press TALK/FLASH. The displayed number
is dialed.
4) To hang up, press END.
ROM TALK
F
1) Press TALK/FLASH.
2) Press /tSPEED.
3) Press ▲ or ▼ to view the Phonebook
locations (see “Viewing the Phonebook”
on page 19).
4) Press SELECT/CH. The number in the
displayed Phonebook location is dialed.
5) To hang up, press END.
MODE
If you have selected a speed dial memory
location (10 locations: SPD1–SPD0) when
storing a phone number in the Phonebook
dial location, you can use the speed dialing
feature.
1) When the phone is in the standby mode,
press and hold a number key (0 – 9)
associated with the speed dial.
The number stored in the speed dial
appears.
2) Press TALK/FLASH. The phone number
in the speed dial (SPD1–SPD0) is dialed.
3) Press END to end the call.
EDITING THE
1) When the phone
is in the standby
mode, press
/tSPEED.
2) Press ▲ or ▼, or the number keypad to
view the Phonebook locations (see
“Viewing the Phonebook” on page 19).
PHONEBOOK
PHONEBOOK
22
23
Page 13

CHAIN DIALING
3) When the Phonebook
location to be edited
appears, press
SELECT/CH. “Store/Edit Name” appears.
4) Follow the steps 3 to 7 under “Storing
Phone Numbers, Names, Distinctive Rings
and Speed Dial” starting on page 17 to
complete the editing operation.
5) Press SELECT/CH. You will hear a
confirmation tone and “Done!” appears
on the display.
DELETING THE S
1) Select the
Phonebook location
to be deleted.
Press DELETE.
“Delete Memory?” appears.
2) Press ▲ to move
the pointer to
“Yes”.
3) Press SELECT/CH
or delete. You hear
a confirmation
tone. “Deleted!”
appears in the display.
TORED DATA
The memory locations in the remote are not
limited to phone numbers. You can also
store a group of numbers (up to 20 digits),
that you need to enter once your call
connects. This is referred to as Chain
Dialing.
An example of this is a bank account
number. Store the special number in the
Phonebook location (refer to “Storing Phone
Numbers, Names, Distinctive Rings and
Speed Dial” on page 17).
Once you have called your bank, and when
you are prompted to enter the account
number, press /tSPEED and use ▲ or ▼
to select the number in the Phonebook
location, then press SELECT/CH.
PHONEBOOK
24
25
Page 14

NE TOUCH DIALING FOR ONE NUMBER
O
You can store one number that you dial
often in the One Touch Dial. The one touch
dialing allows you to dial that number with
one key press.
STORING THE ONE
1) When the phone
is in the standby
mode, press
/tSPEED.
2) Press ▼ once to
display the One
Touch Dial menu.
3) Press SELECT/CH.
4) Store the name, phone number, and
distinctive ring by following the steps 3
to 6 under “Storing Phone Numbers,
Names, Distinctive Rings and Speed
Dial” on page 17.
3) Press SELECT/CH. You will hear a
confirmation tone and “Done!” appears
on the display.
TOUCH DIAL
MAKING CALLS WITH
ONE TOUCH D
THE
When the phone is in the standby mode, press
and hold /tSPEED. The number in the
one touch location is dialed.
DELETING THE ONE
1) When the phone
is in the standby
mode, press
/tSPEED.
2) Press ▼ once to
display the One
Touch Dial menu.
3) Press DELETE.
4) Press ▲ to move
the pointer to “Yes”.
5) Press SELECT/CH
or DELETE. You
hear a confirmation
tone. “Deleted!”
appears in the display.
IAL
TOUCH DIAL
PHONEBOOK
26
27
Page 15

TIPS
If you answer a
call before the
Caller ID
message is
received
(Example: before
the second ring),
the Caller ID
message will not
appear.
When a call is
received via a
telephone
company that
does not offer
Caller ID service,
the caller´s phone
number and name
do not appear.
(This includes
some international
calls.)
When the call
is via a private
branch exchange
(PBX), the caller´s
phone number
and name may
not appear.
CALLER ID
OU MUST SUBSCRIBE TO CALLER ID SERVICE TO
Y
USE THIS FEATURE
When the telephone rings, the Caller ID
feature allows you to view the caller’s name
and phone number on the display before you
answer the phone. Additionally, you can dial
the displayed number and store the
information for memory dialing.
Make sure you have turned on the Caller
ID/Call Waiting feature. (See page 4.)
Important:
The total memory locations for Caller ID
messages and Phonebook locations
(including Speed Dials) is 100 in total. When
the memory locations (Phonebook and Caller
ID) is 100, new Caller ID messages will
overwrite the oldest Caller ID messages.
.
If any of the following occurs during Caller
ID, operation will be canceled.
• Press END. The phone will return to
the standby mode (or the call will be
disconnected).
• Press TALK/FLASH or DELETE.
• Place remote in base.
• Receiving an incoming call or page
(from the standby mode only).
• Receive a CIDCW (Caller ID on Call
Waiting) (during a call only).
The idle time is 30 seconds. If the remote
remains idle for 30 seconds, the phone will
return to the standby mode (or back to the
call).
1) When the Caller ID message is received, the
display shows the caller’s phone number
along with the date and time. The incoming
call information is stored in the Caller ID
record. If the Caller ID service includes the
caller’s name, the name will appear on the
display. (up to 15 characters.)
TIP
The headset LED
will continue
flashing during
Talk Mode.
CALLER ID
28
29
Page 16

CALLER ID DISPLAYS
IEWING THE CALLER ID LIST
V
TIP
TIP
When you press
DELETE during a
call, the call will
be placed on hold
and you will hear
a ring tone. To
resume the call,
press TALK/FLASH
or DELETE. If the
remote remains
idle for 5 minutes,
the phone hangs
up and returns to
the Standby
automatically. To
end a call, press
the END button.
You may receive any one of the following
messages:
When invalid data is received:
“Incomplete Data”
When a private name is received:
“Private Name”
When a private number is received:
“Private Number”
When a unknown name is received:
“Unknown Name”
When a unknown number is received:
“Unknown Number”
2) When you pick up the phone, the display
changes to “Talk”.
(AutoTalk feature is set to On.)
The Caller ID list stores information for
incoming calls— even unanswered calls. You
can store 100 of the Caller ID messages and
Phonebook locations (including Speed Dials)
in total. You can view the Caller ID list during a
call or when the phone is in the standby mode.
1) Press CIDs.
The summary screen
appears. The screen
shows the number of new messages and
the total number of messages.
2) View Caller ID messages by following the
procedure below.
ROM NEW TO OLD
F
:
a.Press ▼ to display the latest Caller ID
message.
b. Press ▼ to see the previous message.
ROM OLD TO NEW
F
:
a. Press ▲ to display the earliest Caller ID
message.
b. Press ▲ to see the next message.
N ALPHABETIC ORDER
I
:
Press the number keypad (2–9 and 0) to
display the Caller ID messages in
alphabetical order. Refer to the letters on the
number keys to select the desired letter.
3) Press CIDs (if you view the Caller ID list
during a call) or end.
TIP
The number of
calls from the
same Caller ID
appears next to
the received
time. Once you
have reviewed
the new
message, the
number will be
cleared and
disappears.
TIP
Once you view
the Caller ID list
in alphabetical
order, you
cannot switch to
the Caller ID
display in
historical order
(from new to old
or from old to
new) unless you
exit the
operation.
CALLER ID
30
31
Page 17

TIP
Once the Caller
ID data has
been deleted,
the information
cannot be
retrieved.
32
DELETING INFORMATION
FROM THE
DELETING A CALLER ID MESSAGE
1) While the incoming Caller ID information
is displayed, press DELETE. “Delete
Message?” appears.
2) Press ▲ or ▼ to choose “Yes” or “No”.
3) Press SELECT/CH
or DELETE.
WHEN THE POINTER IS AT “Yes”: A tone
sounds and the Caller ID message is
deleted. The next or previous Caller ID
message is then displayed.
WHEN THE POINTER IS AT “No”: The display
returns to the Caller ID message.
Deleting All Caller ID Names/Numbers
1) Press CIDs.
2) Press DELETE.
3) Press ▲ or ▼ to
choose “Yes” or “No”.
4) Press SELECT/CH
or DELETE.
WHEN THE POINTER IS AT “Yes”: A tone
sounds and all stored Caller ID messages
are deleted.
WHEN THE POINTER IS AT “No”: The display
returns to the summary screen.
CALLER ID LIST
SING THE CALLER ID MESSAGE LIST
U
ALLING A PARTY FROM THE CALLER ID LIST
C
FROM STANDBY MODE
1) Press CIDs. The
summary screen
appears. The
screen shows the number of new
messages and the total number of
messages.
2) Use the number keypad (2–9 and 0), ▲,
or ▼ to view the Caller ID message list.
3) Press TALK/FLASH.
The displayed phone
Talk
8005551234
number dials
automatically.
FROM TALK MODE
1) Press TALK/FLASH.
2) Press CIDs. The summary screen
appears.
3) View the Caller ID message you want
You cannot
make a call from
the Caller ID list
if your phone is
connected to a
private branch
exchange (PBX).
When a long
distance call has
been set, “1”
appears in the
display.
If a call comes in
via a telephone
system that does
not offer Caller
ID service, no
information is
stored.
to dial.
4) Press SELECT/CH. The displayed phone
number will be dialed.
TIPS
CALLER ID
33
Page 18

TIPS
You cannot store a
Caller ID message
in the Phonebook
if a phone number
does not appear in
the message.
You cannot set the
Distinctive Ring or
Speed dial in this
step. If you would
like to set these
options, edit the
stored data.
Even if the
memory locations
are full, the
message will
be stored in the
Phonebook,
however, the
message will be
erased from the
Caller ID List.
If data is already
stored in the One
Touch Dial, the old
data will be overwritten by the new
data.
ONG DISTANCE CALLS AND
L
AREA CODE SETTING/C
ANCELLATION
While the incoming Caller ID information is
displayed, pressing ✱/TONE will place or
remove the prefix “1” in the display to set the
call for a long distance call, or pressing # will
set or cancel an area code. (See page 5.)
TORING CALLER ID MESSAGES IN THE
S
PHONEBOOK/ONE T
OUCH DIAL
Messages shown in the Caller ID list can be
stored in the Phonebook. Using the
incoming call information (i.e., Caller ID
list), the phone number of the party on the
Caller ID list can be stored in memory.
1) When the phone is
in the standby mode,
while the incoming
Caller ID information
is displayed, press
/tSPEED.
2) Press ▲ or ▼ to
choose “Store in
PB?” (Phonebook
locations) or “Store in
SD?” (One Touch Dial location).
To cancel Storing, select “Cancel”.
3) Press SELECT/CH. You will hear a
confirmation tone.
CALL WAITING DELUXE FEATURES
Your CT12 gives you new options for Call
Waiting. At the touch of a button, you can
place the caller on hold, send them to your
voice mail service, or conference them into
your current call. You may be required to
subscribe to Call Waiting and Call Waiting
Deluxe to use these features. Not all
features are available in all areas. Check
with your local telephone company for
details.
1) When you receive a Call Waiting call,
press MENU/MUTE for a list of options.
2) Press ▲ or ▼, or the number keypad
(1– 7) to select an option. For example:
Press ▼ 4 times
Press ▼ 2 times
3) Press SELECT/CH. A confirmation screen
will appear.
To activate
features, select
“CW Deluxe
On” in the
Caller ID setup.
See page 3.
You can also
answer a waiting
call immediately
by pressing
TALK/FLASH,
the first caller
will be placed on
hold. To return
to the original
caller, press
TALK/FLASH
again.
TIPS
CALLER ID
34
35
Page 19

MORE
HANGING THE DIGITAL
C
TIPS
If you have not
pressed any key
for 30 seconds
while in the deregistering
operation, the
phone returns
to the standby
mode.
If you receive
an incoming
call, page, or
charge the
remote while in
de-registering
operation,
or press
TALK/FLASH
or END, the
operation is
canceled.
The digital security code is an identification
code used to connect the remote and the
base unit. Normally, setting the code is not
necessary. In the rare situation that you suspect
another cordless telephone is using the same
security code, you can change the code. To
change the digital security code, deregister
the code, then register a different code.
REGISTER THE SECURITY
E-
D
1) Remove the remote from the base. In the
standby mode, press and hold DELETE
and END for about 10 seconds until you
hear a confirmation tone.
“De-Register?” appears.
2) Press ▲ to select “Yes”, then SELECT/CH.
You will hear a confirmation tone, and
“Deregistration Complete” appears.
SECURITY CODE
CODE
REGISTER THE
SECURITY C
ODE
1) Unplug the AC adapter. Do not replace
the remote to the base.
2) Press and hold PAGE on the base, while
you plug in the AC Adapter, hold page
until the CHARGE/IN USE LED on the
base flashes.
3) Press TALK/FLASH. “Remote Registering”
appears. When the registration operation
is finished “Registration Complete”
appears and the CHARGE/IN USE LED is
no longer illuminated. You will hear a
confirmation tone and the phone returns
to the standby mode.
TIPS
You must
complete the
registration
operation within
30 seconds, or
the phone
returns to the
standby mode.
During the
registration
operation, you
cannot receive
an incoming call,
page, or make
a call.
MORE
36
37
Page 20

TIP
You can charge
the remote with
or without the
beltclip.
NSTALLING THE
I
TTACH THE BELTCLIP
O A
T
Insert the beltclip
into the holes on
each side of the
remote. Press
down.
O REMOVE
T
THE
BELTCLIP
Pull one side of the
beltclip to release
the tab from the
hole.
BELTCLIP
NOTE ON POWER SOURCES
OUT OF RANGE WARNING
If you walk away from the base unit you will
eventually exceed the maximum operating
range for the CT12 cordless headset system.
Any active call will be suspended and a
double beep will sound in your headset
every 10 seconds to warn you that you are
out of range. The double beep will cease
once you return within range and any active
call will be taken off mute allowing you to
resume your conversation.
ARNING
LOW BATTERY
When the headset is running low (approx.
5 minutes talk time remaining), an audible
warning will be heard through the headset
as a single beep repeating every 10
seconds. Soon after hearing this warning,
you should recharge the remote pack.
W
TIP
It is strongly
advised that you
avoid walking out
of range when on
an active call as
you may find the
call takes some
time to reestablish after
returning into
range.
MORE
38
39
Page 21

GENERAL INFORMATION
CAUTION
Use the specified
battery pack
(63421-01).
Do not remove
the battery from
the remote to
charge it.
Never throw the
battery into a
fire, disassemble
it, or heat it.
Do not remove
or damage the
battery casing.
CAUTION
Do not use
paint thinner,
benzene,
alcohol, or
other chemical
products. Doing
so may discolor
the surface of
the telephone
and damage
the finish.
ATTERY REPLACEMENT AND HANDLING
B
When the operating time becomes short,
even after a battery is recharged, please
replace the battery. With normal usage,
your battery should last about one year.
ARNING:
W
To avoid the risk of personal injury or
property damage from fire or electrical
shock, only use the battery model and
adapter model specifically designated for
this product.
OWER FAILURE
P
During the period that the power is off, you
will not be able to make or receive calls with
the telephone.
MAINTENANCE
When slightly dirty Wipe with a soft, dry
cloth.
When very dirty Wipe with a soft cloth
that has been dampened with diluted,
neutral detergent. Dry
with a dry cloth.
When the charging Wipe with a dr y cloth
terminals or a pencil eraser, if
become dirty necessary.
The phone complies with FCC Parts 15 and
68. Operating temperature: 0 ºC to +50 ºC
(+32 ºF to +122 ºF)
NFORMATION
DAPTER I
AC A
AC Adapter part number: 63539-01
Input Voltage: 120V AC 60Hz
Output Voltage: 9V DC 350 mA
INFORMATION
ATTERY
B
Battery part number: 63421-01
Capacity: 800 mAH, 3.6 V
Battery use time (per charge)
From fully charged
Talk mode duration: 5.5 hours
Standby mode duration: 10 days
Recharge your phone on a regular basis by
returning the remote to the base after each
phone call. When the operating time
becomes short, even after the battery is
recharged, please replace the batter y. With
normal usage, the battery should last about
one year.
Specifications, features, and availability
of optional accessories are all subject to
change without prior notice.
TIP
If the remote is
left off of the
base, the actual
Talk mode
duration will
be reduced
respective to
the amount of
time the remote
is off the base.
MORE
40
41
Page 22

TROUBLESHOOTING
SYMPTOM SUGGESTION
The CHARGE/IN USE LED • Make sure the AC adapter is
light won’t illuminate when plugged into base and wall outlet.
the remote is placed • Make sure the remote is properly
in the base seated in the base.
• Make sure the charging contacts
on the remote and base are clean.
The audio sounds weak • Move the remote and/or base to a
and/or scratchy. different location away from metal
Can’t make or receive calls. • Check both ends of the base tele
objects or appliances and try again.
• Press SELECT/CH to help eliminate
background noise.
• Make sure that you are not too far
from the base.
phone line cord.
• Make sure the AC adapter is
plugged into the base and wall
outlet.
• Disconnect the AC adapter for a
few minutes, then reconnect it.
• Change the digital security code
(See page 37).
• Make sure that you are not too far
from the base.
• Make sure battery is charged.
The Plantronics Technical Assistance Center (TAC) is ready to
.M. through
assist you! Dial (800) 544-4660 x5538 Sunday 5
.M. Pacific Time or visit the Support section of our
Friday, 5
P
P
website at www.plantronics.com. For accessibility information
also call the TAC.
42
SYMPTOM SUGGESTION
The remote doesn’t • The battery pack may be weak.
ring or receive Charge the battery on the base unit
a page. for 15 hours.
• The remote may be too far away
from the base unit
• Place the base unit away from
appliances or metal objects.
• Change the digital security code
(See page 37).
Severe noise interference. • Keep the remote away from
microwave ovens, computers,
remote control toys, wireless micro
phones, alarm systems, intercoms,
room monitors, fluorescent lights,
and electrical appliances.
Move to another location or turn
off the source of interference.
The Caller ID does not display. • The remote was picked up before
the second ring.
• The call was placed through a
switchboard
• Call your local telephone company
to verify your Caller ID service is
current.
The remote doesn’t • Change the digital security code
communicate with the base. (See page 37).
43
TROUBLESHOOTING
Page 23

PARTS & ACCESSORIES
P/N DESCRIPTION
64375-01 BELT CLIP
64376-01 BATTERY
64377-01 REMOTE UNIT
64378-01 CT12 FIREFLY
HEADSET
66523-01 CT11 IN-THE-EAR
HEADSET
P/N DESCRIPTION
63539-01 AC ADAPTER
64460-01 BATTERY COVER
42157-01 NECK STRAP/LANYARD
46186-01 CT12 REPLACEMENT
LEATHERETTE
EAR CUSHION
45651-01 CT12 REPLACEMENT
EAR LOOP
45650-01 CT12 PIVOT BALL RING
61764-01 CT11 REPLACEMENT
EAR CUSHIONS
64406-01 PRODUCT
INFORMATION
BOOKLET
44
For information on spare parts and accessories,
call Plantronics at (800) 544-4660 x5538, or
visit the Plantronics website at www.plantronics.com
45
Page 24

INDEX
0 - 9
10 ring options . . . . . . . . . . . . . 7
A
Area Code. . . . . . . . . . . . . . . . . 5
AutoTalk . . . . . . . . . . . . . . . . . . 4
B
Battery pack
Preparing and charging . . QSG*
Replacement and handling . . 40
Beltclip . . . . . . . . . . . . . . . . . . 38
C
Caller ID . . . . . . . . . . . . . . . . . 28
Caller ID service . . . . . . . . . . 28
Calling . . . . . . . . . . . . . . . . . 33
Call Waiting . . . . . . . . . . . . . 35
Deleting . . . . . . . . . . . . . . . . 32
Setting . . . . . . . . . . . . . . . . . . 3
Storing . . . . . . . . . . . . . . . . . 33
Using . . . . . . . . . . . . . . . . . . 33
Viewing . . . . . . . . . . . . . . . . 31
Chain dialing . . . . . . . . . . . . . . 25
Channel . . . . . . . . . . . . . . . . . 13
D
Deluxe Call Waiting Features . . 35
Dialing mode . . . . . . . . . . . QSG*
Digital security code . . . . . . . 8, 41
Distinctive Ringer . . . . . . . . . . . 23
*Quick Start Guide
E – H
Earpiece volume . . . . . . . . . QSG*
General information . . . . . . QSG*
Headset installation. . . . . . . QSG*
Headset Volume . . . . . . . . . . . 11
L – O
Language. . . . . . . . . . . . . . QSG*
Maintenance . . . . . . . . . . . . . . 40
Making a call. . . . . . . . . . . . . . . 6
Message LED . . . . . . . . . . . . . 14
Mute . . . . . . . . . . . . . . . . . . 8, 11
One touch dialing . . . . . . . . . . 34
P
Phonebook . . . . . . . . . . . . . . . 15
Editing . . . . . . . . . . . . . . . . . 23
Erasing . . . . . . . . . . . . . . . . . 24
Making calls . . . . . . . . . . . . . 22
Storing . . . . . . . . . . . . . . . . . 18
Viewing . . . . . . . . . . . . . . . . 21
R
Receiving a call . . . . . . . . . . . . . 6
Redialing a call . . . . . . . . . . . . . 9
Ringer volume . . . . . . . . . . . . . . 8
S
Setting up. . . . . . . . . . . . . . QSG*
Base unit . . . . . . . . . . . . . QSG*
Remote . . . . . . . . . . . . . . QSG*
Speed dialing. . . . . . . . . . . . . . 23
T – V
Troubleshooting . . . . . . . . . . . . 42
Voice Mail LED . . . . . . . . . . . . 14
INDEX
Page 25

© 2003 Plantronics, Inc. All rights reserved. Plantronics, the logo design,
Plantronics and the logo design combined, and Firefly are trademarks
or registered trademarks of Plantronics, Inc.
Printed in USA. 64006-01 (2 • 04)
345 Encinal Street
Santa Cruz, California 95060
(800) 544-4660
www.plantronics.com
© 2003 Plantronics, Inc. All rights reserved. Plantronics, the logo design,
Plantronics and the logo design combined, and Firefly are trademarks
or registered trademarks of Plantronics, Inc.
345 Encinal Street
Santa Cruz, California 95060
(800) 544-4660
www.plantronics.com
Printed in USA. 64006-01 (2 • 04)
 Loading...