

Page 1
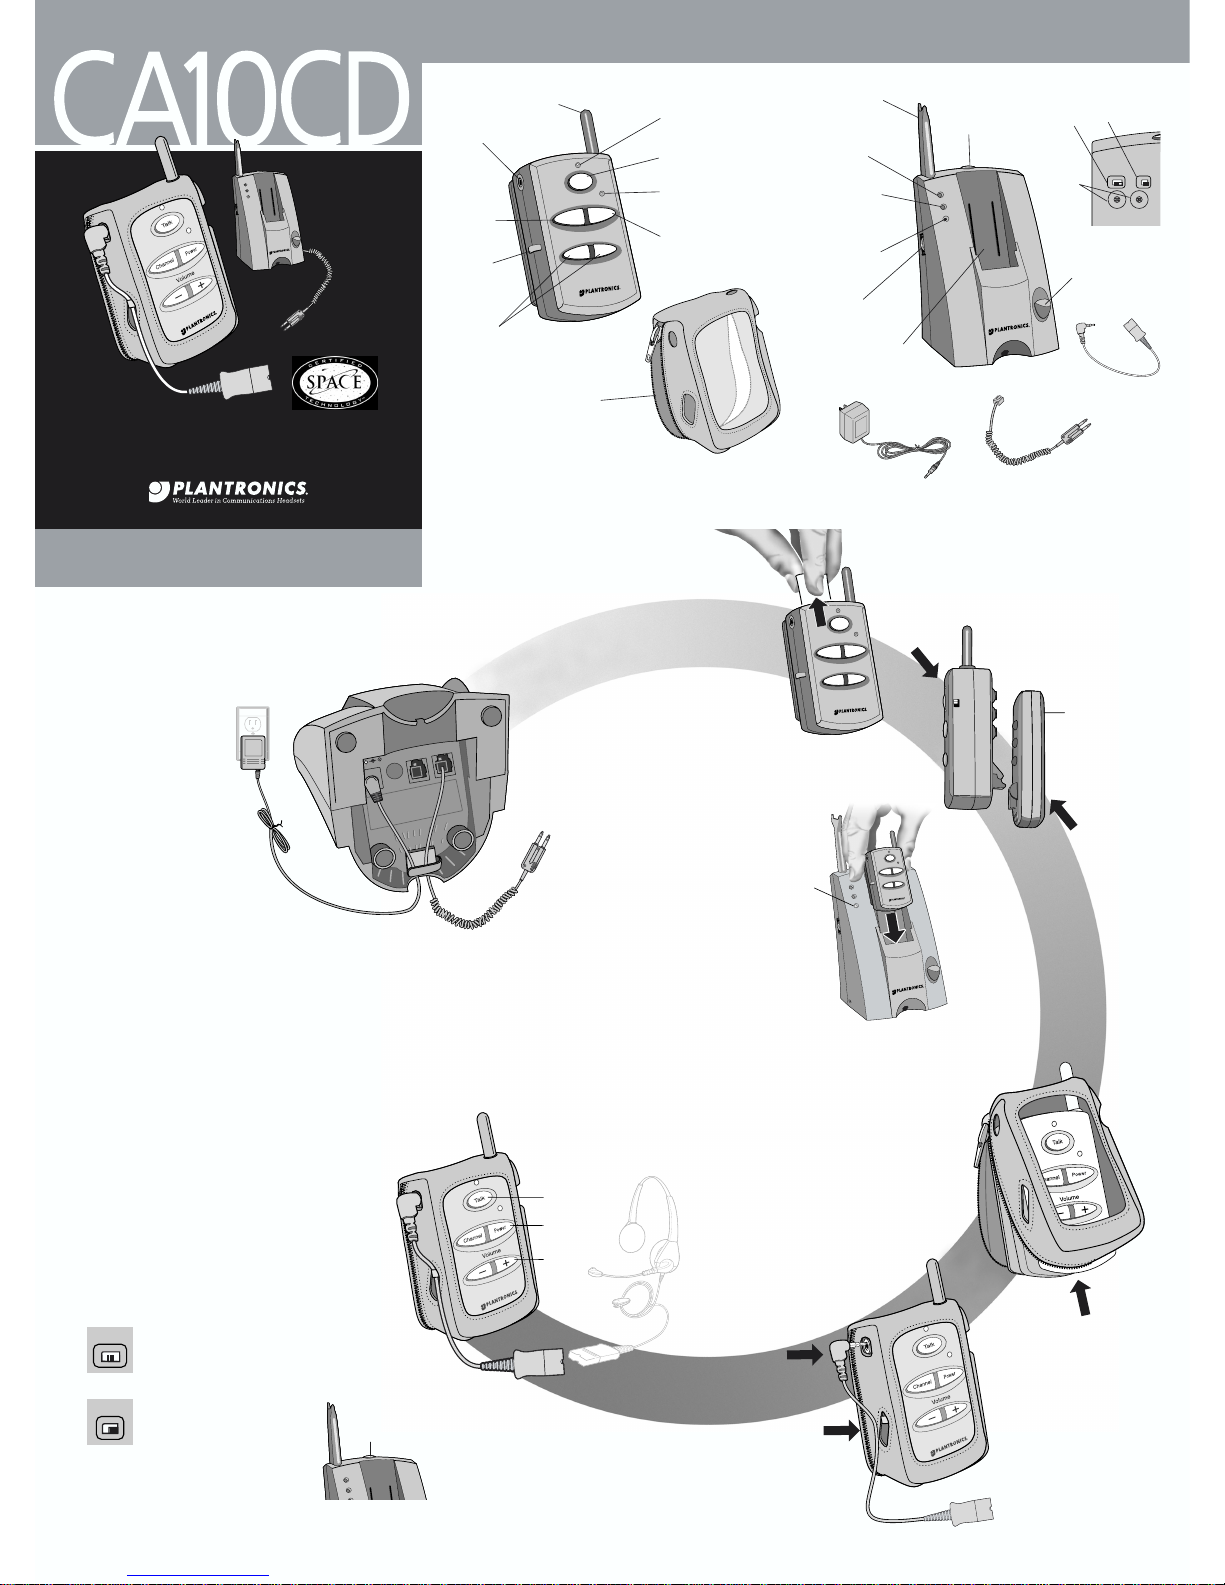
1.1 Set up the CA10CD
Amplifier as shown.
1.2 Plug one end of the Console
Interface Cable into the CA10CD
Telephone Jack and the other end
into the headset receptacle on
your console.
1.3 Plug the AC Adapter into the wall
outlet. The Base Power indicator light will
illuminate.
2.1 If present, remove the shipping
insulator pull-tab on the battery,
located between the Remote Unit
and the Battery Pack.
2.2 If necessary, attach the Remote
Unit to the Battery Pack. The Remote
and Battery Pack slip together easily
and snap into place. Do not force
them together.
2.3 Slide the Remote Unit and Battery
Pack into the Charging Well until the
Charge Indicator illuminates.
Note: Remote Unit must remain in
the Base for 5 seconds to establish a
communications link before the system
can function.
Prior to using the CA10CD, the Battery
must be charged for 8 hours. (You may,
however, use the Remote while it is in the
Charging Well. This will increase charging
time). The Battery Charge Light will turn
off after the Battery is fully charged.
1
Set-up
2
Battery
Preparation
3
Preparing
the Remote
unit for use
4
Operation
– +
REMOTE UNIT
BASE UNIT
CHARGE
REMOTE POWER
R
E
M
O
T
E
P
O
W
E
R
BASE POWER
P
a
g
e
Remote
Power
Indicator
Light
Battery
Charge
Light
Remote Unit
Charging
Well
Base Power
Indicator
Light
Page
Button
Headset
Holder/
Antenna
Talk
Volume
Control
Remote
Power
Button
– +
Volume
Channel Power
TALK
Talk (In-Use)
Indicator Light
Talk Button
Remote Power
Indicator Light
Remote Power
Button
Antenna
Listen
Volume
Controls
Headset
Jack
Channel
Button
Headset
Cord
Clip
AC Adapter
Console
Interface
Cable
Headset
Quick Disconnect
Cable
12 3
1
2
3
4
5
6
7
8
9
0
A B
1
2
3
4
5
6
7
8
9
0
Transmit
Level
Switch
(1/2/3)
Manual
Channel
Settings
Back of Base Unit
Configuration
Switch
(A/B)
3.1 Slide Remote into the unzipped
Pocket. Be sure the antenna goes
through the hole in the Pocket as
shown. Zip up the Pocket to neatly
contain the Remote and Battery.
3.2 Connect the Headset Adapter
Cable to the Remote Unit Headset Jack.
3.3 Press the Headset Quick Disconnect
Cable into the Headset Cord Clip.
4.1 Connect the Quick Disconnect to
the H-Top Headset of your choice.
Put on your headset.
4.2 Press the Power Button on either the
Remote or the Base. The green Remote
Power Indicators on the Remote and
Base will illuminate.
4.3 Depress and hold the Talk Button on the Remote Unit to
generate the “Key” signal to your console or radio. While the
Talk Button is depressed, the Talk Indicator Light will illuminate.
Releasing the Talk Button will remove the “Key” signal to
your console or radio and extinguish the Talk Indicator.
4.4 Adjust the volume from your headset by using the Listen
Volume Control.
The CA10CD is compatible with most systems on the market.
The user must initially set the Transmit Level Switch and the
Configuration Switch to the optimum settings. These switches
determine how the adapter interacts with a particular system.
4.5 The CA10CD Transmit Level Switch provides three levels:
“1” (high or carbon), “2” (medium or electret), and “3” (low
or dynamic). The standard setting is“1”.
Adjusting the transmit output level by moving the
Transmit Level Switch to position 1, results in more
output.
Moving the Transmit Level Switch to position 2 or 3
reduces your output. You can further fine tune the
transmit level with the Talk
Volume Control buttons.
4.6 The Configuration Switch has
two settings: “A” and “B”. The
standard setting is “B”.
4.7 If you have misplaced the
Remote, press the Page Button
for 3 seconds and the Remote will emit two
long loud beeps.
Quick Start User Guide
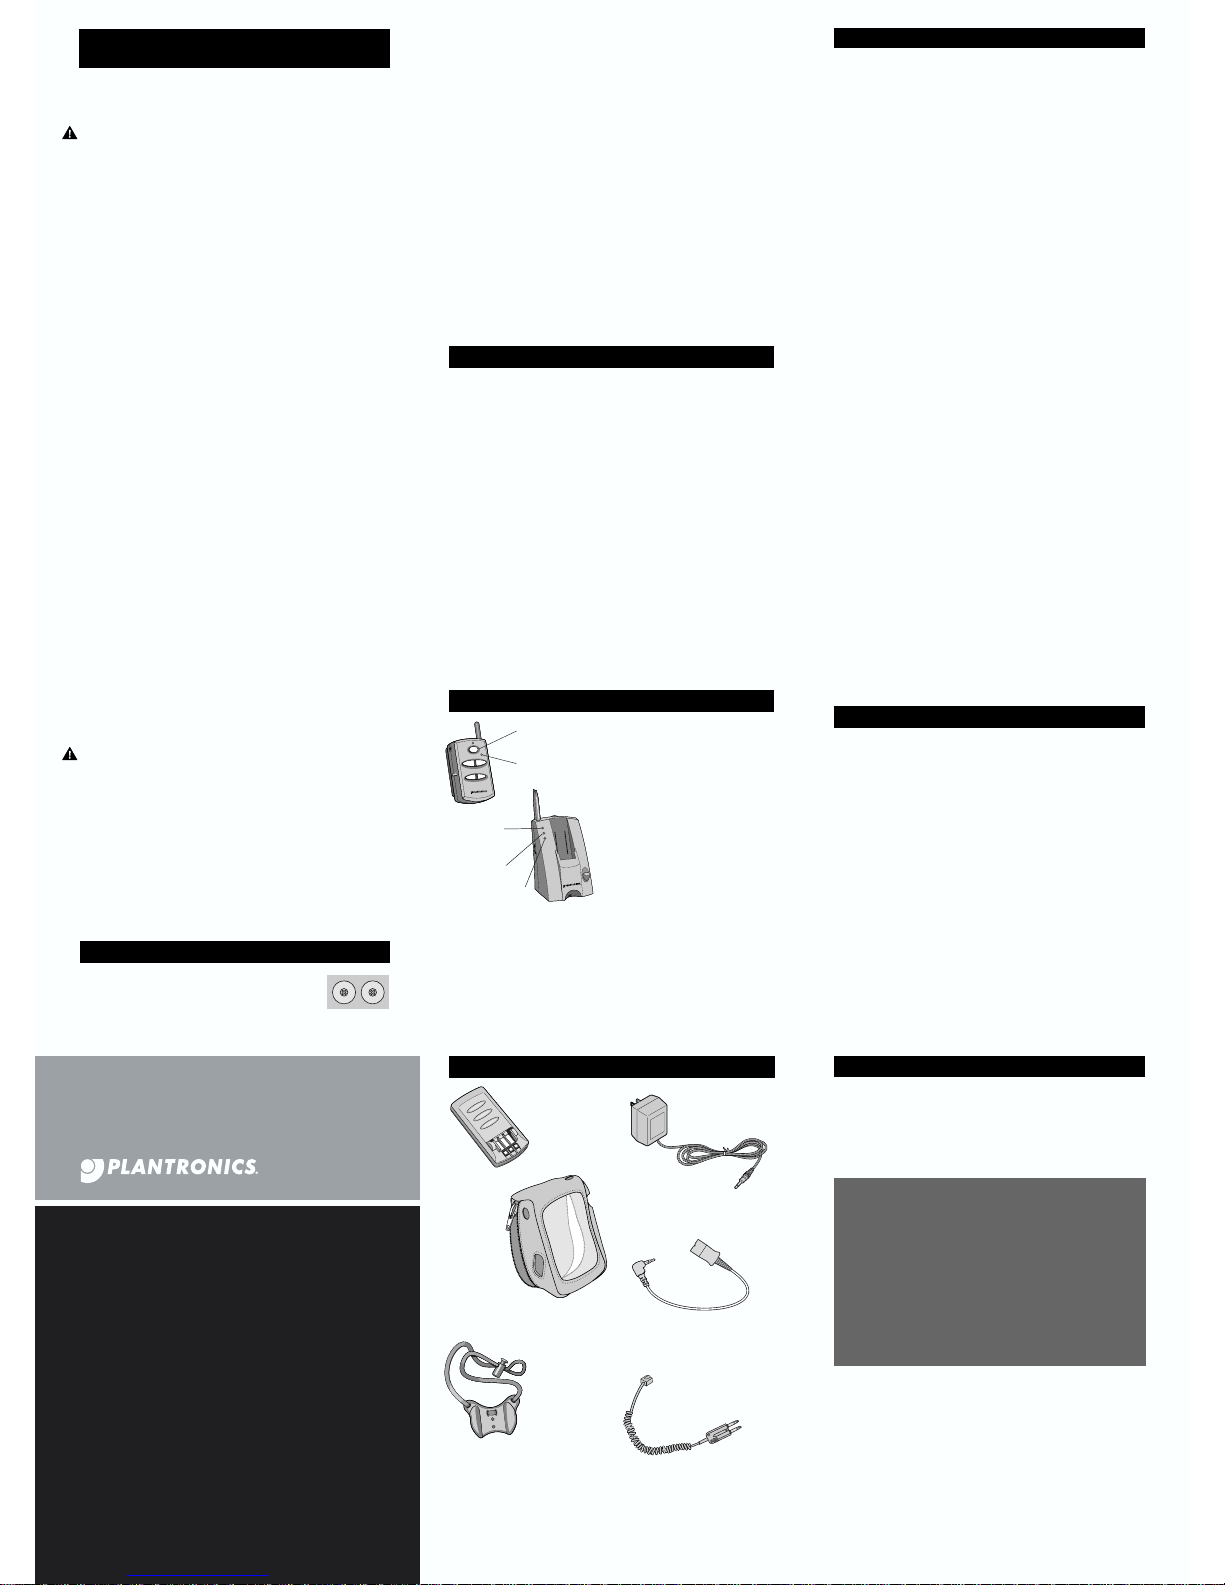
COMPONENTS OF THE CA10CD
LIFT
ER
H
A
N
D
SE
T
TE
L
CL
A
SS 2
DC
9V
1.3
1.2
2.3
2.1
123
4.5
A B
4.6
4.3
4.2
4.4
4.1
Cordless Push-to-Talk Headset Amplifier
Remote Pocket
w/Belt Clip
3.1
3.3
3.2
Off On
Ringer
Off On
Ringer
2.2
battery
Thank you for selecting the CA10CD Push-to-Talk Headset
Amplifier from Plantronics. This User Guide will help you install
your CA10CD Amplifier and learn its basic operation. The
operation of your chosen H top headset is described in a
separate guide.
WELCOME
Pa
ge
C
H
A
R
G
E
R
E
M
O
T
E
P
O
W
E
R
B
A
S
E
P
O
W
E
R
R
E
M
O
T
E
P
O
W
E
R
Volume
Ch
annel Pow
er
TALK
– +
battery
charge
light
CHARGE
REMOTE POWER
R
E
M
O
T
E
P
O
W
E
R
BASE POWER
4.7
P
a
g
e
Top of Base Unit
C
H
A
R
G
E
R
E
M
O
T
E
P
O
W
E
R
B
A
S
E
P
O
W
E
R
V
o
lu
m
e
Channel Power
T
A
L
K
Page 2
© 2002 Plantronics Inc. All rights reserved.
Plantronics, the logo design, and the Plantronics and logo design
combined are registered trademarks of Plantronics Inc. in the United States
and various other countries. Space Certified Technology is a registered
trademark of the Space Awareness Alliance, an initiatve of the aerospace
industry and NASA.
Patents 5,835,852 and 5,259,780
Printed in USA. 62469-01 (3-02)
345 Encinal Street
Santa Cruz, California 95060
(800) 544-4660
www.plantronics.com
Visual Indicators
REMOTE
Push-to-Talk LED-Green Illuminated
only when TALK button is depressed.
Indicates a transmit “Key” signal to
the radio.
Power LED- Green Illuminated while
power to the Remote is ON.
BASE
Base Power LED- Red Illuminated
whenever power is applied to the Base
via the AC Power Adapter.
Remote Power LED- Green
Illuminated while power to the
Remote is on.
Charge LED- Amber Flashes for
2 seconds while verifying contact when Remote is placed in the Charging Well.
The Charge LED remains steady while charging and extinguishes when the
battery is fully charged.
Audio Prompts
Low Battery Two beeps generated at 30-second intervals whenever power is
low. Heard only through the headset when Remote Power is on.
Out-of-Range Three beeps generated whenever the Remote is taken out of
range of the Base. Heard only through the headset when the Remote is on.
Linked One beep is heard through the headset when power to the Remote is
applied and the RF link is established.
I cannot hear
■
Make sure your Remote Battery Pack is securely seated in the Charging
Well and/or fully charged. The Battery Pack must charge for 8 hours prior
to first use.
■
Check that all cords are correctly connected and firmly in place as per the
connection diagram.
■
Adjust the Listen Volume Control.
■
Make sure the Remote Unit is within range of the Base Unit.
■
Separate and then reconnect the Battery Pack and Remote Unit.
■
Return the Remote to the Base Unit charger for 5 seconds to reestablish
a communication link.
■
Disconnect and reconnect the AC power cord to the Base Unit.
Caller cannot hear my voice
■
Make sure Transmit Level is configured.
■
Adjust the Talk Volume Control.
■
Make sure that the microphone boom on your headset is adjusted
properly, as specified in the Headset User’s Guide.
I hear a buzz or hum
■
Move the Configuration Switch to the opposite setting (A or B). B is the
standard setting.
■
Try locating your Base Unit in different positions and make sure no
objects obstruct the Remote or Base Unit.
■
Locate the Remote and Base Units away from electronic equipment or
other radio frequency devices.
I hear a squeal in the headset
■
Be sure the headset plug is pushed all the way into the headset jack on
the Remote.
■
Secure the Headset Cord under the cord clip on the Remote.
■
Reduce the Talk Volume (control located on the side of the Base)
■
If squeal occurs with the talk volume at minimum, move the Transmit
Level Switch (located on the back of the base) from position 1 to position
2, or from position 2 to position 3, and readjust the Talk Volume Control.
Refer to Step 4 on the other side of this guide.
■
Be sure the headset microphone is pointing towards your mouth.
■
Reduce the listen volume by pressing the (-) button on the Remote.
■
If you have multiple CA10CD Base units, move them as far as possible
from each other.
I can hear other cordless device users
■
Press the Channel Button until you get a clear signal.
■
Ensure Manual Channel Settings are “0/0”.
■
If others are using a CA10CD Amplifier in your immediate vicinity, call the
Technical Assistance Center at Plantronics (800-544-4660) for instructions
on adjusting the channel control settings.
I need more talk time
■
A back-up battery pack may be held in the Charging Well while the
Remote Unit is in use. This provides an immediate source of additional
talk time. Extra packs are listed in the Supplies and Accessories section
below.
mode. When the wheels are set to 00, the system looks for an unused channel
when the Remote is turned on. The user can change channels by pressing the
Channel button during the connection. Pressing the Channel button on the
Remote will cause the system to step through the channels in increments of
three to the next unused channel. This permits the user to avoid interference.
Setting the Channel Selection Wheels to 01-40 chooses fixed channel selection
mode. The left wheel is the 10’s digit, and the right wheel is the units digit,
looking at the Base from the back. Selecting channel 01 sets the Base to
transmit on 902.8MHz and the Remote to transmit on 925.3 MHz. Selecting
the next higher channel results in a transmission increment of .05 MHz.
Therefore, selecting channel 02 sets the Base to transmit on 902.85 MHz and
the Remote to transmit on 925.35 MHz. Selecting channel 40 sets the Base to
transmit on 904.75 MHz and the Remote to transmit on 927.25 MHz. The
Channel button on the Remote is disabled when the system is in fixed channel
selection mode. Fixed channel selection mode is provided to permit planned
dedicated channels for individual users in an environment with many users.
This mode avoids interference and accidental eavesdropping.
To select a particular channel, first turn off power to the Remote unit. With the
Remote removed from the base, change the Channel Selection Wheels on the
back of the Base to the desired channel. Then set the Remote in the Base to
train the Remote. When power is reapplied to the Remote, the newly selected
channel will be used.
Changing the Channel Selection Wheels while the Remote is energized will
not result in the system changing channels until the next time the Remote is
TROUBLESHOOTING
INTERFERENCE & NOISY AUDIO
AUDIO & VISUAL INDICATORS
SUPPLIES & ACCESSORIES
FCC RE
Q
UIREMENTS
LIMITED WARRANTY
IMPORTANT
SAFETY INSTRUCTIONS
The CA10CD operates in a frequency band shared with other radio products.
Sometimes interference occurs. Interference may result in buzzing or pops in
the audio, or may result in shortened range. The CA10CD permits manual
channel pre-assignment to avoid interference from other users. The CA10CD
(in automatic mode) has some capability to detect and avoid interference on a
single channel when the Remote is first turned on. The CA10CD will change
channels to find a clear channel when the Remote is turned on if in automatic
channel selection mode. This does not protect the user once the Remote is on.
This protection is also only effective if the interference source stays on one
channel. The system cannot protect itself against frequency-hopping systems.
A total of 40 channels can be manually selected on the CA10CD. 39 Channels
are usable. Do not select channel 15, which is always used by the system for a
moment when the Remote is dropped into the base. Using channel 15 will
result in momentary interference to the unit which has channel 15 selected
from all other units each time the other remotes are cradled.
In high-density applications it is important not to have other 902-928 MHz
cordless products in use in the area. Interference may come from systems well
outside the coverage area, as the range for interference is greater than the
coverage range.
Predicting the effective range and region of susceptibility to interference for
individual environments and building layouts is of sufficient complexity as to
be beyond the scope of this discussion. The preceding information is provided
as a reference for system planning, and the performance of individual
installations may vary.
FCC Requirements
—
Part 15
This device complies with Part 15 of the FCC Rules. Operation is subject to
the following two conditions:
1. This device may not cause harmful interference, and
2. This device must accept any interference received, including interference
that may cause undesired operation.
This equipment has been tested and found to comply with the limits for a
Class B digital device, pursuant to Part 15 of the FCC Rules. These limits
are designed to provide reasonable protection against harmful
interference. This equipment generates, uses, and can radiate radio
frequency energy and, if not installed and used in accordance with the
instructions, may cause harmful interference to radio communications.
However, there is no guarantee that interference will not occur in a
particular installation. If this equipment does cause harmful interference to
radio or television reception the user is encouraged to try to correct
interference by one or more of the following measures:
1. Reorient or relocate the receiving antenna.
2. Increase the separation between the equipment and receiver.
3. Connect the equipment into an outlet on another circuit.
4. Consult the dealer or an experienced radio/TV technician for help.
CAUTION: Changes or modifications not expressly approved by the
manufacturer responsible for compliance could void the user’s authority
to operate the equipment.
Information on Accessories
Call Plantronics at (800) 544-4660 x5538 or visit our website
at www.plantronics.com.
For accessibility information call the Technical Assistance
Center (TAC) at (800) 544-4660 x5538.
Battery Pack,
Heavy Duty
46365-01
Leather
Case for
Remote
Unit with
Belt Clip
60077-01
Protect your
Remote Unit and
secure battery pack
to Remote unit
Neck Strap
(Lanyard)
42157-01
Allows Remote
to be worn
around your
neck
AC Adapter
45669-01
Headset Adapter Cable
43446-02
2.5mm to Quick Disconnect
Console Adapter Cable
90193-01
6 wire, modular to PJ7 connector
Other connectors are
available on request
as Special Order Items
The CA10CD has the ability to operate in either
automatic channel selection or in fixed channel selection
mode. The Channel Selection Wheels on the back of the
Base determine mode and operating channel. Setting the
Channel Selection Wheels to 00 chooses automatic channel selection
CHANNEL SELECTION
1
2
3
4
5
6
7
8
9
0
1
2
3
4
5
6
7
8
9
0
What does this warranty cover?
This warranty covers any defects in workmanship or materials in this
product purchased in the U.S. or Canada. For warranty information in
other countries, contact your local distributor.
How long does the coverage last?
This warranty runs for one year from the date of purchase.
What does this warranty NOT cover?
Damage caused by accident, abuse, misuse, or an act of God
(such as a flood) are not covered. Implied warranties, including
those of merchantability, fitness for a particular purpose and
non infringement shall (a) have no duration greater than one
year from the date of purchase, (b) terminate automatically at
the end of that period, and (c) to the extent permitted by law,
be excluded. Consequential and incidental damages, including
without limitation, loss of property and those arising from
breach of any express or implied warranty, are not the
responsibility of Plantronics, and to the extent permitted
by law, are excluded. Some states do not allow exclusion
or limitation of incidental or consequential damages, so the
above exclusion may not apply to you.
How do you get service?
To obtain service in the U.S. contact Plantronics at (800) 544-4660 and in
Canada call (800) 540-8363.
How does state law apply?
This warranty gives you specific legal rights, and you may also have other
rights, which vary from state to state.
When using this product, basic safety precautions should always be
followed to reduce the risk of fire, electric shock, and injury to persons,
including the following:
1. Read and understand all instructions.
2. Follow all warnings and instructions marked on the product. The
symbol identifies and alerts the user to the presence of important
operating and service instructions.
3. Unplug this product from the wall outlet before cleaning. Do not use
liquid cleaners or aerosol cleaners. Use a damp cloth for cleaning.
4. Do not locate base unit near water, for example, near a bathtub, wash
bowl, kitchen sink, or laundry tub, in a wet basement or near a
swimming pool.
5. This product should never be placed near or over a radiator or heat
register. This product should not be placed in a built-in installation
unless proper ventilation is provided.
6. This product should be operated only from the type of power source
indicated on the marking label. If you are not sure of the type of power
supply to your home, consult your dealer or local power company.
7. Do not allow anything to rest on the power cord. Do not locate this
product where the cord will be abused by persons walking on it.
8. Do not overload outlets and extension cords as this can result in the
risk of fire or electric shock.
9. This product should be supplied by a Listed Class 2 Direct Plug-In Power
Unit rated 9VDC 800mA. Plantronics Part No. 45669-01, rated at an
input voltage of 120 VAC, 60Hz and an output voltage of 9 VDC at
800mA.
10.Never push objects of any kind into this product through base unit slots
as they may touch dangerous voltage points or short out parts that
could result in a risk of fire or electric shock. Never spill liquid of any
kind on the product.
11.To reduce the risk of electric shock, do not disassemble this product,
but take it to qualified service personnel when service or repair work
is required. Opening or removing covers may expose you to dangerous
voltages or other risks. Incorrect reassembly can cause electric shock
when the product is subsequently used.
12.Avoid using this product during an electrical storm. There
may be a remote risk of electric shock from lightning.
13.Do not use this product to report a gas leak in the vicinity of the leak.
14.Unplug this product from the wall outlet and refer servicing to qualified
service personnel under the following conditions:
a) When the power supply cord or plug is damaged or frayed.
b) If liquid has been spilled into the product.
c) If the product has been exposed to rain or water.
d) If the product does not operate normally by following the operating
instructions. Adjust only those controls that are covered by the
operating instructions because improper adjustments of other controls
may result in damage and will often require extensive work by a
qualified technician to restore the product to normal operation.
e) If the product has been dropped or the base unit has been
damaged.
f) If the product exhibits a distinct change in performance.
15.Keep all product cords and cables away from operating machinery.
CAUTION: To reduce the risk of fire or injury to persons, read and
follow these instructions.
1. Use only the battery pack supplied with this product.
2. Do not dispose of battery pack in a fire. The cells may explode. Check
with local codes for possible disposal instructions.
3. Do not open or mutilate battery pack. Released electrolyte is corrosive
and may cause damage to eyes or skin and may be toxic if swallowed.
4. Exercise care in handling the battery pack in order not to “short” the
battery contacts with conducting materials such as rings, bracelets, and
keys. The battery or conductor may overheat and cause burns.
5. Charge the battery pack in accordance with instructions supplied with
this unit.
6. Observe proper orientation between battery pack and charger contacts.
–
+
Tal k (In-Use)
Indicator Light
Remote Power
Indicator Light
V
o
lu
m
e
C
h
a
n
n
e
l
P
o
w
e
r
TA
LK
Pa
ge
Remote Power
Indicator Light
Battery Charge Light
Base Power
Indicator Light
CHARGE
REMOT
E POWER
R
E
M
O
T
E PO
W
ER
BASE POWER
 Loading...