

Page 1
345 Encinal Street
Santa Cruz, California 95060
1.831.458.7700
www.plantronics.com
© 2001 Plantronics Inc. All rights reserved. Plantronics,
the logo design, and the Plantronics and logo design
combined are registered trademarks of Plantronics Inc.
Patents
U.S. 5,259,780 and 5,835,852
Printed in USA. 45397-01 (12-01)
CA 10Gray2 Cover.R2 12/12/01 6:54 PM Page 1
Page 2
Cordless Telephone
Headset Amplifier
Model CA10
User Guide
Guide d’Utilisation
Guía para el usuario
Manual de usuário
CA 10Gray2 Cover.R2 12/12/01 6:54 PM Page 2
Page 3
i
A
D
B
E
C
F
G
CA 10Gray2 Cover.R2 12/12/01 6:54 PM Page 3
TALK
CHANEL MUTE
VOLUME
Page 4

ii
DIAGRAM
CA 10Gray2 Cover.R2 12/12/01 6:54 PM Page 4
On
Ringer
Off
MUTE
VOLUME
123
A B
6
6
5
5
4
4
7
7
3
3
8
8
2
2
9
9
1
1
0
0
Page 5
iii
DIAGRAM KEY
In-Use Indicator Light
Talk Button
Headset Jack
Mute Indicator Light
Channel Button
Headset Cable Retainer
Antenna
Ringer ON/OFF
[for use with optional Lifter]
Mute Button
Listen Volume Control
Headset Adapter Cable
(P/N 43446-02)
[not included with CS10
model]
Headset Holder/Antenna
Power Indicator Light
In-Use Indicator Light
[Talk]
Battery Charge Light
Talk Volume Control
Page Button
Talk Button
Remote Unit Charging Well
Transmit Level Switch
Configuration Switch
Manual Channel Settings
AC Adapter
(P/N 45669-01 120V) or
(P/N 45669-02 220V - 240V)
AC Adapter Jack
Handset Lifter Jack
[Handset Lifter not included]
Handset Jack
Telephone Jack
Short Cord
(P/N 40974-01)
Remote Unit
Base Unit (Front)
Base Underside
1
2
3
4
5
6
7
8
14
15
16
9
10
11
12
13
17
18
19
20
21
22
23
24
25
26
27
28
Base Unit (Rear)
CA 10Gray2 Cover.R2 12/12/01 6:54 PM Page 5
Page 6
ENGLISH FRANÇAIS ESPAN
˜
OL PORTUGUE
ˆ
S KOREAN JAPANESE CHINESE
15
CA 10Gray2 Cover.R2 12/12/01 6:54 PM Page 6
C
H
A
N
E
L
M
U
V
T
O
L
U
M
E
C
S
I
N
O
R
T
N
A
L
P
T
A
L
K
E
Page 7

ENGLISH FRANÇAIS ESPAN
˜
OL PORTUGUE
ˆ
S KOREAN JAPANESE CHINESE
WEL
CO
ME
Thank you for selecting the CA10
Cordless Telephone Headset Amplifier
from Plantronics. This User Guide will
help you install your CA10 Amplifier
and learn its basic operation. The
headset is described in a separate
guide which should be read prior to
installing the Amplifier.
CA 10Gray2 Body.r2 12/12/01 6:50 PM Page 1
Page 8

ENGLISH FRANÇAIS ESPAN
˜
OL PORTUGUE
ˆ
S KOREAN JAPANESE CHINESE
3
IMPORTANT SAFETY INSTRUCTIONS
When using your telephone equipment, basic safety precautions should
always be followed to reduce the risk of fire, electric shock, and injury
to persons, including the following:
1. Read and understand all instructions.
2. Follow all warnings and instructions marked on the
product. The symbol identifies and alerts the user to the
presence of important operating and service instructions.
3. Unplug this product from the wall outlet before
cleaning. Do not use liquid cleaners or aerosol cleaners. Use a
damp cloth for cleaning.
4. Do not locate base unit near water, for example, near a
bathtub, wash bowl, kitchen sink, or laundry tub, in a wet
basement or near a swimming pool.
5. Do not place this product on an unstable cart, stand
or table. The product may fall, causing serious damage to
the product.
6. This product should never be placed near or over a
radiator or heat register. This product should not be placed
in a built-in installation unless proper ventilation is provided.
7. This product should be operated only from the type
of power source indicated on the marking label. If you
are not sure of the type of power supply to your home, consult
your dealer or local power company.
8. Do not allow anything to rest on the power cord. Do
not locate this product where the cord will be abused by persons
walking on it.
9. Do not overload outlets and extension cords as this
can result in the risk of fire or electric shock.
IMPORTANT SAFETY INSTRUCTIONS
10.Never push objects of any kind into this product
through base unit slots as they may touch dangerous voltage
points or short out parts that could result in a risk of fire or electric
shock. Never spill liquid of any kind on the product.
11.To reduce the risk of electric shock, do not
disassemble this product, but take it to qualified service
personnel when service or repair work is required. Opening or
removing covers may expose you to dangerous voltages or other
risks. Incorrect reassembly can cause electric shock when the
product is subsequently used.
12.Avoid using telephone equipment during an electrical
storm. There may be a remote risk of electric shock from
lightning.
13.Do not use the telephone equipment to report a gas
leak in the vicinity of the leak.
14.Unplug this product from the wall outlet and refer
servicing to qualified service personnel under the
following conditions:
a) When the power supply cord or plug is damaged or frayed.
b) If liquid has been spilled into the product.
c) If the product has been exposed to rain or water.
d) If the product does not operate normally by following the
operating instructions. Adjust only those controls that are
covered by the operating instructions because improper
adjustments of other controls may result in damage and will
often require extensive work by a qualified technician to restore
the product to normal operation.
e) If the product has been dropped or the base unit has
been damaged.
f) If the product exhibits a distinct change in performance.
2
CA 10Gray2 Body.r2 12/12/01 6:50 PM Page 2
Page 9

ENGLISH FRANÇAIS ESPAN
˜
OL PORTUGUE
ˆ
S KOREAN JAPANESE CHINESE
SAVE THESE INSTRUCTIONS
5
4
IMPORTANT SAFETY INSTRUCTIONS
15.Never install telephone wiring during a lightning
storm.
16.Never install telephone jacks in wet locations unless
the jack is specifically designed for wet locations.
17.Never touch uninsulated telephone wires or
terminals unless the telephone line has been disconnected at the
network interface.
18.Use caution when installing or modifying telephone
lines.
19.This product should be intended to be supplied by a
Listed Class 2 Direct Plug-In Power Unit rated 9VDC
800mA.
Plantronics Part No. 45669-01, rated at an input voltage of 120
VAC, 60Hz and an output voltage of 9 VDC at 800mA.
Plantronics Part No. 45669-02, rated at an input voltage of 220
VAC - 240 VAC, 50Hz and an output voltage of 9 VDC at
800mA.
20.This product requires AC power in order to operate.
In order to have phone service during a power
outage, have another telephone available that is
powered only by the telephone line.
21.Keep all product cords and cables away from
operating machinery.
CAUTION: To reduce the risk of fire or injury to persons,
read and follow these instructions.
1. Use only the battery pack supplied with this product.
2. Do not dispose of battery pack in a fire. The cells may explode.
Check with local codes for possible disposal instructions.
3. Do not open or mutilate battery pack. Released electrolyte is
corrosive and may cause damage to eyes or skin and may be
toxic if swallowed.
4. Exercise care in handling the battery pack in order not to “short”
the battery contacts with conducting materials such as rings,
bracelets,and keys. The battery or conductor may overheat and
cause burns.
5. Charge the battery pack in accordance with instructions supplied
with this unit.
6. Observe proper orientation between battery pack and
charger contacts.
IMPORTANT SAFETY INSTRUCTIONS
SAVE THESE INSTRUCTIONS
CA 10Gray2 Body.r2 12/12/01 6:50 PM Page 4
Page 10
ENGLISH FRANÇAIS ESPAN
˜
OL PORTUGUE
ˆ
S KOREAN JAPANESE CHINESE
7
6
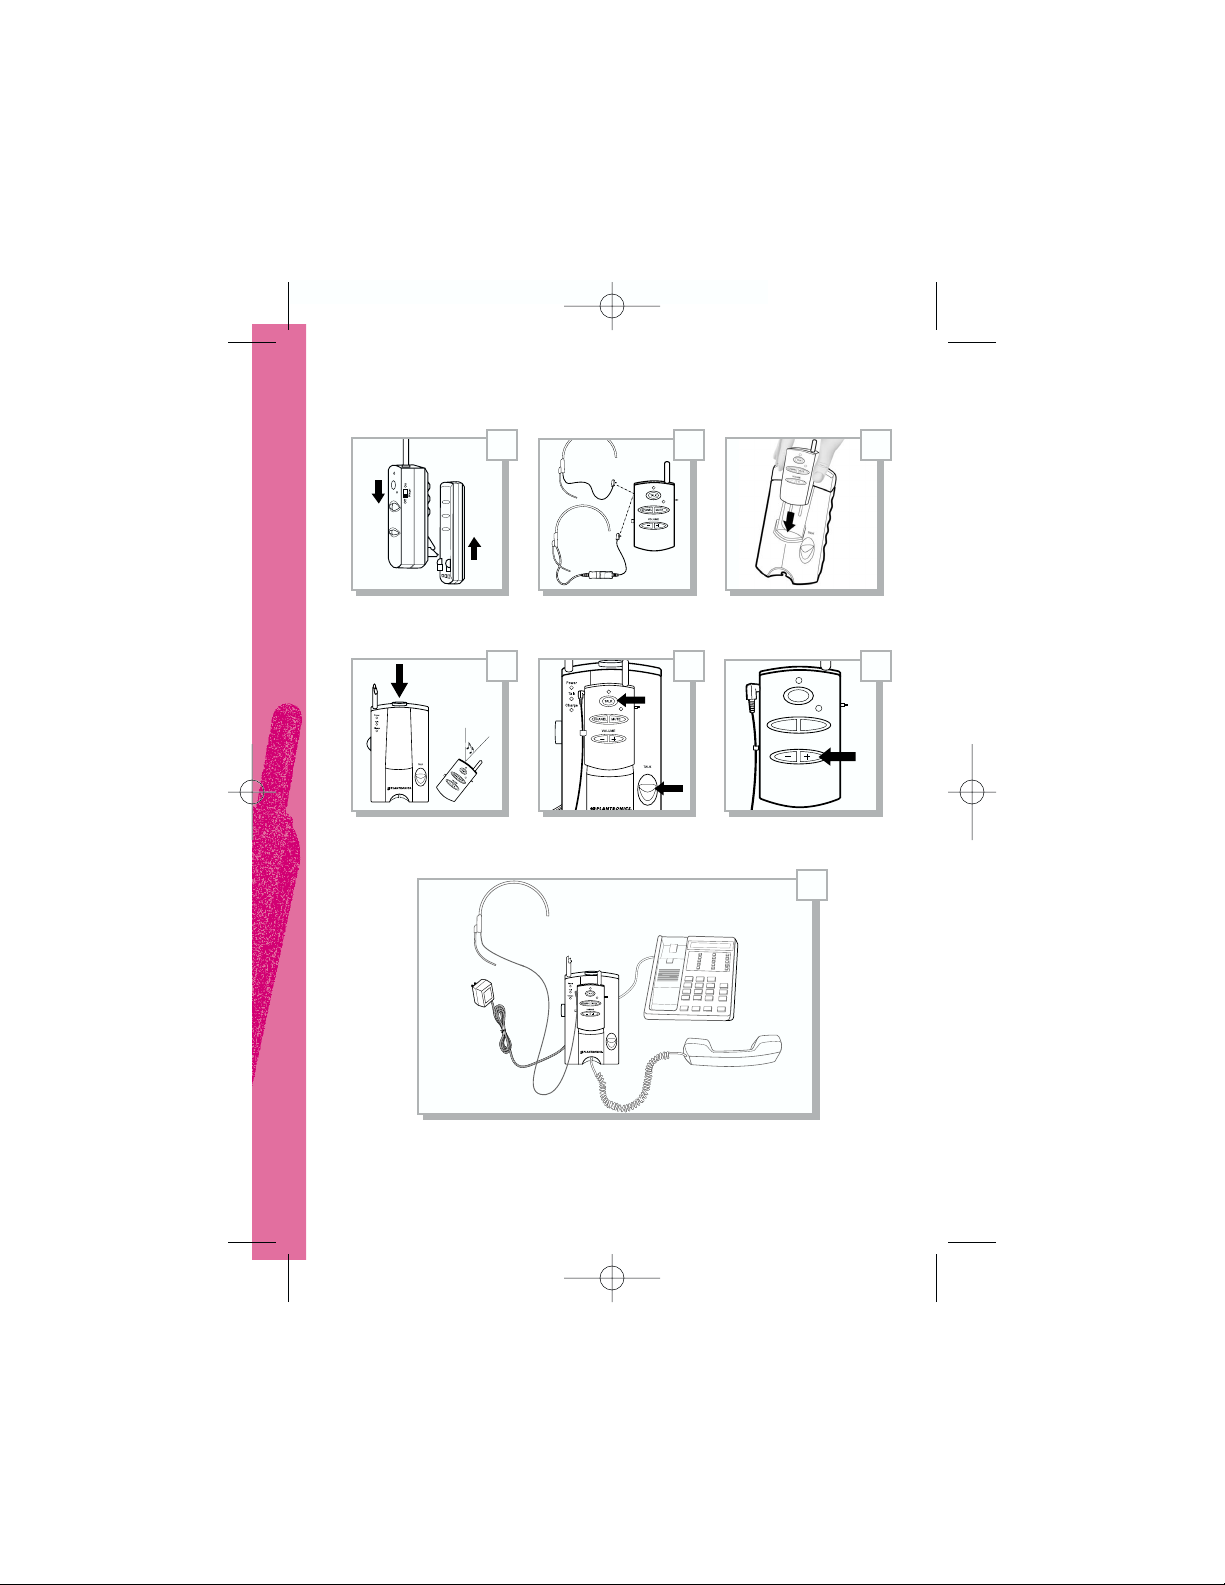
STEP 1
SETUP
Connect the CA10 Amplifier to your telephone using the
illustrations on page ii.
Unplug the telephone handset from the jack on your telephone
base and insert into the Handset Jack on the underside of the
CA10 Base Unit.
Using the Short Cord provided, plug one end into the
CA10 Telephone Jack and the other end into your telephone’s
handset jack.
Now connect the AC Adapter to the AC Adapter Jack and
into a wall outlet. The Power LED will light after
connected, but the In-Use Indicator Light will remain off.
Make sure you remove the shipping battery insulator pull tab
located between the Remote Unit and the Battery Pack. Attach
the Remote Unit to the Battery Pack. The Remote and Battery Pack
slip together easily and gently snap in place. Do not force.
Connect your headset to the Remote Unit Headset Jack . Press
the Headset Cable into the Retainer . If you are using a headset
whose cable terminates in a Quick Disconnect
™
(QD) module, you
will need the QD to 2.5mm Headset Adapter Cable (P/N
43446-02).
Firmly slide the Remote Unit and Battery Pack into the Charging
Well until the Charge Indicator lights.
15
19
11
6
3
14
13
24
23
27
28
26
B
G
Note: Remote Unit must remain in the Base for 5 seconds to
establish a communications link before the system can function.
Prior to first use, the Battery must charge for 8 hours before the
Remote will operate away from the Base.
You may, however, use the Remote while it is in the Charging
Well. (Note: May increase charging time.) The Charge LED will
turn off after the Battery is fully charged.
You are now ready to make or receive calls.
C
A
CA 10Gray2 Body.r2 12/12/01 6:50 PM Page 6
Page 11
ENGLISH FRANÇAIS ESPAN
˜
OL PORTUGUE
ˆ
S KOREAN JAPANESE CHINESE
9
8
RECEIVING A CALLPLACING A CALL
With your headset in position, place the handset off-hook.
Press the Talk Button on either the Remote or the Base Unit .
The In-Use Indicator Lights on the Remote and Base Unit
will light and you will hear a dial tone.
If you do not hear a dial tone, move the Configuration Switch
to the opposite setting (A or B). If you still do not hear a dial tone,
see Troubleshooting on page 11.
Dial a co-worker. When your party answers, speak normally.
If you do not sound loud enough, move the Transmit Level
Switch to position 1 or 2. If you sound too loud, move the
Transmit Level Switch to position 2 or 3. You can further fine tune
the transmit level with the Talk Volume Control .
Adjust the volume of your co-worker’s voice by using the Listen
Volume Control .
Replace the handset upon completion of the call and press the
Talk Button on either the Remote or the Base Unit . The
In-Use Indicator Lights will go out.
14
1
182101620
21
14
1182
E
F
G
E
STEP 2 STEP 3
With your headset in position, when your telephone notifies you of
an incoming call, place the handset off-hook.
Press the Talk Button on either the Remote or the Base Unit .
The In Use Indicator Lights will go on. Begin speaking.
Replace the handset upon completion of the call and press the Talk
Button on either the Remote or the Base Unit . The In-Use
Indicator Lights will go out.
14
1182141182
E
E
G
STEP 4
PAGE FUNCTION
If someone at the Base Unit needs to summon you, pressing
the Page Button momentarily causes the Remote to emit two
long, loud beeps.
If you have misplaced the Remote, press the Page Button for 3
seconds and the Remote will emit a steady alert. Press the Talk
Button once you have located the Remote.
2
17
17
D
CA 10Gray2 Body.r2 12/12/01 6:50 PM Page 8
Page 12
ENGLISH FRANÇAIS ESPAN
˜
OL PORTUGUE
ˆ
S KOREAN JAPANESE CHINESE
11
TROUBLESHOOTING
C
G
A
A
C
C
I CANNOT HEAR A DIAL TONE
MY REMOTE STOPPED WORKING
CALLER CANNOT HEAR MY VOICE
10
AUDIO VISUAL PROMPTS
REMOTE
Talk (In-Use) — Green LED. On only when Remote or Base
Unit TALK button is activated. Flashes in time with telephone ringer
when optional Handset Lifter (see Accessories) is used.
Mute — Red LED. On only when transmit audio is “muted.”
BASE
Power — Red LED. On whenever power is applied to the Base
via the AC Power Adapter.
Talk (In-Use) — See above.
Charge — Amber LED. Flashes for 2 seconds while verifying
contact when Remote is placed in Base Unit Charging Well.
Remains steady while charging, off when battery is fully charged.
VISUAL
Low Battery — Two (2) beeps generated at 30 second
intervals whenever power is low, heard only through the headset
in TALK mode.
Out-of-Range — Three (3) beeps generated whenever the
Remote is taken out-of-range of the Base, heard only in TALK
mode through the headset.
Linked — One (1) beep heard through the headset whenever
the Base or Remote Unit TALK button is activated.
Ringer Tone Alert — (Can be activated when using optional
Handset Lifter)
Tone emitted by Remote timed with telephone ringer; can be
disabled using Ringer Switch on Remote. (Note: Disabling the
audible ringer does not disable the Page Function or the ringing
heard through the headset.)
AUDIO
Make sure your Remote Battery Pack is securely seated in the
Charging Well and/or fully charged. The Battery Pack must
charge for 8 hours prior to first use.
Check that all cords are correctly connected and firmly in place.
Pay special attention that Handset and Telephone cords are
properly connected.
Adjust the Listen Volume Control .
Make sure the Remote Unit is within range of the Base Unit.
Make sure the handset is off-hook.
Separate and then reconnect the Battery Pack and Remote Unit.
Return the Remote to the Base Unit charger for 5 seconds to
re-establish a communication link.
Separate and then reconnect the Battery pack and Remote Unit.
Remove and replace the AC power cord from the Base Unit.
Return the Remote Unit to the Charging Well for 5 seconds to
re-establish a communication link.
Make sure the Mute Button is off.
Make sure Transmit Level Switch is in position 1 or 2.
Adjust the Talk Volume Control .
Adjust headset so the voice boom is closer to your mouth.
16
20
9
10
CA 10Gray2 Body.r2 12/12/01 6:50 PM Page 10
Page 13
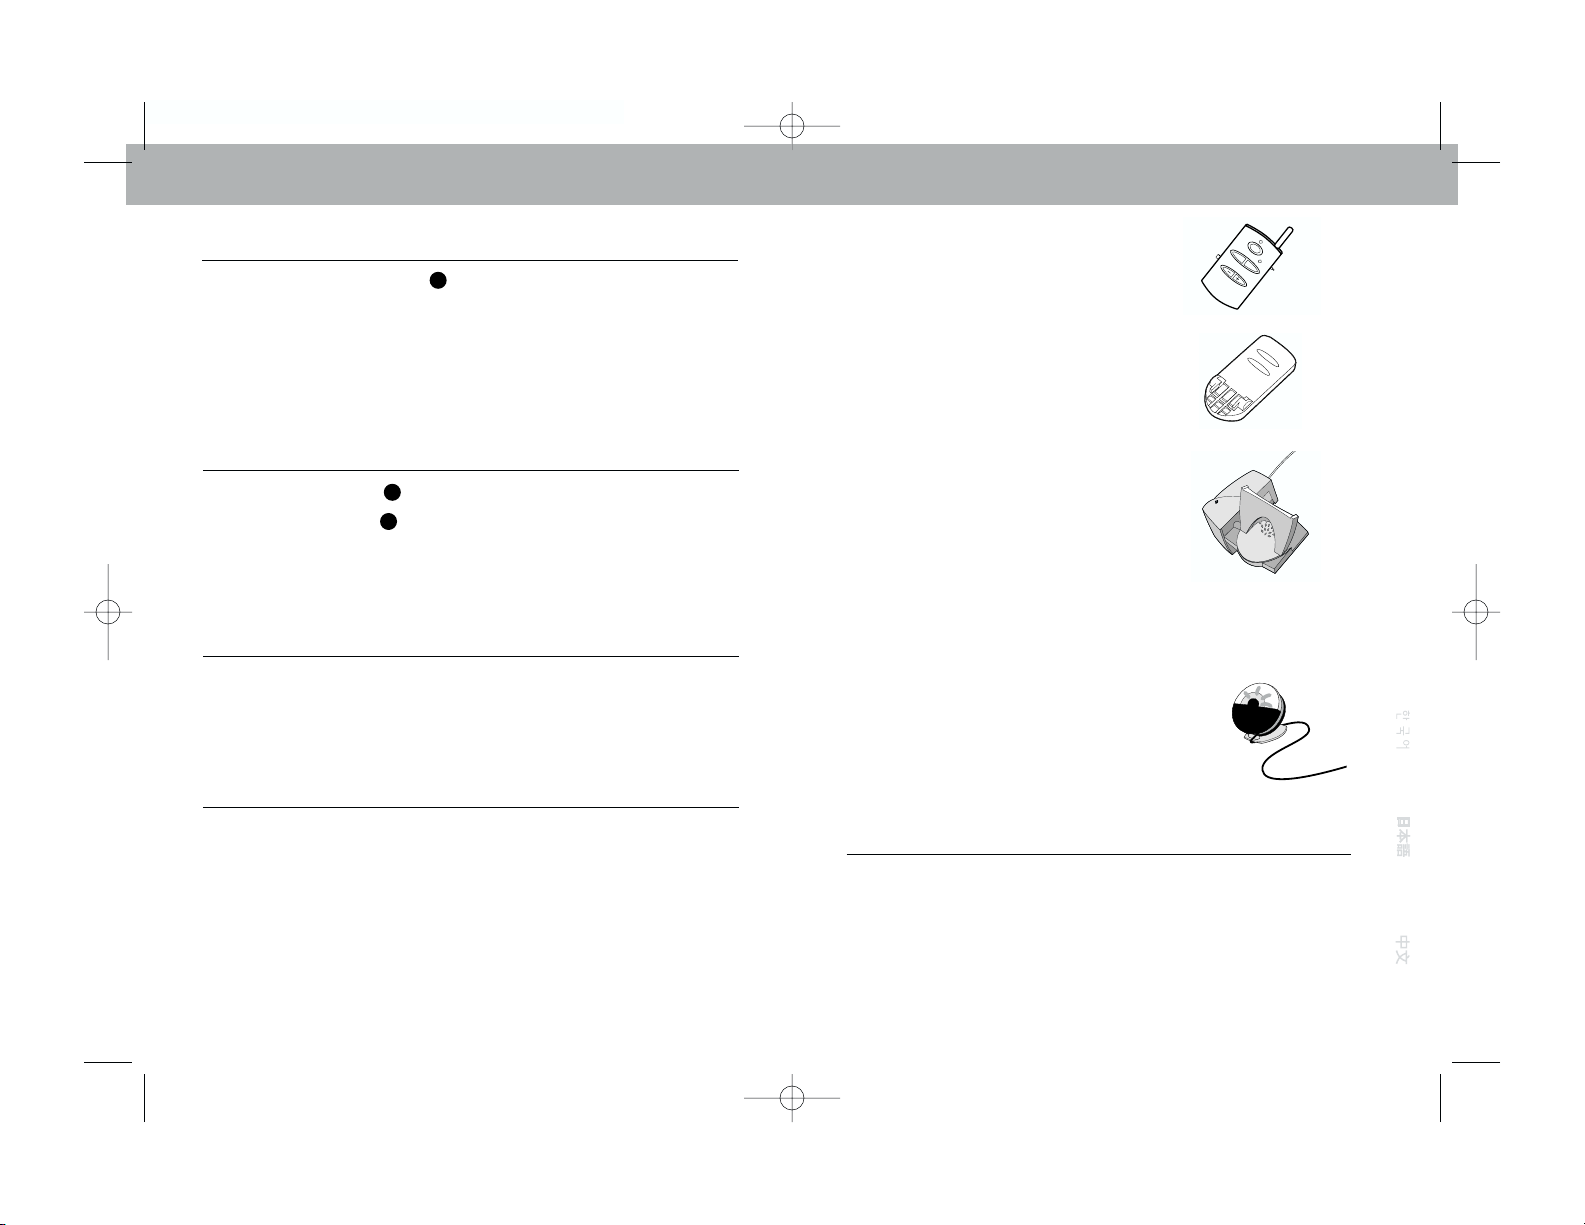
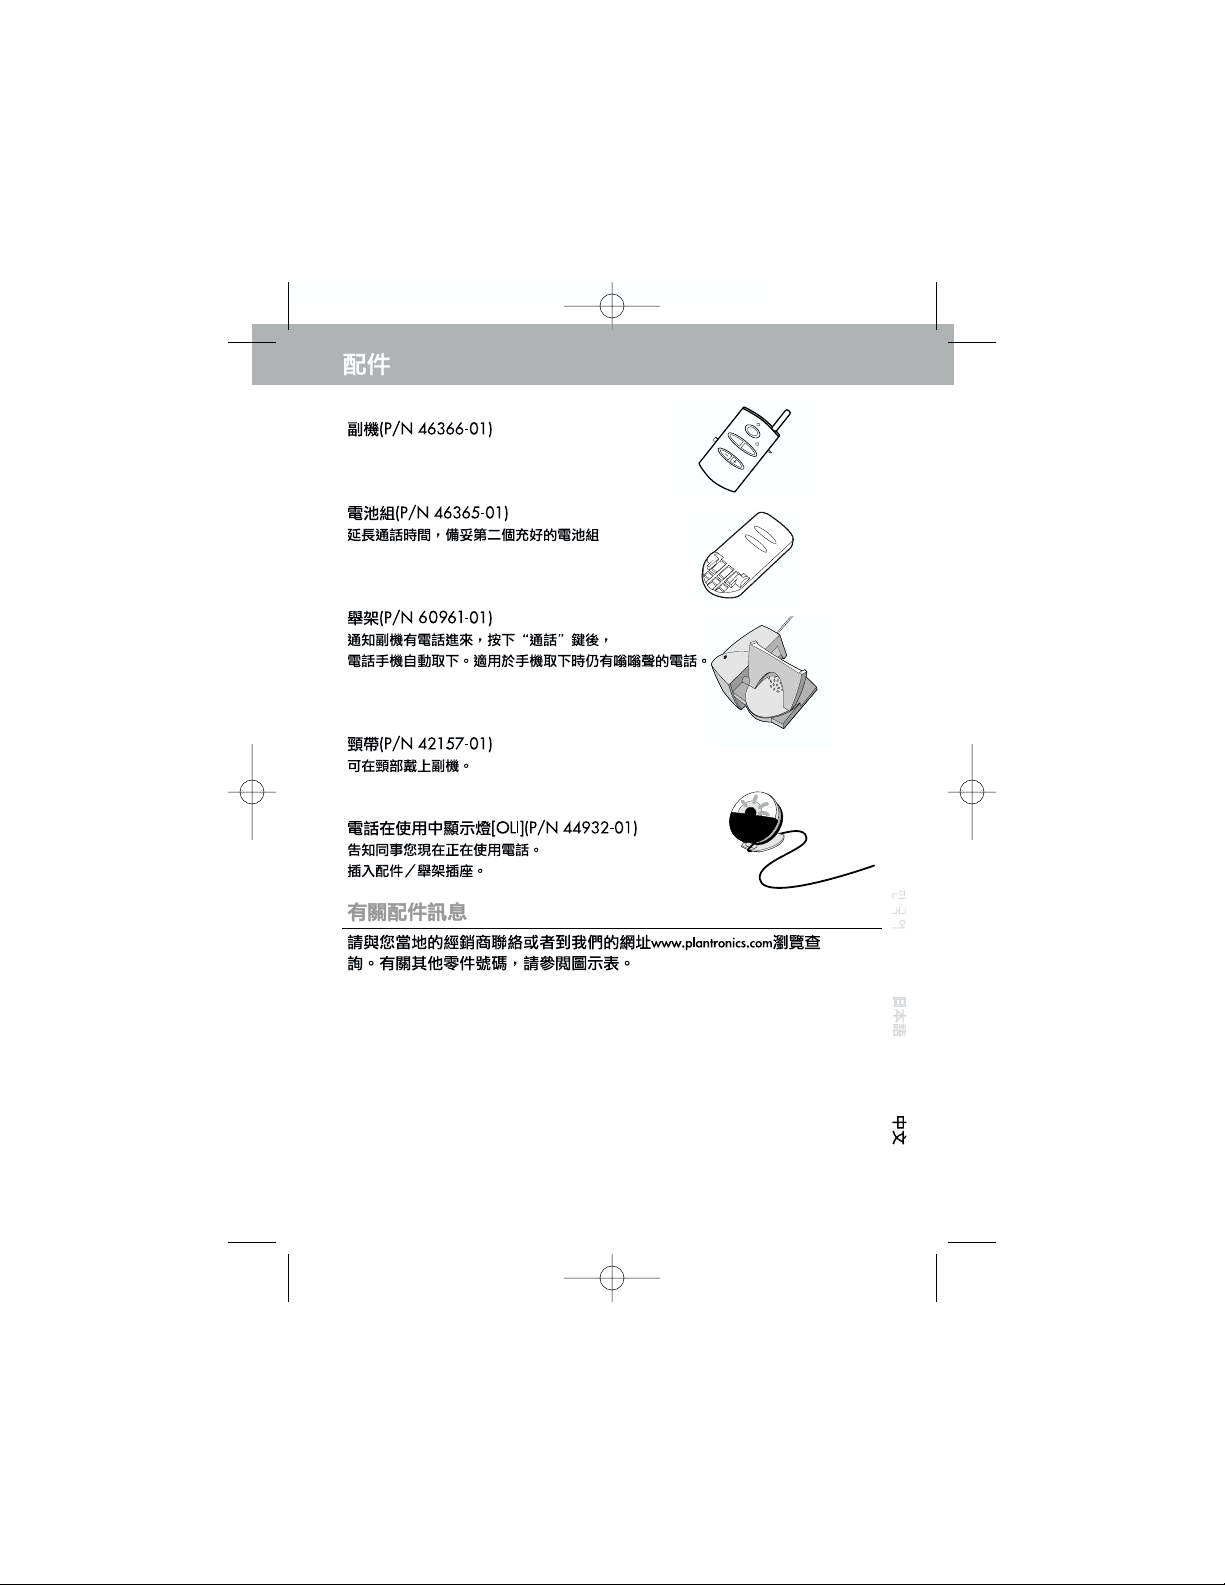
Remote (P/N 46366-01)
Battery Pack (P/N 46365-01)
Extend talk time by having a second Battery
charged and ready.
Lifter (P/N 60961-01)
Rings the Remote Unit for incoming calls and
automatically places handset off-hook when
you press “TALK”. For use with phones which provide
dial tone when Handset is lifted.
Neck Strap (P/N 42157-01)
Allows Remote to be worn around
your neck.
On Line Indicator [OLI] (P/N 46656-01)
Alerts co-workers that you are on the phone.
Plugs into the Accessory/Lifter jack.
INFORMATION ON SUPPLIES
AND ACCESSORIES
Contact your local distributor or visit our website at
www.plantronics.com. See also Diagram Key for additional
part numbers.
ENGLISH FRANÇAIS ESPAN
˜
OL PORTUGUE
ˆ
S KOREAN JAPANESE CHINESE
13
SUPPLIES AND ACCESSORIES
12
I HEAR A BUZZ OR HUM
I CAN HEAR OTHER CORDLESS DEVICE USERS
I NEED MORE TALK TIME
PLANTRONICS HELP DESK
TROUBLESHOOTING
Move the Configuration Switch to the opposite setting
(A or B).
Try locating your Base Unit in different positions and make sure
no objects obstruct the Remote or Base Unit.
Locate the Remote and Base Units away from electronic
equipment or other radio-frequency devices.
Press the Channel Button until you get a clear signal.
Ensure Manual Channel Settings are “0/0”.
If others are using a CA10 Amplifier in your immediate vicinity,
call Plantronics for instructions on adjusting the channel control
settings.
A second Battery Pack may be held in the Charging Well while
the Remote Unit is in use. This provides an immediate source of
additional talk time. Extra packs are listed under Supplies and
Accessories.
The Plantronics Help Desk is ready to assist you! Dial
1.831.458.7700 (Prompt 1 then 2) Monday through Friday 8:00
a.m. to 5:00 p.m. Pacific Standard Time; FAX Plantronics at
1.831.425.8654; visit our website at www.plantronics.com; or
contact your local distributor.
22
5
21
CA 10Gray2 Body.r2 12/12/01 6:50 PM Page 12
T
A
L
K
C
H
A
N
E
L
M
U
V
T
O
E
L
U
M
E
C
S
I
N
O
R
T
N
A
L
P
Page 14

ENGLISH FRANÇAIS ESPAN
˜
OL PORTUGUE
ˆ
S KOREAN JAPANESE CHINESE
15
WARRANTY AND SERVICE
The following warranty and service information applies
only to the U.S. and Canada. For information in other
countries, please contact your local distributor.
Limited Warranty
Plantronics, Inc. (“Plantronics”) warrants to the original consumer purchaser
that, except for limitations and exclusions set forth below, this product shall be
free from defects in materials and workmanship for a period of one (1) year
from the date of original retail purchase (“Warranty Period”). The obligation of
Plantronics under this warranty shall be limited to repair or replacement, at
Plantronics’ option, without charge, of any part or unit that proves to be
defective in material or workmanship during the Warranty Period.
Exclusions From Warranty
This Warranty applies only to defects in factory materials and factory
workmanship. Any condition caused by accident, abuse, misuse or improper
operation, violation of instructions furnished by Plantronics, destruction or
alteration, improper electrical voltages or currents, or repair or maintenance
attempted by anyone other than Plantronics or an authorised service centre, is
not a defect covered by this Warranty. In such cases, Plantronics may charge
you for materials and labor, even during the warranty period. Parts subject to
wear and tear in normal usage are not covered by the Warranty.
Implied Warranties
Under state law, you may be entitled to the benefit of certain implied
warranties. THESE IMPLIED WARRANTIES WILL CONTINUE IN FORCE ONLY
DURING THE WARRANTY PERIOD. Some states do allow limitations on how
long an implied warranty lasts, so the above limitation may not apply to you.
Incidental or Consequential Damages
NEITHER PLANTRONICS NOR YOUR RETAIL DEALER OR SELLING
DISTRIBUTORS HAS ANY RESPONSIBILITY FOR ANY INCIDENTAL OR
CONSEQUENTIAL DAMAGES INCLUDING WITHOUT LIMITATION,
COMMERCIAL LOSS OR PROFIT, OR FOR ANY INCIDENTAL EXPENSES,
EXPENSES, LOSS OF TIME, OR INCONVENIENCE. Some states do not allow
exclusion or limitation of incidental or consequential damage, so the above
limitation or exclusion may not apply to you.
Other Legal Rights
This Warranty gives you specific legal rights and you may also have other
rights which vary from state to state.
14
INDUSTRY CANADA NOTICE
This Class B digital apparatus complies with
Canada ICES003.
Notice: The Industry Canada label identifies certified equipment. This
certification means that the equipment meets certain telecommunications network
protective, operational and safety requirements. The Department does not
guarantee the equipment will operate to the users satisfaction.
Before installing this equipment, users should ensure that it is permissible to be
connected to the facilities of the local telecommunications company. The
equipment must also be installed using an acceptable method of connection. In
some cases, the company’s inside wiring associated with a single line individual
service may be extended by means of a certified connector assembly (telephone
extension cord). The customer should be aware that compliance with the above
conditions may not prevent degradation of service in some situations.
Repairs to certified equipment should be made by an authorized Canadian
maintenance facility designated by the supplier. Any repairs or alterations made
by the user to this equipment, or equipment malfunctions, may give
thetelecommunications company cause to request the user to disconnect
the equipment.
Users should ensure for their own protection that the electrical ground
connections of the power utility, telephone lines and internal metallic water pipe
system, if present, are connected together. This precaution may be particularly
important in rural areas.
Caution: Users should not attempt to make such connections themselves, but
should contact the appropriate electric inspection authority, or electrician, as
appropriate.
Notice: The Ringer Equivalence Number (REN) assigned to each terminal device
provides and indication of the maximum number of terminals allowed to be
connected to a telephone interface. The termination on an interface may consist
of any combination of devices subject only to the requirement that the sum of the
Ringer Equivalence Numbers of all devices does not exceed 5.
See label on unit for REN No., as applicable.
CA 10Gray2 Body.r2 12/12/01 6:50 PM Page 14
Page 15
BIENVENUE
Merci d’avoir choisi l’Amplificateur de
Casque CA10 pour Téléphone Sans Fil
de Plantronics. Ce Guide d’Utilisation
vous aidera à installer votre
Amplificateur CA10 et vous apprendre
son fonctionnement de base. Le casque
est décrit dans un guide séparé.
How to Obtain Warranty Repairs
To obtain in or out of warranty service, please prepay shipment and return the
unit to the appropriate facility listed below:
IN THE UNITED STATES IN CANADA (ONLY)
Plantronics Service Centre Plantronics Service Centre
345 Encinal Street 1455 Pitfield Boulevard
Santa Cruz, CA 95060 Saint-Laurent, Quebec H4S 1G3
Tel. 1.800.544.4660 Tel. 1.800.540.8363
1.831.458.7700 1.514.956.8363
Fax 1.800.279.0162 Fax 1.514.956.1825
Please use the original container, or pack the unit(s) in a sturdy carton with
sufficient packing material to prevent damage. Include the following
information:
1. A proof-of-purchase indicating model number and date of purchase.
2. Bill-to address
3. Ship-to address
4. Number and description of units shipped
5. Name and telephone number of person to call, should contact be necessary
6. Reason for return and description of the problem
Damage occurring during shipment is deemed the responsibility of the carrier,
and claims should be made directly with the carrier.
WARRANTY AND SERVICE
The name Plantronics and the Plantronics logo are registered trademarks of Plantronics, Inc.
Quick Disconnect is a trademark of Plantronics, Inc.
16
CA 10Gray2 Body.r2 12/12/01 6:50 PM Page 16
Page 16
ENGLISH FRANÇAIS ESPAN
˜
OL PORTUGUE
ˆ
S KOREAN JAPANESE CHINESE
3
2
CLÉ DU DIAGRAMME
Voyant de Service
Bouton de Communication
Prise de Casque
Voyant de ‘Secret’
Bouton de Canaux
Support de Câble de Casque
Antenne
MARCHE/ARRÊT de la
Sonnerie
[pour emploi avec Décrochage
de Combiné en option]
Bouton de ‘Secret’
Commande de Volume d’Écoute
Câble d’Adaptation de Casque
(Nº de pièce 43446-02)
[non compris dans le modèle
CS10]
Porte Casque/Antenne
Voyant d’Alimentation
Voyant de Service
Voyant de Chargement de
Batterie
Commande de Volume de
Transmission
Bouton d’Appel de Localisation
Bouton de Communication
Réceptacle de Recharge du Télé-
Élément
Commutateur de Niveau de
Transmission
Commutateur de Configuration
Réglages Manuels des Canaux
Adaptateur CA
(Nº de pièce 45669-01 120V)
(Nº de pièce 45669-02 220V-240V)
Prise d’Adaptateur CA
Prise de Décrochage de Combiné
[Décrochage de Combiné non
compris]
Prise de Combiné
Prise de Téléphone
Cordon Court
(Nº de pièce 40974-01)
TÉLÉ-ÉLÉMENT
ÉLÉMENT DE BASE (AVANT)
ÉLÉMENT DE BASE (DESSOUS)
1
2
3
4
5
6
7
8
14
15
16
9
10
11
12
13
17
18
19
20
21
22
23
24
25
26
27
28
ÉLÉMENT DE BASE (ARRIÈRE)
CONSIGNES DE SÉCURITÉ IMPORTANTES
Lorsque votre équipement téléphonique est en service, des précautions
de sécurité de base doivent toujours être respectées pour réduire les
risques d’incendie, de choc électrique, et de blessures corporelles,
y compris ce qui suit :
1. Lire et comprendre toutes les consignes.
2. Respecter tous les avertissements et consignes apparaissant sur le produit. Le symbole identifie et alerte
l’utilisateur de la présence d’importantes consignes opérationnelles
et de mise en oeuvre.
3. Débrancher cet équipement de la prise murale avant
de le nettoyer. Ne pas utiliser de produits de nettoyage
liquides ou en pulvérisateur. Nettoyer avec un chiffon humide.
4. Ne pas placer l’élément de base à proximité d’eau,
comme près d’une baignoire, cuvette, évier, bac de buanderie,
dans un sous-sol mouillé ou près d’une piscine.
5. Ne pas placer ce produit sur un chariot, support ou
table instables. Le produit pourrait tomber et être
considérablement endommagé.
6. Ce produit ne doit jamais être placé à proximité d’un
radiateur ou d’une bouche de chaleur; il ne doit pas
être encastré sans une ventilation adéquate.
7. Ce produit ne doit être branché que sur le type
d’alimentation électrique indiqué sur l’étiquette. En
cas de doute sur le type d’alimentation électrique de votre
maison, consulter votre fournisseur ou la compagnie électrique
locale.
8. Ne permettre à rien de venir en appui sur le cordon
électrique. Ne pas placer ce produit là où le cordon sera
maltraité par des gens marchant dessus.
CA 10Gray2 Body.r2 12/12/01 6:50 PM Page 18
Page 17

ENGLISH FRANÇAIS ESPAN
˜
OL PORTUGUE
ˆ
S KOREAN JAPANESE CHINESE
5
4
CONSIGNES DE SÉCURITÉ IMPORTANTES
9. Ne pas surcharger les prises ou les rallonges
électriques, car cela peut entraîner un risque
d’incendie ou de choc électrique.
10.N’insérer aucun objet dans ce produit par les fentes
de l’élément de base, car il pourrait contacter des points à
voltage élevé ou court-circuiter des pièces, ce qui pourrait entraîner
un risque d’incendie ou de choc électrique. Ne renverser aucun
liquide sur ce produit.
11.Pour réduire le risque d’incendie ou de choc
électrique, ne pas démonter ce produit, mais l’apporter chez un
réparateur compétent en cas de besoin de service ou de réparation.
L’ouverture ou l’enlèvement des couvercles pourrait vous exposer à
des voltages dangereux ou d’autres risques. Un remontage
incorrect peut entraîner un choc électrique lorsque le produit sera
remis en service.
12.Éviter de se servir d’équipement téléphonique
pendant un orage électrique. Un éclair peut présenter un
vague risque de choc électrique.
13.Ne pas se servir d’équipement téléphonique pour signaler une fuite de gaz à proximité de cette fuite.
14.Débrancher ce produit de la prise murale et demander
à du personnel compétent d’effectuer le service dans
les conditions suivantes:
a) Lorsque le cordon d’alimentation ou la prise sont endommagés
ou élimés.
b) Si du liquide a été renversé dans le produit.
c) Si le produit a été exposé à la pluie ou à de l’eau.
d) Si le produit ne fonctionne pas normalement en suivant les con
signes normales de fonctionnement. Ne régler que les comman
des couvertes par les instructions de mise en oeuvre, car un
réglage incorrect d’autres commandes peut provoquer des
dégâts et nécessitera souvent beaucoup de travail par un techni
cien compétent pour restaurer le fonctionnement normal du
pro duit.
CONSIGNES DE SÉCURITÉ IMPORTANTES
e) Si le produit est tombé ou si l’élément de base est endommagé.
f) Si le produit reflète un changement notable de performances.
15.Ne jamais installer de câblage téléphonique pendant
un orage électrique.
16.Ne jamais installer de prises téléphoniques dans des
endroits mouillés à moins que la prise ne soit spécifiquement conçue pour des endroits mouillés.
17.Ne jamais toucher de fils téléphonique nus ou de bornes
nues à moins que la ligne téléphonique ne soit déconnectée à
l’interface du réseau.
18.Faire très attention en installant ou en modifiant les
lignes téléphoniques.
19.Ce produit est prévu pour être branché sur une
Alimentation à Branchement Direct de Classe
Homologuée, ayant une valeur nominale de 9 VCC à
800 mA.
La pièce Plantronics No. 45669-01, possède un voltage nominal
d’entrée de 120 VCA, 60 Hz, et un voltage de sortie de 9 VCC à
800 mA.
La pièce Plantronics No. 45669-02, possède un voltage nominal
d’entrée de 220 VCA - 240 VCA, 50 Hz, et un voltage de sortie
de 9 VCC à 800 mA.
20.Ce produit nécessite une alimentation CA pour
fonctionner. Pour maintenir un service téléphonique
pendant une interruption du courant électrique, il
faut disposer d’un autre téléphone alimenté
seulement par la ligne téléphonique.
21.Éloigner tous les cordons et câblages du produit de
toute machine en fonctionnement.
CA 10Gray2 Body.r2 12/12/01 6:50 PM Page 20
Page 18
ENGLISH FRANÇAIS ESPAN
˜
OL PORTUGUE
ˆ
S KOREAN JAPANESE CHINESEENGLISH FRANÇAIS ESPAN
˜
OL PORTUGUE
ˆ
S KOREAN JAPANESE CHINESE
6
ATTENTION: Pour réduire le risque d’incendie ou de
blessures corporelles, lire et respecter les instructions
suivantes:
1. N’utiliser que le groupe de batteries fourni avec ce produit.
2. Ne pas jeter le groupe de batteries au feu. Les éléments pourraient
exploser. Consulter les codes locaux pour toutes instructions de
mise au rebut.
3. Ne pas ouvrir ou mutiler un groupe de batteries. L’électrolyte
répandu est corrosif et peut blesser les yeux ou la peau, et peut
être toxique si avalé.
4. Manipuler le groupe de batteries avec soin, pour ne pas "court-
circuiter" les contacts de la batterie avec des produits conducteurs
tels que bagues, bracelets, et clés. La batterie ou l’élément
conducteur pourrait surchauffer et provoquer des brûlures.
5. Mettre le groupe de batteries en charge conformément aux instruc-
tions fournies avec cet équipement.
6. Respecter la bonne orientation entre le groupe de batteries et les
contacts du chargeur.
CONSIGNES DE SÉCURITÉ IMPORTANTES
CONSERVER CES INSTRUCTIONS
7
ÉTAPE 1
PRÉPARATION
Brancher l’Amplificateur CA10 sur votre téléphone à l’aide des
illustrations page ii.
Décrocher le combiné téléphonique de la prise sur la base du
téléphone et insérer le fil dans la Prise de Combiné en dessous
de l’Élément de Base CA10.
En utilisant le Cordon Court fourni, brancher une extrémité
dans la prise de Téléphone du CA10 et l’autre dans la prise de
combiné du téléphone.
Brancher maintenant l’Adaptateur CA dans la Prise
d’Adaptateur CA et dans la prise murale. Le Voyant LED
d’Alimentation s’allumera lorsque branché, mais le Voyant de
Service restera éteint.
S’assurer d’avoir bien retiré la tirette d’isolation (pour
l’expédition) de la batterie, située entre le Télé-élément et le
Groupe de Batteries. Brancher le télé-élément sur le Groupe de
Batteries. Le Télé-élément et la Batterie se joignent facilement et
s’enclenchent doucement. Ne pas forcer.
Brancher votre Casque dans la Prise de Casque du le télé-
élément. Pousser le Câble de Casque dans son Support . Si
vous utilisez un casque dont le câble se termine par un module
Quick Disconnect™ (QD), vous devrez utiliser un Câble
d’Adaptation de Casque QD/2,5 mm (Nº de pièce
43446-02).
Glisser doucement le télé-élément et le Groupe de Batteries dans
le Réceptacle de Recharge jusqu’à ce que le Voyant de
Recharge s’allume.
15
19
11
6
14
13
242327
28
26
B
G
C
A
CA 10Gray2 Body.r2 12/12/01 6:50 PM Page 22
Page 19
ENGLISH FRANÇAIS ESPAN
˜
OL PORTUGUE
ˆ
S KOREAN JAPANESE CHINESE
8
Note: Le Télé-Élément doit rester dans la Base pendant 5
secondes pour établi le relais de communication avant que le
système ne puisse fonctionner.
Avant la première mise en service, la Batterie doit charger
pendant 8 heures avant que le Télé-Élément puisse fonctionner
loin de la Base.
Le Télé-Élément peut cependant être utilisé dans le Réceptacle de
Charge. (Note: Ceci peut augmenter le temps de charge.) Le
Voyant de Charge LED s’éteindra lorsque la Batterie atteindra la
pleine charge.
Vous êtes maintenant prêt à placer ou recevoir
des appels.
9
POUR PLACER UN APPEL
Avec votre casque en place, décrochez le combiné.
Appuyez sur le Bouton de Communication soit sur le Télé-Élément
soit sur l’Élément de Base . Les Voyants de Service et
sur le Télé-Élément et sur l’Élément de Base s’allumeront, et vous
entendrez une tonalité.
Si vous n’entendez pas de tonalité, déplacez le Commutateur de
Configuration sur l’autre position [A] ou [B]. Si vous n’entendez
toujours pas de tonalité, voyez la section Dépannage page 13.
Composez le numéro d’une collègue. Lorsqu’elle répondra, parlez
normalement.
Si votre voix n’est pas assez forte, placez le Commutateur de
Niveau de Transmission sur la position 1 ou 2. Si votre voix est
trop forte, placez le Commutateur sur la position 2 ou 3. Vous
pouvez faire un réglage fin du niveau avec la Commande de
Volume de Transmission .
Réglez le volume de la voix de votre collègue avec la Commande
de Volume d’Écoute .
Raccrochez le combiné à la fin de l’appel et appuyez sur le
Bouton de Communication soit sur le Télé-Élément soit sur
l’Élément de Base . Les Voyants de Service et
s’éteindront.
14
1182
10
16
20
14
1182
E
F
G
E
ÉTAPE 2
CA 10Gray2 Body.r2 12/12/01 6:50 PM Page 24
Page 20

ENGLISH FRANÇAIS ESPAN
˜
OL PORTUGUE
ˆ
S KOREAN JAPANESE CHINESE
10
POUR RÉPONDRE À
UN APPEL
ÉTAPE 3
Avec votre casque en place, lorsque votre téléphone vous
informera de l’arrivée d’un appel, décrochez le combiné.
Appuyez sur le Bouton de Communication soit sur le Télé-Élément
soit sur l’Élément de Base . Les Voyants de Service et
s’allumeront. Commencez à parler.
Raccrochez le combiné à la fin de l’appel et appuyez sur le Bouton
de Communication soit sur le Télé-Élément soit sur l’Élément de
Base . Les Voyants de Service
et
s’éteindront.
14
1182141182
E
E
G
ÉTAPE 4
APPEL DE
LOCALISATION
Si quelqu’un situé à l’Élément de Base a besoin de vous appeler,
en appuyant momentanément sur le Bouton d’Appel de
Localisation le Télé-Élément émettra deux bips longs et forts.
Si vous avez égaré le Télé-Élément, appuyez sur le Bouton
d’Appel de Localisation pendant 3 secondes et le Télé-Élément
émettra un signal d’alerte continu. Lorsque vous aurez retrouvé le
Télé-Élément, appuyez sur le Bouton de Communication .
2
17
17
D
11
MESSAGES AUDIO VISUELS
TÉLÉ-ÉLÉMENT
Conversation (En Cours) — LED Vert. Allumé seulement
lorsque le bouton CONVERSATION est activé sur l’ élément de
base. Clignote en synchronisation avec la sonnerie du téléphone
lorsque le Décrochage de Combiné (en option) est utilisé (voir
Accessoires).
‘Secret’ — LED Rouge. Ne s’allume que quand la transmission
audio est sur ‘Secret’.
BASE
Alimentation — LED Rouge. Allumé lorsque la Base est
alimentée par l’Adaptateur de Courant CA
Conversation (En Cours) — Voir ci-dessus.
Charge — LED Ambré. Clignote 2 secondes en vérifiant le
contact lorsque le Télé-Élément est placé dans le Réceptacle de
Charge de l’Élément de Base. Reste allumé en continuité pendant
la charge.
VISUELS
CA 10Gray2 Body.r2 12/12/01 6:50 PM Page 26
Page 21

ENGLISH FRANÇAIS ESPAN
˜
OL PORTUGUE
ˆ
S KOREAN JAPANESE CHINESE
12
MESSAGES AUDIO VISUELS
Batterie Faible — Deux (2) bips sont entendus à 30 secondes
d’intervalle lorsque la batterie est faible, seulement dans le
casque en mode CONVERSATION, sinon ils sont inaudibles.
Hors de portée — Trois (3) bips sont entendus lorsque le Télé-
Élément est transporté hors de portée de la Base, seulement dans
le casque en mode CONVERSATION, sinon ils sont inaudibles.
Relié — Un (1) bip est entendu dans le casque lorsque le
bouton de CONVERSATION de la Base ou du Télé-Élément est
activé.
Alerte — (Peut être activé lorsqu’on utilise le Décrochage de
Combiné en option)
La tonalité émise par le Télé-Élément est synchronisée avec la
sonnerie du téléphone; elle peut être désactivée avec le
Commutateur de Sonnerie sur le Télé-Élément. (Note: le fait de
désactiver la sonnerie audible ne désactive pas la "Fonction
Recherche" ou la sonnerie audible dans le casque.)
AUDIO
13
S’assurer que le Bloc de Batteries du Télé-Élément est bien assis
dans le Réceptacle de Charg et/ou qu’il est complètement
chargé. Le Bloc de Batteries doit charger pendant 8 heures avant
sa première mise en service.
S’assurer que tous les cordons sont correctement branchés et bien
enfoncés. Faire particulièrement attention à ce que les cordons de
Combiné et de Téléphone soient correctement branchés.
Régler la Commande de Volume d’Ecoute .
S’assurer que le Télé-Élément est bien à portée de l’Élément
de Base.
S’assurer que le combiné est décroché.
Séparer puis renclencher le Bloc de Batteries et le Télé-Élément.
Remettre le Télé-Élément dans le chargeur de l’Élément de Base
pendant 5 secondes pour rétablir la liaison de communication.
Séparer puis renclencher le Bloc de Batteries et le Télé-Élément.
Enlever et rebrancher le cordon d’alimentation CA sur le l’Élément
de Base.
Remettre le Télé-Élément dans le chargeur de l’Élément de Base
pendant 5 secondes pour rétablir la liaison de communication.
S’assurer que le bouton de secret n’est pas enclenché.
S’assurer que le Commutateur de Niveau de Transmission est
sur la position 1 ou 2.
Régler la Commande de Volume de Transmission .
Régler le casque pour que la perche de micro soit plus proche de
votre bouche.
16
20
9
10
19
C
G
A
A
C
C
JE N’ENTENDS PAS DE TONALITÉ
LE DEMANDEUR NE PEUT PAS ENTENDRE MA VOIX
MON TÉLÉ-ÉLÉMENT NE MARCHE PLUS
DÉPANNAGE
CA 10Gray2 Body.r2 12/12/01 6:50 PM Page 28
Page 22

Télé-Élément (Nº de pièce 46366-01)
Groupe de Batteries (Nº de pièce 46365-01)
Prolongez votre durée de communication en ayant une
Batterie supplémentaire chargée et prête.
Décrocheur de Combiné (Nº de pièce
60961-01)
Fait sonner le Télé-Élément et décroche automatiquement
lorsque vous appuyez sur "CONVERSATION". Employer
avec les téléphones fournissant une tonalité lorsque le
Combiné est décroché.
Courroie pour le Cou (Nº de pièce 42157-01)
Permet de porter le Télé-Élément autour du cou.
Indicateur ‘En Ligne’ [OLI] (Nº de pièce 44932-01)
Alerte vos collègues que vous êtes en ligne. Se branche dans
la prise Accessoires/ Décrocheur
INFORMATION CONCERNANT LES
FOURNITURES ET ACCESSOIRES
Contactez votre distributeur régional ou visitez notre site web à
www.plantronics.com. Référez-vous également à la numérotation
des diagrammes pour les numéros de référence des pièces
détachées.
ENGLISH FRANÇAIS ESPAN
˜
OL PORTUGUE
ˆ
S KOREAN JAPANESE CHINESE
14
Placez le Commutateur de Configuration sur l’autre position
(A ou B).
Essayez de placer votre Élément de Base en différentes positions
et assurez-vous qu’aucun objet n’obstrue le Télé-Élément ou
l’Élément de Base.
Placer le Télé-Élément et l’Élément de Base loin de tout équipement
électronique ou autre dispositifs émetteurs de fréquences-radio.
Appuyez sur le Bouton de Canaux jusqu’à ce que le signal soit
clair.
S’assurer que les Réglages Manuels de Canaux sont bien "0/0".
S’il y a d’autres utilisateurs de CA10 dans votre voisinage
immédiat, appeler Plantronics pour avoir des instructions de
réglage du rayon d’action.
Un second Groupe de Batteries peut demeurer en place dans le
Réceptacle de Charge pendant que le Télé-Élément est en service.
Ceci fournit une source immédiate supplémentaire de durée de
communication. Voir les Groupes de Batteries supplémentaires
sous la rubrique Fournitures et Accessoires.
Le Centre d'assistance Plantronics se tient à votre entière
disposition ! Composez le 1.831.458.7700 (à l'invite 1, puis 2)
du lundi au vendredi, de 8h00 à 17h00, heure du Pacifique ;
faxez votre demande à Plantronics au 1.831.425.8654 ; visitez
notre site web à www.plantronics.com; ou contactez votre
distributeur régional.
22
5
21
J’ENTENDS UN BOURDONNEMENT OU
VROMBISSEMENT
J’AI BESOIN D’UNE DURÉE DE COMMUNICATION
PLUS LONGUE
SERVICE D’AIDE PLANTRONICS
JE PEUX ENTENDRE D’AUTRES UTILISATEURS DE
DISPOSITIFS SANS FIL
DÉPANNAGE
15
RECHANGES ET ACCESSOIRES
CA 10Gray2 Body.r2 12/12/01 6:50 PM Page 30
T
A
L
K
C
H
A
N
E
L
M
U
V
T
O
E
L
U
M
E
C
S
I
N
O
R
T
N
A
L
P
Page 23

ENGLISH FRANÇAIS ESPAN
˜
OL PORTUGUE
ˆ
S KOREAN JAPANESE CHINESE
16
Cet équipement numérique de Classe B est conforme àla
norme Canada ICES003.
Notice: L’étiquette Industry Canada identifie un équipement homologué. Cette
homologation signifie que l’équipement satisfait à certaines exigences des
réseaux de télécommunications du point de vue protection, fonctionnement et
sécurité. Le Département ne garantit pas que l’équipement fonctionnera à la
satisfaction de l’utilisateur.
Avant d’installer cet équipement, les utilisateurs devront s’assurer qu’il est permis
de les connecter aux services de la compagnie locale de télécommunications.
L’équipement devra aussi être installé en employant une méthode de connexion
acceptable. Dans certains cas, le câblage interne de la compagnie associé à un
service individuel d’une seule ligne pourra être prolongé par un ensemble de
connexion agréé (fil de rallonge téléphonique). Le client doit être conscient que le
respect des conditions ci-dessus peut ne pas empêcher une dégradation du
service dans certaines situations.
Les réparations des équipements homologués devront être réalisées par un atelier
de réparation canadien agréé, désigné par le fournisseur. Toute réparation ou
modification apportée par l’utilisateur de cet équipement, ou un mauvais
fonctionnement de l’équipement, peut permettre à la compagnie de
télécommunications de demander à l’utilisateur de déconnecter l’équipement.
Pour leur propre protection, les utilisateurs devront s’assurer que les mises à la
terre des câblages électriques d’alimentation, des lignes téléphoniques et des
tuyauteries métalliques internes d’eau, si présentes, sont bien interconnectées.
Cette précaution peut être particulièrement importante en zones rurales.
Attention: Les utilisateurs ne devront pas essayer de réaliser ces connexions
eux-mêmes, mais devront contacter les autorités appropriées de contrôle
électrique, ou un électricien, selon le cas.
Notice: Le Chiffre d’Équivalence de Sonnerie (REN) affecté à chaque dispositif
terminal fournit une indication du nombre maximal de terminaux qui pourront
être connectés à une interface téléphonique. Cet aboutissement sur une interface
pourra être constituée de toute combinaison de dispositifs, à condition seulement
que la somme des REN de tous les dispositifs ne dépasse pas 5.
Voir sur l’étiquette de l’équipement le chiffre REN applicable.
NOTICE INDUSTRY CANADA
17
GARANTIE ET SERVICE
Les informations suivantes sur la garantie et le service
ne s’appliquent qu’aux USA et au Canada. Pour toute
information sur d’autres pays, veuillez contacter
votre concessionnaire local.
Garantie Limitée
Plantronics, Inc. ("Plantronics") garantit à l’acheteur/consommateur original que,
sauf pour les limitations et exclusions définies ci-dessous, ce produit sera exempt
de tout défaut matériel ou de main d’oeuvre pendant une période d’un (1) an à
partir de la date d’achat originale ("Période de Garantie"). Les obligations de
Plantronics selon cette garantie se limiteront à la réparation ou au remplacement
gratuits, à l’option de Plantronics, de toute pièce ou élément s’avérant défectueux
en matériau ou main d’oeuvre pendant la Période de Garantie.
Exclusions de la Garantie
Cette Garantie ne s’applique qu’aux défauts matériels ou de main d’oeuvre en
usine. Toute condition causée par un accident, abus, emploi ou mise en oeuvre
incorrects, non-respect des instructions fournies par Plantronics, destruction ou
modification, mauvais voltages ou courants électriques, ou réparation ou entretien
entrepris par toute personne autre que Plantronics ou un service de réparation
agréé, n’est pas un défaut couvert par cette garantie. Dans ces cas, Plantronics
pourra facturer les matériaux et la main d’oeuvre, même pendant la période de
garantie. Les pièces sujettes à l’usure en cours de fonctionnement normal ne sont
pas couvertes par cette Garantie.
Garanties Implicites
Selon les lois provinciales, vous pourriez bénéficier de certaines garanties
implicites. CES GARANTIES IMPLICITES NE RESTERONT EN VIGUEUR QUE
PENDANT LA PÉRIODE DE GARANTIE. Certaines provinces ne permettent pas
de limiter la durée d’une garantie implicite, donc la limitation ci-dessus peut ne
pas s’appliquer à votre cas.
Dommages Accessoires ou Conséquents
NI PLANTRONICS NI VOTRE DÉTAILLANT OU CONCESSIONNAIRE VENDEUR
N’EST RESPONSABLE D’AUCUN DOMMAGE ACCESSOIRE OU CONSÉQUENT,
Y COMPRIS ET SANS LIMITATION LES PERTES ET BÉNÉFICES COMMERCIAUX,
LES DÉPENSES ACCESSOIRES, COÛTS, PERTES DE TEMPS, OU INCONVÉNIENTS.
Certaines provinces ne permettent pas d’exclusion ou de limitation de dommages
accessoires ou conséquents, donc la limitation ci-dessus peut ne pas s’appliquer
à votre cas.
CA 10Gray2 Body.r2 12/12/01 6:50 PM Page 32
Page 24

ENGLISH FRANÇAIS ESPAN
˜
OL PORTUGUE
ˆ
S KOREAN JAPANESE CHINESE
18
GARANTIE ET SERVICE
Autres Droits Légaux
Cette Garantie vous accorde certains droits, et vous pourriez avoir d’autres droits
qui varient d’une province à l’autre.
Comment Obtenir des Réparations sous Garantie
Garantie Limitée
Plantronics, Inc. ("Plantronics") garantit à l’acheteur/consommateur original que,
sauf pour les limitations et exclusions définies ci-dessous, ce produit sera exempt
de tout défaut matériel ou de main d’oeuvre pendant une période de deux (2)
ans à partir de la date d’achat originale ("Période de Garantie"). Les obligations
de Plantronics selon cette garantie se limiteront à la réparation ou au
remplacement gratuits, à l’option de Plantronics, de toute pièce ou élément
s’avérant défectueux en matériau ou main d’oeuvre pendant la Période de
Garantie.
Les informations suivantes concernant la garantie et le service ne s’appliquent
qu’aux U.S.A. et au Canada. Pour toute information sur d’autres pays, veuillez
contacter votre concessionnaire local.
Pour obtenir du service sous ou hors garantie, veuillez nous renvoyer
l’équipement, port payé, à l’adresse appropriée indiquée ci-dessous:
AUX ÉTAS-UNIS: AU CANADA (ONLY)
Plantronics Service Centre Plantronics Service Centre
345 Encinal Street 1455 Pitfield Boulevard
Santa Cruz, CA 95060 Saint-Laurent, Quebec H4S 1G3
Tél. 1.800.544.4660 Tél. 1.800.540.8363
1.831.458.7700 1.514.956.8363
Fax 1.800.279.0162 Fax 1.514.956.1825
Placer l'équipement dans l’emballage original, ou le placer dans un carton
robuste avec suffisamment d’emballage pour empêcher tout dégât. Inclure les
informations suivantes :
1. Preuve d’achat indiquant le modèle et la date de l’achat.
2. L’adresse où envoyer la facture
3. L’adresse où expédier l’équipement
4. Le nombre et la description des équipements expédiés
5. Nom et téléphone de la personne à appeler, si un contact s’avère nécessaire.
6. Raison du renvoi et description du problème
Tout dégât provenant au cours de l’expédition est considérée la responsabilité
du transporteur, et les réclamations sont à soumettre directement au
transporteur.
Le nom Plantronics, les logos Plantronics et SoundGuard sont des marques déposées de
Plantronics, Inc.
Vista, Quick Disconnect, Call Clarity et SoundGuard Plus sont des marques commerciales de
Plantronics, Inc.
GARANTIE ET SERVICE
19
CA 10Gray2 Body.r2 12/12/01 6:50 PM Page 34
Page 25

BIENVENIDOS
Le agradecemos que haya
seleccionado el amplificador del
auricular del teléfono inalámbrico
CA10 de Plantronics. Esta Guía para
el Usuario le ayudará a instalar su
Amplificador CA10 y aprender su
funcionamiento básico. Al auricular se
lo describe en una guía separada.
CA 10Gray2 Body.r2 12/12/01 6:50 PM Page 36
Page 26

ENGLISH FRANÇAIS ESPAN
˜
OL PORTUGUE
ˆ
S KOREAN JAPANESE CHINESE
3
2
CLAVE DEL DIAGRAMA
Luz indicadora "En Uso"
Botón para Hablar
Ficha del auricular
Luz indicadora del Silenciador
Botón para los canales
Retén del cable del auricular
Antena
Timbre Encendido/Apagado
[o utilice con elevador opcional]
Botón Silenciador
Control del volumen de
audición
Cable del adaptador del
auricular
(P/N 43446-02)
[no incluido con el modelo
CS10]
Porta-auricular/antena
Luz indicadora de energía
Luz indicadora de "En uso"
Luz de Carga de la batería
Control del volumen para
hablar
Botón para localizar
Botón para hablar
Recinto para cargar de la
Unidad remota
IInterruptor del nivel de
transmisión
Interruptor de la configuración
Graduaciones del canal
manuales
Adaptador AC
(P/N 45669-01 120V)
(P/N 45669-02 220V-240V)
Ficha del adaptador AC
Ficha elevadora del auricular
[Elevador del auricular no
incluido
Ficha del auricular de mano
Ficha del teléfono
Cable corto
(P/N 40974-01)
Unidad Remota
Unidade Base (Frente)
Parte Inferior de la Base
1
2
3
4
5
6
7
8
14
16
9
10
11
12
13
17
18
19
20
21
22
23
24
25
26
27
28
Unidade Base (Posterior)
15
INSTRUCCIONES IMPORTANTES ACERCA DE LA SEGURIDAD
Cada vez que utilice su equipo telefónico, usted deberá respetar ciertas
precauciones de seguridad básicas para reducir el riesgo de incendios,
electrocución y lesiones a las personas incluyendo lo que se indica a
continuación:
1. Lea y asegúrese de comprender todas las
instrucciones.
2. Respete todas las advertencias e instrucciones que se
indican en el producto. El símbolo identifica y alerta al
usuario acerca de la presencia de instrucciones importantes
relacionadas con el funcionamiento y servicio.
3. Desenchufe este producto del tomacorriente de la
pared antes de limpiarlo. No utilice limpiadores líquidos o
en aerosol. Utilice un trozo de tela humedecido para limpiarlo.
4. No coloque la unidad base cerca del agua, por
ejemplo, cerca de una tina, lavamanos, fregadero de la cocina o
pileta de lavandería, en un sótano húmedo ni cerca de una
piscina.
5. No coloque este producto sobre un carrito, base o
mesa inestable. El producto podría caerse ocasionándole
daños graves.
6. Este producto no deberá colocarse nunca cerca o
encima de un radiador o registro de calor. A este pro-
ducto no se lo deberá colocar en una instalación empotrada a
menos que se proporcione la ventilación adecuada.
7. Este producto debe funcionar solamente desde la
clase de fuente de energía indicada en la etiqueta de
las instrucciones. Si usted no está seguro/a acerca de la clase
de suministro de energía que llega a su casa, consulte con su
proveedor o con la compañía de energía local.
CA 10Gray2 Body.r2 12/12/01 6:50 PM Page 38
Page 27

ENGLISH FRANÇAIS ESPAN
˜
OL PORTUGUE
ˆ
S KOREAN JAPANESE CHINESE
5
4
INSTRUCCIONES IMPORTANTES ACERCA DE LA SEGURIDAD
8. No permita que haya nada apoyado sobre el cable.
No coloque este producto donde el cable pueda ser pisoteado por
las personas que caminan por el área.
9. No sobrecargue los tomacorriente y extensiones ya
que eso podría resultar en riesgo de incendio o de
electrocución.
10.No empuje nunca ninguna clase de objetos hacia el
interior de este producto a través de las ranuras de
la unidad base, ya que podría tocar puntos de voltaje
peligrosos o poner en cortocircuito a ciertas piezas, lo que podría
resultar en un riesgo de incendio o electrocución. No derrame
nunca líquido de ninguna clase sobre el producto.
11.Para reducir el riesgo de electrocución, no desarme
este producto, entrégueselo a personal de servicio calificado
cada vez que requiera servicio o trabajos de reparación. Al abrir
y quitar las tapas, usted podría exponerse a voltajes peligrosos y
a otros riesgos. Si vuelve a armar este producto de forma
equivocada podría provocar choques eléctricos la próxima ve que
se vuelva a utilizar el producto.
12.Evite utilizar el equipo de teléfono durante una
tormenta eléctrica. Puede existir un riesgo remoto de
electrocución debido a los rayos.
13.No utilice el equipo de teléfono para reportar acerca
de una pérdida de gas en las proximidades de dicha
fuga.
INSTRUCCIONES IMPORTANTES ACERCA DE LA SEGURIDAD
14. Desenchufe este producto del tomacorriente de la
pared y deje que el personal del servicio de
reparaciones adecuado se encargue de las
reparaciones bajo las siguientes condiciones:
a) Cuando el cable de energía eléctrico está dañado o
deshilachado.
b) Si se ha derramado líquido dentro de este producto.
c) Si se ha expuesto al producto a la lluvia o al agua.
d) Si el producto no funciona normalmente después de seguir las
instrucciones para su funcionamiento. Ajuste
solamente aquellos controles que se encuentran cubiertos en
las instrucciones del funcionamiento, ya que los ajustes
inapropiados de otros controles podría resultar en daños y por
lo general, requerirán extenso trabajo por parte de un técnico
calificado que pueda restablecer a este producto a su
funcionamiento normal.
e) Si este producto se ha caído o si se ha dañado la unidad base.
f) Si el producto exhibe un cambio significativo en cuanto a su
desempeño.
15.No instale nunca los cables del teléfono durante una
tormenta eléctrica.
16.No instale nunca las fichas de teléfono en lugares
húmedos, a menos que la ficha haya sido diseñada
específicamente para lugares húmedos.
17.No toque nunca los cables de teléfono o terminales
no aisladas a menos que la línea de teléfono haya sido
desconectada en la interfase de la red.
CA 10Gray2 Body.r2 12/12/01 6:50 PM Page 40
Page 28

ENGLISH FRANÇAIS ESPAN
˜
OL PORTUGUE
ˆ
S KOREAN JAPANESE CHINESE
6 7
PRECAUCION: Para reducir el riesgo de incendio o de
lesiones a las personas, lea y respete las siguientes
instrucciones.
1. Utilice solamente el paquete de baterías suministrado con
este producto.
2. No descarte el paquete de baterías en el fuego. Las células
podrían explotar. Verifique los códigos locales para obtener
instrucciones acerca de los posibles métodos para descartarlo.
3. No abra ni mutile el paquete de baterías. El electrolito liberado es
corrosivo y podría ocasionar daños a los ojos o a la piel y puede
resultar tóxico si se ingiere.
4. Tenga cuidado al manejar el paquete de baterías para no
provocar un "corto" en los contactos de la batería con los
materiales conductores tales como los de los anillos, brazaletes y
llaves. La batería o conductor pueden recalentarse y ocasionar
quemaduras.
5. Cargue el paquete de baterías de acuerdo a las instrucciones que
se suministran con esta unidad.
6. Respete la orientación apropiada entre el paquete de baterías y
los contactos del cargador.
CONSERVE ESTAS INSTRUCCIONES
INSTRUCCIONES IMPORTANTES ACERCA DE LA SEGURIDAD
18.Tenga cuidado al instalar o modificar las líneas
de teléfono.
19.Este producto deberá hacerse con el propósito de ser
suministrado por una Unidad de Potencia de Enchufe
Directo de Clase Mencionada calificada 9 VDC a 800
mA.
Plantronics Pieza Nº 45669-01 calificada a un voltaje de entrada
de 120 VAC, 60 Hz y un voltaje de salida de 9 VDC a 800 mA.
Plantronics Pieza Nº 45669-02, calificada a un voltaje de entrada
de 220 VAC- 240 VAC, 50 Hz y un voltaje de salida de 9 VDC a
800 mA.
20.Este producto requiere energía AC para poder
funcionar. Para poder tener servicio telefónico
durante un corte de energía, tenga a su disposición
otro teléfono que funcione solamente con la línea de
teléfono.
21.Mantenga todos los cables del producto alejados de
maquinaria en funcionamiento.
INSTRUCCIONES IMPORTANTES ACERCA DE LA SEGURIDAD
CONSERVE ESTAS INSTRUCCIONES
CA 10Gray2 Body.r2 12/12/01 6:50 PM Page 42
Page 29

ENGLISH FRANÇAIS ESPAN
˜
OL PORTUGUE
ˆ
S KOREAN JAPANESE CHINESE
8
ARMADO
Conecte el Amplificador CA10 a su teléfono utilizando las
ilustraciones que aparecen en la página ii.
Desenchufe el auricular de mano del teléfono, de la ficha de la
base de su teléfono y colóquelo en la ficha del auricular de
mano en la parte inferior de la Unidad Base del CA10.
Utilizando el cable corto provisto, enchufe un extremo en la
ficha del Teléfono y el otro extremo en la ficha del auricular de
mano del teléfono.
Ahora, conecte el Adaptador de AC con la Ficha del
Adaptador de AC y en el tomacorriente de la pared. El diodo
emisor de luz [LED] se encenderá después de ser conectado
pero la Luz Indicadora de "En Uso" ["In-Use"] permanecerá
apagada.
Asegúrese de quitar la aleta para jalar del aislador de batería
del embalaje que está ubicado entre la unidad remota y el
paquete de baterías. Adjunte la Unidad Remota al Paquete de
Baterías. El Remoto y el Paquete de Baterías se deslizan
fácilmente y calzan en su lugar del modo adecuado. No los
fuerce.
Conecte su auricular a la ficha del auricular de la Unidad
Remota . Presione el Cable del Auricular de Mano en el
Retén Si usted está utilizando un auricular cuyos cables
terminan en un módulo de Desconexión Rápida ["Quick
Disconnect"] ("QD", por sus siglas en inglés), usted necesitará el
QD para el cable del Adaptador del Auricular de 2.5 mm.
(P/N 43446-02).
Haga la Unidad Remota y el Paquete de Baterías hasta el recinto
para cargar hasta que el Indicador de Carga se ilumine.
15
19
11
6
3
14
13
242327
28
26
B
G
C
A
9
Nota: La Unidad Remota debe permanecer en la Base durante 5
segundos para establecer un eslabón de comunicaciones antes de
que el sistema pueda funcionar.
Antes de utilizarlo por primera vez, usted debe cargar la
Batería durante 8 horas antes de que el Remoto funcione alejado
de su Base.
Sin embargo, usted puede utilizar el Remoto mientras este se
encuentra en el recinto para cargar.(Nota: Esto puede alargar el
tiempo que tarda en cargarse). El LED de Carga se apagará
después de que la batería esté completamente cargada.
Ahora sí esta listo para hacer o para recibir
llamadas.
PASO 1
CA 10Gray2 Body.r2 12/12/01 6:50 PM Page 44
Page 30

ENGLISH FRANÇAIS ESPAN
˜
OL PORTUGUE
ˆ
S KOREAN JAPANESE CHINESE
10
MODO DE HACER UNA
LLAMADA
Con su auricular en posición, descuelgue el auricular de mano.
Oprima el Botón "TALK" [Hablar] ya sea en el Remoto o en la
Unidad Base . Las luces del Indicador "En Uso" en el
Remoto y en la Unidad base se encenderán y usted escuchará el
tono para marcar.
Si usted no escucha un tono para marcar, mueva el Interruptor de
Configuración hacia la graduación opuesta [A] o [B]. Si usted
aún no escucha un tono para marcar, vea la página 14 de la
Guía de Resolución de Problemas.
Llame a un compañero de trabajo. Cuando la otra persona
conteste, hable como de costumbre.
Si usted no suena lo suficientemente fuerte, mueva el Interruptor
del Nivel de Transmisión hasta la posición 2 o 3. Si usted
suena demasiado fuerte, mueva el Interruptor del Nivel de
Transmisión hasta la posición 2 o 3. Usted puede refinar el
nivel de transmisión aún más con el Control del Volumen para
Hablar .
Ajuste el volumen de la voz de su compañero de trabajo
utilizando el Control del Volumen de Audición.
Vuelva a colocar el auricular de mano al completar la llamada y
oprima el Botón "TALK" [Hablar] ya sea en el Remoto o en la
Unidad Base . Las Luces del Indicador En Uso se
apagarán.
14
1182
10
162020
14
1182
E
F
G
E
PASO 2
11
MODO DE RECIBIR UNA
LLAMADA
PASO 3
Con su auricular en posición, cuando su teléfono le avise que está
entrando una llamada, descuelgue el auricular de mano.
Oprima el Botón "TALK" [Hablar] ya sea en el Remoto o en la
Unidad Base . Las Luces del Indicador En Uso ["In-Use"]
se encenderán. Comience a hablar.
Vuelva a colocar el auricular de mano en la base una vez que
haya terminado de hablar y oprima el Botón "TALK" [Hablar] ya
sea en el Remoto o en la Unidad Base . ALas Luces del
Indicador En Uso ["In-Use"] se apagarán.
14
1182141182
E
E
G
PASO 4
DISPOSITIVO DE
LOCALIZACION
Si alguien en la Unidad Base necesita encontrar el remoto, al
oprimir el Botón "Page" [Localizar] , momentáneamente hace
que este emita dos "bips" largos y fuertes.
Si usted ha perdido el Remoto, oprima el Botón "Page"
[Localizar] durante 3 segundos y el Remoto emitirá una alerta
constante. Oprima el Botón "Talk" [Hablar] una vez que
localizó el Remoto.
2
17
17
D
CA 10Gray2 Body.r2 12/12/01 6:50 PM Page 46
Page 31

ENGLISH FRANÇAIS ESPAN
˜
OL PORTUGUE
ˆ
S KOREAN JAPANESE CHINESE
12
CLAVES AUDIOVISUALES
REMOTO
"Talk" [Hablar] In-Use [En Uso] — Diodo Emisor de Luz
[LED] verde. Encendido solamente cuando se activa el botón
"Talk" [Hablar] del Remoto o de la Unidad Base. Destella con el
timbre del teléfono cuando se utiliza el Elevador de Auricular de
Mano opcional (Ver Accesorios).
"Mute" [Silenciador] — Diodo Emisor de Luz [LED] rojo.
Encendido solamente cuando el audio de transmisión ha sido
"silenciado".
BASE
Energía — Diodo Emisor de Luz [LED] rojo. Encendido cada
vez que se aplica energía a la Base a través del Adaptador de
Energía AC.
"Talk" [Hablar] In-Use [En Uso] — Ver lo anterior.
Carga — Diodo Emisor de Luz color Ambar. Destella durante 2
segundos mientras verifica el contacto cuando el Remoto está
colocado en el Recinto para Cargar de la Unidad Base.
Permanece firme cuando se lo carga.
VISUAL
13
LEMBRETES AUDIO VISUAIS
Baterías casi gastadas — Dos (2) "bips" generados en
intervalos de 30 segundos cada vez que la energía esté por
acabarse. Se escucha solamente a través del auricular en la
modalidad TALK [Hablar], de otro modo es audible.
Fuera del alcance — Tres "bips" generados cada vez que el
Remoto está Fuera del Alcance de la Base. Se escucha solamente
en la modalidad TALK [Hablar], de otro modo, es audible.
Conectado — Un (1) "bip" escuchado a través del auricular
cada vez que se activa el botón "TALK" [Hablar] de la Base o
del Remoto.
Alerta del tono del timbre — (Exclusivo para el Elevador
del Auricular de Mano opcional)
El tono emitido por el Remoto sincronizado con el timbre del
teléfono; puede desactivarse utilizando el Interruptor del Timbre
en el Remoto. (Nota: al desactivar el timbre audible no se
desactiva el timbre que se escucha a través del auricular.)
AUDIO
CA 10Gray2 Body.r2 12/12/01 6:50 PM Page 48
Page 32

ENGLISH FRANÇAIS ESPAN
˜
OL PORTUGUE
ˆ
S KOREAN JAPANESE CHINESE
14
RESOLUCION DE PROBLEMAS
Asegúrese de que el Paquete de Baterías se encuentre asentado
de forma segura en el Recinto para Cargar y/o que esté
completamente cargado. El Paquete de Baterías debe cargarse
durante 8 horas antes de su primer uso.
Verifique que todos los cables estén conectados de forma correcta
y que estén asegurados en su lugar. Preste especial atención de
asegurarse que los cables del auricular de mano y del teléfono
estén conectados apropiadamente.
Ajuste el Control del Volumen de Audición.
Asegúrese de que la Unidad Remota se encuentre dentro del
alcance de la Unidad Base.
Asegúrese de que el auricular de mano esté descolgado.
Separe y vuelva a conectar el Paquete de Baterías y la Unidad
Remota.
Vuelva a colocar el Remoto en el cargador de la Unidad Base
durante 5 segundos para volver a establecer un eslabón de
comunicación.
Separe y vuelva a conectar el paquete de Baterías y la Unidad
Remota.
Quite y vuelva a colocar el cable de energía AC de la Unidad
Base.
Vuelva a colocar la Unidad Remota en el Recinto para Cargar
durante 5 segundos para volver a establecer un eslabón de
comunicación.
Asegúrese de que el botón "Mute" [Silenciador] esté apagado.
Asegúrese de que el Interruptor del Nivel de la Transmisión
esté en la posición 1 o 2.
Ajuste el auricular para que el tubo acústico quede más cerca de
su boca.
Ajuste el Control del Volumen para Hablar .
16
20
9
10
19
C
G
A
A
C
C
NO SE ESCUCHA EL TONO PARA MARCAR
MI REMOTO DEJÓ DE FUNCIONAR
LA PERSONA QUE LLAMA NO ESCUCHA MI VOZ
RESOLUCION DE PROBLEMAS
Mueva el Interruptor de Configuración hacia la graduación
opuesta (A o B).
Intente ubicar la Unidad Base en diferentes posiciones y
asegurarse de que no haya ningún objeto que obstruya al
Remoto o a la Unidad Base.
Ubique el Remoto y Unidades Base alejadas de equipo
electrónico o de otros dispositivos de frecuencia de radio.
Aperte o Botão de Canal hasta obtener una señal clara.
Asegúrese de que las Graduaciones Manuales de los Canales
estén en "0/0".
Si hay otras personas utilizando un CA10 en las proximidades
inmediatas, llame a Plantronics para recibir instrucciones acerca
del modo en que debe ajustar las graduaciones que controlan el
alcance.
Se puede tener un segundo Paquete de Baterías en el Recinto
para Cargar mientras se utiliza la Unidad Remota. Esto
proporciona un recurso inmediato de tiempo adicional para
hablar. Los paquetes adicionales se encuentran mencionados en
la sección de Productos y Accesorios.
¡El mostrador de ayuda de Plantronics está preparado para
asistirlo! Marque el 1.831.458.7700 (después marque el 1 y
luego el 2) de lunes a viernes, entre las 8:00 a.m. y las 5:00 p.m.
horario del Pacífico; envíele facsímiles a Plantronic marcando el
1.831.425.8654; visite nuestro sitio en el web en
www.plantronics.com; o llame a su distribuidor local.
20520
ESCUCHO A OTROS USUARIOS DE DISPOSITIVOS
INALAMBRICOS
NECESITO MAS TIEMPO PARA HABLAR
ESCRITORIO DE ASISTENCIA DE PLANTRONICS
ESCUCHO UN ZUMBIDO O ZUZURRO
15
CA 10Gray2 Body.r2 12/12/01 6:50 PM Page 50
Page 33

16
PIEZAS DE REPUESTO Y ACCESORIOS
Remoto (P/N 46366-01)
Paquete de baterías (P/N 46365-01)
Extienda el tiempo que tiene para hablar con una segunda
batería cargada y lista para continuar.
Elevador (P/N 60961-01)
Suena en la Unidad Remota para las llamadas que
entran y descuelga automáticamente al auricular de
mano cuando usted oprime "TALK" [Hablar]. Para
utilizar con teléfonos que proporcionan un tono para
marcar cuando el Auricular de Mano esté levantado.
Correa para el cuello (P/N 42157-01)
Permite usar el Remoto alrededor de su cuello. (No mostrada)
Indicador En línea ["OLI", por sus siglas
en inglés]
(P/N 46656-01)
Alerta a los compañeros de trabajo que usted está
utilizando el teléfono. Se conecta en la ficha del
Accesorio/Elevador.
INFORMACION ACERCA DE LOS PRODUCTOS
Y ACCESORIOS
Comuníquese con su distribuidor local o visite nuestro sitio en el web
en www.plantronics.com. También vea la clave del diagrama para
obtener los números de las partes adicionales.
Obrigado por ter escolhido o
Amplificador modelo CA10 para
Telefone Sem fio com Fone de Ouvido
da Plantronics. Este Guia de Usuário
lhe ajudará a instalar seu Amplificador
CA10 e aprender sua operação
básica. O Fone de Ouvido é descrito
em um guia separado.
BEM-VINDO
CA 10Gray2 Body.r2 12/12/01 6:50 PM Page 52
T
A
L
K
C
H
A
N
E
L
M
U
V
T
O
E
L
U
M
E
R
T
N
A
L
P
C
S
I
N
O
Page 34

ENGLISH FRANÇAIS ESPAN
˜
OL PORTUGUE
ˆ
S KOREAN JAPANESE CHINESE
2
DIAGRAMA CHAVE
Luz Indicadora "Em Uso"
Botão de conversa
Tomada para o Fone de Ouvido
Luz Indicadora para Silenciar
Botão de canal
Cabo Retentor do Fone de
Ouvido
Antena
Campainha Ligar/Desligar
[para uso com Lifter
(Levantador) opcional]
Botão Silenciador
Controle de Volume de Audição
Cabo Adaptador do Fone de
Ouvido
(P/N 43446-02)
[não incluído com o modelo
CS10]
Segurador para o Fone de
Ouvido/Antena
Luz Indicadora de Energia
Luz Indicadora Em Uso
Luz de Carga de Bateria
Controle de Volume de
conversa
Botão para localizar
Botão de conversa
Carregador para Aparelho
Móvel
Interruptor de Nível de
Transmissão
Interruptor de configuração
Manual de Configuração
de canais
Adaptador de Corrente
Alternada
(P/N 45669-01 120V)
(P/N 45669-02 220-240V)
Adaptador de Corrente
Alternada
Tomada de Levantar para o
Fone de Ouvido
[Tomada de Levantar não
incluída]
Tomada para Fone de Ouvido
Tomada para Telefone
Corda pequena
(P/N 40974-01)
Aparelho Movel
Unidade Base (Frente)
Base Inferior
1
2
3
4
5
6
7
8
14
16
9
10
11
12
13
17
18
19
20
21
22
23
24
25
26
27
Unidade Base (Atras)
15
3
IMPORTANTES INSTRUÇÕES DE SEGURANÇA
Ao usar seu equipamento de telefone, sempre deve-se seguir precauções
de segurança básicas para reduzir o risco de fogo, choque elétrico, e
dano pessoal, inclusive os seguintes:
1. Leia e entenda todas as instruções.
2. Siga todas as advertências e instruções marcadas no
produto. O símbolo identifica e alerta o usuário da
presença de instruções importantes de operação e assistência.
3. Desligue este produto da parede antes de limpar.
Não use limpadores líquidos ou de aerossol. Use um pano úmido
por limpar.
4. Não coloque a unidade básica próxima a água, por
exemplo, perto de uma banheira, balde de lavar, pia
de cozinha ou de lavar roupa, num porão molhado
ou perto de piscina.
5. Não coloque este produto numa mesa, carrinho ou
estante insegura. O produto pode cair, causando graves danos ao
mesmo.
6. Este produto nunca deverá ser colocado próximo ou
em cima de um aquecedor ou termômetro de
temperatura. Este produto não deve ser colocado numa
instalação embutida a menos que uma ventilação apropriada
fosse provida.
7. Este produto só deve ser operado usando a fonte de
energia indicada na etiqueta de instruções. Se você
não está seguro do tipo de energia fornecida para sua casa,
consulte seu agente ou companhia de eletricidade local.
8. Não permita com que nada fique em cima do fio de
eletricidade. Não coloque este produto onde o fio será
abusado por pessoas andando ao redor dele.
CA 10Gray2 Body.r2 12/12/01 6:50 PM Page 54
Page 35

ENGLISH FRANÇAIS ESPAN
˜
OL PORTUGUE
ˆ
S KOREAN JAPANESE CHINESE
5
4
IMPORTANTES INSTRUÇÕES DE SEGURANÇA
9. Não sobrecarregue as tomadas e fios de extensão,
pois isto pode resultar no risco de fogo ou choque
elétrico.
10.Nunca enfie objetos de qualquer tipo neste produto
pelas aberturas da unidade base, pois eles podem tocar
em pontos perigosos de voltagem ou causar um curto circuito que
poderiam resultar em um risco de fogo ou choque elétrico. Nunca
derrame líquido de qualquer tipo no produto.
11.Para se reduzir o risco de choque elétrico, não
desmonte este produto, no caso da necessidade de reparos,
leve-o para uma assistência técnica de serviço qualificado. Ao
abrir ou remover as coberturas você estará se expondo a
voltagens perigosas ou outros riscos. A montagem incorreta
poderá causar choque elétrico quando o produto for,
subseqüentemente, usado novamente.
12.Evite usar o equipamento de telefone durante uma
tempestade elétrica. Pode-se correr um pequeno risco de
choque elétrico causado por raios.
13.Não use o equipamento de telefone para avisar
sobre um vazamento de gás na redondeza do
próprio vazamento.
IMPORTANTES INSTRUÇÕES DE SEGURANÇA
14.Desligar este produto da tomada da parede e
procure pela assistência técnica de serviço
qualificado para o seu conserto, sob as seguintes
condições:
a) Quando a fio elétrico ou tomada estiverem danificados ou
queimados.
b) Se líquido foi derramado no produto.
c) Se o produto foi exposto a chuva ou água.
d) Se o produto não funciona corretamente depois de seguir as
instruções operacionais. Ajuste somente os controles que são
mencionados pelas instruções operacionais, pois os ajustes
impróprios de outros controles, podem resultar em danos, e
irão, freqüentemente, requerer extensa assistência técnica por
um técnico qualificado para restaurar o funcionamento normal
do produto.
e) Se o produto foi derrubado ou a unidade base foi danificada.
f) Se o produto demonstra uma distinta mudança no seu
desempenho.
15.Nunca instale fios de telefone durante uma tempestade de raio.
16.Nunca instale uma tomada de telefone em locais
molhados, a menos que a tomada for, especificamente, feita
para locais molhados.
17.Nunca toque em fios de telefone ou terminais sem
isolamento a menos que a linha de telefone estiver
desconectada na interface de cadeia.
18.Use precaução ao instalar ou modificar linhas de
telefone.
CA 10Gray2 Body.r2 12/12/01 6:50 PM Page 56
Page 36

ENGLISH FRANÇAIS ESPAN
˜
OL PORTUGUE
ˆ
S KOREAN JAPANESE CHINESE
7
AVISO: Para reduzir o risco de fogo ou dano para as
pessoas, leia e siga as seguintes instruções.
1. Use somente a bateria fornecida junto com este produto.
2. Não jogue a bateria ao fogo. As células podem explodir.
Confira com códigos locais para possíveis instruções da
disposição da mesma.
3. Não abra ou corte em pedaços a bateria. O Eletrólito que é
liberado é corrosivo e pode causar dano para olhos ou pele,
podendo ser tóxico se engolido.
4. Use o máximo de cuidado ao lidar com a bateria para não
causar curto nos pólos, usando materiais que conduzem energia
como anéis, correntes, e chaves. A bateria ou condutor podem
aquecer demais e causando queimaduras.
5. Carregue a bateria conforme instruções fornecidas com
esta unidade.
6. Mantenha as instruções apropriadas entre a bateria e contatos
do carregador.
GUARDE ESTAS INSTRUÇÕES
19."Este produto deverá ser suprido com Listed Class,
Unidade de Energia direta Plug-In de medida de 9
VDC a 800 mA.".
Peça Plantronics N° 45669-01, com medida para um entrada de
voltagem de entrada de 120 VAC, 60 Hz e uma voltagem de
saída de 9 VDC a 800 mA.
Peça Plantronics N° 45669-02, com medida para um entrada de
voltagem de entrada de 220 VAC-240 VAC, 50 Hz e uma
voltagem de saída de 9 VAC a 800 mA.
20.Este produto requer energia de Corrente Alternada
(AC) para ser operado. Para ter serviço telefônico
durante a falta de força elétrica, tenha disponível
outro telefone que funcione somente com linha
telefônica.
21.Mantenha todos os fios do produto longe de
máquinas operacionais.
IMPORTANTES INSTRUÇÕES DE SEGURANÇA IMPORTANTES INSTRUÇÕES DE SEGURANÇA
GUARDE ESTAS INSTRUÇÕES
6
CA 10Gray2 Body.r2 12/12/01 6:50 PM Page 58
Page 37

ENGLISH FRANÇAIS ESPAN
˜
OL PORTUGUE
ˆ
S KOREAN JAPANESE CHINESE
9
Observação: O Aparelho Móvel deve permanecer na Base
por 5 segundos, para se estabelecer um vínculo de
comunicações, antes que o sistema possa funcionar.
Antes do primeiro uso, a Bateria tem que carregar por 8 horas
antes do Aparelho Móvel poder operar longe da Base.
Porém, você pode usar o Aparelho enquanto estiver no
Carregador.(observação: Poderá aumentar o tempo de
carregamento.) O indicador LED de Carregar irá se apagar
depois que a Bateria estiver completamente carregada.
Você está agora pronto para fazer ou receber
chamadas.
8
ETAPA 1
LIGAÇÃO
Conecte o Amplificador CA10 ao seu telefone usando as
ilustrações na página ii.
Desconectar o aparelho de mão da tomada da base de telefone e
insere na Tomada para Aparelho de Mão no lado inferior da
Unidade de Base CA10.
Usando o fio Curto fornecido, conectar uma das pontas na
tomada do Telefone CA10 e o outro lado na tomada do seu
aparelho de mão.
Agora conecte o Adaptador de Corrente Alternada (AC) a
tomada do Adaptador de AC, e a uma tomada da
parede. O indicador tipo LED de Forçairá ascender ao
conectar, mas a Luz do Indicador de "Em uso" permanecerá
desligada.
Você terá que remover uma fita de puxar do isolador de bateria
que fica entre o Aparelho Móvel e a Bateria. Conectar o
Aparelho Móvel à Bateria. Os dois devem se encaixar facilmente
quando forem gentilmente juntados. Não forçar.
Conecte seu fone na tomada do Aparelho Móvel. Aperte o Cabo
do Fone no Retentor . Se você está usando um fone em cujo o
cabo termina num módulo tipo Desconexão Rápida‘ (QD, Quick
Disconnect), você precisará do fio adaptador QD para fone de
2.5mm (P/N 43446-02).
Assentar o Aparelho Móvel e Bateria na base de Carregar até
o Indicador de Carregar ascender.
15
19
11
6
14
13
242327
28
26
B
G
C
A
CA 10Gray2 Body.r2 12/12/01 6:50 PM Page 60
Page 38

ENGLISH FRANÇAIS ESPAN
˜
OL PORTUGUE
ˆ
S KOREAN JAPANESE CHINESE
11
COMO RECEBER UMA
CHAMADA
ETAPA 3
Com seu fone em posição, ao que o seu telefone toque, indicando
uma ligação entrando, coloque o aparelho de mão fora do
gancho.
Aperte o Botão de Conversa no Aparelho Móvel ou a Unidade
Base . As Luzes Indicadoras de "Em Uso" irão ascender.
Comece a falar.
Colocar de volta o aparelho de mão, na conclusão da chamada e
aperte o Botão de Conversa no Aparelho Móvel ou na
Unidade Base . As Luzes Indicadoras de Em Uso se
apagam.
14
1182141182
E
E
G
ETAPA 4
FUNÇÃO BIP
Se alguém perto da Unidade Base lhe necessita localizar, ao
apertar o Botão de "Bip" , isso momentaneamente, causa o
Aparelho Móvel a emitir dois longos e alto "Bips".
Se você não encontra o Aparelho Móvel, aperte o Botão de "Bip"
por 3 segundos e o Aparelho Móvel emitirá um Bip de
Localização. Aperte o Botão de Conversa uma vez que você
localizou o Aparelho Móvel.
2
17
17
D
10
COMO FAZER UMA
CHAMADA
Com seu fone em posição, coloque o aparelho de mão fora
do gancho.
Aperte o Botão de Conversa no Aparelho Móvel ou na
Unidade Base . As luzes Indicadoras de Em uso no
Aparelho Móvel e Base ascendem e você ouvirá um sinal de
linha.
Se você não ouvir um sinal de linha, mude o Interruptor de
Configuração tpara a posição oposta [A] ou [B]. Se você
ainda não ouvir um sinal de linha, referir-se a página 14, para
Solução de Problemas.
Ligue para um colega de trabalho. Quando atender, fale
normalmente.
Se a sua voz não estiver alta o bastante, mude o Interruptor de
Nível de Transmissão posicionando no 1 ou 2. Se a sua voz
estiver muito alta, mude o Interruptor de Nível de Transmissão
posicionando no 2 ou 3. Você pode ajustar melhor o nível de tom
de transmissão através do Controle de Volume de Conversa .
Ajuste o volume de voz do seu colega de trabalho, na linha,
usando o Controle de Volume de Audição.
Ao concluir a chamada, coloque de volta o aparelho de mão, e
aperte o Botão de Conversa no Aparelho Móvel ou na
Unidade Base . As Luzes Indicadoras de In use se
apagam.
14
1182
101620
21
14
1182
E
F
G
E
ETAPA 2
CA 10Gray2 Body.r2 12/12/01 6:50 PM Page 62
Page 39

ENGLISH FRANÇAIS ESPAN
˜
OL PORTUGUE
ˆ
S KOREAN JAPANESE CHINESE
13
LEMBRETES AUDIO VISUAIS
Bateria Fraca — Dois (2) "bips", gerados com 30 segundos
de intervalo, sempre que a energia estiver baixa. Esse "bip" só é
ouvido pelo fone em modo de "TALK" (Conversa), caso contrário
audível.
Fora de alcance— Três (3) "bips" gerados sempre que o
Aparelho Móvel chegar a um ponto fora do alcance da Base. Só
ouvido no modo de "TALK" (conversa) pelo fone de ouvido, caso
contrário audível.
Vinculo —Um (1) "bip" é ouvido através do fone de ouvido,
sempre que o botão de TALK (Conversa) da Base ou do
Aparelho Móvel é ativado.
Tom da Campainha de Alerta — (Exclusivo para a opção
Lifter (levantador) de Aparelho de Mão)
O som emitido pelo Aparelho Móvel cronometrado com a
campainha do telefone; pode ser incapacitado usando o Ringer
Switch (interruptor de campainha) no Aparelho Móvel. (Obs.:
incapacitando a campainha audível não incapacita a
campainha que soa pelo fone.)
AUDIO
12
LEMBRETES AUDIO VISUAIS
APARELHO MÓVEL
Talk (In-Use) — (Conversar) - Indicador LED Verde. Ascende
quando o botão de TALK (Conversa) do Aparelho Móvel ou
Unidade Base é ativado. Pisca ao mesmo tempo da campainha
do telefone quando do uso opcional do Lifter (Levantador) de
Aparelho de mão (veja os Acessórios).
Emudecedor — Indicador LED Vermelho. Ascende somente
quando a transmissão de áudio fica "emudecida".
BASE
Energia — Indicador LED Vermelho. Ascende a qualquer
instância que energia elétrica é aplicada à Base pelo Adaptador
de Corrente Alternada (AC).
Talk (In-Use) — (Conversa) Veja acima.
Charge — (Carregar) Indicador LED mbar. Pisca durante 2
segundos enquanto verificando contato quando Distante é
colocado em Unidade Básica que Carrega Bem. Restos afiançam
quando carregando.
VISUAL
CA 10Gray2 Body.r2 12/12/01 6:50 PM Page 64
Page 40

ENGLISH FRANÇAIS ESPAN
˜
OL PORTUGUE
ˆ
S KOREAN JAPANESE CHINESE
15
RESOLUÇÃO DE PROBLEMAS
Mova o Interruptor de Configuração para a posição oposta
(A ou B).
Tente posicionar a sua Unidade Base em locais diferentes e tenha
certeza que nenhum objeto obstrua a Unidade Base e Aparelho
Móvel.
Posicione a Unidade Base e Aparelho Móvel longe de
equipamento eletrônico ou outros dispositivos de freqüência
de rádio.
Aperte o Botão de Canal até que você adquire um sinal claro.
Tenha certeza da Configuração Manual de Canal é "0/0."
Se outras pessoas estiverem usando o CA10 em sua vizinhança
imediata, chame a Plantronics para receber instruções de como
ajustar as configurações de controle de alcance.
Uma segunda Bateria pode ser carregado no Carregador
enquanto o Aparelho Móvel estiver em uso. Isto lhe dá uma fonte
imediata de tempo de conversa adicional. Baterias extras estão
listada sob a Sessão de Materiais e Acessórios.
A Assistência ao Consumidor da Plantronics está pronta para o
ajudar!
Disque 1.831.458.7700, de segunda à sexta-feira, das 8:00 à
17:00 horas (horário Pacifico EUA); ou Fax pelo n°
1.831.425.8654; e visite o nosso website no endereço
www.plantronics.com, ou procure o seu distribuidor local.
20520
EU OUÇO UM ZUMBIDO OU ZUNIDO
EU ESCUTO OUTROS USUÁRIOS COM APARELHOS
SEM FIO
NECESSITO DE MAIS TEMPO PARA CONVERSAR
ASSISTÊNCIA AO CONSUMIDOR DA PLANTRONICS
Ajuste o fone de ouvido para que o microfone fique mais perto
da sua boca.
14
RESOLUÇÃO DE PROBLEMAS
Tenha certeza que a Bateria do seu Aparelho Móvel está
conectada com firmeza no Carregador e/ou estão
completamente carregadas. A Bateria tem que ficar carregando
por 8 horas antes de ser usada pela primeira vez.
Verificar se todos os fios estão conectados corretamente e
firmemente em suas devidas conexões. Prestar muita atenção
para que os fios do Aparelho de Mão e Telefone estejam
devidamente conectados.
Ajuste o Controle de Volume de Audição.
Tenha certeza que o Aparelho Móvel está dentro do alcance da
Unidade Base.
Tenha certeza o fone está fora do gancho.
Separe e depois conecte de novo a Bateria ao Aparelho Móvel.
Colocar o Aparelho Móvel de volta na Unidade Base durante 5
segundos para estabelecer novamente, um vínculo de
comunicação
Separe e depois conecte de novo a Bateria ao Aparelho Móvel.
Remova e substitua o fio de energia da Corrente Alternada (AC)
da Unidade Base.
Coloque o Aparelho Móvel no Carregador por 5 segundos para
estabelecer novamente, um vínculo de comunicação.
Tenha certeza o Botão de Emudecer está apagado.
Tenha certeza que a Tomada de Nível de Transmissão está na
posição 1 ou 2.
Ajuste o Controle de Volume de Conversa .
16
20
9
10
C
G
A
A
C
C
EU NÃO ESCUTO O SINAL DE LINHA
MEU APARELHO MÓVEL PAROU DE
FUNCIONAR
A PESSOA QUE LIGA NÃO PODE OUVIR
MINHA VOZ
CA 10Gray2 Body.r2 12/12/01 6:50 PM Page 66
Page 41

16
PARTES DE REPOSIÇÃO E ACESSÓRIOS
Aparelho Móvel (P/N 46366-01)
Bateria (P/N 46365-01)
Prolongue seu tempo de conversa tendo uma segunda
Bateria carregada e pronta.
Lifter (Levantador) (P/N 60961-01)
Toca no Aparelho Móvel avisando as chamadas que
entram e automaticamente coloca o fone fora de
gancho quando você aperta "TALK" (CONVERSA). Para
ser usado com os telefones que permitem sinal de linha
quando o Aparelho de Mão é levantado.
Fita para o pescoço (P/N 42157-01)
Permite com que o Aparelho Móvel seja usado ao redor
do pescoço.
Indicador On Line (Conectado na linha)
[OLI] (P/N 46656-01)
Avisa colegas de trabalho que você está usando o telefone.
É conectado direto na tomada do acessório Lifter (Levantador)
INFORMAÇÃO SOBRE MATERIAIS E
ACESSÓRIOS
Procure o seu distribuidor local ou visite o nosso website no
endereço www.plantronics.com. Também veja Diagrama Chave
para os números de peças adicionais.
CA 10Gray2 Body.r2 12/12/01 6:50 PM Page 68
T
A
L
K
C
H
A
N
E
L
M
U
V
T
O
E
L
U
M
E
C
S
I
N
O
R
T
N
A
L
P
Page 42

ENGLISH FRANÇAIS ESPAN
˜
OL PORTUGUE
ˆ
S KOREAN JAPANESE CHINESE
3
2
1
2
3
4
5
6
7
8
14
15
16
9
10
11
12
13
17
18
19
20
21
22
23
24
25
26
27
28
CA 10Gray2 Body.r2 12/12/01 6:50 PM Page 70
Page 43

ENGLISH FRANÇAIS ESPAN
˜
OL PORTUGUE
ˆ
S KOREAN JAPANESE CHINESE
4
5
CA 10Gray2 Body.r2 12/12/01 6:50 PM Page 72
Page 44

7
ENGLISH FRANÇAIS ESPAN
˜
OL PORTUGUE
ˆ
S KOREAN JAPANESE CHINESE
6
B
G
C
A
26
27
28
23 24
13
14
6
11
15
19
CA 10Gray2 Body.r2 12/12/01 6:50 PM Page 74
Page 45

ENGLISH FRANÇAIS ESPAN
˜
OL PORTUGUE
ˆ
S KOREAN JAPANESE CHINESE
8
9
E
F
G
E
14
1
2
21
16
2
18
14
1
18
10
CA 10Gray2 Body.r2 12/12/01 6:50 PM Page 76
Page 46

ENGLISH FRANÇAIS ESPAN
˜
OL PORTUGUE
ˆ
S KOREAN JAPANESE CHINESE
10
E
E
G
14
1
2
18
2
14
1
18
11
D
2
17
17
CA 10Gray2 Body.r2 12/12/01 6:50 PM Page 78
Page 47

ENGLISH FRANÇAIS ESPAN
˜
OL PORTUGUE
ˆ
S KOREAN JAPANESE CHINESE
12
13
C
G
A
A
C
C
19
10
9
CA 10Gray2 Body.r2 12/12/01 6:50 PM Page 80
Page 48

14
CA 10Gray2 Body.r2 12/12/01 6:50 PM Page 82
C
H
A
N
E
L
M
U
V
T
O
L
U
M
E
C
S
I
N
O
R
T
N
A
L
P
T
A
L
K
E
Page 49

ENGLISH FRANÇAIS ESPAN
˜
OL PORTUGUE
ˆ
S KOREAN JAPANESE CHINESE
2
1
2
3
4
5
6
7
8
14
15
16
9
10
11
12
13
17
18
19
20
21
22
23
24
25
26
27
28
3
CA 10Gray2 Body.r2 12/12/01 6:50 PM Page 84
Page 50

ENGLISH FRANÇAIS ESPAN
˜
OL PORTUGUE
ˆ
S KOREAN JAPANESE CHINESE
4
5
CA 10Gray2 Body.r2 12/12/01 6:50 PM Page 86
Page 51

ENGLISH FRANÇAIS ESPAN
˜
OL PORTUGUE
ˆ
S KOREAN JAPANESE CHINESE
7
6
B
G
C
A
19
15
11
3
6
13
24
23
14
27
28
26
CA 10Gray2 Body.r2 12/12/01 6:50 PM Page 88
Page 52

ENGLISH FRANÇAIS ESPAN
˜
OL PORTUGUE
ˆ
S KOREAN JAPANESE CHINESE
8
9
E
F
G
E
14
1
2
18
21
20
16
10
2
18
14
1
CA 10Gray2 Body.r2 12/12/01 6:50 PM Page 90
Page 53

ENGLISH FRANÇAIS ESPAN
˜
OL PORTUGUE
ˆ
S KOREAN JAPANESE CHINESE
10
E
E
G
2
14
1
18
2
18
14
1
11
D
17
17
2
CA 10Gray2 Body.r2 12/12/01 6:50 PM Page 92
Page 54

ENGLISH FRANÇAIS ESPAN
˜
OL PORTUGUE
ˆ
S KOREAN JAPANESE CHINESE
12
13
C
G
A
A
C
C
10
9
20
16
CA 10Gray2 Body.r2 12/12/01 6:50 PM Page 94
Page 55

ENGLISH FRANÇAIS ESPAN
˜
OL PORTUGUE
ˆ
S KOREAN JAPANESE CHINESE
14
21
22
5
15
CA 10Gray2 Body.r2 12/12/01 6:50 PM Page 96
T
A
L
K
C
H
A
N
E
L
M
U
V
T
O
E
L
U
M
E
C
S
I
N
O
R
T
N
A
L
P
Page 56

CA 10Gray2 Body.r2 12/12/01 6:50 PM Page 98
Page 57

ENGLISH FRANÇAIS ESPAN
˜
OL PORTUGUE
ˆ
S KOREAN JAPANESE CHINESE
2
1
2
3
4
5
6
7
8
14
15
16
9
10
11
12
13
17
18
19
20
21
22
23
24
25
26
27
28
3
CA 10Gray2 Body.r2 12/12/01 6:50 PM Page 100
Page 58

4
ENGLISH FRANÇAIS ESPAN
˜
OL PORTUGUE
ˆ
S KOREAN JAPANESE CHINESE
5
CA 10Gray2 Body.r2 12/12/01 6:50 PM Page 102
Page 59

6
ENGLISH FRANÇAIS ESPAN
˜
OL PORTUGUE
ˆ
S KOREAN JAPANESE CHINESE
7
B
G
C
A
26
27
28
23 24
13
14
3
6
11
15
19
CA 10Gray2 Body.r2 12/12/01 6:50 PM Page 104
Page 60

ENGLISH FRANÇAIS ESPAN
˜
OL PORTUGUE
ˆ
S KOREAN JAPANESE CHINESE
8
9
E
F
G
E
14
1
2
21
20
16
10
2
18
14
1
18
CA 10Gray2 Body.r2 12/12/01 6:50 PM Page 106
Page 61

ENGLISH FRANÇAIS ESPAN
˜
OL PORTUGUE
ˆ
S KOREAN JAPANESE CHINESE
10
E
E
G
14
1
2
18
2
14
1
18
11
D
2
17
17
CA 10Gray2 Body.r2 12/12/01 6:50 PM Page 108
Page 62

ENGLISH FRANÇAIS ESPAN
˜
OL PORTUGUE
ˆ
S KOREAN JAPANESE CHINESE
12 13
C
G
A
A
C
C
19
10
9
20
16
CA 10Gray2 Body.r2 12/12/01 6:50 PM Page 110
Page 63

14
20
20
5
CA 10Gray2 Body.r2 12/12/01 6:50 PM Page 112
 Loading...