

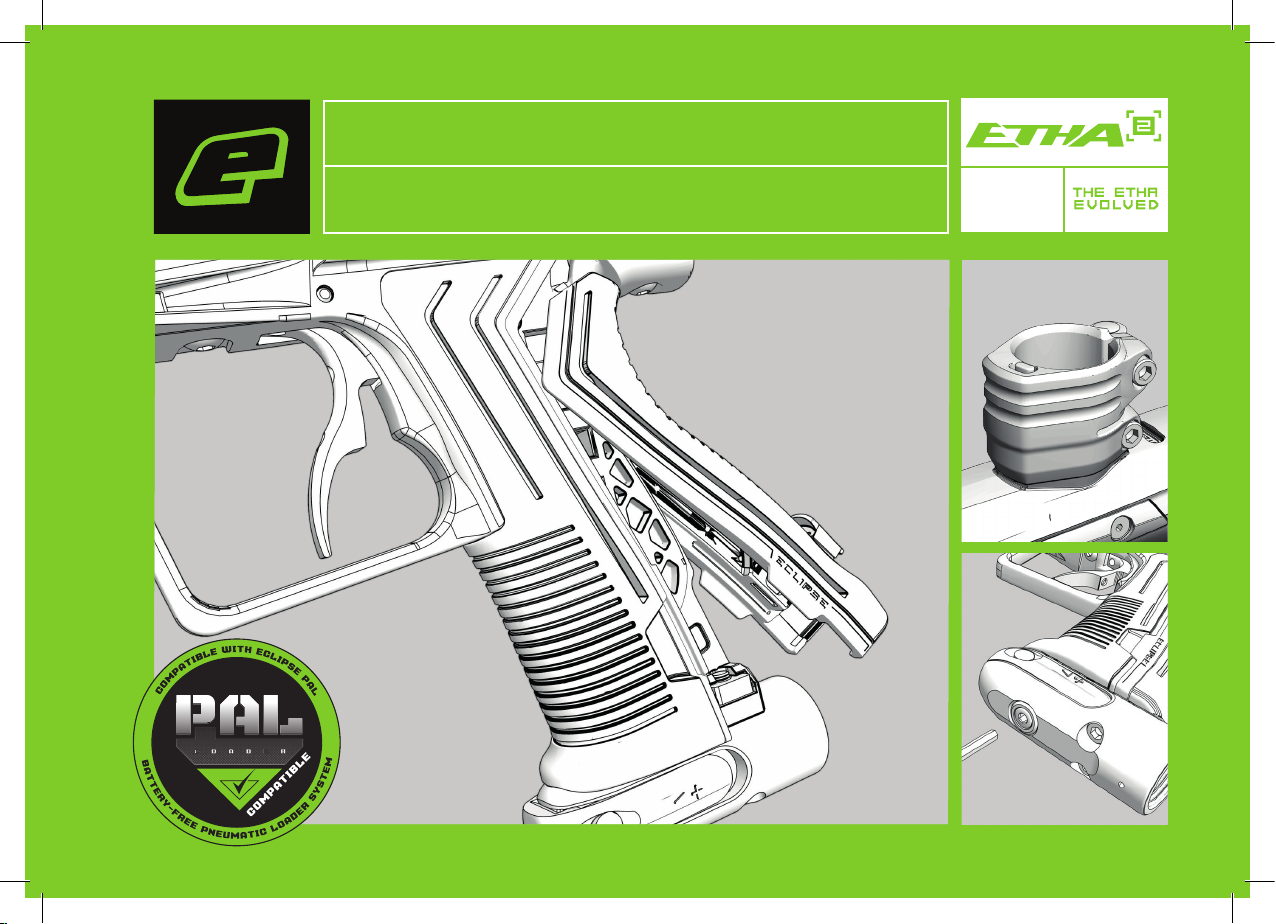
PLANET ECLIPSE ETHA2 User Manual
01
ETHA2 PAL
PLANET ECLIPSE: ETHA2 PAL
USER MANUAL / ENGLISH
.68 CAL
ETHA2 PAL
02
02
WARNINGS
READ CAREFULLY BEFORE USE
!
THE PLANET ECLIPSE ETHA2 IS NOT A TOY. PAINTBALL
SAFETY RULES MUST BE FOLLOWED AT ALL TIMES.
!
Careless or improper use of the ETHA2, including failure to follow
instructions and warnings within this User Manual could cause
serious injury or death.
!
Do not remove or deface any warnings attached to the ETHA2.
!
Paintball industry standard eye/face/ear and head protection
designed specically to stop paintballs and meeting ASTM standard
F1776 (USA) or CE standard (Europe) must be worn by the user and
any person within range. Proper protection must be worn during
assembly, cleaning and maintenance.
!
Hearing protection should be worn.
!
Never shoot at a person who is not wearing proper protection.
!
Never look directly into the barrel of the marker. Accidental
discharge into the eyes may cause permanent injury or death.
Never look into the barrel or breech area of the ETHA2 whilst the
marker is switched on and able to re.
!
Keep the ETHA2 switched o until ready to shoot.
!
Treat every marker as if it is loaded and ready to re.
!
The electronic On/O button is the marker’s disabling device, also
known as a safety. Always switch o the marker when not in use.
!
Always t a barrel-blocking device to the ETHA2 when not in use.
!
Always remove paintballs from the ETHA2 when not in use.
!
Do not eld strip or remove any parts while the marker is
pressurised.
!
Do not pressurise the ETHA2 without all the components of the
marker correctly installed, as high-pressure gas may be emitted.
!
Do not re the ETHA2 without the bolt correctly installed.
!
Never put your nger or any foreign objects into the paintball feed
tube of the ETHA2.
!
Never allow pressurised gas to come into contact with any part of
your body.
!
Always remove the rst stage regulator and relieve all residual gas
pressure from the ETHA2 before disassembly.
!
Always remove the rst stage regulator and relieve all residual gas
pressure from the ETHA2 for transport and storage.
!
Always follow guidelines given with your rst stage regulator for safe
transportation and storage.
!
Always store the ETHA2 in a secure place.
!
Observe all local and national laws, regulations and guidelines.
ETHA2 PAL
WARNING
03
03
WARNINGS
READ CAREFULLY BEFORE USE
!
Persons under 18 years of age must have adult supervision when
using or handling the ETHA2.
!
Use only professional paintball elds where codes of safety are
strictly enforced.
!
Use compressed air/nitrogen only. Do not use any other
compressed gas or pressurised liquid including CO2.
!
Always follow instructions, warnings and guidelines given with any
rst stage regulator you use with the ETHA2.
!
Use 0.68 inch calibre paintballs only.
!
Always measure your marker’s velocity before playing paintball,
using a suitable chronograph.
!
Never shoot at velocities in excess of 300 feet (91.44 metres) per
second, or at velocities greater than local or national laws allow.
!
Any installations, modications or repairs should be carried out by
a qualied individual at a licensed and insured paintball facility.
WARNING!
This user manual must accompany the product in the event of resale or new
ownership. Should you be unsure at any stage you must seek expert advice.
This Users Manual is in English.
It contains important safety guidelines and
instructions. Should you be unsure at any
stage, or unable to understand the contents
of this manual you must seek expert advice.
Le mode d’emploi est en Anglais.
Il contient des instructions et mesures de
sécurité importantes. En cas de doute, ou
s’il vous est impossible de comprendre le
contenu du monde d’emploi, demandez
conseil à un expert.
Este manual de usuarios (operarios)
Usarios está en Inglés.Contiene importantes
normas de seguridad e instrucciones. Si no
está seguro de algùn punto o no entiende los
contenidos de este manual debe consultar
con un experto.
Diese Bedienungs - und
Benutzeranleitung ist in Englisch.
Sie enthålt wichtige Sicherheitsrichtlinen und bestimmungen. Solten Sie sich in irgendeiner
Weise unsicher sein, oder den Inhalte dies
Heftes nicht verstehen, lassen Sie sich bitte
von einen Experten beraten.

04
ETHA2 PAL
CONTENTS
GAME ON!
QUICK START (06 -14)
06 Setting up the ETHA2
08 Switching the ETHA2 On/O
09 Status indicator
10 Velocity adjustment
11 Trigger adjustment
12 Unloading the ETHA2
14 Storage and transportation
MAINTENANCE
15 On-line maintenance videos
ELECTRONICS (16 -17)
16 The set-up mode
17 Presets
RESET (18 -19)
18 Factory reset
19 Installing a 9V battery
FAULT FINDING (20 - 23)
20 Fault nding tables
TECHNICAL (24 - 36)
24 Parts list
26 ETHA2 inline regulator
27 Gamma Core bolt assembly
28 Solenoid assembly
29 Push On Purge System (POPS) assembly
30 Breech Sensor (BS) assembly
31 Tournament lock button
32 ETHA2 frame assembly
33 ETHA2 circuit board
34 PAL Clamping feed neck assembly
35 Two-piece grips
36 Attaching the PAL Loader System
SUPPORT (37 - 41)
37 Index
38 Our promise
39 Warranty Registration Card
41 Notes
PLEASE NOTE
Most ETHA2 diagrams throughout this manual show the standard ETHA2 feed
neck and not the PAL feed neck. This does not aect any specic instructions.

05
ETHA2 PAL
FOLLOW OUR OFFICIAL PLANET ECLIPSE
SOCIAL MEDIA CHANNELS TO KEEP UP TO DATE
WITH OUR TECH SUPPORT EVENTS CALENDAR.
WE GOT
YOUR
BACK!!!
OUR ARMY OF PLANET ECLIPSE PRO
TECHS ATTEND PAINTBALL EVENTS ALL
OVER THE WORLD TO MAKE SURE THAT
YOU AND YOUR ECLIPSE MARKER ARE
FIRING ON ALL CYLINDERS, AT ALL TIMES,
IN ALL GAME SCENARIOS.
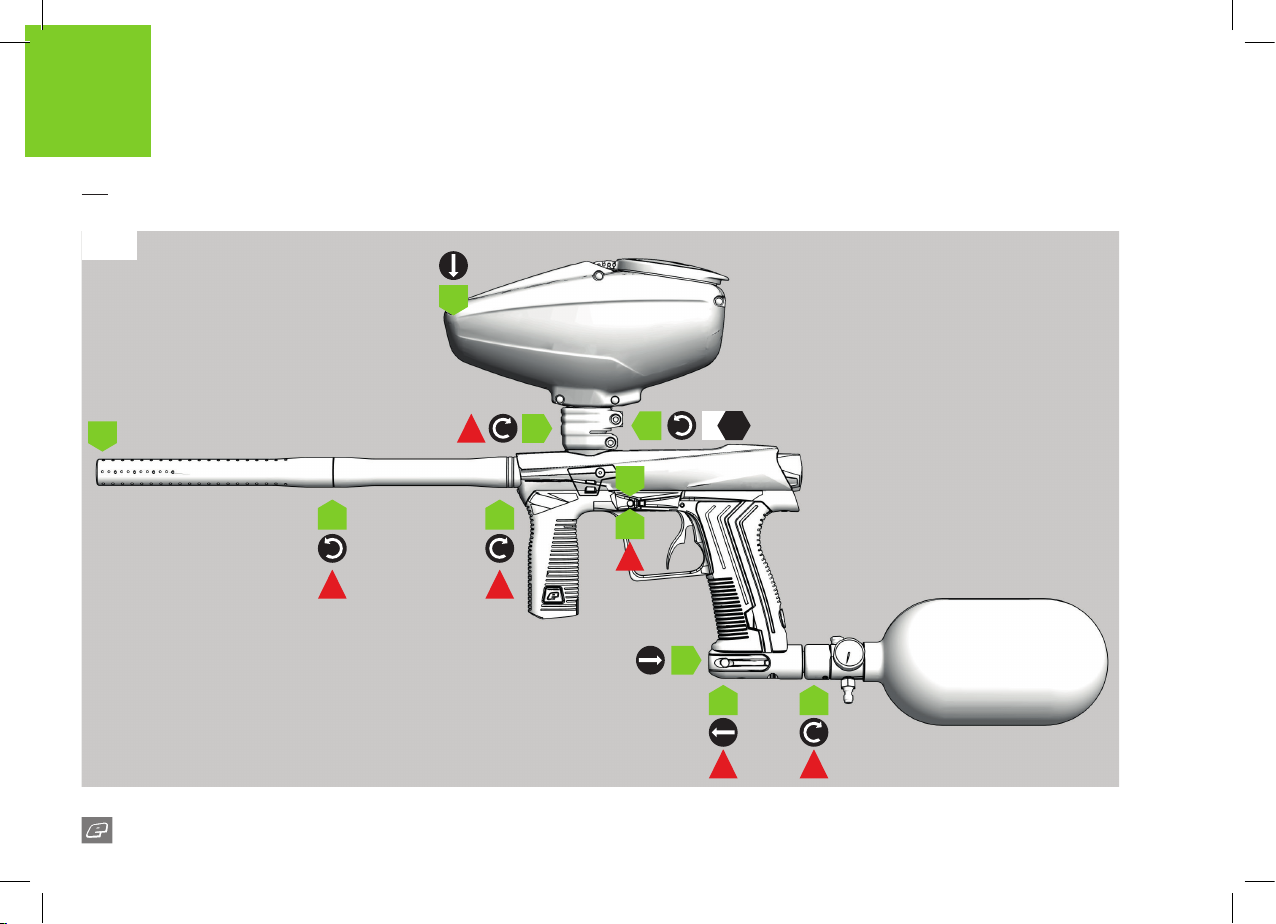
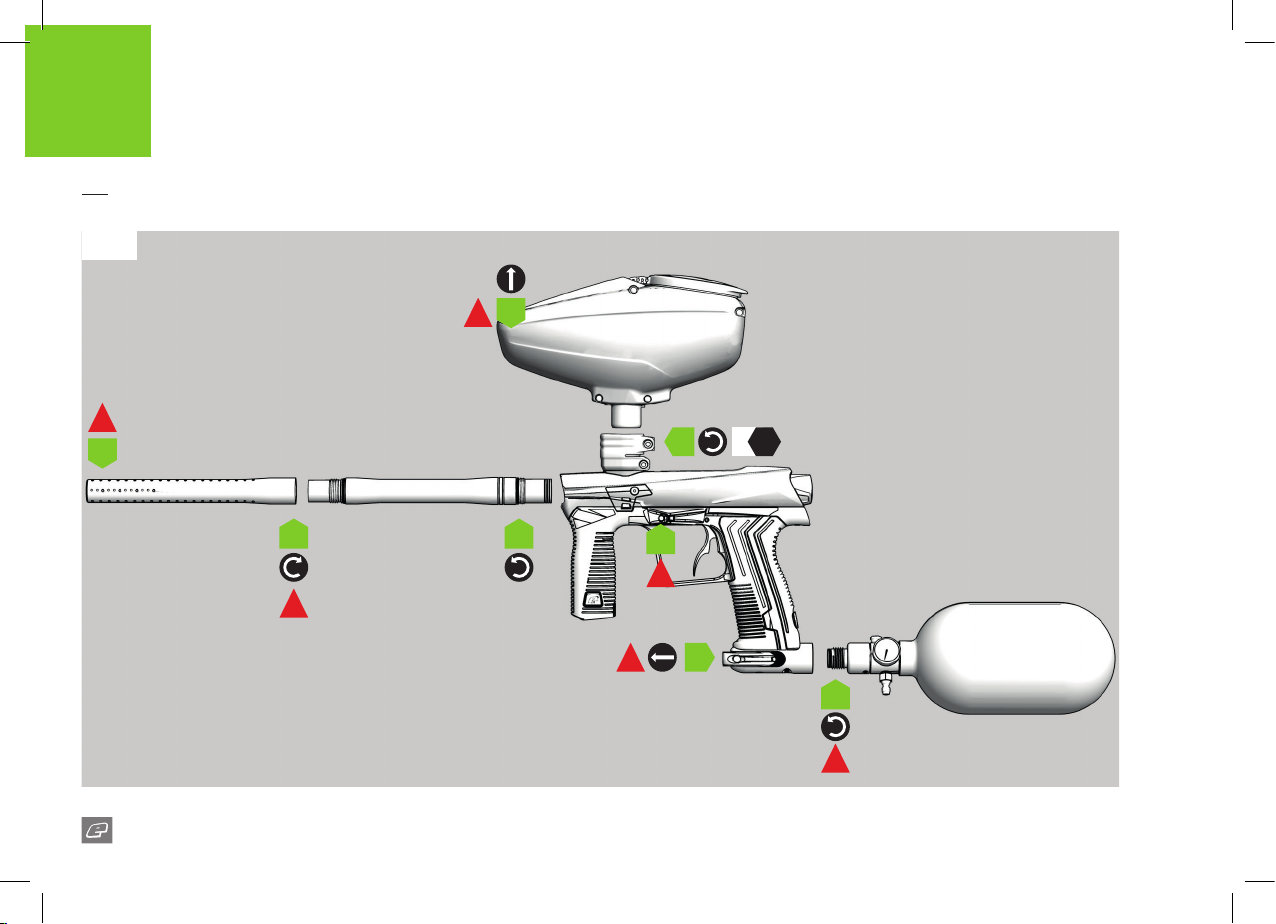
06
ETHA2 PAL
FIG-1
QUICK START
SETTING UP THE ETHA2
H
D
5
I
CB
22
G
K
A
1
5/32
HEX
J
E
3 4
F

07
ETHA2 PAL
WARNING
QUICK START
SETTING UP THE ETHA2
FIG-1
A
Ensure the marker is switched o before you begin.
B
Screw both ends of the barrel together.
Screw the barrel tip counter-clockwise onto the barrel back.
C
Screw the complete barrel to the marker.
The barrel back screws clockwise into the marker body.
D
Attach barrel blocking device for safety.
E
Ensure the marker is de-gassed.
Push and hold the POPS button and pull the POPS switch away
from the POPS body.
F
Attach the preset air system.
Screw the air system clockwise into the POPS body.
G
Loosen the PAL clamping feed neck.
Open the feed neck lever away from the feed neck.
Unscrew the feed neck lever screw counter-clockwise.
H
Attach the loader.
If the feed neck is too tight, loosen the clamping feed neck more.
I
Secure the loader.
Close the feed neck lever to secure.
Screw the feed neck lever screw clockwise to tighten.
J
Gas the marker.
Push the POPS switch into the POPS body until it engages.
K
Switch on the ETHA2.
1
IMPORTANT! To switch On/O see page 8.
2
DO NOT over-tighten the barrel.
3
IMPORTANT! Always ensure marker is de-gassed when setting up.
4
NEVER use CO2. Only use compressed air or Nitrogen.
5
DO NOT over-tighten the feed neck. This may damage the ETHA2.
WARNING!
Always make sure that the marker is o with a barrel blocking device installed
and that no paintballs are in the ETHA2 or loader before installing an air system.
Compressed air and nitrogen systems can be extremely dangerous if handled
or used incorrectly.
Only attach an air system certied for use within the country of use.
Never add lubricants or grease into the ll adaptor of the air system regulator.
Ensure that all screws are tightened and no parts are loose before installing an
air system.
Do not pressurise the ETHA2 without the bolt system correctly installed, as high
pressure gas will be emitted.
Do not install a compressed air system or load paintballs into the ETHA2 until
you feel condent with your ability to handle the marker safely and responsibly.
08
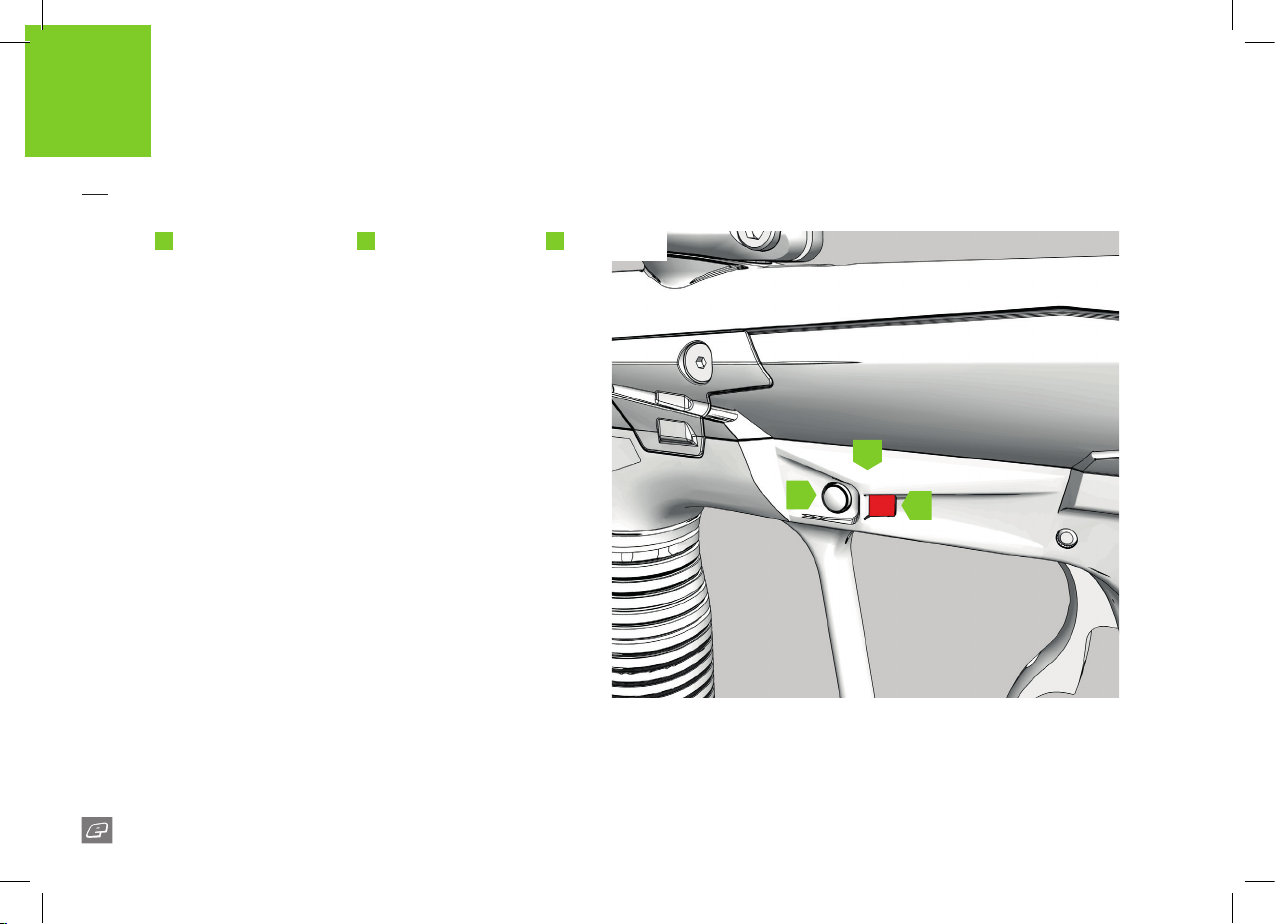
ETHA2 PAL
QUICK START
SWITCHING THE ETHA2
ON/OFF
The frame A houses the On/O button B and the status indicator C.
Use the On/O button to switch the ETHA2 On/O.
FIG-1
To switch the ETHA2 on press and hold the On/O button. Release the
On/O button when the status indicator lights up.
On power up, if the ETHA2 is unable to load its previous settings it will
restore the factory settings. If this happens, the LED will ash RED (error),
then BLUE factory reset).
To switch the ETHA2 o press and hold the On/O button. Release the
On/O button when the status indicator turns red. The ETHA2 will now
switch o.
Firing the ETHA2
Pull the trigger to re the ETHA2. If the marker is able to re then it will
do so.
FIG-1
A
B
C

09
ETHA2 PAL
WARNING
QUICK START
STATUS INDICATOR
FIG-1
The status indicator is visible on each side of the ETHA2 and is used to
indicate a number of dierent things.
Breech sensor status
C
After power up the ETHA2’s status indicator
of the breech sensor (BS). The breech sensor (BS) is used to detect
paintballs in the breech of the marker.
The table below shows each LED colour and its relevant BS status.
will display the status
FIG-1
CB
Battery status
1
Tap the On/O button B .
2
The status indicator C will indicate the status of the battery for
2 seconds (see the table below for battery status colour information).
LED COLOUR BREECH SENSOR (BS) STATUS
FLASHING YELLOW
FLASHING LIGHT BLUE
FLASHING PURPLE (SLOW)
FLASHING PURPLE (FAST)
RED
BS enabled. NO paintball detected.
Marker WILL NOT re.
BS enabled. Paintball detected.
Marker WILL re.
BS disabled. Marker WILL re.
Blockage detected. BS disabled.
Marker WILL re.
Replace battery.
Marker may or may not re.
LED COLOUR BATTERY STATUS
GREEN Battery level is good.
YELLOW Battery level is low.
RED Replace the battery.
FLASHING RED Insufcient energy, replace battery immediately.
The status indicator also indicates the various marker parameter settings.
See pages 16-17.
WARNING!
When the battery indicator is being displayed the marker is still on and will re if
the trigger is pulled - depending on the BS status.
Do not dry re/shoot the marker without paintballs. Prolonged dry ring may
lead to damage/wear of the internal components of the marker.
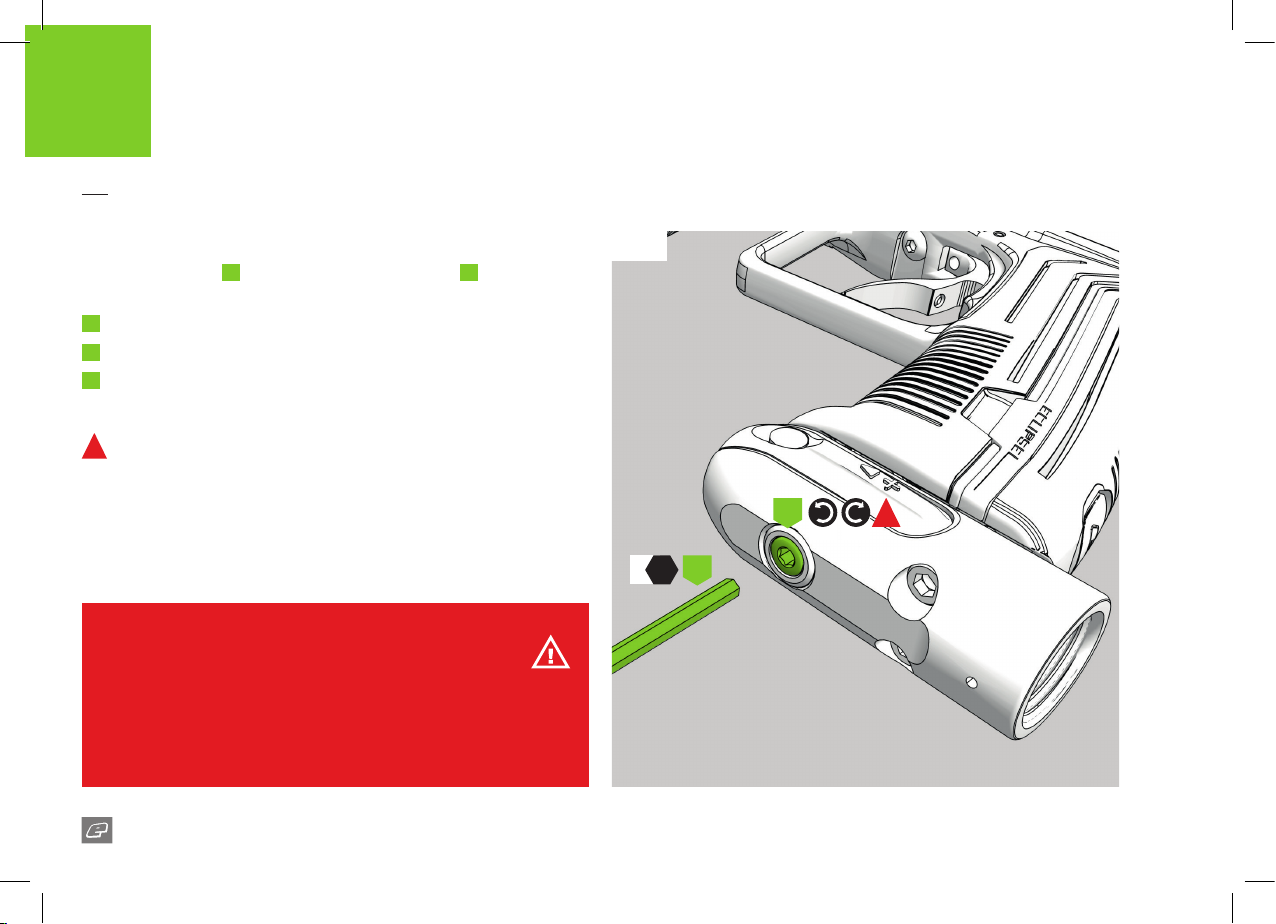
10
ETHA2 PAL
WARNING
QUICK START
VELOCITY ADJUSTMENT
FIG-1
A
Insert a 1/8 hex key
velocity of the ETHA2.
1
Turn the hex key clockwise to reduce velocity.
2
Turn the hex key counter-clockwise to increase velocity.
3
Fire two clearing shots after each velocity adjustment for an
accurate velocity reading.
1
DO NOT turn the adjuster screw in too far. This will prevent the
ETHA2 from ring.
into the velocity adjuster screw B to alter the
WARNING!
DO NOT exceed 300FPS.
ALWAYS wear correct protective equipment when ring your marker.
NEVER point your marker in the direction of other people when not on the eld.
ALWAYS be aware of where the barrel is facing when adjusting the velocity.
FIG-1
HEX
1/8
B
A
1
–+
11
ETHA2 PAL
WARNING
QUICK START
TRIGGER ADJUSTMENT
FIG-1
A
The pre-travel screw
the microswitch is actuated. Clockwise reduces the amount of travel
(shortening the trigger), counter-clockwise increases the trigger pretravel distance.
The trigger spring screw
return. Clockwise increases the spring strength, counter-clockwise
reduces the spring strength.
The post-travel screw
the microswitch has been actuated. Clockwise reduces the amount of
travel (shortening the trigger), counter-clockwise increases the trigger
post-travel distance.
adjusts the distance the trigger travels before
B
adjusts the spring strength of the trigger
C
adjusts the distance the trigger travels once
WARNING!
Always make sure the marker is OFF and de-gassed with a barrel blocking
device installed and that no paintballs are in the ETHA2 or loader before
adjusting the trigger.
Do not wind the screws in too far as this may prevent the ETHA2 from ring
or even damage the marker.
If the pre-travel screw is wound in too far this could cause the ETHA2 to
re unintentionally.
FIG-1
1/16
HEX
A
–+
B
+–
C
–+
12
ETHA2 PAL
FIG-1
1
B
QUICK START
UNLOADING THE ETHA2
F
5
E
5/32
HEX
GH
6
A
2
3
C
D
4
13
ETHA2 PAL
WARNING
QUICK START
UNLOADING THE ETHA2
FIG-1
A
Switch the marker o.
B
Ensure that a barrel blocking device is tted for safety.
C
De-gas the marker.
Push and hold the POPS button and pull the POPS switch away
from the POPS body.
D
Remove the Preset air system.
Unscrew the air system counter-clockwise from the POPS body.
E
Loosen the PAL clamping feed neck.
Open the feed neck lever away from the feed neck.
Unscrew the feed neck lever screw counter-clockwise.
F
Remove the loader.
If the feed neck is too tight, loosen the clamping feed neck more.
G
Remove the barrel from the marker body.
Unscrew counter-clockwise to remove.
H
Remove the barrel tip from barrel back.
Unscrew clockwise to remove.
1
IMPORTANT! Take extra precaution to avoid injury.
2
IMPORTANT! To switch On/O, see page 8.
3
IMPORTANT! Always de-gas before unloading.
4
IMPORTANT! Always remove air system before unloading.
5
IMPORTANT! Always remove any paintballs from the breech of the
marker once the loader has been removed.
6
IMPORTANT! Unscrew the barrel tip CLOCKWISE from the back.
WARNING!
Always make sure that the marker is o with a barrel blocking device installed
and that no paintballs are in the ETHA2 or loader before unloading.
Compressed air and nitrogen systems can be extremely dangerous if handled
or used incorrectly.
NEVER leave the ETHA2 gassed up when unloading.
NEVER point your marker in the direction of other people when not on the eld.
Remove any paintballs from the breech before storing your ETHA2.
 Loading...