


WARNING
2
ADHERE STRICTLY TO THESE AND ALL OTHER SAFETY INSTRUCTIONS AND GUIDELINES!
01.Please read and understand all instruction manuals before use.
02.The Eclipse Etha is not a toy. PAINTBALL SAFETY
RULES MUST BE FOLLOWED AT ALL TIMES.
03.Careless or improper use, including failure to follow instructions and warnings within this User Manual and attached to the Etha could cause death or serious injury.
04.Do not remove or deface any warnings attached to the Etha.
05.Paintball industry standard eye/face/ear and head protection designed specifically to stop paintballs and meeting ASTM standard F1776 (USA) or CE standard (Europe) must be worn by the user and any person within range. Proper protection must be worn during assembly, cleaning and maintenance.
06.Hearing protection should be worn.
07.Never shoot at a person who is not wearing proper protection.
08.Never look directly into the barrel of the marker. Accidental discharge into the eyes may cause permanent injury or death. Never look into the barrel or breech area of the Etha whilst the marker is switched on and able to fire.
09.Keep the Etha switched off until ready to shoot.
10.Treat every marker as if it is loaded and ready to fire.
11.The electronic on/off is the markers safety, always switch off the marker when not in use.
Always fit a barrel-blocking device to the Etha when not in use.
12.Always remove all paintballs from the Etha when not in use on the field of play.
13.Never point the Etha at anything you do not intend to shoot.
14.Do not shoot at persons within close range.
15.Do not field strip or remove any parts while the marker is pressurised.
16.Do not pressurise the Etha without the bolt system correctly installed, as high-pressure gas will be emitted.
17.Do not fire the Etha without the bolt system correctly installed.
18.Never put your finger or any foreign objects into the paintball feed tube of the Etha.
19.Never allow pressurised gas to come into contact with any part of your body.
20.Always remove the first stage regulator and relieve all residual gas pressure from the Etha before disassembly.
21.Always remove the first stage regulator and relieve all residual gas pressure from the Etha for transport and storage.
ADHERE STRICTLY TO THESE AND ALL OTHER SAFETY INSTRUCTIONS AND GUIDELINES!
22.Always follow guidelines given with your first stage regulator for safe transportation and storage.
23.Always store the Etha in a secure place. Persons under 18 years of age must have adult supervision when using or handling the Etha.
24.Observe all local and national laws, regulations and guidelines.
25.Use only professional paintball fields where codes of safety are strictly enforced.
26.Use compressed air/nitrogen only. Do not use any other compressed gas or pressurised liquid including CO2.
27.Always follow instructions, warnings and guidelines given with any first stage regulator you use with the Etha.
28.Use 0.68 calibre paintballs only.
29.Always measure your marker’s velocity before playing paintball, using a suitable chronograph.
30.Never shoot at velocities in excess of 300 feet (91.44 meters) per second, or at velocities greater than local or national laws allow.
31.Any installations, modifications or repairs should be carried out by a qualified individual at a licensed and insured paintball facility.
This user manual must accompany the product in the
event of resale or new ownership. Should you be unsure at any stage you must seek expert advice (See service centres PAGE 60).
This Users Manual is in English.
It contains important safety guidelines 
 and Instructions. Should you be unsure
  at any stage, or unable to understand
the contents of this manual you must seek expert advice.
Le mode d’emploi est en Anglais.
Il contient des instructions et mesures de sécurité importantes. En cas de doute, ou s’il vous est impossible de comprendre le contenu du monde d’emploi, demandez conseil à un
expert.
ESTE MANUAL DE USUARIOS (oPERARIOS) usarios está en
Inglés.
Contiene importantes normas de seguridad e instrucciones. Si no está seguro de algùn punto o no entiende los contenidos de este manual debe consultar con un experto.
Diese Bedienungs - und Benutzeranleitung ist in
Englisch.
Sie enthålt wichtige Sicherheitsrichtlinen und - bestimmungen. Solten Sie sich in irgendeiner Weise unsicher sein, oder den Inhalte dies Heftes nicht verstehen, lassen Sie sich bitte von einen Experten beraten.
QUICK GUIDE
CONTENTS
INTRODUCTION
QUICK SET-UP
ORIENTATION
USING THE ETHA
USER INTERFACE
MAINTENANCE
FAULT FINDING
PARTS LIST
SPARES & ACCESSORIES INDEX
WARNING
3

CONTENTS
4
6 INTRODUCTION |
22 |
> Installing a preset air system |
||
24 |
> Attaching a loader |
|||
An introduction to Planet Eclipse and the Etha |
||||
25 |
> Setting the Trigger |
|||
paintball marker. |
||||
|
|
26 |
> adjusting the velocity |
|
6 >Welcome to Planet Eclipse |
27 |
> Unloading the Etha |
||
|
>The Planet Eclipse Etha Paintball Marker |
28 |
> Storage and Transportation |
|
7 >Included with the Etha Marker |
29 |
> THE tournament lock |
||
|
> Marker Specifications |
30 USER INTERFACE |
||
8 QUICK SETUP |
||||
In depth information on setting up the Etha. |
||||
Details on how to get up and running quickly with your |
30 |
> Understanding the BBSS Operation |
||
Etha. This section is essential reading for everyone. |
||||
|
|
|
> The battery level indicator |
|
8 > SWITCHING ON THE Etha |
31 |
> the set up mode |
||
|
> SWITCHING OFF THE Etha |
|
> modifying a parameter |
|
|
> FIRING the Etha |
|
> Exiting set up mode |
|
|
> The Etha circuit board |
32 |
> Set up parameters |
|
9 > USING THE Break Beam SENSOR SYSTEM |
|
> The firing mode parameter |
||
10 |
> Factory set-up guide |
|
> The maximum Rate OF fire parameter with |
|
11 |
> Replacing A 9V BATTERY |
|
BBSS on (capped modes) |
|
12 ORIENTATION |
|
> The maximum Rate OF fire parameter with |
||
|
BBSS off |
|||
Names the component parts of the Etha Marker. This |
33 |
> Dwell |
||
section is essential reading for everyone. |
|
> Debounce |
||
12 |
> The Etha Paintball Marker |
|
> The Factory Reset |
|
34 MAINTENANCE |
||||
13 |
> The Shaft4 Barrel |
|||
14 |
> The SL3 Inline Regulator |
A guide to performing routine maintenance. |
||
15 |
> the bolt system |
34 |
> the Break Beam Sensor System (BBSS) |
|
16 |
> The Solenoid assembly |
|||
17 |
> The On/Off Purge System (oops) |
36 |
> the SL3 Inline Regulator |
|
18 |
> THE Etha NAVIGATION CONSOLE |
38 |
> Advanced SL3 Inline Regulator maintenance |
|
19 |
> Operational Overview |
39 |
> Cleaning the bolt system |
|
20 USING YOUR ETHA |
42 |
> Assembling the bolt system |
||
44 |
> Removing the frame |
|||
Detailed information on how to use the Etha. |
45 |
> Attaching the frame |
||
20 |
> SETTING UP your Etha |
46 |
> the trigger assembly |
|
48 |
> THE SOLENOID manifold |
|||
|
> INSTALLING A Barrel |
50 |
> THE Etha SOLENOID valve |
|
|
> T-SLOT MOUNTING SYSTEM |
51 |
> The on/Off Purge SYSTEM (OOPS) |
|
21 |
> 90 degree hose fitting |
|
|
|
>Straight hose fitting
>Macroline hosing

53 FAULT FINDING
Information on how to resolve any problems that might arise with your Etha.
56 PARTS LIST
Lists of components that make up the Etha.
60 SERVICE CENTRES
Information on the location of your nearest Etha Service Centre.
61 SPARES
Available upgrades / repair kits for your Etha.
62 INDEX
Etha Manual Index
WARRANTY CARD
Tear-out product registration card to be completed and returned. Alternatively register online at www.planeteclipse.com
QUICK GUIDE
CONTENTS
INTRODUCTION
QUICK SET-UP
ORIENTATION USING THE ETHA USER INTERFACE MAINTENANCE FAULT FINDING PARTS LIST
SPARES & ACCESSORIES INDEX
CONTENTS
5

INTRODUCTION
WELCOME TO PLANET ECLIPSE
Over the last 20 years, Planet Eclipse and Paintball have changed and evolved beyond belief. From humble beginnings in a rundown store on Deansgate in the heart of Manchester city centre to a new purpose built facility in Manchester, England.
We at Planet Eclipse have stayed true to the core values that we have always fought hard to uphold. These values are more than just words, they are what we believe; as a company, employees and as players. We want the equipment that we produce to be the best that it can be and we will not compromise on quality or shy away from research or innovation.
No matter if you are playing in the woods, down at your local paintball site or if you are competing at the World Cup of Paintball for big money prizes, you should demand the very best for your money and that is what we aim to deliver, backed up with award winning customer service and support.
No matter who you are, a player from a championship winning pro team, or a recreational scenario team… we feel every loss and will celebrate your every victory... Get more!
Ledz (Director, Planet Eclipse Ltd)
THE PLANET ECLIPSE ETHA PAINTBALL MARKER
Making a paintball marker that has the core attributes of a Planet Eclipse product but at a price point that makes it affordable for a player on virtually any budget is a huge ask. We have always strived to ensure that the quality, feel, reliability and level of customer support that players come to expect from Planet Eclipse are present in every one of our products: and that is exactly what we expect you to find with the Eclipse Etha.
The Etha is not only constructed using the same high quality aluminium, stainless steel and composite materials that you will find used in the rest of the Eclipse range of paintball markers, but is also manufactured, assembled and tested using the exact same quality control principles and procedures that have been developed on Eclipse markers over the last 20 years.
We believe that compromise is just not acceptable when it comes to quality, reliability and testing. Be it a Rec level Eclipse marker such as the Etha or the very pinnacle of our product line; the SL marker series, there are some things that are priceless to us. These are just some of them.
6

INCLUDED WITH THE ETHA MARKER
1x 2-piece 14.5” Eclipse Barrel
1x Eclipse Tool Tube
1x Eclipse Barrel Sock
1x Manual with Warranty Card Insert
1x Tube of Eclipse Grease
1x 9V battery1
1x Spares Baggy
MARKER SPECIFICATIONS
Length - 539.4mm
Width - 33.51mm
Height - 212.2mm
Weight - 930g/2.05lb (with Eclipse Shaft4 14.5” barrel)
Calibre - 0.68”
Barrel Threads - Cocker
Barrel Type & Length - Eclipse Shaft4 - 14.5” two-piece
Fire Modes - Capped Semi-Automatic, Uncapped Semi-Automatic, PSP(2011) Compliant Ramping2, Millennium(2010) Compliant Ramping2.
Propellant - Compressed Air/Nitrogen
Body Material - 6000 Series Aluminium
Frame Material - Glass Reinforced Nylon
1The 9V Battery is supplied already installed in the marker.
2Firing preset compliant at time of printing. Always check with event organiser for rule changes governing firing modes. Please note items included & marker specification of the Planet Eclipse Etha Marker may vary to what is printed above.
QUICK GUIDE
CONTENTS
INTRODUCTION
QUICK SET-UP
ORIENTATION
USING THE ETHA
USER INTERFACE
MAINTENANCE
FAULT FINDING
PARTS LIST
SPARES & ACCESSORIES INDEX
INTRODUCTION
7
QUICK SET-UP
8
Please Read all the warnings on PAges 2 & 3 before using this marker
SWITCHING ON THE ETHA
At the rear of the frame is the navigation console. Press and hold the select button  (SEE FIGURE 1A).
Release the select button  when the LED lights up and your Etha will begin its power up sequence.
SWITCHING OFF THE ETHA
Press and hold the select button  . Release the select button
  when the LED on the navigation console turns red. The LED will then extinguish and the Etha will turn off.
The Etha has a built in auto-off timer of 20 minutes. If the trigger is not pulled or the select button  is not pressed for 20 minutes then the Etha will power off.
FIRING THE ETHA
If the Break Beam Sensor System is enabled (the BBSS is automatically enabled on power up) and there is
a paintball in the breech, pulling the trigger will fire the Etha. If the Break Beam Sensor System (BBSS) is disabled, the Etha will fire whenever the trigger is pulled, regardless of whether a paintball is in the breech or not.
The entire firing sequence is controlled electronically by the Etha circuit board and solenoid valve, enabling any user to achieve high rates of fire easily.
THE ETHA CIRCUIT BOARD
There are three sockets on the Etha circuit board, the BBSS connector A , the solenoid valve connector B and the micro-switch connector C .
There is a tournament lock button D towards the base of the board. Information on the tournament lock
button functionality can be found on page 29. (SEE FIGURE 1B).
FIG 1A
B
A
C
D
FIG 1B
USING THE BREAK BEAM SENSOR SYSTEM
The Break Beam Sensor System, referred to elsewhere in this manual as ‘BBSS’ is used to detect when a paintball is ready to be fired from the Etha. If no paintball is ready then the BBSS will inhibit the Etha from firing. This prevents the Etha from “chopping” paintballs that are not fully loaded into the marker.
When the Etha is powered up, the BBSS is automatically enabled. The current state of the BBSS is displayed by a flashing LED on the navigation console.
To switch OFF the Break Beam Sensor System, push and hold the select button  for 0.5 seconds. The LED on the navigation console will flash purple indicating that the Break Beam Sensor System has been disabled.
To switch ON the Break Beam Sensor System, push and hold the select button  for 0.5 seconds. The LED on the navigation console will flash either yellow (no ball detected) or light blue (ball detected) indicating that the Break Beam Sensor System has been enabled.
Additional features of the Etha Break Beam Sensor System are covered in the ‘Understanding the BBSS Operation’ section on Page 30 of this User Manual.
PURPLE LIGHT -
BBSS DISABLED
YELLOW LIGHT -
NO BALL DETECTED
LIGHT BLUE LIGHT -
BALL DETECTED
QUICK GUIDE
CONTENTS
INTRODUCTION
ORIENTATION
USING THE ETHA
USER INTERFACE
MAINTENANCE
FAULT FINDING
PARTS LIST
SPARES & ACCESSORIES INDEX
QUICK SET-UP
9

QUICK SET-UP
FACTORY SET-UP GUIDE
DE-GAS YOUR MARKER, DI
 SCHARGING ANY
STORED GAS IN
 A SAFE DIRECTION, AND REMOVE
TH
 E
E
 BARREL
 , LOADE
 R, AIR SYSTEM AND ANY
PAINTBALLS TO MAKE
 THE MARKER EASIER
 AND
AND
SAFER TO WORK ON.
Before using the Etha it is important to make sure that the inline regulator and all electronically controlled parameters are set correctly, as some of these may have a negative (and potentially damaging) effect on the marker, in terms of performance and reliability, if incorrectly set.
The steps below will restore the Etha to the state that it left the factory.
-Reset the control parameters to the factory settings (see page 33).
-Check the inline regulator adjuster screw is set to 21/2 turns clockwise from its maximum output (counterclockwise) position (SEE FIGURE 2A). This will ensure the inline regulator is set to an output pressure that will not damage the Etha when supplied with compressed air/nitrogen (see page 26 for more information on the inline regulator).
FIG 2A
10
REPLACING THE 9V BATTERY
Ensure that the Etha is switched off. Place the marker on a flat surface in front of you with the feed tube furthest away from you and the barrel pointing to the right.
Using a 5/64” (2mm) hex key, remove the countersunk screw towards the bottom of the frame that holds the grip panel onto the frame. Lift the grip panel up to expose the electronics within the frame.
Remove the existing 9 volt battery by sliding your finger into the recess provided below the battery
and gently lever the battery out of the frame (SEE FIGURE 3A).
On top of the battery you will see the battery connector that is used to connect the battery to the circuit board. Gently separate the battery connector from the battery, so that the existing battery can be disposed of responsibly, then taking a new 9 volt Alkaline battery
(type PP3, 6LR61, MN1064)1 connect it to the battery connector (SEE FIGURE 3B).
The battery will only connect to the battery connector one way. If you are unsure of how to install a new battery please contact your nearest Eclipse Service Centre.
Ensure that all of the wires are within the recess of the frame and not trapped in the micro-switch or
trigger spring, then replace the grip panel and tighten the countersunk screw using the 5/64” (2mm) hex key.
DO NOT OVER-TIGHTEN THE Grip SCREW.
1Do not use rechargeable batteries or low quality batteries. 2Some brands 9V batteries may be too large for the Etha battery compartment in the grip frame. When installing a 9V battery, if it does not fit correctly, do not force the battery into place as the frame or battery connector may be damaged as a result.
FIG 3A
-
+
FIG 3B
QUICK GUIDE
CONTENTS
INTRODUCTION
ORIENTATION
USING THE ETHA
USER INTERFACE
MAINTENANCE
FAULT FINDING
PARTS LIST
SPARES & ACCESSORIES INDEX
QUICK SET-UP
11
ORIENTATION
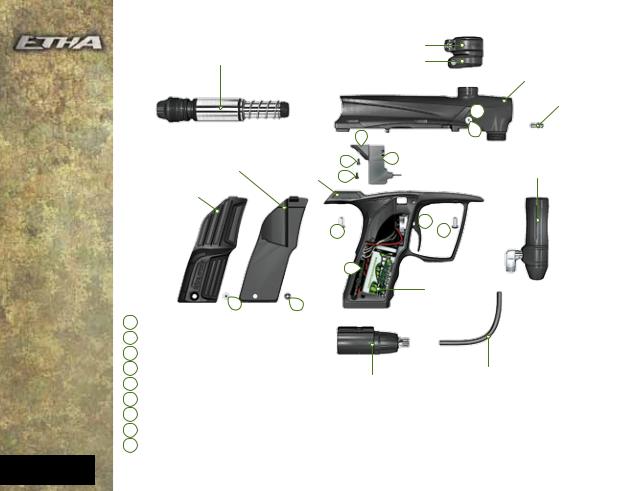
THE ETHA PAINTBALL MARKER
|
|
|
CLAMPING LEVER |
|
|
|
Bolt SYSTEM |
|
|
FEED NECK |
|
|
|
|
|
|
BODY |
|
|
|
|
|
BODY PLUG |
|
|
|
|
|
B |
|
|
|
|
D |
A |
|
|
|
|
|
|
|
Grip panel Left |
|
G |
C |
|
|
|
|
|
SL3 INLINE REGULATOR Assembly |
|
|
|
FRAME |
G |
|
|
|
Grip panel |
|
|
||
|
|
|
|
|
|
|
Right |
|
|
|
|
|
|
|
|
F |
H |
|
|
H |
|
|
|
|
|
|
E |
|
|
|
|
|
|
BATTERY |
|
|
I |
I |
|
|
|
A |
BBSS COVER SCREW |
|
|
|
|
B |
BBSS COVER |
|
|
|
|
C |
SOLENOID ASSEMBLY |
|
|
|
|
D |
MANIFOLD ASSEMBLY |
OOPS ASSEMBLY |
MACROLINE |
||
E |
CIRCUIT BOARD |
|
|||
|
|
|
|
||
FTRIGGER
GManifold Retaining screw H FRAME SCREW
I Grip Screw
12
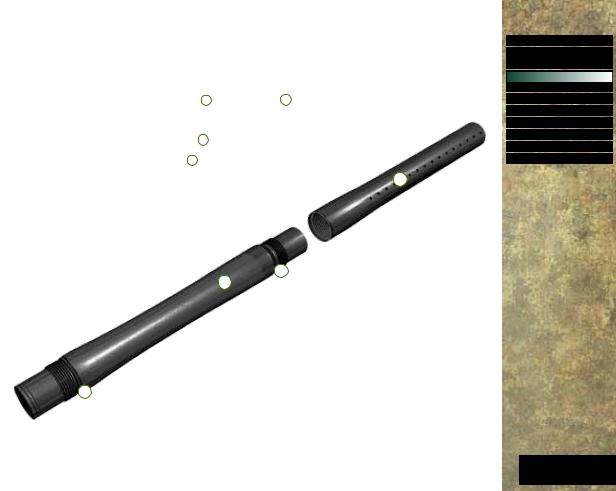
THE SHAFT4 BARREL
The Eclipse Etha comes as standard with an Eclipse Shaft4 barrel.1,4
The barrel screws into the front of the Etha using a right hand thread meaning that if you hold the Etha pointing away from you the barrel screws into the body in a counter-clockwise direction.2
The barrel comprises of two parts, a barrel back A and a barrel tip B . The two parts are joined together with a left hand thread meaning that if you hold the barrel, with the back section nearest you, the barrel tip screws in a clockwise direction.
On the barrel back there is a 016 NBR 70 o-ring C which prevents the Shaft4 barrel from vibrating loose from the Etha body when the marker is fired. There is also a 016 NBR 70 o-ring on the front of the barrel back D helps with alignment when the two barrel sections are screwed together.
B
Replace and lubricate these o-rings with Eclipse Grease as necessary.
QUICK GUIDE
CONTENTS
INTRODUCTION
QUICK SET-UP
USING THE ETHA
USER INTERFACE
MAINTENANCE
FAULT FINDING
PARTS LIST
SPARES & ACCESSORIES INDEX
D
A
1The bore size of your Shaft4 may vary according to the C model of Etha that you have.
2The Etha will only accept COCKER threaded barrels. Do not use any other type of barrel thread.
3The Eclipse Shaft4 tip and back barrel sections are not interchangeable with older version Shaft tip and back barrel sections (including Shaft3 barrel kits).
4The model of barrel accompanying your Etha may differ from that stated in this manual.
ORIENTATION
13

ORIENTATION
14
THE SL3 INLINE REGULATOR |
#016 NBR70 |
|
|
Inline Regulator Piston |
|
|
Inline Regulator Top1 |
|
|
Inline Regulator EGO Spring2 |
|
|
#011 NBR70 |
|
|
Adjuster Top |
|
|
Regulator Seal |
|
|
Purge Poppet assembly3 |
#008 NBR70 |
|
#011 NBR 70 |
|
90 degree |
Adjuster Screw |
|
Macroline Fitting4 |
|
|
 Inline Regulator Swivel
#016 NBR70
Inline Regulator Bottom
1Only use the SL3 inline regulator with the ETHA. 2Only use the SL3 Ego spring with the ETHA SL3 inline regulator.
3If the purge poppet assembly is removed for maintenance ensure is it re-installed correctly, failure to do so may seriously damage the ETHA solenoid valve.
4The macroline fitting Does not need to be removed for regular maintenance.
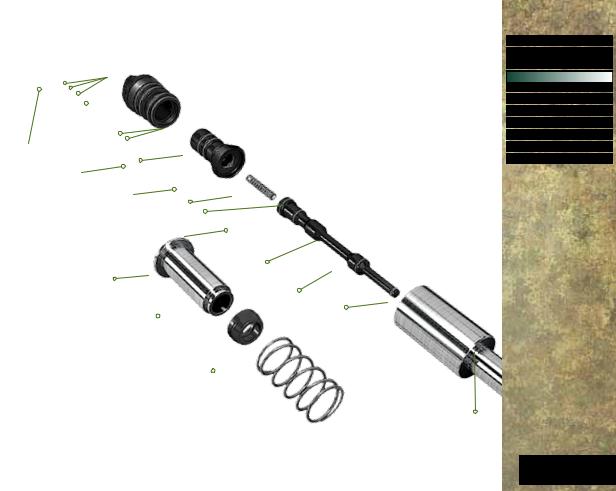
THE BOLT SYSTEM
#020 NBR70
 #017 NBR70
#014 NBR70
Valve Body |
#012 NBR70 |
|
|
Valve Joiner |
|
Poppet SPRING |
#011 NBR70 |
|
#010 NBR70 |
Firing Poppet |
#009 NBR70 |
|
|
Bolt1 |
#004 NBR70 |
|
Bolt Guide
 Bolt Tip
Bolt Bumper
 Bolt Spring
1Inside the bolt is a black stem. Do not attempt to remove this part from the bolt. Removing this part will void the warranty of the marker.
QUICK GUIDE
CONTENTS
INTRODUCTION
QUICK SET-UP
USING THE ETHA
USER INTERFACE
MAINTENANCE
FAULT FINDING
PARTS LIST
SPARES & ACCESSORIES INDEX
ORIENTATION
15

ORIENTATION
16
THE SOLENOID ASSEMBLY
#007 NBR70 (o-ring gasket)
Brass Filter
 #010 NBR70 (o-ring gasket)
MANIFOLD
M2.5x5
Mounting
SCREWS
SOLENOID VALVE1
M3x17 MOUNTING SCREWS
1The Etha solenoid valve is NON-SERVICEABLE. Any attempt to strip, dismantle or service the solenoid valve will immediately void THE Warranty. For more information on the Etha solenoid valve please see page 50.

THE ON/OFF PURGE SYSTEM (OOPS)
OOPS PIN
#007 NBR70
OOPS BODY
#004 NBR70
OOPS insert  #005 NBR90
#004 NBR70
OOPS Push Rod
10-32UNFx1/2 OOPS Retaining Screws
STRAIGHT Macroline
FITTING
OOPS KNOB
QUICK GUIDE
CONTENTS
INTRODUCTION
QUICK SET-UP
USING THE ETHA
USER INTERFACE
MAINTENANCE
FAULT FINDING
PARTS LIST
SPARES & ACCESSORIES INDEX
ORIENTATION
17
ORIENTATION
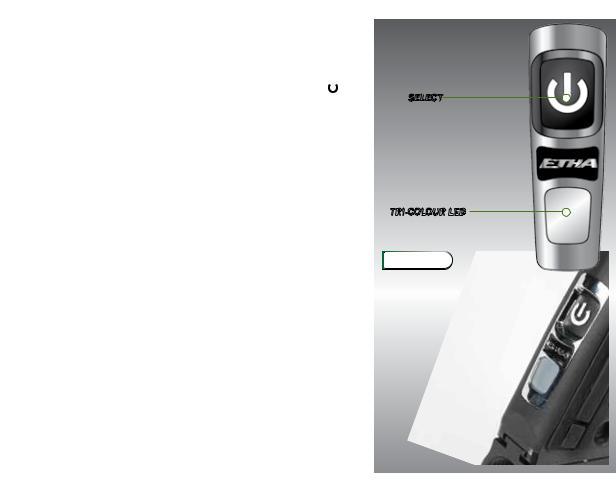
THE ETHA NAVIGATION CONSOLE
The Etha utilises a tri-colour LED to display all of the information that the user requires. This can be found on the navigation console (FIGURE 4A).
The various functions of both the select button  and the LED are outlined below.
The select button  is used to: - Switch the Etha on and off.
-Switch the BBSS (eye system) on and off.
-To scroll through parameters and edit parameters.
The LED on the navigation console is used to:
-Display the status of the BBSS (eye system).
-Display the value of a parameter.
-Display the status of the battery.
-Display power up and power down status.
-Display tournament lock status.
-Display that factory settings have been restored.
-To confirm whether a parameter value has been accepted or rejected.
 SELECT
TRI-COLOUR LED
FIG 4A
18
OPERATIONAL OVERVIEW
Below is a brief overview of what happens during the Etha firing cycle. The location of parts discussed in the text below can be found on pages 56-59.
Assuming the Etha is gassed up and turned on, FIGURE 5A shows the marker in its idle position. The bolt is held back under the tension from the bolt spring, with the bolt guide filled with pressurised gas directly from the inline regulator. The firing poppet is held in its forward position by the firing poppet spring, keeping the bolt guide sealed.
When the trigger is pulled an electrical signal is sent to the solenoid which directs a supply of air to the rear of the firing poppet (SEE FIGURE 5B). The force of this gas is greater than the spring tension pushing the firing poppet forward, and the firing poppet is pushed back to its rear position. In the bolt guide this opens the exhaust port to the bolt and seals off the supply port from the inline regulator.
The gas pressure in the bolt guide forces the bolt forward, overcoming the spring tension from the bolt spring, this pushes a ball into the breach and closes off the feed tube. The internal stem of the bolt is pushed out of the bolt guide, which then fully opens the exhaust port, allowing the pressurized gas in the bolt guide to exhaust through the bolt propelling a ball (SEE FIGURE 5C).
As the bolt guide volume empties, the force pushing the bolt forwards decreases and the bolt spring starts to push the bolt back into the bolt guide exhaust port. The spring
continues to push the bolt back up to its rest position against the rear bolt bumper (SEE FIGURE 5D).
The solenoid continues to hold the firing poppet in its rear position until the Dwell time expires. When this expires the solenoid exhausts the supply of air from the rear of the firing poppet, removing the force holding the firing poppet in this position. The firing poppet spring forces the firing poppet forwards, closing the exhaust port and opening the supply from the inline regulator (SEE FIGURE 5E).
FIG 5A
FIG 5B
FIG 5C
FIG 5D
FIG 5E
QUICK GUIDE
CONTENTS
INTRODUCTION
QUICK SET-UP
USING THE ETHA
USER INTERFACE
MAINTENANCE
FAULT FINDING
PARTS LIST
SPARES & ACCESSORIES INDEX
ORIENTATION
The bolt guide begins to fill with pressurised gas. The Etha |
|
|
19 |
||
has now completed a full cycle. |
||
|
||
|
|
USING THE ETHA
SETTING UP THE ETHA
Before you can begin to use your Etha, you will need to attach a barrel, an air system and a paintball loader.
INSTALLING A BARREL
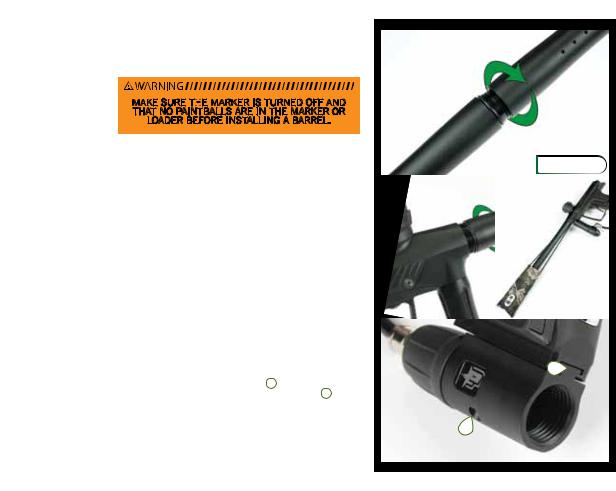
Make sure th


 e marker is turned off and that no paintballs are in the marker or loader before installing a Barrel.
Every Etha comes complete with an Eclipse Shaft4 barrel (see page 13).
To install the Shaft4 barrel, firstly screw the barrel tip and barrel back sections together. The threads on the Shaft4 barrel tip are reverse threaded, to screw the two sections together, with the barrel pointing away from
you, turn the barrel tip in a clockwise direction (SEE FIGURE 6A).
While pointing the Etha marker in a safe direction, insert the assembled Shaft4 barrel into the front of the Etha body and screw the Shaft4 barrel into the Etha (in a counter-clockwise direction). Continue to screw the Shaft4 barrel into the Etha body until the barrel
becomes tight in the body. DO NOT over tighten the barrel (SEE FIGURE 6B).
Install a barrel blocking device over the barrel such as the Eclipse barrel sock supplied with the Etha1 (SEE FIGURE 6C). You have now installed the barrel.
T-SLOT MOUNTING SYSTEM
The Etha utilises a T-slot arrangement to mount the OOPS to the bottom of the frame A . There are two retaining screws on the OOPS body underside B .
These are used to clamp the OOPS onto the frame. It is advisable to make sure that these screws are tight
using a 3/8” hex key before attaching an air system
(SEE FIGURE 6D).
FIG 6A
FIG 6B |
FIG 6C |
A
B
|
1Instruction on using the Eclipse barrel sock can be found on the |
FIG 6D |
|
20 |
|||
barrel sock warning label. |
|
||
|
|
||
|
|
|
 Loading...