

Page 1
PLANET 802.11n Wireless Interactive Presentation Gateway
WIPG-300H
1
Page 2

PLANET 802.11n Wireless Interactive Presentation Gateway
WIPG-300H
Copyright
Copyright 2015 by PLANET Technology Corp. All rights reserved. No part of this publication may be
reproduced, transmitted, transcribed, stored in a retrieval system, or translated into any language or computer
language, in any form or by any means, electronic, mechanical, magnetic, optical, chemical, manual or
otherwise, without the prior written permission of PLANET.
PLANET makes no representations or warranties, either expressed or implied, with respect to the contents
hereof and specifically disclaims any warranties, merchantability or fitness for any particular purpose. Any
software described in this manual is sold or licensed "as is". Should the programs prove defective following
their purchase, the buyer (and not PLANET, its distributor, or its dealer) assumes the entire cost of all
necessary servicing, repair, and any incidental or consequential damages resulting from any defect in the
software. Further, PLANET reserves the right to revise this publication and to make changes from time to time
in the contents hereof without obligation to notify any person of such revision or changes.
All brand and product names mentioned in this manual are trademarks and/or registered trademarks of their
respective holders.
Federal Communication Commission Interference Statement
This equipment has been tested and found to comply with the limits for a Class B digital device, pursuant to
Part 15 of FCC Rules. These limits are designed to provide reasonable protection against harmful
interference in a residential installation. This equipment generates, uses, and can radiate radio frequency
energy and, if not installed and used in accordance with the instructions, may cause harmful interference to
radio communications. However, there is no guarantee that interference will not occur in a particular
installation. If this equipment does cause harmful interference to radio or television reception, which can be
determined by turning the equipment off and on, the user is encouraged to try to correct the interference by
one or more of the following measures:
1. Reorient or relocate the receiving antenna.
2. Increase the separation between the equipment and receiver.
3. Connect the equipment into an outlet on a circuit different from that to which the receiver is
connected.
4. Consult the dealer or an experienced radio technician for help.
FCC Caution
To assure continued compliance, for example, use only shielded interface cables when connecting to
computer or peripheral devices. Any changes or modifications not expressly approved by the party
responsible for compliance could void the user’s authority to operate the equipment.
This device complies with Part 15 of the FCC Rules. Operation is subject to the Following two conditions: (1)
This device may not cause harmful interference, and (2) this Device must accept any interference received,
including interference that may cause undesired operation.
Federal Communication Commission (FCC) Radiation Exposure
Statement
This equipment complies with FCC radiation exposure set forth for an uncontrolled environment. In order to
avoid the possibility of exceeding the FCC radio frequency exposure limits, human proximity to the antenna
shall not be less than 20 cm (8 inches) during normal operation.
2
Page 3

PLANET 802.11n Wireless Interactive Presentation Gateway
WIPG-300H
CE mark Warning
This is a class B device, in a domestic environment; this product may cause radio interference, in which case
the user may be required to take adequate measures.
R&TTE Compliance Statement
This equipment complies with all the requirements of DIRECTIVE 1999/5/CE OF THE EUROPEAN
PARLIAMENT AND THE COUNCIL OF 9 March 1999 on radio equipment and telecommunication terminal
Equipment and the mutual recognition of their conformity (R&TTE). The R&TTE Directive repeals and
replaces in the directive 98/13/EEC (Telecommunications Terminal Equipment and Satellite Earth Station
Equipment) As of April 8, 2000.
Safety
This equipment is designed with the utmost care for the safety of those who install and use it. However,
special attention must be paid to the dangers of electric shock and static electricity when working with
electrical equipment. All guidelines of this and of the computer manufacture must therefore be allowed at all
times to ensure the safe use of the equipment.
EU Countries Intended for Use
The ETSI version of this device is intended for home and office use in Austria Belgium, Denmark, Finland, and
France (with Frequency channel restrictions). Germany, Greece, Ireland, Italy, Luxembourg .The Netherlands,
Portugal, Spain, Sweden and United Kingdom.
The ETSI version of this device is also authorized for use in EFTA member states Iceland, Liechtenstein,
Norway and Switzerland.
WEEE regulation
To avoid the potential effects on the environment and human health as a result of the presence of
hazardous substances in electrical and electronic equipment, end users of electrical and
electronic equipment should understand the meaning of the crossed-out wheeled bin symbol. Do
not dispose of WEEE as unsorted municipal waste and have to collect such WEEE separately.
Revision
User Manual of PLANET 802.11n Wireless Interactive Presentation Gateway with 1080p Full HD
Model: WIPG-300H
Rev: 1.0 (Jan., 2015)
Part No. EM-WIPG-300H_v1.0 (2081-E60070-000)
3
Page 4

PLANET 802.11n Wireless Interactive Presentation Gateway
WIPG-300H
Contents
Chapter 1. PRODUCT INTRODUCTION ................................................................................ 6
1.1 Package Contents ................................................................................................... 6
1.2 Product Description ................................................................................................ 6
1.3 Product Features.....................................................................................................9
1.4 Product Specifications .........................................................................................10
Chapter 2. HARDWARE INSTALLATION ............................................................................ 12
2.1 Hardware Description ........................................................................................... 12
2.1.1 The Front Panel................................................................................................12
2.1.2 LED Indications................................................................................................. 12
2.1.3 The Rear Panel.................................................................................................13
2.2 Hardware Connection ........................................................................................... 13
Chapter 3. WINDOWS CLIENT UTILITY – WIPG ................................................................ 16
3.1. Starting Program ................................................................................................... 16
3.2. Control Panel ......................................................................................................... 17
3.2.1. Show Receiver Information ..............................................................................17
3.2.2. Web Admin ....................................................................................................... 18
3.2.3. Search Receiver Device ................................................................................... 19
3.2.4. Launch SidePad ............................................................................................... 20
3.2.5. Launch WebSlides............................................................................................ 23
3.2.6. Select Projection Source .................................................................................. 26
3.2.7. Projection Quality .............................................................................................28
3.2.8. Projection Mode................................................................................................ 28
3.2.9. Resolution Setting ............................................................................................ 29
3.2.10. Projection Aspect Ratio .................................................................................... 30
3.2.11. Enable IWB USB Bridge...................................................................................31
3.2.12. Advanced Screen Capture ...............................................................................32
3.2.13. Send Audio to Display ...................................................................................... 34
3.2.14. Auto Power Management................................................................................. 35
3.2.15. Auto WiFi Connect............................................................................................ 36
3.2.16. Make USB PnS Token ......................................................................................37
3.2.17. Copy Application to Desktop............................................................................. 39
3.2.18. Hot Key............................................................................................................. 40
3.2.19. About ................................................................................................................41
3.2.20. Exit....................................................................................................................42
Chapter 4. MAC OS X CLIENT UTILITY .............................................................................. 43
4.1. Mac OS X Quick Connection................................................................................ 43
4.2. Download Mac OS X Client Utility ....................................................................... 45
4.3. Main User Interface ............................................................................................... 49
4.4. Screen Projection..................................................................................................49
4.5. MAC Audio Projection........................................................................................... 51
4
Page 5

PLANET 802.11n Wireless Interactive Presentation Gateway
WIPG-300H
Chapter 5. WEB UI MANAGEMENT .................................................................................... 56
5.1. WIPG-300H Homepage.......................................................................................... 56
5.2. Download ............................................................................................................... 57
5.3. Conference Control............................................................................................... 58
5.4. Admin .....................................................................................................................59
5.4.1. System Status................................................................................................... 59
5.4.2. Device Setup ....................................................................................................61
5.4.3. Network Setup .................................................................................................. 62
5.4.4. OSD Setup........................................................................................................ 67
5.4.5. Change Passwords ..........................................................................................68
5.4.6. Reset to Default................................................................................................ 68
5.4.7. Firmware Upgrade............................................................................................69
5.4.8. Webslides Setup............................................................................................... 70
5.4.9. Reboot System ................................................................................................. 71
Appendix A: Configuring the PCs ..................................................................................... 72
Appendix B: FAQ ................................................................................................................ 76
5
Page 6
Chapter 1. PRODUCT INTRODUCTION
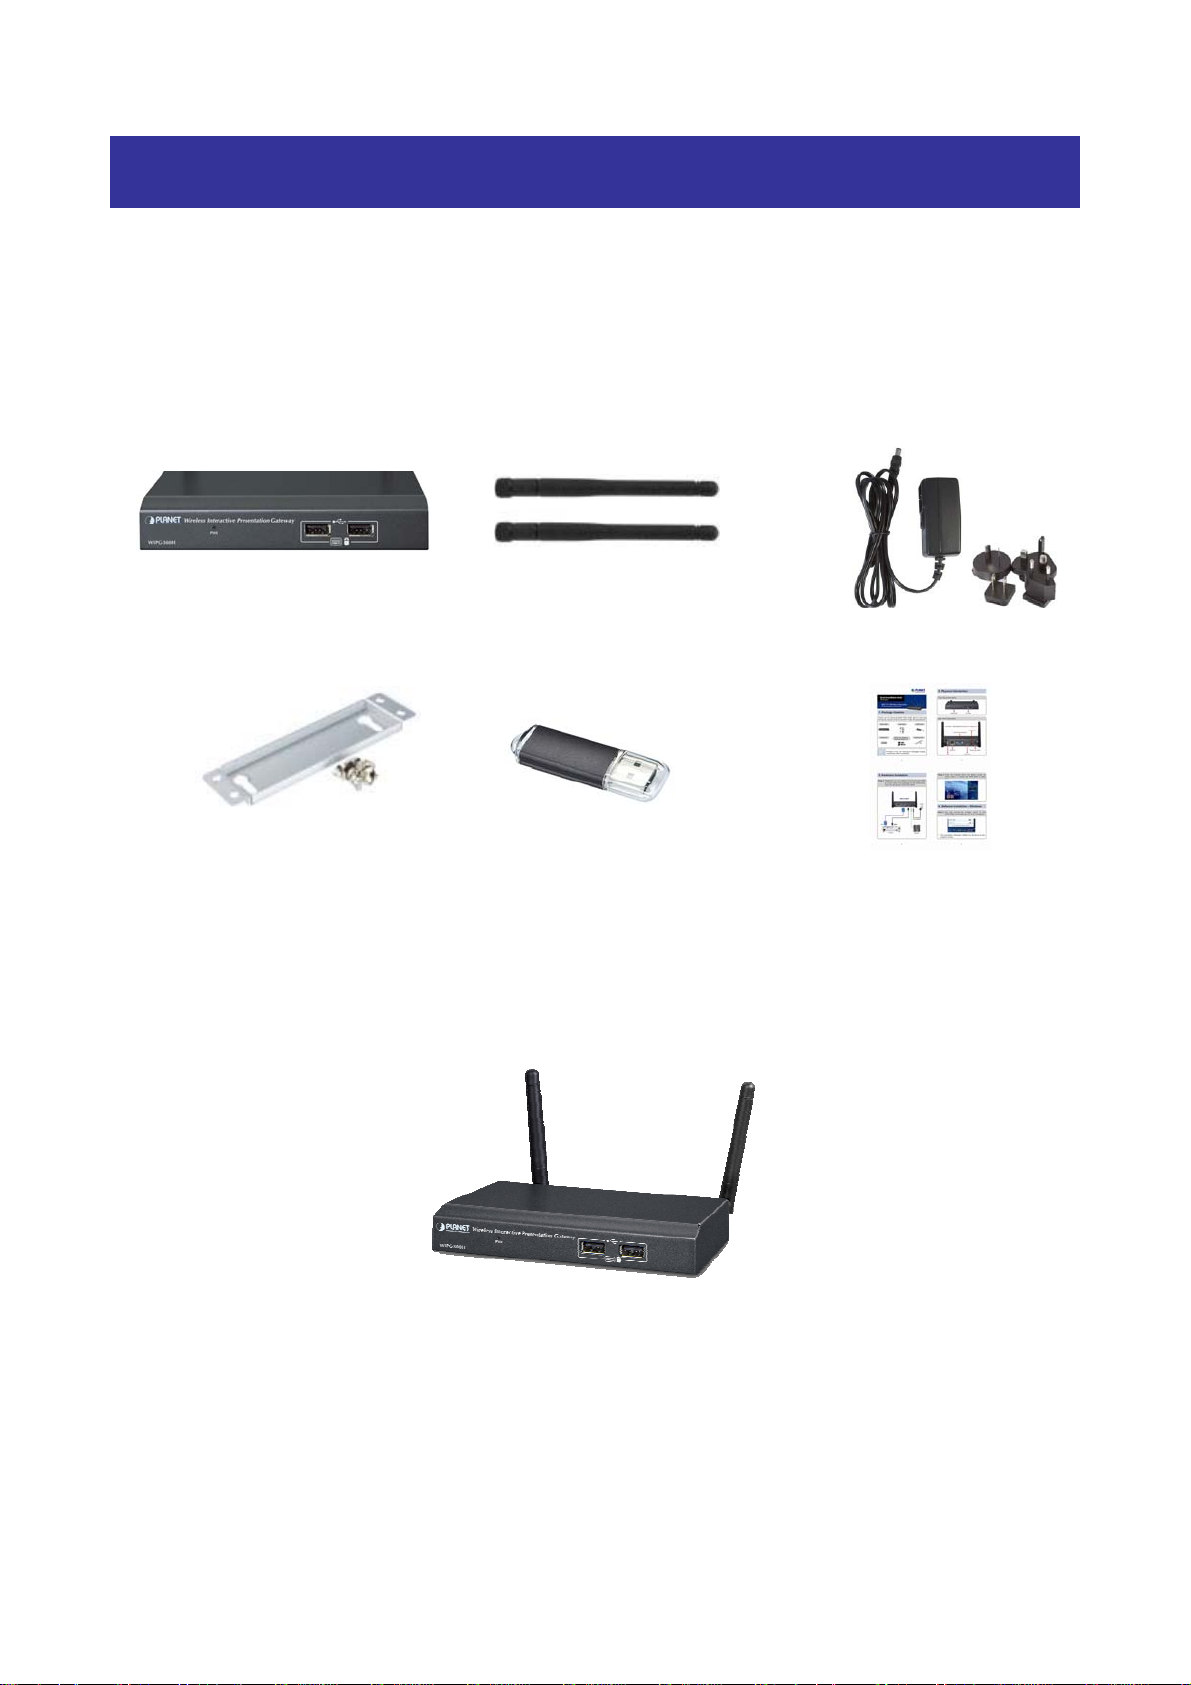
1.1 Package Contents
The following items should be contained in the package:
WIPG-300H × 1
Wall-mount Kit x 1
If there is any item missing or damaged, please contact the seller immediately.
Antenna × 2
USB Token × 1
5V DC Power adapter +
World-Wide Plug Set × 1
Quick Installation Guide × 1
1.2 Product Description
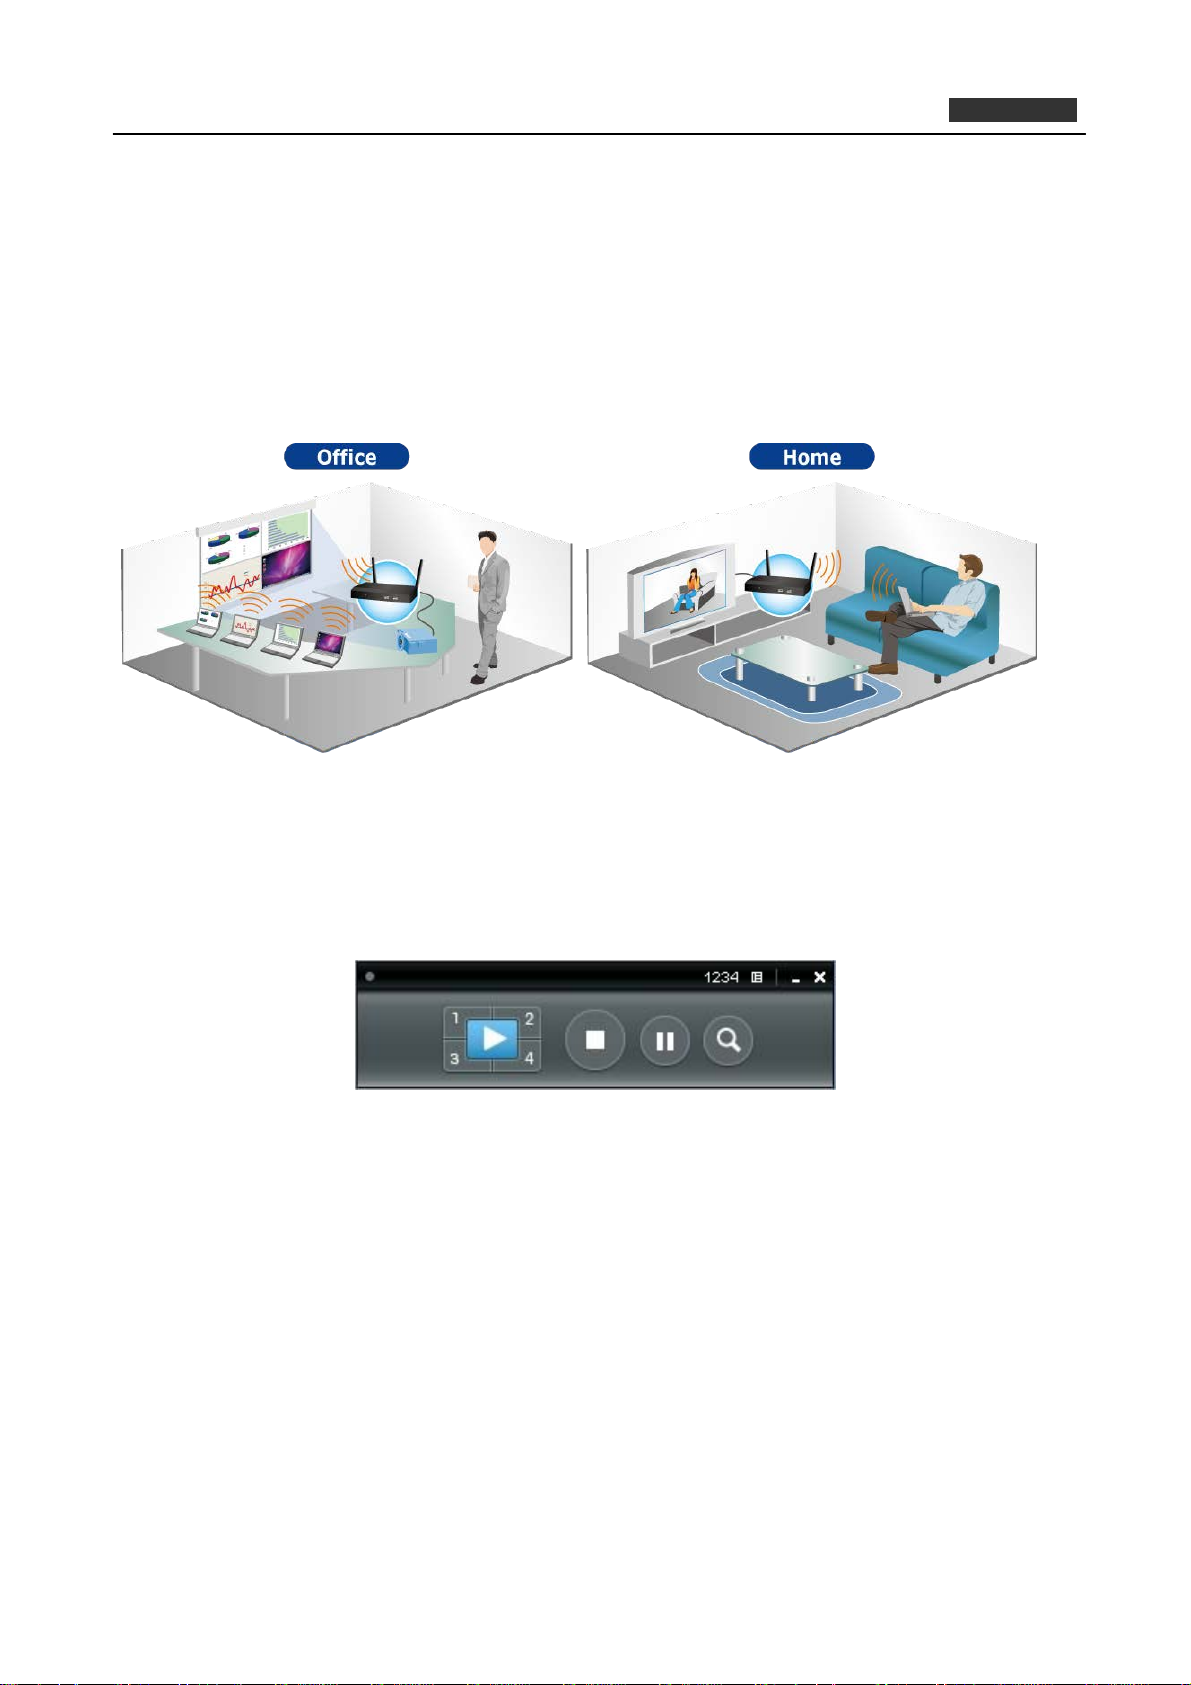
1080p Full HD Resolution, and High-quality Video and Audio Projection
The WIPG-300H supports 1080p Full HD resolution which is suitable for both office presentation and home
entertainment. Home users can easily share the multimedia on the big monitor / screen with friends without
the hassle of cabling.
6
Page 7
PLANET 802.11n Wireless Interactive Presentation Gateway
WIPG-300H
Flexible Projection via Dual Video Output Interfaces
PLANET WIPG-300H is a wireless presentation gateway based on IEEE 802.11n technology. The incredible
wireless speed makes it ideal for handling high bandwidth video stream, VoIP and data streams at the same
time stably and smoothly. To deliver a perfect presentation solution, the WIPG-300H is equipped with both
VGA and HDMI video output interfaces and one 10/100Mbps Ethernet port for LAN connection. With the
hardware decoding capability, the WIPG-300H can project high-definition video on the screen and audio
through wireless or wired LAN connections. It facilitates multiple users to freely display the presentations,
images and videos via connecting to a projector or LCD TV without complex installation.
4-to-1 Split Screen Projection
With this 4-to-1 split screen feature, the WIPG-300H allows up to four PC / Laptop screens to be projected
through one projector at the same time. Therefore, the participants can easily do side-by-side comparison
from four PCs / Laptops to increase meeting efficiency.
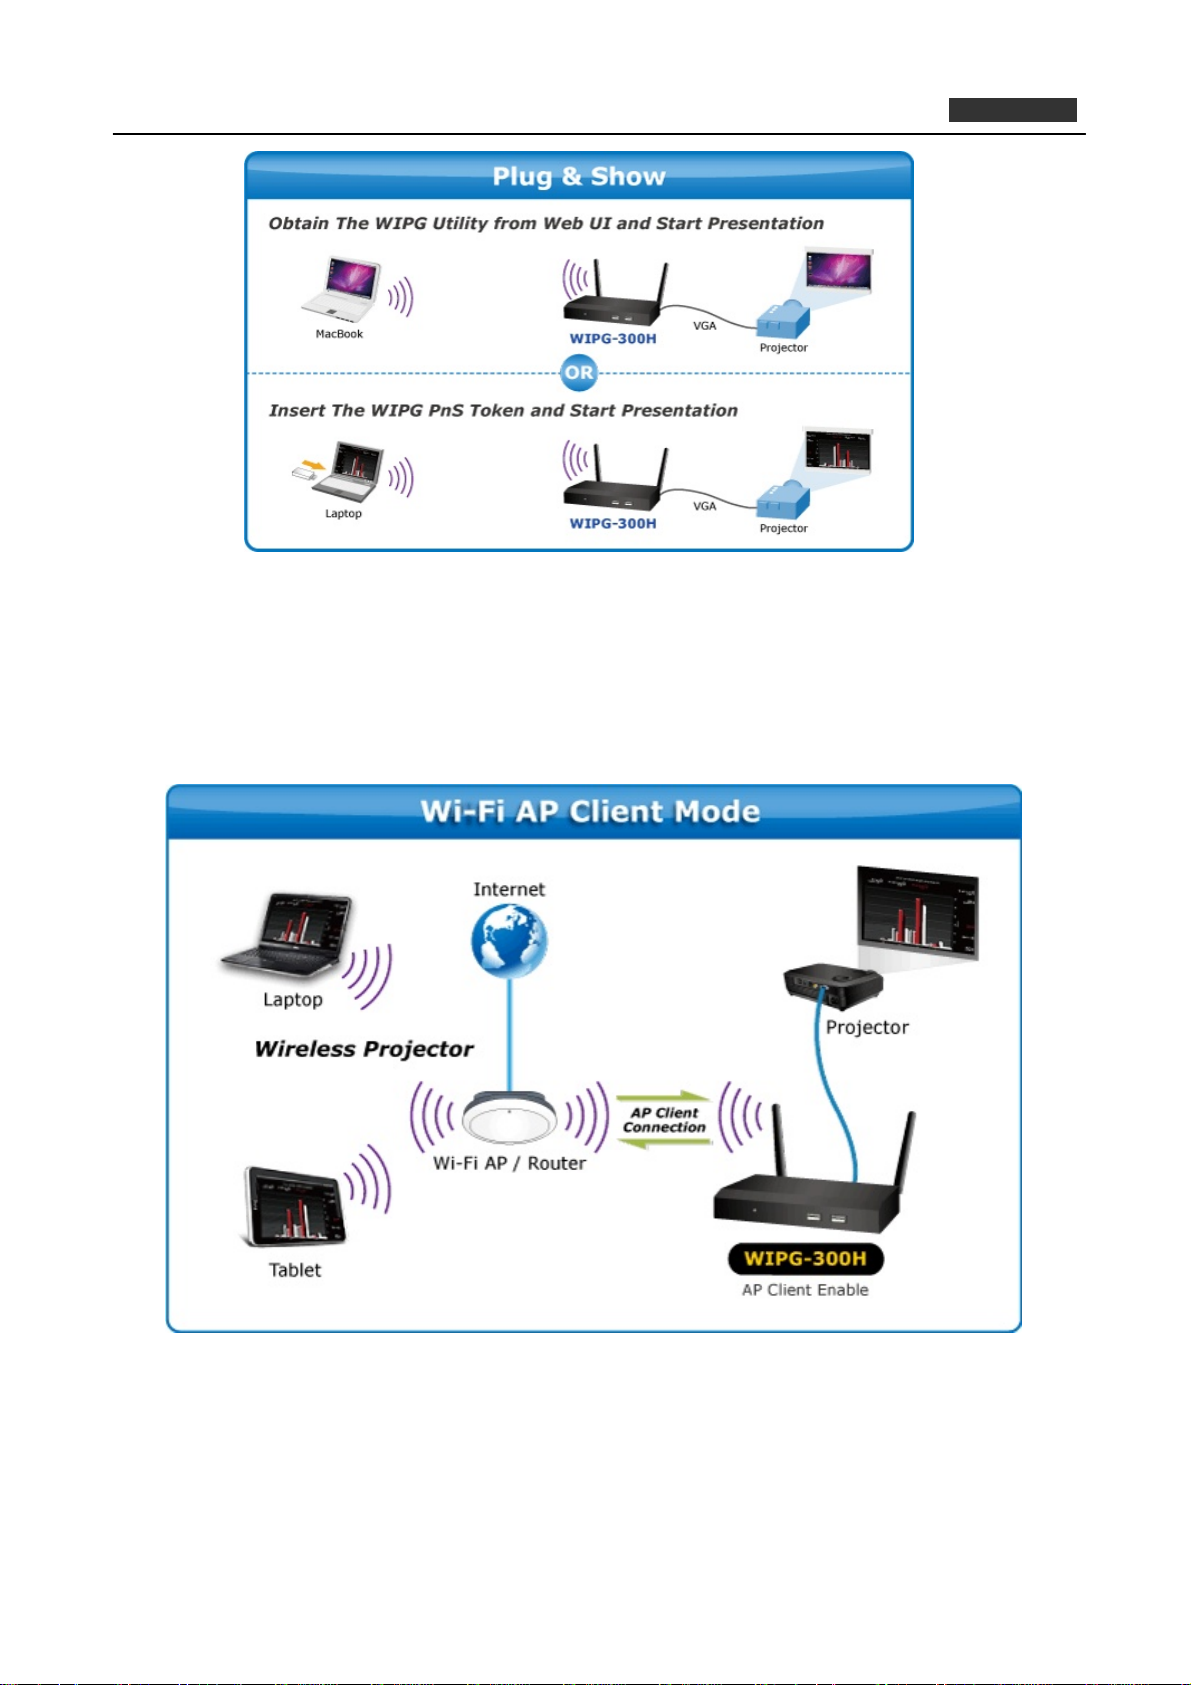
Easy to Use, Plug & Show
The embedded Windows-based utility enables the connected users to directly download the utility from the
WIPG-300H web UI or simply execute the utility from the created USB token. It offers the most convenient
way for the new user to access the presentation in seconds. Just link the PC / laptop to the WIPG-300H
through wireless or Ethernet and the wireless projection can be performed via the connected projector easily.
7
Page 8
PLANET 802.11n Wireless Interactive Presentation Gateway
WIPG-300H
Internet / Intranet Connectivity through AP Client Mode
The WIPG-300H is also a Wireless Access Point. The 10/100Mbps LAN port and 11n wireless performance
ensures the participants in the meeting are able to access the Internet and Intranet all the time, even while
wireless presentations are projecting. You can enable the AP-Client Mode function to let the WIPG-300H joins
the existing Access Point through Wi-Fi. This feature provides the flexibility of wireless network deployment in
enterprise environment.
8
Page 9
PLANET 802.11n Wireless Interactive Presentation Gateway
WIPG-300H
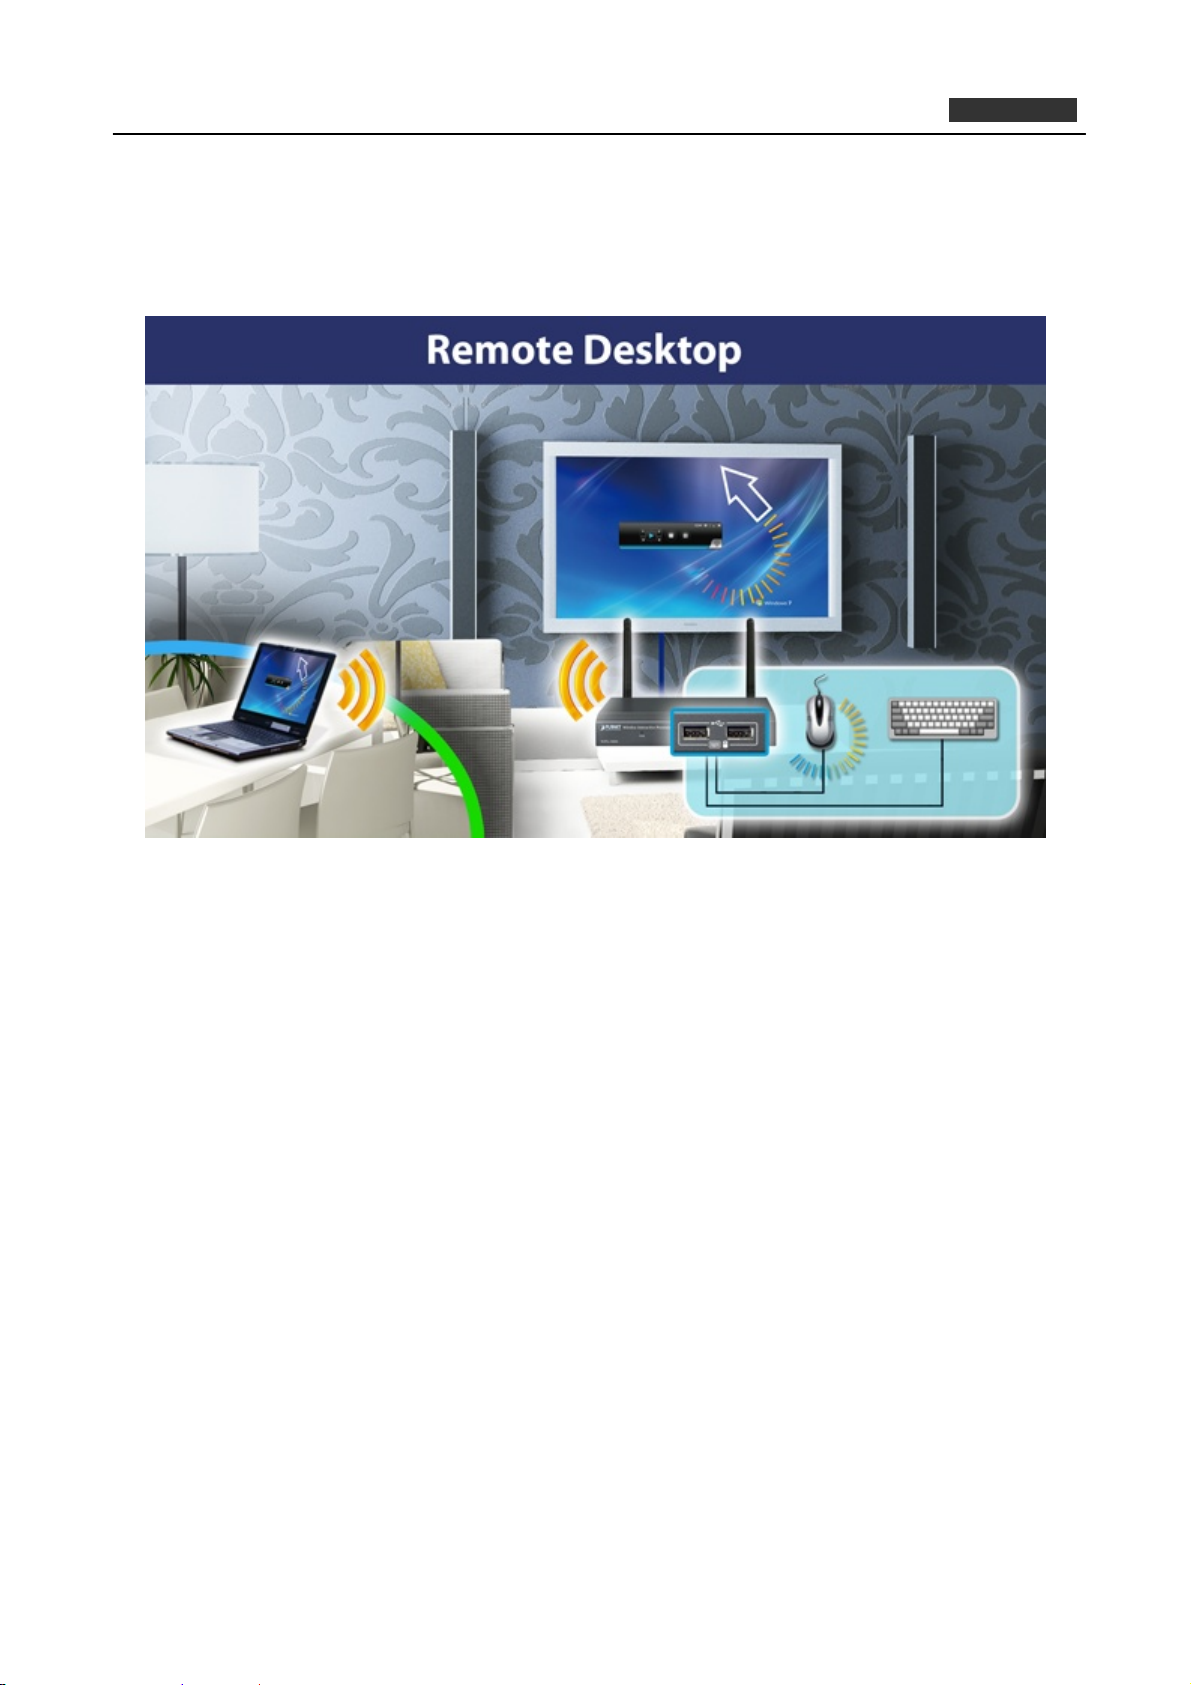
Remote Desktop
Plug standard USB keyboard or mouse into the USB port on the front panel of the WIPG-300H and you can
control your PC remotely. You don’t have to stand still by the side of a PC or the WIPG-300H, thus making
your presentation easily and freely.
1.3 Product Features
Wirelessly project multimedia with laptops, Macs and mobile devices
VGA / 1080p HDMI output
4-to-1 split screen projection
Audio / Video streaming
Plug & Show
802.11n Wi-Fi AP and AP-Client mode
Mouse / Keyboard remote operation
USB over IP for touch screen and IWB
Web browser management
Windows XP / Vista / 7 / 8, Mac OS X, iOS and Android support
Multiple users access
Compact size convenient for installation and placement
9
Page 10
PLANET 802.11n Wireless Interactive Presentation Gateway
1.4 Product Specifications
Product WIPG-300H
Hardware Specification
Video VGA Port: D-Sub 15-pin female port
HDMI 1.4b
Interfaces
LED Indicators Green: Power on
Material Metal
Dimensions (W x D x H) 150 x 59 x 25mm
Weight 243g
Power External Power adaptor 5V DC input 2.6A
Reset Button > 10 sec while booting: Reset to Factory Default
Wireless Interface Specifications
Standard Compliance with IEEE 802.11n
Frequency Band 2.412 ~ 2.462GHz
Wireless Data Rate Up to 300Mbps
Wireless Channel America/ FCC: 2.412~2.462GHz (11 Channels)
Receive Sensitivity
Wireless Security IEEE Standard 64/128 bit WEP / WPA / WPA2-PSK
Operation Mode AP (Access Point)
Video Display
Supported Output Resolution VGA:
System Management
Audio Out 2.5mm stereo jack
LAN 10/100BASE-TX RJ45
Wireless LAN IEEE 802.11n 300Mbps
USB Port 3 x USB 2.0, Type-A, 5VDC / 0.5A output
Gain 2 x 2dBi RP-SMA detachable antenna Antenna
Orientation Omni-directional
Red: Init / firmware upgrade
Multi-type swappable Plug: US / EU / UK / AU
Backward compatible with IEEE 802.11b/g
802.11b: less than -80 dBm (11Mbps)
802.11g: less than -70 dBm (54Mbps)
802.11n: less than -61 dBm at HT40 MCS7
802.11n: less than -64 dBm at HT20 MCS7
AP Client
SVGA (800x600) / XGA (1024x768)
WXGA(1280x768) / WXGA(1280x800)
WXGA (1360x768) / WXGA+ (1440x900)
UXGA (1600x1200)
HDMI:
720P (1280x720) / 1080i (1920x1080) / 1080P
(1920x1080)
WIPG-300H
10
Page 11
PLANET 802.11n Wireless Interactive Presentation Gateway
Protocol TCP/IP
IP Configuration Automatic: DHCP
Manual: Static IP address
Management Web-Based configuration
Supported Windows Account
Right
Administrators
Limited User
Guest
Supported Operation System Windows XP / Vista / 7 / 8
Mac OS X 10.7 and above
Android 2.4 and above
iOS 4.3 and above
Software Features 4-to-1 split screen
Audio Projection
Remote Desktop Control
Virtual Extended Desktop (Windows platform)
Audio Latency Control
Conference Control
Gatekeeper
Advanced Screen Capture (Windows platform)
Webslides
Side Pad
MirrorOP Presenter
Language Support English
Tradition Chinese
Simplified Chinese
Japanese
Korean
French
Standard Conformance
IEEE Standards IEEE 802.11n (2T2R, up to 300Mbps)
IEEE 802.11g
IEEE 802.11b
IEEE 802.3 10BASE-T
IEEE 802.3u 100BASE-TX
Environment
Temperature
Operating: 0 ~ 40 degrees C
Storage: -10 ~ 60 degrees C
WIPG-300H
Humidity
Operating: 10 ~ 90% (non-condensing)
Storage: 10 ~ 80% (non-condensing)
11
Page 12
PLANET 802.11n Wireless Interactive Presentation Gateway
WIPG-300H
Chapter 2. HARDWARE INSTALLATION
Please follow the instructions below to build the wireless network connection between the WIPG-300H,
display equipment and your computers.
2.1 Hardware Description
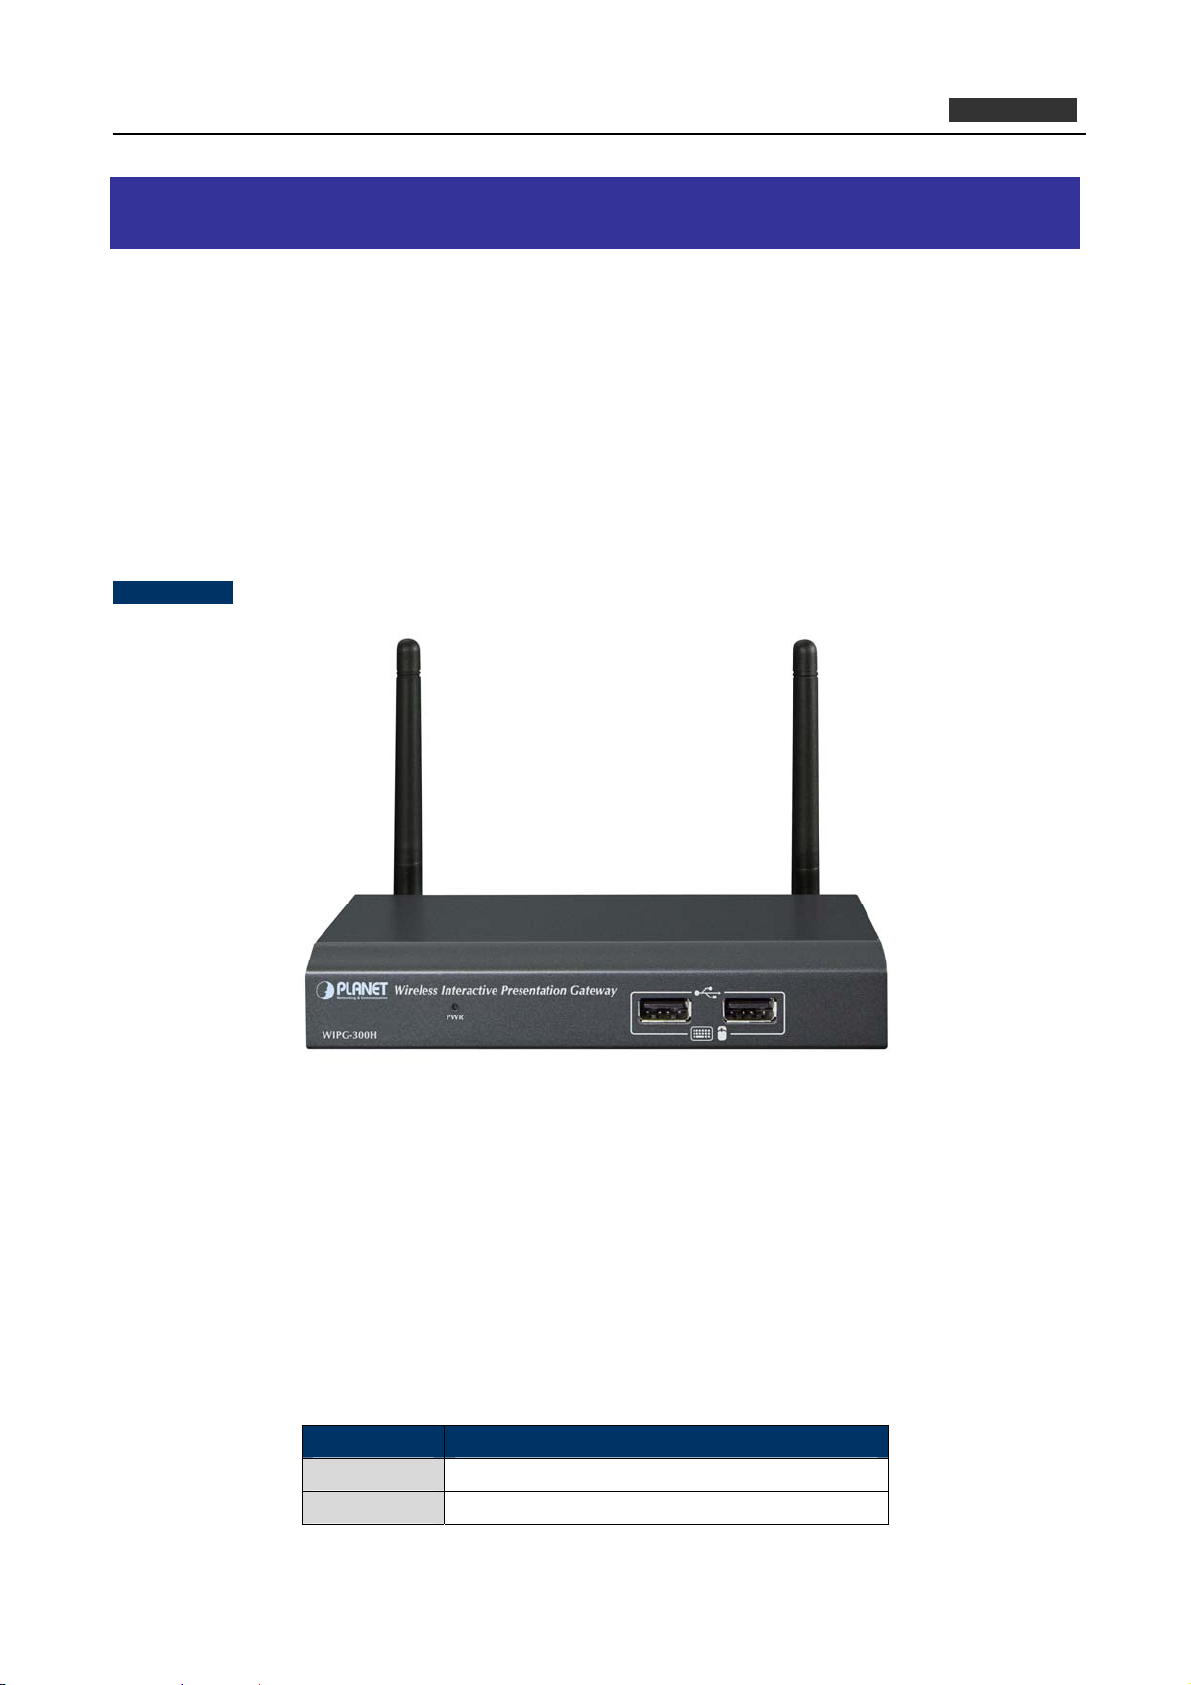
2.1.1 The Front Panel
The front panel provides a simple interface monitoring the wireless presentation gateway. Figure 2-1 shows
the front panel of WIPG-300H.
Front Panel
Figure 2-1 WIPG-300H Front Panel
USB Port: USB 2.0 ports for USB keyboard and mouse.
User can control the projection of PC remotely by simply plugging standard USB
keyboard or mouse into the WIPG-300H.
2.1.2 LED Indications
The front panel LEDs indicate instant status of system power and help monitor and troubleshoot when needed.
The table below shows the LED indications of the Wireless Present Gateway.
LED (Green) Description
On Power On
Off Power Off
12
Page 13
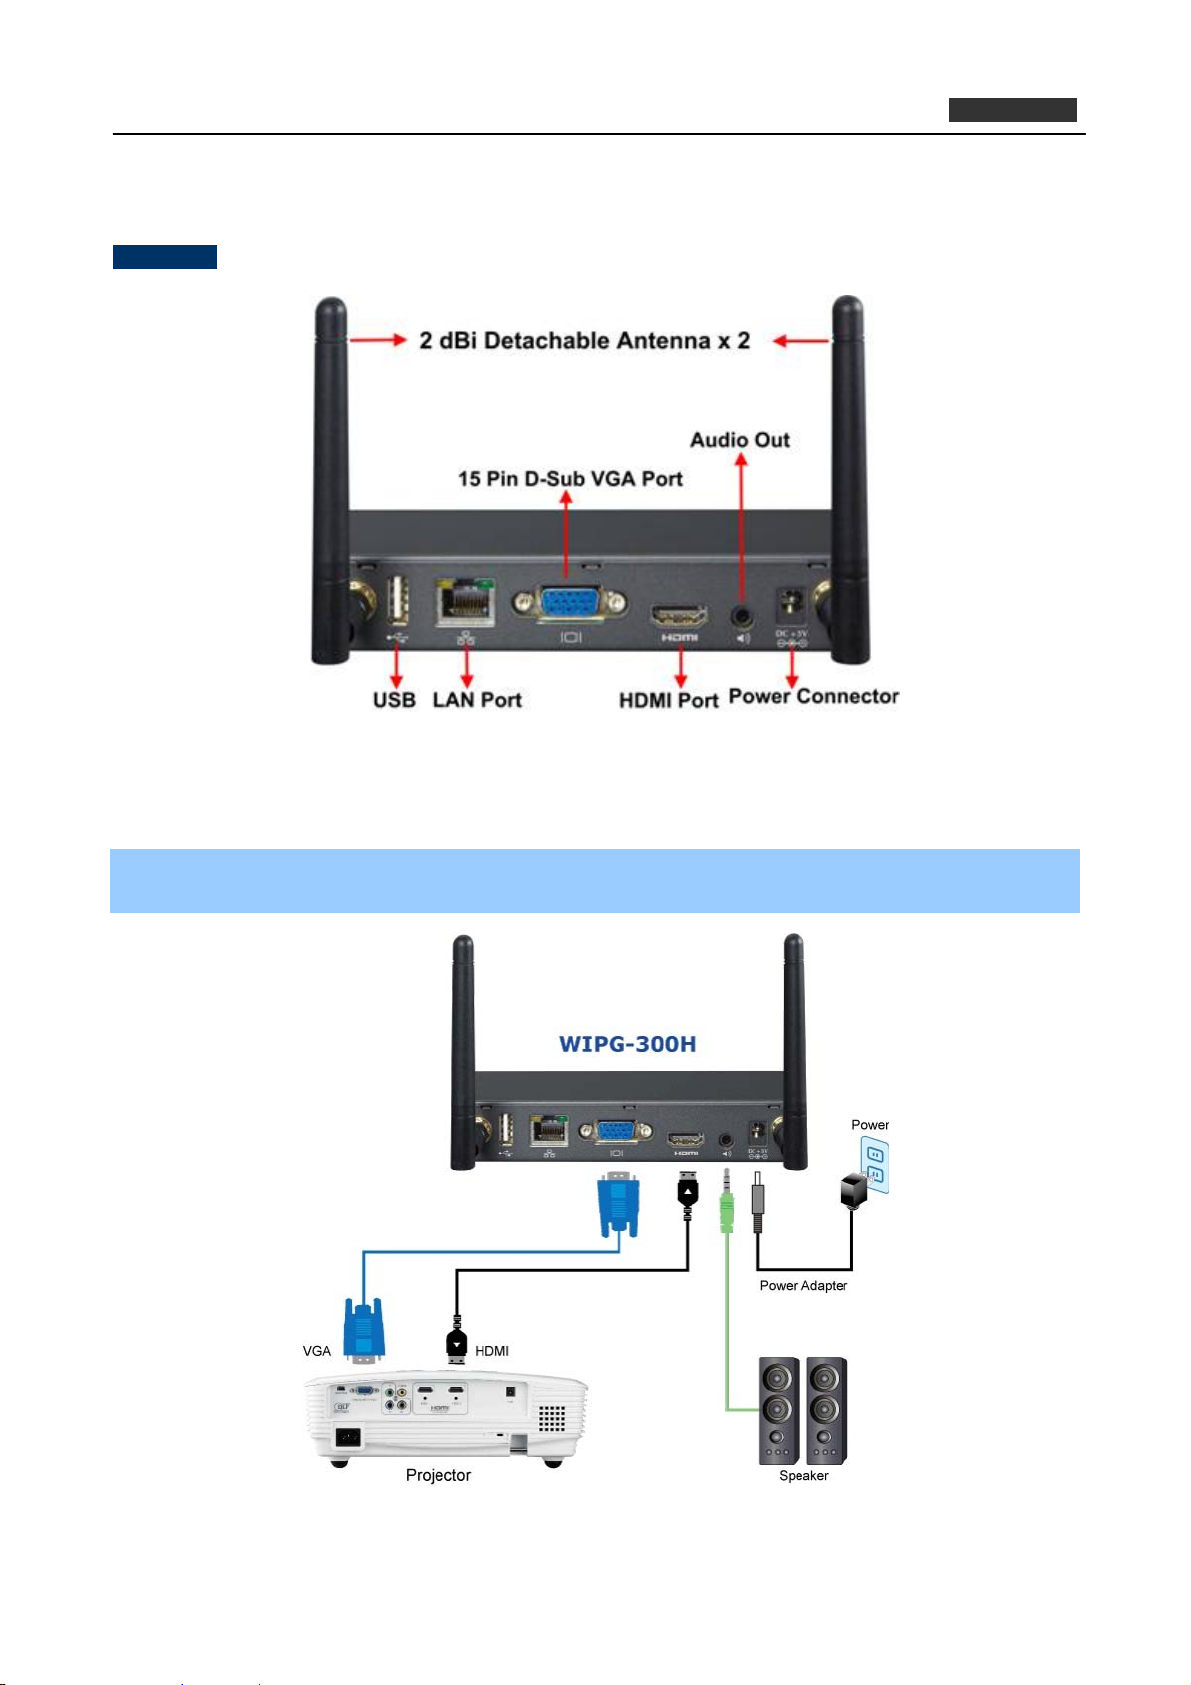
2.1.3 The Rear Panel
Rear Panel
PLANET 802.11n Wireless Interactive Presentation Gateway
WIPG-300H
Figure 2-2 the WIPG-300H Rear Panel
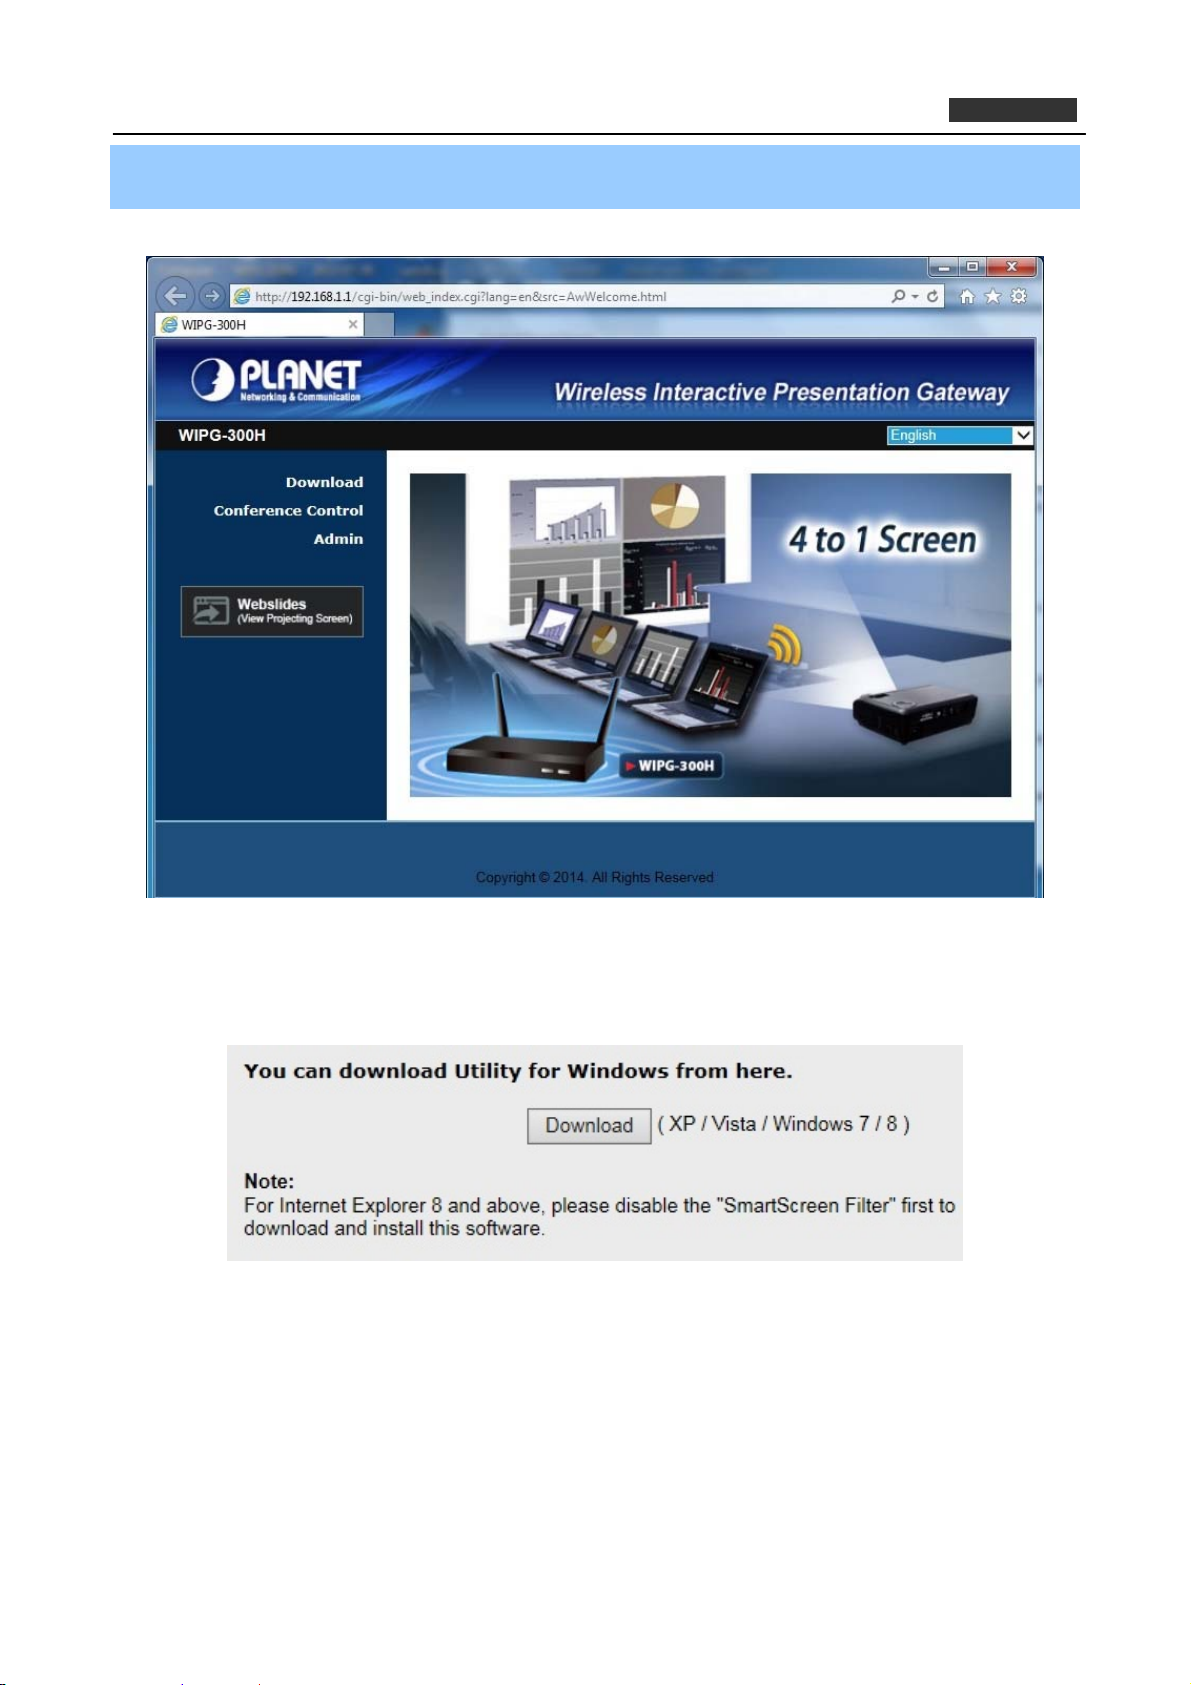
2.2 Hardware Connection
Step 1. Please turn off your projector first, and connect HDMI or D-sub cable of the projector to the
WIPG-300H. Then you can power on the WIPG-300H.
Figure 2-3 VGA / HDMI interface connection
13
Page 14

PLANET 802.11n Wireless Interactive Presentation Gateway
WIPG-300H
Step 2. When the projector shows the default screen as shown below, it indicates the WIPG-300H is ready
now.
Figure 2-4 Projector default screen
Step 3. Use your laptop or desktop for site surveying the wireless signal of the WIPG-300H, and connect
your PC with it wirelessly. The default SSID is WIPG-300H.
Figure 2-5 Windows platform wireless site survey
14
Page 15
PLANET 802.11n Wireless Interactive Presentation Gateway
WIPG-300H
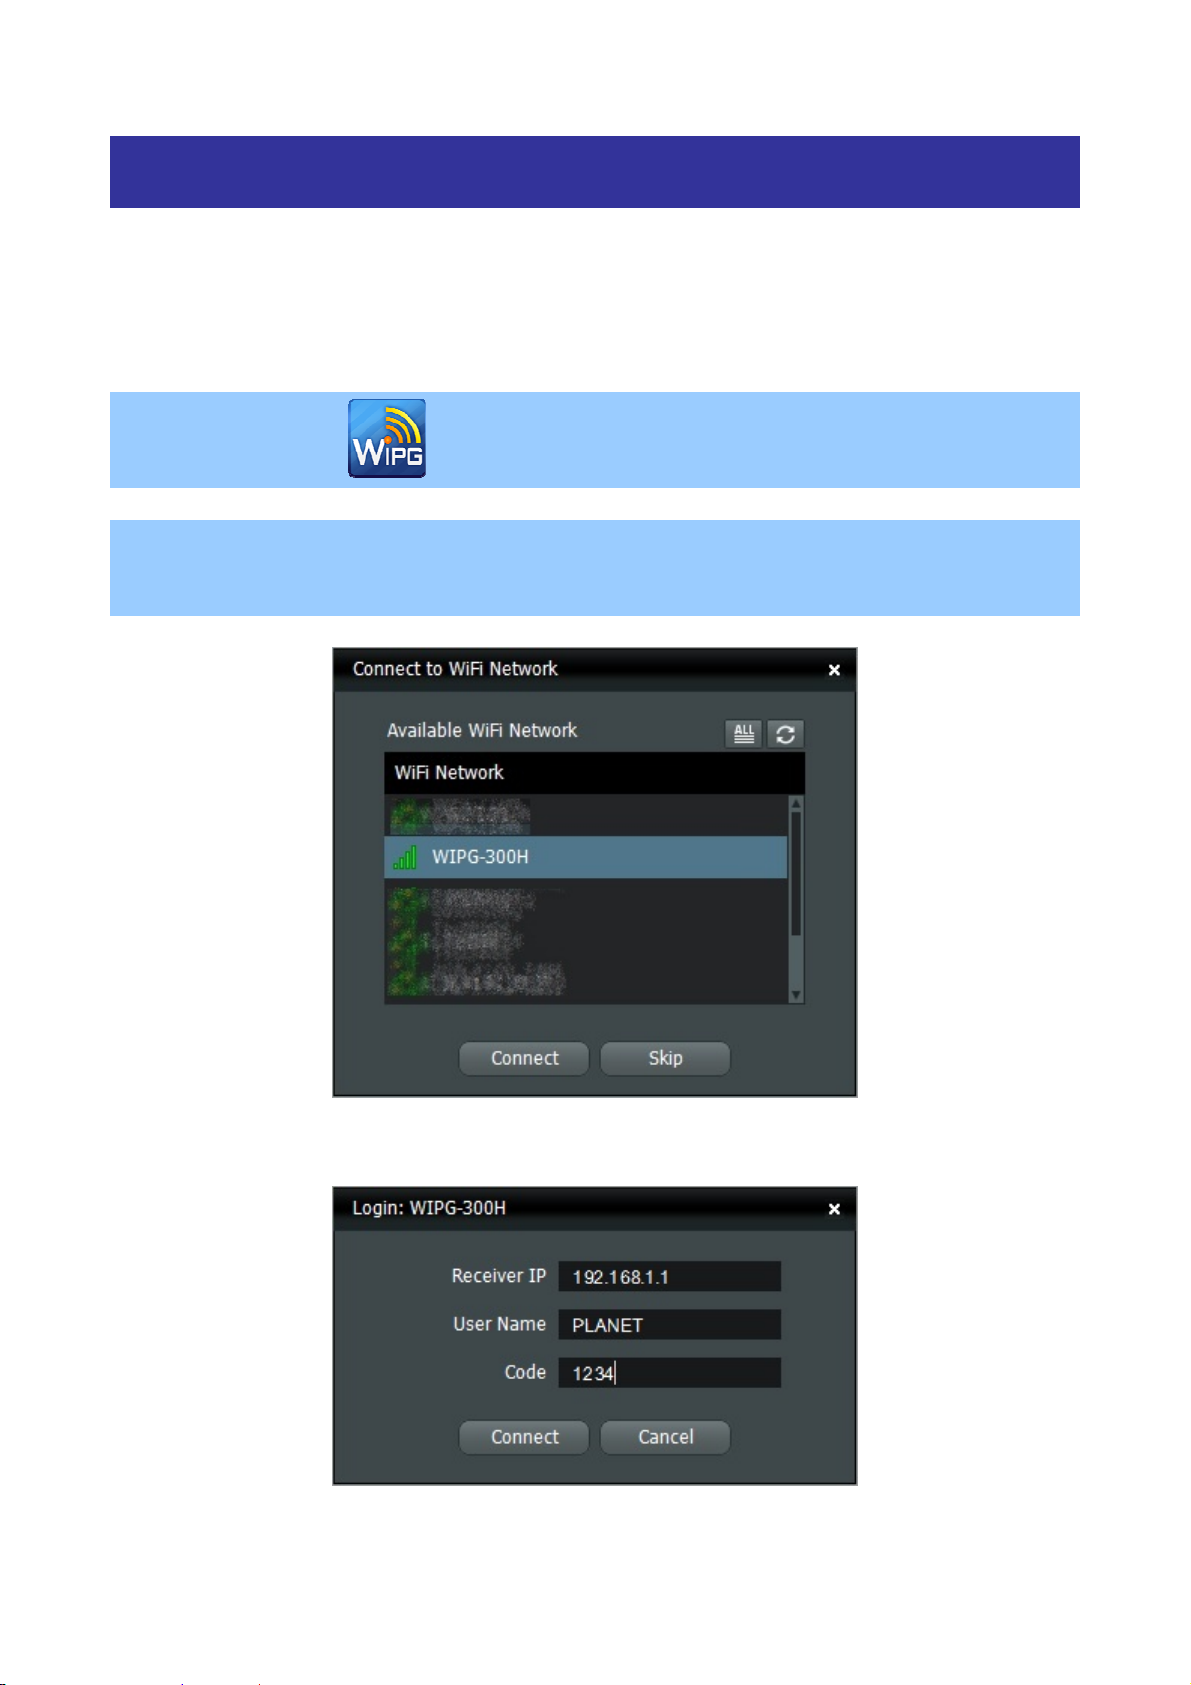
Step 4. Open the web browser and it will redirect to the WIPG-300H web page automatically, or you can
enter the default IP address 192.168.1.1 to access it.
Figure 2-6 WIPG-300H Web UI screenshot
Now you can configure the WIPG-300H and download the client utility (WIPG) of XP / Vista / Windows 7 / 8
via web UI. For further information of the configurations, please refer to the following chapters.
15
Page 16
Chapter 3. WINDOWS CLIENT UTILITY – WIPG
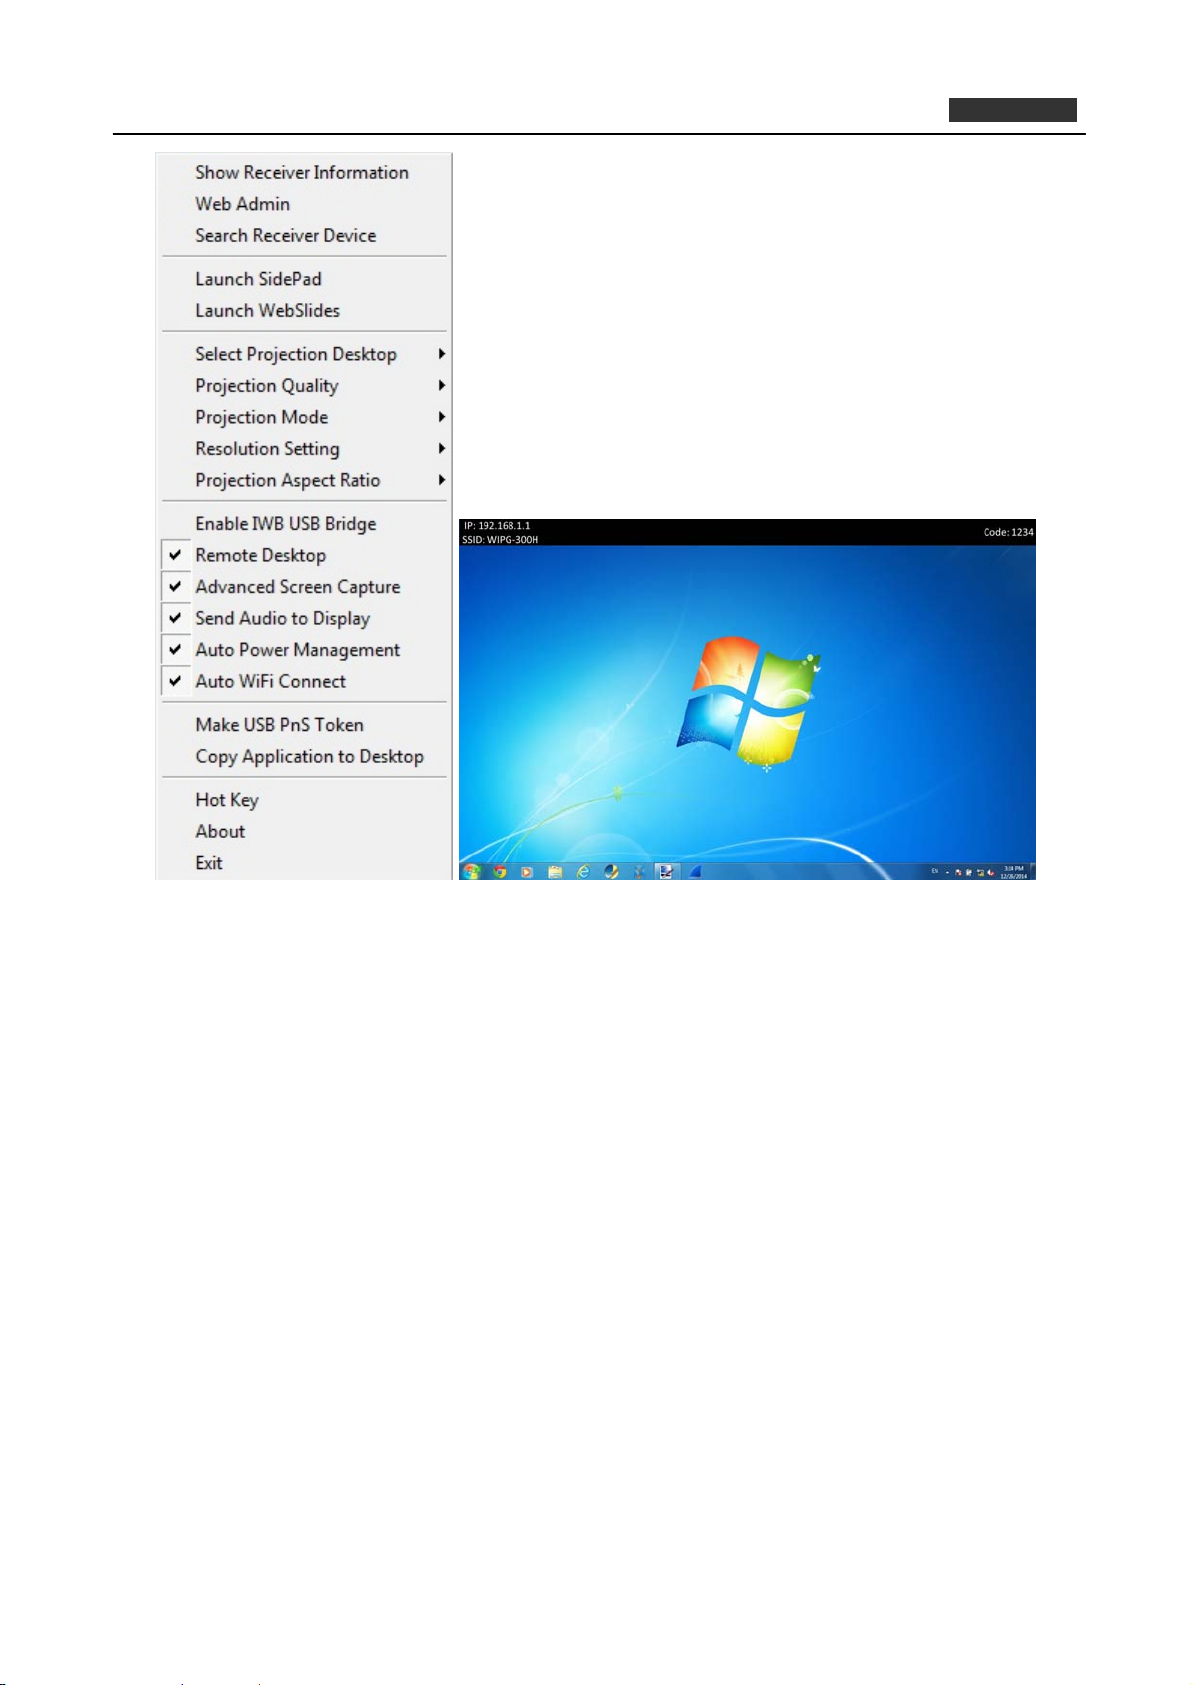
3.1. Starting Program
After installing WIPG (Wireless Interactive Presentation Gateway) utility downloaded from the web page of the
WIPG-300H, please follow the steps below to start.
Step 1. Click WIPG icon on the desktop to execute the program.
Step 2. WIPG will start to search the available access points automatically if you have not connected your
PC to the WIPG-300H manually. When the WIPG-300H is displayed in the list, please click it to
connect and then enter the Login Code shown on the projector screen.
Figure 3-1 WIPG Utility – Access Point Connection
Figure 3-2 WIPG Utility – Access Point Login
16
Page 17

PLANET 802.11n Wireless Interactive Presentation Gateway
Step 3. Click the button to start projection
Figure 3-3 WIPG Utility – Control Panel
3.2. Control Panel
WIPG-300H
Figure 3-4 WIPG Utility – Control Panel Function Introduction
Button Description Button Description
Start Full Screen Projection
Please refer to the following sections for detailed instructions of the menu.
Project to Split No. 1
Project to Split No. 2
Project to Split No. 3
Project to Split No. 4
Stop projecting
Freeze The Projection Screen
Enable the Magnifier function
3.2.1. Show Receiver Information
Click “Show Receiver Information” and it will display the Receiver Information, such as Wi-Fi Name, IP
Address and code on the upper of desktop. It will close automatically after 30 seconds.
17
Page 18
PLANET 802.11n Wireless Interactive Presentation Gateway
WIPG-300H
Figure 3-5 WIPG Utility – Show Receiver Information
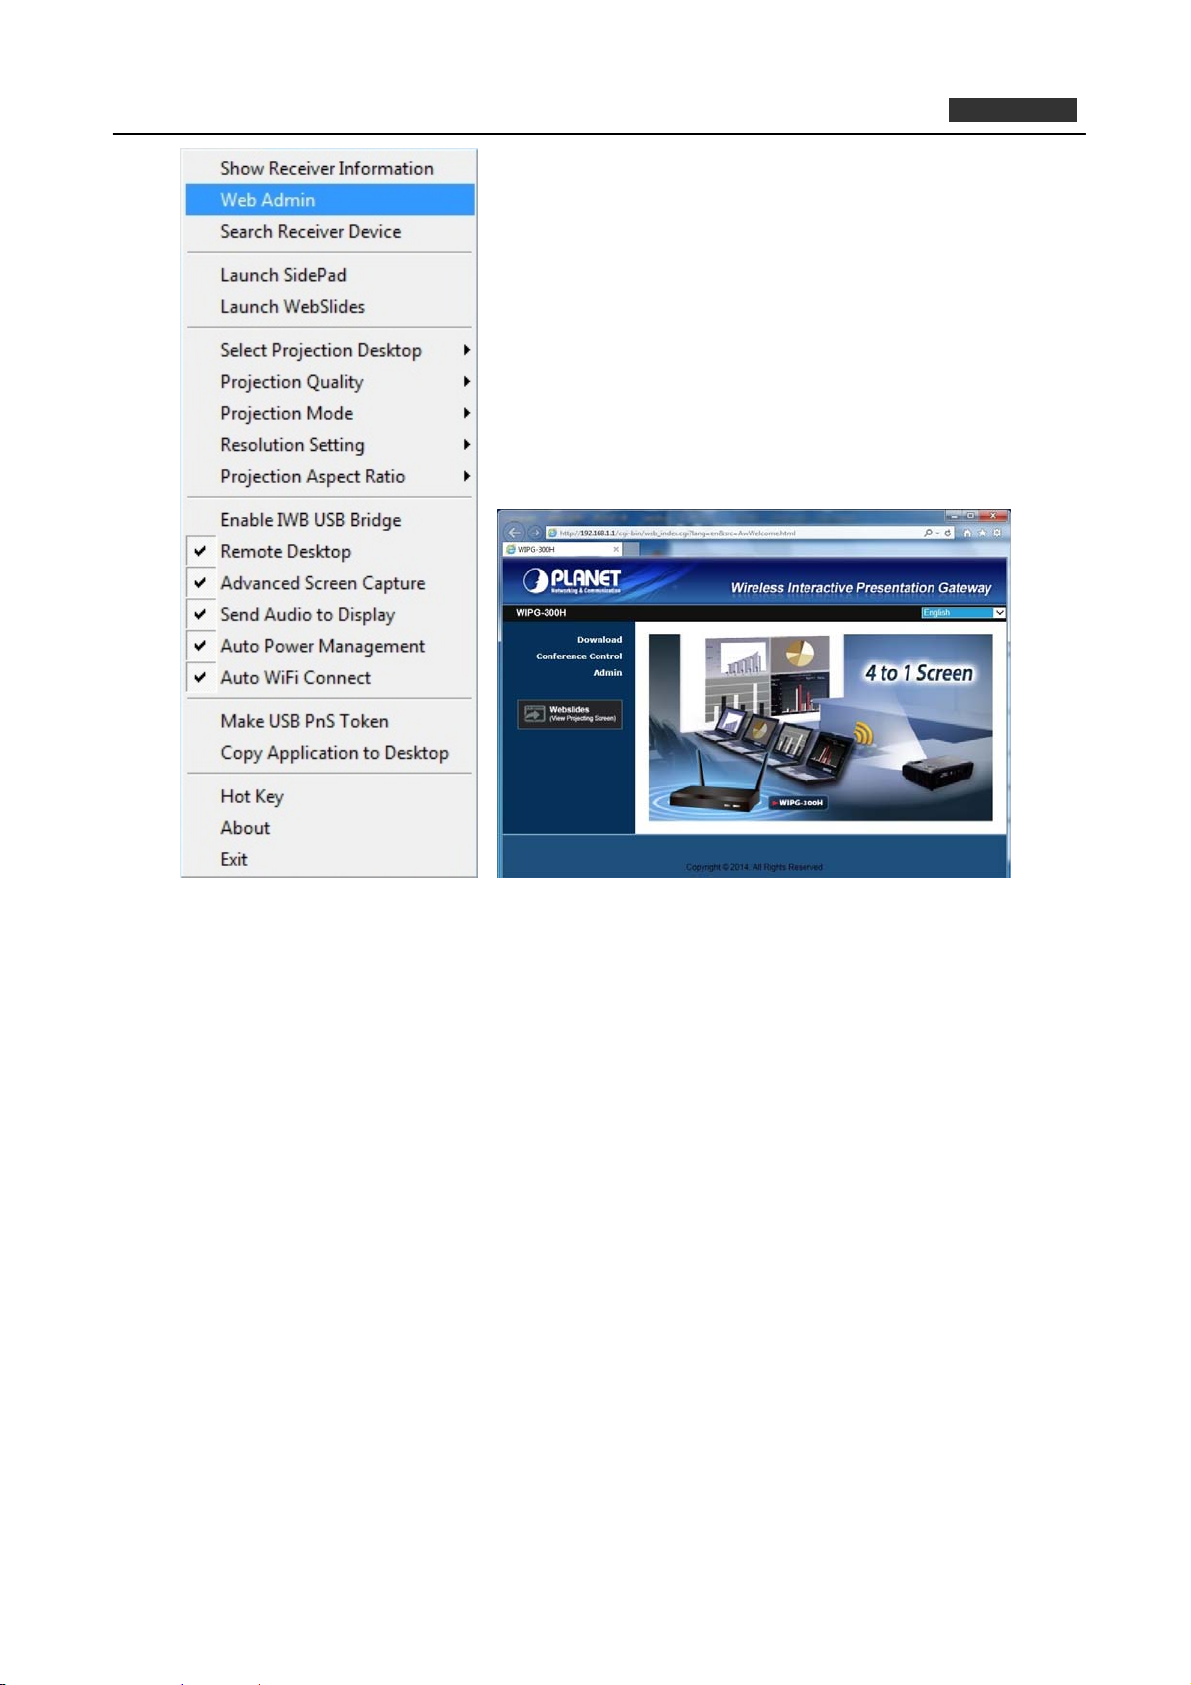
3.2.2. Web Admin
Click “Web Admin” to open the web UI page of WIPG-300H. With regard to the web management UI page,
please refer to the next chapter.
18
Page 19
PLANET 802.11n Wireless Interactive Presentation Gateway
WIPG-300H
Figure 3-6 WIPG Utility – Web Admin
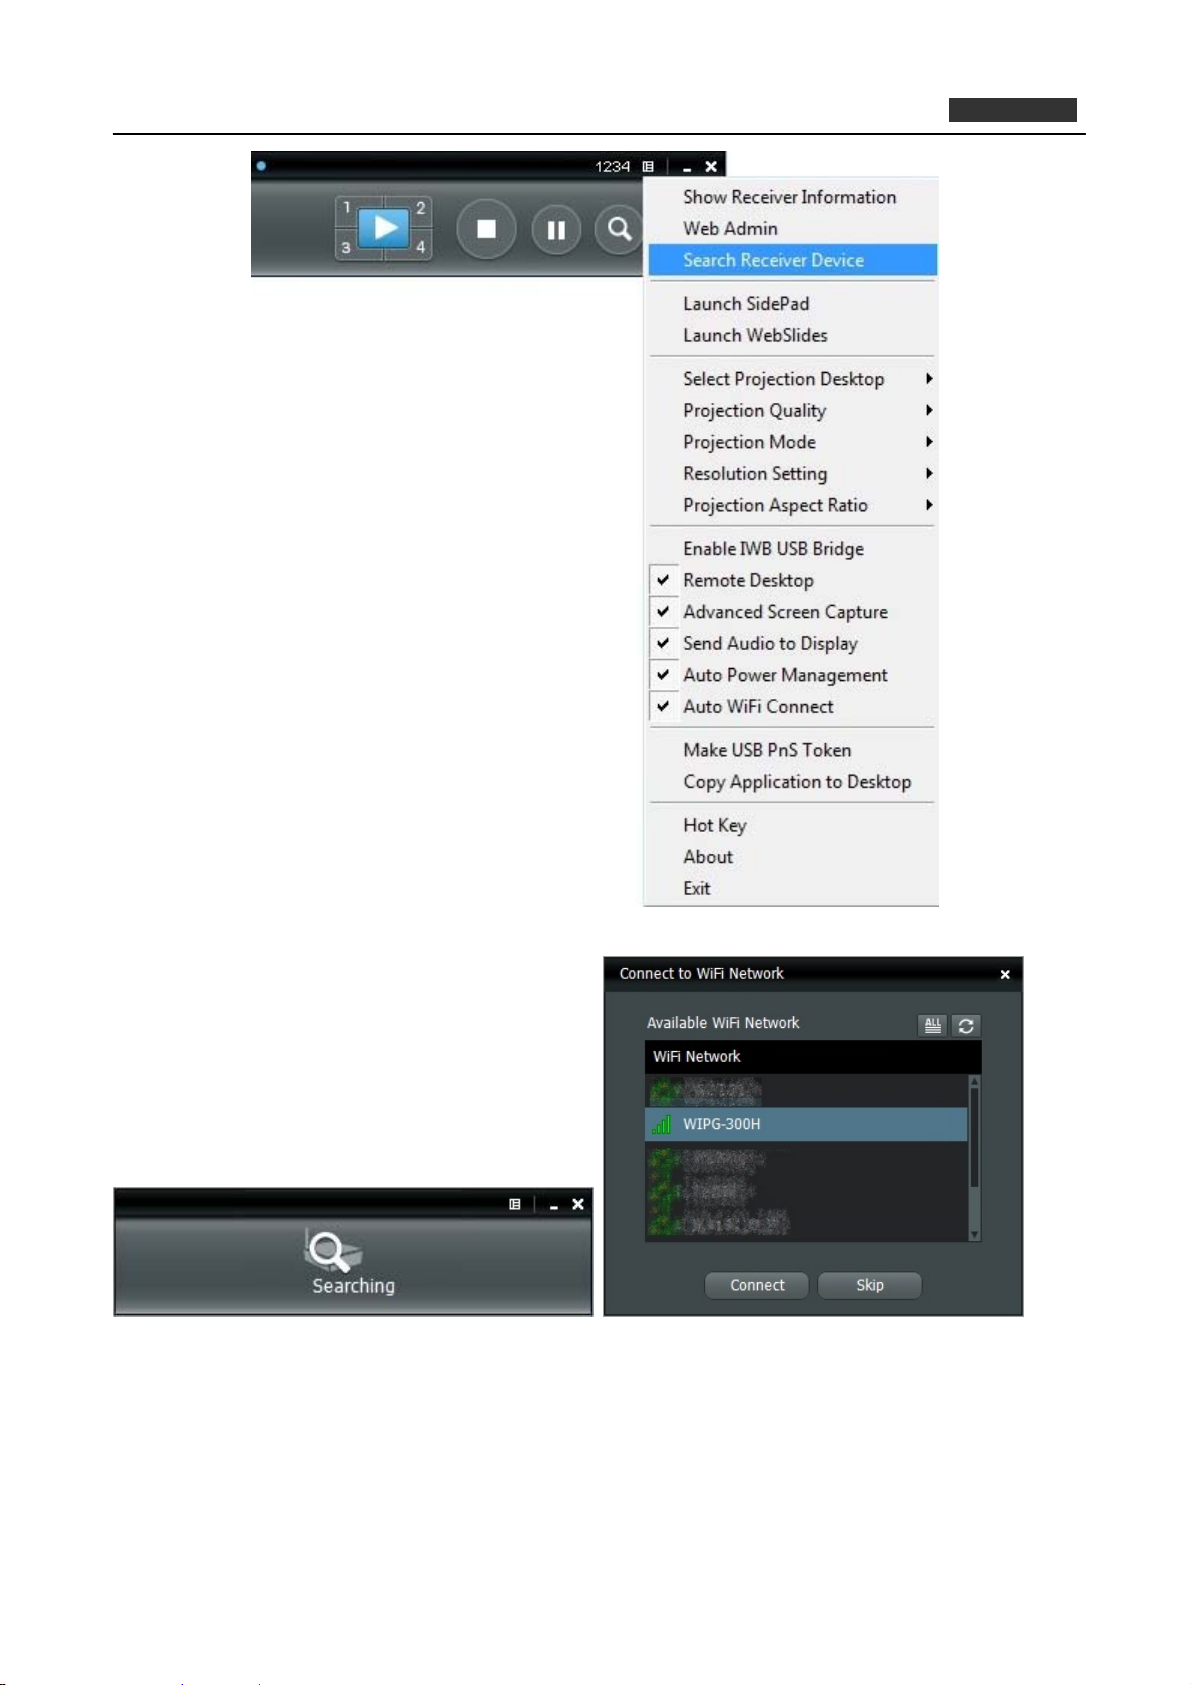
3.2.3. Search Receiver Device
Click “Search Receiver Device” to disconnect from current receiver and search the receiver again.
19
Page 20
PLANET 802.11n Wireless Interactive Presentation Gateway
WIPG-300H
Figure 3-7 WIPG Utility –Search Receiver Device
3.2.4. Launch SidePad
SidePad is an application to allow the user to connect Pad/Smartphone (Android and iOS), PC and
display/projector via the WIPG-300H. User can then control the projecting PC via Pad/Smartphone. Please
refer to the image below for more information.
20
Page 21

PLANET 802.11n Wireless Interactive Presentation Gateway
WIPG-300H
Figure 3-8 WIPG Utility –Launch SidePad
21
Page 22

PLANET 802.11n Wireless Interactive Presentation Gateway
WIPG-300H
SidePad Control for Android /I OS device
Android: Download “SidePad Receiver” from Google Play Store
iOS: Download “SidePad Receiver” from Apple Store.
1. Connect your Android/iOS device to WIPG device through Wi-Fi and launch “SidePad Receiver”
2. Enable “Launch SidePad” and enter the IP of your device. The APP will change to the screen of your PC.
22
Page 23

PLANET 802.11n Wireless Interactive Presentation Gateway
WIPG-300H
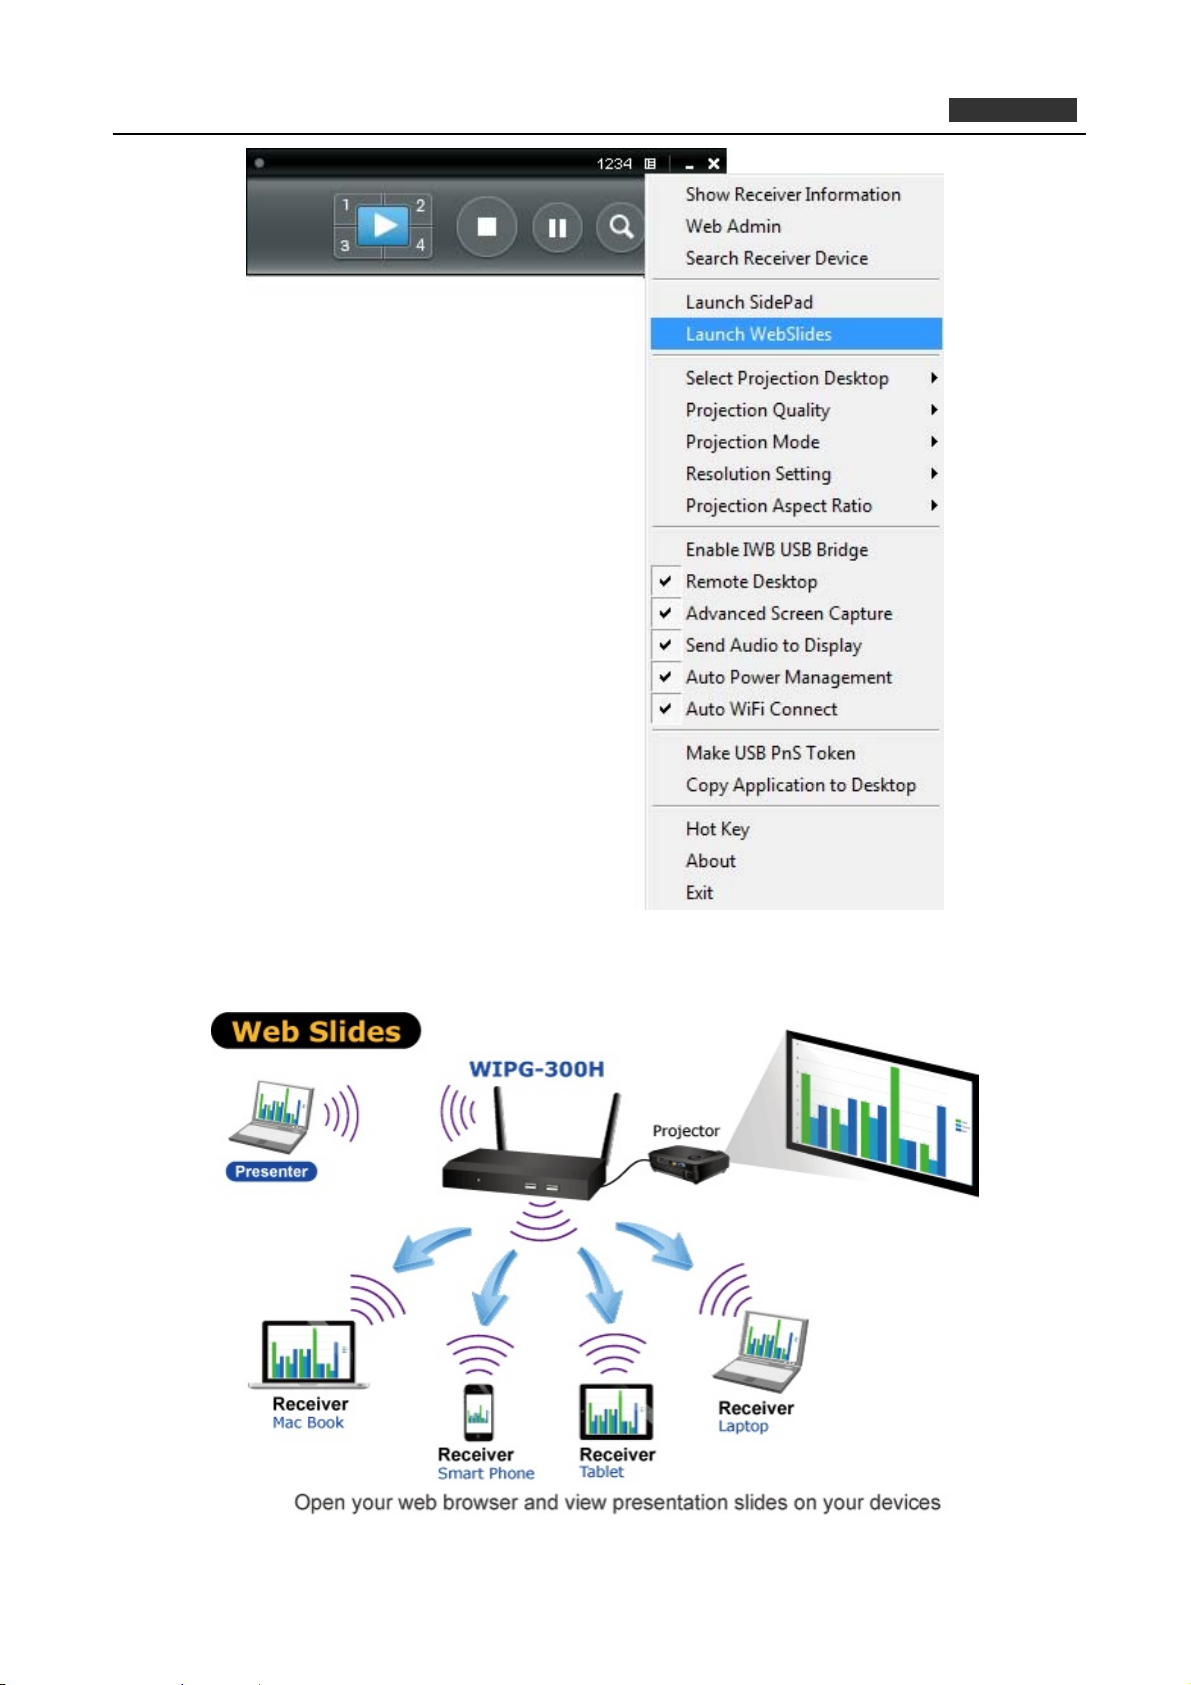
3.2.5. Launch WebSlides
WebSlides is an application to allow the user/presenter to broadcast the projecting screen/slides to allow
multiple login users to receive the slides during a presentation and save the slides for note taking later.
23
Page 24
PLANET 802.11n Wireless Interactive Presentation Gateway
WIPG-300H
Figure 3-9 WIPG Utility –Launch WebSlides
24
Page 25

PLANET 802.11n Wireless Interactive Presentation Gateway
WIPG-300H
Webslides is not available when Quad view is in use.
Presenter: Make sure your PC/Mac is connected to WIPG box and click on “Launch Webslides”. When
the function is on, the item will be checked on the main menu.
Audience: Users need to connect to WIPG Wi-Fi Network as the presenter and then launch their
browser and enter WIPG IP address (The information can be found on the projecting screen) on the URL
of browser.
Once the users are connected, they will see the image below on their devices. Click on to “Webslides”
Button to starting receiving the presenter’s slides and the image can be seen on the audience’s
browser.
25
Page 26

PLANET 802.11n Wireless Interactive Presentation Gateway
Wireless Projection function and Conference Control function can support up to 64 users.
The WIPG logged-in user is not identical to WebSlides user, and they both
consume the wireless bandwidth for device connection. If there are more
than 10 users logged into WIPG, it is recommended to connect WIPG to
company network through Ethernet or bridge WIPG to a router due to
wireless bandwidth concern. User should connect WIPG via company
network or router in order to secure the projection performance. The
WebSlides user number should not exceed the recommended number on
the web management page to prevent the failed connection or low
projection performance.
WIPG-300H
3.2.6. Select Projection Source
Click the “Select Projection Source” to project the main screen of desktop or the virtual extended screen.
Object Description
Main Desktop
Extended Desktop
When “Main Desktop” is
main desktop screen.
When “Extended Desktop” is selected, the WIPG-300H will project out
the virtual screen.
The second virtual monitor is invisible, but it is just right of the main one.
Just pull the presentation item out of the right-sided screen, and you’ll
see it appears on the projector screen.
selected, the WIPG-300H will project out the
26
Page 27

PLANET 802.11n Wireless Interactive Presentation Gateway
WIPG-300H
Figure 3-10 WIPG Utility – Select Projection Desktop
For Windows XP system, before starting the Extended Desktop screen projection,
please install the “VDD.exe” (Virtual Display Driver) first on your computer. Please
find the software in the USB Token.
For Windows 7/Vista Starter edition, it can’t support extended screen.
The extended screen of some Win7/Win8 laptops/tablets is not supported if the
27
Page 28

PLANET 802.11n Wireless Interactive Presentation Gateway
WIPG-300H
display card can’t support the extended screen function. This typically can be verified
by checking whether it can enable the extended screen through physical VGA cable;
if yes, then it should work with WIPG software.
3.2.7. Projection Quality
Click the “Projection Quality” and choose “Normal” for faster projection speed with lower screen image
quality, and “Best” for clear screen image quality but slower projection speed.
Figure 3-11 WIPG Utility – Projection Quality
3.2.8. Projection Mode
The Projection Mode provides the option to support “Presentation Mode” and “Video Mode”.
For the “Presentation Mode”, it will always keep the shortest latency to provide the most responsive
operation performance
For the “Video Mode”, it will trigger the longer latency but much smooth performance when you are
watching video, and change back to the shortest latency mode when it detects you are moving the
mouse cursor.
28
Page 29

PLANET 802.11n Wireless Interactive Presentation Gateway
WIPG-300H
Figure 3-12 WIPG Utility – Projection Mode
3.2.9. Resolution Setting
Click on “Resolution Setting” and choose “Never Change” to keep original desktop resolution. “Always
Change” means to change resolution automatically according to application’s recommendation, or “Always
ask me” to prompt a resolution change message to user.
29
Page 30

PLANET 802.11n Wireless Interactive Presentation Gateway
WIPG-300H
Figure 3-13 WIPG Utility – Projection Mode
3.2.10. Projection Aspect Ratio
Click on “Projection Aspect Ratio” and choose “Keep aspect ratio” to keep the original aspect ratio if the
desktop resolution is different from WIPG output resolution, or choose “Fit full screen” to project the screen
to full screen.
30
Page 31

PLANET 802.11n Wireless Interactive Presentation Gateway
WIPG-300H
Figure 3-14 WIPG Utility -- Projection Aspect Ratio
3.2.11. Enable IWB USB Bridge
Click on “Enable USB IWB Bridge” to enable the USB IWB Bridge feature. When you start the full screen
projection, it will bridge the IWB device to your PC wirelessly.
31
Page 32

PLANET 802.11n Wireless Interactive Presentation Gateway
WIPG-300H
Figure 3-15 WIPG Utility – Enable IWB USB Bridge
You have to install the USBoIP driver first. You can find the driver from USB token.
3.2.12. Advanced Screen Capture
If you enable “Advanced Screen Capture”, all the tip windows and other layered windows (including the
main UI) will be projected to the projector screen. However, the mouse cursor may blink from time to time
when it is projecting.
32
Page 33

PLANET 802.11n Wireless Interactive Presentation Gateway
WIPG-300H
Figure 3-16 WIPG Utility – Advanced Screen Capture
The Source Screen with Tip Window
33
Page 34

PLANET 802.11n Wireless Interactive Presentation Gateway
WIPG-300H
The Projector Screen without Tip Window
3.2.13. Send Audio to Display
Click on “Send Audio to Display” to start the audio projection feature. It will mute your local speaker during
the projection and restore it when it closes the application. The audio will be bridged to your display device.
34
Page 35

PLANET 802.11n Wireless Interactive Presentation Gateway
WIPG-300H
Figure 3-17 WIPG Utility – Send Audio to Display
For Windows XP system, if you can’t hear the audio, please install the Audio
driver (“VAC.exe”, Virtual Audio Control Driver) on your computer first. You can
find the software from USB Token.
(Windows Vista, Win7 and Win8 are not necessary to install VAC driver)
3.2.14. Auto Power Management
To make the highest projection performance, application will turn the PC’s windows power scheme from
current settings to “highest performance”; however, you can click on “Auto Power Management” to enable or
disable this function and restore you power scheme immediately.
35
Page 36

PLANET 802.11n Wireless Interactive Presentation Gateway
WIPG-300H
Figure 3-18 WIPG Utility – Auto Power Management
3.2.15. Auto Wi-Fi Connect
Click “Auto Wi-Fi Connect” to enable the auto Wi-Fi discovery and connection function for quick
establishment of wireless connection.
36
Page 37

PLANET 802.11n Wireless Interactive Presentation Gateway
WIPG-300H
Figure 3-19 WIPG Utility – Auto Wi-Fi Connect
3.2.16. Make USB PnS Token
Click “Make USB PnS Token” to make a USB WPS Token; you can insert a USB and follow the wizard to
make the Token. After completion, you can plug the USB into any PC to do the projection without installing the
WIPG software onto every PC.
37
Page 38

PLANET 802.11n Wireless Interactive Presentation Gateway
WIPG-300H
Figure 3-20 WIPG Utility – Make USB PnS Token
Figure 3-21 USB Auto Setup Wizard
38
Page 39

PLANET 802.11n Wireless Interactive Presentation Gateway
WIPG-300H
Figure 3-22 USB Auto Setup Wizard
Figure 3-23 USB Auto Setup Wizard
3.2.17. Copy Application to Desktop
Click the “Copy Application to desktop” to copy the application to your desktop immediately even you don’t
have the system privilege.
39
Page 40

PLANET 802.11n Wireless Interactive Presentation Gateway
WIPG-300H
Figure 3-24 WIPG Utility – Copy Application to Desktop
3.2.18. Hot Key
Click on “Hot Key” to display the available Hot Key definitions.
Figure 3-25 WIPG Utility – Hot Key
40
Page 41

PLANET 802.11n Wireless Interactive Presentation Gateway
WIPG-300H
3.2.19. About
Click on “About” to show the system information. It includes the client version, server IP address, and login
code.
Figure 3-26 WIPG Utility - About
41
Page 42

PLANET 802.11n Wireless Interactive Presentation Gateway
WIPG-300H
3.2.20. Exit
Click “Exit” to exit the WIPG utility. It will stop the current projection and close the application immediately.
Figure 3-27 WIPG Utility - Exit
42
Page 43

PLANET 802.11n Wireless Interactive Presentation Gateway
Chapter 4. MAC OS X CLIENT UTILITY
4.1. Mac OS X Quick Connection
Step 1: Right-click on the network icon displayed in the system tray
The AirPort Network Connection menu will appear
Figure 4-1
Step 2: Highlight and select the wireless network (SSID) to connect
WIPG-300H
(1) Select and SSID [WIPG-300H]
(2) Double-click on the selected SSID
Figure 4-2
Step 3: Enter the encryption key of the WIPG-300H
(1) Enter the encryption key that configured in section 5.4.3
(1) Click the [Join] button
43
Page 44

PLANET 802.11n Wireless Interactive Presentation Gateway
WIPG-300H
Figure 4-3
If you want to connect this WIPG-300H in the future, check [Remember this
network].
Step 4: Check if the AirPort is connected to the selected wireless network.
If “Yes”, then there will be a “check” symbol in the front of the SSID.
Step 5: Open the web browser and it will redirect to WIPG-300H home page automatically. Or you can enter
the default IP address http://192.168.1.1 to access it.
Figure 4-4
After a moment, the main screen appears as shown in Figure 4-5
44
Page 45

PLANET 802.11n Wireless Interactive Presentation Gateway
WIPG-300H
Figure 4-5
4.2. Download Mac OS X Client Utility
Step 1. : Click “Download”.
Step 2. : Choose the utility for “MAC” and then click Download button and execute the installation program.
45
Page 46

PLANET 802.11n Wireless Interactive Presentation Gateway
WIPG-300H
Figure 4-6
Figure 4-7
46
Page 47

PLANET 802.11n Wireless Interactive Presentation Gateway
WIPG-300H
Step 3. : Follow Installation Wizard instructions to proceed till the installation process is completed.
Figure 4-8
Step 4. Click “WIPG” icon to execute the program.
47
Page 48

PLANET 802.11n Wireless Interactive Presentation Gateway
WIPG-300H
Step 5. WIPG will start to search the available access points automatically if you have not connected your
MAC to WIPG-300H manually. When the WIPG-300H is displayed in the list, please click it to
connect and then enter the Login Code shown on the projector screen.
Step 6. Ready to execute the program.
Figure 4-9
Figure 4-10
48
Page 49

4.3. Main User Interface
PLANET 802.11n Wireless Interactive Presentation Gateway
WIPG-300H
Figure 4-11
4.4. Screen Projection
Click the “Play” button for full or split screen and you can project the main screen on to the display
immediately. Click the “Pause” button and you can freeze you projection screen, and click the “Stop” button to
stop projecting your screen.
Figure 4-12
Button Description
Full Screen projecti
Project to Split #1
Project to Split #2
on
Project to Split #3
Project to Split #4
Stop projecting
49
Page 50

PLANET 802.11n Wireless Interactive Presentation Gateway
WIPG-300H
Pause projecting
Enable the Magnifier fun
ction
50
Page 51

PLANET 802.11n Wireless Interactive Presentation Gateway
WIPG-300H
4.5. MAC Audio Projection
Before starting Audio Projection, please install the “Soundflower.mpkg” (MAC system extension for audio
using) on your computer. Please find the software in USB Token.
1) Execute the “Soundflower.pkg” in the Mac OS.
2) It will pop up a window “Welcome to the Soundflower Installer” and then please click “Continue”.
Figure 4-13
51
Page 52

PLANET 802.11n Wireless Interactive Presentation Gateway
3) After reading the important information, please click “Continue” to go to the next step.
WIPG-300H
4) Select the language and click “Continue”.
Figure 4-14
Figure 4-15
52
Page 53

PLANET 802.11n Wireless Interactive Presentation Gateway
5) Click “Agree” and then click “Continue”.
WIPG-300H
6) Click “Install”.
Figure 4-16
Figure 4-17
53
Page 54

PLANET 802.11n Wireless Interactive Presentation Gateway
7) Enter your Username and Password of the System. Then, click “Install Software”.
WIPG-300H
Figure 4-18
8) A notice will pop up to remind you that computer will restart after finishing the installation. Please click
“Continue Installation”.
Figure 4-19
54
Page 55

PLANET 802.11n Wireless Interactive Presentation Gateway
9) When the installation is successful, click “Restart” to restart your computer.
WIPG-300H
Figure 4-20
10) After restarting the computer, you will see there is a sunflower icon displayed in the system taskbar.
Then, you can configure your audio output per your preference.
※ If the icon is not displayed, please execute the program of WIPG-300H first.
Figure 4-21
55
Page 56

PLANET 802.11n Wireless Interactive Presentation Gateway
WIPG-300H
Chapter 5. WEB UI MANAGEMENT
5.1. WIPG-300H Homepage
Please follow the steps below to enter the web UI of WIPG-300H.
Step 1. First, please connect your PC to WIPG-300H (via wired or wireless).
Step 2. Open the web browser and it will redirect to WIPG-300H home page automatically. Or you can enter
the default IP address http://192.168.1.1 to access it.
After a moment, the main screen appears as shown in Figure 5-1.
Figure 5-1
The following sections will introduce the detailed instructions of the web UI functions.
56
Page 57

PLANET 802.11n Wireless Interactive Presentation Gateway
WIPG-300H
5.2. Download
Please follow the steps below to download and execute the WIPG installation program.
Step 1. Click “Download”.
Step 2. Choose the WIPG utility for “XP / Vista / Windows 7 / 8” or “Mac OS X” and then click Download
button and execute the installation program.
Figure 5-2
Step 3. Follow Installation Wizard instructions to proceed till the installation process is completed. Once
installation is completed, a WIPG utility shortcut will appear on the desktop.
If the “Windows Security Alert” pops up, just press “Unblock” button to continue the installation.
57
Page 58

PLANET 802.11n Wireless Interactive Presentation Gateway
WIPG-300H
5.3. Conference Control
This function allows you to host a meeting without the projector cable swapping, and each participant is able
to show their own presentation easily. Please follow the steps below to execute Conference Control.
Step 1. Click “Conference Control”.
Step 2. Enter the password. The default value is “moderator”. Then press Login button.
Figure 5-3
Step 3. After login, you can see a user list on the screen which indicates the clients who have already logged
in into the WIPG utility. There are three columns, “Name”, “Play Control” and “IP Address”.
There are six buttons:
Play (Full Screen)
Play Split #3 Play Split #4 Stop
Play Split #1 Play Split #2
Figure 5-4
58
Page 59

PLANET 802.11n Wireless Interactive Presentation Gateway
WIPG-300H
5.4. Admin
This function allows you to login web management UI of WIPG-300H. Click “Admin”, and enter the password.
The default value is “admin”. Then click the Login button or press the Enter key.
Please refer to the following sections for further configuration of the web management UI.
Figure 5-5
Default IP Address: 192.168.1.1
Default Password: admin
After entering the password, the main screen appears as shown in Figure 5-6.
5.4.1. System Status
On this page, you can see the current status and some basic settings of the presentation gateway.
Figure 5-6
59
Page 60

PLANET 802.11n Wireless Interactive Presentation Gateway
WIPG-300H
Object Description
Model Name
Firmware Version
Product mod
Product firmware versio
el name
n number
Network Status
IP Address
Subnet Mask
Default Gateway
Wireless MAC Address
Wired MAC Address
The IP addre
The subnet m
The default ga
The wireless MAC address
The wired M
ss of WIPG-300H
ask
teway
AC address
Connection Status
Projecting Status
Total Users
Code
It shows “Wai
The numbe
utility
Login code
ting for projecting” or “Projecting”.
r of users who has already logged in into WIPG
60
Page 61

5.4.2. Device Setup
PLANET 802.11n Wireless Interactive Presentation Gateway
WIPG-300H
Figure 5-7
Object Description
Resolution VGA:
SVGA (800x600) / XGA (1024x768)
WXGA(1280x768) / WXGA(1280x800)
WXGA (1360x768) / WXGA+ (1440x900)
UXGA (1600x1200)
HDMI:
720p (1280x720) / 1080i (1920x1080)
1080p (1920x1080)
You ca
Code
IWB USB Port
n select “Disable”, “Random”, or “Use the following
code” to set a specified 4-characters Number.
You ca
n configure the IWB USB port to support “IWB (HID)”
device or “Mouse/Keyboard” device.
The default setting of project output port is VGA. However, The HDMI cable will still work if you
plug it before powering on the WIPG-300H.
Click the Apply button to make the changes to take effect.
61
Page 62

PLANET 802.11n Wireless Interactive Presentation Gateway
WIPG-300H
5.4.3. Network Setup
This page is used to configure the parameters for local area network which connects to the LAN port or
wireless interface. Here you may change the setting for IP address, subnet mask, DHCP, etc.
IP Setup
The page includes the following detailed fields:
Object Description
IP Setup
Obtain IP address
automatically
Use the following IP
address
If you select this option, the WIPG-300H will detect the
network environment automatically.
When WIPG-300H is connected to a LAN that has DHCP
server, the clients of WIPG-300H will assign an IP by that
server and the built-in DHCP server of WIPG-300H will be
disabled.
When the WIPG-300H is connected to a LAN that does
not have any DHCP server, the built-in DHCP server of
WIPG-300H will be enabled and the clients of WIPG-300H
will obtain IP address by itself.
Or you can select this option to use the fixed IP address for
WIPG-300H. (Default Settings)
IP Address
Figure 5-8-1
The default value is 192.168.1.1
Subnet Mask
Default Gateway
DNS Server
The default value is 255.255.255.0
The default value is 192.168.1.1
The default value is 192.168.1.1
62
Page 63

DHCP Server Setup
Object Description
PLANET 802.11n Wireless Interactive Presentation Gateway
WIPG-300H
Auto
Disable
Wireless Setup
Select “Auto” to enable the built-in DHCP server of
WIPG-300H. (Default Settings)
Start IP
End IP
Subnet Mask
Default Gateway
DNS Server
Or you can select this op
WIPG-300H.
The default value is 192.168.1.100
The default value is 192.168.1.200
The default value is 255.255.255.0
The default value is 192.168.1.10
The default value is 192.168.1.10
tion to disable the DHCP server of
Figure 5-8-2
63
Page 64

PLANET 802.11n Wireless Interactive Presentation Gateway
The page includes the following detailed fields:
Object Description
Wireless LAN
SSID Broadcast
The option for enabling or disabling wireless LAN function
Enable SSID
The default value is “Enable”.
WIPG-300H
You can configure the SSID string here when
Wireless LAN is enabled.
Channel
Encryption
Key
Channel
Bandwidth
If you select “Auto”, the WIPG-300H w
and choose a clear one automatically. Or you can select a fixed channel.
The option of wirele
WPA2, or disable it.
If Encryption is enabled, you have to set the key acco
encryption mode you selected.
Select from 20M or
ss security. You can select one of WEP / WPA /
Auto (20M/40M)
ill scan all of the wireless channels
rding to the
AP Client Setup
Check “Enable” radio button to switch WIPG-300H to AP client mode. It can join other access points
wirelessly. Besides, the clients can also login WIPG-300H for presentation and surf the Internet via other AP
simultaneously.
Figure 5-8-3
64
Page 65

PLANET 802.11n Wireless Interactive Presentation Gateway
The page includes the following detailed fields:
Object Description
Connect to Existing AP
The option for enabling or disabling AP client mode. By this feature
you can join other Access Points wirelessly. And LAN function will
be disabled during AP client mode.
Existing AP
SSID
Choo
Encryption
se the wireless security type of the AP you want to join.
WIPG-300H
Figure 5-8-4
Enter the existing AP’s SSID here when AP
client mode is enabled.
Key
GateKeeper
Enter the key of the
Gatekeeper is designed for ensuring the enterprise network security
AP you want to join.
within WIPG-300H.
All Pass
Allow the clients of WIPG-300H (guests) to
access the whole office network. (Default
setting)
All Block
Block the clients of WIPG-300H (guests) to
access the whole office network (LAN).
Internet only
This option will block the clients of WIPG-300H
(guests) from the office network (LAN) but still
reserve the Internet connection capability.
SNMP
You can cho
ose enable or disable SNMP function from here.
Click the Apply button to make the changes to take effect.
To enable the WIPG-300H to run as an AP Client to connect to other existing APs
wirelessly, please set the encryption security type to “WPA AES” or “WPA2 AES”.
65
Page 66

PLANET 802.11n Wireless Interactive Presentation Gateway
WIPG-300H
LAN function will be disabled during AP client mode.
66
Page 67

PLANET 802.11n Wireless Interactive Presentation Gateway
5.4.4. OSD Setup
Users can customize their own OSD (on-screen display) standby image.
WIPG-300H
The web page includes the following fields:
Object Description
Restore to default
Image File Upload
Device Information
Overlay Device
Information
Screen Saver Settings
Restore to th
Upload the customi
remark on screen when select the file.
Show all or Hide all the device information on standby screen.
When Device Information set Hide option, the ”Overlay Device
Information” & “Screen Saver Setting” will be disabled
Enable or disable the device info
projection screen when doing projection.
Enable or disable the screen saver and also configure the idle
time (Minutes). (Default is 5 minutes)
Figure 5-9
e default OSD standby image.
zed OSD standby image.Please refer to
rmation will be show on top of
67
Page 68

PLANET 802.11n Wireless Interactive Presentation Gateway
5.4.5. Change Passwords
Users can change the login password. The length of password is up to 8 characters.
WIPG-300H
Figure 5-10
Click the Apply button to make the changes to take effect.
5.4.6. Reset to Default
This page allows you to reset the current configuration to factory default.
Figure 5-11
68
Page 69

PLANET 802.11n Wireless Interactive Presentation Gateway
WIPG-300H
Click the Apply button to restore the WIPG-300H to the factory default settings.
5.4.7. Firmware Upgrade
This page allows you to upgrade the WIPG-300H firmware to new version. Please note: Do NOT power off
the device during the upload because it may crash the system.
Figure 5-12
If it is necessary to upgrade the firmware, please follow the steps below to operate carefully.
Step 1. First, download the latest firmware image file from PLANET website.
Step 2. Click Browse button to specify the file you want to upgrade.
Step 3. Click Upgrade button to start.
Step 4. There will be a warning message shown and countdown counter on the screen.
69
Page 70

PLANET 802.11n Wireless Interactive Presentation Gateway
Step 5. After a few minutes, a complete message will show on the screen.
Step 6. Power off the WIPG-300H and then power on it again.
Step 7. Login the web UI, and click Reset to Default to take effect.
New firmware versions posted at the website of PLANET Technology can be downloaded for
free. There is no need to upgrade the firmware unless the new firmware has a new feature you
want to use.
WIPG-300H
When you upgrade its firmware, you may lose its current configurations. Do not turn off the
WIPG-300H while the firmware is being upgraded; otherwise, the WIPG-300H may be damaged.
5.4.8. Webslides Setup
Click on “WebSlides Setup” option, you can: “Adjust Auto Refresh Interval”, or activate “Access
Password Control” Please pay attention on the note for information.
Figure 5-13
70
Page 71

PLANET 802.11n Wireless Interactive Presentation Gateway
5.4.9. Reboot System
Press Reboot to reboot system. Please wait for a few minutes and reload web page again.
WIPG-300H
Click Reboot button to restart the WIPG-300H.
Figure 5-14
71
Page 72

PLANET 802.11n Wireless Interactive Presentation Gateway
WIPG-300H
Appendix A: Configuring the PCs
In this section, we’ll introduce how to install and configure the TCP/IP correctly in Windows XP. First make
sure your Ethernet Adapter is working, refer to the adapter’s manual if needed.
1. Install TCP/IP component
1) On the Windows taskbar, click the Start button, point to Settings, and then click Control Panel.
2) Click the Network and Internet Connections icon, and then click on the Network Connections
tab in the appearing window.
3) Right-click the icon shown below and select Properties on the prompt page.
Figure A-1
4) On the prompt page shown below, double-click on the Internet Protocol (TCP/IP).
72
Page 73

PLANET 802.11n Wireless Interactive Presentation Gateway
WIPG-300H
Figure A-2
5) The following TCP/IP Properties window will display and the IP Address tab is open on this window
by default.
Now you have two ways to configure the TCP/IP protocol below:
Setting IP address automatically
Select Obtain an IP address automatically, Choose Obtain DNS server automatically, as shown in the
Figure below:
73
Page 74

PLANET 802.11n Wireless Interactive Presentation Gateway
WIPG-300H
Figure A-3
Setting IP address manually
1 Select Use the following IP address radio button.
2 If the device's LAN IP address is 192.168.1.1, type in IP address 192.168.1.x (x is from 2 to 254), and
Subnet mask 255.255.255.0.
3 Type the device’s LAN IP address (the default IP is 192.168.1.1) into the Default gateway field.
4 Select Use the following DNS server addresses radio button. In the Preferred DNS Server field you
can type the DNS server IP address which has been provided by your ISP
74
Page 75

PLANET 802.11n Wireless Interactive Presentation Gateway
WIPG-300H
Now click OK to keep your settings.
Figure A-4
75
Page 76

PLANET 802.11n Wireless Interactive Presentation Gateway
WIPG-300H
Appendix B: FAQ
FAQ1 : How to reset the WIPG-300H to factory default
[ANSWERS]
1) Power off the WIPG-300H.
2) Press and hold the button with paper clip, and then plug in the DC jack of the AC adapter to power on
WIPG-300H. After 10~15 seconds, you can release the button.
Reset Button
3) Now
both “admin”.)
FAQ 2: How to use WIPG-300H to output the screen to the projector or LCD via HDMI cable
[ANSWERS]
You can switch the output interface through the web UI. The default setting is VGA.
However, if you want to use HDMI interface directly without switching:
FAQ 3: With the Windows XP client, how to output the audio via the audio jack of the WIPG-300H when
[ANSWERS]
(1) First of all, please install “VAC.exe” (Virtual Audio Control) first on your computer. The software can be
(2) After the driver is installed, please launch WIPG utility.
(3) Click Menu icon and select “Send Audio to Display” to Yes.
(4) After restarting WIPG utility, you can have the audio via the audio jack of the WIPG-300H.
, you should be able to login the WIPG-300H by default setting. (Default username and password are
(1) Plug the HDMI connector and turn on the projector or LCD first.
(2) Then just power on the WIPG-300H to achieve it.
the video is projected
found in the USB Token.
(Optional kit for Wall Mount)
Screw hole
76
Page 77

English
Česky
Dansk
Deutsch
Eesti keeles
Ελληνικά
Español
Français
Italiano
Latviski
PLANET 802.11n Wireless Interactive Presentation Gateway
EC Declaration of Conformity
Hereby, PLANET Technology Corporation,
declares that this 802.11n Wireless Presentation
Gateway is in compliance with the essential
requirements and other relevant provisions of
Directive 1999/5/EC.
Společnost PLANET Technology Corporation,
tímto prohlašuje, že tato 802.11n Wireless
Presentation Gateway splňuje základní
požadavky a další příslušná ustanovení směrnice
1999/5/EC.
PLANET Technology Corporation, erklærer
herved, at følgende udstyr 802.11n Wireless
Presentation Gateway overholder de væsentlige
krav og øvrige relevante krav i direktiv 1999/5/EF
Hiermit erklärt PLANET Technology Corporation,
dass sich dieses Gerät 802.11n Wireless
Presentation Gateway in Übereinstimmung mit
den grundlegenden Anforderungen und den
anderen relevanten
Vorschriften der Richtlinie 1999/5/EG befindet".
(BMWi)
Käesolevaga kinnitab PLANET Technology
Corporation, et see 802.11n Wireless
Presentation Gateway vastab Euroopa Nõukogu
direktiivi 1999/5/EC põhinõuetele ja muudele
olulistele tingimustele.
ΜΕ ΤΗΝ ΠΑΡΟΥΣΑ , PLANET Technology
Corporation, ΔΗΛΩΝΕΙ ΟΤΙ ΑΥΤ Ο 802.11n
Wireless Presentation Gateway
ΣΥΜΜΟΡΦΩΝΕΤΑΙ ΠΡΟΣ ΤΙΣ ΟΥΣΙ ΩΔΕΙΣ
ΑΠΑΙΤΗΣΕΙΣ ΚΑΙ ΤΙΣ ΛΟΙ ΠΕΣ
ΣΧΕΤΙΚΕΣ ΔΙΑΤΑΞΕΙΣ ΤΗΣ ΟΔΗΓΙΑΣ 1999/5/ΕΚ
Por medio de la presente, PLANET Technology
Corporation, declara que 802.11n Wireless
Presentation Gateway cumple con los requisitos
esenciales y cualesquiera otras disposiciones
aplicables o exigibles de
la Directiva 1999/5/CE
Par la présente, PLANET Technology
Corporation, déclare que les appareils du 802.11n
Wireless Presentation Gateway sont conformes
aux exigences essentielles et aux autres
dispositions pertinentes de la directive 1999/5/CE
Con la presente , PLANET Technology
Corporation, dichiara che questo 802.11n
Wireless Presentation Gateway è conforme ai
requisiti essenziali ed alle altre disposizioni
pertinenti stabilite dalla direttiva
1999/5/CE.
Ar šo PLANET Technology Corporation,
apliecina, ka šī 802.11n Wireless Presentation
Gateway atbilst Direktīvas 1999/5/EK
pamatprasībām un citiem atbilstošiem
noteikumiem.
Lietuviškai
Magyar
Malti
Nederlands
Polski
Português
Slovensky
Slovensko
Suomi
Svenska
WIPG-300H
Šiuo PLANET Technology Corporation,,
skelbia, kad 802.11n Wireless Presentation
Gateway tenkina visus svarbiausius 1999/5/EC
direktyvos reikalavimus ir kitas svarbias
nuostatas.
A gyártó PLANET Technology Corporation,
kijelenti, hogy ez a 802.11n Wireless
Presentation Gateway megfelel az 1999/5/EK
irányelv alapkövetelményeinek és a kapcsolódó
rendelkezéseknek.
Hawnhekk, PLANET Technology
Corporation, jiddikjara li dan 802.11n Wireless
Presentation Gateway jikkonforma mal-ħtiġijiet
essenzjali u ma provvedimenti oħrajn relevanti li
hemm fid-Dirrettiva 1999/5/EC
Hierbij verklaart , PLANET Technology
orporation, dat 802.11n Wireless
Presentation Gateway in overeenstemming is
met de essentiële eisen en de andere relevante
bepalingen van richtlijn 1999/5/EG
Niniejszym firma PLANET Technology
Corporation, oświadcza, że 802.11n Wireless
Presentation Gateway spełnia wszystkie
istotne wymogi i klauzule zawarte w
dokumencie „Directive 1999/5/EC”.
PLANET Technology Corporation, declara
que este 802.11n Wireless Presentation
Gateway está conforme com os requisitos
essenciais e outras disposições da Directiva
1999/5/CE.
Výrobca PLANET Technology Corporation,
týmto deklaruje, že táto 802.11n Wireless
Presentation Gateway je v súlade so
základnými požiadavkami a ďalšími
relevantnými predpismi smernice 1999/5/EC.
PLANET Technology Corporation, s tem
potrjuje, da je ta 802.11n Wireless
Presentation Gateway skladen/a z osnovnimi
zahtevami in ustreznimi določili Direktive
1999/5/EC.
PLANET Technology Corporation, vakuuttaa
täten että 802.11n Wireless Presentation
Gateway tyyppinen laite on direktiivin
1999/5/EY oleellisten vaatimusten ja sitä
koskevien direktiivin muiden ehtojen mukainen.
Härmed intygar, PLANET Technology
Corporation, att denna 802.11n Wireless
Presentation Gateway står i
överensstämmelse med de väsentliga
egenskapskrav och övriga relevanta
bestämmelser som framgår av direktiv
1999/5/EG.
77
 Loading...